LECTVCH150 - Vacuum Cleaner TECNO - Free user manual and instructions
Find the device manual for free LECTVCH150 TECNO in PDF.


| Product type | Stick / hand vacuum 2-in-1 |
| Brand | TECNO |
| Model | LECTVCH150 |
| Power supply | Li-ion battery 22.2 V, AC adapter 100-240 V ~ 50/60 Hz |
| Runtime (high speed) | 15 minutes |
| Runtime (low speed) | 30 minutes |
| Charging time | 5 hours (first charge), 4.5 hours (subsequent cycles) |
| Filter type | Washable HEPA |
| Filter replacement frequency | Every 6 months |
| Dustbin capacity | Up to MAX mark (capacity not specified) |
| Included accessories | Floor brush, 2-in-1 crevice tool / dusting brush, tube, wall mount |
| Functions | Two speeds, LED light, 3-LED charge indicator |
| Safety | Auto shut-off when roller is jammed, overload protection |
| Usage | Indoor only |
| Insulation class | II |
| AC adapter | Model WJG-Y132600500W, output voltage 26 V, current 0.5 A, power 13 W |
| Average adapter efficiency | 84.2% |
| No-load power consumption | 0.10 W |
| Brush roller maintenance | Removable for cleaning (hair, threads) |
| After-sales service (France) | 0 978 970 970 (Darty), 7/7 24/24 |
| After-sales service (Belgium) | +32 2 334 00 00 (Vanden Borre), Mon-Sat 8am-6pm |
Frequently Asked Questions - LECTVCH150 TECNO
User questions about LECTVCH150 TECNO
0 question about this device. Answer the ones you know or ask your own.
Ask a new question about this device
Download the instructions for your Vacuum Cleaner in PDF format for free! Find your manual LECTVCH150 - TECNO and take your electronic device back in hand. On this page are published all the documents necessary for the use of your device. LECTVCH150 by TECNO.
USER MANUAL LECTVCH150 TECNO
Language of introduction
Hotline Darty France
2-in-1 splicemondstuk/stofborstel
IMPORTANT SAFETY INSTRUCTIONS
PLEASE READ THE FOLLOWING SAFETY WARNINGS AND THE INSTRUCTIONS CAREFULLY BEFORE USING THE APPLIANCE AND KEEP FOR FUTURE REFERENCE.
Warnings
-
D-DC Detachable supply unit
-
Use only with < WJG-Y132600500W > supply unit.
- This appliance is intended for domestic household use only and should not be used for any other purpose or in any other application, such as for non-domestic use or in a commercial environment.
- The external flexible cable of the transformer cannot be replaced, if the cord of this transformer is damaged, it is necessary to dispose the transformer and replaced by a transformer of the same model.
- The appliance is only to be used with the power supply unit provided with the appliance.
- This appliance can be used by children aged from 8 years and above and persons with reduced physical, sensory or mental capabilities or lack of experience and knowledge if they have been given supervision or instruction concerning use of the appliance in a safe way and understand the hazards involved.
Children shall not play with the appliance.
Cleaning and user maintenance shall not be made by children without supervision.
- The plug must be removed from the socket outlet before cleaning or maintaining the appliance.
- Regarding the detailed instructions for the method and frequency of cleaning and the precautions during user maintenance, refer to the section "CLEANING AND MAINTENANCE" on pages 56-60 of the manual.
- Regarding the detailed instructions for the safe use of the appliance, refer to the section "OPERATION".
-
Following objects are strictly banned, otherwise the vacuum cleaner will be damaged or fire calamity will be caused, which bring such accidents as human body injuries:
-
Don't pick up large or sharp broken objects such as glasses.
- Don't pick up harming or erodent liquids (solvent, corrosive, detergent...).
- Don't pick up inflammable or explosive substance such as gasoline or alcohol.
- Don't pick up/ vacuum burning or glowing objects (cigarettes, matches, hot ashes).
EN
- The battery must be removed from the appliance before it is scrapped.
- The appliance must be disconnected from the supply mains when removing the battery.
The battery is to be disposed of safely. - Exhausted batteries are to be removed from the product.
- The supply terminals are not to be short-circuited.
- Attention should be drawn to the environmental aspects of battery disposal. Don't throw used batteries in dustbin. Please contact your retailer in order to protect the environment.
- The batteries (batteries installed) shall not be exposed to excessive heat such as sunshine, fire or the like.
- If battery leakage occurs, avoid contact with skin. Isolate the leaking battery in a sealed plastic bag and put it in the scrap following the instructions environmental protection. If contact with the skin, mucous membranes or eyes, rinse thoroughly with water and contact your doctor or ophthalmologist.
- This appliance contains batteries that are only replaceable by skilled persons.
- WARNING: For the purposes of recharging the battery, only use the detachable supply unit provided with this appliance. (Adaptor model number: WJG-Y132600500W, Made by: Yuyao Simen Town Wanji Electronics Factory.)
- Regarding the detail on how to remove the battery, refer to the section "Battery Removal".
Safety Information
- Do not leave the appliance unattended when it is switched on.
- Use this appliance only for its intended purpose as laid out in these instructions.
- Always disconnect the appliance from the power supply if it is left unattended and before assembling, disassembling or cleaning.
- Do not unplug by pulling on cord. To unplug, grasp the plug, not the cord.
- Keep the appliance and the power cord away from direct radiant heat from the sun, from damp, from sharp edges and other dangers.
- Do not use the appliance with wet hands or feet.
- Do not use the appliance or store it outdoors or expose the appliance to rain.
- Use only original accessories recommended by the manufacturer.
- Do not attempt to repair the appliance yourself, contact a qualified service agent to carry out any repairs or maintenance or contact the store where you purchased the
EN
appliance.
- Never immerse the appliance in water or any other liquid when cleaning.
- If the appliance should become wet or damp, remove plug from the power supply immediately.
- The plug shall be the main disconnect device and should remain operable at all times.
Extreme care shall be taken when cleaning on stairs.
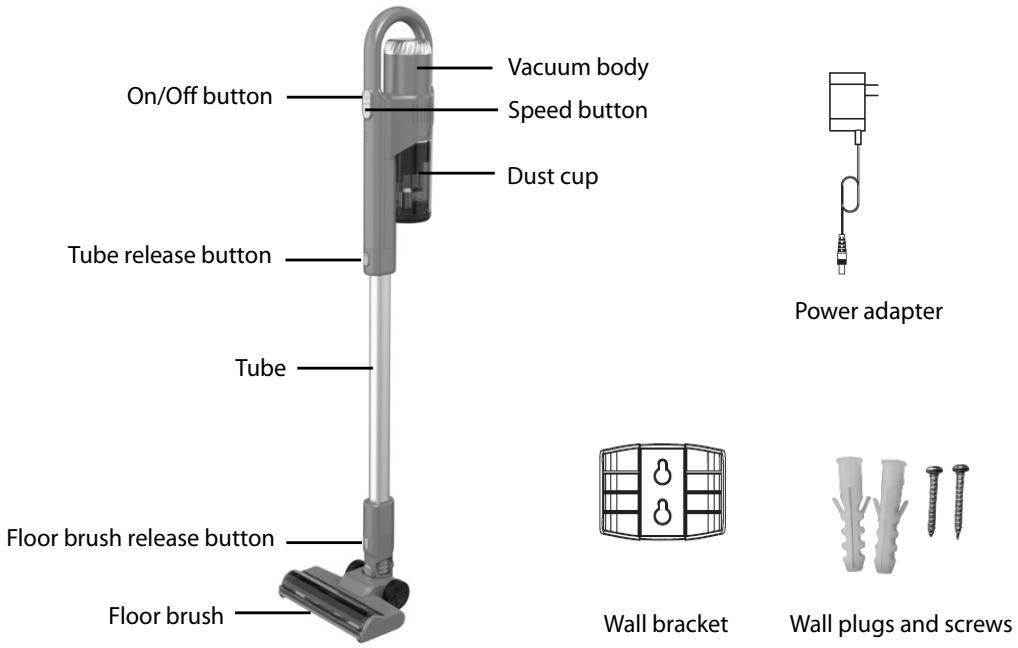
PRODUCT OVERVIEW
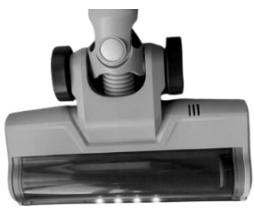
The LED headlights can help see dust or debris under furniture.
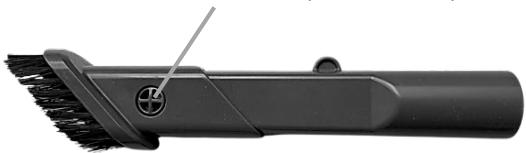
2-in-1 Crevice tool / Dusting brush
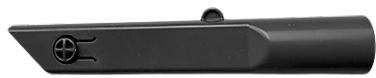
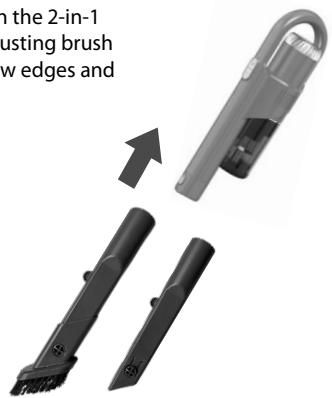
Crevice tool (use without bristles) for cleaning corners, difficult-to-reach areas, etc.
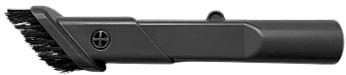
Dusting brush (use with bristles) for cleaning sofa, bookshelf, curtain, furniture, etc.
Press the protrusion to separate the 2 parts.
BATTERY CHARGING
Before first use, please charge the appliance.
Never charge the batteries in temperatures above 37^ or below 0^ .
- Plug the power adapter into the mains socket.
- Insert the supplied power adapter lead into the charging port.
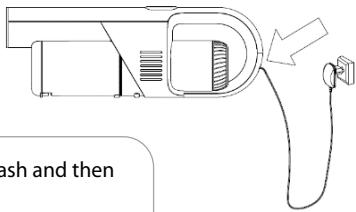
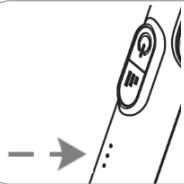
During charging, the indicator light will first flash and then illuminate steadily, in sequential order.
Full charge:
Three indicator lights illuminate steadily.
During charging, the vacuum cleaner does not work when you press the On/Off button.
Charging time:
Please charge the vacuum cleaner for 5 hours and fully discharged for the first use, and the normal time of each charge shall not exceed 4.5 hours.
Running time: High speed 15 minutes, Low speed 30 minutes
Low battery warning: When one indicator light is flashing, please recharge the battery.
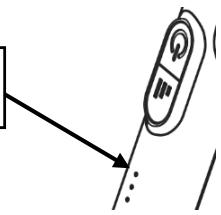
- When fully charged, disconnect the power adapter from the charging port of your vacuum cleaner and unplug the power adapter from the mains socket.
Battery Removal
When disposing of the vacuum cleaner, remove the battery from the appliance first.
This vacuum cleaner has a built-in 22,2V Lithium ion battery.
- Remove the screws of the vacuum body.
- Remove the housing.
- Remove the battery from the vacuum body.
OPERATION
This appliance features 2-in-1 stick/hand vacuum design.
Using as a stick vacuum cleaner
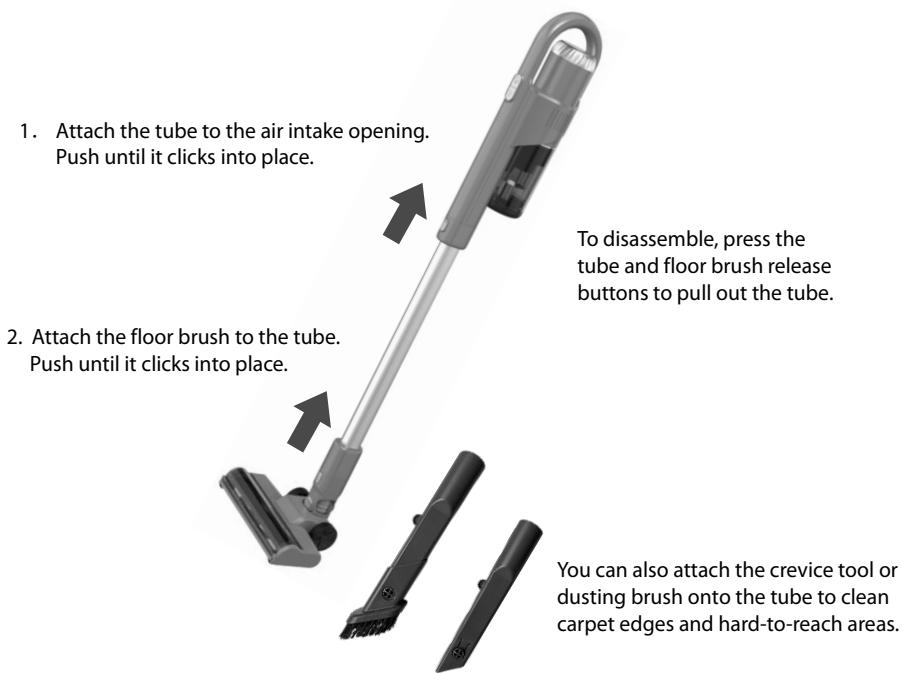
You can also attach the crevice tool or dusting brush onto the tube to clean carpet edges and hard-to-reach areas.
Using as a handheld vacuum cleaner
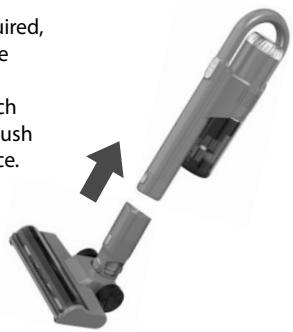
If the tube is not required, the floor brush can be attached directly for cleaning hard-to-reach areas such as stairs. Push until it clicks into place.
You can attach the 2-in-1 crevice tool/dusting brush to clean narrow edges and corners, etc.
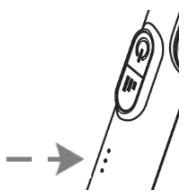
- To start vacuuming, press the on/off button.
- Repeatedly press the speed button to choose the low or high speed.
Visible Battery Capacity
What battery indicator lights mean:
- For 3 lights on, your vacuum cleaner is in high-power battery.
- For 2 lights on, your vacuum cleaner is in medium-power battery.
-
For 1 light on, your vacuum cleaner is in low-power battery.
-
When you have finished vacuuming, press the on/off button to turn off your vacuum cleaner.
Wall mounting

Warning
Please make sure there is no gas, water or electrical cables and wires behind the mounting area.
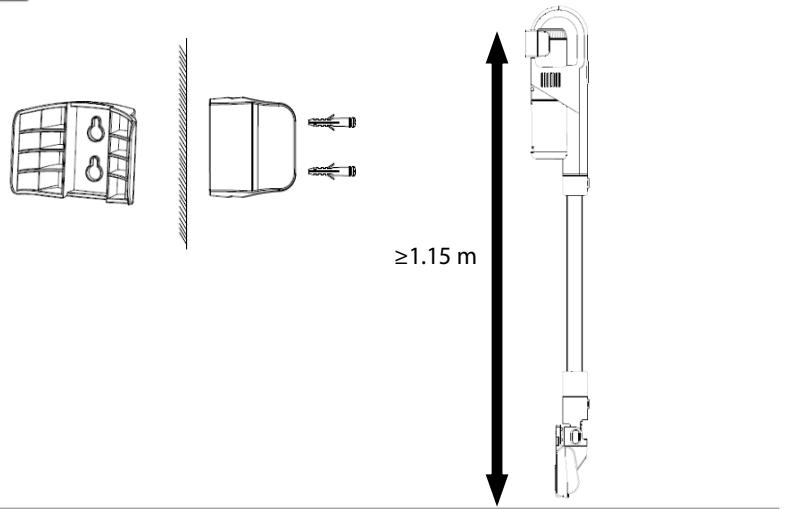
- Locate a free space on a wall which is close to a plug socket.
- Measure ≥ 1.15m above the floor and mark the wall with a pencil.
- Hold the wall bracket with the top screw hole at the pencil mark. Mark the positions of two screw holes through the wall bracket.
- Drill two holes into the wall and insert the supplied wall plugs.
- Securely fix the wall bracket to the wall using the supplied screws.
- Hang your vacuum cleaner on the wall bracket.
CLEANING AND MAINTENANCE

Important!
Turn off the appliance before cleaning and carrying out any maintenance work.
In order to maintain appliance performance, it is recommended that you clean all parts of your appliance periodically.
-
Disassemble the parts.
-
To remove the tube, press and hold the release button on the tube and pull it away from the main unit.
- To remove the cleaning accessory, press and hold the release button on the
cleaning accessory and pull it away from the tube.
- Wipe the surfaces of the main unit, tube, floor brush and power adapter with a slightly damp cloth. Dry thoroughly.
Do not immerse them in water.
- Clean the accessories in warm soapy water with a cloth or soft brush. Rinse and dry thoroughly.
Never use abrasive or chemical cleaning agents.
Emptying the Dust Cup / Cleaning the Filter
NOTE: Empty the dust cup when debris reaches the MAX fill line.
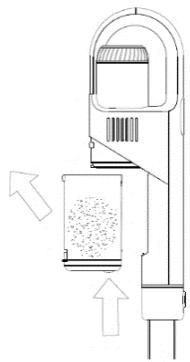
- Press the dust cup release button and pull the dust cup down to remove it from the main unit.
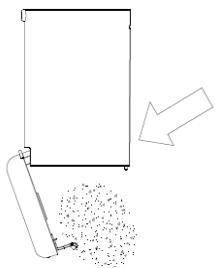
- Position the dust cup over a bin, then open the bottom cover of the dust cup by pressing the dust cup release button.
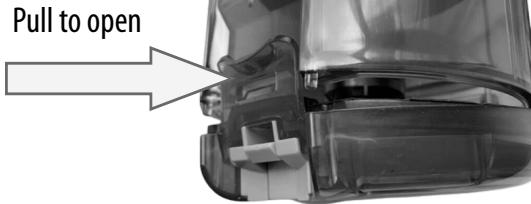
- Lift the HEPA filter with its holder out of the dust cup.
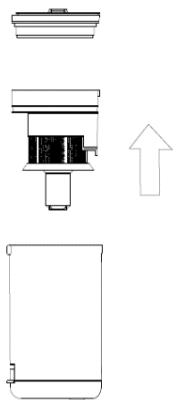
- Tap loose dirt off the filter and its holder. Clean them under running water. Dry thoroughly.
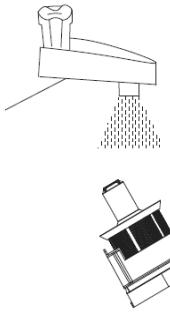
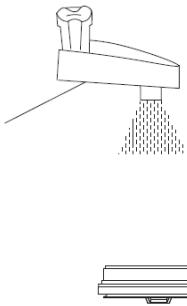
The HEPA filter MUST be replaced every 6 months.
- Fit the filter with holder into the dust cup.
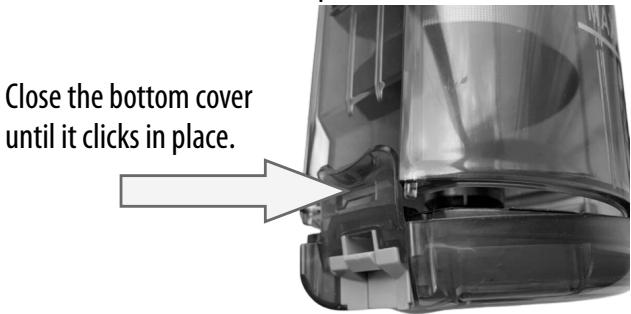
- Attach the dust cup to the main unit.
EN
Cleaning the floor brush
- Push the small lever on one side of the brush roll. The brushroll will pop up.
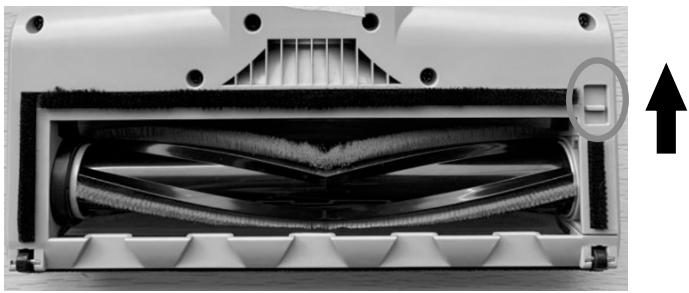
- Remove the brush roll.
- Use scissors (not supplied) remove any strings, hairs or debris that are wrapped around the brush roll.
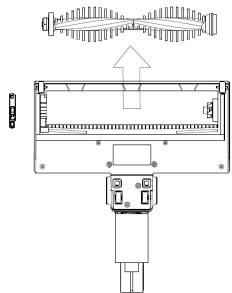
- Refit the brush roll back into the compartment of the floor brush until it clicks in place.
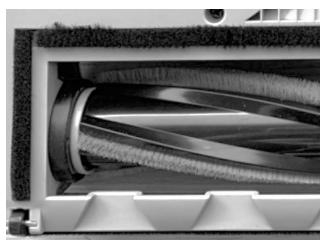
Align one end of brush roll with floor brush gear.
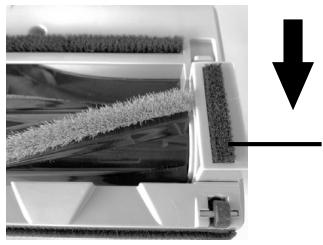
Press down the other end into slot until it clicks in place.
Checking for blockages
If there is a blockage or build-up of debris around the brush roll preventing it from turning, then the first indicator light will flash and your appliance may stop working.
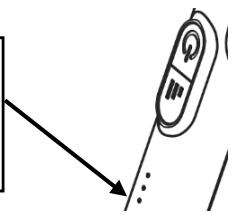
To remove a blockage, please turn off and unplug the appliance.
Check the tube, floor brush, cleaning accessory, dust cup, filter and brush roll to remove blockage.
SPECIFICATIONS
Ratings: 22,2V = -
External power supply
| Information published | Value and precision | Unit |
| Manufacturer's name or trade mark, commercial registration number and address | Yuyao Simen Town Wanji Electronics Factory Simen Industrial Zone, Yuyao City, Zhejiang, P.R.China | |
| Model identifier | WJG-Y132600500W | |
| Input voltage | 100-240 | V |
| Input AC frequency | 50-60 | Hz |
| Output voltage | DC 26,0 | V |
| Output current | 0,5 | A |
| Output power | 13,0 | W |
| Average active efficiency | 84,2 | % |
| Efficiency at low load (10%) | 78,2 | % |
| No-load power consumption | 0,10 | W |
| Class II equipment To identify equipment meeting the safety requirements specified for Class II equipment according to IEC 61140. This symbol indicates that a safety connection to electrical earth (ground) is not required. | |
| For indoor use only | |
| Alternating current | |
| Direct current |
DISPOSAL
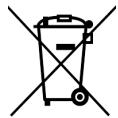
As a responsible retailer we care about the environment. As such we urge you to follow the correct disposal procedure for the appliance and packaging materials. This will help conserve natural resources and ensure that it is recycled in a manner that protects health and the environment.
You must dispose of this appliance and its packaging according to local laws and regulations.
Because this appliance contains electronic components, the appliance and its accessories must be disposed of separately from household waste when the appliance reaches its end of life.
Contact your local authority to learn about disposal and recycling.
The appliance should be taken to your local collection point for recycling. Some collection points accept appliance free of charge.
We apologise for any inconvenience caused by minor inconsistencies in these instructions, which may occur as a result of product improvement and development.
EU Declaration of Conformity
Product Description:
The object of the declaration described above is in conformity with the relevant Union
harmonisation legislation:

- Hotline Darty France
- 2-in-1 splicemondstuk/stofborstel
- IMPORTANT SAFETY INSTRUCTIONS
- PLEASE READ THE FOLLOWING SAFETY WARNINGS AND THE INSTRUCTIONS CAREFULLY BEFORE USING THE APPLIANCE AND KEEP FOR FUTURE REFERENCE.
- Warnings
- EN
- Safety Information
- 2-in-1 Crevice tool / Dusting brush
- BATTERY CHARGING
- Full charge:
- Charging time:
- Battery Removal
- OPERATION
- Using as a stick vacuum cleaner
- Using as a handheld vacuum cleaner
- Visible Battery Capacity
- Wall mounting
- Warning
- CLEANING AND MAINTENANCE
- Important!
- Emptying the Dust Cup / Cleaning the Filter
- Cleaning the floor brush
- Checking for blockages
- SPECIFICATIONS
- External power supply
- DISPOSAL
Brand : TECNO
Model : LECTVCH150
Category : Vacuum Cleaner