
CT718L1B0 - Coffee maker SIEMENS - Free user manual and instructions
Find the device manual for free CT718L1B0 SIEMENS in PDF.
| Product type | Automatic coffee machine (espresso coffee machine) |
| Brand | Siemens |
| Model | CT718L1B0 |
| Dimensions (H x W x D) | 45.5 x 59.4 x 37.7 cm |
| Empty weight | 20.6 kg |
| Power supply | 220-240 V ~, 50/60 Hz, 1500 W |
| Pump pressure | 20 bar (static maximum) |
| Water tank capacity | 2.2 L (without filter) |
| Bean hopper capacity | 400 g |
| Grinder type | Adjustable ceramic grinder (from very fine to very coarse) |
| Main functions | Coffee, espresso, latte macchiato preparation; doubleShot/tripleShot; intensity, temperature, quantity and milk portion adjustment; simultaneous preparation of 2 cups; child safety; customizable favorites; coffeeWorld via Home Connect |
| Connectivity | Integrated Wi-Fi, Home Connect app (remote start, settings, tracking) |
| Maintenance programs | calc’nClean (descaling + cleaning), descaling, milk system cleaning, rinsing, frost protection, brewing unit cleaning |
| Water filter | INTENZA filter (installed, removed or changed via menu) |
| Dishwasher-safe parts | Drip tray, coffee grounds container, milk container, milk storage surface, beverage distributor, milk system |
| Safety | Child safety (touch lock), adjustable auto shut-off, frost protection, permanent magnets (distance ≥10 cm for implant wearers) |
| Included accessories | Milk container, water filter, water hardness test strip, microfiber cloth, assembly instructions |
| Available spare parts | Yes, at least 7 years after market launch (original parts and accessories: cleaning/descaling tablets, filters, maintenance kit, glass milk container, extension) |
| Power cord length | 170 cm |
| Energy efficiency class of light sources | D and F (replacement by qualified personnel) |
Frequently Asked Questions - CT718L1B0 SIEMENS
User questions about CT718L1B0 SIEMENS
0 question about this device. Answer the ones you know or ask your own.
Ask a new question about this device
Download the instructions for your Coffee maker in PDF format for free! Find your manual CT718L1B0 - SIEMENS and take your electronic device back in hand. On this page are published all the documents necessary for the use of your device. CT718L1B0 by SIEMENS.
USER MANUAL CT718L1B0 SIEMENS
IQ700: CT7..., CT9...
Fully automatic espresso machine

DE Gebrauchsanleitung 7
EN Information for Use 39
IT Manuale utente 69
FR Manuel d'utilisation 102
NL Gebruikershandleiding 135
ES Manual de usuario 167
UK KepiBnntBo 3 ekcnnyatauii 200
TR Kullanim kilavuzu 233
A
B
C
D

E

G
F
1
3

4
5
6
7
8
9
10
11
12
13
14
15
16
17
18
19
20
21
22
23
24
25
26

27
Betreff: "OSSREQUEST"
5-GHz-Band (5150-5350 MHz +
5470-5725 MHz): max. 200 mW
Further information and explanations are available online:

Table of contents
1 Safety 41
1.1 General information 41
1.2 Intended use 41
1.3 Restriction on user group..... 41
1.4 Safe installation 41
1.5 Safe use 42
2 Preventing material damage .... 45
3 Environmental protection and saving energy 45
3.1 Disposing of packaging 45
3.2 Tips for saving energy 45
4 Installation and connection..... 45
4.1 Scope of delivery 45
4.2 Installing and connecting the appliance 46
4.3 Connecting the appliance to the electricity supply 46
5 Familiarising yourself with your appliance. 46
5.1 Appliance 46
5.2 Control panel 47
6 Accessories 47
7 Before using for the first time.. 48
7.1 Preparing and cleaning the appliance 48
7.2 Checking the water hardness 48
7.3 Water filter 49
7.4 Performing initial start-up 49
7.5 General information 50
8 Basic operation 50
8.1 Switching the appliance on or off 50
8.2 Dispensing beverages 50
8.3 doubleShot and tripleShot..... 51
8.4 Dispensing a coffee beverage with milk 51
8.5 Dispensing two cups at once.. 51
9Grinder 52
9.1 Setting the grinding level.... 52
10 Milk container shelf. 52
10.1 Using the milk container shelf 52
10.2 Using your own milk container 52
11 Childproof lock. 52
11.1 Activating the child-proof lock 53
11.2 Deactivating the childproof lock 53
12 Favourites. 53
12.1 Creating favourites from Favourites menu 53
12.2 Create favourites from Classic or coffeeWorld 53
12.3 Changing a favourite 53
12.4 Deleting a favourite 53
12.5 Sorting favourites 53
13 Home Connect 53
13.1 Setting up the Home Connect app 54
13.2 Setting up Home Connect.... 54
en
13.3 Home Connect settings.... 54
13.4 Data protection. 55
14 Basic settings. 55
14.1 Changing the basic settings 55
14.2 Overview of the basic settings 56
15 Cleaning and servicing. 57
15.1 Dishwasher-safe components 57
15.2 Cleaning agent 58
15.3 Cleaning the appliance 58
15.4 Cleaning the drip tray and coffee dregs container 59
15.5 Cleaning the milk container .. 59
15.6 Service programmes 59
16 Troubleshooting 61
17 Transportation, storage and disposal 66
17.1 Activating frost protection .... 66
17.2 Disposing of old appliance... 66
18 Customer Service 66
19 Technical specifications. 67
20 Declaration of Conformity 67
18.1 Product number (E-Nr.), production number (FD) and consecutive numbering (Z-Nr.) 66
19.1 Information regarding Free and Open Source Software... 67

1 Safety
Observe the following safety instructions.
1.1 General information
- Read this instruction manual carefully.
- Keep the instruction manual and the product information safe for future reference or for the next owner.
- Do not connect the appliance if it has been damaged in transit.
1.2 Intended use
Only use this appliance:
for preparing hot drinks.
- in private households and in enclosed spaces in a domestic environment.
up to an altitude of max. 2000 m above sea level.
1.3 Restriction on user group
This appliance may be used by children aged 8 or over and by people who have reduced physical, sensory or mental abilities or inadequate experience and/or knowledge, provided that they are supervised or have been instructed on how to use the appliance safely and have understood the resulting dangers.
Do not let children play with the appliance.
Children must not perform cleaning or user maintenance unless they are at least 8 years old and are being supervised.
Keep children under the age of 8 years away from the appliance and power cable.
1.4 Safe installation
WARNING - Risk of electric shock!
Incorrect installation is dangerous.
-
Connect and operate the appliance only in accordance with the specifications on the rating plate.
Always use the supplied power cable for the new appliance. -
Connect the appliance to a power supply with alternating current only via a properly installed socket with earthing.
- The protective conductor system of the domestic electrical installation must be properly installed.
If the appliance or the power cord is damaged, this is dangerous.
- Never operate a damaged appliance.
- Never operate an appliance with a cracked or fractured surface.
- Never pull on the power cord to unplug the appliance. Always unplug the appliance at the mains.
- If the appliance or the power cord is damaged, immediately unplug the power cord or switch off the fuse in the fuse box.
- Call customer services. Page 66
Improper repairs are dangerous.
Repairs to the appliance should only be carried out by trained specialist staff.
- Only use genuine spare parts when repairing the appliance.
- If the power cord or the appliance power cable of this appliance is damaged, it must be replaced with a special power cord or special appliance power cable, which is available from the manufacturer or its Customer Service.
1.5 Safe use

WARNING - Risk of suffocation!
Children may put packaging material over their heads or wrap themselves up in it and suffocate.
- Keep packaging material away from children.
Do not let children play with packaging material.
Children may breathe in or swallow small parts, causing them to suffocate.
- Keep small parts away from children.
- Do not let children play with small parts.

WARNING - Risk of electric shock!
An ingress of moisture can cause an electric shock.
- Never immerse the appliance or the power cord in water.
- Liquids must not be spilled on the appliance plug connection.
-
Only use the appliance in enclosed spaces.
-
Never expose the appliance to intense heat or humidity.
- Do not use steam- or high-pressure cleaners to clean the appliance.
WARNING - Risk of fire!
The appliance will become hot.
- Ventilate the appliance adequately.
- Never operate the appliance with the cupboard door closed.
It is dangerous to use an extended power cord and non-approved adapters.
- Do not use extension cables or multiple socket strips.
- Only use adapters and power cords approved by the manufacturer.
- If the power cord is too short and a longer one is not available, please contact an electrician to have the domestic installation adapted.
WARNING - Risk of burns!
Some parts of the appliance become very hot.
- Never touch hot appliance parts.
- Allow hot appliance parts to cool down before touching.
WARNING - Risk of scalding!
Freshly prepared drinks are very hot.
Leave drinks to cool down if necessary.
- Do not let escaping liquids or steam come into contact with your skin.
A remote start via the Home Connect app while the appliance is unattended may cause scalding to third parties.
- Do not reach under the coffee outlet during the dispensing of drinks.
- Keep other persons, in particular children, away from the appliance.
WARNING - Risk of injury!
Improper use of the appliance may endanger the user.
- To avoid injuries, only use the appliance for its intended purpose.
en Safety
Trapped fingers when closing the appliance door.
- Be careful of your fingers when closing the appliance door. The grinder rotates.
- Never reach into the grinder.

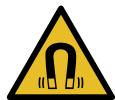
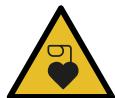
WARNING - Danger: Magnetism!
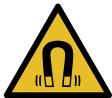
Caution: Magnetism!
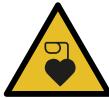
Warning for wearers of pacemakers
The appliance contains permanent magnets. They may affect electronic implants, e.g. pacemakers or insulin pumps.
- People with electronic implants must stand at least 10 ~cm away from the appliance and appliance door.
- Keep a minimum distance of 10~cm from the water tank, milk container, coffee dregs container, beverage outlet cover, beverage dispenser, beverage outlet, milk system holder, brewing chamber cover and brewing unit.

WARNING - Risk of harm to health!
Soiling on the appliance may be harmful to health.
To ensure hygiene, follow the cleaning instructions for the appliance.
2 Preventing material damage
ATTENTION!
Risk of damage to the appliance. If the appliance is not started up correctly, it may be damaged.
- Use the appliance in frost-free rooms only.
If the appliance has been transported or stored below 0^ , wait 3 hours at room temperature before starting it up.
After plugging in, always wait approx. 5 seconds.
Improper installation may cause material damage.
- Observe the installation instructions for the appliance installed above or below.
- When installing the appliance above a warming drawer, observe a niche height of 590 ~mm . Unsecured units may fall over.
- Secure units to the wall using a standard bracket.
3 Environmental protection and saving energy
3.1 Disposing of packaging
The packaging materials are environmentally compatible and can be recycled.
- Sort the individual components by type and dispose of them separately.
3.2 Tips for saving energy
If you follow these instructions, your appliance will use less power.
Set the interval for automatic switchoff to the smallest value.
- If the appliance is not being used, it will switch itself off earlier.
"Basic settings", Page 55
Do not interrupt the dispensing process prematurely.
- The amount of water or milk that is heated is used optimally.
Descale the appliance regularly. - Limescale deposits increase the appliance's energy consumption.
4 Installation and connection
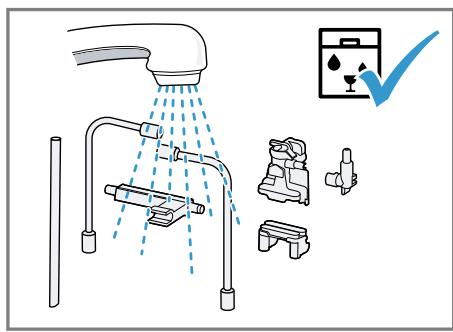
4.1 Scope of delivery
After unpacking all parts, check for any damage in transit and completeness of the delivery.
Note: Different accessories are enclosed depending on the appliance model. This accessory is shown in a frame with a dashed line.
Fig. 1
| A | Fully automatic coffee machine |
| B | Milk container |
| C | Installation instructions |
| D | Water filter1 |
| E | Water hardness testing strip |
| F | User manual |
| G | Microfibre cloth |
1 Depending on the appliance specifications
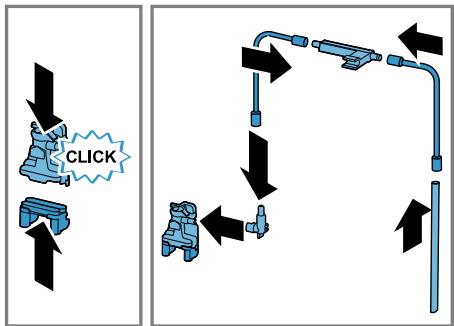
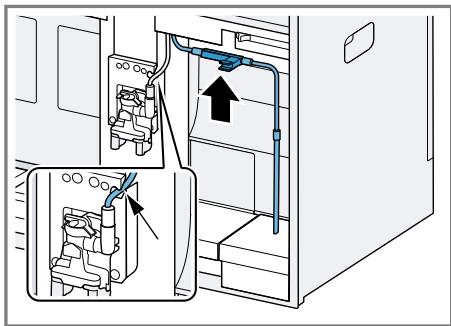
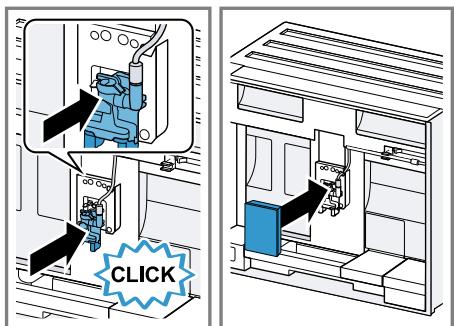
4.2 Installing and connecting the appliance
The installation instructions describe various models that differ with regard to scope of supply and installation.
Note: Observe the information on safety Page 41 and preventing material damage Page 45.
Install and connect the appliance properly in accordance with the installation instructions enclosed in the box.
4.3 Connecting the appliance to the electricity supply
- Insert the non-heating appliance plug of the power cable into the appliance.
- Insert the mains plug of the appliance's power cable in a socket nearby.
- Check the mains plug is inserted properly.
5 Familiarising yourself with your appliance
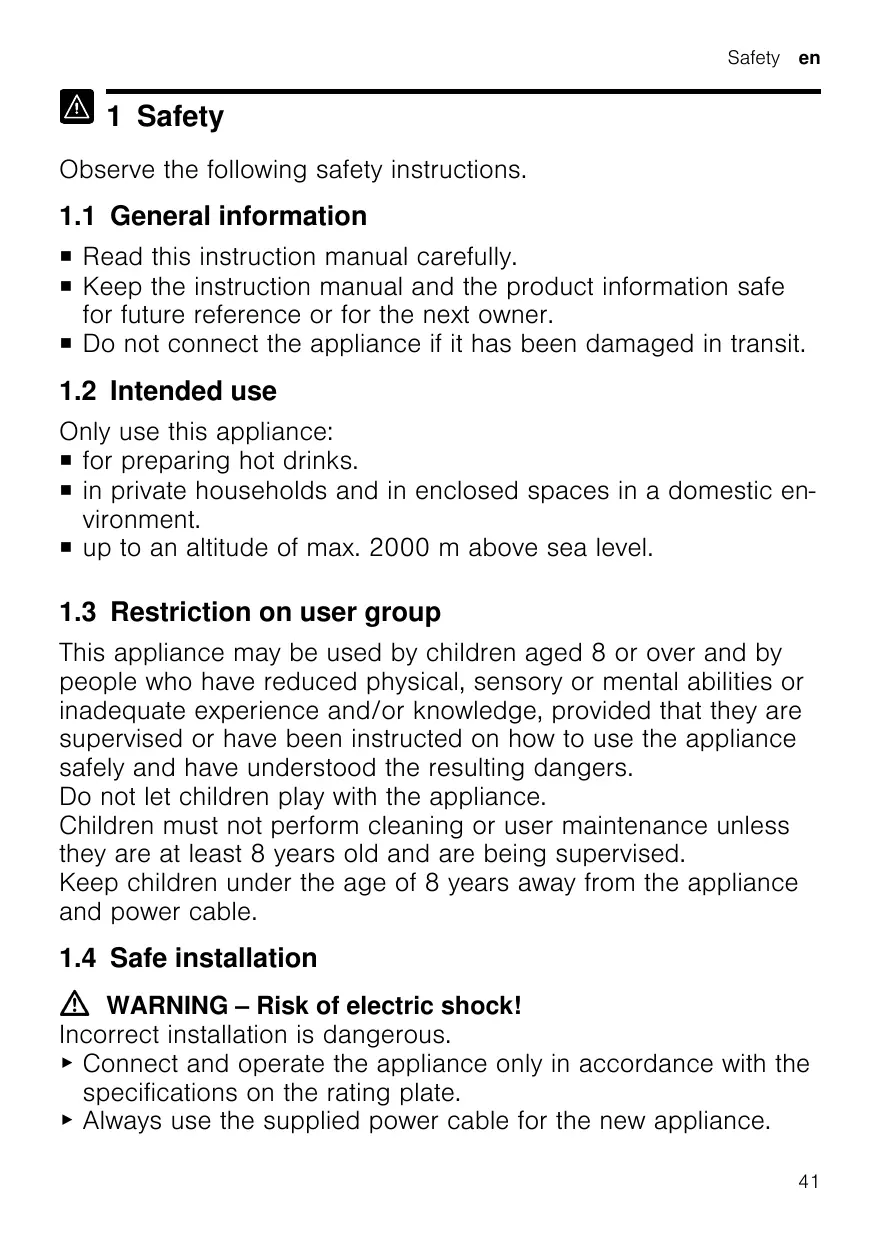
5.1 Appliance
You can find an overview of the parts of your appliance here.
Note: Individual details and colours may differ, depending on the appliance model.
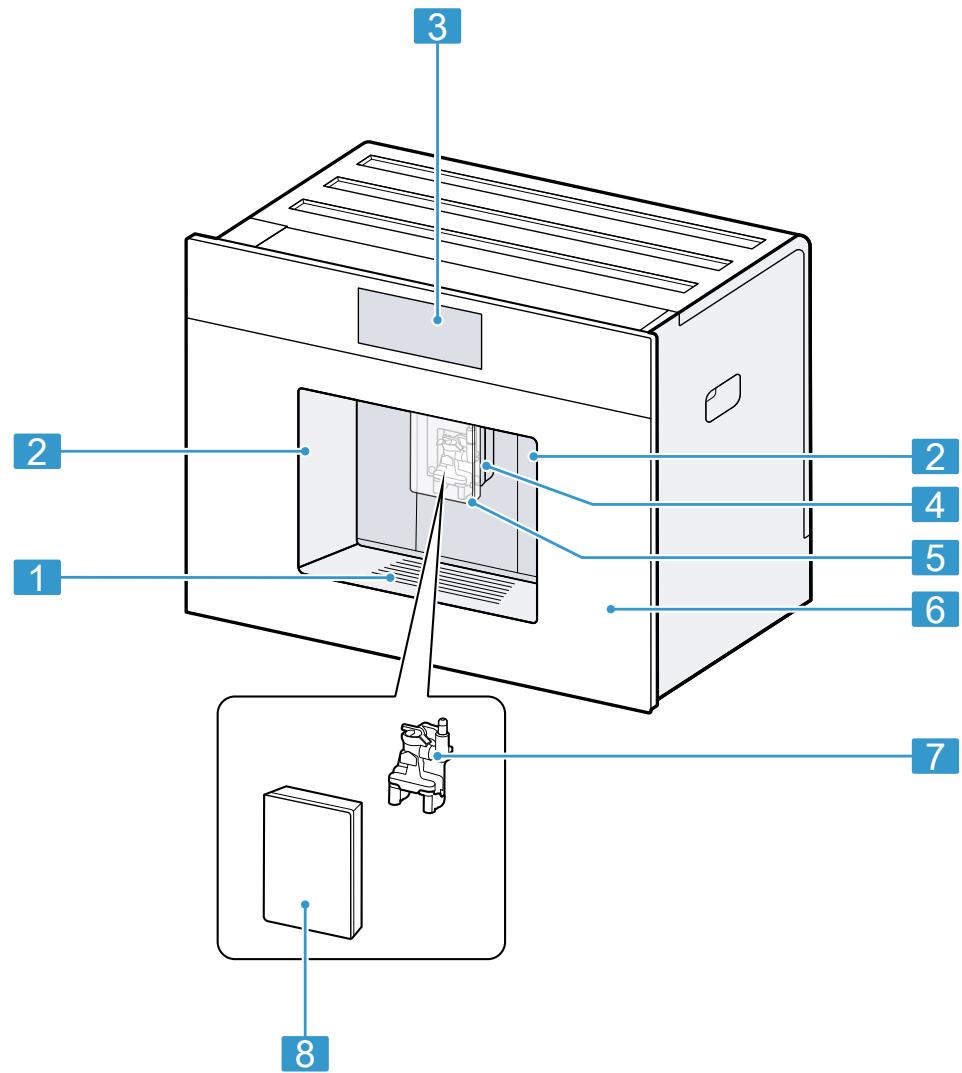
Exterior view
→Fig. 2
| 1 | Shelf, removable |
| 2 | Lights |
| 3 | Control panel |
| 4 | Beverage outlet, height-adjustable |
| 5 | Cup lighting |
| 6 | Appliance door |
| 7 | Beverage dispenser |
| 8 | Beverage outlet cover |
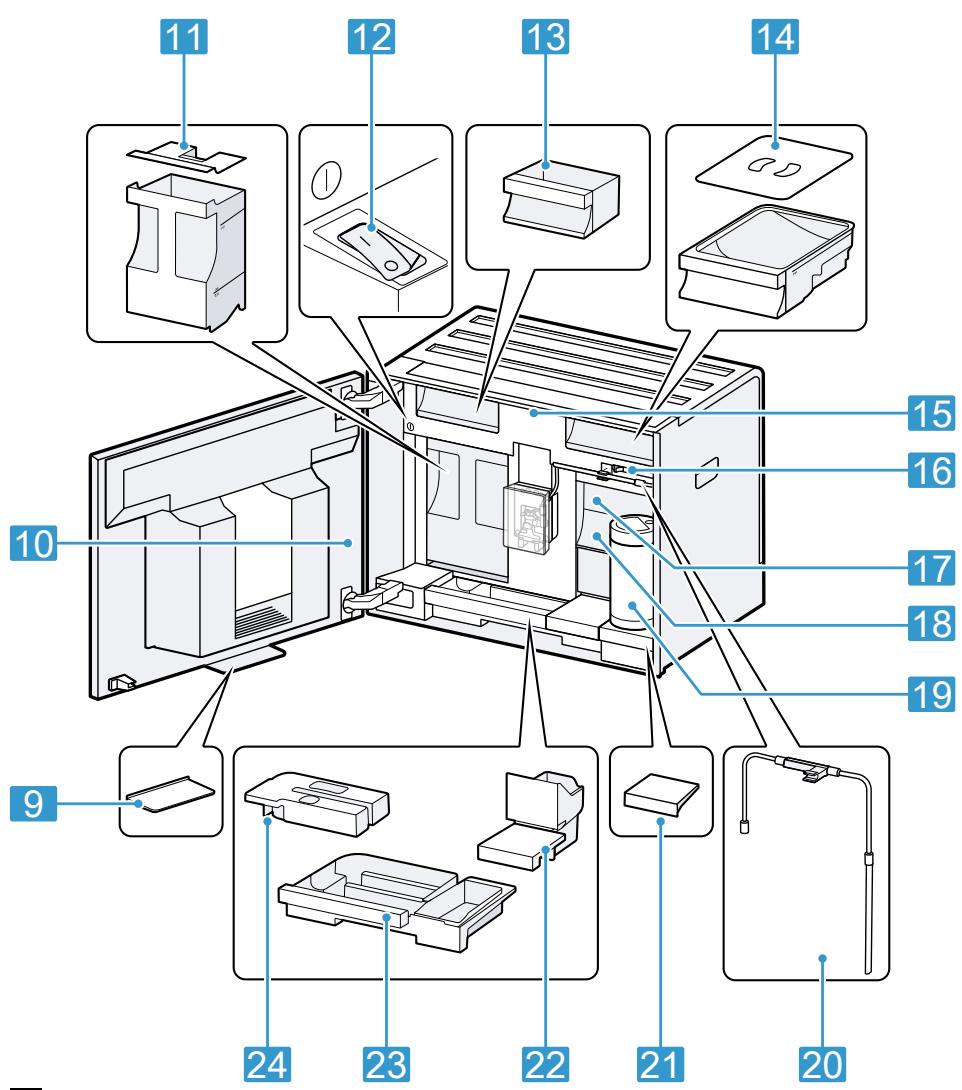
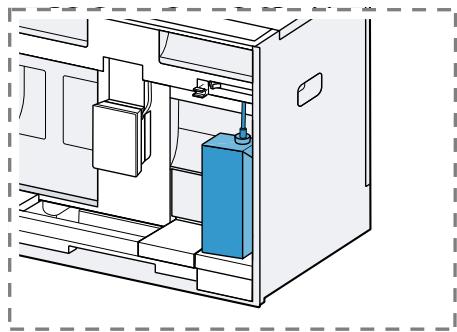
Interior view
| → Fig. 3 | |
| 9 | Collecting tray |
| 10 | Rating plate |
| 11 | Water tank with lid |
| 12 | Mains switch |
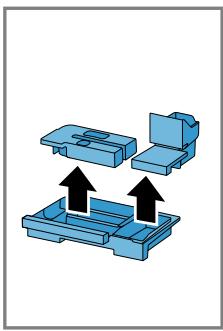
| 13 | Accessory drawer |
| 14 | Bean container with lid |
| 15 | Interior lighting1 |
| 16 | Grinding level adjustment |
| 17 | Brewing chamber cover |
| 18 | Brewing unit |
| 19 | Milk container |
| 20 | Milk system |
| 21 | Milk container shelf, removable |
| 22 | Coffee dregs container |
| 23 | Drip tray |
| 24 | Drip tray cover |
1 Depending on the appliance specifications
5.2 Control panel
You can use the control panel to configure all functions of your appliance and to obtain information about the operating status.
| 1) | Switch the appliance on or off. |
| Favour- ites | Select saved beverages with personal settings. → Page 53 |
| Classic | Select standard bev- ages. |
| coffee- World | Select basic beverages which can be extended in conjunction with Home Connect. |
| Care & mainten- ance | Call up service pro- grammes. |
| 2) | Open or exit the set- tings. |
Information
| Customer service | |
| Appliance is connected to Home Connect. | |
| Appliance is not connec-ted to Home Connect. | |
| Appliance is not connec-ted to the server. |
| ▷- | Playlist function is activ- ated in the Home Con-nect app. |
| ⊕ | Origin |
| ? | Check the milk con- tainer. |
| ⊕= | Add beans. |
| △= | Fill with water. |
Beverage settings
| ① | Strength |
| □ | Quantity |
| □ | Share of milk |
| 8 | Temperature |
| 5 | Aroma |
Operation
| ← | Go back in the menu. |
| ☆ | Add favourite. |
| ★ | Delete favourite. |
| i | Call up information about the respective mode. |
| b | Dispense two cups. |
Quick selection
| ○○ | Activate or deactivate childproof lock. |
| ○· | Switch WiFi on or off. |
6 Accessories
Use original accessories. These have been made especially for your appliance.
| Accessories | Retail | Customer service |
| Cleaning tablets | TZ80001A | 00312097 |
| TZ80001B | 00312098 | |
| Descaling tablets | TZ80002A | 00312094 |
| TZ80002B | 00312095 | |
| Water filter | TZ70003 | 17004340 |
| Water filter pack of 3 | TZ70033A | 17005980 |
| Microfibre cloth | - | 00312289 |
| Care set | TZ80004A | 00312105 |
| TZ80004B | 00312106 | |
| Milk container, glass | - | 12043068 |
| Limit stop for 92° opening angle | - | 10020041 |
| Power cord extension Europe, 5 m | - | 12022522 |
7 Before using for the first time
Prepare the appliance for use.
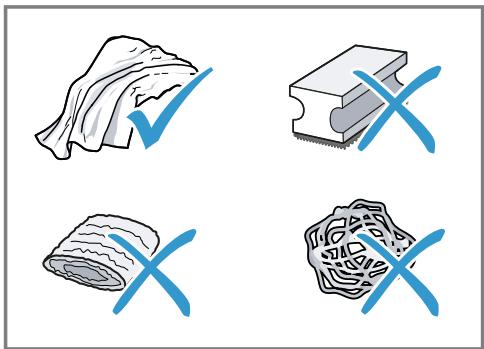
7.1 Preparing and cleaning the appliance
Clean the appliance and individual parts. Follow the illustrated instructions at the beginning of this manual.
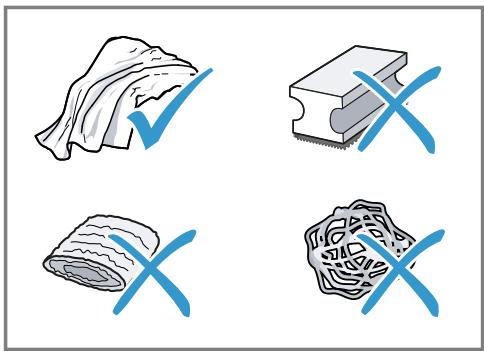
ATTENTION!
Unsuitable beans can block the grinder.
- Only use pure, roasted bean mixes that are suitable for use in fully automatic coffee or espresso machines.
Do not use glazed coffee beans. - Do not use caramelised coffee beans.
- Do not use coffee beans that have been treated with additives containing sugar.
Do not add instant coffee.
Fig. 4 - 23
Note: Fill the water tank each day with fresh, cold, non-carbonated water.
Tip: To keep the coffee beans at their best, store them in a sealed container in a cool place. You can keep the coffee beans in the bean container for several days without them losing their aroma.
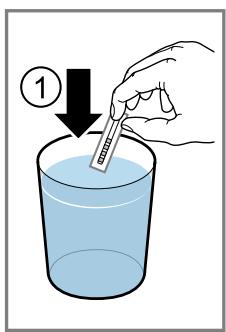
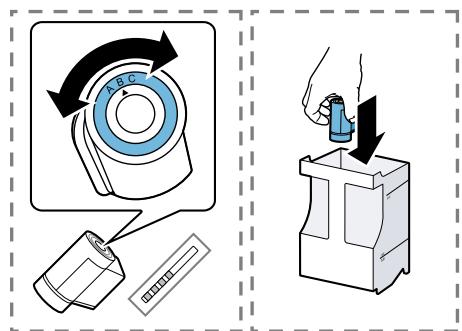
7.2 Checking the water hardness
It is important to set the water hardness correctly so that your appliance indicates in good time that it needs descending. You can use the enclosed test strip to check the water hardness or ask your local water company.
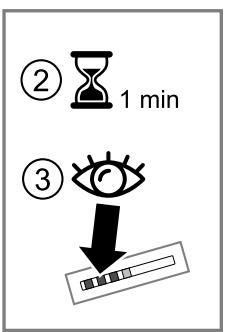
- Briefly dip the test strip in fresh tap water.
- Allow the water to drain off the test strip.
- Read the water hardness off the test strip after 1 minute.
The table shows allocation of the levels to the different degrees of water hardness:
| Level | German degrees in °dH | Total hardness in mmol/ l |
| 1 | 1-7 | < 1.3 |
Factory setting
| Level | German degrees in °dH | Total hardness in mmol/ l |
| 2 | 8-14 | 1.3-2.5 |
| 3 | 15-21 | 2.5-3.8 |
| 4¹ | 22-30 | >3.8 |
Factory setting
Note: If a water softening system is installed in your house, you can select "Water softening system".
Tips
You can change the settings at any time. "Basic settings", Page 55
If the water hardness exceeds 21^ (3.8 mmol/l), you can fill the water tank with prefiltered water to reduce limescale deposits.
7.3 Water filter
You can use a water filter to minimise limescale deposits and reduce impurities in the water.
Inserting the water filter
ATTENTION!
Possible damage to the appliance due to limescale build-up.
- Change the water filter in good time.
- Change the water filter after 2 months at the latest.
-
Observe the display messages.
-
Press "Care & maintenance".
- Press "INTENZA filter" and follow the instructions on the display.
Changing or removing the water filter
You can also operate your appliance without a water filter.
- Press "Care & maintenance".
- Press "INTENZA filter".
- Press "Replace" or "Remove" and follow the instructions on the display.
Tips
- You should also change your water filter for reasons of hygiene.
- With a water filter you need to descale your appliance less frequently.
If you use a water filter, your coffee will be more flavoursome.
If your appliance has not been used for a long time, for example if you were on holiday, you should rinse the water filter before use by dispensing a cup of hot water.
The water filter can be purchased from retailers or customer service. "Accessories", Page 47
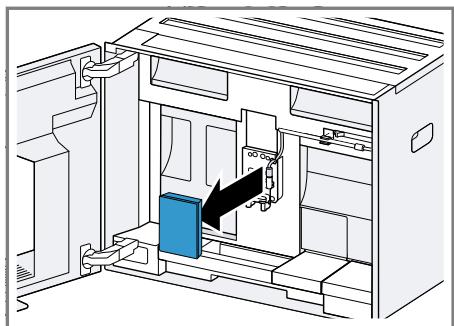
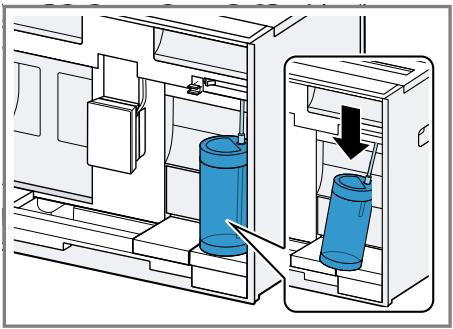
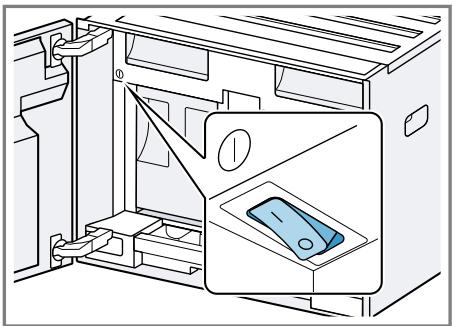
7.4 Performing initial start-up
After connecting the appliance to the power supply, configure the settings for initial start-up. Initial start-up only appears when switching on for the first time.
- Open the appliance door.
- Set the mains switch to l.
Fig. 24
- Close the appliance door.
- Press ① to switch the appliance on and wait until the appliance has rinsed.
- Follow the instructions on the display.
- The display will guide you through the programme.
Tip: To call up brief information, press 1 .
Notes
If you want to set up Home Connect now, follow the instructions in the Home Connect app. "Setting up Home Connect", Page 54
If "Demo mode" is selected, only the displays will work. You cannot dispense a beverage or run a programme.
7.5 General information
Please bear this information in mind so that you can get the best out of your appliance.
Notes
The appliance has been programmed at the factory with standard settings for optimum operation.
- The integrated fan switches on each time a beverage is dispensed and switches off again after around 5-7 minutes.
- The grinder has been factory-set for optimum operation. If coffee is only dispensed drop by drop or is too thin and with too little crema, you can adjust the grinding level. "Setting the grinding level", Page 52
If you do not perform any actions on the appliance for a certain period, it will switch off automatically. You can change the duration in the basic settings.
The first beverage will not yet have its full aroma if:
- You are using the appliance for the first time.
- You have run a service programme.
- You have not used the appliance for a long time.
Do not drink the beverage.
8 Basic operation
8.1 Switching the appliance on or off
Notes
- Do not press the power switch while the appliance is operating.
Before switching off the power switch, switch the appliance off with ① . This is the only way for the appliance to rinse automatically.
Press
When the appliance switches on, the display shows the logo. When the appliance is switched on or off, it will rinse itself automatically.
When switched off, the appliance will emit steam into the drip tray for cleaning. The appliance will not rinse itself if the appliance is still warm when switched on or if no beverage was dispensed before it was switched off.
8.2 Dispensing beverages
Find out how to prepare a drink of your choice.
WARNING
Risk of scalding!
Freshly prepared drinks are very hot.
- Leave drinks to cool down if necessary.
- Do not let escaping liquids or steam come into contact with your skin.
Notes
- With a number of settings your coffee is prepared in several steps. Wait until the process is fully completed.
If you are dispensing a beverage with milk, always connect a container filled with milk to the milk hose and suction pipe.
- The milk container is specially designed for this appliance. Only use the milk container for storing milk in the refrigerator and in the house.
If the milk system has not been cleaned, small amounts of milk may escape when hot water is dispensed.
8.3 doubleShot and tripleShot
Your appliance grinds the coffee two or three times.
To ensure that only pleasant-tasting and easily digestible aromatic substances are released, coffee beans are freshly ground and brewed again by the appliance.
The longer coffee brews, the more bitter substances and undesirable aromas are released. These bitter substances and undesirable aromas affect the taste and digestibility of coffee.
Note: The functions "doubleShot" and "tripleShot" depend on the beverage strength and beverage size selected.
8.4 Dispensing a coffee beverage with milk
An example explains how to make a latte macchiato.
WARNING Risk of burns!
The milk system can become extremely hot.
- Never touch the milk system when it is hot.
- Allow the hot milk system to cool down before touching it.
Requirements
The milk container is inserted.
The milk system is connected to the beverage dispenser.
- The milk container has been filled with sufficient milk.
- Place a glass underneath the beverage outlet.
- Press "Classic".
- Select and press the beverage symbol for latte macchiato.
-
Set the beverage parameters.
-
To change the strength, press ①.
- To change the per-cup quantity, press .
-
To change the milk ratio, press
-
Press "Start" and wait until the process is complete.
-
To completely stop dispensing the beverage, press "Stop".
- To only stop the current dispensing step, press "Skip".
Notes
If you do not change any settings for approx. 30 seconds, the appliance will exit settings mode.
The appliance saves the settings automatically.
Tips
- You can also pre-heat cups before dispensing using hot water.
- You can also use plant-based alternatives to milk, e.g. soya milk.
The quality of the milk froth depends on the type of milk or plant-based alternative used.
8.5 Dispensing two cups at once
Depending on your beverage, you can make 2 cups at the same time.
Note: If the "doubleShot" or "tripleShot" function is active, the function for dispensing two cups at once is not possible.
- Press the symbol for your desired drink.
2 Press
The display shows the setting
3. Place two cups on the left and right underneath the beverage outlet.
4. Press "Start".
The beverage is prepared in 2 steps. The beans are ground in 2 grinding operations.
- The beverage is brewed and then runs into the cups.
- Wait until the process is complete.
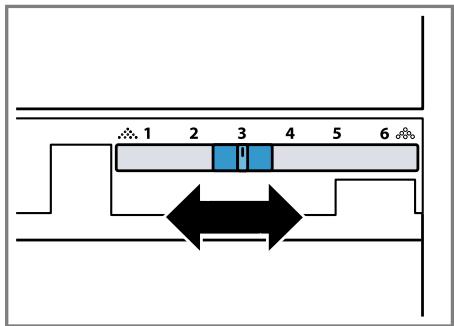
9 Grinding
Your appliance has an adjustable grinder, which you can use to customise the grinding level of your coffe beans.
9.1 Setting the grinding level
Use the slider to set the grinding level to between very fine .and very coarse 念
Fig. 25
Only change grinding level setting slightly.
The grinding level setting only takes effect after the second cup.
Tip: If the coffee is only dispensed drop by drop, set a coarser grinding level.
If the coffee is too thin with too little crema, set a finer grinding level.
10 Milk container shelf
Your appliance detects when there is a milk container on the shelf.
10.1 Using the milk container shelf
- Connect the milk container or milk carton and place it on the shelf.
- Start dispensing.
Note: If the message "Please insert milk container." appears, dispensing is not possible.
10.2 Using your own milk container1
With certain appliance series, you can use your own milk container.
- Put out your own milk container.
- Tare your own milk container. "Overview of the basic settings", Page 56
The appliance uses the weight to detect the quantity of milk in the milk container or the milk carton. If there is not enough milk in the milk container, a message will appear.
Note: If you use the standard milk container or a milk carton, the appliance detects this automatically.
11 Childproof lock
You can lock the appliance, to protect children against scalding and burns.
11.1 Activating the childproof lock
Requirement: The appliance is switched on.
- Press 念
2 Press 一 _ 0
The childproof lock is activated.
11.2 Deactivating the childproof lock
- Press
- Press and hold 一 _ 0 ^ 一 for 4 seconds.
The childproof lock is deactivated.
12 Favourites
Save individual beverages as favourites so that you can dispense them more quickly.
A favourite is a beverage with personal settings. You can change the settings at any time.
Note: To exit the settings, press or start dispensing the beverage.
12.1 Creating favourites from Favourites menu
- Press "Favourites".
2 Press+. - Select a beverage.
- Set the beverage parameters.
- Press "Apply".
- Enter the name.
- Press "Save".
12.2 Create favourites from Classic or coffeeWorld
- Select a beverage from "Classic" or "coffeeWorld".
-
Set the beverage parameters.
-
Press ☆.
- Enter the name.
- Press "Save".
12.3 Changing a favourite
- Press "Favourites".
- Select favourite.
- Make the changes.
- Press .
- Press "Apply".
12.4 Deleting a favourite
- Press "Favourites".
- Select favourite.
- Press ★.
- Press "Delete".
12.5 Sorting favourites
You can change the sequence of your favourites.
- Press "Favourites".
-
Select favourite.
-
The favourite is highlighted and you can slide it with your finger.
- The appliance saves the new sequence automatically.
Tip: You can also use the Home Connect app to create, change, delete, or sort favourites.
13 Home Connect
This appliance is network-capable. Connecting your appliance to a mobile device lets you control its functions via the Home Connect app, adjust its basic settings and monitor its operating status.
The Home Connect services are not available in every country. The availability of the Home Connect function depends on the availability of
Home Connect services in your country. You can find information about this at: www.home-connect.com. To be able to use Home Connect, you must first set up the connection to the WLAN home network (Wi-Fi1) and to the Home Connect app.
The Home Connect app guides you through the entire login process. Follow the instructions in the Home Connect app to configure the settings.
Tip: Please also follow the instructions in the Home Connect app.
Notes
Please note the safety precautions in this instruction manual and make sure that they are also observed when operating the appliance via the Home Connect app. "Safety", Page 41
- Operating the appliance on the appliance itself always takes priority. During this time it is not possible to operate the appliance using the Home Connect app.
13.1 Setting up the Home Connect app
- Install the Home Connect app on your mobile device.

2
- Start the Home Connect app and set up access for Home Connect.
The Home Connect app guides you through the entire login process.
13.2 Setting up Home Connect
Requirements
The Home Connect app has been installed on your mobile device.
The appliance is receiving signals from the WLAN home network (WiFi) at its installation location.
- Open the Home Connect app and scan the following QR code.

- Follow the instructions in the Home Connect app.
13.3 Home Connect settings
Adapt Home Connect to your needs. You can find the Home Connect settings in the basic settings for your appliance. Which settings the display shows will depend on whether Home Connect has been set up and whether the appliance is connected to your home network.
Overview of the Home Connect settings
You can find an overview of the Home Connect settings and network settings here.
| Basic setting | Selection | Description |
| Home Connect assistant | Start Disconnect | Add mobile device. Disconnect appliance from network. |
| WiFi | On Off | Switch off the wireless module during long absences or to save energy. Note: In networked standby mode your appliance requires max. 2 W. |
| Remote start | On Off | Switch remote start on the appliance on and off. Note: With the Home Connect app only switch-off is possible. |
| Software update | - | Note: This setting is only available with a software update. |
Note: When "WiFi" and remote start are switched on, and appear on the display.
13.4 Data protection
Please see the information on data protection.
The first time your appliance is registered on a home network connected to the Internet, your appliance will transmit the following types of data to the Home Connect server (initial registration):
- Unique appliance identification (consisting of appliance codes as well as the MAC address of the Wi-Fi communication module installed).
Security certificate of the Wi-Fi communication module (to ensure a secure data connection). - The current software and hardware version of your appliance.
Status of any previous reset to factory settings.
This initial registration prepares the Home Connect functions for use and is only required when you want to use the Home Connect functions for the first time.
Note: Please note that the Home Connect functions can only be utilised with the Home Connect app. Information on data protection can be retrieved in the Home Connect app.
14 Basic settings
You can configure the basic settings for your appliance to meet your needs and call up additional functions.
14.1 Changing the basic settings
- Press
-
The display shows the list of basic settings.
-
Change the required basic setting.
- The appliance saves the basic setting automatically.
-
To go back to the menu, press .
-
To exit the basic settings, press × .
Tip: To call up brief information, press 1 .
14.2 Overview of the basic settings
You can find an overview of the basic settings here.
| Language | Set language. | |
| Home Connect | Home Connect assistant | → "Setting up Home Connect", Page 54 |
| Time | Set the current time or automatically display via Home Connect. | |
| Date | Set current date or display automatically via Home Connect. | |
| Display settings | Display brightness | Set the brightness in steps. |
| Time display | Switch the time display on and off after the appliance has been switched off. | |
| Time | Set the time display. | |
| Adjustment | ■ Set the horizontal and vertical alignment of the display. ■ Adjust the optimisation and centring of the display to the viewing angle. | |
| Sounds | Button tone | Switch sound off and on. |
| Volume | Adjust volume in steps. | |
| Welcome tune | Switch sound off and on when the appliance is started. | |
| Signal tone | Switch sound off and on. | |
| Beverage setting | Brewing temperature | Set the brewing temperature. |
| Milk sequence | Select the sequence for milk and coffee. | |
| Latte macchiato pause | Select the pause between milk and coffee. | |
| Appliance settings | Automatic switch-off | Set the time after which the appliance switches off. |
| 1 Depending on the appliance specifications | ||
| Water hardness | Set the water hardness. | |
| Illumination brightness | Adjust brightness of the illumination in steps. | |
| Milk container1 | Set milk carton or individual milk container. Note: If you use the standard milk container, the appliance automatically detects it. | |
| Personalisation | Start category | Set the menu display after switching on, e.g. "Classic". |
| Factory settings | Factory settings | Reset appliance to factory settings. |
| Mode | Mode for demo purposes | Switch "Demo mode" on or off. |
| Appliance information | Beverage counter | Display the number of beverages dispensed. |
| Cleaning information | Time until the water filter should next be changed or a service programme started. | |
| Version information | Display appliance information. | |
| Network information | Display network information. | |
| 1 Depending on the appliance specifications | ||
15 Cleaning and servicing
To keep your appliance working efficiently for a long time, it is important to clean and maintain it carefully.
15.1 Dishwasher-safe components
Here you can find an overview of the components you can clean in the dishwasher.
ATTENTION!
Some components are sensitive to heat and may be damaged if they are cleaned in a dishwasher.
-
Follow the operating instructions of the dishwasher.
-
Only clean dishwasher-safe components in the dishwasher.
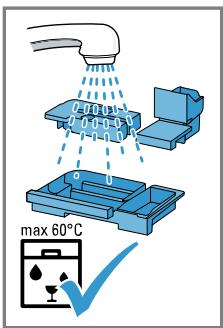
- Only use programmes that do not heat the components above 60^ .
Suitable:
Drip tray
Drip tray cover
Not suitable:
Water tank
Water tank lid
- Coffee dregs container
Collecting tray
Milk container with lid and base
Shelf for milk container - Beverage dispenser
Milk system
Brewing unit
- Beverage dispenser cover
Brewing unit cover
- Accessory drawer
- Bean container
- Bean container lid
15.2 Cleaning agent
Only use suitable cleaning agents.
ATTENTION!
Unsuitable cleaning products may damage the surfaces of the appliance.
- Do not use harsh or abrasive detergents.
- Do not use cleaning agents containing alcohol or spirits.
- Do not use hard scouring pads or cleaning sponges.
Unsuitable cleaning and descaling agents may damage the appliance.
- Do not use pure citric acid, vinegar or any vinegar-based agents to descale the appliance.
- Do not use descending agent with phosphoric acid.
Only use cleaning tablets and descaling tablets that have been specially developed for the appliance. "Accessories", Page 47
Tips
- Wash new sponge cloths thoroughly to remove any salt adhering to them. Salt can cause rust film to develop on stainless steel surfaces.
Always remove any residues of limescale, coffee, milk and cleaning/descaling solutions immediately to prevent corrosion.
15.3 Cleaning the appliance
WARNING
Risk of electric shock!
An ingress of moisture can cause an electric shock.
- Never immerse the appliance or the power cord in water.
- Liquids must not be spilled on the appliance plug connection.
- Do not use steam- or high-pressure cleaners to clean the appliance.
WARNING
Risk of burns!
Some parts of the appliance become very hot.
- Never touch hot appliance parts.
-
Allow hot appliance parts to cool down before touching.
-
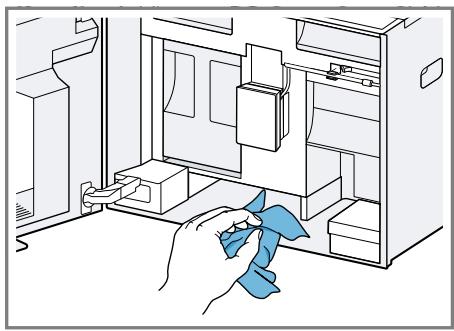
Clean the housing, the high-gloss surfaces and the control panel with the enclosed microfibre cloth.
-
Clean the beverage outlet with a soft, damp cloth after beverages have been dispensed.
-
Rinse the water tank with fresh, clean water.
- If the appliance has not been used for a long time, e.g. after a holiday, clean the entire appliance, including moving parts such as the brewing unit or water tank.
Note: The appliance will rinse itself automatically if you switch it on when it is cold or switch it off after it has dispensed coffee. The system is therefore self-cleaning.
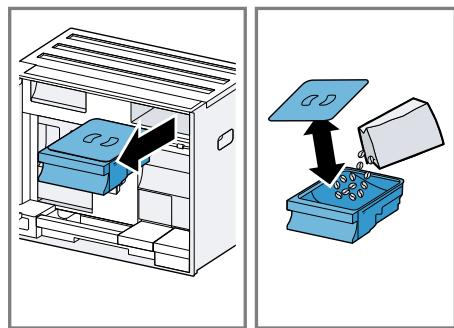
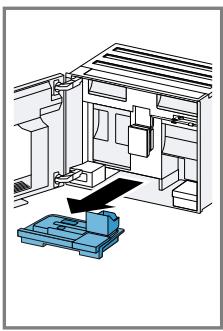
15.4 Cleaning the drip tray and coffee dregs container
Clean and empty the drip tray and coffee dregs container every day to prevent deposits. Follow the illustrated instructions at the beginning of this manual.
→Fig. 26 - 28
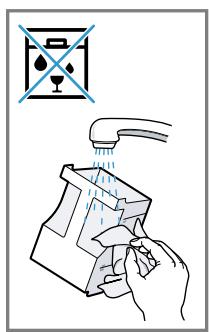
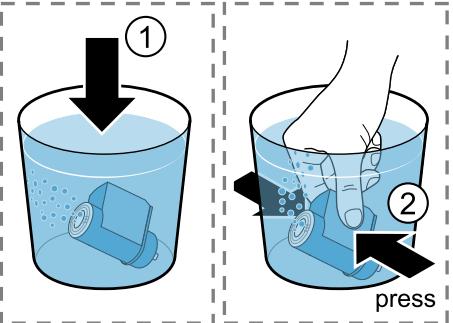
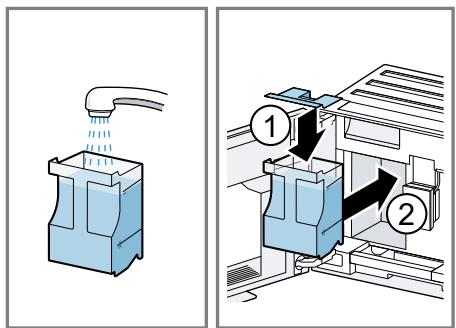
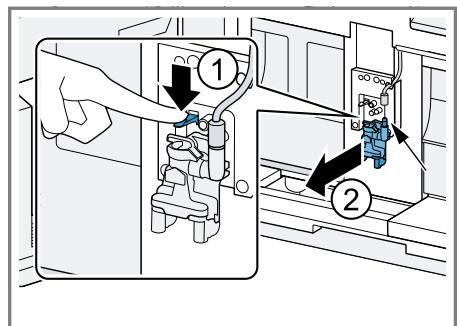
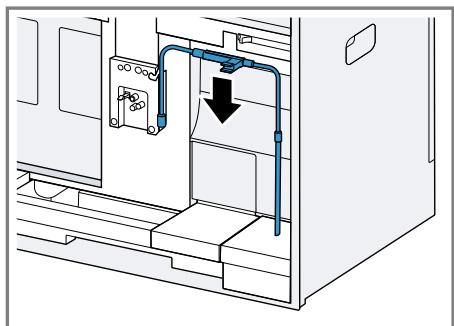
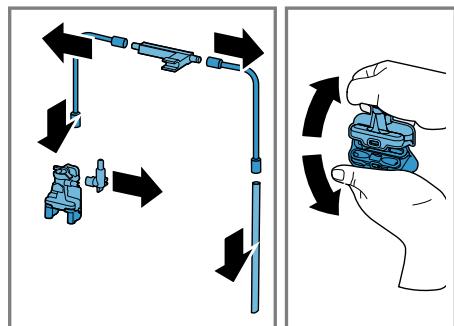
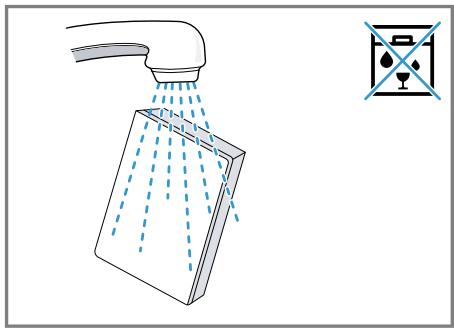
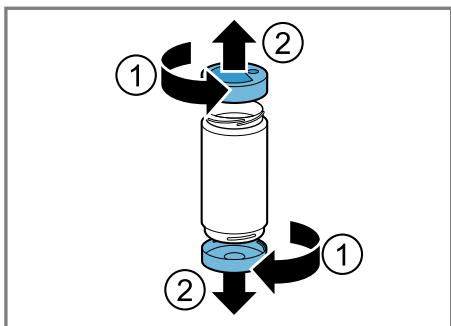
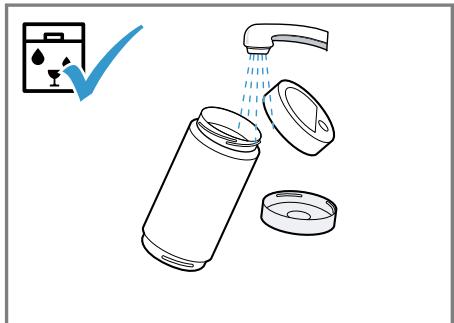
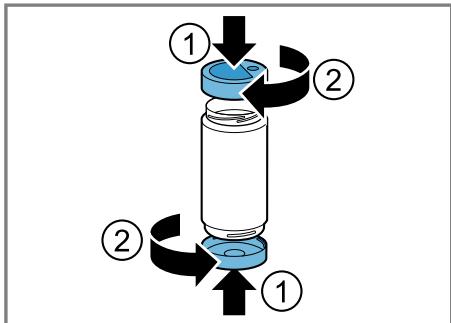
15.5 Cleaning the milk container
Clean the milk container regularly for hygiene reasons. You can clean the milk container in the dishwasher. Follow the illustrated instructions at the beginning of this manual.
→Fig. 19 - 22
15.6 Service programmes
Use the service programmes if you insert or remove a water filter or in order to clean your appliance thor
Overview of service programmes
You can find an overview of the service programmes here.
Note: The start image shows the remaining number of beverages that can be dispensed until running the programme and the duration.
oughly. Your appliance will tell you when you need to perform a service programme, e.g. cleaning.
ATTENTION!
Improper cleaning and descaling or a delay in doing so may damage the appliance.
- Immediately perform the descending process in accordance with the instructions.
- Only put cleaning tablets in the brew chamber of the brewing unit.
- Do not put descending tablets or other products in the brew chamber of the brewing unit.
Notes
- The display indicates the progress of the descending or cleaning process.
If your appliance has been locked, you can only operate it again once the descending process has been carried out.
Tip: In addition to the automatic rinsing process, regularly also remove and clean the brewing unit.
Using the service programmes
- Press "Care & maintenance".
- Press the symbol for the required programme.
- The display will guide you through the programme.
| INTENZA filter | Insert, replace or remove the water fil- ter. | |
| Cleaning milk system | Rinse the milk system automatically. | |
| calc'nClean | Combine cleaning and descaling. Re- move residues of limescale and cof- fee from the pipes. | |
| Cleaning | Remove residues of coffee from the pipes. | |
| Descaling | Remove residues of limescale from the pipes. | |
| Cleaning brewing unit | The display shows optimum cleaning of the brewing unit step by step. | |
| Cleaning beverage system | The display shows optimum manual cleaning of the beverage dispenser and milk system step by step. | |
| Frost protection | Drain the pipes to protect the appli- ance during transport or storage. | |
| Special rinsing | If a service programme is interrupted, e.g. due to a power failure, it will rinse itself automatically. The appliance is then ready for use again. |
Tips
If you are starting the "Descending" or "calc'nClean" programme, keep a container with a capacity of min. 0,5 l at the ready.
If you use a water filter, this will prolong the time until you have to run a service programme.
- You can combine "Dscaling" and "Cleaning" with the "calc'nClean" service programme.
16 Troubleshooting
You can rectify minor faults on your appliance yourself. Read the troubleshooting information before contacting after-sales service. This will avoid unnecessary costs.

WARNING
Risk of electric shock!
Improper repairs are dangerous.
- Repairs to the appliance should only be carried out by trained specialist staff.
- Only use genuine spare parts when repairing the appliance.
- If the power cord or the appliance power cable of this appliance is damaged, it must be replaced with a special power cord or special appliance power cable, which is available from the manufacturer or its Customer Service.
| Fault | Cause and troubleshooting |
| Home Connect is not working properly. | Different causes are possible. • Go to www.home-connect.com. |
| Appliance only dis-penses water, not cof-fee. | Empty bean container is not detected by the appli- ance. • Pour in coffee beans. |
| Coffee shaft on brewing unit is blocked. • Clean the brewing unit. | |
| Coffee beans are too oily and do not fall into the grinder. • Gently tap the bean container. • Change the coffee variety. • Do not use oily beans. • Clean the empty bean container with a damp cloth. | |
| Brewing unit is not inserted properly. 1. Check whether the brewing unit is inserted correctly and is securely locked. 2. Push the red lever up to the left. 3. Insert the brewing unit cover. | |
| Appliance is not dis- pensing milk froth. | Milk system is soiled. • Clean the milk system in the dishwasher. |
| Milk tube not immersed in milk. • Use more milk. • Check whether the milk tube is immersed in the milk. | |
| Heavy build-up of limescale in the appliance. | |
| Appliance is not dis-pensing milk froth. | Descale the appliance. |
| No milk intake by the milk system. | The milk system is assembled incorrectly. • Assemble the milk system correctly. |
| Milk tube not immersed in milk. • Use more milk. • Check whether the milk tube is immersed in the milk. | |
| Milk froth is too cold. | Milk is too cold. • Use lukewarm milk. |
| Appliance is not dis-pensing hot water. | Beverage dispenser is soiled. • Clean the beverage dispenser in the dishwasher. |
| Appliance is not dis-pensing drinks. | Air is in the water filter. 1. Immerse the water filter in water with the opening facing upwards until no more air bubbles escape. 2. Reinsert the filter. • Firmly press the water filter straight down into the tank connection. |
| Residues of limescale remover are blocking the water tank. 1. Remove the water tank. 2. Clean the water tank thoroughly. | |
| There is dripping wa-ter on the inner floor of the appliance. | Drip tray was removed too soon. • Wait a few seconds after the last drink was dis-pensed before removing the drip tray. |
| Brewing unit cannot be removed. | Locking device cannot be released, brewing unit is jammed. • Switch the appliance off and back on after 3 minutes. |
| Grinder won't start. | Appliance is too hot. 1. Disconnect the appliance from the mains. 2. Wait 1 hour so the appliance can cool down. |
| Grinder is not grinding any coffee beans despite full bean container. | Coffee beans are too oily and do not fall into the grinder. • Gently tap the bean container. • Change the coffee variety. • Do not use oily beans. • Clean the empty bean container with a damp cloth. |
| Coffee or milk froth quality varies widely. | Build-up of limescale in the appliance. ► Descale the appliance. |
| Milk froth quality varies widely. | Milk froth quality depends on the type of milk or plant-based alternative used. ► Optimise the result through the selection of the milk or vegetable-based drink type. |
| Coffee is not dispensed or has slowed to a trickle. Set quantity is not reached. | Grinding level is set too fine. ► Set a coarser grinding level. |
| Heavy build-up of limescale in the appliance. ► Descale the appliance. | |
| Air is in the water filter. 1. Immerse the water filter in water with the opening facing upwards until no more air bubbles escape. 2. Reinsert the filter. | |
| Appliance is soiled. ► Clean the brewing unit. ► Descale and clean the appliance. | |
| Coffee has no crema. | Type of coffee is not optimal. ► Use a coffee variety with a higher proportion of Robusta beans. ► Use beans with a darker roast. |
| Coffee beans are no longer freshly roasted. ► Use fresh coffee beans. | |
| Grinding level is not appropriate for coffee beans. ► Adjust the grinder to a finer setting. | |
| Coffee is too acidic. | Grinding level is set too coarse. ► Adjust the grinder to a finer setting. |
| Type of coffee is not optimal. ► Use a coffee variety with a higher proportion of Robusta beans. ► Use beans with a darker roast. | |
| Coffee is too bitter. | Grinding level is set too fine. ► Set a coarser grinding level. |
| Type of coffee is not optimal. ► Change the coffee variety. | |
| Coffee tastes burnt. | Grinding level is set too fine. ► Set a coarser grinding level. |
| Type of coffee is not optimal. | |
| Coffee tastes burnt. | Change the coffee variety. |
| Coffee temperature setting is too high. Set the coffee temperature lower. | |
| Coffee grounds are not compact and are too wet. | The grinding level is not set optimally. Adjust the grinder to a coarser or finer setting. |
| Coffee beans are too oily. Use a different type of bean. | |
| Display shows "Please insert brewing unit." | Brewing unit is not inserted properly. Check whether the brewing unit is inserted correctly and is securely locked. Push the red lever up to the left. Insert the brewing unit cover. |
| Display shows "Please fill water tank" despite the fact that the water tank is full. | Water tank is wrongly inserted. Insert the water tank correctly. Carbonated water is in the water tank. Fill the water tank with fresh tap water. Float is stuck in the water tank. Remove the water tank. Clean the water tank thoroughly. New water filter was not rinsed as per instructions. Rinse the water filter according to the instructions. Place the water filter into operation. Air is in the water filter. Immerse the water filter in water with the opening facing upwards until no more air bubbles escape. Reinsert the filter. Water filter is old. Insert a new water filter. Limescale deposits in the water tank are blocking the system. Clean the water tank thoroughly. Start the descaling programme. |
| Display shows "E61: Please clean brewing unit". | Brewing unit is soiled. Clean the brewing unit. Mechanism of brewing unit is stiff. Clean the brewing unit. There are problems with the power supply. Only operate the appliance at 220 - 240 V. |
| Display shows "Re-start appliance". | Appliance has a fault.1. Set the mains switch to ○ and wait 60 seconds.2. Set the mains switch to l. |
| Display shows calc'nClean very frequently. | Decalcified water still contains small amounts of lime.1. Insert a new water filter.2. Set the corresponding water hardness. |
| Incorrect or too little descending agent used.► When descending, only use suitable tablets. | |
| Service programme has not been carried out in its entirety.► Start the "Special rinsing" service programme.→ "Service programmes", Page 59 |
17 Transportation, storage and disposal
17.1 Activating frost protection
Protect your appliance from frost during transport and storage.
ATTENTION!
Residues of liquid in the appliance may damage it during transport or storage.
-
Empty the pipe system before transport or storage.
-
Run the "Frost protection" programme.
"Overview of service programmes", Page 59 - Disconnect the appliance from the power supply.
17.2 Disposing of old appliance
Valuable raw materials can be reused by recycling.
- Unplug the appliance from the mains.
- Cut through the power cord.
- Dispose of the appliance in an environmentally friendly manner.
Information about current disposal methods are available from your specialist dealer or local authority.

This appliance is labelled in accordance with European Directive 2012/19/EU concerning used electrical and electronic appliances (waste electrical and electronic equipment - WEEE).
The guideline determines the framework for the return and recycling of used appliances as applicable throughout the EU.
18 Customer Service
Function-relevant genuine spare parts according to the corresponding Ecodesign Order can be obtained from Customer Service for a period of at least 7 years from the date on which your appliance was placed on the market within the European Economic Area.
Note: Under the terms of the manufacturer's warranty the use of Customer Service is free of charge.
Detailed information on the warranty period and terms of warranty in your country is available from our after-sales service, your retailer or on our website.
If you contact Customer Service, you will require the product number (E-Nr.), the production number (FD) and the consecutive numbering (Z-Nr.) of your appliance.
The contact details for Customer Service can be found in the enclosed Customer Service directory or on our website.
18.1 Product number (E-Nr.), production number (FD) and consecutive numbering (Z-Nr.)
You can find the product number (E-Nr.), the production number (FD) and the consecutive numbering (Z-Nr.) on the appliance's rating plate.
Make a note of your appliance's details and the Customer Service telephone number to find them again quickly.
19 Technical specifications
| Voltage | 220-240 V ~ |
| Frequency | 50 / 60 Hz |
| Connection rating | 1500 W |
| Maximum static pump pressure | 20 bar |
| Maximum capacity of water tank (without filter) | 2,2 l |
| Maximum capacity of bean container | 400 g |
| Length of the power cable | 170 cm |
| Appliance height | 45,5 cm |
| Appliance width | 59,4 cm |
| Appliance depth | 37,7 cm |
| Weight, empty | 20,6 kg |
| Type of grinder | Ceramic |
This product contains light sources from energy efficiency classes D and F. These light sources are available as spare parts and may only be replaced by trained specialist staff.
19.1 Information regarding Free and Open Source Software
This product includes software components that are licensed by the copyright holders as free or open source software.
The applicable licence information is stored on your home appliance. You can also access the applicable licence information via your Home Connect app: "Profile -> Legal information -> Licence Information".1 You can download the licence information on the brand product website. (Please search on the product website for your appliance model and additional documents). Alternatively, you can request the relevant information from oss-
The source code will be made available to you on request.
Please send your request to ossrequest@bshg.com or BSH Hausgeräte GmbH, Carl-Wery-Str.34, 81739 Munich, Germany.
Subject:"OSSREQUEST"
The cost of performing your request will be charged to you. This offer is valid for three years from the date of purchase or at least as long as we offer support and spare parts for the relevant appliance.
20 Declaration of Conformity
BSH Hausgeräte GmbH hereby declares that the appliance with Home Connect functionality conforms to the
essential requirements and other relevant provisions of Directive 2014/53/EU. A detailed RED Declaration of Conformity can be found online at siemens-home.bsh-group.com among the additional documents on the product page for your appliance.

Hereby, BSH Hausgeräte GmbH declares that the appliance with Home Connect functionality is in compliance with relevant statutory requirements.
A detailed Declaration of Conformity can be found online at siemens-home.bsh-group.com/uk/ among the additional documents on the product page for your appliance.

2.4 GHz band (2400-2483.5 MHz):
Max. 100 mW
5 GHz band (5150-5350 MHz +
5 GHz WLAN (Wi-Fi): For indoor use only.
| BE | BG | CZ | DK | DE | EE | IE | EL | ES |
| FR | HR | IT | CY | LI | LV | LT | LU | HU |
| MT | NL | AT | PL | PT | RO | SI | SK | FI |
| SE | NO | CH | TR | IS | UK (NI) |
| AL | BA | MD | ME | MK | RS | UK | UA |
| 5 GHz WLAN (Wi-Fi): For indoor use only. | |||||||
8.3 doubleShot tripleShot
1.4 Installation sure
13.2 Configurer Home Connect
Conditions
WAARSCHUWING - Kans op verstikking!
5-GHz-band (5150-5350 MHz +
5470-5725 MHz): max. 200 mW
1.1 Advertencias de character general
Los granos de café inapropiadosSEOSEOSEOSEOSEOSEOSEOSEOSEOSEOSEOSEOSEOSEOSEOSEOSEOSEOSEOSEOSEOSEOSEOSEOSEOSEOSEOSEOSEOSEOSEOSEOSEOSEOSEOSEOSEOSEOSEOSEOSEOSEOSEOSEOSEOSEOSEOSEOSEOSEOSEOSEOSEOSEOSEOSEOSEOSEOSEOSEOSEOSEOSEOSEOSEOSEOSEOSEOSEOSEOSEOSEOSEOSEOSEOSEOSEOSEOSEOSEOSEOSEOSEOSEOSEOSEOSEOSEOSEOSEOSEOSEOSEOSEOSEOSEOSEOSEOSEOSEO SEO
13.2 Ajustar Home Connect
Requisitos
1.3 O6MeJKeHnKaKoJa KOpNcTyBaayiB
ДiTи BIKOM BiD 8 pOKiB, a TAKOJ OCO6n 3 O6mExeHIMN φi3nUHIMN, CEHCOPHIMN a6o PO3yMOBIMN 3Ii6HOCTaMn U3 6paKOM IOCbIy Ta/a60 3HaHb MOKyTb KOpNCtYBaTINcA ZIM nPpIaNOM TiIbKN iId HaFJIaDOM a6o NiCIA OTPImaHHB Bka3iBOK i3 6e3neuHOrO KOpNCTyBaHHr nPpIaNOM i NiCJIaTOR, JK BOHN yCBiDOMnIn MOnJIbBi NOB'J3aHI 3 ZIM He6e3NeKn.
ДiTМ 3a6bOpOHeNo ГратиСя 3npuJaIOM.
3a6bOpOHeNoPiHocnTu pyKuPiD Io0aTOpPiD Yac Buai HanoIO.
He niДnyckaiaTe Do npuIaNy dIteNToIo.
YBAG! - He6e3neKa TpaBMyBaHHa!
HénpaВиьHe BnKOpNCTaHHЯПриlaу може CTBOPNTn He6e3пeКу Дя КОпИСТУВачa.
Uso6 yHnKHyTN TpaBM, KOpNCTyITeCg npnlaOM IInIe 3a npn-3HaueHHM.
3aTnckaHnnaIbciB nID uac 3aunHeHHN DBePcT npuJaNy.
3aunHauOuN DBePcTAta npnilaIy, 6epeKiTb naJIbci.
KaBOMOJIka o6eptaetbcr.
He npocobyIte paIbIc I KaBOMOJIky.
YBAFA! - He6e3neKa: MaHHeTN3M!
YBara! BnJIb MaHrIThNX nOJIb!
Oco6lnBa ybara IJIa IIOJeI 3 KApDIOCTUMyIaTOpamN
B npnila di BnKOpncToByIbCn NoCTiHi MaHITn. MaHITn MoKyTb BnINBaTu Ha pOboTy eJeKTPOHHnx IMnlaHTaTiB, HApNklaD, KapIOCTmMyJATopiB uHcUInHOBx Do3aTOPiB.
Людм 3[elektroними IMпалотами HeобхIDNo TpIMaTnca Na 6e3neuHi BiDCTaHI —ПринайMuHi 10 cm BiД npinlaу Ta DBeRцгТnpinlaу.
MiHimaihBa BiDcTahB BiD pe3epByapa DnBBoN, KOHTeHepa DnMOLOKa, KOHTeHepa DnKABOBoi rUsi, KpNIshKn Do3aTopaHaIOIB, PO3NOJIbHnKa HAnOIB, DO3aTopa HaIOIB, KpINJIeHHNMOJIoHO CnCTeMn, KpNIshKn 3abapIOBaIbHOi KaMepn Ta 3abapIOBaJIbHOro 6loka MaE cTaHOBNTn PrnHaIMHi 10 cm.
YBAG! - He6e3neKa shkoJN 3dopOB'U!
3a6pydHHeHHnI npuIaNy MoKe cTaHOBHTn He6e3IeKy IJIa 3DOpOB'J.
BukohyTe Bka3iBKn 1oNo ririHIOu uIeHNn npilaNy.
2Як ункнун MaTepi-aIbHnx 36NTKIB
YBAGA!
He6e3neka nOuKoJxKeHHn npUaNy. HenpaBnIbHe BVeJeHHn B ekCpIyata zuMoKe NOuKOdITn npUaI.
BukopncToByTe npnilaI liuhe B npimiiueHnX, 3axnueHnx BiMopo3y.
- YKIO npINaI TpaHCnOpTyOITb a60 36epiraOIB 3a TeMnpaTpyN, HIXyOI BID 0^ , IpeE BBeDeHnM B EKcIIyataUIO CIIID BVITpIMaTI NOro 3 roI 3a KIMHaTHoi TEMnpaTpyN.
-Пися Кожного пдкючehн слд
-почекати пиблзно 5 c.
-Немалжни монтак може српун-
-ноти матерiaль hyшков.
- Дотримутесь снстукциз моNTаЖу пиладиВ, рОЗТашованix 3Верху abO 3HN3Y.
Y pa3i MOHTaKy HaJ WUxJIaIOU IJa NiIirpIiBaHH Heo6XiIDHO 3po6u-Tn Hi7y BnCOTOIO 590 MM. He3akpiINJIeH Me6JI MoKytb BnactN.
Me6JI cIiI npKpInTu Do CTiH 3a DOIOMOIO CTAHdApTHOrO KytNka.
3 Oxopoha IOBkijnna OuaJInBe KOpHcTByBaHHa
3.1 Ytlini3aizy ynaKOBKn
PakyBaJIbHi MaTepiAIn ekOJorIuHO 6e3neUHi I MOKBytB BnKOpNCTOByBaTn- CnIOBTOPHo.
- Okpeme cklaДинки NotpiHOb po3-copTyBaTn yTuJIi3yBaTn po3-diIbHO.
3.2 3aouzaandKeHHeHeprii
Akuo BV 6yTe BkOHyBaTu zi Bka3iBkn, npnaCPOXnBaTmme MeHs eKtpoeHeprii.
YCTaHOBiTb HaIMMeHsU TpINBaJIcTb 3aTpIMKn aBTOMaTHUHOr BUMKHeH-Hr.
Kolni npnilaIom He 6yIyTB KOpNCTyBaTnCra, BiH BmIKaTUMetbca paHiue. "OchOBHI napameTpU", CToP.218
He nepeepuBaIte npriIroTyBaHnHa naoiB nepeDuacHo.
HarpiTa KIbKicTb BOAn a6o MoIoka 6ynde BnKOpncTaHa ONTImaJIbHO.
Pergnepno BuaaIyTe 3 npnaNy HauN.
V BiДклади haKiny piДВиуIyIeHeprocnoxINBaHHa.
4 YcTaHOBJIeHHa N iD-KJIIOUeHHa
4.1 KomnjeKT NOCTABKN
IicIpaO3naKaYBaHHnepeBipTe, uKOMnJIeKT NOBHN i uH He NIOuKOdINo RaKiCb YactHNI pI d uac TpaHCnpOpTyBaHHa.
3ayBaJehH: 3aJIeJHo BiI MoJeI npIaNy B KOMIIeK T BXOJaTb pi3Hi akCecCyapn. IOnaTkoBi akCecCyapn no-3HaueHi NyHKTInpHOIO paMKoIO.
→ Man. 1
A KabOMaShHa
1 3aJIeJxHO BiI KOMJIeKTaIi Ipnla- dy
- Hatachitb "Dorlan i o6cnyroByBaHnH".
- HatncHtB "IilbTp INTENZA" i BnKoHyTe Bka3iBKN, IIO 3'RAJIaTmMyTbCHa NcPJIeI.
3aMiHa a6o BndaJIeHHa 1JIbTpapIJI BODI
PpHnlaOM MoKHa KOpNCTyBaTINcIe 6e3 pfIbTp a Ia BODI.
-
Hatachitb "Dorlan i o6cnyroByBaHnra".
-
HatnchiTb "DiJbTp INTENZA".
- HatncHtB "3amHnTu" a6o "PnpIbpatu" i BVKOHyIte BkA3iBKn, IIO 3'RAJIaTmUyTBcR Ha DInCnJIeI.
IoparNi
3amihn fijbtp nIy BOiN cIaKoX i3 ririeHuiHx MIPkyBaHb.
3a HaBHOCTI BOJHOrO fIbTpabNdaTn HAKIN i3 npInaNy MOxHa piDwe.
3aHaABHocTiΦiNbTpAДЯВODIN KaBOBi HANOI BHXOJrTb CMaUHiuMn.
JaKIO Bn IOBRO He KOpNCTyBaJInca npIaIOM (HaIpnKlAn, 6yIu y BiIpyctci),TO nepei KOpNCTyBaHnM npOMnTe BCTaHOBJIeHNI BOJHNI fIbTp, pIurOToYBaBUn YauShKy rapa- YoI BOIN.
- Ппдбати Фльт ДЯ ВОДИ можнав Магаши自豪 СерсIHOMу сHTpi. "Прпладя", Cstop. 210
Ioo6 OINTMmaJIbHO KOpNCTyBaTnCnI npIaIOM,3BaXaIte Ha BKa3iBKn.
Bka3IBKn
Ha 3aBoDi BCTaHOBHeO CTAHdApTHi npaMeTpNi DnI ONTImaJIbHOrOpexKIMy pO60rN PpNJaNy.
Пид уас кожногп ригotуваима наю ВмИкайся iHTerpoBaHи BEHTINЯТО, со ВIMИкайся пиблизно за 5-7xBпicля ригotуваима наю.
Kabomolky BiDpeyIbOBAHO Ha 3aBoDi IINr ONTImaJIbHOI pOboTn. RaKIO Kaba Teue IInse KpaIJIaMn aBO HADTo PiKa N MaE 3aMaIo nIHKn, MoXHaPiDKOpNByBatn CTynPiHb NOMeLy. "PeYIIOBaHHra ToHKoCTi NOMeLy", CToP.214
JHKUHIO He pObTu 3 npuJaDOM yIPOIOBJK NEBHO uacy, BIIABTOMaTUNHO BIMKHeTbcr. TpNBAJIcTB cboTO nepioy MOxHa 3MiHTB IN OCHOBNX NapaMeTpax.
- Perший пиrotobаньн Hanii He Byde matn BnpaKeHOro apomaty, RaKIo:
- Bn KoprncTyEcTepnlaIaOM yIepse.
- Bn ⅢoHOBVKOHaJIncepBicHy nporpaMy.
- Bn DoBRO He BMKaJI npJlaI. He nnTe 乙bOro HanoIO.
8 OchoBhi BiIDomocTi npo KopnCTyBaHHa
8.1 YbIMKHeHn a6o BmKHeHHn npHaNy
Bka3iBKn
8.3 doubleShot i tripleShot
PnlaMne KaBy dBiCy a6o Tpnui.
UoB BvBilbHraNCr TiBkn PnpemHi Ha
cMaK i Do6pe 3acBOIOBaHi apOMaTHuHi peOBUHN, PnlaD 3aHOBO MeJe
3epHa N 3aBapIOe KaBy.
YIM DOBWE 3aBapIOETbCAba, TMM 6IbIe rIPKINx peOBoH i He6aKaHNX apOMaTIB BnBbNHeTbCra. FipKi peOBOHNi He6aKaHI apOMaTI NOriPpUOTb CMAk i 3acBOIOBAHicTB KaBN.
3ayBaXeHHa:ФyHKuii "doubleShot" i "tripleShot" 3aIeKaatb BiD BnOpaHnx MiUHOCTI Ta o6'Emy HanoIO.
8.5 Ondohyache He npHroTyBaHn HЯДBoxЧашok
ДлЯ DeякIx HanoiB MoJHa rOryBaTn BODHouac DiBi YaшК.
3ayBaJHexHH:KoIaKTHBHaФyHKcIi "doubleShot"abo "tripleShot", OndHouache npriroTyBaHHaDBOX a- WOK He NiIDTpMMyETbcra.
- HATUCHITb CUMBOJ 6aXaHOro HANOIO.
- HatnchItb P
HaIncnpei 3'ABNTbcH aHaHTyBaH-H
3. NocTaBte DBi YaUkN PiD Do3aTOp, IiBOpyu i npabOpyu.
4. HatncHtB "Start".
ПригOTуВаHHЯ HabIoO cKlaJaeTbСЗТakоi KIьКоCTi etaniB:2.3epHaMeJIOTbCЯ Taky KIьKICTb pa3iB:2.
Hani 3aBapIOeTbcra, a nOTIM Teue B YauKn.
5. Дочакайда Завершени поцecу.
9 KabOMOJIka
LcienpnilaOnbIaIHaHnpeRy- IbOBHOKABOMOLKOHO,IO Dae 3MOry iHNBIyAJIbHO KOpNpyBaTn CTyniHb IOMeNy KaBOBHX 3epeH.
9.1 PerylIOBaHHaToHkoCTi nOmeJy
3a DoIOMOIO NOB3yHKOBOro peTpyJIToPA Bn6epiTb bajKaHy TOHKiCTb NOMEJy: BiD yJxKe TOHKOTo 10 Do IyJxKe rpy6Oro
Man. 25
3MiHIOte TOHKICTb NOMeIy TINbKN He3HaUHO MipoIO.
YctaHOBHeH CTyniHb NOMEny 3aCTOCOByETbcra TiIbKn NiCJn Dpyrooi yaShKn.
Iopada: KaKaBa Teue IiWe KpaJIaMn, yCTaHOBITb rpy6iWiN CTynHb NOMEly. Kaaba HAdTo pIkKa mAc 3amAoPiHKn, yCTaHOBITb TOHsiN CTynHb NOMEly.
10 Полочka Ддя 3берiraHHЯ КОТейнера ДдяMOлOKа
Baw npicpii Bn3Hauae, KOJIHa nI pOJIuCi IJN 36epiraHHa 3HaXoINtbcKoHTeHep IJN MOLOka.
10.1 BnKOpNCTaHHNoJNUChn IJIa 36epiraHHa KOHTeHepa IJIa MoJOKa
1.Пид'еднaite KOHTeHepДЯ MOnOka a6o NaKeT MOLOKa Ta NOCTaBTeHa NOLNUKy dЯ 36epiraHHa.
2 3anycitb npnroTyaHHaHO.
3ayBaXeHn: RaO 3'ABuTbCn NOBIOMJIeHHaBTe KOHTeHep DnMOLoka.", npriToTyBaHHHaNoIO HEMOXJIInBe.
10.2 BnKOpNcTaHnBnAChOro KOHTeHepa JIa MoJOKa
I3 NeBHMN cepiAMn npuJaDiB MOxHa BKNOPNCTOByBaTN BlaChn KOHTeHepa DnA MoLOKa.
- ПиготупЕ ВlaСнй KOнTeHep ДЯн MолOKa.
2 BiTapuyTe BlaChn KOnTeHep IJN MOJOKa. "OrIaO cHOBHX npaMeTpIB", CToP. 219
Пилад ВИЗHAчае KИльКICTь молOKaВ KOHTeHepi ДЯ мOLOKa a6oВ naKeti MONOKa 3a BarOю.ЯкюВ KOHTeHepi 3amAo MOLOKa, 3'YBnEТСЯ NOBIДOMJIeHHЯ.
3ayBaXeHHa:KIO BV BnKOpnCTOBYeTe CTaHapTHN KOHTeHepIaMOLoka a6o NaKeT MOLOka, PpIaD BV3Haac Ce aBTOMaTNoHO.
11БлOKУВаHHЯ BiДdoctупдITEн
Iio6 3axnctnti diTei BiD OwnapenHra Ta onikIB, npnilaM oKHa 3a6lokyBAtn.
11.1 AkTnBaCiIyHKnii 6JOKyBaHHaBdIOCTyny diTei
BvMora: Ppnilad yBIMKHeNo.
2 3anyctitb 3actocyHOK Home Connect Ta hanaustyute doctyndoHomeConnect.
HaMoBJIbHOMy KInUeBOMy npNCTpoI BCTaHOBJeHO 3aCTOCyHOK Home Connect.
Ha miczi BCTaHOBLeHHn IpnIaN npInMae CnHnI DomaunHbOi MepeXi WLAN (Wi-Fi).
- BidkpinyTe 3actocyHok Home Connect Ta npockaHyTe hactynHi QR-koDi.

- BnKoHyIe iHcTpkyKuII, 10 3'ABJIaTIMyTbCBy 3aCTOCyHky Home Connect.
13.3 ПараMeТрн Home Connect
AaantyTe Home Connect do cboix notpe6.
Papametpn Home Connect moxna 3HaHTB MEHIO OCHOBHX
napametpi npilaNy. Kki napametpi BiOobpaxatmyTbCn Ha nCnIe, 3aJIeKHTb BiD TORO, nn Hana-
WTOBaHO Home Connect i nn pIKNo- ueHo npilaad DO DOMaunHbOi MepeKi.
Orla napametpiB Home Connect
Tyt habeHn oIaI npaMeTpiv Home Connect i mepexi.
Bn MoKeTe BCTaHOBtN OCHOBHiyCTaHOBKn BaWoO IpnJaIy BiINoBIiHO Do BJIaChNX IOTpe6, a TaKOK BN-KJInKaTn IOnaTkOBI fYHKcii.
14.1 3MiHa OCHOBnX HaJa-ItyBaHb
-
Hatnchitb
Дисплей пokа3у ecncoK OCHOBHNx napametpiB.
2 3MiHiTb NtOpi6Hn OCHOBHN npaMaTeP.
Пилад abTomatnUHO 3epeiraocHOBnI npaMeTp. -
Lio6 noBepHyTnCBA MeHIO, HATNCHiTb<.
- Lio6 BnTn 3 OCHOBnX npaMeTpib, HATNCiTb X.
Iopana: IJIa 3aIHTy KopoTkooi HΦOpMaζι έHαNCHiB I.
14.2 OrJaO OCHOBHnX npaMeTpipB
Tyt HabeJeHn OrlaOCHOBHX npaMeTpib.
Tyt HabeHn OrIaI DeTaIeI, PnIaTHnx Do MTTB NocydomHi MaunHi.
YBAGA!
Jeyki deTani yTnBi do Tempeatypn MoKyTB 6yTN IOsKOJxHbHacI-DOK MNTT B NOCyDOMNHi MaunHi.
-ДоТРИМУТЕСА ВИМОг iHCTpyKUJI3 eKClnyaTauI IOCyDOMnHOI MaSHIN.
MnIte B nocydomnHi MaunHi TiJIbKn npndaTHi Dny cboRo deTaJI.
BukopncToByTe TiIbKn Ti npo- rpaMn, KOtpi He HarpiaOt b DeTaJI nHaJ 60 ^ C
PnpndaTHi:
Плдондя кpaneелb
KpiuKaPiDoHaIgKpaneIb
KoHTeHepIa KaBOBoI rUci
- PpiuMaJIbHNI pIDIOH
KoHTeINHeP dIa MOLOKa 3 KpN-1sKOIO Ta DHNUeM
Поличka Дли 3бepirahня KOHTeINHepa DnI MOnoka
- Po3nOДиьнИК HanoiB
Molouha cnctema
HenpndaTHi:
Pe3epByap IINBODN
Kpnska pe3epByapa Ia BOnI
BLOK 3aBapIOBaHHA
Kpnska do3aTopa
Kpnska 3aBaapioBaJIbHoI KaMepn
- LluyxlaJa dIy npIaIaIaI
KoHTeINHeP dIa KaBOBIX 3epeH
KpnuKa KOHTeHepa Iy KaBOBx 3epeH
15.2 3ac06nДЯ OUYUeHNA
BnKOpncToByTe IInIe CneUaJIbHi 3acO6n DnA YnUeHHN.
YBAGA!
Henpiudatni 3acobn IJyIuIeHHNMOxytb PONKOJxByaTN NOBepxHi npnila-ny.
He 3acTocOByIte roctpi nn a6pa3nBHI 3acO6n dnn YnIeHHa.
He BnKOpNCTOByIe 3acO6n IJnyuIeHHa,IO MICTA TcNPT.
He 3actocobynte kopctki a6o metanebi ry6kn.
HenpiuaTHi 3acO6n IJy ChuIeHHa BndaJIeHHaHKIpy MOKytb NpIKoNITn npJnaI.
He BnIaJIaIe HaKIn 3a IOnOMo- roU yNCTOJI JIMOHHOI KNCJOTN, ouTy a6o 3acobIB Ha OCHOBIO uOtY.
He BnKOpncTOByTe 3acO6n IJN BnJaJIeHHHaKnIpy,IO MICTaTb focOphHy KNCLOTy.
BukopncToByTe InIe cneiaJIbHOp03pO6JIeHI nI KOHNpeTHNI npIaI Ta6JIeTKN dIy BUNaJIeHHHaKIny NUnIeHH.
"PpnuIaIaIaI",CTop.210
Iopapn
- PeTeIbHO MmIte HOBi rY6Kn, IIOb BnDaJIHTN MoJXINBI peUeTKn CoJeN. CoJI MOxTyB cPnUChIaTNI NOBy HaIbOTy ipKi Ha MeTaJIeBX NOBepxHIX.
Lio6 3anobirn Kopo03ii, 3aBxdn HebiKlaIaNHO npu6npaIte 3aIIuHKn HaKNpy,KaBN,MOLOKa,PO3uHIB DnOuyIeHNry N BuJaIeHNHaKnIpy.
15.3 ChuichiennpaIaNy
YBATA!
He6e3neKa ypaXeHHa eJleKTpHuHm cTpyMOM!
PiznHa, zo BnteKla, MoXe CnpuHnTyn ypaKeHH eJeKtpuHm CTpyMOM.
Hikoln He 3aHypioIte Hi npnila, Hi Ka6eIb XINBLeHnry BOdy.
Ha po3nHmN 3'edHyBauchpnilaNy He Mae NotpaJIaTI npiHa.
He MoXHa YnCTHTn PpUla3a DoIOMoTOrO NaPOBOrO a6o BnCOKOTNCKOBOrO pUnlaNy.
YBATA!
He6e3neKa onikib!
3ayBaJHexHn: NoyaTKOBn ekpaH noka3ye, cKiIbKn HanoiB ige MoXHa npiroTyBaTN Do BVKOHAnHn IpOgrpAmn, a TaKoX BiIDNoBiDnHn Yac.
16 YcyuHnHa HecnpaBHOCTeI
He3NaHHi HeCnpaBHOCTI npuHaNy MOxHa yCyBaTn BlnachOpyu. Nepu HiK 3BeptaTnca Do cepBicHOi CnyXbN, CKOpNCtaTecr BiIOMOCTAmn Ipo yCyHeHHr HeCnpaBHOCTe. TaK MoxHa yHNKHyTN 3aIBNX BVtpaT.
!YBATA!
He6e3neKa ypaXeHH eIeKtpnHm cTpyMOM!
Pemonthi pobotn, BVKoHaHi HeHaJIeKHM YINOM, MOKyTb cKaIaATN He6e3IeKy IJN KOpNCtuyBaVa.
- PemOHtYBaTn npuJa dO3BOLHeo TiIbKn faxiBzM.
- Дя ремоHTу пиладу ДОЗВОЛЯТьСВИКОРИСТОВУВАТИ ЛИше opиriHaJIbHi 3aIчаCTUH.
Y pa3i NOsKOJxHn MepeXHOrO a6o 3'EDHyBaIbHOrO Ka6eJIIO cBOrO npIaIy NOrO nOTpi6HO 3amHInTcneiaIbHmMepeXHm a6o 3'EDHyBaIbHmKa6eJIeM, AKN MOxHa 3AmOBHTu BvPo6Hnka a6o B cepBicHOMy ceHTpi.
8.3 doubleShot ve tripleShot
Valid within Great Britain:
Imported to Great Britain by
BSH Home Appliances Ltd.
Grand Union House
Old Wolverton Road
Wolverton, Milton Keynes
MK12 5PT
United Kingdom
BSH Hausgeräte GmbH
Carl-Wery-StraBe 34
81739 München, GERMANY
siemens-home.bsh-group.com

8001288788
(030616)
de, en, it, fr, nl, es, uk, tr