
ASPIRATEUR-ROBOTVRR94314VB - Vacuum Cleaner BEKO - Free user manual and instructions
Find the device manual for free ASPIRATEUR-ROBOTVRR94314VB BEKO in PDF.
| Product type | Robot vacuum |
| Brand | Beko |
| Model | VRR94314VB |
| Input voltage | 220-240 V~, 50/60 Hz |
| Battery | Li-ion 14.4 V / 3.2 Ah |
| Runtime (silent mode) | Up to 250 min |
| Runtime (standard mode) | Up to 180 min |
| Runtime (powerful mode) | Up to 120 min |
| Runtime (maximum mode) | Up to 65 min |
| Charging time | 6.5 to 7.5 hours |
| Dust bin capacity (robot) | 0.4 L |
| Water tank capacity | 0.3 L |
| Docking station capacity | 4 L |
| Filter | HEPA (washable and replaceable) |
| Connectivity | Wi-Fi 2.4 GHz (IEEE 802.11 b/g/n) |
| Mobile app | HomeDirect-SDA |
| Cleaning functions | Auto, room, zone, spot, mopping |
| Mapping | Real-time LiDAR |
| Sensors | Anti-drop, bumper, laser |
| Included accessories | Docking/charging station, mopping pad holder, 2 dust bags, 1 side brush, 1 mop cloth, 1 filter, cleaning brush |
| Maintenance | Regular cleaning of dust bin, filter, brushes and sensors |
| Safety | Auto shut-off, drop detection, floor protection |
Frequently Asked Questions - ASPIRATEUR-ROBOTVRR94314VB BEKO
User questions about ASPIRATEUR-ROBOTVRR94314VB BEKO
0 question about this device. Answer the ones you know or ask your own.
Ask a new question about this device
Download the instructions for your Vacuum Cleaner in PDF format for free! Find your manual ASPIRATEUR-ROBOTVRR94314VB - BEKO and take your electronic device back in hand. On this page are published all the documents necessary for the use of your device. ASPIRATEUR-ROBOTVRR94314VB by BEKO.
USER MANUAL ASPIRATEUR-ROBOTVRR94314VB BEKO
Robot Vacuum Cleaner
User Manual

VRR 94314 VB
EN-FR-IT-PL-RO-SR-AR
Please read this guide first!
Dear Customer,
Thank you for choosing a Beko product. We would like you to achieve the optimal efficiency from this high quality product which has been manufactured with the state of the art technology. Please make sure you read and understand this guide and supplementary documentation fully before use and keep it as a reference. Include this guide with the unit if you hand it over to someone else. Observe all warnings and information herein and follow the instructions.
Symbols and their meanings
Following symbols have been used throughout this guide:
| i | Important information and beneficial advices regarding the usage of the device. |
| ! | WARNING:Warnings about dangerous situations regarding safety of life and property. |
| Protection class against electric shock. |
CONTENTS
ENGLISH 04-30
FRANÇAIS 31-59
ITALIANO 60-89
POLSKI 90-120
ROMANIAN 121-152
SRPSKI 153-183
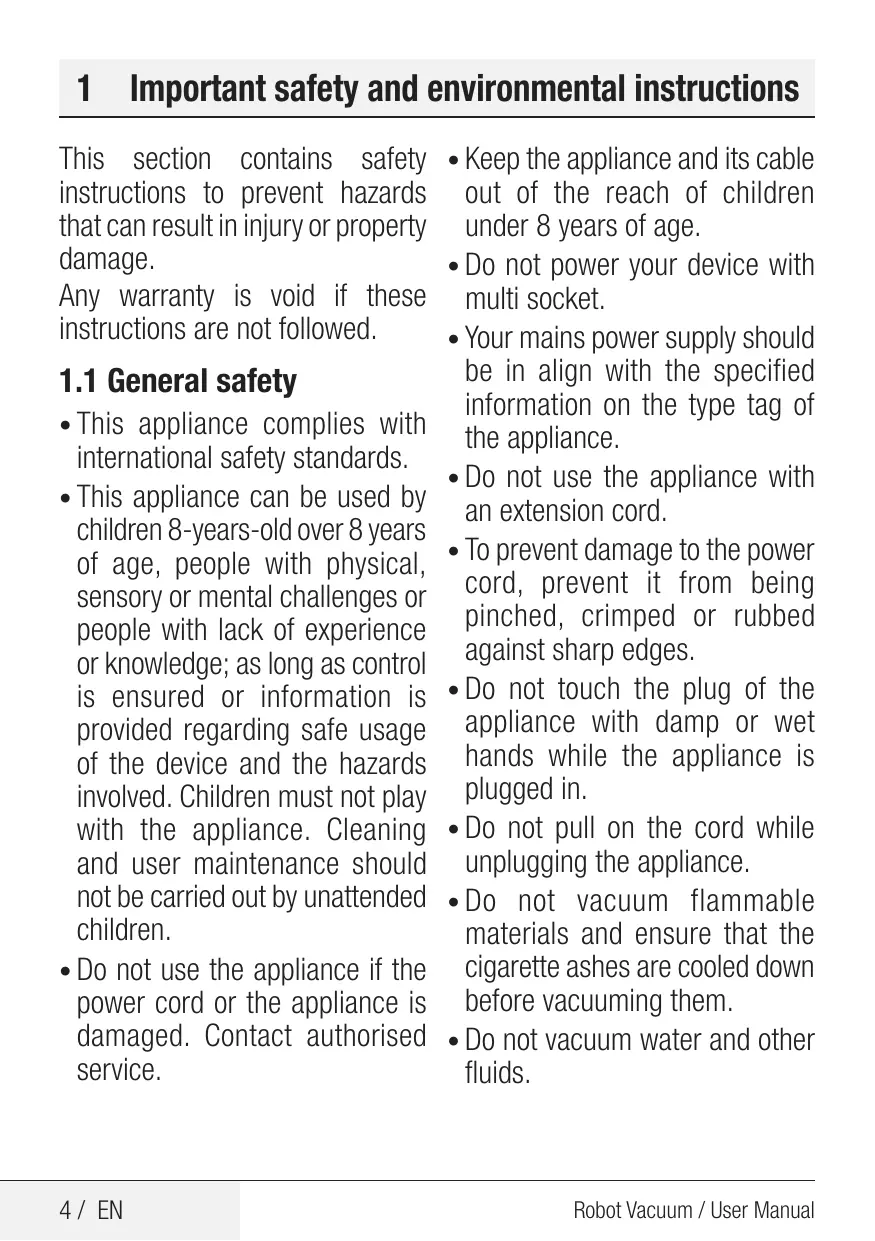
1 Important safety and environmental instructions
This section contains safety instructions to prevent hazards that can result in injury or property damage.
Any warranty is void if these instructions are not followed.
1.1 General safety
- This appliance complies with international safety standards.
- This appliance can be used by children 8-years-old over 8 years of age, people with physical, sensory or mental challenges or people with lack of experience or knowledge; as long as control is ensured or information is provided regarding safe usage of the device and the hazards involved. Children must not play with the appliance. Cleaning and user maintenance should not be carried out by unattended children.
-
Do not use the appliance if the power cord or the appliance is damaged. Contact authorised service.
-
Keep the appliance and its cable out of the reach of children under 8 years of age.
- Do not power your device with multi socket.
- Your mains power supply should be in align with the specified information on the type tag of the appliance.
- Do not use the appliance with an extension cord.
- To prevent damage to the power cord, prevent it from being pinched, crimped or rubbed against sharp edges.
- Do not touch the plug of the appliance with damp or wet hands while the appliance is plugged in.
- Do not pull on the cord while unplugging the appliance.
- Do not vacuum flammable materials and ensure that the cigarette ashes are cooled down before vacuuming them.
- Do not vacuum water and other fluids.
1 Important safety and environmental instructions
- Protect the appliance against precipitation, humidity and heat sources.
- Do not use the appliance in or near explosive or flammable environments and substances.
- Unplug the appliance before cleaning and maintenance.
-
This product is not designed for commercial use, it is intended for use at home and in applications as follows:
-
In the staff kitchens of the stores, offices and other working environments,
-In farm houses, - By customers in hotels, motels or other accommodation facilities;
-In hostels, or similar environments. -
Sleeping places and breakfast environments
-
Do not immerse the appliance or its power cord in water for cleaning.
-
Do not disassemble the appliance.
-
Use only original parts or parts recommended by the manufacturer.
- To prevent blockage of the filter or damage to the motor, do not vacuum cement, plaster or fragments of compressed paper.
- Use the appliance with the adapter delivered with the appliance only.
- Do not use the appliance without filters, it may get damaged.
- If you keep the packaging materials, keep them out of the reach of children.
- This appliance is not intended to be used by persons, including children, with physical, sensory and mental disabilities or those who have not adequate experience and knowledge regarding its use, unless they are under the supervision of a person responsible for their safety or they are informed about the operation of the appliance.
- The children shall be supervised to prevent them from playing with the appliance.
1 Important safety and environmental instructions
- Unplug the adapter and remove the battery pack before any cleaning or maintenance procedure.
- To avoid any risk of hazard, a damaged adapter shall be replaced by the manufacturer, the authorised representative of the manufacturer or a similarly qualified technician.
- Keep your fingers, hair and loose clothes away from moving parts or clearances while vacuuming.
- Please discard used batteries in accordance with local laws and regulations.
- The batteries in this appliance may only be replaced by the authorised service.
- Do not use batteries of different types or old and new batteries together.
- Do not short circuit the supply terminals.
-
Shall be used with ME1XXFG CM 3200 mAh batteries only.
-
This appliance shall not be operated by children and people with limited physical, sensory and cognitive skills or people with lack of experience and knowledge unless they are under supervision or they are provided with the relevant instructions.
- The children shall be supervised to prevent them from playing with the appliance.
- Do not put weight on the appliance. Make sure that the children and domestic animals do not get on the appliance.
- Do not run the appliance on high grounds like table or chair.
1 Important safety and environmental instructions
1.2 Compliance with the WEEE regulations and waste disposal

This product complies with EU WEEE Directive (2012/19/EU). This product bears a classification symbol for waste electrical and electronic equipment (WEEE).
This symbol indicates that this product shall not be disposed with other household wastes at the end of its service life. Used device must be returned to official collection point for recycling of electrical and electronic devices. To find these collection systems please contact to your local authorities or retailer where the product was purchased. Each household performs important role in recovering and recycling of old appliance. Appropriate disposal of used appliance helps prevent potential negative consequences for the environment and human health.
1.3 Packaging information

The product's packaging is made of recyclable materials, in accordance with the National Legislation.
Do not dispose of the packaging waste with the household waste or other wastes, dispose it to the packaging collection areas specified by local authorities.
1.4 Waste batteries

This symbol on rechargeable batteries/ batteries or on the packaging indicates that the rechargeable battery/battery may not be disposed of with regular house hold rubbish. For certain recharge
able batteries/batteries, this symbol may be supplemented by a chemical symbol. Symbols for mercury (Hg) or lead (Pb) are provided if the rechargeable batteries/batteries contain more than 0,0005 % mercury or more than 0,004 % lead.
Rechargeable batteries/batteries, including those which do not contain heavy metal, may not be disposed of with household waste. Always dispose of used batteries in accordance with local environmental regulations. Make enquiries about the applicable disposal regulations where you live.
1.5 What to do for energy saving
- When using your appliance, adjust the speed settings according to the surface, in order to save energy.
- Normally, lower speeds are used when cleaning hard surfaces while high speeds are used for cleaning carpets.
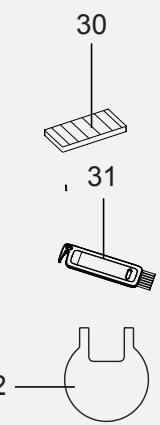
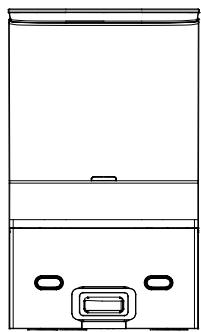
2 Box content

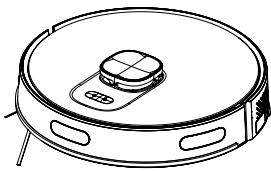
Robot Vacuum


Auto dust collector and charging station + internal dust bag

Mopping tool
Mopping cloth

User's manual and product documentation (2 pcs)

Cleaning brush
Spare accessories supplied
| 1 side brush | |
| 1 mopping cloth | |
| 1 filter | |
| 2 dust bags |


2.1 Checks and components
- Lidar
- Upper body
- Central body
- Start Cleaning-Pause Button / Sending to Charging Stand button
- Bumper sensor
- Front bumper
- Front bumper hitting sensor
- Charging pins
- Fall prevention sensor
- Charging pins
- Front rotating wheel
- Rotating brush
- Rotating brush cover
- Rear wheel
- Side brush
- Charging stand upper lid
- Charging stand dust container
- Charging stand light
- Charging and robot vacuum discharge parkland
- Charging stand charging communication pins
- Robot vacuum dust container suction nozzle
- On/Off button
- Robot vacuum container EPA filter opening lid
- Robot vacuum container charging communication pins
- Robot vacuum dust container ejection button
- Charging stand dust discharge outlet
- Mop water container
- Mop water container filling lid
- Dust container
- EPA filter
- Cleaning brush
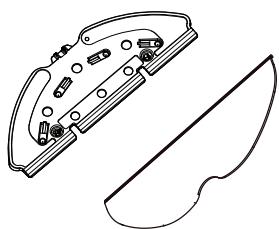
- Floor protection pad from wetness
2.2 Technical data
| Rated voltage | 220-240V~, 50-60 Hz |
| At charging condition | 0.4 A |
| At dust collection condition | 4.5 A |
| Output | 24.0V / 1.5 A |
| Battery | Li-ion: 14.4V / 3.2 Ah |
| Charging period: | 6.5 - 7.5 hours |
| Operation time | Up to 250 minutes (in mute position) |
| Dust container capacity | 0.4 L |
| Water tank capacity | 0.3 L |
| Dust collection station capacity | 4 L |
| 2.4G Wi-Fi frequency range | 2412-2472 MHz |
| Supported Connections | WLAN IEEE 802.11 b/g/n wireless |
| 2.4G Wi-Fi maximum RF output power | 20 dBm |
| RF exposure information | 2.4G Wi-Fi maximum |
| 2.4G Wi-Fi maximum RF output power | 20 dBm |
| Operating time | Maximum: 65 mins Powerful: 120 mins Standard: 180 mins Quiet: 250 mins |
RF exposure information : The maximum allowed exposure level is calculated according to the 20 cm distance between the appliance and the human body. To comply with the RF exposure condition, a distance of 20 cm should be put between the appliance and the person.
Conformity declaration for CE
Arcelik A.S. hereby declares that this appliance complies with Directive 2014/53/EU. The complete text of the EU declaration of conformity is available in the following internet address: - Products, from :beko.com
The rights to make technical and design changes are reserved.
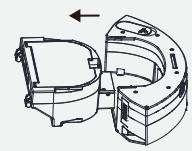
4 Installation
1- Remove the protective sponges.
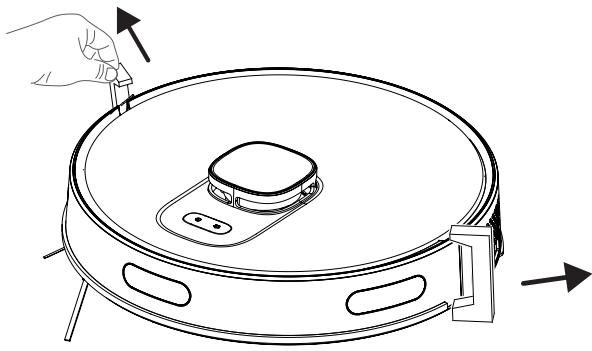
2- Install the dust collection and charging station.

Install the dust collection and charging station in a location where it can easily be accessed by the vacuum cleaner. Install the dust collection and charging station on a hard and level ground rather than a carpet.
To ensure a smooth operation of the robot, it is advised that no obstacles are present within 1.5m on the front and within 0.5m on the left and right sides.

4 Installation
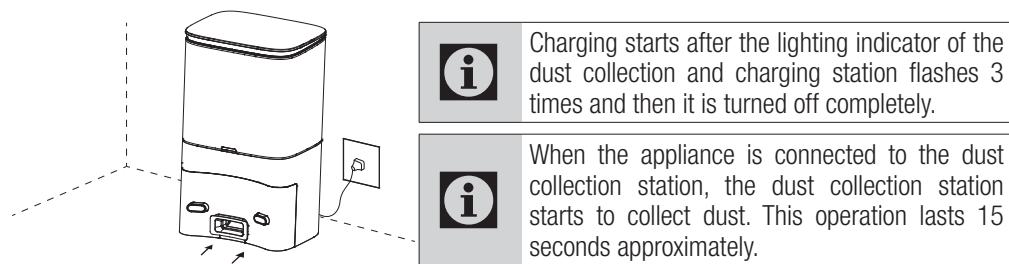
Install the dust collection and charging station on a hard and level ground so that its back faces the wall and then plug it.


Always keep the dust collection and charging station plugged, otherwise the robot vacuum cleaner cannot return to the charging station automatically.

For a smooth charging operation, do not move the dust collection station. When the location is changed, it may delete the available map and create a new map due to the positioning error.
5 Operation

Please charge the machine before first use.
5.1 Intended use
This appliance is intended for household use and it is not suitable for industrial use.
5.2 Charging the appliance
- Bring the on-off button on the side to the on position for the initial power up.

- Place the appliance to the dust collection station so that it shall be aligned with the charging communication pins.
5.3 Operation
For the first operation, bring the ON/OFF button on the side from "0" to "1" position. Press "①" button on the robot vacuum cleaner for 3 seconds to turn it on.
- Do not turn off the appliance using ON/OFF button directly during cleaning; otherwise the data of the robot vacuum cleaner cannot be saved.
- If the ON/OFF button is on OFF position, the robot vacuum cleaner will be turned on automatically when it is placed on the charging dock and turned off automatically when it is removed from the charging dock.
- If the robot vacuum cleaner will not be used for a long period of time, bring the ON/OFF button to off position.
Starting the cleaning

Press "①" button to start the automatic cleaning mode. When it is started, the robot vacuum cleaner is removed from the charging dock, performs an automatic scan to create a map, determines the cleaning route in a smart way and divides the area to several regions. The cleaning route is planned along the wall and the robot vacuum cleaner moves forward and backward to clean different regions in order.

WARNING: If the charging level is too low, the cleaning cannot be started. Please charge the appliance before starting the cleaning.
WARNING: Before the cleaning, tidy up all cables to prevent disconnections due to entanglement/pulling of the cables and to prevent damage to the furniture.
WARNING: In the automatic cleaning mode, if the area to be cleaned is less than 10 square meters, the cleaning is performed twice as default.
WARNING: Do not move the charging dock or dust collection station during cleaning and make sure that the station is plugged; otherwise the robot vacuum cleaner may not be able to return for recharging.
Pausing
Press "①" button on the body to stop the robot vacuum cleaner while it is operating. The robot vacuum cleaner switches to pause mode.
Automatic charging: The robot vacuum cleaner returns automatically to recharge after the cleaning is completed.
Manual charging: The robot vacuum cleaner returns automatically to the charging station when you press "↑" button on the upper body when it is in the pause position.
A. If the operation is paused, press "窗口" button to recharge automatically.
B. If the robot vacuum cleaner is caught up anywhere and cannot find the charging dock, please move the robot vacuum cleaner to the dust collection station yourself to allow it to be charged.
Point cleaning

Bring the robot vacuum cleaner to the area to be cleaned and press “①” button twice. When the mode is activated, the robot vacuum cleaner shall clean a square area of 1.5 × 1.5 ~m by considering itself as the center.
- It cannot start the point cleaning operation from the charging dock or the dust collection station. When the point cleaning is completed, it does not return to the charging station and remains in its position. Bring it to the charging stand or move it to the charging stand by pressing "On" button on the upper body.
5 Operation
Vacuum power selection
(Supported with the relevant mobile application only) You may select the desired cleaning power from the application:
- Quiet
Standard
Powerful
Maximum
Remote controlled cleaning
(Supported with the relevant mobile application only) You may direct the robot vacuum cleaner to the area to be cleaned by using the manual remote control mode through the application.
Sleep
The robot vacuum cleaner switches to sleep mode automatically if it remains stationary for 10 minutes. The robot vacuum cleaner switches to sleep mode automatically 10 minutes after it is completely recharged. The sleep mode deactivates the current task.
Resetting the system
For APP account delete, the customer can press "remove the product and clear the account" button on the APP to delete all the data on the APP and cloud like maps, clean histories, shared machine, WIFI account password...etc.
Press "①" button for 15 seconds in standby position to reset the system. When the system is reset, the map and the original settings (including virtual limits) on the robot vacuum cleaner are deleted.
5.3.1 Operation with the application
Download the application
To download the application, search for "HomeDirect-SDA" application in the mobile app store. Review the mobile application manual for detailed information.
Reset Wi-Fi
Press "①" "⑦" buttons simultaneously until you hear the aural warning and see the light blinking.
Add a device
- Open the app, create a new account and follow the instructions in the application.
- Before setting up the Wi-Fi, ensure that the robot vacuum cleaner and the Wi-Fi network meet the following requirements.
A. Robot Vacuum Cleaner:
- The charging level of the robot vacuum cleaner shall be over 20% or the robot vacuum cleaner shall be placed on the charging dock.
B. Wi-Fi network:
- Make sure the password of your wireless network (modem) is correct.
- Do not use any VPN (Virtual private Network).
- Wi-Fi router shall support, 802.11b/g/n and IPv4 protocols.
- The router shall be in the 2.4GHz frequency band or a dual-band router that supports the 2.4GHz band shall be used. The robot vacuum cleaner does not support the 5GHz frequency band.
- If the robot vacuum cleaner cannot connect the 2.4/5GHz dual-band Wi-Fi network, please select 2.4GHz network for Wi-Fi settings. You may switch back to the other frequency band when the setting is completed.
- If you are connecting to a hidden network, please ensure that you enter the network name [SSID (sensitive to capitalization)] correctly and that you are connected to a 2.4GHz wireless network.
- If you are using a wireless network extender, please ensure that the network name (SSID) and the password are the same with the main network.
Wi-Fi connection error
| Wi-Fi Status | Root Cause | Solution |
| White light is illuminated continuously. | The robot vacuum cleaner is connected to the router (modem), but it cannot connect to the network. | ·Ensure that the modem is connected to the network. ·Contact your network operator to see if there is a problem in the internet data. |
| White light is flashing rapidly | The robot vacuum cleaner cannot connect to the modem | ·Ensure that the network name and the password are not changed. ·Reset the Wi-Fi connection, if required. Please refer to the “Resetting Wi-Fi” section in the “Downloading the Application and Resetting the Wi-Fi” part of this manual. |
| White light is flashing slowly. | Wi-Fi is reset. | ·Ensure the Wi-Fi connection of the robot vacuum cleaner. Please review the Mobile Application Manual for detailed directions. Reset the Wi-Fi connection, if required. Please refer to the “Resetting the Wi-Fi” section of this manual |
5 Operation
Network security requirements:
Use TKIP, PSK and AES/CCMP encrypted WPA and WPA2 networks.
5.3.2 Operation modes
Map Management
A. Real time mapping
Real time creation of a house map may help you understand the cleaning route and the cleaning environment easily. A map of the house is created after cleaning. The map is updated in real time during each vacuuming operation to ensure a normal navigation. To create a complete house map;
a. Open the doors of your rooms for the robot vacuum cleaner to map each room;
b. Remove any objects that may cause obstruction or blockage of the robot vacuum cleaner;
c. Do not change the location of the charging dock or unplug it after the map is created.
B. Repositioning and remapping
If the robot vacuum cleaner is relocated or significant changes are made in the environment, the robot vacuum cleaner tries to reposition to adapt to the new environment and may create the relevant map again. The details are as follows:
a. If repositioning is successful, the robot vacuum cleaner continues on cleaning;
b. If repositioning is unsuccessful, the robot vacuum cleaner starts over to scan in order to make the mapping again.

WARNING: Ensure that the robot vacuum cleaner always starts the cleaning operation from the charging dock.
During cleaning, do not intervene in the robot vacuum cleaner or change its location.
Room cleaning mode (Supported by the relevant mobile application only)
You may specify the rooms you want to be cleaned with the mobile application, then the robot vacuum cleaner cleans only the room(s) that is/are marked in the map.

- The robot vacuum cleaner may also enter the areas other than the selected area after it starts cleaning; thus please remove the obstacles on the ground around the selected area. Area selection does not provide a secure isolation.
- Regional cleaning may only be started after the robot vacuum cleaner successfully creates a map.
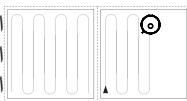
Regional cleaning mode (Supported by the relevant mobile application only)


The dimensions of the region can be determined by holding from the right bottom corner. In the meantime, the dimensions of the displayed area are written on the screen with the dotted line.
Select regional cleaning mode in the application and then specify a cleaning area. The robot vacuum cleaner only cleans the selected area and then returns to the charging dock.
- Regional cleaning may only be started after the robot vacuum cleaner successfully creates a map.

Refer to the mobile application operation manual for detailed usage tips.
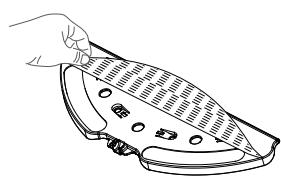
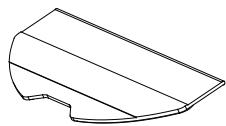
5.4 Operation of the mop

It is recommended to place the cushion against humidity in front of the charging station. It is designed to protect the sun from damage caused by damp vadrouille chiffon if the vadrouille appliance is not lifted when the damp cleaning is finished and when the product is charged.
| WARNING: Do not use the mopping mode on a carpet. |
| WARNING: Do not put bleach or detergent in the water tank. These chemicals may damage the liquid channels that ensure the water flow in the robot vacuum cleaner or the pump. |
| WARNING: Remove the mopping unit while the robot vacuum cleaner is being charged or when it is not operated. |
| WARNING: Remove the mopping unit immediately after the mopping operation is completed to prevent damage to your wooden floors. |
| WARNING: The robot vacuum cleaner cuts off the water automatically when mopping is paused or ended. However, the mop remains wet and thus it shall not be kept at this condition for a long period and removed without delay. |
5.4.1 Installation of the wet mopping unit

Remove the dust container and the water tank assembly (2 in 1).

Remove the dust container.

Remove the rubber plug and add water to the water tank from the water inlet.

Remove the swab on the mop retainer as it is shown.

Moisten the swab before each mopping.

Place the swab to the mop retainer.


Install the mop retainer to the dust container and the water tank assembly (two in one) in the direction of the arrow.
Install the dust container and the water tank assembly (two in one) to the appliance, their places in the direction of the arrow.
5.4.2 Wet mopping setting
You may start the cleaning operation by selecting the cleaning mode and set the level of wetness during mopping as desired in the application.
It is advised that you remove your carpets or you add a virtual wall (mop prohibited area) to the carpet area on the application in order to keep the vacuum cleaner away from the carpet to prevent the wetting of the carpet by the robot vacuum cleaner during the mopping operation.
6 Cleaning and maintenance
Turn off the appliance and unplug it before cleaning it.

WARNING: Never use gasoline, solvent, abrasive cleaners, metal objects or hard brushes to clean the appliance.
6.1 Cleaning the dust container and filters

You may call our call center to order a new filter when your filter reaches the end of its expected life, is deformed or needs to be replaced for a reason.

To achieve the maximum performance with EPA filter, clean it with a brush after each cleaning.
EPA filter is a replaceable accessory.
If you performed a cleaning operation in a space where there is construction dust and dust with very tiny particles, replace your filter with a new one in order not to experience a loss of performance.
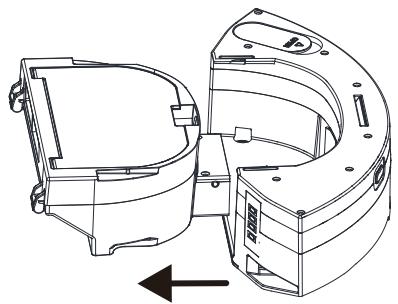
- Remove the dust container and the water tank assembly (2 in 1) by pressing the button as shown below.

6 Cleaning and maintenance
- Remove the dust container by pulling it in the direction of the arrow.
- Open the dust container as it is seen below and empty it as it is shown.

- Remove the high performance filter and clean the filter using the cleaning brush provided together with the appliance.


6 Cleaning and maintenance
- Wash the water tank, dust container and filter assembly periodically with cold water as required as per the frequency of operation.

- Leave the water tank, dust container and filter assembly to dry after washing, and ensure that they are completely dried.

Drying may take 24 to 48 hours.
- Assemble the water tank, dust container and filter assembly after drying them and then install the assembly to the vacuum cleaner.

WARNING: Do not operate the robot vacuum cleaner without installing the filter group. Otherwise, the appliance may get damaged.
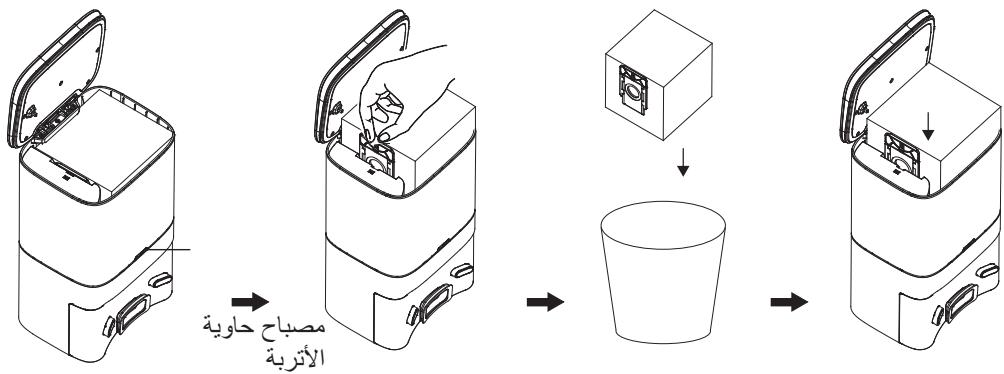
6.2 Replacing the dust bag
When the dust container is full, the indicator of the dust collection station flashes in red or a notification is displayed on the application. Replace the dust bag in a timely manner. When the dust bag is under normal operation, the white light on the dust collection station is illuminated stationally or flashes.
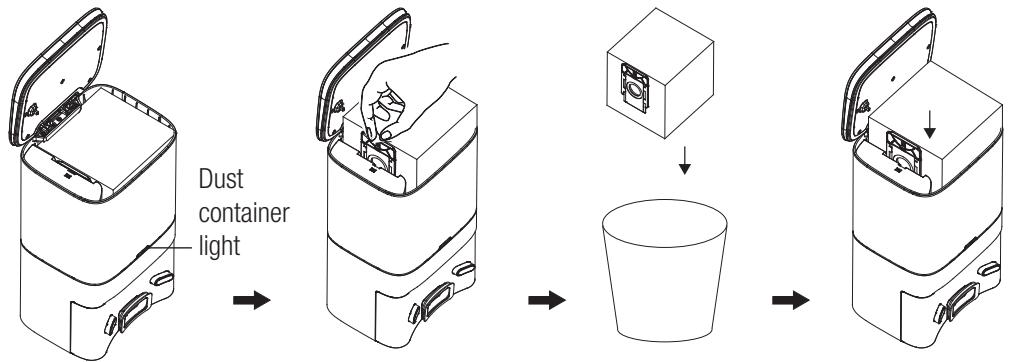
| Raise the upper cover. | Pull the handle of the dust bag upwards. | Discard the old dust bag | Install a new dust bag and close the upper cover. |
6 Cleaning and maintenance
| i | When the dust bag is not installed inside the station, automatic dust collection operation shall not be started when the robot vacuum cleaner returns to the station after the vacuuming operation. When a dust bag is not available, the dust inside the dust container shall be removed manually. |
| i | Make the provision of the dust bag in the charging stand from the authorized service. Incompatible and inappropriate bags that you will use in the charging stand of the robot vacuum cleaner may damage the charging stand and your robot vacuum cleaner. The damage and the reparations caused by the unoriginal dust bags which are used in the charging stand are not under warranty. |
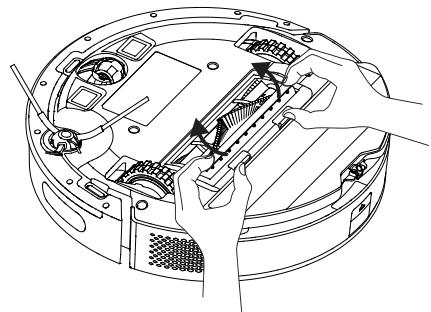
6.3 Cleaning of the brush
- Open the upper cover of the main brush by pressing on the tabs. Pull and remove the main roll upwards. Cut the hair lapped on the roller brush with the cutting and sharp side of the cleaning brush. Then clean the dusts on the roller brush with the bristles of the cleaning brush.

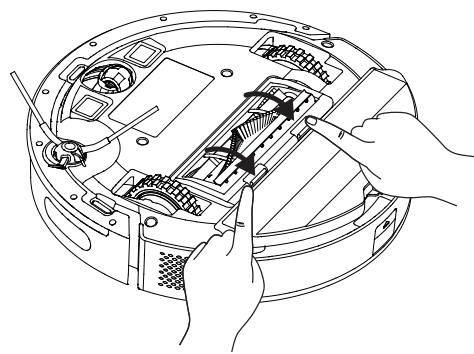
- Replace the brush after cleaning it and close the cover in the direction of the arrow.

6.4 Cleaning and installation of the side brush


In the long term use, wash the side brush with warm water in order to eliminate the shape deformation. Install it to the robot as it is shown after it has dried.
6.5 Cleaning of the sensors
Clean the sensors and charging pins/electrodes regularly and remove the dust using a dry and soft cloth or a cleaning brush.
Information: You get a notification via the application when sensor cleaning is required.


Fall prevention sensor
6.6 Cleaning of the mopping unit
We recommend that you remove the mop holder from one side, drain the water tank, rinse the mop with water and then leave it to dry after each operation of the mopping unit.
You may wash the mop in a washing machine.


General Error Conditions
| Failure | Cause and remedy |
| Cannot be operated | 1. Charging level is low. Place the robot vacuum cleaner to the charging dock or the dust collection station so that it shall be aligned with the charging poles. Bring the button on the left of the robot vacuum cleaner to position "l"; and the vacuum cleaner shall be operated automatically (When the robot vacuum cleaner is completely discharged, you shall need to charge for a while for automatic operation).2. The ambient temperature is very low (under 0 °C) or very high (above 50 °C). Please use the robot vacuum cleaner at an ambient temperature from 0 to 40 °C.3. Please ensure that the on/off button on the side of the robot vacuum cleaner is brought to position "l". |
| Battery not charging | 1. Please remove the robot vacuum cleaner and check if the indicator light on the charging dock or the dust collection station is illuminated and ensure that both ends of the power adaptor of the charging dock are connected.2. Loose contact. Please clean the spring contacts on the charging dock and the charging contacts on the robot vacuum cleaner.3. Please ensure that the on/off button on the side of the robot vacuum cleaner is brought to position "l". |
| Does not return to the dock/station for charging | 1. There are too many obstacles around the charging dock or the dust collection station. Please place the charging dock or the dust collection station to an area free of obstacles.2. The robot vacuum cleaner is too far away from the charging dock or the dust collection station. Bring the robot vacuum cleaner closer to the charging dock or the dust collection station and try again.3. Make sure that the charging stand station is plugged and there is energy. |
| Abnormal operation | Turn off and on again. |
| Operates with abnormal noise. | Foreign materials may have entered to the main brush, side brushes and the wheels. Please turn off the robot vacuum cleaner and clean it. |
| Cleaning performance is low / dust leaks | 1. Dust container is full. Please clean the dust container.2. Filter is clogged. Please clean or replace the filter.3. Foreign materials may have entered to the main brush. Please clean the main brush. |
7 Troubleshooting
| Cannot connect to the Wi-Fi network. | 1. Wi-Fi signal is weak. Make sure that the Wi-Fi signal in the location of the robot vacuum cleaner is strong. 2. There is a cutoff in Wi-Fi connection. Please reset Wi-Fi, download the latest mobile application and try again. 3. Password is not entered correctly. 4. The router used is a model that operates in 5G frequency band (this robot vacuum supports the 2.4G frequency band only). |
| Timed cleaning feature does not operate | Charging level is low. Timed cleaning can only be started when the charge level is higher than 20%. |
| The vacuum cleaner consumes power while it is in the charging dock | The vacuum cleaner consumes very little amount of power while it is in the charging dock or the dust collection station; this feature allows to keep the battery performance in the best level. |
| Automatic dust collection operation does not start after the robot vacuum cleaner returns to its charging dock and dust collection station. | 1. Make sure that the dust collection station and charging dock are powered on. When the vacuum cleaner returns to recharge after more than 5 minutes of cleaning, automatic dust collection is started; 2. Check if the cover of the dust collection station is closed or if it is closed properly (red light is illuminated if it is not properly closed); 3. Make sure that the dust bag is installed in the dust collection station (red light is illuminated if bag is not installed properly); 4. For a smooth dust collection performance, it is recommended to allow the vacuum cleaner to automatically return to charge after cleaning (placing the vacuum cleaner yourself in the dust collection station or charging dock will cause connection imbalance and thus affects dust collection performance); 5. Please regularly check whether the dust bag is full or not; otherwise, the dust bag will be overfilled and torn, the dust collection tube will be clogged, resulting in damage to the dust collection station and the charging dock; 6. If the problem continues although the solutions above are applied, contact the customer service. |
7 Troubleshooting
| The vacuum cleaner stops after the automatic dust collection operation starts and the dust collection performance is low. | 1. Check if the dust bag is full. Replace the dust bag if it is full; 2. The dust collection outlet of the vacuum cleaner's dust container is clogged with foreign material, causing the container compartment not to open; 3. Check for blockage on the air duct of the dust collection station; 4. The vacuum cleaner is moved during dust collection (Please do not move the vacuum cleaner during dust collection, otherwise damage may occur); 5. Water may have entered the vacuum cleaner's dust container, thus preventing the dust from being easily vacuumed. Please do not let the vacuum cleaner to vacuum water; otherwise, dust collection performance shall decrease. |
| The internal compartment where the dust bag is located in the dust collection station is dirty. | 1. Small dust particles may have passed through the dust bag and adhered to the inner wall of the dust container. Please check and clean these parts regularly; 2. The dust bag may be damaged. Please check and replace it if required; 3. Excessive accumulation of dirt in the interior affects the fan and air pressure sensor to a certain extent. It is recommended to regularly clean the accumulation of dirt in the interior compartment. |
Failure List
When the robot vacuum cleaner switches to the error position, the illuminated home button on the upper body starts to blink red and gives an audible warning. Follow the audible warning to resolve the fault.
| Audible Warning | Solution |
| Error 1: Battery error. Please refer to the manual or the application. | ·Battery temperature is very high or very low. Wait until the battery temperature reaches the normal values (0 °C~40 °C/32 °F~104 °F). |
| Error 2: Wheel error. Please refer to the manual or the application. | ·Please check for any foreign material stuck in the wheels and restart the vacuum cleaner. |
| Error 3: Side brush error. Please refer to the manual or the application. | ·Please check for any foreign material stuck in the side brush and restart the vacuum |
| Error 4: Main motor error. Please refer to the manual or the application. | ·Please check whether there is any foreign material stuck at the rear of the rotating brush (in the air flow path) and restart the vacuum cleaner. ·Please check the dust container and the filter, and restart the vacuum cleaner. |
7 Troubleshooting
| Error 5: Turbo brush error. Please refer to the manual or the application. | ·Please remove the rotating brush, and clean the connection part of the rotating brush, rotating brush cover and the dust nozzle. Restart the vacuum cleaner after cleaning. |
| Error 6: Water pump error. Please refer to the manual or the application. | ·Please clean the water tank and the water flow under the vacuum cleaner and check the mopping module. Please try to restart the vacuum cleaner after cleaning. |
| Error 7: Laser sensor error. Please refer to the manual or the application. | ·Please check for any foreign material inside the laser sensor, clean if required and restart the vacuum cleaner. |
| Error 9: Charging operation error. Please clean the charging contact area. | ·Please check for any contamination in the charging area and clean the charging poles. |
| Error 10: Software error. Please turn off and restart again. | ·Please bring the main button to position O and back to position I and restart the vacuum cleaner |
| Error 12: Abnormal operation. Please make sure that the main button is turned on. | ·Please bring the main button to on position initially |
Cher/Chere client(e),
aill aiey lgl jg aunjll o jll cwlw auiy iie biaally aunjll o w jll gall clll qil.1 1


aullolgclgllglgllglll 2
J 15.5


Lalai psszj 105g. (Jusell 1 g j j j j j j j j j j j j j j j j j
48 24 no aill aacg j

Aii jySll Aaiiokall gacgazal 2j pgsiajz jilall acgaoa yjglal agolall jj gzz.7
e g o 5 k j n nn nnnn nnnn nnnn nnnn nnnn nnnn nnnn nnnn nnnn nnnn nnnn nnnn nnnn nnnn nnnn nnnn nnnn nnnn nnnn nnnn nnnn nnnn nnnn nnnn nnnn nnnn nnnn nnnn nnnn nnnn nnnn nnnn nnnn nnnn
. 1

6.2
a 1
J 1
4.2.1.5 1
S OBC = S COD + S_ BOC
y j 1
.2

.2a 3

a a a a a a a a a a a a a a a a a a a a a a a a a
jill
Cie 10gall aalall jj .

Jus Jus Jus Jus Jus Jus

a a a a a a a a a a a a a a a a a a a

y j 1 y
i 1
AES/CCMP, PSK, TKIP, WPA2, WPA
5.3.2
1
1
Jjiall abjz elw jy y. alg y a bll y y. a bll Jnna g 1e LJJ jiall abjz elu d Jy jy elw y . jall jaii jaiy jy S wikkly ajiit aie Jc lil jaiy jall ajiit
aJ 1
1000000000000000000000000000000000000000
aBjy jll aai i 1
bubisoll o1o!g gall yoi o1o! -
a a a a a a a a a a a a a a a a a a a
1
20% 20% 20% 20% 20% 20% 20%
jouill 25 le
:Wi-Fi
(1)
(AuAaJ)VPN
IPv4,802.11b/g/n Wi-Fi
a 2.4 2 jj j j j j j j
5 5 5 5 5 5 5 5 5 5 5 5 5 5 5 5 5 5 5 5 5 5 5 5 5 5 5 5 5 5 5 5 5 5 5
2.4/5 24/5 Wi-Fi 48000000000000000000000000000000000000000000
jill jll jilbi jilj lki J. Wi-Fi 2.4
.1a.y1 JaiS1 iie
J [(0y 1111111111111111111111111111] SSID] aI 1 1 1 1 1 1 1 1 1 1 1 1 1 1 1 1 1 1 1 1 1 1 1
2.4 2y 4y 4y 4y
ssssssssssssssssssssssssssssssssssssssssssssssssssssssssssssssssssssssssssssssssssssss
J
Wi-Fi 4560Julai jus
:abilln 2y alal blll lal (blllall y jgall
A
Aul
4
aaii aaiiaai i aaii aaii aaii aaii aaii aaii aaii aaii aaii aaii aaii aaii aaii aaii aaii aaii aaii aaii aaii aaii aaii aaii aaii aaii aaii aaii aaii aaii aaii aaii aaii aaii aaii aaii
.
a 10 a 11 a 12 a 13 a 14 a 15 a 16 a 17 a 18 a 19 a 20 a 21 a 22 a 23 a 24 a 25 a 26 a 27 a 28 a 29 a 30 a 31 a 32 a 33 a 34 a 35 a 36 a 37 a 38 a 39 a 40 a 41 a 42 a 43 a 44 a 45 a 46 a 47 a 48 a 49 a 50 a 51 a 52 a 53 a 54 a 55 a 56 a 57 a 58 a 59 a 60 a
A
pili bia 1
aill 1111111111111111111111111111111111
. 5
aill bia 15 1 1 1
gabill alldiy 5.3.1
J 1
J 1
alao CioIogles Gc Ugall Ugall
Wi-Fi
. 1
j_L = ( 1 - y)
.
WiiFi 50
JyI 1
1
i !
Lg 1
aill aikll jai .i i 1 1 1 1 1 1 1 1 1 1 1 1 1 1 1 1 1 1 1 1 1 1 1 1 1 1 1 1 1
aill lai 12 gian sle Lilati ygll aikall gai: ilall jaii
gi gali "m" jll lc biaic laie d gai llalili ci gll aikll gai: gail iaii
"1111 1111 1111 1111 1111 1111 1111 1111 1111 1111 1111 1111 11
baili
.15x1.5 1.5 x 1.5

a baiill aaiii lalac Jlki Sic g. ay jil 100000000000000000000000000000000000000000000000000000000000000000000000000
J 2
aaii 3 3

1 15


5.3
11 11 11 11 11 11 11 11 11 11 11 11 11 11 11 11 11 11 11 11 11 11 11 11 11 11 11 11 11 11 11 11 11 11 000000000000000000000000000000000000000000000000000000000000000000000000000000000
a
aikai jia cali iie g jialil lgliiill g jiai i 1"0" jll gl bc i
jua a jy jia jia jia jia jia jia jia jia jia jia jia jia jia jia jia jia jia jia jia jia jia jia jia jia jia jia jia jia jia jia jia jia jia jia jia jia jia jia jia jia jia jia jia jia jia jia jia jia jia jia j
j j 15 15

g j 1


ailln m 11 11 11 11 11 11 11 11 11 11 11 11 11 11

a 20 aalwll g wawll w waiu waii.
a 20 aaii j 20 aaii j i j
CE J aalbll
a#
g 2.1


(204 1

aalal aalal aalal aalal aalal
Cuaall o1s Cuaall ulas aea

iiill gilg g dnill (jlaia
aaiy
a + b = 1
aaiiaaiiie
i 1
.0000
1
Jgill jbj Jd
ME1XXFG
aclll 1 Cm 3200
b
1 111111111111111
J 1 J 1 J 1 J 1 J 1 J 1 J 1 J 1 J 1 J 1 J 1 J 1 J 1 J 1 J 1 J 1 J 1 J 1 J 1 J 1 J 1 J 1 J 1 J 1 J 1 J 1 J 1 J 1 J 1 J 1 J 1 J 1 J 1 J 1
gale 20 y! jge 10 iuiy
b00 jge 20 ggi
J 1
Iaia I aia I aia I aia I aia I aia I aia I aia I aia I aia I aia I aia I aia I aia I aia I aia I aia I aia I aia I aia I aia I aia I aia I aia I aia I aia I aia I aia I aia I aia I aia I aia I aia I aia I a ia I aia I aia I aia I aia I aia I aia I aia I aia I aia I aia I aia I aia I aia I aia I aia I aia I aia I aia I aia I aia I aia I aia I aia I aia I aia I aia I aia I aia I aia I aia I aia I aia I aia
Jg 1
JbIyI yIy IyIyIyIyIyIyIyIyIyIyIyIyIyIyIyIyIyIyIyIyIyIyIyIyIyIyIyIyIyIyIyIyIyIyIyIyIyIyIyIyIyIyIyIyIyIyIyIyIyIyIy
Jie 1
jol jol jol jol jol jol jol jol jol jol jol jol jol jol jol jol jol jol jol jol jol jol jol jol jol jol jol jol jol jol jol jol jol jol jol jol jol jol jol jol jol jol jol jol jol jol jol jol
1
.
jz jz jz jz jz jz jz -
aJ11 JJIaIg - 1 g aJg Jjll g Jdlaill 2 jil -
aJ 1
JbI Jgl Ii Igill - 1
A 与 B 重合
jiee
jie 1
.8JgJg
juiu pi duiwu L jieji
.
j 元一次不等式
Jybi sluji jgljui
g j 1
.
auii iic jieai wali y
.
jglll Jlslil lll
S ABC = S ABC + S_ CBA
Jiuiu uaiiaolalgaiy
J 15 JJI JIJI JIJI JIJI JIJI JIJI
A
.
i 1
yblnnoaiaa
i j 1 1 1 1 1 1 1 1
| S_四边形 | = 12 · AC · PD
.
aaleal aeXw1 1.1
A
Jn jIe J 1s p
J 8 Jb
aagaae aee
J 1
j 1
jll jilipd lo
jblal jI Jllo
j 1
i11111111111111
aBwJy Jn Dzwiwlly abgial
J 1
sll j5 1jgl Jaaui
.
.
04-29
4
i 1 i 1 1 1 1 1 1 1 1 1 1 1 1 1 1 1 1 1 1 1 1 1 1 1 1 1 1 1 1 1 1 1 1 1 1 1 1
1
j000
jaii jai iuiu

j 1

a


a

VRR 94314 VB
AR