RealishotWP8000 - Digital Camera DARTY - Free user manual and instructions
Find the device manual for free RealishotWP8000 DARTY in PDF.
User questions about RealishotWP8000 DARTY
0 question about this device. Answer the ones you know or ask your own.
Ask a new question about this device
Download the instructions for your Digital Camera in PDF format for free! Find your manual RealishotWP8000 - DARTY and take your electronic device back in hand. On this page are published all the documents necessary for the use of your device. RealishotWP8000 by DARTY.
USER MANUAL RealishotWP8000 DARTY
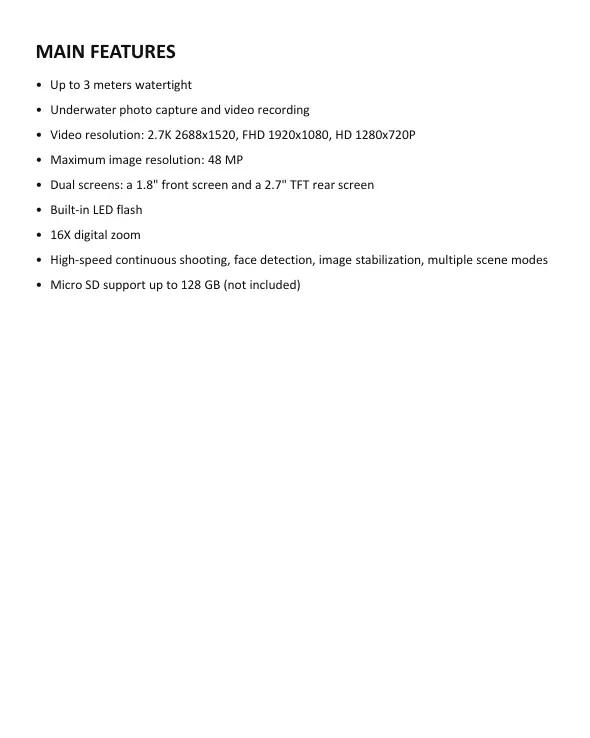
- Up to 3 meters watertight
- Underwater photo capture and video recording
Video resolution: 2.7K 2688x1520, FHD 1920x1080, HD 1280x720P
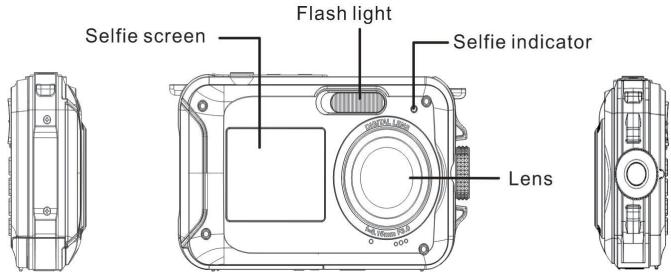
Maximum image resolution: 48 MP - Dual screens: a 1.8" front screen and a 2.7" TFT rear screen
Built-in LED flash
16X digital zoom - High-speed continuous shooting, face detection, image stabilization, multiple scene modes
- Micro SD support up to 128 GB (not included)
PREPARATION BEFORE USE:
Lithium battery installation
Please install the lithium battery supplied with the camera before using it according to the following instructions.
- Slide the battery cover on the bottom of the camera to the left to access the battery compartment:
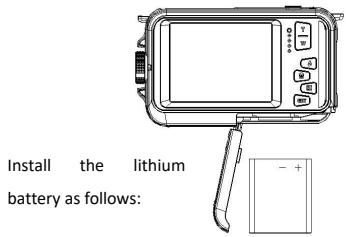
- Install the battery in the correct polarity.
- Then close the battery cover and slide it to the left to lock it in place.
Note: Please remove the battery if you are not going to use the camera for a while.
Lithium battery charging
To recharge the lithium battery, simply connect the camera (without removing the battery) to your computer using the USB cable provided in the box. The red LED on the back of the camera will light up to indicate that the battery is being charged, and will turn off when fully charged. You can also charge the lithium battery by connecting the camera to AC power if you have an adapter to which you can connect the USB cable.
Computer system requirements - Windows 7/XP3
If you want to transfer photos and videos to a Windows 7/XP3 computer, the computer must be set up as follows:
- Pentium processor compatible with Windows 7/XP3 or higher
RAM of at least 128 MB with at least 150 MB of available disk space - Compatible USB interface
- Recommended screen resolution: 1024 × 768 pixels or more / 16-bit color or more
Computer system requirements - Windows Vista
If you want to transfer photos and videos to a Windows Vista computer, the computer must be set up as follows:
- 800 MHz processor and 512 MB RAM
- 20 GB hard disk with at least 16 GB available space
Super VGA Graphics Array Support - Compatible USB interface
Computer system requirements - Macintosh
If you want to transfer photos and videos to a Mac computer, the computer must be set up as follows:
- Macintosh G3 500 MHz processor or higher
Mac OS X or 10.5.X or earlier versions
RAM of at least 256 MB or more with at least 150 MB of available disk space - Recommended screen resolution: 800 × 600 pixels or more

Icons:
Battery charging

Fully charge battery

Medium charged battery

Low battery
Quality

Common

Fine

Super Fine
Flash

Flash on

Auto flash

Flash off
Mode

Photo

Video

Playback
Self-timer

Self-timer 10s

Self-timer 5s

Self-timer 2s

Self-timer off
Digital zoom


Protection

Protection on
Anti-shake

Anti-shake on

Anti-Shake off
Scenes

Auto

Scenery

Portrait

Night scenery

Night portrait

High sensitivity

Sport

Beach

Party
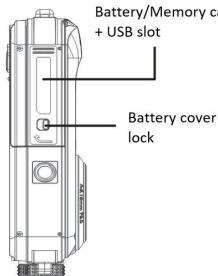
Memory card installation
The camera supports micro SD memory cards up to 128 GB (not included). The internal memory of the camera can only store one photo for test purposes. It is necessary to insert a micro SD card into the micro SD card slot before using the camera, which is located below the lithium battery slot. Make sure that it is inserted correctly by gently sliding it into the slot until it clicks into place to confirm that it is locked. A micro SD card icon will appear on LCD screen to indicate that the camera has detected the micro SD card. To remove the card, simply press it firmly and the card will eject itself from the slot.
Note:
- All photos and videos will be saved to the micro SD card once it is installed.
- Formatting will delete all data stored on the memory card.
- Do not remove the micro SD card during formatting as this may damage the card.
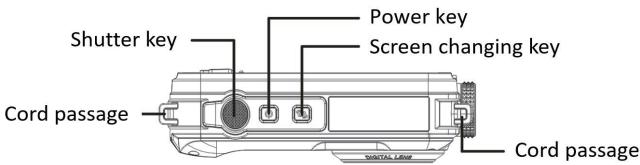
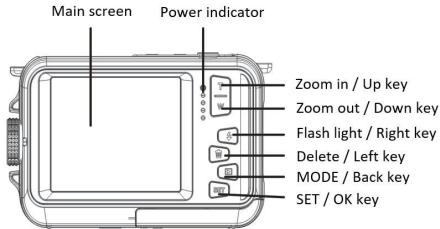
- Turning on the camera
Press the power key on the top of the camera to turn it on. The LCD screen will then turn on to confirm that it is working.
- Turning off the camera
Press the power key again to turn off the camera. When the battery power level is insufficient, the camera will display a red icon on LCD screen and automatically turn off after a few seconds.
PHOTO MODE:
Once the camera is turned on, the icon will appear on LCD screen indicating that the photo mode is activated.
- Switching between screens
To switch from the front screen to the rear screen, press the screen change key next to the power key. Each press will alternately activate the 1.8'' front screen and the 2.7'' rear screen.
- Photo shooting
To take a picture, simply press the shutter key on the top of the camera. It then takes a few seconds to record the photo on the memory card. After each image capture, the number
displayed on the screen indicates how many more photos you can take based on the current settings and the size of the memory card inserted in the camera. A message appears on the screen when the memory card is full. To continue, you need to transfer all data on the memory card to your computer or insert a new memory card.
Digital zoom
You can enlarge the object up to 16 times with the digital zoom. Press the (T) key to zoom in and press the (W) key to zoom out. The icon W T will be displayed on LCD screen.

Photo mode settings:
The camera has 18 settings that can be adjusted to improve shooting: Flash, Scenes, Image resolution, Anti-Shake, Face detection, Continuous shooting, Self-timer, EV, ISO, White balance, Sharpness, Quality, Effects, auto power off, Sound, Date/Time, Frequency, Memory card formatting.
- Press the SET key.
- Press the Up/ Down keys to select the setting to be changed.
Built-in flash
Press the Flash key on the back of the camera to activate the three flash modes. To activate Auto Flash, select the icon A ; it should turn on automatically if the shooting brightness is low.
If you select the icon , you activate the flash manually, so it remains active until you turn it off. Finally turn the Flash off by selecting the icon ⑤
- Scenes
The camera has a multiple choice of scenes to adapt the shooting to the environment where you are: Auto / Scenery / Portrait / Night scenery / Night portrait / High sensitivity / Sport / Beach / Party.
Press the power key to turn on the camera, the icon will be displayed in the upper left corner of the LCD screen.
- Press the SET key.
- Press the Left / Right keys to select the icon

- Press the Up / Down keys to select the scene you need.
- Press the SET key again to confirm.
- Image resolution selection
- Press the SET key.
- Press the Left / Right keys to select the icon MP
- Press the Up / Down keys to select from the following image resolutions: (48M) 8000x6000, (30M) 6400x4800, (24M) 5600x4200, (20M) 5200x3900, (16M) 4608x3456, (12M) 4000x3000, (8M) 3264x2448, (7MHD) 3648x2048, (5M) 2592x1944, (3M) 2048x1536, (2MHD) 1920x1080.
- Press the SET key to confirm your selection.
- The selected resolution will appear as an icon on LCD screen.
Image quality
This function allows you to adjust the overall quality of your photo.
- Press the SET key.
- Press the Left / Right keys to select Image quality.
- Press the Up / Down keys to select: Normal / Fine / Super fine.
- Press the SET key again to confirm your selection.
- The icon corresponding to the selected quality will then be displayed on the LCD screen.
Self-timer
When the self-timer is on, the picture is taken a few seconds after the shutter key is pressed. Ideal for group shots, we recommend you to use a tripod or to place the camera on a stable surface if you wish to use the self-timer.
- Press the SET key.
- Press the Left / Right keys to select the icon
- Press the Up / Down keys to select a duration: 2 sec. / 5 sec. / 10 sec. / Off.
- Press the SET key again to confirm.
- The icon corresponding to the selected self-timer time will then be displayed on the LCD screen.
Note: This function switches off automatically after each use.
Anti-shake
This setting allows you to stabilize shooting to avoid taking blurry pictures:
- Press the SET key.
- Press the Left / Right keys to select the icon
- Press the Up / Down keys to choose: On / Off.
- Press the SET key again to confirm.
- The icon will be displayed on LCD screen to indicate that the Anti-Shake is activated.
Face detection
Activate face detection as follows:
- Press the SET key.
- Press the Left / Right keys to select the icon
- Press the Up / Down keys to choose: On / Off.
- Press the SET key again to confirm.
Continuous shooting
With this setting, you can take up to 6 pictures in quick succession (VGA image size only) after pressing the shutter key once.
- Press the SET key.
- Press the Left / Right keys to select the icon
- Press the Up / Down keys to choose: On / Off.
- Press the SET key again to confirm.
Note:
When you activate this setting, the image resolution automatically switches to VGA. If it has been changed, the message "Continue without continuous shooting" will be displayed on the screen to remind you that this function is only available when the image size is VGA.
White balance
This setting allows you to modify the color of your photos according to the light source.
- Press the SET key.
- Press the Left / Right keys to select White balance.
- Press the Up / Down keys to select: Auto / Daylight / Cloudy / Fluorescent / Incandescent.
- Press the SET key again to confirm your selection.
Color effect
This parameter allows you to give a fancy effect to your photos by changing their color.
- Press the SET key.
- Press the Left / Right keys to select Color effect.
- Press the Up / Down keys to select: Standard / Sepia / Monochrome / Vivid.
- Press the SET key again to confirm your selection.
Sharpness
This setting allows you to adjust the sharpness of the photo so that the image edges are clearer or more precise.
- Press the SET key.
- Press the Left / Right keys to select Sharpness.
- Press the Up / Down keys to select: Sharp / Common / Soft.
- Press the SET key again to confirm your selection.
Exposure
This setting allows you to adjust the brightness of your photos.
- Press the SET key.
- Press the Left / Right keys to select Exposure (EV).
- Press the Up / Down keys to select an exposure value from +3 to -3.
- Press the SET key again to confirm your selection.
- The exposure icon will then be displayed on the LCD screen.
ISO
It is better to activate this setting if the shooting brightness is low and flash using is not possible.
- Press the SET key.
- Press the Left / Right keys to select ISO.
3 Press the Up / Down keys to select an ISO value: Auto / 100 / 200 / 400. - Press the SET key again to confirm your selection.
- The ISO icon will then be displayed on the LCD screen.
- Metering
This setting allows you to adjust the metering point.
- Press the SET key.
- Press the Left / Right keys to select Metering.
- Press the Up / Down keys to select: Center / Multi / Spot.
- Press the SET key again to confirm.
Language
The camera supports many languages.
- Press the SET key.
- Press the Left / Right keys to select Language.
- Press the Up / Down keys to select your language.
- Press the SET key again to confirm.
Date/Time
This setting allows you to set system date and time that will be displayed on the photos if you turn it on.
- Press the SET key.
- Press the Left / Right keys to select Date/Time.
- Press the Up / Down keys to select: On - to display the date on the photo when you download it to your computer / Off - no date on the photos / Date Setup - to set the system date.
-
If you select Date Setup:
-
Press SET key to enter the Date Setup menu.
- Press Left / Right keys to select the highlighted Year / Month / Date / Hour / Minute / Second / AM.
-
Press Up / Down keys to set up the precise date and time.
-
Press the SET key again to confirm your selection.
- Silent mode
This setting allows you to turn the sound of the camera on or off.
- Press the SET key.
- Press the Left / Right keys to select Silent mode.
- Press the Up / Down keys to choose: On / Off.
- Press the SET key again to confirm your selection.
- Auto power off
The default setting for camera auto power off is 3 minutes, to change it, simply follow the steps below:
- Press the SET key.
- Press the Left / Right keys to select Auto power off.
- Press the Up / Down keys to select a duration: 1 min / 3 min / 5 min / Disable.
- Press the SET key again to confirm your selection.
Note: If this setting is disabled, the camera will not turn off until the battery is completely discharged or it is manually turned off.
Frequency
- Press the SET key.
- Press the Left / Right keys to select Frequency.
- Press the Up / Down keys to select: 50Hz / 60Hz
- Press the SET key again to confirm your selection.
- Format memory card
This option will format the memory card and erase all photos and videos stored on it including protected files.
- Press the SET key.
- Press the Left / Right keys to select Format memory card.
- Press the Up / Down keys to select: Yes / No.
- If you select No, press the SET key to confirm. The camera will return to photo mode.
- Otherwise select Yes and then press the SET key to confirm the start of formatting.
Note: Please be careful with formatting. Once the memory card is formatted, all files stored on it will be permanently deleted. It is highly recommended that you transfer all your photos and movies or other important files to your computer before formatting.
Default setting
This setting allows you to reset your camera settings back to the factory defaults values.
- Press the SET key.
- Press the Left / Right keys to select Default setting.
- Press the SET key to enter the submenu.
-
Press the Up / Down keys to select: Yes / No.
-
If you select No, press the SET key to confirm. The camera will return to photo mode.
- Otherwise press Yes and then press the SET key to restore the default settings.
Note: All settings previously defined will be lost unless they are defaults settings.
Press the MODE key to select the video recording mode and then press the shutter key to start video recording. The video icon will be displayed in the upper left corner of the LCD screen and the elapsed recording time in the upper right corner. The flashing red dot will also appear on the screen to indicate that video recording is in progress.
Note:
- You will then be able to view your video via the camera playback mode.
Each video file is saved in AVI format. - If you reach the maximum video recording time of 29 minutes, the camera will turn off automatically. In this case, just restart it by pressing the power key again.
> PLAYBACK MODE:
With the playback mode, you can view the photos and videos stored on the memory card. You can also rotate, protect, delete, print and start a slideshow of your photos. To switch on it, press the MODE key and an icon will appear on the LCD screen to indicate that the playback mode is activated.
Note:
- No files will appear on the LCD screen if there are no photos or videos stored on the memory card.
- Please set your video recording settings in video recording mode.
- Slide show playback
You can choose how long each photo will be displayed on the screen when using slideshow viewing.
- Press the SET key.
- Press the Left / Right keys to select Slide show.
- Press the Up / Down keys to select the viewing time for each photo: 3 sec / 5 sec / 10 sec.
- Press the SET key to confirm your selection and launch the slideshow of your photos.
Playback mode functions:
First select a photo to rotate, protect, delete or print.
- Delete
You can delete unwanted photos and videos to gain more memory. You can do this file by file or delete all unprotected photos and movies stored on the memory card. In photo/video recording mode, press the Delete key (or Left one) to delete the last photo/video.
In playback mode, please follow the steps below:
- Press the Left / Right keys to select a file.
- Press the SET key.
- Press the Left / Right keys to select Delete.
- Press the Up / Down keys to select: Delete this photo? / Delete all images? / Cancel.
- Press the SET key again to confirm.
- Press the Up / Down keys to choose: Yes / No.
- If you select No, press the SET key to confirm and the camera will return to playback mode.
- Otherwise select Yes and then press the SET key to confirm the deletion.
- Rotate
This function allows you to rotate photos.
- Press the Left / Right keys to select a file.
- Press the SET key.
- Press the Left / Right keys to select a photo and press the SET key.
- Press the Left / Right keys to select a rotation angle or cancel the change: 90^ / 180^ / 270^ / Cancel.
- Press the SET key again to confirm the rotation.
Note: The message "Saving" will appear on the LCD screen after pressing the SET key.
- Protect/Lock
You can protect your photos/videos from accidental deletion.
- Press the Left / Right keys to select a file.
- Press the SET key.
- Press the Left / Right keys to select Protect/Lock.
-
Press the Up / Down keys to choose: Lock this photo / Unlock this photo / Lock all images / Unlock all images.
-
Press the SET key again to confirm.
- When you view photos or videos, a lock icon will be displayed on the screen for each protected file.
Photos can be printed using any printer with the PictBridge function:
- Press the Left / Right keys to select the photo you want to print.
- Press the SET key.
- Press the Left / Right keys to select the print icon
- Press the Up / Down keys to select: Print / Cancel.
- Press the SET key again to confirm your choice.
- If wireless printing fails, please connect the camera to your printer via the USB cable.
Video files playing
Select the AVI video file you want to play back and press the shutter key to play it back. To pause, press the shutter key again.
Uploading photos and videos on your computer
- Turn on the camera.
- Select the playback mode.
- Then connect the camera to your computer with the supplied USB cable.
- The actions window of the removable disk corresponding to the camera will appear on your computer screen.
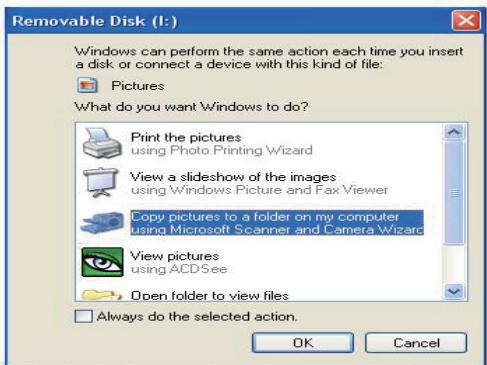
- Click on "Open folder to view files", the pictures will be stored in the DCIM subfolder.
- Finally, you can copy and paste the photos you want into the folder of your choice on your computer.
| Sensor | CMOS SONY |
| Photo resolution | (48M) 8000x6000, (30M) 6400x4800, (24M) 5600x4200, (20M) 5200x3900, (16M) 4608x3456, (12M) 4000x3000, (8M) 3264x2448, (7MHD) 3648x2048, (5M) 2592x1944, (3M) 2048x1536, (2MHD) 1920x1080 |
| Video resolution | 2.7K 2688X1520, FHD1920x1080, HD1280x720P |
| Dual screens | 2.7" back screen, 1.8" front screen |
| Intern memory | Micro SD card max. up to 128 GB (not included) |
| Digital zoom | 16X |
| EV | -3~+3 |
| White balance | Auto/Sunny/Cloudy/Fluorescent/Incandescent |
| Scenes | Auto/Scenery/Portrait/Night Scenery/Night Portrait/ High Sensitivity/Sport/Beach/Party |
| ISO | Auto/100/200/400 |
| Self-timer | 2s/5s/10s |
| File format | JPEG (photo)/AVI (video) |
| Anti-shake | YES |
| Flash | Auto/Flash on/Flash off |
| Print support | YES |
| Face detection | YES |
| Continuous shooting | YES |
| Microphone | Built-in |
| USB slot | 2.0 |
| Battery | Lithium |
| Working temperature | 0-40°C |
COMMON PROBLEMS AND SOLUTIONS
Q: I took pictures but my computer doesn't recognize my camera. What should I do?
A: First of all, make sure you took photos. Take a few photos as a test, and then try downloading them to your computer by connecting the camera to it via the USB charging cable. Alternatively, you can insert the memory card directly into your computer card slot if your computer has one, or use an external card slot that can be connected to your computer USB port. Also check that your computer has the minimum requirements as indicated at the beginning of this instruction manual.
Q: How to be sure that I haven't missed any important photos?
A: As all photos are stored on the micro SD card inserted in your camera, make sure there is always enough space on the card for you to take pictures. It is recommended that you regularly transfer the files stored on the memory card to your PC to free up more memory.
Q: Will the camera work normally if I use the MAC system?
A: The camera can also be used as a removable disk on Mac OSX (version 10.5.x or higher).
PRINCIPALES CARACTERISTIQUES
Fully charge battery

Medium charged battery

Low battery
Qualität

Common

Fein

Superfein
Blitzlicht

Blitz EIN

Auto Blitz

Blitz AUS
Mode

Photo

Video

Playback
Selbstausloser

Selbstausloser 10S

Selbstausloser 5S

Selbstausloser 2S

Selbstausloser AUS
Digitaler Zoom


Schützen

Schützen
Anti-shake

Anti-shake EIN

Anti-shake AUS
Szenen

Auto

Szenerie

Portrait

Nachtszenerie

Nachtportrait

Hohe Sensitivitat

Sport

Strand

Party
(48M) 8000x6000, (30M) 6400x4800, (24M) 5600x4200, (20M) 5200x3900,
(16M) 4608x3456, (12M) 4000x3000, (8M) 3264x2448, (7MHD) 3648x2048,
(5M) 2592x1944, (3M) 2048x1536, (2MHD) 1920x1080
When the self-timer is on, the picture is taken a few seconds after the shutter key is pressed. Ideal for group shots, we recommend you to use a tripod or to place the camera on a stable surface if you wish to use the self-timer.
This parameter allows you to give a fancy effect to your photos by changing their color.
This setting allows you to adjust the sharpness of the photo so that the image edges are clearer or more precise.
- Press the SET key.
- Press the Left / Right keys to select Sharpness.
- Press the Up / Down keys to select: Sharp / Common / Soft.
- Press the SET key again to confirm your selection.
Belichtung
Optionen (in Sekunden): 3s/5s/10s

Notice of compliance for the European Union:
products bearing the CE mark comply with the applicable European directives and associated harmonised European standards.
Disposal of waste equipment by users in the European Union:
this symbol means that according to local laws and regulations, it is prohibited to dispose of this product with household waste. Instead, it is your responsibility to protect the environment and human health by handing over your used device to a designated collection point for the recycling of waste electrical and electronic equipment. For more information about where you can drop off your waste equipment for recycling, please contact your local city office, your household waste disposal service or the shop where you purchased the product.
After sales service / service après vente / Kundendienst /的服务 postventa /service pós vendita /servizio post vendita /servico pós vendita /servis posprzedaowy /poprodejni servisi /ertekesités utani szolgaltatas / Dienst na verkoop /noclenpodaanhoe 06cnykubane:
@: aftersaleservice@gtcompany.fr
+33 (0) 1.85.49.10.26
Product manufactured for and distributed by:
GT COMPANY - 5 rue de la Galmy - 77700 Chessy - France - +33 (0) 1.61.10.09.25 - www.gtcompany.fr
AgfaPhoto is used under license of Agfa-Gevaert NV. For this product a sublicense has been granted by AgfaPhoto Holding GmbH (www.agfaphoto.com). Neither Agfa-Gevaert NV nor AgfaPhoto Holding GmbH manufacture this product or provide any product warranty or support. For service, support and warranty information, Contact the distributor or manufacturer.