
TDW4316SL - Dishwasher PROLINE - Free user manual and instructions
Find the device manual for free TDW4316SL PROLINE in PDF.
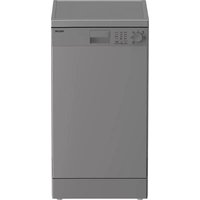
| Product type | Freestanding dishwasher |
| Brand | PROLINE |
| Model | TDW4316SL |
| Capacity | 16 place settings |
| Dimensions (H x W x D) | 85 x 60 x 60 cm |
| Power supply voltage | 220-240 V ~ 50 Hz |
| Rated power | 1828 - 2158 W |
| Admissible water pressure | 0.04 - 1 MPa |
| Water consumption (eco program) | 9.0 L per cycle |
| Energy consumption (eco program) | 0.559 kWh per cycle |
| Eco program duration | 4 h 40 min |
| Energy efficiency class | A |
| Noise level | 43 dB(A) – Class B |
| Wash programs | Auto, Hygiene, ECO, 90 min, 58 min, Express, Soak, Self-cleaning |
| Options | Intensive wash, Turbo+ Speed, Extra drying, Delayed start (1-24h), Auto open, Spray arm selection (upper/lower) |
| Child safety | Yes (button lock) |
| Installation type | Freestanding |
| Water softener | Adjustable, 6 levels (H1 to H6) |
| Filters | Coarse debris filter, fine filter |
| Warranty | 24 months |
| Spare parts | Available within 15 working days |
Frequently Asked Questions - TDW4316SL PROLINE
User questions about TDW4316SL PROLINE
0 question about this device. Answer the ones you know or ask your own.
Ask a new question about this device
Download the instructions for your Dishwasher in PDF format for free! Find your manual TDW4316SL - PROLINE and take your electronic device back in hand. On this page are published all the documents necessary for the use of your device. TDW4316SL by PROLINE.
USER MANUAL TDW4316SL PROLINE
https://eprel.ec.europa.eu/screen/product/dishwashers2019/1608230

SERVICE DE RÉPARATION ET PIEÇES DE RECHANGE
https://eprel.ec.europa.eu/screen/product/dishwashers2019/1608230

SERVICE VOOR REPARATIES EN RESERVEONDERDELEN
IMPORTANT SAFETY INSTRUCTIONS. 2
PRODUCT OVERVIEW 5
BEFORE INSTALLING YOUR DISHWASHER. 7
INSTALLATION INSTRUCTIONS 7
BEFORE LOADING THE BASKETS 9
LOADING THE DISHWASHER. 9
ADJUSTING THE UPPER BASKET 12
FOLDING THE CUP RACK. 12
FOLDING SPIKES 12
USING THE WATER SOFTENER. 12
USING THE RINSE AND DETERGENT DISPENSERS 14
WASHING PROGRAMS 16
STARTING A WASH CYCLE 18
CLEANING AND MAINTENANCE 20
TROUBLESHOOTING 24
SPECIFICATIONS. 26
PRODUCT INFORMATION SHEET 27
REPAIR AND SPARE PARTS SERVICE 28
DISPOSAL 29
PLEASE READ THE FOLLOWING SAFETY WARNINGS AND THE INSTRUCTIONS CAREFULLY BEFORE USING THE APPLIANCE AND KEEP FOR FUTURE REFERENCE.
Warnings
-
This appliance is intended to be used in household and similar applications such as:
-
staff kitchen areas in shops, offices and other working environments;
-
farm houses;
-
by clients in hotels, motels and other residential type environments;
-
bed and breakfast type environments.
-
If the supply cord is damaged, it must be replaced by the manufacturer, its service agent or similarly qualified persons in order to avoid a hazard.
- This appliance can be used by children aged from 8 years and above and persons with reduced physical, sensory or mental capabilities or lack of experience and knowledge if they have been given supervision or instruction concerning use of the appliance in a safe way and understand the hazards involved.
Children shall not play with the appliance.
Cleaning and user maintenance shall not be made by children without supervision.
- Regarding the instructions for the method and frequency of cleaning, refer to the section "Cleaning and Maintenance" in pages 22-25.
- The openings must not be obstructed by a carpet.
- The new hose-sets supplied with the appliance are to be used; old hose-sets should not be reused.
- The maximum number of place settings to be washed by this dishwasher is 16 place settings.
- The door should not be left in the open position since this could present a tripping hazard.
- Regarding the detailed instructions on how to load the dishwasher, refer to the section "Loading the upper and lower baskets" in pages 10-11.
- WARNING: Knives and other utensils with sharp points must be loaded in the basket with their points down or placed in a horizontal position.
- The minimum permissible inlet water pressure is 0.04MPa . The maximum permissible inlet water pressure is 1MPa .
- The plug must be remained easily accessible after installation of the appliance.
Safety Precautions
- Installation and repair can only be carried out by a qualified technician.
- This appliance is for indoor household use only.
-
To protect against the risk of electrical shock, do not immerse the appliance, cord or plug in water or any other liquid.
-
Turn off and unplug the appliance before cleaning and performing maintenance.
- Do not sit on, or stand on the door or dish rack of the dishwasher.
- Do not operate your dishwasher unless all enclosure panels are properly in place.
- Carefully open the door when the dishwasher is operating because there might be a risk of water squirting out.
- Do not place any heavy object on or stand on the door when it is open. The appliance could tip forward.
- Some dishwasher detergents are strongly alkaline. They can be extremely dangerous if swallowed. Avoid contact with the skin and eyes and keep children away from the dishwasher when the door is open.
- Do not wash plastic items unless they are marked "dishwasher safe" or the equivalent.
- Use only detergent and rinse agents recommended for use in an automatic dishwasher.
- Never use soap, laundry detergent, or hand washing detergent in your dishwasher.
- Do not tamper with controls.
-
Earthing Instructions:
-
This appliance must be earthed. In the event of a malfunction or breakdown, earthing will reduce the risk of an electric shock by providing a path of least resistance of electric current. This appliance is equipped with an earthing conductor plug.
-
The plug must be plugged into an appropriate outlet that is installed and earthed in accordance with all local codes and ordinances.
- Improper connection of the equipment-earthing conductor can result in the risk of an electric shock.
- Check with a qualified electrician or service representative if you are in doubt whether the appliance is properly grounded.
- Do not modify the plug provided with the appliance. If it does not fit the outlet, have a proper outlet installed by a qualified electrician.
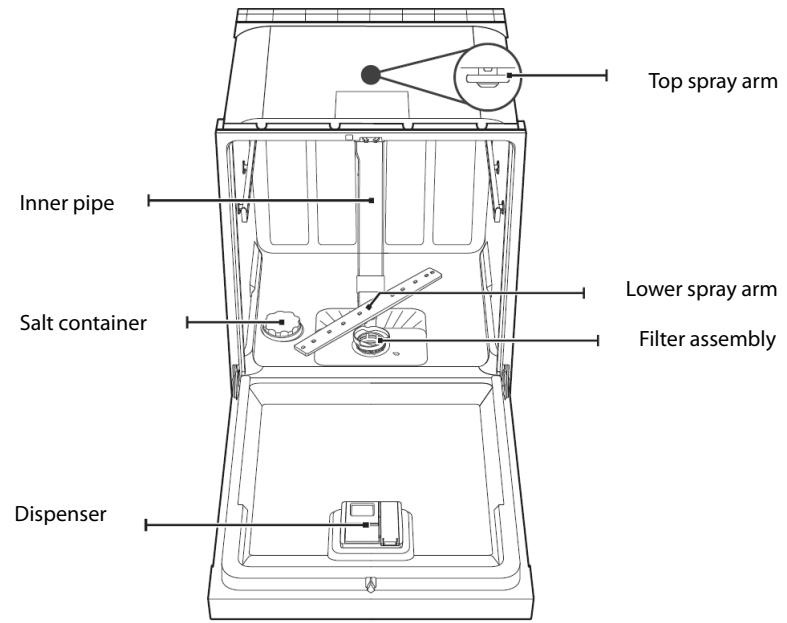
PRODUCT OVERVIEW
Cutlery rack
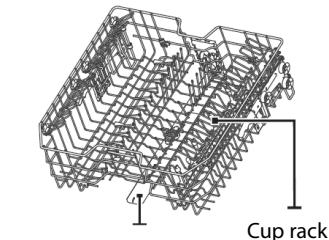
Upper basket
Upper spray arm
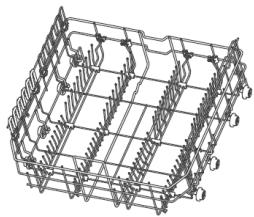
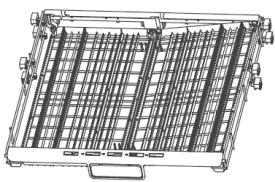
Lower basket
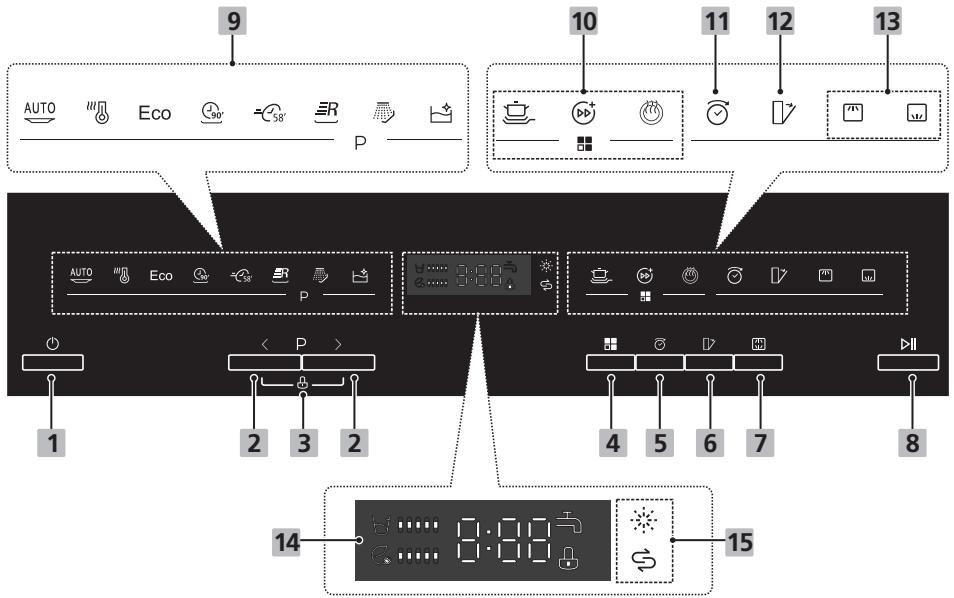
Control Panel
1 Power button
2 P < > Washing program buttons
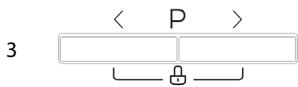
Child lock buttons
4 Function button
5 Delayed start button
6 Auto open button
7 Dual spray button
8 Start/Pause button
9 Program indicator lights
| AUTO | “” | Eco | “” | “” | R | ||
| Auto | Hygiene | ECO | 90 minutes | 58 minutes | Rapid | Soak | Self-clean |
10 Function indicator lights
| Power wash To wash very dirty, hard to clean dishes. (It can only be used with Hygiene, ECO, 90 min, 58 min programs.) | |
| Turbo speed+ Reduce the program time. (It can only be used with Hygiene, ECO, 90 min, 58 min and Self-clean programs.) | |
| Extra Drying To dry dishes more completely (It can only be used with Hygiene, ECO, 90 min and 58 min programs.) |
11 Delayed start indicator light
12 Auto open indicator light
13 Dual spray indicator lights
| Upper When you select Upper, only the dishes in the upper rack will be washed. The spray system of the lower basket will not operate. | |
| Lower When you select Lower, only the dishes in the lower rack will be washed. The spray system of the upper basket will not operate. |
14 Display
| 8:88 | To show the remaining time, delayed start time, water hardness and error codes. |
| 7 | To show the degree of water consumption |
| 6 | To show the degree of energy consumption |
| 5 | Water Faucet If this indicator light illuminates, it means the water faucet closed. |
| 4 | Child lock |
15 Status indicator lights
| Rinse Aid If this indicator light illuminates, it means the dishwasher is low on dishwasher rinse aid and requires a refill. | |
| Salt If this indicator light illuminates, it means the dishwasher is low on dishwasher salt and needs to be refilled. |
Before connecting your dishwasher to the power supply, check that the voltage stated on the rating label of your appliance corresponds to the voltage in your home. The appliance must be grounded. The manufacturer is not responsible for damages that may occur as a result of usage without grounding.
WARNING: Disconnect electrical power before installing your dishwasher.
INSTALLATION INSTRUCTIONS
Your dishwasher can be installed in various locations in your kitchen as long as there is space and accessibility to connect your dishwasher to the water/drainage and electrical supply. Do not connect an extension lead to the appliance to avoid potential safety hazards.
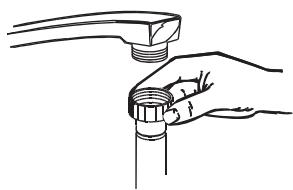
Cold Water Connection
The installation of the hose should be done by professionals. Connect the supplied water supply hose to a threaded 3 / 4'' connector and make sure that it is fastened tightly in place. If the water pipes are new or have not been used for an extended period of time, let the water run to make sure that the water is clear. This precaution is needed to avoid the risk of the water inlet to be blocked and damage the appliance.
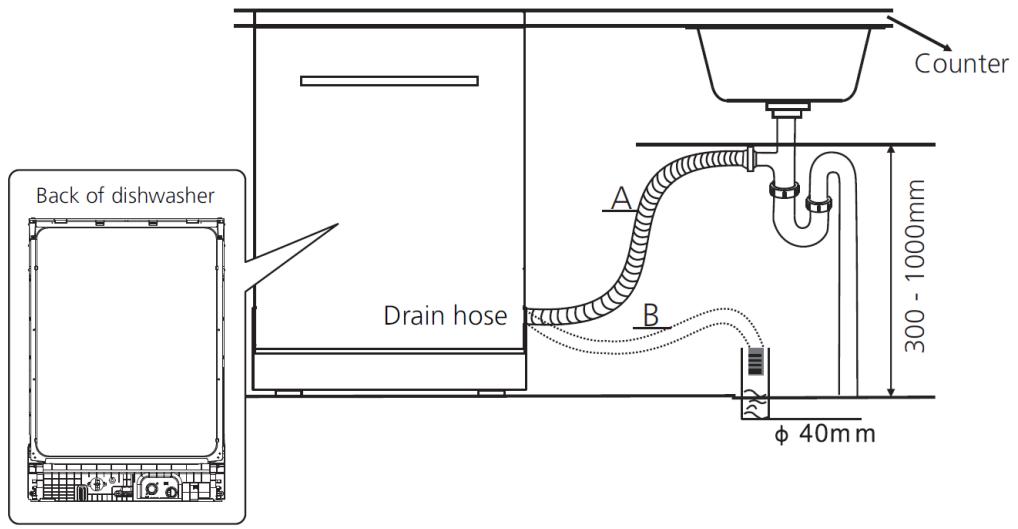
Connection of the Drain Hose
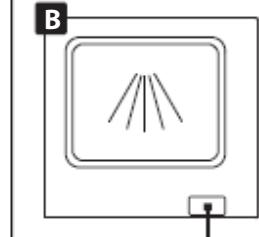
Insert the drain hose into a drain pipe with a minimum diameter of 4cm , or let it run into the sink, making sure to avoid bending or crimping it. The height of drain pipe must be less than 1000mm . The free end of the hose must not be immersed in water to avoid the back flow of it.
Please securely fix the drain hose in either position A or position B. The installation of the hose should be done by professionals.
If leaks are detected, immediately shut the water supply and check the hose connections fully. Re-tighten the connections if necessary.
If for any reason you are unable to stop the leak yourself, please seek advice from a qualified plumber.
Electrical Connection
The installation of electrical equipment should be done by professionals.
- Do not use an extension cord or an adapter plug with this appliance.
- Do not, under any circumstances, cut or remove the earthing connection from the power cord.
Ensure the voltage and frequency of the dishwasher correspond to those indicated on the rating plate. Only insert the plug into an electrical socket which is earthed properly. If the electrical socket to which the appliance must be connected is not appropriate for the plug, replace the socket, rather than using a adaptors or the like as they could cause overheating and burns.
Ensure that proper earthing exists before use.
Levelling
Place the dishwasher on an even, stable surface. It is very important that the dishwasher is perfectly levelled in order to avoid the dishwasher to malfunction. You can level the dishwasher by adjusting the base feet.
- Remove coarse food remains, e.g. bones, which may clog the filter or damage the wash pump.
- Soak any pots or pans with burnt-on food remains on the bottom then load them into the basket.
WARNING:
- Make sure that the dishes are securely in place so that they cannot tip over or obstruct the rotation of the spray arms during the washing cycle.
- Containers such as cups, bowls, glasses and pots should always be loaded with the opening facing downwards and with any cavities at an angle, to allow the water to drain out.
- Do not stack dishes.
- Do not place glasses too close together because they may knock against each other and break.
- Load large items which are most difficult to clean into the lower basket.
- Make sure that the items being washed are dishwasher-safe.
Items which are not dishwasher-safe:
Wooden dishes, pots or pans
Handcrafted items
- Plastic dishes (except when marked dishwasher-safe)
- Dishes and objects in copper, tin, zinc or brass
- Aluminium dishes
Silverware
Glass and crystal
- Decorated items
LOADING THE DISHWASHER
Loading the Upper and Lower Baskets
- The upper basket is designed to hold delicate and light items such as glasses, cups, saucers, serving bowls and shallow pans.
- The lower basket is designed to take saucepans, lids, plates, salad bowls, cutlery etc.
- Serving dishes and large lids should be arranged around the edge of the basket, ensuring that the upper spray arm can turn freely.
- Arrange items so that water can reach all surfaces.
Upper basket
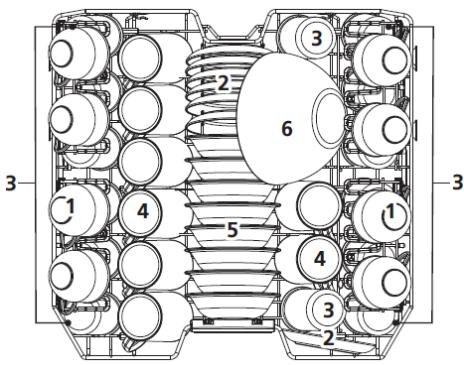
- Cups
- Saucers
- Glasses
- Mugs
- Dessert bowls
- Glass bowl
- Soup plates
Lower basket
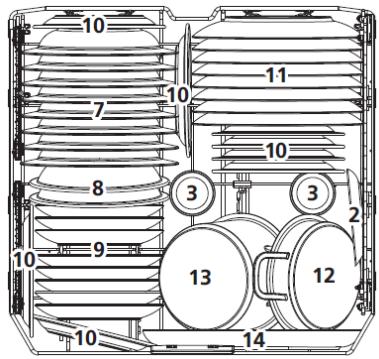
- Melamine bowls
- Dessert plates
- Melamine dessert plates
- Dinner plates
- Small pot
- Oven pot
- Oval platter
Loading the Cutlery Rack
Arrange the cutlery in the rack.
The top spray arm must not be blocked by items.
Take care during loading to avoid injury from the knife blades .
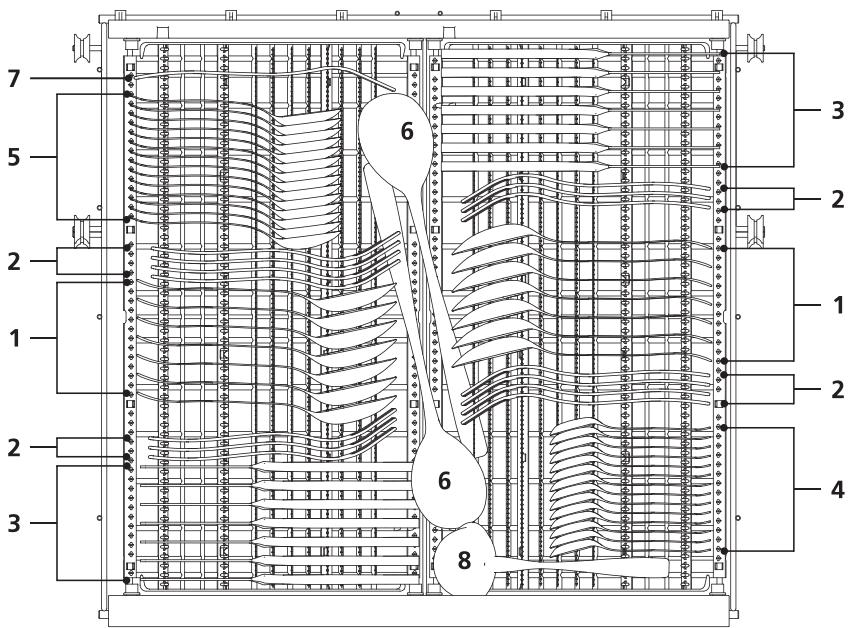
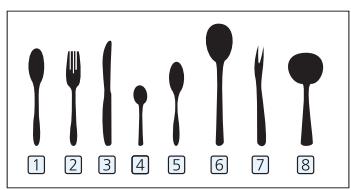
- Soup spoons
- Forks
- Knives
-
Teaspoons
-
Dessert spoons
- Serving spoons
- Serving forks
- Gravy ladles
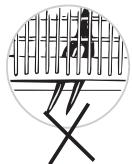
Do not let any item extend through the bottom. Always load sharp utensils with the sharp point down!
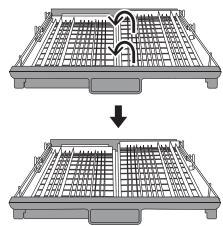
Both parts are flat.
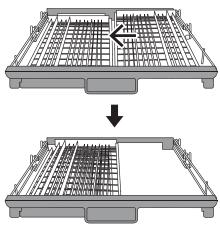
Both parts are overlapped.
Right part is removed.
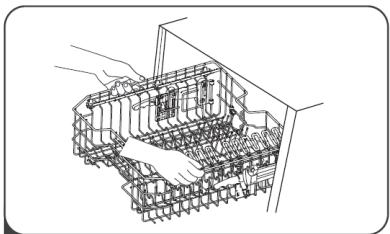
1 To raise the upper basket, just lift the upper basket at the center of each side until the basket locks into place in the upper position. It is not necessary to lift the adjuster handle.
2 To lower the upper basket, lift the adjuster handles on each side to release the basket and lower it to the lower position.
NOTE:
When the upper basket locks in the upper position, cups cannot be put on the cup shelves as the space decreases.
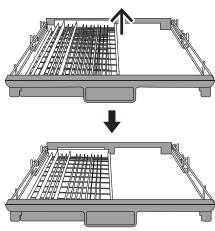
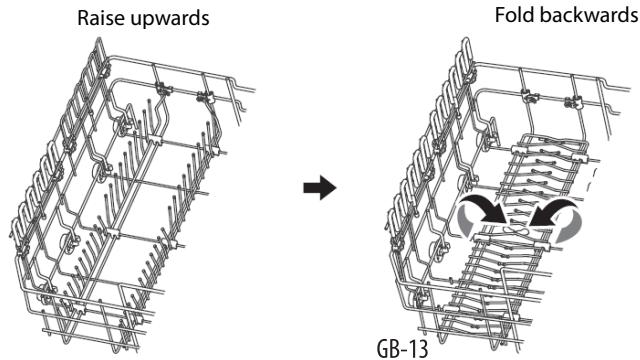
FOLDING THE CUP RACK
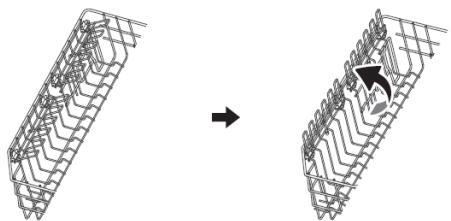
To make room for taller items in the upper basket, raise the cup rack upwards.
You can then lean the tall glasses against it. You can also remove it when it is not required for use.
NOTE:
When the upper basket locks in the upper position, it can't fold back the cup shelves.
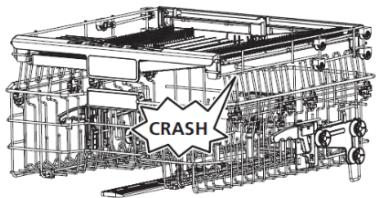
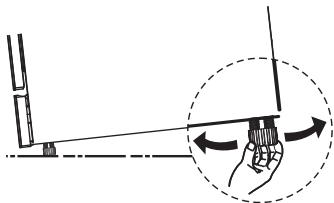
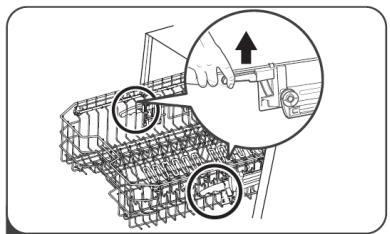
FOLDING SPIKES
The spikes of the lower basket are used to hold plates and a platter. They can be folded down to make more room for large items.
The hardness of the water varies from place to place. If hard water is used in the dishwasher, deposits will be formed on the utensils. This appliance is equipped with a water softener which uses a salt specifically designed to eliminate the minerals from the water.
CAUTION:
- Only use salt specially formulated for domestic dishwashers.
- Do not use table salt as it contains insoluble substances which may damage the water softening system.
- Fill the salt container before starting the washing program. In this way, the excess saline solution will be immediately removed by the water; the prolonged presence of salt water inside the tank may lead to corrosion.
Adjusting the salt consumption
- After the dishwasher is switched on, enter the status of adjusting the salt consumption by holding down until the display shows H3.
- Repeatedly press > to adjust the setting to suit the water hardness.
- Press to validate settings.
| WATER HARDNESS | Display | Regeneration occurs every X program sequence 1) | Salt consumption (gram / cycle) | |||
| °dH | °fH | °Clarke | Mmol/l | |||
| 0 - 5 | 0 - 9 | 0 - 6 | 0 - 0.94 | H1 | No regeneration | 0 |
| 6 - 11 | 10 - 20 | 7 - 14 | 1.0 - 2.0 | H2 | 10 | 9 |
| 12 - 17 | 21 - 30 | 15 - 21 | 2.1 - 3.0 | H3 | 5 | 12 |
| 18 - 22 | 31 - 40 | 22 - 28 | 3.1 - 4.0 | H4 | 3 | 20 |
| 23 - 34 | 41 - 60 | 29 - 42 | 4.1 - 6.0 | H5 | 2 | 30 |
| 35 - 55 | 61 - 98 | 43 - 69 | 6.1 - 9.8 | H6 | 1 | 60 |
Factory setting: H3
NOTE:
1°dH=1.25°Clarke=1.78°fH=0.178 mmol/l
°dH: German degree °fH: French degree °Clarke: British degree
1) Every cycle with a regeneration operation consumes additional 2.0 litres of water, the energy consumption increases by 0.02kWh and the program extents by 4 minutes.
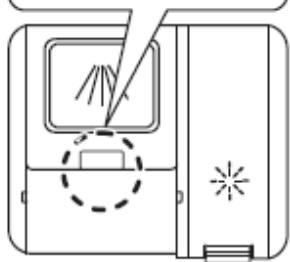
Filling with salt
The salt container must be refilled when the salt warning light illuminates.

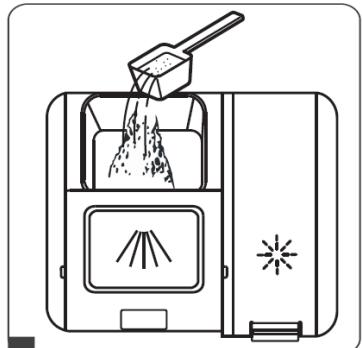
- Remove the lower basket and unscrew the cap from the salt container.
- Place the end of the funnel (supplied) into the hole and pour in about 1.5kg dishwasher salt.
- Fill the salt container to its maximum limit with water. It is normal for small amount of water to come out of the salt container.
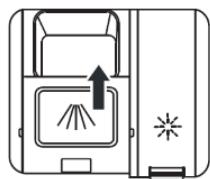
- Screw back the cap tightly.
- Remove any salt that has fallen around the opening of the container and into the tub.
WARNING!
Salt is corrosive, it is strongly recommended to run a shortest program without dishes after each salt container filling to wash away any salt that may have been spilled into the tub.
NOTE: Depending on how well the salt dissolves, the salt warning light may still be on even though the salt container is filled.
USING THE RINSE AND DETERGENT DISPENSERS
Function of the rinse aid
The rinse aid is released during the final rinse to prevent water from forming droplets on your dishes, which can leave spots and streaks. It also improves drying by allowing water to roll off the dishes.
WARNING! Only use branded rinse aid for dishwasher. Never fill the rinse aid dispenser with any other substances (e.g. Dishwasher cleaning agent, liquid detergent). This would damage the appliance.
Function of the detergent
The chemical ingredients that compose the detergent are necessary to remove, crush and dispense all dirt out of the dishwasher.
WARNING!
- Proper use of detergent
- Use only detergent specifically made for dishwasher use. Keep your detergent fresh dry.
- Do not put powdered detergent into the dispenser until you are ready to wash dishes.
- Dishwasher detergent is corrosive! Keep it out of the reach of children.
Filling the rinse aid dispenser
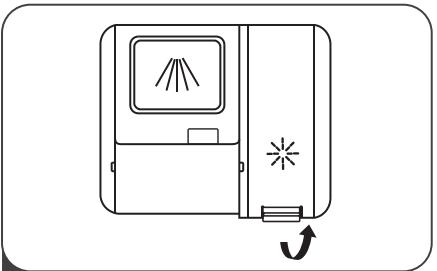
1 Remove the rinse aid dispenser cap by lifting up the tab.
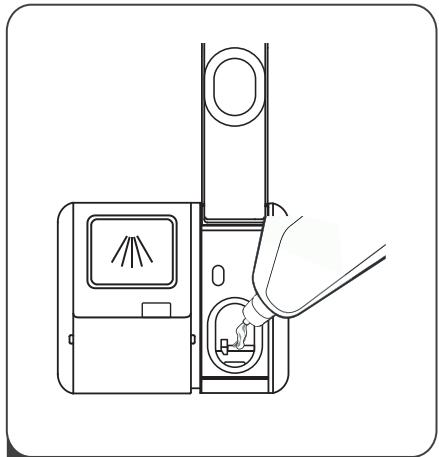
Pour the rinse aid into the dispenser, being careful not to overfill.
3 Close the cap.
Adjusting the rinse aid dispenser
To achieve a better drying performance with limited rinse aid, the dishwasher is designed to adjust the consumption by user. Follow the below steps:
- Power on the dishwasher.
- Within 60 seconds after powering on the dishwasher, press and hold for about 5 seconds and then
press to enter the setting mode.
The display will show d3.
- Repeatedly press > to select the proper setting.
- The setting will be confirmed if there is no operation in about 5 seconds.
| Display | Amount of rinse aid (mL) |
| d1 | 1.2 |
| d2 | 2.4 |
| d3 | 3.6 |
| d4 | 4.8 |
| d5 | 6.0 |
| d6 | 7.2 |
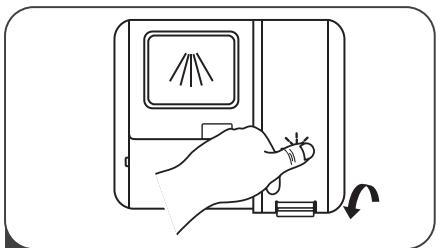
Three ways to open the detergent cap:
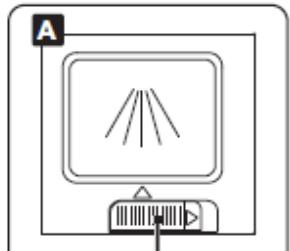
Slide it to the right

Press down
Press in
2
Add the detergent into the compartment.
3
Close the cap by sliding it to the front and pressing it down.
1
Please choose a way according to the actual situation:
A. Open the cap by sliding the release latch.
B. Open the cap by pressing down the release latch.
C. Open the cap by pressing in the release latch.
| Program | Type of Dishes | Cycle Description | Detergent Pre/Main | Program duration (min) | Energy (kWh) | Water consumption (L) | Rinse aid needed? |
| AUTO | Auto sensing wash, for lightly, normally or heavily soiled loads | Pre-wash (45°C) wash(55°C -65°C) Rinse Rinse Rinse (50°C -60°C) Drying | 5+19 g | 105 – 179 | 0,930 – 1,470 | 10,3 – 17,0 | Yes |
| Hygiene | Use to sanitize your dishes and glassware. The highest water temperature is 70°C. | Pre-wash (45°C) Wash (72°C) Rinse Rinse (50°C) Rinse (60°C -65°C) Drying | 5+19 g | 165 | 1,650 – 1,720 | 16,0 | Yes |
| ECO (*EN60436) | Standard cycle for normally soiled loads such as pots, plates, glasses and lightly soiled pans | Wash (45°C) Rinse Rinse (43°C) Drying | 24 g | 280 | 0,559 | 9,0 | Yes |
| 90' | For normally soiled loads that need quick wash | Wash (55°C) Rinse Rinse (55°C -60°C) Drying | 5+19 g | 90 | 0,810 – 0,865 | 9,0 | Yes |
| 58' | For normally soiled loads that need quick wash | Wash (50°C) Rinse Rinse (55°C) Drying | 20 g | 58 | 0,740 – 0,795 | 11,5 | Yes |
| ER | A shorter wash for lightly soiled loads that do not need drying | Wash (45°C) Rinse Rinse (50°C) | 15 g | 45 | 0,650 – 0,710 | 9,0 | No |
| Self-clean | To rinse out loosen soil particles from the dishes | Pre-wash | N/A | 15 | 0,020 | 3,5 | No |
| This program provides an effective cleaning of the dishwasher itself. | Wash (70°C) Rinse Rinse (65°C -72°C) Drying | 20 g | 130 | 1,245 – 1,320 | 12,0 | Yes |
NOTE:
(*EN 60436): This program is the test cycle. The information for comparability test is in accordance with EN 60436.
- The eco programme is suitable to clean normally soiled tableware, that for this use, it is the most efficient programme in terms of its combined energy and water consumption, and that it is used to assess compliance with the EU ecodesign legislation.
- Loading the household dishwasher up to the capacity indicated by the manufacturer will contribute to energy and water savings.
- Manual pre-rinsing of tableware items leads to increased water and energy consumption and is not recommended.
- Washing tableware in a household dishwasher usually consumes less energy and water in the use phase than hand dishwashing when the household dishwasher is used according to the manufacturer's instructions.
- The values given for programmes other than the eco programme are indicative only.
STARTING A WASH CYCLE
- Turn the water tap on.
-
Open the dishwasher door.
-
Check the filters.
-
Ensure that they are clean and properly positioned. See the section Cleaning and Maintenance.
-
Check that there is rinse aid and salt.
-
Load the dishes.
-
Ensure that the spray arms can rotate freely.
-
Add the required amount of detergent into the dispenser according to the Washing Program chart.
- Close the dishwasher door securely.
- Press to switch on the dishwasher.
-
Repeatedly press / to select the desired washing program.
-
The corresponding programme indicator light will illuminate.
- Delay Timer: The delay timer allows you to delay the start of a washing program from 1 hour up to 24 hours.
Repeatedly press until the desired delayed start time is shown on the display, e.g. H:03 for a 3-hour delay.
Once the delay timer has been set, press to activate the function.
To cancel the delayed start, first press then repeatedly press until the display shows "H:00".
-
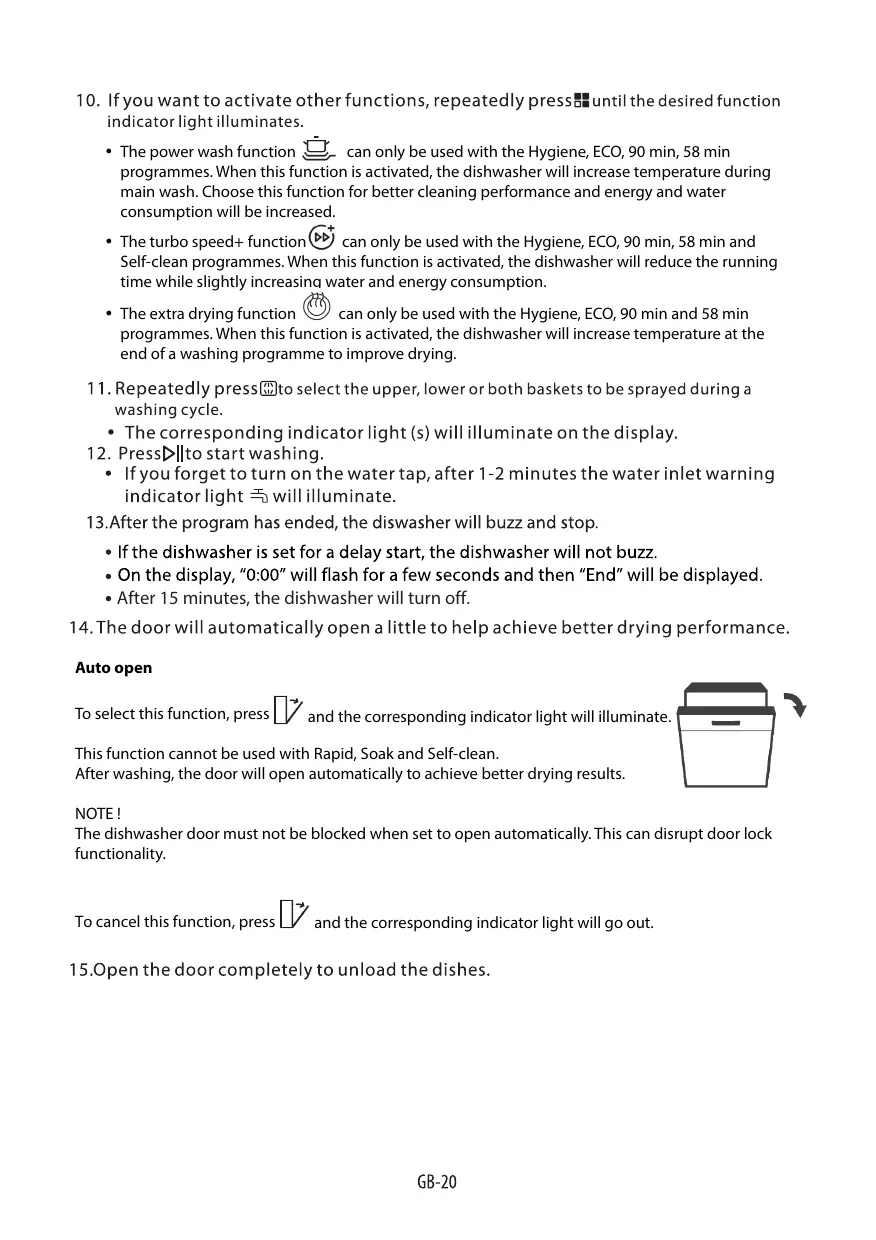
If you want to activate other functions, repeatedly press until the desired function indicator light illuminates.
-
The power wash function can only be used with the Hygiene, ECO, 90 min, 58 min programmes. When this function is activated, the dishwasher will increase temperature during main wash. Choose this function for better cleaning performance and energy and water consumption will be increased.
- The turbo speed+ function can only be used with the Hygiene, ECO, 90 min, 58 min and Self-clean programmes. When this function is activated, the dishwasher will reduce the running time while slightly increasing water and energy consumption.
-
The extra drying function can only be used with the Hygiene, ECO, 90 min and 58 min programmes. When this function is activated, the dishwasher will increase temperature at the end of a washing programme to improve drying.
-
Repeatedly press to select the upper, lower or both baskets to be sprayed during a washing cycle.
-
The corresponding indicator light (s) will illuminate on the display.
-
Press to start washing.
-
If you forget to turn on the water tap, after 1-2 minutes the water inlet warning indicator light will illuminate.
-
After the program has ended, the diswasher will buzz and stop.
-
If the dishwasher is set for a delay start, the dishwasher will not buzz.
-
On the display, "0:00" will flash for a few seconds and then "End" will be displayed.
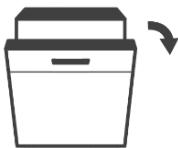
After 15 minutes, the dishwasher will turn off. -
The door will automatically open a little to help achieve better drying performance.
Auto open
To select this function, press and the corresponding indicator light will illuminate.
This function cannot be used with Rapid, Soak and Self-clean. After washing, the door will open automatically to achieve better drying results.
NOTE!
The dishwasher door must not be blocked when set to open automatically. This can disrupt door lock functionality.
To cancel this function, press and the corresponding indicator light will go out.
15.Open the door completely to unload the dishes.
WARNING!
- The washing cycle will not start if the dishwasher door is left open or not properly closed.
- Do not open the door when the dishwasher is working since hot water may be ejected, which could cause scalding.
Adding extra dish

A forgotten dish can be added any time before the detergent dispenser opens. If this is the case, follow the instructions below:
- Press to pause.
- Wait for 5 seconds then open the door.
- Add the forgotten dishes.
- Close the door.
- Press The cycle will start from the point at which it was interrupted.
Changing the program in progress

A wash cycle can only be changed if it has been running for a short time otherwise, the detergent may have already been released and the dishwasher may have already drained the wash water. If this is the case, the dishwasher needs to be reset and the detergent dispenser must be refilled. To reset the dishwasher, follow the instructions below:
- Press to pause.
- Press and hold > for more than 3 seconds - the program will cancel. You will hear a beep.
-
Repeateldy press < / > to select a new program.
-
The new programme indicator light will illuminate.
-
Press to start the program.
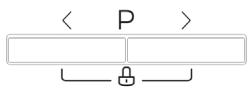
Child lock function
The child lock function of your dishwasher prevents accidental program changes and stops children playing with the controls while the appliance is running.
To activate the function, press and hold
simultaneously until the lock indicator light illuminates.
To deactivate the function, press and hold the two buttons simultaneously until the lock indicator light goes out.
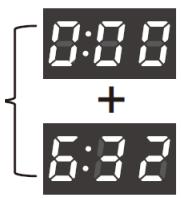
When the power cord is connected, but the dishwasher is not turned on, press and hold for 5 seconds, the dishwasher display will show the number of cycles.

for 5 Sec.

0:00
appears for 2
seconds then appears 6:32
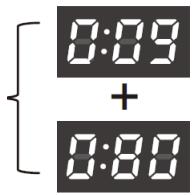
0:09
appears for 2
seconds then
appears 0:80
Example:
0:00 is displayed for two seconds, then 6:32 is displayed for two seconds, and then the display turns off. A total of 632 cycles were completed.
0:09 is displayed for two seconds, then 0:80 is displayed for two seconds, and then the display turns off. A total of 9080 cycles were completed.
CLEANING AND MAINTENANCE
Always switch off and unplug the appliance before cleaning.
- To avoid penetration of water into the door lock and electrical components, do not use a spray cleaner of any kind.
- Never use abrasive cleaners or scouring pads on the outer surfaces because they may scratch the finish.
Your dishwasher cleans by spraying a mixture of clean water and detergent (under pressure) against the soiled surface of dishes. The water is pumped through a rotating spray arm, drained through a filter removing food and soiled particles and pumped back through the spray arm.
Soiled water is pumped out and replaced with clean water at the end of each cycle (the number of times depends on the cycle being used).
NOTE:
Hard water conditions will adversely affect washability performance of your dishwasher. Hard water conditions will also contribute to "Lime" (white film substance) deposits and/or "Scaling" on the stainless steel surface of the dishwasher tub and heater element located in the sump underneath the removable filter screen.
To minimise these conditions, it is recommended to periodically operate/rinse the inside of the dishwasher (empty) using 1 cup of white vinegar (at least once a week).
Cleaning the door and the door seal
Clean the door seals regularly with a soft damp cloth to remove food deposits.
When the dishwasher is being loaded, food and drink residues may drip onto the sides of the dishwasher door. These surfaces are outside the wash cabinet and are not accessed by water from the spray arms. Any deposits should be wiped off before the door is closed.
Cleaning the control panel
If cleaning is required, the control panel should be wiped with a soft damp cloth only.
Cleaning the filtering system
The filtering system in the base of the wash cabinet retains coarse debris from the washing cycle. The collected coarse debris may cause the filters to clog. Check the condition of the filters regularly and clean them if necessary under running water.
Follow the steps below to clean the filters in the wash cabinet.
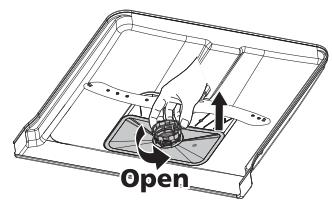
Hold the coarse filter and rotate it anticlockwise to unlock the filter. Lift the filter upwards and out of the dishwasher.
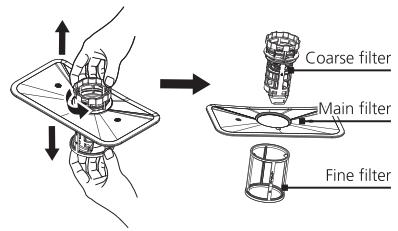
Pull the fine filter off the filter assembly. Detach the coarse filter from the main filter by gently squeezing the tabs at the top and pulling it away.
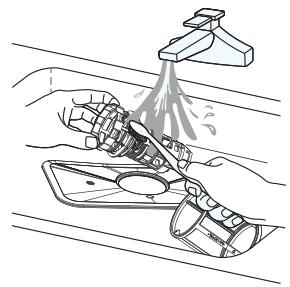
3 Rinse the filters under running water. For a more thorough clean, use a soft cleaning brush.
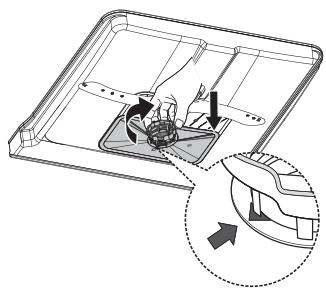
4 Reassemble the filters, replace the filter insert, and rotate clockwise to the close arrow.
WARNING!
- Do not over tighten the filters. Put the filters back in sequence securely, otherwise coarse debris could get into the system and cause a blockage.
- Never use the dishwasher without filters in place. Improper replacement of the filters may reduce the performance level of the appliance and damage dishes and utensils.
Cleaning the spray arms
It is necessary to clean the spray arms regularly, otherwise hard water chemicals will clog the spray arm jets and bearings.
To clean the spray arms, follow the instructions below:

To remove the upper spray arm, hold the nut in the centre still and rotate the spray arm anticlockwise to remove it.
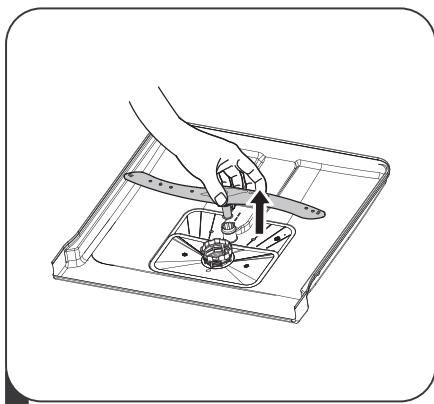
To remove the lower spray arm, pull out the spray arm upward.
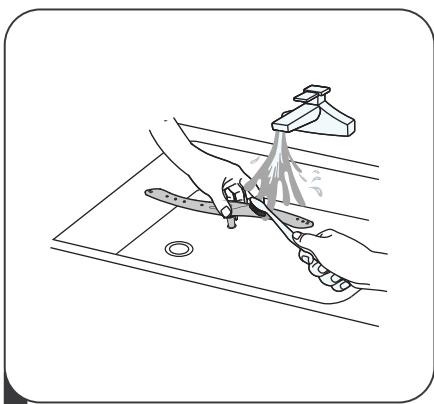
3 Wash the arms in warm soapy Water using a soft brush. Replace them after rinsing them thoroughly.
Frost precaution
Please take frost protection measures on the dishwasher in winter. Every time after washing cycles, please operate as follows:
- Cut off the electrical power to the dishwasher at the supply source.
- Turn off the water supply and disconnect the water inlet pipe from the water valve.
- Drain the water from the inlet pipe and water valve (Use a pan to gather the water).
- Reconnect the water inlet pipe to the water valve.
- Remove the filter at the bottom of the tub and use a sponge to soak up water in the sump.
After every wash
After every wash, turn off the water supply to the appliance and leave the door slightly open so that moisture and odors are not trapped inside.
No solvents or abrasive cleaning
To clean the exterior and rubber parts of the dishwasher, do not use solvents or abrasive cleaning products. Only use a cloth with warm soapy water.
To remove spots or stains from the surface of the interior, use a cloth dampened with water on a little vinegar, or a cleaning product made specifically for dishwashers.
When not in use for a long time
It is recommend that you run a wash cycle with the dishwasher empty and then remove the plug from the mains socket, turn off the water supply and leave the door of the appliance slightly open. This will help the door seals to last longer and prevent odors from forming within the appliance.
Moving the appliance
If the appliance must be moved, try to keep it in the vertical position. If absolutely necessary, it can be positioned on its back.
Cleaning the seals
One of the factors that cause odours to form in the dishwasher is food that remains trapped in the seals. Periodic cleaning with a damp sponge will prevent this from occurring.
Reviewing the charts on the following pages may save you from calling for service.
Before Calling For Service
| Problem | Possible Causes | Possible Solution |
| Dishwasher will not start. | Fuse blown, or the ir庚it breaker tripped | Replace fuse or reset circuit breaker. Remove any other appliance sharing the same circuit with the dishwasher. |
| Power supply is not turned on. | Make sure the dishwasher is turned on and the door is closed securely. Make sure the power cord is properly plugged into the wall socket. | |
| The door has not been properly closed. | Close the door securely. | |
| Water not pumped from dishwasher | Kink in drain hose | Check drain hose. |
| Filter clogged | Check the filters (see “Cleaning the Filtering System”). | |
| Kitchen sink clogged | Check kitchen sink to make sure it is draining well. If kitchen sink is not draining, you may ask a plumber to check it. | |
| Suds in the tub | Improper detergent | Use only the detergent special for dishwasher to avoid suds. If this occurs, open the door and let the suds evaporate. Add 1 gallon of cold water to the bottom of the dishwasher. Close the dishwasher door, then select any cycle. Initially, the dishwasher will drain out the water. Open the door after draining stage is complete and check if the suds have disappeared. Repeat if necessary. |
| Spilled rinse aid | Always wipe up rinse aid spills immediately. | |
| Stained tub interior | Detergent with colourant may be used. | Make sure that the detergent has no colourant. |
| White film on inside surface | Hard water minerals. | To clean the interior, use a damp sponge with dishwasher detergent and wear rubber gloves. Never use any other cleaner than dishwasher detergent otherwise it may cause foaming or suds. |
| There are rust stains on cutlery. | The affected items are not corrosion resistant. | Avoid washing items that are not corrosion resistant in the dishwasher. |
| A program is not run after adding dishwasher salt. Traces of salt have gotten into the wash cycle. | Always run a wash program without any crockery after adding salt. | |
| The cap of the salt container is loose. | Check the cap is secure. | |
| The dishwasher is noisy. | Dishes are rattling against each other. The spray arms are knocking against the dishes. | Refer to “Loading the Dishwasher” to rearrange the dishes. |
| The dishes are not clean. | The dishes have not been arranged properly. | Refer to “Loading the Dishwasher”. |
| The washing program selected is too gentle. | Select a more intensive program. Refer to “Washing Programs”. | |
| Not enough detergent has been used or it is unsuitable. | Use more detergent or change the detergent. | |
| The spray arms are clogged. | Rearrange the items so that the spray arms can rotate freely. | |
| The filters are not clean or not in the correct position. | Clean and/or position the filters correctly. | |
| Cloudiness on glassware | Combination of soft water and too much detergent | Use less detergent if you have soft water and select a shorter cycle to wash the glassware and to get them clean. |
| White spots appear on dishes and glasses | Hard water area can cause limescale deposits. | Add more detergent. |
| The dishes are not quite dry. | Improper loading | Refer to “Loading the Dishwasher”. |
| The rinse aid has run out or too little is being used. | Increase or refill the amount of rinse aid. | |
| Wrong program has been selected. | Choose a program with long washing time. |
Error codes
| Codes | Meanings | Possible Causes | Possible Solution |
| E1 | Longer inlet time. | Tap is not opened, or water inlet is restricted, or water pressure is too low. | Turn on the water tap. Check the water inlet hose is not blocked. Increase inlet water pressure. |
| E3 | Not reaching required temperature | Malfunction of heating element | Contact the after-sales service to replace the heating element. |
| E4 | Overflow | Some dishwasher parts are leaking. | Contact the after-sales service to repair and replace parts. |
| E8 | Failure of orientation of distributary valve | Open circuit or break of distributary valve | Contact the after sales service to repair and replace parts. |
| EC | Washing control system fails. | PCB or motor fails. | Contact the after-sales service to repair and replace parts. |
| L4 | Motor failure | Motor failure | Contact the after-sales service to repair and replace parts. |
| C4 | Drain pump failure | Drain pump failure | Contact the after-sales service to repair and replace parts. |
| Ed | Failure of communication between main circuit board with display circuit board | Open circuit or break wiring for the communication. | Contact the after sales service to repair and replace parts. |
WARNING!
- If overflow occurs, turn off th main water supply before calling service.
- If there is water in the base pan because of an overfill or small leak, the water should be removed before restarting the dishwasher.
SPECIFICATIONS
| Rated voltage / frequency | 220-240V~ 50Hz |
| Rated power | 1828-2158W |
| Water pressure | 0.04 –1 MPa |
| Supplier's name or trade mark: Etablissements Darcy & fils © THOMSON | ||||
| Supplier's address: 9 Rue des Bateaux-Lavoirs, 94200 Ivry-sur-Seine, France | ||||
| Model identifier: TDW4316SL | ||||
| General product parameters: | ||||
| Parameter | Value | Parameter | Value | |
| Rated capacity (1) (ps) | 16 | Dimensions in cm | Height | 85 |
| Width | 60 | |||
| Depth | 60 | |||
| EEI (1) | 31.9 | Energy efficiency class (1) | A | |
| Cleaning performance index (1) | 1.125 | Drying performance index (1) | 1.065 | |
| Energy consumption in kWh [per cycle], based on the eco programme using cold water fill. Actual energy consumption will depend on how the appliance is used. | 0.559 | Water consumption in litres [per cycle], based on the eco programme. Actual water consumption will depend on how the appliance is used and on the hardness of the water. | 9.0 L | |
| Programme duration (1) (h:min) | 4:40 | Type | Free standing | |
| Airborne acoustical noise emissions (1) (dB(A) re 1 pW) | 43 | Airborne acoustical noise emission class (1) | B | |
| Off-mode (W) (if applicable) | N/A | Standby mode (W) (if applicable) | 0.49 | |
| Delay start (W) (if applicable) | 1.00 | Networked standby (W) (if applicable) | N/A | |
| Minimum duration of the guarantee offered by the supplier: 24 months | ||||
| Additional information: | ||||
| Weblink to the supplier's website, where the information in point 6 of Annex II to Commission Regulation (EU) 2019/2022 is found: www.darty.com | ||||
(1) for the eco programme.
This product has been manufactured and sold under the responsibility of Etablissements Darty et Fils (S.A.S). THOMSON, and the THOMSON logo are trademarks used under license by Etablissements Darty et Fils (S.A.S) -- further information at www.thomson-brand.com
All other products, services, companies, trademarks, trade or product names and logos referenced herein are the property of their respective owners.
To find the model information in the product database :
Click the link
https://eprel.ec.europa.eu/screen/product/dishwashers2019/1608230

REPAIR AND SPARE PARTS SERVICE
Do not disassemble or repair the appliance by yourself. Failure to do so may result in an electric shock or personal injury.
To access to professional repair and order spare parts, please get the support from FNAC DARTY after-sales service.
Spare parts for your appliances will be delivered within 15 working days after having received the order.
Please Note!
All appliances have a 2-year warranty.
Warranty does not cover damages caused due to improper installation, unauthorized modification, self-repair or non-professional repair.
Contact us at:

www.darty.com

0978 970 970
24 Hours
7 Days a week

As a responsible retailer we care about the environment. As such we urge you to follow the correct disposal procedure for the appliance and packaging materials. This will help conserve natural resources and ensure that it is recycled in a manner that protects health and the environment.
You must dispose of this appliance and its packaging according to local laws and regulations. Because this appliance contains electronic components, the appliance and its accessories must be disposed of separately from household waste when the appliance reaches its end of life.
Contact your local authority to learn about disposal and recycling.
The appliance should be taken to your local collection point for recycling. Some collection points accept appliance free of charge.
We apologise for any inconvenience caused by minor inconsistencies in these instructions, which may occur as a result of product improvement and development.
EU Declaration of Conformity
Product Description:
The object of the declaration described above is in conformity with the relevant Union harmonisation legislation:
Low Voltage Directive (LVD)
Eco design requirements for energy-related products (ErP)
RoHS
EMC:
EN IEC 55014-1:2021
CISPR 14-1:2020
EN IEC 55014-2:2021
CISPR 14-2:2020
EN IEC 61000-3-2:2019+A1
EN 61000-3-3:2013+A1+A2
IEC 61000-3-2: 2018+A1: 2020
IEC 61000-3-3:2013+A1:2017+A2:2021
LVD :
EN 60335-1: 2012+A11+A13+A1+A14+A2+A15
EN 60335-2-5: 2015+A11+A1
EN 62233:2008
ErP :
(EU) 2019/2017
(EU) 2019/2022
(EU) 2021/340
(EU) 2021/341
EN 60436:2020 + A11:2020 + AC:2020-6
EN50564:2011
This declaration of conformity is drawn up under the sole responsibility of the manufacturer.
The person responsible for this declaration is:
Place, Date / Lieu :

- SERVICE DE RÉPARATION ET PIEÇES DE RECHANGE
- SERVICE VOOR REPARATIES EN RESERVEONDERDELEN
- PLEASE READ THE FOLLOWING SAFETY WARNINGS AND THE INSTRUCTIONS CAREFULLY BEFORE USING THE APPLIANCE AND KEEP FOR FUTURE REFERENCE.
- Warnings
- Safety Precautions
- INSTALLATION INSTRUCTIONS
- Cold Water Connection
- Connection of the Drain Hose
- Electrical Connection
- Levelling
- WARNING:
- Items which are not dishwasher-safe:
- LOADING THE DISHWASHER
- Loading the Upper and Lower Baskets
- Upper basket
- Lower basket
- Loading the Cutlery Rack
- NOTE:
- FOLDING THE CUP RACK
- FOLDING SPIKES
- CAUTION:
- Adjusting the salt consumption
- Filling with salt
- WARNING!
- USING THE RINSE AND DETERGENT DISPENSERS
- Function of the rinse aid
- Function of the detergent
- Filling the rinse aid dispenser
- Adjusting the rinse aid dispenser
- STARTING A WASH CYCLE
- Auto open
- NOTE!
- Adding extra dish
- Changing the program in progress
- Child lock function
- Example:
- CLEANING AND MAINTENANCE
- Cleaning the door and the door seal
- Cleaning the control panel
- Cleaning the filtering system
- Cleaning the spray arms
- Frost precaution
- After every wash
- No solvents or abrasive cleaning
- When not in use for a long time
- Moving the appliance
- Cleaning the seals
- REPAIR AND SPARE PARTS SERVICE
- Please Note!
- EMC:
- LVD :
- ErP :
Brand : PROLINE
Model : TDW4316SL
Category : Dishwasher