DFP8363A - Built-in DARTY - Free user manual and instructions
Find the device manual for free DFP8363A DARTY in PDF.


User questions about DFP8363A DARTY
0 question about this device. Answer the ones you know or ask your own.
Ask a new question about this device
Download the instructions for your Built-in in PDF format for free! Find your manual DFP8363A - DARTY and take your electronic device back in hand. On this page are published all the documents necessary for the use of your device. DFP8363A by DARTY.
USER MANUAL DFP8363A DARTY
RELATIONS CONSOMMATEURS FRANCE
TILBEREDNING MED UDSKUDT START
TILBEREDNING MED UDSKUDT START
TILBEREDNING MED UDSKUDT START
TILBEREDNING MED UDSKUDT START
lille and, perlehone
| A | B | G |
| SERVICE: C | TYPE: D | I CE |
| E | F | |
| Nr H | Made in France |
B: Forhandlingsreference
C:Servicereference
H: Serienummer
| RETTER | * | * | * | * | * | * | STEGE / BAGE TIDER | |||||||
| °C | TRIN | °C | TRIN | °C | TRIN | °C | TRIN | °C | TRIN | °C | TRIN | |||
| KÖD | Svinesteg (1 kg) | 200 | 2 | 190 | 2 | 60 | ||||||||
| Kalvesteg (1 kg) | 200 | 2 | 190 | 2 | 60-70 | |||||||||
| Oksesteg | 240 | 2 | 200 | 2 | 30-40 | |||||||||
| Lam (lammekølle, lammebov 2,5 kg) | 220 | 2 | 220 | 2 | 200 | 2 | 210 | 2 | 60 | |||||
| Kyllingelår | 200 | 3 | 220 | 3 | 210 | 3 | 185 | 3 | 60 | |||||
| Stort fjerkrå | 220 | 3 | 210 | 3 | 20-30 | |||||||||
| Svine- kalvekoteletter | 210 | 3 | 20-30 | |||||||||||
| Højreb (1 kg) | 210 | 3 | 210 | 3 | 20-30 | |||||||||
| Färekoteletter | 210 | 3 | 20-30 | |||||||||||
| FISK | Grillet fisk | 275 | 4 | 15-20 | ||||||||||
| Fisk i fad (guldbrasen) | 200 | 3 | 190 | 3 | 30-35 | |||||||||
| Fisk i papillote | 220 | 3 | 200 | 3 | 15-20 | |||||||||
| GREEN SAGER | Gratin (kogte ingredienser) | 275 | 2 | 30 | ||||||||||
| Kartoffelgratin | 200 | 3 | 180 | 3 | 45 | |||||||||
| Lasagnes | 200 | 3 | 180 | 3 | 45 | |||||||||
| Farserede tomater | 170 | 3 | 170 | 3 | 30 | |||||||||
| BAGING | Sukkerbrödsrand | 180 | 3 | 180 | 4 | 35 | ||||||||
| Roulade | 220 | 3 | 180 | 2 | 190 | 3 | 5-10 | |||||||
| Brioche | 180 | 3 | 200 | 3 | 180 | 3 | 180 | 3 | 35-45 | |||||
| Brownies | 180 | 2 | 180 | 2 | 20-25 | |||||||||
| Cake - Sandkage | 180 | 3 | 180 | 3 | 180 | 3 | 45-50 | |||||||
| Clafoutis | 200 | 3 | 190 | 3 | 30-35 | |||||||||
| Cookies - Småkager | 175 | 3 | 170 | 3 | 15-20 | |||||||||
| Kugelhof | 180 | 2 | 40-45 | |||||||||||
| Marengs | 100 | 4 | 100 | 4 | 100 | 4 | 60-70 | |||||||
| Madeleinekage | 220 | 3 | 210 | 3 | 5-10 | |||||||||
| Vandbakkelsensedej | 200 | 3 | 180 | 3 | 200 | 3 | 30-40 | |||||||
| Små butterdejskager | 220 | 3 | 200 | 3 | 5-10 | |||||||||
| Savarin | 180 | 3 | 175 | 3 | 180 | 3 | 30-35 | |||||||
| Tært e mørdej | 200 | 1 | 200 | 1 | 30-40 | |||||||||
| Tært e butterdej | 215 | 1 | 200 | 1 | 20-25 | |||||||||
| DIVERSE | Dej i postejform | 200 | 2 | 190 | 2 | 80-100 | ||||||||
| Pizza | 240 | 1 | 15-18 | |||||||||||
| Æggekage | 190 | 1 | 180 | 1 | 190 | 1 | 35-40 | |||||||
| Soufflé | 180 | 2 | 50 | |||||||||||
| Pie | 200 | 2 | 190 | 2 | 40-45 | |||||||||
| Brød | 220 | 2 | 220 | 2 | 30-40 | |||||||||
| Ristet brød | 275 | 4-5 | 2-3 | |||||||||||
| A | B | C |
| SERVICE: G | TYPE: D | I CE |
| E | F | |
| Nr H | Made in France |
Discovering a De Dietrich product means experiencing the range of unique emotions.
The attraction is immediate, from the moment you set eyes on the product. The sheer quality of the design shines through, thanks to the timeless style and outstanding finishes which make each component an elegant and refined masterpiece in its own right, each one in perfect harmony with the others. Next, comes the irresistible urge to touch it.
De Dietrich design makes extensive use of robust and prestigious materials, where the accent is place firmly upon authenticity. By combining state-of-the-art technology with top quality materials, De Dietrich produces beautifully crafted products to help you get the most from the culinary arts, a passion shared by all lovers of cooking and fine food. We hope that you enjoy using this new appliance.
Thank you for choosing a De Dietrich product.

The label "Origine France Garantie" assures the consumer the traceability of a product by giving a clear and objective indication of the source. The DE DIETRICH brand is proud to affix this label on products from our French factories based in Orléans and Vendôme.
www.dedietrich-electromenager.com

CONTENTS
EN
Safety and Important Precautions 4
1 / Installation 6
2 / Environment 7
3 / Presentation of the oven 8
The controls and display 9
Accessories 10
4 / Settings 12
Time setting 12
Changing the time 12
Timer 12
Control lock 12
Settings menu 12
5 / Cook 13
"EXPERT" mode 13
- Immediate cooking 13
- Program the temperature, duration 13
- Delayed start cooking 14
- Save a cooking 14
- Cooking functions in "Expert" mode 15
"LOW TEMPERATURE" mode 18
"RECIPES" mode 19
"CHEF" mode 21
6 / Maintenance 25
External surface 25
Dismantling the steps 25
Cleaning the door windows 25
Disassembly and reassembly of the "Sensor" plate 26
Self-cleaning by pyrolysis 27
Lamp replacement 28
7 / Anomalies and solutions 29
8/After-sales service 30
9 / Cooking aid 31
Cooking charts 31
Functional aptitude tests 32
Recipes with yeast 32
IMPORTANT SAFETY INSTRUCTIONS - READ CAREFULLY AND RETAIN FOR FUTURE USE.
This user guide is available for download on the brand's website.
When you receive the appliance, unpack it or have it unpacked immediately. Check its general appearance. Make a note of any reservations on the delivery slip and keep a copy.

Important:
This appliance may be used by children aged 8 years and older, and by persons with impaired physical sensorial or mental capacities, or without experience or knowledge, if they are supervised or have received prior instructions on how to use the appliance safely and have understood the risks involved. Children must not be allowed to play with the appliance. Cleaning and maintenance operations must not be carried out by children without supervision.
Children must be supervised to prevent them from playing with the appliance.
WARNING:
The appliance and its accessible parts become hot during use. Be careful not to touch the heating elements inside the oven. Children under 8 years old must not be allowed near it unless they are supervised at all times.
This appliance is designed to
cook with the door closed.
Before pyrolytic cleaning of your oven, remove all accessories and any thick deposits.
During cleaning, the surfaces may become warmer than under normal conditions of use. It is advisable to keep children away from the appliance.
— Do not use a steam cleaner.
- Do not use abrasive cleaning products or hard metal scrapers for cleaning the oven's glass door, as they could scratch the surface and cause the glass to shatter.
WARNING :
Make sure the appliance is disconnected from the power before replacing the lamp in order to avoid the risk of electric shock. Change the lamp only when the appliance has cooled down. To unscrew the view port and the light, use a rubber glove, which will make disassembly easier.
IMPORTANT SAFETY INSTRUCTIONS

The electrical plug must remain accessible after
installation.
- It must be possible to disconnect the appliance from the power supply, either using a plug or by fitting a switch on the fixed wiring system in accordance with installation rules.
If the power cable is damaged, it should be replaced by the manufacturer, its after-sales service department or by a similarly qualified person in order to avoid danger.
- This appliance may be installed either under a worktop or in a cabinet column, as indicated on the installation diagram.
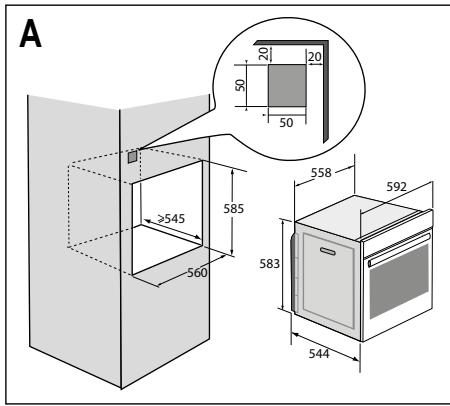
Centre the oven in the unit so as to ensure a minimum distance of 10mm between the appliance and the surrounding unit. The material of the unit supporting the appliance must be heat-resistant (or covered with a heat-resistant material). For greater stability, attach the oven to the unit with 2 screws through the holes provided on the side panels.
In order to avoid overheating, the appliance must not be installed behind a decorative door.
This appliance is designed to be used for domestic and similar applications such as :
Kitchen areas for the staff of shops, offices and other professional premises.
Farms. Use by clients of hotels, motels and other residential type establishments; guest house type environments.
The oven must be turned off when cleaning inside the oven.
Do not modify the characteristics of this appliance; doing so could be dangerous.
Do not use your oven as a larder or to store any items after use.
CHOICE OF LOCATION AND FITTING
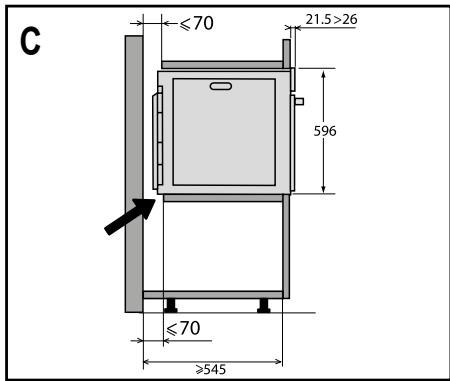
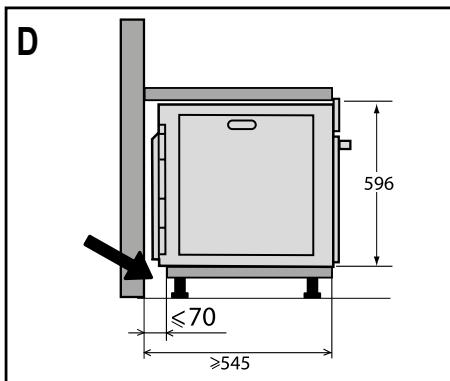
The diagrams show the dimensions of a cabinet that will be able to hold your oven. This appliance may be installed either under a column (A) or in a worktop (B). If the cabinet is open, its opening at the back must be 70mm maximum (C,D).
Install the oven in the furniture. To do this, remove the rubber stops and pre-drill a 2-mm diameter hole in the wall of the furniture to avoid splitting the wood. Attach the oven with the two screws. Re-position the rubber stops.

Tip
To be certain that you have properly installed your appliance, do not hesitate to call on a household appliance specialist.

Warning :
If the electrical installation in your residence requires any changes in order to hook up your appliance, contact a professional electrician. If the oven malfunctions in any way, unplug the appliance or remove the fuse corresponding to the sector where the oven is hooked up.
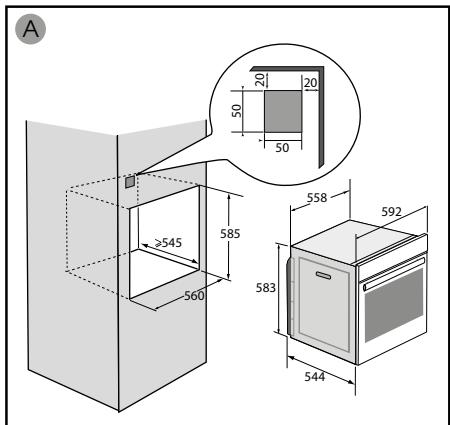
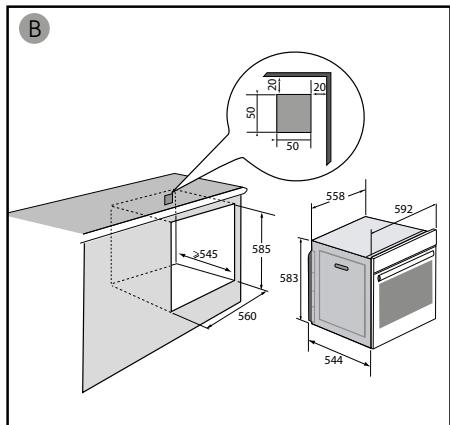
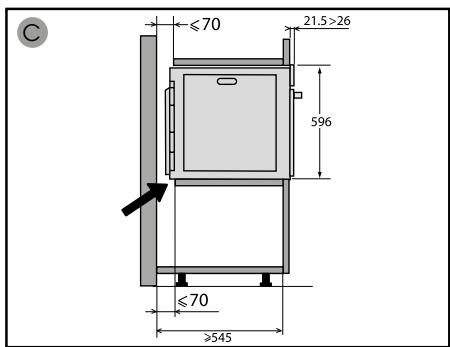
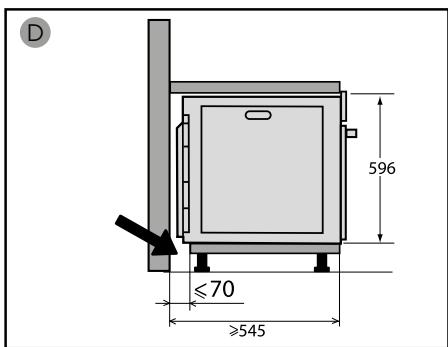
ELECTRICAL CONNECTION
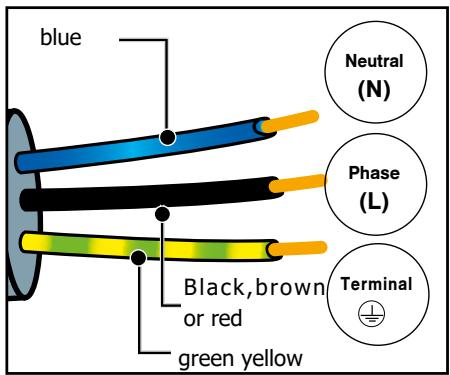
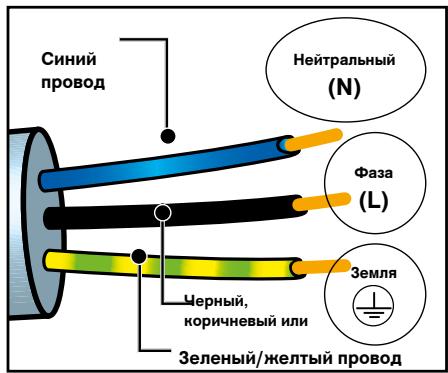
Your oven must be connected with a (standard) power cable with 3 conductors of 1.5mm^2 (1 live + 1 neutral + earth) which must be connected to a 220-240V~ single-phase grid by means of a 1 live + 1 neutral + earth CEI 60083 standard power socket or via an all-poles cut-off device in compliance with the installation rules.
We cannot be held responsible for any accident resulting from inexistent, defective or incorrect earthing.
Warning
The safety wire (green-yellow) is connected to the appliance's 电电 terminal and must be connected to the earth terminal of the electrical set-up.
The fuse in your set-up must be 16 amperes.
2 ENVIRONMENT
CARE FOR THE ENVIRONMENT
The packaging of this appliance can be recycled. Help to recycle them and protect the environment by placing them
in the municipal containers provided for this purpose.
Your appliance also contains many recyclable materials. It therefore is marked with this symbol to indicate that
appliances to be disposed of should not be mixed with other waste.
This way, the appliance recycling
organised by your manufacturer will be done with maximum efficiency, in compliance with European Directive 2002/96/EC on Waste Electrical and Electronic Equipment.
Contact your local authority or retailer for information on used appliance collection points close to your home.
Thank you for co-operation in protecting the environment.
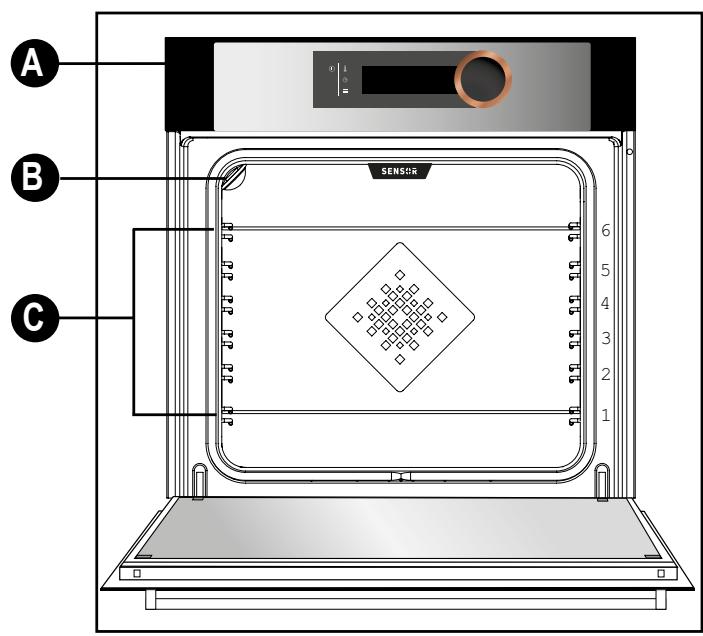
PRESENTATION DU FOUR
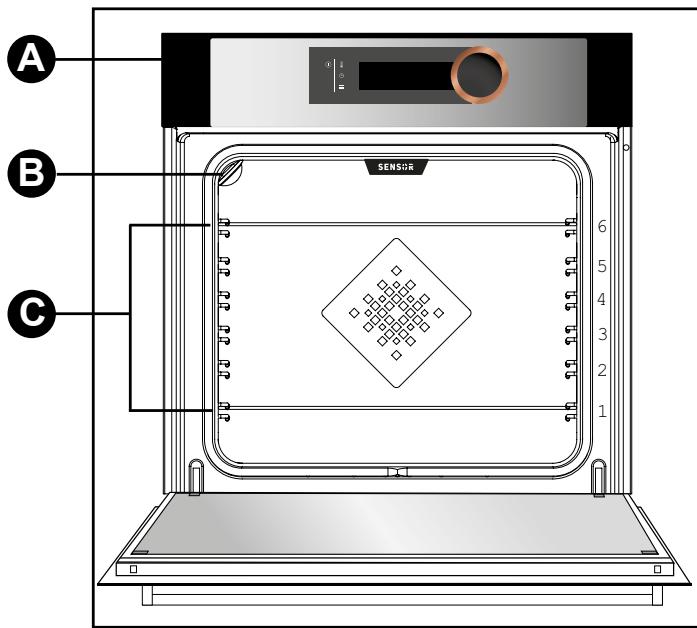
A Control panel
B Lamp
C Shelf runners (6 heights available)
CONTROL PANEL
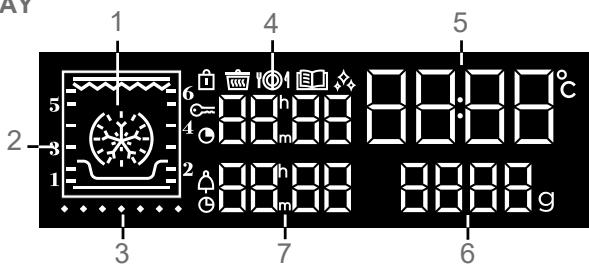
- THE DISPLAY
1 Cooking modes display
2 Shelf runner indicator
3 Temperature rise indicator
4 Cooking time display
5 Oven temperature and clock display
6 Weight display
7 Minute minder and cooking end time display
Control locking indicator
《Low temperature》function indicator
101 «Chef» function indicator
«Recipes» function indicator
Cleaning indicator
Cooking time indicator
Minute minder indicator
Cooking end time indicator
BUTFONS
1 On/Off
2 Adjusting the temperature
3 Adjusting the clock, the time and the end of cooking, the minute minder
4 Access the settings MENU
- CONTROL KNOB
This is a rotating knob with central button to choose programmes, increase or reduce values and confirm.
3 DESCRIPTION OF THE OVEN
ACCESSORIES (depending on model)
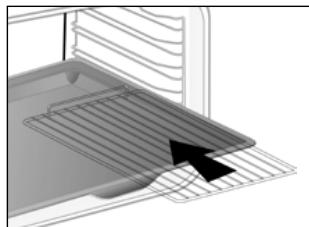
- Anti-tip safety rack
The rack can be used to support all dishes and moulds containing food for cooking or browning. It can be used for grilling (placed directly on top).
Position the anti-tip stop towards the back of the oven.
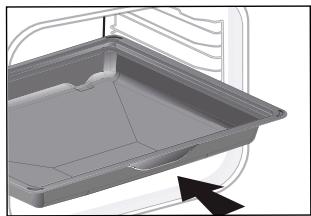
Multi-purpose tray, drip tray45 mm
When inserted in the shelf runners under the grill with the handle towards the oven door, it collects juice and fat from grilling, and can be used half-filled with water as a double-boiler.
- «Flavour» grills
These half «flavour» grills are used separately, but only when placed in one of the dishes or drip tray with the anti-tip handle towards the back of the oven.
By using just one grill, it is easy to moisten your food with the cooking juices collected in the dish.
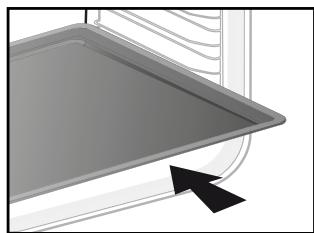
- 8mm pastry tray
Insert in the shelf runners. Ideal for baking cookies, shortbread and cupcakes.
The tilted surface makes it easier for you to place your preparations on a dish. Can also be inserted into the runners under the grid to collect juice and fat from grilling.

3 DESCRIPTION OF THE OVEN
- Sliding rail system
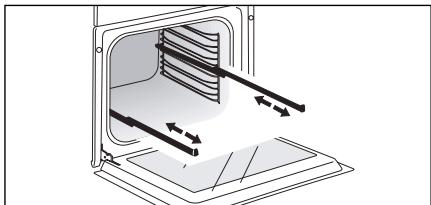
The new sliding rail system makes food more practical and easier to handle as the trays can be effortlessly pulled for simpler handling. The trays can be completely removed, providing full access.
Their stability ensures that food can be handled safely, reducing the risk of burns. This means that you can take food out of the oven far more easily.
INSTALLING AND REMOVING THE SLIDING RAILS
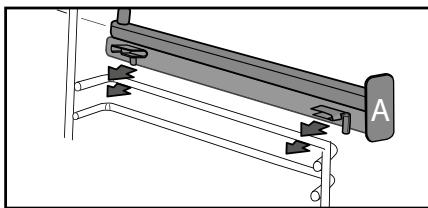
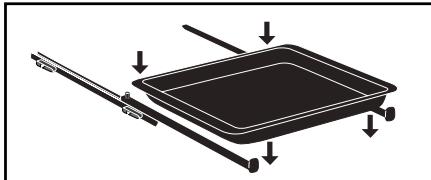
After removing the 2 shelf runners, choose the height (2 to 5) at which you want to fit your rails. Snap the left rail against the left shelf runner by applying enough pressure to the front and back of the rail so that the 2 tabs on the side of the rail slot into the shelf runner. Do the same for the right-hand rail.
NOTE: the telescopic sliding part of the rail must unfold towards the front of the oven, with the buffer opposite you.
Insert your 2 shelf runners and then put your tray on the 2 rails. The system is now ready to use.
To remove the rails, remove the shelf runners again.
Slightly prisepart the bottom of the tabsfixed on each rail to release the shelfrunner.Pull the rail towards you.

@Tip
To avoid fumes when cooking fatty meats, we recommend you add a small amount of water or oil to the bottom of the drip pan.
The accessories may warp with the effect of heat, but this will not alter their function. They will return to their original shape once cooled.
SETTING THE CLOCK
When switching on, the display flashes at 12:00.
Adjust the hour by turning the knob, then press to confirm.
If there is a power cut, the clock flashes.
CHANGING THE CLOCK
Press the button for a few seconds until the clock flashes. Adjust the clock by turning the knob and then press to confirm.
MINUTE MINDER
This function can only be used when the oven is off.
Press
00:00 flashes. Set the minute minder by turning the knob and then press to confirm. The timer starts.
Once the time has lapsed, there is a sound signal. To stop it, press any key.
NB: You can modify or cancel the minute minder at any time.
To cancel, return to the timer's menu and set to 00:00.
If you do not confirm, it will be saved automatically after a few seconds.
CONTROL LOCKING Child safety
Press and at the same time until the symbol appears on the screen.
Control locking is accessible during cooking or when the oven has stopped.
N.B.:only the button remains active.
To unlock the keypad, press 和 together until the symbol disappears off the screen.
SETTINGS MENU
You can adjust different settings on your oven:
light, contrast, sounds and demo mode.
To do this, press for a few seconds to access the settings menu.
See the table below:
To modify the different settings if necessary, turn the control knob and then press ① to confirm.
To come out of the settings menu at any time, press ①.
| Default settings | Light: Position ON, la lampe reste allumée durant les cuissons (sauf en fonction ECO). Position AUTO, la lampe du four s'eteint au bout de 90 secondes lors des cuissons. |
| RÉNU LAMP ON | |
| RÉNU Snd On | Sounds - beeps: Position ON, sounds active. Position OFF, no sounds. |
| RÉNU Lcd 50 | Contrast: The brightness of the display is adjustable from 10 to 100%. |
| RÉNU dENO OFF | DEMO mode: "DEMO" mode; demonstration mode used in exhibition. Turn it off to make your oven up and running. |
| RÉNU SLEEP OFF | Display standby: ON position, display off after 90s. OFF position, reduction, brightness after 90s. |
5 COOKING
COOKING
This oven gives you access to three different types of programming depending on the degree of knowledge you have about the recipe in question:
-
For a recipe where you know all the settings (you choose the type of cooking, temperature and cooking time yourself), select «EXPERT» mode.
-
For a recipe managed entirely by the oven thanks to a specific electronic programme in order to obtain unrivalled tenderness of meat and exceptional flavours, select "LOW TEMPERATURE" mode.
-
For a recipe where you need assistance from the oven (simply choose the type of food from a list and the weight; the oven will select the most suitable settings: temperature, cooking time, type of cooking), select «RECIPES» mode.
Select "CHEF" mode for a recipe automatically managed by the oven. Choose from a list of the most common dishes you want to cook.
Before using your oven for the first time, heat it at maximum temperature while empty for approximately 30 minutes. Make sure that the room is sufficiently ventilated.
《EXPERT》MODE
The Expert function lets you set the cooking parameters yourself: temperature, cooking type, cooking time.
-
Access the "Expert" screen by pressing or turning the knob or by pressing = on ①
-
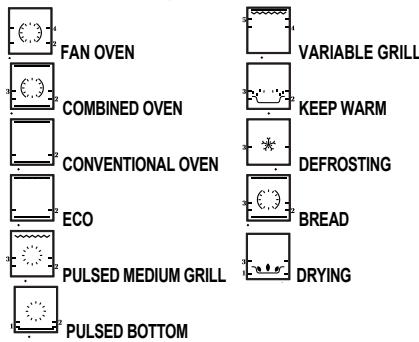
Then select the type of cooking from the following list by turning the control knob and then press to confirm.
IMMEDIATE COOKING
The programmer must only display the time. It should not be flashing.
Turn the control knob until you get to the cooking function of your choose, then confirm.
The temperature starts to increase at once. Your oven recommends one (or two) shelf height(s) and a modifiable temperature.
The oven heats up and the temperature indicator flashes. A series of beeps sounds when the oven has reached the programmed temperature.
CHANGING THE TEMPERATURE
When you are in the cooking mode of your choice, press
Adjust the temperature by turning the knob and then press to confirm.
PROGRAMMING THE COOKING TIME
Use the immediate cooking programme, then press ; the cooking time flashes and it is now possible to set it.
Turn the knob to adjust the cooking time. Press to confirm.
Your oven has the "SMART ASSIST" function which, when programming a cooking time, will suggest a cooking time which can be modified depending on the selected cooking mode.
| COOKING MODE | RECOMMENDATION OF COOKING TIME |
| FAN OVEN | 30 min |
| COMBINED OVEN | 30 min |
| CONVENTIONAL OVEN | 30 min |
| ECO | 30 min |
| PULSED GRILL | 15 min |
| PULSED BOTTOM | 30 min |
| VARIABLE GRILL | 7 min |
| KEEP WARM | 60 min |
| DEFROSTING | 60 min |
| BREAD | 40 min |
| DRYING | 5 hours |
The time starts to count down as soon as the cooking temperature is reached.
DELAYED START
Proceed as for programmed cooking. After setting the cooking time, press The display flashes. Set the cooking end time by turning the knob.
Press to confirm.
The cooking end time display stops flashing.
MEMORISE A COOKING MODE
You can memorise 3 cooking programmes of your choice.
-Programme a memory (fig. E):
In Expert mode, select a cooking mode, the temperature and time and then press the knob until you get to «MEM 1». Choose one of the 3 memories by turning the control knob and confirm to memorise it. Confirm again to start cooking.
NB: If the 3 memories are saved, any new memorisation will replace the previous one.
A delayed start cannot be programmed for memorisations.
- Select one of the 3 memories already saved (fig. F):
Turn the knob and go to MEMO, then confirm. Scroll through the memories with the knob and confirm the one you want. Cooking starts, you can now delay your start time.
5 COOKING
COOKING FUNCTIONS IN «EXPERT» MODE
(dependently on model)

Pre-heat your oven empty before cooking.
| Position | T°C recommended mini - maxi | Use |
| Combined oven* | 180°C 35°C - 250°C | Recommended for keeping white meat, fish and vegetables moist. For cooking multiple items on up to three levels. |
| Combined oven | 205°C 35°C - 230°C | Recommended for meat, fish, vegetables, preferably in an earthenware dish. |
| Conventional oven | 200°C 35°C - 275°C | Recommended for meat, fish, vegetables, preferably in an earthenware dish. |
| ECO* | 200°C 35°C - 275°C | This setting saves energy while maintaining the quality of the cooking. In this setting, pre-heating is not required. |
| Pulsed grill | 200°C 100°C - 250°C | Roasts and poultry are juicy and crisp all over. Slide the drip tray on to the bottom shelf support. Recommended for all spit-roasted poultry or meat, for sealing and thoroughly cooking a leg or a rib of beef. To retain the moist texture of fish steaks. |
| Pulsed bot- tom | 180°C 75°C - 250°C | Recommended for meat, fish, vegetables, preferably in an earthenware dish. |
*Cooking mode as per standard EN 60350-1: 2016 to demonstrate compliance with requirements of the energy label of European regulation UE/65/2014.
| Position | T°C recommended mini - maxi | Use |
| Variable grill | 4 | Recommended for grilling cutlets, sausages, toasting bread and prawns placed on the grill. Cooking is done by the upper element. The grill covers the entire shelf surface. |
| 1 - 4 | ||
| Keep warm | 60°C | Recommended for letting dough rise for bread, brioche, kügelhopf. |
| 35°C - 100°C | Put the mould on the bottom, not exceeding 40°C (plate-warming, defrosting). | |
| Defrosting | 35°C | Ideal for delicate dishes (fruit tarts, custard pies, etc.). Meat, rolls, etc. are defrosted at 50°C (meat should be placed under the grill with a dish underneath to catch the drips). |
| 30°C - 50°C | ||
| Bread | 205°C | Recommended cooking sequence for bread making. Pre-heat, then place the ball of dough on a baking sheet - 2nd shelf. Do not forget to place a dish of water in the bottom to obtain a crisp, golden crust. |
| 35°C - 220°C | ||
| Drying | 80°C | Sequence to dehydrate certain food such as fruits, vegetables, seeds, roots, seasoning plants and herbs. Refer to the specific drying table below. |
| 35°C - 80°C |

Advice on how to save energy
Avoid opening the door during cooking to avoid heat escaping from the oven.

Never place tin foil directly in contact with the oven floor as the build of heat may damage the enamel.
DRYING FUNCTION
Drying is one of the oldest methods of preserving food. The aim is to remove all or some of the water in the food to preserve foodstuffs and prevent the development of microbes. Drying preserves the nutritional qualities of food (minerals, proteins and other vitamins). It allows food to be stored in optimal conditions thanks to their reduced size and makes food easy to use once rehydrated.
Only use fresh food.
Wash the food carefully, drain and wipe. Cover the grill in parchment paper and distribute the cut food evenly on top.
Use shelf level 1 (if you have several grill pans, put them on levels 1 and 3).
Turn the food over several times during drying. The values provided in the table may vary depending on the type of food to dehydrate, its maturity, its thickness and its humidity rate.

Guide table to dehydrate your food
| Fruits, vegetables and herbs | Temperature | Time in hours | Accessories |
| Fruits with seeds (in 3 mm slices, 200 g per grill pan) | 80°C | 5-9 | 1 or 2 grill pans |
| Fruits with stones (plums) | 80°C | 8-10 | 1 or 2 grill pans |
| Edible roots (carrots, parsnips), grated and blanched | 80°C | 5-8 | 1 or 2 grill pans |
| Sliced mushrooms | 60°C | 8 | 1 or 2 grill pans |
| Tomato, mango, orange, banana | 60°C | 8 | 1 or 2 grill pans |
| Sliced red beetroot | 60°C | 6 | 1 or 2 grill pans |
| Herbs | 60°C | 6 | 1 or 2 grill pans |
5 COOKING
MODE (depending on model)
Cooking "BASSE TEMPERATURE" must definitely start cold oven.
This cooking mode makes meat fibres tender thanks to slow cooking at low temperature.
Cooking quality is optimal.
The oven offers a choice of 10 dishes:

P01

P

P03

P04

P

P06

P


PI

9

P10


P01 Roast veal (4 hours)
P02 Roast beef rare (3 hours)
P03 Roast beef well done (4 hours)
P04 Roast pork (5 hours)
P05 Pink lamb (3 hours)
P06 Lamb well done (4 hours)
P07 Chicken (6 hours)
*P08 Small fish (1 hour 20)
*P09 Large fish (2 hours 10)
*P10 Yoghurt (3 hours)
IMMEDIATE COOKING
Turn the control knob to the «low temperature» cooking function.
The symbol and «Lt» are displayed on the screen.
- Confirm the selection by pressing the control knob.
«P01» flashes, you have to choose your dish by turning the knob.
-
Select your dish.
-
Once the dish has been selected, for example: P01 (roast veal), put your meat on the grill pan in the upper level (level 2) and slide the drip pan below (level 1).
-
N.B: Do not use the grill pan for programmes P08-P09-P10. Put them directly on the drip tray on the shelf level shown on the screen.
-
Confirm the selection by pressing the control knob. Cooking starts.
When cooking is complete, the oven switches off automatically and rings for 10 minutes.
- Press a button to stop the beeping.
Cooking at low temperature requires food to be extremely fresh. For poultry, it is important to rinse the outside and inside with cold water and to dray with absorbent paper before cooking.
5 COOKING
DELAYED START
You can choose a delayed «low temperature» start. After selecting your programme, press 口 .
The display flashes. Set the cooking end time by turning the knob. Press to confirm. The cooking end time display stops flashing.
If your oven is too hot to start low temperature cooking, the word «Hot» is displayed on the screen. Leave the oven to cool.
«RECIPES» MODE
The "Recipes" function selects the appropriate cooking parameters for you based on the food being prepared and its weight.
IMMEDIATE COOKING
Select «Guide» on the screen by turning the knob and then confirm.
The symbol 10 is displayed and «Guide» shows on the screen.
There are 35 (or 15, depending on the model of your oven) pre-programmed recipes. See the 2 tables below.
Use the control knob to scroll through the food choices and press to confirm.
A suggested weight flashes on the screen. Enter the actual weight of your food by turning the knob, then confirm.
The oven automatically calculates the ideal cooking time and displays it. Cooking starts immediately.
DELAYED START
If you wish, you can change the cooking end time by pressing ⑤ and displaying the new cooking end time when the oven has started.
Confirm by pressing the knob.
The oven stops and will start later so that cooking ends at the desired time.
For recipes which require preheating, do not use the delayed start function.
5 COOKING
| Food | 35 Recipes |
| Chicken | P01 |
| Duck | P02 |
| Duck breast | *P03 |
| Turkey | P04 |
| Rosé shoulder of lamb | P05 |
| Rare beef | P06 |
| Beef medium done | P07 |
| Well-cooked beef | P08 |
| Roast pork | P09 |
| Roast veal | P10 |
| Veal chops | *P11 |
| Salmon | P12 |
| Trout | P13 |
| Fish terrine | P14 |
| Lasagne | P15 |
| Potato gratin | P16 |
| Stuffed tomatoes | P17 |
| Baked potatoes | P18 |
| Puff pastry | P19 |
| Pizza | P20 |
| Quiche | P21 |
| Shortcrust pastry | P22 |
| Leavened dough | P23 |
| Fruit tart | P24 |
| Crumble | P25 |
| Sponge cake | P26 |
| Cupcakes | P27 |
| Crème caramel | P28 |
| Biscuits | *P29 |
| Cake | P30 |
| Yoghurt cake | P31 |
| Chocolate cake | P32 |
| Brioche | P33 |
| Bread | P34 |
| Baguette | P35 |
| Food | 15 Recipes |
| Chicken | P01 |
| Duck breast | *P02 |
| Rare beef | P03 |
| Pizza | P04 |
| Roast pork | P05 |
| Potato gratin | P06 |
| Rosé shoulder of lamb | P07 |
| Roast veal | P08 |
| Salmon | P09 |
| Fish terrine | P10 |
| Quiche | P11 |
| Stuffed tomatoes | P12 |
| Biscuits | *P13 |
| Cake | P14 |
| Brioche | P15 |
*Pre-heat before placing the dish in the oven.
《CHEF》MODE
This mode will make the task all the easier since the oven will automatically calculate all the cooking parameters according to the selected dish (temperature, cooking time, type of cooking) thanks to electronic sensors placed in the oven that continuously measure the humidity and temperature variation.
No preheating is required to use the "CHEF" mode. Cooking must IMPERATIVELY start cold oven.
IMMEDIATE COOKING
- Turn the knob to the "Chef" cooking function.
The symbol 1 and "CHEF" are displayed on the screen. Validate by pressing the controller. Chef "1" flashes, you have to choose your dish by turning the controller..
The oven offers a choice of 6 dishes (see the list of dishes below).
- Select your dish and then validate.
- Validate again on the controller to start cooking.
ATTENTION:
This method of cooking takes place in two phases:
1- A first phase of research during which the oven begins to heat up and will determine the ideal cooking time. This phase lasts between 5 and 40 minutes depending on the dish.
IMPORTANT: Do not open the door during this phase so as not to disturb the calculation and recording of the data or the cooking will be cancelled.
This research phase is represented by an animation
2-A second phase of cooking: the oven has adjusted the necessary time, this research phase is represented by an animation
The remaining time taken into account the cooking time of the first phase.
It is now possible for you to open the door, to water or return your meats.
- The oven goes out when the cooking time is over and your screen tells you that the dish is ready.
DEFERRED DEPART COOKING
You can change the end time of cooking before putting your dish in the proposed bleacher.
- If you wish, you can change the end time by pressing the ⑤ button and displaying the new end-of-cooking time when the oven has started.
Validate by pressing the controller.
The oven stops and will start later so that the cooking finishes at the desired time.
LIST OF «CHEF» DISHES

CHEF1

CHEF 2

CHEF3

CHEF 4

CHEF 5

CHEF 6

Pizza (CHEF 1)
300gr to1.2kg
Store-bought pizza - fresh pasta
Ready-to-use pizza dough
Home-made pizza dough
Place it on the grill for a crispy crust (you can place a sheet of parchment paper between the grid and the pizza to protect the oven from cheese drippings). Place the pizza on the baking tray for a soft crust.

Chicken (CHEF 2)
Chickens (1,4 kg to 2.5 kg) Duck, guinea fowl
Place the chicken on the grill using the grill + drip tray assembly. Pierce the skin of poultry to avoid splat-tering.

Fish (CHEF 3)
(400 gr to 1kg)
Whole fish (bream, hake, trout, mackerel) Roast fish. Not suitable for flat fish.
Use the multipurpose tray.

Savoury tart (CHEF 4)
Fresh quiches Frozen quiches
Use a non-stick aluminium mould: the crust will be crispy on the bottom. Remove the tray from frozen quiches before placing them on the grid.

Sweet tarts (CHEF 5)
Fresh tarts Frozen tarts
Use a non-stick aluminium mould: the crust will be crispier on the bottom.

Small biscuits (CHEF 6)
Small individual cakes: cookies, croissants, buns, fruit bread in a mould, croque-monsieur.
Place the small individual cakes on a pastry tray, itself placed on the grill.
LIST OF «CHEF» DISHES
Pizza
Pizza Base: 1 pizza crust
*with vegetables : 6 tablespoons tomato sauce + 100 g diced courgettes + 50 g diced bell
peppers + 50 g sliced aubergines + 2 small sliced tomatoes + 50 g shredded gruyere + oregano + salt
+pepper.
*with roquefort and smoked bacon :6 tablespoons tomato sauce + 100 gsmoked bacon +
100 g roquefort in small chunks + 50 g walnuts + 60 g grated gruyere.
*with sausage and cottage cheese : 200 g drained cottage cheese spread on the crust + 4
sausages, sliced + 150 g ham slivers + 5 olives + 50 g grated gruyere + oregano + salt + pepper.
Quiches:
Base: 1 aluminium mould, diameter 27 to 30~cm
1 ready-to-use short crust pastry
3 beaten eggs + 50 cl heavy cream salt, pepper, nutmeg.
Various garnishes :
200 g precooked larding bacon
or - 1 kg cooked endives + 200 g grated gouda
or - 200 g broccoli + 100 g larding bacon
+50g blue cheese
or - 200 g salmon + 100 g spinach, cooked and drained.
Chicken
Stuff it with a good bouquet of fresh tarragon or rub it with a mixture of 6 crushed cloves of garlic with a pinch of coarse salt, and some peppercorns.
Flaky praline apple tart:
1 flaky pastry crust rolled and pricked with a fork.
200 ml cream brought to a boil with a vanilla bean.
2 beaten eggs with 30g sugar, add the cooled cream.
2 apples cut into cubes rolled in 70g crushed pralines.
Add cream and apples to crust. Place in the oven.
HINTS AND TIPS
- Beef, pork, lamb
- Always remove meat from the refrigerator well before cooking: cold-hot temperature shocks toughen meat; this way you will produce a roast beef that is golden outside, red inside and warm in the middle.
Do not salt before cooking: salt absorbs the blood and dries out the meat. Turn the meat over using spatulas; if you pierce it, the blood will run out. Always leave meat to rest for 5 to 10 minutes after cooking. Wrap it in foil and put it at the oven's entrance; the blood attracted outside during cooking will return inside and moisten the meat.
-
Use earthenware roasting dishes; glass tends to get splattered in grease.
-
Do not cook in the enamelled drip tray.
-
Avoid sticking garlic cloves into a leg of lamb, this will cause it to lose its blood; rather slip the garlic between the meat and the bone or cook unpeeled cloves alongside the lamb and crush them when cooking is complete to season the sauce; strain it and serve it very hot in a gravy boat.
Fish
-
When you buy it, it should smell pleasant and not too "fishy".
-
The body should be firm and rigid and the scales should be firmly attached to the skin; the eyes should be bright and rounded and gills will appear shiny and moist.
Tarts, quiches
-
Avoid glass or porcelain dishes as they are too thick and extend the cooking time and the bottom of the crust is not crispy.
-
With fruits, the bottom of the tart may become soggy: just add a few spoonfuls of fine semolina, crushed biscuit crumbs, almond powder or tapioca, which will absorb the juice during cooking.
-
With high-water content or frozen vegetables (leeks, spinach, broccoli or tomatoes) you can sprinkle a tablespoon of cornmeal.
- Pizza
- To prevent cheese or tomato sauce from dripping in the oven, you can place a piece of parchment paper between the shelf and the pizza.
CLEANING AND MAINTENANCE:
EXTERNAL SURFACE
Use a window washing product applied to a soft cloth. Do not use abrasive creams or scouring sponges.
REMOVING THE SHELF RUNNERS
Side liners with shelf runners:
Lift the front part of the shelf runner upwards. Press the entire shelf runner and release the front hook from its housing. Then, gently pull the whole of the shelf runner towards you to release the rear hooks from their housing. Pull out the two shelf supports.


CLEANING THE DOOR GLASS
Warning Do not:
Do not use scouring products, abrasive sponges or metal scrapers to clean the glass oven door as this could scratch the surface and cause the glass to shatter.
First of all remove any excess grease with a soft cloth and washing up liquid.
To clean the different inner glass, disassemble them as follows:
Open the door fully and block it with one of the plastic wedges provided in your appliance's plastic pouch.
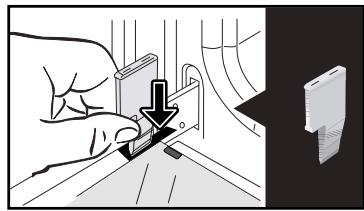
Remove the first clipped glass panel: Using the other wedge (or a screwdriver), press the slots A to unclip the glass.
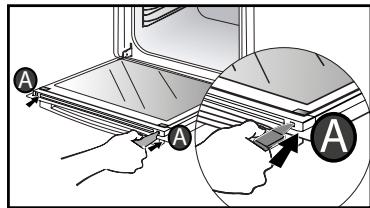
Remove the glass panel.
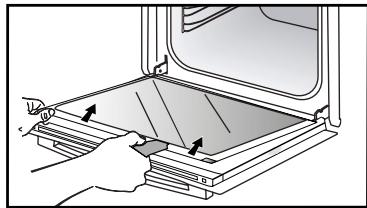
The door consists of two additional glass panels, with a black rubber spacer at each corner.
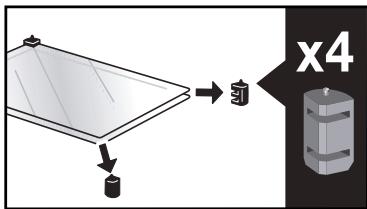
If necessary, remove them to clean them.
Do not soak the glass panels in water. Rinse with clean water and dry off with a lint-free cloth.
After cleaning, reposition the four rubber stops with the arrow upwards and reposition all of the glass panels.
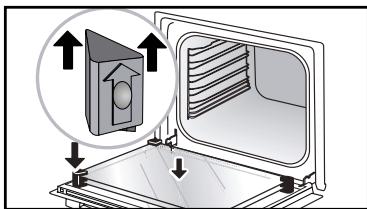
Insert the last glass panel into the metal stops, then clip it in with the side with «PYROLYTIC» facing you and legible.
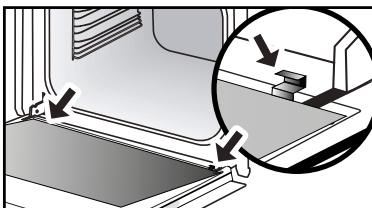

Remove the plastic wedge.
Your appliance is now ready for use again.
DISASSEMBLY AND REASSEMBLY OF THE "SENSOR" PLATE
You can dismantle the "SENSOR" plate indicating the presence of a humidity sensor linked to the CHEF mode as it is not essential for operation. Use the plastic wedge supplied to dismantle the door glass.
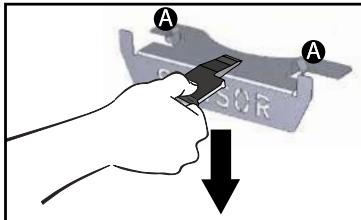
Disassembly :
Slide the plastic wedge between the "SENSOR" plate and the top of the oven and make a downward movement to unclip it.
Reassembly :
Grasp the "SENSOR" plate and firmly
insert the notches A into the corresponding slots upwards.
PYROLYTIC SELF-CLEANING
This oven is equipped with a pyrolytic self-cleaning function:
Pyrolysis is a cycle during which the oven cavity is heated to a very high temperature in order to eliminate soiling from splattering and spills.
Before starting pyrolysis cleaning, remove any large overspills, if any. Remove the excess grease on the door using a damp sponge.
As a safety measure, cleaning only occurs after the door locks automatically; it is impossible to unlock the door.
Remove the accessories and supports from the oven before beginning pyrolysis cleaning.
PERFORM A SELF-CLEANING CYCLE
Proposed cycles:

PyroExpress in 59 minutes.
This specific function uses the heat built up during a previous cooking cycle to quickly and automatically clean the inside of the oven: it cleans a mildly dirty oven interior in less than an hour.
The electronic oven temperature monitor determines whether the residual heat remaining in the oven interior is sufficient to provide a good cleaning result. If this is not the case, a 90-minute ECO pyrolysis cycle will automatically begin.

Pyrolysis 2h00
for more in-depth cleaning of the inside of the oven.
IMMEDIATE CLEANING
The programmer must only display the time. It should not be flashing.
Turn the function selector to one of the self-cleaning functions.
The pyrolysis cycle begins. The time starts to count down as soon as it is set (press the knob).
During pyrolysis, the symbol is displayed in the programmer to indicate that the door is locked.
At the end of pyrolysis, a cooling phase takes place and your oven remains unavailable during this time.

When the oven is cool, use a padmp cloth to remove the white fires. The oven is clean again and ready for further cooking operations.
DELAYED CLEANING
Follow the instructions in the previous paragraph and then set the end time for the pyrolysis cycle by pressing 5 . The display flashes. Set the end time with + and - . After these steps, the start of pyrolysis is delayed so that it finishes at the programmed time. When the pyrolysis cycle has finished, put the function selector back to 0.
REPLACING THE LIGHT BULB
Warning
Make sure the appliance is disconnected from the power before replacing the bulb in order to avoid the risk of electric shock. Carry out the operation when the appliance has cooled.
Bulb specification:
25 W, 220-240 V\~, 300^ G9.

You can replace the bulb yourself. Unscrew the view port and remove the bulb (use a rubber glove, which will make it easier to remove). Insert the new bulb and replace the view port.
This product contains a light source of energy efficiency class G.
7 ANOMALIES AND SOLUTIONS
- «AS» is displayed (Auto Stop system).
This function stops heating the oven if you forget to switch it off. Turn your oven to STOP.
- Default code starting with «F». Your oven has detected a problem.
Stop the oven for 30 minutes. If the fault is still there, cut off the power supply for at least one minute.
If the fault persists, contact the Customer Service Department.
- The oven is not heating. Check that the oven is correctly connected and that your installation's fuse is not out of service.
Check that the oven is not set to «DEMO» mode (see settings menu).
- The oven light is not working. Replace the bulb or the fuse.
Check that the oven is correctly connected.
-
The cooling fan continues to operate after the oven stops. This is normal. It can work for up to one hour after cooking to cool down the oven. If it continues beyond this, contact the Customer Service Department.
-
The pyrolysis cleaning cycle does not begin. Check that the door is locked. Call the Customer Services Department if the problem persists.
-
The «door locking» symbol flashes in the display. Door locking fault. Contact the Customer Services Department.
Vibration noise.
Check that the power cord is not coming in contact with the rear wall. This has no impact on the proper operation of your device but can nevertheless generate a vibration noise during ventilation. Remove your device and move the cord. Replace your oven.
8 AFTER-SALES SERVICE
SERVICE CALLS
Any repair made to your appliance must be carried out by a qualified professional authorised to work on the brand. When you call, state your appliance's complete reference information (model, type, serial number). This information appears on the manufacturer's nameplate.
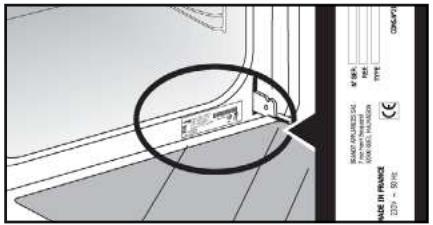
ORIGINAL PARTS
During any servicing, ask that only certified genuine replacement parts are used.

| A | B | C |
| SERVICE: C | TYPE: D | I CE |
| E | F | |
| Nr H | Made in France | |
B:Commercial reference
C: Service reference
H: Serial number
| DISHES | * | * | * | * | * | * | Cooking time | |||||||
| c | LEAV | c | LEAV | c | LEAV | c | LEAV | c | LEAV | c | LEAV | |||
| MEAT | Roast pork (1kg) | 200 | 2 | 190 | 2 | 60 | ||||||||
| Roast veal (1kg) | 200 | 2 | 190 | 2 | 60-70 | |||||||||
| Roast beef | 240 | 2 | 200 | 2 | 30-40 | |||||||||
| Lamb (leg, shoulder, 2.5kg) | 220 | 2 | 220 | 2 | 200 | 2 | 210 | 2 | 60 | |||||
| Poultry (1kg) | 200 | 3 | 220 | 3 | 210 | 3 | 185 | 3 | 60 | |||||
| Chicken thighs | 220 | 3 | 210 | 3 | 20-30 | |||||||||
| Pork/veal chops | 210 | 3 | 20-30 | |||||||||||
| Beef ribs (1kg) | 210 | 3 | 210 | 3 | 20-30 | |||||||||
| Lamb chops | 210 | 3 | 20-30 | |||||||||||
| FISH | Grilled fish | 275 | 4 | 15-20 | ||||||||||
| Cooked fish (bream) | 200 | 3 | 190 | 3 | 30-35 | |||||||||
| Fish in papillotte | 220 | 3 | 200 | 3 | 15-20 | |||||||||
| VEGETABLES | Gratins (cooked foods) | 275 | 2 | 30 | ||||||||||
| Potato gratin | 200 | 3 | 180 | 3 | 45 | |||||||||
| Lasagne | 200 | 3 | 180 | 3 | 45 | |||||||||
| Stuffed tomatoes | 170 | 3 | 170 | 3 | 30 | |||||||||
| PASTRIES | Sponge cake | 180 | 3 | 180 | 4 | 35 | ||||||||
| Swiss roll | 220 | 3 | 180 | 2 | 190 | 3 | 5-10 | |||||||
| Buns | 180 | 3 | 200 | 3 | 180 | 3 | 180 | 3 | 35-45 | |||||
| Brownies | 180 | 2 | 180 | 2 | 20-25 | |||||||||
| Cake - Pound cake | 180 | 3 | 180 | 3 | 180 | 3 | 45-50 | |||||||
| Clafoutis | 200 | 3 | 190 | 3 | 30-35 | |||||||||
| Cookies - Shortbread | 175 | 3 | 170 | 3 | 15-20 | |||||||||
| Kugelhopf | 180 | 2 | 40-45 | |||||||||||
| Meringues | 100 | 4 | 100 | 4 | 100 | 4 | 60-70 | |||||||
| Madeleines | 220 | 3 | 210 | 3 | 5-10 | |||||||||
| Choux pastry | 200 | 3 | 180 | 3 | 200 | 3 | 30-40 | |||||||
| Flaky pastry hors d'oeuvres | 220 | 3 | 200 | 3 | 5-10 | |||||||||
| Savarin cake | 180 | 3 | 175 | 3 | 180 | 3 | 30-35 | |||||||
| Shortcrust tart | 200 | 1 | 200 | 1 | 30-40 | |||||||||
| Thin flaky crust tart | 215 | 1 | 200 | 1 | 20-25 | |||||||||
| OTHER | Terrine pâté | 200 | 2 | 190 | 2 | 80-100 | ||||||||
| Pizza | 240 | 1 | 15-18 | |||||||||||
| Quiches | 190 | 1 | 180 | 1 | 190 | 1 | 35-40 | |||||||
| Soufflé | 180 | 2 | 50 | |||||||||||
| Pies | 200 | 2 | 190 | 2 | 40-45 | |||||||||
| Bread | 220 | 2 | 220 | 2 | 30-40 | |||||||||
| Toast bread | 275 | 4-5 | 2-3 | |||||||||||
N.B : Allow all joints to sit at room temperature for at least 1 hour before roasting.
* depending on model
All the temperatures and cooking times are given for pre-heated ovens.
| RELATIONSHIP OF SETTINGS TO TEMPERATURE °C / °F | |||||||||
| Setting | 1 | 2 | 3 | 4 | 5 | 6 | 7 | 8 | 9 max. |
| °Celsius | 30 | 60 | 90 | 120 | 150 | 180 | 210 | 240 | 275 |
| °Fahrenheit | 85 | 140 | 195 | 250 | 300 | 355 | 410 | 465 | 525 |
PERFORMANCE TESTING ACCORDING TO STANDARD IEC 60350
| FOOD | * COOKING MODES | SHELF | ACCESSORIES | °C | TIME min. | PREHEAT |
| Shortbread (8.4.1) | 5 | Deep Tray 45mn | 150 | 30-40 | yes | |
| Shortbread (8.4.1) | 5 | Deep Tray 45mn | 150 | 25-35 | yes | |
| Shortbread (8.4.1) | 2 + 5 | Deep Tray 45mn + grill | 150 | 25-45 | yes | |
| Shortbread (8.4.1) | 3 | Deep Tray 45mn | 175 | 25-35 | yes | |
| Shortbread (8.4.1) | s | Deep Tray 45mn + grill | 160 | 30-40 | yes | |
| Small cakes (8.4.2) | 5 | Deep Tray 45mn | 170 | 25-35 | yes | |
| Small cakes (8.4.2) | 5 | Deep Tray 45mn | 170 | 25-35 | ||
| Small cakes (8.4.2) | 2 + 5 | Deep Tray 45mn + grill | 170 | 20-40 | yes | |
| Small cakes (8.4.2) | 3 | Deep Tray 45mn | 170 | 25-35 | yes | |
| Small cakes (8.4.2) | 2 + 5 | Deep Tray 45mn + grill | 170 | 25-35 | yes | |
| Fatless sponge cake (8.5.1) | 4 | Grill | 150 | 30-40 | yes | |
| Fatless sponge cake (8.5.1) | 4 | Grill | 150 | 30-40 | yes | |
| Fatless sponge cake (8.5.1) | 2 + 5 | Deep Tray 45mn + grill | 150 | 30-40 | yes | |
| Fatless sponge cake (8.5.1) | 3 | Grill | 150 | 30-40 | yes | |
| Fatless sponge cake (8.5.1) | 2 + 5 | Deep Tray 45mn + grill | 150 | 30-40 | yes | |
| Apple pie (8.5.2) | 1 | Grill | 170 | 90-120 | yes | |
| Apple pie (8.5.2) | 1 | Grill | 170 | 90-120 | yes | |
| Apple pie (8.5.2) | 3 | Grill | 180 | 90-120 | yes | |
| Surface browning (9.2.2) | 5 | Grill | 275 | 3-6 | yes |
*Depending on model
N.B.: To cook on 2 levels, dishes can be taken out at different times.
Recipe with yeast dough (depending on model)
Ingredients:
- Flour 2 kg - Water 1240 ml - Salt 40 g - 4 packets of dehydrated baker's yeast
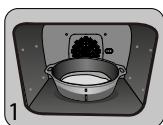
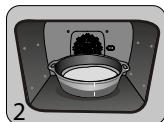
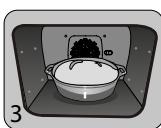
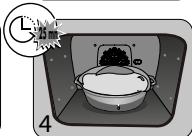
Mix the dough in a mixer and allow to rise in the oven.
Method: For yeast-based pastry recipes. Pour the dough into a heat-resistant dish.
Remove the wire shelf supports and put the dish on the bottom.
Pre-heat the oven to 40 - 50^ with the circulating heat function for five minutes. Stop the oven and allow the dough to rise for 25-30 minutes thanks to the residual heat.
| "Domestic Electric Oven - Product Fiche As per the Commission Delegated Regulation (EU) N° 65/204" | |
| Trade Mark | DE DIETRICH |
| Commercial code | DOP8360* |
| Energy Efficiency Index (EEI cavity) | 81,4 |
| Energy Efficiency Class | A+ |
| Energy consumption per cycle in conventional mode | 0,70kWh |
| Energy consumption per cycle in fan-forced convection mode | 1,10kWh |
| Number of cavities | 1 |
| Heat source(s) per cavity | Electric |
| Volume of the cavity | 73l |
| European Union eco-label | |
GUIA DEL USUARIO
HORNO
ES
ESTIMADA CLIENTA, ESTIMADO CLIENTE
KYPSENNYSTOIMINNOT "OHJELMAVALINTA»-TILASSA
(mallista riippuen)

Pitsa, "talon" taikina
| A | B | G |
| SERVICE: C | TYPE: D | I CE |
| E | F | |
| Nr H | Made in France |
PROGRAMMARE LA TEMPERATUREA
PROGRAMMARE LA DURATA
PyroExpress in 59 minutes
STEKING MED UTSATT START
Ràd for energisparing.
Unngå à apné døren under tilberedningen for á unngå varmetap.

Legg aldri aluminiumsfolie i direkte kontakt med ovnsbunnen, den akkumulerte varmen kan ødelegge emaljen.
TØRKEFUNKSJON
P07 - Kyling (6 timer)

*P08 - Liten fisk (1 time 20 min)

*P09 - Stor fisk (2 timer 10 min)

*P10 - Yoghurt (3 timer)
UMIDDELBAR STEKESTART
-Vri bryteren frem til stekefunksjonen «langtidssteking».
STEKING MED UTSATT START
STEKING MED UTSATT START
STEKING MED UTSATT START
INSTALACJA I DEMONTAZ SZYN UCHYLNYCH
tarty swieze
tarty mrozone
tarty swieze
tarty mrozone
BbIbOP MECTA IN BCTPAHIN
Ha cxemax noka3aHb pa3Mepbl Me6eIN, noXoJyIe IpyDyXOBOrO uka.
AnnapaT MaXeT 6bIb YcTaHOBJIeN IOJ KpbIshKy (pnc.A) INI B KOIOHcy (pnc.B).
BHHMaHHe: npOtKpIToN 3aJNeH cTeHKe Me6eJI (IOJ KpIbIKo NIN B KOJOnHKe) pacCToHHe Mekdy CTeHOI N IOIKo, HA KOTOpO YcTaHOBJeH dYXOBoi UkaΦ,doJHKHO 6bITb He 60Jee 70 MM* (Pnc. C).
Pn3akpbitc 3aam MebeI npedymToptb OTBepCTne 50x50 MM dIy shHypa nITAHNA.
3aKpeNTb dYXOBoI uKaΦ b npEdmTe Me6eJI.
Tnra 3tOrO ydaNtB pe3HNOBbIe ynpbl npoCBePntB OTBepCTne 2 MM B cTeHke Me6eJIi
BO n36exaHnne IIOBHeHnI TpeunH B DepeBe. 3aKpeNTb DxyoBoi UkaΦ DBym BUNTaMn. YCTaHOBNtpe3INHOBbIye yNOpbl Ha MeTo.
COBET
YtO6bIy6eIITbcB INpabUNJIbHOCn YcTaHOBKN, 6oBaTNTbcK CneuHaNCTy NO 6bITOBbIM 3JNeKTPonpi6opam.


3JIeKTPoIPOJOKJIIOUcHHeN:
PeybdoJxHa 6bITb noKJIyHea npn nomOu nctAHdapTHOro Ka6eIy NtAtnHc 3 npBOOnHKAMCeueHem 1.5 MM2 (1 pa3a + 1 HeYtpaB + 3emN), KOTOpbIe doJXhbl 6bITb noKJIyHeb K cETN 220-240B\~ nocpeDCTBM CTahdapTHoN po3EtKNIEC 60083 IIn6o BceNoIHOco yCTpoiCtBAOTKJIyHeHn B COOTBeTCTBnA Mn C INHCTpyKUraMn NO MOHTaxy.
IpoBOD 3a3emHeHn (3eJenb-KeIb) noCoEHHnK KNeMMe 3a3EmHeHn o6OpyOboAHn IdoJIkeH 6bITb NpOKnUoHc K 3emYeCTaHOBKn. IVcNoIb3ObaTb npEdoxpaHntel Ha 16 amneP.
ФИрма-иЗТOTOBNTeIb He HeCet OTBETCTBEHOCHTa HeCchAcTHbIe CnyuAn IINI NOJOMKINBVNDy OTCyTCTByUOJIero,HeNCnPabHOrO INIHNepBaNbHOrO 3a3eMJIeHnI,H3a HEPpaBbHbHoNEPOKJIUoyEHe.
BhimaHne:
Ecnn 3neKtpocetb Baawero Doma Tpe6yet
H3MeHenn dIra NODKnIOUeHENA annapata,
O6paNTbcr K KBaIIuNpOBAHHOMy
3NeKTPnky. Ecnn dyXOBoN uKaΦ BeDet
ce6r HeObIuHO, OTKnIOHTb annapat nn
ydaNt b COOTBeCTBvUOIN npEdoxpanHTel,
pa3OpBaB cenb ee NODKJIIOUeHEN.
2 OKPYJKAIOIIA CPEI A
Annapat codepknt TaKke MHOrOuNCJIeHHIe
MaTePnAJIbI, npIrOaHbI IJN BToPunHoi nepepa60Kn. Ha HeRo HaNecen IJorOTIN, roBopAun, yTO NcNoJIb3OBaHNbIe annapaTbI He CNeDeyET CMeuNbA Tb C npOuIMN OTXoJamn.
Takm 06pa3om, Bo3BpaueHne B zukl
BaWero aannapata ero n3roTOBnteIeM 6ydet npOn3BOOHTbc8n B HauNyuUHX yCNOBnX B COOTBeTcBn C EbpOInpeKtNbOoi 2002/96/CE OT yTNIN3aun 3JKeKtpueckoro n 3JKeKtpoHnOrO o6OpYOBaHn.
O6paatabca B cBOIO M3pHIO IIN K npOdaBcy, yTObI y3HaTb 6JInKaIIme K BaWEmy Domy ToKn C6opa annapaTob dIg IN yTuIN3aUIN.
Blaarodapim Bac 3a coeIcTBne oxpane okpykaiouie cpebl.
ONICAHNEIUXOBOTOUKAΦA
A Panaheb ynpabvennna
B Jlamnoyka
C IpoBOnIOUHbIe peWteKn (6 BapnaHTOB BbICOTbl)
3 OIIINCAHNE IYXOBORI IIKAΦA
IIAHEJIb YIPABJIeHINr
DINCNPIEI

1 OTo6paKeHHepeKIMOBnIPOTOBteHnA
2 INHINKATOp BbIbOpa ypOBHeN
3 INDnKATOP NOBbIeHINr TEMpePaTybl
4 OTo6paXeHne npDoJTKnTeJIbHOCTn pIINrTOBHeHn
5 OTo6paKeHHe BpeMeHn TEmpePaTypbI dyXOBOrO uKaopa
6 OTo6paKeHneBeca
7 OTo6paXeHne TaIMePa n BpeMeHn OkOHuaHn npiroTOBJIeHn
KHONKIN
1


2

3

4
YCTAHOBKA IN DEMOHTAX BblBnKhbIX HANPABJIOUX
Посе удалия 2 поволочьх peшеток bblберпу ровьь bblcotы (OT 2do5),на которom bbl xotte zadнсрobatb bashi наразлочи. Bctabte lebyu habралочув yctyn leboi pewetkn, bbloninb doctatoohoe daBleHne Ha nepeDnIOU n 3aDnIOU qactn habралочe, yto6bI 2 naKnHa 6oky habралочe BOwn B npovolchnyo pewetky. BblonInTe ahaIorMHyble deiCTBnI dI pyabO Hi npavBJIOnIe.
BawdyxobowuokaochauenyuknueeSMART ASSIST》(ymhblnmoounik),KOTopraBoBpeMa nporpammmpoBaHnnpoJNOXHTeBHOCTnBaM nocobetyTnpoJNOXHTeBHOCTb pIroTOBHeHnna, N3MeHnIOUyOcB 3aBNCMOCTn OT Bb6paHHOrOpexmma npiroTOBHeHn.
OTo6paKeHne OkOHaHn npiroTOBHeHn npEkaaet MraTb.
COXPAHITb IPOIPTPAMMY IPIIROTOBIIENH
BblMOXeTe coxpaHHTb Ha CBOI BbI6Op 3 nporpammbl npiroTOBJIeHnK, KOTOpIe cMOXeTe BdaIbHeIWeM IcNOLb3OBAtB.
- IporpammmopobAHne :
B pexkme «CneuanaIcT» Bb6epnte npuroTOBLeHne, ero Tempeatpy u npdoJnxTeJIbHocTb, 3aTeM nobepnTe pyky do «MEM 1» (PPOPT 1). Bb6epnte oDHy n3 3 coxpaehhblx nporpamM, nobopauVBaR pyky n haxab ee Iy noDTBepKdEHH. POnTbeprnte ehe pa3 dny hauana npuroTOBLeHn.
PpmeaHne: Ecn 3 3anomHeHHbI nporpaMbl 3aperncptnpoBaHbI, HOBa nporpamma 3ameHnT ppeBdyuH.
Bo Bpem 3anomnHaHne nporpaMmpyetc
IeNCTBNE C OTIOXKeHHbIM HauJOM.
- BbIbpaTb OndHy n3 3 yXe 3apernctpnpoBaHHbIX nporpaMM:
ПовернITE руку до MEMO, зatem потвердente. Cnomоцью рунп посмOTРITE пограмьи потвердente ВбранHyю Bamn. Пи���говлени Наинаетс, Bbl можete ИзMeHHT bHaayIo npinotoblenia.
ФУHKUINIПИROTOВЛЕNHЯВPEXКIME«CIELUNJIANT
(B 3aBnCmOCTN OT MoDeJIH)

IpeepnIO6bIM nprirotOBJIeHMe npeDbarntelbHO pa3OrpeTe BaW dYxOBOI uKaΦ.
IcnoJIb3yIe ToJIbKO CBExKe npOduKyTbI.
TuaTeJIbHO BbIMoIte INX, DaIe BOe CTeYb INBblTPInE INX.
HakpoTe peWetky neprameHTHOB 6ymarOu n CBepxypaBHOMepHO BbIIOXITe pa3pe3aHHbI npdykTbl.
IcnoJb3yIte ypoBHe 1 (ecnI y Bac HeckoJIko peWetOK, BCTaBtE IN HA ypoBHN 1 n 3).
Pn cyuke ouheb couhbix npodyktopebepehnte ux Heckolbko pa3.3aueHnra, npnbdeehhble B tabniue, moryt bapbnpoBaTbcB 3abncmocTo OT Tnna DeNpdpatnpyemoro npodykta,ero cneNoctn, TOIunHb I codepkaHn BlaHn.

Pekomehdyemar Ta6nua no Dei npataun Baushx npodykTOB
OTo6paXeHne OKoHuaHn npiroTOBHeHn npekpaaet MmraTb.
Ecnn BaW dYxOBoi uKaΦ cNnKoM ropnyu, YTo6bI hauTaB npriroTOBHeHne npn Hn3KoI Tempepatye,Ha 3KpaHe nOBAHTc «Hot» (rOpnyu). DaIte dYxOBKe ocTbITb.
PEXIM «TOTOBblE PEENTbl
Функця «ГOTOBble pecentbl» BbIbnaepaet 3a Bac nOxOJaIne npaMeTpbl npriTobNeHnB 3aBucNMOCTN OT pOdyKta, KOToPbI HyKHO npriTobNTb, I erO Beca.
ObbyHbI PEXKIM PNIGOTOBJIENIA
BbIePeHa3kpaHc《Guide》(CnpaBouHnK)c nOmoIbU BpaueHnpyuKn CnoTBePxDeHnEm.
OTo6paXaetcCnMBoN «CnpabOuHnK» nOBJIeTcHa 3kpaHe.
IpeBapntelbHnIporpammmpyoTc35peeentOB (nn 15 B 3aBNCMocTn OT BaWero dYxOBO Oka)。Cm.2 TaBnucbl HnKe.
Ecnn XOTnTe, Bbl MoXeTe N3MeHnTb BpeM OOKHuaHnI npiroTOBLeHnI, HaxBa HA 0 I OTo6pa3nB HOBoE BpeM OKOHuaHnI npiroTOBLeHnI, KOrDa DuxOBoi ShkaΦ hauan pa6oTaTb.
IoiTBePnTe Bb6Op HaxKaTneM Ha pyKy. IyXOBoI uKaΦ octaHabNtBaetc N 3aNyCaetc No3Ke, YTO6bl pInrOToBnEHe 3aKOHnIOcb B OxuDaemoe BpeMa.
ДлгpecentOB,дяКOTOpbIX Tpe6yetcnpedBapntIbHbI HarpeB,HeBO3MOxHO BbINOHTb npriTOBJIeHne C OTJIOXeHHbIM CTApTOM.
·5ППИГOTOBЛЕHNE
DyXOBkaOCTaHOBNTcN3aNyCTNTcN03Ke, TAK YTO PnIroTOBJIeHHe 3aKaHnIBaETCR B HJxHoe Bpemr
CINCOK BJIIOD «CHEF»

CHEF1

CHEF 2

CHEF 3

CHEF 4

CHEF 5

CHEF 6

Пица (CHEF 1)
300rdo1,2K
- Niцua-Полуфабркат - Мakapоньи нздения ИЗ CBжениг�TOВпЕНОТ TeCTa
- Niuza (MaKaPOnHbIe N3dJIInJ), rOToBbIe K yNoTpe6JIeHnIO
- Domaunry niuza(MaKapOHHbIe N3deJIIn)
Для получених русятю сеса noctаБпЕпETКУ (Вbl можete NOLOЖNTь пICT nepramentHоBбумаг МекдгриелIMицeй,чTOбыЗИТНБ dYXOBKY OT BbITEKAнЯ CBIPA).
BbIOKNTe ee Ha npOTNBeHb IJIa BbIeUKN, TObbl TeTo 6blMmKIM.

Kypuca (CHEF 2)
Kypuza BeCOM O T 1.4 Do 2,5 K
- yTka-MaHdapnHka, uecapKa
IomeCTnte 乙bInnEnKa B peuTeKy rpiJ +c6opka ndoHa.
Bo n36eXaHne 6pbI3r npOKoJIInTe Koxy nTnUcblpeepnpuROTOBHeHnEM.

Poissons (CHEF 3)
400rdo1K
Bcra pbl6a (MopckoN IeU, xek, fOpelb, cKym6pna), 3aneueHHa C pbl6oN.
He noDxOJNT dIg KaM6aNoo6pa3HbIX.
3ape3epBpyuTe 3Tu cyHKUIO dnyeJoi pbl6bl.
IcnoJIb3yIte yHnBepcaJIbHOe 6JIIO

ПиPORснанчнков (CHEF 4)
KMIJI/nyIDINr CBExnI
KIIU/nyDINr3aMOpOKeHHbI
IcnoJb3yIteΦopMy n3 aJIHOMHHa c aHTnInpIraPbHbIM NOKpbITnEM, BHN3y BaSha BbIeUka 6yEdt xpyCTaIe.
IpeXe Yem BbIIOXHTb 3aMOpOKeHHbIe nyDInHn Ha peWetKy, He 3a6yDbTe y6paTb IoIIOXkY.

Cnadkn npor (CHEF 5)
CBeKne NpOrgn
- 3amopoxKeHHbIe NIpOrn
IcnoJb3yIteΦopMy n3 aJIHOMHHa c aHTnIpyarHbIM NOKpbITnEM, BHN3y BaSha BbIeYka 6yEdt xpyctaee.

MeIknoe neueHbe (CHEF 6)
MeIka npCIOHHa BbIeUka: neeHbe, neeHbe fHaHcBe, kpyaccaHbI, xIe6CuI, xIe6 C n3IOMom, ropuyn CaHbN C cbIpom N BeTuHOn
IonoKnte MeIkyo npCIOHOHyOBbIeKy Ha npOTNBHe DnA BbIeKn, KOTOpBn NoCTaBbTe Ha peWetKy.
HEKOTOPBIE PEÇENTbI JILY PEXKIMA «CHEF»
Пица
I py peceeta nohaobntc: 1 nlaCT TeCTa IJIy Nnucbl
*IJI NIIuIbI C OBOUaMn: 6 CTOnOBbIX JIOKeK TOMaTHORO coyca, 100 r Hape3aHHbIX KybIkAmn zukInn, 50 r Hape3aHHoro KybIkAmn nepua, 50 r Hape3aHHoro baknaXana, 2 He6oJbUnx Hape3aHHbIX nomdopa, 50 r TepTorO cbipa «TpHoeP», operaHO, coJIb, nepeu.
*IINuBcBipom PokpOp NkOnyeHbIM 6ekohom:6 cTolOBbIX JIOKe TOMaTHoro coyca,100 r konyeHoro 6ekoha,100 r Hape3aHHoro He6oJbUIMN KycouKaMn cbipa PokpOp,50 r rpeKnx opexob,60 r TepTorO cbipa FrpoInep.
*IJI NIIcBIC KOJIbACKAMN 3ePHNCTbIM TBOPOROM:200 r cyxoro 3ePHNCTORo TBOPora (HaMa3aTb Ha OCHOBY IJIA NIIcB),4 Hape3aHHbIe KpyKoUcAMN KOJIbACKn,150 r BetuHbI,5 ONIBOK,50 r TepTORO cbipa TpOHeP,operHo,coNb, nepeu.
Knss (nporc hauHHko):
Для peцenta noHaio6ntc: 1 aJIOMHnEBAЯ FOpMa IЯ BbIeukn Диametpom ot 27do 30cm
1 ynapokbka roTOBOro necoHoro TecTa 3 B3bntbIX mya,50 mN kInpHbIX cINBOK coIb, npeu, MyckaTHbI opex
BapnaHbI NaunHKn: 200 r roTOBOrO 6ekoHa co shNIKOM n1 1 Kr npriroTOBneHHoro zIKOpNya-3HdNBra, 200 r tepTOrO cbipa Fayda
nIIN 200 r 6pOKKoN, 100 r Hape3aHHoro
Ha MaIeHbKne KycOuKN 6eKoHa, 50 r
cblpa c ronyboi nIpeCeHbIO
nIIN 200 r IococJ, 100 r OTBapEnHoro n
BbICyUeHHoro UINHaTa
Kypnca
Haapupnyte Kpyu npy nuykom CBexkero 3ctparOHa nJn HaTpne ee CmecbI O3 6 N3MeJIbHHeBIX 3y6HKnOB YecHoka c 1eNoTkoK kpyHNOI COIN I He6OJIbShIM KOJINUeCTBOM nepca.
CnoeHbIy6NoHybI npor c npaunHe
1IncT cNoeHOro TecTa, KOtOpbI cIeNyET pa3BepHyTb I NaKoJIOTb BUNKOJ.
B 200 Mn CnIBOK NIOJoxNtB CTpyOK BaHJIIN I NOBecTn DO KInneHn.
2 RncaB3bntb Bmcte c 30 r caxapa, 3aTEM Do6aBnTb OXnaJdeHHbIe CINBKn.
Hape3aTb 2я6Ioka ky6nKamn n o6BaJIaTb INB70rKpoJKN npaJIInHe
BbIIOxNtB Kpem IЯБIoCHyU NaChNkU Ha TectO. NocTaBnTb BdYXOBKy.
IcnoIb3yIte MrgkyIO TkaHb, CmoeHHyIO cpeCTBOM IJn YIcTKn CTEKOJI. He IcnoIb3yIte HN YIcTIAX Nact, HN abpa3INBbIX ry6OK.
PyroExpress Ha 59 MInHyT
Daanha cneunuuecka yHKnna
NCNb3yeT aKKyMynipOBaHHoe BO BpeM
npdebluyeO pInrOToBJeHnTeIIO dJI
6bICTPO ABOTMaTNUeCKo OuncTKn KOpnyca;
BbINlHReTcO uNCTKa Cna6o 3aqr3HeHnOro
KOpnyCa B TeUeHne MeHee Yaca.
3JNeKtpOnHbIKoHTpOJIbTeMnepaTpybl KOpnyCa ONpeDeIeAET, YBJIeTcR JN OCTaToUHoe TEnIO DoCTaToUHbIM JINJIoNyHeHnXopoUxN pe3yJIbTaTOB OChCTKN.
B npoTHBOM cnyae, npoON3 3KO npoOJXntelbHOCTbIO 1:30 6ydet
3aDénCTBOBaH aBTOMaTnueckn.

Пиролиз на 2 час
7 HENCIPABHOCTH IN CIOCOBbI Ix YCTPAHEHn
-ПОВДЯТСТСССССССССССССССССССССССССССССССССССССССССССССССССССССССССССССССССССССССССССCS
Danhha fyuHKnIg OTKIIIOuHaET HArpeB DuyxOBOro 1kka,ecIn 3a6bln 3TO cDeIaTb.YCTAHOBITe Bauy dyXOBky HA OCTAHOB.
- Koid HeuCnpabHocTn HauHHaetc Tc F'). BaW duXOBoi ukaq o6hApyKm hapyuHeHn.
OctaHOBnTE pa6oTy dyXOBKn Ha 30 MNHy.T. EcnI HeNCnPabHOCbT No-PrpexKHeMу npCcyTcByET, OTKIIHOHTe OT NITaHIM MHNmym Ha OdHy MNHyTu.
Ecnn HecnpnaBnctb He nCye3aet, oBpaTnTeCB Cnyk6y nocennpodaXhoro obcnykmbAHn.
- Duyxoboi ukaq He rpeet. PpOBepbTe, TcO6bl Duyxoboi ukaq 6bl npaBnIbHO nOdkluChen npedoxpanHeIb BaWero npnbopa 6bl pa6oHm.
Поверьт, He HabstpoeHa IIN neYb Ha «ДEMO»peKIM (CM. MeHIO HabstpoEk).
- lamnoka duyxoboro shkahe CBETTcra. 3ameHnTe lamnoky nnn npedoxpaHnteJb.
IpoBepbTe npaBnIbHocTb nOdkNIOUChnI yXOBOro ukapa.
- BeHTnIaTOp oxJaXeHn npoDOnJkaet pa6oTaTb nocne octaHOBa dyxOBOro wkaFa.
3To HopMaIbHo, OH MoKet pa6oTaTb NocLe OOKHauHnI PnIroTOBHeHnM MaKcIMyM Do OJHOrO Yaca DnI PNOBeTpNBaHn DyXOBOrO uKaFa. EcN 3To BpEm IpeBbIeHo, ObpaTInTeCB B Cnyk6y NocIenPdoaJHOro 0cbNyKuBaHnR.
-He BBINOJIHReTcOuCTKa NIpOJIIN3OM.
NAPPROGRAMOVANIE TEPLOTY
Ked sa presuniete na pozadovanu funkciu pecenia, stla cate tlacidlo.
VAL AV PLACERING OCH INBYGGNAD
I ritningarna anges matten for den mobel som skahysa ulagen.
Kex/Smakakor (CHEF 6)
smabrod: cookies, mandelbakelser, croissanter, kuvertbrod, russinbrod, varma mackor
Lagg smabroden pa bakplaten som sedan stalls pa gallret.
Observera: for bra resultant sca petit choux bakas med laget Tartor.
NAGRA RECEPT I "CHEF"-LÄGET
Pizza
Bas: 1 pizzadeg
*med grönsaker: 6 matskedar tomatsås + 100 g tärnad zucchini + 50 g tärnad paprika + 50 g skivad aubergine +2 små skivade tomater + 50 g riven gruyereost + oregano + salt + peppar.
SJALVRENGORING MED PYROLYS
SJÄLVRENGÖRING MED FÖRDROJD START
| A | B | G |
| SERVICE: C | TYPE: D | I CE |
| E | F | |
| Nr H | Made in France |