
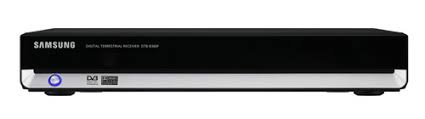
DCB-H360R - DVB SAMSUNG - Free user manual and instructions
Find the device manual for free DCB-H360R SAMSUNG in PDF.
| Product Type | DTT decoder (cable) |
| Brand | SAMSUNG |
| Model | DCB-H360R |
| Power supply | AC 100-240 V~, 50/60 Hz; fuse 250 V / T1.6 A |
| Dimensions (W x D x H) | 351 x 227 x 60 mm |
| Net weight | 2.47 kg |
| Tuner type | DVB-C (cable): VHF/UHF 50.5~858 MHz, QAM 16~256, symbol rate 7.252 Msps max |
| Video formats | MPEG-2 HD (MP@HL), SD (MP@ML); H.264 MP@L3/L4/HP@L4 up to 30 Mbps; resolutions 1080i, 720p, 576p, 576i |
| Audio formats | MPEG-1/2, Dolby Digital (AC-3); modes mono, dual, stereo, joint stereo; sampling 32/44.1/48 kHz |
| Video outputs | HDMI, Component (YPbPr), Composite (RCA), Scart (AV1/AV2), RF loop |
| Digital audio output | Optical S/PDIF |
| Main functions | Electronic Program Guide (EPG), teletext, multilingual subtitles, 4 favorite lists, 15 timers, parental control, channel locking, software update via network |
| OSD languages | Multilingual (3 display languages, 37 audio/subtitle/teletext/EPG languages) |
| Smart card slot | Irdeto (front) |
| Energy consumption | Low consumption (not specified exactly) |
| Cleaning | Unplug before cleaning; exterior with slightly damp cloth, no solvent |
| Ventilation | Do not block vents; at least 30 mm clearance behind, 10 mm above and sides; do not stack other devices |
| Safety | Do not overload outlets; do not expose to liquids; do not repair yourself; CATV cable grounding required |
| Disposal | Do not dispose with household waste; recycle according to local regulations (WEEE symbol) |
Frequently Asked Questions - DCB-H360R SAMSUNG
User questions about DCB-H360R SAMSUNG
0 question about this device. Answer the ones you know or ask your own.
Ask a new question about this device
Download the instructions for your DVB in PDF format for free! Find your manual DCB-H360R - SAMSUNG and take your electronic device back in hand. On this page are published all the documents necessary for the use of your device. DCB-H360R by SAMSUNG.
USER MANUAL DCB-H360R SAMSUNG
Instructions for use
GB
SAMSUNG
SAFETY INSTRUCTIONS
This STB has been manufactured to satisfy international safety standards.
Please read the following recommended safety precautions carefully.
MAINS SUPPLY: AC 100-240V\~, 50/60Hz
OVERLOADING: Do not overload wall outlets, extension cords or adapters as this can result in fire or electrical shock.
LIQUIDS: Keep liquids away from the STB.
CLEANING: Before cleaning, disconnect the STB from the wall socket. Use a cloth lightly dampened with water(no solvents) to clean the exterior.
VENTILATION: Do not block the STB ventilation holes. Ensure that free airflow is maintained around the STB. Never store the STB where it is exposed to direct sunlight or near heating equipment e.g. a radiator. Never stack other electronic equipment on top of the STB. Place the STB at least 30mm from the wall. Need at least 10mm from the top and both side of the STB for ventilation.
ATTACHMENTS: Do not use any attachment that is not recommended by the manufacturer; it may cause a hazard or damage the equipment.
SERVICING: Do not attempt to service this product yourself. Any attempt to do so will make the warranty invalid. Refer all servicing to a qualified service agent.
LIGHTNING: If the STB is installed in an area subject to intense lightning activity, protection devices for the STB mains connector and modem telephone line are essential. The individual manufacturer's instruction for safeguarding other equipment, such as TV set, Hi-Fi, etc., connected to the STB must also be followed during lightning storms.
GROUNDING: CATV cable MUST BE EARTHED. The grounding system must comply with local regulations.
Note: Dispose the used batteries at designated place for environment protection. To disconnect the apparatus from the mains, the plug must be pulled out from the mains socket, therefore the mains plug shall be readily operable.

Correct Disposal of This Product
(Waste Electrical & Electronic Equipment)
(Applicable in the European Union and other European countries with separate collection systems)
This marking shown on the product or its literature, indicates that it should not be disposed with other
household wastes at the end of its working life. To prevent possible harm to the environment or human health from uncontrolled waste disposal, please separate this from other types of wastes and recycle it responsibly to promote the sustainable reuse of material resources.
Household users should contact either the retailer where they purchased this product, or their local government office, for details of where and how they can take this item for environmentally safe recycling.
Business users should contact their supplier and check the terms and conditions of the purchase contract. This product should not be mixed with other commercial wastes for disposal.
TECHNICAL OVERVIEW
What are SDTV and HDTV ?
SDTV
SDTV is a digital TV format that provides a high quality picture at resolutions that can be displayed on standard TV sets (see more on resolutions later in this chapter).
HDTV
HDTV is a digital TV format that provides the highest quality picture at resolutions that can be displayed on computer monitors and HDTV-ready TV displays (see more on resolutions later in this chapter).
Resolution
Resolution refers to the number of pixels on the screen. The higher the resolution, the better the visual quality.
Digital broadcasts are classified into HD and SD grades according to the visual quality. In general, HD (High Definition) grade supports resolutions of 1920x1080i and 1280x720p and an aspect ratio of 16:9 for both ATSC and DVB standards.
SD (Standard Definition) grade supports resolutions of 720x480p and 720x480i for the ATSC standard, and supports resolutions of 720x576p and 720x576i for the DVB standard.
SD grade usually supports an aspect ratio of 4:3. However, it may differ depending on the region.
DVB-C ( Cable Digital Video Broadcasting)
Digital video broadcasting - cable (DVB-C) is European standard DVB for digital broadcasting transmission via cable. DVB-C system provide audio/video digital transmission throughmpeg-2 format and utilize QAM modulation system.
DVB-C standard has been developed so that a digital broadcasting signal can be sent through VHF/UHF channels. The advantages of this standard are relatively protected environment with respect to distortion and signal path attenuation so a higher signal to noise ratio can be achieved and no negative effect from multipath so higher order modulation schemes can be implemented.
Aspect ratio
In addition to resolution, HDTV is also defined by the aspect ratio of its broadcasts.
Aspect ratio means the shape of the screen as defined by the ratio of the screen's width to its height. For analog TV and SDTV, the aspect ratio is 4 units wide by 3 units high (usually written 4:3). This is the familiar shape of conventional TVs — slightly wider than they are tall.
For HDTV broadcasts, the aspect ratio is 16:9 (nearly twice as wide as it is tall).
This is, not coincidentally, more like the shape of movies shown in theaters.
This makes HDTV an ideal format for broadcasting and viewing movies on a TV.
But what happens if you are watching a nearly square-shaped 4:3 broadcast on a rectangular 16:9 TV, or vice-versa? The HD Receiver allows you to choose from a variety of screen formats to help you deal with those scenarios.
Dolby® Digital 5.1
Dolby Digital 5.1 provides 5 discrete channels of digital audio information for use by A/V receivers capable of decoding the 5.1 channel signal.
The audio signals are broken into left-front, center, right-front, left-rear, right-rear and a low-frequency effects channel (designed for subwooers).
The result when connected to a compatible Dolby Digital 5.1 channel A/V receiver and speaker setup is a home theater experience that provides much of the dynamic range, 360-degree imaging, and sonic excitement of a real theater.
To take full advantage of the Dolby Digital 5.1 capabilities of the HD Receiver, you will need a Dolby Digital 5.1 compatible A/V receiver connected to the HD Receiver through the Dolby Digital Optical jack.
AC-3 is a sound encoding/decoding technology developed in 1987 for movie theatres and means an AC-3 bit stream. AC-3 is used synonymously with Dolby Digital nowadays.
HDMI (High Definition Multimedia Interface)
HDMI is an interface to enable the digital transmission of video and audio data with just a single connector. Using HDMI the receiver transmits a digital video and audio signal and displays as a vivid picture on a TV having an HDMI input jack.
CONTENT
Safety Instructions 1
Technical Overview 2
Content 4
General Features 5
Connecting Your "STB" 6
Description 12
Front Panel 12
Rear Panel. 13
Remote Control Unit. 14
Basic Functions. 16
Operating The Receiver 22
Main Menu 22
-
Installation 22
1.1 Manual Scanning 23
1.2 Parental Control 23
1.3 Reset to Factory Defaults 24
1.4 Software Update 24 -
Channel 24
2.1 Update List 24
2.2 Favorite Channels 25
2.3 Set Channel Lock 25
- System 26
3.1 Language Selection. 26
3.2 OSD Settings 27
3.3 Media Settings 28
3.4 Change PIN Code 29
3.5 Timer Settings 29
3.6 System Information 30
4.MailBox 30
5.Irdeto Menu. 31
5.1 CA Status 31
5.2 IRD Status 31
5.3 Loader Status 31
Available TV Manufacturer Numbers 32
Troubleshooting 38
Disposal 38
Technical Specifications 39
GENERAL FEATURES
1. USER SECTION
DIGITAL HD/SDTV BROADCASTING RECEPTION
SOFTWARE DOWNLOAD VIA NETWORK
ADVANCED ELECTRONIC PROGRAM GUIDE
MULTI LANGUAGE SUPPORTED FOR OSD
SUBTITLE & TELETEXT(OSD) SUPPORTED WITH MULTI LANGUAGE
FULL FUNCTION INFRARED REMOTE CONTROL UNIT
SCART OUTPUT
LOW POWER CONSUMPTION
4 FAVORITE Lists
AUTO UPDATED EPG
PASS LOOP FOR RGB SIGNAL
15 TIMERS TO RESERVE PROGRAMS( EVENTS) FOR TURNING ON/OFF
2. TUNER SECTION
VHF, UHF BAND 50.5~858 MHz
MAX 7.252 Msps SYMBOL RATE
16~256 QAM Modulation Format
RF LOOP-THROUGH OUTPUT FOR OTHER RECEIVER OR TV
3. VIDEO SECTION
DVB-C COMPLIANT
MPEG-2: HD(MP@HL), SD(MP@ML)
H.264: MP@L3, MP@L4, HP@L4 up to 30 Mbps
USER SELECTABLE OUTPUT FORMATS 1080i, 720p, 576p, (576i)
1~30 Mbps DATA RATE
SUPPORTS ASPECT RATIO 4:3(NORMAL) AND 16:9(WIDE SCREEN)
HDMI, COMPONENT, COMPOSITE, SCART
4. AUDIO SECTION
DOLBY DECODING
MPEG-1 AUDIO LAYER 1, LAYER 2 MPEG-2 AUDIO
MONO, DUAL, STEREO AND JOINT STEREO AUDIO MODE
32, 44.1 AND 48 kHz SAMPLING FREQUENCIES
VOLUME CONTROL AND MUTE FUNCTION THROUGH REMOTE CONTROL
SPDIF DIGITAL AUDIO OUTPUT
Connecting the receiver cable system
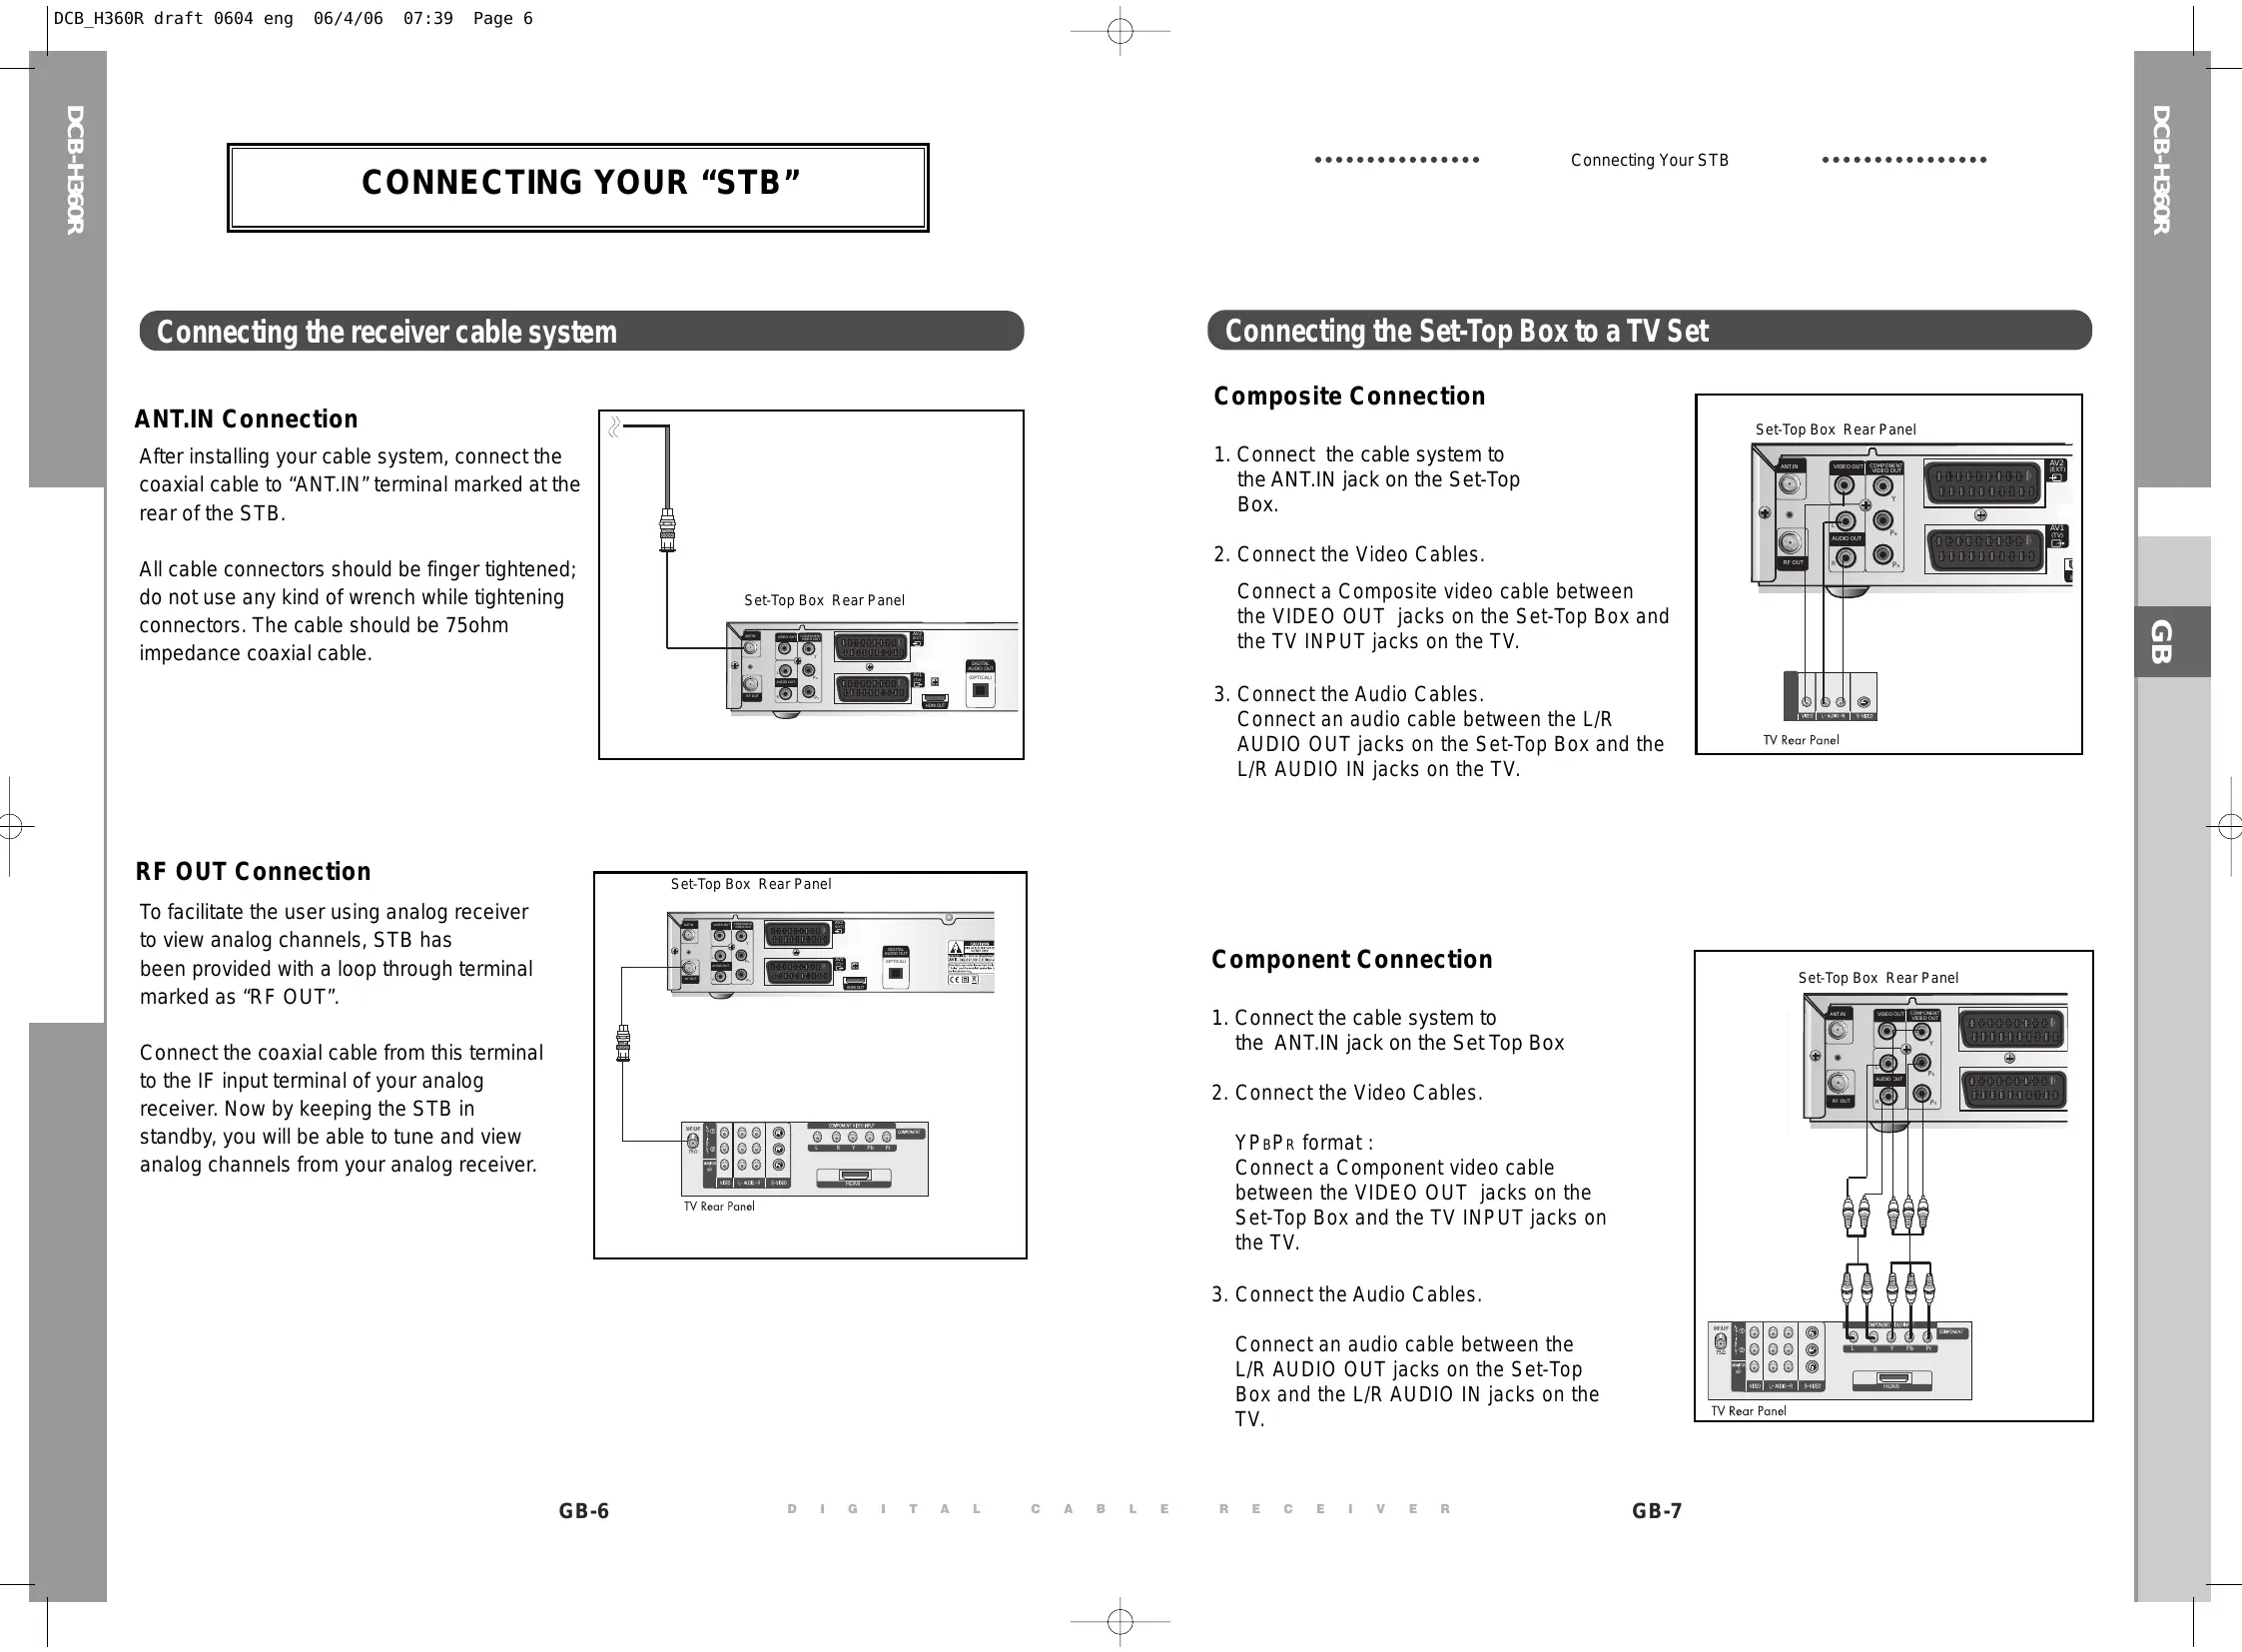
ANT.IN Connection
After installing your cable system, connect the coaxial cable to "ANT.IN" terminal marked at the rear of the STB.
All cable connectors should be finger tightened; do not use any kind of wrench while tightening connectors. The cable should be 75ohm impedance coaxial cable.
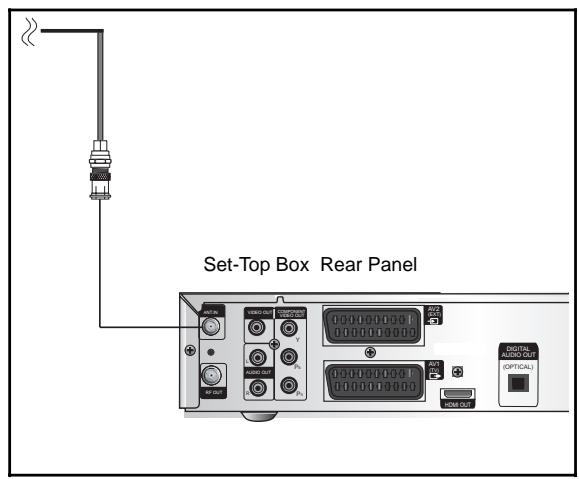
RF OUT Connection
To facilitate the user using analog receiver to view analog channels, STB has been provided with a loop through terminal marked as "RF OUT".
Connect the coaxial cable from this terminal to the IF input terminal of your analog receiver. Now by keeping the STB in standby, you will be able to tune and view analog channels from your analog receiver.
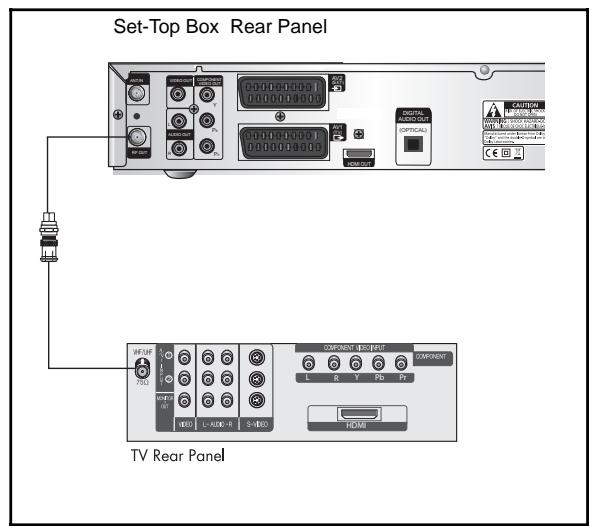
Connecting the Set-Top Box to a TV Set
Composite Connection
- Connect the cable system to the ANT.IN jack on the Set-Top Box.
- Connect the Video Cables. Connect a Composite video cable between the VIDEO OUT jacks on the Set-Top Box and the TV INPUT jacks on the TV.
- Connect the Audio Cables. Connect an audio cable between the L/R AUDIO OUT jacks on the Set-Top Box and the L/R AUDIO IN jacks on the TV.
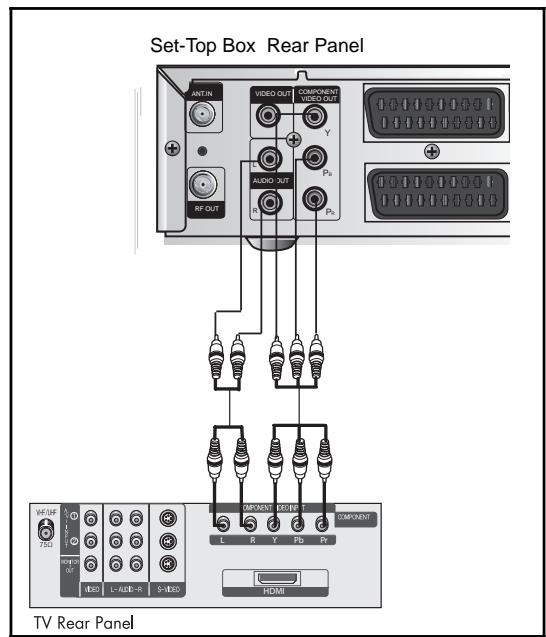
Component Connection
- Connect the cable system to the ANT.IN jack on the Set Top Box
- Connect the Video Cables.
YPBPR format: Connect a Component video cable between the VIDEO OUT jacks on the Set-Top Box and the TV INPUT jacks on the TV.
- Connect the Audio Cables.
Connect an audio cable between the L/R AUDIO OUT jacks on the Set-Top Box and the L/R AUDIO IN jacks on the TV.
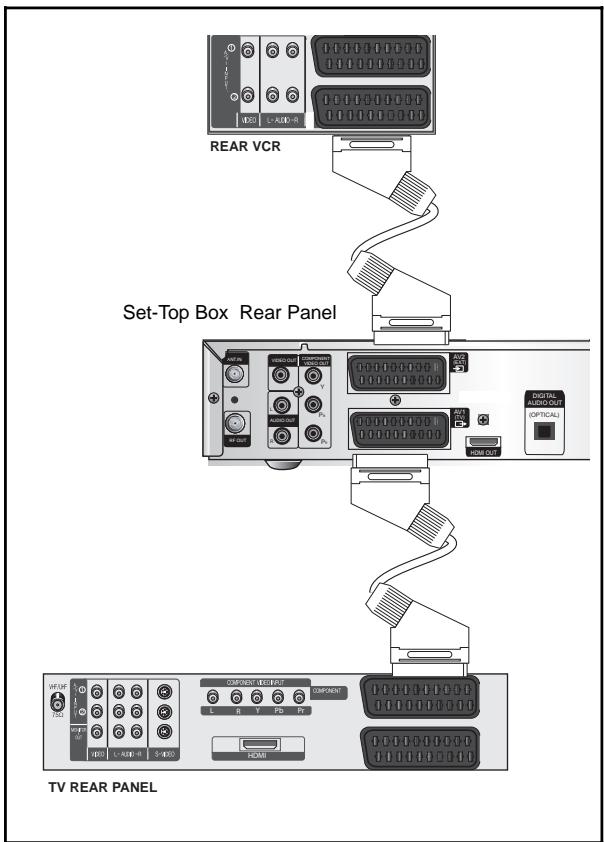
Scart Connection
- Connect the cable system to the ANT.IN jack on the Set-Top Box.
- Connect a Scart cable between the VCR OUT jacks on VCR and the Scart AV2 (EXT) jacks on the STB.
3, Connect Scart cable between AV1 (TV) jack on the STB and jack Scart Input on the TV
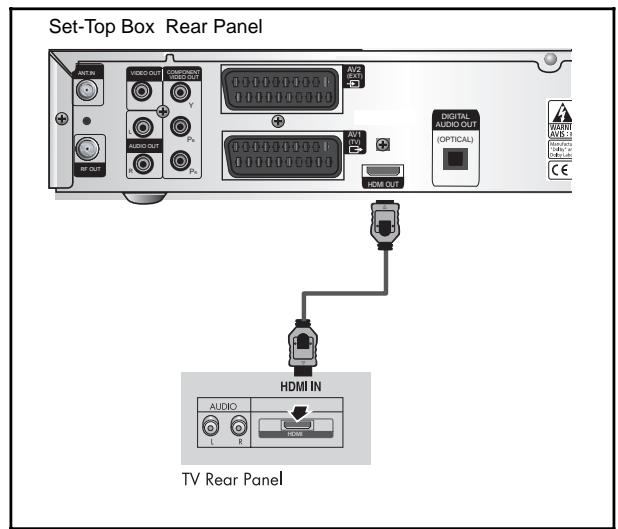
Connecting the Set-Top Box to a TV with a HDMI jack
- Connect the cable system to the ANT.IN jack on the Set-Top Box.
- Connect a HDMI cable between the HDMI OUT jack on the Set-Top Box and the HDMI IN jack on the HDMI device (TV, Monitor)
Note : Depend on the any receiver, HDMI out may not operate properly.
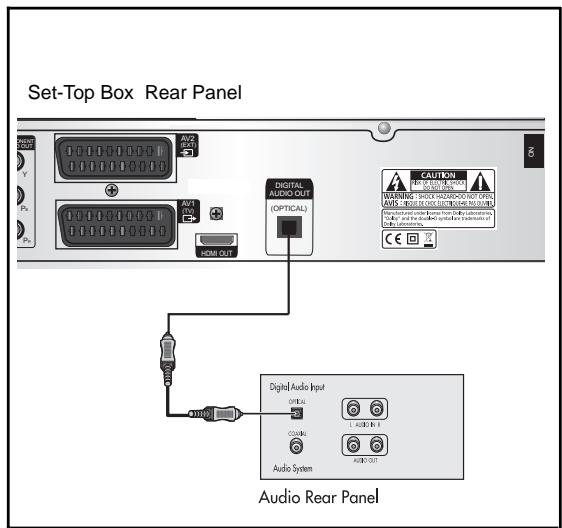
Connecting an Audio Component
There are many types of audio systems on the market today.
A simplified illustration of an audio system is shown to the right. For more information, see your audio system owner's manual.
For An optical digital audio input, connect the audio system to the DIGITAL AUDIO (OPTICAL) jack on the Set-Top Box.
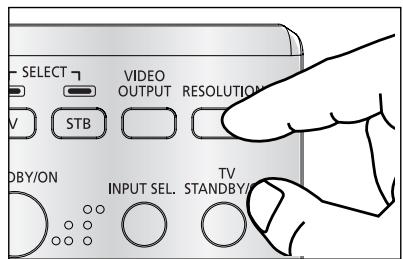
Selecting the Resolution and the DTV Output Signal
You can select the appropriate video output for the connected TV or monitor mode.
To select the resolution:
- Select a resolution by using the RESOLUTION key on the remote control and referring to the following table.
Note: EXIT key at the front of the HD receiver also operates as RESOLUTION key, when any OSD is not displayed on the screen.
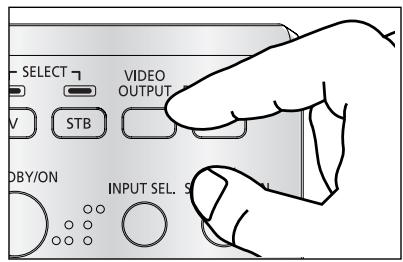
To select the video output signal:
- Select the output signal by using the VIDEO OUTPUT key on the remote control and referring to the following table.
RGB: Select the output signal by using the VIDEO OUTPUT key on the remote control referring to the following table.
YP_BPR : Select YP_BPR when the TV is connected to the Component (YP_BPR) and HDMI output port of the HD receiver.
Resolution and Video Output
| Video Out | Available Resolution | Output Status |
| Composite | 576i | Always output. |
| Scart | 576i | Scart output can be selected between RGB and Composite. |
| Component (YPBPR) | 1080i/720p/576p | The 576i resolution is not supported. |
| HDMI | 1080i/720p/576p | The 576i resolution is not supported. |
Note: Initial value is YP_BPR (1080i resolution) mode.
Setting Up TV Operations with the Remote Control
Enter the manufacturer number into the remote control to control the TV with the remote control (see "Available TV Manufacturer Numbers" on pages 32~37).
- Turn the TV on.
- Point the remote control towards the TV.
- Enter the TV manufacturer number by using the NUMERICAL keys while pressing the TV key. E.g. For a Samsung TV, press 0, 0 and 1 in this order by using the NUMERICAL keys while pressing the TV key.
- When the TV is turned off or on, the configuration is finished.
TV functions that you can control with the remote control
| Button key | Function |
| TV STANDBY/ON | Press to turn the TV on or off. |
| INPUT SEL | Press to select an external input source for the TV. |
| VOL+/- | Press to adjust the TV volume / Exclusive to the TV |
| CH ↑/↓ | Press to select a TV channel. |
| MUTE | Press to mute the TV sound. |
| 0~9 | Press to select TV channel. |
Note : 1. There is a model that can only be turned on by pressing the numeric key ‘0’ on the remote control.
- TV models of other manufacturer that can be controlled with the remote control are limited, and some functions may not work.
- If you replace the remote control batteries or enter a new manufacturer number, the previously configured TV manufacturer number is deleted.
- When a connected device is an integrated TV model (VCR, DVDP), take care when using the remote control because it may operate both of them simultaneously.
- If the configuration number does not work, try another number.
DESCRIPTION
Front Panel
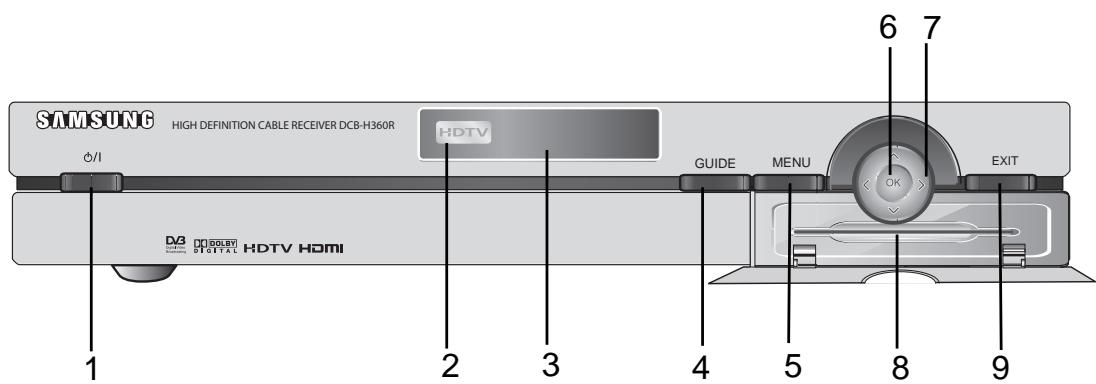
- / Turns the receiver operating or standby mode.
- HDTV Displays the broadcasting status. When the STB detects a HD Broadcasting signal, the HDTV logo lights.
- Display Window Displays information about digital HDTV receiver.
- GUIDE Press to display the on-screen Electronic Program Guide (EPG)
- MENU Displays the main menu.
- OK Selects highlighted items on Guide and Menu screens.
- < > These arrow keys navigate in the on screen guide and menu system.
8.Card Slot Slot for Irdeto Smartcard. - EXIT Clears on-screen displays and returns to TV program viewing.
Rear Panel
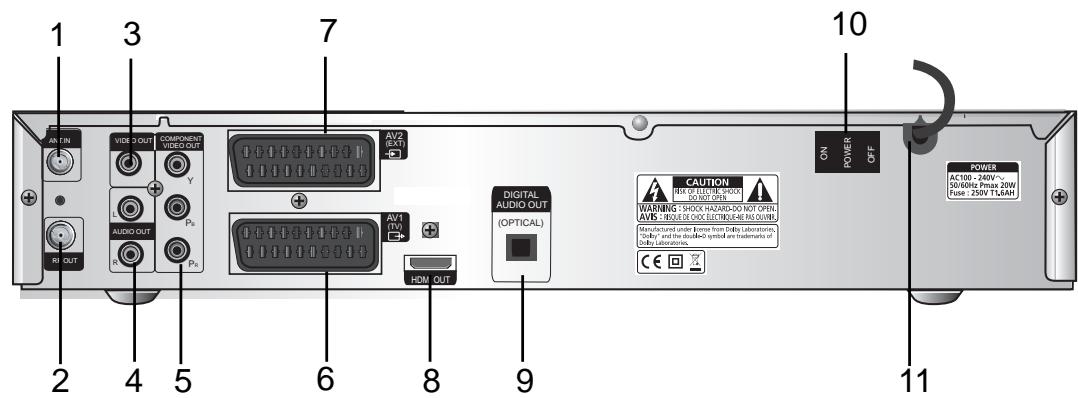
- ANT.IN This port is connected to your cable system via a coaxial cable.
- RF OUT Connects a TV or other receiver via a coaxial cable.
- VIDEO OUT Connect to a TV, monitor or other external display device through the Analog Video IN port.
- AUDIO OUT Connect to a TV, audio receiver or other external device through the analog Audio IN port.
- COMP. VIDEO OUT Connect to a TV, monitor or other external display device through the Component Video IN (YPbPR). At this time, the VIDEO OUTPUT key on the remote control has to be YPBPR mode.
- AV1 (TV) This is used to connect to your TV.
- AV2 (EXT) This is used to connect to your VCR, DVD or other receiver.
- HDMI Out Use the HDMI cable to connect this jack on your television for the best quality picture.
- DIGITAL AUDIO Output for connection to a digital amplifier.
- POWER SWITCH This is used to supply(ON) or interrupt (OFF) the power.
- POWER CORD Connect to the wall outlet of AC 100-240V, 50/60Hz.
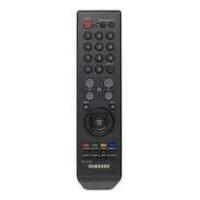
Remote Control Unit
- TV (for TV exclusive use)
Switches the remote control mode to TV mode.
- STB
Switches the remote control mode to receiver mode.
- STANDBY/ON
Turns the receiver operating or standby mode.
- 0 ~ 9 NUMERICAL keys
Press the number keys to tune to a channel or to enter numbers on menu screens.
- FAV. CH
Use the key to switch between favorite lists.
- ALT
Press once to select the soundtrack list and twice to select video track list.
- FREEZE
Press once to hold the picture, twice to release.
- AUDIO
Change the audio to the left, right or both channel.
- CH. LIST
The scanned channel list appears.
10.Vol+ /Vol-
Adjust the volume level
11.MENU
Press to display the on-screen menus.
- ▲/▼/▲/
These keys are for moving the highlight bar for selecting options on the menu.
- GUIDE
Press to display the on-screen Electronic Program Guide (EPG).
- P.SIZE
Press to change the screen format according to the screen aspect ratio and the input signal format.
- COLOR (RED, GREEN, YELLOW, BLUE)
Use according to the instructions on the screen when using a menu or guide screen.
- RESOLUTION
Selects the output resolution format between 1080i, 720p, and 576p (576i) according to the video input of the TV or monitor.
17.VIDEO OUTPUT
Selects Video Output format between RGB and YPbPR according to the video input of TV or monitor
- TV STANDBY/ON
Turns the TV operating or standby mode.(for TV exclusive use)
- INPUT SEL
Press to select the input source in the TV (for TV exclusive use)
- PRE. CH
Turn to the previous channel.
- SUBTITLE
Displays the subtitle on the screen.
- TEXT
Displays the teletext OSD mode on the screen.
- TIMER
This is used to reserve a program by EPG.
- TV/RADIO
Toggles between the TV channel and Radio channel.
- CH /
Press to change the channel
- RETURN
Press to return to the previous menu.
- MUTE
Mutes the audio
- OK
Press to confirm and save any data to the receiver in the menu system
- INFO
Displays the program information in the screen. Press it once and basic information appears. Press it twice and detailed information appears in the text box.
- EXIT
Clearly on-screen displays and return to program viewing.
BASIC FUNCTIONS
1. Display Screen
Before you can view the television program, you must perform the installation.
Therefore you will see only menu images at first.
After the television channels have been programmed, you will see the following picture(banner) each time you switch channels:
(1) Parental Rating.
⑥ Subtitle.
① HD/SD
② Favorite Channel.
⑦ Soundtrack.
12 16:9/4:3
③ Locked Channel.
⑧ Mail.
③ Signal Status.
④ Scramble Channel.
⑨ Announcement.
⑤ Teletext
Dolby Digital.
- Press the INFO key in view mode.
- Select the channel by pressing NUMERICAL 0-9 or / keys and select the TV/RADIO key to move to TV or Radio channel
You will also see this picture each time you change the channels.
When you press the TV/RADIO key on the remote control. TV and Radio program are toggled.
Detailed program information
- Press the INFO key twice while you are viewing a program
First you will see the banner described above.
After the INFO key is pressed in the second time, detailed information for current program can be displayed on another banner, if there is more information. When this information is more than one page, YELLOW and BLUE keys can be used for scroll up and down.
Note : This service depends on service provider.
2. Volume Control

To control the volume level :
- Press the VOL- or VOL+ keys to adjust the volume level.
- Press the MUTE key to turn to silence mode.
- Press the MUTE key again or VOL- / VOL+ keys in order to cancel the mute function.
Note : HDMI sound is controlled by TV, not HD receiver.
3. Select Soundtrack
- Press the ALT key to see the soundtrack list.
- Press the / and OK key to select one.
- The soundtrack service is not provided for every channel and depends on the conditions the operator is in.
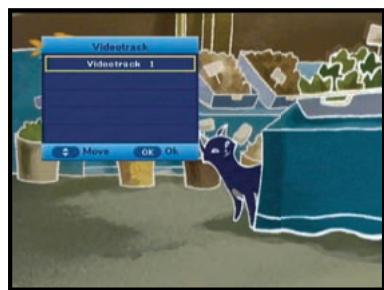
4. Select Videotrack
- Press the ALT key twice to see the videotrack list.
- Press the / and OK key to select one.
- The videotrack service is not provided for every channel and depends on the conditions the operator is in.
Note : When you select AUTO in the selection window, operation will follow system setting of main menu.
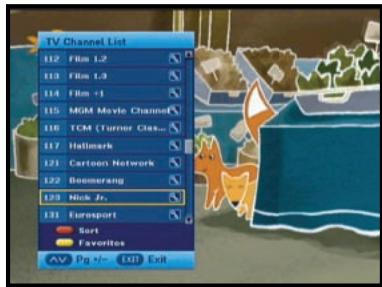
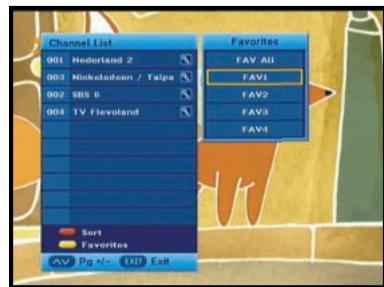
5. Channel List
- Press the CH LIST key while you are viewing a program.
- Select list by pressing the TV/RADIO key.
The icon behind the channel name symbolises scrambled channel, and the icon behind the channel name shows locked channel.
- Select the channel by pressing the / keys on the remote control.
- Press the OK key to watch that channel.
The colour key corresponds the following service list.
- YELLOW key : Favorites
- RED key : Alphabetical
- Press the V (Page Up/Dn) keys to move to next or previous page.
- Press the EXIT key to exit.
5.1 Favorite Channel List
- Press the YELLOW key on the remote control to select the group of favorite channel list.
- Press the YELLOW key to switch between favorite channel list and channel list.
- Use the / keys to select a favorite group or a channel that you want.
- Press the (Page Up/Dn) keys to move to next or previous page.
- Press the EXIT key to exit
5.2 Alphabetical Channel List
- Press the RED key on the remote control to select the Alphabetical channel list.
- Press the RED key to switch between alphabetical channel list and channel list.
- Use the / keys to select a Alphabetical group or a channel that you want.
- Press the EXIT key to exit.
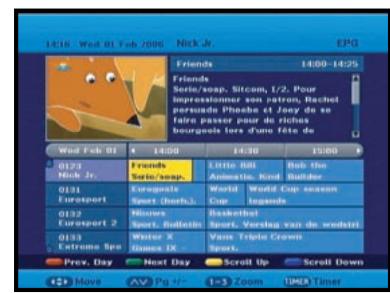
6. Guide (EPG) Menu
EPG-Electronic Program Guide
The electronic program guide gives you information for the channels.
Note: 1. This service depends on service provider.
-
After receiver recognized the GMT-time from the signal which takes few seconds, it can display correct EPG information.
-
Press the GUIDE key while you are viewing a program.
- RED key is for moving back to the previous date.
- GREEN key is for moving to the next coming date.
- YELLOW key can be used for scroll up, if there is more information than one page.
- BLUE key can be used for scroll down, if there is more information than one page.
Time interval can be adjusted by press keys as followings on EPG screen:
1 key: 1 hour and 30 minutes 2 key: 30 minutes 3 key: 15 minutes
With the TV/RADIO key you can browse among the various programs lists.
- Select the channel by pressing the / keys and press the OK key to watch this channel.
- When the TIMER key on the remote control is pressed in the EPG screen, if the current channel involves an event, timer is set immediately and the set timer is indicated on the EPG screen. A program that has been set in this way is indicated on Timer Setting.

7. Teletext OSD
When the current broadcasting program provides Teletext, press the TEXT key once to see the current language list for Teletext in order to get teletext in OSD regardless of TV type.
-
icon on the banner shows that Teletext is available on this event(program). Even - is displayed on the banner, Teletext may not be available due to broadcasting.
-
Press the EXIT key to exit.
Note : When the connected TV provides the Teletext feature, this function is not supported. The HD receiver does not support the Teletext VBI function.
When the teletext application is active following keys can be used:
- NUMERICAL keys: 0....9 are used to change main page.
Then in the left upper corner will be visible number of the main page. If the broadcasting program provides this page after the moment (usually about 20s), this page will be visible.
- / keys are used to change main page, just (+1) for key and (-1) for key.
- / keys are used to change Next/Previous subpage number.
Sometimes broadcaster send one or more subpages on one main page. To change sub-page number just press or key, if subpages will be exist in STB memory then next/previous subpage will be displayed.
8. Subtitle
When the current broadcasting program provides subtitle, press the SUBTITLE key to see the current subtitle language list. If subtitle is available on current program, is displayed on the banner.
To change the subtitle language:
- Press the SUBTITLE key once to see the subtitle language List.
- Use the / keys to select a subtitle language you want.
- Press the OK key and then the subtitle language you want is displayed.
Note: When you select AUTO in the selection window, operation will follow system setting of main menu.

9. Audio Mode
You can choose a mode among left, right or stereo using the AUDIO key.
To change the audio mode:
- Press the AUDIO key to select the left, right or stereo.
After installing your cable system and STB with appropriate connectors.
- Plug in the AC main power and switch on the receiver.
- Press the MENU key to bring up the main menu.
The following on screen display will appear:
The sub menu topics will be displayed. For the sub-menus Installation, Channel , System, Mailbox and Irdeto
Before you begin with the "Installation" menu, you should check in the 3th menu "System" whether all the information are applicable for you.
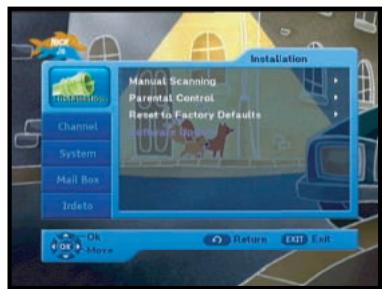
1. Installation
The menu provides settings for customizing, adding new services and displaying the status of the receiver.
- Select "Installation" in the main menu to select the sub menu.
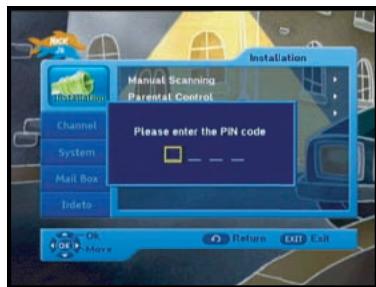
- Enter the PIN Code.
If you have not entered your own PIN Code then the PIN Code 0000 applies, which was set at the factory.
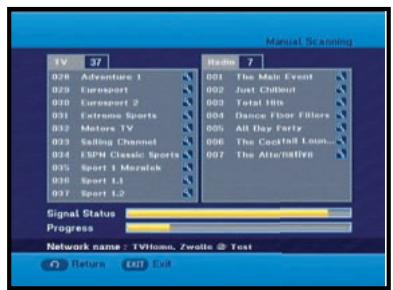
1.1 Manual Scanning
To tune-in new channels, the STB has been provided with "Manual Scanning" where the channel data can be entered by the user. After selecting the "Manual Scanning" from the Installation Menu, the following screen will be displayed:
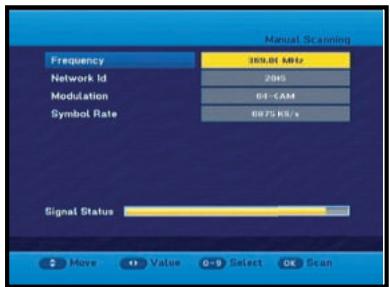
- Input the frequency of the channel you want to find.
- Input the Network ID of the channel you want to find. Ask your cable operator.
- Select the Modulation of the channel you want to find. You can select the value of 16, 32, 64, 128 and 256.
- Input the symbol rate of channel you want to find.
- After select option, press the OK key to start the scan process.
- Press the EXIT key to exit the menu.
Note: When you see “NOT COMPLETE CHANNEL”, please scan again with following instruction of service provider.
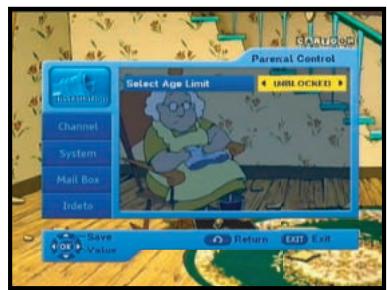
1.2 Parental Control
Parental rating protects your children from adult content. This option is set in Installation Parental Control menu.
- Use the / keys to select age for your youngest child then press the OK key to save this setting.
- All services which age grade is greater than set will be blocked and request to enter the PIN Code.
- If you want blocked all services, select "ALL BLOCKED".
- By default, all services are "UNBLOCKED".
Please enter the PIN Code.
- This banner is shown if service which age grade is greater than set in Parental Control menu. Enter four digits PIN Code to hide this banner and show service content. Factory PIN Code is 0000, and you can change it in Change PIN Code menu.
- Press the EXIT key to exit the menu.
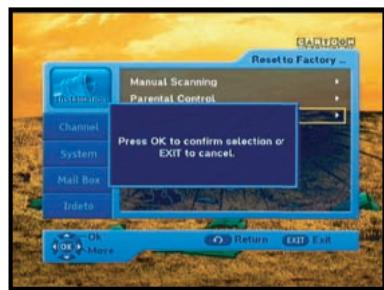
1.3 Reset to Factory Defaults
This is to recover the Factory set values in case the user has encountered some problems after changing any values of channel data and others which may be in error.
The screen display will be as follows:
At the request window, if you press the OK key, the receiver will be reset to factory default settings automatically.
Note : This causes your previous settings to be deleted! All settings and information including channel data will be deleted.
- Press the EXIT key to exit the menu.
1.4 Software Update
This option is enabled only if your cable provider sends software for your STB.
To upgrade the software, place the cursor on Installation Software Update menu and press the OK key. If new software is available, banner "Start Software Updating Process ?" will be displayed. There is also information about estimated time of software download.
Press the OK key to confirm and start Software Updating process.
If there is newest software on your STB "You don't need to update software !" will be displayed.
Note: STB automatically reboots for software upgrading process. During the upgrading process, TV screen will remain blank for approximately 10 minutes. Window display at the STB front panel will show the progress. Service will be resumed automatically after the upgrade is completed.
- Press the EXIT key to exit the menu.
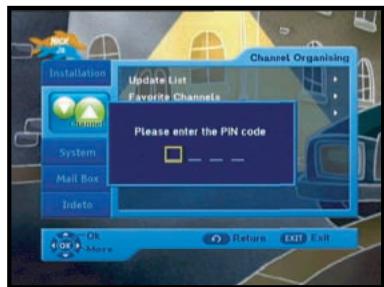
2. Channel
The "Channel" menu has three functions:
Saving changes on channel list by select Update List and it provides making four favourite lists and set channel lock, as you want.
- Enter the PIN Code.
If you have not entered your own PIN Code, 0000 applies which was set at the factory.
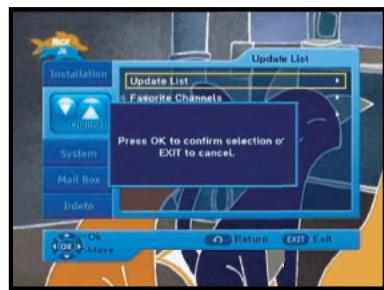
2.1 Update List
When some new channels will be transmitted to your cable network, these channels would be shown on channel list green colored. To save these channels, use Channel Update List.
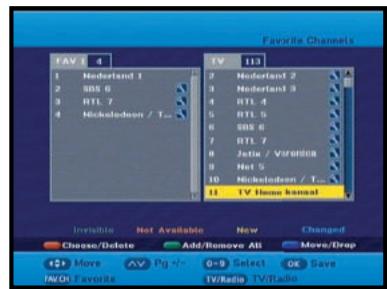
2.2 Favorite Channels
You can immediately register the present channel to the desired Favorite Group.
In addition, you can register a channel to multiple favorite groups.
- Select the desired Favorite Group(FAV1~FAV4) using the FAV.CH key.
- Select the desired channel list using the / or numeric keys at the TV or RADIO list window.
- Press the RED key and then register the selected channel at the Favorite Group.
- Then press the OK key for confirmation.
You can change TV list or Radio list by the TV/RADIO key and change favorite list by the FAV.CH key.
- When you press the TV/RADIO key, TV list and Radio list are toggled.
- Press the FAV.CH key to select another favorite list.
- Press the EXIT key to exit the menu.
To delete channels from Favorite Group:
- Select a channel list to delete with the / keys.
- Press the RED key to delete the selected channel from the favorite channels.
- Press the EXIT key to exit the menu.
Note : One favorite list can contain max 200 channels.
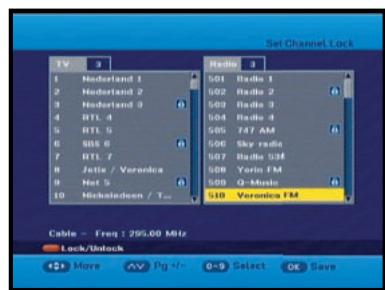
2.3 Set Channel Lock
- Select the TV or RADIO channel window by pressing the / keys.
- Focus the channel by pressing the / keys.
- Select the channel lock by pressing the RED key.
- Press the OK key for confirmation.
This will lock the channel. Whenever you need to view the channel, you will have to enter the PIN Code at the request window.
To cancel the lock:
- Press the RED key again in order to cancel the lock.
- Press the EXIT key to exit the menu.
3. System
This option enables you to change the system settings as your requirements.
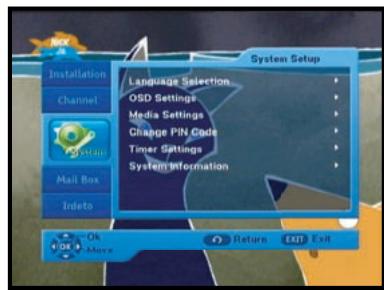
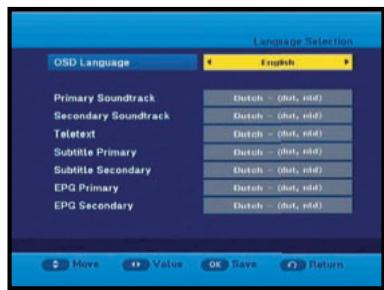
3.1 Language Selection
The "Language Selection" option allows the user to select the desired language of the OSD, Soundtrack, Teletext, Subtitle or EPG. However, these languages for Soundtrack, Teletext, Subtitle and EPG depend on broadcasting.
For example, even the language for Subtitle can be selected, it may not be supported because of no Subtitle on the program.
- There are 3 OSD languages available and 37 languages supported for soundtracks, subtitles, Teletext, and EPG.
- To select the desired language menu, press the / keys to change language and press the OK key.
- The soundtracks, subtitle, Teletext, and EPG will vary according to the selected language.
- Press the EXIT key to exit the menu.
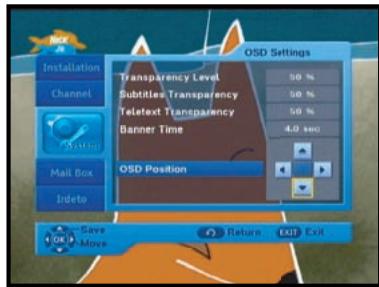
3.2 OSD Settings
You can set the transparency of OSD, subtitle and Teletext, banner display time and OSD Position.
- Select OSD Transparency level.
The OSD Transparency level from 0 to 100% .
Setting is made with the numeric keys, / or CH + / CH -keys.
/ keys : Setting in increment of 1% .
CH+/CH- keys : Setting in increment of 10% .
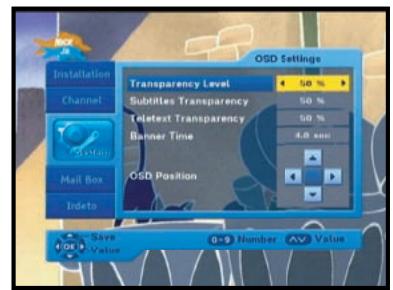
- Select Subtitle Transparency level.
The OSD Transparency level from 0 to 100% .
Setting is made with the numeric keys, / or CH + / CH -keys.
/ keys : Setting in increment of 1% .
CH+/CH- keys : Setting in increment of 10% .
- Select Teletext Transparency level.
The OSD Transparency level from 0 to 100% .
Setting is made with the numeric keys, / or CH + / CH -keys.
/ keys : Setting in increment of 1% .
CH+/CH- keys : Setting in increment of 10% .
- Set the display duration of the information(banner) box displayed in the screen.
The time ranges from 0.5 to 60.0 seconds.
Setting is made with the numeric keys, / keys or CH + / CH - keys.
/ keys : Adjusting in increment of 0.5sec.
CH+/CH- keys : Adjusting in increment of 1 sec.
Note : This setting does not apply to info banner and info window.
OSD Position
- Place the cursor on the position you want, and press the / or / keys until the screen moves to the position you want.
The screen will move to the position you want. - Press the EXIT key to exit the menu.
3.3 Media Settings
You can set the various media settings you want.
Place the cursor on this sub menu and press OK.
- Press the / keys to move the sub items and press the / keys to select the option.
- Press the OK key to confirm.
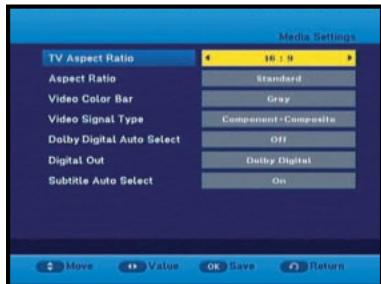
Screen Format
- Select the Screen Format according to your TV : STANDARD 4:3 or WIDE SCREEN 16:9 ratio type.4:3 Video aspect ratio: PAN&SCAN, Full Screen 14:9 LB (Letter Box), 16:9 LB
- When selecting 16:9 for the screen format, you can select an aspect ratio of 4:3 for a movie. (However, the 16:9 video menu is not available in this aspect ratio).
16:9 Video aspect ratio: Standard, Wide
- When selecting 4:3 for the screen format, you can select an aspect ratio of 16:9 for a movie. (However, the 4:3 video menu is not available in this aspect ratio).
-
Select Video Color Bar: Black or Grey.
-
Warning!
Do not display the video color bar in black for extended periods of time as you may experience temporary or permanent image burn. See also the precaution instructions regarding your display device.
- Select the Video Signal Type :
Composite + Component, Composite + RGB
- Select the Dolby Digital Auto Select : On or Off.
On : Outputs the Dolby Digital signal first.
Off: Outputs other audio formats first.
- Select the Digital Out : Dolby Digital or PCM.
Dolby Digital : When Dolby Digital Auto Selected is on, outputs the Dolby Digital signal first.
PCM : When Dolby Digital Auto Selected is on, outputs the PCM signal first.
- Select the Subtitle Auto Select : On, Hearing Impaired or off
- Press the EXIT key to exit the menu.
DOLBY
DIGITAL
Manufactured under license from Dolby Laboratories.
"Dolby" and the double-D symbol are trademarks of Dolby Laboratories.
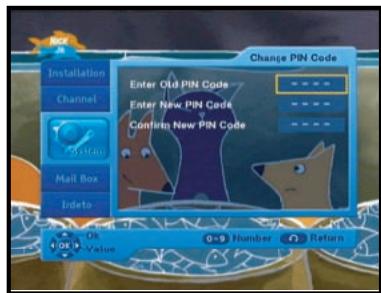
3.4 Change PIN Code
To change the PIN Code, select the fourth option "Change PIN Code".
This will take you to the following menu:
In this option, you need to enter the current PIN Code at the first cursor, and at the second cursor enter the desired PIN Code.
To confirm, you need to enter the new PIN Code again.
Please remember the PIN Code should be a 4 digit numerical value.
THE FACTORY PRESET PIN Code: 0000.
- Press the EXIT key to exit the menu.
3.5 Timer Settings
1) Guard Band Time
Guard-Band time is a function to ensure, that whole event will fit in set time boundaries.
1 minute of Guard-Band Time means that STB will start this timer operation 1 minute before set time and end 1 minute after set time.
2) Timer
15 timers are supported including timer(s) from EPG.
- Select the timer number on 'Timer' using the / keys from 1 to 15.
- Press the / keys to choose event repetition you want to reserve: Daily, Every Sunday, Every Monday, Every Tuesday, Every Wednesday, Every Thursday, Every Friday, Every Saturday and Once. If the timer is set from EPG screen, EPG is displayed on 'Event Repetition'.
- Press the Numerical (0~9) keys to set the time you want and press the / keys to choose a switch time you want to reserve. If set time on 'Switch-on Time' is same as one on 'Switch-off Time', this timer works for 24 hours.
- Select TV program to set the event program by pressing the / keys. When you press the TV/RADIO key, TV program and Radio program are toggled.
- Even you can set timers on Daily and Every Monday or Every Sunday, etc. The priority has the repetition event which is less. For example, when you set timers onOnce and daily, 'Once' will work in stead of 'Daily' at that day. If the timer is running, 'Running' message with a timer number is displayed on 'Timer'.
- Press the EXIT key to exit the menu.

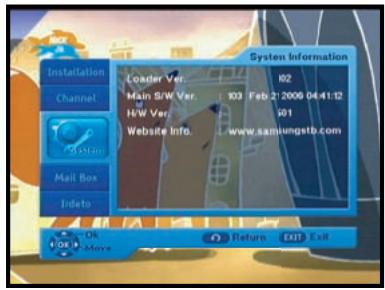
3.6 System Information
If you have to contact your service provider or a service center they might ask for information available from this menu. Place the cursor on this sub menu and press the OK key. The following will be the on-screen display.
- Press the EXIT key to exit the menu.
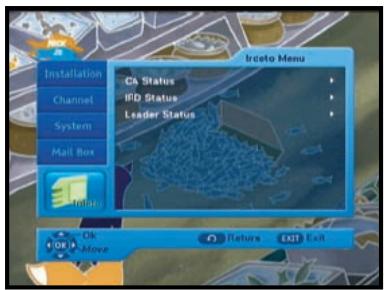
5. Irdeto Menu
The menu provides the information of the smartcard and the STB. Press the OK key to enter the sub menu.
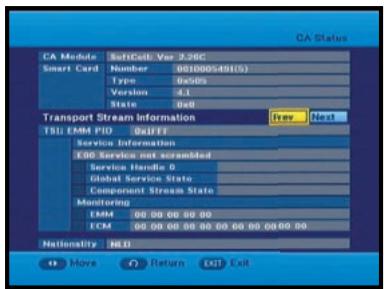
5.1 CA Status
You can see the CA status (Smart Card EMM/ECM information).
- Press the EXIT key to exit the menu.
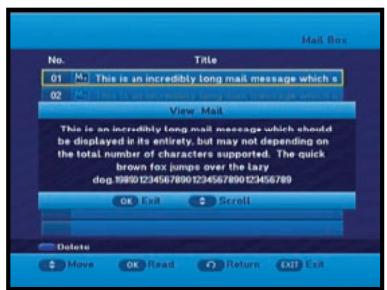
4. Mail Box
You can read the message sent to the individual decoders. We can save the maximum 10 mail messages.
- Press the EXIT key to exit the menu.
5.2 IRD Status
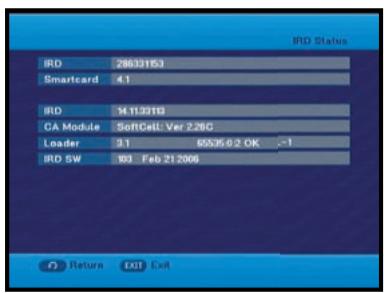
You can see the IRD status (technical information about the IRD, CA, Smart Card and software loaded into it).
- Press the EXIT key to exit the menu.
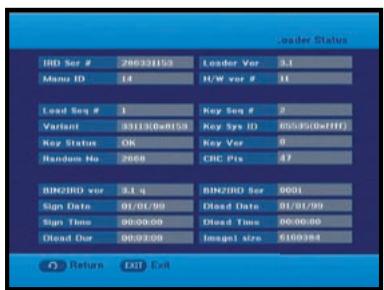
5.3 Loader Status
You can see the information about the IRD, and software loaded into it.
- Press the EXIT key to exit the menu.
Available TV Manufacturer Numbers
- TV key + 3-Digit User Code
- TV Operating keys: TV STANDBY/ON, 0~9, CH / , VOL+/-, INPUT SEL, MUTE
TV
| Maker (BRAND) NAME | CODE NUMBER (3DIGIT) LIST |
| SAMSUNG | 001 002 003 004 005 006 007 008 009 |
| 010 050 066 076 102 195 217 365 379 | |
| 421 | |
| A.R. SYSTEMS | 049 152 |
| ACCENT | 049 152 |
| ACEC | 112 |
| ACURA | 195 |
| ADMIRAL | 065 076 163 171 190 307 324 369 466 |
| 481 | |
| ADYSON | 379 |
| AGASHI | 076 379 |
| AGEF | 324 |
| AIKO | 049 076 102 141 152 172 195 225 379 |
| AIWA | 377 459 |
| AKAI | 049 050 055 066 076 102 107 123 139 |
| 141 150 152 172 182 195 209 225 379 | |
| 428 433 437 471 475 | |
| AKIBA | 049 123 152 380 378 |
| AKITO | 049 106 152 |
| AKURA | 049 076 123 195 378 426 470 |
| ALARON | 042 379 |
| ALBA | 018 049 050 107 123 134 163 168 195 |
| 225 232 379 413 421 457 | |
| ALBIRAL | 371 |
| ALCYON | 407 |
| ALLORGAN | 050 094 236 379 |
| ALLSTAR | 049 152 |
| AMPLIVISION | 113 379 421 425 |
| AMSTRAD | 012 049 076 123 131 152 172 195 225 |
| 426 476 | |
| ANAM | 049 152 195 |
| ANAM NATIONAL | 049 152 |
| ANGLO | 076 195 |
| ANITECH | 049 076 152 195 407 |
| ANSONIC | 045 049 107 112 152 195 210 226 391 |
| 413 421 | |
| ARC EN CIEL | 074 182 186 424 453 463 |
| ARCAM | 379 424 |
| ARISTONA | 049 050 065 079 112 152 160 |
| ARTHUR MARTIN | 107 127 136 139 153 307 425 |
| ASA | 020 065 078 080 091 146 171 197 307 |
| 324 375 408 449 | |
| ASBERG | 049 152 407 |
| ASORA | 195 |
| ASTRA | 195 |
| ASUKA | 050 076 123 378 379 |
| ATLANTIC | 049 050 071 113 152 236 379 |
| ATORI | 195 |
| AUCHAN | 107 425 |
| AUDIOSONIC | 049 074 076 152 182 195 213 379 421 |
| AUDIOTON | 050 076 379 421 |
| AUSIND | 090 407 |
| AUTOVOX | 050 071 078 079 080 083 090 156 236 |
| 324 379 407 413 449 468 470 | |
| AWA | 018 049 131 152 195 226 320 379 426 |
| 433 | |
| AYOMI | 411 |
| BAIRD | 074 102 182 209 218 379 409 |
| BANG & OLUFSEN | 324 |
| BARCO | 107 371 480 |
| BASIC LINE | 049 107 123 195 226 378 |
| BASTIDE | 379 |
| Maker (BRAND) NAME | CODE NUMBER (3DIGIT) LIST |
| BAUR | 049 107 150 152 172 247 249 357 414 454 470 475 |
| BEKO | 152 241 421 433 460 |
| BEON | 049 152 163 |
| BEST | 213 421 |
| BESTAR | 049 152 226 421 |
| BINATONE | 379 |
| BLACK STAR | 413 |
| BLACKTRON | 378 |
| BLACKWAY | 378 |
| BLAUPUNKT | 057 060 113 247 249 345 451 454 481 |
| BLUE SKY | 049 123 152 195 217 232 378 380 457 |
| BLUE STAR | 378 |
| BONDSTEC | 413 |
| BOOTS | 050 106 379 |
| BPL | 049 152 378 |
| BRANDT | 014 074 182 186 218 424 436 452 462 |
| BRANDT ELECTRONIC | 074 453 463 |
| BRANDT ELECTRONIQUE | 074 182 186 453 |
| BRINKMANN | 049 152 163 |
| BRIONVEGA | 049 065 083 152 167 172 324 356 476 |
| BRITANNIA | 379 |
| BROTHER | 076 |
| BRUNS | 065 324 |
| BSR | 094 107 110 139 168 |
| BTC | 123 |
| BUSH | 018 049 076 094 106 107 123 134 139 142 172 193 195 209 217 225 226 232 307 378 379 457 458 470 480 |
| BUSH(UK) | 107 168 |
| CAPSONIC | 049 076 152 380 |
| CARREFOUR | 018 177 |
| CASCADE | 049 064 152 195 |
| CASIO | 049 152 |
| CATHAY | 049 152 |
| CCE | 049 152 379 |
| CENTURION | 049 152 |
| CENTURY | 065 163 324 411 413 481 |
| CGE | 011 090 093 094 107 139 142 163 168 346 348 369 407 413 421 480 |
| CIHAN | 217 |
| CIMLINE | 123 134 195 |
| CITY | 195 |
| CLARIVOX | 049 125 163 |
| CLATRONIC | 045 049 076 113 123 152 195 225 379 407 413 421 |
| CMS HIGHTEC | 379 |
| COMTEL | 125 217 |
| CONCORDE | 195 |
| CONDOR | 045 049 050 113 152 163 195 210 378 379 413 421 467 |
| CONTEC | 018 131 195 320 379 |
| CONTINENTAL EDISON | 014 074 182 186 232 424 453 462 463 |
| COSMEL | 195 213 |
| CROSLEY | 065 090 093 094 104 107 139 324 346 348 407 413 469 481 |
| CROWN | 049 152 163 170 195 209 232 407 421 470 |
| CRYSTAL | 477 |
| CS ELECTRONICS | 123 379 413 |
| CTC | 413 |
| CTC CLATRONIC | 045 |
| CURTIS MATHES | 126 190 |
TV
| Maker (BRAND) NAME | CODE NUMBER (3DIGIT) LIST |
| CURTIS MATHES | 126 190 |
| CYBERTRON | 123 |
| DAENYK | 042 |
| DAEWOO | 049 123 152 193 195 226 379 456 464 |
| DAINICHI | 123 379 |
| DANSAI | 049 076 141 152 195 379 |
| DANSETTE | 426 |
| DANTAX | 421 |
| DATSURA | 209 |
| DAWA | 049 152 |
| DAYTON | 049 152 195 226 |
| DE GRAAF | 107 139 209 307 479 |
| DECCA | 049 102 106 120 217 |
| DECCA(UK) | 046 049 050 102 106 131 152 379 |
| DEITRON | 049 152 |
| DENKO | 076 |
| DENON | 126 |
| DERWENT | 105 |
| DESMET | 049 113 152 |
| DIGATRON | 049 |
| DIGILINE | 049 152 |
| DIXI | 049 152 195 379 413 |
| DORIC | 104 105 |
| DREAN | 049 152 |
| DTS | 195 |
| DUAL | 049 050 107 139 152 156 168 182 243 |
| 379 414 417 424 468 470 | |
| DUAL TEC | 040 050 168 195 379 |
| DUMONT | 045 065 080 102 139 146 324 375 379 |
| 449 469 | |
| DUMONT-FINLUX | 020 045 078 091 104 |
| DUX | 049 112 152 |
| DYNATRON | 049 152 |
| ELBE | 049 107 123 152 172 210 243 369 391 |
| 411 421 435 | |
| ELBIT | 217 |
| ELCIT | 045 046 062 065 104 107 150 168 324 |
| 413 | |
| ELECTA | 076 378 |
| ELECTRO TECH | 195 |
| ELEKTA | 076 378 |
| ELG | 049 152 |
| ELIN | 020 049 107 139 152 172 195 379 470 |
| 479 | |
| ELITE | 049 123 152 467 |
| ELMAN | 045 168 |
| ELTA | 195 076 379 |
| EMERSON | 012 042 049 065 113 152 225 324 378 |
| 413 475 481 | |
| ERRES | 049 112 152 |
| ESC | 049 152 |
| ETRON | 049 107 139 152 195 |
| EURO-FEEL | 076 |
| EUROMAN | 049 076 152 379 421 |
| EUROPA | 049 152 |
| EUROPHON | 045 046 049 050 068 107 120 152 168 |
| 379 413 | |
| EXPERT | 071 107 236 425 |
| EXQUISIT | 049 152 413 |
| FAMILY LIFE | 049 152 |
| FENNER | 152 195 226 |
| FERGUSON | 049 050 074 076 080 082 102 103 182 |
| 218 247 409 411 436 452 472 | |
| FIDELITY | 049 050 076 107 152 225 307 379 475 |
| FILSAI | 050 379 |
| FINLANDIA | 033 139 172 197 209 307 375 470 474 |
| FINLUX | 020 042 045 049 078 080 090 091 102 |
| 104 107 139 146 152 163 197 210 324 | |
| 375 379 407 408 428 429 437 449 469 |
| Maker (BRAND) NAME | CODE NUMBER (3DIGIT) LIST |
| FIRST LINE | 045 049 094 102 107 134 139 152 191 |
| 195 209 210 226 379 411 413 457 470 | |
| FISHER | 018 041 050 065 069 102 104 107 139 |
| 156 172 209 320 324 379 408 414 421 | |
| 470 | |
| FLINT | 049 102 123 152 380 |
| FNR | 045 |
| FORMENTI | 049 090 107 113 139 307 324 379 407 |
| 467 469 480 481 | |
| FORMENTI-PHOENIX | 050 104 113 307 |
| FORTRESS | 190 324 |
| FRABA | 049 152 421 |
| FRIAC | 045 049 152 195 |
| FRONTECH | 066 076 139 195 307 379 413 466 470 |
| 477 | |
| FUJITSU | 042 045 071 102 107 195 236 379 |
| FUJITSU GENERAL | 195 379 |
| FUNAI | 042 076 094 |
| GALAXI | 045 049 152 |
| GALAXIS | 045 049 152 163 421 |
| GBC | 104 107 139 168 195 226 480 |
| GE | 074 182 218 378 |
| GEANT CASINO | 107 425 |
| GEC | 049 102 104 107 120 152 171 172 307 |
| 379 470 | |
| GEC(UK) | 046 050 102 107 150 162 |
| GELOSO | 062 104 107 139 168 171 195 226 307 |
| 413 469 481 | |
| GENERAL | 064 074 182 |
| GENERAL TECHNIC | 195 |
| GENEXXA | 049 123 152 307 426 466 |
| GOLDHAND | 379 |
| GOLDLINE | 213 |
| GOLDSTAR(LG) | 049 050 055 107 139 152 168 172 182 |
| 195 219 379 413 414 421 460 | |
| GOODMANS | 018 042 049 076 102 134 139 141 152 |
| 182 193 195 218 225 226 232 379 428 | |
| 450 456 464 | |
| GORENJE | 421 |
| GPM | 123 |
| GRADIENTE | 049 152 170 177 |
| GRAETZ | 049 090 104 136 139 152 153 162 171 |
| 172 198 225 307 466 469 475 | |
| GRANADA | 013 018 033 041 049 102 104 105 112 |
| 120 152 171 172 198 209 218 238 241 | |
| 307 379 407 425 470 471 472 474 | |
| GRANADA(UK) | 046 050 090 107 139 162 307 |
| GRANDIN | 049 107 113 123 152 195 378 380 425 |
| 435 | |
| GRONIC | 045 379 |
| GRUNDIG | 049 080 090 152 232 247 249 407 454 |
| 455 | |
| HALIFAX | 076 379 |
| HAMPTON | 379 |
| HANIMEX | 094 |
| HANSEATIC | 018 049 050 094 104 107 113 152 172 |
| 195 241 324 378 379 391 421 455 467 | |
| 470 475 | |
| HANTAREX | 045 046 049 152 195 |
| HANTOR | 049 152 |
| HARLEY DAVIDSON | 042 |
| HARWOOD | 049 152 195 426 |
| HAUPPAUGE | 049 152 |
| HAVERMY | 190 |
| HCM | 049 076 123 152 163 195 378 379 426 |
| HEMA | 195 379 |
| HEMMERMANN | 150 470 |
| HIFIVOX | 074 182 186 424 453 463 |
TV
| Maker (BRAND) NAME | CODE NUMBER (3DIGIT) LIST |
| HIGASHI | 050 |
| HIGHLINE | 049 076 152 |
| HIKONA | 123 |
| HINARI | 012 018 042 049 066 094 107 123 134 |
| 139 195 209 232 307 | |
| HISAWA | 123 378 380 425 |
| HIT | 324 |
| HITACHI | 018 020 033 049 050 074 086 099 102 |
| 104 107 110 126 127 139 150 152 162 | |
| 168 171 182 186 218 238 307 379 466 | |
| 469 470 472 479 | |
| HITACHI FUJIAN | 013 |
| HITSU | 123 195 380 |
| HORNYPHON | 049 112 152 |
| HOSHAI | 123 380 |
| HUANYU | 193 226 379 |
| HYGASHI | 379 |
| HYPER | 050 168 195 379 413 |
| HYPERSONIC | 172 |
| HYPSON | 049 076 152 217 378 379 380 425 |
| IBERIA | 049 152 |
| ICE | 049 076 123 152 195 225 379 |
| ICES | 123 379 |
| IMPERIAL | 011 049 090 093 094 107 142 152 163 |
| 168 307 346 348 369 407 413 421 470 | |
| 480 | |
| INDIANA | 049 152 |
| INGELEN | 090 104 136 139 153 162 171 198 232 |
| 435 466 | |
| INGERSOLL | 195 |
| INNO HIT | 046 049 050 066 102 123 152 195 217 |
| 379 407 413 | |
| INNOVATION | 049 152 |
| INTERACTIVE | 210 |
| INTERBUY | 076 195 413 |
| INTERFUNK | 049 065 067 074 090 104 107 112 139 |
| 150 152 153 172 182 307 324 413 421 | |
| 453 463 466 475 | |
| INTERNAL | 049 152 |
| INTERVISION | 045 049 055 076 107 123 152 225 232 |
| 378 379 380 413 421 | |
| IR | 346 |
| IRRADIO | 049 066 090 123 152 195 407 413 |
| ISUKAI | 049 123 152 378 |
| ITC | 379 480 |
| ITS | 049 076 123 152 225 378 379 |
| ITT | 042 090 107 134 139 150 162 171 172 |
| 193 197 198 209 307 375 428 466 469 | |
| 470 471 475 479 | |
| ITT-NOKIA | 042 090 104 107 134 136 139 150 153 |
| 162 171 172 193 197 198 209 307 375 | |
| 470 428 433 435 437 | |
| ITV | 076 049 152 413 |
| JEAN | 018 |
| JEC | 141 |
| JET POINT | 365 |
| JVC | 018 103 123 170 182 225 409 433 439 |
| 465 | |
| KAISUI | 049 050 123 152 195 378 379 380 |
| KAMOSONIC | 050 |
| KAMP | 379 |
| KAPSCH | 071 107 172 236 466 |
| KARCHER | 020 045 049 050 068 076 107 152 195 |
| 217 378 421 435 | |
| KATHREIN | 455 |
| KAWASHO | 379 |
| KB ARISTOCRAT | 107 |
| Maker (BRAND) NAME | CODE NUMBER (3DIGIT) LIST |
| KENDO | 045 049 055 134 152 172 210 413 421 435 476 |
| KENNEDY | 071 079 104 107 139 236 369 480 |
| KINGSLEY | 379 |
| KLARMAX | 371 |
| KNEISSEL | 049 152 210 243 369 391 411 421 435 |
| KOLSTER | 045 049 152 470 |
| KONKA | 049 123 152 225 |
| KONTAKT | 232 |
| KORPEL | 049 152 |
| KORTING | 065 094 113 324 421 |
| KOSMOS | 049 152 |
| KOTRON | 076 426 |
| KOYODA | 195 |
| KRAKING | 411 |
| KRIESLER | 050 065 079 112 152 160 |
| KTV | 050 379 |
| KURO | 445 |
| KYOSHU | 076 163 426 |
| KYOTO | 107 |
| LECSON | 049 152 |
| LEMAIR | 210 |
| LENCO | 049 107 152 195 226 |
| LENOIR | 050 195 |
| LESAS | 413 |
| LEYCO | 049 076 094 102 152 |
| LIESENK & TTER | 049 112 152 345 |
| LIFE | 440 441 443 444 |
| LIFETEC | 049 076 123 152 195 226 440 441 443 444 |
| LLOYD_S | 195 |
| LOEWE | 035 049 089 120 152 324 391 421 |
| LOEWE OPTA | 035 046 049 065 120 144 152 213 324 |
| LOGIK | 131 225 |
| LOGIX | 195 |
| LUMA | 071 107 110 152 171 172 195 210 226 236 307 |
| LUMATRON | 049 076 107 152 172 236 379 |
| LUX MAY | 049 152 195 |
| LUXOR | 042 050 090 107 127 139 150 172 197 209 307 375 428 429 470 472 473 475 |
| LYCO | 076 |
| MAAZ | 371 |
| MADISON | 049 152 |
| MAGNADYNE | 045 046 062 065 104 107 120 139 150 168 324 413 469 |
| MAGNAFON | 045 046 050 068 090 120 379 407 481 |
| MAGNAVOX | 018 042 049 152 |
| MAGNUM | 440 441 443 444 |
| MANDOR | 076 |
| MANESTH | 076 094 113 134 141 152 379 467 |
| MANHATTAN | 049 195 |
| MARANTZ | 049 152 455 |
| MARELLI | 324 |
| MARK | 049 152 195 226 379 |
| MASUDA | 123 195 225 |
| MATSUI | 012 018 041 049 050 094 100 102 106 107 131 134 141 150 152 171 195 209 218 225 232 247 307 379 380 470 |
| MAXIMAL | 139 |
| MAXWELL | 371 |
| MEDIATOR | 049 112 152 |
| MEDION | 049 152 195 217 457 |
| MEGAS | 435 |
| MEGATRON | 126 |
| MELECTRONIC | 020 049 074 152 182 193 195 197 210 226 375 379 408 413 428 429 466 470 |
| MELVOX | 425 |
TV
| Maker (BRAND) NAME | CODE NUMBER (3DIGIT) LIST |
| MELVOX | 425 |
| MEMOREX | 099 195 217 |
| MEMPHIS | 102 125 195 213 |
| MERCURY | 049 152 195 |
| METZ | 049 065 067 070 092 247 324 412 420 454 481 |
| MICROMAXX | 049 152 195 |
| MICROSTAR | 440 441 443 444 |
| MINERVA | 080 090 232 247 249 407 454 |
| MINOKA | 049 152 426 470 |
| MITSUBISHI | 013 018 049 065 105 131 152 157 190 247 324 454 |
| MIVAR | 046 050 058 072 081 090 120 379 391 407 414 421 434 |
| MONACO | 195 |
| MORGAN_S | 049 152 |
| MOTION | 407 |
| MOTOROLA | 190 |
| MTC | 152 379 421 470 |
| MTEC | 106 |
| MULTISTANDARD | 045 |
| MULTITEC | 049 152 195 |
| MULTITECH | 045 046 049 050 120 152 195 379 407 413 421 470 |
| MURPHY | 102 104 105 107 171 307 379 |
| MURPHY(UK) | 162 |
| MUSIKLAND | 123 |
| MYRYAD | 455 |
| NAD | 172 209 475 |
| NAIKO | 049 152 |
| NAKIMURA | 049 152 226 |
| NAONIS | 040 071 079 110 171 |
| NAT | 085 151 |
| NATIONAL | 033 085 104 |
| NEC | 018 049 113 131 152 177 195 226 379 380 |
| NECKERMANN | 011 049 050 065 107 139 152 163 210 247 249 307 324 357 379 413 421 455 470 481 |
| NEDIATOR | 152 |
| NEI | 049 125 152 225 477 |
| NESCO | 042 413 |
| NETSAT | 049 152 |
| NETWORK | 213 |
| NEUFUNK | 049 152 195 435 |
| NEW TECH | 049 050 152 182 195 379 |
| NEW WORLD | 123 |
| NICAMAGIC | 379 |
| NIKKAI | 018 049 076 102 123 125 139 141 152 195 213 379 066 |
| NOBLEX | 049 076 152 |
| NOBLIKO | 045 050 080 090 379 407 |
| NOGAMATIC | 074 182 186 424 453 463 |
| NOKIA | 090 104 107 134 136 139 150 153 157 162 171 172 193 197 198 209 226 307 375 428 429 433 437 465 470 475 478 479 |
| NORDMENDE | 049 074 083 150 152 182 186 218 247 307 424 453 463 469 481 |
| NOVATRONIC | 020 049 152 226 |
| OCEANIC | 086 094 104 107 108 109 139 172 209 425 466 469 475 |
| OCEANIC(F) | 150 |
| ODEON | 076 |
| OKANO | 049 076 102 152 421 |
| OMEGA | 076 |
| ONCEAS | 050 |
| ONWA | 123 225 |
| OPERA | 049 152 |
| Maker (BRAND) NAME | CODE NUMBER (3DIGIT) LIST |
| OPTIMUS | 099 |
| OPTONICA | 190 |
| ORBIT | 049 152 |
| ORION | 012 042 045 049 076 094 113 131 134 |
| 139 150 152 191 195 216 366 367 426 | |
| 467 | |
| ORLINE | 049 123 152 |
| ORMENTI-PHOENIX | 104 |
| ORMOND | 195 |
| OSAKA | 066 |
| OSAKI | 049 066 076 102 106 123 152 226 379 |
| 426 | |
| OSIO | 049 152 |
| OSO | 123 |
| OSUME | 018 102 123 |
| OTAKE | 450 |
| OTTO VERSAND | 018 049 050 074 094 104 107 113 134 |
| 139 152 172 190 218 247 249 357 362 | |
| 379 413 414 454 455 467 469 470 480 | |
| 481 | |
| P.T ACTRON | 217 |
| PAEL | 050 379 |
| PALLADIUM | 049 107 152 163 210 247 324 357 379 |
| 413 421 470 | |
| PALSONIC | 049 055 076 152 379 426 |
| PANAMA | 049 076 152 195 379 413 |
| PANASONIC | 016 049 099 104 107 139 151 152 172 |
| 396 420 466 469 481 | |
| PANAVISION | 049 152 210 |
| PATHE CINEMA | 107 113 379 391 411 425 467 470 480 |
| 481 | |
| PATHE CINEMA(F) | 050 168 |
| PATHE MARCONI | 014 074 182 186 424 453 462 463 |
| PAUSA | 195 |
| PAUZA | 195 |
| PERDIO | 049 102 107 113 152 467 |
| PERFEKT | 049 152 |
| PERSHIN | 425 |
| PHILCO | 011 016 049 065 090 093 094 104 107 |
| 126 142 152 163 324 346 348 369 | |
| 407 413 421 480 481 | |
| PHILEX | 471 |
| PHILHARMONIC | 379 |
| PHILIPS | 014 049 050 065 079 089 112 152 160 |
| 182 193 216 217 220 226 247 249 324 | |
| 427 455 482 | |
| PHOENIX | 049 050 102 104 107 113 152 324 379 |
| 421 | |
| PHONOLA | 049 050 065 079 112 152 160 324 379 |
| PILOT | 049 152 |
| PIONEER | 049 074 152 172 182 209 218 307 421 |
| 427 466 | |
| PLANTRON | 049 076 152 195 |
| PLAYSONIC | 379 |
| POLICOM | 074 |
| POPPY | 195 |
| PORTLAND | 226 |
| POWERPOINT | 232 |
| PRANDONI-PRINCE | 046 090 120 171 172 307 407 413 |
| PRECISION | 379 |
| PREMIER | 142 |
| PRIMA | 076 195 307 |
| PRINCE | 046 171 |
| PRINZ | 102 470 |
| PROFEX | 107 139 195 407 475 |
| PROFI-TRONIC | 045 049 152 |
| PROLINE | 049 102 112 191 366 436 |
| PROSONIC | 049 085 151 152 195 225 226 379 421 |
TV
| Maker (BRAND) NAME | CODE NUMBER (3DIGIT) LIST |
| PROTECH | 045 049 076 125 139 152 163 195 379 |
| 413 457 470 477 480 | |
| PROVISION | 049 152 |
| PYE | 050 065 079 112 152 160 226 324 |
| PYMI | 049 112 152 195 226 324 |
| QUADRA VISION | 425 |
| QUASAR | 045 046 068 099 413 |
| QUELLE | 018 020 049 050 074 076 078 080 090 |
| 091 094 113 131 139 146 150 152 153 | |
| 172 195 247 249 320 345 346 348 357 | |
| 379 408 413 449 451 454 470 475 480 | |
| 481 | |
| QUESTA | 018 |
| RADIALVA | 049 074 107 123 152 |
| RADIOLA | 014 049 050 065 079 112 152 160 |
| RADIOMARELLI | 045 046 062 065 104 105 150 152 168 |
| 324 413 | |
| RADIONETTE | 020 150 |
| RADIOSHACK | 049 152 |
| RADIOTONE | 049 076 152 163 195 421 426 |
| RANK ARENA | 018 |
| RCA | 190 218 436 |
| RECOR | 049 152 |
| RECTILIGNE | 049 152 |
| REDIFFUSION | 018 059 104 105 139 171 172 307 471 |
| 475 | |
| REDIFFUSION(UK) | 150 162 |
| REDSTAR | 049 152 |
| REFLEX | 049 152 |
| REOC | 460 |
| REVOX | 049 152 421 |
| REX | 040 071 079 107 110 152 171 210 236 |
| 243 307 413 466 | |
| RFT | 076 102 241 324 391 421 |
| RHAPSODY | 379 |
| R-LINE | 049 152 |
| ROADSTAR | 049 076 123 152 163 195 |
| ROBOTRON | 065 324 |
| RODEX | 049 152 |
| ROWA | 458 |
| ROWSONIC | 050 |
| ROYAL LUX | 421 426 |
| RTF | 065 |
| SABA | 046 065 074 077 107 120 139 172 182 |
| 186 218 307 324 424 436 452 453 463 | |
| 466 469 481 | |
| SACCS | 411 |
| SAGEM | 378 380 435 |
| SAISHO | 012 050 076 107 131 134 195 307 379 |
| 477 | |
| SALORA | 033 107 127 136 139 150 153 171 172 |
| 198 209 307 466 470 472 474 475 479 | |
| SAMBERS | 045 046 068 090 120 407 481 |
| SANDRA | 379 |
| SANELA | 411 |
| SANSUI | 049 152 225 |
| SANTON | 195 |
| SANYO | 018 020 041 049 050 065 102 107 131 |
| 152 195 198 209 320 379 391 408 421 | |
| 481 | |
| SAVE | 049 152 |
| SBR | 049 112 152 |
| SCHAUB LORENZ | 090 104 136 139 153 162 171 198 307 |
| 433 469 470 475 | |
| SCHNEIDER | 014 040 049 050 065 069 079 104 107 |
| 112 123 139 152 156 160 168 172 182 | |
| 195 225 243 307 379 382 413 414 417 | |
| 457 468 470 |
| Maker (BRAND) NAME | CODE NUMBER (3DIGIT) LIST |
| SCOTT | 042 |
| SEARS | 042 |
| SEG | 018 045 049 050 076 107 152 172 195232 379 413 407 457 480 |
| SEI | 012 045 049 094 107 139 152 236 324357 469 470 481 |
| SEI SINUDYNE | 446 |
| SELECO | 040 071 079 107 110 152 171 172 210236 243 307 369 466 476 |
| SENCORA | 195 |
| SENTRA | 123 139 141 195 |
| SERINO | 380 435 |
| SHARP | 018 094 170 190 320 362 |
| SHORAI | 042 094 |
| SIAM | 049 152 |
| SIAREM | 045 046 065 104 107 120 139 324 469481 |
| SIEMENS | 018 049 066 113 152 247 249 307 320345 451 454 469 481 |
| SIERA | 050 065 079 112 152 160 |
| SIERRA | 049 112 152 |
| SIESTA | 421 |
| SILVA | 049 152 379 |
| SILVER | 018 042 049 076 152 172 |
| SINGER | 045 049 065 104 152 195 324 369 413425 |
| SINUDYNE | 012 045 065 094 104 107 134 139 150152 172 210 216 236 324 357 366 367469 470 481 |
| SKANTIC | 307 472 473 |
| SKY | 049 152 |
| SKYWORTH | 448 |
| SOGERA | 113 |
| SOLAVOX | 066 102 107 139 172 307 466 471 |
| SONAWA | 123 |
| SONITRON | 209 379 421 |
| SONNECLAIR | 049 152 |
| SONOKO | 049 050 076 152 195 378 379 |
| SONOLOR | 107 139 172 209 357 425 466 |
| SONTEC | 049 094 152 421 |
| SONY | 018 045 131 211 346 357 358 370 |
| SOUND & VISION | 045 123 226 |
| SOUND WAVE | 049 113 163 |
| SOUNDESIGN | 042 |
| SPECTRA | 195 |
| SSANGYONG | 195 |
| STANDARD | 049 050 113 123 152 195 226 379 |
| STARLIGHT | 049 076 107 152 195 |
| STENWAY | 123 378 |
| STERN | 040 071 079 107 110 152 171 236 243307 466 |
| STRATO | 049 076 152 195 |
| SUNKAI | 049 094 123 134 152 191 232 367 380 |
| SUNSTAR | 049 152 195 225 |
| SUNWOOD | 049 152 195 |
| SUPERLA | 379 |
| SUPERTECH | 049 123 152 195 379 |
| SUPRA | 195 226 |
| SUSUMU | 123 218 |
| SUTRON | 195 |
| SWISSLINE | 413 |
| SYDNEY | 379 |
| SYSLINE | 049 |
| SYTONG | 379 |
| TACTUS | 106 |
| TANDBERG | 065 074 078 172 182 210 213 420 449 |
| TANDY | 050 102 123 190 307 379 413 466 |
| TASHIKO | 018 050 107 177 379 470 474 |
TV
| Maker (BRAND) NAME | CODE NUMBER (3DIGIT) LIST |
| TATUNG | 049 050 102 106 120 131 152 217 379 |
| TCM | 440 441 443 444 |
| TEAC | 049 076 152 163 195 217 378 380 426 457 458 470 |
| TEC | 040 050 064 168 195 213 218 243 379 413 480 |
| TECH LINE | 049 152 195 |
| TECHICA | 123 |
| TECHNEMA | 113 467 |
| TECHNICS | 099 |
| TECHNOL ACE | 042 |
| TEDELEX | 379 |
| TEIRON | 195 |
| TEKNIKA | 042 |
| TELEAVIA | 014 074 182 186 218 424 453 462 463 |
| TELECOR | 049 107 123 152 379 |
| TELEFUNKEN | 049 064 074 082 152 182 186 187 218 230 346 348 424 436 452 453 463 |
| TELEFUSION | 049 152 |
| TELEGAZI | 049 076 107 123 152 |
| TELEMEISTER | 049 113 152 467 |
| TELESONIC | 049 152 |
| TELESTAR | 049 152 |
| TELETECH | 049 152 195 213 413 |
| TELETON | 018 067 071 107 236 379 470 |
| TELEVIDEON | 050 104 107 113 379 |
| TELEVISO | 425 |
| TEMCO | 094 |
| TEMPEST | 049 152 195 |
| TENNESSEE | 049 152 |
| TENSAI | 020 050 055 094 113 123 152 195 225 226 379 413 450 467 |
| TESMET | 439 |
| TETUNG | 046 |
| TEVION | 049 152 195 |
| TEXET | 050 123 195 226 379 |
| THOMSON | 014 024 049 064 074 134 152 182 186 218 230 424 436 453 462 463 470 |
| THORN | 049 102 103 106 141 152 218 226 346 348 408 409 411 454 464 470 475 |
| THORN-FERGUSON | 074 076 080 082 103 218 357 358 375 |
| TOKAI | 049 102 107 152 195 213 226 379 |
| TOKYO | 141 379 |
| TOMASHI | 123 378 |
| TOSHIBA | 018 045 128 141 369 379 |
| TOWADA | 045 379 470 480 |
| TOYODA | 195 |
| TRAKTON | 076 |
| TRANS CONTINENS | 046 049 152 171 307 379 |
| TRANSONIC | 049 152 380 458 |
| TRANSTEC | 379 |
| TRIDENT | 379 |
| TRISTAR | 123 |
| TRIUMPH | 012 046 049 128 152 197 375 |
| UHER | 049 069 071 080 090 113 152 163 226 236 307 407 414 421 467 |
| ULTRA | 409 |
| ULTRAVOX | 045 049 050 065 104 107 139 152 226 324 379 413 471 |
| UNIC LINE | 049 152 |
| UNITED | 049 152 |
| UNIVERSUM | 011 012 018 020 049 074 076 094 107 131 152 163 172 195 197 210 213 247 320 345 346 357 375 379 407 408 413 421 428 429 437 454 470 480 |
| UNIVOX | 049 107 152 213 324 411 |
| UTAX | 050 |
| VEGAVOX | 163 |
| Maker (BRAND) NAME | CODE NUMBER (3DIGIT) LIST |
| VESTEL | 049 107 125 152 379 |
| VEXA | 152 195 |
| VICTOR | 170 |
| VIDEO SYSTEM | 049 152 |
| VIDEOLOGIQUE | 123 379 |
| VIDEOSAT | 413 447 |
| VIDEOSYSTEM | 049 152 |
| VIDEOTECHNIC | 113 226 379 |
| VIDEOTON | 107 472 |
| VIDIKRON | 045 |
| VIDTECH | 018 |
| VIPER | 213 |
| VISSIOLA | 379 |
| VISION | 049 113 152 467 |
| VISOREX | 442 |
| VISTAR | 172 236 |
| VOLTEC | 074 |
| VORTEC | 152 |
| VOXSON | 049 065 090 152 163 171 307 324 407 466 |
| WALTHAM | 049 152 163 182 307 379 472 |
| WATSON | 049 107 113 123 152 195 247 467 |
| WATT RADIO | 045 050 068 104 107 139 150 379 470 480 |
| WEGA | 018 049 139 152 324 |
| WEGA COLOR | 065 088 |
| WEGAVOX | 195 |
| WELTBlick | 113 152 |
| WESTINGHOUSE | 094 152 |
| WESTON | 168 |
| WHARFEDALE | 049 152 |
| WHITE | 045 |
| WHITE WESTINGHOUSE | 049 050 113 152 213 379 467 |
| WINCO | 426 |
| WINDSTAR | 378 |
| XCRYPTON | 049 152 |
| YAMISHI | 049 123 152 378 379 380 |
| YOKAN | 049 152 |
| YOKO | 049 050 076 123 152 195 379 413 421 477 |
| YORX | 123 |
| ZANUSSI | 040 071 079 110 152 171 236 307 379 |
| ZOPPAS | 040 071 079 110 171 307 |
TROUBLESHOOTING
| Problem | Possible cause | Solution of the problem |
| No display LED on the front panel; No power supply | Power cord not plugged in correctly | Power cord plug in correctly |
| No pictures on the screen | Receiver in Standby mode; SCART,RCA or HDMI not connected tightly to video input of television; Incorrect channel or video output selected on television; Incorrect video output selection on HD Receiver | Set receiver to “On”; Check connection; Check channel and video input of TV (TV instruction manual); Check video output on HD receiver (Refer to page 10) |
| No sound | SCART or Audio connected incorrectly; Loudness level = 0; Muting active | Check connection; Increase loudness on television set or HD receiver; Press the MUTE key |
| Remote Control does not operate directly | Incorrect Operation; Batteries dead or inserted incorrectly | Point remote control towards the receiver; Replace batteries or insert correctly |
| Poor picture quality | Signal strength too low | Check all wire connections |
| Menu screen does not disappear | Channel lists not installed; | Scan channels. Please go to Installation menu; |
| On-Screen Error Messages; “Searching for signal”; “No signal” | Signal cable not connected or not tight | Check connection |
| On-Screen Error Messages; “Smartcard Failure” “Unknown smartcard” “Please insert Smartcard” | Smartcard - not plugged in correctly; - not plugged in | (Depend on model) Check the smartcard; Insert the smartcard |
DISPOSAL
The device, packaging material (e.g. Styrofoam) and the batteries must never be disposed of with household refuse. Please obtain appropriate information about the regulations in your community, and dispose of all refuse in accordance with regulations at the separate locations provided.
TECHNICAL SPECIFICATIONS
Power supply
Type: SMPS
Input voltage : AC 100-240V\~, 50/60 Hz
Fuse rating : 250 V/T1.6AH
Tuner & Demodulator
Input Frequency : 50.5~858 MHz
Channel Bandwith 8 MHz
DEMODULATION: QAM DVB-C
SYMBOL RATE : MAX 7.252 Msps
Constellation: 16,32,64,128,256 QAM
CABLE OUT: RF LOOP-THROUGH OUTPUT for other
receiver or TV
Video decoder
System decoding : MPEG-2 ISO/IEC 13818-2
Profile@Level (MP@HL(HD), MP@ML(SD))
H.264 ISO/IEC 14496-10
(MP@L3, MP@L4, HP@L4 up to 30 Mbps)
Resolution : 1080i, 720p, 576p, (576i)
Video Output: SD output (2 SCART (AV1,AV2), Composite RCA)
Profile@Level (MP@HL(HD), MP@ML(SD))
H.264 ISO/IEC 14496-10
(MP@L3, MP@L4, HP@L4 maximaal 30 Mbps)
Resolutie: 1080i, 720p, 576p, (576i)
Video-uitgang: SD-uitgang (2 SCART (AV1,AV2), Composite RCA)
HD-uitgang (Component (YPBPR), HDMI)
Description technique 2
Table des matieres 4
Please enter the PIN Code.
Le code PIN PAR DEFAULT est: 0 0 0 0.
DEMODULATION: QAM DVB-C
DEBIT DE SYMBOLES: MAXI. 7 252 Msps
Constellation: 16,32,64,128,256 MAQ
Profile@Level (MP@HL(HD), MP@ML(SD))
H.264 ISO/IEC 14496-10

- Instructions for use
- SAFETY INSTRUCTIONS
- TECHNICAL OVERVIEW
- What are SDTV and HDTV ?
- SDTV
- HDTV
- Resolution
- DVB-C ( Cable Digital Video Broadcasting)
- Aspect ratio
- Dolby® Digital 5.1
- HDMI (High Definition Multimedia Interface)
- CONTENT
- GENERAL FEATURES
- USER SECTION
- TUNER SECTION
- VIDEO SECTION
- AUDIO SECTION
- Connecting the receiver cable system
- ANT.IN Connection
- RF OUT Connection
- Connecting the Set-Top Box to a TV Set
- Composite Connection
- Component Connection
- Scart Connection
- Connecting the Set-Top Box to a TV with a HDMI jack
- Connecting an Audio Component
- Selecting the Resolution and the DTV Output Signal
- To select the resolution:
- To select the video output signal:
- Resolution and Video Output
- Setting Up TV Operations with the Remote Control
- DESCRIPTION
- Front Panel
- Rear Panel
- Remote Control Unit
- BASIC FUNCTIONS
- Display Screen
- Detailed program information
- Volume Control
- Select Soundtrack
- Select Videotrack
- Channel List
- Favorite Channel List
- Alphabetical Channel List
- Guide (EPG) Menu
- EPG-Electronic Program Guide
- Teletext OSD
- When the teletext application is active following keys can be used:
- Subtitle
- Audio Mode
- Installation
- Manual Scanning
- Parental Control
- Please enter the PIN Code.
- Reset to Factory Defaults
- The screen display will be as follows:
- Software Update
- Channel
- Update List
- Favorite Channels
- To delete channels from Favorite Group:
- Set Channel Lock
- System
- Language Selection
- OSD Settings
- OSD Position
- Media Settings
- Screen Format
- Change PIN Code
- Timer Settings
- 1) Guard Band Time
- 2) Timer
- System Information
- Irdeto Menu
- CA Status
- Mail Box
- IRD Status
- Loader Status
- Available TV Manufacturer Numbers
- TROUBLESHOOTING
- DISPOSAL
- TECHNICAL SPECIFICATIONS
- Power supply
- Tuner & Demodulator
- Video decoder
Brand : SAMSUNG
Model : DCB-H360R
Category : DVB