LE52A559P4F - TV SAMSUNG - Free user manual and instructions
Find the device manual for free LE52A559P4F SAMSUNG in PDF.

User questions about LE52A559P4F SAMSUNG
0 question about this device. Answer the ones you know or ask your own.
Ask a new question about this device
Download the instructions for your TV in PDF format for free! Find your manual LE52A559P4F - SAMSUNG and take your electronic device back in hand. On this page are published all the documents necessary for the use of your device. LE52A559P4F by SAMSUNG.
USER MANUAL LE52A559P4F SAMSUNG
If you have any questions or comments relating to Samsung products, please contact the SAMSUNG customer care centre. (See back cover for more informations.)
Precautions When Displaying a Still Image
A still image may cause permanent damage to the TV screen.
- Do not display a still image on the LCD panel for more than 2 hours as it can cause screen image retention. This image retention is also known as "screen burn". To avoid such image retention, reduce the degree of brightness and contrast of the screen when displaying a still image.
- Watching the LCD TV in 4:3 format for a long period of time may leave traces of borders displayed on the left, right and center of the screen caused by the difference of light emission on the screen. Playing a DVD or a game console may cause a similar effect to the screen. Damages caused by the above effect are not covered by the Warranty.
- Displaying still images from Video games and PC for longer than a certain period of time may produce partial after-images.
To prevent this effect, reduce the 'brightness' and 'contrast' when displaying still images.
© 2008 Samsung Electronics Co., Ltd. All rights reserved.
Contents
CONNECTING AND PREPARED YOUR TV
< List of Parts 3
< Installing the Stand. 3
< Installing the Wall Mount Kit 3
Viewing the Control Panel 4
Viewing the Connection Panel 5
Viewing the Remote Control. 8
< Installing Batteries in the Remote Control... 9
Switching On and Off 9
< Placing Your Television in Standby Mode... 9
Viewing the Menus. 10
Using the TOOLS Button. 10
Plug & Play 11
SETTING THE CHANNELS
< Storing Channels Automatically 12
< Storing Channels Manually 13
< Adding / Locking Channels 14
<Sorting the Stored Channels. 15
<Assigning Channels Names. 15
< Fine Tuning Channel Reception 16
/1 /R Z 1 R L V HP.S.Q.L.ó.H.U.... 16
SETTING THE PICTURE
Changing the Picture Standard 17
Adjusting the Custom Picture 18
&RQJJXULQJ 'HWDLOHG 6H.W8W
Resetting the Picture Settings to the Factory Defaults 19
&RQJ JXULQJ 3LE.W.X.U.H...2.S.W.L2RQ
Viewing the Picture In Picture (PIP) 22
SETTING THE SOUND
Sound Features 23
Selecting the Sound Mode 24
Connecting Headphones (Sold separately) .... 24
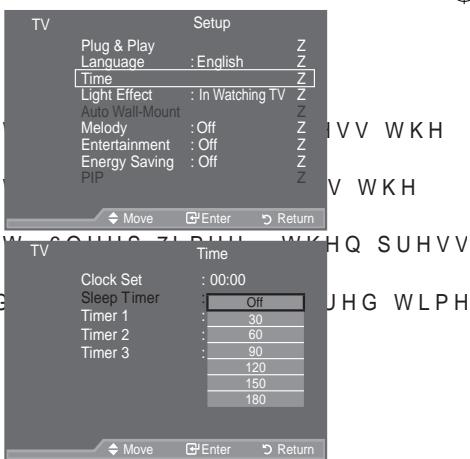
SETTING THE TIME
< Setting and Displaying the Current Time... 25
< Setting the Sleep Timer 25
Switching the Television On and Off Automatically 26
FUNCTION DESCRIPTION
Choosing Your Language 26
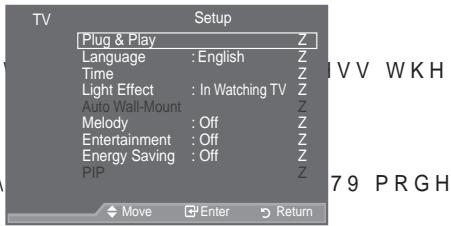
Setting the Light Effect (depending on the model) 27
< Melody / Entertainment / Energy Saving 27
Selecting the Source 29
< Editing the Input Source Names 29
USING THE DTV FEATURE
< Previewing the DTV Menu System 30
<Updating the Channel List Automatically. 31
<Updating the Channel List Manually 31
< Editing Your Favourite Channels 32
< Selecting Channel List 34
<DisplayingProgrammeInformation 34
Viewing the EPG (Electronic Programme Guide) Information 35
Using the Scheduled List 36
< Setting the Default Guide 36
Viewing All Channels and Favourite Channels 37
Adjusting the Menu Transparency. 37
< Setting up the Parental Lock 38
< Setting the Subtitle 39
< Setting the Subtitle Mode 39
< Selecting the Audio Format 39
< Selecting the Audio Description 40
< Selecting the Digital Text (UK only) 40
QJSEIERtAg tWeKThHe3ZbIeWSsduHnly) 41
Viewing Product Information 41
< Checking the Signal Information 42
Upgrading the Software 42
Viewing Common Interface 43
< Selecting the CI (Common Interface) Menu..... 43
Resetting 44
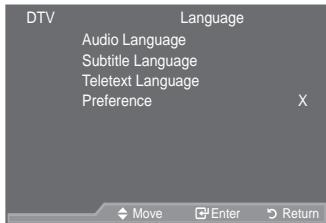
Selecting the Preferred Language (Subtitle, Audio or Teletext) 44
< Preference 45
SETTING THE PC
Setting up Your PC Software (Based on Windows XP) 46
<Display Modes. 46
< Setting up the TV with your PC 47
WISELINK
Using the WISELINK Function 48
Using the WISELINK Menu 49
Using the PHOTO (JPEG) List 50
Using the MP3 List 53
Using the Setup Menu 54
ABOUT ANYNET+
What is Anynet+? 55
<Connecting Anynet+ Devices 55
< Setting Up Anynet+ 56
Scanning and Switching between Anynet+ Devices 57
<Recording. 59
Listening through a Receiver 59
< Check Points before Requesting Service 60
RECOMMENDATIONS FOR USE
< Teletext Feature 61
< Auto Wall-Mount (Sold separately). 63
Using the Anti-Theft Kensington Lock (depending on the model) 64
Troubleshooting: Before Contacting Service Personnel 65
7HFKQLFDO DQG (QYLURQP.H6QWDO 6SHF
Symbol

Press

Note

One-Touch Button
List of Parts
Please make sure the following items are included with your LCD TV. If any items are missing, contact your dealer.
| Remote Control & Batteries (AAA x 2) | Power Cord | Cover-Bottom | Stand Screw X 4 | Stand | Cleaning Cloth |
| • Owner's Instructions | • Warranty card | • Safety Guide | • Registration Cards | ||
^ 念 Warranty card / Safety Guide / Registration Cards (Not available in all locations)
° The stand and stand screw may not be included depending on the model.
Installing the Stand
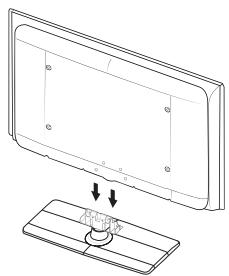
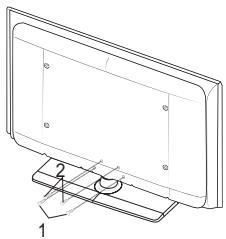
- Connect your LCD TV and the stand.
° Two or more people should carry the TV.
o Make sure to distinguish between the front and back of the stand when assembling them.
- Fasten two screws at position 1 and then fasten two screw at position 2 .
° Stand the product up and fasten the screws. If you fasten the screws with the LCD TV placed down, it may lean to one side.
° The stand is installed for models with the screen size of 37 inch and above.
Installing the Wall Mount Kit
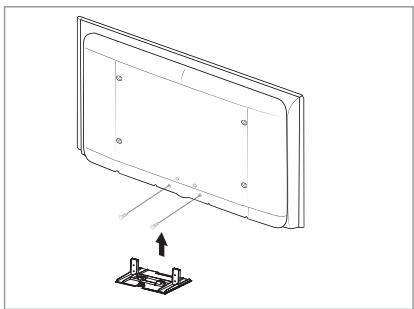
Wall mount items (sold separately) allow you to mount the TV on the wall.
For detailed information on installing the wall mount, see the instructions provided with the Wall Mount items.
Contact a technician for assistance when installing the wall mounted bracket.
Samsung Electronics is not responsible for any damage to the product or injury to yourself or others if you elect to install the TV on your own.
Do not install your Wall Mount Kit while your TV is turned on. It may result in personal injury due to electric shock.
Remove the stand and cover the bottom hole with a cap and fasten with two screws.

Viewing the Control Panel
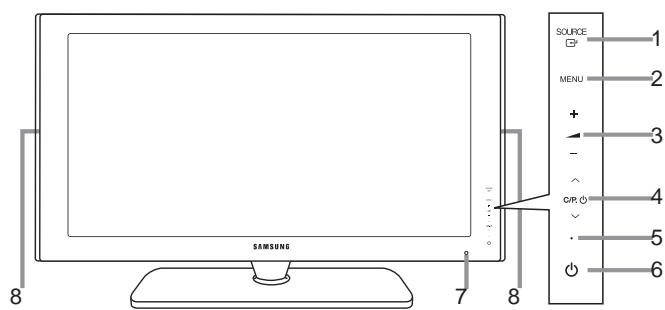
Front Panel buttons Touch each button to operate.
Side Panel buttons
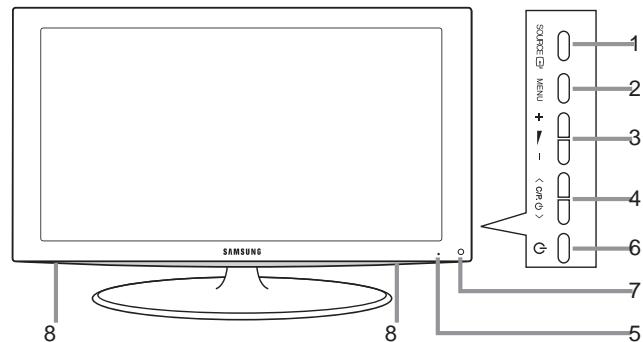
° The product colour and shape may vary depending on the model.
1 SOURCE
Toggles between all the available input sources (TV, Ext.1, Ext.2, AV, S-Video, Component, PC, HDMI1, HDMI2, HDMI3, DTV). In the on-screen menu, use this button as you use the ENTER button on the remote control.
2 MENU
Press to see an on-screen menu of your TV's features.
3 -+
Press to decrease or increase the volume. In the on-screen menu, use the - + buttons as you
XVH WKH {DQG y EXWWRQV RQ WKH UHPRWH FRQWURO
5 Power Indicator
Blinks and turns off when the power is on and lights up in stand-by mode.
6 (Power)
Press to turn the TV on and off.
7 Remote Control Sensor
Aim the remote control towards this spot on the TV.
8 Speakers
4 C / P,0
Press to change channels.
In the on-screen menu, use the C / P.
buttons as you use the z and x buttons on the remote control.
(Without the Remote Control, you can turn on the TV by using the Channel buttons.)

Viewing the Connection Panel

The product colour and shape may vary depending on the model.
° Whenever you connect an external device to your TV, make sure that power on the unit is turned off
° When connecting an external device, match the colour of the connection terminal to the cable.
1 PC IN [PC] / [AUDIO]
- Connect to the video and audio output jack on your PC.
2 COMPONENT IN
- Connect component video cables (optional) to component connector ("PR", "Pb", "Y") on the rear of your set and the other ends to corresponding component video out connectors on the DTV or DVD.
- If you wish to connect both the Set-Top Box and DTV (or DVD), you should connect the Set-Top Box to the DTV (or DVD) and connect the DTV (or DVD) to component connector ("PR", "PB", "Y") on your set.
- The PR , PB and Y connectors on your component devices (DTV or DVD) are sometimes labeled Y, B-Y and R-Y or Y, Cb and Cr.
- Connect RCA audio cables (optional) to "R - AUDIO - L" on the rear of your set and the other ends to corresponding audio out connectors on the DTV or DVD.
3HDMI IN 1,HDMI IN 2,HDMI IN 3
Supports connections between HDMI-connection-enabled AV devices (Set-Top Boxes, DVD players)
- No additional Audio connection is needed for an HDMI to HDMI connection.
- When using an HDMI/DVI cable connection, you must use the HDMI IN 2 jack.

What is HDMI?
- 3 + LJK 'HJQLWLRQ 0XOWLPGLD LQWHUIDFH' DODIRVZ DOWYKHGWB DGDPW and multiple channels of digital audio.
- The HDMI/DVI terminal supports DVI connection to an extended device with the appropriate cable (not supplied). The difference between HDMI and DVI is that the HDMI device is smaller in size, has the HDCP (High Bandwidth Digital Copy Protection) coding feature installed, and supports multi-channel digital audio.
The TV may not output sound and pictures may be displayed with abnormal colour when DVD players/Cable Boxes/Satellite receivers supporting HDMI versions older than 1.3 are connected. When connecting an older HDMI cable and there is no sound, connect the HDMI cable to the HDMI IN 2 jack and the audio cables to the DVI IN (HDMI2) [R-AUDIO-L] jacks on the back of the TV. If this happens, contact the company that provided the DVD player/Cable Box/Satellite UHFHLYHU WR FRQ UP WKH ^+ '0, YHUVLRQ WKH HUHWDWW DDU HUPRP PD\ FDXVHDQQR\LQJ ALFNHU RU QR VFUHHQ GLVSOD
DVI IN(HDMI2) [R-AUDIO-L]
- DVI audio outputs for external devices.
Supported modes for HDMI/DVI and Component
| 480i | 480p | 576i | 576p | 720p | 1080i | 1080p | |
| HDMI/DVI 50Hz | X | X | X | O | O | O | O |
| HDMI/DVI 60Hz | X | O | X | X | O | O | O |
| Component | O | O | O | O | O | O | O |
4 ANT IN
To view television channels correctly, a signal must be received by the set from one of the following sources:
- An outdoor aerial / A cable television network / A satellite network
5 SERVICE
Connect this to the jack on the optional wall mount bracket. This will allow you to adjust the TV viewing angle using your remote control.
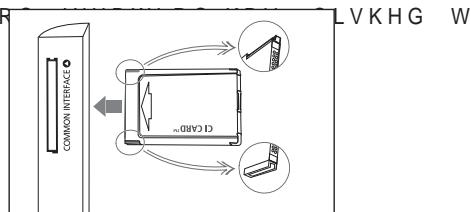
6 COMMON INTERFACE Slot
- When not inserting "CI CARD" in some channels, "Scrambled Signal" is displayed on the screen.
-
The pairing information containing a telephone number, CI CARD ID, Host ID and other information will be displayed in about 2~3 minutes. If an error message is displayed, please contact your service provider.
-
:KHQ WKH FKDQ QHO LQIRUPD WLRQ message "Updating Completed" is displayed, indicating that the channel list is now updated.
° You must obtain a CI CARD from a local cable service provider. Remove the CI CARD by carefully pulling it out with your hands since dropping the CI CARD may cause damage to it.
Insert the Cl-Card in the direction marked on it.
° The place of the COMMON INTERFACE Slot may be different depending on its model.
7 WISELINK
- &RQQHFW D 86% PDVV VWRUDJH GHYLHF WR YLHZ SOKRWR IOHV -3(*

8 S-VIDEO or VIDEO / R-AUDIO-L
- Connect RCA or S-VIDEO cable to an appropriate external A/V device such as VCR, DVD or Camcorder.
- Connect RCA audio cables to "R-AUDIO-L" on your set and the other ends to corresponding audio out connectors on the A/V device.
9 Headphones jack
- Headphone may be connected to the headphone output on your set. While the head phone is connected, the sound from the built-in speakers will be disabled.
0 AUDIO OUT [R-AUDIO-L]
- Connect RCA audio cables to AUDIO OUT [R-AUDIO-L] on the rear of your set and the other ends to FRUUHVSRQGLQJ DXGLR LQ FRQQHFWRUV RQ WKH $PSOLz HURU '9' +R
DIGITAL AUDIO OUT (OPTICAL)
- Connect to a Digital Audio Component.
° When the HDMI IN jacks are connected, the DIGITAL AUDIO OUT (OPTICAL) jack on the TV outputs 2 channel audio only. If you want to hear 5.1 channel audio, connect the Optical jack on WKH '9' SOD\HU RU & DEOH 6DWHOOLWH %R [ GLUHFWO\ WR DQ $PSC
@EXT1,EXT2
| Connector | Input | Output | ||
| Video | Audio (L/R) | RGB | Video + Audio (L/R) | |
| EXT 1 | O | O | O | Only TV or DTV output is available. |
| EXT 2 | O | O | Output you can choose. | |
- Inputs or outputs for external devices, such as VCR, DVD, video game device or video disc players.
Kensington Lock (depending on the model)
- 7KH . HQVLQJWRQ ORFN RSWLRQDO LV D GHYLFMVHGHGQWDR SXYEOLIFD place.
- If you want to use a locking device, contact the dealer where you purchased the TV.
- The location of the kensington lock may be different depending on its model.
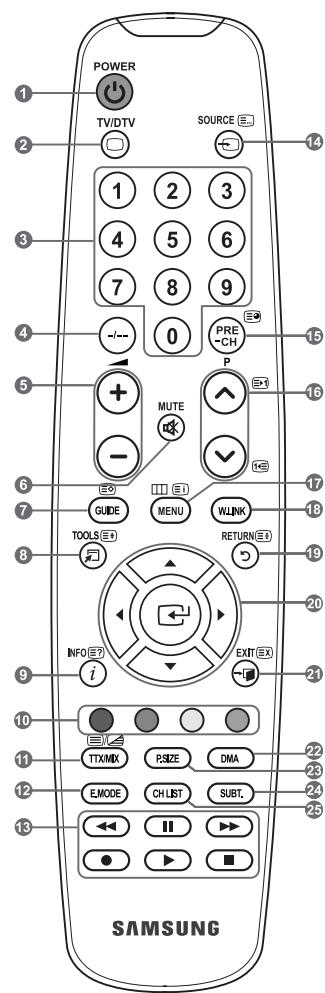
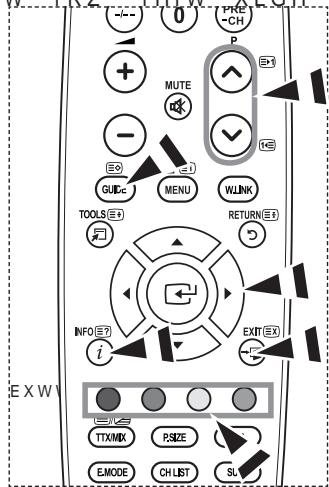
Viewing the Remote Control
1 Television Standby button
2 Selects the TV and DTV mode directly
3 Number buttons for direct channel access
4 One/Two-digit channel selection
5 :Volume increase :Volume decrease
6 Temporary sound switchoff
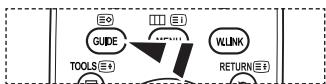
7 Electronic Program Guide (EPG) display
8 Use to quickly select frequently used functions.
9 Use to see information on the current broadcast
0 Colour buttons : Use these buttons in the Channel list and WISELINK, etc.
@ Press to select the optional display and sound modes for sports, cinema and games.
Use these buttons in the DMA, WISELINK, and Anynet+.
( : This remote can be used to control recording on Samsung recorders with the Anynet ^+ feature)
$ Available source selection
% Previous channel
P : Next channel P : Previous chan
& Displays the main on-screen menu
* This function enables you to view and play photo and music files from an external device.
Returns to the previous menu
) Control the cursor in the menu
a Exit the on-screen menu
b Use this when connecting a SAMSUNG DMA (Digital Media Adapter) device through an HDMI interface and switching to DMA mode. (The DMA button is optional.) For more information on the operating procedures, refer to the user manual of the DMA. This button is available when "Anynet+ (HDMI-CEC)" is 2 Q' VHH SDJH
c Picture size selection
d Digital subtitle display
e It display "Channel List" on the screen.
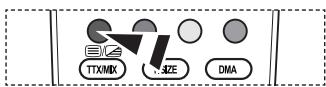
Teletext Functions
2 Exit from the teletext display
7 Teletext store
8 Teletext size selection
9 Teletext reveal
0 Fastext topic selection
! Alternately select Teletext, Double, or Mix.
$ Teletext mode selection (LIST/FLOF)
% Teletext sub page
A P : Teletext next page P : Teletext previous page
& Teletext index
( Teletext hold
a Teletext cancel

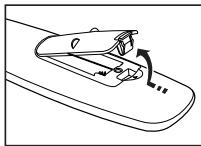
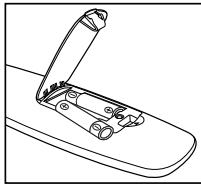
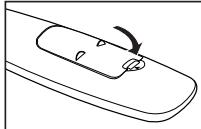
Installing Batteries in the Remote Control
- Lift the cover at the back of the remote control upward as shown in the J X U H
- Install two AAA size batteries.
Make sure to match the "+" and "-" ends of the batteries with the diagram inside the compartment.
- Replace the cover.
Remove the batteries and store them in a cool, dry place if you won't be using the remote control for a long time.
° If the remote control doesn't work, check the following:
- Is the TV power on?
- Are the plus and minus ends of the batteries reversed?
- Are the batteries drained?
- Is there a power outage, or is the power cord unplugged? VWKHUHDVSHFLDO AXRUHVFHQWOLJKW
Switching On and Off
The mains lead is attached to the rear of your set.
- Plug the mains lead into an appropriate socket.
° The standby indicator lights up on your set.
- Press the button on your set.
° You also can press the POWER button or the TV/DTV button on the remote control to turn the TV on.
° The programme that you were watching last is reselected automatically.
- Press the numeric button (0~9) or channel up/down ( / ) button on the remote control or C / P . button on your set.
:KHQ\RX VZLWFK WKH VHW RQ IRU WKH YHU\ UVW WLPH \RX ZLOO EH menus are to be displayed. - To switch your set off, press the POWER button again.
Placing Your T elevision in Standby Mode
Your set can be placed in standby mode in order to reduce the power consumption. The standby mode can be useful when you wish to interrupt viewing temporarily (during a meal, for example).
- Press the POWER button on the remote control.
° The screen is turned off and a red standby indicator appears on your set. - To switch your set back on, simply press the POWER 串 , numeric buttons (0~9), TV/DTV button or channel up/down (\ / ) button again.
Do not leave your set in standby mode for long periods of time (when you are away on holiday, for example).
It is best to unplug the set from the mains and aerial.
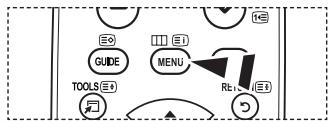
Viewing the Menus
- With the power on, press the MENU button.
The main menu appears on the screen. The menu's left side has icons: Picture, Sound, Channel, Setup, Input, Digital Menu. - 3UHVV WKH x RU z EXWWRQ WR VHOHF Then press the ENTER按钮 to access the icon's sub-menu.
- Press the EXIT button to exit.
The on-screen menus disappear from the screen after about one minute.
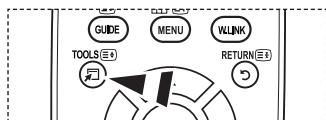
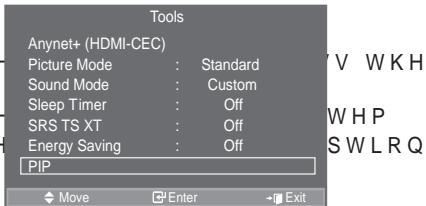
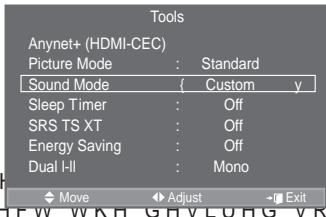
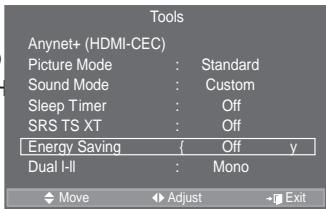
Using the TOOLS Button
You can use the TOOLS button to select your frequently used functions quickly and easily. The "Tools" menu change depending on which external input mode you are viewing.
- Press the TOOLS button.
7KH 37RROV' PHQX ZLOO DSSHDU - 3UHVV WKH x RU z EXWWRQ WR VHOHF
- 3 U H V V W K H ENTER按钮 to display, change, or use the selected items. For a more detailed description of each function, refer to the corresponding page.
Anynet+ (HDMI-CEC), see page 56
Picture Mode, see page 17
Sound Mode, see page 23
Sleep Timer, see page 25
SRS TS XT, see page 23
Energy Saving, see page 28
Dual I-II, see page 24
PIP, see page 22
Auto Adjustment, see page 47
Tools
Anynet+ (HDMI-CEC)
Picture Mode Standard
Sound Mode : Custom
Sleep Timer Off
SRS TS XT Off
Energy Saving : Off
Dual I-II : Mono
Move
Enter
Exit

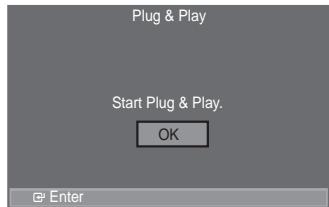
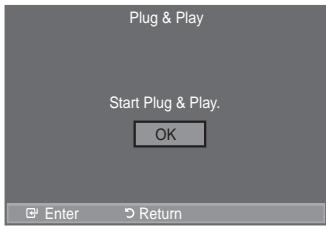
Plug & Play
When the TV is initially powered on, several basic settings proceed automatically and subsequently. The following settings are available.
The Screen Saver is activated if there is no remote control key input for longer than 1 minute while "Plug & Play" is running.
The Screen Saver is activated if there is no operating signal for longer than 15 minutes.
° Any functions related to Digital TV (DVB) will only work in countries or areas where DVB-T (MPEG2) digital terrestrial
V L J Q D O V D U H E EUR D G F D V W H G 3 O H D V H F R Q _ {i} U P Z _ {i} W _ {R} W L X I O D O R F D O G H \(O W K R X J K W K L V 79 V H W I R O O R Z V W K H '9% 7 V S H F L _ {i} F D W L R Q P D L Q W D DVB-T digital terrestrial broadcasts is not guaranteed. Several functions may not be available in some countries.
- Press the POWER button on the remote control.
The message "Start Plug & Play" is displayed with "OK" selected.
- Select the appropriate language by pressing the x or z button.
Press the ENTEREXWWRQWRFRQUPRXUFKRLFH
- Press the { or y button to select ^36 W R U H oH ^3R P H 8 fthm the ENTER按钮.
We recommend setting the TV to "Home Use" mode for the best picture in your home environment.
"Store Demo" mode is only intended for use in retail environments.
If the unit is accidentally set to ^36 W R U H middle and you want to return to ^3 + R P H 8 V H (Standard): Press the Volume button on the TV. When the volume OSD is displayed, press and hold the MENU button on the TV for 5 seconds.
- The message "Check antenna input." is displayed with "OK" selected.
Press the ENTER button.
° Please check that the antenna cable is connected correctly.
- Select the appropriate country by pressing the x or z button.
Press the ENTEREXWWRQWRFRQUPRXUFKRLFH
- 7KH PHVVDJH 36RPH '79 IXQFWLRQV PD\ QRWE IDYHSLODEOH 'LJLWDC
Press the { or y EXWWRQ WR VHOHFW 3 < H VENREUR@bRtfon.WKHQ SUHVV WKH
Yes: First an ATV search is performed and then a DTV ch. auto search is performed.
No: Only an ATV search is performed.
This function is supported for all countries except for the following countries: France, Germany, Italy, Netherlands, Spain, Switzerland, United Kingdom, Austria.
- The "Auto Store" menu is displayed with the "Start" selected. Press the ENTER button.
The channel search will start and end automatically. The DTV channel scan menu appears and the DTV channel is automatically updated.
° If the DTV channel is updated, the Source in the source list of the Input menu is automatically changed to DTV. After all the available channels are stored, the "Clock Set" menu appears.
Press the ENTER button at any time to interrupt the memorization process.
For detailed descriptions about DTV channel update, refer to page 31 of this manual. After all the available digital channels are stored, the screen to select a time zone is displayed depending on the country.
- Press the ENTER button.
Select the "Month", "Day", "Year", "Hour", or "Minute" by pressing the { or y button. Set the "Month", "Day", "Year", "Hour", or "Minute" by pressing the x or z button.
<RXFDQDOVRVHWWKH 30RQWK 'Minutby pssing the numbrs QG on the remote control.

- Press the ENTER EX WWRQ WR FRQ UP \RXU VHWLQJ 7KH PHVVDJH 3(QM : KHQ \RX KDYH QLVENTER@WHToh/W KH
Even if the ENTER按钮 is not pressed, the message will automatically disappear after several seconds.
Language: Select your language.
Country: Select your country.
Auto Store: Automatically scans for and stores channels available in the local area.
Clock Set: Sets the current time for the TV clock.
If you want to reset this feature...
- Press the MENU button to display the menu.
3UHVV WKHX RUX EXWWRQ WR VHOHF ENTER@ button.
- Press the ENTER button again, to select "Plug & Play".
For further details on setting up options, refer to the page 11.
° 7KH 3OXJ 3OD` IHDWXUH LV RQO
- Storing Channels Automatically
- Storing Channels Manually
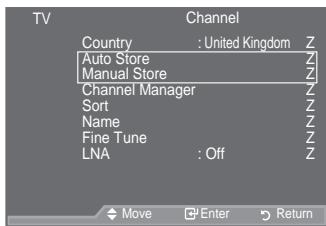
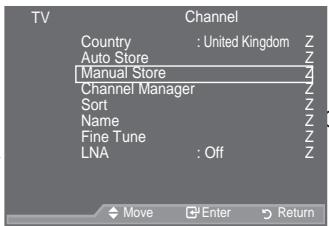
Storing Channels Automatically
You can scan for the frequency ranges available to you (and availability depends on your country). Automatically allocated programme numbers may not correspond to actual or desired programme numbers. However, you can sort numbers manually and clear any channels you do not wish to watch.
- Press the MENU button to display the menu.
3UHVW WKHX RZ EXMnR,QheWpres theEHNTR按钮. - Press the ENTER button to select "Country".
- Select the appropriate country by pressing the x R U button.
Press the ENTEREXWWRQWRFRQUPRXUFKRLFH
Even though you have changed the country setting in this menu, the country setting for DTV is not changed. (Refer to page 31)
- Press the x R U button to select "Auto Store", then press the ENTER button.
- Press the ENTER button.
° The TV will begin memorizing all of the available channels.
Press the ENTER button at any time to interrupt the memorization process and return to the "Channel" menu.
- After all the available channels are stored, the "Sort" menu appears. (refer to page 15)
Storing Channels Manually
Not available in DTV or external input mode.
You can store television channels, including those received via cable networks.
When storing channels manually, you can choose:
:KHWKHU R U QR W WR VWRUH HDFK RI
7 KH SURJUDPPH QXPEHU R I HDFK VWR to identify.
1. Press the MENU button to display the menu.
3UHVVWKHXRUZEXMWher,QheWpresstheH ENTER@ button.
- 3UHVVWKHXRUZEXWWRQWRVHOHP the ENTER按钮.
- 6 HOHFW WKUHTXLUHGRSWLRQ E\ Su press the ENTER按钮.
- :KHQ \RXDUH VDWLV \HG ZLWK \RXU V ENTERG button.
- Press the EXIT button to exit.
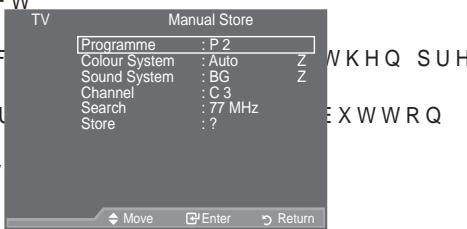
Programme (Programme number to be assigned to a channel)
- 3UHVW WKH x RU z EXWWRQ XQWLO \RX 己 QG WKH FRUHFW QXPEHU
° You can also select the channel number directly by pressing the numeric buttons (0~9).
Colour System: Auto/PAL/SECAM/NTSC4.43
- 3UHVV WKHX Ruz EXWWRQ WR VHOHFW WKHUHTXLUHG FRORXUV
Sound System: BG/DK/I/L
- 3UHVV WKH x RU z EXWWRQ WR VHOHFW WKH UHTXLUHG VRXQG VWT
Channel (When you know the number of the channel to be stored)
-
3UHVV WKHX RZ EC(AWthRaHneMoRSQcbHeTWhel).
-
3UHVV WKH y EXWWRQ WKHQ SUHVV WKH x RU z EXWWRQ WR VHOH
° You can also select the channel number directly by pressing the numeric buttons (0~9).
° If there is abnormal sound or no sound, re-select the sound standard required.
Search (When you do not know the channel numbers)
-
3UHVV WKH x RU z EXWWRQ WR VWDUW WKH VHDUFK
-
7KH WXQHU VFDQV WKHIUHTXHQF\UDQJHXQWLXOWWKOHFCWMMEFDQQ received on the screen.
Store (When you store the channel and associated programme number)
- Set to "OK" by pressing the ENTER button.
Channel mode
- P (Programme mode): When completing tuning, the broadcasting stations in your area have been assigned to position numbers from P00 to P99. You can select a channel by entering the position number in this mode.
- C (Air channel mode): You can select a channel by entering the assigned number to each air broadcasting station in this mode.
- S (Cable channel mode): You can select a channel by entering the assigned number for each cable channel in this mode.

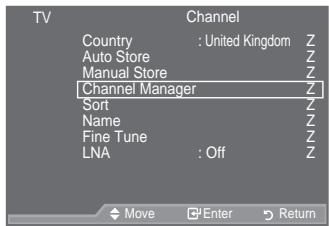
Adding / Locking Channels
° Not available in DTV or external input mode.
Using the Channel Manager, you can conveniently lock or add channels.
- Press the MENU button to display the menu.
Press the x or z button to select "Channel", then press the ENTER button. - Press the x or z button to select "Channel Manager", then press the ENTER按钮.
Adding channels
Using the Channel List, you can add channels.
- Select Channel List by pressing the ENTER button.
- Move to the (HOG E\SUHVVLQJ WKH x button, select a channel to be added, and press the ENTER button to add the channel.
° If you press the ENTER button again, the (√) symbol next to the channel disappears and the channel is not added.
° “LV DFWLYH ZKHQ &KLOG /RFN LV VHOHFWHG WR 2Q

/RFNLQJFKDQQHOV
This feature allows you to prevent unauthorized users, such as children, from watching unsuitable programmes by muting out video and audio.
- 3UHVV WKH x RU z EXWWRQ WR VHOHF ENTER按钮.
- 6 HOHFW 2Q E\SUHVVLQJ WKHX RUZ ENTER@ button.
- 3UHVV WKH x RU z EXWWRQ WR VHOHF the ENTER按钮.
- Move to the (HOG E\SUHVVLQJWKHX select a channel to be locked, and press the ENTER button.
° If you press the ENTER按钮 again, the (√) symbol next to the channel disappears and the channel lock is cancelled.
A blue screen is displayed when "Child Lock" is activated.
- Press the EXIT button to exit.
^ Select "On" or "Off" in "Child Lock" to easily turn the channels which selected on "■" to be active or inactive.
Q SUHVV
VWKH
KHQ SUH
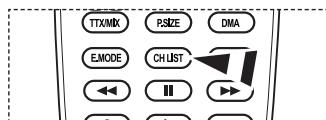
You can select these options by simply pressing the CH LIST button on the remote control
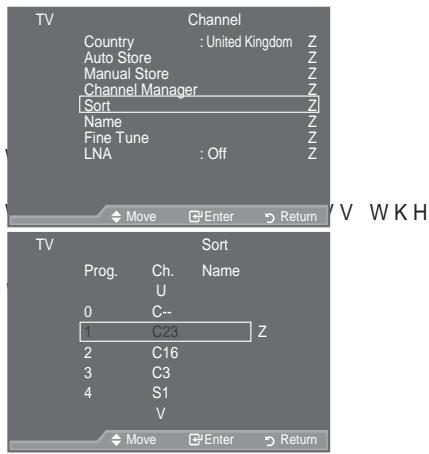
Sorting the Stored Channels
This operation allows you to change the programme numbers of the stored channels. This operation may be necessary after using the auto store.
Not available in DTV or external input mode.
- Press the MENU button to display the menu.
3UHVWKHXRUZEXMarWERQheWpRes theHF ENTER按钮. - 3UHVV WKH x Ruz EXWWRQ WR VHOHF ENTER@ button.
- Select the channel number that you wish to change by SUHVVLQJ WKHX RUX EXWWRQUHSHD Press the ENTER按钮.
The selected channel number and name are moved to right side.
- Press the x R U button to move to the position in which you would like to change and then press the ENTER button.
The selected channel is exchanged with the one previously stored to the chosen number.
- Repeat steps 3 to 4 for another channel to be sorted.
- Press the EXIT button to exit.
Assigning Channels Names
Channel names will be assigned automatically when channel information is broadcast. These names can be changed, allowing you to assign new names.
° Not available in DTV or external input mode.
- Press the MENU button to display the menu. Press the x R U button to select "Channel", then press the ENTER button.
- Press the x R U button to select "Name", then press the ENTER button.
- If necessary, select the channel to be assigned to a new QDPHE\SUHVVLQJWKHX RENTERGWWR button
° The selection bar is displayed around the name box.
| To... | Then... |
| Select a letter, number or symbol | 3 U H V V W K H x R U z |
| Move on the next letter | 3 U H V V W K H y E X W |
| Move back the previous letter | 3 U H V V W K H { E X W} |
| & R Q ♂ U P W K H Q D P H | Press the ENTER G button |
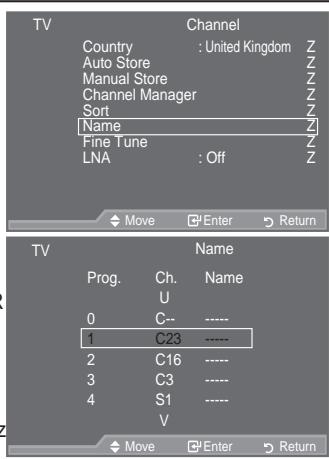
The following characters are available: Letters of the alphabet (A~Z) / Numbers (0~9) / Special characters (+, -, *, /, space)
- Repeat steps 3 to 4 for each channel to be assigned to a new name.
- Press the EXIT button to exit.

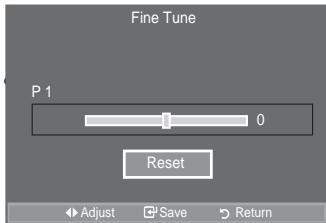
Fine Tuning Channel Reception
Use fine tuning to manually adjust a particular channel for optimal reception.
° Not available in DTV or external input mode.
- Use the number buttons to directly select the channel that RX ZDQW WR j QH WXQH
- Press the MENU button to display the menu. Press the x R U button to select "Channel", then press the ENTER button.
- Press the x R U button to select "Fine Tune", then press the ENTER button.
- Press the { R U yEXWWRQ WR DGMXVW WKH Press the ENTER按钮.
- Press the EXIT button to exit.
- Fine tuned channels that have been saved are marked with an asterisk *** on the right-hand side of the channel number in the channel banner. And the channel number turns red.
° 7R UHVW WKH iQH WXQLQJ VH@HRWz 5HVW E\SUHVVLQJ WKH button and then press the ENTER按钮.

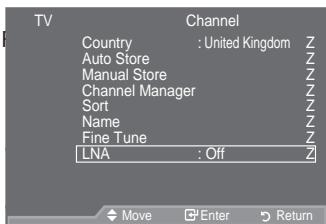
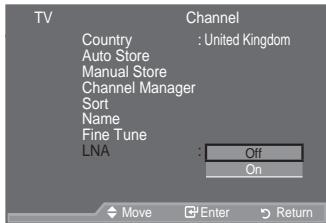
/1/RZ 1RLVHPSOLµHU
If the TV is operating in a weak-signal area, the LNA function FDQ LPSURYH WKH UHFHSWLRQ D ORZ Q incoming signal).
° Not available in DTV or external input mode.
- Press the MENU button to display the menu. 3UHVVWKHXRUZEXWWRQWRVHOH F ENTER@ button.
- 3UHVV WKH x RU z EXWWRQ WR VHOHF ENTER@ button.
- 3UHVV WKH x RU z EXWWRQ WR VHOHF ENTER@ button.
- Press the EXIT button to exit.

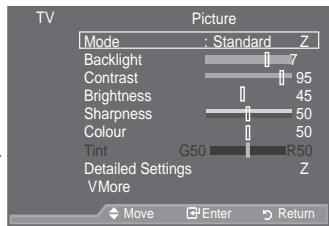
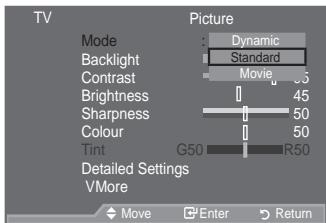
Changing the Picture Standard
You can select the type of picture which best corresponds to your viewing requirements.
- Press the MENU button to display the menu.
Press the ENTER button, to select "Picture". - Press the ENTER button again, to select "Mode".
- 3UHVV WKHX RZ EXWWRQ WR VHOHPress the ENTER按钮.
- Press the EXIT button to exit.
Dynamic: Selects the picture for high-definition in a bright room.
Standard: Selects the picture for optimum display in a normal environment.
Movie : Selects the picture for comfortable display in a dark room.
The Picture mode must be adjusted separately for each input source.
MXUH HIIH
Easy Setting
- Press the TOOLS button on the remote control.
- 3UHVV WKH x RU z EXWWRQ WR VHOHF
- 3UHVV WKH {RU y EXWWRQ WR VHOHF
- Press the EXIT or TOOLS button to exit.
VXUH PRG
Adjusting the Custom Picture
Your set has several settings which allow you to control picture quality.
- To select the desired picture effect, follow the "Changing the Picture Standard" instructions number 1 to 3.
- 3UHVV WKHX Ruz EXWWRQ WR VHOHF ENTER@ button.
- 3UHVVWKH{RUyEXWWRQWRGHFUH particular item. Press theENTER按钮.
- Press the EXIT button to exit.
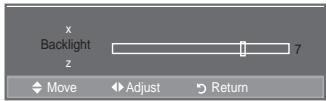
Backlight: Adjusts the screen brightness by adjusting the LCD backlight brightness. (0~10)
Contrast: Adjusts the lightness and darkness between objects and the background.
Brightness: Adjusts the brightness of the whole screen.
Sharpness: Adjusts the outline of objects to either sharpen them or make them more dull.
Colour: Adjusts the colours, making them lighter or darker.
Tint: Adjusts the colour of objects, making them more red or green for a more natural look.
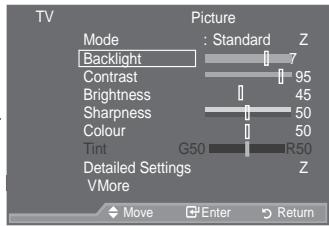
HP 3UHVV
° The adjusted values are stored according to the selected Picture mode.
° , Q 3& PRGH \RX FDQ RQO\ PDNH FKDQJHV WR %D/FNOLJKW’ 3&RQWUI
° In Analogue TV, Ext., AV, S-Video modes of the PAL system, you cannot use the "Tint" Function.
° You can return to the factory defaults picture settings by selecting the "Reset". (Refer to "Resetting the Picture Settings to the Factory Defaults" on page 19)
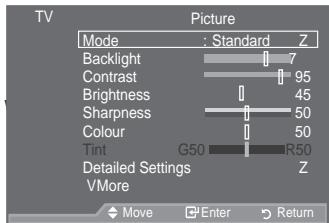
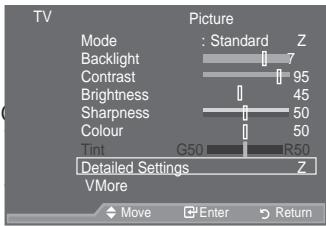
&RQ;JXULQQJ 'HWDLOHG 6HWWLQQJV RQ WKH 3
You can set detailed picture settings.
- Press the MENU button to display the menu.
Press the ENTER button, to select "Picture". - Press the ENTER@ EXWWRQ WR VHOFW 30R @ 3UHVV WKH x RU z EXWWRQ WR VHOHF press the ENTER@ button.
- 3UHVVWKHXRUZEXWWRQWRVHOHF the ENTER按钮.
- 6 HOHFW WKHUHTXLUHGRSWLRQE\SU press the ENTER@ button.
- :KHQ \RXDUH VDWLVHG ZLWIENTERV button.
- Press the EXIT button to exit.
"Detailed Settings" is available in "Standard" or "Movie" mode.
° Q 3& PRGH \RX FDQ RQO\PDNH FKDQ ^3 DPPD'DQG ^3 KLWH %DODQFH IURPD 6HWWLQJV LWHPV
RYLH' WK
QJV WKH
XWWRQ V
WUDVW
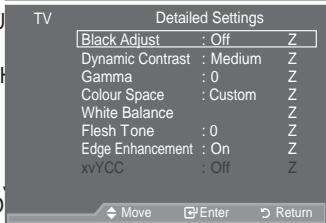
Black Adjust: Off/Low/Medium/High
You can directly select the black level on the screen to adjust the screen depth.
Dynamic Contrast: Off/Low/Medium/High
You can adjust the screen contrast so that the optimal contrast is provided.
Gamma: -3 +3
You can adjust the Primary Colour (Red, Green, Blue) Intensity.
3UHVW WKH { RUYEXWWRQ XQWLO \RX UHDFK WKHRSWLPDO VHWWLG
Colour Space: Auto/Native/Custom
&RORXU VSDFH LV D &RORXUPDWULI FRPSRVHG RI ^35HG^ ^3UHHQ^ DQ
Select your favourite Colour space to experience the most natural Colour.
‡Auto: Auto Color Space automatically adjusts to the most natural color tone based on program sources.
‡Native: Native Color Space offers deep and rich color tone.
‡Custom: Adjusts the color range to suit your preference.
Customizing the Colour Space
Colour: Red/Green/Blue/Yellow/Cyan/Magenta
Adjusts the Colour range to suit your preference.
3&RORXU' LV DYDLÖDEOH ZKHQ 3&RORXU 6SDFH' LV VHW WR 3&XVW
3UHVV WKHX RZ EXWWRQ WR VHOHFW 35HG' 3*UHHQ' 3%OXH' 3
Press the ENTER button.
Red/Green/Blue: , Q ³& R ORXU´ \RX FDQ DGMXVW WKH 5* % YDOXHV IRU W
3UHVV WKHX RZ EXWWRQ WR VHOHFW 5HG *UHHQ RU %OXH
Press the ENTER button.
3UHVW WKH { RUYEXWWRQ WR GHFUHDVHRU LQFUHDVH WKHYDO
ENTER按钮。
Reset: Resets the colour space to the default values.
White Balance: R-Offset/G-Offset/B-Offset/R-Gain/G-Gain/B-Gain/Reset
You can adjust the colour temperature for more natural picture colours.
R-Offset/G-Offset/B-Offset/R-Gain/G-Gain/B-Gain: Changing the adjustment value will refresh the adjusted screen.
6HOHEW WKHUHTXLUHGRSWLRQE\SUHVVIEJERG button.RUz EXWWRQ V
3UHVV WKH { RUYEXWWRQ XQWLO \RX UHDFK WKHRSWLPDO VHWLL
Reset: The previously adjusted white balance will be reset to the factory defaults.
Flesh Tone: -15 ~ +15
You can emphasize the pink 'flesh tone' in the picture.
3UHVV WKH { RU y EXWWRQ XQWLO \RX UHDFK WKH RSWLPDO VHWLC
° Changing the adjustment value will refresh the adjusted screen.
Edge Enhancement: Off/On
You can emphasize object boundaries in the picture.
xvYCC: Off/On
Setting the xvYCC mode to On increases detail and colour space when watching movies from an external device (ie. DVD player) connected to the HDMI or Component IN jacks. You must set the Picture Mode to Movie to enjoy this feature.
Only available in "HDMI" and "Component" on "Movie" mode.
° If xvYCC function is active, PIP cannot be selected.
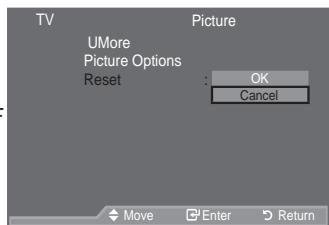
Resetting the Picture Settings to the Factory Defaults
You can return to the factory defaults picture settings.
-
To select the desired picture effect, follow the "Changing the Picture Standard" instructions number 1 to 3 (On page 17).
-
3UHVV WKH x RU z EXWWRQ WR VHOHF ENTER@ button.
-
Press the x R U button to select "OK" or "Cancel". Press the ENTER button.
-
Press the EXIT button to exit.
The "Reset" will be set for each "Picture" mode.
HVVWKH

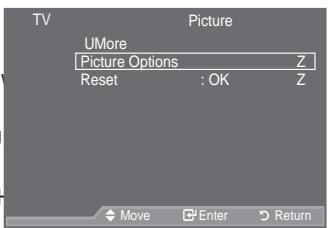
&RQ;JXULQQJ 3LFWXUH 2SWLRQ
- Press the MENU button to display the menu.
Press the ENTER button, to select "Picture". - 3UHVV WKHX Ruz EXWWRQ WR VHOHF the ENTER按钮.
- 6 HOHFW WKHUHTXLUHGRSWLRQE\SU press the ENTER@ button.
- :KHQ \RXDUH VDWLVHG ZLWIENTERVH button.
- Press the EXIT button to exit.
° In PC mode, you can only make changes to the “Colour 7RQH’ DQG‘36L]H’ IURP DPRQJ WKHL
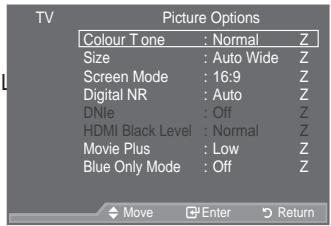
Colour Tone: Cool2/Cool1/Normal/Warm1/Warm2
You can select the most comfortable colour tone to your eyes.
The adjusted values are stored according to the selected "Picture" mode.
° 3:DUP 'RU 3:DUP 'LV RQO\DFWLYDWHG ZKHQ WKH SLFWXUH PRGH
Size: Auto Wide/16:9/Wide Zoom/Zoom/4:3/Just Scan
You can select the picture size which best corresponds to your viewing requirements.
‡Auto Wide: Automatically adjusts the picture size to the "16:9" aspect ratio.
16:9: Adjusts the picture size to 16:9 appropriate for DVDs or wide broadcasting.
Wide Zoom: Magnify the size of the picture more than 4:3.
$Zoom: Magnifies the 16:9 wide picture (in the vertical direction) to fit the screen size.
4:3: This is the default setting for a video movie or normal broadcasting.
Just Scan: Use the function to see the full image without any cutoff when HDMI (720p/1080i/ 1080p) or Component (1080i/1080p) signals are input.
"Auto Wide" function is available only in "TV", "DTV", "Ext.1", "Ext.2", "AV", and "S-Video" mode.
° In PC Mode, only "16:9" and "4:3" mode can be adjusted.
Settings can be adjusted and stored for each external device you have connected to an input of the TV.
Temporary image retention may occur when viewing a static image on the set for more than two hours.
° :LGH =RRP 0RYH WKH VFUHHQ XSGRZQXVLQJWbyxRUzEXWWSUHVVLLQJ WKKHRbattn.
"Zoom": Select E\SUHVVLQJ WKH{RU yEXWWRQ 8VH WKHX RU z EXW and down. After selecting XVWHKHX RUXEXWWRQ WR PDJQLI\RU UHGXF vertical direction.
° When Double (□, □) mode has been set in PIP, the Picture Size cannot be set.
^ After selecting "Just Scan" in HDMI (1080i/1080p) or Component (1080i/1080p) mode : Select E \ SUHVV LQJ WKH { R U y EXWWRQ 8VH WKHX z { R U y EXWW Reset: 3UHVV WKH { R U y EXWWRQ WR VHESTERbch.VHW ' WKHQ SUHV You can initialize the setting.
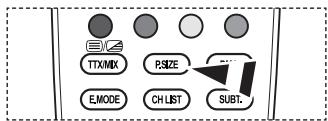
You can select these options by simply pressing the P.SIZE button on the remote control.


Screen Mode: 16:9/Wide Zoom/Zoom/4:3
When setting the picture size to "Auto Wide" in a 16:9 wide TV, you can determine the picture size you want to see the 4:3 WSS (Wide Screen Service) image or nothing. Each individual European country requires different picture size so this function is intended for users to select it.
16:9: Sets the picture to 16:9 wide mode.
Wide Zoom: Magnify the size of the picture more than 4:3.
Zoom: Magnify the size of the picture vertically on screen.
4:3: Sets the picture to 4:3 normal mode.
This function is available in "Auto Wide" mode.
This function is not available in "PC", "Component" or "HDMI" mode.
Digital NR: Off/Low/Medium/High/Auto
If the broadcast signal received by your TV is weak, you can activate the Digital Noise Reduction feature to help reduce any static and ghosting that may appear on the screen.
° When the signal is weak, select one of the other options until the best picture is displayed.
DNle: Off/ Demo/On
This TV includes the DNle function so as to provide a high visual quality. If you set DNle to on, you can view the screen with the DNle feature activated. If you set the DNle to Demo, you can view the applied DNle and normal pictures on the screen, for demonstration purposes. Using this function, you can view the difference in the visual quality.
° DNleTM (Digital Natural Image engine)
This feature brings you more detailed image with 3D noise reduction, detail enhancement,
contrast enhancement and white enhancement. New image compensation Algorithm gives
brighter, clearer, more detailed image to you. DNle™ WH F K Q R O R J\ Z L O O i W H Y H U\ VLJ Q D
eyes.
This function is not available in "Movie" and "Standard" mode.
HDMI Black Level: Normal/Low
You can directly select the black level on the screen to adjust the screen depth.
This function is active only when the external input connects to HDMI(RGB signals).
Movie Plus: Off/Low/Medium/High/Demo
You can view more natural skin and clear text even in fast moving scenes.
° Use this function when watching movies.
° 7KLV IXQFWLRQ LV QRW DYDLODEOH LQ ^3 :LGH =RRP’ DQG ^3 =RRP’ PI
This function is not available when "PIP" is set to "On".
° It is not supported in HDMI 1080p/24Hz mode.
Blue Only Mode: Off/On
This function is for AV device measurement experts. This function displays the blue signal only by removing the red and green signals from the video signal so as to provide a Blue Filter effect that is used to adjust the Colour and Tint of video equipment such as DVD players, Home Theaters, etc.
Using this function, you can adjust the Colour and Tint to preferred values appropriate to the signal level of each video device using the Red/Green/Blue/Cyan/Magenta/Yellow Colour Bar Patterns, without using an additional Blue Filter.
3^ 3 % OXH 2QO\0RGH' LV DYDLODEOH ZKHQ WKH SLFWXUH PRGH LV VH

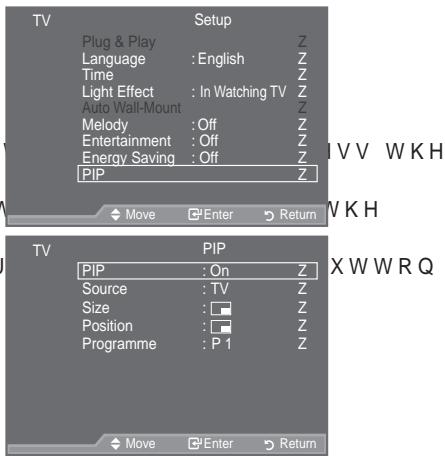
Viewing the Picture In Picture (PIP)
You can display a sub picture within the main picture of set programme or video input. In this way, you can watch the picture of set programme or video input from any connected equipment while watching the main picture.
- Press the MENU button to display the menu.
3UHVV WKHX RUXEXWWRQ WR VHOH F ENTER@ button. - 3UHVV WKHX R U Z EXWWRQ WR VHOHFW ENTER@ button.
- 6 HOHFW WKHUHTXLUHGRSWLRQE\SU press the ENTER按钮.
- When you are satisfied with your setting, press the ENTER button.
- Press the EXIT button to exit.
° You may notice that the picture in the PIP window becomes slightly unnatural when you use the main screen to view a game or karaoke.
Easy Setting
- Press the TOOLS button on the remote control.
- 3UHVV WKHX Ruz EXWWRQ WR VHOH ENTER@ button.
- 3UHVV WKHX Ruz EXWWRQ WR VHOH
4.3UHVVWKH{RUyEXWWRQWRVHO - Press the EXIT or TOOLS button to exit.
PIP:On/Off
You can activate or deactivate the PIP function.
You can select a source of the sub-picture.
Size: //
You can select a size of the sub-picture.
° If main picture is in "HDMI" mode, "Size" is available.
Position: // / /
You can select a position of the sub-picture.
° In Double (□□,□) mode, "Position" cannot be selected.
Programme
You can select a channel of the sub-picture only when the "Source" is set to "TV" or "DTV".

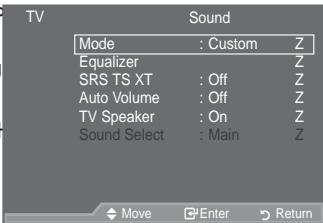
Sound Features
- Press the MENU EXWWRQ WR GLVSOD\WKH button to select "Sound", then press the ENTER@ button.
- 6 HOHFW WKHUHTXLUHGRSWLRQE\SU press the ENTER@ button.
- :KHQ \RXDUH VDWLV HG ZLWIENTERVH button.
- Press the EXIT button to exit.
Mode: Standard/Music/Movie/Speech/Custom
You can select the type of special sound effect to be used when watching a given broadcast.
Easy Setting
- Press the TOOLS button on the remote control.
- 3UHVV WKHX Ruz EXWWRQ WR VHO
- 3UHVV WKH {RU y EXWWRQ WR VHO
- Press the EXIT or TOOLS button to exit.
XWWRQ V
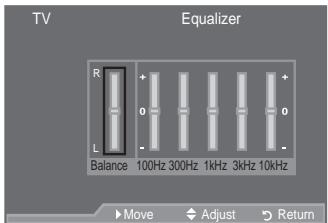
Equalizer: Balance/100Hz/300Hz/1kHz/3kHz/10kHz The sound settings can be adjusted to suit your personal preferences.
° If you make any changes to these settings, the sound mode is automatically switched to "Custom".
SRS TS XT: Off/On
TruSurround XT is a patented SRS technology that solves the problem of playing 5.1 multichannel content over two speakers. TruSurround delivers a compelling, virtual surround sound experience through any two-speaker playback system, including internal television speakers. It is fully compatible with all multichannel formats.
Easy Setting
- Press the TOOLS button on the remote control.
2.3UHVW WKHX Ruz EXWWRQ WR VHOP - 3UHVV WKH {RU y EXWWRQ WR VHO
- Press the EXIT or TOOLS button to exit.

TruSurround XT, SRS and () Symbol are trademarks of SRS Labs, Inc.
TruSurround XT technology is incorporated under license from SRS Labs, Inc.
Auto Volume: Off/On
Each broadcasting station has its own signal conditions, and so it is not easy to adjust the volume every time the channel is changed. This feature lets you automatically adjust the volume of the desired channel by lowering the sound output when the modulation signal is high or by raising the sound output when the modulation signal is low.
TV Speaker: Off/On
If you want to hear the sound through separate speakers, cancel the internal amplifier.
° The +, - and MUTE buttons do not operate when the "TV Speaker" is set to Off.
^ :KHQ 379 6SHDNHU' LV VHW WR 32II' \RX FDQ RSHUDWH RQO\ 36RXQ menu.
Sound Select: Main/Sub
When the PIP feature is activated, you can listen to the sound of the sub (PIP) picture.
i Main: Used to listen to the sound of the main picture.
i Sub: Used to listen to the sound of the sub picture.

Manufactured under license from Dolby Laboratories. Dolby and the double-D symbol are trademarks of Dolby Laboratories.
Selecting the Sound Mode
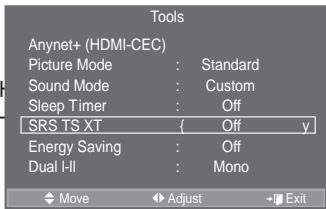
You can set the sound mode in the "T ools" menu. When you set to "Dual I-II", the current sound mode is displayed on the screen.
- Press the TOOLS button on the remote control.
- 3UHVV WKH x RU z EXWWRQ WR VHOHF
- 3UHVW WKH {RU y EXWWRQ WR VHOHF
- Press the ENTER按钮.
| Audio Type | Dual 1/2 | Default | |
| A2 Stereo | Mono | MONO | Automatic change |
| Stereo | STEREO <MONO | ||
| Dual | DUAL <DUAL 2 | DUAL 1 | |
| NICAM Stereo | Mono | MONO | Automatic change |
| Stereo | MONO <STEREO | ||
| Dual | < DUAL 1 > | DUAL 1 |
| Tools | |
| Anynet+ (HDMI-CEC) | |
| Picture Mode : | Standard |
| Sound Mode : | Custom |
| Sleep Timer : | Off |
| SRS TS XT : | Off |
| Energy Saving : | Off |
| Dual HI : | Mono y |
| Move : | Adjust →Exit |
° If the stereo signal is weak and an automatic switching occurs, then switch to the Mono.
This function is only activated in stereo sound signal. It is deactivated in mono sound signal.
This function is only available in Analogue TV mode.
Connecting Headphones (Sold separately)
You can connect a set of headphones to your set if you wish to watch a TV programme without disturbing the other people in the room.
° When you insert the head set jack into the corresponding port, you can operate only "Auto Volume" and "Sound Select"(in PIP mode) in Sound menu.
Prolonged use of headphones at a high volume may damage your hearing.
° You will not receive sound from the speakers when you connect headphones to the system.
° The headphone volume and TV volume are adjusted differently.
TV Side Panel

Setting and Displaying the Current Time
You can set the TV's clock so that the current time is displayed when you press the INFO button. You must also set the time if you wish to use the automatic On/Off timers.
- Press the MENU button to display the menu.
3UHVVKHXRUZ EXWWRQ WRVHOHF ENTER@ button.
- 3UHVV WKHX Ruz EXWWRQ WR VHOHF ENTER@ button.
- Press the ENTER button to select "Clock Set".
| To... | Press the... |
| Move to "Month", "Day", "Year", "Hour" or "Minute" | { R U y E X W W R Q |
| Set the "Month", "Day", "Year", "Hour" or "Minute" | x R U z E X W W R Q |
| & R Q ; UP W K H V H W W L Q | JENTER按钮 |
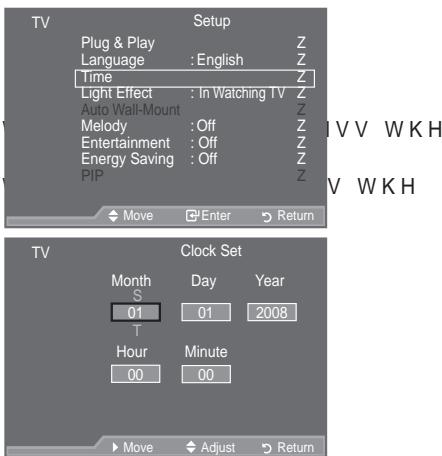
- Press the EXIT button to exit.
° The current time will appear every time you press the INFO button.
- You can also set "Year", "Month", "Day", "Hour" and "Minute" by pressing the number buttons on the remote control.
Setting the Sleep T imer
You can select a time period of between 30 and 180 minutes after which the television automatically switches to standby mode.
- Press the MENU button to display the menu.
3UHVW WKHX Ruz EXWWRQ WR VHOHF ENTER@ button.
-
3UHVV WKH x RU z EXWWRQ WR VHOHF ENTER@ button.
-
3UHVWWKHXRUZEXWWRQWRVHOHF the ENTER按钮.
-
3UHVV WKHX RZ EXWWRQ UHSHDWHG appears (Off, 30, 60, 90, 120, 150, 180).
Press the ENTER button.
- Press the EXIT button to exit.
The TV automatically switches to standby mode when the timer reaches 0.
Easy Setting
- Press the TOOLS button on the remote control.
- 3UHVV WKHX RZ EXWWRQ WR VHOHF
- 3UHVV WKH {RU y EXWWR Q WR VHOHF
- Press the EXIT or TOOLS button to exit.


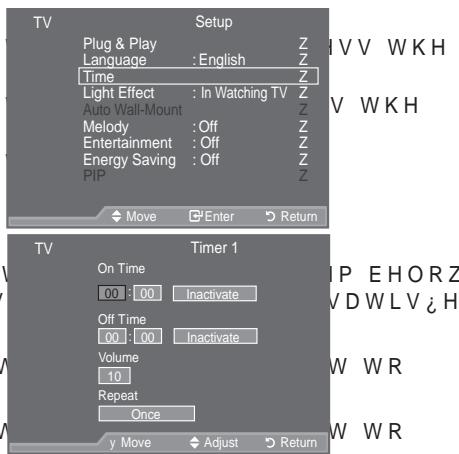
Switching the T elevision On and Off Automatically
- Press the MENU button to display the menu.
3UHVV WKHX Ruz EXWWRQ WR VHOHF
ENTER按钮。
- 3UHVV WKHX RZ EXWWRQ WR VHOHF
ENTER按钮。
- 3UHVV WKH x RU z EXWWRQ WR VHOHF
"Timer 3", then press the ENTER按钮.
Three different On/Off Timer Settings can be made.
° You must set the clock first.
- 3UHVV WKH {RU y EXWWRQ WR VHOHFV
3UHVV WKHX Ruz EXWWRQ WR DGMXV
- On Time: Select hour, minute and "Activate"/"Inactivate".
7R DFWLYDWH WLPHU ZLWK WAddivateV.HW
Off Time: Select hour, minute and "Activate"/"Inactivate".
7R DFWLYDWH WLPHU ZLWK VAddivate.HV
Volume : Select the desired turn on volume level.
Repeat: Select "Once", "Everyday", "Mon~Fri", "Mon~Sat" or "Sat~Sun".
° You can set the hour and minute directly by pressing the number buttons on the remote control.
° Auto Power Off
When you set the timer On, the TV will eventually turn off, if no controls are operated for 3 hours after the TV was turned on by timer. This function is only available in timer On mode and prevents overheating, which may occur if a TV is on for too long time.

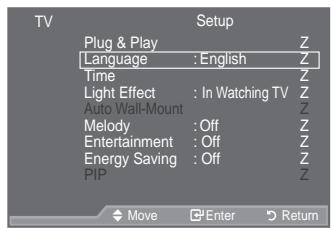
Choosing Your Language
When you start using your set for the first time, you must select the language which will be used for displaying menus and indications.
- Press the MENU button to display the on-screen menu.
Press the x R U button to select "Setup", then press the ENTER button. - Press the x R U button to select "Language", then press the ENTER button.
- Select a particular language by pressing the x R U button repeatedly.
Press the ENTER button. - Press the EXIT button to exit.
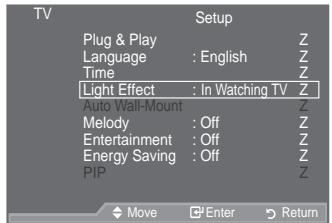
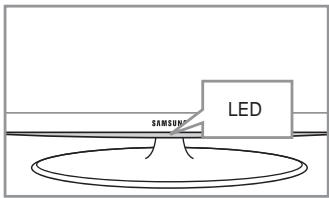
Setting the Light Effect (depending on the model)
You can turn on/off the LED on the front of TV according to the situation. Use it for saving power or when the LED dazzles your eyes.
- Press the MENU button to display the on-screen menu. Press the x R U button to select "Setup", then press the ENTER button.
- Press the x R U button to select "Light Effect", then press the ENTER按钮.
- Press the x R U button to select "Off", "In Standby", "In Watching TV" or "Always". Press the ENTER button.
Off: LED will not come on.
In Standby: Turns the LED on in standby mode.
In Watching TV: Turns the LED on while watching TV.
Always: LED is always on.
-
Set the "Light Effect" to "Off" to reduce the power consumption.
-
Press the EXIT button to exit.
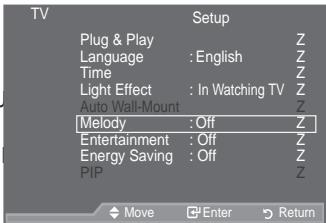
Melody / Entertainment / Energy Saving
- Press the MENU button to display the menu.
3UHVW WKHX R U Z EXWWRQ WR VHOHP ENTER@ button. - 6 HOHFW WKHUHTXLUHGRSWLRQE\SUpress the ENTER按钮.
- :KHQ \RXDUHVDWLVHGZLWIENTERG V button.
- Press the EXIT button to exit.
HVVWKH
XWWRQ
Melody: Off/Low/Medium/High
The TV power on/off melody sound can be adjusted.
The Melody does not play
i : KHQ QR VRXQGLV RXWSXW IMBTE Btttnhas Steenphesedv H WKH
i : KHQ QR VRXQGLVRXWSXWIUR(Polwh)Button heshedWKH
i When the TV is turned off by the Sleep Timer function.
Entertainment: Off/Sports/Cinema/Game
7KH ^3 (QWHUWDLQPHQW' PRGH HQDEOHV \RX WR VHOHFW WKHRSWLPD and games.
i Off: Switch the "Entertainment" function off.
i Sports : Provides the optimal picture and sound quality for sports. You can enjoy more thrilling colour and sound.
Cinema: Provides the optimal picture and sound quality for cinema. You can experience a richer picture and enhanced sound.
i Game: Provides the optimal picture and sound quality for games. This mode accelerates the playing speed when using an external game console connected to the TV.
I \RX VHW DQ \ RI WKH WKUHH 3/QWHUWDLQPHQWD QFHDQVRRWQE H DGMXVWHG ,I \RX ZDQW WR PDNH 3LFWXUH DQ GGRHKQWPPRRGGHDGM must be turned off.
7KH 3(QWHUWDLQPHGW' VHWLQQJV DUH VDYHG IRU HDFK LQXSW VPH, I\RX VHW DQ\ RI WKH WKUHH 3(QWHUWDLQPHGW' PRGHV WR 2Q 3
You can press the E.MODE button on the remote control U H S H D W H G O \ W R F K D Q J H W K H 3 (Q W H U V T X M X) P.S Z E D M A W L Q J
‡ Energy Saving: Off/Low/Medium/High/Auto
This feature adjusts the screen brightness depending on the surrounding lighting conditions.
1 Off: Turns off the energy saving function.
i Low: Sets the TV to low energy saving mode.
1 Medium: Sets the TV to medium energy saving mode.
1 High: Sets the TV to high energy saving mode.
1 Auto: Automatically adjusts the brightness of the TV screen in accordance with the scenes.
Easy Setting
- Press the TOOLS button on the remote control.
- 3UHVV WKH x RU z EXWWRQ WR VHO
- 3UHVVWKH {RU y EXWWRQ WR VHOH "High" or "Auto".
- Press the EXIT or TOOLS button to exit.
OHGLXP
Selecting the Source
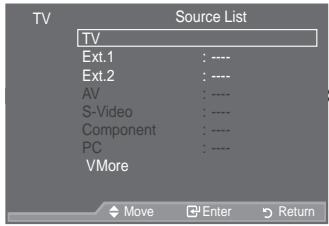
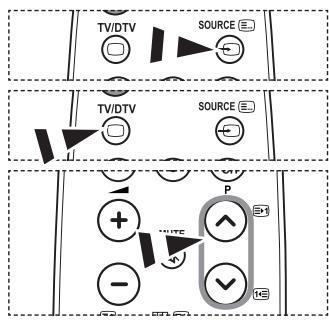
You can select among external sources connected to your TV's input jacks.
- Press the MENU button to display the menu. 3UHVVWKHXRUZEXWWRQWRVHOHF ENTER按钮.
- Press the ENTER button again, to select "Source List".
° When no external device is connected to your set, only "TV", "Ext.1", "Ext.2", "DTV" are activated in the "Source List". "AV", "S-Video", "Component", "PC", "HDMI1", "HDMI2", "HDMI3" are activated only when they are connected to your set. - 6 HOHFW WKHUHTXLUHGGHYLFHE\SU Press the ENTER按钮.
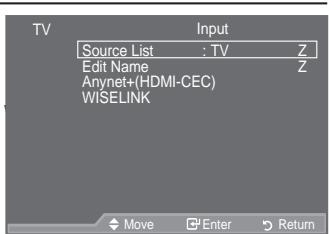
VVWKH
WWRQ
Press the SOURCE button on the remote control to toggle between all the available source. TV mode can be selected by pressing the TV/DTV button, number buttons(0~9), and the P button on the remote control.
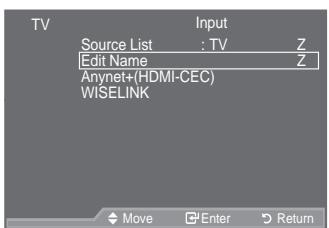
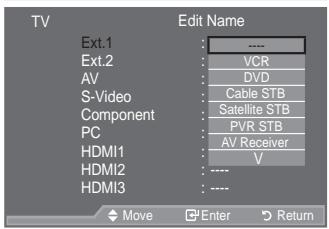
Editing the Input Source Names
Name the device connected to the input jacks to make your input source selection easier.
- Press the MENU button to display the menu. 3UHVVWKHXRUZEXWWRQWRVHOHP ENTER按钮.
- Press the x R U button to select "Edit Name", then press the ENTER按钮.
- Press the x R U button to select the device that you wish to edit. Press the ENTER button.
- Press the x R U button to select the required device. Press the ENTER button.
- Press the EXIT button to exit.
° When a PC with a resolution of 1920 x 1080@60Hz is connected to the HDMI IN 2 port, you should set the "HDMI2" mode to "PC" in the "Edit Name" of the "Input" mode.
VVWKH
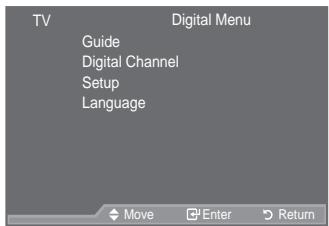
Previewing the DTV Menu System
The company does not guarantee the normal operation of the DTV menu for countries other than the supported countries (France, Germany, Italy, Netherlands, Spain, Switzerland, United Kingdom, Austria) because only these country standards are supported.
In addition, when the country of the broadcast stream differs from the country selected by the current user, the string appearing in the channel banner, Info, Guide, Channel Manager, etc. may not be displayed properly.
‡Available in DTV mode. Preset to the DTV mode by using the TV/DTV button on your remote control. To help you navigate around the on-screen menu system and adjust the various settings available, refer to the following illustration.
Press the MENU button to display the menu.
3UHVVKHXRUZEXWWRQWRVHOHW ENTER按钮.
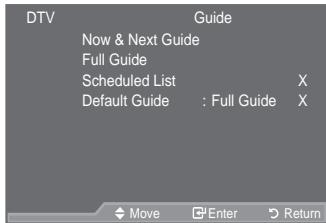
Guide
Now & Next Guide
Full Guide
Scheduled List
Default Guide
Now/Next, Full Guide
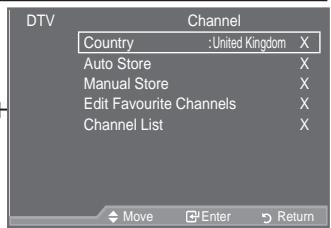
Channel
Country
Auto Store
Manual Store
Edit Favourite Channels
Channel List
All, Favourites, Default
Setup
Menu Transparency High, Medium, Low, Opaque
Change PIN
Parental Lock
Subtitle
Subtitle Mode
Audio Format
Audio Description
Off, On
Normal, Hard of hearing
PCM, Dolby Digital
Audio Description—Off, On Volume
Digital Text
Time Zone
Common Interface
System
Application Info, CI Menu
Product Information
Signal Information
Software Upgrade
Reset
Language
Audio Language
Subtitle Language
Teletext Language
Preference
Primary Audio Language
Secondary Audio Language
Primary Subtitle Language
Secondary Subtitle Language
Primary Teletext Language
Secondary Teletext Language (Depending On the Country)
° The sub-items of the CI Menu may vary depending on the CAM model.
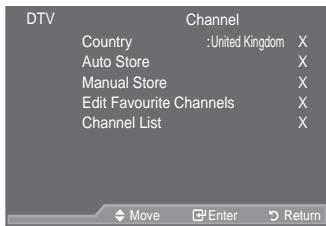

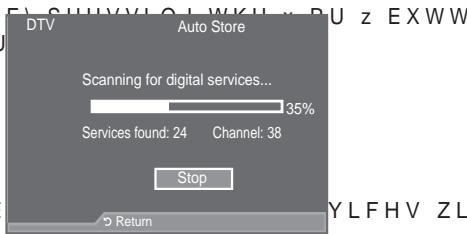
Updating the Channel List Automatically
You can update the channel list when the broadcaster adds new Services or if you move the TV to a new location.
- Press the MENU button to display the menu.
3UHVV WKHX R U Z EXWWRQ WR VHOh the ENTER按钮. - Press the x R U button to select "Channel", then press the ENTER button.
- Press the ENTER button again, to select "Country".
- 6 HOHFWWKHDSSURSULDWHFRXQWU Press the ENTEREXWWRQWRFRQUPRXU
Even though you have changed the country setting in this menu, the country setting for Analogue TV is not changed. (Refer to page 12)
- Press the x R U button again, to select "Auto Store". Press the ENTER button.
° : KHQ LW KDV QLVKHG WKH QXPE be displayed.
° The existing favourite channel list will not be deleted when the channel list is updated.
° 7R VWRS WKH VFDQ EHIRUH LEWTERIGbuaa withKStOP" Selectd.V WKH
- Press the EXIT button to exit.
° If the signal status is poor, the "No Service found! Check the aerial connection" message is displayed.

Updating the Channel List Manually
You can specify the channel for a fast channel search.
- Press the MENU button to display the menu.
3UHVW WKx RUz EXWWRQ WR VHOh the ENTER按钮. - Press the x R U button to select "Channel", then press the ENTER button.
- Press the x R U button to select "Manual Store", then press the ENTER按钮.
- Press the x R U button to select the required option, then press the ENTER button.
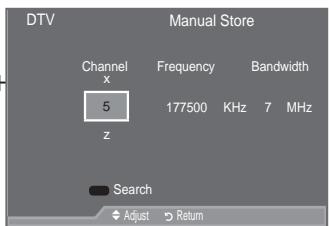
WKHQ SI
° i Channel : Channel "5" to "69" in sequence are displayed (depending on the country)
i Frequency : The frequency available in the Channel group is displayed.
i Bandwidth : The available bandwidths are 7 and 8 MHz.
Press the red button to start the scan for digital services.
When it has finished, channels are updated in the channel list.
- :KHQ LW KDV iQLVKHG WKH QXPEHU RI VFDQQHG VHUYLFHV ZLOO EH
- Press the EXIT button to exit.
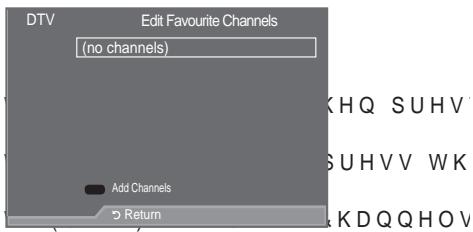
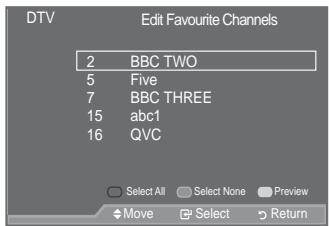
Editing Your Favourite Channels
You can edit your favourite channels using the four colour buttons.
- Press the MENU button to display the menu.
3UHVV WKHX RU z EXWWRQ WR VHOHF ENTER@ button.
- 3UHVV WKH x RU z EXWWRQ WR VHOHF
ENTER按钮。
- 3UHVV WKH x RU z EXWWRQ WR VHOHF
then press the ENTER button.
-
Press the red button to display all currently stored channels.
-
3UHVV WKH x RU z EXWWRQ WR VHOHF Press the ENTER button.
A"●"icon is shown next to the selected channel and the channel will be added to the favourite channel list.
To undo, press the ENTER button again.
- Select All : Select all channels currently displayed.
- Select None : Deselect all selected channels.
- Preview: Displays (a) currently selected channel(s).
The Favourite Channels settings have been completed.
- Press the EXIT button to exit.

Add
You can use this function when one or more favourite channels have been selected.
- Press the MENU button to display the menu.
3UHVVKHXRUZEXWWRQWRVHOHF ENTER@ button.
- 3UHVW WKHX RZ EXWWRQ WR VHOHF
ENTER按钮。
- 3UHVW WKHX RZ EXWWRQ WR VHOHF
then press the ENTER按钮.
- Press the red button in the "Edit Favourite Channels" menu.
To add more channels, refer to the step 5 on the previous description.
- If you want to check the channel to be stored, press RETURN button.
Press the EXIT button to exit.
- To add all channels to the favourite channel list, press the red button.
- To remove all channels, press the green button.
- Preview : Displays (a) currently selected channel(s).
- Press the CH LIST button to display the favourite channel manager.

Renumber (depending on the country)
- Press the MENU button to display the menu.
3UHVV WKHX Ruz EXWWRQ WR VHOHW ENTER button. - 3UHVVWKHXRUZ EXWWRQ WR VHOHFW ENTER按钮.
- 3UHVV WKHX Ruz EXWWRQ WR VHOHFW then press the ENTER button.
- 6HOHFWWKUHTXLUHGFKDQQHO XVLQ
- Press the green button.
° The space for entering the number is a blank.
- Enter the new channel number. Press ENTER按钮 to store or RETURN button to cancel.
° 3UHVV WKH { EXWWRQ WR GHOHWD Q HQWHUH GLJLW
If you enter a number already assigned to another channel, the number is assigned to the selected channel and the previous number assigned to the selected channel is assigned to the other channel.
That is, the two numbers are exchanged.
The Favourite Channels are automatically sorted in ascending order of channel numbers.
- Press the EXIT button to exit.

Preview
- In the "Edit Favourite Channels" menu, select the channel to be SUHYLHZHG E\SUHVVLQQJ WKHX RUXEX
- Press the yellow button.
° The selected channel is displayed on the screen.
$Delete
- In the "Edit Favourite Channels" menu, select the channel to be deleted from the favourite channels list by pressing the x R U Z E X W W R Q
- Press the blue button.
° The selected channel and number will be deleted.
To add a deleted channel back in to the favourite channel list, see "Add" on page 32.


Selecting Channel List
You can exclude the channels you have chosen from the channels you have scanned. When you scan through the stored channels, those you have chosen to skip are not displayed. All channels that you do not specifically choose to skip are displayed during scanning.
- Press the MENU button to display the menu.
3UHVVWKHXRUZ EXWWRQ WR VHOHF the ENTER按钮. - Press the x R U button to select "Channel", then press the ENTER button.
- Press the x R U button to select "Channel List". Press the ENTER button.
- 3UHVVWKHXRUZEXWWRQWRVHOHPress the ENTER@ button.
- Press the yellow button to toggle between your favourite channels and all channels.
° Your favourite channels are only displayed if they were previously set in the "Editing Your Favourite Channels" menu (refer to page 32).
- Press the red or green button to display the previous or next channel List page.
- 3UHVV WKH x RU z EXWWRQ WR VHOHFW D FKDQQHO WREH WXQHG Press the ENTER button.
The channel number, name and an icon are displayed in the top left corner while changing the channel. The channel number and name are displayed if the channel is one of the all channels, and a icon if the channel is one of the favourite channels.
- Press the blue button to toggle between your "TV", "Radio", "Data/Other" and "All".
- Press the CH LIST button to exit from the channel List.
Displaying Programme Information
While viewing a channel, additional information about the current programme may be displayed.
- While viewing a programme, press the INFO button.
The programme information is displayed.
- To exit from banner information, press the INFO button.
The information is displayed:
i 3DUHQWDO5DWLQJ
i 9LGHR7\SH6' +' 5DGLR
i $XGLR 7\SH 0RQR 6WHUHR 'XDO
i ([LVWHQFH RI 7HOHWH[WRU '9% 6)
i $XGLR /DQJXDJH
14:30 Sat 1 Sep
1 AFDO,16:9
AFDO 16:9
No Block
SD
Stereo
Subtitle
English
IMD EXIT
All Channels
14:30-14:33
Contains video with AFD O; coded frame
is 16:9
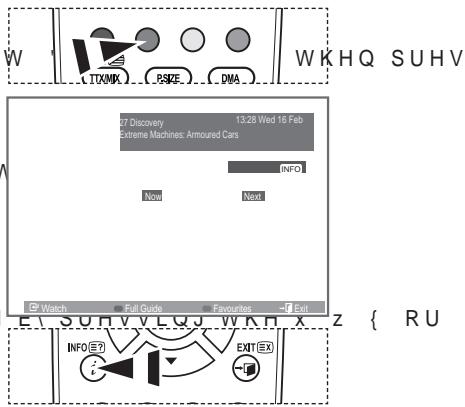
Viewing the EPG (Electronic Programme Guide) Information
The EPG (Electronic Programme Guide) information is provided by the broadcasters. Programme entries may appear blank or out of date as a result of the information broadcast on a given channel. The display will dynamically update as soon as new information becomes available.
1RZ 1H|W *XLGH
For the six channels indicated in the left-hand column, displays the Current programme and the Next programme information.
)XOO \*XLGH
Displays the programme information as time ordered One hour segments. Two hours of programme information is displayed which may be scrolled forwards or backwards in time.
- Press the MENU button to display the menu.
3UHVV WKHX Ruz EXWWRQ WR VHOHF ENTER@ button.
- Press the ENTER button, to select "Guide".
- 3UHVVWKHXRUZ EXWWRQ WR VHOHF "Full Guide".
Press the ENTER button.
° You can also display the guide menu simply by pressing the GUIDE button.
4.
| To... | Then... |
| Watch a programme in the EPG list | • Select a programme by pressing W K H x z { y E X W W R Q • Press the ENTER按钮. |
| >If the next programme is selected, it is scheduled with the clock icon displayed. If the ENTER button is pressed again, the scheduling is cancelled with the clock icon gone. For details about scheduling programmes, refer to the next page. | |
| View programme information | • Select a programme of your choice by SU H V L Q J W K H x z { • Press the INFO button when the programme of your choice is highlighted. |
| Toggle between the "Now & Next Guide" or "Full Guide" | • Press the red button repeatedly. |
| Display the "Favoursites" and the "All Channels" list | • Press the green button repeatedly. |
| Scrolls backwards quickly (24 hours). | • Press the yellow button repeatedly. |
| Scrolls forward quickly (24 hours). | • Press the blue button repeatedly. |
| Exit the guide | • Press the EXIT button. |
KHQ SUHV
W.1.R.Z.1.H.W. X.L.G.H.RU
The programme title is on the upper part of the screen center. Please click on INFO button for the detailed information. Channel Number, Running Time, Status Bar, Parental Level, Video Quality Information(HD/SD), Sound Modes, Subtitle or Teletext, Languages of Subtitle or Teletext, and brief summary of the highlighted programme are included on the detailed information. "... will be appeared if the summary is long.
Six channels are displayed. To scroll between channels, move to a channel using the x R U button. To display page by page, use the P or P button.

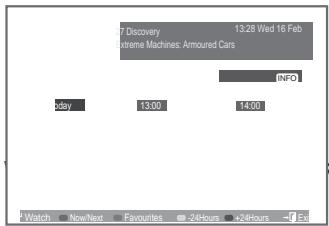
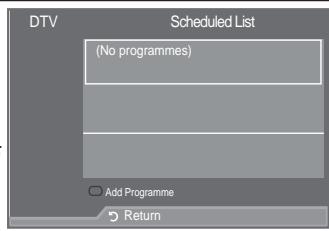
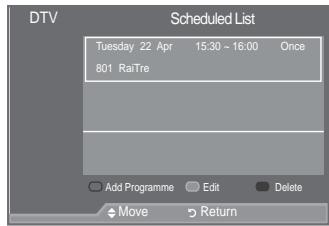
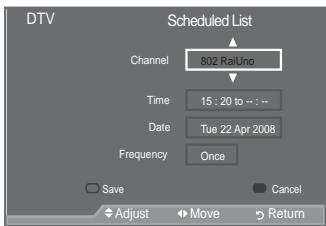
Using the Scheduled List
If you make a scheduled viewing list of programs you may like to see, the channel will be automatically switched to the scheduled programme at the scheduled time even if you are watching another programme.
- Press the MENU button to display the menu.
3UHVW WKHX R U Z EXWWRQ WR VHOHP ENTER@ button. - Press the ENTER button, to select "Guide".
- Press the x R U button to select "Scheduled List", then press the ENTER button.
- Press the red button.
The channel will be switched to the scheduled programme.
-
Press the ENTER button to select an item and adjust with the x R U button.
-
You can also set hour and minute by pressing the number buttons on the remote control.
-
Channel: Set the channel.
- Time: Set the time.
- Date: Set Year, Month and Day.
Frequency: Set the frequency.
("Once", "Daily", or "Weekly")
-
After setting the schedule, Press the red button.
-
Press the EXIT button to exit.
-
Save: Save the adjusted schedule.
- Cancel: Cancel the adjusted schedule.
- Add Programme : Add a new schedule.
- Edit: Readjust the selected schedule.
- Delete: Delete the selected schedule.
KHQ SUHV
Setting the Default Guide
You can preset the default guide style.
- Press the MENU button to display the menu.
3UHVVKHX Ruz EXWWRQ WR VHOHF ENTER@ button. - Press the ENTER button, to select "Guide".
- Press the x R U button to select "Default Guide", then press the ENTER button.
- Select "Now/Next" or "Full Guide" using the x R U button, and press the ENTER button.
- Press the EXIT button to exit.
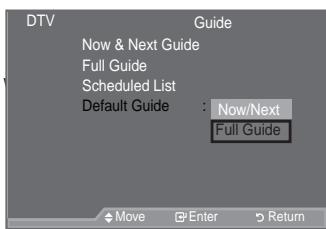
HQ SUHV
You can select these options by simply pressing the GUIDE button on the remote control.

Viewing All Channels and Favourite Channels
In the EPG menu, you can display all channels or favourite channels.
- Press the MENU button to display the menu.
3UHVW WKHX RZ EXWWRQ WR VHOHF
ENTER按钮。
- Press the ENTER button again, to select "Guide".
- Select the your required guide ("Now & Next Guide" or "Full
*XLGH E\ SUHVVLQJ WKH x RU z EXWW
- Press the ENTER button.
- Press the green button.
All the channel lists and the Favourite Channel lists will be toggled.
- 6HOHFWDSURJUDPPHRI\RXUFKRLFH
y EXWWRQ
- Press the INFO button to display information about the highlighted programme.
- When the Edit Favourite Channels list has not been set up:
"The favourites list is empty.
Would you like to choose your favourites now?" message is displayed.
- Select "Yes".
The "Edit Favourite Channels" menu is displayed.
If you select "No", all channels will remain unchanged.
- To edit the favourite channels, refer to page 32 for more details.
- Press the EXIT button to exit.
" All Channels" is the list of channels that have been scanned by the channel list update.
All channels are displayed in the all channel mode.
"Favourites" (favourite channels) is the list of channels that has been set in the "Edit Favourite Channels" menu (refer to page 32).
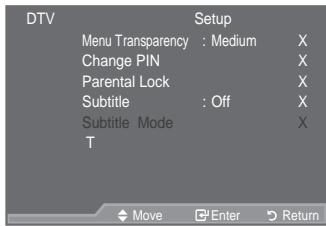
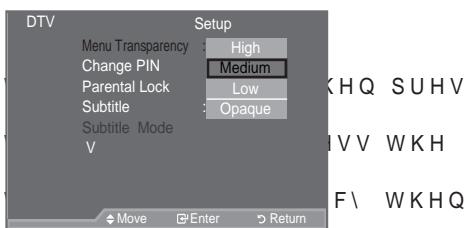
Adjusting the Menu T transparency
You can set the Transparency of the menu.
- Press the MENU button to display the menu.
3UHVV WKHX RZ EXWWRQ WR VHOHF
ENTERG button.
- 3UHVV WKH x RU z EXWWRQ WR VHOHF
ENTER按钮。
- 3UHVV WKH x RU z EXWWRQ WR VHOHF
press the ENTER按钮。
- Select the required option ("High", "Medium", "Low", or
2SDTXH E\SUHVVLQJ WKHX Ruz EXWWRQ
ENTER按钮to change the setting.
- Press the EXIT button to exit.


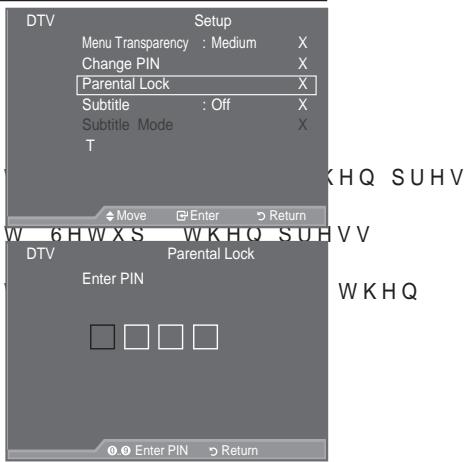
Setting up the Parental Lock
This feature allows you to prevent unauthorized users, such as children, from watching unsuitable programmes by a 4-digit PIN (Personal Identification Number) code that is defined by the user. The on-screen menu will instruct you to assign a PIN code (you can change it later, if necessary).
- Press the MENU button to display the menu.
3UHVV WKHX RU z EXWWRQ WR VHOHF ENTER@ button.
-
3UHVV WKHX Ruz EXWWRQ WR VHOHF the ENTERG button.
-
3UHVVWKHXRUZEXWWRQWRVHOHPress the ENTER按钮.
-
The "Enter PIN" is displayed.
-
Enter your current 4-digit PIN code by using the numeric buttons (0~9).
The default PIN code for a new TV set is 0000.
° If you enter an invalid PIN code, the "Invalid PIN code. Please try again." message is displayed.
-
Press the ENTER button.
-
3UHVV WKH x R U z EXWWRQ WR VHOHF lock out.
Press the ENTER button.

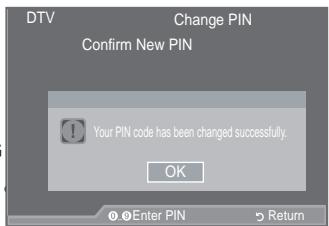
Change PIN
- Press the MENU button to display the menu.
3UHVV WKHX RU z EXWWRQ WR VHOHF ENTER@ button.
-
3UHVV WKHX Ruz EXWWRQ WR VHOHF the ENTERG button.
-
3UHVVWKHXRUZEXWWRQWRVHOHF press the ENTER按钮.
The "Enter PIN" is displayed.
- Enter your current 4-digit PIN code by using the numeric buttons (0~9).
° 7KH³(QWHU 1HZ 3,1' LV GLVSOD\HG
- Enter your new PIN code by using the numeric buttons (0~9)
° 7KH &RQùP U P 1HZ 3,1 LV GLVSOD\HG
- 5 H HQWHU \RXU QHZ 3,1 FRGH WR FRQ buttons (0~9).
The Your PIN code has been changed successfully message is displayed.
-
Press the ENTER button.
-
Press the EXIT button to exit.
° If you forget the PIN code, press the remote control buttons in the following sequence, which resets the PIN to 0-0-0-0:POWER (Off), MUTE, 8, 2, 4, POWER (On).
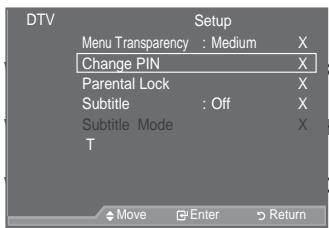

Setting the Subtitle
You can activate and deactivate the subtitles.
- Press the MENU button to display the menu. 3UHVVWKHXRUZEXWWRQWRVHOHP ENTER@button.
- Press the x R U button to select "Setup", then press the ENTER button.
- Press the x R U button to select "Subtitle", then press the ENTER button.
- Select "On" by pressing the x R U button. Press the ENTER button.
- Press the EXIT button to exit.
You can select these options simply by pressing the SUBT. button on the remote control.
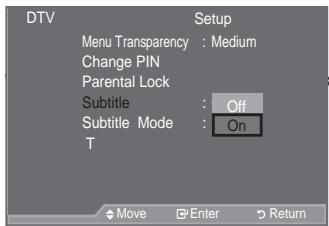
KHQ SUHV

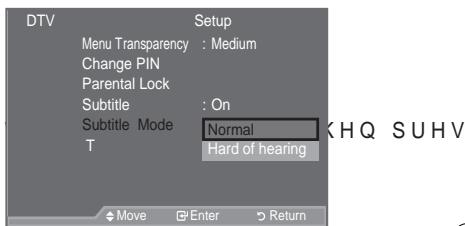
Setting the Subtitle Mode
Use this menu to set the Subtitle Mode. "Normal" under the menu is the basic subtitle and "Hard of hearing" is the subtitle for a hearing-impaired person.
- Press the MENU button to display the menu. 3UHVVWKHXRUZEXWWRQWRVHOHP ENTER@ button.
- Press the x R U button to select "Setup", then press the ENTER button.
- Press the x R U button to select "Subtitle Mode", then press the ENTER button.
- Press the x R U button to select "Normal" or "Hard of hearing". Press the ENTER button.
- Press the EXIT button to exit.
° If the programme you are watching does not support the "Hard of hearing" function, "Normal" automatically activates even though "Hard of hearing" mode is selected.
Selecting the Audio Format
You can only hear Dolby Digital sound through the audio receiver connected through an optical cable. You can only hear PCM sound through the main speaker.
When sound is emitted from both the main speaker and the audio receiver, a sound echo may occur due to the decoding speed difference between the main speaker and the audio receiver. In this case, use the internal mute function.
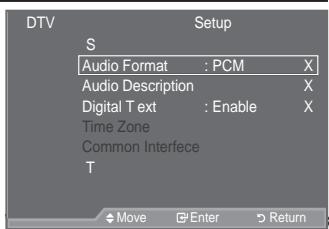
KHQ SUHV
- Press the MENU button to display the menu. 3UHVVWKHXRUZEXWWRQWRVHOHP ENTER按钮.
- Press the x R U button to select "Setup", then press the ENTER button.
- Press the x R U button to select "Audio Format", then press the ENTER button.
- Press the x R U button to select "PCM" or "Dolby Digital". Press the ENTER button.
- Press the EXIT button to exit.
The Audio Format appears according to the broadcasting signal. Dolby digital sound is only available when the TV is connected with an external speaker using an optical cable.

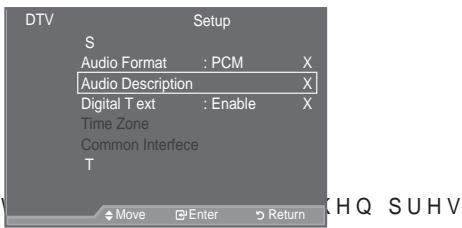
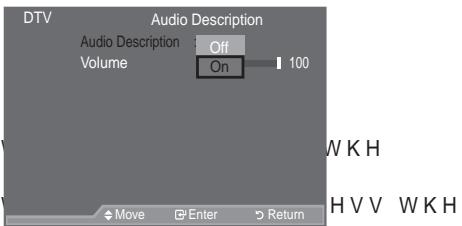
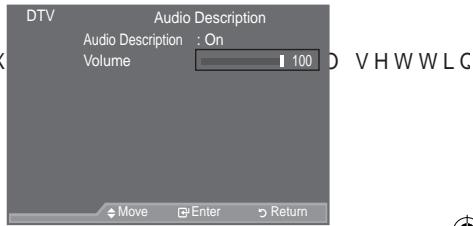
Selecting the Audio Description
This is an auxiliary audio function that provides an additional audio track for visually challenged persons. This function handles the Audio Stream for the AD (Audio Description), when it is sent along with the Main audio from the broadcaster. Users can turn the Audio Description On or Off and control the volume.
- Press the MENU button to display the menu.
3UHVV WKHX RUXEXWWRQ WR VHOHF ENTER@ button. - Press the x R U button to select "Setup", then press the ENTER button.
- Press the x R U button to select "Audio Description", then press the ENTER button.
- 3UHVV WKHX Ruz EXWWRQ WR VHOHF ENTER按钮。
- 3UHVV WKH x RU z EXWWRQ WR VHOHF ENTER按钮。
"Volume" is active when "Audio Description" is set to "On".
- 3UHVVWKH{RU y EXWWRQ XQWLO \RX Press the ENTER按钮.
- Press the EXIT button to exit.
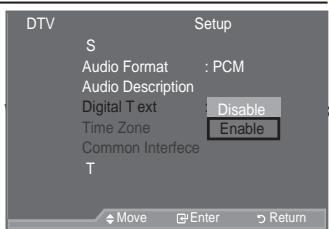
Selecting the Digital T ext (UK only)
If the programme is broadcast with digital text, this feature is enabled.
- Press the MENU button to display the menu.
3UHVVKHXRUZ EXWWRQ WRVHOHF ENTER@ button. - Press the x R U button to select "Setup", then press the ENTER button.
- Press the x R U button to select "Digital Text", then press the ENTER button.
- Press the x R U button to select "Disable" or "Enable". Press the ENTER button.
- Press the EXIT button to exit.
MPEG(Multimedia and Hypermedia Information Coding Experts Group) An International standard for data encoding systems used in multimedia and hypermedia. This is at a higher level than the MPEG system which includes data-linking hypermedia such as still images, character service, animation, graphic and video files as well as multimedia data. MPEG is user runtime interaction technology and is being applied to various fields including VOD (Video-On-Demand), ITV (Interactive TV), EC (Electronic Commerce), tele-education, tele-conferencing, digital libraries and network games.
HQ SUHV
Selecting the T ime Zone (Spain only)
Select the local time zone.
- Press the MENU button to display the menu.
3UHVVKHX RUXEXWWRQWRVHOHF ENTER@ button. - 3UHVVx WRKU-bzxtkRtNvSbWcBwR, YidropeSsH@GIFW> ENTER按钮。
- 3UHVVx WRKUbztBzEeRtUvSsEeRcXeTMeZdEeYrERrFpAeSsIbTePVH ENTERC button.
- Select the time zone where you locate by pressing the x R U button.
Press the ENTER button.
° The following options are available
The Iberian Peninsula and Balearic Islands - Canary Islands
- Press the EXIT button to exit.
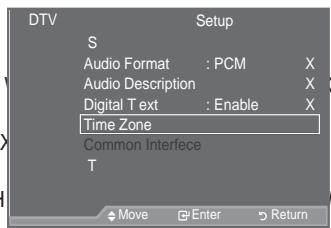
[THQ SUHV]
WKH
HKHV WKH
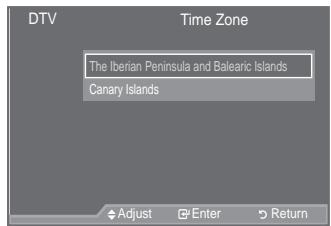
Viewing Product Information
You can view your product information. For service or repair, please contact a Samsung approved dealer.
- Press the MENU button to display the menu.
3UHVV WKHX RU Z EXWWRQ WR VHOHF ENTER@ button. - Press the x R U button to select "Setup", then press the ENTER button.
- Press the x R U button to select "System", then press the ENTER button.
- Press the ENTER button again, to select "Product Information".
The Product Information menu is selected.
-
Software Version, Firmware Version
-
Press the EXIT button to exit.
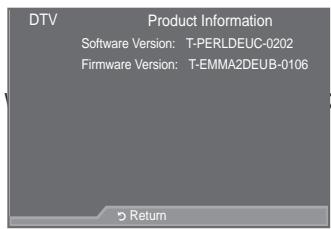
HQ SUH
Checking the Signal Information
You can get information about the signal status.
- Press the MENU button to display the menu.
3UHVVKHXRUZ EXWWRQ WRVHOHF ENTER@ button. - Press the x R U button to select "Setup", then press the ENTER button.
- 3UHVV WKH x RU z EXWWRQ WR VHOHF ENTER按钮。
- 3UHVV WKH x RU z EXWWRQ WR VHOHW
- Press the EXIT button to exit.
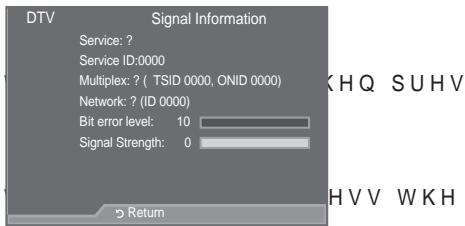
° If the signal status is poor, the "No signal." message is displayed.
Upgrading the Software
To keep your product up-to-date with new Digital Television features then software upgrades are periodically broadcast as part of the normal Television signal.
It will automatically detect these signals and display the software upgrade banner. You are given the option to install the upgrade.
- Press the MENU button to display the menu.
3UHVVKHXRUZ EXWWRQ WRVHOHF ENTER@ button. - Press the x R U button to select "Setup", then press the ENTER button.
- Press the x R U button to select "System", then press the ENTER按钮.
- Press the x R U button to select "Software Upgrade", then press the ENTER button.
- Press the x R U E X W W R Q W R V H O F W 36RIWZD 30DQXDO8SJUDGH'RU36WDQGE\0RGHX| Press the ENTERG button.
Software Information Press the ENTER button, then the current software version is shown. To display the software version information, press the ENTER button again. To switch to an alternative version, press the red button. Press the blue button to reset, activate the upgrade and restart.
Manual Upgrade Press the ENTER button to search for new software from the currently broadcasting channels.
Standby Mode Upgrade: On / Off Press the ENTER button. To continue software upgrade with master power on, Select On E\SUHVVLQJWKHXRUZEXWWRQ PLQXWHVDIWHU HQWHULQJ VW automatically conducted. Since the power of the unit is turned on internally, the screen may be on slightly for the LCD product. This phenomenon may continue for more than 1 hour until the software upgrade is completed. - Press the EXIT button to exit.
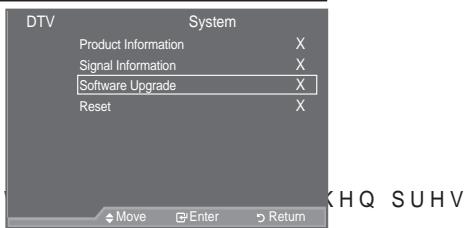
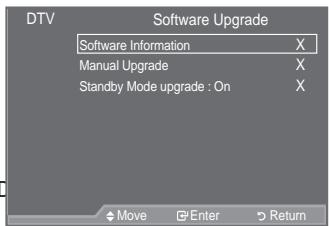

Viewing Common Interface
This contains information on CAM inserted in the CI slot and displays it.
- Press the MENU button to display the menu. 3UHVVWKHXRUZEXWWRQWRVHOHF ENTER按钮.
- Press the x R U button to select "Setup", then press the ENTER button.
- Press the x R U button to select "Common Interface", then press the ENTER button.
- Press the ENTER button to display the information for your application.
-
Press the EXIT button to exit.
The Application Info inserting is about the CI CARD. You can install the CAM anytime whether the TV is ON or OFF. -
Purchase the CI CAM module by visiting your nearest dealer or by phone.
- Insert the CI CARD into the CAM in the direction of the arrow until it fits.
- Insert the CAM with the CI CARD installed into the common interface slot.
(Insert the CAM in the direction of the arrow, right up to the end so that it is parallel with the slot.)
- Check if you can see a picture on a scrambled signal channel.
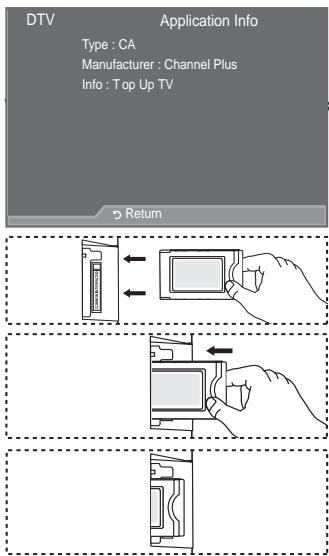
KHQ SUHV
Selecting the CI (Common Interface) Menu
This enables the user to select from the CAM-provided menu.
- Press the MENU button to display the menu. 3UHVVWKHXRUZEXWWRQWRVHOHP ENTER按钮.
- Press the x R U button to select "Setup", then press the ENTER button.
- Press the x R U button to select "Common Interface", then press the ENTER button.
- Select to "CI Menu" by pressing the x R U button, and press the ENTER按钮.
- Select the required option by pressing the x R U button, and press the ENTER button.
- Press the EXIT button to exit.
0 Select the CI Menu based on the menu PC Card.
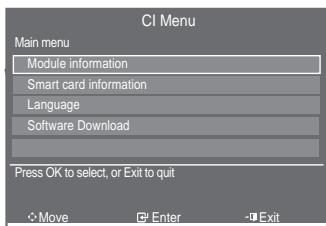
KHQ SUHV
Resetting
You can reset the values stored to the factory default values.
The Reset operation deletes all channel information and user preferences returning all values to their default factory state.
- Press the MENU button to display the menu.
3UHVVKHXRUZ EXWWRQ WR VHOHP ENTER@ button. - Press the x R U button to select "Setup", then press the ENTER button.
- Press the x R U button to select "System", then press the ENTER按钮.
- Press the x R U button to select "Reset", then press the ENTER按钮.
- The "Enter PIN" screen will appear.
- Enter your current 4-digit PIN code by using the numeric buttons (0~9).
The warning message is displayed. All values will be reset by pressing the coloured buttons (red, green, yellow, and blue) in turn.
- Press the EXIT button to exit.
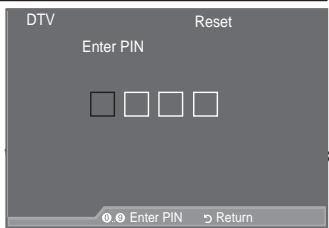
HQ SUHV
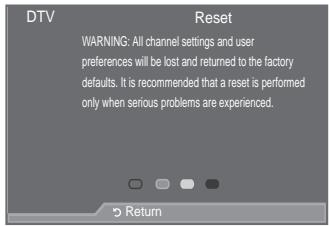
Selecting the Preferred Language (Subtitle, Audio or Text)
You can change the default value for subtitle, audio teletext languages.
Displays the language information for the incoming stream.
- Press the MENU button to display the menu.
3UHVVKHXRUZ EXWWRQ WR VHOHP ENTER@ button. - Press the x R U button to select "Language", then press the ENTER button.
- Press the x R U button to select "Audio Language",
"Subtitle Language" or "Teletext Language".
Press the ENTER按钮. - Select a particular language by pressing the x R U button repeatedly.
Press the ENTER button.
English is the default in cases where the selected language is unavailable in the broadcast.
- Press the EXIT button to exit.
While viewing a programme, the subtitle can be selected While viewing a programme, audio languages can be selected.
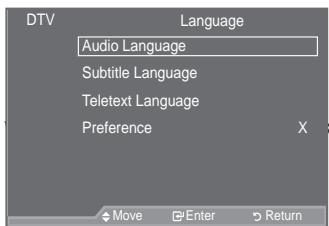
KHQ SUHV
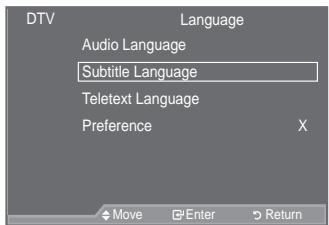
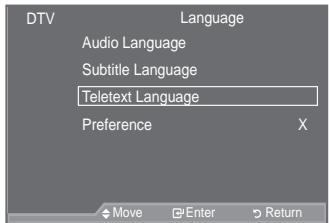

Preference
This menu consists of 6 sub-menus:
Primary Audio Language, Secondary Audio Language, Primary Subtitle Language, Secondary Subtitle Language, Primary Teletext Language, Secondary Teletext Language.
Using this feature, users can select one of the languages (English, German, Italian, Swedish, French, Welsh, Gaelic, Irish, Danish, Finnish, Spanish, Dutch). The language selected here is the default when the user selects a channel.
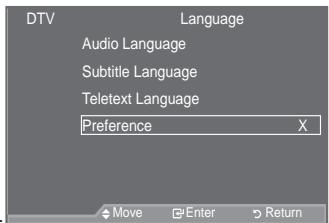
3UHVV WKH x Ruz EXWWRQ WR VHOHP W UHTALG PHQX SULPDU $ Language, Secondary Audio Language, Primary Subtitle Language, Secondary Subtitle Language, Primary Teletext Language, Secondary Teletext Language), then press the ENTER button. The options of the selected menu are displayed.
6 HOFW WKDSSURSULWH ODQJXDJH E\SUHVVLQJ WKH x Ruz EXW Press the ENTER button to confirm your choice.
If you change the language setting, the Subtitle Language, Audio Language, and the Teletext Language of the Language menu (refer to page 44) are automatically changed to the selected language.
The Subtitle Language, Audio Language, and the Teletext Language of the Language menu show a list of languages supported by the current channel and the selection is highlighted. If you change this language setting, the new selection is only valid for the current channel. The changed setting does not change the setting of the Primary Subtitle Language, Primary Audio Language, or the Primary Teletext Language of the Preference menu.
Setting up Your PC Software (Based on Windows XP)
The Windows display-settings for a typical computer are shown below. The actual screens on your PC may be different depending upon your particular version of Windows and your particular video card. Even if your actual screens look different, the same, basic set-up information will apply in almost all cases. (If not, contact your computer manufacturer or Samsung Dealer.)
- First, click on "Control Panel" on the Windows start menu.
- When the control panel window appears, click on "Appearance and Themes" and a display dialog-box will appear.
- When the control panel window appears, click on "Display" and a display dialog-box will appear.
- Navigate to the "Settings" tab on the display dialog-box. The correct size setting (resolution): Optimum- 1920 X 1080 If a vertical-frequency option exists on your display settings dialog box, the correct value is "60" or "60 Hz". Otherwise, just click "OK" and exit the dialog box.
Display Modes
Both screen position and size will vary depending on the type of PC monitor and its resolution. The resolutions in the table are recommended.
D-Sub Input
| Mode | Resolution | Horizontal Frequency (kHz) | Vertical Frequency (Hz) | Pixel Clock Frequency (MHz) | Sync Polarity (H/V) |
| IBM | 640 x 350 | 31.469 | 70.086 | 25.175 | +/- |
| 720 x 400 | 31.469 | 70.087 | 28.322 | -/+ | |
| VESA | 640 x 480 | 31.469 | 59.940 | 25.175 | -/- |
| 640 x 480 | 37.861 | 72.809 | 31.500 | -/- | |
| 640 x 480 | 37.500 | 75.000 | 31.500 | -/- | |
| 800 x 600 | 37.879 | 60.317 | 40.000 | +/+ | |
| 800 x 600 | 48.077 | 72.188 | 50.000 | +/+ | |
| 800 x 600 | 46.875 | 75.000 | 49.500 | +/+ | |
| 1024 x 768 | 48.363 | 60.004 | 65.000 | -/- | |
| 1024 x 768 | 56.476 | 70.069 | 75.000 | -/- | |
| 1024 x 768 | 60.023 | 75.029 | 78.750 | +/+ | |
| 1280 x 1024 | 63.981 | 60.020 | 108.000 | +/+ | |
| 1280 x 1024 | 79.976 | 75.025 | 135.000 | +/+ | |
| 1360 x 768 | 47.712 | 60.015 | 85.500 | +/+ | |
| 1600 x 1200 | 75.000 | 60.000 | 162.000 | +/+ | |
| CVT | 1920 x 1080RB | 66.587 | 59.934 | 138.500 | +/- |
^ HDMI/DVI Input
| Mode | Resolution | Horizontal Frequency (kHz) | Vertical Frequency (Hz) | Pixel Clock Frequency (MHz) | Sync Polarity (H/V) |
| VESA | 640 x 480 | 31.469 | 59.940 | 25.175 | - / - |
| 800 x 600 | 37.879 | 60.317 | 40.000 | + / + | |
| 1024 x 768 | 48.363 | 60.004 | 65.000 | - / - | |
| 1280 x 1024 | 63.981 | 60.020 | 108.000 | + / + | |
| 1360 x 768 | 47.712 | 60.015 | 85.500 | + / + | |
| 1600 x 1200 | 75.000 | 60.000 | 162.000 | + / + | |
| CEA | 1920 x 1080p | 67.500 | 60.000 | 148.500 | + / + |
° When using an HDMI/DVI cable connection, you must use the HDMI IN 2 jack.
° The interlace mode is not supported.
° The set might operate abnormally if a non-standard video format is selected.
° Separate and Composite modes are supported. SOG is not supported.
° Too long or low quality VGA cable can cause picture noise at high resolution modes (1920x1080 or 1600x1200).
Setting up the TV with your PC
Press the SOURCE button to select PC mode.
1. Press the MENU button to display the menu.
Press the ENTER button, to select "Picture".
2. 6HOHFWWKHUHTXLUHGRSWLRQE\SU then press the ENTER button.
3. :KHQ \RX DUH VDWLV HG ZLWIENTERV button.
4. Press the EXIT button to exit.
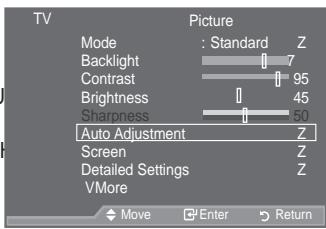
XWWRQ
Auto Adjustment
Auto adjustment allows the PC screen of set to self-adjust to the incoming PC video signal. The values of fine, coarse and position are adjusted automatically.

Easy Setting
- Press the TOOLS button on the remote control.
- 3UHVVWKHXRUZ EXWWRQ WR VHOH press the ENTER按钮.
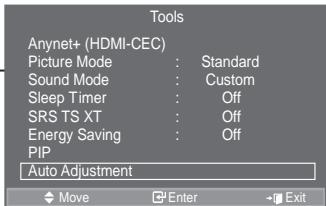
QW WKH
Screen:
Coarse/Fine
The purpose of picture quality adjustment is to remove or reduce picture noise. If the noise is not removed by Fine-tuning alone, then adjust the frequency as best as possible (coarse) and Finetune again. After the noise has been reduced, readjust the picture so that it is aligned on the center of screen.
3UHVV WKHX Ruz EXWWRQ WR VHOHFV the ENTER@ button.
3UHVV WKH {RU y EXWWRQ WR DGMXV Press the ENTER button.
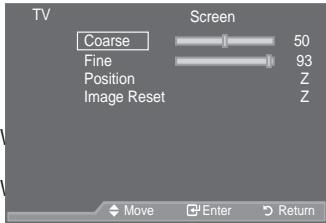
WKHQS
W
Position
Adjust the PC's screen positioning if it does not fit the TV screen.
3UHVV WKHX RZ EXWWRQ WR DGMXV
3UHVV WKH {RU y EXWWRQ WR DGMXV}
Press the ENTER button.
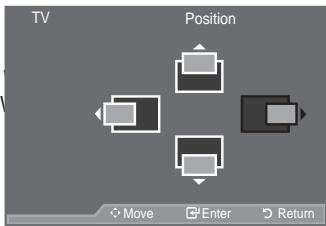
3RVLWLR RVLWLRQ
Image Reset
You can replace all image settings with the factory default values.
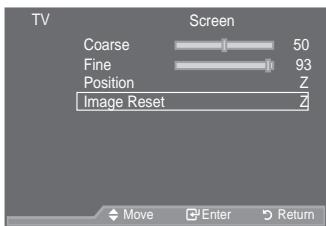

Using the WISELINK Function
This function enables you to view and listen to photo (JPEG) D Q G D X G L R o H V 03 V D Y H G R Q D 86 (MSC) device.
Press the POWER button on the remote control or your set. & R Q Q H F W D 86% GH Y L F H F R Q W D L Q L Q J WISELINK jack (USB jack) on the side of the TV.
If you enter the WISELINK mode with no USB device FRQQHFWHGWKPHVVDJH ^37 KHUH LV appear. In this case, insert the USB device, exit the screen by pressing the WLINK button on the remote control and enter the WISELINK screen again.
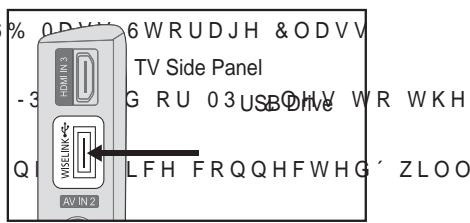
Only alphanumeric characters must be used as a folder name or filename (photo, music).
The file system only supports FAT16/32 (The NTFS file system is not supported)
Certain types of USB Digital camera and audio devices may not be compatible with this TV.
Wiselink only supports the USB Mass Storage Class device (MSC). MSC is a Mass Storage Class Bulk-Only Transport device. Examples of MSC are Thumb drives and Flash Card Readers (Both USB HDD and HUB are not supported.)
Before connecting your device to the TV, please back up your files to prevent them from damage or loss of data. SAMSUNG is not responsible for any data file damage or data loss.
Please connect directly to the USB port of your TV. If you are using a separate cable connection, there may be a USB Compatibility problem.
Only MP3 and JPEG file formats are supported.
The Wiselink mp3 format only supports music files with a high sampling frequency (32 kHz, 44.1 kHz, or 48 kHz).
We recommend the sequentialjpeg format. ProgressiveJPEG uses a lot of memory and decoding may fail.
Do not disconnect the USB device while it is loading.
MTP (Media Transfer Protocol) is not supported.
The playing duration of an mp3 file may be displayed as '00:00:00' if its playing time information is not found at the start of the file.
The higher the resolution of the image, the longer it takes to display on the screen.
The Photo or Music List displays up to 300 folders or files.
Loading may take some time depending on the size of the file.

Using the WISELINK Menu
- Press the MENU EX WW RQ 3 U H V V W K H x R U ^3 , Q SX W' W K H E N T B R M u tior W K H
- 3UHVV WKHX RUXEXWWRQ WR VHOHP ENTER@ button.

- 3UHVWWKHXRUZEXWWRQWRVHOHP Memory Device, then press the ENTER button.
The "WISELINK" menu differs depending on the USB Memory Device connected to TV.
Some devices may not be supported due to compatibility problems.
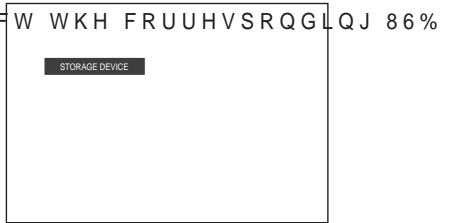
To exit WISELINK mode, press the W.LINK button on the remote control.
Press the W.LINK button on the remote control to display a WISELINK menu.
Using the Remote Control Button in WISELINK Menu
| Button | Operations |
| x z { y | Move the cursor and select an item. |
| ENTER | Select the currently selected item. |
| ▶ | Play the Slide Show or MP3 file. |
| II | Pause the Slide Show or MP3 file. |
| RETURN | Return to the previous menu. |
| INFO | Run various functions from the Photo and Music menus. |
| ■ | Stop the current slide show or MP3 file. |
| ←→ | Page Up or Down (file list item) |
| EXIT | Stop the current function and return to the previous high-level menu. |

Using the PHOT O (JPEG) List
7KLV PHQX VKRZV -3(* OHVDQG IROGHUV VDYHGRQ DQ 86%PHPRU device.
- &R P S O H W H 6 W H S V W R R I 38V L Q J W K H :, 6(/,1. 0HQX (Refer to page 49)
- 3UHVW WKH {RU y EXWWRQ WR PRYHW '33KRWR' WKHQ SUHVW WKH ENTEREXWWRQ 7KH VDYHG oOH LQIRUPDWLRQ LV GLVSODHG DV D IROGHURU OH
-
3UHVW WKH x z {DQG y EXWWRQV WR VHOHW D OH
-
Pressing the ENTER button over a photo icon shows the currently selected photo in full screen.
- Pressing the ENTER按钮过一个3次,按住Enter键,再按住Enter键,选择“OK”按钮,然后单击Enter按钮。
To exit WISELINK mode, press the W.LINK button on the remote control.
0 RYLQJ WR D SKRWR PD\ WDNHD At this point, the icon will appear at the top left of the screen.
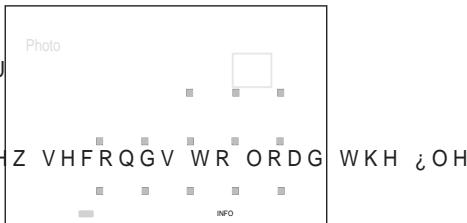
° ,W WDNHV WLPH WR VKRZ - 3( * ,OHV DV 7KXPEQDLO LPDJHV
7KLVPHQXRQO\VKRZV OHV ZKRVH OH H[WHQVDVR EPLS/ RUSJWL)ILOH will not be displayed.
° 7KH ΚOHV DUH GLVSOD\HG RQ D SDJH WKXPEQDLO SKRWRV DUH
° The thumbnails are numbered from left to right and from top to bottom, from 1 to 15.
Certain types of USB Digital camera and audio devices may not be compatible with this TV.
°)ROGHUV DUH GLVSOD\HG UVW DQG WKH\DUH IGIRZHHG E\DOO IROGHUV DQG -3( * OHV DUH VRUWHG LQ DOSKDEHWLFDO RUGHU
° If the photo is displayed in full screen, you can zoom in and out or rotate the photo on the screen.
:KLOHDIXOO VFUHHQLV GLVSOD\HG {RUYEXWHLRCQWZKL@DDHHW\ folder.
Press the button when a Photo icon is selected to start a Slide Show.
Photos without EXIF information may not be displayed as thumbnail images in the PHOTO LIST depending on the picture quality and resolution.
Viewing a Slide Show
- Press the INFO button to display the option("Start Slide Show", "Select All").
- 3UHVVKHXRUZ EXWWRQ WRVHOHPress the ENTER按钮.
° 'XULQJ WKH VOLGH VKRZ iOHV DUH FXUHHWO\ VKRZQ iOH
° 03 c OHV FDQ EHD XWRPD WLFDOO\ Show if the Default Background Music is set to On. To HQDEOH WKLVIXQFWLRQ 03 c OHV be located in the same folder on the USB Memory Device.
- Press the INFO button during the slide show to set the following options ("Slide Show Speed", "Background Music", "Background Music Setting" / L V W 3 U H V W K H to select the option, then press the ENTER按钮.
After setting the option press the ENTER button to make a change.

Using the Menu during a Slide Show
Slide Show Speed:
Select to control the slide show speed.
3UHVV WKHX Ruz EXWWRQ WR VHOHFW ("Fast", "Normal", "Slow"), then press the ENTER按钮.
Background Music:
6 HÖHFW WR FKRRVH ZKHWKHU \RX ZDQV slide show.
3UHVV WKHX Ruz EXWWRQ WR VHOHFW then press the ENTER按钮.
GXULQJ
RQ 2Q
Background Music Setting:
:KLOHWKH VOLGH VKRZ LV LQ SURJUHV the same directory are displayed.
6 HOHFW DIROGHUXVLQJWKHXERTERGE) button. The selected folder will be highlighted. Press the RETURN button again to return to the slide show screen. The selected background music is played.
° If you turn Off the Background Music, even if the Background Music Settings have been set up, the background music will not be played.
To exit WISELINK mode, press the W.LINK button on the remote control.
:KHQ VHOHFWLQJD SKWR OH WKH displayed on the left side of the TV screen, such as the UHVROXWLRQ WKH GDWH PRGL HG D current directory (e.g. 10th out of 15).
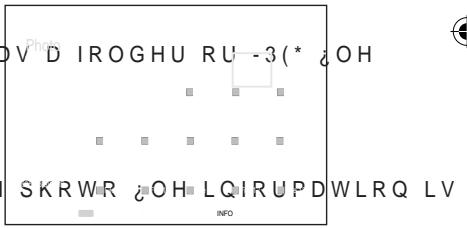
QG WKH RUGHU RI WKH OH LQ
:Foldericon
: Photo icon
:Move to the previous folder stage icon
Such as the resolution
File Size
Date modified
Order of the file in the current directory


Using the Option Menu
- & R P S O H W H 6 W H S V W R RI 38 VLQJ W KH :,6(/,1.0HQX' (Refer to page 49)
- 3UHVW WKH {RU y EXWWRQ WR PRYH WR '3KWR' WKHQ SUHVW WKH ENTEREXWWRQ 7KH VDYHG OH LQIR UPDWLRQ LV GLVSOD VHGDVD IROGHURU OH Start Slide Show
- 3UHVV WKH x z {DQG y EXWWRQ WR the ENTER按钮. Pressing the button over a photo thumbail displays the photo in full screen.
- Press the INFO button to display the option("Start Slide Show", "Zoom", "Rotate", "List")
Zoom:
3UHVW WKHX Ruz EXWWRQ WR VHOHR RP'WKHQ SUHVV WKH ENTER@ button.
- 6 H O H F W W K H U H T X L U H G R S W L R Q E \ SU H V V L Q J W K H x R U z E X W W R Q press the ENTER button. (X1, X2, X4)
To pan up/down/left/right in the zoomed-in photo, press the INFO EXWWRQ WR H[ LWW RSWLRQ PHQX y EXWWRQV
"Start Slide Show" or "Rotate" is disabled when the "Zoom" option is selected.
" x1": Restore a photo to its original size.
" x2": Zoom-in to a photo x2.
"x4":Zoom-in to a photo x4.
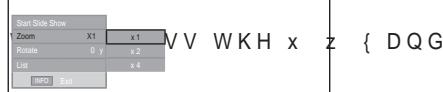
/ / : Move the zoomed-in photo up/down/right/left.

Rotate:
3UHVW WKHX RZ EXWWRQ WR VHOHF W35RWDWH'WKHQ SUHVW WKH ENTER@ button.
- 6 H OH F W W K H U HT X L U H G R S W L R Q E \ S U H press the ENTER按钮. (0^, 90^, 180^, 270^)
° 7KH URWDWHG 念 OH LV QRW VDYHG
6 W D U W 6 O L G H 6 K R Z R U = R R P L V GL option is selected.
° "0" : This rotates a photo to its original position
90^ : This rotates a photo by 90 degrees
"180°": This rotates a photo by 180 degrees
"270": This rotates a photo by 270 degrees
Using the MP3 List
7KLVPHQXVKRZV03 OHVIURPDPRQJWKHOHVVDYHGRQD 86% memory device.
- & R P S O H W H 6 W H S V W R R I 3 8 V L Q J W K H :,6(/,1. 0 H Q X (Refer to page 49)
- 3UHVW WKH {RU y EXWWRQ WR PRYH WR '0XVLF' WKHQ SU HVW WKH ENTEREXWWRQ 7KH VDYHG OH LQIRUPDWLRQ LV GLVSODHG DV D IROGHURU OH
-
3UHVV WKH x RU z EXWWRQ WR PRYH WR DQ LFRQ WKHQ SUHVV WKH ENTER button.
-
Pressing the ENTER button over a musical note icon LPPHGLDWHO\SOD\VWKHPXVLF 念 OH
-
Pressing the ENTER button over a folder icon shows the PXVLF OHV LQFOXGHGL WKH IROG
7R VHOHFW D oH RQ WK bHTnH to move to the next page. -
7R VHOHFW DOO oI WIFB butn goDiysplayStileH
Music menus. Press the ENTER@ EXWWRQ WRVHO
35HSHDW 0XVLF'RU 36HOHFW $OO
To exit WISELINK mode, press the W.LINK button on the remote control.
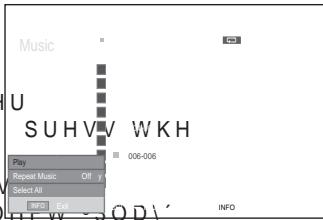
:Folder icon
: Music icon
Using the Option Menu
Play:
Select to play MP3 files.
: Move to the previous
folder stage icon
° Press the EXWWRQ ZKLOH SOD\LQJDQ 03 OH WRSDXVH WKH OH
Press the button to exit Play mode.
7 KLV PHQX RQO\ VKRZV OHV ZLWK WKH 03 OHLRWHHEURGRORWLOHV displayed, even if they are saved on the same USB device.
° 7KH VHOHFWHG OH LV GLVSOD\HG RQ WKH WRS ZLWK LWV SOD\LQJ
To adjust the music volume, press the VOL , VOL button on the remote control. To mute the sound, press the MUTE button on the remote control.
Repeat Music:
6HOHFW WR UHSHDWHGO\SOD\03 OHV LQ WKH FXUHHW IROGHU
You can select On or Off.
Music function information icon

:KHQ DOOPXVLF OHV DUH EHLQJ SOD\HG

:KHQDPXVLF OH LV EHLQJ SOD\HG

: When pressing the button on the remote control while music is playing.

: When pressing the button on the remote control when music is stopped.
Using the Setup Menu
Setup displays the user settings of the WISELINK menu.
- & R P S O H W H 6 W H S V W R RI 3 8 V L Q J W K H :, 6 (/, 1. 0 H Q X' (Refer to page 49)
- 3UHVV WKH {RU y EXWWRQ WR PRYENTWbWXS' WKHQ SUHVV WKH
- 3UHVW WKHX RZ EXWWRQ WR VHOHFWENOTERG/HTtn. YskeZbW WKHQ S6SHHG ' 3 % DFNJUBaKgGunXMUsicFSetting'Repeat Music ' 36 F UHHQ 6DYHU
- 3UHVW WKHX RZ EXWWRQ WR VHOENIFR@Vckton.R SWLRQ WKHQSUV To exit WISELINK mode, press the W.LINK button on the remote control.
Slide Show Speed:
6HOHFW WR FRQWURO WKH VOLGH VKRZ 31RUPDO'RU 36ORZ'
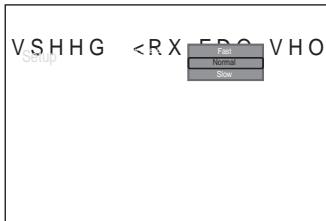
HFW3)DV
Background Music :
Select to determine whether to play an MP3 file during a slide show. <RX FDQ VHOHFW 0XVLF ^32Q^ RUXVLF
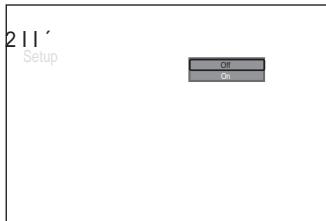

Background Music Setting:
While a slide show is in progress, use the "Background Music Setup" to select a music file to listen to. Select an MP3 file as the background music.


Repeat Music :
Select to determine whether to repeat playing the music when all MP3 files in the current folder have been played.
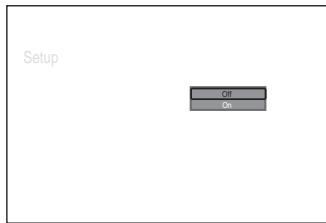
Screen Saver:
Select to set the waiting time before the screen saver appears. The screenshot will appear when no button is pressed for 1, 5 or 10 minutes.
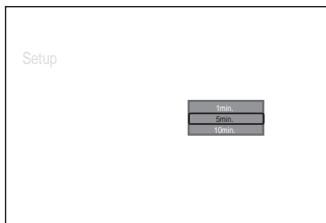
What is Anynet+?
Anynet+ is an AV network system that enables an easy-to-use AV interface for users by controlling all connected AV devices through the Anynet+ menu when Samsung Electronics AV devices are connected.
Connecting Anynet+ Devices
The Anynet+ system supports AV devices supporting Anynet+ only.
Check if there is an Anynet+ mark on the AV device to be connected to the T V.

To directly connect to TV
Connect the [HDMI 1], [HDMI 2] or [HDMI 3] jack on the TV and the HDMI OUT jack of the corresponding Anynet+ device using the HDMI cable.
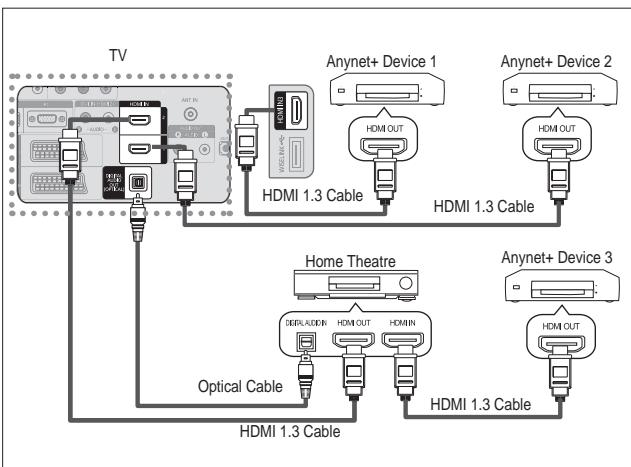
To connect to Home Theater
- Connect the [HDMI 1], [HDMI 2] or [HDMI 3] jack on the TV and the HDMI OUT jack of the corresponding Anynet+ device using the HDMI cable.
- Connect the HDMI IN jack of the home theatre and the HDMI OUT jack of the corresponding Anynet+ device using the HDMI cable.
Connect only the optical cable between [Digital Audio Out (Optical)] on your TV and Digital Audio Input on the receiver.
Connect only one receiver.
You can listen to 5.1 channel sound through the home theatre's speakers. Otherwise, you can only listen to 2 channel stereo sound in other cases. Make sure to connect the Digital Audio IN (Optical) of the home theatre and the TV correctly to listen to TV sound through the home theatre. However, you cannot listen to sound from the BD recorder that is sent to the home theatre via the TV in 5.1 channel sound because the TV outputs only 2 channel stereo sound. Please see the manual for the home theatre.
° You can connect an Anynet+ device using the HDMI 1.3 cable. Some HDMI cables may not support Anynet+ functions.
° Anynet+ works when the AV device supporting Anynet+ is in the Standby or On status.
° Anynet+ supports up to 8 AV devices in total.

Setting Up Anynet+
The following settings are to use Anynet+ functions.
Using the Anynet+ Function
- Press The TOOLS button. Then Press the ENTER button to select "Anynet+(HDMI-CEC)". 3UHVVWKHXRUZ EXWWRQWRVHOHF ENTER button.
- Press the ENTER button to select "Anynet+ (HDMI-CEC)", then press the ENTER button.
- 3UHVVWKHXRUZ EXWWRQ WR VHOHF ENTER按钮。
° The "Anynet+ (HDMI-CEC)" function is enabled.
° If you select "Off", "Anynet+ (HDMI-CEC)" is disabled.
° When the "Anynet+ (HDMI-CEC)" function is disabled, all the Anynet+ related operations are deactivated.
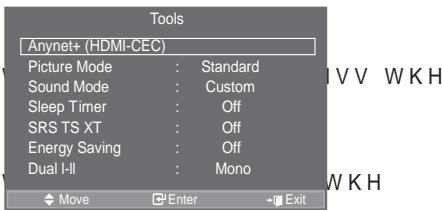
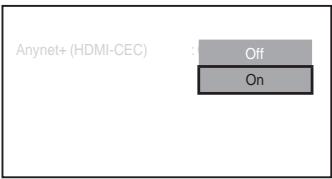
Turning an Anynet+ Device Off Automatically when the TV is Turned Off
- PreVV WKH x RU z EXWWRQ WR VHOHFW $XWR 7XUQ 2II WKHQ SUHVV the ENTERG' button.
2.3UHVVWKHXRUZEXYes"WheropressRhe/HOHFW
ENTERG button.
The Auto turn off function is enabled.
° If you select "No", the Auto turn off function is cancelled.
Press the EXIT button to exit.
The Select Device setting of the TV remote control is to be set to TV to use the Anynet+ function.
° If you set "Auto Turn Off" to "No", connected external devices are also turned off when the TV is turned off. However, if the device is recording, it may not be turned off.
Scanning and Switching between Anynet+ Devices
- Press the TOOLS button.
Then press the ENTER button to select "Anynet+(HDMI-CEC)".
- 3UHVVWKHXRUZ EXWWRQWRVHOHP the ENTERG button.
- 3UHVVWKHX Ruz EXWWRQ WR VHOHPress the ENTER button. It is switched to the selected device.
- ,I\RXFDQQRW 念 QGDGHYLFH\RXZDQ select"Setup",thenpress the ENTER@ button.
- 3UHVV WKH x RU z EXWWRQ WR VHOHP then press the ENTER button.
7 KH PHVVDJH & RQ JXULQJ \ q\ displayed.F When searching devices completes, the connected devices are listed in the Anynet+ menu.
Switching to the selected devices may take up to 2 minutes. You cannot cancel the operation during the switching operation.
° The time required to scan for devices is determined by the number of connected devices.
° When the device scan is complete, the number of found devices is not displayed.
^ Although the TV automatically scans devices when it is turned on using the POWER button, devices FRQQHFWHG ZKHQ WKH 79 LV RQRUXQGHUD VSHFL F FLUFXPVWDQF Therefore select "Searching Connections" menu to search devices.
° If you have selected external input mode by pressing the SOURCE button, you cannot use the Anynet+ function. Make sure to switch to an Anynet+ device by using the TOOLS button.
Anynet+ Menu
The Anynet+ menu changes depending on the type and status of the Anynet+ devices connected to the TV.
| Anynet+ Menu | Description |
| View TV | Switches from Anynet+ to TV broadcast mode. |
| Select Device | Your TV connects to the corresponding device. |
| Record | Starts a recording. (This menu works only for a device supporting recording.) |
| Menu on Device | Shows the menu of the connected device. Example. When a DVD Recorder is connected, the DVD Recorder's title menu appears. |
| Device Operation | Shows the play control menu of the connected device. Example. When a DVD Recorder is connected, the play control menu of the DVD Recorder appears. |
| Receiver | Sound is output through the receiver. |
| Setup | You can set the environment for using Anynet+. |
TV Remote Control Buttons Available in Anynet+ Mode
| Device Type | Operating Status | Available Buttons |
| Anynet+ Device | After switching to the device, when the menu of the corresponding device is displayed on the screen. | Numeric buttons x z { y ENTER☐ buttons Colour buttons EXIT button |
| After switching to the device, while playing a file | Backward search/ Forward search/ (Stop)/Play/ (Pause) | |
| Device with built-in T uner | After switching to the device, when you are watching a TV programme | P / button |
| Audio Device | When Receiver is activated | VOL / button MUTE button |
° The Anynet+ function only works when the remote control is set to TV.
° The button works only while in the recordable state.
You cannot control Anynet+ devices using the buttons on the TV. You can control Anynet+ devices only using the TV remote control.
The TV remote control may not work under certain conditions. In this case, re-select the Anynet+ device.
The Anynet+ functions don't operate for the products from other manufacturers.
In Anynet+ mode, the colour buttons may not work properly.
° The , operations may differ depending on the device.
Recording
You can make a recording of a TV programme using a recorder.
Press the button.
Recording begins. (Only when the Anynet+ enabled recording device is connected.)
The current TV programme is recorded in the Watching TV status. If you are watching video from another device, the video from the device is recorded.
° You can also record the source streams by selecting Record after pressing the TOOLS button.
Before recording, check whether the antenna jack is properly connected to the recording device. For the antenna connection to the recording device, refer to its user manual.
Listening through a Receiver
You can listen to sound through a receiver instead of the TV speaker.
- Press the TOOLS button. Then Press the ENTER button to select "Anynet+(HDMI-CEC)".
3UHVV WKHX Ruz EXWWRQ WR VHOHFW 5HFHLYHU WKHQ SUHVW ENTER button. - 3UHVVWKH{RU y EXWWRQ WR VHOH ENTER@ button.
Now you can listen to sound through the receiver. - Press the EXIT button to exit.
° When the receiver is set to On, you can listen to the TV sound through the 2-channel receiver.
° If the receiver is exclusively for a home theatre only (supporting audio only), it may not appear in the device list.
Only when you have connected the optical jack of the TV and the receiver properly, does Receiver work.
In case of a content with copyright problem, listening through the receiver may not properly operate.
^ , I WKHUH LV D SRZHU LQWHUUXSWLRQ WR WKH 79 ZKHQ WKH 35 HFHLJ SRZHU FRUG RUD SRZHU IDLOXUH W KIH ZKGH QSWRDNXW UQ DW KEH 79HRMQV (see page 24)
Check Points before Requesting Service
| Symptom | Solution |
| Anynet+ does not work. | v & K H F N L I W K H G H Y L F H L V D Q Q H W G H Y L F H 7 K HQ\Q H devices only. v & R Q Q H F W R Q O \ R Q H U H F H L Y H U v & K H F N L I W K H Q H W G H Y L F H S R Z H U F R U G L V S U R S H U O v & K H F N W K HQ\Q H W G H M D N H . . . . . . . . . . . . . . . . . . . . . . . . . . . . . . . . . . . . . . . . . . . . . . . . . . . . . . . . . . . . . . . . . . . . . . . . . . . . . . . . . . . . . . . . . . . . . . . . . . . . . v & K H F N Z K H W K H U Q H W + ' ', & ( & LV V H W WR 2 Q L Q W K H v & K H F N Z K H W K H U W K H 79 U H P R W H F R Q W U R O L V L Q 79 P R G H v & K H F N Z K H W K H U L W L VQ\Q H W H [F O X V L Y H U H P R W H F R Q W V Q H W G R H V Q J W Z R U N D (S h e a n h i g h t h m e d s , O p e f a r n Q G L W L R Q WISELINK, Plug & Play, etc.) v : K H Q F R Q Q H F W L Q J R H D M U H C P B A L P l e a s e / w h i c h sure to search devices again or restart your TV. v & K H F N L I W K HQ\Q H W ) X Q F W L R Q R I Q H W G H Y L F H L V v |
| I want to start Anynet+. | v & K H F N L I W K HQ\Q H W G H Y L F H L V S U R S H U O \ FR Q Q H F W H G Anynet+ (HDMI-CEC) is set to On in the Anynet+ Setup menu. v 3 U H V V T W D R K H button on the TV remote control to switch to TV. Then press the TOOLS button to show the Anynet+ menu and select a menu you want. |
| I want to exit Anynet+. | v 6 H O W F WTV in Anynet+ menu. v 3 U H V V S O U R G E button on the TV remote control and select a device other than Anynet+ devices. v 3 U H V V D P @/RCH LIST, PRE-CH, and such to change to the TV mode. (Note that the channel button operates only when a tuner-embedded Anynet+ device is not connected.) |
| The Connecting to Anynet+ device... message appears on the screen. | v <R X F D Q Q R W X V H W K H U H P R W H F R Q W U R O Z K H Q \ RX D U H F switching to a view mode. v 8 V H W K H U H P R W H F R Q W U R O Z K H Q W K H Q H W V H W L Q J complete. |
| The Anynet+ device does not play. | You cannot use the play function when Plug & Play is in progress. |
| The connected device is not displayed. | v & K H F N Z K H W K H U R U Q R W W K H G H Y L F H V X S S R U W VQ\Q H W v & K H F N Z K H W K H H D N R U 3 G a b l e s p r o p e l y connected. v & K H F N Z K H W K H U Q H W + '0, & ( & LV V H W WR 2 Q L Q W K H v 6 H D U F KQ\Q H W G H Y L F H V D J D L Q v <R X F D Q F R Q Q H F W D Q $Q\Q H W D I 1.8 C a b l e f o n l y S o n l e H D M I W K H cables may not support Anynet+ functions. v If it is terminated by an abnormal situation such as disconnecting the HDMI 1.3 cable or power cord or a power failure, please repeat the device scan. |
| The TV programme cannot be recorded. | Check whether the antenna jack on the recording device is properly connected. |
| The TV sound is not output through the receiver. | Connect the optical cable between TV and the receiver. |
Teletext Feature
Most television stations provide written information services via Teletext. The index page of the teletext service gives you information on how to use the service. In addition, you can select various options to suit your requirements by using the remote control buttons.
° For teletext information to be displayed correctly, channel reception must be stable. Otherwise, information may be missing or some pages may not be displayed.
- (exit)
Exit from the teletext display
2 (index)
Used to display the index (contents) page at any time while you are viewing teletext.
3 (store)
Used to store the teletext pages.
4 (size)
Press to display the double-size letters in the upper half of the screen. For lower half of the screen, press it again. To display normal screen, press it once again.
5 (reveal)
Used to display the hidden text (answers to quiz games, for example). To display normal screen, press it again.
6 (teletext on/mix)
Press to activate teletext mode after selecting the channel providing the teletext service. Press it twice to overlap the teletext with the current broadcasting screen.
7 (mode)
Press to select the teletext mode (LIST/FLOF). If you press it in the LIST mode, it switches into the List save mode. In the List save mode, you can save teletext page into list using the (store) button.
8 (sub-page)
Used to display the available sub-page.
9 (page up)
Used to display the next teletext page.
0 (page down)
Used to display the previous teletext page.
(hold)
Used to hold the display on a given page if the selected page is linked with several secondary pages which follow on automatically. To resume, press it again.
(@ cancel)
Used to display the broadcast when searching for a page.
Colour buttons (red/green/yellow/blue)
If the FASTEXT system is used by a broadcasting company, the different topics covered on a teletext page are colour-coded and can be selected by pressing the coloured buttons. Press one of them corresponding to the required. The page is displayed with other coloured information that can be selected in the same way. To display the previous or next page, press the corresponding coloured button.
- You can change teletext pages by pressing the numeric buttons on the remote control.
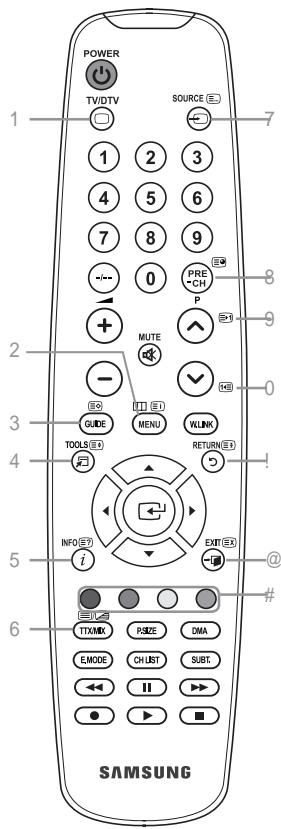

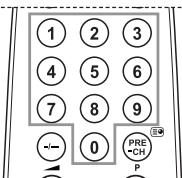
The teletext pages are organized according to six categories:
| Part | Contents |
| A | Selected page number. |
| B | Broadcasting channel identity. |
| C | Current page number or search indications. |
| D | Date and time. |
| E | Text. |
| F | Status information. |
| FASTEXT information. |
Teletext information is often divided between several pages displayed in sequence, which can be accessed by:
Entering the page number
Selecting a title in a list
Selecting a coloured heading (FASTEXT system)
Press the TV/DTV button to exit from the teletext display.
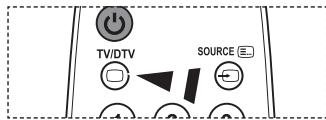
Auto Wall-Mount (Sold separately)
Once the auto wall mount is installed, your TV's position can be easily adjusted.
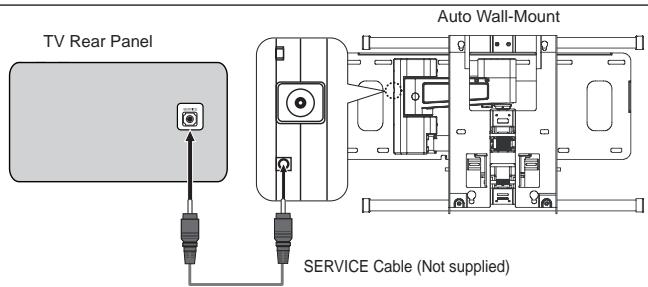
Entering the menu
- 3UHVWWKHXZ {RUyEXWWRQRQ\R
The Auto Wall-Mount screen is displayed.
° If the Auto Wall-Mount screen is not displayed when clicking on a direction button while watching your TV, use the menu to display that screen.
- Press the MENU butt on to display the menu. 3UHVVWKHXRUZEXWWRQWRVHO ENTER@ button.
$3UHVVWKHX R UZ EXAutoWBIOMowR' VW KHW'press the ENTER button.
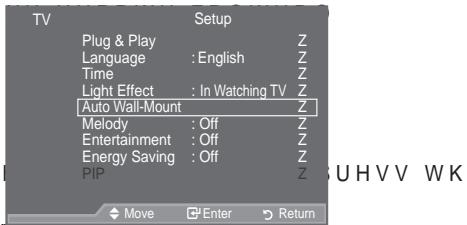
Remembering the Position
- $GMXVW WR WKH GHVLUHG SRVLWLRQ
° If you press an arrow button when no OSD is displayed on the TV screen, the Adjustment screen appears.
Press the INFO EXWWRQ WR UHVW 3UHV VHOHFW ^3 < HV' WIKTHERG'Suttdn/V WKH The position is initialized to the default setting.
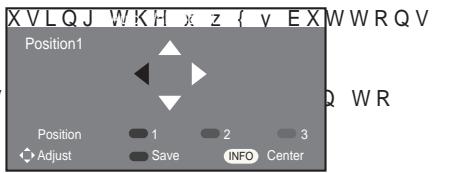
- Press the blue button.
3 UHVV WKH x DQG z EXWWRQV WR VHC Position 1, Position 2 or Position 3 in order to save the current position.
° To not save the current position, press the RETURN button.
° When selecting a save mode, you cannot use the Colour buttons.
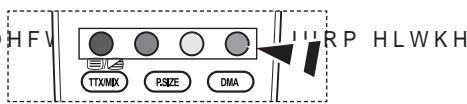
- Press the ENTER按钮 to save.
° When Position1 is selected, the message "Current position saved as Position1" is displayed.
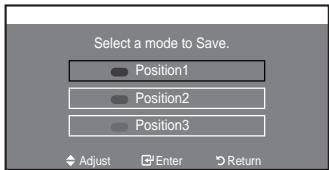
- Press the ENTER button.
The saved Position appears on the left side of the OSD.
Moving to the remembered position
-
&RPSOHWH 6WHS RI ^3 (QWHULQJ WKH
-
Pressing a Colour (Red, Green, Yellow) button moves the auto wall mount to the saved position.
-
You can move the wall mount to one of the 3 pre-set positions by pressing the Red (Position 1), Green (Position 2) or Yellow (Position 3) buttons.
If you adjust the position after moving to a pre-set position, the position display will disappear.
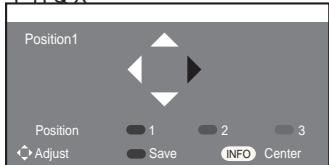
PHQX
° For installation, refer to the Installation Manual provided with the wall mount.
For product installation and the installation and moving of the wall mount, make sure to consult a specialized installation company.
This installation manual is to be used when attaching the wall mount to a wall. When attaching to other building materials, please contact your nearest dealer.
° The auto wall mount will not work when Anynet+ and WISELINK are operating.
37, 40 and 46 inch models are not compatible with the old electrically powered wall mount model (WMN5090A*).
Using the Anti-Theft Kensington Lock (depending on the model)
7KH . HQVLQJWRRQ ORFN LV D GHYLFH XVHG WR SSKJ\V WNF QCD S K EOKLF V\VVW place. The appearance and locking method may differ from the illustration depending on the manufacturer. Refer to the manual provided with the Kensington lock for proper use. The locking device has to be purchased separately.
- Insert the locking device into the Kensington slot on the LCD TV (Figure 1), and turn it in the locking direction (Figure 2).
- Connect the Kensington lock cable.
- Fix the Kensington lock to a desk or a heavy stationary object.
The place of the Kensington Lock may be different depending on its model.
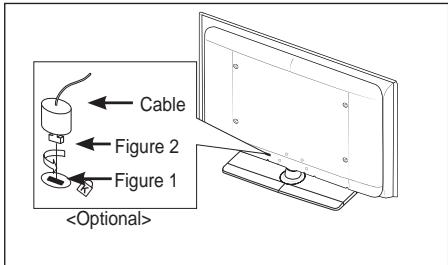
Troubleshooting: Before Contacting Service Personnel
| No sound or picture | #Check that the mains lead has been connected to a wall socket. #Check that you have pressed the Ⓞ button on your set. #Check the picture contrast and brightness settings. #Check the volume. |
| Normal picture but no sound | #Check the volume. #Check whether the MUTE button has been pressed on the remote control. #Check if "TV Speaker" is on |
| Screen is black and power indicator light blinks steadily | #On your computer check; Power, Signal Cable. #The TV is using its power management system. #Move the computer's mouse or press any key on the keyboard. |
| No picture or black and white picture | #Adjust the colour settings. #Check that the broadcast system selected is correct. |
| Sound and picture interference | #Try to identify the electrical appliance that is affecting the set and move it further away. #Plug your set into a different mains socket. |
| Blurred or snowy picture, distorted sound | #Check the direction, location and connections of your aerial. This interference is often due to the use of an indoor aerial. |
| Remote control malfunctions | #Replace the remote control batteries. #Clean the upper edge of the remote control (transmission window). #Check the battery terminals. |
| "Check signal cable." message is displayed | #& K H F N W K D W W K H V L J Q D O F D E O H L V i U P O \ F #Check that the PC or video sources are turned on. |
| On PC mode, "Not Supported Mode." message is displayed | #Check the maximum resolution and the frequency of the video adaptor. #Compare these values with the data in the Display Modes. |
| The damaged picture appears in the corner of the screen | If "Just Scan" is selected in some external devices, the damaged picture may appear in the corner of the screen. This symptom is caused by external devices, not TV. |
| The "Reset all settings to the default values" message appears. | This appears when you press and hold the EXIT button for a while. The product settings are reset to the factory defaults. |
The TFT LCD panel uses a panel consisting of sub pixels (6 220 800) which require sophisticated technology to produce. However, there may be few bright or dark pixels on the screen. These pixels will have no impact on the performance of the product.
| Model Name | LE32A556 | LE37A556 | LE40A556 |
| Screen Size (Diagonal) | 32 inch | 37 inch | 40 inch |
| PC Resolution | 1920 x 1080 @ 60 Hz | 1920 x 1080 @ 60 Hz | 1920 x 1080 @ 60 Hz |
| Sound Output | 10 W X 2 | 10 W X 2 | 10 W X 2 |
| Dimensions (WxDxH) | |||
| Body | 865 x 79 x 500 mm | 984 x 87 x 572 mm | 1058 x 91 x 608 mm |
| With stand | 865 x 220 x 561 mm | 984 x 240 x 637 mm | 1058 X 240 X 672 mm |
| Weight | |||
| With stand | 14 kg | 18 kg | 19 kg |
| Environmental Considerations | |||
| Operating Temperature | 10 °C to 40 °C (50 °F to 104 °F) | ||
| Operating Humidity | 10 % to 80 %, non-condensing | ||
| Storage Temperature | -20 °C to 45 °C (-4 °F to 113 °F) | ||
| Storage Humidity | 5 % to 95 %, non-condensing | ||
| Stand Swivel (Left / Right) | \(\hat{U}\ \hat{a}\ \hat{U}\) | ||
| Model Name | LE46A556 | LE52A556 | |
| Screen Size (Diagonal) | 46 inch | 52 inch | |
| PC Resolution | 1920 x 1080 @ 60 Hz | 1920 x 1080 @ 60 Hz | |
| Sound Output | 10 W X 2 | 10 W X 2 | |
| Dimensions (WxDxH) | |||
| Body | 1186 x 111 x 686 mm | 1330 x 120 x 779 mm | |
| With stand | 1186 X 260 X 749 mm | 1330 X 291 X 842 mm | |
| Weight | |||
| With stand | 27 kg | 33 kg | |
| Environmental Considerations | |||
| Operating Temperature | 10 °C to 40 °C (50 °F to 104 °F) | ||
| Operating Humidity | 10 % to 80 %, non-condensing | ||
| Storage Temperature | -20 °C to 45 °C (-4 °F to 113 °F) | ||
| Storage Humidity | 5 % to 95 %, non-condensing | ||
| Stand Swivel (Left / Right) | \(\hat{U}\ \hat{a}\ \hat{U}\) | ||
| Model Name | LE32A557 | LE37A557 | LE40A557 |
| Screen Size (Diagonal) | 32 inch | 37 inch | 40 inch |
| PC Resolution | 1920 x 1080 @ 60 Hz | 1920 x 1080 @ 60 Hz | 1920 x 1080 @ 60 Hz |
| Sound Output | 10 W X 2 | 10 W X 2 | 10 W X 2 |
| Dimensions (WxDxH) | |||
| Body | 801 X 88 X 526 mm | 918 X 92 X 608 mm | 997 X 92 X 641 mm |
| With stand | 801 X 252 X 574 mm | 918 X 300 X 650 mm | 997 X 300 X 686 mm |
| Weight | |||
| With stand | 13 kg | 18 kg | 21 kg |
| Environmental Considerations | |||
| Operating Temperature | 10 °C to 40 °C (50 °F to 104 °F) | ||
| Operating Humidity | 10 % to 80 %, non-condensing | ||
| Storage Temperature | -20 °C to 45 °C (-4 °F to 113 °F) | ||
| Storage Humidity | 5 % to 95 %, non-condensing | ||
| Stand Swivel (Left / Right) | \(\hat{U}\ \hat{a}\ \hat{U}\) | ||
| Model Name | LE46A557 | LE52A557 | |
| Screen Size (Diagonal) | 46 inch | 52 inch | |
| PC Resolution | 1920 x 1080 @ 60 Hz | 1920 x 1080 @ 60 Hz | |
| Sound Output | 10 W X 2 | 10 W X 2 | |
| Dimensions (WxDxH) | |||
| Body | 1127 X 100 X 716 mm | 1269 X 109 X 806 mm | |
| With stand | 1127 X 280 X 767 mm | 1269 X 326 X 857 mm | |
| Weight | |||
| With stand | 28 kg | 32 kg | |
| Environmental Considerations | |||
| Operating Temperature | 10 °C to 40 °C (50 °F to 104 °F) | ||
| Operating Humidity | 10 % to 80 %, non-condensing | ||
| Storage Temperature | -20 °C to 45 °C (-4 °F to 113 °F) | ||
| Storage Humidity | 5 % to 95 %, non-condensing | ||
| Stand Swivel (Left / Right) | \(\hat{U}\ \hat{a}\ \hat{U}\) | ||
| Model Name | LE32A558 | LE37A558 | LE40A558 |
| Screen Size (Diagonal) | 32 inch | 37 inch | 40 inch |
| PC Resolution | 1920 x 1080 @ 60 Hz | 1920 x 1080 @ 60 Hz | 1920 x 1080 @ 60 Hz |
| Sound Output | 10 W X 2 | 10 W X 2 | 10 W X 2 |
| Dimensions (WxDxH) | |||
| Body With stand | 801 X 88 X 514 mm801 X 252 X 574 mm | 918 X 92 X 592 mm918 X 300 X 650 mm | 997 X 92 X 628 mm997 X 300 X 686 mm |
| Weight With stand | 13 kg | 18 kg | 21 kg |
| Environmental Considerations | |||
| Operating Temperature Operating Humidity Storage Temperature Storage Humidity | 10 °C to 40 °C (50 °F to 104 °F)10 % to 80 %, non-condensing-20 °C to 45 °C (-4 °F to 113 °F)5 % to 95 %, non-condensing | ||
| Stand Swivel (Left / Right) | \(\hat{U}\ \hat{a}\ \hat{U}\) | ||
| Model Name | LE46A558 | LE52A558 | |
| Screen Size (Diagonal) | 46 inch | 52 inch | |
| PC Resolution | 1920 x 1080 @ 60 Hz | 1920 x 1080 @ 60 Hz | |
| Sound Output | 10 W X 2 | 10 W X 2 | |
| Dimensions (WxDxH) | |||
| Body With stand | 1127 X 100 X 700 mm1127 X 280 X 767 mm | 1269 X 109 X 791 mm1269 X 326 X 857 mm | |
| Weight With stand | 28 kg | 32 kg | |
| Environmental Considerations | |||
| Operating Temperature Operating Humidity Storage Temperature Storage Humidity | 10 °C to 40 °C (50 °F to 104 °F)10 % to 80 %, non-condensing-20 °C to 45 °C (-4 °F to 113 °F)5 % to 95 %, non-condensing | ||
| Stand SWivel (Left / Right) | \(\hat{U}\ \hat{a}\ \hat{U}\) | ||
| Model Name | LE32A559 | LE37A559 | LE40A559 |
| Screen Size (Diagonal) | 32 inch | 37 inch | 40 inch |
| PC Resolution | 1920 x 1080 @ 60 Hz | 1920 x 1080 @ 60 Hz | 1920 x 1080 @ 60 Hz |
| Sound Output | 10 W X 2 | 10 W X 2 | 10 W X 2 |
| Dimensions (WxDxH) | |||
| Body With stand | 801 X 88 X 524 mm801 X 252 X 574 mm | 918 X 92 X 601 mm918 X 300 X 650 mm | 997 X 92 X 638 mm997 X 300 X 686 mm |
| Weight With stand | 13 kg | 18 kg | 21 kg |
| Environmental Considerations | |||
| Operating Temperature Operating Humidity Storage Temperature Storage Humidity | 10 °C to 40 °C (50 °F to 104 °F)10 % to 80 %, non-condensing-20 °C to 45 °C (-4 °F to 113 °F)5 % to 95 %, non-condensing | ||
| Stand Swivel (Left / Right) | \(\hat{U}\ \hat{a}\ \hat{U}\) | ||
| Model Name | LE46A559 | LE52A559 | |
| Screen Size (Diagonal) | 46 inch | 52 inch | |
| PC Resolution | 1920 x 1080 @ 60 Hz | 1920 x 1080 @ 60 Hz | |
| Sound Output | 10 W X 2 | 10 W X 2 | |
| Dimensions (WxDxH) | |||
| Body With stand | 1127 X 100 X 710 mm1127 X 280 X 767 mm | 1269 X 109 X 800 mm1269 X 326 X 857 mm | |
| Weight With stand | 28 kg | 32 kg | |
| Environmental Considerations | |||
| Operating Temperature Operating Humidity Storage Temperature Storage Humidity | 10 °C to 40 °C (50 °F to 104 °F)10 % to 80 %, non-condensing-20 °C to 45 °C (-4 °F to 113 °F)5 % to 95 %, non-condensing | ||
| Stand SWivel (Left / Right) | \(\hat{U}\ \hat{a}\ \hat{U}\) | ||
Design and specifications are subject to change without prior notice.
This device is a Class B digital apparatus.
° For the power supply and Power Consumption, refer to the label attached to the product.
© 2008 Samsung Electronics Co., Ltd. All rights reserved.
Sommaire
BRANCHEMENT ET INSTALLATION DE VOITRE TELEVISEUR
Installation du support mural
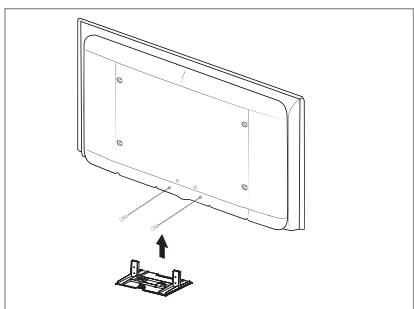
SHUPHWWHQW GH [HU OH WpOpYLVHXU DX
(QOHYH] OH VXSSRUW ERXFKH] OfRULi
G HyaT-BaTeF/U L RQV GHYR WUH
&RQQHFWH]XQ SpULSKpULTXH GH VWRFNDJH GH PDVVH 86% SRXUDI FKH GHV FKLHUV DXGLR 03
8 S-VIDEO ou VIDEO / R-AUDIO-L
0 AUDIO OUT[R-AUDIO-L]
DIGITAL AUDIO OUT (OPTICAL)
/H FkEOH UHOLp DX VHFWHXU HVW [p j OQUULqUH GX WpOpYLVHXU PR
Q +'0, &(& 5HSRUWH] YRXV DX[#ORGH ,PDJH 5HSRUWH] YRXV DX[ SDJHV#ORGH 6RQ 5HSRUWH] YRXV DX[ SDJHV#9HLOOH 5HSRUWH] YRXV DX[ SDJHV#656 76 ;7 5HSRUWH] YRXV DX[ SDJHV#ORGH pFR 5HSRUWH] YRXV DX[ SDJHV#XDO O OO 5HSRUWH] YRXV DX[ SDJHV#3,3 5HSRUWH] YRXV DX[ SDJHV#5pJODJHXWRPDWLTXH 5HSRUWH] YRXV

Plug & Play
9RXV SRXYH] FKHUFKHU OHV SODJHV GH IUpTXHQFH GLVSRQLEOHV SDUGHYRWUH SD\V
° /D EDUUH GH VpOHFWLRQ VfDI fFKH
$SSX\H] VX OHERXWRQ x RX z SRXU VpOHHHFJWML'RRQX PH%OCHDX 'FB XQ HGHU
PRGL;HU $SSX\H] ENTERGH ERXWRQ
$SSX\H] VXU OHERXWRQ{RX y SRXU UpGXLUH RXVSEFQXHHU OD
9RXV SRXYH] UpJOHU OD WHPSpUDWXUH GHV FRXOHXUV SRXU TXH FHC
M 5RXJH M 9HUW M % OHX '5 HJO '5R/ADJ HP RSGI QF DYMHURMQ 5GHJ YEDCHHX L
/D PRGLfDWLRQ GHY YDOHXUV GH UpJODJH SHUBHWU WKBOLVHU
5HLQLWLDOLVDWLRQ GHV SDUDPqWUHV G¶LPDJH j
9RXV SRXYH] UplQLWLDOLVHU OD YDOHXU sDU GpiDxwGhV SDUDPqWUH
d'image.
°/D IRQFWLRQ 35pLQLWLDOLVHU' HVW FRQjXUpHSRXU WRXV OHVP
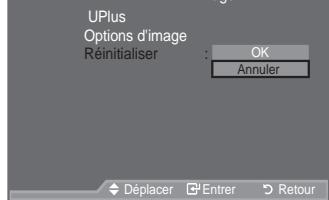


&RQ;JXUDWLRQ GH OQRSWLRQ 3LFWXUH
9RXV SRXYH] VpOHFWLRQQHU OD WDLOOH TV PRILTV SRSQG OH
PLHX[j YRV EHVRLQV GJDI FKDJH
6pOHFWLRQQH]OJRSWLRQ UHTXLSUHQ
SXLVDSSX\H]VENTERERERXWRQ
/RUVTXH YRXV rWHV VDWLVIDLW GH OD
bouton ENTERG
9RXV SRXYH] VpOHFWLRQQHU OD QXDQ
DX UHJDUG
° /HV YDOHXUV UpJOpHV VRQW PpPRULVpHV HQ IRQFWLRQ GX PRGH ,I
° 3&KDXGH ' RX 3&KDXGH ' HVW DFWLYp XQLTXHPHIQ WXORL<OphD'HP
7DLOOH DXWR =RRP ODUJH =RRP 6FDQ XQLTXHPHQW
9RXV SRXYH] VpOHFWLRQQHU OD WDLOOH GJLPDJHTXL FRUUHVSRQG

° /DIRQFWLRQ 3 DXWR' HVW XQLTXHPHQ W GLVSRQ$E'OHWHG PRGRH379
° (Q PRGH 3& VHXOV OHV PRGHV 3 ' HW 3 ' SHXYHQW rWUH VpOHFWLR
° 9RXV SRXYH] HIIHFWXHU GHV UpJODJHV SRXU FKDTXHDSSDUHLO H[WHU OHV HQUHJLVWUHU
8QH UpPDQHQFH WHPSRUDLUH SHXW VH SURGXLUH SHRQG M WROXHV RDX F GHXI KHXUHV VXU OqFUDQ GX WpOpYLVHXU
3=RRP ODUJH 'pSDFH]O'LPDJY HUV OH KDXW RX qVHDVRQHUEDV jOqVpOHFV RQQDSSX\DWQW VXUENHEGXWRQyRX
=RRP 6pOHWEWQRQDSX\DQW VXU OHERXRWXR{RX y 8WLOLVH}OHER) OJLPDJH HQ KDXWH HW HQ EDV$SUNVODVRLUPeCRXFWRLQORQOPx z SRXUDJU UpGXLUH OD KDXWHX UGH OJLPDJH
° /RUVTXH OH PRGH RXEΦHpWp GpQL VXU 3,3 OH SDUDPqWUH 3LFWXUH QHSXW SDV rWUH UpJOp
° $SUqV DYRLU VpOHFWLRQQp OfRSWLRQ 36FDQ XQLTHXP RWSRWD WGH + L S6pOHFWERQDLGH GX ERXWRQ { RX y 8WLOLVH} OH ERXW GpsODFHU OLPDJH 5pLQLWLDOLVHU DSSX\H] VXU OH ERXWRQ { RX y SRXU QpOHFWLRQ ENTERG 9RXV SRXYH] LQLWLDOLVHU OH UpJODJH
9RXV SRXYH] VpOHFWLRQQHU FHV RSWERQ
sur le bouton 3 6, = ( G H Y R W U H W p O p F R P P D Q G H
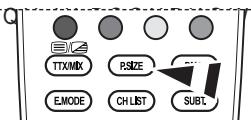

4:3:5qJOH O¶LPDJH HQ PRGH 1RUPDO F¶HVW j GLUH HQ
R 'H F HW P P H L S H P H Q W
5pJODJH HW DI FKDJH GH O KHXUH DFWXHO
9RXV SRXYH] UpJOHU OJKRUORJH GX WpOOKHXUH DFWXHOOH VDI FKH ORUVTXH,1)2 9RXV GHY] pJDOPHQW UPJOHU Outiliser les minuteurs de mise sous/hors tension.

0LVHV HQ PDUFKH HW DUUrW DXWRPDWLTXH
0pORGLH 'LYHUWLVVHPHQW ORGH pFR
0RGH pFR UUrW %DV 0R (OHYpXWR
0RGH 6RXV W L W J H M Alentendants
Format Audio PCM/Dolby Digital
Description audio Description audio Arrêt, Marche Volume
9RXV SRXYH] PHWWUH j MRXU OD OLVWH O#pPHWWHXU DMRXWH GH QRXYHDX[ VHU YRWUH WpOpYLVHXU
9LVXDOLVDWLRQ GH WRXV OHV FDQDX[ HW G
'DQV OH PHQX (3* YRXV SRXYH] DI FKHU FDQDX[ IDYRULV
9RXV SRXYH] UpJOHU OD WUDQVSDUHQFH
° 3(QWUHU OH QRXYHDX FRGH 3,1' V9D
° /H PHVVDJH 3&RQ UPHU 1RXYHDX &RQ
LSDU WULEXHU FHVVDLUH
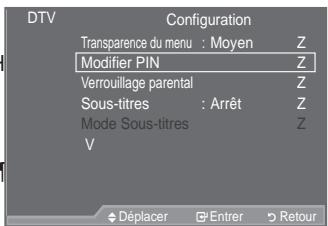
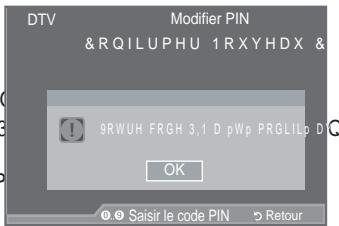
&RQ JXUDWLRQ GHV VRXV WLWUHV
9RXV SRXYH] DFWLYHU RX GpVDFWLYHU
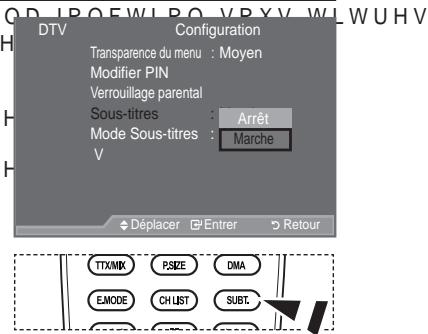
- $ S S X\H] VXU O H E R X W R Q { RX y S R X U convient.
9RXV SRXYH] YLVXDOLVHU OHV LQIRUPDV
SURGXLW 3RXU WRXWH LQWHUYHQWLRQ
FRQWDFWHU XQ UHYHQGHXU 6DPVXQQJDJ
9RXV SRXYH] UDPHQHU WRXV OHV UpJOD YDOHXU SDU GpIDXW
&RQ;JXUDWLRQ GX WpOpYLVHXU DYHF OH 38
'XUDQW OH GLDSRUDPD OHV FKLHUV V DI FKHQW GDQV O RUGUH SDUWLUG X FKLHU o pFUDQ
° 'HV fK L H U V 03 SHXYH Q W r W U H GL I X V n V D X W R P D W L T X H P Q W SHQGDQ W O H GLD S R U D P D V L O R S W I G P X V L F D G H W D F W L Y 3RXU D F W L Y H U F H W H I R Q F W L R Q O N E O Quirer H U V 0.5 INFO HW OHV SKRWI
6 pOHFWLRQQH] FHWHRSWLRQ SRXUPR diaporama.
6pOHFWLRQQH] FHWWH RSWLRQ SRXU OLUH OHV fKLFHUV 03
V'VXUH' YRX' TXH O'DSSDUH'LO9 FRQQHFw'p DX WpOpYLVHXU SRUWH
&RQQH[LRQ GLUHFWD X WpOpYLVHXU
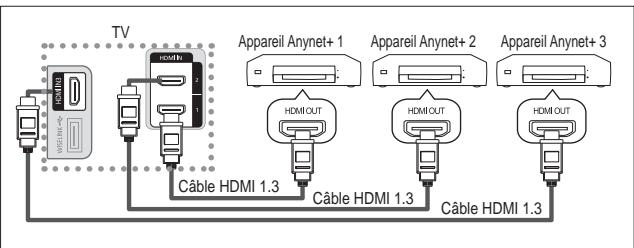
&RQ ijXUDWLRQ G $Q\QHW
/HV IRQFWLRQV G$Q\QHW HPSORLHQW OHV UpJODJHV VXLYDQWV
([WLQFWLRQ DXWRPDWLTXH G\Q DSSDUHLO $Q\QHW ORUVTXH OH WpOpYL\
(FRXWH YLD XQ UpFHSWHXU
/H VRQ SHXw rWUH pPLV SDU OllLQWHUPpGLDLUHGX WOuPfLVSHHXU DX OL
VXU OHERX|WRQ {RXy SXLV
- 5pJOH] j OD SRVLWLRQ VRXKDLWpH j
6 L YRXV DSSX\H] VXU XQH WRXFKH A PHQX 26' QHVW DI 己 FKp VXU O pFUD UpJODJH V 己 FKH
© 2008 Samsung Electronics Co., Ltd. All rights reserved.
Inhalt
6LH GLH 6FKDOWAIFKHQ
0 AUDIO OUT [R-AUDIO-L]
DIGITAL AUDIO OUT (OPTICAL)
RUPDW $XWRP %UHLW %UHLWHQ]RRP = RRP 1XU6FDQ
6LH N|QQHQ HLQ %LOGIRUPDW DXVZIKOHQ GDV ,KUHQ VHKJHZRKQKHL
$X WRP %LMLV LHVHU 2SWLRQ VWOOHQ 6LH GDV %LOGIRUPDW DXWRPDV
ein.
:IKOHQ 6LH GLHVH 2SWLRQ DXV XP DOV %LOGIRUPDW GDV 6HLWHQYJ
$Q HLJHQ YRQ '9'V XQG)HUQVHKVHQGXJHQ LP %UHLWELOGIRUPDW
%UHLWHQ]RRP 'LHVH 2SWLRQ YHUJU%Huw GDV %LOG DXIPHKU DOV
=RRP.IKOHQ 6LH GLHVH 2SWLRQ DXV XP GDV %UHLWELOG DXI GLH YR
'LHV LVW GLH 6WDQGDUGHLQVWHOOXQJ'XP $Q HLJHQ YRQ 9LGHRV XG
1XU 6FDOW GLHVHU)XQNWLQR ZLUG GDV JDQJH %LOG DXFK EHL 9HUVRUJ
RGHU .RPS L S YROOVWIQGLJ XQG RKQH %HVFKQHLGXQJD
° 'LH )XQNWLQR 3$XWRP %UHLW' LVW QXULQ GHQGGB9ZLGHR'79 ' YHUI•JEDU
° , P 3& ORGXV NIQQHQ QXU GLH ORGL³ ‘ XQG³ ‘ HLQJHVWHOOW ;
6LH N|QQHQ GLH (LQVWHOOXQJHQ I·UMGHV H[WHGUHQ CHUHQLQV (LQJDQJ GHV)HUQVHKJHUIWVDQJHVFKORVVHQ KDEHQ
° (VNDQQ]X YRU·EHUJHKHQGHU %LOGNRQVHUYLHWXPQHK NFDROPVHZHLG 6WXQGHQ ODQJ HLQ XQEHZHJWHV %LOG DQJHHLJW KDEHQ
‰ UHLWHQ]RRP 9HUVFKLHEHQ 6LH GDV %LOG PL@n@CHQ 7DVWHQ x XQWHQ QDFKGHP 6LH PLENTER@JHIDQ/HW $XWZ@HK@ JHWURIIHQ KDEHQ
=RRP :IKOQD8XLH LQGHP 6LH GLH 7DVWH {RGHU y GU•FNHQ 0LW N|QQHQ 6LH GDV %LOG QDFK REHQ RGHU QD KQCOFW HJHW B MIFIKUHLE $XVZDKO GLH 7DVWHQ x RGHU z XP GDV %LOG LQ YHUWLNDOHU 5L verkleinern.
° :HQQ GHU 0RGXV [P] R X E O H P 3,3 0RGXV HLQJHVWHOOW ZXUGH N|QQ %LOGJU|‰H QLFKW IHVWOHJHQ
1DFK $XVZDKO YRQ 31XU 6FDQ' LP 0RGXV +'0, L S RGHU .RPS Wahlen Sie GXUFK 'U·FNHQ GHU 7DVWH { RGHU y DXV 0LW GHQ 7DVW 6LH GDV %LOG YHUVFKLHEHQ 5HVWKOHQ 6LH 35HVHW' PLW GHQ 7DVWH { RENTER#tstecken Sie dann di 6LH N|QQHQ GLH (LQVWHOOXQJ LQLWLDOLVLHUHQ
LHVH 2SWLRQHQ NJQQHQ 6LHDXFKGXUF 36,=(DXIGHU)HUQEHEGLHQXQJDXIUXHFQ
Deutsch - 20

i $Q]HLJH YRQ 9LGHRWH[WRGHU '9%
i:LHGHUJDEHVSSUDFKH
14:30 Sa1 Sep
1 AFDO,16:9
AFDO 16:9
Sperre aus
SD
Stereo
Untertitel
English
Beenden
Alle Kanäe A
14:30-14:33
Contains video with AFD O; coded frame
is 16:9
DXVJXZIKOHQ 6FKQHOO 1RUPDO
© 2008 Samsung Electronics Co., Ltd. All rights reserved.
Inhoud
UWTV/MONITOR AANSLUITEEN EN GEBRUISKLAAR MAKEN
0 AUDIO OUT[R-AUDIO-L]
DIGITAL AUDIO OUT (OPTICAL)
i 'UXN RSGH WRHWV x RI'z RP KHW IRHNHQ WH VWDUWHQ
i'H WXQHU VFDQWKHW IUHTXHQWLHEHUHLN WRWG DW KHW HHUVWH beeld komt.
* HGHWDLOOHHUGH EHHOGLQVWHOOLOJHQ FF
xvYCC:Uit/Aan
'H RSWLH %HHOG FRQ JXUHUHQ
Film plus: Uit/Laag/Middel/Hoog/Demo
Picture in Picture (PIP)
° 'H79 VFKDNHOW DXWRPDWLVFK RYHUR EHUHLNW
XN
JGH WLPI
Eenvoudig in te stellen
i :DQQHHU GH WY ZRUGW XLWJHVFKDNHOG YLD GH VODDSWLPHU
Entertainment: Uit/Sport/Film/Spelcomputer
i /HHIWLMGVEHSHUNLQJ
19LGHRW\SH 6' +' 5DGLR
17\SHJHOXLG 0RQR 6WHUHR 'XDO
i % HVWDDQ YDQ WHOHWNW R I '9%
i *HVSURNHQ WDDO

14:30 Za1 Sep
Alle kanalen
14:30-14:33
1 AFDO,16:9
AFDO 16:9
Blokk.uit
SD
Stereo
Ondertiteling
Engels
Sluiten
De EPG-informatie (elektronische programmagids) weergeven
‡ Handmatige upgrade
'UXN RSGH WRHWV x RI z RP KHW JHZ
'HPS LQGHOLQJ YDQ :LVHOLQN RQGHUVWHXQW DPOSHIQBNUHMEBWWE (32 kHz, 44.1 kHz of 48 kHz).
:LM EHYHOHQ JHEUXLN YDQ GH VHTXHQLHO MSHJ LQGHOLQJ DDQ 3U geheugen, en het decoderen ervan kan fouit gaan.
- 6WHOGH JHZHQVWH SRVLWLH LQ PHW
© 2008 Samsung Electronics Co., Ltd. All rights reserved.


0 AUDIO OUT[R-AUDIO-L]
DIGITAL AUDIO OUT (OPTICAL)
& Indice Teletext
Mantieni Teletext
a Annulla Teletext
DXGLRGXDQ

° 8QD YROWD PRGL‡FDWR LO YDORUH OR VFKHUPR YLHQH DXWRPDV
Migliora imm bordi: Spento/Acceso
DNIleTM (motore Digital Natural Image)
Melodia/Entertainment/Risp. energia
6H LO WHOHYLVRUH QRQ HPHWWD OFXQ VXNRUE VLJQLf FD FKH q 6H LO WHOHYLVRUH QRQ HPHWWD OFXQ VXRQ/Blumid.JQLf FD FKH q
17LSRGLYLGHR 6' +5DGLR
7LSRGLDXGLR 0RQR6WHUHR 'XD
i3UHVHQ]DGL7HOHW[WRVRWWRR
i/LQJXD GHOQJDXGLR
14:30 Sab1 Set
1 AFDO,16:9
AFDO 16:9
Sbloccato
SD
Stereo
Sottitolo
Inglese
WDVWR
Tutti Canali
14:30-14:33
Contains video with AFD O; coded frame
is 16:9
y0RGLfFOGLfFDODSURJUDPPD]LRQH
É SRVVLELOH PRGL FDUH OD OLQJXD SU e teletext.
G Fucicn&teletexto 61
DVI IN (HDMI2) [R-AUDIO-L]
0 AUDIO OUT [R-AUDIO-L]
DIGITAL AUDIO OUT (OPTICAL)
Alternatively, you can choose to use the number of channels directly. For example, you could use a single channel for each channel.
6 LVW HGHRDRO WWRPIWLFR 3/6(0 176&
i 3XOVH ORV ERWRQHV x R z SDUD VHOHFFLRQDU HO HVWiQGDU GH F
6 LVW HGRQ L%R ., /
í 3XOVH ORV ERWRQHV x R z SDUD VHOHFFLRQDU HO HVWiQGDU GH V
Restablecer ( O E D O D Q F H G H E O D Q F R D Q W H U L R U P H Q W H D M X V WLDGGRV VGHU H V
fábrica.
GHOWURD]XOTXHVHXVDSDUDDMXVWDUHORPRROHSUIKXPFDMRLU HMA
If you have any questions or comments relating to Samsung products,
please contact the SAMSUNG customer care centre.
| Country | Customer Care Centre® | Web Site |
| AUSTRIA | 0800-SAMSUNG (726-7864) | www.samsung.com/at |
| BELGIUM | 0032 (0)2 201 24 18 | www.samsung.com/be |
| CZECH REPUBLIC | 844 000 844 | www.samsung.com/cz |
| Distributor pro Českou republiku:Samsung Zrt., Česka organizačné složka Vyskočilova 4, 14000 Praha 4 | ||
| DENMARK | 70 70 19 70 | www.samsung.com/dk |
| EIRE | 0818 717 100 | www.samsung.com/ie |
| FINLAND | 030-6227 515 | www.samsung.com/fi |
| FRANCE | 3260 SAMSUNG (€ 0,15/Min)08 25 08 65 65 (€ 0,15/Min) | www.samsung.com |
| GERMANY | 01805 - SAMSUNG (726-7864) (€ 0,14/Min) | www.samsung.com |
| HUNGARY | 06-80-SAMSUNG (726-7864) | www.samsung.com |
| ITALIA | 800-SAMSUNG (726-7864) | www.samsung.com |
| LUXEMBURG | 0035 (0)2 261 03 710 | www.samsung.com/be |
| NETHERLANDS | 0900-SAMSUNG (726-7864) (€ 0,10/Min) | www.samsung.com/nl |
| NORWAY | 815-56 480 | www.samsung.com/no |
| POLAND | 0 801 801 881022-607-93-33 | www.samsung.com/pl |
| PORTUGAL | 80820-SAMSUNG (726-7864) | www.samsung.com/pt |
| SLOVAKIA | 0800-SAMSUNG (726-7864) | www.samsung.com/sk |
| SPAIN | 902 10 11 30 | www.samsung.com |
| SWEDEN | 0771-400 200 | www.samsung.com/se |
| SWITZERLAND | 0800-SAMSUNG (726-7864) | www.samsung.com/ch |
| U.K | 0845 SAMSUNG (7267864) | www.samsung.com |
| TURKEY | 444 77 11 | www.samsung.com |
| ESTONIA | 800-7267 | www.samsung.ee |
| LATvia | 800-7267 | www.samsung.com/lv |
| LITHUANIA | 8-800-77777 | www.samsung.lt |
| KAZAHSTAN | 8-10-800-500-55-500 | www.samsung.kz |
| KYRGYZSTAN | 00-800-500-55-500 | - |
| RUSSIA | 8-800-555-55-55 | www.samsung.com |
| TADJIKISTAN | 8-10-800-500-55-500 | - |
| UKRAINE | 8-800-502-0000 | www.samsung.com |
| UZBEKISTAN | 8-10-800-500-55-500 | www.samsung.uz |

BN68-01409A-00


imagine the possibilities
Thank you for purchasing this Samsung product.
To receive more complete service, please register your product at
www.samsung.com/global/register
Model Serial No.