
TQ905DF9 - TQ905DF9--B - Coffee maker SIEMENS - Free user manual and instructions
Find the device manual for free TQ905DF9 - TQ905DF9--B SIEMENS in PDF.
| Product type | Automatic coffee machine |
| Brand | Siemens |
| Model | TQ905DF9 / TQ905DF9--B |
| Voltage | 220-240 V ~, 50 Hz |
| Power | 1500 W |
| Pump pressure | 20 bar |
| Water tank capacity | 2.3 L |
| Bean container capacity | 375 g (single model) / 260 g (left) + 280 g (right) for double model |
| Grinder type | Ceramic grinder |
| Dimensions (H x W x D) | 40 x 32 x 47 cm |
| Net weight | 12 kg |
| Cord length | 100 cm |
| Display | Color touch display |
| Connectivity | Home Connect (Wi-Fi) |
| Special functions | doubleShot, tripleShot, BaristaMode, ComfortMode, aromaBoost |
| Customization | User profiles, beanIdent System, electronic grind adjustment eGrinder |
| Milk system | Refrigerated milk container with automatic frother |
| Cup warmer | Integrated (depending on model) |
| Maintenance programs | calc'nClean, descaling, milk system cleaning, frost protection |
| Safety | Child safety, adjustable automatic shut-off |
| Included accessories | Milk container, milk hose, adapter, water filter, descaling and cleaning tablets, microfiber cloth |
Frequently Asked Questions - TQ905DF9 - TQ905DF9--B SIEMENS
User questions about TQ905DF9 - TQ905DF9--B SIEMENS
0 question about this device. Answer the ones you know or ask your own.
Ask a new question about this device
Download the instructions for your Coffee maker in PDF format for free! Find your manual TQ905DF9 - TQ905DF9--B - SIEMENS and take your electronic device back in hand. On this page are published all the documents necessary for the use of your device. TQ905DF9 - TQ905DF9--B by SIEMENS.
USER MANUAL TQ905DF9 - TQ905DF9--B SIEMENS
Fully automatic espresso machine
EQ900
TQ903...
TQ905...
TQ907...
en Information for Use
Register your product on My Siemens and discover exclusive services and offers.
siemens-home.bsh-group.com/welcome
The future moving in.
A

K
B
C

D
J
E

1

H
F

G
1
3
4
6
8
5
7
9
10

11
12
14
13
15
16
17
18
19
20
21
22
23
24
25
26
27
28
29

30
31
32
33
Further information and explanations are available online:

Table of contents
1 Safety 9
1.1 General information 9
1.2 Intended use 9
1.3 Restriction on user group.... 9
1.4 Safety information.. 9
2 Environmental protection and saving energy. 13
2.1 Disposing of packaging 13
2.2 Tips for saving energy 13
3 Installation and connection..... 13
3.1 Scope of delivery 13
3.2 Installing and connecting the appliance 13
4 Familiarising yourself with your appliance. 14
4.1 Appliance 14
4.2 Control panel 14
5 Accessories. 15
6 Before using for the first time... 16
6.1 Preparing and cleaning the appliance 16
6.2 Checking the water hardness 16
6.3 Water filter 16
6.4 Performing initial start-up 17
6.5 General information 17
7 Basic operation 18
7.1 Switching the appliance on or off 18
7.2 Dispensing beverages 18
7.3 doubleShot and tripleShot.....18
7.4 Dispensing a coffee drink with milk 19
7.5 baristaMode or comfort- Mode 20
7.6 Dispensing two cups at once... 20
7.7 Saving favourite beverage ☆ 20
7.8 Using electronic grinding level adjustment eGrinder 20
7.9 Using beanldent System 1.....21
8 Childproof lock 21
8.1 Activating the child-proof lock 21
8.2 Deactivating the childproof lock 21
9 Cup heater1 21
9.1 Activating and deactivating the cup heater1 21
10 Personalisation 21
10.1 Create first profile 21
10.2 Create other profiles 22
10.3 Edit profile 22
10.4 Delete profile 22
10.5 Sort profiles 22
10.6 Add beverage to a profile..... 22
10.7 Add a beverage from Classic or coffeeWorld to the profile 22
10.8 Create profile from Classic or coffeeWorld 22
10.9 Edit beverage in profile 23
10.10 Delete beverage in profile.... 23
en
11 Home Connect 23
11.1 Setting up Home Connect.....23
11.2 Home Connect settings..... 23
11.3 Remote diagnostics 24
11.4 Data protection 24
12 Basic settings 25
12.1 Changing the basic settings 25
12.2 Overview of the basic settings 25
13 Cleaning and servicing. 27
13.1 Dishwasher-safe components 27
13.2 Cleaning agent 27
13.3 Cleaning the appliance 28
13.4 Cleaning the drip tray and coffee dregs container 28
13.5 Cleaning the milk container ... 28
13.6 Service programmes 28
14 Troubleshooting 31
15 Transportation, storage and disposal 36
15.1 Activating frost protection ...... 36
15.2 Disposing of old appliance .... 36
16 Customer Service 36
16.1 Product number (E-Nr.), production number (FD) and consecutive numbering (Z-Nr.) 36
17 Technical specifications 37
17.1 Information regarding Free and Open Source Software.... 37
18 Declaration of Conformity 37

1 Safety
Observe the following safety instructions.
1.1 General information
- Read this instruction manual carefully.
- Keep the instruction manual and the product information safe for future reference or for the next owner.
- Do not connect the appliance if it has been damaged in transit.
1.2 Intended use
Only use this appliance:
for preparing hot drinks.
- In private households and in enclosed spaces in a domestic environment.
Up to an altitude of max. 2000 m above sea level.
1.3 Restriction on user group
This appliance may be used by children aged 8 or over and by people who have reduced physical, sensory or mental abilities or inadequate experience and/or knowledge, provided that they are supervised or have been instructed on how to use the appliance safely and have understood the resulting dangers.
Do not let children play with the appliance.
Children must not perform cleaning or user maintenance unless they are at least 8 years old and are being supervised.
Keep children under the age of 8 years away from the appliance and power cable.
1.4 Safety information
WARNING - Risk of suffocation!
Children may put packaging material over their heads or wrap themselves up in it and suffocate.
- Keep packaging material away from children.
- Do not let children play with packaging material.
en Safety
Children may breathe in or swallow small parts, causing them to suffocate.
- Keep small parts away from children.
- Do not let children play with small parts.
WARNING - Risk of electric shock!
Incorrect installation is dangerous.
- Connect and operate the appliance only in accordance with the specifications on the rating plate.
- Connect the appliance to a power supply with alternating current only via a properly installed socket with earthing.
- The protective conductor system of the domestic electrical installation must be properly installed.
If the appliance or the power cord is damaged, this is dangerous.
- Never operate a damaged appliance.
- Never operate an appliance with a cracked or fractured surface.
- Never pull on the power cord to unplug the appliance. Always unplug the appliance at the mains.
- If the appliance or the power cord is damaged, immediately unplug the power cord or switch off the fuse in the fuse box.
- Call customer services. Page 36
Incorrect repairs are dangerous.
- Repairs to the appliance should only be carried out by trained specialist staff.
- Only use genuine spare parts when repairing the appliance.
- If the power cord of this appliance is damaged, it must be replaced by the manufacturer, the manufacturer's Customer Service or a similarly qualified person in order to prevent any risk.
An ingress of moisture can cause an electric shock.
- Never immerse the appliance or the power cord in water.
- Liquids must not be spilled on the appliance plug connection.
- Only use the appliance in enclosed spaces.
- Never expose the appliance to intense heat or humidity.
- Do not use steam- or high-pressure cleaners to clean the appliance.
WARNING - Risk of fire!
The appliance will become hot.
- Ventilate the appliance adequately.
- Never operate the appliance in a cupboard.
It is dangerous to use an extended power cord and non-approved adapters.
- Do not use extension cables or multiple socket strips.
- Only use adapters and power cords approved by the manufacturer.
- If the power cord is too short and a longer one is not available, please contact an electrician to have the domestic installation adapted.
WARNING - Risk of burns!
Some parts of the appliance become very hot.
- Never touch hot appliance parts.
- Allow hot appliance parts to cool down before touching.
WARNING - Risk of scalding!
Freshly prepared drinks are very hot.
Leave drinks to cool down if necessary.
- Do not let escaping liquids or steam come into contact with your skin.
A remote start via the Home Connect app while the appliance is unattended may cause scalding to third parties.
- Do not reach under the coffee outlet during the dispensing of drinks.
- Keep other persons, in particular children, away from the appliance.
WARNING - Risk of injury!
Improper use of the appliance may endanger the user.
- To avoid injuries, only use the appliance for its intended purpose.
Trapped fingers when closing the appliance door.
- Be careful of your fingers when closing the appliance door.
en Safety
The grinder rotates.
Never reach into the grinder.
WARNING - Danger: Magnetism!
The appliance contains permanent magnets. These may affect electronic implants, e.g. pacemakers or insulin pumps.
- People with electronic implants must stand at least 10~cm away from the appliance.
This minimum distance of 10~cm must also be observed for the water tank when removed.
WARNING - Risk of harm to health!
Soiling on the appliance may be harmful to health.
To ensure hygiene, follow the cleaning instructions for the appliance.
2 Environmental protection and saving energy
2.1 Disposing of packaging
The packaging materials are environmentally compatible and can be recycled.
- Sort the individual components by type and dispose of them separately.
2.2 Tips for saving energy
If you follow these instructions, your appliance will use less power.
Set the interval for automatic switchoff to the smallest value.
- If the appliance is not being used, it will switch itself off earlier.
"Basic settings", Page 25
Do not interrupt the dispensing process prematurely.
- The amount of water or milk that is heated is used optimally.
Descale the appliance regularly. - Limescale deposits increase the appliance's energy consumption.
3 Installation and connection
3.1 Scope of delivery
After unpacking all parts, check for any damage in transit and completeness of the delivery.
Note: Different accessories are enclosed depending on the appliance model. This accessory is shown in a frame with a dashed line.
Fig. 1
| A | Fully automatic coffee machine |
| B | Milk container |
| C | Milk tube |
| D | Adapter for milk containers1 |
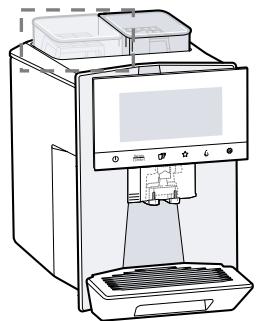
| E | User manual |
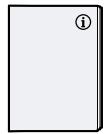
| F | Insertion aid for water filter |
| G | Descaling tablet1 |
| H | Cleaning tablet1 |
| I | Water filter |
| J | Water hardness testing strip |
| K | Microfibre cloth |
1 Depending on the appliance specifications
3.2 Installing and connecting the appliance
ATTENTION!
Risk of damage to the appliance. If the appliance is not started up correctly, it may be damaged.
- Use the appliance in frost-free rooms only.
If the appliance has been transported or stored below 0^ , wait 3 hours at room temperature before starting it up.
After plugging in, always wait approx. 5 seconds. -
Place the appliance on a level, water-resistant surface that is capable of bearing its weight.
-
Using the mains plug, connect the appliance to an earthed socket that has been correctly installed.
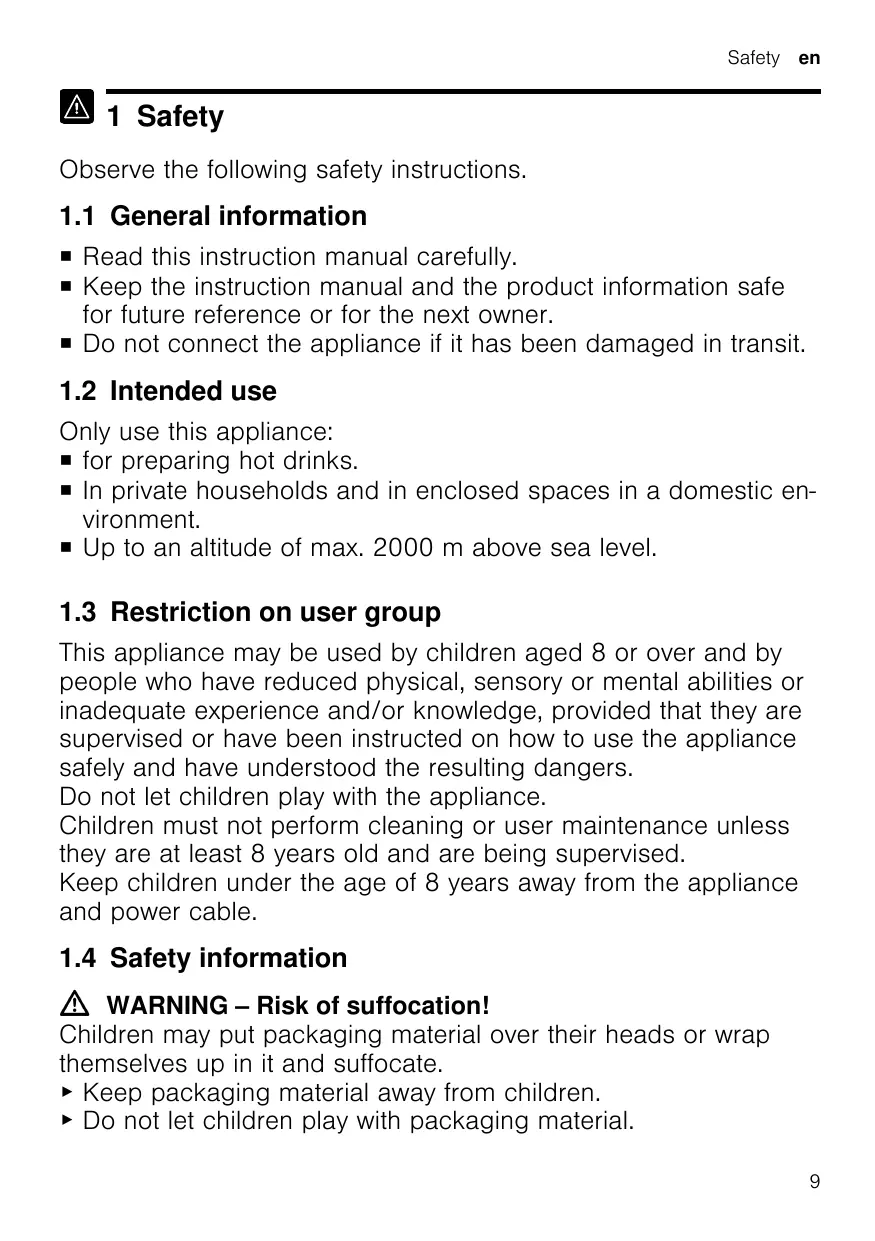
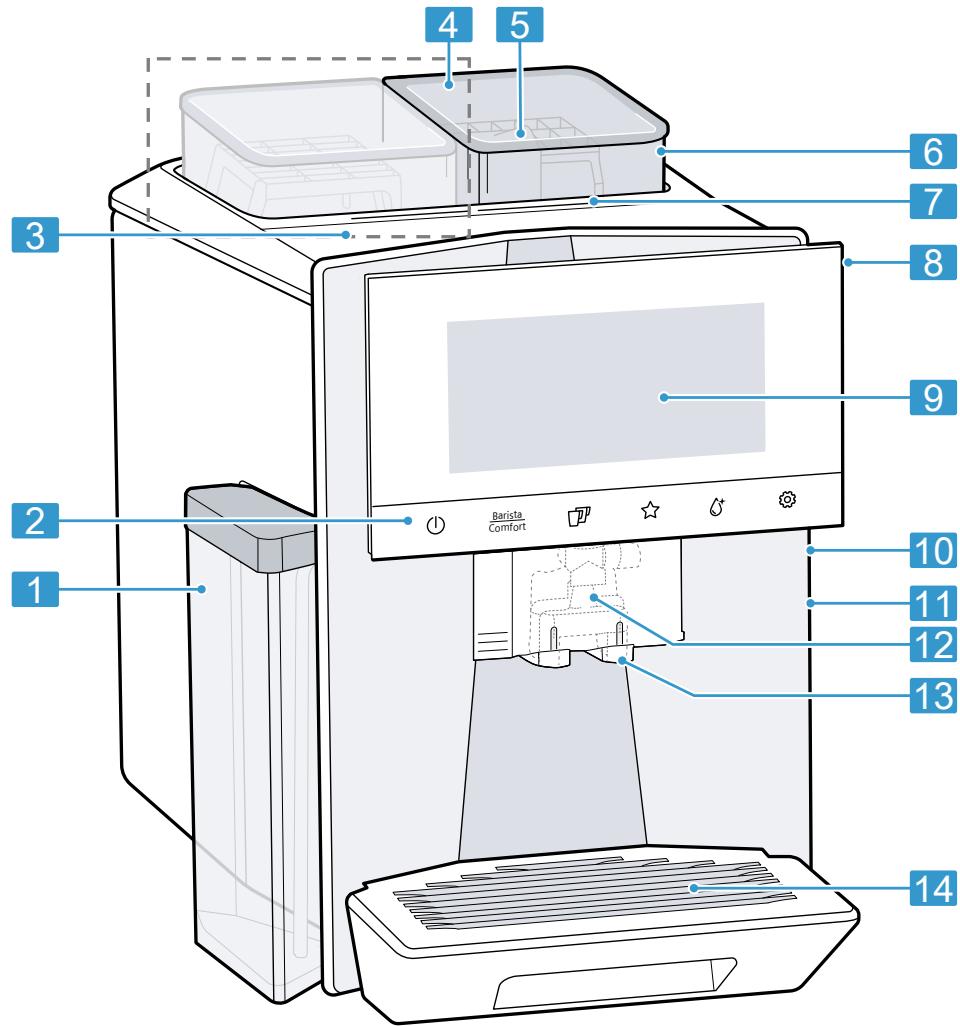
4 Familiarising yourself with your appliance
4.1 Appliance
You can find an overview of the parts of your appliance here.
Notes
-
Individual details and colours may differ, depending on the appliance model.
The operating instructions describe two product variants: -
Appliance has a bean container.
- Appliance has two bean containers.
Fig. 2
| 1 | Milk container |
| 2 | Touch fields |
| 3 | Cup heater1 |
| 4 | Bean container1 |
| 5 | Tablet compartment |
| 6 | Aroma lid1 |
| 7 | Bean container LED display1 |
| 8 | Rating plate |
| 9 | Touch display |
| 10 | Brewing chamber door |
| 11 | Water tank |
| 12 | Milk system |
Depending on the appliance specifications
| 13 | Beverage outlet cover |
| 14 | Drip tray |
Depending on the appliance specifications
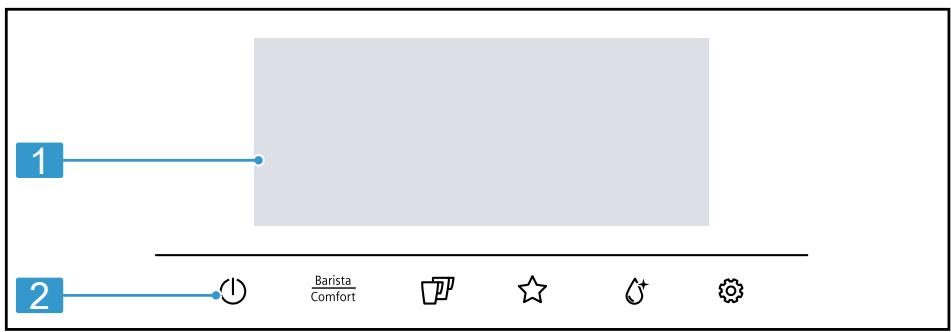
4.2 Control panel
You can use the control panel to configure all functions of your appliance and to obtain information about the operating status.
→ Fig. 3
| 1 | Touch display |
| 2 | Touch fields |
Touch display
The touch display functions both as a display and a control element.
Main menu
| Profiles | Select saved beverages with personal settings. |
| Classic | Select standard beverages. |
| coffee-World | Select basic beverages which can be extended in conjunction with Home Connect. |
Beverage parameters
| ① | Strength |
| ② | Quantity |
| ③ | Share of milk |
| ④ | Grinding level |
| ⑤ | Contact time |
| ⑥ | Temperature |
| 1 | Depending on the appliance spec-cifications |
| Eq. | Bean type selected1 |
| Select bean container1. | |
| 1 | Depending on the appliance spec-cifications |
Tip: You can find other beverage settings in the basic settings.
Display
| comfort barista | Appliance is in baristaMode or com- fortMode. |
| ∑∑∑ | Cup warmer is switched on. |
| ∑A | aromaBoost |
| ∑· | Appliance is connec- ted to Home Connect. |
| Appliance is not con- nected to Home Con-nect. | |
| Appliance is not con- nected to the server. |
Touch fields
Here you can find an overview of the symbols that are always visible.
| ① | Switch the appliance on or off. |
| Barista Comfort | Select baristaMode or comfortMode. |
| ⑪ | Dispense two cups. |
| ☆ | Save favourite beverage. |
| Open or close the service programmes. | |
| ③ | Open or exit the settings. |
5 Accessories
Use original accessories. These have been made especially for your appliance.
| Accessories | Retail | Customer service |
| Cleaning tablets | TZ80001A | 00312097 |
| TZ80001B | 00312098 | |
| Descaling tablets | TZ80002A | 00312094 |
| TZ80002B | 00312095 | |
| Water filter | TZ70003 | 00575491 |
| Water filter pack of 3 | TZ70033A | - |
| Microfibre cloth | - | 00460770 |
| Care set | TZ80004A | 00312105 |
| TZ80004B | 00312106 | |
| Adapter for milk containers | TZ70001 | 17006005 |
6 Before using for the first time
Prepare the appliance for use.
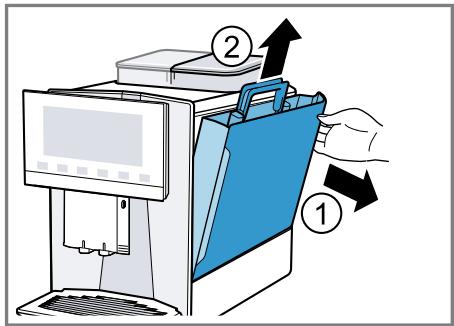
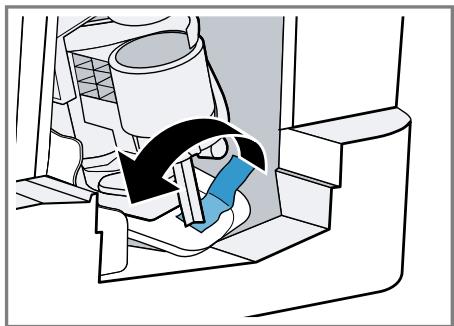
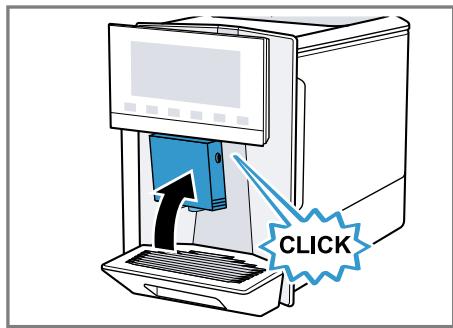
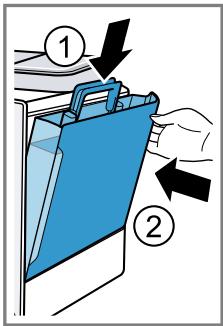
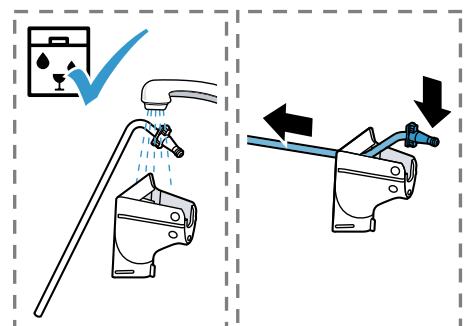
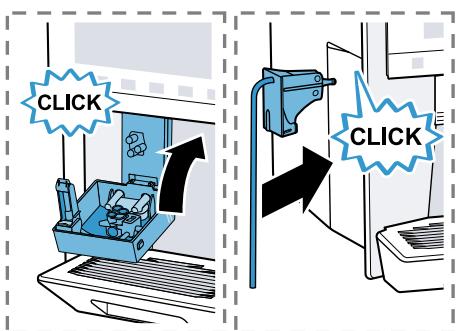
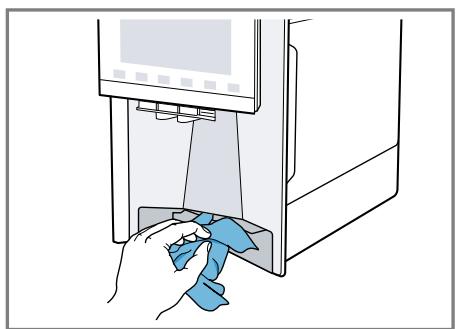
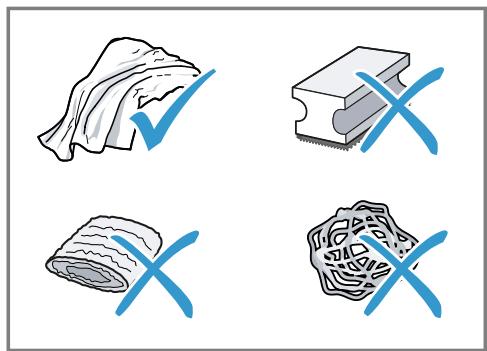
6.1 Preparing and cleaning the appliance
Remove the protective foils and clean the appliance and individual parts. Follow the illustrated instructions at the beginning of this manual.
ATTENTION!
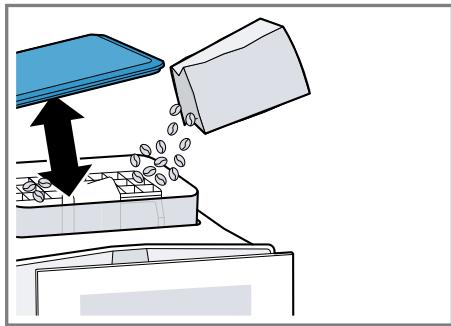
Unsuitable beans can block up the grinder.
- Only use pure, roasted bean mixes that are suitable for use in fully automatic coffee or espresso machines.
Do not use glazed coffee beans. - Do not use caramelised coffee beans.
- Do not use coffee beans that have been treated with additives containing sugar.
Do not add ground coffee.
Fig. 4 - 29
Notes
- Fill the water tank each day with fresh, cold, non-carbonated water.
If you have the product variant with 2 bean containers, you can add 2 different types of coffee. The LED of the active bean container lights up. - The appliance memorises the bean container last selected for each drink. You can change this default setting.
"Basic settings", Page 25
Tip: To keep the coffee beans at their best, store them in a sealed container in a cool place.
You can keep the coffee beans in the bean container for several days without them losing their aroma.
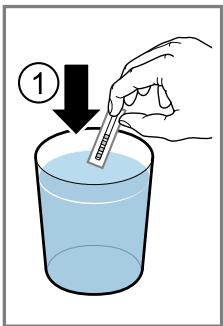
6.2 Checking the water hardness
It is important to set the water hardness correctly so that your appliance indicates in good time that it needs descending. You can use the enclosed test strip to check the water hardness or ask your local water company.
- Briefly dip the test strip in fresh tap water.
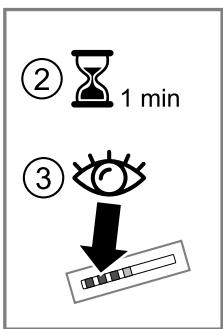
- Allow the water to drain off the test strip.
- Read the water hardness off the test strip after 1 minute.
The table shows allocation of the levels to the different degrees of water hardness:
| Level | German degrees in °dH | Total hardness in mmol/ l |
| 1 | 1-7 | < 1.3 |
| 2 | 8-14 | 1.3-2.5 |
| 3 | 15-21 | 2.5-3.8 |
| 4¹ | 22-30 | > 3.8 |
Factory setting
Note: If a water softening system is installed in your house, you can select "Water softening system".
Tip: You can change the settings at any time.
"Basic settings", Page 25
6.3 Water filter
You can use a water filter to minimise limescale deposits and reduce impurities in the water.
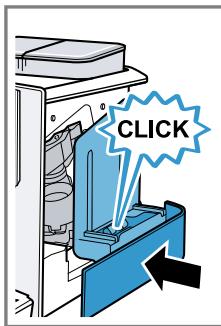
Inserting the water filter
ATTENTION!
Possible damage to the appliance due to limescale build-up.
- Change the water filter in good time.
-
Change the water filter after 2 months at the latest.
Observe the display messages. -
Press ^ .
- Press "INTENZA filter" and follow the instructions on the display.
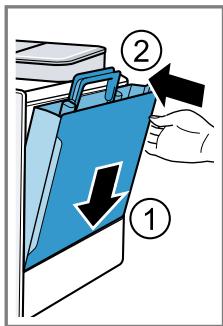
Changing or removing the water filter
You can also operate your appliance without a water filter.
- Press ^ .
- Press "INTENZA filter".
- Press "Replace" or "Remove" and follow the instructions on the display.
Tips
- You should also change your water filter for reasons of hygiene.
- With a water filter you need to descale your appliance less frequently.
If you use a water filter, your coffee will be more flavoursome.
If your appliance has not been used for a long time, for example if you were on holiday, you should rinse the water filter before use by dispensing a cup of hot water.
The water filter can be purchased from retailers or customer service. "Accessories", Page 15
6.4 Performing initial start-up
After connecting the appliance to the power supply, configure the settings for initial start-up. Initial start-up only appears when switching on for the first time.
- Press ① to switch the appliance on.
- Follow the instructions on the display.
- The display will guide you through the programme.
Notes
If you want to set up Home Connect now, follow the instructions in the Home Connect app.
"Setting up Home Connect", Page 23
- If "Demo mode" is selected, only the display screens will work. You cannot dispense a beverage or run a programme.
6.5 General information
Please bear this information in mind so that you can get the best out of your appliance.
Notes
The appliance has been programmed at the factory with standard settings for optimum operation.
- The grinder has been factory-set for optimum operation. If coffee is only dispensed drop by drop or is too thin and with too little crema, you can set the grinding level. "Using electronic grinding level adjustment eGrinder", Page 20
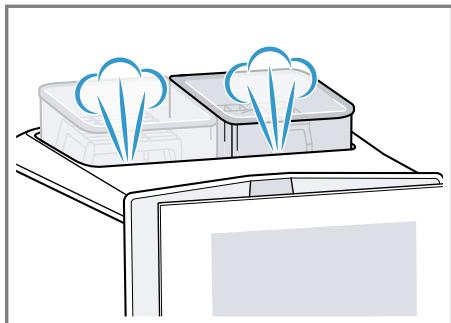
During operation water droplets may form at the ventilation slits and on the lid of the tablet compartment.
If you do not perform any actions on the appliance for a certain period, it will switch off automatically. You can change the duration in the basic settings. Page 25
For technical reasons steam can escape from the appliance.
The first beverage will not yet have its full aroma if:
- You are using the appliance for the first time.
- You have run a service programme.
- You have not used the appliance for a long time.
Do not drink the beverage.
Tip: You will get a stable, fine-pored crema after you have started up your appliance and dispensed a few cups.
7 Basic operation
7.1 Switching the appliance on or off
Press ①.
When the appliance switches on, the display shows the logo. When the appliance is switched on or off, it will rinse itself automatically. When switched off, the appliance will emit steam into the drip tray for cleaning. The appliance will not rinse itself if the appliance is still warm when switched on or if no beverage was dispensed before it was switched off.
7.2 Dispensing beverages
Find out how to prepare a drink of your choice.
WARNING Risk of scalding
Freshly prepared drinks are very hot.
- Leave drinks to cool down if necessary.
- Do not let escaping liquids or steam come into contact with your skin.
Notes
- With a number of settings your coffee is prepared in several steps. Wait until the process is fully completed.
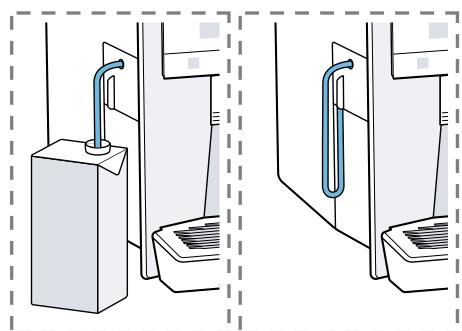
If you are dispensing a beverage with milk, always connect the milk container filled with milk or the milk adapter to a milk carton. - You can only insert or remove the beverage outlet if the milk container or milk adapter is not connected.
- The milk container is specially designed for this appliance. Only use the milk container for storing milk in the refrigerator and in the house.
If the milk system has not been cleaned, small amounts of milk may escape when hot water is dispensed.
7.3 doubleShot and tripleShot
Your appliance grinds the coffee two or three times.
To ensure that only pleasant-tasting and easily digestible aromatic substances are released, coffee beans are freshly ground and brewed again by the appliance.
The longer coffee brews, the more bitter substances and undesirable aromas are released. These bitter
substances and undesirable aromas affect the taste and digestibility of coffee.
Note: The functions "doubleShot" and "tripleShot" depend on the beverage, the beverage strength and the beverage size selected.
7.4 Dispensing a coffee drink with milk
An example explains how to make a latte macchiato.
WARNING Risk of burns!
The milk system can become extremely hot.
- Never touch the milk system when it is hot.
- Allow the hot milk system to cool down before touching it.
Requirements
- The appliance is switched on and the water tank and bean container have been filled.
- The milk container or milk adapter is connected.
- The milk container is filled with milk or the milk adapter hose is immersed in milk.
- Place a glass underneath the beverage outlet.
2 Press Barista Comfort and select "baristaMode". - Press "Classic".
- Select the beverage symbol for latte macchiato.
-
Press the beverage symbol and set the beverage parameters.
-
To set the strength , press the segments.
-
To set the per-cup quantity 日, press the segments.
- To set the milk ratio 0 , press the segments.
- To set the grinding level, press the segments. "Using electronic grinding level adjustment eGrinder", Page 20
- To set the contact time ⑤ , press the segments.
- To set the brewing temperature, press the segments.
-
To change the bean container ^1 , press [6].
-
Press "Start" and wait until the process is complete.
-
To completely stop dispensing the beverage, press "Stop".
- To only stop the current dispensing step, press "Skip".
Notes
If you do not change any settings for approx. 30 seconds, the appliance will exit settings mode.
The appliance saves the settings automatically.
- To reset all beverage parameters, press "Reset".
Tips
- You can also pre-heat cups before dispensing using hot water or the cup heater1.
- The appliance variant with 2 bean containers allows you to switch containers while dispensing a beverage if the bean container is empty. Dispensing will then continue with the full bean container.
- You can also use plant-based alternatives to milk, e.g. soya milk.
The quality of the milk froth depends on the type of milk or plant-based alternative used.
7.5 baristaMode or comfortMode
You can select the mode. When selecting "baristaMode", more setting options are available for the individual beverages, e.g. contact time.
7.6 Dispensing two cups at once
Depending on your beverage, you can make 2 cups at the same time.
Note: If the "doubleShot" or "tripleShot" function is active, the function for dispensing two cups at once is not possible.
- Press the symbol for the required beverage.
2 Press
The display shows the setting .
3. Place two cups on the left and right underneath the beverage outlet.
4. Press "Start".
The beverage is prepared in 2 steps. The beans are ground in 2 grinding operations.
- The beverage is brewed and then runs into the cups.
- Wait until the process is complete.
7.7 Saving favourite beverage

You can directly save a favourite beverage that you frequently dispense.
- Press the symbol for the required beverage.
- Press the beverage symbol and set the beverage parameters.
- To save, press ☆ for 3 seconds.
Tips
To display and start your favourite beverage at any time, briefly press
- You can save a new favourite beverage at any time.
Note: If you save a new favourite beverage, this will replace your existing favourite.
7.8 Using electronic grinding level adjustment eGrinder
Your appliance has an adjustable grinder, which you can use to customise the grinding level of the coffee beans in "baristaMode".
- Press Barista and select "baristaMode".
- Press the symbol for the required beverage.
- Press and set the grinding level. The grinding level setting only takes effect after the second cup.
Note: The appliance variant with 2 bean containers allows you to set the grinding level for each bean container separately.
Tips
- You can set the basic grinding level for the "comfortMode" in the beverage settings.
- In "comfortMode" you can also use the [aromaBoost] function for small beverages, e.g. espresso. With [aromaBoost] the grinding level is set slightly finer than the basic grinding level selected.
If the coffee is only dispensed drop by drop, set a coarser grinding level. If the coffee is too thin with too little crema, set a finer grinding level.
7.9 Using beanldent System
You can set your appliance to the type of coffee bean you are using.
- Press
- Select "Beverage settings".
- Select "beanldent System".
- Select the type of coffee.
8 Childproof lock
You can lock the appliance, to protect children against scalding and burns.
8.1 Activating the child-proof lock
Requirement: The appliance is switched on.
Press and hold for at least 3 seconds.
The childproof lock is activated.
8.2 Deactivating the childproof lock
Press and hold for at least 3 seconds.
The childproof lock is deactivated.
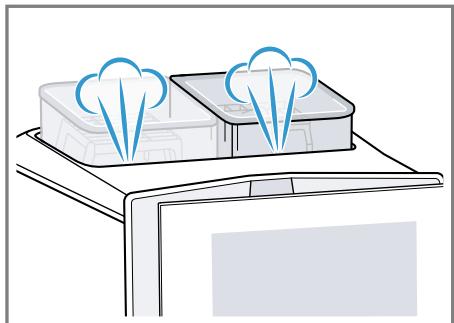
9 Cup heater1
You can use the cup heater to preheat your cups.
9.1 Activating and deactivat ing the cup heater
WARNING Risk of burns!
The cup heater1 can become very hot.
- Never touch the cup heater1 while hot.
- Allow the hot cup heater1 to cool down before touching it.
Tip: Place the cups with their base on the cup heater to warm them to optimum effect1.
- You can activate or deactivate the cup heater1 in the basic settings.
10 Personalisation
Save beverages in your personal profile.
A profile contains preferred beverages with personal settings. To exit the settings, press .
Tip: You can change the settings at any time.
10.1 Create first profile
- Press "Profiles".
- Press "Create profile".
- Enter a profile name, e.g. Tom.
- Press "Save".
- Select a background picture.
- Press "Continue".
- Press + "Add beverage".
- Select a beverage and press "Select".
-
Set the beverage parameters and press "Save".
-
Enter a beverage name and press "Save".
10.2 Create other profiles
- Press "Profiles".
- Press "Profiles" at the bottom of the display.
- Press + "Add profile".
- Enter a profile name.
- Press "Save".
- Select a background picture.
- Press "Continue".
- Press + "Add beverage".
- Select a beverage and press "Select".
- Set the beverage parameters and press "Save".
- Enter a beverage name and press "Save".
Note: The profile used last is always shown in the profiles. If several profiles have been created, press "Switch profile" at the bottom of the display to create new profiles or edit existing ones.
10.3 Edit profile
- Press "Profiles".
- Press "Profiles" at the bottom of the display.
- Press "Edit profiles".
- Press the required profile.
- Change the profile name and press "Save".
- Select the required background picture and press "Continue".
10.4 Delete profile
- Press "Profiles".
- Press "Profiles" at the bottom of the display.
- Press "Delete profile".
-
Press the required profile.
-
Press "Delete".
10.5 Sort profiles
- Press
- Press "Personalisation".
- Press "Profile sequence".
- Sort the profiles.
10.6 Add beverage to a profile
- Press "Profiles".
- Press "Profiles" at the bottom of the display.
- Press the required profile.
- Press + "Add beverage".
- Select a beverage and press "Select".
- Set the beverage parameters and press "Save".
- Enter a beverage name and press "Save".
10.7 Add a beverage from Classic or coffeeWorld to the profile
- Select a beverage from "Classic" or "coffeeWorld".
- Set the beverage parameters.
- Press "Save in profile".
- Select the required profile.
- Enter a name for the beverage.
-
Press "Save".
-
The beverage is now saved in the profile.
10.8 Create profile from Classic or coffeeWorld
- Select a beverage from "Classic" or "coffeeWorld".
- Set the beverage parameters.
- Press "Save in profile".
-
Press + "Add profile".
-
Enter a profile name.
- Press "Save".
- Select a background picture.
- Press "Continue".
- Enter a beverage name and press "Save".
- The profile and beverage are now saved.
10.9 Edit beverage in profile
- Press "Profiles".
- Press "Profiles" at the bottom of the display.
- Press the required profile.
- Select a beverage.
- Set the beverage parameters.
- Press "Save".
- Press "Overwrite".
- Start the beverage or use to return to the menu.
10.10 Delete beverage in profile
- Press "Profiles".
- Press "Profiles" at the bottom of the display.
- Select and press the profile.
- Press the beverage.
- Press "Delete".
11 Home Connect
This appliance is network-capable. Connecting your appliance to a mobile device lets you control its functions via the Home Connect app, adjust its basic settings and monitor its operating status. The Home Connect services are not available in every country. The availability of the Home Connect function depends on the availability of
Home Connect services in your country. You can find information about this at: www.home-connect.com. The Home Connect app guides you through the entire login process. Follow the instructions in the Home Connect app to configure the settings.
Tip: Please also follow the instructions in the Home Connect app.
Notes
Please note the safety precautions in this instruction manual and make sure that they are also observed when operating the appliance via the Home Connect app. "Safety", Page 9
- Operating the appliance on the appliance itself always takes priority. During this time it is not possible to operate the appliance using the Home Connect app.
11.1 Setting up Home Connect
Requirements
The appliance is already connected to the mains power supply and switched on.
- You have a mobile device with a current version of the iOS or Android operating system, e.g. a smartphone.
The mobile device and the appliance are within range of your home network's WiFi signal.
- The Home Connect app has been installed on your mobile device.
- Open the Home Connect app and scan the following QR code. Fig. 30
- Follow the instructions in the Home Connect app.
11.2 Home Connect settings
Adapt Home Connect to your needs.
en Home Connect
You can find the Home Connect settings in the basic settings for your appliance. Which settings the display shows will depend on whether
Home Connect has been set up and whether the appliance is connected to your home network.
Overview of the Home Connect settings
Here you can find an overview of the "Home Connect" settings and network settings.
| Basic setting | Selection | Description |
| WiFi connection | OnOff | Switch off the wireless module during long absences or to save energy. Note: In networked standby mode your appliance requires max. 2 W. |
| Remote start | OnOff | Switch remote start on the appliance on and off. Note: With the "Home Connect" app only switch-off is possible. |
| Add mobile device | - | Connect the appliance to the "Home Connect" app or additional accounts. |
| Network information | - | Display network information and appliance information. |
| Delete | - | Note: You cannot operate your appliance via the "Home Connect" app without a network connection. |
| Software update | - | Note: This setting is only available with a software update. |
11.3 Remote diagnostics
Customer Service can use Remote Diagnostics to access your appliance if you contact them, have your appliance connected to the Home Connect server and if Remote Diagnostics is available in the country in which you are using the appliance.
Tip: For further information and details about the availability of Remote Diagnostics in your country, please visit the service/support section of your local website: www.home-connect.com
11.4 Data protection
Please see the information on data protection.
The first time your appliance is registered on a home network connected to the Internet, your appliance will transmit the following types of data to the Home Connect server (initial registration):
- Unique appliance identification (consisting of appliance codes as well as the MAC address of the Wi-Fi communication module installed).
Security certificate of the Wi-Fi communication module (to ensure a secure data connection).
- The current software and hardware version of your appliance.
Status of any previous reset to factory settings.
This initial registration prepares the Home Connect functions for use and is only required when you want to use the Home Connect functions for the first time.
Note: Please note that the Home Connect functions can only be utilised with the Home Connect app. Information on data protection can be retrieved in the Home Connect app.
12 Basic settings
You can configure the basic settings for your appliance to meet your needs and call up additional functions.
12.1 Changing the basic settings
-
Press
-
The display shows the list of basic settings.
- Change the required basic setting.
- The appliance saves the basic setting automatically.
- To exit the basic settings, press
12.2 Overview of the basic settings
You can find an overview of the basic settings here.
| Basic setting | Selection | Use |
| Beverage setting | Bean container | Set allocation of the bean containers. |
| "Electronic grinding level adjustment" Electronic grinding level adjustment Set the basic grinding level in "comfortMode". | ||
| beanldent System | Select the type of beans used. → "Using beanldent System", Page 21 | |
| Milk sequence | Select the sequence for milk and coffee. | |
| Latte macchiato pause | Select the pause between milk and coffee. | |
| Brewing temperature | Set the brewing temper- ature. | |
| Resetting beverage para- meters | Reset the beverage set- tings. |
1 Depending on the appliance specifications
| Basic setting | Selection | Use |
| Appliance setting | Cup heater1 | Switch the cup heater1on or off. |
| Automatic switch-off | Set the time after which the appliance switches off. | |
| Display brightness | Set the brightness in steps. | |
| Sounds | Switch sounds on and off. ■ Set the volume. | |
| Water hardness | Set the water hardness. | |
| Language | Set the language. | |
| Factory settings | Reset the appliance to the factory settings. | |
| Personalisation | Start category | Set the menu display after switching on, e.g. "Classic". |
| Profile sequence | Set the sequence of profiles. | |
| Beverage sequence in profile | Set the sequence of beverages in the profile. | |
| Home Connect | Information about Home Connect | → "Setting up Home Connect", Page 23 |
| Appliance information | Beverage counter | Display the number of beverages dispensed. |
| Cleaning information | Time until the water filter should next be changed or a service programme started. | |
| Version information | Display network information and appliance information. | |
| Licence information | Display FOSS licence text. | |
| Mode | Mode for demonstration purposes | Switch "Demo mode" on or off. |
| Quick guide to user interface | Get to know the appli-ance settings. | |
| 1 Depending on the appliance specifications | ||
| Customer service | Find QR code and coun-try-specific Customer service. | |
| 1 Depending on the appliance specifications | ||
13 Cleaning and servicing
To keep your appliance working efficiently for a long time, it is important to clean and maintain it carefully.
13.1 Dishwasher-safe components
Here you can find an overview of the components you can clean in the dishwasher.
ATTENTION!
Some components are sensitive to heat and may be damaged if they are cleaned in a dishwasher.
-
Follow the operating instructions of the dishwasher.
-
Only clean dishwasher-safe components in the dishwasher.
- Only use programmes that do not heat the components above 60^ .
Suitable:
Drip tray
- Drip plate
- Coffee dregs container
- Mechanical fill level indicator
Milk system with adapter
Milk container with lid
Red trays of the brewing unit
Adapter for milk container
Not suitable:
Water tank
Aroma lid
Brewing unit
Cover of brewing unit
- Beverage dispenser cover
1 Depending on the appliance specifications
13.2 Cleaning agent
Only use suitable cleaning agents.
ATTENTION!
Unsuitable cleaning products may damage the surfaces of the appliance.
- Do not use harsh or abrasive detergents.
-
Do not use cleaning agents containing alcohol or spirits.
-
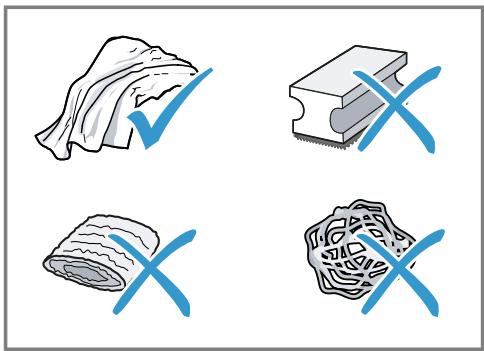
Do not use hard scouring pads or cleaning sponges.
Unsuitable cleaning agents and descalers may damage the appliance. - Do not use pure citric acid, vinegar or any vinegar-based agents to descale the appliance.
- Do not use descaling agent with phosphoric acid.
en Cleaning and servicing
Only use cleaning tablets and descaling tablets that have been specially developed for the appliance. "Accessories", Page 15
Tips
- Wash new sponge cloths thoroughly to remove any salt adhering to them. Salt can cause rust film to develop on stainless steel surfaces.
Always remove any residues of limescale, coffee, milk and cleaning/descaling solutions immediately to prevent corrosion.
13.3 Cleaning the appliance

WARNING
Risk of electric shock!
An ingress of moisture can cause an electric shock.
- Never immerse the appliance or the power cord in water.
- Liquids must not be spilled on the appliance plug connection.
- Do not use steam- or high-pressure cleaners to clean the appliance.

WARNING
Risk of burns!
Some parts of the appliance become very hot.
- Never touch hot appliance parts.
-
Allow hot appliance parts to cool down before touching.
-
Clean the housing, the high-gloss surfaces and the control panel with the enclosed microfibre cloth.
- Clean the outlet system with a soft, damp cloth after beverages have been dispensed.
- Rinse the water tank with fresh, clean water.
- If the appliance has not been used for a long time, e.g. after a holiday, clean the entire appliance, including moving parts such as the brewing unit or water tank.
Note: The appliance will rinse itself automatically if you switch it on when it is cold or switch it off after it has dispensed coffee. The system is therefore self-cleaning.
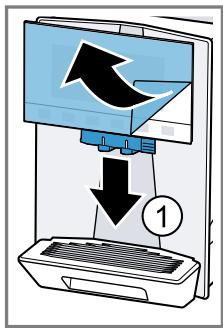
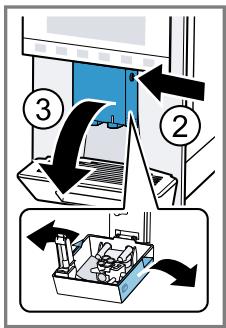
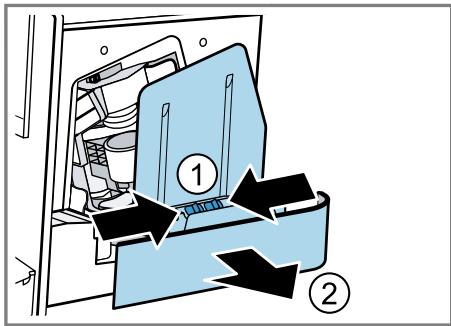
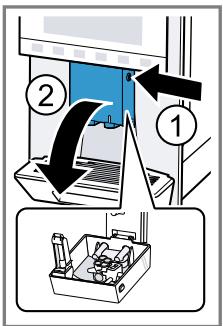
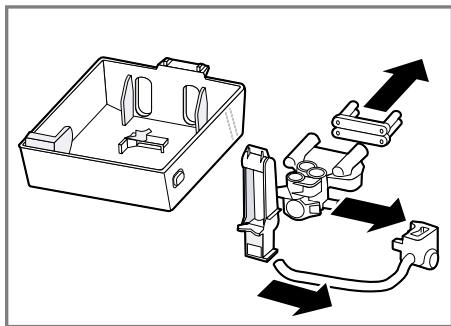
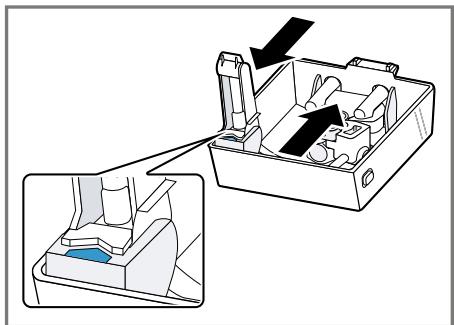
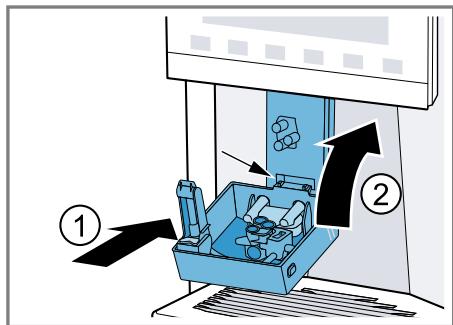
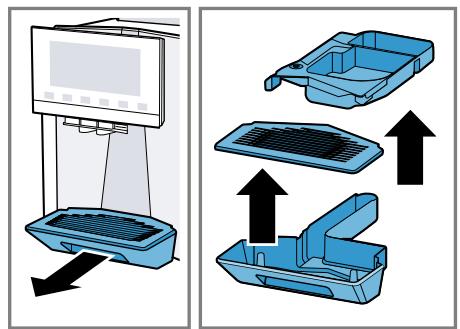
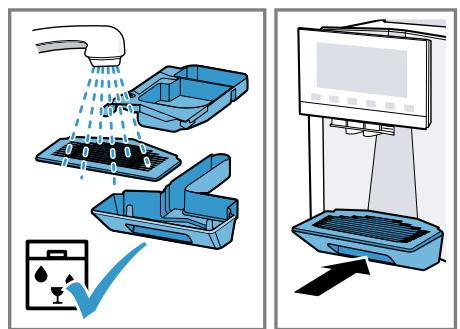
13.4 Cleaning the drip tray and coffee dregs container
Clean and empty the drip tray and coffee dregs container every day to prevent deposits. Follow the illustrated instructions at the beginning of this manual.
Fig. 31 - 33
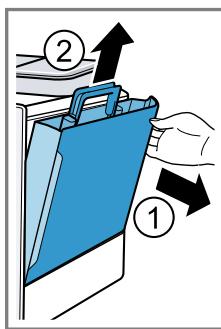
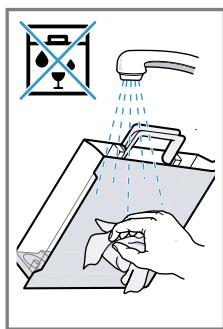
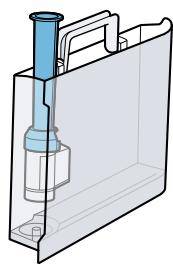
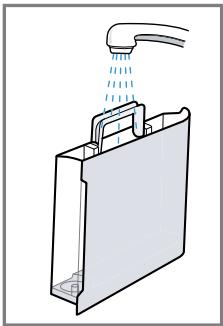
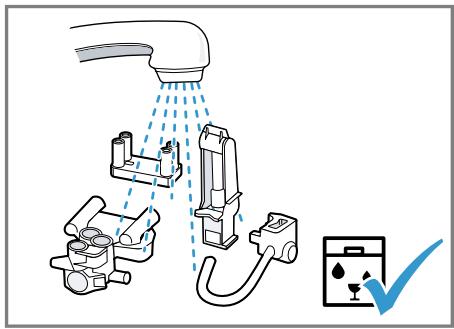
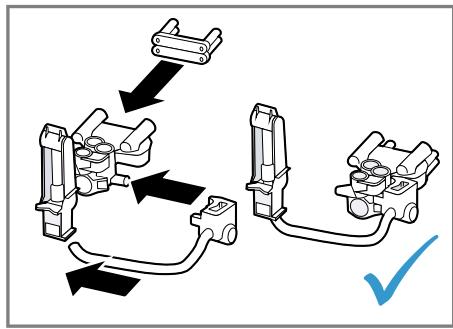
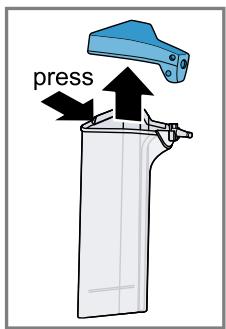
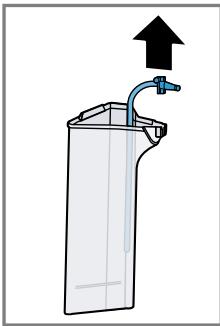
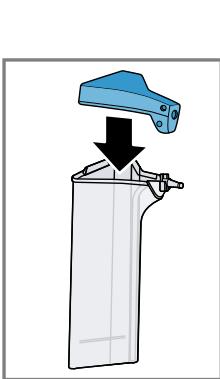
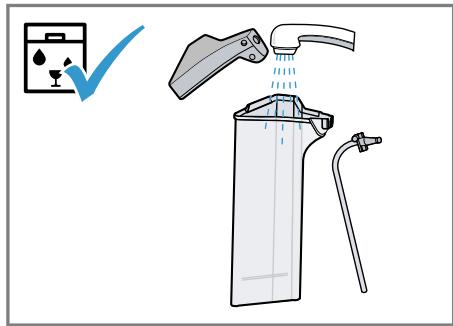
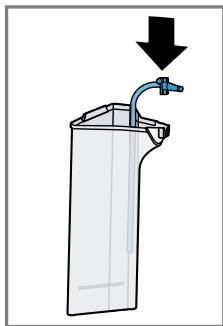
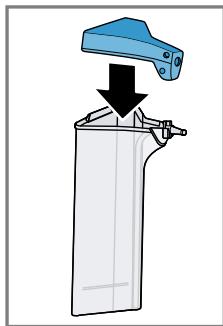
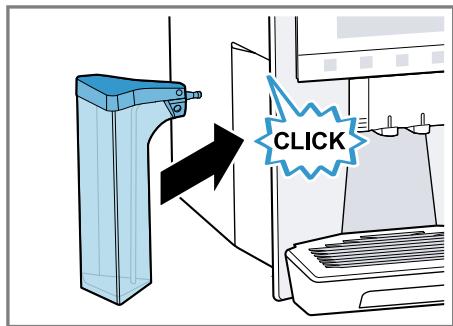
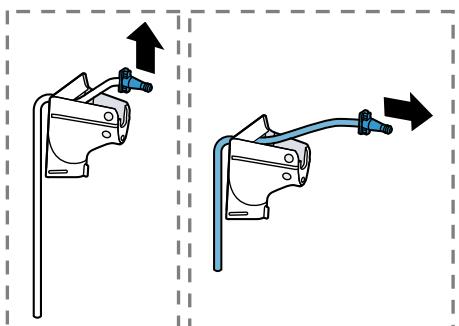
13.5 Cleaning the milk container
Clean the milk container regularly for hygiene reasons. You can clean the milk container in the dishwasher. Follow the illustrated instructions at the beginning of this manual.
Fig. 22 - 25
13.6 Service programmes
Use the service programmes if you insert or remove a water filter or in order to clean your appliance thor-
oughly. Your appliance will tell you when you need to perform a service programme, e.g. cleaning.
ATTENTION!
Improper cleaning and descending or a delay in doing so may damage the appliance.
- Immediately perform the descending process in accordance with the instructions.
- Only use cleaning tablets in the tablet compartment.
- Do not put descending tablets or other products in the tablet compartment.
Notes
- The display indicates the progress of the descending or cleaning process.
If your appliance has been locked, you can only operate it again once the descending process has been carried out.
Tip: In addition to the automatic rinsing process, regularly also remove and clean the brewing unit.
Using the service programmes
- Press ^+ .
- Press the symbol for the required programme.
- The display will guide you through the programme.
Overview of service programmes
You can find an overview of the service programmes here.
Note: The start image shows the remaining number of beverages that can be dispensed until running the programme and the duration.
| BRITA | INTENZA filter | Insert, replace or remove the water fil-ter. |
| Cleaning the milk sys-tem | Rinse the milk system automatically. | |
| calc'nClean | Combine cleaning and descaling. Re-leave residues of limescale and cof-fee from the pipes. | |
| Cleaning | Remove residues of coffee from the pipes. | |
| Descaling | Remove residues of limescale from the pipes. | |
| Cleaning brewing unit | The display shows optimum cleaning of the brewing unit step by step. |
en Cleaning and servicing
| Beverage outlet cleaning | The display shows optimum cleaning of the outlet step by step. | |
| Frost protection | Drain the pipes to protect the appliance during transport or storage. | |
| Special rinsing | If a service programme is interrupted, e.g. due to a power failure, it will rinse itself automatically. The appliance is then ready for use again. |
Tips
If you are starting the "Dscaling" or "calc'nClean" programme, keep a container with a capacity of min. 1 I at the ready.
If you use a water filter, this will prolong the time until you have to run a service programme.
- You can combine "Dscaling" and "Cleaning" with the "calc'nClean" service programme.
14 Troubleshooting
You can rectify minor faults on your appliance yourself. Read the troubleshooting information before contacting after-sales service. This will avoid unnecessary costs.

WARNING
Risk of electric shock!
Incorrect repairs are dangerous.
- Repairs to the appliance should only be carried out by trained specialist staff.
- Only use genuine spare parts when repairing the appliance.
- If the power cord of this appliance is damaged, it must be replaced by the manufacturer, the manufacturer's Customer Service or a similarly qualified person in order to prevent any risk.
| Fault | Cause and troubleshooting |
| Appliance no longer responds. | Appliance has a fault. 1. Pull out the mains plug and wait 60 seconds. 2. Re-insert the mains plug. |
| Home Connect is not working properly. | Different causes are possible. ► Go to www.home-connect.com. |
| Appliance only dis-penses water, not cof-fee. | Empty bean container is not detected by the appli- ance. ► Pour in coffee beans. |
| Coffee shaft on brewing unit is blocked. ► Clean the brewing unit. | |
| Beans are too oily and are not falling into the grinder. ► Gently tap the bean container. ► Change the coffee variety. ► Do not use oily beans. ► Clean the empty bean container with a damp cloth. | |
| Brewing unit is not inserted properly. 1. Check whether the brewing unit is inserted correctly and is securely locked. 2. Push the red lever up to the left. 3. Insert the brewing unit cover. | |
| Appliance is not dis-pensing milk froth. | Milk system is soiled. ► Clean the milk system in the dishwasher. |
| Milk tube not immersed in milk. ► Use more milk. | |
| Appliance is not dis-pensing milk froth. | Check whether the milk tube is immersed in the milk. |
| Heavy build-up of limescale in the appliance. Descale the appliance. | |
| No milk intake by the milk system. | The milk system is assembled incorrectly. Assemble the milk system correctly. |
| Order for connecting the milk container and milk sys-tem is wrong. First insert the milk system into the outlet and then the milk container. | |
| Milk tube not immersed in milk. Use more milk. Check whether the milk tube is immersed in the milk. | |
| Milk froth is too cold. | Milk is too cold. Use lukewarm milk. |
| Appliance is not dis-pensing hot water. | Milk system is soiled. Clean the milk system in the dishwasher. |
| Milk system cannot be assembled or dis-as-sembled. | Order of assembly is wrong. First connect the milk system and then the milk container. When disassembling, you must first remove the milk container and then the milk system. |
| Appliance is not dis-pensing drinks. | Air is in the water filter. 1. Immerse the water filter in water with the opening facing upwards until no more air bubbles escape. 2. Reinsert the filter. Firmly press the water filter straight down into the tank connection. |
| Residues of limescale remover are blocking the water tank. 1. Remove the water tank. 2. Clean the water tank thoroughly. | |
| There is dripping wa-ter on the inner floor of the appliance. | Drip tray was removed too soon. Wait a few seconds after the last drink was dispensed before removing the drip tray. |
| Brewing unit cannot be removed. | Locking device cannot be released, brewing unit is jammed. Switch the appliance off and back on after 3 minutes. |
| Grinder won't start. | Appliance is too hot. 1. Disconnect the appliance from the mains. 2. Wait 1 hour so the appliance can cool down. |
| Grinder is not grinding any coffee beans despite full bean container. | Beans are too oily and are not falling into the grinder. ►Gently tap the bean container. ►Change the coffee variety. ►Do not use oily beans. ►Clean the empty bean container with a damp cloth. |
| Coffee or milk froth quality varies widely. | Build-up of limescale in the appliance. ►Descale the appliance. |
| Milk froth quality varies widely. | Milk froth quality depends on the type of milk or plant-based alternative used. ►Optimise the result through the selection of the milk or vegetable-based drink type. |
| Coffee is not dispensed or has slowed to a trickle. Set quantity is not reached. | Grinding level is set too fine. ►Set a coarser grinding level. |
| Heavy build-up of limescale in the appliance. ►Descale the appliance. | |
| Air is in the water filter. 1. Immerse the water filter in water with the opening facing upwards until no more air bubbles escape. 2. Reinsert the filter. | |
| Appliance is soiled. ►Clean the brewing unit. ►Descale and clean the appliance. | |
| Coffee has no crema. | Type of coffee is not optimal. ►Use a coffee variety with a higher proportion of Robusta beans. ►Use beans with a darker roast. |
| Beans are no longer fresh. ►Use fresh beans. | |
| Grinding level is not appropriate for coffee beans. ►Adjust the grinder to a finer setting. | |
| Coffee is too acidic. | Grinding level is set too coarse. ►Adjust the grinder to a finer setting. |
| Type of coffee is not optimal. ►Use a coffee variety with a higher proportion of Robusta beans. ►Use beans with a darker roast. | |
| Coffee is too bitter. | Grinding level is set too fine. → Set a coarser grinding level. |
| Type of coffee is not optimal. → Change the coffee variety. | |
| Coffee tastes burnt. | Grinding level is set too fine. → Set a coarser grinding level. |
| Type of coffee is not optimal. → Change the coffee variety. | |
| Coffee temperature setting is too high. → Set the coffee temperature lower. | |
| Coffee grounds are not compact and are too wet. | The grinding level is not set optimally. → Adjust the grinder to a coarser or finer setting. |
| Beans are too oily. → Use a different type of bean. | |
| Display shows "Please insert brewing unit"." | Cover is wrongly inserted. 1. Check whether the brewing unit is inserted correctly and is securely locked. 2. Push the red lever up to the left. 3. Insert the brewing unit cover. |
| Display shows "Please fill water tank." despite the fact that the water tank is full. | Water tank is wrongly inserted. → Insert the water tank correctly. |
| Carbonated water is in the water tank. → Fill the water tank with fresh tap water. | |
| Float is stuck in the water tank. 1. Remove the water tank. 2. Clean the water tank thoroughly. | |
| New water filter was not rinsed as per instructions. 1. Rinse the water filter according to the instructions. 2. Place the water filter into operation. | |
| Air is in the water filter. 1. Immerse the water filter in water with the opening facing upwards until no more air bubbles escape. 2. Reinsert the filter. | |
| Water filter is old. → Insert a new water filter. | |
| Limescale deposits in the water tank are blocking the system. 1. Clean the water tank thoroughly. | |
| Display shows "Please fill water tank." despite the fact that the water tank is full. | 2. Start the descending programme. |
| Display shows "Please clean brewing unit"." | Brewing unit is soiled. ► Clean the brewing unit. |
| Mechanism of brewing unit is stiff. ► Clean the brewing unit. | |
| Display shows "Incorrect voltage". | There are problems with the power supply. ► Only operate the appliance at 220 - 240 V. |
| Display shows "Restart appliance". | Appliance has a fault. 1. Pull out the mains plug and wait 60 seconds. 2. Re-insert the mains plug. |
| Display very frequently shows " " . | Decalcified water still contains small amounts of lime. 1. Insert a new water filter. 2. Set the corresponding water hardness. |
| Incorrect or too little descending agent used. ► When descending, only use suitable tablets. | |
| Service programme has not been carried out in its entirety. ► Start the "Special rinsing" service programme. → "Service programmes", Page 28 |
15 Transportation, storage and disposal
15.1 Activating frost protection
Protect your appliance from frost during transport and storage.
ATTENTION!
Residues of liquid in the appliance may damage it during transport or storage.
-
Empty the pipe system before transport or storage.
-
Run the "Frost protection" programme.
"Overview of service programmes", Page 29 - Disconnect the appliance from the mains power supply.
15.2 Disposing of old appliance
Valuable raw materials can be reused by recycling.
- Unplug the appliance from the mains.
- Cut through the power cord.
- Dispose of the appliance in an environmentally friendly manner.
Information about current disposal methods are available from your specialist dealer or local authority.
This appliance is labelled in accordance with European Directive 2012/19/EU concerning used electrical and electronic appliances (waste electrical and electronic equipment - WEEE).
The guideline determines the framework for the return and recycling of used appliances as applicable throughout the EU.
16 Customer Service
Function-relevant genuine spare parts according to the corresponding Ecodesign Order can be obtained from Customer Service for a period of at least 7 years from the date on which your appliance was placed on the market within the European Economic Area.
Note: Under the terms of the manufacturer's warranty the use of Customer Service is free of charge.
Detailed information about the warranty period and the warranty terms in your country is available in the enclosed customer service directory, from our customer service, your retailer or on our website.
If you contact Customer Service, you will require the product number (E-Nr.), the production number (FD) and the consecutive numbering (Z-Nr.) of your appliance.
The contact details for Customer Service can be found in the enclosed Customer Service directory or on our website.
16.1 Product number (E-Nr.), production number (FD) and consecutive numbering (Z-Nr.)
You can find the product number (E-Nr.), the production number (FD) and the consecutive numbering (Z-Nr.) on the appliance's rating plate.
Make a note of your appliance's details and the Customer Service telephone number to find them again quickly.
17 Technical specifications
| Voltage | 220-240 V ~ |
| Frequency | 50 Hz |
| Connection rating | 1500 W |
| Maximum static pump pressure | 20 bar |
| Maximum capacity of water tank (without filter) | 2,3 l |
| Maximum capacity of bean container | 375 g |
| Maximum capacity of right/left bean container | 260 g / 280 g |
| Length of the power cable | 100 cm |
| Appliance height | 40 cm |
| Appliance width | 32 cm |
| Appliance depth | 47 cm |
| Weight, empty | 12 kg |
| Type of grinder | Ceramic |
17.1 Information regarding Free and Open Source Software
This product includes software components that are licensed by the copyright holders as free or open source software.
The applicable licence information is stored on your home appliance. You can also access the applicable licence information via your Home Connect app: "Profile -> Legal information -> Licence Information".1 You can download the licence information on the brand product website. (Please search on the product website for your appliance model and additional documents). Alternatively, you can request the relevant information from oss-request@bshg.com or BSH Hausgeräte GmbH, Carl-Wery-Str. 34, 81739 Munich, Germany.
The source code will be made available to you on request.
Please send your request to ossrequest@bshg.com or BSH Hausgerate GmbH, Carl-Wery-Str.34, 81739 Munich, Germany.
Subject: „OSSREQUEST“
The cost of performing your request will be charged to you. This offer is valid for three years from the date of purchase or at least as long as we offer support and spare parts for the relevant appliance.
18 Declaration of Conformity
BSH Hausgeräte GmbH hereby declares that the appliance with Home Connect functionality conforms to the basic requirements and other relevant provisions of Directive 2014/53/EU.
A detailed RED Declaration of Conformity can be found online at siemens-home.bsh-group.com among the additional documents on the product page for your appliance.
CE
Hereby, BSH Hausgeräte GmbH declares that the appliance with Home Connect functionality is in compliance with relevant statutory requirements.
A detailed Declaration of Conformity can be found online at siemens-home.bsh-group.com/uk/ among the additional documents on the product page for your appliance.
UK CA
Only applies to Great Britain
2.4 GHz band (2400-2483.5 MHz): Max. 100 mW
5 GHz band (5150-5350 MHz + 5470-5725 MHz): Max. 100 mW
| BE | BG | CZ | DK | DE | EE | IE | EL | ES |
| FR | HR | IT | CY | LI | LV | LT | LU | HU |
| MT | NL | AT | PL | PT | RO | SI | SK | FI |
| SE | NO | CH | TR | IS | UK (NI) | |||
| 5 GHz WLAN (Wi-Fi): For indoor use only. | ||||||||
| AL | BA | MD | ME | MK | RS | UK | UA | |
| 5 GHz WLAN (Wi-Fi): For indoor use only. | ||||||||
WAARSCHUWING - Kans op verstikking!
WAARSCHUWING - Kans op brand!
WAARSCHUWING - Kans op letsel!
| Comfort Barista | Apparaat is in de ba-ristamodus of comfort-modus. |
| ∑∑∑ | Kopjesverwarming is ingeschakeld. |
| ∑∑∑ | aromaBoost |
| ∑∑∑ | Apparaat is met Ho-me Connect verbon-den. |
7.5 baristaMode of comfortMode
11.2 Home Connect instellin-gen
5-GHz-band (5150-5350 MHz +
5470- 5725 MHz): max. 100mW
7.3 doubleShot i tripleShot
7.3 doubleShot a tripleShot
(waste electrical and electronic equipment - WEEE).
ДлгпriroTOBJIeHЯ rOpyuXHaHNTKOB.
B 6bIToBbIX yCIOBnIX IN B 3aKpbItbIX NOMEuEHNHX DOMaUHNX XO-3rICTB.
Ha BbICote He 6oJee 2000 M HaJ yPoBHeM Mopra.
1.3 OrpaHnueHne Kpyra noIb3ObaTeJeIe
Данныnpибор может Исплььзоваыся DeТьМВ ВОЗpacTe OT 8 leT n CTapшe, a TaKke Лицамс OгранчehнblIMФиЗИчecKMn, ceHcOрнblIM Илу умCTВеHHblIMсСОСБНOCHTM Илс C HeДОСТКOM ONblTa n/ Ил 3нанн, ecIn OHI HaxODЯТСЯ ПОд ппсмOTpOM ИлпослполучЕну уka3aHni NO 6e3ОпаСHOMY Исплььзованю рибopa и посLEТOrO, KaK OHI OCO3HaJI N OnaCHOCTN, CBЯЗAHьIe C HeпразВиьнblIM Испльь3O-BaHneM.
TeTAM 3aIpeSeHo IrgpaTb c npI6Opom.
OuicTkU n o6cIyJxHbAHne npi6opa 3aIpeuaeTcB bInoJIHrTb DeTAM; 3TO pa3pe7aetcTToIbKO DeTAM cTapwe 8 let noD HaI3OpOM B3pocJIbIX.
He donyckaTe deTei MnaIe 8 let K npbOpy I erO ceTeBOMy npoBODy.
1.4 Yka3aHnno To TexHnke 6e3onacHocTn
PPEyIpeJDEHNE -Onacnoctb yduyb!
IeTN MOryT 3aBepHyTbCBy B yPaKOBoHbI MaTePnaJI nII NaDeTbe erO ce6e Ha rOIOBy n 3aDOxHyTbCra.
He noDnyscaIte deTeK yyaKoBOuHOMy MaTePnaIy.
He nO3B0JIaIe Te DeTAM HrpaTb C yNaKOBouHbIM MaTePnaJIOM.
IeTN MOryT BdoXHyTb IIN IpOrlOTnTb MeJKe DeTaJI, B pe3yIbTaTe ueo 3aDOxHyTbcra.
He npdnyckaTe DeTeK MeJkM DeTaIaM.
He nO3BOLJIte DeTm INrpaTb C MeIKNIMn DeTaJIaMn.
ПЕДУПЕЖДЕНЕ -Опасноctь поражени злектуческIMТOKOM!
3 YcTaHOBKa N NOkJIIOUeHHe
3.1 KomnJIeKT NOCTABKN
Iocne pacnakOBKn npOBepbTe Bce DeTaHn OTCyTCTBHe TpaHCnOpTHbIX NOBpeKdEHN, a TaKKe KOMNJIeKTHOcTb NocTaBKn.
3aMetka: B 3aBnCmOCTn OT Tnna pnp60pa OH nocTaBJIeTcA pa3JIuHbIMn npHaJaJIeKHOCTMa. 3Tu npHaJaJIeKHOCTNo 0bO3NaueHbI WTPNXOBaHHo paMKoI.
→Pnc.1
CehcnpbI dncnpe npedctabnre coboi KOMbHnpoBaHHbI 3neMeHT INdkaunu nppaBHeHH.
TJabhoe MeHIO
Pekomehdaun:pyrye yCTaHOBKn HAnNTKOB DoCTyINbI B OCHOBbIX YcTaHOB-Kax.
Hnkaun
| Комфорт Бариса | Пробarbeitов в pe- жиме «Бариса» и в разиме «Комфорт». |
| XXX | Прогouverчашек Влю- чен. |
| ▲ | aromaBoost |
| © | Пробarbeit подк nullуен К Home Connect. |
| © | Пробarbeit подк nullуен К Home Connect. |
IoproToBbTe np6oB K nCnoJIb3ObaHnIO.
6.1 Побrotовka прибopa и erо ouhctka
CHIMITE 3aUHTHbIe PIIeHKn I OuchTInTe npBOp I erO deTaIN. CneDyIte HnCTpyKcIN B KapTHKax, PpNBEdeHHoB B HaJaJIe 3TORO DOkymeHTa.
BHIMAHNE!
Bo3MoJHa 3a6nBka KoΦeMOnI KHeIoDxo- DIAuIMN KoΦeHbIMN 3epHaMn.
HcnoIb3yIte ToJIbKO uIcTble cMeCn npOkapeHHbIX KoFeIhBIX 3epeH dIpynIroTOBNeHnIg Cnppecco IIN dIra aBToMaTHueckNX KoFeMaIHH.
He nCnoJIb3yIte KoPeIHbIe 3epHa, noKpbIbIe rna3ypbHO.
He nCnoB3yIte kapaMeIIN3npoBaHHbIe KoFeIhIbe 3epHa.
He nCnoB3yIte KoFeiHbIe 3epHa, o6pa6oTaHHbIe caxapocOdepKaUIMM Do-6aBkAmN.
He 3acbinaTe MoIOTbIKoFe.
→Pc.4-29
PpIMeuaHn
EkeDHeBHO HApONHnIe EMKoCTb DnI BODbl CBeXeJXOLOHNO BDOI 6e3 yIeKNCLOTbl.
B BapnHaTe npnbopa c DByMa EMMKocTm NДЯ KoФeHbIX 3epeH MOxHO 3aCbI-NaTb KoΦe DByX pa3hIX copTOB. CBeToNIOd NcNoJIb3YeMoH eMKOCTn DIA Ko-ΦeHbIX 3epeH rOpNT.
■ПиборзанOMHnaeТДЯКаждого
нанNTka EMKocTb ДЯ Кофeyньix 3ерен,
ВыбранHyю посл徳н. 3Ту пpeДари-
TeIbHyU yctaHOBky мОЖHo ИЗМeHNTb.
"Ba3ObIe yCTaHOBKn", CtpaHnua 192
PekomeHdau:YTo6bIcoxpaHnTbOHTMaJIbHOeKaueCTBO,XpaHnTeKoPeHbIe3epHaBIIpOxAaHOMMeCTN B3aKpbItbIXEMKOCTX.
B emKoCTn dIg KoFeHbIX 3epeH MoJHo XpaHntb KoFeHbIe 3epHa B TeueHHe HeckOJIbKnX dNei 6e3 nOpEn apomata.
6.2 OnpeJeIeHne JecTKoCTN BOJbl
IpaBnBnaHacTpoKa JcEcTKoCTN BOnbl BaKHa IJr OecneueHn CBOeBpeMeHHo Tn HApOMnHaHnO Heo6XoDmOocTH ydaJIeHn HAKnPi. XEcTkoCTb BObl MoKHO ONpeJeNTb Pn NOMoU nPnlaRaemOn INdNKaTOPHO NOLOCKN IIN Y3HaTB ee B MeCTHO BODOCHA6kaIoSeOpraHn3aunn.
- Ha kopotkoe Bpemr norgy3nte HndnKaTopHyIO nolocky B CBeKyu BOOpnpoBOdHyIO BOy.
2.ДаTe BOe cTeUb c INHnKaTOpHoI no-LOsKn.
3.CuHTaIte JecTkoCTb BObl Ha HnDnKa-TopHOI NOLOCKe cnYcT 1 MHN. B Ta6NIue npEiCtBaJIeHO COOTBeTCTBHe peKIMoB pa3JIHbIM CTeNEHrM JecTKOCTN BObl.
He neiTe 3OT HAnIToK.
PekomeHdaun: Cta6nIbHo MeKoNOpnCTa KOnCnCTeHcHneHb DoCTnRaTcNoCNE BBODa np60paB aKcnnyatauHIO nPpiroTOBHeHn HeckOJIbKnx YauKe.
7 CtaHdapThoe ynpaBneHne
7.1 BkJIIOUeHne HnBbIKJIIOUeHne npI6opa
HaKMITE ①.
PnBkLIOUeHnHaDcNJIeE NOBbIaETcA ILOrToHn.PnBkLIOUeHn N BbIKIIOUeHn BbINONHAEtca ABTOMaTNUeCKaI npOMbIBKa pnp6opa. PnBbIKIOUeHn np6Op BbInyckaetnapB loTOK dIra c6opa KapeIb C cEnbIO OunchTk. Ecnn np6Op npBkLIOUeHn eue Harpet INI nepeiBbIKIOUeHneM HAnITOK He roTOBUNC, npOMbIBKa np6Opa He BblIOJIHaeTcA.
3decb onncaHo, KaK npriroTOBHTb HAnITOK nO BaWemy Bb6Opy.
ПЕДУПЕЖДEHNE Onachoctb ownapuBaHnI!
CbeKe npriroTOBJIeHHbIe HAnITKn OueHb roPraHne.
Ecnn noTpe6yETc, daTe ocTbITb HAnNTkAm.
H36eRaIte KOHTaKa TbIeJIaHOuNXcJHKIOcTeNnapOBcKoKeJ.
PpIMeuaHn
- HekoTOpbIe HacTpoiKn npEidnoJaraIOT npriToTOBJIeHne KoFe B HeckOJIbKO Ia-roB. Joxdntecb OKOHyatelbHOro 3a-BepuHenr npocceca.
Длп риготовелян haNTka C MOnoKOM cIeJyET BcERda NOДcoEДИНТь 3a-ПОЛHEHNYO MOnOKOM emKOCTb ДлЯ MOLOKа Или aДаNTep C MoJOUHbIM NaKeTOM.
YcTaHaBJIbBaTb HIN CHIMaTb yCtpoICTBO pa3JINBa HAnITKOB MOXHO TOnbKO TORda, KOrDa npNbOp He CoeINHeN CEMKOCTbIO JI MOnOKa HIN aJaNTepOM DnA MoJOnyHbIX NaKeTOB.
EMKOCtB dIa MoIOKa cneuaJIbHo pa3pa6oTaHa dIa 3TOrO np6oba.EmKocTb dIa MoIOKa ppeHa3NaueHa NCKLIouHTeJbHO dIa TORO, yTObI XpaHnTb MOIOKo B 6bITOBbIX ycIOBnaX N BXOLOINbHNke.
EcnncTeMa nOaun MoIoka He Oun- 1eHa,TO npn HauBaHnn Togpaue BoDbl C HeM MoKET BbIXoNDtB He6oJIbShoe KOJInuYeCTBO MOIoka.
7.3 doubleShot n tripleShot
Pn6op DbA nIu TpI pa3a MeIeT KoFe.
YTo6bB BcBO6OHTb TOJIbKO JERKoyCBOReMble I npIaTHbIe Ha Bkyc apOMaTHueckne BeueCTBa, Pnp6op NOBtOPHO nepMaIbIbAet 3aBapINBaET KoFeHbIe 3epHa.
YeM DoJIbIe 3aBapINBaETcR KoFe, Tem 60JIbIe rOpbKnx BeUeCTB N HeKeIaTeJIbHbIX apOMaTOB nonaDaET B HAnITOK. TOpbKne BeUeCTBa N HeKeIaTeJIbHbIe apOMaTBIOTPiuCaTeJIbHO BIIIAJOT Ha Bkyc I DeJaOT KoFe MeHee pInrTHbIM dJIy yNoTpe6NeHHIa.
3aMeTka:Функш "doubleShot" n tripleShot 3aBnCrt OT BbIpaHoro HAnIT-ka,ero KpeNoCTn O6bema.
HnB KOem cnyuae He npKacaiTecb K ropaemy noDorpeBaTeIHO uaWek'.
- Pered KOnTaKToM c rOpAaHm NDoIorpeBaTeJeMaWeK' daTte Emy OcTbITb.
PekomeHdaun:IJIaONTImaJIbHOrO nOIOrgpeBa yctaHaBnBaIte YaShKIN DHom HaNoIOrgpeBaTeIb1.
IOnOrpeB qaueK MoJHo BkIoUOHTb IIN BBIKNoOHTb B 6a30BbIX HAcTpoiKaX.
10 NepcoHaJIH3aun
HaHTKMOJHOCoxpaTbBJIuHOM npo-phiJe.
Ctayc npeIbIyUeIro BOCCTaHOBLeHn3aBOIDCKHX HAcTpoEK,ecNIOHO BbINOpHJNOCb.
PepBoHaJaBHaRa pernctpaZna I BJIaTeC 3TaIOM NDoTOrOBK K nCNoJb3OBAHnHO fYHKcHm Home Connect n Tpe6yETc IINb OndHOKpATko, npn nepBOM nCNoJb3OBAHn HfYHKcHm Home Connect.
3aMetka: O6paTHe BHNMaHne, UTo Ic- noJIb3OBAHne FyHKnI Home Connect Bo3- MoKHO ToJIbKO pRi HAnuNn npInoKeHn Home Connect. INΦopMaunO 3aUnTe DaHHbIX MOKHO HaHTB npInoKeHn Home Connect.
12 Ba3ObBiye yCTaHOBKn
BblMOKeTe 3aDaTb 6a3ObIe yCTaHOBKn Ipn6Opa B COOTBeTcTBn C BaUIMM NtPte6HocTAmN BB3BaTb DOnoJIHInTeJbHbIe fYHKUn.
12.1 Изменинке 6a3OBbIX Ha-ctpoek
- HauKMITE
Ha dincpiiee oTo6paKaetc cncok 6a-30BbIX Hactpoek.
2.ИЗмEHITe HUKKHyO 6a3OByIO HacTpOi-Ky.
ПиборзалOMHaeT6a3OByHnactpoI Ky aBTOMaTHueCKN.
3.ДЯВыхолаизpeЖIMа6a3OBbIXHa-CTpoeK HaKMnTe←.
12.2 063op 6a3OBbIx yCTaHOBOK
3decb npBDOHTc063op 6a3OBbIX HacTpoeK.
He nCnoB3yIte arpecnBhIe nn a6pa- 3NBhIE YnCTaIne CpeIcTBA.
He nCnoIb3yIte uHcTnIe cpeIcTba, coedeJkaIne aNkoIorJIb/cnIrt.
He nCnoIb3yIte JxecTkne MoaJkn nn ry6kn.
HenodxoJnue nctTnue cpeCTBa n cpeCTBa dIydaJIeHnHaKInmMOrTy NOBpeDntb npNoOp.
Дя удалени Накпи He Использун TeчсTuO JIMMOHHy KINCIOTy, yKcyc Ипсpeдста Ha ochObe yKcyca.
He nCnoB3yIe cpeIcTBo IaJydaJIeHnHaKInn,coedePkaUee focΦopHyIO KNCIoTy.
IcnoIb3yIte ToJIbKO cneuaJIbHO pa3pa6oTaHHbIe NOD KOHKeTHbI np6Op Ta6JeTKn IyJaIeHHaKaIIHn OOHTKN.
"AKececcyapbl",CTpaHua 182
PekomEnDaun
TtataTeIbHo npOMoIte HOBle rHy6aTbe caJIeTKn, YTObI yJaIITb CoN, KOTOp bIe MOryt IMeTbcN Ha HIX. CoN MoYr TpINBeCTN K O6pa3OBAHIO HaJIeta pKaBcHHbHa NOBepxHOcTAX I3 CTaII.
OcTaTKn HaKInn, KOFe, MONoka, MOIOxN CpeIcTB N CpeIcTB IaYdaJIeHna HaKInn BceIgA ydaJIaIe He MeMeJInHeHO, UTo6bl PpeIoTbPaITb O6pa3oBaHne KoppO3nn.
13.3 OuHcTka npHbopa
PPEyPExKDEHNE
Onachoctb npaKeHHa 3JIeKTPnueckHM TOKOM!
cKnx n 3JeKeTpoHbIx npNoB- oPoB (waste electrical and electronic equipment - WEEE).
JaHHbIe HOpMbI OnpedeJIaIOT DeIcTByUOuIe Ha TeppINTOpIN EbpocOIO3a IpaBnA Bo3Bpata N yTInN3aUIN CtaPbIX pIn6oPoB.
16 CepBnchna CJyX6a
BaxKbIe IJIa FyHKUHOHPOBaHHaNpHbopaOpHnHaJIbHbIe 3aIuactH, COOTBeTCTByOuIe DInpeKTINBE EC no 3koJIoRnueckOMyPnoEeHToPAHnIO 3JeKTPoONtpe6JIaIOUeINpoDyKcNN, Bbl MoKeTe 3aKa3aTb B HaSeiCEpBnCHOn CUYK6e, KaK MHNmym, B TeYeHne 7 let C MOMeHTa PnoDaJKN BaWeroPnp6opBa B npdeJax EbponeeCKoro 3KO-HOMnueckOro nPoCTpaHCTBa.
3aMeTka: PnBbIOpHHeHHrapaHTnHbIX yCIOBn IPOIN3BOIDTeJIpa6Otbl BbIOpHraIOTcA cepBnCHoCnJxK60B 6ecnIaTHO.
Iopno6Hyu HnΦOpMaunO rapaHTnHOM cpoke n yCNOBnX rapaHTn B BaWe CTpaHe MoKHo HaTn B npInaRaEMOM nepeueHcepBnchbIX CnykO nn HaHaWeM Be6-caTe, TaKKe Bbl MoKTe yToCHNtB 3Ty HnΦOpMaunO B HaWei cepBnChOn CnykOe nn y BaWero dInlepa.
Ampes Telefoh cepBnchOn cnyk6bMoKHO HaTn B npnilaRaemom nepeHecepBnchbIX cnyk6 nHa HaHaem Be6caite.
https://www.siemens-home.bsh-group.ru

1.3 O6MeJKeHnKaKoJa KOpNcTyBaayiB
ДiTи BIKOM BiD 8 pOKiB, a TAKOJ OCO6n 3 O6mExeHIMN φi3nUHIMN, CEHCOPHIMN a6o PO3yMOBIMN 3Ii6HOCTaMn U3 6paKOM IOCbIy Ta/a60 3HaHb MOKyTb KOpNCtYBaTINcA ZIM nPpIaNOM TiIbKN iId HaIraIOM a6o NiCJIa OTpIMaHHB Bka3iBOK i3 6e3neuHOrO KOpNCTyBaHnR nPpIaNOM i NiCJIaTOrO, JK BOHn YCBiIDOMnIn MOnJIbBi NOB'J3aHI 3 ZIM He6e3NeKn.
YCTaHOBIb HaIMeHsU TpNBaIcTb 3aTpIMKn aBTOMaTHO BUMKHeH H.
Koln npilaJom He 6yIyb KOpNCTyBaTncra, BiH BIMNKaTUMetbcpaHiue.
"OChOBHi npaMeTpN", CToP. 226
He nepepnuBaIte npriroTuBaHnHa naoiB nepeDuacHo.
HarpiTa KIbKICTb BOAn a6o MoIoka 6yJe BnKOpNCTaHa ONTUMaJIbHO.
PergyIaRHO BuaJIaIe 3 npIaIy HauKIn.
V BiДклади habиу piДВишуOTb eHeprocnoxINBaHHa.
3 YcTaHOBJIeHHa N iD-KJIIOUeHHa
3.1 KomnjeKT NOCTABKN
Iicla po3nakyBaHH nepeBipTe, uKOMnJIeKT NOBHN i uH He NIOsKOdINo RaKiCb yactuHnPi dac TpaHCnpTyBaHH.
3ayBaHexHH: 3aIeKHO BiM MoJeI npIaNy B KOMnIeKT BXoIaTb pi3Hi akcesCyapn. IodatKobi akcesCyapn no-3HaueHNIyHKTInpHOIO paMKOIO.
Man. 1
| A | Кавомашина |
| B | ЕмнICTь дlya молoka |
| C | Гунчka Труобка дlya молoka |
| D | Адамер emnocti дlya молoka1 |
| E | История 3 ekсплуатацii |
| F | Довоміжна наразмна дlya Bстановленnerski Фільстра. |
| G | Таблека дlya видаlementно накини1 |
| H | Таблека дlya оочиения1 |
| I | Вожnéй сільстp |
| J | Смужka дlya визанныени Жорстковские вodи |
| K | Сервetedka з мікpoвolyоны |
1 3aJIeJHObIi KOMJIeKTaUII npnla-ny
3.2 YcTaHOBJIeHHa NPiDKJIIO-ueHHa npHJaNy
YBAGA!
He6e3neKa nOuKOJxEHHn pUInaNy. HenpaBnIbHe BVeJeHHn B eKcPJIyatauIIO MOKe N0oKOJNTn pUInaI.
BukopncToByTe npuJaI JnIe B npMiuSeHnX, 3axNuEHNx BiD MOpO3y.
-Якшо пилад транспортуоть abo 3берігайыть 3а Temпepатур,在жуовд O°C,пегд ВьеденHMВЕКПУATAцIO CIIД BNTPIMATN IO-ro 3 roД за KMHaTHOITemператур.
-Пися Кожного пдкюченя слд поуекати риблизно 5c.
1. YctaHOBIb II npnlaI Ha pIBHi BOIOCTiKi IIOBepxHl, 3daTHi BHTpIMaTI NOrO Bary.
2 BCTaBTe 7TeNceIbHy BNkky npnla-ny Do HaleJHIM YHOM BCTaHOBJIeHOi PO3eTKI.
4 3HaHOMCTBO
4.1 Пплад
Tyt MoXHa IIO3HaIOMHTnC 3i CKlaDnKamn PpIaNy.
Bka3iBKn
3aIeJxHO BiD MoIeJI npIaNy MoKJIuBi DeIeKI BiIMiHNOCTI KOJIbOpTy TaDeTaJIeN.
B i nctpykui 3 ekcnlyataui onncaHI dBa bapiaHTn npnilaNy:
-ПрILAД МаС OДИН KOHTeHep ДЯ КавOBuX 3epeH.
- PnIaMae IBa KOHTeHepn Iy KaBOvX 3epeH.
Man. 2
| 1 | ЕмнICTь дlya молoka |
| 2 | Сechорни Кногки |
| 3 | Пidirрів чашok1 |
| 4 | Контунер дlya кавobих зерен1 |
| 5 | Вidiсік дlya tabл致电OK |
| 6 | Кршka дlya збэржени.apомату1 |
| 7 | Свитlandoideший indидахетахрюнaja кал'te_Hepa дlya кавobих зерен1 |
| 8 | ЗавODсьka tabлчuka |
| 9 | Сенистий диспей |
| 10 | Довцята заварюваль碍и kamери |
| 11 | Peэрвуap дlya ВОи |
| 12 | Молоча систema |
| 13 | Кршka dozoatopa |
| 14 | Пддons дlya краель |
1 3aIeJHOBiKOMJIeKTaCiI npIla-ny
LIO6 OINTMmaJIbHO KOpNCTyBaTnCnI npIaJOM,3BaJaTe Ha BKa3iBKn.
Bka3iBKN
Ha 3aBoDi BCTaHOBLeHo CTAHdApTHi npaMeTpNi DnI ONTImaJIbHOrOpexkMpyo60tN pnpJaNy.
KabOMOJIky BiDpeRyIbOBAHO Ha 3aBODi IJN ONTIMaJIbHOI PO6OTn. JkIo KaBa Teue IINe KpaIJIaMn a6o HauTo pIka N MaE 3aMaNo nIHKn, MoXHa BiDpeRyIbOBAtN CTyniHb POMeNy. "KOpNCtYBaHNr eENeKTPOHHm peRyIbOBAHHrM CTyneHr POMeLy eGrinder", Cstop. 221
Пд уас Користувашина Вerteцліцинх плинхі кршци BiDciky Дп ТаБлЕТOK можлamba пова Крапель BODи.
JaKIO He KopnCTyBaTncr npnilaDOM ynpoIOBx NeBHO uacy, BIn aBTOMaTNUHO BUMKHeTbcr. TpNBAJIcTB cboO rpeIoMy MOxHa 3MiHITN B OCHOBHnx NapaMeTpax. Ctop.226
3TexHiuHnX npuHn 3cepeiHn npIaMy MOKe BxOoNTn npa.
-
Perший пигорованьни He bye matn Bupaжehoro apomaty, YKQUO:
-
Bn koprncctyetece npnilaonm ynppe.
- Bn ⅢoIHO BVkoHaJInc cepBicHy nporpaMy.
- Bn DoBro He BMkai npnila.
He pnte zboTo hanoIO.
Iopapa: CtaibbHa dpiHOpncta KpemOba nIHKa doCraeTbcn iicJI npriOTyBaHHK iJIbKOx yauoK BiD NOaTky KOpNCtYBaHHn PpINAdom.
7 OchoBhi BiIDomocTi npo KopnCTyBaHHa
7.1 YbIMKHeHn a6o BmKHeHHn npHaNy
- HatnCiHtB ①.
Плд уас yВIMKHeHЯ на дспле i 3'ЯВИТбСЯlorOTи. Плд уас yВIMKHeHЯ вIMKHeHЯ пилад aBTOMaTNUHO npOMuBaeTBCSR. BIMnkaIouNcSb, пилад чИСТИТCSR, BINySCaIouNnapyВпIDоH.ЯКIo ppiIaHa MOMeHT yBIMKHeHЯ сTeПЛm a6O nepeД ВIMKHeHЯнHaIoI He rotYBaJIи, пилад He npOMuBaeTBCSR.
7.2 Пнготуваима наоов
Tyt Bn Di3HaεTeC8,ЯK pIpyToBAtu BnOpaHni Hani.
YBARA!
He6e3neka oniky!
LioHOn npiroTOBaHi Hanoi dYke ra-paui.
Y pa3i noTppe6n daBaIte HaNoyM OXoJOhTyN.
YHnKaIte nOtpaIIHHHa shkipy piINi napu, 0o BVXoJrTb i3 npInaNy.
Bka3iBKn
3a DeKnX npaMeTpIB Kaba roTyetbCBy KijbKa etanIB. 3aueKaJTe, DOKN IpOcE npuRTOyBaHHI NOBHICTIO 3aBepuHTbcra.
IIO6 npnroTyBaTu Hani3 MoJOKOM,do npnilaNy NotpiHO npneJHaTn 3aNOBHeHm MOJOKOM KOHTeHep a6o,3a DOnOMOrOo aadantepa,MOJouHn naket.
YcTaHOBJIIOBaTn a6o 3HIMaTn IO3aTOP MOJHa TIJIbKNI TOI, KOJI He npIEdHaHn KOHTeHep dJa MOnOKa a6o MoJouHn aJaNTep.
KoHTeHepIJMaMOJOKa pO3pOBeHeHcpeiaJIbHO nId cei npUlaI. KoHTeHepIJMaMOJOKa npu3HaueHnTilbKn dJa TOrO, 0o6 36epirAtm MOJOKOBIOyTOBnx yMOBaX i B XOJODINbHNky.
Якшо молоча систema Heпочишина, нал'tа rapяча Вда може мICTИТи He3нayнi Домішки молoka.
7.3 doubleShot i tripleShot
PpnilaMJIe KaBy DBiCi a6o TpruCi.
LIOb BnBilbHraIcN TIIbKNI pIneMHi Ha CMAk I Do6pe 3acBOIOBaHi apOMaTIuHi peOBoHH, PpnilaI 3aHOBO MeJIe 3epHa N 3aBapIOE KaBy.
YIM DOBSe 3aBapIOeTbCkaba,TM6iJIbSe rIPKnxpeyOBnIH eBaXaHx apomatIB BnBilbHReTbC. FipKi peyOBnHn H eBaXaHi apomATn NoripSlyOTb CMAk i 3acBOIOBaHicTb KaBN.
3ayBaXeHHa:ФyHkUii "doubleShot" i "tripleShot" 3aIeKaatb BiD BnOpaHoro HanoIO, INO rMiuHOCTi Ta o6'Emy.
7.4 ПпнгOTуВаHHЯ KaBOBOrO HANOHO 3 MOJIOKOM
YcIbOMy npIKlaJI Mm PO3rJIaHEMo, JAK pIINOTyBaTN IaTe-MaK'JrTO.
YBATA!
He6e3neKa onikB!
Molouha cnCTema dYxE cnIbHO ha-rpiBaetbcra.
Hikon He TopkaTecra rapaoMolouHOI CnCTEMN.
- Perш Нix TopkaTNc MOnOuHOi CnCTeMn, daIte iN OXOJHOHTN.
Bumorm
-
Пилад уВімКнЕни, peЗерБуар Дя ВОДи i KOHTeHep Дя KaBOBux 3epeн 3aNoBHeNi.
KoHTeHepIJIaMOJokaaboMOJOnuHNiaanTepPnueHaHn.
KoHTeHepIaMOLOKa 3aIOBHeHm MOLOKOM, aOb IaHr MOLOUHO r aDantepa 3aHypeHn y MOLOKO. -
NocTaBTe cKJIaHKy pIД Do3aTop.
- Hatnichitb Barista i BnBepiTb "baristaMode".
- HatnChiTb "KJaCnKa".
- Bn6epiB CmB0J HanoIO JatemaK'rTO.
-
Hatnchitb Cnmbol HaNOIO i HaIa- 1tYiTe npapMeTp nHaIOU.
-
Lio6 yctaHOBTu MiUHicTb 0, HATNCKaIte CeRMHTn.
-
Uo6 yCTaHOBnT KJIbKICTb 日, HATNCKaIte CeRMHTN.
-
Uo6 yctaHOBHTn YacTky MOJOKa, HATNCKaIte CeMENTn.
- Uio6 yctaHOBNTn CTyneHb NOMeNy ,HaTNCaIte Ce- rMeHTN. "KOpNUCTyBaHHe eJeKTPOHHM peYIIOBAHHM CTypeHr NOMeLy eGrinder", CToP. 221
- Uio6 yctaHOBHTN uac KOHTaKtTy ©, HATNUCKaIte CeRMHTN.
- Uso6 yctaHOBNTu TEMpepatyp 3aBapIOBaHHa,HaTnCKaITe Ce- rMENTn.
-
Lio6 3miHHTN KOHTeHep dIЯ KaBOBnX 3epeH, HATNCiTb [E]
-
HatncHtB "Start" i doyeKaITeC3aBepWeHH npoecy.
-
Μιοῦ πονβίcτύ 3υπινινι πρινό-TyBaHHaHηO, HαTικΗΤβ"Stop".
- Uo6 3ynHHTn TiIbKn nTOOHyn eTan npnroTyBaHHa, HATNCiTb "PpOnyctNTn".
Bka3iBkn
JaKIO He 3MIHITN KOJHOrO npaMeTpa npOTyROM npu6JIu3HO 30c, npuilaBnIe 3peXIMy HanaaHTyBaHHa.
- Пилад зберіга有很大ametprn abTomaTNUHO.
LIO6 cKInHyTN BcI npaMeTpnu HANOIO, HATNCHiTb "BIDHOBTn".
IoparNi
- Pered nprirotyBaHHn HaNoiB Ya- shkn MoXHa NiirpiBatn rapaOIO BOIO a6o CneiaIbHnM niirpiBaueM'.
JHKUO npuJaMaE Da KaBOBx 3epeH, a B OndHomy 3 HnXPiJ Yac npuROTuBaHHa 3aKiHuaTbCzepHa, MoKHa nepeMkHyTnc Ha dpyrN KOHTeHep1. 3epHa IJI NpdaJIbIoo npuToTyBaHH6paTmMyTbc3 NOBHOKOHTeHepa.
3aMicTb MOJOKa MOJHa BIKOpNCTOByBaTn HaIoi pocJIINHOro IOXOJKeHHa, HApNIKJaI COeBE MOJOKO.
■Ykictb MoIouHoiPiHKn 3aJIeKHTB BiI COPTy BIKOPINCTOBYBaHOrO MOJIOKa a6o HAnIO pocInHHOrO INOXoJKeHHJ.
7.5 baristaMode a60 comfortMode
Bmora: Ppnilad yBIMKHeHO.
HaTnCHiB i BTPmUyTe 0o-HaIMeHwe 3 c.
Φункцин «Блокувпьд Достуни DiTeи» aKТИВОВаHO.
8.2Дeактубacia六个月后BIDdoctундITEI
HaTnCHiB i BTPmUyTe 0HaHMeHwe 3 c.
БлOKуВаHHЯ BiД ДОCTупу ДITEй DeaKTINBOBaHe.
9Підірів чашок¹
UaJKN MOxHa NiirpIbATn 3a DonomOroTO NiirpiBaVa UaJOK.
9.1 AkTnBaCi i DeaKTHBaCi niDirpiBaCu ya ChaWoK
YBATA!
He6e3neKa onikB!
Пидирьач чашok¹ Дуже Нагрьа-Тбс.
Hikoln He TopkaTecra rapuoro nidiirpiBaaya yauok
- Першних покатися rapячoro ni-dirpiBaça уашok¹, дайтейюmy oxolohytn.
Iopapa: IJIa ONTImaJIbHOro NiirpIBy uawok CTaBTe uawkn DHom Ha niirpiBauch.
- AKTINByBaTN i DeaAKTINByBaTN nIi-rpIBaU qAwoK MOXHa B OCHOBHnN npapaMeTpax.
10 Pecnoi3aia
36epiraIte Hanoi B ocoBuctomy npophiNi.
PpoΦiMbMiCTNtB yIIOBeHHi Hanoi3 nepcoHaJIi3OBAHmHn HaIaWtYBaHHaMn. Lio6 BnHTn 3 MeHIO HaIaWtYBaHHa, HAITNCHTb
Nopa: 3MiHHTn HalaHTyBaHHaHaIO MOxHa B 6yDb-AKM MOMeHT.
10.1 CTbOpENHa nepworo npoΦiHou
- HataichiTb "PpOphiJI".
- HatncHtIb "CTBOpHTn npoΦiJIb".
- BBeiItb Ha3By npophiIIO, HapnKlaI «Mi npophiIb>.
- Hatncihitb "36epeTn".
- BnBepiTb foHOBe 3o6paXeHHa.
- HatncHtB "JaJI".
- HATINCHITb + "DOnaTn Hani"
- BnBepiTb Hani i HaTncHiTb "Bn- 6patu".
- HanaTnyTe npaMeTpnu HanoIu i HauNCHiB "36epeRTn".
- BBeiItb Ha3By HanoIO i HATnCHiTb "36epeTn".
10.2 CTBOpEHHI OJaATKOBnx npophiJIiB
- HatnchItb "PpOphiJI".
- HatnchItb "PpOphiI" npHnKhbOMy KpaU dncnneJ.
- HatncHItb + "Ioatn npophiib".
- BVeIitbHa3By npoΦiIIO.
- Hatnchitb "36epeRTn".
- BnBepiTb foHOBe 3o6paXeHHa.
- HatncHtB "JaJI".
- HataHaii".
- BnBepiTb Hani i HaTncHiTb "Bn-6patu".
10.HanaTnyTe npaMeTpnu HanoIO i HATnCHiTb "36epeTNI".
11.BVeDitb Ha3By HanoIO i HATnCHiTb "36epeTn".
3ayBaJHexH:Y npophiJx 3aBKnI
3'raJIeTbcR OCTaHHi BnKOpNCTAHNI.
JaIO CTbOpEHn He OINH npophiIb,
HaTNCHTb "PepeITn B iHNs
npophiIb" pIn HXHbOMy KpaIO DnC-
IIe, IIOb CTbOpNTn HOBN npophiIb
abo BiDpeDaRGyBaTN HaBHNI.
10.3 PeDaryBaHHn IpoΦiIHO
- HaTnCHiTb "PpOphiJI".
- HatnchItb "PpOphiI" npHnKhbOMy KpaU dncnneJ.
- HatncHtB "PeIaIyBaTn npofoJIi".
- Hatnchitb 6aKaHn npoipnlb.
- 3MiHiTb Ha3By npofoJIO n HaTNCHiTb "36epeTn".
- Bn6epiTb foHOBe 3o6paXeHHa HATNCiTb "JaI".
10.4 BvdaJIeHnI npoΦiJIO
- HaTnCHiTb "PpOphiJI".
- HatnchItb "PpOphiI" npHnKhbOMy KpaIO dncnne.
- HatnchItb "BuaJntn npoipjib".
- Hatinchitb baxaHn npoipilb.
- HatncHItb "BnJaIInT".
10.5 CopTyBaHHa npoΦiJIb
- Hatnchitb
- Hatncitb "PepcoHaJIi3aIiJ".
- HATnCHiTb "PiocJIIOBHiCTb npoΦiJIig".
- Bicoptyntnpophiini.
Iopara:BnKohyTe TaKoX BKa3iBKn, 10 3'ABJIHObCBy B 3aCTOCyHky Home Connect.
Bka3iBkn
Дотримутеся праил Тexніки 6e3пеки, HabeDEHx y zui iH-CTpykci3 ekCnIyatauii; zu npaBnla MaIOt b6yTN DoTpIMaHI y pa3i, AKKU BO KepyeTe npINAdom 3a ДОПOMOrOIO 3aCToCvHky Home Connect. "Бe3neKa", CToP.209
- YnpabHnHa 6e3nocepEnhO Ha npnilaDi 3aBxJn Mae npeBaIy. U cien yac ynpabHnHa 3a IOnOMo- roIO MObIbHOI npo- rpaMn Home Connect hemoxJIVe.
11.1 HajaustyBaHnHa Home Connect
Bumorm
-
Пилад пд'елдануеелктpo-Mepeksi ta yBIMKHeHn.
Y Bac e MObiIbHn KInIeBn IpnIcTiPi, HApriKJa, CMaprfoH, i3 HOBOB BepciEo OnpauiHOi CnCTemn iOS a6o Android.
MobiBn KInCeBn Pnpctpi I BaI npIaI nepe6yBaIOb B MeJax cnHaNy WLAN baIoI DomaShHboI MepeXi.
Ha MobiHOMy KInCeBOMy PnIcTpoi BCTaHOBJeHO 3aCTOCyHOK Home Connect. -
BiДкриTe 3aCTocyHOK Home Connect Ta npocKaHyTe NaCTuПHi QR-KoДn. →MaI. 30
- Доттугштесь вадзов Застocунky Home Connect.
11.2 ПараMeТрн Home Connect
AaantynteHomeConnectdoCboix notpe6.
IapametpnHomeConnect moKHa 3NaHTB MeHIO OCHOBHX
napametpiB npnilady.JKi napametpn BiOobpaxatmYbCS Ha DnCnJIeI,
3aIeKntb BiT TORO, uH Hana-
HToBaHo Home Connect i uH nIckluo
yeHo npnilad do DomaunHboi Mepeki.
Orna napaMeTpiB Home Connect
Tyt haVeHEn oIaIpaMaTePrib "Home Connect" i mepeXi.
12.1 3MiHa OCHOBnX HaJa-ItyBaHb
- Hatnchitb
Дисплей пokа3у ecncoK OCHOBHNx napametpiB. - 3MiHiTb IOTpiHn OCHOBHn npaMeTp.
Пилад abTomatnuchno 36epirae OCHOBHNI napaMeTp. - Ilo6 BnTn 3 OCHOBnX npaMeTpIb, HATNCiTb
12.2 OrlaO ochOBHnx npaMeTpib
Tyt HabeJeHn OrlIa OCHOBHnx npaMeTpib.
Tyt HabeHn OrIaI DeTaJIeI, PnIaTHnx Do MTTB NocydomHi MaunHi.
YBAGA!
ДeякдетаиЧутлNBIdo Tempepatypu MyMOxTyb 6yTN N0UShKOJXeHi BHaCJI-DOK MNTTBA NOCyDOMNHiMaunHi.
-ДоТРИМУТЕСА ВИМОг iHCTpyKUJI3 eKClIyAtaUII IOCYdOMnHOI MaSHINH.
MnIte B nocydomnHi MaunHi TiJIbKn npndaTHi Dny cboRo deTaJI.
BukopncToByTe TiIbKn Ti npo- rpaMn, KOtpi He HarpiaOt b DeTaJI nHaJ 60 ^ C
| Придатни: 1/2■ Пidон дя краель | He пriдатни: 1/2■ Pezeервар дя Вори |
| 1 3алекно вiod komпленктуць приладу | |
- Peuitka
- KoHTeINHeP dIa KaBOOoi rUzii
- MexahiHni iHnKaTOp pIBHa
Molouha cncTeMa 3 aadantepom
EMHICTb DnRA MOLOKA 3 KpNIuKOIO
- YepBOHJIOTKN 3aBapHOBaJIbHOrO 6Joka
Aaantep KOHTeHepa nMa MoIoka
3aJIeJxHO BiK KOMJIeKToaIi npInlaNy
Kpnka dny 36epekeHHa apomaty
BLOK 3aBapIOBaHHA
KpnuKa 3aBapIOBaJIbHOro 6JIOKa
Kpnska do3aTopa
13.2 3ac06nДЯ OUnIeHHa
BnKOpncToByTe IInIe CneUaJIbHi 3acO6n DnA YnUeHHN.
YBAGA!
HenpndaTHi 3acO6n IJyNueHHeNHa MOKByTb NooKOJxUyBaTu NOBepXHi npIa-ny.
He 3actocobyIte roctpi nn abpa3nBHI 3ac06n dny uHneHHa.
He BnKOpncTOByuTe 3acO6n IaIyUHEnH, UO MICTaTb CnIpt.
He 3acTocOByuTe JopctKia a6o MeTaJIeBi ry6Kn.
HenpuaTHi 3acO6n IJy UuIeHHN BnIaJIeHHHaKINy MOxUytb NIOXKOITN npIJaI.
He BndaIaIne HaKIn 3a IOnOMoTIO UcNToI JIMMOHHO KNCLOTU, OuTy a6O 3acObIB Ha OCHOBI OuTy.
He BnKOpNCToBvIe 3acO6n IJRA BnDaJIeHnHaKIny, Uo MICTaTb focOpHy KNCIoTy.
BukopncToByTe InIe cneiaJIbHo po3po6JeHi NiKoHNpeTHNI npIaI Ta6JeTKn DInA BuaJAEHHaHKnpy NUnSeHHa.
"PpnuIaIaIa", CToIp. 215
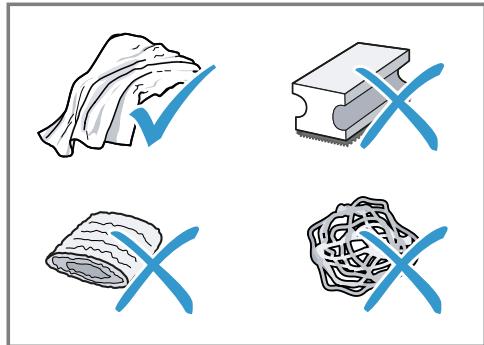
Iopadn
- PeTeIbHO MmIte HOBi rY6Kn, IIO6 BnDaJIHTN MoKJIbI peUHTK coJeI. CoJI moKBy cnpuHrTn IoRBy HaIbOry ipXi Ha MeTaJIeBHX NOBepxHax.
IIO6 3aONoBITN Kopo03ii, 3aBxDN HeBIXKlaIaHNO pnpbpaTe 3aIIuKn HaKNpy, KaBn, MoLOKa, PO3UnHIB DnA OUYIeHHN N BuJaIeHHN HaKNpy.
13.3 Chuichiennn npnilaNy
YBATA!
He6e3neKa ypaXeHHa eJleKTpHuHm cTpyMOM!
Piznha, zo BVteKla, MoXe cnpuHHT npaKeHH eJeKtpuHm CTpyMOM.
Hikoln He 3aHypioIte Hi npnila, Hi Ka6eIb XINBLeHnry BOdy.
Ha po3nHmN 3'eDnHyBaU npnlaNy He MaE NOTpaJIaTI npiHa.
He MoXHa YnCTHTn PpUJa 3a OIOIOMOROI npoBOrO a6o BnCOKOTNCKOBOrO npuJaNy.
YBATA!
He6e3neKa onikib!
14 YcyHeHHa HeCnpaBHOCTeH
He3NaHHi HeCnpaBHOCTI npuHaNy MOxHa yCyBaTn BlnachOpyu. IepH HiK 3BeptaTnca Do cepBicHOi CnyXb6, CKOpNCtaTecr BiIOMOCTAmN IpO yCyHeHHr HeCnpaBHOCTe. TaK MoxHa yHNKHyTN 3aIBNX BVtpaT.
YBATA!
He6e3neKa ypaXeHH eIeKTpHuHm cTpyMOM!
PemOHTHi pO6OTn, BnKoHaHl HeHaJIeXHHm YInHOM, MoKyTb CTaHOBHTn He6e3IeKy IIN KOpNCTyBaUa.
- PemOHtYBaTn npuJa dO3BOLHeo TiIbKn faxiBzM.
-Для ремоHTу пиладу ДОЗВОЛЯЕТСВИКОРИСТОВУВАТИ ЛИше opигIHальни занчacTNH.
yHnKHyTN He6e3neK, y pa3i nOuKoJKeHHKa6eJIIO KINBHeHHa bOTo npIaNy Ioro 3amHy MaE BnKOHyBaTn BnPo6HnK, cepBicHn CHTp a6o ocOba 3 BiIDNoBIHOIO KBaJIΦiKaUciEIO.
Betreff: "OSSREQUEST"
5-GHz-Band (5150-5350 MHz +
5470-5725 MHz): max. 100 mW
| BE | BG | CZ | DK | DE | EE | IE | EL | ES |
| FR | HR | IT | CY | LI | LV | LT | LU | HU |
| MT | NL | AT | PL | PT | RO | SI | SK | FI |
| SE | NO | CH | TR | IS | UK (NI) | |||
| 5-GHz-WLAN (Wi-Fi): Nur zum Gebrauch in Innenräumen. | ||||||||
Valid within Great Britain:
Imported to Great Britain by BSH Home Appliances Ltd.
Grand Union House
Old Wolverton Road
Wolverton, Milton Keynes
MK12 5PT
United Kingdom