
QA506 - Food Processor MOULINEX - Free user manual and instructions
Find the device manual for free QA506 MOULINEX in PDF.
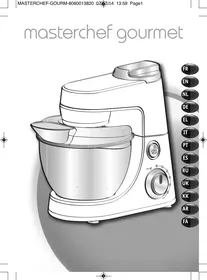



| Product type | Multifunction food processor |
| Brand | Moulinex |
| Model | QA506 |
| Power supply | 220-240 V, 50/60 Hz (estimated) |
| Power | Not specified, but suitable for described uses |
| Stainless steel bowl capacity | Up to 1.8 kg of light dough |
| Blender bowl capacity | 1.5 L for thick mixtures, 1.25 L for liquids |
| Main functions | Mixing, kneading, beating, emulsifying, whisking, blending, chopping, grating, slicing, juicer (depending on model), grinding (depending on model) |
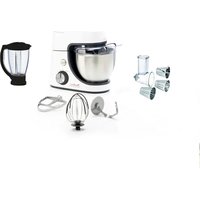
| Included accessories | Stainless steel bowl, lid, dough hook, beater, multi-wire whisk, blender bowl, adapter, meat grinder head, vegetable cutter (cones), juicer (depending on model) |
| Speeds | Electronic speed control from 1 to max, plus pulse position |
| Control type | Rotary knob with stop (0) and intermittent operation (pulse) |
| Main bowl material | Stainless steel |
| Safety | Safety cover, microprocessor with automatic overload shut-off, head locking |
| Maintenance and cleaning | Dishwasher-safe accessories (except metal components of the meat grinder head); wipe motor unit with a damp cloth |
| Spare parts and optional accessories | Stainless steel bowl, lid, dough hook, beater, whisk, blender bowl, juicer, grinder, meat grinder head, adapter, vegetable cutter (cones), fresh pasta kit, puree accessory, pasta roller |
| Repairability | Approved service center for repairs; parts available upon presentation of the manual |
| Dimensions (approx.) | Not specified, standard size for food processor |
| Weight (approx.) | Not specified, approximately 5-7 kg |
| Warranty | Not specified, refer to the service booklet |
Frequently Asked Questions - QA506 MOULINEX
User questions about QA506 MOULINEX
0 question about this device. Answer the ones you know or ask your own.
Ask a new question about this device
Download the instructions for your Food Processor in PDF format for free! Find your manual QA506 - MOULINEX and take your electronic device back in hand. On this page are published all the documents necessary for the use of your device. QA506 by MOULINEX.
USER MANUAL QA506 MOULINEX
- Assembled chopper head (F)
3.1 - INSTALLING THE ADAPTER
Thank you for choosing this appliance, which is intended exclusively for the preparation of food and is for indoor, domestic use only.
DESCRIPTION
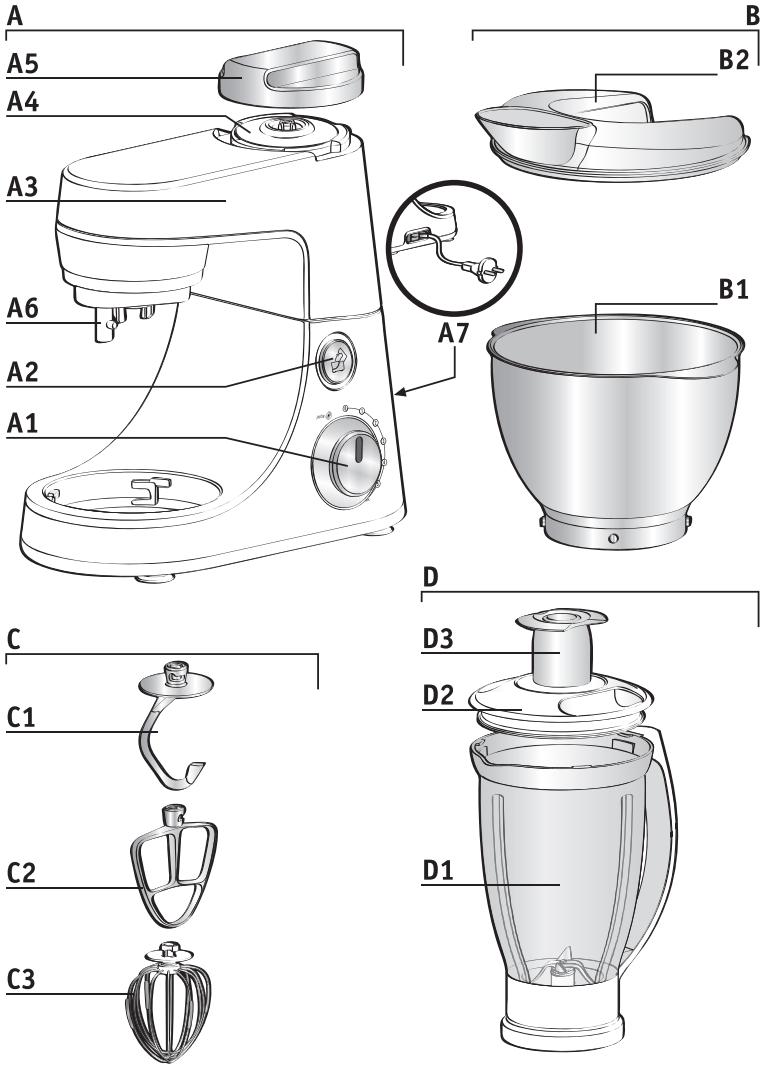
A - Motor unit
A1 Electronic speed selector A2 Multi-function head release button (A3) A3 Multi-function head A4 High speed outlet (blender jug / juice extractor / grinder) A5 Safety cover A6 Mixer accessories outlet (kneader, balloon whisk, mixer)
A7 Power cord storage
B - Bowl assembly
B1 Stainless steel bowl
B2 Lid
C - Mixer accessories
C1 Kneader C2 Mixer C3 Balloon whisk
D - Blender jug (depending on model)
D1 Jug D2 Lid D3 Measuring cup
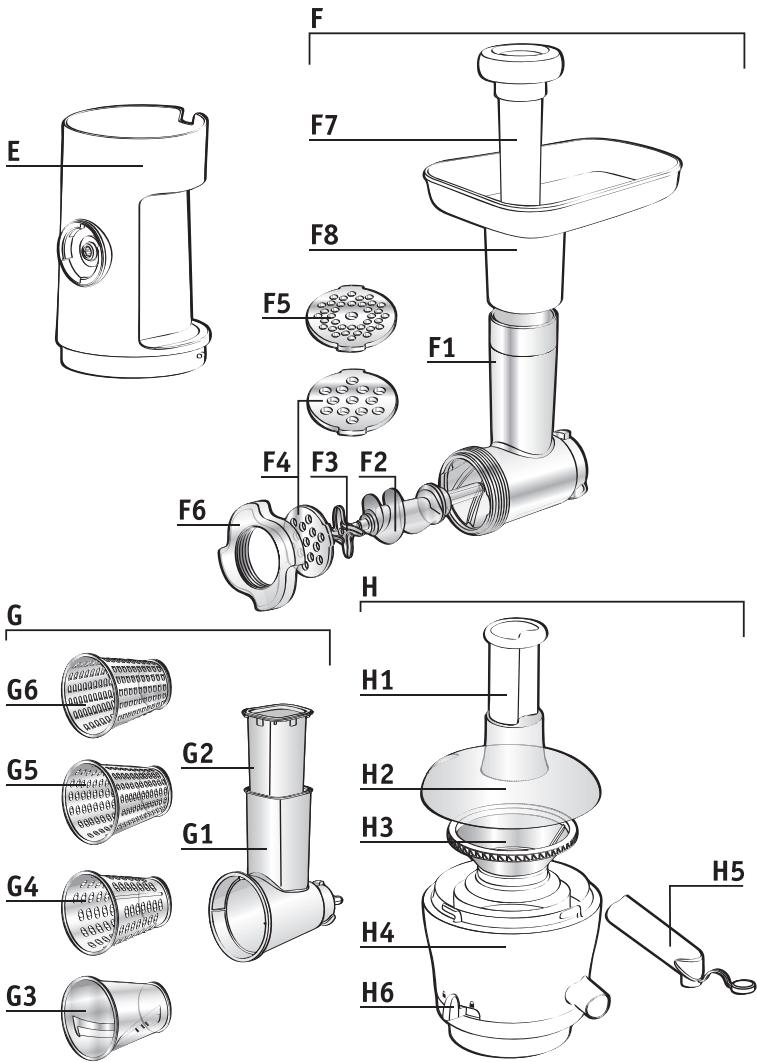
E - Attachment holder (depending on model)
F - Mincer head (depending on model)
F1 Metal body F2 Feed screw F3 Blade F4 Large-hole screen F5 Small-hole screen F6 Nut F7 Pusher F8 Tray
G - Vegetable slicer (depending on model)
G1 Drum body G2 Pusher G3 Slicer drum G4 Coarse grater drum G5 Fine grater drum G6 Potato shredder drum
H - Juice extractor (depending on model)
H1 Pusher H2 Lid H3 Rotary filter H4 Juice collector H5 Pouring spout H6 Locking lever
BEFORE FIRST USE
- Before using for the first time, wash all accessory parts in soapy water (except for the attachment (E): see § Cleaning). Rinse and dry.
- Place the appliance on a flat, clean and dry surface. Make sure that the selector button (A1) is in "0" position and plug in your appliance.
- You have several options for starting your appliance:
- Intermittent operation (pulse): Turn the selector button (A1) to the "pulse" position. Using a succession of pulses can give you better control when preparing certain foods.
- Continuous operation: Turn the selector button (A1) to the desired position from "1" to "max" depending on the food you are preparing. You can change it as required during preparation.
- To stop the appliance, turn the button (A1) to "0".
Important: The appliance will start only if the cover (A5) and the head (A3) are locked. The appliance will stop immediately if you unlock the cover (A5) and/or the head (A3) during operation. Lock the cover and/or the head, turn the control button (A1) to the "0" position, and then start the appliance normally by selecting the desired speed.
Your appliance comes with a microprocessor that controls and analyses the operating power. If the load becomes too high, your appliance will stop automatically. To restart your appliance, turn the rotary button (A1) to the "0" position and remove some of your ingredients. Allow your appliance to cool down
The paragraph numbering corresponds to the numbers in the diagrams.
1 - MIXING / KNEADING / BEATING / EMULSIFYING / WHISKING
You can prepare up to 1.8 kg light dough and heavy dough made with up to 500 g flour using the stainless bowl (B1) and its lid (B2) depending on the food.
ACCESSORIES USED:
- Stainless steel bowl (B1).
- Lid (B2)
- Kneader (C1) or mixer (C2) or balloon whisk (C3)
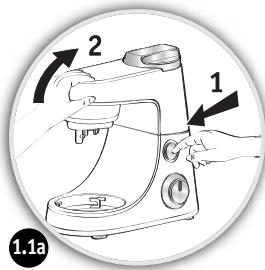
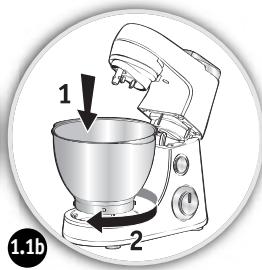
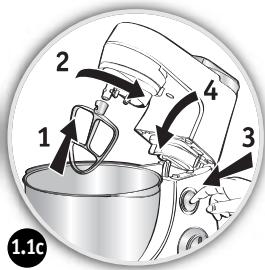
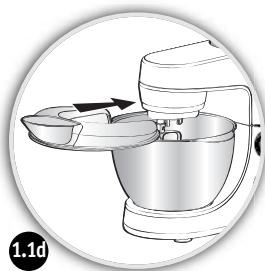
1.1 - ASSEMBLING THE ACCESSORIES
- Press the button (A2) to release the multi-function head (A3) and raise it until it locks in place.
- Lock the stainless steel bowl (B1) (clockwise) on the appliance and put in the ingredients.
- Insert the desired accessory (C1, C2 or C3) on the outlet (A6), push and rotate it anti-clockwise a quarter turn to lock the accessory in its housing.
- Place the multi-function head (A3) to the horizontal position: press the button (A2) and manually lower the multi-function head (A3) until it locks (the button (A2) returns to its initial position).
- Slide the lid (B2) over the stainless steel bowl (B1).
Note: It is not essential to use the lid but it prevents splashing.
- Make sure that the cover (A5) is locked correctly (clockwise) on the high-speed outlet (A4).
1.2 - USAGE
Start by turning the selector button (A1) to the desired position according to the recipe.
- The appliance starts running immediately.
You can add food through the hole in the lid (B2) during preparation.
- To stop the appliance, turn the button (A1) to "0".
Tips:
- Kneading
- Use the kneader accessory (C1) at speed "1". You can knead up to 500 g of flour (e.g. white bread, grain bread, short crust pastry, etc.).
- Maximum time of use: 13 minutes.
- Mixing
- Use the mixer (C2) at speed "1" to "max".
- You can mix up to 1,8 kg of light dough (light cake mixture, sponge cake, biscuit or cookie dough).
- Maximum time of use: 13 minutes.
- Never use the mixer (c2) to knead heavy dough.
- Beating / emulsifying / whisking
- Use the balloon whisk (C3) at speed "1" to "max".
- You can prepare: mayonnaise, aioli, sauces, whisked egg whites (up to 8 egg whites), whipped cream (up to 500 ml), meringues, etc.
- Maximum time of use: 10 minutes.
- Never use the balloon whisk (C3) to knead heavy dough or mix light dough.
1.3 - DISMANTLING THE ACCESSORIES
- Wait for the appliance to come to a complete stop.
- Remove the lid (B2).
- Using the button (A2), release the multi-function head (A3) and raise it to the upper position.
- Release the accessory (C1), (C2) or (C3) from the multi-function head by pushing the accessory into the head and rotating it clockwise a quarter turn.
- Remove the stainless steel bowl.
2 - BLENDING/MIXING (DEPENDING ON MODEL)
Depending on the nature of the food, you can use the blender (D) to prepare up to 1.5 L of thick mixtures and 1.25 L of liquid mixtures.
ACCESSORIES USED:
- Blender jug (D).
2.1 - ASSEMBLING THE ACCESSORIES
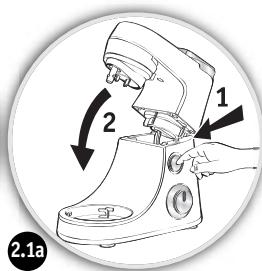
- Place the multi-function head (A3) in the horizontal position: press the button (A2) and manually lower the multi-function head (A3) until it locks (the button (A2) returns to its initial position).
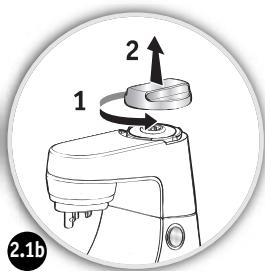
- Unlock the safety cover (A5) from the high-speed outlet (A4) by rotating it anti-clockwise and then remove it.
- Make sure that the appliance is switched off before locking the blender (D).
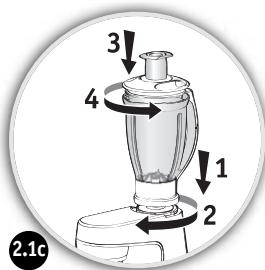
- Lock the blender jug (D) on the outlet (A4) by rotating it clockwise.
- Place the food in the blender jug, and lock the lid (D2) fitted with the measuring cap (D3), by rotating it anti-clockwise.
2.2 - USAGE
- Start by turning the selector button (A1) to the desired position (from speed 4 to Max or pulse) according to the recipe. Use the "Pulse" position for better mixing control and for a better blending of your preparation. You can add food through the hole in the measuring cap (D3) during preparation.
- To stop the appliance, turn the button (A1) to "0".
- Maximum time of use: 3 minutes.
Tips:
You can prepare:
- finely blended soups, cream soups, stewed fruit, milkshakes and cocktails.
- liquid batter (pancake, fritters, Yorkshire pudding, waffles, clafoutis and custard flans). If ingredients stick to the sides of the bowl when mixing, stop the appliance and wait until the blades have stopped completely. Remove the blender and push the food down onto the blades using a spatula, and put your blender back on the appliance to continue processing.
- Never fill the blender jug with boiling liquid.
- Never run the blender jug empty.
- Always use the blender jug with its lid.
- Never remove the lid before the blades have stopped completely.
- Always pour liquid ingredients into the blender jug first before adding solid ingredients.
2.3 - DISMANTLING THE ACCESSORY
- Wait for the appliance to come to a complete stop before removing the blender by unlocking it in the anti-clockwise direction and put back the cover (A5) by locking it on the outlet (A4) (clockwise).
3 - MINCING (DEPENDING ON MODEL)
ACCESSORIES USED:
- Attachment holder (E)
- Assembled mincer head (F)

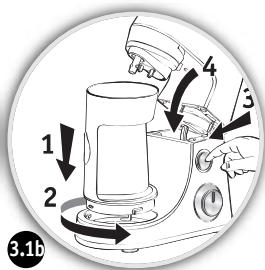
3.1 - FITTING THE MINCER ATTACHMENT
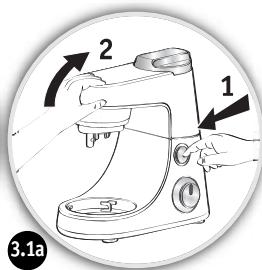
- Press the button (A2) to release the multi-function head (A3) and raise it until it locks in place.
- Place the attachment (E) and lock it in the anti-clockwise direction such that the outlet is in alignment with the appliance.
- Place the multi-function head (A3) in the horizontal position by pressing the button (A2) once again.
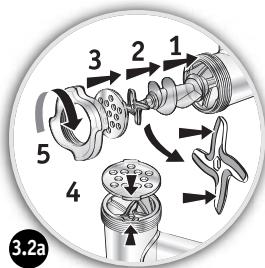
3.2 - ASSEMBLING THE MINCER HEAD
- Hold the body (F1) by the feed tube, with the wider opening uppermost.
- Insert the feed screw (F2) (long shaft first) into the body (F1).
- Fit the blade (F3) onto the short shaft protruding from the feed screw (F2) with the cutting edges facing outwards.
- Fit the chosen screen (F4 or F5) on the blade (F3), aligning the two lugs with the two notches in the body (F1).
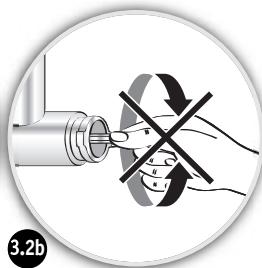
- Screw the nut (F6) home on the body (F1) in the clockwise direction, without locking it.
- Check the assembly. The shaft should have no play, neither should it be able to turn on its own. Otherwise, repeat the assembly procedure.
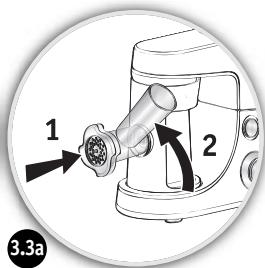
3.3 - FITTING THE MINCER HEAD ON THE APPLIANCE
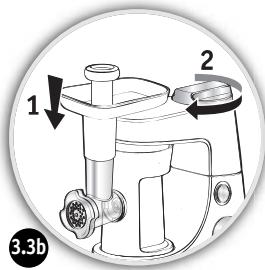
- Facing the attachment outlet (E), insert the assembled mincer head (F) inclined to the right, aligning the two bayonets in the mincer head with the two notches in the attachment. Push the mincer head home into the attachment and turn the mincer head anti-clockwise until it latches with the feed tube in the vertical position.
- Place the removable tray (F8) on the feed tube.
3.4 - USAGE, TIPS AND DISMANTLING
- Make sure that the safety cover (A5) is locked correctly (clockwise) on the high-speed outlet (a4).
- Place a container to collect the preparation in front of the appliance.
- Run the appliance by turning the selector (A1) to speed "3" or "4".
- Push the meat, piece by piece, down the feed tube, using the pusher (F7). Never push the ingredients down the feed tube with your fingers or any other utensil.
- You can chop up to 3 kg of meat (gristle, bone and sinew removed).
- Maximum time of use: 10 minutes.
- Leave your appliance to cool down completely before using again.
- To stop the appliance, turn the selector to "0" speed and wait for the appliance to come to a complete stop.
- Unlock the mincer head in the reverse order of the assembly.
Tips:
- Prepare all of the foodstuffs to be minced (for meat, remove the bones, gristle and tendons and cut it into pieces of approximately 2 x 2 cm).
- Make sure that frozen meat is thoroughly thawed.
- At the end of the operation, you can feed a few small pieces of bread into the feed tube to clear any meat remaining in the machine.
4 - GRATING / SLICING (DEPENDING ON MODEL)
ACCESSORIES USED :
- Attachment holder (E)
- Assembled vegetable slicer (G)
- Drums (depending on model)
4.1 - ASSEMBLING THE ACCESSORIES
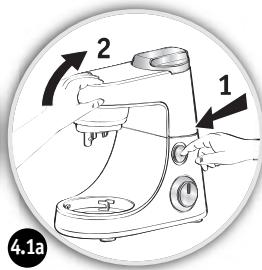
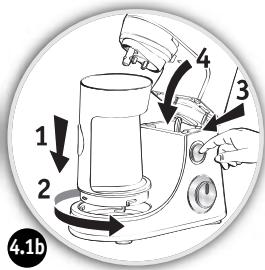
- Press the button (A2) to release the multi-function head (A3) and raise it until it locks in place.
- Place the attachment (E) and lock it in the anti-clockwise direction such that the outlet is in alignment with the appliance.
- Place the multi-function head (A3) in the horizontal position by pressing the button (A2) once again.
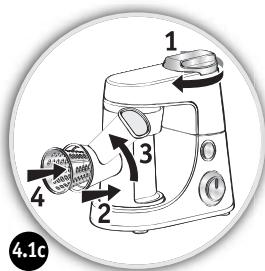
- Make sure that the safety cover (A5) is locked correctly (clockwise) on the high-speed outlet (A4).
- Facing the attachment (E) outlet, insert the drum body (G1) inclined to the right, aligning the two bayonets in the drum body with the two notches in the attachment. Push the drum body home and turn the drum body anti-clockwise until it latches with the feed tube in the vertical position.
- Insert the chosen drum into the body, and make sure that it is fully engaged in the body.
4.2 - USAGE AND TIPS
- Place a container to collect the preparation in front of the appliance.
- Run the appliance by turning the selector (A1) to speed "3" to slice and to speed "4" to grate.
- Place the food in the feed tube on the body and press down with the pusher (G2). Never push the ingredients with your fingers or any other utensil.
- You can prepare up to 2 kg of food.
- Maximum time of use: 10 minutes.
- To stop the appliance, turn the selector to "0" speed and wait for the appliance to come to a complete stop.
- Unlock the drum body in the reverse order of the assembly.
- Use the drums to:
- Grate coarsely (G4) / grate finely (G5): carrots, celery, potatoes, cheese, etc.
- Slice thickly (G3): potatoes, carrots, cucumbers, apples, beetroot, etc.
- Potato shredder (G6): potatoes, parmesan, etc.
5 - EXTRACTING JUICE FROM FRUITS AND VEGETABLES (DEPENDING ON MODEL)
ACCESSORIES USED:
- Assembled juice extractor (H).
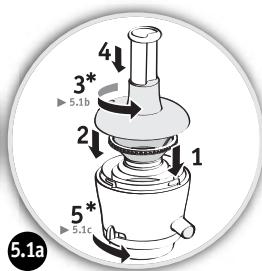
5.1 - ASSEMBLING THE JUICE EXTRACTOR
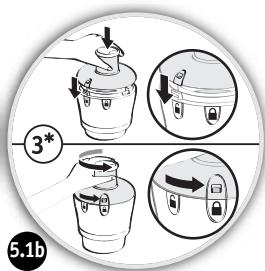
- Place the filter (H3) in the middle of the juice collector (H4).
- Lock the lid: turn it anti-clockwise and lock the lid (H2) on the juice collector (H4) (closed padlock position).
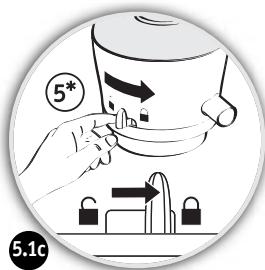
- General locking: push the locking lever (H6) to closed padlock position.
5.2 - FITTING THE JUICE EXTRACTOR ON THE APPLIANCE
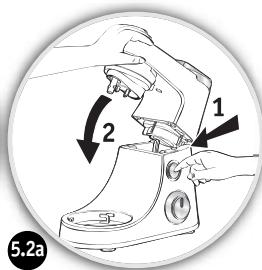
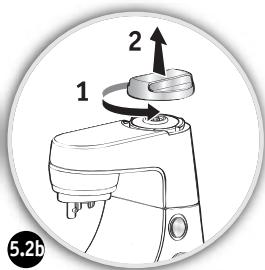
- Place the multi-function head (A3) in the horizontal position: press the button (A2) and manually lower the multi-function head (A3) until it locks (the button (A2) returns to its initial position).
- Unlock and remove the cover (A5) from the outlet (A4) by turning it anti-clockwise.
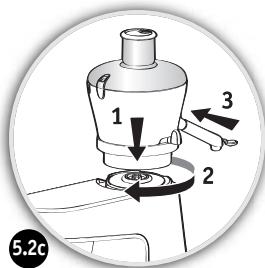
- Make sure that the appliance is switched off before locking the juice extractor (H).
- Lock the assembled juice extractor on the outlet (A4) by turning it clockwise, so as to have the outlet for the pouring spout aligned with the appliance.
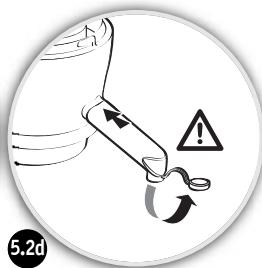
- Fit the pouring spout (H5) on the collector (H4).
- Check that the pouring spout (H5) is fully open.
5.3 - USAGE AND TIPS
- Place a large glass under the pouring spout (H5).
- Run the appliance by turning the selector (A1) to speed "3".
- Cut the fruits and/or vegetables into pieces.
- Insert them down the feed tube in the lid (H2) push them slowly using the pusher (H1). Never push the ingredients with your fingers or any other utensil.

- Do not process 500 g of food more than 5 times continuously, without allowing your appliance to cool down completely.
- Maximum time of use: 10 minutes.
- For best results, clean the filter after every 300 g of ingredients.
- Important: When the pulp collector is full, stop the appliance and empty the collector.
- To stop the appliance, turn the selector to "0" speed and wait for the appliance to come to a complete stop.
- Wait until the rotary filter comes to a complete stop before removing the assembly from the appliance.
- To remove the juice extractor, unlock it by turning it anti-clockwise.
- Place the locking lever (H6) in the open padlock position. Open the lid (open padlock position). You can then remove the filter (H3) to clean it and empty the collector (H4).
Tips:
- You can make juice from: carrots, tomatoes, apples, grapes, raspberries, etc.
- Peel fruits with thick skins; remove stones and the core of pineapples.
- It is not possible to extract juice from certain fruits and vegetables: bananas, avocado pears, blackberries, some varieties of apples, etc...
- You can prepare juices with different fruits and vegetables without having to clean the juice extractor every time, the flavours will not be mixed. Just run the extractor with a little water to rinse it between two different juices.
- Drink the juices immediately after preparation, and add lemon juice to keep them in the fridge for a few hours.
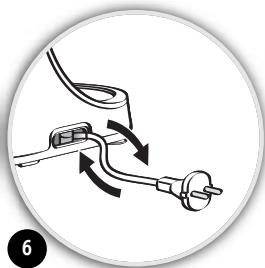
6 - ADJUSTING THE CORD LENGTH
For more comfortable use or for storage, you can reduce the cord length by pushing it inside the motor unit (A) via the opening on the rear (A7).
7 - FINELY CHOPPING SMALL QUANTITIES (DEPENDING ON MODEL)
ACCESSORY USED:
- Assembled grinder.
You can use the grinder to:
- Chop in a few seconds by pulsing: dried figs, dried apricots, etc.
Quantity / max time: 100g / 5s
This grinder is not designed for hard products like coffee beans or hard spices.
CLEANING
- Unplug the appliance.
- Do not immerse the motor unit (A) or the attachment (E) in water or under running water. Wipe them with a dry or slightly damp cloth.
- For easier cleaning, rinse the accessories quickly after use. Dismantle the mincer head assembly fully. Handle the blades with care to prevent injury.
- Wash, rinse and dry the accessories: they are dishwasher-safe, except for all the metal components in the mincer head: body (F1), feed screw (F2), blade (F3), screens (F4 and F5), nut (F6).
- The screens (F4) and (F5) as well as the blade (F3) must remain greased. Coat them with cooking oil.
Tips:
- In the event any of your accessories are coloured by food (carrots, oranges, etc.), rub with a cloth soaked in cooking oil and then clean them as usual.
- Blender jug (D): pour some hot water containing a few drops of washing up liquid into the blender. Close the lid. Place it on the appliance and pulse a few times. After removing it, rinse the bowl in running water and allow to dry (bowl upside down).
STORAGE
Do not store your appliance in a humid environment.
WHAT TO DO IF YOUR APPLIANCE DOES NOT WORK
If your appliance does not work, check:
- that it is plugged in correctly.
- that the accessories are correctly locked.
- The position of the electronic speed selector (A1): put it back to the "0" position, then select the desired speed again.
Your appliance comes with a microprocessor that controls and analyses the operating power. If the load becomes too high, your appliance will stop automatically. To restart your appliance, turn the rotary button (A1) to the "0" position and remove some of your ingredients. Allow your appliance to cool down for a few minutes. You can then select the desired speed to complete your preparation.
Your appliance still does not work? Contact an authorised service centre (see the list in the service booklet).
DISPOSAL OF PACKAGING AND THE APPLIANCE

The packaging is comprised exclusively of materials that present no danger for the environment and which may therefore be disposed of in accordance with the recycling measures in force in your area.
For disposing of the appliance itself, please contact the appropriate service of your local authority.
ACCESSORIES
You can customise your appliance and obtain the following accessories from your usual retailer or an authorised service centre:
- Stainless steel bowl
- Stainless steel bowl lid
- Kneader
- Mixer
- Balloon whisk
- Blender jug
- Juice extractor
- Grinder
- Mincer head
- Attachment holder
- Vegetable slicer:
- Slicer
- Coarse grating
- Fine grating
- Potato shredder
- Pasta kit
- Coulis attachment
- Pasta rolling mill
Caution: This booklet contains instructions for additional accessories. Please keep safe for future reference. Please contact Tefal Customer Relations for further information on how to purchase accessories.
5 - JUICING FRUIT AND VEGETABLES (DEPENDING ON MODEL)
ACCESSORIES USED:
3.4 - SWITCHING ON, TIPS AND DISASSEMBLY
4.2 - SWITCHING ON AND TIPS
5.3 - SWITCHING ON AND TIPS

- INSTALLING THE ADAPTER
- DESCRIPTION
- A - MOTOR UNIT
- B - BOWL ASSEMBLY
- C - MIXER ACCESSORIES
- D - BLENDER JUG (DEPENDING ON MODEL)
- E - ATTACHMENT HOLDER (DEPENDING ON MODEL)
- F - MINCER HEAD (DEPENDING ON MODEL)
- G - VEGETABLE SLICER (DEPENDING ON MODEL)
- H - JUICE EXTRACTOR (DEPENDING ON MODEL)
- BEFORE FIRST USE
- THE PARAGRAPH NUMBERING CORRESPONDS TO THE NUMBERS IN THE DIAGRAMS
- MIXING / KNEADING / BEATING / EMULSIFYING / WHISKING
- ACCESSORIES USED
- ASSEMBLING THE ACCESSORIES
- USAGE
- TIPS
- KNEADING
- MIXING
- BEATING / EMULSIFYING / WHISKING
- DISMANTLING THE ACCESSORIES
- BLENDING/MIXING (DEPENDING ON MODEL)
- DISMANTLING THE ACCESSORY
- MINCING (DEPENDING ON MODEL)
- FITTING THE MINCER ATTACHMENT
- ASSEMBLING THE MINCER HEAD
- FITTING THE MINCER HEAD ON THE APPLIANCE
- USAGE, TIPS AND DISMANTLING
- GRATING / SLICING (DEPENDING ON MODEL)
- USAGE AND TIPS
- EXTRACTING JUICE FROM FRUITS AND VEGETABLES (DEPENDING ON MODEL)
- ASSEMBLING THE JUICE EXTRACTOR
- FITTING THE JUICE EXTRACTOR ON THE APPLIANCE
- ADJUSTING THE CORD LENGTH
- FINELY CHOPPING SMALL QUANTITIES (DEPENDING ON MODEL)
- ACCESSORY USED
- YOU CAN USE THE GRINDER TO
- CLEANING
- STORAGE
- WHAT TO DO IF YOUR APPLIANCE DOES NOT WORK
- DISPOSAL OF PACKAGING AND THE APPLIANCE
- ACCESSORIES
- JUICING FRUIT AND VEGETABLES (DEPENDING ON MODEL)
- SWITCHING ON, TIPS AND DISASSEMBLY
- SWITCHING ON AND TIPS
Brand : MOULINEX
Model : QA506
Category : Food Processor