USER MANUAL COMPACT CHEF HF405110 MOULINEX
natural_image
Line drawing of a blender with control panel and lid (no text or symbols)
natural_image
Hand inserting a plug into an electrical outlet (no text or symbols visible)
natural_image
Line drawing of a blender with a control panel and a downward arrow indicating compression (no text or symbols)

natural_image
Illustration of a blender with a smokestack emitting smoke, showing the process from a container to a funnel (no text or symbols)
natural_image
Illustration of a hand using a tool to press down a small cylindrical component into a kitchen appliance (no text or symbols)
natural_image
Illustration of laboratory equipment including a test tube, a pressure vessel, and a cleaning machine with a checkmark (no text or symbols present)
natural_image
Illustration of a smart device with lock icons and a numbered tag (6), no text or symbols present.
natural_image
Illustration of a kitchen appliance with a basket, airplane, and cleaning tools (no text or symbols)
natural_image
Technical illustration of a mechanical component with directional arrows indicating assembly or movement (no text or symbols)

natural_image
Illustration of hands assembling a mechanical component (no text or symbols visible)
natural_image
Illustration of a hand pressing down on a kitchen blender with a control panel (no text or symbols)
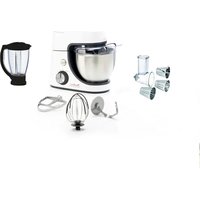
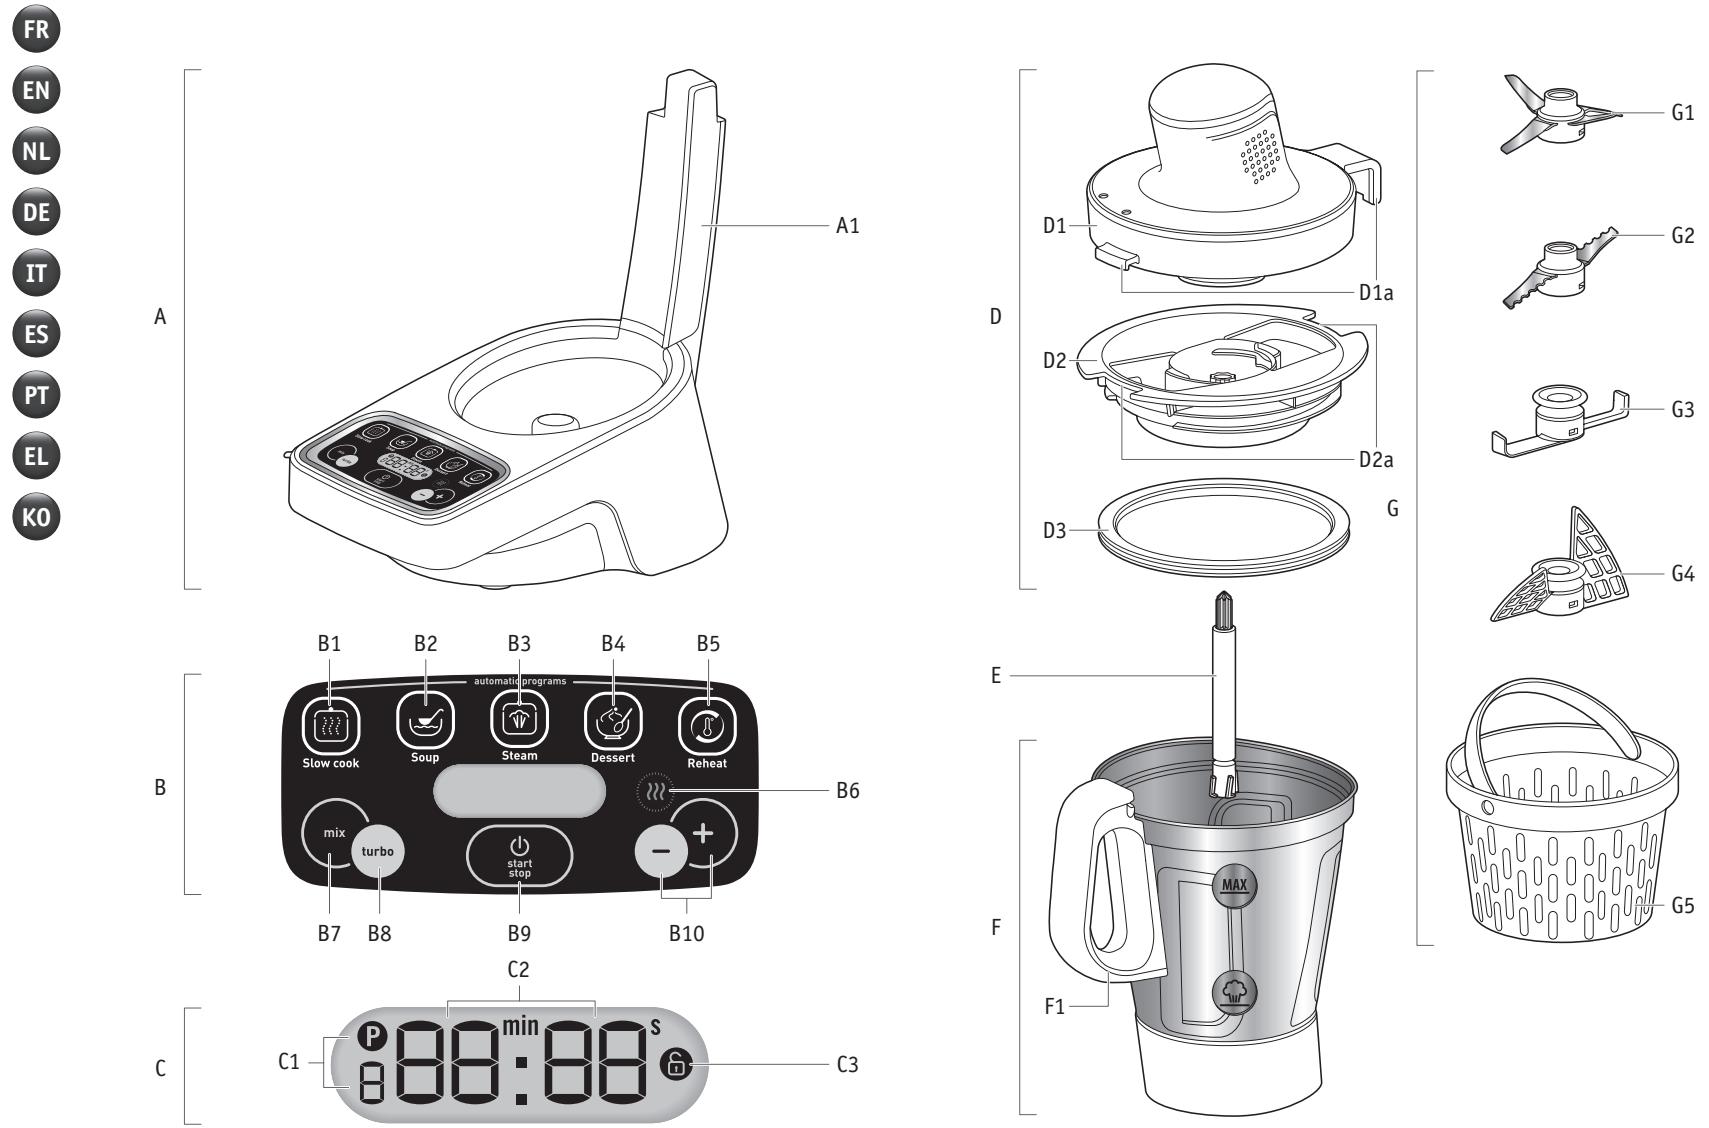
A Base
A1 Colonne arrière
| Power: | 1000W (600W: heating resistor / 400W: motor) |
| Operating duration range: | From 10 sec to 2 hrs 30 min |
| Number of speeds: | 3 speeds - 1 intermittent speed |
Personal safety
- Read the instructions for use carefully before using your appliance for the first time and keep them in a safe place. The manufacturer shall not accept any liability in the event of any use that does not comply with the instructions.
- Always disconnect the appliance from the power supply if you are to leave it unattended and before assembly, dismantling or cleaning. Do not allow children to use the appliance without supervision.
- This appliance should not be used by children. Keep the appliance and its cord out of reach of children.
- This appliance is not intended for use by persons (including children) with reduced physical, sensory or mental capabilities, or lack of experience and knowledge, unless they have been given supervision or instruction concerning use of the appliance by a person responsible for their safety. Children should be supervised to ensure that they do not play with the appliance.
- Keep your appliance out of reach of children.

natural_image
Warning symbol depicting steam rising inside a triangle (no text or numbers)
- When using the appliance, certain parts reach high temperatures
(stainless steel wall of the jug, metal parts under the jug, seal-mounting cup). They can cause burns. Handle the appliance by holding the cold plastic parts (handles, motor-unit lid). The red heating indicator light indicates that there is a risk of burning.
- The temperature of the accessible surfaces may be high when the appliance is in operation.
- The appliance is not intended to be operated using an external timer or by a separate remote control system.
- Do not use your appliance if it is not working properly, if it is damaged or if the power cord or plug is damaged.
- If the power cable is damaged, it must be replaced by a special type of cable or unit available from the manufacturer or its after-sales service. (see the list in the service booklet).
- The appliance must not be immersed in water. Do not put the motor-unit lid (D1) under running water.
- This appliance is designed for indoor household use only and at an altitude below 2000 m. The manufacturer shall not accept any liability and reserves the right to
cancel the guarantee in the event of commercial or inappropriate use or failure to follow the instructions.
- This appliance is intended for indoor, domestic household use only. It is not intended to be used in the following applications and the guarantee will not apply for:
- staff kitchen areas in shops, offices and other working environments;
- farm houses;
- On farms
- by clients in hotels, motels and other residential type environments;
- bed and breakfast type environments
- Your appliance emits steam which can cause burns.
Handle using the seal-mounting cup (if necessary, use a glove, oven mitts etc.).
- Do not operate the appliance if the sealing ring is not positioned on the seal-mounting cup.
WARNING: Be aware of the risk of injury in the event of incorrect use of the appliance.
Take precautions with the chopping blades (G1) and the kneading/crushing blade (G2) when you clean them and when you empty the jug. They are extremely sharp.
Be careful if a hot liquid is poured into the food processor because it could be ejected from the appliance due to it suddenly boiling.
Store the chopping blade (G1) in the jug after each use.
WARNING: Be careful to avoid any spillage on the connector during cleaning, filling or pouring.
WARNING : Your appliance releases steam which can cause burns.
WARNING: The heating element surface is subjected to residual heat after use.
Make sure you only touch the product's handle (F1) when it is heating up and until it has cooled completely.
Refer to the instructions when assembling and mounting the accessories on the appliance, for cleaning and maintenance and for setting the functions on your appliance.
Always follow the cleaning instructions on how to clean your appliance :
- Unplug the appliance.
- Do not clean the appliance while hot.
- Clean with a damp cloth or sponge.
- Never immerse the appliance in water or put it under running water.
EUROPEAN MARKETS ONLY:
- This appliance must not be used by children with the following accessories: the chopping blade (G1) and the kneading/crushing blade (G2). Keep the appliance and its cord out of reach of children. Children should not use the appliance as a toy.
- This appliance may be used by persons with reduced physical, sensory or mental capabilities or whose experience or knowledge is insufficient, as long as they have the benefit of supervision or they have received instructions regarding safe use of the appliance and they understand its potential dangers.
- This appliance may be used by children of at least 8 years of age, as long as they are supervised and have been given instructions about using the appliance safely and are fully aware of the dangers involved. Cleaning and maintenance by the user should not be carried out by children without supervision unless they are at least 8 years of age and are supervised by an adult.
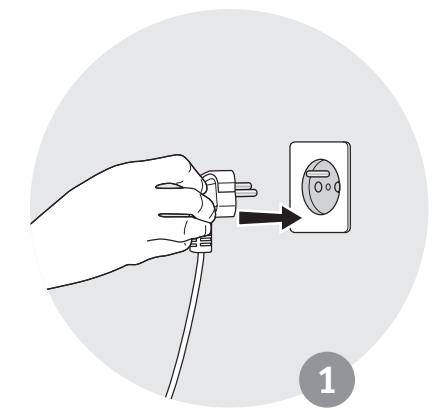
Connection to the power supply
- The appliance should be plugged in to an earthed electrical socket.
- The appliance is designed to work with alternating current only. Check that the supply voltage indicated on the rating plate of the appliance corresponds to that of your electrical installation.
- Any connection error will negate the guarantee.
- Never pull on the power cord to unplug the appliance.
- The power cord must never be left near or in contact with the hot parts of your appliance, near a source of heat or on a sharp edge.
Incorrect use
- Do not touch the lid before the appliance comes to a complete stop (stop button); wait until the food being mixed is no longer rotating.
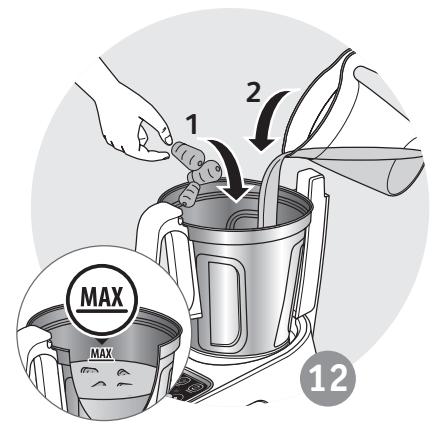
- Always add solid ingredients to the jug first before adding liquid ingredients (Fig. 12), without exceeding the MAX mark engraved on the inside of the jug (Fig. 13). If the jug has been over-filled, boiling water can be ejected.
- Pay attention when using the steam program, observe the water level indicated in the jug (Fig. 14).
-
Never put your fingers or any other object in the jug while the appliance is in operation.
-
Do not use the jug as container (storage, freezing, sterilisation).
- Place the appliance on stable flat, heat resistant, clean and dry surface.
- Do not place the appliance near a wall or a cupboard: the steam produced may damage them.
- Do not place your appliance near a heat source in operation (hob, household appliance, etc.).
- Do not cover the lid with a cloth or any other objects.
- Never put the accessories, jug and lid in a microwave.
-
Do not use the appliance outdoors.
-
Never exceed the maximum quantity indicated in the instructions.
- Store the appliance when it has cooled down.
After-sales Service
- For your own safety, do not use accessories or spare parts other than those provided by the approved after-sales centres.
- Any intervention other than cleaning and usual maintenance by the customer must be carried out by an approved service centre.
- Consult the table "What to do if your appliance does not work" at the end of the instruction manual.
USING THE APPLIANCE FOR THE FIRST TIME
Before using for the first time:
- Read this instruction manual carefully. As you go through it, you will discover advice and tips to help you to use the appliance to its full potential: preparing stews, soups, steamed dishes, and desserts but also the possibility of re-heating dishes.
- Keep for future reference: using the appliance in a way that does not comply with the safety instructions will release the manufacturer from any liability.
- Ensure that you remove all of the packaging from your product.
- Clean the different parts: the jug, accessories, drive shaft, seal-mounting cup and sealing ring(D2, D3, E, F, G) using soapy water. (see § CLEANING in this instruction manual).
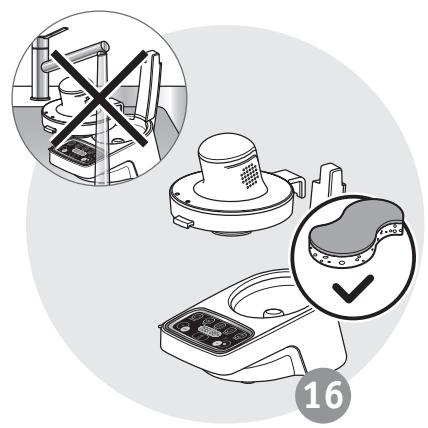
- Caution: the cover that contains the motor unit (D1) as well as the base (A) must not be placed under the water (Fig. 16).
Using the appliance for the first time: fitting the jug, accessories and lid
Your appliance is equipped with a power cord. Connect the power cord into the main socket.
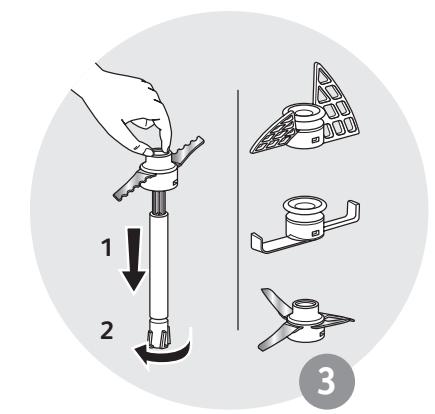
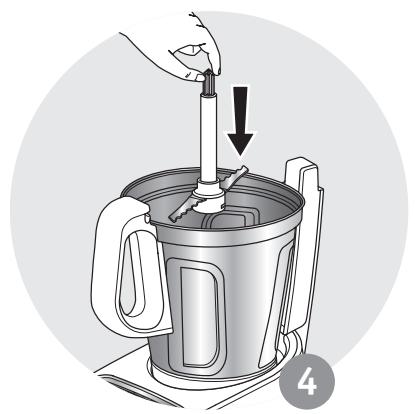
• Fitting the jug and accessories
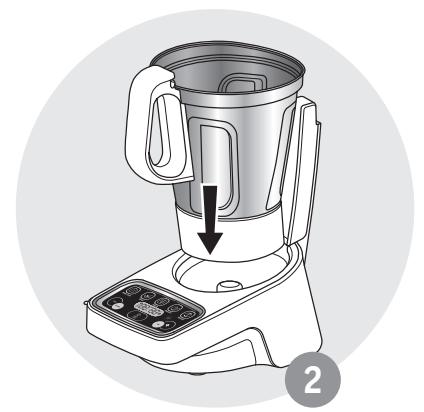
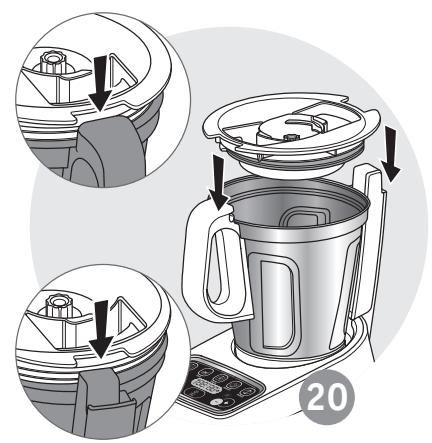
- Place the jug (F) on the base of the appliance (A), holding the handle (F1) (Fig. 2).
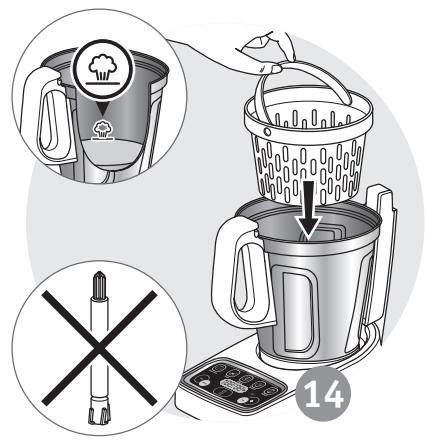
- Position the chosen accessory (G1 → G5) on the drive shaft (E) (Fig. 3), and then place the assembled parts on the jug (F) (Fig. 4). To use the steamer basket (G5), first make sure you fill the jug up to the mark (corresponding to 400ml/0.4L of liquid:water, etc.) (Fig. 13) before placing inside the jug (F) (Fig. 14),
- Stir the ingredients inside of the jug (F) or steamer basket (G5).
- Fitting the lid assembly
The appliance's lid is made up of three parts: the motor-unit lid (D1), the seal-mounting cup (D2) and the sealing ring (D3).
These 3 items come assembled.
For your future uses, there are two ways to assemble the lid:
EN
| Steps | Scenario 1 | Scenario 2 |
| 1 |  |
| Place the jug (F) on the base of the appliance (A), holding the handle (F1) (Fig. 2). |
| 2 | 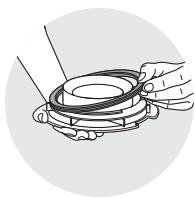 |
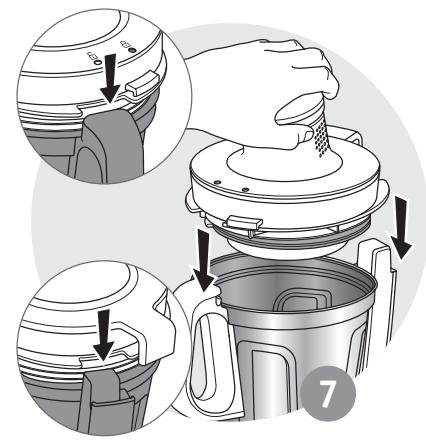
| Place the sealing ring (D3) on the seal-mounting cup (D2) (Fig. 19). |
| 3 | 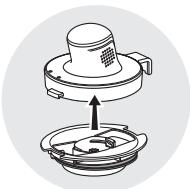 | 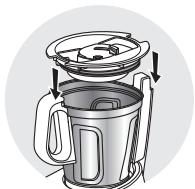 |
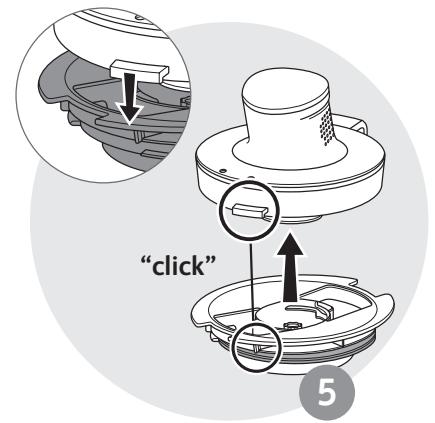
| Clip the cup (D2) to the motor-unit lid (D1), making sure you position the tab (D1a) of the motor unit at the edge of the notch (D2a) on the cup (D2), and press until you hear a "click" (Fig. 5). The cup is now in place. | Place the cup (D2) on the jug making sure you align the notches (D2a) of the cup (D2) with the handle (F1) and rear column (A1) (Fig. 20) |
| 4 | 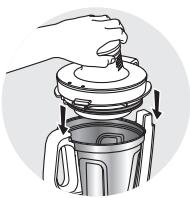 | 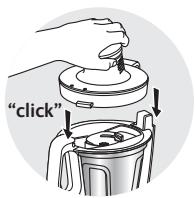 |
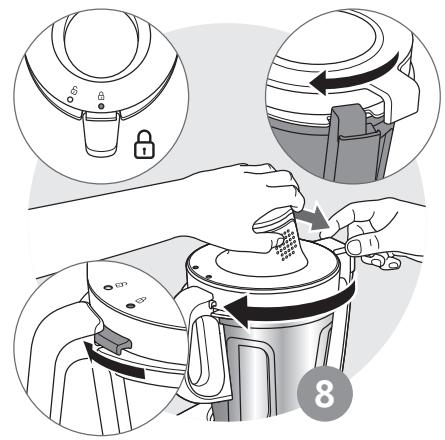
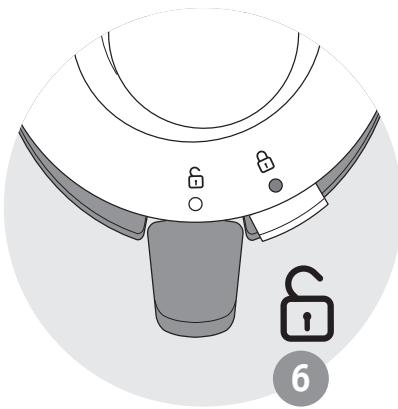
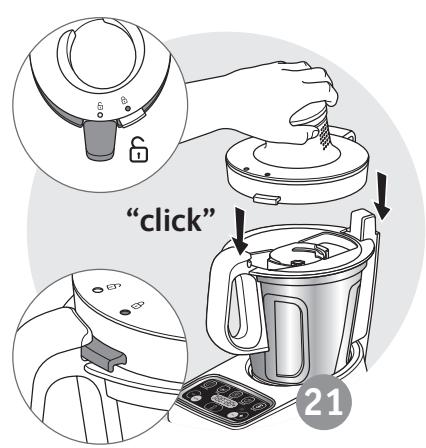
| Place the assembled motor-unit lid (D1, D2+D3) on the jug (F), making sure you position: - the "open padlock" symbol in front of the handle (Fig. 6) - the notches (D2a) of the cup around the handle (F1) and rear column (A1) (Fig. 7) | Fit the motor-unit lid (D1) on the cup (D2), making sure you position the "open padlock" in front of the handle (F1) and press until you hear a "click" (Fig. 21). |
| 5 | 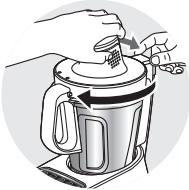 |
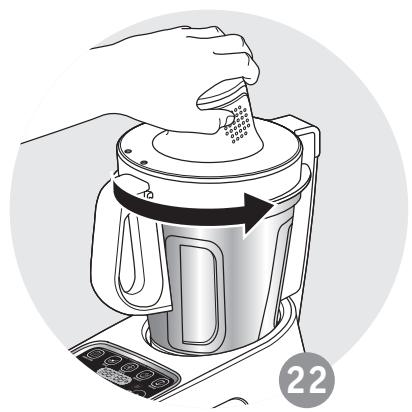
| To lock the lid in place position the “locked padlock” 📋 opposite the handle (F1): To do this, with one hand, turn the cover assembly in a clockwise direction so as to slide the motor unit locking tab (D1a) into the handle (F1): To do this, with one hand, press lightly on the cover assembly while you turn it in a clockwise direction so as to slide the second locking tab (D1a) into the rear column on the base (A). (Fig. 8). |
! The lid should only be fitted if the sealing ring is placed on the seal-mounting cup (Fig. 19) and if the self-mounting cup is fixed to the motor-unit lid.
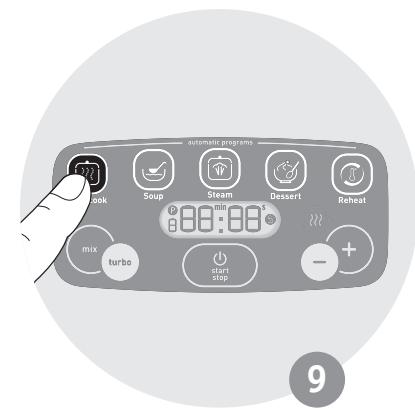
- Switching on
- Select the desired automatic program (B1, B2, B3, B4, B5, B7) by pressing on the corresponding button (Fig. 9). To select the different sub-programs, press the program button again to scroll through the sub-programs (e.g: soup P1 = 1 press; soup P2 = 2 presses etc.).
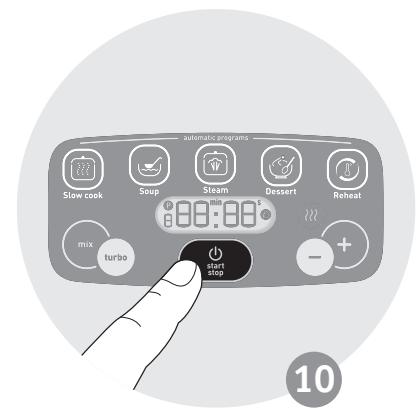
- Press the start/stop/reset button (B9) to launch the program (Fig. 10).
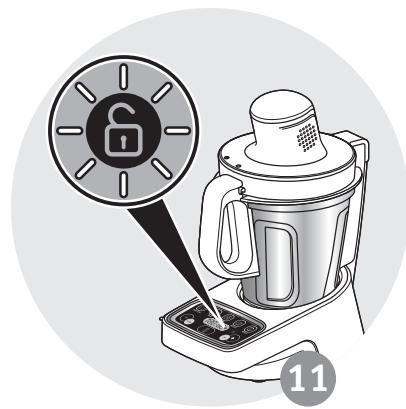
The appliance only starts if the jug is correctly positioned on the base and if the motor-unit lid assembly is correctly positioned on the jug.
In the event of incorrect positioning of the jug or poor locking of the lid, the control panel will flash when you try to launch a programme (Fig. 11).
Disassembling the lid:
- Unlock the lid assembly, by turning the lid in an anti-clockwise direction so as to bring the open padlock opposite the handle (Fig. 22).
- Lift the lid with one hand and with the other pull the cup to separate it from the motor unit (Fig. 18).
- Remove the sealing ring (Fig. 19).
| | MAXIMUM QUANTITIES | AUTOMATIC PROGRAMMES |
| WITHOUT COOKING | WITH COOKING |
| CHOPPING BLADE | 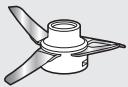 Do not use this accessory to chop hard products. Use the kneading/crushing blade (G2). Do not use this accessory to chop hard products. Use the kneading/crushing blade (G2). | Mixing soup | 1.5L |  P3 P3 | 1min10sec |  P1 or P2 P1 or P2 | 35min |
| Mixing compotes (stewed fruit) | 1kg |  P3 P3 | 1min |  P4 P4 | 15min |
| Mixing smoothies | 1.5L |  P3 P3 | 1min10sec | - | - |
| Chopping vegetables | 500g |  P3 P3 | 15sec | - | - |
| Chopping meat | 500g |  P3 P3 | 30sec |  P5 P5 | 2h |
| Chopping fish | 500g |  P3 P3 | 15sec | - | - |
| MIXER |  | Rissoles | 200g | - | - |  P1 P1 | 5min |
| Stews | 1.2L |  | - |  P4 P4 | 45min |
| Risotto | 1.2L |  | - |  P3 P3 | 30min |
| WHISK |  | Whisked egg whites |  |  P2 P2 | 2min30sec | - | - |
| Sauce (e.g. béchamel) | 0.6L | - | - | [1  2-P3 2-P3 | 15min |
| KNEADING/CRUSHING BLADE |  Do not use for heavy doughs e.g. white bread, wholemeal bread, enriched bread dough or shortcrust pastry. Do not use for heavy doughs e.g. white bread, wholemeal bread, enriched bread dough or shortcrust pastry. | Mixing light batters, light doughs and light sponge cake mixtures | 600g |  P1 P1 | 30sec | - | - |
| Chopping nuts | 500g |  P3 P3 | 1min | - | - |
| Crushing ice | 6 to 10 |  P4 P4 | 30sec | - | - |
| Pancake batter, waffles | 1.2L |  P1 P1 | 30sec | - | - |
| STEAMER BASKET |  | Steaming vegetables, fish (place baking paper in the bottom of the basket) or chicken | 600g | - | - |  P1 P1 | 30min |

Automatic programs:
Speed, cooking temperature and duration are pre-programmed to make soups, stews, steamed dishes, and desserts automatically or to re-heat dishes. The cooking duration is an adjustable setting. You can increase or decrease the cooking time (B10) for your convenience.
What shall I make with the automatic programs on the control panel (B)?
 Slow cook Slow cook | Making stews(Sub-programs P1, P2, P3, P4, P5) |  Dessert Dessert | Making desserts(Sub-programs P1, P2, P3, P4) |
 Soup Soup | Making soups(Sub-programs P1, P2) |  Reheat Reheat | Re-heating dishes |
 Steam Steam | Steamed dishes |  | Making whisked egg whites, chopping meat, crushed ice(Sub-programs P1, P2, P3, P4) |

Do not use the whisk accessory (G4) with a mixture that is too liquid and that measures more than 1 litre. If you do so, there is a risk of splashing outside the jug.
- During cooking, steam is released from the jug. This is not a sealing fault. The back of the jug is appropriately shaped to prevent excess pressure.
Automatic programs and sub-program details
| | Speed (non-adjustable) | Default time (adjustable) | Default temperature (non-adjustable) | Keeping warm | Recipe examples |
| Slow cook P1 |  | Slow | 5min(1min to 10min) | 120°C | NO | Onion rings |
| Slow cook P2 |  | Slow and intermittently, then continuously | 20min(5min to 2h30min) | 80°C | 45 min | Tomato sauce |
| Slow cook P3 |  | Slow and intermittently | 30min(5min to 2h30min) | 90°C | 45 min | Risotto |
| Slow cook P4 |  | None | 45min(5min to 2h30min) | 95°C | 45 min | Stewed fish with saffron |
| Slow cook P5 |  | Fast 15sec, slow and intermittently | 60min(5min to 2h30min) | 95°C | 45 min | Pâté casserole |
| Soup P1 | [7ST7]Soup | No speed during cooking, then 10 pulses, followed by fast speed for 2min after cooking | 35min(5min to 1h) | 100°C | 45 min | Creamed Courgette Soup |
| Soup P2 |  Soup Soup | No speed during cooking, then a medium speed for 15 seconds after cooking | 38min(5min to 1h) | 100°C | 45 min | Mashed carrot/ potato |
| Steam P1 |  Steam Steam | None | 30min(5min to 1h) | 100°C | 45 min | Steamed broccoli |
| Dessert P1 |  Dessert Dessert | Fast and intermittently, then continuously | 30sec(10s to 1min) | None | NO | Sponge cake |
| Dessert P2 |  Dessert Dessert | Slow and intermittently | 10min(1min to 30min) | 55°C | NO | Chocolate fondu |
| Dessert P3 |  Dessert Dessert | Slow, intermittently and then continuously | 20min(10min to 1h) | 90°C | NO | Rice pudding |
| Dessert P4 |  Dessert Dessert | None, then slow and intermittently during cooking | 15min(5min to 1h) | 100°C | NO | Apple compote |
| Reheat |  Reneat Reneat | Slow and intermittently | 15min(3min to 30min) | 80°C | NO | Reheating a soup |
| Mix P1 |  | Slow | 2min(30s to 5min) | None | NO | Tuna mayo with eggs |
| Mix P2 |  | Medium | 5min(1min to 10min) | None | NO | Whisked egg whites |
| Mix P3 |  | Fast | 1min(10s to 1min 10sec) | None | NO | Smoothie |
| Mix P4 |  | Fast and intermittently | 1min(10s to 1min) | None | NO | Crushing ice |

MANUAL USE OF THE CONTROL PANEL (B):
This mode allows you to customise the cooking-duration setting to use at your convenience.
- Using the manual programs on the control panel (B):
 | This button has 4 functions:- Start/stop- "Confirmation" of your automatic program choice- "Pause" during use, once the appliance has started.- "Reset" the chosen settings by pressing for 2 seconds (reset). |
 | Adjusting the operating duration: Select the desired program and adjust by increasing or decreasing the cooking time. |
 | This mode allows you to manually mix your ingredients. |
• Using the steamer basket
Place baking paper in the bottom of the basket to prevent food from falling out.
To cook with steam using the basket, you need to add 400 ml/0.4L cold water to the bottom of the jug (up to mark engraved on the just (Fig. 13). The cooking times are for guidance only, and in most cases allow for satisfactory cooking.
Nevertheless, certain conditions will influence the cooking time:
– the size of the vegetables (cut or not cut)
– the quantity of ingredients in the basket
– the variety of vegetables, and their maturity
-the amount of water in the jug, which must correspond to the mark 📋 (400 ml/0.4L).
If the cooking results are not sufficient, you can add additional cooking time.
Table of quantities and steaming times
| Steaming times |
| Ingredients | Quantities (max) | Approximate steaming time (for fresh ingredients) |
| Potato (small whole new) | 600g (rinsed with water beforehand) | 30 min |
| Carrots 3mm slices | 600g | 40 min |
| Courgettes 5mm slices | 600g | 25 min |
| Parnips 1x1cm cubes | 600g | 30 min |
| Leeks (white part only) 5mm slices | 500g | 25 min |
| Green beans | 400g | 35 min |
| Broccoli (florets) | 300g | 20 min |
| Fish fillets or steaks (fresh or frozen) | 500g | 15 min |
| White meat (skinless and boneless chicken breast fillets) | 400g | 25 min |
Some recipes may cause unintentional overflow, particularly when using frozen vegetables. If your product overflows during use, switch it off and wait 10 seconds before opening the lid. In this case, you will need to reduce the quantity.
Your appliance comes equipped with electronic protection of the motor to guarantee its longevity. This electronic security protects against any abnormal use; meaning that the motor is properly protected.
In cases of extreme use, which disregard the recommendations in the instruction manual (see section "ACCESSORIES, PROGRAMS AND QUANTITIES), the electronic protection will be triggered to protect the motor.
This can occur when you use your own recipes (from the internet or other sources) and the quantities may be too high and/or the processing time is abnormally long and/or processing a succession of recipes too close together without sufficient cooling time in between. In this event, the appliance stops and the message "SECU" will appear on the control panel's LCD display to indicate that the appliance is momentarily non-operational.
If "SECU" appears on your control panel and your device stops, proceed as follows:
- Leave your appliance plugged in.
- Refer to the recommendations in this instruction manual to re-adapt your dishes (quantity of ingredients / processing times / type of accessories (see. § "ACCESSORIES, PROGRAMS AND QUANTITIES").
- Wait half an hour for the motor to cool down.
- Reset the device by pressing the "Start / Stop / Reset" button for 2 seconds (B9).
Your appliance is ready to be used again.
The customer service team remains at your disposal for any questions (see contact details in the separate booklet).
CLEANING THE APPLIANCE
- The appliance must not be immersed in water. Do not put the base or motor-unit lid (D1) under running water.
Once you have finished using the appliance, unplug it from the power socket.
- Remove the motor-unit lid assembly (D1+D2) from the jug (F) by turning it in an anticlockwise direction to move the "open padlock" opposite the handle.
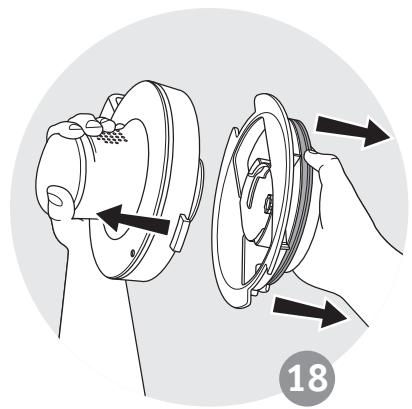
- Remove the sealing-mount cup (D2) from the motor unit by pulling it (Fig. 18).
- Remove the sealing ring (D3) from the seal-mounting cup (Fig. 19).
- Clean the jug immediately after use to avoid staining.
- Remove the jug (F) from the base of the appliance (A), holding the grip handle (F1) (Fig. 2).
- Place the jug on a flat surface.
- When the parts have cooled:
- Take care with the chopping blades (G1) and the kneading/crushing blade (G2) when you clean them and when you empty the jug because they are extremely sharp.
– Clean the jug (F), drive shaft (E), accessory used (G1, G2, G3, G4, G5), seal-mounting cup (D2) and sealing ring (D3), using a sponge, hot water and washing up liquid.
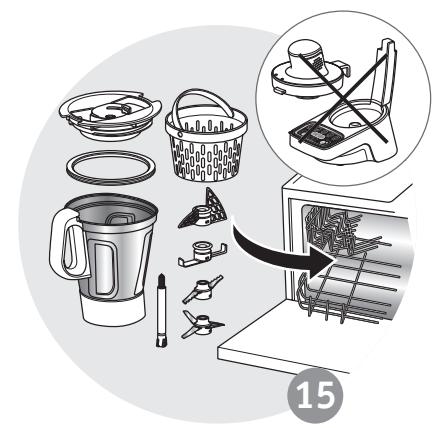
- The jug, sealing-mount cup, sealing ring, drive shaft, steaming basket and accessories, can be washed in the dishwasher (Fig. 15).
- If there is a build-up of limescale in the jug, you can use the scourer side of a sponge dampened if necessary with white vinegar, or with cleaning products suitable for stainless steel.
- In the case of stuck-on grime, leave it to soak for several hours with water and a little washing-up liquid and scrape if needed with a spatula or the scourer side of a sponge.
- To clean the motor unit (D1) and the base (A), use a damp cloth. Dry it carefully.
- The accessories, drive shaft and lid parts can discolour slightly with some ingredients such as curry, carrot juice etc. this presents no danger to your health or to the operation of your appliance. To avoid this, clean the items immediately after use.
- Before reusing the jug (F), make sure that the electrical contacts under the jug are always clean and dry.
STORING THE APPLIANCE
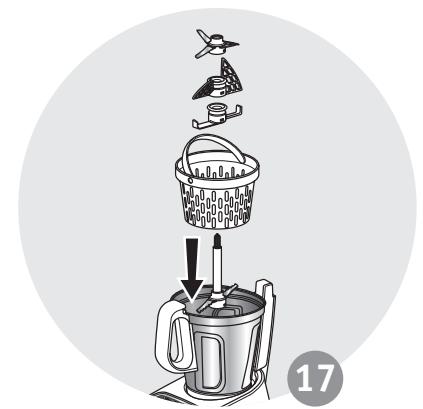
To help with storing your appliance, the accessories and drive shaft can be kept in the jug in the order shown in figure 17 followed by the lid assembly (cup, lid).
WHAT TO DO IF YOU APPLIANCE DOESN'T WORK
| PROBLEMS | CAUSES | SOLUTIONS |
| Insufficient cooking | The cooking times are for guidance only and in most cases allow for satisfactory cooking.Nevertheless, certain conditions will influence the cooking time:- the size of the vegetables (cut or not cut)- the quantity of ingredients- the variety of vegetables, and their maturity- If the ingredients are frozen or not .... | Add further cooking time using the button (B10).Reduce the size of the pieces. |
| Unsatisfactory steaming | Inappropriate quantity of water in the jug.Pieces too large. | The amount of water in the jug must correspond to the mark (400 ml/0.4L).Reduce the size of the pieces. |
| Difficulties succeeding with some recipes | Unsuitable recipes. | Your recipes, whether your own or found on the internet, may not be suited to your appliance and its accessories (quantities, cooking time, processing time, inappropriate accessories). Before you begin your recipe, make sure that you read the instructions for use shown in this instruction manual. |
| The appliance doesn't work | The power cord is not plugged in. | Insert the plug into a power socket. |
| The lid does not lock or locks with difficulty. | The motor-unit lid is not fully assembled. | Check that the sealing ring is correctly assembled on the seal-mounting cup and that it is correctly assembled on the motor-unit lid (Fig. 5 to 8). |
| Excessive vibration or noise. | The appliance is not on a flat surface, the appliance is not stable. | Place the appliance on a stable surface. |
| Too many ingredients have been added. | Reduce the quantity of ingredients added. |
| A problem with the accessories. | Check that you are using the recommended accessory. |
| Leak through the motor-unit lid. | Too many ingredients have been added. | Reduce the quantity of ingredients added. |
| The sealing ring is not present. | Position the sealing ring on the seal-mounting cup and clip to the motor-unit lid. |
| The sealing ring has been cut or is damaged. | Replace the sealing ring - contact an authorised service centre. |
| A problem with the accessories. | Check that you are using the recommended accessory. |
| Smell from the motor. | When first using the appliance, or in the event of motor overload caused by adding too many ingredients, or pieces that are too large. | Leave the motor too cool (for about 30 minutes) and reduce the quantity of ingredients in the jug. |
| "1SECU" appears on the display. | A motor overload caused by adding too many ingredients or pieces that are too hard or large, or processing succession of recipes without sufficient cooling time. | Allow the motor to cool down (approximately 30 minutes) and reduce the quantity of ingredients in the jug, check that you are using the right program, as well as the recommended accessory and that you are not exceeding the capacity of the appliance. |
| "2SECU" displayed + red warning light on. | The temperature sensors can overheat due to the jug heating up if it is empty, or if it has too few ingredients or too little liquid in it. | Add more ingredients or a bit of liquid to the jug. |
| "Err1" is displayed. | The temperature sensor no longer works. | Contact an authorised service centre. |
| "Err2" is displayed. | The jug is very hot. | Switch off the appliance and let the jug cool down. Do not operate your jug when it is empty. Add the ingredients to the jug or even a little liquid. |
| The safety lock indicator appears (C3) on the LDC display. | The jug or motor-unit lid has not locked into place properly. | Check that the jug is correctly positioned on the base and that the motor-unit lid is correctly locked in place (the padlock will no longer appear on the screen). |
| Motor overload. | Allow the motor to cool down (approximately 30 minutes) and reduce the quantity of ingredients in the jug, check that you are using the right program, as well as the recommended accessory.You are sure that everything is assembled correctly but the problem persists (the padlock can be seen on the display), in this case, contact an approved service centre. |

Pork Pâté with figs

For 4 to 6 people – Preparation time 10 mins – Cooking time 2 hrs
Accessories and programs used:
- Chopping blade (G2)
- Turbo program / slow-cook program P5
500g pork belly (without the rind and deboned) • 150g dried figs • 1 onion • 1 clove garlic • 20 ml oil • 50 ml white wine • 50 ml Armagnac or brandy • 14 teaspoon five spice powder • 5g salt.
- Peel the garlic and onion and chop them into quarters. Cut the pork belly into large cubes and the figs into two.
- Put the onion and garlic in the jug fitted with the chopping blade. Blend for 10 seconds at turbo speed.
- Add the oil, figs, pork belly and all the other ingredients to the jug. Program the slow-cook program P5 for 2 hours.
- At the end of the cooking time, put the cooked meat in a terrine dish and remove some of the fat from the surface. Allow to cool at room temperature, cover the cling film and refrigerate.
Tip:
Leave enough fat for the terrine to set.
RECYCLING
- Elimination of packaging and appliance materials.

The packaging exclusively contains materials that are not dangerous to the environment, which can be disposed of in accordance with the recycling regulations in force. To dispose of your appliance, ask the appropriate department of your local authority.
• End-of-life electronic or electrical appliances:

Environmental protection first!
① Your appliance contains numerous materials that can be recovered or recycled.
Take it to a collection point for processing.
A Voet
natural_image
Warning symbol of a building with steam rising inside a triangle (no text or numbers)
HET APPARAAT OPBERGEN
natural_image
Warning symbol depicting steam rising inside a triangle (no text or numbers)
natural_image
Warning symbol depicting steam rising inside a triangle (no text or numbers)
ACCESSORI, PROGRAMMI E QUANTITÀ
natural_image
Warning symbol depicting steam rising inside a triangle (no text or numbers)
SOLO MERCADOS EUROPEOS
natural_image
Warning symbol depicting steam rising inside a triangle (no text or numbers)
natural_image
Warning symbol depicting steam rising inside a triangle (no text or numbers)