FP513110 - Food Processor MOULINEX - Free user manual and instructions
Find the device manual for free FP513110 MOULINEX in PDF.
| Product Type | Food Processor |
| Brand | Moulinex |
| Model | FP513110 |
| Main Functions | Chop, mix, knead, blend, grate, slice, emulsify, beat, whip, juice citrus, herb mill, chopper head |
| Main Bowl Capacity | Up to 600 g heavy dough, 500 g special dough, 0.5 L liquid (blender) |
| Blender Bowl Capacity | 1 L for thick mixtures, 0.8 L for liquid mixtures |
| Juicer Capacity | Up to 0.6 L of juice |
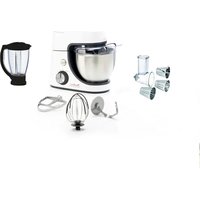
| Included Accessories | Main bowl, lid, drive shaft, stainless steel chopping blade, kneading blade, emulsifying disc, emulsifying whisk, vegetable cutting discs (C/H, A/D, B/G, E), blender bowl, juice filter, pestle, juicer, herb mill, chopper head, reducer, spatula, storage box |
| Speeds | Pulse (intermittent), 1, 2 |
| Power Supply | Check local voltage, mains connection |
| Maintenance and Cleaning | Accessories dishwasher safe except chopper head and motor block (wipe with damp sponge). Oil blades after washing to prevent rust. |
| Safety | Mandatory locking of bowl and lid, use pushers, do not touch blades, unplug after use, suitable for domestic use |
| Storage | Integrated storage box for accessories, cord storage under motor block |
Frequently Asked Questions - FP513110 MOULINEX
User questions about FP513110 MOULINEX
0 question about this device. Answer the ones you know or ask your own.
Ask a new question about this device
Download the instructions for your Food Processor in PDF format for free! Find your manual FP513110 - MOULINEX and take your electronic device back in hand. On this page are published all the documents necessary for the use of your device. FP513110 by MOULINEX.
USER MANUAL FP513110 MOULINEX

natural_image
Line drawing of a kitchen blender with handle and side panel (no text or symbols)b
b1
natural_image
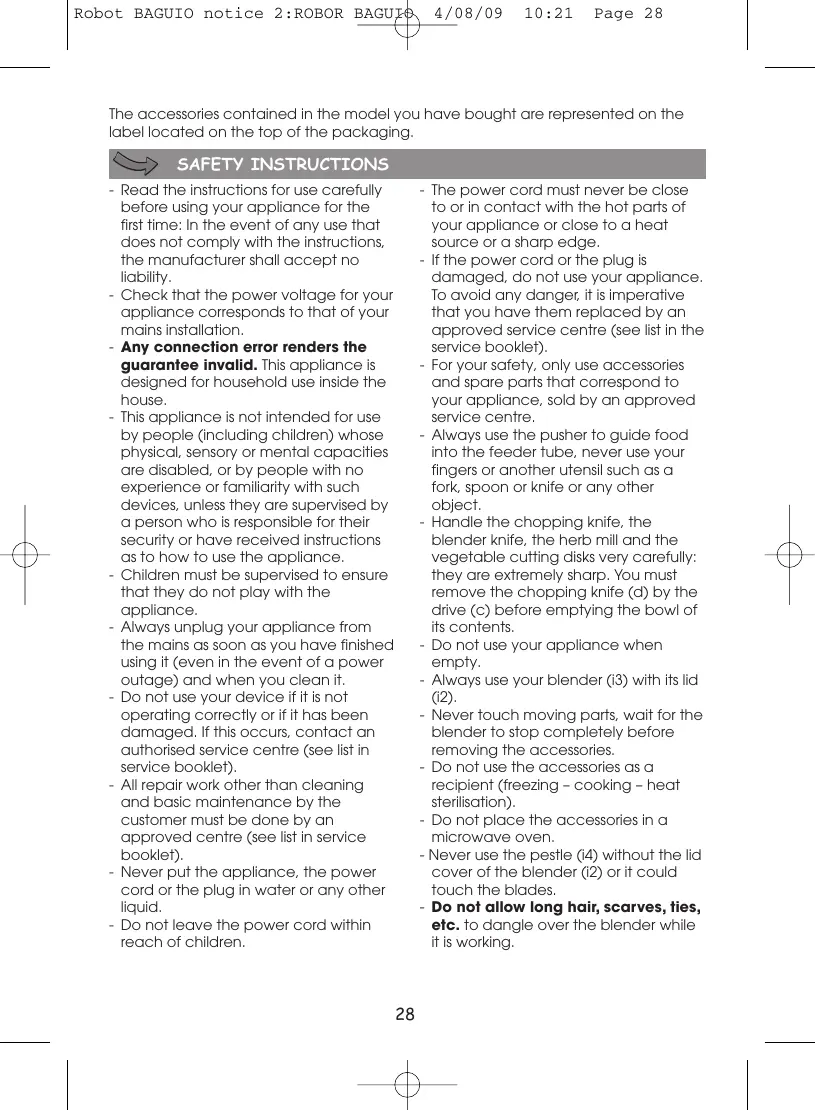
Line drawing of a cylindrical container with three vertical slots, no text or symbols presentC
d
e

b2
natural_image
Simple line drawing of a cylindrical object mounted on a circular base with a clip, no text or symbols present.b3
natural_image
Line drawing of a kitchen oven with a cylindrical lid and handle (no text or symbols)f
natural_image
Technical line drawing of a mechanical gear or wheel component (no text or symbols)9
g1
g2
g4
natural_image
Diagram of a mechanical device with a cylindrical component and coiled spring-like components (no text or symbols)a
natural_image
Simple line drawing of a circular object with internal structures and no text or symbolsA/D

natural_image
Pure technical line drawing of a mechanical component with no text or symbolsB/G
natural_image
Circular mechanical component with multiple holes and a central hub (no text or symbols)E
natural_image
Technical line drawing of a mechanical component with a central hole and flange (no text or symbols)i

i1-2

i2-1
natural_image
Line drawing of a mechanical pulley or washer component (no text or symbols)i2-2
natural_image
Technical line drawing of a mechanical component with concentric rings and a central shaft (no text or symbols)i5

natural_image
Line drawing of a cylindrical object with oval cutouts and a flared rim (no text or symbols)i4

natural_image
Line drawing of a cylindrical mechanical part with flange and central hole (no text or symbols)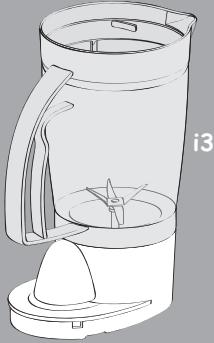
natural_image
Line drawing of a coffee maker with handle and spout, labeled i3 (no text or symbols on the diagram itself)j

j2
natural_image
Simple line drawing of a cooking pan with a handle and lid, labeled 'j3' (no text or symbols on the diagram itself)k
|
natural_image
Technical line drawing of a mechanical component with a circular top and flange (no text or symbols)m
m7-1
m7-2


m8 r
7 m6
natural_image
Simple line drawing of a flask with a handle and label 'm' (no text or symbols on the object itself)0
natural_image
Technical line drawing of a mechanical component with cylindrical and cylindrical features (no text or symbols)n

natural_image
Line drawing of a kitchen knife (no text or symbols)1
2
3
4
5-1
5-2
6-1


natural_image
Diagram of a coffee maker with a plug and cable, showing internal components (no text or symbols)
CONSEILS DE SÉCURITÉ
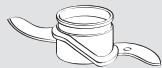
b Ensemble bol hachoir
b1 Poussoir doseur
natural_image
Recycling symbol icon with three chasing arrows inside a rounded square (no text or labels)natural_image
Symbol of a trash bin crossed with no text or labels, representing waste sorting or disposal (no text present)natural_image
Recycling symbol icon with three chasing arrows inside a rounded square (no text or labels)natural_image
Pure electrical circuit lines without any symbolsThe accessories contained in the model you have bought are represented on the label located on the top of the packaging.

SAFETY INSTRUCTIONS
- Read the instructions for use carefully before using your appliance for the first time: In the event of any use that does not comply with the instructions, the manufacturer shall accept no liability.
- Check that the power voltage for your appliance corresponds to that of your mains installation.
- Any connection error renders the guarantee invalid. This appliance is designed for household use inside the house.
- This appliance is not intended for use by people (including children) whose physical, sensory or mental capacities are disabled, or by people with no experience or familiarity with such devices, unless they are supervised by a person who is responsible for their security or have received instructions as to how to use the appliance.
- Children must be supervised to ensure that they do not play with the appliance.
- Always unplug your appliance from the mains as soon as you have finished using it (even in the event of a power outage) and when you clean it.
- Do not use your device if it is not operating correctly or if it has been damaged. If this occurs, contact an authorised service centre (see list in service booklet).
- All repair work other than cleaning and basic maintenance by the customer must be done by an approved centre (see list in service booklet).
- Never put the appliance, the power cord or the plug in water or any other liquid.
-
Do not leave the power cord within reach of children.
-
The power cord must never be close to or in contact with the hot parts of your appliance or close to a heat source or a sharp edge.
- If the power cord or the plug is damaged, do not use your appliance. To avoid any danger, it is imperative that you have them replaced by an approved service centre (see list in the service booklet).
- For your safety, only use accessories and spare parts that correspond to your appliance, sold by an approved service centre.
- Always use the pusher to guide food into the feeder tube, never use your fingers or another utensil such as a fork, spoon or knife or any other object.
- Handle the chopping knife, the blender knife, the herb mill and the vegetable cutting disks very carefully: they are extremely sharp. You must remove the chopping knife (d) by the drive (c) before emptying the bowl of its contents.
- Do not use your appliance when empty.
- Always use your blender (i3) with its lid (i2).
- Never touch moving parts, wait for the blender to stop completely before removing the accessories.
- Do not use the accessories as a recipient (freezing – cooking – heat sterilisation).
- Do not place the accessories in a microwave oven.
- Never use the pestle (i4) without the lid cover of the blender (i2) or it could touch the blades.
- Do not allow long hair, scarves, ties, etc. to dangle over the blender while it is working.

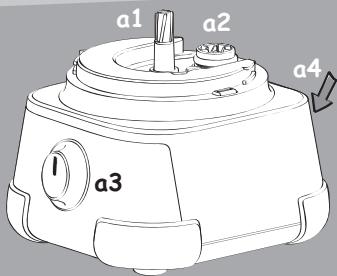
DESCRIPTION
a Motor unit
a1 Slow output motor unit
a2 Fast output motor unit
a3 Speed switch: "Pulse" (intermittent) position - '0' - '1' - '2'
a4 Cord storage cavity
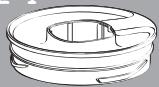
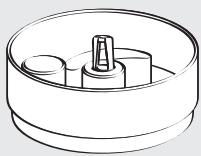
b Bowl chopper unit
b1 Measurer pusher
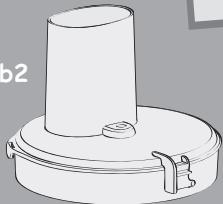
b2 Lid with feeder tube
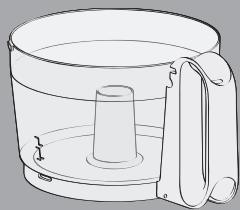
b3 Bowl
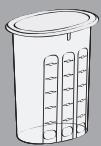
c Drive
d Stainless steel chopping knife
e Kneading blade (depending on the model)
f Emulsifying disk (depending on the model)
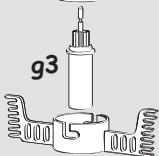
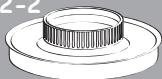
g Emulsifying mixer (depending on the model)
g1 Upper ring of the drive
g2 Drive reducing gear
g3 Drive
g4 Mixer
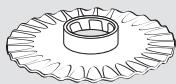
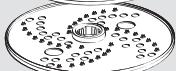
h Vegetables cutting disks
C/HThick grated or thick sliced
A/D Thin grated or thin sliced (depending on model)
B/G Curls or Parmesan – Reibekuchen (depending on model)
E Chip cutter (depending on model)
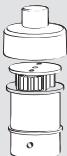
i Blender (depending on the model)
i1-1 Graduated measuring cap
i2-1 Lid with filter
i3 Blender
i4 Pestle
i5 Juice filter
OR
i1-2 Measuring cap
i2-2 Lid
i3 Blender
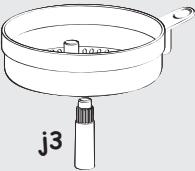
j Citrus press (depending on the model)
j1 Cone
j2 Filter basket
j3 Citrus press drive
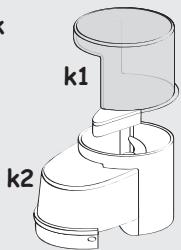
k Herb mill (depending on model)
k1 Lid
k2 Herb mill bowl
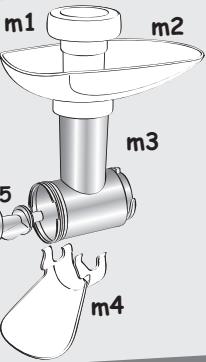
I Chopper head reducing gear (depending on model)
m Chopper head (depending on the model)
m1 Pusher
m2 Removable tray
m3 Body
m4 Food guide
m5 Screw
m6 4 branch knife
m7*Grids
m7-1 Small hole grid:
finely chopped
m7-2 Large hole grid:
thickly chopped
m8 Bolt
n Spatula
o Storage box

USING FOR THE FIRST TIME
- Before using the appliance for the first time, clean all of the accessories in warm soapy water. Rinse and dry.
- Use the motor unit (a) on a work surface that is flat, clean and dry.
- Plug your appliance in.
- "Pulse" (intermittent): turn the knob (a3) to the "Pulse" position successively for better control over certain mixtures.
- Continuous function: turn the knob (a3) to position '1' or '2'.
- Stop: turn the knob (a3) to position '0'.
Paragraph numbering matches the numbers of the diagrams.
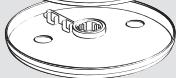
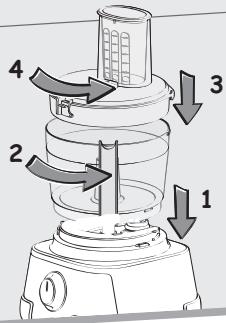
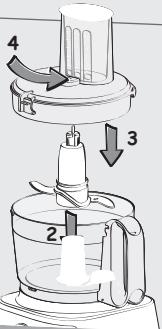
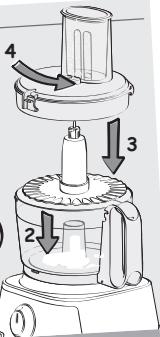
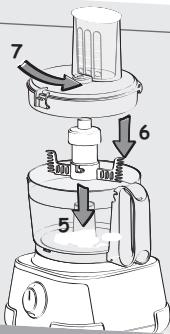
1: SETTING UP THE CHOPPER BOWL AND LID
ACCESSORIES USED
- Bowl unit (b)
ASSEMBLING THE ACCESSORIES
- Place the bowl (b3) on the motor unit (a), with the handle of the bowl positioned slightly to the right of the speed switch (a3).
- Lock the bowl by turning it to the right.
- Place the selected accessory in it.
- Place the lid (b2) on the bowl. Lock it by turning it to the right in the bowl handle.
It is essential to lock the bowl (b3) on the motor unit (a) before locking the lid (b2).
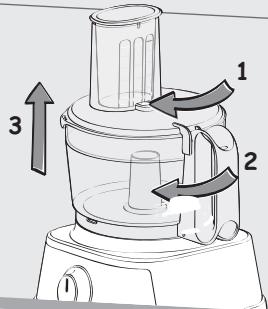
2: REMOVAL OF THE CHOPPER BOWL AND LID
- Unlock the lid (b2) by turning it anticlockwise in order to release the bowl handle. You can then lift and remove it.
- Unlock the bowl also by turning it anticlockwise.
- Only then will you be able to lift it up and remove it from the motor unit.
3: CHOP / MIX / KNEAD / BLENDING 3.1 CHOPPING
ACCESSORIES USED:
- Bowl (b3)
- Drive (c).
- Stainless steel chopping knife (d)
ASSEMBLING THE ACCESSORIES:
- Place the bowl (b3) on the motor unit (a) and lock it to the base.
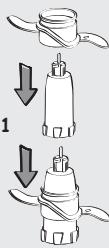
- Slide the chopping knife (d) on the drive (c) and place it on the motor unit outlet (a1).
- Put the ingredients in bowl.
- Place the lid (b2) and lock it on the bowl (b3).
START-UP AND ADVICE:
- Turn the speed selector (a3) to position "2" to start, or for better control of the chopping, use the position "Pulse."
You can chop up to 300g of food such as:
. raw or cooked meat (boneless, diced).
. raw or cooked fish (without skin or bones).
. hard foods: cheese, dried fruits, some vegetables (carrots, celery ...).
. soft foods: some vegetables (onions, spinach ...).
3.2 KNEAD / MIX
ACCESSORIES USED:
- Bowl (b3)
- Drive (c).
- Chopping knife (d) or kneading knife (e) (depending on the model).
ASSEMBLING THE ACCESSORIES:
- Place the bowl (b3) on the motor unit (a) and lock it to the base.
- Slide the chopping knife (d) or the chopping knife (e) on the drive (c) and place it on the motor unit outlet (a1).
- Put the ingredients in bowl.
- Place the lid (b2) and lock it on the bowl (b3).
START-UP AND ADVICE:
- Turn the speed switch (a3) to the position "2" to start it up.
You can knead up to:
- 600g of heavy dough, such as: white bread dough, shortcrust pastry... in 30 sec.
- 500g of special bread doughs such as: rye bread, wholemeal bread, cereal bread, etc. in 30 sec.
You can mix up to:
- 600g of light dough or mixture, such as: biscuits, pound cake, yogurt cake...in 1 min 30s to 2 min.
You can also mix up to 0.5 litres of pancake and waffle mixture, etc. in 1 min to 1 min 30 sec.
BLENDING
- Turn the speed selector (a3) to position 2 to start. You can blend to 0.5 litre of soup or stewed fruit in 20 seconds.
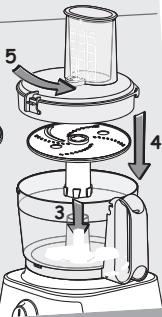
4: GRATE / SLICE
ACCESSORIES USED:
- Bowl (b3)
- Drive (c).
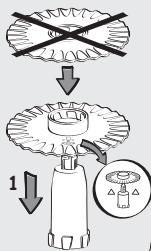
- Vegetable cutting disk (h) (depending on model).
ASSEMBLING THE ACCESSORIES:
- Place the bowl (b3) on the motor unit (a) and lock it.
- Lock the vegetable disk cutting on the drive (c) and then place it on the motor unit outlet (a1).
- Place the lid (b2) and lock it on the bowl (b3).
START-UP AND ADVICE:
- Introduce the food through the feeder
tube and push them using the pusher (b1).
- Turn the speed switch (a3) to the position "1" to slice or position "2" to grate.
Using the vegetable cutting disks, you can:
. thick grating (C) / thin grating (A): celeriac, potatoes, carrots, cheese...
. thick sliced (H) / thin sliced (D): potatoes, onions, cucumbers, beets, apples, carrots, cabbage...
. chip cutter (E): chips...
. reibekuchen (G): parmesan, potatoes...
. curls (B): chocolate
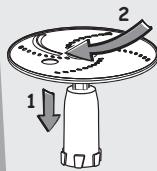
5: EMULSIFY / BEAT / WHIP
ACCESSORIES USED:
- Bowl (b3)
and depending on model
- Emulsifying mixer or emulsifying disk (f) with driver (c).
5.1 ASSEMBLING THE ACCESSORIES WITH THE EMULSIFYING DISK:
- Place the bowl (b3) on the motor unit (a) and lock it to the base.
- Slide the emulsifying disk (d) in the right direction, as shown on image 5.1, and lock it to the drive (c) and place it on the motor unit outlet (a1).
- Put the ingredients in bowl.
- Place the lid (b2) and lock it on the bowl (b3).
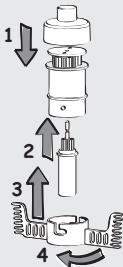
5.2 ASSEMBLING THE ACCESSORIES WITH THE EMULSIFYING MIXER
- Place the bowl (b3) on the motor unit (a) and lock it to the base.
- Place the top ring (g1) on the reducing gear (g2) and the drive (g3) inside it. The metal axis of the drive (g3) should come out of the middle of the ring (g1).
- Place the hand mixer (g4) over the drive unit (g2) and lock it on the pins, before positioning everything onto the motor unit outlet (a1).
- Put the ingredients in bowl.
- Place the lid (b2) and lock it on the bowl (b3).
START-UP AND ADVICE:
- Turn the speed switch (a3) to the position "1" or "2" to start it up. You can prepare: mayonnaise, garlic mayonnaise, egg whites until stiff (1 to 6 eggs), whipped cream, Chantilly cream (up to 0.2 l).
- Never use these accessories to knead heavy doughs (bread dough, etc.) or to mix light doughs (cookies, pound cakes, etc.).
6: HOMOGENISE / MIX / BLEND VERY FINELY
6.1 ACCESSORIES USED:
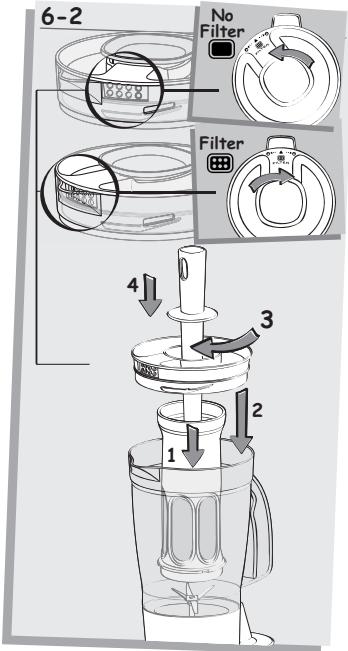
- Blender unit (i) (depending on model). ASSEMBLING THE ACCESSORIES:
- Put the ingredients in the blender (i3) without exceeding the maximum volume of 1 L.
- Close the lid (i2), with the measuring cap (i1), and lock it by turning it clockwise.
- Turn the assembled blender (i) on the motor unit (a), with the handle facing the speed switch.
- Wait until the blender has come to a complete stop before removing it from the motor unit.
START-UP AND ADVICE:
- Turn the speed switch (a3) to the position "1" or "2" to start it up. You can use the "Pulse" position for better control of the mixture.
- Never fill the blender with a boiling liquid.
- Always use the blender with its lid.
- Do not use the blender with dry products only (hazelnuts, almonds, peanuts etc.).
-
Always pour the liquid ingredients into the bowl first before adding the solid ingredients, without exceeding the following maximum levels:
-
1 L for thick mixtures.
- 0.8 L for liquid mixtures.
- To add ingredients while the appliance is working, remove the measuring cap (i1) from the lid and add the ingredients through the feeder hole.
Tips:
- When mixing, if the ingredients stick to the sides of the bowl, stop the machine and unplug it. Remove the blender unit from the body of the appliance. Using the spatula (n), drop the mixture onto the blade. Never put your hands or fingers into the bowl or near the blade.
You can:
- prepare finely mixed smooth soups, creams, compotes, smoothies, cocktails.
- prepare all kinds of fluid mixtures (pancakes, doughnuts, clafoutis, far).
6.2 To make soy milk, fruit juices, cocktails without skins or seeds, you can use the juice filter (15).
To do so, place the filter in the blender (i3), with the metal grids facing down, making sure that you place the slots on the filter against the internal ribs of the bowl.
- Place the lid (i2-1) on the blender to attach the filter.
- Enter the food or liquid in the filter by opening the measuring cap (i1-1). Replace the measuring cap and turn the switch (a3) to position "1" or "2" or turn it a few times to the "Pulse" position.
Tip: For carrot or apple juice, cut the fruit into small cubes and add a dose of water
- The pestle (i4) is used to homogenise and pack down your mixtures (the thicker ones in particular) into the blender. To do this, insert the pestle through the hole in the centre of the blender lid (i2). While it is turning, push the food towards the blades using the pestle.
ATTENTION: Never use the pestle (i4) without the lid of the blender (i2) or it could touch the blades. Do not use your pestle with another accessory.
You can pour your liquid mixtures directly in without taking the lid off (i2-1) through the filter built into the lid. To do this, turn the lid to the filter position (fig 6-2).
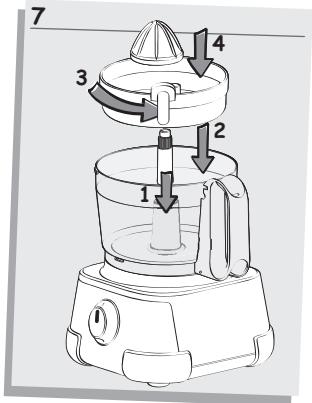
7: PRESS CITRUS FRUIT
ACCESSORIES USED:
- Bowl (b3).
- Citrus press set (j) (depending on model).
ASSEMBLING THE ACCESSORIES:
- Place the bowl (b3) on the motor unit (a) and lock it.
- Slide the drive (j3) onto the motor unit outlet (a1).
- Place the filter basket (j2) on the bowl and lock it by turning it to the right.
- Place the cone (j1) on the basket feeder tube (j2).
- To remove the citrus press: unlock the basket (j2) then the bowl and then you can then remove everything from the motor unit.
START-UP AND ADVICE:
- Place half a citrus fruit on the cone (j1).
- While holding it down, turn the speed switch (a3) to the position "1" to start it up.
- You can get up to 0.6 L of citrus juice without emptying the bowl.
- Note: you must rinse the filter basket (j2) every 0.2 L.
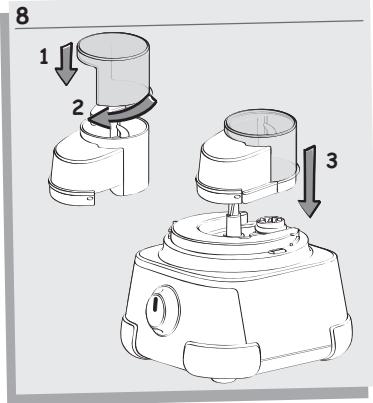
8: CHOP SMALL QUANTITIES VERY FINELY
ACCESSORIES USED:
- Herb mill set (k) (depending on model) ASSEMBLING THE ACCESSORIES:
- Put the ingredients in the herb mill bowl (k2).
- Place the lid (k1) on the herb mill bowl (k2) and lock it by turning it clockwise.
- Place the assembly on the motor unit (a).
START-UP AND ADVICE:
- Turn the speed switch (a3) to the position "2" to start it up while at the same time holding the herb mill on the motor unit while it is operating.
You can use the "Pulse" position for better control of the mixture.
With the mill herb (k) you can:
. Chop in just a few seconds: dried apricots, dried figs, pitted prunes: quantity/maximum time: 80g / 5s
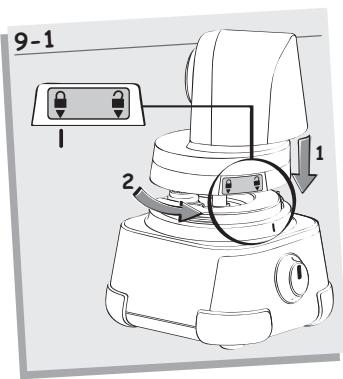
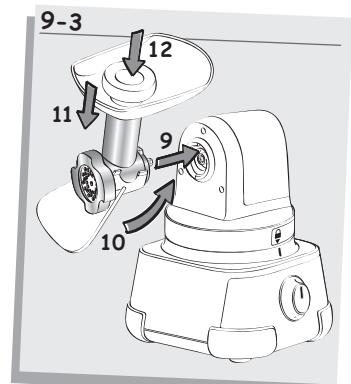
9: CHOPPER HEAD
ACCESSORIES USED:
Reducer (l) and chopper head (m) (depending on model).
ASSEMBLING THE ACCESSORIES:
9.1 Placing the reducer on the food processor
- Place the reducer (I) on the motor unit (a) by setting the marks of the reducer and the motor unit (a) opposite one another. Lock it by turning to the right.
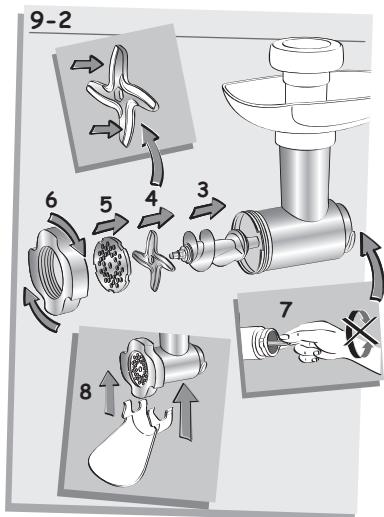
9.2 Assembly of the chopper head
- Take the body (m3) by the feeder tube, placing the widest opening upwards. Then insert the screw (m5) (long axis first) in the body (m3).
- Insert the knife (m6) on the short axis placing the sharp edges outwards.
- Place the grid chosen (m7-1 or m7-2) on the knife by aligning the lugs with the notches in the head (m3).
- Tighten the nut (M8) on the body (m3) clockwise, without blocking it.
- Check that everything is assembled. The axis should not be able to wobble, nor should it be able to turn round. Otherwise, repeat the previous operations.
- Clip the food guide (m4) under the chopper head (m3).
9.3 Placing the chopper head on the appliance
- With the appliance off and unplugged, place the chopper head (m) with the feeder tube tilted to the right opposite the reducer. Fit the chopper head firmly in to the reducer (l).
- Bring the feeder tube back to the vertical until it blocks. The chopper

CLEANING
- Unplug the device.
- For easier cleaning, rinse the accessories quickly after use.
- Wash and dry the accessories: they can all go in the dishwasher, in water or under the tap with the exception of the chopper head unit
head (m) will automatically lock on the reducer (l) when it starts up
- Fit the removable tray (m2) on the feeder tube.
- Plug the device in.
START-UP AND ADVICE:
- Prepare the amount of food to be chopped. Remove the bones, cartilage and nerves.
- Cut the meat into pieces (around 2 x 2 cm) and place them on the tray (m2).
Place a receptacle under the chop per head with the food guide (m4).
- Turn the speed switch (a3) to the position "1" or "2" to start it up.
- Introduce the meat into the feeder tube, piece by piece, using the pusher (m1).
- Never push food with your fingers or any other utensil.
Do not use your appliance for more than 15 minutes when chopping meat.
- Make sure your meat is fully thawed.
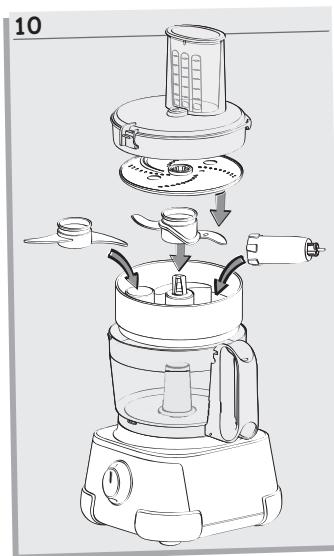
10: STORAGE of the ACCESSORIES
Your food processor is equipped with a storage box (o) can be positioned inside the bowl (b). You can use it to store the drive (c), the stainless steel chopping knife (d), kneading knife (e),
2 disks: vegetable cutter (h) or emulsifying disk (f)
11: CORD LENGTH ADJUSTMENT
For more comfortable use or easy storage, you can reduce the length of the power cord by pushing it inside the motor unit (a) through the opening at the back (a4).
(l+m3+m6+m7+m8) and the motor unit (a). These should be wiped with a damp sponge.
- Once dried, coat the 4 branch knife (m6) and grids (m7) with edible oil to prevent oxidation.
- Pour hot water with a few drops of liquid soap in the blender (i3). Close the lid (i2), with the measuring cap (i1). Press pulse a few times. Unplug the device. Rinse the bowl.
- The blades are extremely sharp accessories. Handle them with care.
Tip: In the event that your accessories are coloured by the food (carrots, oranges, etc.), rub them with a cloth with sunflower oil and then clean them as usual.

STORAGE
Do not store your food processor in a damp environment.

WHAT DO I DO IF MY APPLIANCE DOESN'T WORK?
If your appliance does not work, check:
- that it is properly plugged in.
- that each accessory is locked.
Your appliance still does not work?
Contact an approved service centre (see the list in the service booklet).

DISPOSAL OF THE APPLIANCE AND ITS PACKAGING MATERIALS

natural_image
Recycling symbol icon with three chasing arrows inside a rounded square (no text or labels)The packaging is comprised exclusively of materials that present no danger for the environment and which may therefore be disposed of in accordance with the recycling measures in force in your area. For disposing of the device itself, please contact the appropriate service of your local authority.

END OF LIFE ELECTRICAL AND ELECTRONIC PRODUCTS
natural_image
Symbol of a trash bin crossed with diagonal lines, no text or labels presentEnvironmental protection first!
①Your appliance contains a lot of recoverable or recyclable material.
Leave it at a local civic waste collection point so that it can be recycled.

ACCESSORIES
You can customise your appliance and obtain the following accessories from your usual retailer or an approved service centre:
-Stainless steel chopping knife
- Kneading knife
- Emulsifying disk
- Emulsifying mixer
- Vegetable cutting disks
• C/H: Thick grated / thick sliced
• A/D: Fine grating / thin slicing
- B/G: Shavings / Parmesan – Reibekuchen
- E: Chip cutter
- Blender
- Juice filter + pestle
- Citrus press
- Herb mill
- Chopper
White bread dough
375g of flour – 225ml of lukewarm water – 1 packet of baker's yeast – 5g of salt In the bowl of the food processor fitted with the chopping knife (d) or kneading hook (e), place the flour, salt and yeast. Run at speed "2", and after the first few seconds, pour the warm water down the feeder tube. Once the dough forms a ball (around 30s), stop the food processor. Leave the dough in a warm place to rise until it has doubled in size. Then rework the dough to shape it, then place it on your baking sheet, buttered and floured. Leave it to rise again. Preheat your oven to gas mark 8 (240°). Once the bread has doubled in size, put it in the oven along with a glass filled with water, for a more crusty loaf. Leave to bake for 30 min.
Pizza dough
150g of flour – 90ml of lukewarm water – 2 tablespoons of olive oil – 1/2 sachet of baker's yeast – salt In the bowl of the food processor fitted with the chopping knife (d) or kneading hook (e), place the flour, salt and yeast. Run at speed "2", and after the first few seconds, pour the warm water and olive oil down the feeder tube. Once the dough forms a ball (15 to 20s), stop the food processor. Leave the dough in a warm place to rise until it has doubled in size. Preheat your oven to gas mark 8 (240°). Meanwhile, spread the dough out and add your selected toppings: tomato puree and onions, mushrooms, ham, mozzarella, etc. Garnish your pizza with a few anchovies and black olives, sprinkle a little oregano and grated Gruyere, and dash with a few drops of olive oil. Place the garnished pizza on your baking sheet, buttered and floured. Place in the oven for 15 to 20 minutes, monitoring the progression.
Shortcrust pastry
280g of flour - 140g of soft diced butter - 70ml of water - a pinch of salt In the bowl of the food processor, fitted with the chopping knife (d) or kneading hook (e), place the flour, the salt and the butter.
Run at speed "2" for a few seconds, then pour the water down the feeder tube. Continue mixing until the dough forms a ball (25 to 30s). Leave to stand in the cool for at least 1 hour before rolling it out and cooking with the filling of your choice.
Pancake mixture (in the bowl (b) with the chopping knife (d) or kneading hook (e), or in the blender (i))
160g of flour – 1/3l of milk – 2 eggs – 12 teaspoon of table salt – 2 tablespoons of oil – 15 g of sugar (optional) – Rum or orange blossom or vanilla according to taste
In the bowl of the food processor, fitted with the chopping knife (d), place all the ingredients. Run at speed "1" for 20s, then go to speed "2" for 25s.
Put all the ingredients except the flour in the blender (i3). Run at speed "2", and after a few seconds, add the flour gradually, through the hole in the middle of the blender lid, then mix for 45s.
Pound cake
180g of flour – 180g of soft butter – 180g of sugar – 3 whole eggs – 12 sachet of baking powder – 1 pinch of salt In the bowl of the food processor, fitted with the chopping knife (d) or kneading blade (e), place all the ingredients. Run at speed "2" for 1 min 30s. Preheat the oven to gas mark 6 (180°). Pour the mixture into a cake dish and cook for 40 to 50 minutes.
Gingerbread
150g flour - 70g of soft butter - 70g of sugar - 3 eggs - 50ml of milk -
2 teaspoons of baking powder - 1 teaspoon of cinnamon - 1 teaspoon of ginger - 1 teaspoon of grated nutmeg - 1 grated orange zest - 1 pinch of pepper.
In the bowl of the food processor, fitted with the chopping knife (d) or kneading blade (e), place all the ingredients. Select speed "2" and run for 50s. Place in a buttered and floured tin and cook for 50 min at gas mark 6 (180°C).
Serve warm or cold with fruit stew compote or jam.
Chocolate cake
5 eggs, 200g of sugar, 3 tablespoons of flour, 200g of melted butter, 200g of chocolate, 1 sachet of baking powder, 100ml of milk.
Melt the chocolate in a bain-marie with 2 tablespoons of water. Add the butter and stir until the mixture is completely melted.
In the bowl of the food processor fitted with the chopping knife (d) or kneading hook (e), place the sugar and eggs and run at speed "2" for 45s until the mixture becomes foamy. Without stopping the food processor, go down to speed "1" and add the melted chocolate, flour, yeast and milk through the feeder tube. When all ingredients are mixed in together, run at speed "2" for 15s.
Pour into a buttered cake tin and bake for about 1 hour at gas mark 5/6 (160°C)
Chantilly Cream
200ml of very cold single fresh cream, 30g of icing sugar.
The bowl must be cold, place in the refrigerator for a few minutes.
ACCESSORIES USED:
- Emulsifying disk (f)
In the bowl of the food processor fitted with emulsifying disk, put the fresh cream and icing sugar. Select speed "2" and run for 40s.
ACCESSORIES USED:
- Emulsifying mixer (g)
In the bowl fitted with emulsifying mixer, put the fresh cream and icing sugar.
Select speed "2" and run for around 3 min. 30 s.
Mayonnaise
1 egg yolk, 1 teaspoon of mustard, 1 teaspoon of vinegar, 14 litre of oil, salt, pepper.
ACCESSORIES USED:
- Emulsifying disk (f)
In the bowl of the food processor fitted with the emulsifying disk, place all the ingredients except the oil. Place the lid (b2) and lock it on the bowl (b3).
Select speed "2" and run for 5s, then without stopping, pour in the oil very slowly through the feeder tube. When the mayonnaise has set, it becomes pale.
ACCESSORIES USED:
- Emulsifying mixer (g)
In the bowl of the food processor fitted with the emulsifying mixer, place all the ingredients except the oil.
Place the lid (b2) and lock it on the bowl (b3).
Select speed "1", run for 20 s and slowly pour in a portion of the oil through the feeder tube, then without stopping the food processor go up to speed "2" and pour the remaining oil in.
Note: for successful mayonnaise, the ingredients should be at room temperature.
N.B.: keep refrigerated and use within 24 hours.
WAT TE DOEN INDIEN UW APPARAAT NIET FUNCTIONEERT?
natural_image
Recycling symbol icon with three chasing arrows inside a rounded square (no text or labels)natural_image
Pure electrical circuit lines without any symbolsnatural_image
Recycling symbol icon with three chasing arrows inside a rounded square (no text or labels)natural_image
Symbol of a trash bin crossed out by two crossed lines, no text or labels present3: PICAR / INCORPORAR / AMASSAR / MISTURAR
3.1 PICAR
3.2 AMASSAR / INCORPORAR
6: HOMOGENEIZAR / INCORPORAR / PASSAR MUITO FINO
6.1 ACESSÓRIOS UTILIZADOS:
natural_image
Recycling symbol icon with three chasing arrows inside a rounded square (no text or labels)natural_image
Pure electrical circuit lines without any symbols- Ciotola (b3)
- Cilindro guida (c).
natural_image
Recycling symbol icon with three chasing arrows inside a rounded square (no text or labels)natural_image
Symbol of a trash bin crossed out by two crossed lines, no text or labels presentnatural_image
Recycling symbol icon with three chasing arrows inside a rounded square (no text or labels)natural_image
Symbol of a trash bin crossed with two crossed lines, no text or labels presentnatural_image
Recycling symbol icon with three chasing arrows inside a rounded square (no text or labels)natural_image
Symbol of a trash bin crossed with diagonal lines, no text or labels presentnatural_image
Simple line drawing of a trash bin with no text or symbolsالملحقات

natural_image
Simple line drawing of a trash bin with crossed lines indicating no waste or restriction (no text or symbols)وسائل جانبی