
DCE5260HM - Basket AEG - Free user manual and instructions
Find the device manual for free DCE5260HM AEG in PDF.
| Product type | Range hood |
| Brand | AEG |
| Model | DCE5260HM |
| Number of speeds | 4 (1, 2, 3, maximum speed) |
| Hob2Hood function | Yes, automatic control from the hob |
| Remote control | Yes, included |
| Lighting | Variable intensity LED (max, medium, low, off) |
| Grease filter | Dishwasher safe (short cycle, low temperature) |
| Charcoal filter | Washable and regenerable (every 2 months, replace every 2 years) |
| Filter notification | Yes, indicator light for cleaning/replacement |
| Automatic stop after max speed | Yes, switches to 3rd speed after 5 minutes |
| Warranty | 2 years |
| Finish | Not specified |
| Body material | Not specified |
| Country of manufacture | Not specified |
| Energy class | Not specified |
| Dimensions (W x H x D) | Not specified |
| Weight | Not specified |
| Power supply | Not specified |
| Motor power | Not specified |
Frequently Asked Questions - DCE5260HM AEG
User questions about DCE5260HM AEG
0 question about this device. Answer the ones you know or ask your own.
Ask a new question about this device
Download the instructions for your Basket in PDF format for free! Find your manual DCE5260HM - AEG and take your electronic device back in hand. On this page are published all the documents necessary for the use of your device. DCE5260HM by AEG.
USER MANUAL DCE5260HM AEG
natural_image
Simple line drawing of a kitchen chimney with three dots on the base (no text or symbols)PËRMBAJTJA
- INFORMACIONI I SIGURISË DHE INSTALIMI....2
- PËRSHKRIM I PRODUKTIT....3
- PËRDORIMI I PËRDITSHËM.... 3
- KUJDESI DHE PASTRIMI....5
- ÇËSHTJE QË LIDHEN ME AMBIENTIN....6
PËR REZULTATE PERFEKTE
2. PËRSHKRIM I PRODUKTIT
flowchart
graph TD
    A["Sun icon"] --> B["Circle"]
    C["0-1"] --> D["Circle"]
    E["2"] --> F["Circle"]
    G["3"] --> H["Circle"]
    I["4"] --> J["Circle"]
    K["5"] --> L["Circle"]
    M["6"] --> N["Circle"]
    O["7"] --> P["Grid icon"]
    style A fill:#fff,stroke:#000
    style C fill:#fff,stroke:#000
    style E fill:#fff,stroke:#000
    style G fill:#fff,stroke:#000
    style I fill:#fff,stroke:#000
    style K fill:#fff,stroke:#000
    style M fill:#fff,stroke:#000
    style N fill:#fff,stroke:#000
    style O fill:#fff,stroke:#000
    style P fill:#fff,stroke:#000
natural_image
Isometric line drawing of a rectangular frame with internal parallel lines and curved arrows indicating rotation (no text or symbols)flowchart
graph TD
    A["Sun icon"] --> B["Circle"]
    C["0-1"] --> D["Circle"]
    E["2"] --> F["Circle"]
    G["3"] --> H["Circle"]
    I["4"] --> J["Circle"]
    K["5"] --> L["Circle"]
    M["6"] --> N["Circle"]
    O["7"] --> P["Grid icon"]
    style A fill:#fff,stroke:#000
    style C fill:#fff,stroke:#000
    style E fill:#fff,stroke:#000
    style G fill:#fff,stroke:#000
    style I fill:#fff,stroke:#000
    style K fill:#fff,stroke:#000
    style M fill:#fff,stroke:#000
    style N fill:#fff,stroke:#000
    style O fill:#fff,stroke:#000
    style P fill:#fff,stroke:#000
natural_image
Isometric line drawing of a rectangular frame with internal divisions and curved arrows indicating rotation (no text or symbols)flowchart
graph TD
    A["Sun icon"] --> B["Circle"]
    C["0-1"] --> D["Circle"]
    E["2"] --> F["Circle"]
    G["3"] --> H["Circle"]
    I["4"] --> J["Circle"]
    K["5"] --> L["Circle"]
    M["6"] --> N["Circle"]
    O["7"] --> P["Grid icon"]
    style A fill:#fff,stroke:#000
    style C fill:#fff,stroke:#000
    style E fill:#fff,stroke:#000
    style G fill:#fff,stroke:#000
    style I fill:#fff,stroke:#000
    style K fill:#fff,stroke:#000
    style M fill:#fff,stroke:#000
    style N fill:#fff,stroke:#000
    style O fill:#fff,stroke:#000
    style P fill:#fff,stroke:#000
| Funkcija | Opis | |
| 1 | Svjetlo | Uključuje i isključuje svjetlo. |
| 2 | Prva brzina / Isklj. | Motor prebacuje na prvu razinu brzine. Drugi pritisak isključuje uređaj. |
| 3 | Druga brzina | Motor prebacuje na drugu razinu brzine. |
| 4 | Treća brzina | Motor prebacuje na treću razinu brzine. |
| 5 | Maksimalna brzina | Motor se prebacuje na maksimalnu razinu brzine. Na- kon 5 minuta uređaj prebacuje na treću brzinu. |
| 6 | Obavijest o filtru | Podsjeća da promijenite ili očistite filtar s ugljenom i očistite filtar za masnoću. |
| 7 | Hob ^2 Hood | Indikator funkcije upravljanja napom iz ploče za kuha- nje. Za neke modele simbol se nalazi na upravljačkoj ploči. |
3. SVAKODNEVNA UPORABA
3.1 Uporaba nape
natural_image
Isometric line drawing of a rectangular frame with internal curved arrows indicating rotation or movement (no text or symbols)- Pritisnite ručku montažne kopče na ploči filtra ispod nape (1).

- Lagano nagnite prednji dio filtra prema dolje (2), a zatim ga povucite. Ponovite prva dva koraka za sve filtre.
- Očistite filtre pomoću spužve s deterdžentima koji nisu abrazivni ili u perilici posuđa.
5. BRIGA ZA OKOLIŠ
Reciklirajte materijale sa simbolom 🚪. Ambalažu za recikliranje odložite u prikladne spremnike. Pomozite u zaštiti okoliša i ljudskog zdravlja, kao i u recikliranju otpada od električnih i elektroničkih uređaja. Uređaje označene
- Filtar operite u toploj vodi bez uporabe deterdženta ili u perilici posuđa.
Postavite perilicu posuđa za rad bez sredstva za ispiranje ili bilo kojeg drugog deterdženta. Perilica ne može biti napunjena posuđem.
flowchart
graph TD
    A["Sun icon"] --> B["Circle"]
    C["0-1"] --> D["Circle"]
    E["2"] --> F["Circle"]
    G["3"] --> H["Circle"]
    I["4"] --> J["Circle"]
    K["5"] --> L["Circle"]
    M["6"] --> N["Circle"]
    O["7"] --> P["Grid icon"]
    style A fill:#fff,stroke:#000
    style C fill:#fff,stroke:#000
    style E fill:#fff,stroke:#000
    style G fill:#fff,stroke:#000
    style I fill:#fff,stroke:#000
    style K fill:#fff,stroke:#000
    style M fill:#fff,stroke:#000
    style N fill:#fff,stroke:#000
    style O fill:#fff,stroke:#000
    style P fill:#fff,stroke:#000
natural_image
Isometric line drawing of a rectangular frame with internal parallel lines and curved arrows indicating rotation (no text or symbols)flowchart
graph TD
    A["Sun icon"] --> B["Circle"]
    C["0-1"] --> D["Circle"]
    E["2"] --> F["Circle"]
    G["3"] --> H["Circle"]
    I["4"] --> J["Circle"]
    K["5"] --> L["Circle"]
    M["6"] --> N["Circle"]
    O["7"] --> P["Grid icon"]
    style A fill:#fff,stroke:#000
    style C fill:#fff,stroke:#000
    style E fill:#fff,stroke:#000
    style G fill:#fff,stroke:#000
    style I fill:#fff,stroke:#000
    style K fill:#fff,stroke:#000
    style M fill:#fff,stroke:#000
    style N fill:#fff,stroke:#000
    style O fill:#fff,stroke:#000
    style P fill:#fff,stroke:#000
natural_image
Isometric line drawing of a rectangular frame with internal divisions and directional arrows indicating rotation (no text or symbols)- Tryk på grebet til monteringsclipsen på filterpanelet under emhætten (1).
5. MILJ∅HENSYN
flowchart
graph TD
    A["Sun icon"] --> B["Circle"]
    C["0-1"] --> D["Circle"]
    E["2"] --> F["Circle"]
    G["3"] --> H["Circle"]
    I["4"] --> J["Circle"]
    K["5"] --> L["Circle"]
    M["6"] --> N["Circle"]
    O["7"] --> P["Grid icon"]
    style A fill:#fff,stroke:#000
    style C fill:#fff,stroke:#000
    style E fill:#fff,stroke:#000
    style G fill:#fff,stroke:#000
    style I fill:#fff,stroke:#000
    style K fill:#fff,stroke:#000
    style M fill:#fff,stroke:#000
    style N fill:#fff,stroke:#000
    style O fill:#fff,stroke:#000
    style P fill:#fff,stroke:#000
natural_image
Isometric line drawing of a rectangular frame with internal divisions and curved arrows indicating rotation (no text or symbols)5. MILIEUBESCHERMING
Thank you for choosing this AEG product. We have created it to give you impeccable performance for many years, with innovative technologies that help make life simpler – features you might not find on ordinary appliances. Please spend a few minutes reading to get the very best from it.
Visit our website to:

Get usage advice, brochures, trouble shooter, service and repair information: www.aeg.com/support

Register your product for better service: www.registeraeg.com

Buy Accessories, Consumables and Original spare parts for your appliance: www.aeg.com/shop
CUSTOMER CARE AND SERVICE
Always use original spare parts.
When contacting our Authorised Service Centre, ensure that you have the following data available: Model, PNC, Serial Number.
The information can be found on the rating plate.
⚠ Warning / Caution-Safety information
i General information and tips
Environmental information
Subject to change without notice.
1. SAFETY INFORMATION AND INSTALLATION

WARNING!
Refer to the separate Installation Instructions booklet for Safety Information and Installation. Read carefully the Safety chapters before any use or maintenance of the appliance.
2. PRODUCT DESCRIPTION
2.1 Control panel overview

flowchart
graph TD
    A["Sun icon"] --> B["Circle"]
    C["0-1"] --> D["Circle"]
    E["2"] --> F["Circle"]
    G["3"] --> H["Circle"]
    I["4"] --> J["Circle"]
    K["5"] --> L["Circle"]
    M["6"] --> N["Circle"]
    O["7"] --> P["Grid icon"]
    style A fill:#fff,stroke:#000
    style C fill:#fff,stroke:#000
    style E fill:#fff,stroke:#000
    style G fill:#fff,stroke:#000
    style I fill:#fff,stroke:#000
    style K fill:#fff,stroke:#000
    style M fill:#fff,stroke:#000
    style N fill:#fff,stroke:#000
    style O fill:#fff,stroke:#000
    style P fill:#fff,stroke:#000
| Function | Description | |
| 1 | Lamp | Turns the lights on and off. |
| 2 | First speed / Off | The motor switches to first speed level. Second press turns off the appliance. |
| 3 | Second speed | The motor switches to second speed level. |
| 4 | Third speed | The motor switches to third speed level. |
| 5 | Maximum speed | The motor switches to maximum speed level. After 5 minutes appliance switches to third speed. |
| 6 | Filter notification | Reminds to change or clean the charcoal filter and clean the grease filter. |
| 7 | Hob ^2 Hood | Indicator of the function to control hood from hob. For some models the symbol present on the control panel. |
3. DAILY USE
3.1 Using the hood
Check the recommended speed according to the table below.
 | While heating up food, cooking with covered pots. |
 | While cooking with covered pots on multiple cooking zones or burners, gentle frying. |
 | While boiling and frying big quantities of food without a lid, cooking on multiple cooking zones or burners. |
| [B2A1] | While boiling and frying big quantities of food without a lid, big humidity. |

It is recommended to leave the hood operating for approximately 15 minutes after cooking.
To operate the hood:
- Press the first speed button 🎨0-1 to switch on the appliance.
- If needed, press the light button ⚙️ to illuminate the cooking surface. The light is dimmable. Press again the button to change the intensity from:
a. Maximum,
b. Medium,
c. Low,
d. Off. - If needed, change the speed by pressing the desired button.
To turn off the appliance press the first speed button 🎨0-1 again.
3.2 Hob ^2 Hood function 📋
It is an automatic function which connects the hob with a hood. Both the hob and the hood have an infrared signal communicator. Speed of the fan is defined automatically on basis of mode setting and temperature of the hottest cookware on the hob. You can also operate the fan using the hob manually. The function can be activated from panel of the hob.

For more information how to use the function refer to the hob user manual.
3.3 Filter notification
Filter alarm reminds to change or clean the charcoal filter and clean the grease filter. The filter indicator is turned on for 30 seconds if the grease filter must be cleaned. The filter indicator flashes for 30 seconds if the charcoal filter must be replaced or cleaned.

Refer to cleaning the grease filter in care and cleaning chapter.

Refer to cleaning the charcoal filter or replacing the charcoal filter in care and cleaning chapter.
To activate or deactivate function:
- To activate function press the button ⚙2 for 3 seconds.
If the function is activated, the filter indicator ⏻ flashes two times. - To deactivate function press the button 🎨₂ for 3 seconds.
If the function is deactivated, the filter indicator ⏻ flashes ones.
To reset the function press the button 03 for 3 seconds.
3.4 Remote-control
The appliance is supplied with a remote-control.
The connection is originally enabled.
To connect or disconnect remote-control:
- Switch off the appliance.
- Press the 🎨 for 3 seconds.
The indicator on control panel flashes twice if function is enabled and once if disabled.
4. CARE AND CLEANING
4.1 Notes on cleaning
 Cleaning Agents Cleaning Agents | Do not use abrasive detergents and brushes.Clean the surface of the appliance with a soft cloth with warm water and a mild detergent. |
| After cooking some parts of appliance can get hot. To avoid stains appliance must be cooled down and dried with clean cloth or paper towels. | |
| Clean stains with a mild detergent. | |
 | Clean the appliance and grease filters each month. Clean the interior and grease filters carefully from fat. Fat accumulation or other residue may cause fire.Follow the instructions for cleaning the accessories when filter notification is on. Refer to Filter notification in daily use chapter. |
| Keep the hood clean | Grease filters can be washed in a dishwasher.The dishwasher must be set to a low temperature and a short cycle.The grease filter may discolour, it has no influence on the performance of the appliance. |
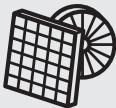 Charcoal filter Charcoal filter | The time of saturation of the charcoal filter varies depending on the type of cooking and the regularity of cleaning the grease filter. Charcoal filter is washable, clean or regenerate the filter after approximately every two months. Refer to leaflet included in the accessory. |
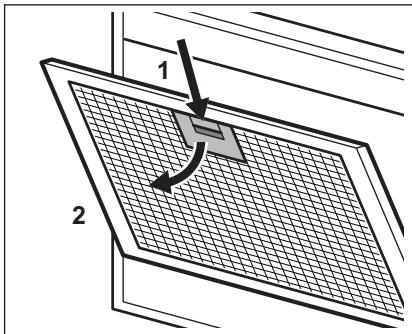
4.2 Cleaning the grease filter
Filters are mounted with the use of clips and pins on the opposite side.
To clean the filter:
- Pull the cover to open it.

natural_image
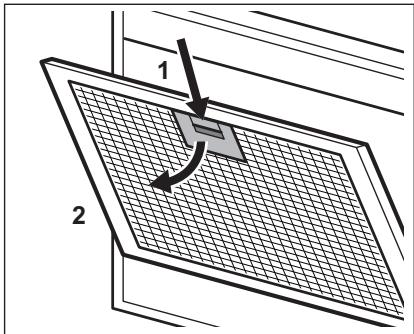
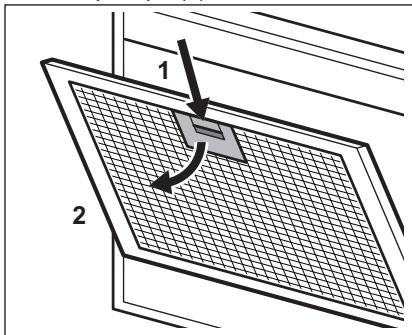
Isometric line drawing of a rectangular frame with internal parallel lines and curved arrows indicating rotation (no text or symbols)- Press the handle of the mounting clip on the filter panel underneath the hood (1).
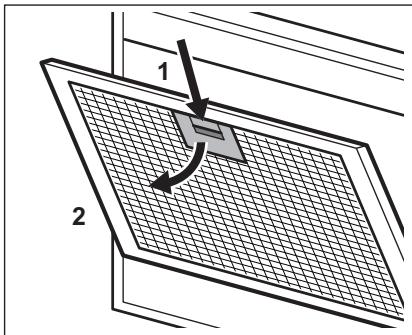
- Slightly tilt the front of the filter downwards (2), then pull.
Repeat the first two steps for all filters. - Clean the filters using a sponge with non abrasive detergents or in a dishwasher.
The dishwasher must be set to a low temperature and a short cycle. The grease filter may discolour, it has no influence on the performance of the appliance.
- To mount the filters back follow the first two steps in reverse order.
Repeat the steps for all filters if applicable.
4.3 Cleaning the charcoal filter
To remove the filter:
- Remove the grease filters from the appliance.
Refer to "Cleaning the grease filter" in this chapter. - Remove the clips holding the filter bed (1), then the filter bed (2).
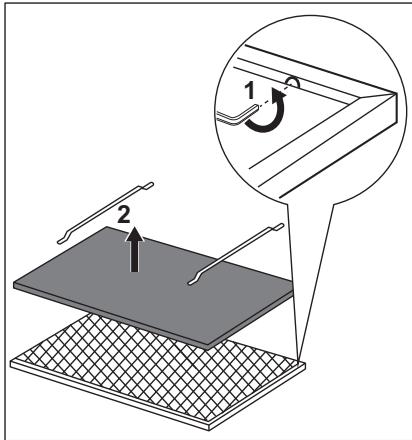
- Wash the filter bed in hot water without using detergent or use a dishwasher.
i Set the dishwasher without using rinse aids or any other detergents. The dishwasher cannot be filled with dishes.
- Leave the filter bed to dry or use an oven.
Set the oven for 7 minutes in the maximum temperature of 60^ C.
- To install the filter, perform the steps in reverse order. The filter has to be fully dried before installing it back into appliance.
Replace the filter bed every 2 years or when the cloth is damaged.
4.4 Replacing the lamp
This appliance is supplied with a LED lamp. This part can be replaced by a technician only. In case of any malfunction refer to "Service" in the "Safety Instructions" chapter.
5. CH GUARANTEE
Customer Service Centres
| Point of Service | ||
| Industriestrasse 105506 Mägenwil | Le Trési 61028 Préverenges | Via Violino 116928 Manno |
| Point of Service | |
| Morgenstrasse 1313018 Bern |  |
| Langgasse 109008 St. Gallen | |
| Am Mattenhof 4a/b6010 Kriens | |
| Schlossstrasse 14133 Pratteln | |
| Comercialstrasse 197000 Chur | |
Spare parts service Industriestrasse 10, 5506 Mägenwil, Tel. 0848 848 111
Specialist advice/Sale Badenerstrasse 587, 8048 Zürich, Tel. 044 405 81 11
Warranty For each product we provide a two-year guarantee from the date of purchase or delivery to the consumer (with a guarantee certificate, invoice or sales receipt serving as proof). The
guarantee covers the costs of materials, labour and travel. The guarantee will lapse if the operating instructions and conditions of use are not adhered to, if the product is incorrectly installed, or in the event of damage caused by external influences, force majeure, intervention by third parties or the use of non-genuine components.
6. ENVIRONMENTAL CONCERNS
Recycle materials with the symbol 📊. Put the packaging in relevant containers to recycle it. Help protect the environment and human health by recycling waste of electrical and electronic appliances. Do not dispose of appliances marked with the symbol 🌘 with the household waste. Return the product to your local recycling facility or contact your municipal office.

For Switzerland:
Where should you take your old equipment?
Anywhere that sells new equipment or hand it in to official SENS collection points or official SENS recycling firms.
The list of official SENS collection points can be found at www.erecycling.ch
SISUKORD
- OHUTUSINFO JA PAIGALDAMINE....38
- TOOTE KIRJELDUS....39
- IGAPÄEVANE KASUTAMINE....39
- PUHASTUS JA HOOLDUS....41
- JÄÄTMEKÄITLUS....42
PARIMATE TULEMUSTE SAAVUTAMISEKS
flowchart
graph TD
    A["Sun icon"] --> B["Circle"]
    C["0-1"] --> D["Circle"]
    E["2"] --> F["Circle"]
    G["3"] --> H["Circle"]
    I["4"] --> J["Circle"]
    K["5"] --> L["Circle"]
    M["6"] --> N["Circle"]
    O["7"] --> P["Grid icon"]
    style A fill:#fff,stroke:#000
    style C fill:#fff,stroke:#000
    style E fill:#fff,stroke:#000
    style G fill:#fff,stroke:#000
    style I fill:#fff,stroke:#000
    style K fill:#fff,stroke:#000
    style M fill:#fff,stroke:#000
    style N fill:#fff,stroke:#000
    style O fill:#fff,stroke:#000
    style P fill:#fff,stroke:#000
natural_image
Isometric line drawing of a rectangular frame with internal parallel strips and directional arrows indicating rotation (no text or symbols)5. JÄÄTMEKÄITLUS
flowchart
graph TD
    A["Sun icon"] --> B["Circle"]
    C["0-1"] --> D["Circle"]
    E["2"] --> F["Circle"]
    G["3"] --> H["Circle"]
    I["4"] --> J["Circle"]
    K["5"] --> L["Circle"]
    M["6"] --> N["Circle"]
    O["7"] --> P["Grid icon"]
    style A fill:#fff,stroke:#000
    style C fill:#fff,stroke:#000
    style E fill:#fff,stroke:#000
    style G fill:#fff,stroke:#000
    style I fill:#fff,stroke:#000
    style K fill:#fff,stroke:#000
    style M fill:#fff,stroke:#000
    style N fill:#fff,stroke:#000
    style O fill:#fff,stroke:#000
    style P fill:#fff,stroke:#000
natural_image
Isometric line drawing of a rectangular frame with internal curved arrows indicating rotation (no text or symbols)5. YMPÄRISTÖNSUOJELU
natural_image
Isometric line drawing of a rectangular frame with internal parallel lines and curved arrows indicating rotation (no text or symbols)flowchart
graph TD
    A["Sun icon"] --> B["Circle"]
    C["0-1"] --> D["Circle"]
    E["2"] --> F["Circle"]
    G["3"] --> H["Circle"]
    I["4"] --> J["Circle"]
    K["5"] --> L["Circle"]
    M["6"] --> N["Circle"]
    O["7"] --> P["Grid icon"]
    style A fill:#fff,stroke:#000
    style C fill:#fff,stroke:#000
    style E fill:#fff,stroke:#000
    style G fill:#fff,stroke:#000
    style I fill:#fff,stroke:#000
    style K fill:#fff,stroke:#000
    style M fill:#fff,stroke:#000
    style N fill:#fff,stroke:#000
    style O fill:#fff,stroke:#000
    style P fill:#fff,stroke:#000
natural_image
Isometric line drawing of a rectangular frame with internal parallel slots and directional arrows indicating rotation (no text or symbols)flowchart
graph TD
    A["Sun icon"] --> B["Circle"]
    C["0-1"] --> D["Circle"]
    E["2"] --> F["Circle"]
    G["3"] --> H["Circle"]
    I["4"] --> J["Circle"]
    K["5"] --> L["Circle"]
    M["6"] --> N["Circle"]
    O["7"] --> P["Grid icon"]
    style A fill:#fff,stroke:#000
    style C fill:#fff,stroke:#000
    style E fill:#fff,stroke:#000
    style G fill:#fff,stroke:#000
    style I fill:#fff,stroke:#000
    style K fill:#fff,stroke:#000
    style M fill:#fff,stroke:#000
    style N fill:#fff,stroke:#000
    style O fill:#fff,stroke:#000
    style P fill:#fff,stroke:#000
natural_image
Isometric line drawing of a rectangular frame with internal channels and directional arrows indicating rotation (no text or symbols)flowchart
graph TD
    A["Sun icon"] --> B["Circle"]
    C["0-1"] --> D["Circle"]
    E["2"] --> F["Circle"]
    G["3"] --> H["Circle"]
    I["4"] --> J["Circle"]
    K["5"] --> L["Circle"]
    M["6"] --> N["Circle"]
    O["7"] --> P["Grid icon"]
    style A fill:#fff,stroke:#000
    style C fill:#fff,stroke:#000
    style E fill:#fff,stroke:#000
    style G fill:#fff,stroke:#000
    style I fill:#fff,stroke:#000
    style K fill:#fff,stroke:#000
    style M fill:#fff,stroke:#000
    style N fill:#fff,stroke:#000
    style O fill:#fff,stroke:#000
    style P fill:#fff,stroke:#000
natural_image
Isometric line drawing of a rectangular frame with internal divisions and curved arrows indicating rotation (no text or symbols)natural_image
Isometric line drawing of a rectangular frame with internal divisions and curved arrows indicating rotation (no text or symbols)flowchart
graph TD
    A["Sun icon"] --> B["Circle"]
    C["0-1"] --> D["Circle"]
    E["2"] --> F["Circle"]
    G["3"] --> H["Circle"]
    I["4"] --> J["Circle"]
    K["5"] --> L["Circle"]
    M["6"] --> N["Circle"]
    O["7"] --> P["Grid icon"]
    style A fill:#fff,stroke:#000
    style C fill:#fff,stroke:#000
    style E fill:#fff,stroke:#000
    style G fill:#fff,stroke:#000
    style I fill:#fff,stroke:#000
    style K fill:#fff,stroke:#000
    style M fill:#fff,stroke:#000
    style N fill:#fff,stroke:#000
    style O fill:#fff,stroke:#000
    style P fill:#fff,stroke:#000
natural_image
Isometric line drawing of a rectangular frame with internal parallel strips and curved arrows indicating rotation (no text or symbols)flowchart
graph TD
    A["Sun icon"] --> B["Circle"]
    C["0-1"] --> D["Circle"]
    E["2"] --> F["Circle"]
    G["3"] --> H["Circle"]
    I["4"] --> J["Circle"]
    K["5"] --> L["Circle"]
    M["6"] --> N["Circle"]
    O["7"] --> P["Grid icon"]
    style A fill:#fff,stroke:#000
    style C fill:#fff,stroke:#000
    style E fill:#fff,stroke:#000
    style G fill:#fff,stroke:#000
    style I fill:#fff,stroke:#000
    style K fill:#fff,stroke:#000
    style M fill:#fff,stroke:#000
    style N fill:#fff,stroke:#000
    style O fill:#fff,stroke:#000
    style P fill:#fff,stroke:#000
natural_image
Isometric line drawing of a rectangular frame with internal channels and curved arrows indicating rotation (no text or symbols)5. APLINKOS APSAUGA
flowchart
graph TD
    A["Sun icon"] --> B["Circle"]
    C["0-1"] --> D["Circle"]
    E["2"] --> F["Circle"]
    G["3"] --> H["Circle"]
    I["4"] --> J["Circle"]
    K["5"] --> L["Circle"]
    M["6"] --> N["Circle"]
    O["7"] --> P["Grid icon"]
    style A fill:#fff,stroke:#000
    style C fill:#fff,stroke:#000
    style E fill:#fff,stroke:#000
    style G fill:#fff,stroke:#000
    style I fill:#fff,stroke:#000
    style K fill:#fff,stroke:#000
    style M fill:#fff,stroke:#000
    style N fill:#fff,stroke:#000
    style O fill:#fff,stroke:#000
    style P fill:#fff,stroke:#000
natural_image
Isometric line drawing of a rectangular frame with internal divisions and curved arrows indicating rotation (no text or symbols)flowchart
graph TD
    A["Sun icon"] --> B["Circle"]
    C["0-1"] --> D["Circle"]
    E["2"] --> F["Circle"]
    G["3"] --> H["Circle"]
    I["4"] --> J["Circle"]
    K["5"] --> L["Circle"]
    M["6"] --> N["Circle"]
    O["7"] --> P["Grid icon"]
    style A fill:#fff,stroke:#000
    style C fill:#fff,stroke:#000
    style E fill:#fff,stroke:#000
    style G fill:#fff,stroke:#000
    style I fill:#fff,stroke:#000
    style K fill:#fff,stroke:#000
    style M fill:#fff,stroke:#000
    style N fill:#fff,stroke:#000
    style O fill:#fff,stroke:#000
    style P fill:#fff,stroke:#000
natural_image
Isometric line drawing of a rectangular frame with internal parallel strips and curved arrows indicating rotation (no text or symbols)- Trykk på håndtaket til monteringsklipsen på filterpanelet under ventilatoren (1).
flowchart
graph TD
    A["Sun icon"] --> B["Circle"]
    C["0-1"] --> D["Circle"]
    E["2"] --> F["Circle"]
    G["3"] --> H["Circle"]
    I["4"] --> J["Circle"]
    K["5"] --> L["Circle"]
    M["6"] --> N["Circle"]
    O["7"] --> P["Grid icon"]
    style A fill:#fff,stroke:#000
    style C fill:#fff,stroke:#000
    style E fill:#fff,stroke:#000
    style G fill:#fff,stroke:#000
    style I fill:#fff,stroke:#000
    style K fill:#fff,stroke:#000
    style M fill:#fff,stroke:#000
    style N fill:#fff,stroke:#000
    style O fill:#fff,stroke:#000
    style P fill:#fff,stroke:#000
natural_image
Isometric line drawing of a rectangular frame with internal divisions and directional arrows indicating rotation (no text or symbols)flowchart
graph TD
    A["Sun icon"] --> B["Circle"]
    C["0-1"] --> D["Circle"]
    E["2"] --> F["Circle"]
    G["3"] --> H["Circle"]
    I["4"] --> J["Circle"]
    K["5"] --> L["Circle"]
    M["6"] --> N["Circle"]
    O["7"] --> P["Grid icon"]
    style A fill:#fff,stroke:#000
    style C fill:#fff,stroke:#000
    style E fill:#fff,stroke:#000
    style G fill:#fff,stroke:#000
    style I fill:#fff,stroke:#000
    style K fill:#fff,stroke:#000
    style M fill:#fff,stroke:#000
    style N fill:#fff,stroke:#000
    style O fill:#fff,stroke:#000
    style P fill:#fff,stroke:#000
natural_image
Isometric line drawing of a rectangular frame with internal divisions and curved arrows indicating rotation (no text or symbols)flowchart
graph TD
    A["Sun icon"] --> B["Circle"]
    C["0-1"] --> D["Circle"]
    E["2"] --> F["Circle"]
    G["3"] --> H["Circle"]
    I["4"] --> J["Circle"]
    K["5"] --> L["Circle"]
    M["6"] --> N["Circle"]
    O["7"] --> P["Grid icon"]
    style A fill:#fff,stroke:#000
    style C fill:#fff,stroke:#000
    style E fill:#fff,stroke:#000
    style G fill:#fff,stroke:#000
    style I fill:#fff,stroke:#000
    style K fill:#fff,stroke:#000
    style M fill:#fff,stroke:#000
    style N fill:#fff,stroke:#000
    style O fill:#fff,stroke:#000
    style P fill:#fff,stroke:#000
natural_image
Isometric line drawing of a rectangular frame with internal divisions and curved arrows indicating rotation (no text or symbols)natural_image
Isometric line drawing of a rectangular frame with internal divisions and curved arrows indicating rotation (no text or symbols)flowchart
graph TD
    A["Sun icon"] --> B["Circle"]
    C["Wind icon"] --> D["Circle"]
    E["Wind turbine icon"] --> F["Circle"]
    G["Wind turbine blade icon"] --> H["Circle"]
    I["Ground station icon"] --> J["Grid symbol"]
    K["Radio signal icon"] --> L["Radio beam"]
natural_image
Isometric line drawing of a rectangular frame with internal divisions and curved arrows indicating rotation (no text or symbols)- Притисните ручку затеге за монтажу на панелу филтера испод аспиратора (1).
flowchart
graph TD
    A["Sun icon"] --> B["Circle"]
    C["0-1"] --> D["Circle"]
    E["2"] --> F["Circle"]
    G["3"] --> H["Circle"]
    I["4"] --> J["Circle"]
    K["5"] --> L["Circle"]
    M["6"] --> N["Circle"]
    O["7"] --> P["Grid icon"]
    style A fill:#fff,stroke:#000
    style C fill:#fff,stroke:#000
    style E fill:#fff,stroke:#000
    style G fill:#fff,stroke:#000
    style I fill:#fff,stroke:#000
    style K fill:#fff,stroke:#000
    style M fill:#fff,stroke:#000
    style N fill:#fff,stroke:#000
    style O fill:#fff,stroke:#000
    style P fill:#fff,stroke:#000
natural_image
Isometric line drawing of a rectangular frame with internal divisions and curved arrows indicating rotation (no text or symbols)5. SKRB ZA OKOLJE
flowchart
graph TD
    A["Sun icon"] --> B["Circle"]
    C["0-1"] --> D["Circle"]
    E["2"] --> F["Circle"]
    G["3"] --> H["Circle"]
    I["4"] --> J["Circle"]
    K["5"] --> L["Circle"]
    M["6"] --> N["Circle"]
    O["7"] --> P["Grid icon"]
    style A fill:#fff,stroke:#000
    style C fill:#fff,stroke:#000
    style E fill:#fff,stroke:#000
    style G fill:#fff,stroke:#000
    style I fill:#fff,stroke:#000
    style K fill:#fff,stroke:#000
    style M fill:#fff,stroke:#000
    style N fill:#fff,stroke:#000
    style O fill:#fff,stroke:#000
    style P fill:#fff,stroke:#000
natural_image
Isometric line drawing of a rectangular frame with internal channels and directional arrows indicating rotation (no text or symbols)reparationsinformation:
www.aeg.com/support
flowchart
graph TD
    A["Sun icon"] --> B["Circle"]
    C["0-1"] --> D["Circle"]
    E["2"] --> F["Circle"]
    G["3"] --> H["Circle"]
    I["4"] --> J["Circle"]
    K["5"] --> L["Circle"]
    M["6"] --> N["Circle"]
    O["7"] --> P["Grid icon"]
    style A fill:#fff,stroke:#000
    style C fill:#fff,stroke:#000
    style E fill:#fff,stroke:#000
    style G fill:#fff,stroke:#000
    style I fill:#fff,stroke:#000
    style K fill:#fff,stroke:#000
    style M fill:#fff,stroke:#000
    style N fill:#fff,stroke:#000
    style O fill:#fff,stroke:#000
    style P fill:#fff,stroke:#000
natural_image
Isometric line drawing of a rectangular frame with internal divisions and directional arrows indicating rotation (no text or symbols)5. MILJÖSKYDD
flowchart
graph TD
    A["Sun icon"] --> B["Circle"]
    C["0-1"] --> D["Circle"]
    E["2"] --> F["Circle"]
    G["3"] --> H["Circle"]
    I["4"] --> J["Circle"]
    K["5"] --> L["Circle"]
    M["6"] --> N["Circle"]
    O["7"] --> P["Grid icon"]
    style A fill:#fff,stroke:#000
    style C fill:#fff,stroke:#000
    style E fill:#fff,stroke:#000
    style G fill:#fff,stroke:#000
    style I fill:#fff,stroke:#000
    style K fill:#fff,stroke:#000
    style M fill:#fff,stroke:#000
    style N fill:#fff,stroke:#000
    style O fill:#fff,stroke:#000
    style P fill:#fff,stroke:#000
natural_image
Pure technical line drawing of a rectangular frame with internal channels and curved arrows indicating rotation (no text or symbols)flowchart
graph TD
    A["Sun icon"] --> B["Circle"]
    C["0-1"] --> D["Circle"]
    E["2"] --> F["Circle"]
    G["3"] --> H["Circle"]
    I["4"] --> J["Circle"]
    K["5"] --> L["Circle"]
    M["6"] --> N["Circle"]
    O["7"] --> P["Grid icon"]
    style A fill:#fff,stroke:#000
    style C fill:#fff,stroke:#000
    style E fill:#fff,stroke:#000
    style G fill:#fff,stroke:#000
    style I fill:#fff,stroke:#000
    style K fill:#fff,stroke:#000
    style M fill:#fff,stroke:#000
    style N fill:#fff,stroke:#000
    style O fill:#fff,stroke:#000
    style P fill:#fff,stroke:#000
natural_image
Isometric line drawing of a rectangular frame with internal divisions and curved arrows indicating rotation (no text or symbols)5. ОХОРОНА ДОВКІЛЛЯ
natural_image
Isometric line drawing of a rectangular frame with internal channels and directional arrows indicating rotation (no text or symbols)flowchart
graph TD
    A["Sun icon"] --> B["Circle"]
    C["0-1"] --> D["Circle"]
    E["2"] --> F["Circle"]
    G["3"] --> H["Circle"]
    I["4"] --> J["Circle"]
    K["5"] --> L["Circle"]
    M["6"] --> N["Circle"]
    O["7"] --> P["Grid icon"]
    style A fill:#fff,stroke:#000
    style C fill:#fff,stroke:#000
    style E fill:#fff,stroke:#000
    style G fill:#fff,stroke:#000
    style I fill:#fff,stroke:#000
    style K fill:#fff,stroke:#000
    style M fill:#fff,stroke:#000
    style N fill:#fff,stroke:#000
    style O fill:#fff,stroke:#000
    style P fill:#fff,stroke:#000