
NRS9182BBK - Combined refrigerator GORENJE - Free user manual and instructions
Find the device manual for free NRS9182BBK GORENJE in PDF.
| Brand | Gorenje |
| Model | NRS9182BBK |
| Product type | Combined refrigerator with water and ice dispenser |
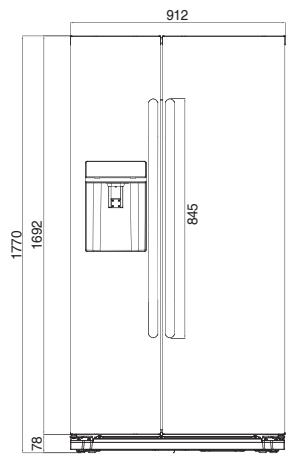
| Dimensions (H x W x D) | 1770 x 906 x 758 mm |
| Fridge volume | Approximately 350 L (estimate) |
| Freezer volume | Approximately 120 L (estimate) |
| Climate class | SN, N, ST, T (from +10°C to +43°C) |
| Refrigerant | R600a (isobutane) |
| Control panel | Touch electronic with digital display |
| Super freeze function | Yes (speed freeze) |
| Super cool function | Yes (speed cooling) |
| Water dispenser | Yes, with water/ice selection button |
| Automatic ice maker | Yes, produces up to 10 ice cubes per cycle |
| Home Bar (refreshment compartment) | Yes, one-touch opening |
| Interior lighting | LED (lights when opened) |
| Water filter | Yes, replacement recommended every 6 months |
| Open door alarm | Yes (after 1 minute) |
| Panel lock | Yes (anti-tamper) |
| System shutdown function | Yes (for prolonged absence) |
| Defrost | Automatic (no frost) |
| Cleaning | Unplug, use a soft cloth and mild detergent |
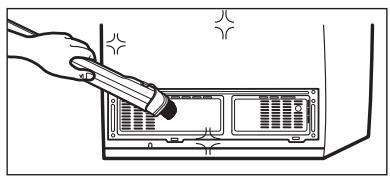
| Annual maintenance | Clean rear grille with vacuum cleaner |
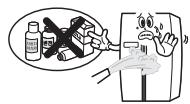
| Safety instructions | Do not use flammable gases, ensure proper grounding |
| Included accessories | Egg tray, filter housing, water supply kit |
| Repairability | Call a qualified technician |
Frequently Asked Questions - NRS9182BBK GORENJE
User questions about NRS9182BBK GORENJE
0 question about this device. Answer the ones you know or ask your own.
Ask a new question about this device
Download the instructions for your Combined refrigerator in PDF format for free! Find your manual NRS9182BBK - GORENJE and take your electronic device back in hand. On this page are published all the documents necessary for the use of your device. NRS9182BBK by GORENJE.
USER MANUAL NRS9182BBK GORENJE
natural_image
Illustration of a gray server cabinet with two doors and a front panel (no text or symbols)Refrigerator - Freezer
Disposal of Used Electrical & Electronic Equipment
The meaning of the symbol on the product, its accessory or packaging indicates that this product shall not be treated as household waste. Please, dispose of this equipment at your applicable collection point for the recycling of electrical & electronic equipments waste.
In the European Union and Other European countries there are separate collection systems for used electrical and electronic product. By ensuring the correct disposal of this product, you will help prevent potential hazards to the environment and to human health, which could otherwise be caused by unsuitable waste handling of this product. The recycling of materials will help conserve natural resources.
Please do not therefore dispose of your old electrical and electronic equipment with your household waste.
For more detailed information about recycling of this product, please contact your local city office, your household waste disposal service or the shop where you purchased the product.
SAFETY WARNING

This appliance contains a certain amount of isobutane refrigerant (R600a) a natural gas with high environmental compatibility that is, however, also combustible.
When transporting and installing the appliance, care should be taken to ensure that no parts of the refrigerating circuit are damaged.
Refrigerant squirting out of the pipes could ignite or cause eye injury. If a leak is detected, avoid any naked flames or potential sources of ignition and air the room in which appliance is standing for several minutes.
- In order to avoid the creation of a flammable gas-air mixture if a leak in the refrigerating circuit occurs, the size of the room in which the appliance may be sited depends on the amount of refrigerant used.
The room must be 1 m^3 in size for every 8g of R600a refrigerant inside the appliance. The amount of refrigerant is shown on the identification plate inside the appliance.
- Never start up an appliance showing any signs of damage. If in doubt, consult your dealer.
RoHS (Directive 2011/65/EU) Compliant

This product is environmentally sound and sustainable free from Pb, Cd, Cr+6, Hg, PBBs and PBDEs restricted in accordance with the Directive.
OBSERVE AMBIENT TEMPERATURE
This refrigerator is designed to operate in ambient temperature specified by its category, which is marked on the rating plate
| Climatic category | Ambient temperature from...to |
| SN | +10°C to +32°C |
| N | +16°C to +32°C |
| ST | +16°C to +38°C |
| T | +16°C to +43°C |
NOTE
Internal temperature may be affected by such factors as the location of the refrigerator, ambient temperature and frequency of the door opening.
Contents
How to use the Dispenser 8
Before You Call for Service... 10
Something strange?
Don't worry. Here is the answer . . . . . . . . . . 11
Installation Preparation 12
If the refrigerator can not pass through a door during installation, follow these steps . . . . . . . . 13
Refrigerator Leveling &
Door Adjustment (if needed) 14
How to install Water Line 15
Be sure to keep for safety!
Read these safety instructions thoroughly and carefully before using. Please keep this user guide on hand for future reference.

Indicates the possibility of danger of death or serious injury.

Indicates the possibility of risk of personal injury or material damage.
Other Signs

DO NOT remove or disassemble!

Be sure to unplug from outlet/mains!

NO. DO NOT...

Be sure to keep and follow!

Caution
- If the supply cord becomes damaged, it must be replaced by a qualified person in order to avoid a hazard.
- This appliance is not intended for use by persons (including children) with reduced physical, sensory or mental capabilities, or lack of experience and knowledge, unless they have been given supervision or instruction concerning use of the appliance by a person responsible for their safety.
WARNING

Never let the power cord be crushed by the refrigerator itself or other (heavy) objects. Never bend power cord excessively.
- If the cord is damaged or peeled, it can be a cause of fire and electric shock.

Do not plug several appliances into the same wall outlet.
- It can be a cause of overheating and/or fire. Use an exclusive grounding receptacle for the refrigerator.

Never hold the power cord or plug with wet hands.
●There is a risk of electric shock.

Never use a damaged power cord or plug, or loose main socket.
● There is a risk of fire, electric shock or serious injury.

Be sure to ground. Check if your wall outlet is grounded (earthed).
●There is a risk of electric shock hazards.

Never unplug by pulling only the power cord wire. Always grip the plug firmly.

Let the cord from the plug outlet be directed downwards.
- If it is directed up, the cord near the plug is bent and can be damaged, which can cause an electric shock or fire.

Do not install the refrigerator on a wet floor or in a place with excessive humidity and moisture.
●Electric insulation gets weakened, resulting in a risk of electric shock hazards.

Never let the power cord touch or pass over heating appliances.
●Power cord can be damaged, resulting in a risk of electric shock hazards.

Check if plug is loose from the wall outlet.
●Electric insulation gets weakened, resulting in a risk of electric shock hazards.

Never pour or spray water into the refrigerator (both interior and exterior).
●Electric insulation gets weakened, resulting in a risk of electric shock hazards.

Do not place containers with water or liquid on top of refrigerator.
● Water can spill into the refrigerator and can cause electric shock hazards or damage.

Do not let children hang on the refrigerator doors.
●Refrigerator can fall and harm them.

Do not move or remove compartment shelves/pockets while foods and containers are on them.
● Hard containers (of glass, metal etc.) can fall to hurt you and can break glass shelf and interior parts.

Never repair or disassemble or amend the refrigerator on your own.
● There is a risk of personal injury or damage to the refrigerator. It is recommended that any service be carried out by a qualified person.

Never store any flammable gas or liquid in the refrigerator.

Never use flammable gas, benzene, thinners, gasoline, spray etc. near the refrigerator.
● There is a risk of fire, explosion and personal injury or damage.

If a gas leak is found near the refrigerator or in the kitchen, ventilate it immediately without touching the power plug or refrigerator.

Do not store medicine or academic research samples which require strict temperature control in the refrigerator.

Never insert fingers or hands into the bottom of the refrigerator, especially into the bottom at the back.
● You can be hurt by sharp metal edges or can receive an electric shock.

Do not change fuse or LED lamp on your own. Call the service agent to change them.

When you find the power cord damaged or cut, call the service agent immediately.

When you get rid of your old refrigerator, be sure to remove the doors first.
●Children can be entrapped and suffocated in an abandoned refrigerator.

Keep ventilation openings, in the appliance enclosure or in the built-in structure, clear of obstruction.

Do not use mechanical devices or other means to accelerate the defrosting process.

Do not use electrical appliances inside the food storage compartments of the appliance.

The ice-maker in the freezer can be only replaced by the manufacturer or the service agent.

When the freezer door is open, do not press the dispenser lever.

Connect to drinkable water supply only.
CAUTION

Be sure to unplug the refrigerator when it is not going to be used for a long time.

Never touch foods and containers especially of metal with wet hands in the freezer compartment.
●You can be hurt by chilblains or cold burns.

Never eat any decayed or deteriorated food at all.
●Foods stored too long in the refrigerator can deteriorate and become decayed.

Never place bottles and containers of glass in the freezer compartment.
●Glass containers and bottles can break and can hurt you.

When moving the refrigerator (horizontally or tilted), more than 2 people are required to hold it.
(One to hold top back handles, the other to hold the bottom holder.)
If other parts are held instead, it is very dangerous and likely to slip.

Be sure to turn up the wheel first before moving the refrigerator.
- The wheels can damage or scratch the floor. If you are moving it for a long distance, never forget to fasten the interior parts tightly with tapes. - Otherwise, the parts can collide and break each other.
Installation Guide
* Read these safety instructions carefully before use and follow precautions for your safety.

Precautions in installation and power connection
■ To prevent fire, electric shock or leakage.
①Never install the refrigerator on a wet, watery floor or where water can gather easily.
② Check the following before power connection.
- Connect power plug only to a grounded wall socket (an earthed mains).
- Do not plug refrigerator power together with other appliances to the same socket.
③Do not use an adapter plug or an extension cord.
④Do not let the power cord be crushed by other (heavy) objects.
※If you hear a strange noise, strong chemical odour or find smoke etc. from the refrigerator after the power is plugged in, pull out the plug immediately and call a service agent.
※Wait about 5 minutes before you plug-in again in order to prevent any damage to the compressor and electrical devices of the refrigerator.
※Wait 2\~3 hours until the inside gets cold enough after the first power plug-in, then store foods inside.
(There can be some smell of plastic parts on initial operation of the refrigerator after plugging in.
The smell fades away as the refrigerator works and doors are opened and closed.)

Precautions in use
■ To prevent personal injury, fire, electric shock etc. read this user guide carefully before use and keep it at hand for reference.
■ Accessories

Egg case
Filter Box

Water supply Kit
User guide
Dispenser models only
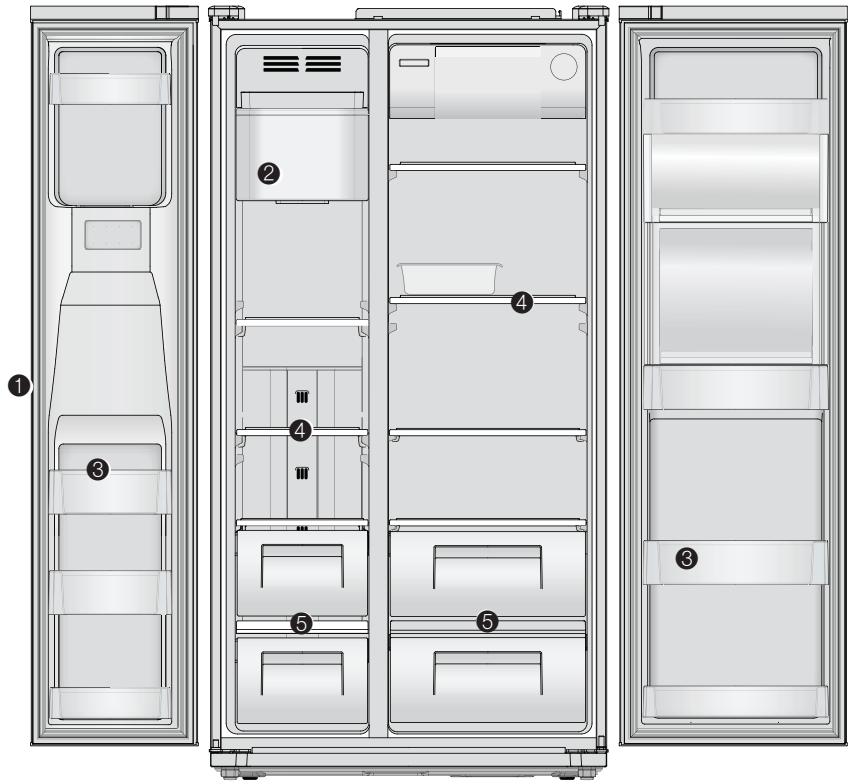
Control Panel
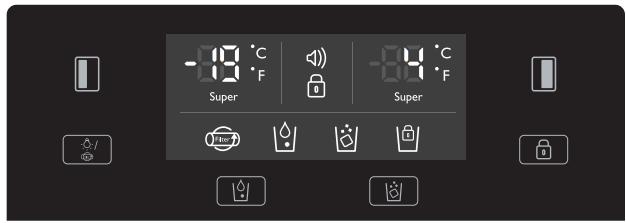
1. FRZ.SET button
Temperature selection button for freezer compartment.
2. LIGHT/FILTER button
1) Button for dispenser light on.
2) Button for filter exchange or reset.
After exchanging or to reset, press the button for 3 seconds.
3. Alarm display
Customers can be informed of temperature status when temperature abnormally rises due to accidents (for example, blackout)
1) Alarm icon blinks, displaying the highest inner temperature.
2) Alarm stops when ☑ button is pressed, and display shows temperature control value.
4. Displays the button 'Lock'.
5. Filter exchange display
After 6 months of first power input, the icon will flicker.
6. Button for water dispensing. Water symbol (☐) lights up when selected.
7. Selection button for ice dispensing and lock for ice maker.

● Interior lights of the refrigerator turn off when the doors are open for more than 10 minutes.
- In case either the freezer or refrigerator door is left open for more than a minute, door alarm rings for 5 minutes with 1 minute intervals.
● Display off function
- All the light in the display will turn off after 20 seconds to save energy when doors closed.
- The light will turn on when the door is opened or button is pressed.
- Normal display mode resumes when customers operate buttons or doors.
● System off function (power off function)
- You can stop operating the appliance without unplugging, especially on holidays.
- Pressing FRZ.SET and REF.SET button at the same time for 5 seconds will turn the appliance off.
- Under the 'off' mode, freezer and refrigerator temperature displays "-- --".
- Other LED lights go out and all the operation of your appliance halts.
- Conversely, pressing FRZ.SET and REF.SET button together for 5 seconds will switch it back on.
8.

REF.SET button Temperature selection button for refrigerator compartment.
9.

Lock button for control panel Press button for more than 3 seconds to activate and prevent settings from being unintentionally changed.
To unlock, press for more than 3 seconds. The display goes out.
Temperature Control
* When this refrigerator is first plugged in, the temperature mode is set to [Middle].
Freezer Compartment
Push the FRZ.SET button and the setting temperature changes as the figure shows.
Sequential Temperature Change <<<

Super
Faster Freezing...
When you want faster freezing, push the FRZ.SET button until 'Super' LED turns on. Just push the button again to release.
Refrigerator Compartment
Push the REF.SET button and the setting temperature changes as the figure shows.
Sequential Temperature Change <<<

Super
Faster Cooling or Refrigeration
When you want faster cooling or refrigeration, push the REF.SET button until 'Super' LED turns on. Just push the button again to release.
Temperature indicator convert function (Fahrenheit Celsius)
Press the lock button to enter locked mode. Under the locked mode, press the light and water button at the same time for 10 sec to swap temperature scale (default setting is Celsius).

Caution
Foods in the refrigerator can be frozen if the ambient temperature of the refrigerator is below 5^ C.
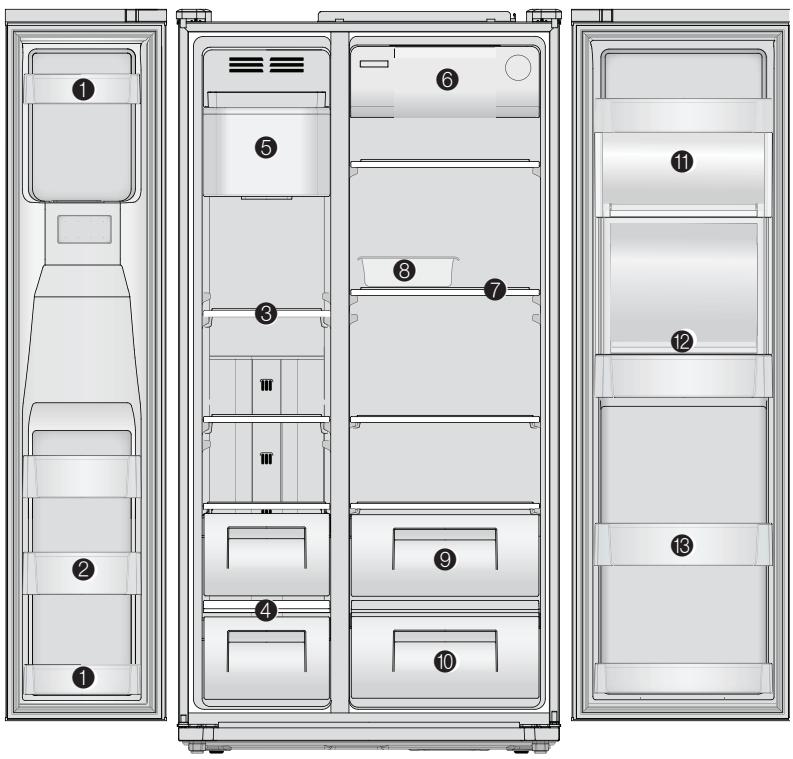
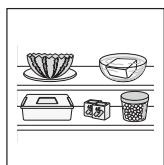
How to use the interior parts
※ This instruction manual refers to several models. The real features are model dependent.
- Door storage compartment for short-term storage of food and ice cream.
- Door storage compartment for storing frozen food.
- Freezer shelf for storing frozen foods such as meat, fish, ice-cream.
- Freezer case for storing dried foods, fish or meat for long periods of time.
-
Ice maker & storage
-
Xpress Can Chiller for storing beverage (quick cooling compartment).
- Refrigerator shelf for storing common foods.
- Egg case (do not use the case for storing ice cubes nor place in the freezer compartment.)
- Vegetable case
-
Fruit case
-
Multi Plus Zone for storing general products.
- Refreshment compartment (Option) for frequently used cans, drink water, beverages.
- Refreshment pocket for storing refrigerating foods, milk, juice, beer bottle etc.

Caution
- Do not touch or hold foods or food containers in the freezer compartment with wet hands.
- There is a risk of chilblains (cold burns).
●Do not store medicine, academic research samples etc. in the refrigerator.
Food Storage Tips
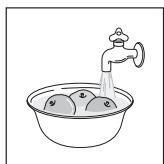
Wash foods before storing.
Divide and separate foods into smaller pieces.
Place watery foods or foods with a lot of moisture in front shelves (close to door side). If they are placed close to the cold air spout, they can be frozen.
Warm or hot foods should be cooled down enough before storing to reduce power consumption and to enhance refrigeration performance.
Be careful in storing tropical fruits such as bananas, pineapples and tomatoes, as they can easily deteriorate in lower temperatures.
Keep enough space between foods. If too tight or too close, cold air circulation is hindered, resulting in poor refrigeration.
Never forget to cover or wrap foods to prevent odours.
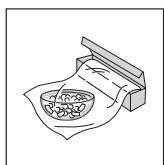
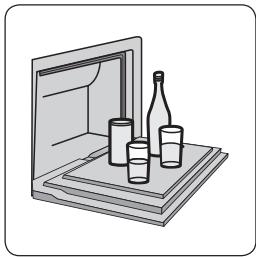
Refreshment compartment (Option)
natural_image
Illustration of a hand inserting or removing a stack of documents into an open storage cabinet (no text or symbols)-
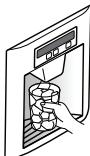
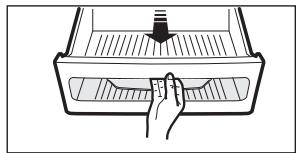
Softly press the upper centre of Home Bar to open (one-touch push type).
-
You can access the refreshment compartment without opening the door thus saving electricity.
- The refrigerator lamp is lit when the refreshment compartment door is open. It is easy to identify the contents.
natural_image
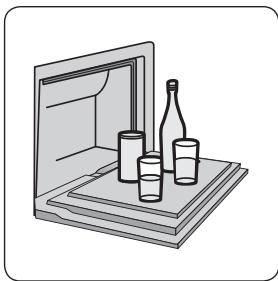
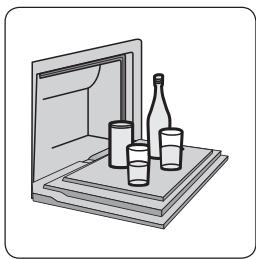
Illustration of a closed storage cabinet with bottles and glass (no text or symbols)- You can put your wine or food on the opened home bar cover.
- Leaving the cover open for too long could weaken cooling performance.
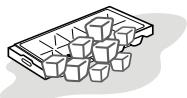
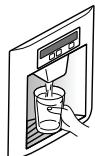
How to use the Dispenser
Select the 'WATER' or 'ICE' button and push the lever gently with your cup.
Your selection will come out 1\~2 seconds later.

Press the 'WATER' button and icon lights up.

Press the 'ICE' button and icon lights up.
WATER
CUBED ICE

When cleaning the icecubes case assembly or if you will not use it for a long time, remove the icecubes in the ice storage case and lock the icemaker by pushing the 'ICE' button for 3 seconds.

Caution
● Avoid using thin fragile cups or crystal glasses when taking icecubes.
- For your safety, never insert your fingers or other tools into the dispenser outlet.
- If you find the icecubes are discolored, stop using the dispenser and call a service agent.
How to use the Automatic Icemaker
- About 10 icecubes (14\~15 times a day) are made at one time. If the ice storage case is full, icemaking stops.
● It is normal for the icemaker to make banging sounds when the icecubes are falling into the ice storage case.
● To prevent bad odours or smells, regularly clean the icecubes storage case. - If the amount of ice in the storage case is not sufficient, the ice may not be dispensed. Wait a day or so to make more ice.
- If the ice does not dispense easily, ensure the dispenser outlet is not blocked.
In case the icemaker doesn't work
If the icecubes get stuck and not
dispensed
● Pull out the ice storage case and separate any icecubes that may have stuck together.
- If the amount of water which is supplied to the icemaker needs adjusting, call for a service agent.
In case of power failure
●The icecubes in the case may melt and flow to the room.
- If many hours of power failure is predicted, pull out the case, remove the icecubes in it and replace it back when power resumes.
Care & Cleaning
※ The real features are model dependent
① Dispenser Water Shelf
- Remove the spill grill and clean the water shelf regularly. (The spill shelf is not self-draining.)
natural_image
Illustration of two hand-drawn diagrams showing a computer monitor and a keyboard, both without any text or symbols.② Icecubes storage Case
●Removing: Pull the case assembly forward to remove.
● Replacing: Fit to the side grooves and insert to the end. If it is difficult to fully insert the case, remove it, rotate the swirl coil in the case or drive mechanism a quarter turn and insert again.
Do not store the icecubes for too long.

natural_image
Line drawing of a hand pressing down on a device panel (no text or symbols)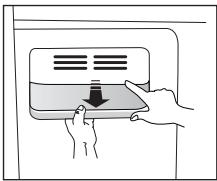
natural_image
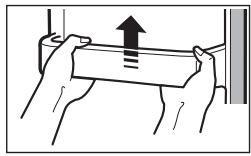
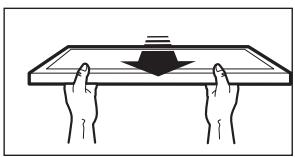
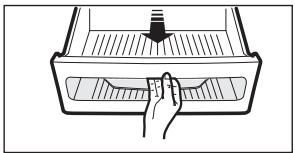
Illustration of hands holding a device with a downward arrow, no text or symbols present③ Freezer & Refrigerator Pockets
●Hold both ends and pull up.
natural_image
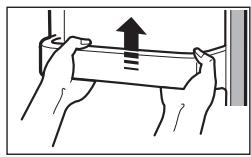
Illustration of hands holding a rectangular object with an upward arrow and three vertical bars, no text or symbols present.④ Freezer & Refrigerator Shelves
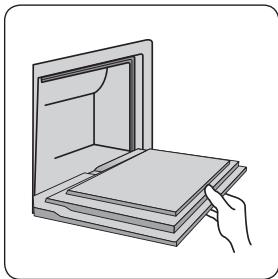
- Open the doors fully, then pull the shelves forward to remove.

natural_image
Illustration of two hands holding a tray with a downward arrow, no text or symbols present⑤ Vegetable Case & Fruit Case
●Pull forward and lift up a little to remove.
natural_image
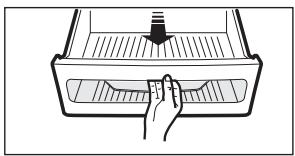
Line drawing of a hand pressing down on a tray with a handle (no text or symbols)How to Clean
Interior Parts
●Use cloth with water and mild detergent to clean.
natural_image
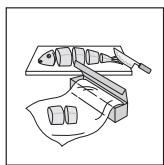
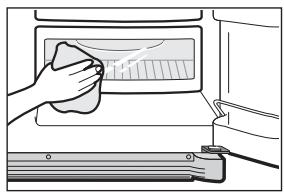
Illustration of a hand cleaning a microwave oven with a cloth (no text or symbols)Back (Machine section)
- Remove dust on grill with a vacuum cleaner at least once a year.
natural_image
Illustration of a hand inserting a plug into a device panel (no text or symbols visible)
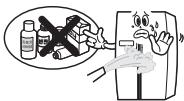
Caution
Never use petrol, benzene, thinners, scouring pads or harsh abrasives, for they can damage the surfaces.
Before You Call for Service...
Please check the following troubleshooting tips before you call for service!
natural_image
Cartoon illustration of a door with a hand gesture and a thought bubble showing a smoke or smoke (no text or symbols)Problem
It never gets cold inside. Freezing & refrigerating is not very good.
Checkup Point
① Is the refrigerator unplugged?
② Is the temperature set to [Low Mode]?
③ Is the refrigerator under direct sunlight or is a heat appliance placed near it?
④ Is the space between the refrigerator back and the wall too close?
Action
① Plug in the refrigerator.
② Set the temperature mode to Middle or High.
③ Move to a place where there is no direct sunlight, no heat appliances around.
④ Keep sufficient space between the back of the refrigerator and the wall.
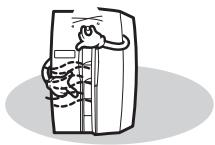
natural_image
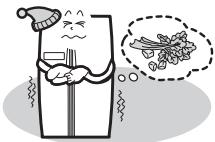
Illustration of a refrigerator with a hand holding a bag and a snowman wearing a Santa hat, accompanied by a thought bubble showing a snowflake (no text or symbols present)Problem
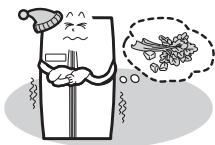
Foods in the refrigerator get frozen.
Checkup Point
① Is temperature set to [High]?
② Is the room temperature too low?
③ Is food with moisture stored close to the cold air spout?
Action
① Set the temperature to [Middle] or [Low].
② Foods can be frozen if ambient temperature is below 5°C. Move to a place where the temperature is over 5°C.
③ Place foods with moisture on the shelves close to the doors.
natural_image
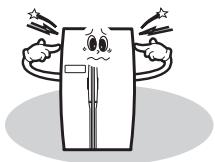
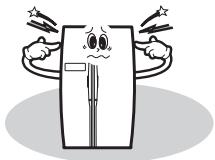
Cartoon illustration of a door with arms and stars around it (no text or symbols)Problem
Strange sounds from the refrigerator.
Checkup Point
① Is the floor beneath the refrigerator uneven?
② Is the space between the refrigerator back and the wall too close?
③ Does any object touch the refrigerator?
Action
① Move the refrigerator to a level and even floor.
② Keep sufficient space.
③ Remove any object which touches the refrigerator.
natural_image
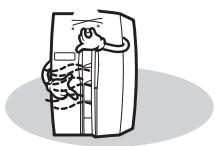
Simple line drawing of a door with a hand near the top (no text or symbols)Problem
Odour or unpleasant smell from the inside.
Checkup Point
① Is the food stored uncovered or unwrapped?
② Are the shelves and pockets stained with food stuff?
③ Is the food stored too long?
Action
① Be sure to cover and wrap the foods.
② Clean them regularly. Once smell gets soaked into those parts, it is not easy to remove.
③ Do not store foods for too long. A refrigerator is neither a perfect nor a permanent food keeper.
Something strange? Don't worry. Here is the answer.
| Case | Explanation | ||
| Heat | Front and side of refrigerator feels warm or hot. |  | ●Pipes (refrigerant vessel) are placed beneath the surface to prevent moisture forming on it. |
| Door is sticky | Doors do not open easily. | 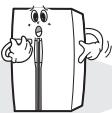 | ●When you close the door and then open it again immediately, the door is not easy to open. Warm air rushes into the inside to create the pressure difference. In this case wait for a minute, it will then open easily. |
| Strange Sound | It sounds like water is flowing from the refrigerator. | 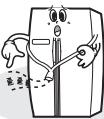 | ●When the compressor starts to run or stops, refrigerant which makes the inside cold flowing in the pipes can make such a sound. ●Defrosted water can also make such a sound. (This refrigerator adopts an automatic defrosting system.) |
| Cracking or clicking sounds. |  | ●Inside parts shrink and/or expand due to temperature change --- When the inside gets cold or when the door is open, such sounds can be made. | |
| Humming or buzzing sounds. | ●Compressor or fans for cold air circulation can make such working sound. (If the refrigerator is not level, the sound can be louder.) | ||
| Frost & Dew | Dew or frost on the wall and/or food container surface in the freezer and refrigerator compartment. |  | Frost and/or dew can be made in the following cases; ●High temperature and/or high humidity around the refrigerator. ●When doors are open too long. ●Foods with much moisture are stored uncovered or unwrapped. ※You can see the same appearance when cold water is poured in a glass cup and dew is forming on the surface of it. |
| Dew on the cabinet surface. | ●If it is highly humid around the refrigerator, moisture in the air sticks to the surface to form dew. | ||
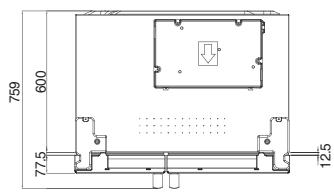
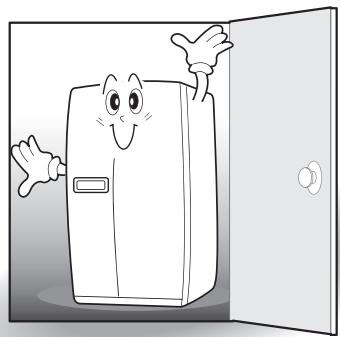
Installation Preparation
Dimensions (including Door Handles)
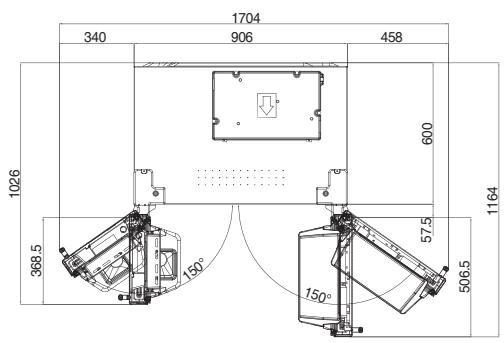
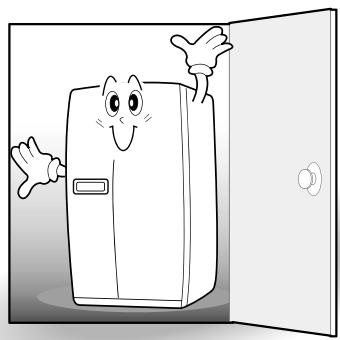
Check if the refrigerator can pass a doorway or enter a door first.
natural_image
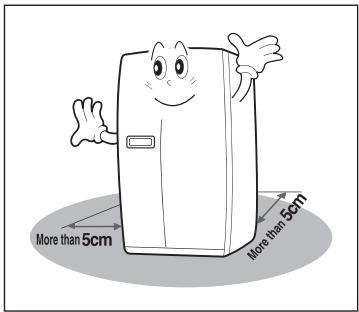
Cartoon illustration of a smiling refrigerator with arms raised, standing in front of an open door (no text or symbols)Find a suitable place to install
Ensure sufficient space from the back of refrigerator to the wall for free air ventilation.
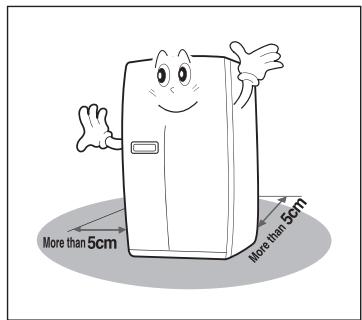
Avoid direct sunlight.

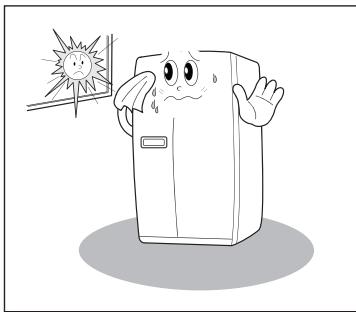
natural_image
Cartoon illustration of a distressed refrigerator with a surprised expression, standing under a sun (no text or symbols)
- Once the installation place is ready, follow the installation instructions. If the surrounding temperature of the refrigerator is low (below 5°C), foods can be frozen or the refrigerator can function abnormally.
If the refrigerator can not pass through a door during installation, follow these steps.
(This guide refers to several models. The real features are model dependent..)
Removing Freezer Door
※Remove front bottom cover first, if it is attached.
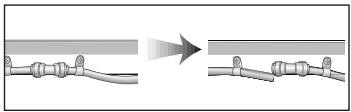
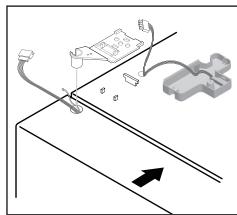
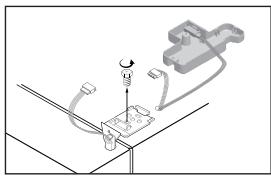
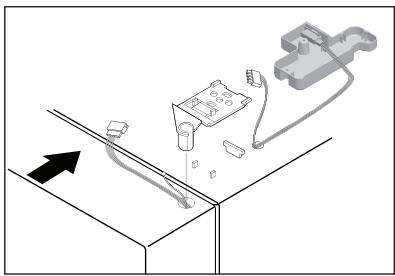
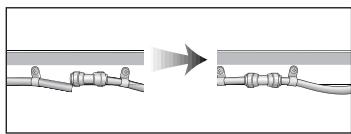
1 Pull out bending tube guide and the left water tube. (Dispenser Models Only)
natural_image
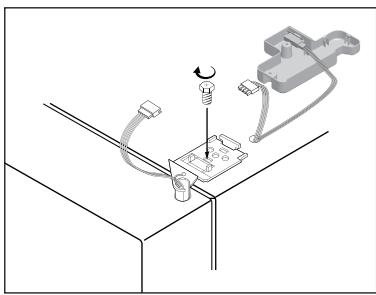
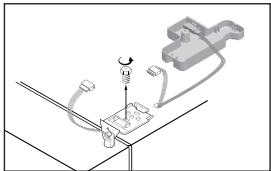
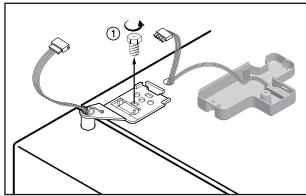
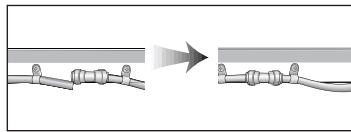
Diagram showing a pipe connection with a magnified view of the main structure (no text or symbols)2 Unscrew top hinge cover with a screw driver.
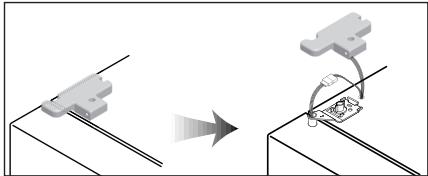
natural_image
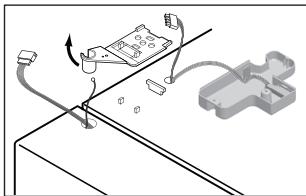
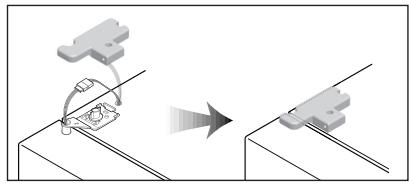
Diagram showing a mechanical assembly with an arrow indicating direction, no text or symbols present3 Turn top hinge fastener counterclockwise 3\~4 times. Disconnect the harness wires.

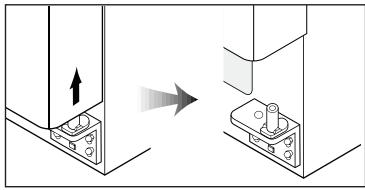
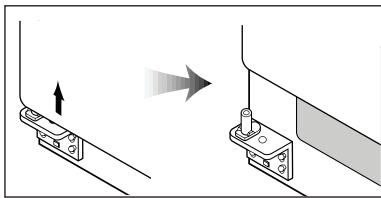
4 Lift up the front of hinge to remove. (After the hinge is removed the door can fall down forward. Be careful!)
natural_image
Mechanical assembly diagram showing a moving component and connecting rod (no text or symbols)5 Be careful not to damage the water line when removing the door.
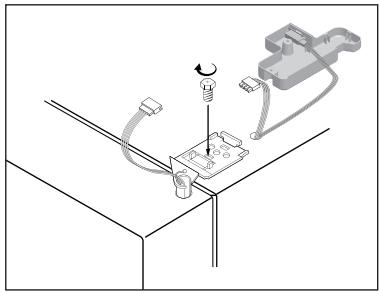
natural_image
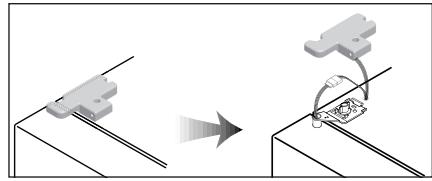
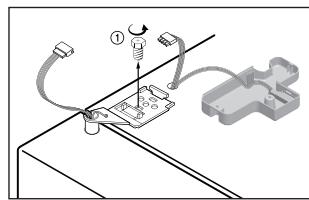
Diagram showing two mechanical components with an arrow indicating direction, no text or symbols presentRemoving Refrigerator Door
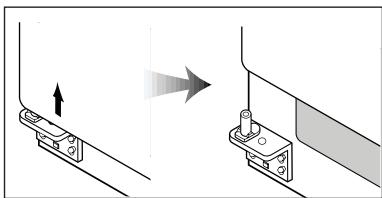
1 Unscrew top hinge cover with a screwdriver. Insert a thin screwdriver into the side groove of the cover to remove.

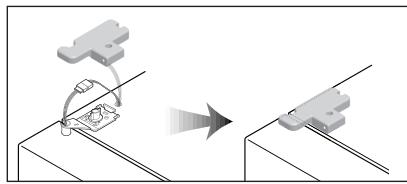
natural_image
Diagram showing a mechanical assembly or process with two components and an arrow indicating direction (no text or symbols present)2 Turn top hinge fastener counterclockwise 3\~4 times. Disconnect harness wires (model dependent).
natural_image
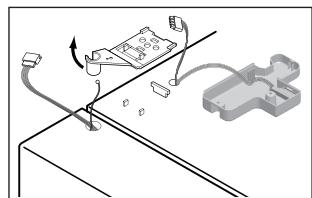
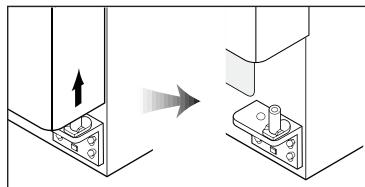
Diagram of a mechanical assembly with a spring-loaded component and connecting wires (no text or symbols)3 Lift the door straight up to remove.
natural_image
Diagram showing a mechanical assembly with an arrow indicating direction, no text or symbols presentReplacing Freezer Door
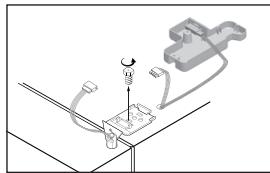
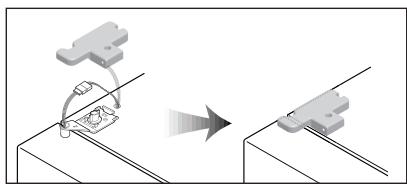
1 Insert the water tube into the hole of the bottom hinge pin first.

2 Let the top of the door close and insert the top hinge pin to the top hole of the freezer door. (Insert the back of hinge to the groove of protrusion first, then front to the top hole of door.)
3 Turn the hinge fastener tightly to the end. Connect harness wirings and screw down the ground wire.
natural_image
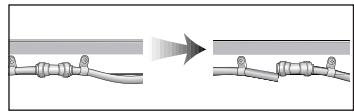
Diagram showing a robotic arm interacting with a mechanical component on a base, before and after motion (no text or symbols)4 Fasten the bending tube guide and insert the water tube far into the coupling. (Dispenser Models Only)
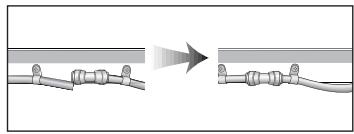
natural_image
Diagram showing a pipe connection with a magnified view of the process (no text or symbols)Replacing Refrigerator Door
1 Insert the bottom hole of the refrigerator door straight into the bottom hinge pin.
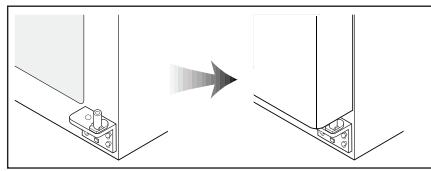
natural_image
Diagram showing a device interacting with a wall-mounted component, with an arrow indicating direction (no text or symbols present)2 Let the top of the door close and insert the top hinge pin to the top hole of the refrigerator door. (Insert the back of hinge to the groove of protrusion first, then front to the top hole of door.)
natural_image
Diagram showing mechanical components and a directional arrow, no text or symbols present3 Turn the hinge fastener tightly to the end. Connect harness wirings (model dependent) and screw down the ground wire. Click and screw the top hinge cover.
natural_image
Diagram of a mechanical or electrical component with wires and a light bulb, no text or symbols presentRefrigerator Leveling & Door Adjustment (If needed)
The refrigerator must be level in order to maintain optimal performance and desirable front appearance. (If the floor beneath the refrigerator is uneven, the freezer and refrigerator doors may look unbalanced.)
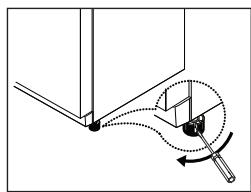
In case freezer door is lower than refrigerator door...
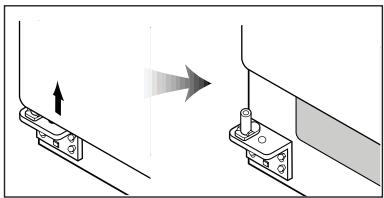
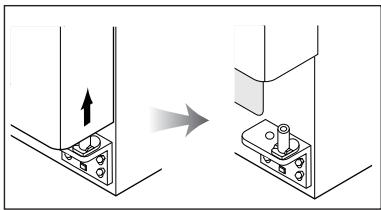
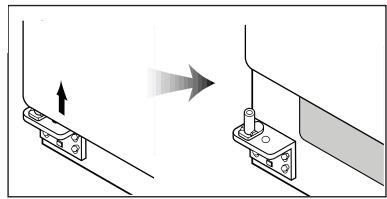
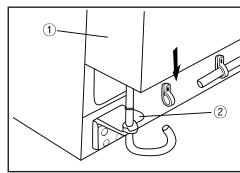
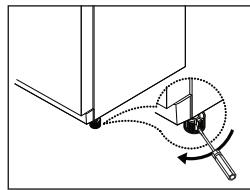
1 Insert a screw driver (flat tip) into a groove of the left wheel (bottom of freezer) and turn it clockwise until the door is balanced. (Clockwise to raise freezer door, counterclockwise to lower.)

natural_image
Pure mechanical diagram showing a lever and pivot mechanism without any text or symbols※ If the freezer door is not balanced by step 1, then follow the next steps.
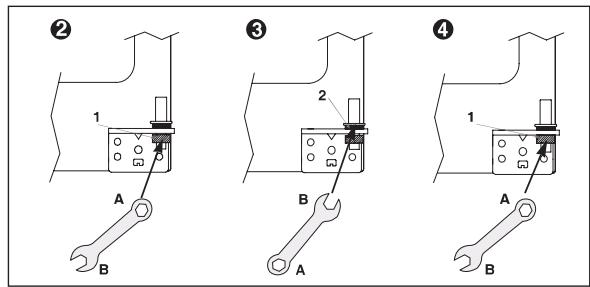
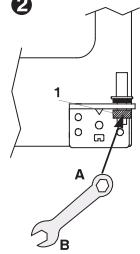
2 Open the doors, unscrew the front cover and remove, if it is attached.
natural_image
Technical line drawing of a mechanical assembly with no visible text or symbols3
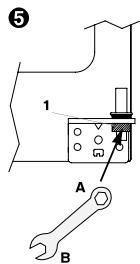
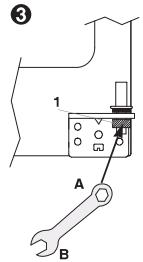
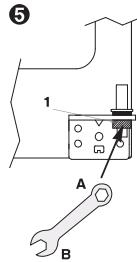
Insert a spanner (A part) into the hinge nut (1 part) and unscrew the nut by turning clockwise.
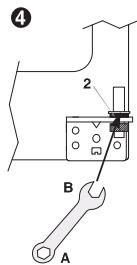
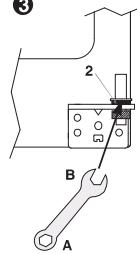
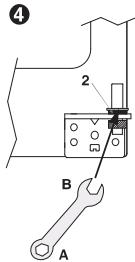
4 Insert a spanner (B part) into the hinge nut (2 part) and turn clockwise to lower the door.
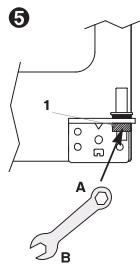
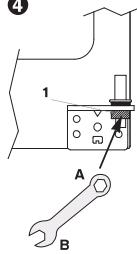
5 If the door is aligned, fasten the nut (1) tightly by turning counter-clockwise.
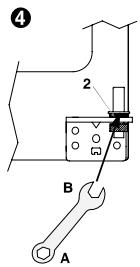
In case refrigerator door is lower than freezer door...
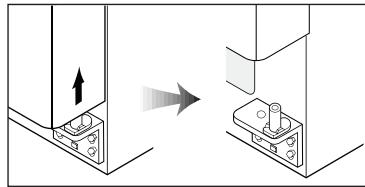
1 Insert a screw driver (flat tip) into a groove of the right wheel (bottom of refrigerator) and turn it clockwise until the door is balanced. (Clockwise to raise refrigerator door, counterclockwise to lower.)
natural_image
Pure mechanical diagram showing a lever and rotating component without any text or symbols※ If the refrigerator door is not balanced by step 1, then follow the next steps.
2 Insert a spanner (A part) into the hinge nut (1 part) and unscrew the nut by turning clockwise.
3 Insert a spanner (B part) into the hinge nut (2 part) and turn counter-clockwise to tighten the door.
4
If the door is aligned, fasten the nut (1) tightly by turning.
Front Cover
After installation and/or door leveling, fasten front cover with screws. (Remove the screws on the front bottom panel first. Click and screw the cover.)

Caution
● The front of the refrigerator needs to be just a little higher than the back for easy door closing, but if the wheel is raised too much for door balance, i.e. the front of refrigerator is much higher than the back, it can be difficult to open the door.
Information concerning the water filter
- After use, the water system is subject to low pressure. Proceed with caution when removing the filter.
- Flush the water system if the appliance has not been in use for a long period of time, or if the ice/water has an unpleasant taste or smell. To do this, dispense water through the water dispenser for several minutes. If the unpleasant taste or smell remains, replace the filter.
- Protect from frost: remove the filter cartridge if you expect the temperature to drop below freezing.
- If pressure surges could occur in the water pipe, do not install the water filter without a suitable surge eliminator. Contact an installation expert if you are not sure whether pressure surges could occur in the water pipe.
- After installing a new filter: Discard any ice produced in the first 24 hours after switching on.
- If no ice has been removed for a long period of time, empty the ice box and discard any ice produced over the next 24 hours.
How to install Water Line
- The water pressure should be 2.0\~12.5 kgf/cm ^2 (1.96 \~12.26 Bar) or more to run the automatic icemaker. Check your tap water pressure; if a cup of 180cc is full within 10 seconds, the pressure is OK.
- When installing the water tubes, ensure they are not close to any hot surfaces.
- The water filter only filters water; it does not eliminate any bacteria or microbes.
- If the water pressure is not sufficient to run the icemaker, call the local plumber to get an additional water pressure pump.
- The filter life depends on the amount of use. We recommend you to replace the filter at least once every 6 months.
- After installation of refrigerator and water line system, select [WATER] on your control panel and press it for 2\~3 minutes to supply water into the water tank and dispense water.
- Use plumbers thread sealing tape on every connection of pipes/tubes to ensure there is no water leaks.
- The water tube should be connected to the cold water line.
WATER SUPPLY KIT
※ Check the parts below for installing water supply. Necessary parts are available at your local service agents.
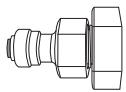
Connector
Filter Box

Water tube
Installation Procedure
1. Join connector to the tap water line
Figure A
Connector
Filter Box

Water tube
Figure B
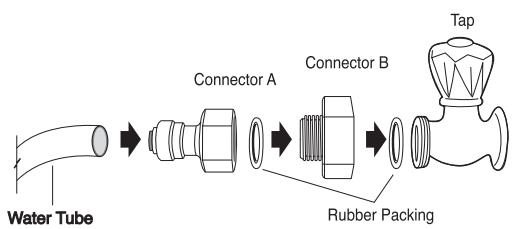
flowchart
graph LR
    A["Water Tube"] --> B["Connector A"]
    B --> C["Connector B"]
    C --> D["Rubber Packing"]
    D --> E["Tap"]

Place the rubber washer inside the tap connector and screw onto the water tap.
2. Connect the Water Tube to the refrigerator.
1) Remove the rear cover at the bottom back of the refrigerator.
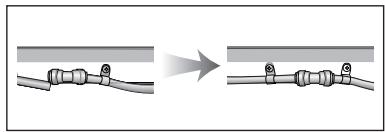
2) Insert the fastening ring into the Water tube. (Be careful to follow the direction of the nut.)
3) Insert the Water Tube into the top of the Water Valve, turn the nut clockwise to fasten it. (The Water valve is to the right of the motors.)
4) Check for any bent tubes or water leaks; if so, recheck installation procedure.
5) Replace the rear cover. (The Water Tube should be placed between the groove of the refrigerator back and motor cover.)
※Set the tube upright as the figure shows.

3. After installation of Water Supply System
1) Plug in the refrigerator, press the [WATER] button on the control panel for 2\~3 minutes to remove any air (bubble) in the pipes and drain out the initial water.
2) Check for the water leaks again through the water supply system(tubes, connectors and pipes). Rearrange the tubes again and do not move the refrigerator.
natural_image
Isometric illustration of a modern cabinet with two doors and a front panel (no text or symbols)1. Taste FRZ.SET
natural_image
Illustration of a hand opening a stack of documents (no text or symbols visible)natural_image
Illustration of a closed book with three glass bottles and a bottle placed on top (no text or symbols)
natural_image
Illustration showing two hand-drawn steps: one inserting a card into a folder, the other holding a tablet (no text or symbols present)natural_image
Illustration of hands holding a rectangular object with an upward arrow, no text or symbols present③ Eiswürfelfach
natural_image
Line drawing of a hand opening a cabinet with a magnified inset showing a drop (no text or symbols)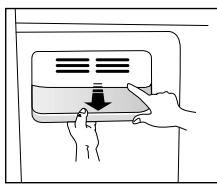
natural_image
Illustration of hands inserting a device into a tray with a downward arrow (no text or symbols)natural_image
Illustration of two hands holding a tray with a downward arrow, no text or symbols presentnatural_image
Simple line drawing of a hand pressing down on a container with a handle (no text or symbols)Reinigungsverfahren
Innenteile
natural_image
Illustration of a hand cleaning a microwave oven with a cloth (no text or symbols)natural_image
Illustration of a hand using a tool to press internal components (no text or symbols visible)
Achtung
natural_image
Cartoon illustration of a character with a surprised expression and a dashed line indicating a shock or shock (no text or symbols)Problem
natural_image
Cartoon illustration of a computer monitor with arms and stars (no text or symbols)Problem
Check if the refrigerator can pass a doorway or enter a door first.
natural_image
Cartoon illustration of a smiling refrigerator with arms raised, standing in front of an open door (no text or symbols)natural_image
Cartoon illustration of a distressed refrigerator with a surprised expression and a sunburst effect (no text or symbols)
natural_image
Diagram showing a pipe connection with a magnified view of the process (no text or symbols)natural_image
Diagram showing a mechanical assembly with an arrow indicating motion, no text or symbols presentnatural_image
Pure mechanical diagram showing a lever mechanism with no text or symbolsnatural_image
Diagram showing two mechanical components with arrows indicating motion, no text or symbols presentnatural_image
Diagram showing a mechanical assembly or assembly process with two components and an arrow indicating direction (no text or symbols present)natural_image
Diagram showing a mechanical assembly with a spring-loaded component and wiring (no text or symbols)natural_image
Diagram showing two mechanical components with arrows indicating motion, no text or symbols presentnatural_image
Diagram showing a mechanical assembly with an arrow indicating process (no text or symbols present)natural_image
Diagram showing a pipe connection with a magnified view of the end (no text or symbols)natural_image
Diagram showing a device mounted on a bracket with an arrow indicating direction (no text or symbols present)natural_image
Diagram showing mechanical components and a directional arrow, no text or symbols presentnatural_image
Technical diagram showing a mechanical assembly with wires and a light bulb, no text or symbols presentnatural_image
Pure mechanical diagram showing a lever and pivot point without any text, numbers, or symbolsnatural_image
Technical line drawing of a mechanical assembly with no visible text or symbols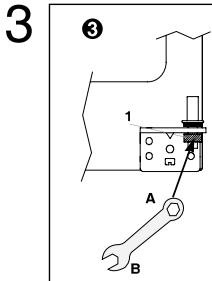
natural_image
Pure mechanical diagram showing a lever and pivot mechanism without any text or symbolsnatural_image
Isometric illustration of a gray server cabinet with two doors and a front panel (no text or symbols)Odstranjevanje izrabljene električne in elektronske opreme
natural_image
Illustration of a hand inserting or removing a stack of documents into an open storage unit (no text or symbols)natural_image
Illustration of a closed storage cabinet with three glassware and a bottle on top (no text or symbols)natural_image
Illustration of two hands holding a tablet device, one with a grid and the other with a phone (no text or symbols present)② Polička
natural_image
Illustration of hands holding a rectangular object with an upward arrow, no text or symbols present③ Predal za shranjevanje ledenih kock
natural_image
Line drawing of a hand opening a rectangular box with a downward arrow symbol (no text or labels)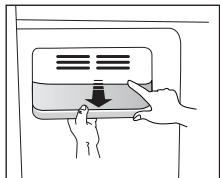
natural_image
Illustration of hands pressing down on a device with a downward arrow (no text or symbols)
natural_image
Illustration of two hands holding a rectangular object with a downward arrow, no text or symbols present⑤ Predal za zelenjavo & sadje
- Povlecite naprej in rahlo dvignite, da predal odstranite.
natural_image
Simple line drawing of a hand pressing down on a tray with a handle (no text or symbols)
Pozor
natural_image
Illustration of a hand cleaning a microwave oven with a cloth (no text or symbols)natural_image
Illustration of a hand inserting a device into a computer case (no text or symbols visible)
Pozor
natural_image
Cartoon illustration of a door with a surprised face and a hand gesture, accompanied by a dashed line indicating a drop or damage (no text or symbols)Težava
V notranjosti ni nikoli hladno. Zamrzovanje in hlajenje nista učinkovita.
Preverite
natural_image
Illustration of a refrigerator with a hand holding a teddy bear and a thought bubble showing food items (no text or symbols)Težava
natural_image
Cartoon illustration of a refrigerator with arms and legs, surrounded by stars (no text or symbols)Težava
natural_image
Cartoon illustration of a smiling refrigerator with arms and legs, waving to the door (no text or symbols)natural_image
Cartoon illustration of a distressed refrigerator with a sun and waving hand (no text or symbols)
natural_image
Diagram showing a mechanical component transforming into a connected assembly (no text or symbols)natural_image
Technical diagram showing a mechanical assembly with tubing and a central component (no text or symbols)natural_image
Pure technical diagram of a mechanical assembly with no text, numbers, or symbols4 Dvignite vrata navzgor, da jih snamete.
natural_image
Diagram showing a mechanical assembly with an arrow indicating direction, no text or symbols presentnatural_image
Diagram showing two stages of a cable or wire connection, with no text or symbols present.natural_image
Diagram showing a mechanical assembly with an arrow indicating motion, no text or symbols presentnatural_image
Diagram showing two mechanical components with arrows indicating motion, no text or symbols presentnatural_image
Diagram showing a mechanical assembly or mounting process before and after, with no visible text or symbols.natural_image
Technical diagram showing mechanical components and a directional arrow (no text or symbols)natural_image
Technical diagram showing a mechanical assembly with rotating components and wiring (no text or symbols)natural_image
Pure mechanical diagram showing a lever and bracket with no text or symbolsnatural_image
Technical diagram of a mechanical assembly with no visible text or symbolsnatural_image
Diagram showing a mechanical assembly with a rotating component and an arrow indicating process (no text or symbols)5 Vstavite cev za vodo globoko v spoj. (Samo modeli z avtomatom za vodo)
natural_image
Diagram showing two stages of a cable or connector assembly, with no visible text or symbolsnatural_image
Pure mechanical diagram showing a lever and pivot mechanism without any text or symbolsnatural_image
Technical line drawing of a mechanical assembly with no visible text or symbols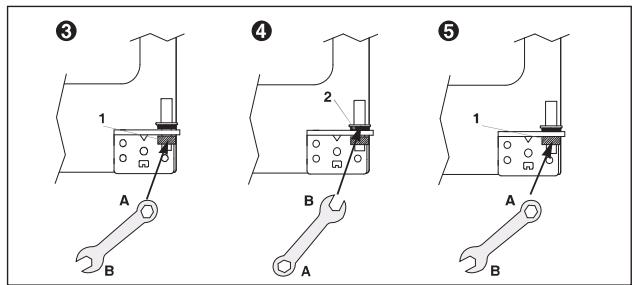
natural_image
Pure mechanical diagram showing a lever and pivot mechanism without any text or symbolsnatural_image
Isometric illustration of a gray server cabinet with two doors and a front panel (no text or symbols)natural_image
Illustration of a hand opening a stack of documents (no text or symbols visible)- Lagano pritisnite na srednji gornji deo vrata domaćeg bara, i tako otvorite taj predeo (dovoljan je jedan dodir, odnosno lagani pritisak).
natural_image
Illustration of a closed book with three glasses and bottles on top (no text or symbols)natural_image
Illustration of two hand-drawn panels showing a container with contents and a chocolate chip, no text or symbols present.② Ladica
●Vadite je tako da je uhvatite s obe strane i podignete.
natural_image
Illustration of hands holding a rectangular object with an upward arrow and three vertical lines, no text or symbols present.③ Fijoka za spremanje kocki leda
●Vađenje: povucite fijoku prema vani.
●Ponovno stavljanje: umetnite fijoku u bočne utore i gurnite je do kraja.
- Ako imate poteškoća sa stavljanjem fijoke, izvadite je, navoj u fijoci obrnite za četvrtinu obrtaja, i ponovno pokušajte ugurati fijoku.
* Kocke leda nikad ne čuvajte predugo.

natural_image
Line drawing of a hand opening a closed book with a paper airplane icon on the cover (no text or symbols)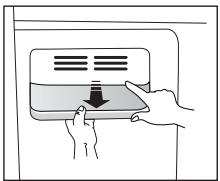
natural_image
Illustration of hands pressing down on a device with a downward arrow (no text or symbols)
● U unutrašnjosti frižidera nemojte nikad koristiti nikakve električne aparate, da ne bi došlo do električnog udara ili požara.
④ Police zamrzivača i frižidera
●Uhvatite ih na obe strane i podignite.
natural_image
Illustration of two hands holding a tray with a downward arrow, no text or symbols presentnatural_image
Line drawing of a hand pressing down on a tray with a handle (no text or symbols)
Pažnja
Za vlastitu bezbednost, jednom pritisnite ICE MAKER LOCK (blokada izrade leda) kad čistite (vadite i ponovno stavljate) pribor za spremanje ledenih kocki.
natural_image
Illustration of a hand cleaning a microwave oven with a cloth (no text or symbols)Zadnja strana (mašinski delovi)
natural_image
Illustration of a hand inserting a device into a rack with a brush (no text or symbols)
Pažnja
natural_image
Cartoon illustration of a door with a surprised expression and a thought bubble showing a broken object (no text or symbols)Poteškoća
U unutrašnjosti nikad nije dovoljno hladno. Zamrzavanje i hlađenje nisu efikasni.
Proverite
① Dali je frižider priključen na električnu mrežu?
② Dali je temperatura postavljena na manje hladno [Low Mode]?
③ Dali je frižider izložen direktnim zrakama sunca, odnosno dali se u blizini aparata nalazi kakva naprava za grejanje?
④ Dali je između frižidera i zida dovoljno prostora?
Rešenje
① Priključite frižider na napajanje.
② Temperaturu postavite na srednje ili jače hlađenje (Middle ili High).
③ Frižider premestite na takav položaj, gde nema neposrednih zraka sunca, odnosno naprava za grejanje.
4 Između zadnje stenke frižidera i zida mora biti dovoljno prostora (više od 10 cm).
natural_image
Cartoon illustration of a refrigerator with a hat and a thought bubble showing a gift box (no text or symbols)Poteškoća
Namirnice u frižideru zamrznu.
Proverite
① Dali je temperatura postavljena na najviši stepen hlađenja [High]?
② Dali je temperatura okoline preniska?
③ Dali su namirnice s velikim procentom vlage složena preblizu izlazu hladnog vazduha?
Rešenje
① Snizite regulaciju temperature i izaberite srednje ili slabije hlađenje ([Middle] ili [Low].
② Namirnice mogu zamrznuti ukoliko je temperatura okoline niža od 5°C. Frižider premestite u takav prostor, u kojem je temperatura viša od 5°C.
③ Namirnice s velikim procentom vlage složite na police bliže vratima.
natural_image
Cartoon illustration of a refrigerator with arms and legs, surrounded by stars (no text or symbols)Poteškoća
Iz frižidera se čuje čudan zvuk.
Proverite
① Dali je tlo ispod frižidera neravno?
② Dali je između zadnje strane frižidera i zida premalo prostora?
③ Dali kakav predmet dodiruje frižider?
Rešenje
① Premestite frižider na ravno tlo.
② Oko aparata neka bude dovoljno prostora.
③ Odstranite predmet koji dodiruje frižider.
Poteškoća
Iz unutrašnjosti frižidera se širi smrad.
Proverite
① Dali ste u frižider složili nepokrivene ili neupakovane namirnice?
② Dali su police zaprljane ostacima namirnica, odnosno hrane?
③ Dali namirnice predugo stoje u frižideru?
Rešenje
① Pokrijte ili zamotajte namirnice.
② Police redovito čistite. Ako se smrad uvuče u te delove, nije ga se jednostavno otarasiti.
③ Namirnice nemojte držati u frižideru predugo. Frižider nije niti besprekorno niti trajno mesto za čuvanje namirnica.
natural_image
Cartoon illustration of a smiling refrigerator with arms and legs open, waving (no text or symbols)Izaberite prikladno mesto za postavljanje
Među zadnjom stranom frižidera i zidom ostavite dovoljno prostora za neometano kruženje vazduha.
Izbegavajte izlaganje aparata direktnim zrakama sunca.
natural_image
Cartoon illustration of a distressed refrigerator with a sad face and a smiling sun (no text or symbols)
- Kad ste izabrali prikladno mesto za nameštanje, sledite uputstvima za montažu. Ukoliko je temperatura okolice preniska (manje od 5°C), namirnice u njemu mogu zamrznuti, ili je delovanje frižidera nenormalno.
natural_image
Diagram showing a mechanical assembly or assembly process with two components and directional arrows (no text or symbols)2 Pričvrsnu sponu gornjeg šarnira obrnite 3 do 4 puta u suprotnom smeru kazaljki na satu. Iskopčajte žice. Podignite prednji deo šarnira, i skinite ga (kad je šarnir izvađen, vrata mogu pasti. Pazite na to!)
natural_image
Technical diagram showing a mechanical assembly with wires and a bracket (no text or symbols)3 Podignite vrata prema gore i skinite ih.

natural_image
Diagram showing a mechanical assembly process with an arrow indicating direction (no text or symbols present)Skidanje vrata zamrzivača
1 Najpre odstranite poklopac dna. Zatim izvucite levu manšetu spoja i izvucite levo crevo za vodu (samo za modele s automatom za vodu):
natural_image
Diagram showing two stages of a cable or connector assembly, with no visible text or symbols2 Odšrafite štitnik gornjeg šarnira.
natural_image
Diagram showing a mechanical assembly with two components and a curved arrow indicating motion (no text or symbols)3 Pričvrsnu sponu gornjeg šarnira obrnite 3 do 4 puta u suprotnom smeru kazaljki na satu. Iskopčajte žice.
4 Podignite prednji deo šarnira, i skinite ga (kad je šarnir izvađen, vrata mogu pasti. Pazite na to!)
5 Kad skidate vrata, pazite da ne oštetite vodovodnu instalaciju.
natural_image
Diagram showing two mechanical components with arrows indicating motion, no text or symbols presentPonovno montiranje vrata frižidera
natural_image
Diagram showing a mechanical assembly with an arrow indicating direction, no text or symbols present2 Pomerite gornji deo vrata prema kućištu i stavite klin gornjeg šarnira u gornji otvor vrata (najpre nataknite zadnji deo šarnira u utor na klinu, a zatim podesite prednji deo na gornji otvor vrata).
natural_image
Technical diagram showing a mechanical assembly with wires and components, no visible text or symbols3 Pričvrsnu sponu šarnira obrnite do kraja. Priključite žice i zašrafite žicu za uzemljenje. Namestite i zašrafite štitnik gornjeg šarnira.
natural_image
Pure electrical circuit lines without any symbolsPonovno montiranje vrata zamrzivača
1 Najpre crevo za vodu ugurajte u otvor u donjem šarniru (samo modeli s automatom za vodu). Namestite dno vrata zamrzivača na klin donjeg šarnira.
3 Pričvrsnu sponu šarnira obrnite do kraja. Priključite žice i zašrafite žicu za uzemljenje.
natural_image
Diagram showing a mechanical assembly with a tool interacting with a component, before and after motion (no text or symbols)4 Befestigen Sie die Biegende Rohrführung und Fügen Ugurajte crevo za vodu duboko u spoj (samo modeli s automatom za vodu).
natural_image
Diagram showing two pipe connection stages with a light beam, no text or symbols presentIzravnavanje frižidera i regulisanje vrata (ako je potrebno)
natural_image
Pure mechanical diagram showing a lever and pivot mechanism without any text or symbols※ Ukoliko vam vrata zamrzivača nije uspelo poravnati prema uputstvima iz 1. koraka, postupite u skladu sa sledećim uputstvima.
natural_image
Technical line drawing of a mechanical assembly with no visible text or symbols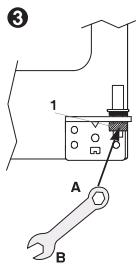
3 Ključ (deo A) stavite na maticu šarnira (1. deo) i odšrafite maticu, tako da ključ obrćete v smeru kazaljki na satu.
4 Sada stavite ključ (deo B) na maticu šarnira (2. deo) i obrćite ga smeru kazaljki na satu, da spustite vrata niže.
5 Kad vrata budu poravnana, čvrsto pritegnite maticu (1) obrćući je u smeru kazaljki na satu.
Ukoliko su vrata frižidera niža od vrata zamrzivača...
1 Gurnite ravni šrafciger u utor na levom kotačiću (na dnu frižidera) i obrćite ga u smeru kazaljki na satu sve dok vrata ne budu izravnana (u smeru kazaljki na satu da vrata podignete, a u suprotnom smeru da ih spustite).
natural_image
Pure mechanical diagram showing a lever and pivot mechanism without any text, numbers, or symbols※ Ukoliko vam vrata frižidera nije uspelo poravnati prema uputstvima iz 1. koraka, postupite u skladu sa sledećim uputstvima.
2
③
4
2 Stavite ključ (deo A) na maticu šarnira (1. deo) i odšrafite maticu, tako da ključ obrćete v smeru kazaljki na satu.
3 Sada stavite ključ (deo B) na maticu šarnira (2. deo) i pričvrstite vrata, tako da ključ obrćete u suprotnom smeru od kazaljki na satu.
4 Kad vrata budu poravnana, čvrsto pritegnite maticu (1) obrćući je u smeru kazaljki na satu.
Prednji štitnik
Nakon nameštanja i/ili izravnavanja vrata, šrafovima pritegnite i prednji štitnik.
(Najpre odstranite šrafove sa prednje donje table. Zatim namestite i pritegnite štitnik).

Pažnja!
Prednja strana frižidera mora biti malenkost viša od zadnje, tako da se vrata s lakoćom mogu zatvarati. Naime, ukoliko je kotačić zbog izravnavanja vrata previše podignut, dakle da prednja strana bude vidljivo viša od zadnje, može se desiti da se vrata teže otvaraju.
Informacije o filteru za vodu
- Nakon upotrebe tlak u vodovodnom sistemu je nizak. Budite oprezni prilikom skidanja filtera.
Ukoliko aparat niste koristili duže vreme, ili ako osetite da led ili voda imaju neprijatan okus, isperite sistem za dovođenje vode. To ćete uraditi tako da iz automata za vodu nekoliko minuta ispuštate vodu.
Ako ovim niste postigli osetno poboljšanje neprijatnog okusa ili mirisa, zamenite filter.
- Zaštitite sistem od zamrzavanja: ako očekujete da će se temperatura spustiti ispod 0°C, odstranite filterski uložak.
natural_image
Isometric illustration of a gray server cabinet with two doors and a front panel (no text or symbols)natural_image
Illustration of a hand inserting or opening a stack of documents into a filing cabinet (no text or symbols visible)natural_image
Illustration of a closed book with three small items on top (no text or symbols)
natural_image
Illustration of two hand-drawn panels showing a hand holding a calculator and another with a keyboard (no text or symbols)natural_image
Illustration of hands holding a rectangular object with an upward arrow, no text or symbols presentnatural_image
Line drawing of a hand inserting a card into a folder (no text or symbols)
natural_image
Illustration of hands pressing down a button on a device (no text or symbols visible)natural_image
Illustration of two hands holding a tray with a downward arrow (no text or symbols)natural_image
Illustration of a hand pressing down on a container with a handle (no text or symbols)Jak čistit
Vnitřní součásti
natural_image
Line drawing of a hand cleaning a microwave oven with a cloth (no text or symbols)natural_image
Illustration of a hand using a tool to clean or install an internal device (no text or symbols visible)
Varování
natural_image
Cartoon illustration of a door with open mouth and hands, showing a surprised face and a dashed outline of a box (no text or symbols)Problém
natural_image
Cartoon illustration of a computer with arms and stars (no text or symbols)Problém
natural_image
Cartoon illustration of a smiling refrigerator with arms and legs, standing in front of an open door (no text or symbols)natural_image
Cartoon illustration of a distressed refrigerator with a smiling sun and waving hand (no text or symbols)
natural_image
Diagram showing a pipe connection process with arrows indicating direction (no text or symbols)natural_image
Diagram showing a mechanical assembly with an arrow indicating motion, no text or symbols presentnatural_image
Mechanical assembly diagram showing a component being processed with wires and clamps (no text or symbols)natural_image
Diagram showing two mechanical components with arrows indicating motion, no text or symbols presentnatural_image
Diagram showing a mechanical assembly or assembly process with two components and directional arrows (no text or symbols)natural_image
Diagram showing a mechanical assembly with a spring-loaded component and wiring (no text or symbols)natural_image
Diagram showing a mechanical assembly with an arrow indicating direction, no text or symbols presentnatural_image
Diagram showing a mechanical assembly or assembly process with an arrow indicating direction (no text or symbols present)natural_image
Diagram showing two connected cable assemblies with a light beam passing through it (no text or symbols)natural_image
Diagram showing a mechanical assembly with an arrow indicating direction, no text or symbols presentnatural_image
Diagram showing mechanical components and a directional arrow, no text or symbols presentnatural_image
Technical diagram showing a mechanical assembly with a spring-loaded component and wiring (no text or symbols)natural_image
Pure mechanical diagram showing a lever and pivot point without any text, numbers, or symbolsnatural_image
Technical line drawing of a mechanical assembly with no visible text or symbolsnatural_image
Pure mechanical diagram showing a lever and rotating component without any text or symbolsnatural_image
Isometric illustration of a gray server cabinet with two doors and a front panel (no text or symbols)- Never start up an appliance showing any signs of damage. If in doubt, consult your dealer.
RoHS (Directive 2011/65/EU) Compliant

natural_image
Illustration of a hand opening a stack of documents (no text or symbols visible)natural_image
Illustration of a closed book with three bottles and a cup on top, no text or symbols present
natural_image
Illustration of two hand-drawn diagrams showing a computer monitor with an abacus and a pencil, both without any text or symbols.natural_image
Line drawing of a hand inserting a card into a cabinet (no text or symbols)
natural_image
Illustration of hands pressing down a device into a container with a downward arrow (no text or symbols)natural_image
Illustration of hands holding a rectangular object with an upward arrow, no text or symbols presentnatural_image
Illustration of two hands holding a rectangular object with a downward arrow, no text or symbols presentnatural_image
Line drawing of a hand holding a tray with a lid, no text or symbols presentComment nettoyer
posteriore (zona motore)
natural_image
Illustration of a hand cleaning a microwave oven with a cloth (no text or symbols)natural_image
Illustration of a hand using a tool to press internal components (no text or symbols visible)
Attention
natural_image
Cartoon illustration of a door with a hand gesture and a thought bubble showing a hand holding a piece of liquid (no text or symbols)Problème
natural_image
Cartoon illustration of a computer monitor with arms and stars (no text or symbols)Problème
natural_image
Cartoon illustration of a smiling refrigerator with arms raised, standing in front of an open door (no text or symbols)natural_image
Cartoon illustration of a distressed rectangular object with arms and facial features, standing beside a sun (no text or symbols)
natural_image
Diagram showing a pipe connection with a magnified view of the main structure (no text or symbols)natural_image
Diagram showing a mechanical setup with two components and an arrow indicating motion (no text or symbols)natural_image
Diagram showing two mechanical components with arrows indicating motion, no text or symbols presentnatural_image
Diagram showing a mechanical assembly or assembly process with no visible text, numbers, or symbols.natural_image
Technical diagram showing a mechanical assembly with wires and a component (no text or symbols)natural_image
Diagram showing two mechanical components with an arrow indicating motion, no text or symbols presentnatural_image
Diagram showing a mechanical assembly with an arrow indicating process (no text or symbols present)natural_image
Diagram showing two pipe connection stages with a light beam, no text or symbols presentnatural_image
Diagram showing a device interacting with a wall-mounted bracket, with an arrow indicating direction (no text or symbols present)natural_image
Diagram showing a mechanical assembly with wires and components, no text or symbols presentnatural_image
Technical diagram showing a mechanical assembly with a spring-loaded component and wiring (no text or symbols)natural_image
Pure mechanical diagram showing a lever and pivot point without any text, numbers, or symbolsnatural_image
Technical line drawing of a mechanical assembly with no visible text or symbols3
natural_image
Pure mechanical diagram showing a lever and pivot mechanism without any text or symbolsKIT D'ALIMENTATION D'EAU
natural_image
Isometric illustration of a gray server cabinet with two doors and a front panel (no text or symbols)natural_image
Illustration of a hand inserting or opening a stack of documents into a filing cabinet (no text or symbols visible)natural_image
Illustration of a closed book with three small items on top (no text or symbols)
natural_image
Illustration of two hand-drawn panels showing a keyboard and a remote control, no text or symbols presentnatural_image
Illustration of hands holding a rectangular object with an upward arrow, no text or symbols present③ Zásobník kociek l'adu
- Vyberanie: Vytiahnite zásobník smerom dopredu.
● Výmena: Založte do bočných drážok a zasuňte na doraz. Ak sa zásobník t'ážko zasúva, vyberte ho, otočte špirálu v zásobníku alebo poháňací mechanizmus o štvrtinu a vložte znovu.
natural_image
Illustration of two hands holding a wooden tray with a downward arrow (no text or symbols)natural_image
Line drawing of a hand pressing down on a tray with a handle (no text or symbols)Správne čistenie
Vnútorné časti
natural_image
Line drawing of a hand cleaning a microwave oven with a cloth (no text or symbols)natural_image
Illustration of a hand inserting a device into a rack with heat effect indicators (no text or symbols)
Upozornenie
natural_image
Cartoon illustration of a door with open lid and hand gesture, showing facial features and a dashed outline (no text or symbols)Problém
Vnútro nikdy nevychladne.
natural_image
Cartoon illustration of a refrigerator with a hat and a thought bubble showing food items (no text or symbols)Problém
Jedlo v chladničke mrzne.
Kontrolný bod
natural_image
Cartoon illustration of a refrigerator with arms and stars (no text or symbols)Problém
Divné zvuky z chladničky
Kontrolný bod
natural_image
Cartoon illustration of a smiling refrigerator with arms raised, standing in front of an open door (no text or symbols)natural_image
Cartoon illustration of a distressed refrigerator with a smiling sun and waving hand (no text or symbols)
natural_image
Diagram showing a pipe connection with a magnified view of the cable (no text or symbols)natural_image
Diagram showing a mechanical assembly with an arrow indicating direction, no text or symbols present5 Dávajte pozor, aby ste nepoškodili vodovodné potrubie pri odstraňovaní dvier.
natural_image
Diagram showing two mechanical components with arrows indicating motion, no text or symbols presentnatural_image
Diagram showing a 3D object interacting with two connected structures, one emitting a light beam (no text or symbols present)natural_image
Diagram of a mechanical assembly with wires and a component, no visible text or symbols3 Nadvihnite dvere priamo nahor a odstráňte.
natural_image
Diagram showing a mechanical assembly with an arrow indicating direction, no text or symbols presentnatural_image
Diagram showing a mechanical assembly with a tool interacting with a component, resulting in an arrow indicating motion (no text or symbols present)natural_image
Diagram showing two stages of a mechanical or electrical component with arrows indicating process direction (no text or symbols)natural_image
Diagram showing a mechanical assembly with an arrow indicating direction, no text or symbols presentnatural_image
Technical diagram showing mechanical components and a directional arrow (no text or symbols)natural_image
Technical diagram showing a mechanical assembly with a spring-loaded component and wiring (no text or symbols)natural_image
Pure mechanical diagram showing a lever and pivot point without any text, numbers, or symbolsnatural_image
Technical line drawing of a mechanical assembly with no visible text or symbolsnatural_image
Pure mechanical diagram showing a lever and pivot mechanism without any text or symbolsnatural_image
Isometric illustration of a gray server cabinet with two doors and a front panel (no text or symbols)※ Ilustracija prikazuje model opremljen svim mogućnostima. Pojedini dijelovi opreme ovise o modelu uređaja.
- Polica (džep) na vratima zamrzivača za kraće čuvanje hrane i sladoleda.
- Polica na vratima zamrzivača za držanje zamrznutih namirnica.
- Polica zamrzivača Za držanje namirnica, npr. mesa, ribe, sladoleda ...
-
Ladica zamrzivača Za držanje sušenih namirnica, mesa, ribe, peradi, pokrivene ili umotane u foliju.
-
Ledomat i posuda za led
- Brzo hlađenje limenki Za držanje pića (predio brzog hlađenja).
- Polica hladnjaka Za držanje uobičajenih namirnica.
-
Prijenosna kutija za jaja Postavite je tamo gdje mislite da vam je najzgodnije (kutiju nemojte koristiti za držanje kocki leda, i nemojte je stavljati u zamrzivač).
-
Ladica za povrće
- Ladica za voće
- Višenamjenski predio Multi Plus Za držanje raznovrsnih namirnica.
- Polica za osvježenja (opcija). Za limenke, vodu u boci, pića koja često koristite.
- Polica na vratima hladnjaka Za držanje namirnica kao što su mlijeko, sokovi, pivo, i slično.

Pažnja
natural_image
Illustration of a hand opening a stack of documents (no text or symbols visible)- Lagano pritisnite na srednji gornji dio vrata domaćeg bara, i tako otvorite taj predio (dovoljan je jedan dodir, odnosno lagani pritisak). Sadržaj ladice s osvježenjima dostupan je bez otvaranja vrata hladnjaka; time uštedite nešto električne energije. Kad su vrata ladice s osvježenjem otvorena, svijetli lampica u hladnjaku. Sadržaj ladice je pregledan i lako dostupan.
natural_image
Illustration of a closed book with three glasses and bottles on top (no text or symbols)natural_image
Illustration of two hand-drawn panels showing a container with contents and a chocolate chip, no text or symbols present.② Ladica
●Vadite je tako da je uhvatite s obje strane i podignete.

natural_image
Illustration of hands holding a rectangular object with an upward arrow, no text or symbols present③ Ladica za spremanje kocki leda
●Vađenje: povucite ladicu prema van.
●Ponovno stavljanje: umetnite ladicu u bočne utore i gurnite je do kraja.
- Ako imate poteškoća sa stavljanjem ladice, izvadite je, navoj u ladici okrenite za četvrtinu okreta, i ponovno pokušajte ugurati ladicu.
* Kocke leda nikad ne čuvajte predugo.

natural_image
Line drawing of a hand opening a closed book with a paper airplane icon on the cover (no text or symbols)
natural_image
Illustration of hands pressing down on a device with a downward arrow (no text or symbols)
● U unutrašnjosti hladnjaka nemojte nikad koristiti nikakve električne uređaje, da ne bi došlo do električnog udara ili požara.
④ Police zamrzivača i hladnjaka
●Uhvatite ih na obje strane i podignite.

natural_image
Illustration of two hands holding a tray with a downward arrow, no text or symbols present⑤ Ladica za voće i povrće
●Povucite naprijed (k sebi) i lagano podignite, te ladicu izvucite.
natural_image
Line drawing of a hand pressing down on a tray with a handle (no text or symbols)
Pažnja
Za vlastitu sigurnost, jednom pritisnite ICE MAKER LOCK (blokada izrade leda) kad čistite (vadite i ponovno namještate) pribor za spremanje ledenih kocki.
natural_image
Hand cleaning a microwave oven with a cloth (no text or symbols visible)natural_image
Illustration of a hand using a tool to press internal components (no text or symbols visible)
Pažnja
Za čišćenje nikad nemojte koristiti benzin, benzen (benzol), razrjeđivače, itd., jer mogu oštetiti površinu.
natural_image
Cartoon illustration of a door with a surprised expression and a hand gesture, showing a broken glass (no text or symbols)Poteškoća
natural_image
Cartoon illustration of a computer monitor with arms and stars (no text or symbols)Poteškoća
Iz hladnjaka se čuje čudan zvuk.
Provjerite
natural_image
Cartoon illustration of a smiling refrigerator with arms raised, standing in front of an open door (no text or symbols)Izbjegavajte izlaganje uređaja neposrednim zrakama sunca.

natural_image
Cartoon illustration of a distressed refrigerator with steam rising from its window (no text or symbols)
natural_image
Diagram showing a mechanical component transforming into a connected assembly (no text or symbols)2 Pričvrsnu sponu gornje šarke okrenite 3 do 4 puta u suprotnom smjeru kazaljki na satu. Iskopčajte žice. Podignite prednji dio šarke, i skinite ju (kad je šarka izvađena, vrata mogu pasti. Pazite na to!)
natural_image
Diagram of a mechanical assembly with a spring-loaded component and connecting wires (no text or symbols)3 Podignite vrata prema gore i skinite ih.
natural_image
Diagram showing a mechanical assembly with an arrow indicating direction, no text or symbols presentSkidanje vrata zamrzivača
natural_image
Diagram showing a cable being inserted into a wire, with no text or symbols presentnatural_image
Diagram showing a mechanical assembly with an arrow indicating motion, no text or symbols present3 Pričvrsnu sponu gornje šarke okrenite 3 do 4 puta u suprotnom smjeru kazaljki na satu. Iskopčajte žice.
4 Podignite prednji dio šarke, i skinite ju (kad je šarka izvađena, vrata mogu pasti. Pazite na to!)

natural_image
Pure mechanical diagram showing a lever mechanism with no text or symbols5 Kad skidate vrata, pazite da ne oštetite vodovodnu instalaciju.
natural_image
Diagram showing two mechanical components with an arrow indicating direction, no text or symbols presentPonovno montiranje vrata hladnjaka
natural_image
Diagram showing a device interacting with a wall-mounted panel, with an arrow indicating direction (no text or symbols present)natural_image
Diagram showing a mechanical assembly with wires and components, no text or symbols present3 Pričvrsnu sponu šarke okrenite do kraja. Priključite žice i privijte žicu za uzemljenje. Namjestite i privijte štitnik gornje šarke.
natural_image
Pure electrical circuit lines without any symbolsPonovno montiranje vrata zamrzivača
3 Pričvrsnu sponu šarke okrenite do kraja. Priključite žice i privijte žicu za uzemljenje.
natural_image
Diagram showing a mechanical assembly with an arrow indicating process (no text or symbols present)4 Ugurajte cijev za vodu duboko u spoj (samo modeli s automatom za vodu).
natural_image
Diagram showing two stages of a mechanical or electrical component with arrows indicating direction (no text or symbols)Izravnavanje hladnjaka i podešavanje vrata (ako je potrebno)
natural_image
Pure mechanical diagram showing a lever and pivot mechanism without any text or symbolsnatural_image
Technical line drawing of a mechanical assembly with no visible text or symbols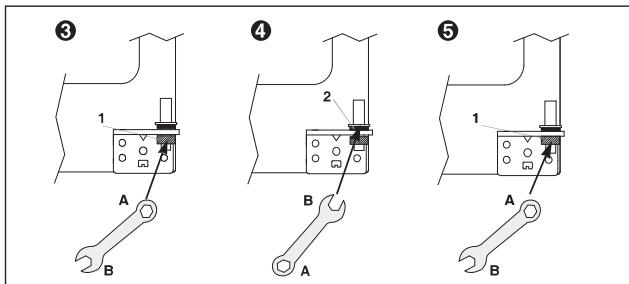
natural_image
Pure mechanical diagram showing a lever and pivot mechanism without any text or symbolsnatural_image
Isometric illustration of a gray server cabinet with two doors and a front panel (no text or symbols)VEILIGHEIDSWAARSCHUWING

6. Xpress Can Chiller
natural_image
Illustration of a hand opening a stack of documents (no text or symbols visible)natural_image
Illustration of a closed book with three glasses and bottles on top (no text or symbols)
① Dispenser Water Plank
natural_image
Illustration of two hand-drawn diagrams showing a computer monitor with an open notebook and a keyboard inserted, both without any text or symbols.② Het plankje
natural_image
Illustration of hands holding a rectangular object with an upward arrow and three vertical lines, no text or symbols present.natural_image
Two-step illustration showing hand inserting a card into a box, with no text or symbols present.natural_image
Illustration of two hands holding a tray with a downward arrow, no text or symbols present⑤ Groente & Fruit bak
natural_image
Line drawing of a hand holding a tray with a tool, no text or symbols present
voorzichtig
natural_image
Illustration of a hand cleaning a microwave oven with a cloth (no text or symbols)natural_image
Illustration of a hand using a tool to press internal components (no text or symbols visible)
voorzichtig
natural_image
Illustration of a door with open lid and hand gesture, showing a thought bubble with a flame (no text or symbols)Probleem
natural_image
Cartoon illustration of a character holding a small object with a hat, accompanied by a thought bubble showing flowers (no text or symbols)Probleem
Etenswaren in de koelkast raken bevroren.
Controlepunt
natural_image
Cartoon illustration of a refrigerator with arms and stars (no text or symbols)Probleem
natural_image
Simple line drawing of a hand pressing down on a door (no text or symbols)Probleem
natural_image
Cartoon illustration of a smiling refrigerator with arms and legs, standing in front of an open door (no text or symbols)natural_image
Cartoon illustration of a distressed refrigerator with a smiling face and waving hand, next to a sun (no text or symbols)
natural_image
Diagram showing a mechanical assembly or assembly process with two components and directional arrows (no text or symbols)natural_image
Diagram of a mechanical assembly with a spring-loaded component and connecting wires (no text or symbols)natural_image
Diagram showing a device with an arrow indicating direction, no text or symbols presentnatural_image
Diagram showing a cable being twisted with a light beam, illustrating the process (no text or symbols present)natural_image
Diagram showing a mechanical assembly with two components and a curved arrow indicating motion (no text or symbols)natural_image
Diagram showing two mechanical components with arrows indicating motion, no text or symbols presentnatural_image
Diagram showing a mechanical assembly with an arrow indicating direction (no text or symbols present)natural_image
Technical diagram showing mechanical components and a directional arrow (no text or symbols)natural_image
Diagram of a cable installation with a light bulb and wiring, no text or symbols presentnatural_image
Diagram showing a mechanical assembly with a tool interacting with a component, before and after an operation (no text or symbols present)natural_image
Diagram showing two stages of a mechanical or electrical component with arrows indicating process direction (no text or symbols)natural_image
Pure mechanical diagram showing a lever and pivot mechanism without any text or symbolsnatural_image
Technical line drawing of a mechanical assembly with no visible text or symbols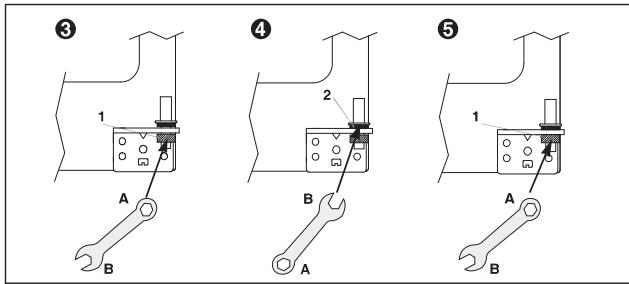
natural_image
Pure mechanical diagram showing a lever and pivot mechanism without any text or symbolsnatural_image
Isometric illustration of a double-door cabinet with a single door (no text or symbols)natural_image
Illustration of a hand inserting or removing a stack of documents into an open storage cabinet (no text or symbols)natural_image
Illustration of a closed book with three glasses and bottles on top (no text or symbols)natural_image
Illustration of two hands using a handheld device to interact with a card or notebook (no text or symbols present)② Prateleiras de porta do congelador e do frigorífico
natural_image
Illustration of hands holding a rectangular object with an upward arrow, no text or symbols present③ Reserva de pedras de gelo
natural_image
Line drawing of a hand inserting a card into a folder (no text or symbols)
natural_image
Illustration of hands inserting a card into a device (no text or symbols visible)④ Prateleiras do congelador e do frigorífico.
natural_image
Illustration of two hands holding a rectangular object with a downward arrow, no text or symbols presentnatural_image
Simple line drawing of a hand pressing down on a tray with a handle (no text or symbols)Como limpar
natural_image
Hand cleaning a microwave oven with a cloth (no text or symbols visible)natural_image
Illustration of a hand using a tool to clean or install a microwave oven (no text or symbols visible)
Aviso
natural_image
Cartoon illustration of a door with a surprised expression and a thought bubble showing a broken object (no text or symbols)Problema
natural_image
Cartoon illustration of a computer monitor with arms and stars (no text or symbols)Problema
natural_image
Cartoon illustration of a smiling refrigerator with arms and legs, standing in front of an open door (no text or symbols)natural_image
Cartoon illustration of a distressed refrigerator with a smiling sun and waving hand (no text or symbols)
natural_image
Diagram showing a pipe connection with a magnified view of the end pipe (no text or symbols present)natural_image
Diagram showing a mechanical setup with two components and an arrow indicating motion (no text or symbols)natural_image
Technical diagram showing a mechanical assembly with wires and components, no visible text or symbolsnatural_image
Pure mechanical diagram showing a lever mechanism and a cross-shaped component (no text or symbols)natural_image
Diagram showing two mechanical components with arrows indicating motion, no text or symbols presentnatural_image
Diagram showing a mechanical component transforming into a gear mechanism (no text or symbols present)natural_image
Technical diagram showing a mechanical assembly with wires and a bracket (no text or symbols)natural_image
Diagram showing two mechanical components with arrows indicating motion, no text or symbols presentnatural_image
Diagram showing a mechanical assembly with an arrow indicating process (no text or symbols present)natural_image
Diagram showing a pipe connection with a magnified view of the end (no text or symbols)natural_image
Diagram showing a device interacting with a wall-mounted component, with an arrow indicating direction (no text or symbols present)natural_image
Diagram showing mechanical components and a directional arrow, no text or symbols presentnatural_image
Technical diagram showing a mechanical assembly with a spring-loaded component and attached clamping device (no text or symbols)natural_image
Pure mechanical diagram showing a lever and pivot point without any text, numbers, or symbolsnatural_image
Technical line drawing of a mechanical assembly with no visible text or symbols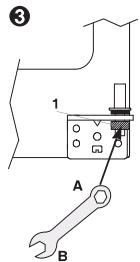
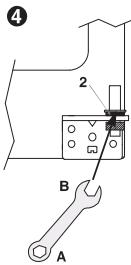
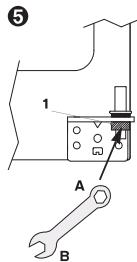
natural_image
Pure mechanical diagram showing a lever and rotating component without any text or symbolsnatural_image
Isometric illustration of a modern cabinet with two doors and a front panel (no text or symbols)Хладилник – Фризер
natural_image
Illustration of a hand inserting or opening a stack of documents into a filing cabinet (no text or symbols visible)natural_image
Illustration of a closed storage unit with three bottles and a glass on top (no text or symbols)
natural_image
Illustration of two hand-drawn diagrams showing a computer monitor and a remote control, both without any text or symbols.natural_image
Illustration of hands holding a rectangular object with an upward arrow and three vertical lines, no text or symbols present.natural_image
Line drawing of a hand inserting a card into a folder (no text or symbols)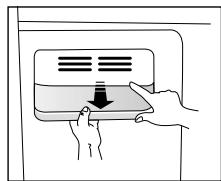
natural_image
Illustration of hands inserting a device into a fan (no text or symbols)natural_image
Illustration of two hands holding a tray with a downward arrow, no text or symbols presentnatural_image
Simple line drawing of a hand pressing down on a container with a handle (no text or symbols)Как да почиствате
Вътрешните части
natural_image
Hand cleaning a microwave oven with a cloth (no text or symbols visible)natural_image
Illustration of a hand using a tool to clean or store air quality inside a microwave oven (no text or symbols visible)
Внимание
natural_image
Cartoon illustration of a door with open hands and a surprised expression, no text or symbols presentПроблем
natural_image
Cartoon illustration of a computer monitor with stars around its screen (no text or symbols)Проблем
natural_image
Cartoon illustration of a smiling refrigerator with arms and legs, standing in front of an open door (no text or symbols)natural_image
Cartoon illustration of a distressed refrigerator with a smiling face and waving hand, next to a sun (no text or symbols)
natural_image
Diagram showing a pipe connection with a magnified view of the internal structure (no text or symbols)natural_image
Diagram showing a mechanical assembly with two components and a rotating component, no text or symbols presentnatural_image
Diagram showing two mechanical components with arrows indicating motion, no text or symbols presentnatural_image
Diagram showing a mechanical assembly or assembly process with no visible text, numbers, or symbols.natural_image
Technical diagram showing a mechanical assembly with a spring-loaded component and wiring (no text or symbols)natural_image
Diagram showing a mechanical assembly with an arrow indicating direction, no text or symbols presentnatural_image
Diagram showing a mechanical assembly with an arrow indicating process direction (no text or symbols)natural_image
Diagram showing two connected cable or wire structures with a light beam passing through it (no text or symbols)natural_image
Diagram showing a device mounted on a bracket with an arrow indicating direction (no text or symbols present)natural_image
Technical diagram showing a mechanical assembly with wires and components, no visible text or symbolsnatural_image
Technical diagram showing a mechanical assembly with a spring-loaded component and wiring (no text or symbols)natural_image
Pure mechanical diagram showing a lever and pivot point without any text, numbers, or symbolsnatural_image
Technical line drawing of a mechanical assembly with no visible text or symbols3
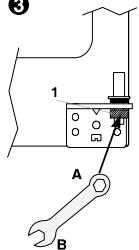
4
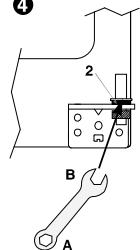
5
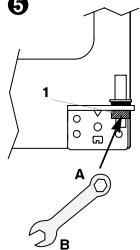
natural_image
Pure mechanical diagram showing a lever and pivot mechanism without any text or symbolsnatural_image
Isometric illustration of a modern office cabinet with two doors and a front panel (no text or symbols)natural_image
Illustration of a hand inserting or opening a stack of documents into a filing cabinet (no text or symbols visible)natural_image
Illustration of a closed book with three glassware and bottles on top (no text or symbols)
natural_image
Illustration of two hand-drawn diagrams showing a clipboard with contents and a pencil, no text or symbols present.natural_image
Illustration of hands holding a rectangular object with an upward arrow, no text or symbols presentnatural_image
Line drawing of a hand inserting a card into a folder (no text or symbols)
natural_image
Illustration of hands pressing down on a device panel with a downward arrow (no text or symbols)natural_image
Illustration of two hands holding a rectangular object with a downward arrow, no text or symbols presentnatural_image
Line drawing of a hand pressing down on a container with a handle (no text or symbols)Nasıl Temizlenir
İç Parçalar
natural_image
Illustration of a hand cleaning a microwave oven with a cloth (no text or symbols)natural_image
Illustration of a hand using a tool to press internal components (no text or symbols visible)
Dikkat
natural_image
Cartoon illustration of a door with a surprised face and hands holding a bag, emitting exhaust smoke (no text or symbols)Problem
natural_image
Cartoon illustration of a refrigerator with arms and stars (no text or symbols)Problem
natural_image
Cartoon illustration of a smiling refrigerator with arms and legs, waving from the door (no text or symbols)natural_image
Cartoon illustration of a distressed refrigerator with a sun and waving hand (no text or symbols)
natural_image
Diagram showing a pipe connection with a magnified view of the main structure (no text or symbols)natural_image
Diagram showing a mechanical assembly with two components and an arrow indicating motion (no text or symbols)natural_image
Mechanical assembly diagram showing a cutting tool interacting with a component, no text or symbols presentnatural_image
Diagram showing two mechanical components with arrows indicating motion, no text or symbols presentnatural_image
Diagram showing a 3D object interacting with two connected structures, one emitting a light beam (no text or symbols present)natural_image
Pure mechanical diagram showing a clamp or bracket assembly with no text, numbers, or symbolsnatural_image
Diagram showing a mechanical assembly with an arrow indicating direction, no text or symbols presentnatural_image
Diagram showing a mechanical assembly or tool interacting with two surfaces, one with a curved arrow indicating motion (no text or symbols present)natural_image
Diagram showing a pipe connection with a magnified view of the process (no text or symbols)natural_image
Diagram showing a device mounted on a base with an arrow indicating direction (no text or symbols present)natural_image
Diagram showing mechanical components and a directional arrow, no text or symbols presentnatural_image
Technical diagram showing a mechanical assembly with a spring-loaded component and wiring (no text or symbols)natural_image
Pure mechanical diagram showing a lever and pivot point without any text, numbers, or symbolsnatural_image
Technical line drawing of a mechanical assembly with no visible text or symbols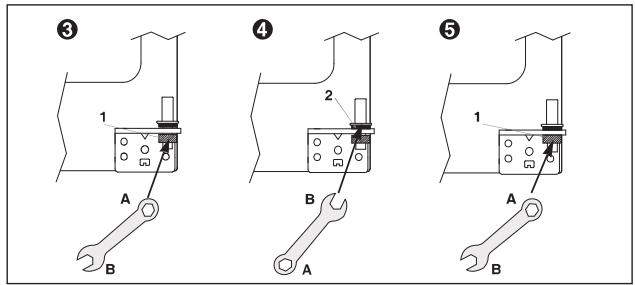
natural_image
Pure mechanical diagram showing a lever and pivot mechanism without any text or symbolsflowchart
graph LR
    A["Water Tube"] --> B["Connector A"]
    B --> C["Connector B"]
    C --> D["Tap"]
Şekil B
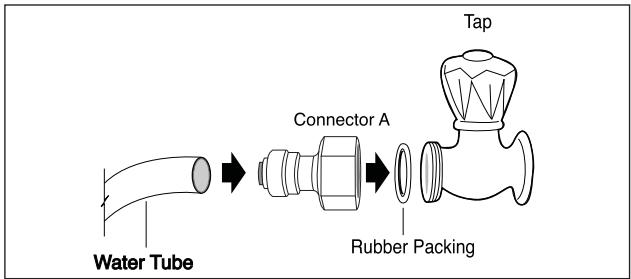
flowchart
graph LR
    A["Water Tube"] --> B["Connector A"]
    B --> C["Rubber Packing"]
    C --> D["Tap"]

3. Su Tedarik Sisteminin Kurulumundan Sonra
natural_image
Illustration of a gray server cabinet with two doors and a front panel (no text or symbols)natural_image
Illustration of a hand inserting or removing a stack of documents into a storage unit (no text or symbols)natural_image
Illustration of a shelf with bottles and glasses, no text or symbols present
natural_image
Illustration of two hand-drawn diagrams showing a device being inserted into a clip (no text or symbols present)natural_image
Line drawing of a hand inserting a card into a cabinet (no text or symbols)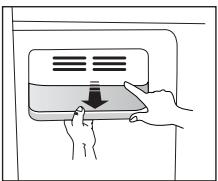
natural_image
Illustration of hands inserting a device into a container with a downward arrow (no text or symbols)natural_image
Illustration of hands holding a rectangular object with an upward arrow, no text or symbols presentnatural_image
Illustration of two hands holding a tray with a downward arrow (no text or symbols)natural_image
Line drawing of a hand holding a tray with a handle, inside a container (no text or symbols)Tisztítás
natural_image
Illustration of a hand cleaning a microwave oven with a cloth (no text or symbols)natural_image
Illustration of a hand using a tool to clean or install a computer rack (no text or symbols visible)
Figyelmeztetés
natural_image
Cartoon illustration of a door with a hand gesture and a thought bubble showing a hand holding a bag (no text or symbols)Probléma
natural_image
Illustration of a refrigerator with a hand holding a bag and a thought bubble showing a pile of food items (no text or symbols)Probléma
natural_image
Cartoon illustration of a refrigerator with arms and stars (no text or symbols)Probléma
natural_image
Cartoon illustration of a smiling refrigerator with arms raised, standing in front of an open door (no text or symbols)natural_image
Cartoon illustration of a distressed refrigerator with a surprised expression and a sunburst effect (no text or symbols)
natural_image
Diagram showing a pipe being inserted into a cable, with no text or symbols presentnatural_image
Diagram showing a mechanical assembly with an arrow indicating direction, no text or symbols presentnatural_image
Diagram showing two mechanical components with arrows indicating motion, no text or symbols presentnatural_image
Diagram showing a 3D object interacting with a mechanical component, with no visible text or symbols.natural_image
Mechanical assembly diagram showing a clamp and connecting rod (no text or symbols)natural_image
Diagram showing two mechanical components with directional arrows indicating motion (no text or symbols)natural_image
Diagram showing a mechanical assembly with an arrow indicating process direction (no text or symbols present)natural_image
Diagram showing two connected pipe fittings with a light beam passing through, no text or symbols presentnatural_image
Diagram showing a mechanical assembly with an arrow indicating direction, no text or symbols presentnatural_image
Diagram showing mechanical components and a directional arrow, no text or symbols presentnatural_image
Technical diagram showing a mechanical assembly with a spring-loaded component and wiring (no text or symbols)natural_image
Pure mechanical diagram showing a lever and pivot point without any text, numbers, or symbolsnatural_image
Technical line drawing of a mechanical assembly with no visible text or symbols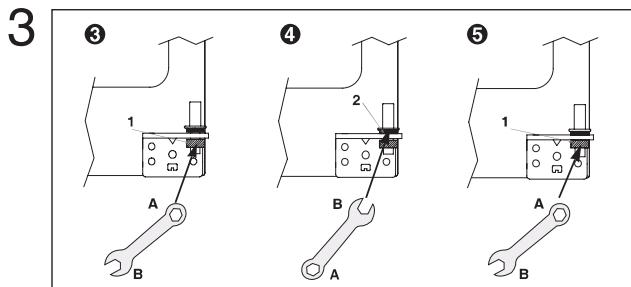
natural_image
Pure mechanical diagram showing a lever and pivot mechanism without any text or symbolsflowchart
graph LR
    A["Water Tube"] --> B["Connector A"]
    B --> C["Connector B"]
    C --> D["Rubber Packing"]
    D --> E["Tap"]

GNTC - Gorenje Niti Tiki Company
Veternik B.B.
10000 Priština KOSOVO
Tel.: 00381 (0) 38 55 66 88