
EQ. 300 TI351209RW - Coffee maker SIEMENS - Free user manual and instructions
Find the device manual for free EQ. 300 TI351209RW SIEMENS in PDF.
| Product type | Automatic espresso machine |
| Brand | Siemens |
| Model | EQ.300 TI351209RW |
| Dimensions (H x W x D) | 37.3 x 24.9 x 42.8 cm |
| Weight (empty) | approx. 8-9 kg |
| Power supply | 220-240 V~, 50/60 Hz |
| Power | 1300 W |
| Max. pump pressure | 15 bar |
| Water tank capacity | 1.3 L (without filter) |
| Coffee bean hopper capacity | approx. 250 g |
| Grinder type | Ceramic/steel |
| Functions | Espresso, Caffè crema, Cappuccino, Latte Macchiato, milk frother |
| Settings | Coffee strength (5 levels), volume, foam duration, grind degree |
| Automatic shut-off | Yes, adjustable from 15 min to 4 h |
| Acoustic signal | On/Off |
| Water filter | Yes (ref. TZ70003) |
| Maintenance program | Calc'nClean: automatic descaling and cleaning |
| Safety | Automatic shut-off, frost protection, child safety (lock) |
| Cleaning | Removable brewing unit, drip tray, detachable milk frother |
| Included accessories | Milk frother, water hardness test strip |
| After-sales service | Contact details at the end of the manual |
Frequently Asked Questions - EQ. 300 TI351209RW SIEMENS
User questions about EQ. 300 TI351209RW SIEMENS
0 question about this device. Answer the ones you know or ask your own.
Ask a new question about this device
Download the instructions for your Coffee maker in PDF format for free! Find your manual EQ. 300 TI351209RW - SIEMENS and take your electronic device back in hand. On this page are published all the documents necessary for the use of your device. EQ. 300 TI351209RW by SIEMENS.
USER MANUAL EQ. 300 TI351209RW SIEMENS
Fully automatic espresso machine
A B T O M A T N U E C K A Y K O p e M a I N H A
Kaffeevollautomat
TI351...
siemens-home.bsh-group.com/welcome
en Instruction manual 5
fr Mode d'emploi 27
nl Gebruiksaanwijizing 51
pl Instrukcja obslugi 75
cs Navod k pouzití 99
ru IpaBnla noIb3OBaHnra 121
de Gebrauchsanleitung 145
Register your product online
A
B
C
D
1
3
4
5

6
7
Table of contents

Intended use. 6

Important safety information . . . 6

Environmental protection. 8
Saving energy. 8
Environmentally-friendly disposal . . . 8

Getting to know your appliance . . .9
Included in delivery. 9
Assembly and components 9
Controls 10

Accessories 11

Before using for the first time . 11
Installing and connecting the appliance 11
Commissioning the appliance . . . . 11

Operating the appliance 13
Preparing coffee using freshly ground beans. 13
Preparing drinks with milk 13
Adjusting beverage settings 14
Water filter 16
Frost protection. 16

Settings. 17
Automatic switch-off 17
Switching the audible signal on/off. 17
Setting the water hardness. 17
Factory reset. 18

Daily care and cleaning. 19
Cleaning agent. 19
Cleaning the appliance. 19
Cleaning the drip tray and coffee grounds container. 20
Cleaning the milk system 20
Cleaning the brewing unit. 20

Service programme. 21
Starting Calc'nClean 22

Troubleshooting 23

Customer service 26
Technical data. 26
E number and FD number. 26
Guarantee 26

Intended use
Check the appliance for damage after unpacking it. Do not connect the appliance if it has been damaged in transport.
This appliance is intended for domestic use only.
Only use the appliance indoors at room temperature and up to 2000m above sea level.

Important safety information
Please read carefully, follow and retain the operating instructions. When passing on the appliance, enclose these instructions.
This appliance can be used by children aged from 8 years and above and by persons with reduced physical, sensory or mental capabilities or lack of experience and knowledge if they have been given supervision or instruction concerning use of the appliance in a safe way and if they understand the hazards involved. Keep children under 8 years of age away from the appliance and connecting cable and do not allow them to use the appliance. Children shall not play with the appliance. Cleaning and user maintenance shall not be made by children unless they are older than 8 years and supervised.
Warning
Danger of electric shock!
- The appliance may only be connected to a power supply with alternating current via a correctly installed socket with earthing. Ensure that the protective conductor system of the domestic electricity supply has been correctly installed.
- Connect and operate the appliance only in accordance with the specifications on the rating plate. If the power cord of this appliance is damaged, it must be replaced by customer service.
- Do not use if the power cable or appliance is damaged. If a fault occurs, pull the mains plug or switch off the mains voltage immediately.
- To prevent hazards, the appliance may be repaired by our customer service only.
- Never immerse the appliance or mains cord in water.
- The plug and socket connection of the appliance must not come into contact with liquids.
Please note the special information on cleaning in the instructions.
Warning
Hazard due to magnetism!
The appliance contains permanent magnets which may affect electronic implants, e.g. heart pacemakers or insulin pumps. Persons with electronic implants should keep a minimum distance of 10 cm from the appliance and the water tank when removed.
Warning
Risk of suffocation!
Do not let children play with packaging material. Store small parts safely as they can be easily swallowed.
Warning
Risk of burns!
The milk system becomes very hot. After use, allow it to cool down first before touching it.
After use, surfaces may still be hot for a certain period.
- Freshly prepared beverages are very hot. Leave to cool a little if necessary.
Warning
Risk of injury!
- Improper use of this appliance may result in injury.
- Do not reach into the grinding unit.
Warning Fire hazard!
The appliance will become hot.
- Never operate the appliance in a cupboard.
Environmental protection
Saving energy
If the appliance is not being used, switch it off.
Set the interval for automatic switch-off to the smallest value.
If possible, do not interrupt coffee or milk froth dispensing. Stopping a process prematurely results in higher energy consumption and the drip tray fills up more quickly.
- Descale the appliance regularly to avoid a build-up of limescale. Limescale residue results in higher energy consumption.
Environmentally-friendly disposal
Dispose of packaging in an environmentally-friendly manner.
This appliance is labelled in accordance with European Directive 2012/19/EU concerning used electrical and electronic appliances (waste electrical and electronic equipment - WEEE). The guideline determines the framework for the return and recycling of used appliances as applicable throughout the EU.
Please ask your dealer about current disposal routes.

Getting to know your appliance
This section provides an overview of the scope of delivery, the assembly and the components of your appliance. It also introduces you to the different controls.
Note: Depending on the appliance model, individual details and colours may differ.
How to use these instructions:
The cover pages of the operating instructions can be folded out towards the front. The illustrations are identified using numbers that are referred to in the operating instructions.
Example: Fig. 1
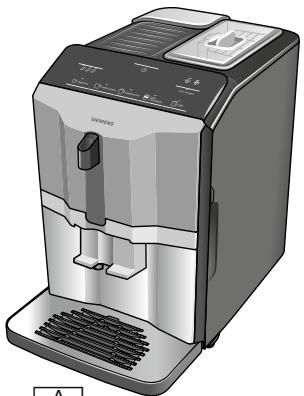
Included in delivery
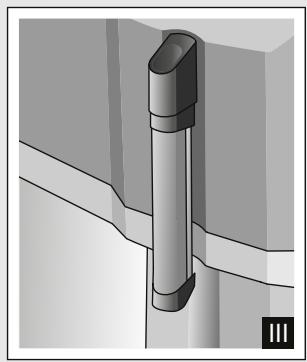
Fig. 1
A Fully automatic coffee machine
B Water hardness testing strip
C Instruction manual
D Milk frother
Assembly and components
Fig. 2
1 On/off button (stand-by mode)
2 Control panel
3 Handle of milk frother
4 Outlet system for coffee, height adjustable
5 Milk frother (holder, frother, cover), height adjustable
6 Drip tray (coffee grounds container, drip grate, drip plate, float)
7 Door of brewing chamber
8 Rating plate
9 Brewing unit
10 Aroma lid
11 Bean container
12 Rotary selector for setting grinding level
13 Cover for water tank
14 Water tank
Controls
| Button | Meaning |
| Switch the appliance on and off The appliance rinses automatically when it is switched on and off. The appliance is not rinsed if: ■ it is still warm when switched on, or ■ coffee was not dispensed before the appliance was switched off. The appliance is ready for use when the LEDs of the buttons for selecting drinks light up in the control panel. The appliance has automatic switch-off. → "Selecting automatic switch-off" on page 17 | |
| espresso | Dispensing Espresso |
| caffe crema | Dispensing Caffe crema |
| cappuccino | Dispensing cappuccino |
| latte macchiato | Dispensing latte macchiato |
| milk | Frothing up milk |
| Coffee strength Adjusting the coffee strength → "Adjusting beverage settings" on page 14 | |
| calc'nClean | Start the service programme Flashes when the service programme needs to be performed. → "Calc'nClean service programme" on page 22 |
| Symbol | |
| Lamps | Lights up when the water tank needs to be topped up with water or the water tank is not inserted. Flashes when the water filter needs to be replaced. |
| Flares | Lights up when trays need to be emptied. Flashes when door of brewing chamber is open. |
| espresso | |
| is continuously lit | Ready to use, selection possible |
| is pulsing | Dispensing underway |
| is flashing off | Waiting for operation, e.g. with calc'nClean Not available |

Accessories
The following accessories are available from retailers or from customer service:
| Accessory | Order number | |
| Retail | Customer service | |
| Cleaning tablets | TZ80001N | 00311807 |
| Descaling tablets | TZ80002N | 00576693 |
| Water filter | TZ70003 | 00575491 |
| Care set | TZ80004 | 00576330 |
The contact data for customer service in all countries can be found at the back of these instructions.

Before using for the first time
In this section, you will learn how to commission your appliance.
Note: Only use the appliance in frost-free areas. If the appliance was transported or stored at temperatures below 0^ , you must wait for at least 3 hours before using it.
Installing and connecting the appliance
- Remove any protective plastic film.
- Place the appliance on a level, water-resistant surface which can bear the weight.
- Using the mains plug, connect the appliance to an earthed socket that has been correctly installed.
Note: After plugging in, always wait (approx. 5 seconds).
Commissioning the appliance
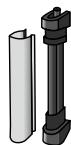
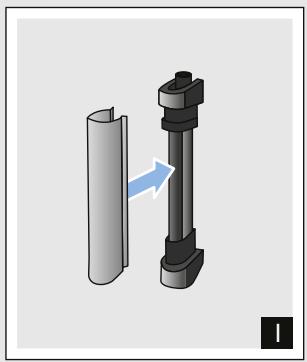
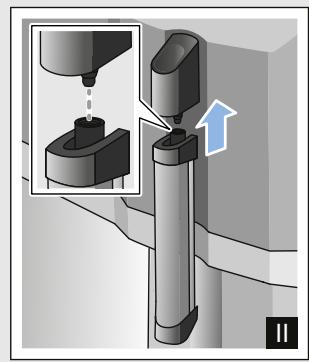
Attaching milk frother
Fig. 3
- Remove milk frother parts from the bag.
- Assemble milk frother.
- Attach the milk frother on the front of the appliance.
Filling the bean container
This appliance can be used to make coffee drinks from coffee beans.
- Open the lid 10 of the bean container 11.
- Pour in coffee beans.
- Close the lid again.
Notes
Coffee beans that have been glazed or caramelised or that contain other sugary additives block the brewing unit. Only use pure bean mixes that are suitable for use in fully automatic espresso or coffee machines.
The coffee beans are freshly ground for each brewing process.
- Keep the coffee beans sealed and stored in a cool place to maintain optimum quality.
- Coffee beans can be stored in the bean container for a number of days without losing their aroma.
Filling the water tank
Important: Fill the water tank with fresh, cold, still water on a daily basis. Prior to operation, check whether the water tank has been sufficiently filled.
- Carefully remove the cover of the water tank.
- Use the handle to remove the water tank and then rinse out.
- Fill the water tank with water up to the "max" marking.
- Put the water tank back in the holder again, keeping it straight, and fit the cover of the water tank.
General information
The factory settings of the fully automatic coffee machine are programmed for optimal performance.
The appliance switches off automatically after a specific time.
Whenever a button is pressed, a signal sounds. It can be switched off. "Settings" on page 17
- When the appliance is used for the first time, after running a service programme or has not been operated for a long period, the first beverage will not have the full aroma and should not be consumed.
After commissioning the appliance, you will only achieve a suitably thick and stable "crema" after the first few cups have been dispensed.
If the appliance is in use for a long period of time, water droplets will form on the ventilation slots. This is normal.
Escaping steam is not a fault but due to the design of the machine.
Before using your new appliance, you should check and select the water hardness. "Settings" on page 17

Operating the appliance
In this section, you will learn how to make beverages with coffee and milk. It contains information about settings, water filters and adjustment of the grinding level, in addition to frost protection.
Note: Freshly prepared beverages may be very hot.
Preparing coffee using freshly ground beans
You can choose between Espresso and Caffe crema. "Preparing drinks with milk" on page 13
The appliance is switched on. The water tank and bean container have been filled.
- Place a cup under the outlet system.
- Touch repeatedly to select the required coffee strength.
- Touch the espresso or caffe crema button.
The coffee is brewed and then dispensed into the cup.
Note: To stop dispensing the drink before the end, touch espresso or caffe crema again.
Preparing drinks with milk
This appliance has a milk frother. You can make drinks of coffee with milk or froth up milk.
Tip: You can also use plant-based alternatives to milk, e.g. soya milk.
Notes
The quality of the milk froth depends on the type of milk or the plant-based alternative used.
Dried milk residues are difficult to remove so always perform cleaning. "Daily care and cleaning" on page 19
Warning
Risk of burns!
The milk frother gets very hot. Hold only by the handle. After use, let it cool down first before touching it.
Coffee drinks with milk
You can choose between cappuccino and latte macchiato. When doing so, please check the position of the coffee dispenser and milk frother.

The appliance is switched on. The water tank and bean container have been filled.
The milk frother is installed.
- Fill a large cup or a large glass with approx. 100 ml milk for cappuccino and approx. 150 ml milk for latte macchiato.
- Place a cup or a glass under the outlet system.
- Push the coffee dispenser and milk frother right down.
- Touch repeatedly to select the required coffee strength.
- Touch the cappuccino or latte macchiato button.
The milk is first frothed up in the cup or glass. The coffee is then brewed and dispensed into the cup or glass.
Note: To stop current dispensing of the drink before the end, touch cappuccino or latte macchiato again.
Frothing up milk
The appliance is switched on. The water tank has been filled.
The milk frother is installed.
- Fill a large cup or a large glass with approx. 100 ml milk.
- Place a cup or a glass under the outlet system.
- Push the coffee dispenser and milk frother right down.
- Touch the milk button. The milk is frothed up.
Note: To stop the process before the end, touch milkagain.
Adjusting beverage settings Coffee strength
Before making a drink, you can adjust the coffee strength:
To do so, touch 000 to select the strength you require.
| - | - | - | mild |
| - | - | - | regular |
| - | - | - | strong |
Note: The coffee strength selected is then active for all drinks made with coffee.
Filling level
You can adjust the filling level of your drinks.
Press and hold espresso or caffe crema for 3 seconds.
Dispensing takes place, with the button selected flashing.
Once the required filling level is reached in the cup, touch the button selected to stop. The new filling level is only apparent after the next drink is dispensed.
Note: The filling level can be selected either for Espresso (25 - 60 ml) or Caffe crema (80 - 200 ml). A minimum quantity is always brewed: Espresso approx. 25 ml and Caffe crema approx. 80 ml.
Frothing time
You can adjust the frothing time of your drinks.
Press and hold cappuccino, lattemacchiato or milk for 3 seconds.
The milk is frothed up, and the button selected flashes.
Once the required frothing time is reached, touch the button selected to stop.
Note: Setting the frothing time has no impact on the amount of coffee.
Setting the grinding level
This appliance features an adjustable grinder. This enables the grinding level of the coffee to be individually changed.
Warning
Risk of injury!
Do not reach into the grinding unit.
Caution!
The appliance may be damaged! Only adjust the grinding level when the grinder is running!
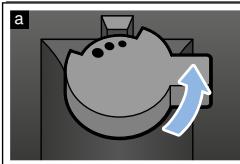
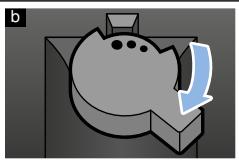
When the grinder is in operation, use the rotary selector 12 to set the grinding level.
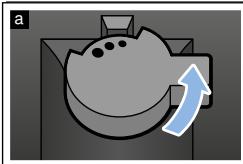
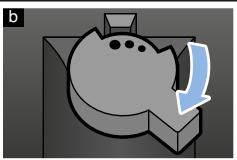
Finer grinding level: turn anticlockwise. (Fig. a)
Coarser grinding level: turn clockwise. (Fig. b)
Notes
The new setting will not become apparent until after the second cup of coffee.
- Set a finer grinding level with dark-roasted coffee beans and a coarser grinding level with lighter coffee beans.
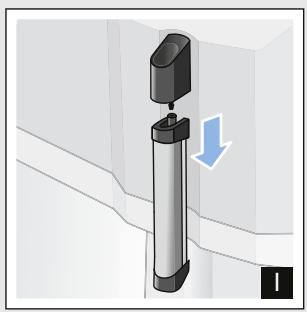
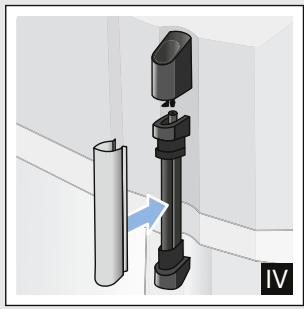
Water filter
Fig. 7
A water filter lessens limescale deposits and reduces impurities in the water. The appliance also does not need to be descaled so often. Water filters are available from retailers or from customer service.
If a water filter is inserted, the appliance will show when this needs to be changed. The symbol is flashing.
Inserting or replacing a water filter
A new water filter must be rinsed before it can be used.
The appliance is switched on. The water tank has been filled.
- Simultaneously hold down 000 and calc'nClean for at least 3 seconds.
- Touch espresso button, and "W. hardness" will be activated.
- Touch button and make the following selection:
000
with water filter
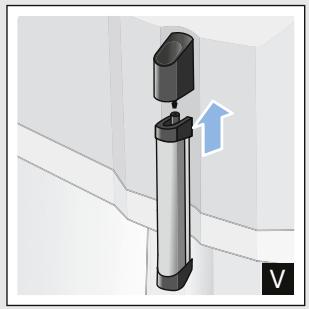
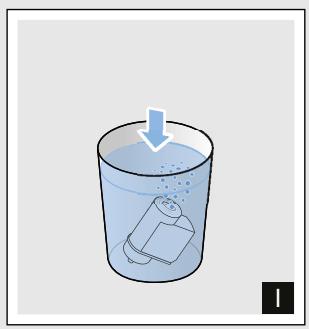
- Immerse the water filter (opening facing up) in a container filled with water until no more air bubbles rise to the surface. Fig. 7
- Then press the water filter firmly into the empty water tank.
- Fill the water tank with water up to the "max" marking.
- Place a container with a capacity of 1.0 litre under the outlet.
- Touch espresso button to save the setting and activate rinsing.
- Insert water tank.
- Touch espresso button to save the setting and start rinsing. Water will now flow through the filter.
- Touch calc'nClean button to exit the menu.
- Then empty the container. The appliance is ready for use again.
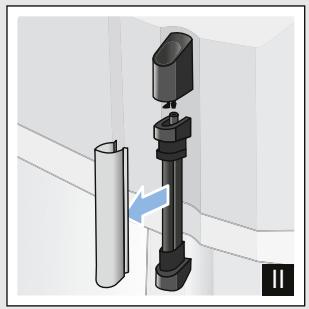
Removing the water filter
If the water filter has been removed and no new one inserted, please select the appropriate water hardness. "Setting the water hardness" on page 17
Frost protection
To prevent frost damage during transportation and storage, the appliance must be completely emptied beforehand.
Info: The appliance must be ready for use and the water tank filled.
- Place a large container under the outlet of the milk frother and push the frother down.
- Press and hold milk button for at least 5 seconds. The LED in the button flashes, and the appliance now heats up.
- As soon as steam escapes from the milk frother, remove the water tank.
- Allow the appliance to cool down. Wait until symbol and all LEDs are flashing.
- Use button to switch the appliance off.
- Empty the water tank and the drip tray and thoroughly clean the appliance.
The appliance can now be transported or stored.
Note: The brewing unit is now secured and cannot be removed.

Settings
This appliance has different factory settings. You can customise the settings on the appliance.
Note: If no button is pressed within 90 seconds, the appliance switches to "Choose beverage" without saving. The previous setting remains unchanged.
You can select the following settings:
Automatic switch-off
The appliance switches off automatically at a specific time after the last button was pressed. This time can be selected, with settings from 15 minutes to 4 hours possible here.
- Simultaneously hold down and calc'nClean for at least 3 seconds.
- Touch caffe crema button and "Automatic switch-off" will be activated.
- Touch button and select the required time. The following settings are possible:
| 0 0 0 | 15 minutes |
| 0 0 0 | 30 minutes (factory setting) |
| 0 0 0 | 1 hour |
| 0 0 0 | 2 hours |
| 0 0 0 | 4 hours |
- Touch caffecrema button to save the setting.
- Touch calc'nClean button to exit the menu.
Switching the audible signal on/off
Whenever a button is pressed, an audible signal sounds.
This can be switched on or off.
- Simultaneously hold down and calc'nClean for at least 3 seconds.
- Touch cappuccino button, and "Signal tone" menu will be activated.
- Touch button and switch signal tone on or off.
| ∅∅∅ | On (factory setting) |
| ∅∅∅ | Off |
- Touch cappuccino button to save the setting.
- Touch calc'nClean button to exit the menu.
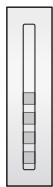
Setting the water hardness
It is important to set the water hardness correctly so that the appliance indicates in good time when the descending programme should be run. The preset water hardness is level 4.
You can check the water hardness using the enclosed test strip or by asking your local water supplier.
- Briefly immerse the enclosed test strip in fresh tap water, leave it to drip and read off the result after 1 minute.
- Simultaneously hold down and calc'nClean for at least 3 seconds.
- Touch espresso button, and "W. hardness" menu will be activated.
en Settings
- Touch button and select the water hardness.
The following settings are possible:
| ∅∅∅ | W. hardness 1 |
| ∅∅∅ | W. hardness 2 |
| ∅∅∅ | W. hardness 3 |
| ∅∅∅ | W. hardness 4 (factory setting) |
| ∅∅∅ | Water filter (when used) |
| ∅∅∅ | H2O-softener (if available) |
- Touch espresso button to save the setting.
- Touch calc'nClean button to exit the menu.
The table shows the allocation of the levels to the different degrees of water hardness:
| Setting | Degree of water hardness | |
| German (°dH) | French (°fH) | |
| 1 | 1-7 | 1-13 |
| 2 | 8-14 | 14-25 |
| 3 | 15-21 | 26-38 |
| 4 | 22-30 | 39-54 |
Subsequent changes to the water hardness can be made at any time.
Note: When using the water filter (see section "Accessories"), proceed as follows. "Water filter" on page 16
Factory reset
If you set the appliance back to the factory settings, you will lose your own settings.
- Simultaneously hold down 000 and calc'nClean for at least 3 seconds.
- Touch latte macchiato button. The factory settings are reactivated.
- Touch calc'nClean button to exit the menu.

Daily care and cleaning
With good care and cleaning, your appliance will remain fully functioning for a long time to come. In this section, you will learn how to correctly clean and care for your appliance.
Warning
Risk of electric shock!
Before cleaning the appliance, pull out the mains plug. Never immerse the appliance in water. Do not use a steam cleaner.
Cleaning agent
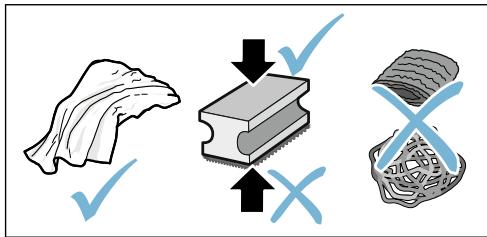
Please observe the following information to ensure that the different surfaces are not damaged by using the wrong type of cleaning agent.
Do not use:
Harsh or abrasive cleaning agents.
Any cleaning agents containing alcohol or spirits.
Hard scouring pads or sponges.
Notes
- New sponge cloths may contain salts. Salts can cause rust film on stainless steel. Wash new sponge cloths thoroughly before use.
Always remove any limescale, residues of coffee or milk, cleaning or descaling solution immediately. This residue may cause corrosion.
Caution!
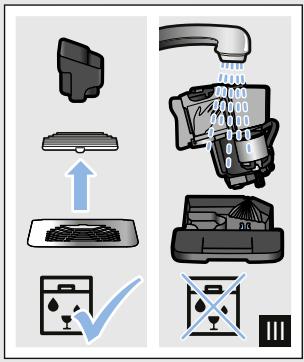
Not all of the appliance's components can be cleaned in the dishwasher.
Fig. 5 - 7
Not dishwasher-safe:

Water tank
Cover for water tank
Aroma lid
Brewing unit
Drip tray
Dishwasher-safe:

Drip plate
Drip grate
max. 60^
Coffee grounds container
Float
Milk frother
Cover for milk frother
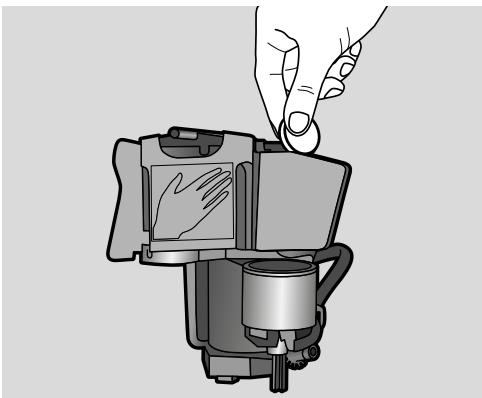
Cleaning the appliance
- Wipe down the outside of the appliance with a soft, damp cloth.
- Clean the control panel using a micro-fibre cloth.
- Wipe down the coffee dispenser if required after dispensing each beverage.
Notes
If the appliance is cold when switched on or if it is switched off after dispensing coffee, it rinses automatically. The system is therefore self-cleaning.
If the appliance has not been used for a long period of time (e.g. while you are on holiday), clean the entire appliance thoroughly, including the milk frother, trays and brewing unit.
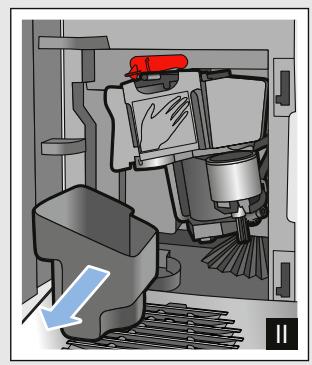
Cleaning the drip tray and coffee grounds container
Fig. 5
Note: The drip tray and coffee grounds container should be emptied and cleaned every day in order to prevent deposits. With frequent use also empty from time to time as soon as the float is clearly visible if or the relevant symbol lights up.
- Open the door.
- Pull the drip tray with the coffee grounds container forwards and out.
- Remove the drip plate with grate.
- Empty and clean the drip tray and coffee grounds container.
- Wipe out the inside of the appliance (area of drip tray).
Cleaning the milk system
The milk system must be cleaned after each use to remove residues.

Warning
Risk of burns!
The milk frother gets very hot. Hold only by the handle. After use, let it cool down first before touching it.
- Fill a glass half-full with water and place under the outlet system.
- Push the milk frother right down.
- Touch the milk button to clean the milk system.
- Push the milk frother right up and allow it to cool down.
- Dismantle the milk frother into its individual parts and clean thoroughly.
Fig. 6
- Dry the individual parts, reassemble and fit back onto the appliance.
Notes
To stop the process before the end, touch milk again.
All parts of the milk system should be cleaned in the dishwasher. Detergent residues in the milk system must be thoroughly removed following the rinsing process.
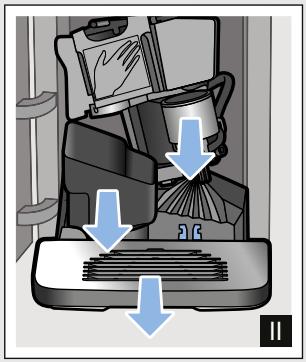
Cleaning the brewing unit
Fig. 4, Fig. 5
In addition to automatic cleaning, the brewing unit should be removed regularly for cleaning.
Caution!
Clean the brewing unit without detergent or products containing vinegar or acid and do not place in the dishwasher.
Remove the brewing unit:
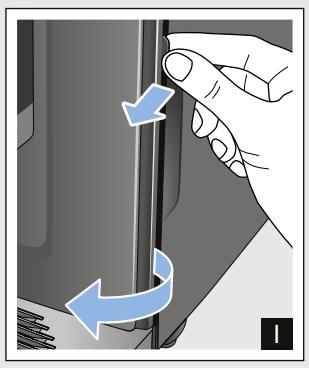
- Switch off the appliance.
- Open the door to the brewing chamber.
- Remove the coffee grounds container.
- Push the red lever up, grasp the brewing unit by the handle and pull forwards carefully.
- Rinse the brewing unit thoroughly under warm, running water.
- Clean the interior of the appliance thoroughly with a damp cloth, removing any coffee residues.
- Allow the brewing unit and the interior of the appliance to dry.
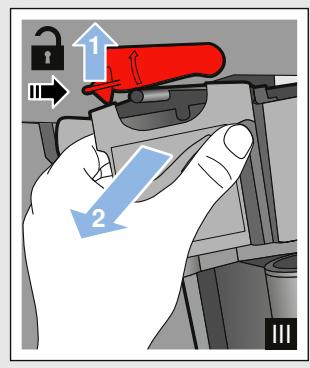
Insert the brewing unit:
- Hold the brewing unit only by the handle.
- Push the red lever up, position the brewing unit underneath and slide back as far as it will go. The lever must snap into place.
- Insert the coffee grounds container again and close the door.
Important: If the brewing unit has not been inserted, or the brewing unit or drip tray not inserted correctly, it will not be possible to close the door.

Service programme
The calc'nClean button will light up every so often, with the exact frequency depending on the water hardness and usage of the appliance.
The appliance should be immediately cleaned and descaled using the programme.
Notes
Important: If the appliance is not cleaned and descaled in good time, it may be damaged.
Caution! For each of the service programmes, use Calc'nClean descending and cleaning agents as described in the instructions and observe the (relevant) safety information.
Do not drink the liquids.
- Never use citric acid, vinegar or any vinegar-based agents to descale the appliance.
For cleaning and descending, only use the tablets intended for such purposes. They have been specially developed for this appliance, and new stocks can be ordered through customer service. "Accessories" on page 11
- Never insert descending tablets or other products into the brewing unit.
- Never interrupt the service programme.
Prior to starting a service programme, remove, clean and re-insert the brewing unit. Clean the milk frother.
At the end of a service programme, wipe down the appliance using a soft, damp cloth to immediately remove any descaler residue. This residue may cause corrosion.
- New sponge cloths may contain salts. Salts can cause rust film on stainless steel, so cloths must always be washed out thoroughly before use.
Using a water filter increases the intervals until a service programme needs to be performed.
If the service programme is interrupted, e.g. by a power failure, and calc'nClean will light up.
Then proceed as follows:
- Rinse out the water tank.
- Pour in fresh, still water up to the "max" marking.
- Touch the calc'nClean button. The programme starts and rinses the appliance.Duration: approx. 2 minutes.
- Empty, clean and re-insert the drip tray. Close the door.
The programme has finished. The appliance is ready for use again.
Starting Calc'nClean
Duration: approx. 40 minutes
- Press and hold the calc'nClean button for approx. 5 seconds.
symbol lights up. - Open the door, remove the drip tray and coffee grounds container and empty.
- Remove and clean the brewing unit.
- Place a Siemens cleaning tablet in the brewing unit and re-insert the unit.
- Re-insert the drip tray and coffee grounds container and close the door.
symbol lights up. - Remove the water filter (if there is one).
- Pour 0.5 litres of lukewarm water into the empty water tank up to the mark and dissolve a Siemens descaling tablet in it.
- Re-insert the water tank and place a large container (approx. 1 litre) under the outlet system.
- calc'nClean flashes, touch calc'nClean.
The programme starts, cleans and descapes the appliance. calc'nClean pulses. Duration approx. 20 minutes.
symbol lights up.
-
Empty the container, open the door, empty the drip tray and re-insert.
-
Close the door and place a container under the outlet system.
symbol lights up. - Clean the water tank and replace the water filter (if removed).
$$ \longrightarrow \text {F i g .} 7 $$
- Fill with fresh, still water up to the "max" mark. Place the container under the outlet system again.
- calc'nClean flashes, touch calc'nClean.
The programme starts and then cleans and rinses the appliance. calc'nClean pulses.
symbol lights up.
15. Empty, clean and re-insert the drip tray and coffee grounds container. The programme has finished. The appliance is ready for use again.

Trouble shooting
Faults often have simple explanations. Before calling the customer service,
please refer to the fault table and attempt to correct the fault yourself.
Please read through the safety information at the beginning of these instructions.
Fault table
| Problem | Reason | Remedial action |
| The appliance no longer responds. | Fault in the appliance. | Pull out the mains plug, wait 5 seconds, plug it back in. |
| Coffee or milk froth quality var-ies considerably. | Build-up of limescale in the appliance. | Descale the appliance in accordance with the instructions. |
| The individually selected per-cup quantity is not reached. | The grinding level is too fine. | Set a coarser grinding level. |
| Coffee dispensing slows to a trickle or stops completely | Heavy build-up of limescale in the appliance. | Descale the appliance as described in the instructions. |
| Air in the water filter. | Immerse the water filter in water until no more air bubbles escape, then insert the filter again. | |
| The quality of the milk froth var-ies. | The quality of the milk froth depends on the type of milk or the plant-based alternative used. | Optimise the result by selecting your milk or plant-based alternative as appropriate. |
| No coffee dispensed, only water. | An empty bean container is not detected by the appliance. | Add coffee beans Note: The appliance will adjust to the coffee beans on the next dispensing process. |
| The coffee shaft on the brewing unit is blocked. | Clean the brewing unit. → "Cleaning the brewing unit" on page 20 | |
| Beans are not falling into the grinding unit (beans too oily). | Gently tap the bean container. Possibly change the type of coffee. When the bean container is empty, wipe it with a dry cloth. | |
| Coffee has no "crema". | Unsuitable type of coffee. | Use a type of coffee with a higher pro-pportion of robusta beans. |
| The beans are no longer freshly roasted. | Use fresh beans. | |
| The grinding level is not suitable for the coffee beans. | Set a finer grinding level. | |
| The coffee is too "acidic". | Grinding level set too coarse. | Set a finer grinding level. |
| Unsuitable type of coffee. | Use a darker roast. | |
| The coffee is too "bitter". | Coffee is ground too fine. | Set a coarser grinding level. |
| Unsuitable type of coffee. | Change the type of coffee. | |
| The coffee tastes "burnt". | Coffee is ground too fine. | Set a coarser grinding level. |
| Unsuitable type of coffee. | Change the type of coffee. | |
| Milk/blended milk drinks too hot.Milk froth too thin, loud sucking noise. | Too little milk in glass or cup. | Use more milk or adjust frothing time. |
| Milk/blended milk drinks too cold. | Too much milk in glass or cup. | Use less milk or adjust frothing time. |
| No milk/milk froth dispensed. | The milk brother is soiled.The milk brother is not inserted in the milk. | Clean the milk brother in the dishwasher. → "Cleaning the milk system" on page 20.Use more milk, check whether the milk brother is inserted in the milk. Slide the outlet system right down. |
| The water filter does not stay in position in the water tank. | The water filter is not mounted correctly. | Immerse the water filter into water until no more air bubbles escape; insert the filter again.Firmly press the water filter straight down into the tank connection. |
| Several buttons flashing, a loud noise can be heard. | Water tank missing or wrongly inserted. | Insert water tank correctly. |
| Water dripped onto the inner floor of the appliance when the drip tray was removed. | Drip tray removed too early. | Wait a few seconds after the last drink was dispensed before removing the drip tray. |
| The brewing unit cannot be removed. | The brewing unit is not in the removal position (e.g. frost protection activated). | Switch the appliance on again. |
| The appliance cannot be operated, LEDs lit up or flashing. | The appliance is in demo mode. | Hold button for at least 5 seconds to deactivate demo mode. |
| The grinder will not start. | The appliance is too hot. | Wait 1 hour so the appliance can cool down. |
| LED flashes. | The door is not properly closed. | Press the door firmly closed. |
| The appliance is too hot. | Wait 1 hour so the appliance can cool down. | |
| LED lit up despite empty drip tray - what to do? | Emptying is not detected when the appliance is off. | When the appliance is switched on, remove and re-insert the drip tray. |
| LED lit up despite water tank being full. | Water tank wrongly inserted. | Insert water tank correctly. |
| Carbonated water in the water tank. | Fill the water tank with fresh tap water. | |
| Float is stuck in the water tank. | Remove the water tank and clean thoroughly. | |
| New water filter not rinsed according to the instructions. | Rinse the water filter according to the instructions and then switch on. | |
| Air in the water filter. | Immerse the water filter (opening up) in water until no more air bubbles escape; insert the filter again. → "Inserting or replacing a water filter" on page 16 | |
| Water filter is old. | Insert a new water filter. | |
| Limescale deposits in the water tank can block up the system. | Thoroughly clean the water tank and start calc'nClean. → "Calc'nClean service programme" on page 22 | |
| LED flashes and all beverage LEDs flashing. | Water tank is missing or not inserted correctly. | Insert water tank correctly. |
| The pipe system in the appliance is dry. | Insert water tank correctly. Fill the water tank with fresh tap water. Do not fill with carbonated water. | |
| Air in the water filter. | Immerse the water filter (opening up) in water until no more air bubbles escape; insert the filter again. → "Inserting or replacing a water filter" on page 16 | |
| All LEDs flashing. | Incorrect voltage in building. | Only operate the appliance at 220V-240V. |
| and calc'nClean LEDs flashing. | The ambient temperature is too cold. | Operate the appliance at temperatures >5°C. |
| and ①②③ LEDs flashing. | Brewing unit very heavily soiled or brewing unit cannot be removed. | Clean brewing unit if possible and switch appliance off and back on again. |
| ①②③ LEDs flashing. | Fault in the appliance. | Restart appliance. |
| calc'nClean and light up. | The descaling process has been interrupted. | Continue the descaling process. → "Service programme" on page 21 |
| Display "calc'nClean" keeps on appearing. | The water is too hard. | Insert water filter and activate according to the instructions. → "Water filter" on page 16 |
| If you are unable to solve the problem, always call the hotline. You will find the telephone numbers at the back of these instructions | ||

Customer service
Technical data
| Power connection (voltage - frequency) | 220–240 V ~, 50/60 Hz |
| Power rating | 1300 W |
| Maximum static pump pressure | 15 bar |
| Maximum water tank capacity (without filter) | 1.3 l |
| Maximum capacity of the coffee bean container | ≈ 250 g |
| Length of the power cable | 100 cm |
| Dimensions (H x W x D) | 37.3 x 24.9 x 42.8 cm |
| Weight, empty | approx. 8-9 kg |
| Type of grinder | Ceramic/steel |
E number and FD number
When calling us, please give the full product number (E no.) and the production number (FD no.) so that we can provide you with the correct advice. These numbers can be found on the rating plate 8. ( Fig. 2)
To save time, you can make a note of the data for your appliance and the telephone number for customer service here, should this be required.
E no.
FD
Number
Customer service
The contact data for customer service in all countries can be found at the back of these instructions.
Guarantee
The guarantee conditions for this appliance are as defined by our representative in the country in which it is sold. Details regarding these conditions can be obtained from the dealer from whom the appliance was purchased. The bill of sale or receipt must be produced when making any claim under the terms of this guarantee. Changes reserved.
Table des matieres

cappuccino, latte macchiato of milk
PnIroTOBJIeHHe KOeHOrO HaNTKa n3 CBExKeMOJToBix KOeHbIX 3epeH . 129
PnroTOBJIeHHe HAnITKOB C MoJOKOM. 129
I3MeHHeYcTaHOBOKДЯHaHNTKOB 130
ΦnIbTpДЯВOДы 132
3aunTa oT 3amep3anr. 132

UcTaHOBKn 133
ABTOMaTnueckoe OTKIIOUeHne 133
BkJIIOUeHne IN BbIKJIIOUeHne 3ByKOBOrO cnHaHa .133
YcTaHOBKa JecTKOCTN BOJbl. 133
Bo3BpaT K 3aBODcKIM HaCTpoiKaM .. 134

EeHHeBHy yXoH uOChTka . 135
YnCTraIe e cpeIcTBo 135
OuicTka npnbopa. 136
OuNTKa POnDoHa N EMcKoCTN DnI KofeHNo Tuyu. 136
OuNTka cncTeMbI nOaun MoNoka...136
OuicKa 3aBapouHoro 6loka.137

CepBnchna nporpaMa 138
3anyck nporpammbi Calc'nClean . . .139

UTo DeIaTb B Cnyae HencnpaBHOCTn? 140

Cnyk6a cepBnca 144
TexHnueckne xapaKTepeNCTnKn 144
Homep E n Hoome FD. 144
YcnoBna rapaHTnHOro
O6CnyKuBaHn .144

Anachoctb, CBaHnaC MaHnTHbIM NOJEM!
Прибор содержNT NOCTОньМагНИТ, KOTOPыМожETBO3ДeICTBOВaТьHa3JIeKТрОньгБЕ ИМПlaHTaHTbI,HaNPIMep,KapДиNOCTIMуЛЯTOрБИNHСУЛINHOВБIE NOMпБ.I.ПриHAJIчИВ OРГАн3Me3JIeKТрОнHOrO IMПlaHTaHTaHeJIb3Я ПрибOLINЖаTbCЯКПрибОpopY I BbIHyTOMype3ePByapy ДЯ ВODы Блжke,чem Ha 10 cm.
Anachoctb yduyba!!
He pa3pewaIte DeTAM nIgpaTb C ynaKOBKO. XpaHnte MeIknne DeTaJI N B HaIeXHOM MecTe, TaK KaK pe6eHOK MoKeT INX InpOrIOTnTb.
!PpeDynpexKdeHne Onachoctb oXora!!
CnCTema nOdaun MOJOKa CTaHOBNTc8 OueHb TOpraYe. Pocne nCpOJIb3OBAHn CHaUaJa DoXdIITecb OXlaJxDeHnCnCTeMb1, Ipejde yem 6paTbc 3a Hee.
После рабы пибopa erо
ПоверхноCTN MOуTВ
Тechен HeKOTOPO
ВрemeH N OCTaBaTbC
Торчим.
CBeJKePnIroTOBJeHHbIe HAnITKn OueHb IopYcne. EcIn NOTpe6yEtC, daTHe HEMHO OCTbITb.
Haayano pa6oTbI c npH6Opom
YcTaHOBka KaIyUHaTopa
Pnc. 3
- BbIbTe qactn kanyuHaTopa n3 naKeta.
- BbInOnHIne c6OpKy kanyuHaTopa.
- YctaHOBNTe KanyuHaTOp cnepei Ha npu6ope.
HanoJIHeHne emKocTn JIa KoOeINbIX 3epeH
B npu6ope MOxHO pnproTaBnBaTb KoepHbIe HAnITKn 3KoepHbIX 3epeH.
- OtkpoTe KpbIshky 10 emKoCTnДЯ KoPeHbIX 3epeH 11.
- 3a rpy3nTe KopeHbIe 3epHa.
- Choba 3aKpoTe KpbIshky.
Yka3aHHN
「Tla3npoBaHHbIe, KapaMeJIIN3OBaHHbIe IINoO6pa60TaHHbIe IpyrIMN COJepKaaUIMM caxap IO6abVKamN KOFeHbIe 3epHa IpiBODaT K 3a6NBKe 3aBapOuHOro 6Ioka. NcNoJIb3yIte TOLbKO CMECN KoFeHbIX 3epeH, IpeJHa3NaueHHbIe IJIA IIOJIHOCTbIO aBTOMaTHueCKo KQfemaUNHbI.
Pn INCPOIb3OBAHmN KoFeeHbIX 3epeH BblIOJIHReTcN IX CBexN IOMoJ IJIa KaKdoBapKn.
XpaHnte KofoeHbIe 3epHa B npoxlaHOM MeCTe N B 3aKpbITbIX EMKOCTAX IJIY ONTUMaJIbHOcoxpaHeHn IX KauecTBa.
B éMKoCTn Дя КофeиHbIx 3epeH KOfeyHbIe 3epHa MOxH0 XpaHNTb B TeueHne HeCKoJIbKInx DHei 6e3 IOTepn apomata.
HanoJIHeHne pe3epByapa Ia BOJbl
BaxHo: EKeJHeBHO 3aJIbAaiTe B pe3epByap dIa IBObl CBexyIO XoIoDHyIO BOdy 6e 3yIkeKncIoTbl. IpePeI 3KcIIpyatauneI npIbopa npOBepbTe, IOCTaTOUHO IIN HApONHeH pe3epByap dIa BObl.
- CHIMITE KpbIuKy pe3epByapa IJBAObl.
- Понимпе за ручку и помоштуpeзервар дя воры.
- 3aJIeIte BOyB pe3epByap IJIY BOIbI DO OTMeTKn «max»
- BCTaBbTe pe3epByap ДЯ BAДы пямов ДЕржаTeьи YcTaHOBnTE KpbIшКу pe3epByapa ДЯ BAДы.
O6uHne yka3aHHa
Ha 3aBoJe-n3rOToBnTeJe 3aInpoPramMnPOBaHbI CTaHdapTHbIe HAcTpoKn, OBeCneuNBAIOUne ONTImaJIbHbI peKIM paObTbI aBTOMaTIueCKo KOpEbApKn.
IIO nCTeueHn 3aHaHHOro BpeMeHN npi6Op aBTOMaTHueCKN BbIKJIHOaETCA.
Ppi KaacHnn JIObO KNOHKn pa3daeTc3ByKOBoCnHaJI, KOTOpBIMoKHO BbIKJIOuHTb. "YCTaHOBKN" Ha cTpaHnua 133
PnI nepBOM IcNoJIb3OBAHnI npI6opa, nocJe BblIOJIHeHnI CepBnCHOI npOrpaMMbl NII NOCJe DInTeJIbHOI nepepbIBa B pa6OTE apOMaT HAnITKa B nepBOJ yauKe He packpblBaETCnB IOnHOH Mepe, IN 3TOT HaNITOK PNTb He peKOMeHNyETcR.
После начала paobToI npi6opaMeJIKOnOpNCTaR,КрЕМОБpa3HaJ KOhCINCTeHcUЯ ПeHbI DoCTnIraETCa TOLbKO IocLJe pIruTOBJIeHnI HeCKOJIbKIn YaIeK.
PnI dIITeHbOM IcIOJIb3OBAHIN RAJIaETCA HOpMaJIbHbIM, YTO Ha BEHTUNLAIOHHbIX OTBepCTINAX O6pa3yOTc KaIeJIbKN BOJbl.
BbIXoI npa oOcIobJIeH KOHCTpyKUneI npIObaI N He YBJIaETcH HeINcPpABHOCTbIO.
IpepeTEm, KaH NaatbNoJIb3OBAtbcra HOBbIM pnpoPOM, npOBepbTe N UCTaHOBNTe XECTKOCtB BOiI. "YCTaHOBKn" Ha cTpaHnca 133

YnpaBJIeHne 6bITOBbIM npH6Opom
B daHHoI rIabe OnUcaHO npriroTOBHeHne KOeMHbIX MMOUChbIX HAnITKOB. OnicaHbI TaKxE yCTaHOBKn Pnp6opa, IcNoJIb3OBAHne FInbTpA dIra BObl, I3MeHeHne CTeNEH NOMOJa, a TaKxE 3aUHTa OT 3aMEp3aHnR.
Yka3aHHe: CBeXePnIroTOBJeHHbIe HAnITKn MOrTy 6bITb OChEh TOpRyIMN.
PnHroTOBJIeHne KoΦeHOrO HAnHTKa n3 CBExMeMOJToBIX KoΦeINbIX 3epeH
BbMOxKeTe BbIpaTb Espreeo nnCaffe crema. "PpuroToBneHne HaNTKOB C MOJOKOM"Ha cTpaHnua 129
PnboB BKIOUeH. Pe3epByap IJI BODI N EMKoCTb IJI KOpeHbIX 3epeH HANOJIHeHbI.
- NocTaBbTe YauKy IOn DInCpeHcep.
- KocHyBUnCb HeCKoJIbKO pa3 000, yCTaHOBInTe HUxKHyIO KpeIOcTb KoPe.
- KocHTecb KHOPIKn especco nn caffe crema.
KoepaBapKa CBAPNT KoPe n 3aTeM HaJIbeT erO B YaShKy.
Yka3aHHe: YTo6bI npexKDeBpeMeHHO 3aKOHHTb pInrTOBJIeHne HAnITKa, CHOBA KOCHTecb espresso IINn caffe crema.
KanyuHaTop yctaHOBJIeH.
- Hanelte B boIbIyU qaIcku IIN 6oIbIoC takaH npI6I. 100 Ml MOLOka IJN KAnyuHIO n pI6I. 150 Ml MoLOka IJN NaITe MaKNaTO.
- Постаьтей чашky пл стакан под диссентер.
- Onyctnte dinncnHcep dny KoFe n KaanyuHaTOp Do yNopa BHN3.
- KocHyBUnCb HeCKoJIbKO pa3 000, yCTaHOBInTe HUKHyIO KpeIOcTb KoOfe.
- KocHTecb KHONKc cappuccino IJI latte macchiato.
Chauana BCneHnBaETc MoIOKo B yaIke IIN CTaKaHe. 3aTeM 3abapuBaETc KoFe I pa3JIbAeTcB YAshky IIN CTaKaH.
Yka3aHHe: YTo6bI npexJdeBpeMeHHO 3aKOHuHTb DaHHb I3TaN IpNiTOBJIeHHa HAnITKa, CHOBa KOCHTec b cappuccino IIN latte macchiato.
BcneHbHaHe MoJoka
PnboB BKJIOueH. Pe3epByap HanoJIHeH. KaanyHaTop yCTaHOBJIeH.
- Hane Te B 60JIbUyO yauKu nn 60JIbIoW CTaKaH npNoI. 100 Mm MOJIOka.
- Пocтавытушку пи CTаKaH NOД ДИССЕнсер.
- Onyctnte dinncnHcep IЯ KoFe n KaNYuHHaTOp Do yNopa BHN3.
- KocHTecb KHONKn milk.
Прибор BCпениBaet MOLOKO.
Yka3aHHe: YTo6bI npexJeBpeMeHHO 3aKoHHTb IpOceCC, CHOBa KCHNTecb milk.
I3MeHeHne yCTaHOBOK JIA HAnHTKOB
Kpenoctb Kofoe
IpeeTeM, KaK paZnITb HAnITOK, MoXHO yCTaHOBNTb KpeNoCTb KoPe.
ДлЯЗТOrO,KOKHyBшись 000,ВыбepиTe HУЖHyI O KpeNoCTb.
Yka3aHHe: YcTaHOBJIeHHa KpeNoCTb KOFe DeIeCTBNTeJIbHa IJa BCex KoFeiHbIX HAINTKOB.
KolnuectBO HanNTka
BbMOxKeTe N3MeHnTb KOJIuYeCTBO npIroTaBnBaEMOHO HAnITKa.
YdepnBaIte HaxaToI esppso nI I I I I I I I I I I I
NIDeT pnproTOBJIeHne HAnITka, BbIpaHHaKHOIIKA Mmraet.
Iocne TOrO, Ka6yDet DoCTnHyTO HJxHoe KOJIueCTBO HAITKa B YaShke, KCHNTecb KHONK, YTObI NpeKpaTtB npoeecc. YcTaHOBLeHHOE 3aHOBO KOJIueCTBO HAITKa peAJIIN3yETc, TOJbKO HaunHa CO CJeDyUoEro PnIroTOBHeHn HAITKa.
Yka3aHHe: MoXHO yCTaHOBnTb
KoJIuYeCTBO HAnITKa IdIg EsPso (25-60 mI) nIi Caffe crema (80-200 mI).BceIgIa npIrOToABInBaETcMNIHMaJIbHoE KoJIuYeCTBO,EsPso npIb.25 mI n Caffe crema npIb.80 mI.
ДиNTeJIbHOCTb BCПЕнИВанЯ
BbMOKeTe n3MeHHTb dIITeJIbHOCTb BCHeHbAHnHaNTKa.
YdepxkBaTe HaKaToI cappuccino, lattemacchiato milk B TeueHne 3 CeKyHd.
MOJOKO BCNEHnBaETc, BbIpaHHaKHOPIKA Mmraet.
Iocne TOrO, KaH NyxHnAa DInTeJIbHOCTb BCHeHnBaHnB 6yDeT DoCTnHyTA, KOCHNTecb KHOJKN, UTObI PpeKpaTnTB npouceC.
Yka3aHHe: YcTaHOBkaДЛNTeJIbHOCTN BCNEHnBaHnI He BnIeT Ha KOJIuYeCTBO KoΦe.
YctaHOBka CTeneHn NOMOJa
DaHHbI npnbop o6obpyoBaH peryunpyemoi KoemolKo.3To IO3BOJARENHNiBnDyalbHO 13MeHrTb CTeneH NOMOJa Koe.
!IpeDynpexKdEHe
Onachoctb TpaBMPOBaHnI!
He npikacaiTecb K BVHTpeHHm Yactam KoΦeMOJIKN.
BHHMaHHe!
Bo3MOxHbI NOBpeKdEHHa Ipi6Opa! CTepeHb IomOna MoXHo peYunIpoBaTb ToJIbKO pRn pa6OtaIOUeI KOfEmolKe!
Pnpa6oTaHouSei KofoemolKe yCTaHOBnTe IOBOPOTbIM IpeKJIuOHaTeJeM 12 CTeNEHb NOMOLA.
ToHKnI pOMoJI:BpaUeHne npOTnB yacOBoi CTpeJIkn. (Pnc.a)
Boile rpy6bI nOmoI:BpaUeHne no yacobOn cTpeKe. (Pnc. b)
Yka3aHHa
IzhmeheHHe HactpoiK6bJET 3aMeTHOJIuMbHaunHae Co BTOPOJuaIKKOfe.
Длг TemHbIXЖарeHbIXKoФeINbIX 3epeh Bbl6epuTe 6OJIe MeIKNI NOMOI,Длг 6OJIe CBETbIX 3epeH - 6OJIe KpyINbI NOMOI.
ΦильТР ДЛЯ ВОДы
Pnc. 7
ФильтprДЯВОдblСнИжаETOBaHHe NaKINiA taKxBe B3HaunTeJbHOn Mepe OuNlaeT BOу OT 3aRpa3HeHn. Kpome TOrO, He HUxHO TaK YacTo ydaJIraTb HaKINb n3 Pnp6oPa.ФиьТрblДЯ BOdbl MOxHO npNo6peCTN B MaRa3nHax IIn Ypee3 CepBnCHyIO CnyK6y.
EcIn BCTaBHeN qHbTp DnI BObl, np6op cnHaHn3npyeT, KOrda eRTOpe6yETc3aMeHNb.CmMBoJ Mmraet.
YcTaHOBKa HJIN 3aMeHa FJIbTp a JIy BOJbl
IpeepnCNoJIb3OBAHnEMHOBOrOΦnJIbTpapdIyBOJbIeHOHyXHNOIpOMblTb.
Pn6op BkIoueH. Pe3epByap HanoJIHeH.
- YdepxkBaIte HaKAtbIMn 000 n calc'nClean OJHOBpeMeHHO B TeueHne MInHMym3 CeKYHd.
- KocHTecb KHONKn espresso, OTKPOETcMeHIO «JKeCTKOCTb BOIbI».
- KocHTecb KHOPIKU OOO N BbIOJIHNTe CLeIyUOuYU yCTaHOBKY:
000
CΦnIIbTpOMДIЯBOIbI
4.Погу3nteФиЛьТрДЯВОды (OTBерстNiEM BВЕрX)ВHAПОЛHeHHbI BOДОКоHTeHepИ OCTaБTeВ HeM, NOKa He ПпекраNTСЯВыOXOD Пу3ыIPьКOBBO3Дуxa. →Pnc.7
5. После зтого почно BCTаьte Фильту Дли BAДыВпустон pe3epByap Дли BAДы.
6. 3aJIeIte BOyB Bpe3epByap IJIA BOIbI DO OTMETKII «max»
7. Повпставытей EMKоctь оььемOM Mнимуm 1,0 пд дисн cap.
8. KocnHtecb KHOpIKn especco, yTo6bl COxpaHHTb yCTaHOBky 3aJeNCTBOBaTb IpoUeCC pOMbIBKN.
9. YCTaHOBInTe KOHTeINHeP DnIy BOJbl.
10. KocHTecb KHONKn especco, yTO6bI coXpaHNTb yCTaHOBky 3aNyCTntb npOceC ppomblBkn. Boga Teet uepe3 fnilbTp.
- KOCHTECb KHONKn calc'nClean, yTO6bl BbIITN I3 MEHIO.
12.По OkOHuaHnOOnOpOxHnTe EMKoCTb. Пибор сHOBa rToTob K paBoTe.
H3BneHHe ΦnIbTpA dJa BOJbl
Ecnn nIbTp IJI B0Bbl BbIHyt N HOBbI
nIbTp IJI BA0Bbl HE BCTaBJIeH,
yCTaHOBNTe JKeCTKOCTb BOBbl.
"YcTaHOBka JceCTKOCTN BOIDI" Ha cTpaHnca 133
3auntata OT 3aMep3aHnA
UTo6bI u36eKaTb IOBpeJdeHn B pe3yJIbTaTe BO3JeCTBnXOJOna BO BpeM TpaHCnOpTnpOBKn UIn XpaHeHn, npioop Heo6xOdmo IppeDbapntelbHO IOnHOCTbIO ONOPOXHNTb.
HhOpmaun. Pnpoep DOnJKeH 6bITb rTOB K pa6Ote, pe3epByap dIy BOdbi HanoJIHeH.
- Постаьтей по диссентер Калун Hatopa EMKOCTB 60льшогуразмера и onyctnte BHH3 Калун Hatop.
- YdepnBauTe HaKaToI KHOIpKy milk MInHIMym 5 ceKyHd. CBeTOIOJ KHOIpKu Mmraet, BbIOJIHHReTcpa3OgpeB npioopa.
- KaK TOnbKO n3 KaIyUnHaTopa NaHET BbIXOДNTb Nap, CHIMITE pe3epByap ДЯВОДbl.
- BbIopJIHaETcI npOeCC npOpapINBaHn npIbopa. IIOJoxdnte, noka CmB0J 5 N BCE CBTeODIOdb HaCyHT MmRaTb.
- KhoIkoBbIKHouTe npioop.
- OnopoxHNB pe3epByap IJRA BOblI NIOJIOH, TtAteJIbHO ONUCTNTe npnbop. Tepeb MOKHO TpaHCnOpTnpOBaTb npnbop IIN yCTaHOBNTb eO Ha xpaHeHne.
Yka3aHHe: 3aBapOuHbI 6Jok 3a6JIOKIpOBaH n He BbIHMaeTcA.

YctaHOBKN
B npnbope BbIIOJIHeHb pa3JIuHbIe 3aBOdCKne HAcTpoKn. HAcTpoKn npnbopa MOxHO peRyIIpOBAt b INDINBIDyaJIbHO.
Yka3aHHe: EcnB TeueHne 90 cekyHn Hn Onda HKHOJOK He bdyet Haxkata, npnbop nepexoNT B pexkM Bb6opa Hapntka 6e3 coxpaHEn HaCTpoek. CoxpaHEnHble do 3TOHO HAcTPOKn He MeHraOTcA.
Moxho BbIIOJIHHITb CJIeIyIOUne HAcTpoiKN.
ABTOMaTHueeCHOE OTKJIIOUeHHe
IIO nCTeueHn ONpeJeJIeHHOro BpeMeHn IocJIe IocJIeJHeRo KacAHnK HOnIKn IprbOp aBTOMaTHeCKN BbIKJIouaETcR. 3TO BpeM MoXHo YcTaHOBnTb, PInuem BO3MOxHa yCTaHOBka O T 15 MmHT Do 4 yaCoB.
- YdepKnBaIte HaKaTbIMN Ooo n calc'nClean OJHOBpeMeHHO B TeueHne MInHMym 3 CekyHd.
- KocHTecb KHOPIK cafe crema, OTKPOETcH MEHIO «ABTOMaTHueCKOE BbIKJIIOUeHHe».
- KocHTecb KHOPIKU OOO uYCTaHOBNTe HxKHOe BpEmr. Bo3MOXHbI cJeDyUOUIne HaCTpoiKn:
BkJIIOUeHnE n BbIKJIIOUeHne 3ByKOBOrO cnHaJa
He npiroDhblnMbITbB NocydomoeyHmMa-

Pe3epByap DnI B0bl
KpbIshka pe3epByapa IaI BObl
Kpbilka, coxpannoiopaomat
3abapouhnyb6l0K
ПОДДОН
PnIroHbI JJI MaBITbB NOCyDOMOeHON MaHINHe:

Лоток дд сбора каль
Pewetka
EMKoCTbIaI KoPeHoi ryu
MaKc. 60°C
Пплавok
KanyuHaorop
Kpbuika kanyuHaTaTopa
OuHcTka npH6opa
- ПострптЕ Корпс Мяков Влжно.TkaHbH.
- OuInCTnTe NaHEnIb ynpaBLeHnMnKpOΦn6pOBoN caJΦeTkoN.
- Ecni nOtpe6yEtca, npotupaTe IncnHecep dIa KoPe nOcJIe KaKDoRo npuToTOBLeHn HAnITka.
Yka3aHnA
EcIn npBOp BkIIOuAeTcB XOJODHom COCToHHN INI BbIKIOUaEc TIOCJIe IpiIroTOBJIeHn KoFe, IpOMbIBKa Ipi6opa IIPOIN3BOIDITcA bTOMatNueckn. TaKIM O6pa3OM, CNTema OUYIaEcTc CaMOCTOARTeJIbHO.
IpeepdIINTEbHbIMpepepbBOM B IcNoIb3OBAHN(HaPnMpE,peepo OTyckOM)CJeDyET TuaTeJIbHO OuNCTNTB BeCb npioOp, BKIOUaJ AnCpEncepIg KoPe, KaNyHHaTOp, YaShKn 3aBaOpuHbI OJOK.
OuHcTka POnDoHa N EMcKoCTN DJI KOFeHNoI rUsn
Puc. 5
Yka3aHHe: IOndoH n EMKoCTb DnI KOΦeHOrn Tpyu HUxHo ONPoOxHrTb N OUYuAtb KaKdBi DeHb BO N36ExKaHne CLOEb OTLoXeHn. Pn YactOM NcIOJIb3OBAHN HxKHO nepNoDiueCKN ONPoOxHrTb, KOrJa CTAHet OTyETnIBO BUnEH NpONlaBOK Nm 3aFOpNTc4 COOTBETCTByUoUsn CImBOJ.
- Otkpoite Dbepy.
- BbHbTe POnDoH C EMcOCTbIO DnIa KOpEiHOH rUzI, NOTaHHyB INX BnpeI.
- BbHbTe IOTOK dIa c6opa KaIeJIb cpeWetKoI.
- Onopoxhnte n ounctnte pOdoH n EMKoCTb dIa KofoHOr rUuN.
- Празпerte BHTpeHHee пoctpaHCTBO npibopa (В зоне пдюн).
OuHCTKa cHCTeMbI NOJaUH MOJOKa
CnCTemy NODaun MOJOKa CNeIyET OUYIaTb NOCLe KaJDoTO IcNIOJIb3OBaHIN JIyUdAJIeHINO OCTaTKOB.
!PpeDynpexJeHne OnachocTB oKora!
KanyuHaTOp CnIbHo HaRpeBaetc. BepTeCb TOnIbKO 3a pyUky.Pocne IcNoJIb3OBAHnI, npEeJeYem npINKaCaTbCn, DoXdNTeCb OxJaXKeHHa.
- HajeTe cTaKaH Do IIONoBnHb BODoI nOCTaBBte IOJ DInCneHcep.
- Onyctnte kaanyuHaTOp Do ynpa BHN3.
- KocHTecb KHONKn milk, BbIIOJIHReTcOYNCtKa CNTeMbI IOnaUn MOLOKA.
- Пондимпе КалунHaTOp Вьрх И дай Te EmY OCTыТь.
- Pa36epeHte KaIyUHaTOp Ha OTdIeIbHbIe DeTaIIN TtAteIbHO OuNCTHe. Pnc. 6
- BbCyuHnTe OTdIeNbHbIe IeTaJI, coBepnte INx IN BCTaBbTe ObpaTHO B npnbop.
Yka3aHn
TTo6bI npexdEBpeMeHHo 3aKOHHTb npouecc,CHOBa KCHNTecb milk.
Bce yactn cnCTembl IOdaun MOLOKa CJIeIyETMbITb B NOCyIDOMOEuHOn MaUNHe. Iocne IpombIKN TuaTeNbHO ydaIInTe OCTaTKMblbHOro pactBopa IN3 CNCTemblIOdaUnMOLOKA.
OuHcTka 3aBapouHoro 6Ioka
Pnc.4, pnc.5
ДононтельноК abTomatnueckоМоИke Нeoбхоюmo peуларho BbIHMaTb ДЯ ОчNTkn 3aBaPouHbI 6ЛOK.
BHHMaHHe!
- YCTaHOBnOB ObpaTHO NIOIHOH I EMKoCTb JIJI KOFeHON TgUIN, 3aKpOHTe JBePcy.
3aropaetcCIMB0J
6.ИЗВЛЕКИТЕФИЛБТРДЯВОДБI(приНалИЧИN).
7. Hanelte B nycto pe3epByap nla BOIbI TeNlIyO BOy Do OTMeTkn 0,5 I npactBOpnte B HeT Ta6IeTKy dIy ydaJIeHnHaKuIN Siemens.
8. BCTaBbTe o6paTHo pe3epByap IJNBAOblI NOIDcTaBbTe IOJ INCpeHcepEMKOCtB 60JIbIoo O6bema (npn6I.1).
9. calc'nClean MɪræT, Kɔchntecb calc'nClean.
Störungen, was tun? 164

Kundendienst 168
www siemens-home.bsh-group.com
AE 048030501
AL 0662064794
AT 0810550522
AU 1300368339
BA 033213513
BE 070222142
BG 029315062
CH 0434554095
CN 4008899999
Call rates depend on the network used
CZ 0251095546
DE 091170440044
DK 44898985
EE 06278730
ES 902118821
FI 0207510700
Calls charged at local or mobile rate
GR 18182 (Aotikn xpewon)
HR 013028226
HU 003614895461
IE 014502655
0.03 € per minute at peak. Off peak 0.0088 € per minute.
IL 08977222
IS 05203000
IT 800 018 346 (Line Verde)
LI 052741788
LU 26349300
LV 067425232
ME 050432575
MK 022454600
NL 0884244020
NO 22660600
PL 801 191 534
PT 214250720
RO 021 203 9748
RU 88002002962
SE 0771 11 22 77 (local rate)
SK 0244452041
SL 012007017
TR 4446688
AE United Arab Emirates,
BSH Home Appliances FZE Round About 13,Plot Nr MO-0532A
Jebel Ali Free Zone - Dubai Tel: 04 881 4401
mailto:service.euae@bshg.com www.siemens-home.bsh-group.com/ae
www.siemens-home.bsh-group.at
Gate 1, 1555 Centre Road
Clayton, Victoria 3168
Tel.: 1300 167 425*
Fax: 1300 306 818
mailto: aftersales.au@bshg.com
www.siemens-home.bsh-group.com/au
- Mo-Fr: 24 hours
BE Belgique, Belgie, Belgium
BSH Home Appliances S.A. - N.V.
www.siemens-home.bsh-group.com/be
BH Bahrain,
Khalaifat Est.
P.O.Box 5111
Manama
Tel.: 017400553
mailto:service@khalaifat.com
BY Belarus, Bénapycb
OOO“BCXБbITOBaTexHnka"
ten.: 495 737 2962
mailto:mok-kdhl@bshg.com
CH Schweiz, Suisse, Svizzera, Switzerland
BSH Hausgeräte AG
www.siemens-home.bsh-group.com/ch
CY Cyprus, Kuppo
BSH Ikiakes Syskeves-Service
39, Arh. Makaariou III Str.
2407 Egomi/Nikosia (Lefkosia)
Tel.: 7777 8007
Fax: 022 65 81 28
mailto:bsh.service.cyprus@
cytanet.com.cy
CZ Ceska Repubika, Czech Republic
www.siemens-home.bsh-group.com/cz
DK Danmark, Denmark
BSH Hvidevarer A/S
Telegrafvej 4
2750 Ballerup
Tel.: 44 89 80 28
BSH-Service.dk@bshg.com
www.siemens-home.bsh-group.com/dk
ES Espana, Spain
www.siemens-home.bsh-group.es
FI Suomi, Finland
BSH Kodinkoneet Oy
Italahdenkatu 18 A
PL 123
00201 Helsinki
Tel.: 0207 510 715
mailto:Siemens-Service-FI@bshg.com
www.siemens-home.bsh-group.com/fi
siemens-home.bsh-group.com
www.siemens-home.bsh-group.fr
GB Great Britain
BSH Home Appliances Ltd.
Grand Union House
Old Wolverton Road
Wolverton
Milton Keynes MK12 5PT
To arrange an engineer visit, to order spare parts or accessories or for product advice please visit www.siemens-home.bsh-group.com/uk Or call
Tel.: 0344 892 8999*
- Calls are charged at the basic rate, please check with your telephone service provider for exact charges.
GR Greece, EAA
BSH Ikiakes Siskeves A.B.E.
Central Branch Service
17 km E.O. Athinon-Lamias &
Potamou 20
14564 Kifisia
TnAeΦwvo:181 82
TnEΦwvo:2104277701
mailto: nkf-CustomerService@bshg.com
www.siemens-home.bsh-group.com/gr
HK Hong Kong, 香港
BSH Home Appliances Limited
Unit 1 & 2, 3rd Floor
North Block, Skyway House
3 Sham Mong Road
Tai Kok Tsui, Kowloon,
Hong Kong
Tel.: 2565 6151 (HK)
Toll free 0800 030 (Macao)
Fax: 25656681
mailto:siemens.hk.service@bshg.com
www.siemens-home.bsh-group.com/hk
IE Republic of Ireland
BSH Home Appliances Ltd.
M50 Business Park
Ballymount Road Upper
Walkinstown
Dublin 12
To arrange an engineer visit, to order spare parts and accessories or for product advice please call
Tel.: 01450 2655
www.siemens-home.bsh-group.ie
- Calls are charged at the basic rate, please check with your telephone service provider for exact charges.
IL Israel
C/S/B/ Home Appliance Ltd.
1, Hamasger St.
North Industrial Park
Lod, 7129801
Tel.: 08977222
Fax: 08 9777 245
mailto:csb-serv@csb-ltd.co.il
www siemens-home.bsh-group.com/il
IN India, Bharat,
BSH Household Appliances
Mfg. Pvt. Ltd.
Arena House,
Main Bldg, 2nd Floor
Plot No. 103, Road No. 12
MIDC, Andheri East
Mumbai 400 093
Toll Free 1800 209 1850*
www siemens-home.bsh-group.com/in
- Mo-Sa: 8.00am to 8.00pm
(exclude public holidays)
IS Iceland
Smith & Norland hf.
Noatuni 4
105 Reykjavik
Tel.: 05203000
Fax: 05203011
www.sminor.is
IT Italia, Italy
www.siemens-home.bsh-group.com/it
LB Lebanon, []
Tehaco s.a.r.l.
Boulevard Dora 4043 Beyrouth
P.O.Box 90449
Jdeideh, 1202 2040
Tel.: 01 255 211
mailto:Info@Teheni-Hana.com
LU Luxembourg
www.siemens-home.bsh-group.com/lu
MK Macedonia,Makeonna
GORENEC
Jane Sandanski 67 lok.3
1000 Skopje
Tel.: 02 2454 600
Mobil: 070 233 689
mailto:gorenec@yahoo.com
MT Malta
Aplan Limited
The Atrium
Mriehel by Pass
BKR3000 Birkirkara
Tel.: 025495122
Fax: 021 480 598
mailto:lapap@aplan.com.mt
NL Nederlande, Netherlands
www.siemens-home.bsh-group.com/no
PL Polska, Poland
www.siemens-home.bsh-group.pl
PT Portugal
BSHP Electrodomesticos,
www.siemens-home.bsh-group.com/pt
RO Romania, Romania
BSH Electrocasnice srl.
Sos. Bucuresti-Ploiesti,
nr. 19-21, sect.1
13682 Bucuresti
Tel.: 021 203 9748
Fax: 021 203 9733
mailto:service.romania@bshg.com
www.siemens-home.bsh-group.com/ro
RU Russia, Pocsn
OOO“BCXБbITOBbIePnp6Opbl
CepBnC OT npOn3BoNTeTn
MaJAR Kanycka,15
119071 MockBa
ten.: 8 (800) 200 29 62
mailto:mok-kdhl@bshg.com
www.siemens-home.bsh-group.ru
SE Sverige, Sweden
BSH Home Appliances AB
Landsvagen 32
169 29 Solna
Tel.: 0771 195500 local rate
Tel.: 0771 11 22 77 local rate
mailto:Siemens-Service-SE@bshg.com
www.siemens-home.bsh-group.com/se
SK Slovensko, Slovakia
www.siemens-home.bsh-group.com/tr
TOB "BCX NObyToBa TexHika"
ten.: 044 490 2095
mailto:bsh-service.ua@bshg.com
www.siemens-home.bsh-group.com/ua
XK Kosovo
Service-General SH.P.K
rr. Magjistralja Ferizaj Prishtine
70000 Ferizaj
Tel.: 00381 (0) 290 330 723
Tel.: 00377 44 172 309
mailto:servicegeneral527@gmail.com
ZA South Africa
BSH Home Appliances (Pty) Ltd.
15th Road Randjespark
Private Bag X36, Randjespark
1685 Midrand-Johannesburg
Tel.: 086 002 6724
Fax:0866171780
mailto:applianceserviceza@bshg.com
www.siemens-home.bsh-group.com/za
BSH Hausgeräte GmbH
siemens-home.bsh-group.com