
BKH 60 FO - Range hood BERBEL - Free user manual and instructions
Find the device manual for free BKH 60 FO BERBEL in PDF.
| Product Type | Range Hood |
| Brand | BERBEL |
| Model | BKH 60 FO |
| Width | 60 cm |
| Configuration Method | Berbel remote control or Berbel app |
| Functions | Touch control, air recirculation, on/off |
| Power Supply | Electrical mains (230 V, 50 Hz) |
| Installation | Wall-mounted or under-cabinet |
| Maintenance | Regular cleaning of filters and surfaces |
| Safety | Automatic shut-off, overheat protection |
| Spare Parts | Filters, remote control, bulbs |
| Repairability | Repairability index not communicated |
| Country of Origin | Germany (brand) |
| Warranty | 2 years (parts and labor) |
| Dimensions (H x W x D) | Height variable depending on installation, width 60 cm, standard depth about 50 cm |
Frequently Asked Questions - BKH 60 FO BERBEL
User questions about BKH 60 FO BERBEL
0 question about this device. Answer the ones you know or ask your own.
Ask a new question about this device
Download the instructions for your Range hood in PDF format for free! Find your manual BKH 60 FO - BERBEL and take your electronic device back in hand. On this page are published all the documents necessary for the use of your device. BKH 60 FO by BERBEL.
USER MANUAL BKH 60 FO BERBEL
Configuration of your extractor hood
berbel
Table of contents
1.0 Preface 17
2.0 Configuration with berbel remote control 18
2.1 BKH 60 - 90 EG-2, BKH 90 GL-2 18
2.2 BKH 110 EG-2, BKH 120 EG-2, BKH 110 GL-2. 19
2.3 BKH 60 - 120 FO 20
2.4 BKH 80 / 90 ST, BEH 60 FLU, BEH 90 FLU, BWH 60 - 120 BL, BWH 60 - 120 EL ..... 21
2.5 BEL 90 ML, BEH 60 - 90 GL. 22
2.6 BWH 90 GL, BTH 100 ML, BIH 90 - 120 BL, BIH 110 EG, BIH 100 GL 23
3.0 Configuration with berbel control app 24
3.1 BKH 60 - 90 EG-2, BKH 90 GL-2. 25
3.2 BKH 110 EG-2, BKH 120 EG-2, BKH 110 GL-2 26
3.3 BKH 60 - 120 FO 27
3.4 BKH 80 / 90 ST, BEH 60 FLU, BEH 90 FLU, BWH 60 - 120 BL, BWH 60 - 120 EL ..... 28
3.5 BEL 90 ML, BEH 60 - 90 GL. 29
3.6 BWH 90 GL, BTH 100 ML, BIH 90 - 120 BL, BIH 110 EG, BIH 100 GL
2.0 Preface
The following manual helps you with the initial configuration of the specific characteristics of your berbel extractor hood.
You can choose whether to operate the hood with the accompanying berbel remote control or the berbel control app on your smart phone. Both ways are explained in detail. You may be limited to one option, based on the scope of function and delivery of your hood.
Refer to the sub-item in which your hood is specified in the chapter "Configuration with berbel remote control" or "Configuration with berbel control app".
These settings must only be carried out once.
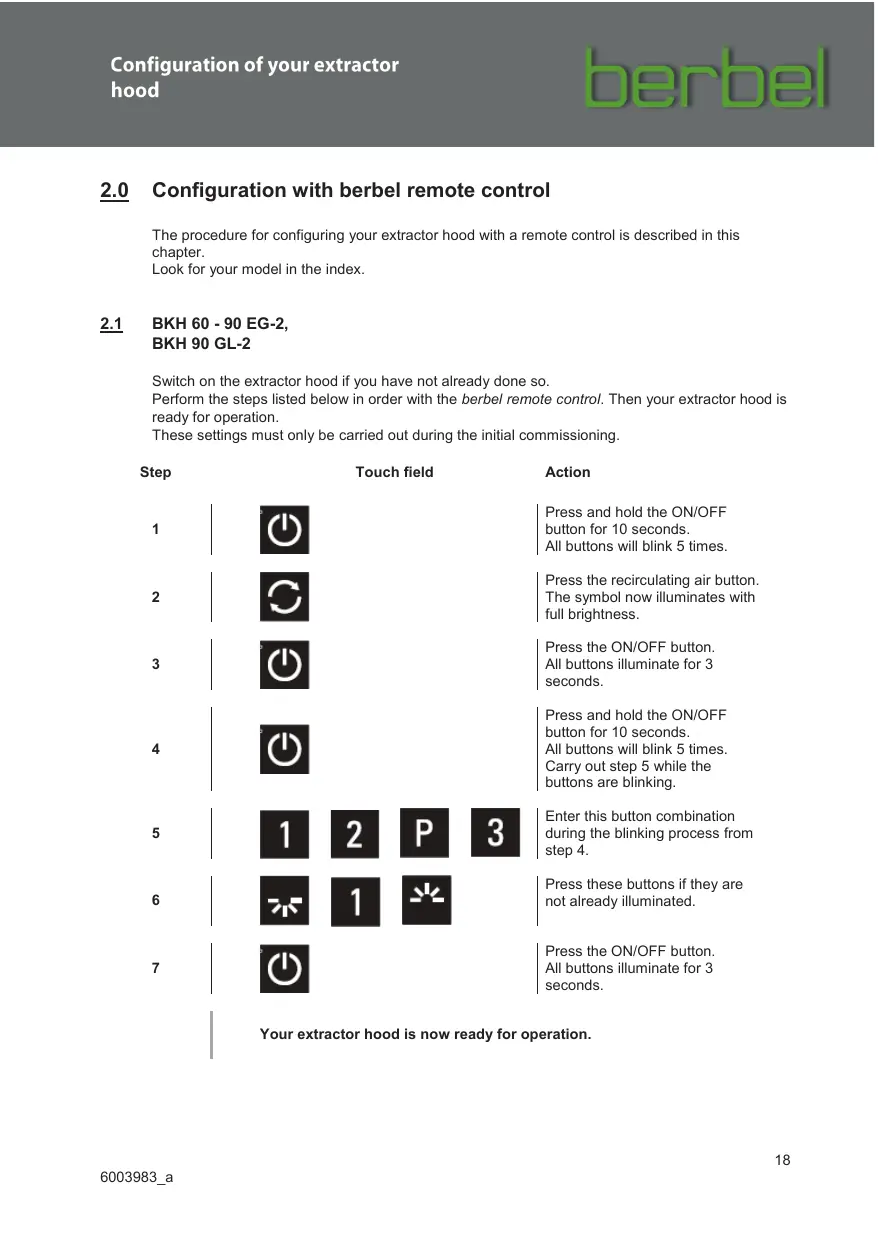
2.0 Configuration with berbel remote control
The procedure for configuring your extractor hood with a remote control is described in this chapter.
Look for your model in the index.
2.1 BKH 60 -90 EG-2, BKH 90 GL-2
Switch on the extractor hood if you have not already done so.
Perform the steps listed below in order with the berbel remote control. Then your extractor hood is ready for operation.
These settings must only be carried out during the initial commissioning.
| Step | Touch field | Action | |||
| 1 | Press and hold the ON/OFF button for 10 seconds. All buttons will blink 5 times. | ||||
| 2 | Press the recirculating air button. The symbol now illuminates with full brightness. | ||||
| 3 | Press the ON/OFF button. All buttons illuminate for 3 seconds. | ||||
| 4 | Press and hold the ON/OFF button for 10 seconds. All buttons will blink 5 times. Carry out step 5 while the buttons are blinking. | ||||
| 5 | 1 | 2 | P | 3 | |
| 6 | 2 | 1 | Press these buttons if they are not already illuminated. | ||
| 7 | Press the ON/OFF button. All buttons illuminate for 3 seconds. | ||||
Your extractor hood is now ready for operation.
2.2 BKH 110 EG-2,
BKH 120 EG-2,
BKH 110 GL-2
Switch on the extractor hood if you have not already done so.
Perform the steps listed below in order with the berbel remote control. Then your extractor hood is ready for operation.
These settings must only be carried out during the initial commissioning.
| Step | Touch field | Action | |||
| 1 | Press and hold the ON/OFF button for 10 seconds. All buttons will blink 5 times. | ||||
| 2 | Press the recirculating air button. The symbol now illuminates with full brightness. | ||||
| 3 | Press the ON/OFF button. All buttons illuminate for 3 seconds. | ||||
| 4 | Press and hold the ON/OFF button for 10 seconds. All buttons will blink 5 times. Carry out step 5 while the buttons are blinking. | ||||
| 5 | 1 | 2 | P | 3 | Enter this button combination during the blinking process from step 4. |
| 6 | 2 | 2 | Press these buttons if they are not already illuminated. | ||
| 7 | Press the ON/OFF button. All buttons illuminate for 3 seconds. | ||||
Your extractor hood is now ready for operation.
2.3 BKH 60 ... 120 FO
Switch on the extractor hood if you have not already done so.
Perform the steps listed below in order with the berbel remote control. Then your extractor hood is ready for operation.
These settings must only be carried out during the initial commissioning.
| Step | Touch field | Action | |||
| 1 | Press and hold the ON/OFF button for 10 seconds. All buttons will blink 5 times. | Press and hold the ON/OFF button for 10 seconds. All buttons will blink 5 times. | |||
| 2 | Press the recirculating air button. The symbol now illuminates with full brightness. | Press the recirculating air button. The symbol now illuminates with full brightness. | |||
| 3 | Press the ON/OFF button. All buttons illuminate for 3 seconds. | Press the ON/OFF button. All buttons illuminate for 3 seconds. | |||
| 4 | Press and hold the ON/OFF button for 10 seconds. All buttons will blink 5 times. Carry out step 5 while the buttons are blinking. | Press and hold the ON/OFF button for 10 seconds. All buttons will blink 5 times. Carry out step 5 while the buttons are blinking. | |||
| 5 | 1 | 2 | P | 3 | |
| 6 | 2 | Press these buttons if they are not already illuminated. | |||
| 7 | Press the ON/OFF button. All buttons illuminate for 3 seconds. | ||||
2.4 BKH 80/90 ST, BEH 60 FLU, BEH 90 FLU, BWH 60 ...120 BL, BWH 60 ...120 EL
Switch on the extractor hood if you have not already done so.
Perform the steps listed below in order with the berbel remote control. Then your extractor hood is ready for operation.
These settings must only be carried out during the initial commissioning.
| Step | Touch field | Action | |||
| 1 | Press and hold the ON/OFF button for 10 seconds. All buttons will blink 5 times. | Press the recirculating air button. The symbol now illuminates with full brightness. | |||
| 2 | Press the recirculating air button. The symbol now illuminates with full brightness. | Press the ON/OFF button. All buttons illuminate for 3 seconds. | |||
| 3 | Press the ON/OFF button for 10 seconds. All buttons will blink 5 times. Carry out step 5 while the buttons are blinking. | Press and hold the ON/OFF button for 10 seconds. All buttons will blink 5 times. Carry out step 5 while the buttons are blinking. | |||
| 4 | Enter this button combination during the blinking process from step 4. | Press this button if it is not already illuminated. | |||
| 5 | 1 | 2 | P | 3 | |
| 6 | 2 | ||||
| 7 | Press the ON/OFF button. All buttons illuminate for 3 seconds. | ||||
Your extractor hood is now ready for operation.
2.5 BEL 90 ML, BEH 60 ... 90 GL
Switch on the extractor hood if you have not already done so.
Perform the steps listed below in order with the berbel remote control. Then your extractor hood is ready for operation.
These settings must only be carried out during the initial commissioning.
| Step | Touch field | Action | |||
| 1 | Press and hold the ON/OFF button for 10 seconds. All buttons will blink 5 times. | Press the recirculating air button. The symbol now illuminates with full brightness. | |||
| 2 | Press the recirculating air button. The symbol now illuminates with full brightness. | Press the ON/OFF button. All buttons illuminate for 3 seconds. | |||
| 3 | Press the ON/OFF button for 10 seconds. All buttons will blink 5 times. Carry out step 5 while the buttons are blinking. | Press and hold the ON/OFF button for 10 seconds. All buttons will blink 5 times. Carry out step 5 while the buttons are blinking. | |||
| 4 | Enter this button combination during the blinking process from step 4. | Press this button if it is not already illuminated. | |||
| 5 | 1 | 2 | P | 3 | |
| 6 | 1 | ||||
| 7 | Press the ON/OFF button. All buttons illuminate for 3 seconds. | Press the ON/OFF button. All buttons illuminate for 3 seconds. | |||
Your extractor hood is now ready for operation.
2.6
BWH 90 GL,
BTH 100 ML,
BIH 90 ... 120 BL,
BIH 110 EG,
BIH 100 GL
Switch on the extractor hood if you have not already done so.
Perform the steps listed below in order with the berbel remote control. Then your extractor hood is ready for operation.
These settings must only be carried out during the initial commissioning.
| Step | Touch field | Action | |||
| 1 | Press and hold the ON/OFF button for 10 seconds. All buttons will blink 5 times. | Press the recirculating air button. The symbol now illuminates with full brightness. | |||
| 2 | Press the recirculating air button. The symbol now illuminates with full brightness. | Press the ON/OFF button. All buttons illuminate for 3 seconds. | |||
| 3 | Press the ON/OFF button for 10 seconds. All buttons will blink 5 times. Carry out step 5 while the buttons are blinking. | Press and hold the ON/OFF button for 10 seconds. All buttons will blink 5 times. Carry out step 5 while the buttons are blinking. | |||
| 4 | Enter this button combination during the blinking process from step 4. | Press this button if it is not already illuminated. | |||
| 5 | 1 | 2 | P | 3 | |
| 6 | 3 | ||||
| 7 | Press the ON/OFF button. All buttons illuminate for 3 seconds. | Press the ON/OFF button. All buttons illuminate for 3 seconds. | |||
Your extractor hood is now ready for operation.
3.0 Configuration with berbel control app
As an alternative to the berbel remote control, you can use the berbel control app to configure your extractor hood. This procedure is described in the following chapter.
Switch on the extractor hood if you have not already done so. Install the berbel control app on your smartphone. It is available via the following internet addresses:
iOS: www.berbel.de/App/berbel_control/IOS Android: www.berbel.de/App/berbel_control/Android
Then open the app on your smartphone. The following interface appears:
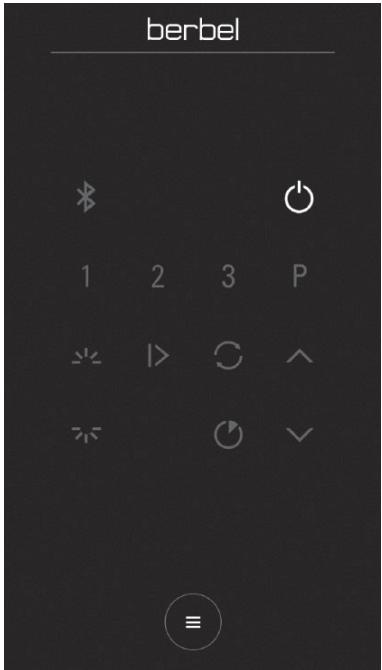
Fig. 1
Now click on the button to open the settings menu. Select the "Additional configurations" tab under the "Configuration" menu item. After entering the PIN "1234", you can change the specific settings of your hood.
3.1 BKH 60 ... 90 EG-2, BKH 90 GL-2
Once you have opened "Additional configurations" in the menu, as described under 3.0 on page 9, you can change the settings as indicated in Fig 2.
Then exit the menu with the arrow in the upper left corner.
Your extractor hood is now ready for operation.
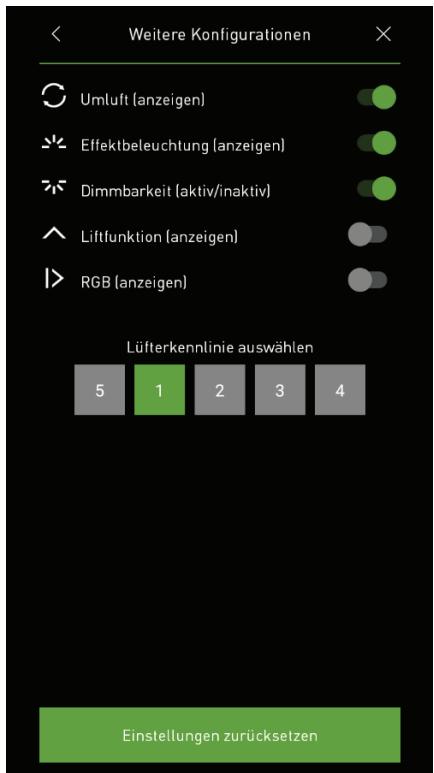
Fig. 2
3.2 BKH 110 EG-2, BKH 120 EG-2, BKH 110 GL-2
Once you have opened "Additional configurations" in the menu, as described under 3.0 on page 9, you can change the settings as indicated in Fig 3.
Then exit the menu with the arrow in the upper left corner.
Your extractor hood is now ready for operation.
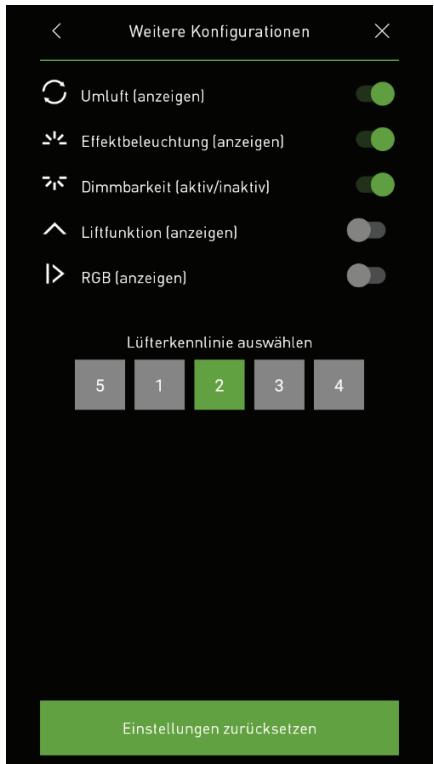
Fig. 3
3.3 BKH 60 ... 120 FO
Once you have opened "Additional configurations" in the menu, as described under 3.0 on page 9, you can change the settings as indicated in Fig 4.
Then exit the menu with the arrow in the upper left corner.
Your extractor hood is now ready for operation.
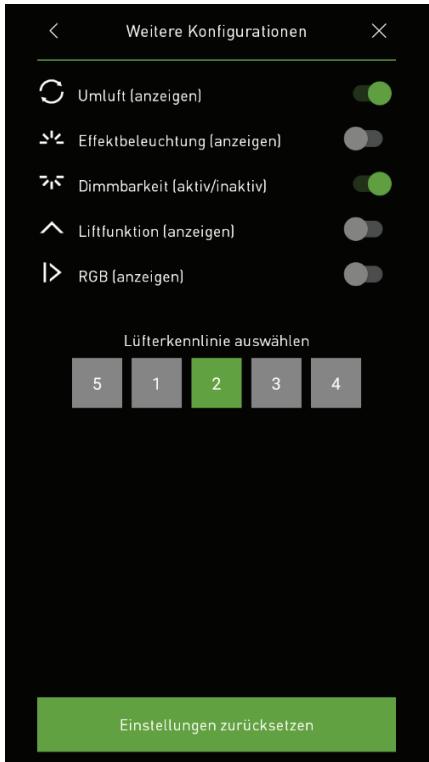
Fig. 4
3.4 BKH 80/90 ST,
BEH 60 FLU,
BEH 90 FLU,
BWH 60 ... 120 BL,
BWH 60 ... 120 EL
Once you have opened "Additional configurations" in the menu, as described under 3.0 on page 9, you can change the settings as indicated in Fig 5.
Then exit the menu with the arrow in the upper left corner.
Your extractor hood is now ready for operation.
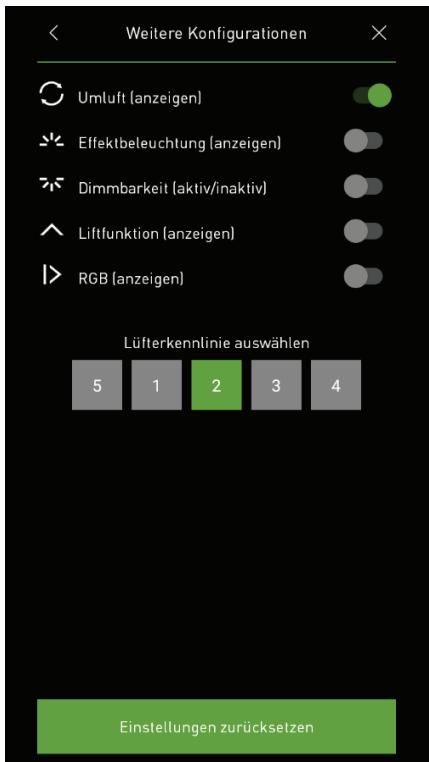
Fig. 5
3.5 BEL 90 ML, BEH 60 ... 90 GL
Once you have opened "Additional configurations" in the menu, as described under 3.0 on page 9, you can change the settings as indicated in Fig 6.
Then exit the menu with the arrow in the upper left corner.
Your extractor hood is now ready for operation.
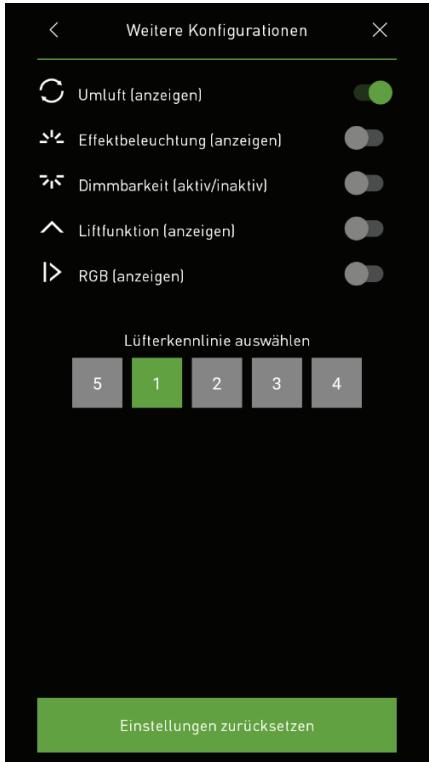
Fig. 6
3.6 BWH 90 GL,
BTH 100 ML,
BIH 90 ... 120 BL,
BIH 110 EG,
BIH 100 GL
Once you have opened "Additional configurations" in the menu, as described under 3.0 on page 9, you can change the settings as indicated in Fig 7.
Then exit the menu with the arrow in the upper left corner.
Your extractor hood is now ready for operation.
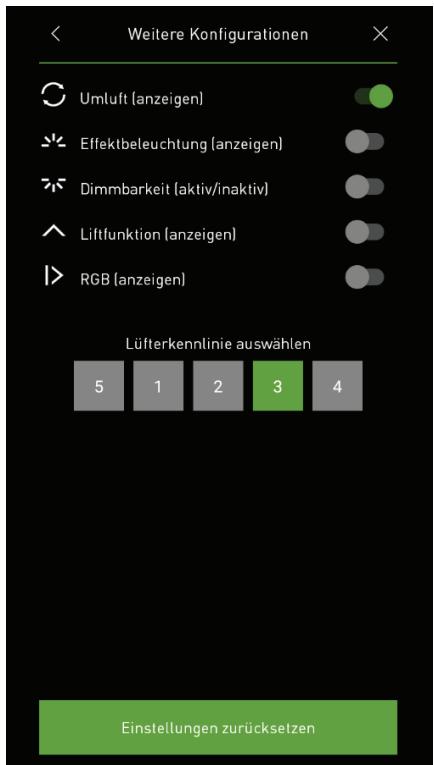
Fig. 7

