BUENO PRO - Electric coffee maker WMF - Free user manual and instructions
Find the device manual for free BUENO PRO WMF in PDF.

| Brand | WMF |
| Model | BUENO PRO |
| Product type | Electric coffee maker |
| Rated voltage | 220-240 V ~ 50-60 Hz |
| Power | 1000 W (glass carafe model) / 900 W (thermal carafe model) |
| Protection class | I |
| Water tank capacity | Up to 10 cups (125 ml per cup) |
| Carafe type | Aroma-preserving glass carafe or Cromargan® thermal carafe |
| Filter | Filter holder for paper filter size 1x4 |
| Keep warm function | Yes (40 min) – only on model with glass carafe |
| Automatic shut-off | Yes – only on model with thermal carafe |
| Drip-stop valve | Yes |
| Water level indicator | Yes |
| On/Off button | Yes, with indicator light |
| Cleaning | Do not immerse in water, wipe with a damp cloth |
| Recommended descaling | Every month to every 6 months depending on water hardness |
| Safety | Hot surfaces, automatic shut-off in case of overheating (thermal model), splash protection |
| Microwave compatibility | Glass carafe not compatible |
| Use by children | From 8 years old, under supervision |
| Spare parts | Filter, carafe (depending on model) |
Frequently Asked Questions - BUENO PRO WMF
User questions about BUENO PRO WMF
0 question about this device. Answer the ones you know or ask your own.
Ask a new question about this device
Download the instructions for your Electric coffee maker in PDF format for free! Find your manual BUENO PRO - WMF and take your electronic device back in hand. On this page are published all the documents necessary for the use of your device. BUENO PRO by WMF.
USER MANUAL BUENO PRO WMF
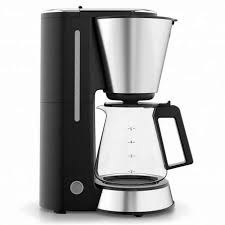
natural_image
Two modern coffee dials with black lids and metallic shades, one containing a glass coffee cup (no visible text or symbols)de Gebrauchsanweisung 4
en Operating Manual 10
fr Mode d'emploi 16
es Instrucciones de uso 22
it Istruzioni per l'uso 28
Set-up of the coffee machine
1 Water tank lid
2 Filter
3 Aroma glass jug/ vacuum jug
4 Water tank
5 Water level indicator
6 Start / Stop button with control lamp
Important safety information
- This appliance can be used by children aged 8 years and upwards if they are supervised or have been instructed in how to use the appliance in a safe way and understand the hazards involved. Cleaning and user maintenance must not be carried out by children under the age of 8 or without supervision.
■ Children must not play with the appliance. - Keep the appliance and its power cord out of reach of children under the age of 8.
■ Appliances can be used by persons with reduced physical, sensory or mental capacities or a lack of experience and/or knowledge if they are supervised or have been instructed on how to use the appliance safely and they understand the hazards involved. - Do not immerse the appliance in water.
- If the appliance's power cord is damaged, it must be replaced by the manufacturer, its after-sales service or a similarly qualified person if hazards are to be avoided.
- This appliance is designed for use in households and similar environments, e.g.
- Staff kitchen areas in shops, offices and other commercial environments;
- Farmhouses;
- By guests at hotels, motels and other residential facilities;
- At bed-and-breakfast establishments.
The appliance is not intended for purely commercial use.
- Caution: risk of burns! Accessible surfaces can become very hot. The heating surfaces remain hot for some time after the appliance has been switched off.
- Always use the appliance in accordance with these instructions. Improper use may result in electric shocks or other hazards.
Before use
Congratulations on the purchase of your coffee machine.
The coffee machine may be used only for its intended purpose and in accordance with this instruction manual. For this reason, please read the instruction manual carefully before use because it provides instructions for using, cleaning and caring for the appliance. We accept no liability for any damage caused by a failure to heed the instructions. Keep this instruction manual in a safe place and pass it on to any subsequent user together with the appliance. Please also note the warranty information at the end of the instruction manual.
There is no guarantee for glass breakage.
The safety precautions must be observed during use.
Technical data
| Rated voltage: | 220-240 V~ 50-60 Hz | |
| Power consumption: | 1,000 Watt | (version with glass jug) |
| Power consumption: | 900 Watt | (version with thermal jug) |
| Protection class: | I | |
Additional safety information
- The appliance should be connected only to earthed wall sockets that have been installed in accordance with the regulations. The power cable and plug must be dry.
- Do not pull or clamp the connection cable over sharp edges. Do not leave it dangling. Protect it from heat and oil.
- Only use an extension cable if it is in perfect condition.
- Never pull the mains plug out of the socket by the cable or with wet hands.
- Do not carry the appliance by the cable.
- Do not place the coffee machine on hot surfaces, such as hot plates or similar, or near open flames, as the casing could melt.
- Do not place the appliance on water-sensitive surfaces. Splashed water may damage such surfaces.
- Do not switch the device on without water. Fill the fresh water tank with cold water up to no more than the maximum permissible number of cups.
- Do not add water to the appliance when it is switched on or still hot. Before filling or refilling, switch the automatic coffee machine off and allow to cool for 5 minutes.
- Caution: The appliance gets hot! Risk of scalding from escaping steam. Never swing out the filter or open the lid during brewing.
- When the appliance is not being used for a while, pull the mains plug out of the socket.
- Stop using the appliance and/or pull the mains plug out of the socket immediately if:
- The appliance or power cord is damaged
- you suspect that the device may be defective following a fall or similar incident.
In such cases, arrange for the appliance to be repaired.
■ The appliance must be supervised when in use.
■ Descale the appliance regularly. - The glass jug is not suitable for use in the microwave.
- We accept no liability for damage caused as a result of misuse, incorrect operation, improper repair or failure to observe the descaling advice. Warranty claims are likewise excluded in such cases.
Initial operation
Prior to the first use and after the appliance has not been operated for an extended period of time, carry out 2–3 boiling processes with fresh water without coffee grounds. To do this, fill the tank (4) up to the 10-cup mark, as otherwise the jug (3) can overflow. After each brewing cycle, turn the coffee machine off by pressing the Start/Stop button (6) and leave the appliance to cool down for 5 minutes before you fill the tank (4) again with fresh water to the 8-cup mark.
Coffee preparation
Open the water tank (4). To do so, swing open the lid (1) upward. Only pour cold fresh water into the tank (4). The water-level indicator (5) applies to the amount of fresh water needed to brew the desired number of cups of coffee @ 125ml. Take a size 1x4 paper filter, fold over the stamped edge and place it into the filter (2). The paper filter should not protrude over the edge of the filter. If necessary, push it down slightly with your hand. Add the required amount of ground coffee. Depending on your personal taste, use approx. 5–7 g of medium-fine ground coffee per cup. If the coffee is ground too finely, the filter (2) may overflow. Close the lid (1). It will audibly click into place. Plug the mains plug into the socket and push the on/off button (6). This illuminates and the preparation begins. You can cancel brewing at any time by pressing the on/off button (6) again. Wait a few minutes until all of the coffee has run into the jug (3). When you remove the jug (3), a drip-stop valve prevents the coffee dripping.
Keep-warm function (only version with glass jug)
Your appliance is equipped with a keep-warm function to maintain brewed coffee at serving temperature. After the preparation is complete, the keep-warm function activates automatically and the Start/Stop button (6) remains illuminated. Coffee is kept warm for 40 minutes, after which the device automatically switches off and the light on the on/off button (6) is extinguished. You can deactivate the keep-warm function at any time by pressing the on/off button (6).
Automatic switch-off (only version with thermal jug)
The automatic shut-off function prevents overheating when the device is in use. The device switches off only once all of the water has passed through the filter. It is possible to shut off the coffee maker early by pressing the start / stop button . This could be necessary if you accidentally start the coffee machine without water. Before filling a hot appliance, you must wait a few minutes and allow the coffee machine to cool down.
Information about the Cromargan® thermal jug (only version with thermal jug)
Important: Do not use the jug to keep milk products or baby food warm due to the risk of the build-up of bacteria. Do not heat the jug up in the microwave or the oven. Do not use the jug to store or transport carbonated drinks. After cleaning, rinse out carefully with clean water. The jug is designed as a serving jug and best keeps the content warm when it is full. The time the content is kept warm may be reduced significantly if the jug is only partially filled or almost empty. It is best to rinse the jug with hot water before preparation. For technical reasons, the seal from the brewing lid is not 100% tight so that it can be easily opened, even after the coffee cools down. Therefore, never lie the jug down to transport it, otherwise coffee could spill out. To close, only slightly tighten the lid. Only use the filled jug standing upright. The double-walled Cromargan® container is absolutely break-proof. Nevertheless, it should be protected against mechanical stresses. Rinse the jug regularly. If iron particles from water accumulate on the Cromargan® surface, they can cause pitting at those points. These deposits must therefore be removed immediately with a stainless steel cleanser. Do not clean in the dishwasher or in rinsing water.
Note: Stubborn deposits can be removed using soda, dishwasher granules or denture cleansing tablets.
Cleaning and care
Cleaning
Pull out the mains plug and allow the appliance to cool down. Do not immerse the appliance in water. Outer surfaces can be cleaned using a damp cloth and a little washing-up liquid if necessary. Do not use harsh or abrasive cleaning agents. The filter (2) and glass jug (3) are cleaned under running water.
Limescale
Limescale deposits extend brewing times and lower the quality of your coffee. They also lead to energy losses and impair the service life of the appliance.
If too much limescale has accumulated, the appliance switches off prematurely. The limescale is then very difficult to remove. You should therefore descale regularly or at the latest when brewing times are significantly longer or the noise level increases.
The following specifications are guidelines based on daily use in the home.
| Hardness range | Hardness | Descaling intervals |
| 1 Soft | 0-7° dH | Every 6 months |
| 2 Medium | >7-14° dH | Every 3 months |
| 3 Hard | >14-21° dH | Every 6 weeks |
| 4 Very hard | >21° dH | Monthly |
1° dH corresponds to about 0.18 mmol/l Ca and Mg ions
You can ask your local water company or government about the water hardness range in your neighbourhood.
Descaling
Please descale your appliance regularly using a high-quality commercial descaling agent. Follow the manufacturer's instructions, particularly with regard to the subsequent cleaning with clear water, which is essential! Suitable descaling agents contain inhibitors that protect appliances against damage to seals and surfaces, do not cause additional deposits and have no taste. Do not use descaling agents that are unsuitable for your appliance (such as substances based purely on vinegar or citric acid). Our warranty does not cover damage caused by using unsuitable descaling agents or failure to follow the descaling instructions. Please keep descaling agents out of reach of children and make sure you do not inhale any of the steam given off during descaling.
For UK use only
This product is supplied with a 13 A plug conforming to BS 1363 fitted to the mains lead. If the plug is unsuitable for your socket outlets or needs to be replaced, please note the following. If the plug is a non-rewireable one, cut it from the mains lead and immediately dispose of it. Never insert it into a socket outlet as there is a very great risk of an electric shock.
- The replacement of the plug at the mains lead has to be done according to the following instructions:
Warning - This appliance must be earthed
Important: The wires in this mains lead are coloured in accordance with the following code:
green/yellow
Earth
blue
Neutral
brown
Live
As the colours of the wires in the mains lead of this appliance may not correspond with the coloured markings identifying the terminals in your plug, proceed as follows: As the colours of the wires in the mains lead of this appliance may not correspond with the coloured markings identifying the terminals in your plug, proceed as follows:
- the wire which is coloured green and yellow must be connected to the terminal which is marked with the letter E or by the earth symbol ⏻ or coloured green or green and yellow,
- the wire which is coloured blue must be connected to the terminal which is marked the letter N or coloured black,
-
the wire which is coloured brown must be connected to the terminal which is marked with the letter L or coloured red.
-
If a 13 A (BS 1363) plug is used it must be fitted with a 13 A fuse conforming to BS 1362 and be ASTA approved. If any other type of plug is used, the appliance must be protected by a 10 A fuse either in the plug or adapter or at the distribution board. If in doubt - consult a qualified electrician.
- Never use the plug without closing the fuse cover.

The appliance complies with European directives 2014/35/EU, 2014/30/EU and 2009/125/EU.
At the end of its life, this product may not be disposed of in normal household waste, but must instead be taken to a collection point for recycling electrical and electronic appliances.
The materials are recyclable in accordance with their labelling. Reuse, recycling and other ways of reutilising old appliances make an important contribution to protecting our environment.
Please ask your local authorities for information about the appropriate disposal point.
Subject to change