VIVACE BL/A/90 - Air-conditioner TURBOAIR - Free user manual and instructions
Find the device manual for free VIVACE BL/A/90 TURBOAIR in PDF.
User questions about VIVACE BL/A/90 TURBOAIR
0 question about this device. Answer the ones you know or ask your own.
Ask a new question about this device
Download the instructions for your Air-conditioner in PDF format for free! Find your manual VIVACE BL/A/90 - TURBOAIR and take your electronic device back in hand. On this page are published all the documents necessary for the use of your device. VIVACE BL/A/90 by TURBOAIR.
USER MANUAL VIVACE BL/A/90 TURBOAIR
EN Instruction on mounting and use
Closely follow the instructions set out in this manual. All responsibility, for any eventual inconveniences, damages or fires caused by not complying with the instructions in this manual, is declined. This appliance is intended to be used in household and similar application such as: - staff kitchen areas in shop, offices and other working environments; - farm houses; - by clients in hotels, motels and other residential type environments; - bed and breakfast type environments.
The hood can look different to that illustrated in the drawings in this booklet. The instructions for use, maintenance and installation, however, remain the same.
It is important to conserve this booklet for consultation at any moment. In the case of sale, cession or move, make sure it is together with the product.
- Read the instructions carefully: there is important information about installation, use and safety.
- Do not carry out electrical or mechanical variations on the product or on the discharge conduits.
- Before proceeding with the installation of the appliance verify that there are no damaged all components. Otherwise contact your dealer and do not proceed with the installation.
Note: The parts marked with the symbol "(*)" are optional accessories supplied only with some models or otherwise not supplied, but available for purchase.

Caution
- Before any cleaning or maintenance operation, disconnect hood from the mains by removing the plug or disconnecting the mains electrical supply.
- Always wear work gloves for all installation and maintenance operations.
- This appliance can be used by children aged from 8 years and above and persons with reduced physical, sensory or mental capabilities or lack of experience and knowledge if they have been given supervision or instruction concerning use of the appliance in a safe way and understand the hazards involved.
Children shall not be allowed to tamper with the controls or play with the appliance. - Cleaning and user maintenance shall not be made by children without supervision.
- The premises where the appliance is
installed must be sufficiently ventilated, when the kitchen hood is used together with other gas combustion devices or other fuels.
- The hood must be regularly cleaned on both the inside and outside (AT LEAST ONCE A MONTH).
- This must be completed in accordance with the maintenance instructions provided. Failure to follow the instructions provided regarding the cleaning of the hood and filters will lead to the risk of fires.
- Do not flambe under the range hood.
- Do not remove filters during cooking.
- For lamp replacement use only lamp type indicated in the Maintenance/Replacing lamps section of this manual.
The use of exposed flames is detrimental to the filters and may cause a fire risk, and must therefore be avoided in all circumstances.
Any frying must be done with care in order to make sure that the oil does not overheat and ignite.
CAUTION: Accessible parts of the hood may become hot when used with cooking appliances.
-
Do not connect the appliance to the mains until the installation is fully complete.
-
With regards to the technical and safety measures to be adopted for fume discharging it is important to closely follow the regulations provided by the local authorities.
- The air must not be discharged into a flue that is used for exhausting fumes from appliance burning gas or other fuels.
- Do not use or leave the hood without the lamp correctly mounted due to the possible risk of electric shocks.
- Never use the hood without effectively mounted grids.
- The hood must NEVER be used as a support surface unless specifically indicated.
- Use only the fixing screws supplied with the product for installation or, if not supplied, purchase the correct screws type.
-
Use the correct length for the screws which are identified in the Installation Guide.
-
In case of doubt, consult an authorized service assistance center or similar qualified person.
WARNING!
- Failure to install the screws or fixing device in accordance with these instructions may result in electrical hazards.
-
Do not use with a programmer, timer, separate remote control system or any other device that switches on automatically.
-
This appliance is marked according to the European directive 2012/19/EC on Waste Electrical and Electronic Equipment (WEEE).
- By ensuring this product is disposed of correctly, you will help prevent potential negative consequences for the environment and human health, which could otherwise be caused by inappropriate waste handling of this product.

- The symbol on the product, or on the documents accompanying the product, indicates that this appliance may not be treated as household waste. Instead it should be taken to the appropriate collection point for the recycling of electrical and electronic equipment. Disposal must be carried out in accordance with local environmental regulations for waste disposal.
- For further detailed information regarding the process, collection and recycling of this product, please contact the appropriate department of your local authorities or the local department for household waste or the shop where you purchased this product.
Appliance designed, tested and manufactured according to:
- Safety: EN/IEC 60335-1; EN/IEC 60335-2-31, EN/IEC 62233.
Performance: EN/IEC 61591; ISO 5167-1; ISO 5167-3; ISO 5168; EN/IEC 60704-1; EN/IEC 60704-2-13; EN/IEC 60704-3; ISO 3741; EN 50564; IEC 62301. - EMC: EN 55014-1; CISPR 14-1; EN 55014-2; CISPR 14-2; EN/IEC 61000-3-2; EN/IEC 61000-3-3. Suggestions for a correct use in order to reduce the environmental impact: Switch ON the hood at minimum speed when you start cooking and kept it running for few minutes after cooking is finished. Increase the speed only in case of large amount of smoke and vapor and use boost speed(s) only in extreme situations. Replace the charcoal filter(s) when necessary to maintain a good odor reduction efficiency. Clean the grease filter(s) when necessary to maintain a good grease filter efficiency. Use the maximum diameter of the ducting system indicated in this manual to optimize efficiency and minimize noise.
Use
The hood is conceived for the suction of cooking fumes and steam and is destined only for domestic use.
The hood is designed to be used either for exhausting or filter version.

Extraction version
In this case the fumes are conveyed outside of the building by means of a special pipe connected with the connection ring located on top of the hood.
CAUTION!
The exhausting pipe is not supplied and must be purchased apart.
Diameter of the exhausting pipe must be equal to that of the connection ring.
CAUTION!
If the hood is supplied with active charcoal filter, then it must be removed.
Connect the hood and discharge holes on the walls with a diameter equivalent to the air outlet (connection flange).
Using the tubes and discharge holes on walls with smaller dimensions will cause a diminution of the suction performance and a drastic increase in noise.
Any responsibility in the matter is therefore declined.
Use a duct of the minimum indispensable length.
! Use a duct with as few elbows as possible (maximum elbow angle: 90^ ).
! Avoid drastic changes in the duct cross-section.

Filtration version
The aspirated air will be degreased and deodorised before being fed back into the room.
In order to use the hood in this version, you have to install a system of additional filtering based on activated charcoal.
Installation
The minimum distance between the supporting surface for the cooking equipment on the hob and the lowest part of the range hood must be not less than 45cm from electric cookers and 65cm from gas or mixed cookers.
If the instructions for installation for the gas hob specify a greater distance, this must be adhered to.
As described in the installation drawings perform 6 holes (8 mm diameter, 40 mm deep), in the positions shown in the drilling template, to fix the hood support bracket and the exhaust flue. After installation, check that the hood and exhaust flue are perfectly aligned.
The range hood is intended to be installed over a hob having 6 heating elements.

Electrical connection
The mains power supply must correspond to the rating indicated on the plate situated inside the hood. If provided with a plug connect the hood to a socket in compliance with current regulations and positioned in an accessible area, after installation. If it not fitted with a plug (direct mains connection) or if the plug is not located in an accessible area, after installation, apply a double pole switch in accordance with standards which assures the complete disconnection of the mains under conditions relating to over-current category III, in accordance with installation instructions.

WARNING!
Before re-connecting the hood circuit to the mains supply and checking the efficient function, always check that the mains cable is correctly assembled.
Warning! If the supply cord is damaged, it must be replaced by the manufacturer, its service agent or similarly qualified persons in order to avoid hazard.
Mounting
Before beginning installation:
- Check that the product purchased is of a suitable size for the chosen installation area.
- Remove the charcoal (*) filter/s if supplied (see also relative paragraph). This/these is/are to be mounted only if you want to use the hood in the filtering version.
- Check (for transport reasons) that there is no other supplied material inside the hood (e.g. packets with screws (^) , guarantees (^) , etc.), eventually removing them and keeping them.
Expansion wall plugs are provided to secure the hood to most types of walls/ceilings. However, a qualified technician must verify suitability of the materials in accordance with the type of wall/ceiling. The wall/ceiling must be strong enough to take the weight of the hood.
Do not tile, grout or silicone this appliance to the wall. Surface mounting only.
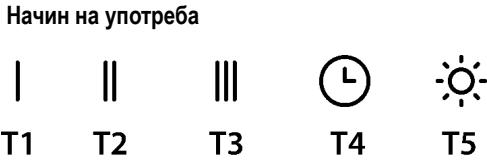
Operation
| I | II | III | L | O |
| T1 | T2 | T3 | T4 | T5 |
First speed (T1)
Press T1 to activate the first speed. When the function is activated, the LED turns on with a fixed light. Press T1 again to turn the hood off.
Second speed (T2)
Press T2 to activate the second speed. When the function is activated, the LED turns on with a fixed light. Press T2 again to turn the hood off.
Third speed (T3)
Press T3 to activate the second speed. When the function is activated, the LED turns on with a fixed light. Press T3 again to turn the hood off.
Timer (T4)
The timer can be activated when the first, second or third speed is active. When the function is activated, both the LED of the Timer (T4) and that of the previously selected speed (T1/T2/T3) turn on with a fixed light.
The duration of the timer depends on the selected speed:
First speed T1 = duration 20'
Second speed T2 = duration 15'.
Third speed T3 = duration 10'.
When a speed is timed, the timer can be deactivated by pressing T4, or one of the other two inactive speeds. To turn the hood off, press the speed again to which the timer had previously been linked.
Light (T5)
The light can be activated at any time by pressing key T5. When the function is activated, the LED turns on with a fixed light.
Filter setting
Activation or deactivation of the filter indicators is only possible with the hood off.
To access the configuration menu, hold pressed T2+T3, once inside the menu T1 will start to flash.
The default setting is:
-
grease filter indicator (T2) on, therefore active;
-
odour filter indicator (T3) off, therefore not activated.
T2 activates/deactivates the grease filter indicator. T3 activates/deactivates the odour filter indicator. To exit the menu, hold pressed T1 or wait 10
Filter reset
The hood signals the need for filter maintenance at regular intervals:
-
grease filter every 40 hours;
-
odour filter every 160 hours.
In this case, with the hood off, when the user touches any button the interface signals two types of needs for a period of 10^17 :
-ifT1+T2flash:grease filter maintenance;
-if T1+T3 flash: odour filter maintenance.
During the 10" it is possible to reset the grease filter by pressing T1+T2 and to reset the odour filter by pressing T1+T3. After the reset, the button combinations will flash rapidly twice. The interface will now work as normal.
Please note:
During the 10^ , the hood will work normally but without any visual feedback regarding the speed buttons. If during the 10^ no operations are carried out, the LEDs will stop flashing and the visual feedback will return to normal.
Maintenance
Cleaning
Clean using ONLY a cloth dampened with neutral liquid detergent. DO NOT CLEAN WITH TOOLS OR INSTRUMENTS. Do not use abrasive products. DO NOT USE ALCOHOL!
Grease filter
Fig. 11
Traps cooking grease particles.
The grease filter must be cleaned once a month using non aggressive detergents, either by hand or in the dishwasher, which must be set to a low temperature and a short cycle. When washed in a dishwasher, the grease filter may discolor slightly, but this does not affect its filtering capacity.
To remove the grease filter, pull the spring release handle.
Charcoal filter (filter version only)
Fig. 12
It absorbs unpleasant odors caused by cooking.
The saturation of the charcoal filter occurs after more or less prolonged use, depending on the type of cooking and the regularity of cleaning of the grease filter.
In any case it is necessary to replace the cartridge at least every four months.
The charcoal filter may NOT be washed or regenerated.
Circular charcoal filter
Apply one on each side as cover to both the shield grids of the motor impeller, then turn clockwise.
For the disassembly, turn counter-clockwise.
Replacing lamps
Fig. 10
Disconnect the appliance from the electricity.
Warning! Prior to touching the light bulbs ensure they are cooled down.
Replace the old light bulb with the one of the same type as specified in the feature label or near the light lamp on the hood.
- Using a flat head screwdriver or equivalent tool, carefully pry loose the light cover.
- Replace the damaged LED or halogen lamp, with one having the same characteristics, as specified in the label features or near the lamp:
LED lamp:For replacement, contact the technical service.
Halogen lamp: 12V - 20W max - G4 (take care not to touch them with your hands)
- Reinstall the light cover. (it will snap shut).
If the lights do not work, make sure that the lamps are fitted properly into their housings before you call for technical assistance.
Pred zahajenim instalace:
Okružno uhońny filter
Použit jedno na kaźdu stranu po zakrytie obidvoch ochrannych mrieżok motorovej vrtule, za tym pootočit smerom hodinovych ručiciek.
Koli odmontovaniu pootočit oproti smeru hodinovych ručićiek.
Vymena ziaroviek
Obr. 10
- Ebponeckata dupekTnba 2012/19/EC
- Waste Electrical and Electronic Equipment (WEEE).
YBepraBauKnCe,YeTo3NypedJe6bJepeuKnIpaH noNooobabaunr3aTobaNauchIN,BineDopnpHacrTe 3a Ona3BaHeto HaOKoHnata CpeaNaBaWTo 3dPabe.

CIMBOBT Bbpxy yepa nnB nprpkybaaata ro DOKyMENTAUN NooOyBa, ye To3n npodykT He Tpa6Ba da 6bde CHTAH 3a Domauhen OTnAdkB, a Tpa6Ba da 6bde npedaeHN B CNEuHaNO ppeDaHsHaENHeTte 3a TOBA npHKTOBe 3a peUKKnpuane H aeEkeTpncHecka n EkeTKPOHn TExnKa. PnpduKpaJte Ce KMB MeCTHNTe HOPMaTHN 3a npepaOTka H otnaDbu. 3a NoNDp6bHa INHOpMaJIy B8B Bp3ka C npedabAHeto, Cb5bupaheto n peuKlnpApHeTo H To3n npoDyKT BcBETBaMe Da ce Ob5bPheTe KbM KOMPeTEHTHIne MecTHN cIyK6u, cIyK6uTe 3a Cb5bupane Ha DOMaUN OTnAdlbuN IIN Mara3nHbT, B KOIT OTe 3aKyTNl To3n en. ypeJ.
YpeBt e npoeKtnpaH, TcTeBaH n npOn3BeDeH B CbOTBETCTBnE C:
- Be30NaChOCT: EN/IEC 60335-1; EN/IEC 60335-2-31, EN/IEC 62233.
- Pa60THn XapaKTepeNCTmK: EN/IEC 61591; ISO 5167-1; ISO 5167-3; ISO 5168; EN/IEC 60704-1; EN/IEC 60704-2-13; EN/IEC 60704-3; ISO 3741; EN 50564; IEC 62301.
- EMC - EneKtpomarHHTa CbBMeCTIMOCT: EN 55014-1; CISPR 14-1; EN 55014-2; CISPR 14-2; EN/IEC 61000-3-2; EN/IEC 61000-3-3.
IpeDIOXeHn 3a npabINHa yNtpe6a, 3a da ce HamaII
Bb3dEeCTBneto Bbpyx OkONHATA cpea: BkNIOHeTe (ON) acInnpatopa Ha MNHMajHa ckOcT, KORato 3anoHHe Ta rotBTne I ro octabete da pa6OTn HRAKONKO MNHTn CneI pRKMIOuBAhe Ha rotBeHETo. YBeJIuBaAaiTE ckOpCTTA camo B cnUayi Ha rOJIMo KOINIECTBO DmN I napN m3NOI3BaIte yBeJIuEHNIte CKOcPTOn Camo B EKCPTPEMH CNITyaUNM. CMeHnITE ITbpa/ ITPnTE C AKTIbEN BbIJIeN, KORATO e Heo6XoIMNo, 3a da NODbPKaTe DO6pa eFKeTNBHOCT Ha HAmaJIbaHe Ha MmIP3MaT. POniCtBae Tbe FNTbpa/ ITnPTpe 3a Ma3HNiH, KORATO e Heo6XoIMNo, 3a Da NODbPKaTe DO6pa eFKeTNBHOCT Ha FNTbPa 3a Ma3HNHIne. IVo103BaIae MACImANHJa DNAmETbp Ha CNCTeMATA 3a OTBXJaHe Ha Bb3Dyxa, NOCOH B TOBA pBkoBOIDCTBO 3a OTTIMIN3paHe Ha eFKeTNBHOCTTa n 3a HAmaJIbaBaHe Ha SiYMa.
YnoTpe6a
AcnpatopbTe npoeKtnpah 3a acnpipapane Ha nIMma nnapata, KOITc Ce OTdJIaT PnI rOTBeH, n e ppeHa3HaueH cAmO 3a 6ntoBa yNtpe6a.
Acnipatopbt mma cneHOTOpnpedHaHaueHHe: BcMyKba nOTBeJxda HABbN mIuΦnITpPa Bb3DyXa, KaTo eHOBpeMeHHo CTOBA ro peUknpa.

Bercncaacnpa
Iapata ce OTBeJda HABbH NocpeDCTBOM Bb3dyXOBoHa Tp56a Cbb3Ha cbc CbeINHTENHnF pnaHeL.

BHIMAHHE!
Bb3dyXOBODHaTtpb6aHeE bKJIIOHeHa KbM aKCEcoapnte m Tpa6Ba da 6bde 3akynHea OTdeJIHO.
DnAmetbpt Ha Bb3dYxOBoHaTata Tpb6a Tp6Ba da OTROBapHa DnAmetbpa Ha CbeDNHHTINHINPbCTEH.

BHIMAHHE!
Ako acnnpatopbTe cch6dH C qnttnp C actINBEH BByIeH, BbyPocHIne TpaBa da 6baT OTCTpaHEH.
CbBpKTe acnnapatopa KbM Bb3DyXOBODHn TpbBn N OTBOPN BCTeHa. DImaMeTbPbT Ha TpbBnTE Tpr6Ba Da CbOTBeCTBa Ha DImaMeTbPa Ha CbeDNHITENHn ONaHeu 3a OTBeXJaHe Ha Bb3DyXa.
Cbpb3BaHETO KMB B3DyXOBODH TpB6n I OTBOPN C NO-MaIbK DnAmEtbp HAMJARBA KanaNTETHa acNpuPAnHe N YbeNnUaba 3NaHTENHO yMaMaNo BpeMe Ha pa6ota.
B Te3n cnyuanyu npMaTa He noema HnkaKBa OTROBOPHOCT.
! N3noJ3BaIe TpIb6a C HeO6xoDImMaTa IbIKNHa.
! 13n0n3BaIte TpB6a C Bb3MOxHO Hai-MaIKO TpB6H KOIeHa (CMAKCIMAIHeHbBJHa N3BVBKa:90°).
He npomehraTe p3kO cehenTo Ha Tb6nt!

BercnC c nIITpupe
AcnpnpaHnrt BbDyX ce npneHcTBa nOCBExkaba npedn da bBNE 0THOBo B O6bLsHeMe B NOMeHcHMeTO.3a Da n3nON3BaTE acnpaTopa B To3n BapnaHT ha pa6ota Tpr6Ba DA IHCTanpate DOnBJIHNTeJIHa pIITpnpaA cNCTema Ha Ba3ata H pIITpn C aKTNBE BbTlEN.
MOnTtupahe
MnHmMaHnOpa3cTOHnE MEXy NObByxHOCTTa,Ha KOrTo CE NOCTaBt CbIOBeTe 3a rOTBEHe N HAI-HNCKATAcHt Ha KyXHeNcKNa acnIapTop, TpReBa Da 6bDe He No-MaNkoT O45cm B cLyuHa NEeKTPnueckn NeeKn Hne Mo-NaKoT O65cm, B cLyuHa Ra30Bn INI KOMbHnHPaHn NeeKn.
Ako B INHCTpyKcHHe Ha ra3OBnI ypeI 3a rotBeHe e nocOeHO No-ROJMo pa3CToRHe, To Tp46Ba da ce HMa npEdBnI.
Ipo6bnte 6 OTBopa, KaKTo e NocOeyHo Ha YepTeKHTe, (0 8 MM n DblbochHa 40 MM), KATO 3a ZENTa Ce npuDpXaTe KbM o63NaueHnra Ta BpXy UabNoHa, 3a Da PmKcnpaTe acnnpaTOn nOpHATA pAnHa 3a KomHa. CneJ KATO npKnHOHTe, yBepTe ce, Ye acnnpaTa N KomHa ca nepfekTHo n3paBHeHn IomEkJy MM.
YpeBt e npEHa3Hauen 3a Hnctanipahe HaI rotBapckn neKc makCmym6 KOTnoHa.

En.Bpb3ka
HanpexeHneto B en.MpeXaTa Tp6Ba Da otroBapra Ha HanaPexeHneto, KOTo e nocOeHO Bbpyx EtNKeTa C daHHnTe 3a acnnpatopa, noCTaben OT bTpeuHaTa My cTpaHa. Ako e Chabdenn C uence Cbpxkete acnpatopa KbM KOHTAK, CbOTBeCTBAU Ha DeNCTBAuNTe HOpMN HAMpuCa Ce Ha IeCHO DoCTbHNO MRCTO DOpN CnEe PnKlnHouBaHe HA MOtaxa. AKe He e Chabden C uence (DpeKTHo CBbP3BaHe KbM pExka), NnI UcncBbT He e Ha DCtBnHO MRCTO CneL PrNKlNUOVAHe HA MOtaxa, INON3BaVe DByNONHOceh PpeKbCBau CNopeD HOpMtE, Taka Ye da ce ocNtypn PbHNo N3KIOUbaHe HApeXaTa Prn CBpbXhanpexeHne III, B CbOTBeCTBne C npabunata 3a MOHTpae.

BHIMAHME!
Ipei Da Cbpxte OTHOBO acnnpaTopa KbM MPekata N da npOBepTe daHnФyHKUOnHpa npabuHNO, npOBepTe daHn Ka6eBt EMOHTnpaH KAKTO Tp8Ba.
BHHMaHHe!NoMmHaTnHa3axpaHbAunKa6eN Tpr6Ba Da ce 13BbPbWAOTOpn3npuHAncePBn3aTexHnueckaIOMoU,3a da Ce N3BeHrE BCaKaBb PnCK.
MOHTAX
IpeDn da npncTbnte KbM MOHTaxa::
- Ybepete ce, ye 3aKyIeHnT oBac npOyKT oTROBaP no pa3MePN Ha n36paHOTo MRCTO 3a nHCTaInpaHe.
- OTeTpaHete fInnIbpa/fInnTpnte c aKTHBEN bByrHeN (pa36bnape, ako n36panaHT oBac moJe p3aONarra c TaKbB). 3a da n38bpuNTe TOBA npocnepe tonepauNTe B cbOTBeTHna npaRpaF. MoTHnpaHTe fInnTpnte OTHOBO camo B cnayu, ye JeNaTaE da n3no13BaTe acnPaTopa BbB BapAHHT ha fInnTPnpaUa BEpcnA.
YBepTe Ce, Ye No BpeMe Ha TpaHcNopTa BBb BbTpeUHaTa Yact Ha acnnpatopa He ca NonaHaN Ipde6HN IpEmedTN KaTO HApIMeP PInKHeTa C BNHTOBe, rapaHcNHOHN KAPTN I np.; aKO HAMEPte TAKMBA OTCTpAHeTe TN IN Tn 3ana3eTe.
Pn BCE TOBA, Bn npenopbYBaMe Da ce nocBbETBaTe c KbaIINDmUpan TeHNK, 3a Da CTE cnpyHn, Ye DoCTaBeHnTe akcecoapn Ca noDxOJaUN 3a CEJNTA. CTeHATA, CbOTBeTHo TabaHbT, Tpa6Ba Da 6DaTdoCTaTbHNo CTaBUnHn 3a Da N3DbpKaT ha HATOBaBaHTo.
Tbpa ckopoct (T1)
HaTNCHe T1 3a da aKTbIpaTe IIpbTa cKOpocT. Korato cyHKnIaTa e aKTbIpaHa, LED INdIkAtOpbT ce BkIIOBa C fIKcIpaHa CBETINHa. HaTNCHe OTHOB T1 3a da n3KlHOHTe acNIPAtopa.
Btopa ckopoct (T2)
HaTNCHE T2 3a da aKTbNupate BTOpTa CkOpoCT. Korato cyHKnIaTe a AKTNbupaHa, LED INdIkATOpbT Ce BKIOuBa cФIKcNpaHa CBeTIInHa. HaTNCHE OTHOB TO2 3a da nKIIIOHTe acNpApota.
Tpetackopoct (T3)
HaTnche T3 3a da akTbBnpate Btopata ckopoct. Korato
fHKuIraTa e akTbBnpaHa, LED INDkAToPbT ce BKIOUcb a
fMKcnpaHa CBETInHa. HaTnche OTHOB TO3 3a da
nKIIOnHe acNpapota.
Taimep (T4)
TaimepbT M0ke da 6bDe aKtmbPahn, KOrato e aKtmbPapaHa nBpaA nn BTOPA INI TpTa cKOpct. Korato fHyHKmuTae a aKtmbPapaHa, KaTcLED INHdkatopbT ha Taimepa (T4) taka nTo3n Ha cKOpCTTA, n3bpaA npdeBaPteNHO (T1/T2/T3) ce BKNUcbATC fMKcPapa CEBTINHA.
TaimepbT npoDbIjXaBa da e aKTHBEH, B 3aBcIMOCT OT 136paHATA cKOpOCT:
Pbpa ckopocT T1 = npoBjnxTeHnOCT 20'
Btopa ckopoct T2 = npodbIjNKeTHeHocT 15'.
TpetackopocT:T3=npoDblnxHnHooCT 10
Korato eHaCKOcTe c TEMnop3aTOp, TaMepbT MoKe da 6bJe DeAeAKTNBpuH, Ype3 HaNTsKaHe HA T4 mIe EHa OT dpYrnte ckOcTn, KORTo He e AKTNBPaHa. 3a Da n3KlIOChte acnnpaTopa, HATNCHTe OTHOBo CKOPcTTa, Ha KOTo npEiTOBa eBil npINIOxHem TEmnop3aTOp.
CBeTnHa (T5)
CBeTInHaTMOKeJa6bIeakTnBnPaHa BbBCEKeEiHIMOMeHT,4pe3HaTnCKaHe Ha6yToHa T5.KoratoФунKuYraTeaekTnBpHa,LEDmNdkaTopbTeBkLIOvBa cФnkCpuHaCBeTInHa.
HaetpoKaHaΦnTbP
AknBnPaHTo NmN DeakTNBpuHaTo Ha INhDnKaTOpnte Ha
fnnTbpa MoXe Da Ce N3BpWBA cAmO npn N3KJIOueH
acnnpaTOP.
3adoctbIIO MeHOTa KOHcHpyaun,HaTnchTe npOdbNknteHIO T2+T3,eINH nB,T,B MeHIO T1 3aOnuHe da nyncupa.
Hacpojka n o npda3bnpahe e:
-Фиптbp cpeу Ma3HHH INHДИКaTOP (T2) BKINOueH, CJIeIOBATEIHO e aKTHbIpaH;
- p npotnB mnp3mN INdkaTOp (T3) nKIOueH, CLEDOBaTeIHO He e aKTbUpaH.
T2akTNbpa/deakTNbpa INdNkATopHa HaΦnITbpa 3a Ma3HNH. T3 akTNbpa/deakTNbpa INdNkATopHa HaΦnITbpa 3a MnpN3Mn. 3a n3n3aHe OT MeHOTo, HATNCHE npOdbJnxTeHNO T1 nIi n3kaKaTe 10"
Bb3ctaHOBABaHaΦnTbp
AcnpatopbT CnHAn3npa Ha peoBHN INTepeBaI,Ye 0nTTpTe Tpr6Ba Da bDat noDIOXKeH Na nOIDpBxka:
-ФИЛТБСЕЦУ Ma3HINH Na BCEKN 40 Yaca;
-ФиNTbP npOTnB MmN3Mn Ha BCEkn 160 yaca.
BTo3n Cnya, KOrato acnpatopbTe n3KnHueh, Korato notpe6ntenTdoKoCHe eINn pOn3BOeH 6byToH, INTEpFoeBcT 莚 cInHaJIuN3Ipa 3a 10" Dba Tnna Heo6xOJMOCT:
- ako T1+T2 nyncipat: nodpbxxka Ha phnntba p cpeuy Ma3HHH;
- ako T1+T3 nyncupaT: noDnpbkka Ha φnntb npotNB Mnpn3Mn.
IIO Bpeme Ha 10" e Bb3MOXHO da Ce Bb3CTaHOBn FInTbpT npOTB Ma3HNH, Ype3 HATNcKaHe Ha T1+T2 n da ce Bb3CTaHOBn FInTbpRa CpeUy MmR3Mn, Ype3 HATNcKaHe Ha T1+T3. CneI 3abPbBaHe Ha Bb3CTaHOBraBaHeto, KOMBHaunTe OT bTyOnn Ie MmRat 6bp3o Dba nTn. INtpeFcBt Cera Iue pa6Otn, KaKTo 6bIKHObe. BHIMAHIE:
IbBpeHa 10", acnnpatOpbt fynKUOnHpa HOpMaJHo, Ho Hma da IMA Bn3yAnHa ObaPaTHa Bp3ka 3a 6byToHnte 3a CKopocT. Ako no BpeHa 10" He ce n3BbpHnHTo eHa onepaIra, LED INndkAtopnte ige cnpa Da npncpata In Bn3yAnHATA 6bpaTHa Bp3ka ige Ce BbPhe KbM HopMaHnHOTo.
PoiDpBxka
Почистван
3a nouchBaHETo n3noJI3BaIte EINHCTBEHO Kbpna, HabJaxHeHa C HeYtpaIIH TeuHn NoUcHtBaIe npenapatn. HE N3NoJI3BAIte INCHTPMEHTN IIN PIPBOPN 3A NOUCHTBAHE!
Избягайтpeперарази,КоюТСьдьржатабраЗинчаси.HEИЗПОЛЗВАЕСПИТ!
ФИЛТьрзma3HnHH
ФИ.11
UcTpoIcTBpa3pa60TaHo,NcblTaHo Nn3roTOBnEHO B COOTBETCTBM C:
- Бez�ларость: EN/IEC 60335-1; EN/IEC 60335-2-31, EN/IEC 62233.
- 3KcIpyaTauMOHHbIe XapakTepcntk: EN/IEC 61591; ISO 5167-1; ISO 5167-3; ISO 5168; EN/IEC 60704-1; EN/IEC 60704-2-13; EN/IEC 60704-3; ISO 3741; EN 50564; IEC 62301.
EMC:EN55014-1;CISPR14-1;EN55014-2;CISPR14-2 EN/IEC61000-3-2;EN/IEC61000-3-3.PpeIIOxHeNnIpnapBnHbOIOICNOJIb3OBaHHaBnBcIeXCHIXeHnBO3dEiCTBmHa
OkpyxauuCypey: BkHOnHe BbIgXHO KONnak Ha MNHIMAbHo CKOpOCTN, KOrDa NaHmHaTe TOTOBHT, N OCTaBtE ero pa6oTaB B TeueHne HECKoBkIX MNHT NoCte TOR, KAK 3aOHnHte rTOBHT. YBeHNuBaIe TcKOpOCTb TOLbKO B CUYae 60JIbUoro KOINHeCTBa DbIMa N npa, N npin6eAte K INCIb3OBAHIO NOBbIWeHHbIX CKOpOCTe TObKO B 3KCTPemAlbHbX CNTyaUHX. 3AmEnHJeYrOlbNbIΦnIbTp(b), KOrDa 3To HeoBXODMO, DnI NOdEPKAnHJ XOPOSeI 3fFekTINBHOCTn yMeHbSeHnI 3anaxOB. OChuAte XInpOBoB/Be fInbTp(b), KOrDa 3To HeoBXODMO, DnI NOdEPKAnHJ XOPOSeI 3fFekTINBHOCTn XINOBTO FInbTpA. VcNoJIb3yIte MAKImaJIbHbI dNAmETP CNTeMbI BO3DyXOBODB, Yka3aHbN B DaHHOM pyKOBOIDCTBE, DnI ONTMn3aUN 3fFekTINBHOCTn MHNIMImaUM yOBHbU7MgA.
Пользоваиме
BbIyKa CnyKt DnB BcAsBaHn DaMa napa pinnpiroTOBHeHn PmU nPpeHa3NaeHa TOJbKO dN8 6bITOBORNCIOJIb3OBAHn.
BbIyKa cKoHCTpymPoBaHa dIpaBoBt BpeKIMe OTbOa BO3Dyxa HApKy mIpeNPKyJIaMn BO3Dyxa.

Icnonb3OBAHnE c pexKmE OTOBa BO3Dyxa
B 3TOM pexkime nCnapeHnBa BbIBOaTcH nApkyu cheE r6knI tyboPobOD,IOCDoeINHeHHK COeINHInTeHbOMy KOJIbU.
BHIMAHHE!
BbIbOJHna Tpy6a He BXoJNT B KOMPJIeKt N DoJXHa 6bITb npIO6peTeHa OTdJIbHO.
DInaMeTp BbIbOJHOITpy6I DJIJIxKeH COOTBETCTBOBaT DInaMeTpY COeINHHTeJIbHOro KOLJIba.
BHIMAHHE!
EcIN BbITRAKKa CHa6XeHa yrOJIbHbIM fIbTpOM,TOy6peIteero. IIOcEOdINHTe BbITRAKky K BbIBOJHOI Tpy6e C dIaMeTpOM COOTBETCTBYUcIM OTBepCTMIO BbIXOda BO3dyxa (coEINHITeJIbHbIΦnAHeU).
UctahOBka Tpyb C MeHbIIM DnAmETpOM DaCT yMeHbIeHMeMOuHOCTN BCaCbIBAHNA BO3Dyxa N pe3Koe yBEnHHe HyePOBHa UyMa.
IpoN3BODNTJIb CHIMaET Cce6BaBCaKyO OTBeTCTBeHHoCTb no OTHOHeHIN BOIIe Cka3aHHoro.
! NcnoJIb3ObaTtp6yCMMHMaJIbHO Heo6XoDMoIINHOJ
! NcnoJIb3ObaTtp6yC HAmMeHbIMKoINHeCTBOMn3rIn6OB (MAKcMmaJIbHi yOrn n3r6a:90°).
! N36eraTb pe3KOrO N3MeHeHnCeHeHn Tpy6bl.

IcnoIb3OBAHne B peKIMe peuPKyJauu
B03nyxa
HaxmTe T2 nIBy BkIOUeHnBTOPOCKOcSTn.Ipn BkIOUeHn 3ToI cyHKuIN, COOTBeTCTBYIOUcN CiD 3aRopaETc I rOpNT NOCToHHbIM CBETOM. ChOba HaxmTe Ha T2 nIBy BkIOUeHn BbITXHOr KOJnaka.
Tpebckopoctb (T3)
Haxmte T3 nIBy BkIOUeHn BTOPO CKOOPCTn. Ipn BkIOUeHn 3ToI cyHKuIN, COOTBETCTBYIOUcN CIVd 3aRopaetc n Iropnt NoCToARHHbIM CBETOM. CHOBA Haxmte Ha T3 nIBy BkIOUeHn BBITXKHO KONnaka.
Timer (TaMep) (T4)
Timer MOxHOBKIOUOaTb npn BKNIOUeHHbIX NepBoi, BTOPOI nn TpeTbeckocoptt. Ecn 3TaФyHKUINBKNIOUeHO, To CND Timer (T4) n CND pahee BbIbpaHNOckocoptt (T1/T2/T3) 6bydT ropeTb NOCTOHNbIM CBETOM. IInnteNbHOctb paOToI timer 3aBcNt OT bIbpaHNOCKOCPTt:
PepBaCkoOpocbT1=JnnteBHOCTb20MnHyT
BtopackoocTbT2=JnnteJbHocTb15MnhyT.
TpetbckopocTb:T3=NTteNbHocTb10MnHyT.
Korda oHa n3 ckOpcte pa6oTaET c TaHMePOM, MoKHo BbIKIOHT timer/taHMeR hAnaTeN M KHOKN T4, IIN JKe HAnaTne KNOHKn IIO60 dpyToH He BkIOUeHHO CKOpOCTn. DnBa BbIKIOUeHn BbITXHOr KOJnaka HaxMnte CHOba Ha KHOKNy ToI CKOpOCTn, K KOTopoB 6bl npImHeH TaHMePbI peXIM pa6Otbl.
Побсветка (T5)
IIOcBtKa MoKET BkIOnaTbC8 B JIo6oMOMeHT HaxaTneM KHOJIK T5. IPrn BkJIOnyEnH N 3ToN cyHKuN, COOTBeTCTByOuN CIVd 3aropaetcN rOpNT NOCToHHbIM CBETOM.
HactpoKnФmJIbItpa
BkIIOHHe H BbIKIOUeHHe INdMkaTopoB φnIbTp a MoKet npOIM3BOIDNTCBa TOnbKO Y BbIKIOUeHHOro BByTJXHO KONNaKa. IJI IOCTyNA K MeHO KOHNpyaUN HxHO BbINOHHT b OIIrOe HAnatne Ha KNOpKN T2+T3. IocNe BxoJa B MeHO T1 NaHHT NpIbCnPOBaTb.
Преуновленьая Насточа ТAKОВА:
- JxnpoyuabnBaIoUmIΦnIbTp INDnKaTOp (T2) rOpIT, To ECTb BKJIHOeH;
-ДezoOpnpuOuIиФиltpИнДиКaTOp(T3)He rOpIT,TO
ECTb HE BKJIIOUeH.
T2 BKNIOUaET/BbIKNIOUaET INIINKATOP XINPOUYIABINBAIOUeO
fNtBtpa.T3 BKNIOUaET/BbIKNIOUaET INIINKATOp
Te3OOpnpYIOUeO fNtBtpa.IIpaBIXOJa I3 MeH0
BbINOHNTE IINITeJIbHOE HAXaTne Ha KHOJky T1 nIi
IIOOJNTe 10 cekyHd
BocstaHOBJIeHneФnIbTPOB
Yepe3 onpeIeHHeIe INTEpBaIbI bBITJxHOI KOnnak CnIHAnImNpyET O Heo6XoIMOCn TExo6CnyKuBaHnIaPbTPOB:
- xinpoyIaBnBaIOuIe nnIbTp KaKdIbe 40 yacob;
-De3oOpnpuyoosmΦnIbTpKaXdbie160yacob.
B TAKHx CnyaX, PnB BIKIOUeHOM KOJINake, B MOMENTPINKOCHOBENI NOJIb3ObaTeNA K IIO60I KNOpKE, INTEppeIC6yETCnHAIIm3IpOBAtB TeueHne 10 cekyHd O DByx TmNaXHeo6xOdmblx Opepaui:
-
ecnT1+T2 nylbcnpyoT: texo6cnykBaHne KnpoynaBnBaHOoero fNtpa;
-
ecnnybcbnpuyT1+T3: texo6cnykBaHne de3oOpnpuyuOe oJnbtpa.
B TeueHHe 10 cKeYnD MoXHo C6pOcHTb HnDnKaUHn
KxnpOyAaNbaOuJero FmIbTa nHaKaTneM T1+T2 n
HnDnKaUHnDe3oOpOpnyUoEo FmIbTp aHaKaTneM Ha
T1+T3. TocB neBIOHHeNc C6pOca KOMbHaun mTHnx KHONOK
6bIcTO pMIHyT daBa3a. TepeB nHTepeFc6 yEdet
ФунцINOHPOBaTb, kak ObIyHNo.
BHHMaHHe:
B TeueHHe 3nX 10 ckyHb BItjxHKn KoJInak 6yIe paOtaT b HOpMaNbHO, HO He 6yIe Tbn3yAJIbHO O6paTHo C83n Ha KhoNkax BKnUChEHHa CKOpOtei. EcJIN B XoJe 3nX 10 ckyHd He 6yIe TblONlHeNo HnKaKnx DeIcTBn, CNDbI nepeCTaHT nyIbCnPoBaTb Nbn3yAJIbHa O6paTHa C83b BepHETcK HOpMaNbHOMy pexmmy.
yxo
OuNTka
Дя Oунстkn Испolyte TOЛьКО cneцалыну Трянky, CMOЧЕнHyо HeITpaIbHbIM JxIDKIM MOLOUM moedCTBOM. HE IСПОЛБ3YITE HNKAKNE NHCTPYMEHTbl ДЯ Oунстkn. He npIMeHЯTe cpeDCTBA, coedePkauNe abpa3mBhIe MaTePnAbl. HE IPIMEHЯITE CnINT!
Фильтpbi 3aiderkkn knpa
Pnc.11
YdepKnBaET qactnbl Xnpa, nCXoJaune Oe OT JInTbI.
Фильтслдуетчпгьжмсян HoarpeccnBbIMM MoHcIMM CpeDCTBaMM, BpyHyu IIN B NocydomoeHoi MaUNHe Пи ИЗКОТ TemNepaType I 3KOHOMHCHOM KInKle МЛТЯ.
PmMbIbBe B NocyDOMOeHNO MaUNHe MOKET MeTb MeCTo HEKOTOPoe OecBcEuyBaHne JNPOBOro FnIbTpA,HOero FnIbTpRuOaXapaKTepNCtNa ocTaetc a6coNHTHO HEN3MeHHoI.
IЯ ChraTna JnpoBOrO fNlbTp a NotaHnte K ce6e npDpyKHeHHyO pyky OTcENHeHna fNlbTpA.
YrOJIbHbI ΦnIbTp (ToIbKO BpeKIme peuRpyJauu)
Pnc. 12
Ydannet HnptnTbIe 3anax KyxHn.
HacbIeHHe yOrlbHorO fNbTpa npoCxOaNT no IcTeYeHnB0one Hm MeHee dIInTeBHorO nepNoa 3KcPnYatauIm, npdeOpnepeJemorMO TINOM KuxHN n nepNoDnUHcOtBHO OOnCTKN KxipOBx bFnLbTPO.B NIObOM cnuae, ZameHnTe KaRPtJXk NO kPainHe Mepe cepE3KaXDbie 4 Meca.
YornbHbIΦnBtp HE IopJeKHT MoKe IIN pereHepaun.
Kpyrbly yrorhbln qniltp
Ppnaad cnpoeKToBaHO, BInpo6yBaHO i BnroTOBneHO 3rJHO 3:
-Бezneka:EN/IEC60335-1;EN/IEC60335-2-31,EN/IEC62233.
- EKcIpyatauHmI kocti: EN/IEC 61591; ISO 5167-1; ISO 5167-3; ISO 5168; EN/IEC 60704-1; EN/IEC 60704-2-13; EN/IEC 60704-3; ISO 3741; EN 50564; IEC 62301.
EMC:EN 55014-1; CISPR 14-1; EN 55014-2; CISPR 14-2; EN/IEC 61000-3-2; EN/IEC 61000-3-3. Iopadn npabinbhoi EKcnnyataui Ta dna 3HNOXeHHB BnIMBy Ha cepedobuie Bmkaite BnTAAkHu MHiMaIbHy bWbIDKCTb neped noaTOM pnrOtyBaHH iKi, iZanMaaite II npauoBAtn Ha deKInbKa XBNINH nCtzaKHeHHn pnrOtyBaHH. 3bIbUyIe WbIDKcIb T tBkn y paai BeNkoi KInbKOci DmY i napy Ta BnKOpCTOByte HndyB tBkn y kPainH BnAdkax. DnI niDTPmaHnB BnCOKI eefKTmbHOCTi BnDAJIeHHa ZanAix, 3a Heo6xIHOCtI, BnKOHyTe ZAMHy ByrIbHorO(-x) fbltpy(-iB). DnI niDTPmaHnB BnCOKI eefKTmbHOCTi fbltpy KmjRiB, 3a Heo6xIHOCtI, BnKOHyTe MCTKY fbltpy(-iB) XjMpIB. BnKOpCTOByte MaKcMaIbHN Diametp
CNTeM NOBITPOBODI, 10KBA3AHy IHCPTyKUJI DnIa ONTIMi3aJI eEeKTHBOCTI Ta MihIMi3aJI WMy.
BnKOpNCtAHH
Bntjxnn KOBnak CnpoeKTOBaHm DnB BCMOKTyBaHHaMy Ta npay, 0o yTbOpocTbc nD ac npiroToBaHH aXi Ta npin3HaueHm IInse nObyTOBO BRkopunctaHHa..
Bntjka po3po6IeHa dI pyo6Ou B pexMIMBCMOKTyBaHnR, BvBOJ4N N0BITpr Ha3OBHI a6o B φiNbtpyOCHyOMpeXMMI 3 peUpKyJIaIcIO NOBITP.

BapiaHT BiBVeHnHa
Iapn BnBODaTbCn Ha3OBHn Iepe3 BnBIDHy Tpy6y 3akpinHeNy DoФlaHn4 3'cDHaHHN.

YBAGA!
BvbiHa Tpy6a He noctaetbca i Tomy Heo6xidno II npndatn Okpemo.
IiAmetp BvBjIoH Itp6n NobInen BiNobiDaTH iAmetpy 3'cHyBaJIbHOrO KJIbU.

YBAGA!
YKUO BNTXKNH KOBNAK MaE ByrInbHi FInbTpN, To iX Tpe6a 3HATN.
Пд' endaTN KOBnak Do hactiHNo BvBidHO Tpy6n Ta BvBIDHoro OTbOpy 3 OndaKOBm Diametpom BxXoY Nobitpr (3'edHyOnnФlaHeu).
BukopncTahn HactiHnX BvBiDnX Tpy6 Ta OTbOpi 3 MeHIm DiAMetpom IpNBeDe Do 3MeHWeHH eEeKTHBOcTI BCMOKTyBaHHaTa 3Haue He 3bIbWeHH pIBH yMy.
Tomy Mm 3Himaem 3 Ce6e 6ydb-ky BiinobiidaIbHiCtB no Bnuecka3aHOMy.
! BnKOpncToBnyTe HaNkopOTmBnTjxHnn KaHaJ.
! BnKOpIcTObyIe BnTJxHNI KAHJI 3 HaMeHIOKINbKiCtIO NOBOpTiB (MAKCMaJIbHNI KYT NOBOpTy: 90^
! YHnKaIe Te pi3Kx 3mIH nloCi nepepi3y BNTJXHO KAHaNo.

Bapiant 3 pfinbtpauieio
B Ta TnT 3HexKnpOeTbC Ta OOnuTyTcTa Ta 3HOy NOBepTaTcB B npMlueHn. ITO, 06 BVNKOPNCTOBYBATN KOBnak y CbOMy pexIMi, Heo6xJdHO BCTaHOBTN DoaTKOBy CNTeMy fIbTpIB 3 aKTINBOBaHm ByrIJIAM.
Ihctanlaia
BIDCTaHb HNkhBoi BiDuaCTHH BITJAKKn Do NocuNy Ha kxyoHni PNIIT Mae 6ytn He MeHsE 45cm, y BnnaKy eKeTpuHnx PNT, ta 65 cm, y BnnaKy r3OBx Ta KOM6IHOBAHX PNT.
Heo6xioH npinMaTH Do yBarn BiDCTAHi, kki Bka3yHbCBA IHcTpyKuii 3 IHCTaIaII ra3OBoI pIHTN.
Ja nokaaHn ha Kpecnennx no yctahOBu npocBepInTu 6 OTbopir (08MM rIin6HHO 40 MM), B Micxw Bka3aHnx Ha wa6bnHi CbepiHH, uo6 3akpInTu BNtAkky i KpoHtTeH niTpmkN kamiHy. PobiprTu B kiH zuCTAHOBKn Y BuTAAKki kamiH e 6e3doorHO BpuBnHi.
Bntjka npn3nahe nIpyctaHOBKn Hnd nIHTOIO, 0o MaC He 6iNbwe 6 HarpibanbHex enemehTIB.

Nepsha wbnkictb (T1)
HaTnCKyTe T1 nBkIIOUeHHn nepwoi uBnKoCTi. Pnp BkIIOUeHHI ciE iFHyKcII, BiIDnoBIDHm CId cnaIaxe i ropntb noctiHMM CBTJOM. 3HOBy HaTnCKyTe Ha T1 nDa BKNJIIOUeHHN BNTXHORO KOBNaKa.
ДурашвдкICTb(T2)
HaTnCKyTe T2 nIe BkIIOUeHHaDpyoI WbNkOcTI. Ipn BkIIOUeHHI ciEi cyHKci, BiINOBiDNH CId cnaJaxe i ropntb noctiHm CBITlOM. 3HOBy haTnCKyTe Ha T2 nIa BKNJIIOUeHHBNTXHORO KOBnaka.
Tpe TaBnKicTB (T3)
HaTnCKyIe T3 dIa BkIIOueHHdpyroI WbNkOcTI.Ipn BkIIOueHHI cieI cyHKci, BiIDnoBIDHm CId cnaJaxye i ropntb noctiHm CBITlOM. 3HOby HaTnCKyIe Ha T3 dIa BKNIOueHHBnTRXHORo KOBnaka.
Timer (TaMep) (T4)
Timer moxha BkIOUATn npB KIOUeHIN nepoio, dpyoi a60
tpetboi wBnkocti. RaIoo Ia FyHKJIB BKIOUeHa, TO ClD
Timer (T4) i CId paHie o6paHOI WbIKocTi (T1/T2/T3)
6dytbropitnoctiHMMCBITLOM.
Tpnbnictbpoobtn timer 3aIeJntbBID o6paHOI WBnKocTi:
Pepwa WbNdkicTB T1 = Tpnbnictb 20 xBNH
Dpyra WbNdkicTB T2 = Tpnbnictb 15 xBNH.
TpetaBnKicb:T3=tpnbajcTb10xbnnH.
KoIOn OJHa 3 WbNdkOCTe npaUcE 3 TaMepOM, MoXHa BIMKHyTN timer HATNCHEHHM KHONK T4, a60 X HaTNCHEHHM KHOKN 6yNb-kaoi iHWOi HE BKIOHeOH IO WBIDKOCTi. IIN BIKJIIOUeHHBINTJXHO RO KOBnaka HATNCKyIte 3HOBy HA KHOKNY tIEI WbNkOCTi, Do KaOI 6yB 3actOCobAHn TaMepHN pexm pObotn.
Пдсвуваня (T5)
Bknouehn i BnknoeHH nDnkaTopib pfInbtpy MoKe 3diinCHOBATNCJIne y BmKHeHO BRaXHOro KOBnaka. IJa doctyn Do MeHO KOhFirpaui NotpiHo BVKOHaTn DOBe HAtncHEHH Ha KHOpKn T2+T,PiCnBy BMeHO T1 noHc nylbCyBaTn.
IpepeBCTaHOBHe HanaWtYBaHHr Take:
- JnpooyOBHOBaBbHm fInbTp iHnKaTOp (T2) rOpntb, TO6TO BKNIOUeHn;
-De3oOpuyounΦiNbTp iHnKaTOp (T3) He ropuTB, T6To HE BKJIIOUeHm.
T2 BKNIOUae /BIMNKAe iHINKaTOp KINPOYIOBIOBAJIbHOrO
φiIbTy. T3 BKNIOUae /BIMNKAe iHINKaTOp De3OIOpyOHOrO
φiIbTy. ΠnA BNXOy 3 MeHIO BVKOHaTe TpNBaIe
HaTIckAHNa HkONKy T1 a6o NoceKaTe 10 cekyHd
Bidnoenna cstatycipnbtpib
Yepe3 neBHI iIeRbAIN BnTJxHNI KOBnAC CnHAni3ye npo Heo6XiHicThb Texo6cLyroByaHaHHaΦinbTpib:
- KInpooyOBHOBaIbHnΦInbTpKoXHi 40 roDnH;
-De3oOpuyounФiJIbTpKoXHi 160 roHn.
Y TAKINB NIIaIakx, INP BIMKHEHOMY KOBnaky, B MOMENTdoTky KOpNCyBaVa 6yDb-RAKOI KHONK, IHTeppeic 6ydeCNRHaJI3yBaTn pOITrOm 10 cekyHn npo DBOX TnIaxHeo6xIDnIX Oepaui: - RAKUTo T1+T2 nyIbCyHb: texo6cnyroByBaHHJXnpooyNoBnOBAhBHO φInbtpy;
- RAKUo T1+T3 npIbCyHtB: texo6cnyroByBaHHa De3oOpuyOro oinbtpy.
IpoTROM 10 cekyHd moKHa cckHytn iHdkaio
XipooyOBIOBbHOrO fInbtpy HATNCHEHNrM T1+T2i
IHdkaio De3oOpyOHO rOfInbtpy HATNCHEHNrM T1+T3.
PiCnBa BIKOHNNrCbO rCKDaHH, KOMbIaIIu Xx KHONkO
UbnKO 6bnmHyTB DbiHi. Teep INTEpceic cyHKcIOHyBaTMe,
JAK 3abXdN.
Ybara:
IpoTROMx10ceyHbBnTJXHHKOBnak 6yde npaIOBATN HOpMaJIbHO, ahe 6yde Bi3yAJIbHOro 3BOPOTHO 3B'3kYHa KHOIIKAX BKNIOUeHNH IuBnKOCTe. RaIoo B XoDi x10 ceyHd He 6yde BIKOHAHO XoDnHX di, CIINpepctAHyt bnybcBaTH, i3iayJIbHH 3BOPOTHH 3B'3OK nobepHeTbCdo HOpMaJIbHOrO peKIMy.
Доглад
YnCTka
Дячск ВИКОПСТОВУТЕ ЛИЗЕ Спесь lycepebetky, HAMOЧENH HeITpaJIbHIM piIKM MInOHIM 3acOBom. HE BIVKOPICTOBYTE 3ACOBIB A50 IHCTPYMEHTIB ДЯ OCHUSEHH!
He BnKOpNCTOBYIte 3aoc6n IIO MaOTb abpa3mBHi MaTeiApIi. HE BnKOPNCTOBYIte CInPIT!
ΦInbTp 3aTpIMKn JxipB
Man. 11
3atpmyc xnpoBi cnoJyehn, 10 BHHKaIOb niD yac nprirotyaBHn iXi.
Повинецчелпгьдддддддддддддддддддддддддддддддддддддддддддддддддддддддддддддддддддддддддддддддддддддддддддддддддддд徳н <|im_start|>assistant Повинецчелпгьдддддддддддддддд徳н Мнокиммзасбам,Врчу a60В nocуомнй Машни рп Ниькін Temпетатулі з коротКIM LИКЛOM.
Пи PMNTI B NOCyDOMHII MaSHNI MeTaNEBM pINbTp 3aTPMNKxNpy MOKe BTPaTITN KOJIp, aNE IYO XapAKTePcTnK 3 pINbTPyBaHHJ KODHM YIHOM He 3MiHrTBcR.
ДяЗИТТФIпьТу 3aTpIMKmJxpyNotrHITbHa c6e npyMHHy pykkyBIDcENPeHnФIbTpY.
ByrIbHn IpIbTp (tIbKn B pexmippeu npkyuai)
Man. 12
B6npae HennpncMh3anaxu kxyxhi.
IpebeBpka ByrIlbHoro fipbtpy Ha HacnueHHN pOBoDHTcBc nICJIa 6blu MeHUs DOBFO repOdy BIKOPNCtAHN B3aJIeXHOCT BiD TmNy KxHi I peryIaRPHoCTi OHCTKn fIpbT py XmIPiB. Y bIb-RAKOMY BinaAkiye Heo6XiDNo 3aMIHTn NaTPOH MaKcIMym KOKHI YoTIPI MciUli.
HE nidae MMTTO qnoHOBneHHIO.
Kpyrnn Byrnilbni fipnb
PnKnactn pInbTp n 06nbDi cTOpOH nIyNOKpTT3aXHCHNX pUitok potopa DnBHyHa, nicJrO YOro NOBepHytn pInbTp 3a roHHNKOBIO CTpiIKOIO.
ДяЗHA附T-NOBEPHyTN pInbTp npOTn rOdiHHNKOBoi CTPIK.
3amHaJAmn
Man. 10
BidKnIOHnTn npnnad Bid eNeKtpomepexi.
Ybara! IepiHIX TopkATn lamn Hnoe6xIDHO BneBHNTICr IO BOHN OXOJIOnI.
3aMHITN NIOKOKEny NaMnOky Ha HObY TAKORO X Tmny, YK 3aHaeho Ha etKeTlJI, abO npuy 3 NaMnOkuo HA BtRkUJI.
- BmMItb 3axnChn enemt 3a donomoroI HebeNkoi BkpyTkn abo noDi6Horo IHcTpmyt.
- 3amHInTN PnOxKoJEny lamNoKy iNHOI lamNoKoHO LED a60 ranorehKOHO, 3 TAKIMM CAMHMX xapaKTeprCTNKAMN I0 Bkaz3aHI Ha etMeTJI xapaKTeprCTNK a60 NoBHy lamNoKH: lamNoKHa LED:IOdo IX 3amHn 3BeptaiTeec DO cnyKb EtnHiO OcbnyOByaHHra.
7anEHHa lamNoKoHa:12V-20W MaKc-G4 (Hamaraohncb He DotopKaTNC pykAmi). - 3akpiTe pnafoh (kpinneHnHa 3acyBkoHO).
Kikuo cnctema niccbitkn He npauoc, nepebeipte Bipny yctahOBky lamn Br hi3da, peped TMM Yk 3BepTaTmCra Do ceHTpy TexhiHOI dONOMORN.
JaBnIaaybI acnantbI naIanany 6apbcihda 6yn HcykaDBeNJIeHReK KOIaNHy 7apTtApBH CaKTamaFaHHbIH KecpiHEn 60fAH ONkblIK eP NT neH 3aKIM yuiH Xayan 6epMeiDi. CopfblI TEK KAHa Ynde naIananaHf 6onatbIHdai etin JxObaanHFAH.
KaKnak ocbi kitanwada Kepcetinreh cypeTepen e3rewe 6oBIn Kepinyi Mymkin. DereHmeh, Kondahy, texnkaIbIK KbI3Met Kepcety XHe opHaTy Hxckaynapbl 6ipDen 6oJaI.
Ke3keIreH yaBbTTa 6yn HycKayMeH naJaNaHy yuIH aKtaFaH MaHbI3bl. BybIM catbJfAH, TanCbIPFaH HeMece KOnBILFaH Ke3de ON OHBMe6ipre KaNFAhBaHa Ke3 KeTki3iH3.
Hcyaydb MyKnT Okbl3: OHda 6yamdb KoHdbpy, naJaIaHy XHe Kaybinc3dk Xehinde MaHb3db MeJIMet 6ap.
БуныMHbIH əNeKtpoHdbI K Hemece MexaHnKaIbIK KOHCTpyKUrycblHa Hemece copfbl W BeHTINJIyraNbIK KaHaJdapblHa eKhdaJ da e3repicTeP JxacamaHbI3.
OpHaTuDbI opbHdAmac 6pybH 6epiReH 6apNbIK KypamdaTcAtpB13aKbIMdaMaHaBbIH TeKcepiH3 Hemece opHaTuDbI KaJFaTbIpMac 6pybH DePdAnFxa6apnAcbHbI3.
Eckenthe:"(") TaH6acbI 6ap 6JIikTeP TeK KeB6ip Ynirinepmen 6epinTeH (6aca KaFdaJnapda 6epiimeTIn), 6ipak catbIn anyf aOnaTbH KocbIMsa akceccyapnap 6Obn Tabblnabbl.
! HycKaynap
Ke3 KeIReH Ta3aJay HeMeceTexHnKaJIbIK Kbl3MeT KOpCteTyKymbICTapbIH opbIHdAmac 6ypbIH aUHaHbI bIfapy HeMece JeJIiIK KyaT Ke3IH axbIpaTy apKblblcOpfblHTbl əJeKTp JxJIiCiHeHaXbIpaTBHbI3.
OpHaTy XaHe TexHnKaIbIK Kbl3MeT KepcTeY XyMbICTapbIH Kypri3reH Ke3De aPdaiBIM XyMbIC KOfA6bIH KniH3.
-Бул Крьлгын 8жacTaы
ЖэHe Oдан унkeн балanap, DeHe,
ce3y Hemece aKbI-N-О
KaBineTTEpi WeKteyni TУnfaIap
Hemece TExipu6eci MeH 6iJimi
JOK TYnfaIap OHbl Kayinci3
ЖоЛмeн падануfa KaTbICTbI
HyCKay aNbIn, bIKTmAmJI
KayinTepei yfblHfaH XaFdaNda
XeHe 6akblayda 6oJFaHda
PnaiDanaHa aIaNbl.
Баллардын ьамentTepiH e3repTyiHe XaHe KypblfblMeH OINaybHa XOJI 6epmey Kepek.
Ta3aay XHe 36eTihwe TexHnKaIbIK Kbl3MeT Kepcety XyMbICTapbIH 6aJnapDbIH 6aKblaycbI3 xypri3yije 6oImaiIbI.
- Acy copfblbbl baca ra3 xaFy KypblfblnapbImeH Hemece baca OTbIHapMeH naJaHaNbIHaF Ke3de, Kypblfbl opHaTbIHaFb 6JMe XeTKiJIkTi TpyDe JeIeTeTInyi KaKet.
Copfbltbi iWihEn De, cbiptbHaH da JyneJI Tpyde (KEM DEIeHENDE AINbHA BIP PET) Ta3aJay Kepek, aPdaiBIM TexHnKaJIbIK Kbl3MeT KepceTy HcckayIbIFbIHDa bepiInreH HcckaynapDbI opbIHdaHbI3.
CopfbIbTbIH Ta3aJAY CTaHdapTTapbIH XHe cy3rInepdi aAMactbipy XHe Ta3aJAY BoiBbHsa epEkepepi
- yctaH6ay HETNXeCiHNe ePT TybIHaaybl MymKIn. TaMaKTbI TIkeJeI copfblu aCTbIHda XaHdbIpyfa KaTaH TblbIM caNbHaDbI.
- UaMbI aybICTbIPy ywiH TeK OcbI HyCKayNbIKTbIH «TexHnKaJIbK Kbl3MeT Kepcety/UaMdapdbI aybICTbIPy》 6eImiHde KepcetIJIreH IaM TpyiH NaIdaHaHbIHbI3.
AaBbHDbI naJaHaHy cy3rIep yuH 3nH XaHe ePT KayniH TybHdaTybl MymKiH,
coHdbIKTaH Ofah eUkaUaH KOJI 6epMey Kepek.
MaHbIH 7aMaHaTbIC Kbl3bIn HeMece KaHbIN KeTneyiH KaMTaMaCbI3 eTy yuH, TaMaKTbl a6aIan KybIpyKaJcET.
CAK BOJbIHbI3: CopfbltbiH KOJIkeTImDi 6eJIkTepi TaMaK DaIbIHay KypblJFblJaPbI NaIdaIaHaBILFaH Ke3De KbI3bIN KeTyI MymKiH.
-
Ophaty Tobilbik aayktaJMaBihwa KpyblfblHbI 3JIeKTp JxeliciHe KocnHaBl3.
-
BydibH 乌bIyBHa Kapcbl KOndaHbJIaTbH TexHnKaNbIK XHe Kayinci3ik WapanapbH eckepe OtbipIn, Xeprilnkti Bnik opraHdpbl BeKtKe H epexeIepdi MyknATOpbIHdayMaHb3bl.
OcbI KpyblfblHbI TYtIK apKbIbI 6aBfITTay Kyyneicnra3 HeMece 6acka OTbHdbJ XaFaTbH KpyblfnapdAn ShlkKaan 6ynapDbI Shlfapy CnKtBb 6acka Da MaKCaTAPda NaDanaHbIaNbTH Ke3 KeIReH KonDaHbICTabI JxEnDeTy KyeineHe XaNfay KaKxt. 3NeKtp TorblHbIN CORY KayNihe BaNlaHbICTbl WAmbl Dpybc BEkITINMereH copFbIwTbI naDanaHbAbI3 KHe KaNDbIpMaHbI3. - TopnapbI Tnicti Typde 6ekitImereH copfbltbi ekwkaan naDanaHa6aHb3.
- Aphaы! KepcetIIMMeIHHe, copfbltby EUKAUAH TIpeK 6eTI petiHne naIdaIaH6aHbI3.
- Tek opnaty yuin Ehimmen bipre 6epinren 6ekity 6yaapanapbIn naiDanaHbI3, erep 6epimce, 6yaapanbHn TniCi TyPiCatbIn ablbI3.
ByaHdAnapdbIh opHaTy HcKaybIfbIHda KepcetinReH dypbic y3bHdIfbHnaiDaNaHbHb13.
KymHdHaCahB3, ekilTti KbI3MeT KepcTy BoiHwa XepDem KepcTy optaIbIbHa HemeC Tnici MaMaHaHaFah TyIaFafa xa6apnaCbHbI3.
ECKEPTY!
-Бураздаларды Hemece 6eKity KpybIfbcIH Ocbl Hyckaynapra caikeopHaTnay 3neKtpniik KayinTepre ekenyi MymkiH.
- BaIapIaMaIayUbImeH, TaImePMeH, 6eIek KaUbIKTaH 6ackapy KJyIecimEHemeC aBTOMaTTbI TypJe KocblNaTbIH Ke3 KeJIreH 6acka KypblfBImeKoJlaHaHaHbI3.
3JNeKtpnIK XHe 3JNeKtpOnHbIK acnAnTapIbI KaTaNanJaTa acbpy XeHiNderi 2012/19/EC EbpOnaBik DnpeKtNBke (WEEE) caiKeC 6epinreH eHIM TaH6aNaHbl.
BepinreH eHIMdi dypbic KaTaNanDaFa acbpydbI
KaMTaMaCCbI3 eTymHe, C3 KOpIaFaH opTaFa XeHe aDAM DeHcayIbIbHa Kepi EcePi TnI3y Di 6oJIbIpMayFa KEmeKTececic3.

Acnantarbl HeMece KonlDama KyktaTarl TaHbAcbl 6epiReh acnantbl KaTaNlaFa acbpyda eDeTeri TypMbICTbIK KaNbIK peTIHe nrepyE boImaTbHIn Kepcetei. OhIn opHbHa 3NeKtpnik XaHe 3NeKtpoHdbIK acnantarpbl KaTa naIdaRa acbpyra apHaJIfah KaBlnday NHTIHe tancbipy Kepek.
Byyra tancbipy acnantb Kaeta naJaFa acbipy KehiHderi XepriNtI epexenepre caikec 1blfapblnybl Tnic.
BvHdai eHIMeepi naIaIaNHy, KaI Ta naIaIaRa acbipy epexenepi XeHInDe TOnbIK aKnapatTbI KepriIikTI ekIMwiNik opbIHapbHaH, KaNbIKTapdbI kaTa naIdara acbipy Kb3MeTIHeH HeMece 6epinreh eHIMdi C3 catbin anfah dyKeHen ana analacbl3.
KpybIrfkeneincinepre caJxO6aHaHaH,cbHaHaH KHe Jxacan sbIrapblfah:
Kayinci: EN/IEC 60335-1; EN/IEC 60335-2-31, EN/IEC 62233.
- ΘΗΠДιΙΚ: EN/IEC 61591; ISO 5167-1; ISO 5167-3; ISO 5168; EN/IEC 60704-1; EN/IEC 60704-2-13; EN/IEC 60704-3; ISO 3741; EN 50564; IEC 62301.
EMC: EN 55014-1; CISPR 14-1; EN 55014-2; CISPR 14-2; EN/IEC 61000-3-2; EN/IEC 61000-3-3.
KopwaFAn optara əcepdi aazainTu ywiH duypbc naaanaHy typalb Hcckaynap:
3zipnydi 6actaHaJa KaKaNTbI eH a3 KbldAmdbkneH KocbHb3 XaHe a3ipney aaytaFaanHn KeiH bpa3 MNHT BoBj XyMbIC icTeiH3. KbldAmdbkTa TcK TyTINH HxHe 6yDhY LKeH MeJIeepi XaFaBaNHda apTTbPbHB3 XeHE KyWeu TYbNdAmdbfBn(HKTapBn) TeK WeKTI KaFdainapDa naiDaIaNbHb3. XaKcbXaFbIMCb3 niCti a3aTy TImdiinirCaTay YwH KaKet 6BonFaHa kemip cy3ricn(Nepi) aybcTbPbHB3. XaKcbMai Cy3rici TImdiinirCaTay YwH KaKet 6BonraDa Mau cy3ricn(Nepi) aybcTbPbHB3. TImdiInKi OThaNaDbpy XaHe WSyDb 6abHwa a3aTu yWih OcbHyckaybIKTa KepcTeINReH eTKi3y KyueciHnEH YNKeH DnaMeTpH naDaIaNbHb3.
Паддалиу
CopfblTamaK 3eipnerHe naIa 60nataBH TTVIH MeH 6yblCopbl anyfa XHe TEK TyPbICTbIK MaKcatta KOndaHyFa apHaHaF.
Copfblcblpaay6ypfblb6ap TaTpY keIeTkiipetihne,HeMece iki KaIa aHany cy3ri piTeiNe naDaIaNHyra apHaNFaH.

Copy Hyckacbi
By cbipKa biikipuyi fpaHeuKe KocblfAH copfbIkw KybIp apKbIbl WbIfapblnadbl.

ECKEPTY!
Copfbl K6bipdbH dAmetpi 6ipiKtipuyi caKHaBbH dAmetpimTeHdec 6ony Kepek.

ECKEPTY!
Copfbll Ky6bIpbI copfbll XnHaKtMaCbImeH XeTki3iImeNi, OHb 6eNEk catbn any KepeK.
Copfbltbl Kabfpadaftb copfbl Kxgbipnapb Meh aya 1bIfapatbH TecikTepde, con dnaMetpderi TecikTepre Kocblb3 (biiktpiyu pfnaheu).
Ka6bipraaBc copTbIu Kx6bipnapbI MeH KeMDey dAmetpreri Teciknt naDanahy, copy KyaTbIH HaWapnTaBIn, rypindeYiH KyweTei.
! KaKETTI MNHIMaJIbI Y3bIHbIKTaFbI TYTikTi KOJdaHbIHbI3.
!BapbHwaKeiinimiBapTyrTiKoJaHbIb3(iniimHiMakcImaIdb6pybIb:90°).
! TytikTH KENDeHeH KIMacbIHda TY6ereNti e3repictepdi 6oJIbIpMaHbI3.

Cy3y Hyckacbl
On yuinbip kemip cyrici kajet, OHbl eDetteri caTyubnapan anyfa 60ana.
Cy3ri 1bIrapIbnFaH ayahbl XOFapFbl 1bIFbc TOpbl apKblbl 6eMere kaTt Kaibepy anBda Ohbl Ma Mm HicTepeH Ta3aTpAbI.
KoHdbipy
Copfbltih TEmHri Kbipb Meh bIdic acbHaftiipeiyixa3bIbIbHap aKaBbIKbIbI 3NeKtp pNITacbi ywiH 45cm, an ra3 Hemece biikipinre nPiTanap yiw 65cm den kem 60nMaybTnic.
Erep Hcyka yda ra3 nnntacbH opnatyfa apTbIbIpaKapa KaawbIKTBk 6enrineHren 6onca, OHbl eckepiH3.
KaknaktbH tipeiyu KPOHtEHH XHe Mypxahbl6ekity yuih, bprbnay yrrniciHde 6enllneHreOpbHndpcaype TcpeTcTeHreIe 6 tecik (DnAmetpi 8 MM, TepeHdi 40 MM) JkacaHb3. OphatKaHHa KeHH, KaNk nen Mypxa dAnMe-dTpyanaHaBHaKe3 xetKi3iH3.
Copfb6 Kb13bipy 3nemehi 6ap neu yctihe ophatyfa aphaHaH.

3nektp KocynapbI
KeninH KepHeyi acnantbH iuiHde opHanackaH TaikTawada 6enrIneHren TexnkaBik DepekTepei Kepehyre caikec kenyi kepek. Erep copfblw BnKamem XabkiTaNanHan bOnca, opnatblnFaHH KeHH de icteyre bonaTbH, KOJ XeTePNIK XePeDe bonybl Tnic, icten Typran epexenepre Caikec aImaIb-CanMaIb WtTenCeJIbe copfblt bKocbIHb3. Erep copfbl WnKamem XabkiTaNMaFah BoNca (Xenire Typa KocbIy), Hemece aImaIb-caMaIb WtTenCeIb OpaTbIINFaHH KeHH de KOJ XeTePNIK XePeDe bONmaca OHda opnaty HcyKaybHa Caikec 3- dpepeJeeri acbH KepHeydi 6ondbpMaTbH XHe JeinIH ToIbIK aUbIybl KAMTaMaCCbI 3 EtetIH Tnicti ekinIONtIK axbipATbIbTI naDanaHbIHb3.

ECKEPTY!
Kopek XeicHe CopfbltBuH 3JeKtpnIK KyyecIn Kocy anDbIHa Kopek Ka6eni DpybIC MoTakdaIaNFaBHa Ke3 KeTki3iH3.
ECKEPTY! HAp 6epuui CbIMXeJIi ABTOPI3aIHaIaHraf texHnKanbIK opTaNkTA HeMece BinKi Tmamah aybCTbpy Keek.
Bekity
Ophatydb6actay andbIHda:
- ΘΗΜΗΙν, εἰλιωεΜι opHaTy opHbI yιδι έρβις ἐκεθιν τέκεριής.
Bencendi kemip cy3ricH(lepH) (KaMTbIHaF 60nca) (6acaXepdi KapaHbI3) aIbIHbI3. KaNakTbIH cy3ri HcckacbH naJaNaHfbHbI3 KeIce, OHbI/OnapDbI any kepeK.
IwHne 6paHdapanap, Keninik KapTacbl, T.6. cnKtbl 6ap cemKelep cnKtbl KaKnak iWihDeri KocanKbl KypaJadApbl (coHda OHai TaCbImaJay ysiH opHaJnactbipBlnfah) TeKcepiH3. Onapbl anbln, KayinciOpbHda caKaTbH3.
Cy3i KeNTereH Ka6bIpa/Te6e TypIepine CaiKec KeTeIH 6ekTIkuTepMeH (fHKcATOpIapMeH)
KaMTaMaCbI3daHdBbPbIInraH. AAniDa, MaTePnAanap 6epiIreh Ka6bIpra/Te6e Typine caiKeCTiriHe Ke3 KETki3y yuiH biNikTi MamHaFa JOnblfBbIbI3. Cy3ri caNMaBbIH KeTepe anaTbHdai Ka6bIpra/Te6e KETkiiKTI MbIKTb BoNybl Kepek.
Падалану
| I | II | III | L | O |
| T1 | T2 | T3 | T4 | T5 |
Bipihui kbldAmdbk (T1)
Bipihx jkblamdbkTb icke Kocy yuH T1 tyMecih 6acblb3. CyHKunieKocblfahKe3e, XUd TypaKtbl JkaHaDbI. TyIH copflwbl eWipy yuH T1 tyMecih TaBf bAcblb3.
EkiHwi XbJnDaMdbk (T2)
EkiHJi KjIbIaMdbIKbI icKe Kocy yuH T2 TuMecin 6acblb3. FHKnIe icKe KocblraH Ke3e, KUd TpaKbI JxHaIbI. TyIH copbltB eWipy yuH T2 TuMecin TaBbI bAcblb3.
Ywihwi xblamdbk (T3)
EkiHJi KjIJaAMDbIKbI icKe Kocy yuH T3 TuMecin 6acblb3. FHKnir icKe KocblrHan Ke3e, KUd TpaKbI JxHaAbI. TyIH copBfIbTb eWipy yuH T3 TuMecin TaIb Iacblb3.
Taimep (T4)
Bipinshi, ekihshi Hemece yuhi Shi XblnDAMbIK icke KocblrHan Ke3de, Taimepi icke Kocyfa 60ana.
Fyhncnir cike KocblrHan Ke3de, TaimepdiH (T4)
XeHe OcbIHaN deiHri TaHdAnfah XblnDAMbIKbIH
(T1/T2/T3) XJld Wambl TypaKbI JkHaDbI.
TaimepHIN Y3aKbTIbFl TaHdAnfah XblnDAMbIKKa
6aJIaNbIcTBb60ana:
Bipinshi XblnDAMbIK T1 = y3aKbITbFl 20'
EkiHsi XblnDAMbIK T2 = y3aKbITbFl 15'.
YiHsi XblnDAMbIK T3 = y3aKbITbFl 10'.
XblnDAMbIK pexmHInyakbl aAeTaNfAH Ke3de
taimepdi T4 TyMecin Hemece baca eki 6enCeHN
emec XblnDAMbIKbTIbN TYMecin Bacy apKbIbI
eWipyre BoJaDbI. TyTIn copbltbl icke Kocy
MaKcTaBlHa Da ByfAH DeiH Taimep
6aJIaNbIcTBipblnFAh XblnDAMbIKbTI TaflDa
6acblHbI3.
Llam (T5)
T5 TymecinbacyapkblbIwamdbKe3KeIReh yaKbTTaicke Kocyfa60naDb.Функця icke KocbIFan Ke3de,JIUd TypaKtbyJxHaNbI.
Cy3rihi ophaty
Cy3ri INdNkAtOpIapbIH TeK TyTih copfbiH eWipyJI 6oJIfAH Ke3Je fHa iCe KocyFa Hemece eWipyre 6oJaBl.
KoHnrgypaunM3epin aWuYwIH T2+T3 Tymecin 6acbln TpybHbI3, M3ep aWbIK 6oJFaH Ke3de T1 XblblkTaBtai TaBd.
Дэденипапаметр:
-
MaCy3rici INHnKaTOpbl (T2) KocyIbI, COHdbIKTaH ON 6eNceHdi;
-
niC cy3rici HnDnKkATOpbl (T3) eWipyni, COHdbiKTah on 6eNceHdi eMec.
T2 TYMeci MaC cy3ricinH INHdkaTopbIH Kocadbl/ewipeDi. T3 TYMeci nic cy3ricinH INHdkaTopbIH icKe Kocadbl/ewipeDi. M3ipDeH YbiFy ywiH T1 Hemece TYmeci 6acbl, 10 MNH. KyTIHi3
Cy3riHi KaIa oPHaTy
TyTih WbIFapFbIw TypaKTbI yaKbIT apaIbIKTapbIHcCy3IRE TexHnKaIbIK KbI3MeT KepCteTy KepeKtiriH eCkepyuWih Dbl6bICTbCI rHan WbIFapaDbI:
- Man cy3rici 40 carat caibH;
-nic cy3rici 160 cafat caibH.
Byn JkaFdaIa, TyTIn COpfbiU eWipin, Ke3 KeJrH TymMeHi typtiH3. INHTepFeic 10 MmN.6oBb Eki KaKeTTiNik CnHaNbIH 6epei:
- erep T1+T2ЖынblынblкТаса: Мал cy3riche TexHnkaNbIk Kbl3MeT KepeTy KaXket;
- erep T1+T3 XblblblkTaca: nic cy3riche TexHnKaIbIK Kbl3Met KepeCy KaXeT.
10 Mн.6apbicbHda T1+T2 TyMecin bacy apKblI MaJ cy3rCIn, an T1+T3 TyMecin bacy apKblI niC cy3rCIn kaTt aOpHaTyfa 6oNaDbI. KaTa opHaTuDan KeiN TYMe KombHaunraJaPbI eki pet Te3 JxblIbIKaTaNbI. NHTeppeic eDeTTerIeJxMbIC icTeMeNi.
MbHaHb eckepiH3:
Tytih copfbiu 10 MN.6oBi KaIbITb Jxymblc icTeiDi,6ipak XblnDaMblK TyMeIepiHe KaTbICTb e6bp KepHeki Kayan 6oMaNbE. Erep 10 MN. 6oBi e6bp apeket opbHdAmaca, KUd KblbIKayh TOKTaTbJa,KepHeki Kayan KaIbITb Kyire opanaBl.
TexHnKaJIbIK KbI3MeT KOpceTy
Ta3anay
TataayuhiTEK6eHTapan kyyfbi3aTneH cyanHaH apnabIy uyepekTI naJaIaNbIHbI3. KPyblFbIHbHEMECE T3AIAUY KPAJIbIH NAIDAIIAHbAHcI3! A6pa3nIbIK Kocnacbi 6ap 3aTbI naJaIaNbHaB13.CNPTTI NAIDAIIAHSAHbI3!
MaiDbI yctan Kany cy3riwi
11-cypet
Ac daHbIHaydaFbMaH 6eIweKTePiY cTan KaJaBbI.
Фильтдіа саын arpeccnbTi eмс Куьш 3aTTapmeh,
КOLIMEN HEMeCE bIbICxKyblu MaunHada,TOMEH TemnepaTypaDA,yHMdi Ta3anay Tepti6InHe Kyy Kepek.
blbICxyblu MaunHada KByIlnFaH Mau YCTaTbH FOnlbTp TyCcIeHy MyMKIn, bipak OdaH OHbH cy3riKhaceti MyJNe erepicci3 Kanabl.
MaJ cy3ricin anbIn Tactay Yuuih cepinneni Bocaty TTKacbH TapTbIb3
Kemip cy3riw (Tek cy3riw-copfbiw TypiHde)
12-cypet
Ac nicipren Ke3e JxapamcbI3 Nicti yctan Kaanda.
Kemipni Fnbltpdi Kahlbyi y3aKa naIadanaHy Mep3imHiH KblcKa Hemece y3ak etyIHe baiNaHaBcTb 60anabi, on ac YdiH Typi MeH MaIdbYCTaIbTH Fnbltpdi YCTaHbIfAH Mep3imJIK Tazalaymen anDbIH ana AhbIKtanaIb. KaHdai XaJaan 6oJc Da, kaptpndkDi KEM dereHde 4 aJa 6ip pet aybICTbIpbiH3.
Kemipni pfnlbtpdi kyyfa 6olmaIdbI JxHe de perehepeuHa xapamcbI3.
DhenreIek KEMip cy3rici
Ko3fantkbIbH KanaKbI deHreinerIH TopanbHa 6ipeyIH opaTbHb3, cetin onapdbI cafat tImem 6paHb3.
Ohu valjatombega version
Birinci hiz T1 = sure 20'
I 1020 Lx J
J T2+T1
T3+T1
J
J
.
4k + 1 0( mod D)
j 10 10 10 10 10 10 10 10 10 10 10 10
aejll 8jjie a jyall 4yill cJl Jg
aill
a 1000 a a b a yaaag a b a a c a bll a a a a a a a a a a a a a a a a a a a a a a a a a a a a a a a a a a a a
1Jg201
joo all joo
11
a a a a a a a a a a a a a a a a a a a a a a a a a a a a a a a a a a a a a a a a a a a a a a a a a a a a a a a a a aaa
- lalbo jie 2. w jil
aaii iia aiee
()
12
a a a a a a a a a a a a a a
a 100000000000000000000000000000000000000000000000
A. h1 即为 h1 = 12
y
oJgdl 1 aI aI aI 1 kLk 1 k
aLall oolil llll aalld
Aclull jiae oaii wae gai ai

(T1)
aalldo 20sLiLAcJyAe Jull T1glc biai
11n jna biai. Aylslol ydiu uilll Led aol nlaia
blilll clybyT1jll wiiie
(T2) 4
aalldo 0sloaic ailll ae jull T2 ale baiol
yjno baiol aylslol ydiw uillled led ayol lde
blailclbyT2 jll wlele
(T3)
aaii i 1000000000000000000000000000000000000000000000000000000000000000000000000
(T4)
aill g lgl aeglln g Si Lioic bie ci gll 12e Lgai Saj
al g w g iiaiaiaiaiaiaiaiaiaiaiaiaiaiaiaiaiaiaiaiaiaiaiaiaiaiaiaiaiaiaiaiaiaiaiaiaiaiaiaiaiaiaiaiaiaiaiaiaiaiaiaiaiaiaiaiaiaiaiaiaiaiaiaiaiaiaiaiaiaiaiaiaiaiaiaiaiaiaiaiaiaiaiaiaiaia
Aa 13T3/T2/T1)
20 1 T1 a
15 1 T2 a
10 1T3:
Lgll Lg 1234567890123456789012345678901234567890123456789012345678901234567890123456789012345678901234567890123456789
aill 1
(T5)
Laiic .T5 jill le hiaiiy a bai y ooiuuiy uaiy uaiy ooiy iuei led aol uai aaioo aiai ooi Si
la blll, 1111111111111111111111111111111111111111
aal al aal
(T2)j 1
(T3)yglj
j 3 T2 a b i i j j j j j j j j j j j j j j j j j j j j j j j j j j j j j j j j j j j j j j j j j j j j j
10 1 T1
1
gill 1234567890123456789012345678901234567890123456789012345678901234567890123456789012345678901234567890123456789
J 6 4 4 4 4 4 4 4 4 4 4 4 4 4 4 4 4 4 4 4 4 4 4 4 4 4 4 4 4 4 4 4 4 4 4 4 4 4 4 4 4 4 4 4 4 4 4 4 4 4 4 100
6
y

g jll jll k g a g aal l lal b 22 1 1 1 1 1 1 1 1 1 1 1 1 1 1 1 1 1 1 1 1 1 1 1 1 1 1 1 1 1 1 1 1 1 1 1 1 1 1 1 1 1 1 1 1 1 1 1 1 1 1 0
g aall g aall g aall g aall g aall g aall g aall g aall g aall g aall g aall g aall g aall g aall g aall g aall g aall g aall g aall g aall g aall g aall g aall g aall g aall g aall g aall g aall g aall g aall g aall g aall g aall g aall g
1
1 1 1 1 1 1 1 1 1 1 1 1 1 1 1 1 1 1 1 1 1 1 1 1 1 1 1
a aie iie 1iie iie iie iie iie iie iie iie iie iie iie iie iie iie iie iie iie iie iie
1
aaii aiee
auiia sll i lii oj j pi gill ciiil j n a gai
jglal g cglg lblgl 100slllclalw jy e jil oolc joll .(d lly aolld sdl jnl k) alal
yill 2j all
1 1 1 1 1 1 1 1 1 1 1 1 1 1 1 1 1 1 1 1 1 1 1 1 1 1 1 1 1
g j 1 1 1 1 1 1 1 1 1 1 1 1 1 1 1 1 1 1 1 1 1 1 1 1 1 1 1 1 1 1 1 1 1 1 1 1 1 1
- 可分 ( a - b) = 0 不变 且b > 0 .
Culac jie aill oj y, iis bial bial l 10 pai pai jiai alil ai wll laa ia gai gai bai jai biw uolai wail ai bialll 10 gi gai gai pai

a


Jg j 100


a jaiy jaiy jaiy jaiy jaiy jaiy jaiy jaiy jaiy jaiy jaiy jaiy jaiy jaiy jaiy jaiy jaiy jaiy jaiy jaiy jaiy jaiy jaiy jaiy jaiy jaiy jaiy jaiy jaiy jaiy jaiy jaiy jaiy jaiy
gol 10000000000000000000000000000000000
EN/IEC 60335-2- EN/IEC 60335-1:EN/IEC 60335-2
EN/IEC 61591; ISO 5167-1; ISO :5167-3; ISO 5168; EN/IEC 60704-1; EN/IEC 60704-2-13; EN/IEC 60704-3; ISO 3741; EN
.50564; IEC 62301
EN 55014-1; CISPR 14-1; EN :55014-2; CISPR 14-2; EN/IEC 61000-3-2; EN/IEC 61000-3-3
gall jglal piai i aai 61000-3-3
gall gall aie yie ady i yll
jglal gall aie ay j glal yll
jglal gall aie ay j glal yll
jglal gall aie ay j glal yll
jglal gall aie ay j glal yll
jglal gall aie ay j glal yll
jglal gall aie ay j glal yll
1111 1111 1111 1111
aai jbi ball bai ai iuiu ic aiai
.
()
LgJg
e 1
a lac g bfa a biii cIg olol
jbi 1
勾结
baw
J 1
iilip
Jdall
y jll
i
1
1
jll jll jll
jSao 8oBol 10go pioi wic
aiisblabla jia jjglj
yjll jlll jll ljj
(1) S jill a lac o Lai ai
aollg jnly aolal al g aial lgl y
Laiyegjll 1b bai Laii l 1
- j 1j 1j 1j
gill 1j j 0j 0j 0j 0j 0j 0j 0j 0j 0j
1
J 1
Jaiaill gillgall jbi
124
m = 311
J 1
g laa a gill aayaaal ybbl cgl rll
jill jidc
aall j laell gll ll lla yj yll a
a. = , all a. sall
al jlll y llll l l l l l l l l l l l l l l l l l l l l l l l l l l l l l l l l l l l l l l l l l l l l l l l l l l l l l l l l l l l l l l l l l l l l l l l l l l l l l
1
i 1 1 1 1 1 1 1 1 1 1 1 1 1 1 1 1 1 1 1 1 1 1 1 1 1 1
aill gaii aai jai i kll gai jia gai gai n 1
gali aai gai ai aai al lci yai uao lele ybl
gai gai ci kll ni n 1 1 1 1 1 1 1 1 1
gai jialn aai aai cna gla a gai cai aai aia
10
e iie 1le a slls y
g 1