DHU665EL - Basket BOSCH - Free user manual and instructions
Find the device manual for free DHU665EL BOSCH in PDF.
User questions about DHU665EL BOSCH
0 question about this device. Answer the ones you know or ask your own.
Ask a new question about this device
Download the instructions for your Basket in PDF format for free! Find your manual DHU665EL - BOSCH and take your electronic device back in hand. On this page are published all the documents necessary for the use of your device. DHU665EL by BOSCH.
USER MANUAL DHU665EL BOSCH
Household Appliances
deSeite 3-14
en page 15-26
fr page 27-38
nI pagina 39-50
it pagina 51-62
es págin63-74
pt página 75-86
SV sida 87-98
noside 99-110
fisivu 111-122
da side 123-134
Elektrische Kochfelder
Electric cookers
Cuisinières électriques
Elektrisch fornuis
Cucine elettriche
Cocinas electricas
Fogoes electricos
Elektrisk spis
Elektriske komfyrer
Sähköliesien osalta
Elektriske kogeplader
Gas- oder kombinierte Herde
Gas or mixed cookers
Cuisinières à gaz ou mixtes
Gas- of gemengd fornuis
Cucine a gas o miste
Cocinas a gas o mixtas
Fogoes a gás ou mistos
Gasspis aller kombinerad gashäll
Gasskomfyrer og blandede komfyrer
Kaasu- ja sekaliiesien osalta
Gasblus og elektriske kogeplader
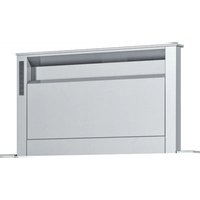
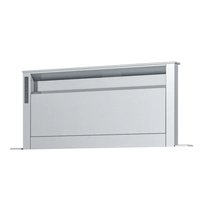
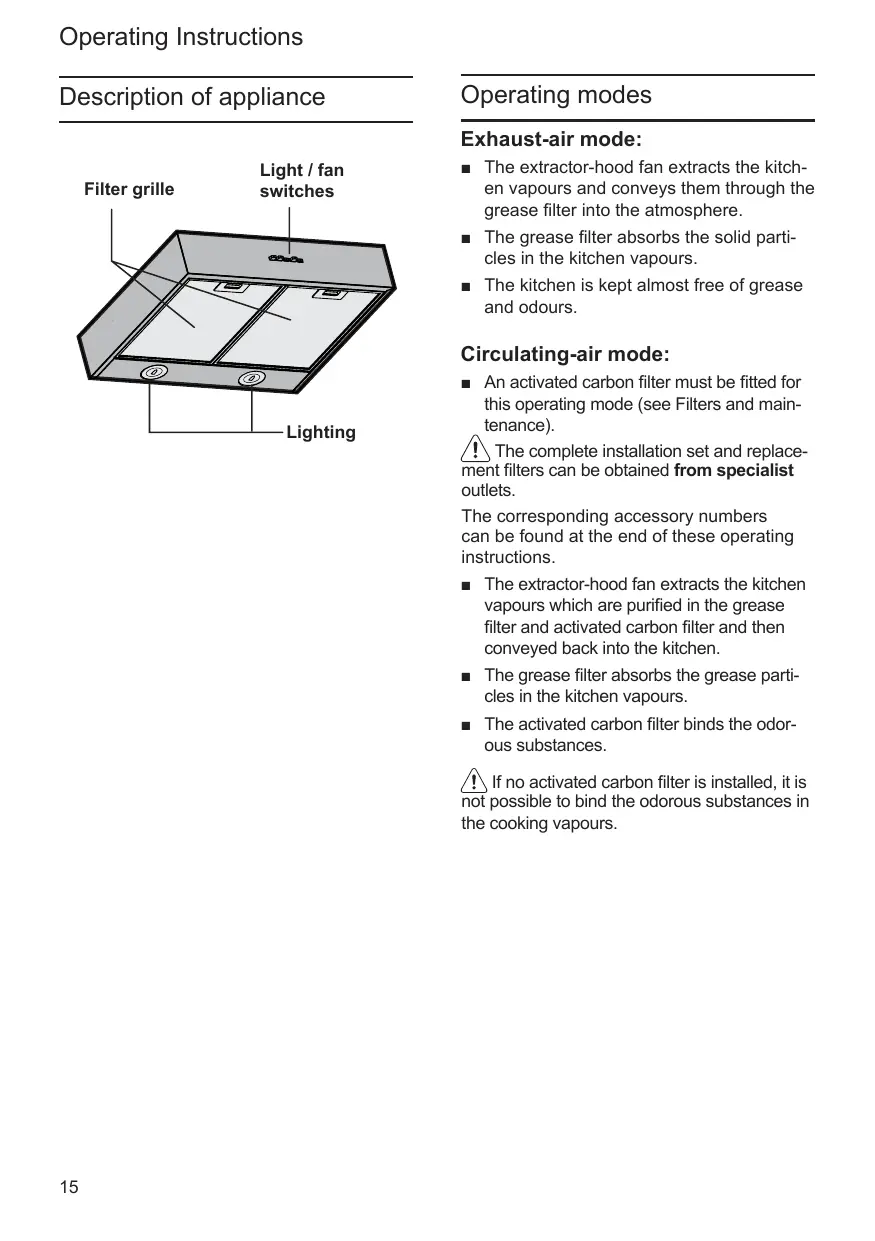
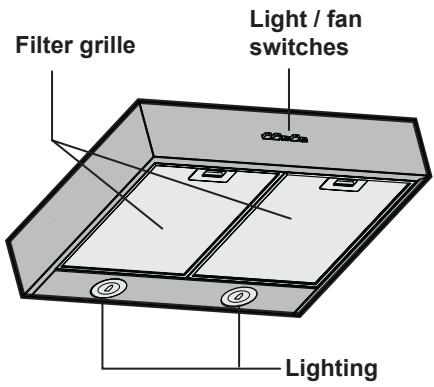
Gerätebeschreibung

Betriebsarten
Abluftbetrieb:
Description of appliance
Operating modes
Exhaust-air mode:
The extractor-hood fan extracts the kitchen vapours and conveys them through the grease filter into the atmosphere.
The grease filter absorbs the solid particles in the kitchen vapours.
The kitchen is kept almost free of grease and odours.
Circulating-air mode:
An activated carbon filter must be fitted for this operating mode (see Filters and maintenance).
The complete installation set and replacement filters can be obtained from specialist outlets.
The corresponding accessory numbers can be found at the end of these operating instructions.
The extractor-hood fan extracts the kitchen vapours which are purified in the grease filter and activated carbon filter and then conveyed back into the kitchen.
The grease filter absorbs the grease particles in the kitchen vapours.
The activated carbon filter binds the odorous substances.
If no activated carbon filter is installed, it is not possible to bind the odorous substances in the cooking vapours.
Before using for the first time
Important notes:
The Instructions for Use apply to several versions of this appliance. Accordingly, you may find descriptions of individual features that do not apply to your specific appliance.
This extractor hood complies with all relevant safety regulations.
Repairs should be carried out by qualified technicians only.
Improper repairs may put the user at considerable risk.
Before using your appliance for the first time, please read these Instructions for Use carefully. They contain important information concerning your personal safety as well as on use and care of the appliance.
Please retain the operating and installation instructions for a subsequent owner.
! Dispos of packaging materials properly (see Installation instructions).
This extractor hood is designed for domestic use only.
Before any cleaning or maintenance operation, disconnect the hood from the mains by removing the plug or disconnecting the home mains switch.
The appliance is not intended for use by children or persons with impaired physical, sensorial or mental faculties, or if lacking in experience or know-how, unless they are under supervision or have been trained in the use of the appliance by a person responsible for their safety.
Children should be monitored to ensure that they do not play with the appliance.
! Never use the hood without effectively mounted grating!.
The hood must NEVER be used as a support surface unless specifically indicated.
The premises must be sufficiently ventilated, when the kitchen hood is used together with other gas combustion devices or other fuels.
The suctioned air must not be conveyed into a conduit used for the disposal of the fumes generated by appliances that combust gases or other fuels.
The flaming of foods beneath the hood itself is severely prohibited.
The use of exposed flames is detrimental to the filters and may cause a fire risk, and must therefore be avoided in all circumstances.
Any frying must be done with care in order to make sure that the oil does not overheat and burst into flames.
As regards the technical and safety measures to be adopted for fume discharging it is important to closely follow the relations provided by the competent authorities.
The hood must be regularly cleaned on both the inside and outside (AT LEAST ONCE A MONTH, it is in any event necessary to proceed in accordance with the maintenance instructions provided in this manual)..
Failure to follow the instructions as concerns hood and filter cleaning will lead to the risk of fires.
Before using for the first time
Gas stoves and electric stoves
Do not use a gas hob with all the stoves on and top-powered for more than 15 minutes, otherwise the surface of the cooker hood might risk overheating, thus causing burns in case of contact with the hood.
Furthermore the cooker hood might get damaged.
In case more than 3 gas stoves are used, the cooker hood must be used at top power.
Important: a big stove having power higher than 5 KW (type WOK) corresponds to 2 standard stoves.
- Never use the gas stoves without any pots. Adjust the flame so that it does not exceed the perimeter of the pot.
Do not use or leave the hood without the lamp correctly mounted because of the possible risk of electric shocks.
We decline any responsibility for any problems, damage or fires caused to the appliance as the result of the non-observation of the instructions included in this manual.
Operating procedure
The most effective method of removing vapours produced during cooking is to:
- Switch the ventilator ON as soon as you begin cooking.
- Switch the ventilator OFF a few minutes after you have finished cooking.
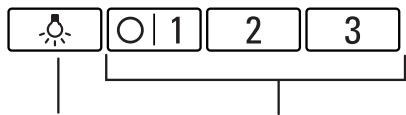
Light Off/On
Ventilator settings
Switching ON:
Switch the desired fan setting.
Switching OFF:
Switch back to 0.
Lighting:
The light can be switched on at any time, even though the fan is switched off.
ATTENTION! Before performing any maintenance operation, isolate the hood from the electrical supply by switching off at the connector and removing the connector fuse.
Or if the appliance has been connected through a plug and socket, then the plug must be removed from the socket.
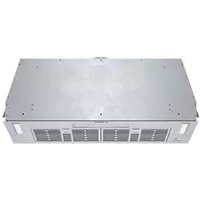
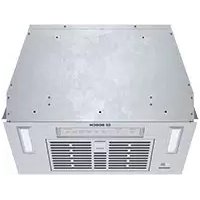
Grease Filter
Metal filters are used to trap the greasy element of the vapours that develop during cooking.
The filter mats are made from non combustible metal.
Caution:
As the filter becomes more and more saturated with grease, not only does the risk of it catching fire increase but the efficiency of the extractor hood can also be adversely affected.
Important:
By cleaning the metal grease filters at appropriate intervals, the possibility of them catching fire as a result of a build-up of heat such as occurs when deep-fat frying or roasting is taking place, is reduced.
Cleaning the metal grease filters:
In normal operation (1 to 2 hours daily), the metal grease filter must be cleaned after 8 to 10 weeks.
The filters can be cleaned in a dishwasher. It is however possible that they will become slightly discoloured.
The filter must be placed loosely, and NOT wedged, in the dishwasher.
Important: Metal filters that are saturated with grease should not be washed together with other dishes etc.
- When cleaning the filters by hand, soak them in hot soapy water first of all. Then brush the filters clean, rinse them thoroughly and leave the water to drain off.
Removing and inserting the metal grease filters:
- Press the catch on the grease filters inwards and fold the filters down.
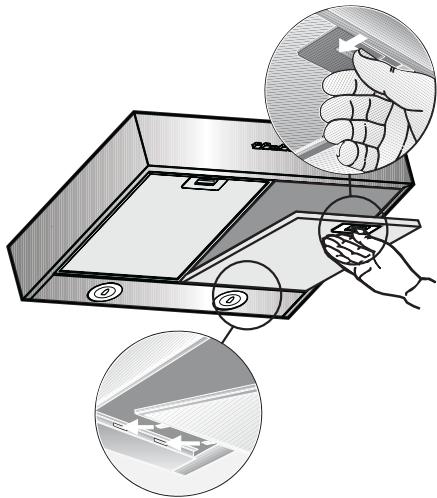
- Clean the filters.
- Insert the clean filters back into the hood.
Activated carbon filter:
For neutralizing odours in recirculating mode.
Caution:
As the filter becomes more and more saturated with grease, there is an increased risk of fire and the function of the extractor hood may be impaired.
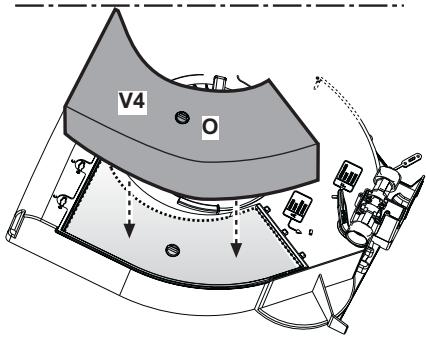
Mounting:
Remove the cover W by rotating the O knobs to 90^ , fit the filter inside and lock in place with the central knob O, then close the cover.
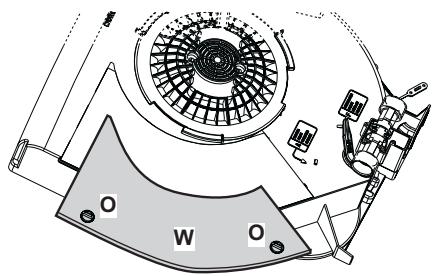
Removing the filter:
The filters are removed in reverse sequence.
Replacing the activated carbon filters:
The saturation of the activated charcoal occurs after more or less prolonged use, depending on the type of cooking and the regularity of cleaning of the grease filter.
In any case it is necessary to replace the cartridge at least every 4 months.
The carbon filter may NOT be washed or regenerated.
The activated carbon filters are available from specialist outlets (see Optional accessories).
Use only original filters. The appliance is then guaranteed to function perfectly.
- Activated carbon filters do NOT contain any harmful substances. They can therefore be disposed of as householder fuse.
Disposal of old activated carbon filters:
Cleaning and care
Disconnect the extractor hood from the electricity supply by pulling out the mains plug or switching it off at the fuse box.
- At the same time as you clean the grease filters, clean off any grease from all accessible parts of the housing. This significantly reduces the fire hazard and ensures that the extractor hood performs as effectively as possible.
- Use a hot detergent solution or a mild window cleaner to clean the canopy of the extractor hood.
- Do not scrape off any dirt that has dried on but loosen it up with a damp cloth.
- Do not use abrasive cleaning agents or sponges that could cause scratches.
Note: Do not use alcohol (spirit) on plastic parts, otherwise the surface may become matt in appearance.
Caution: Ensure that the kitchen is adequately ventilated. Avoid naked flames!
Clean the sliding switch with a soft, damp cloth (mild detergent solution) only. Do not use stainless steel polish on the sliding switch.
Stainless steel surfaces:
- Use a mild non-abrasive stainless steel cleaner.
- Clean the surface in the same direction as it has been ground and polished.
! Do not use any of the following to clean stainless steel surfaces: abrasive sponges, cleaning agents containing sand, soda, acid or chloride!
Aluminium and plastic surfaces:
- Use a soft, non-linting window cloth or micro-fibre cloth.
- Do not use dry cloths.
- Use a mild window cleaning agent.
- Do not use aggressive, acidic or caustic cleaners.
- Do not use abrasive agents.
Replacing the light bulbs
The hood is equipped with a lighting system based on LED technology.
The LEDs guarantee an optimum lighting, a duration up to 10 times as long as the traditional lamps and allow to save 90% electrical energy.
For replacement, contact the technical service.
Malfunctions
If you have any questions or if a fault occurs, please call Customer Service. (See list of Customer Service representatives). When you call, please quote the following:
E-No. FD
Enter the relevant numbers into the box above.
The E-Nr. (product no.) and FD (production date) are shown on the name plate which can be seen inside the extractor hood after the filter frame has been detached.
Before installation
Important information
Danger of death!
Risk of poisoning from flue gases that are drawn back in.
Always ensure adequate fresh air in the room if the appliance is being operated in exhaust air mode at the same time as room air-dependent heat-producing appliance is being operated.
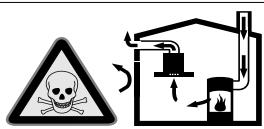
Room air-dependent heat-producing appliances (e.g. gas, oil, wood or coal-operated heaters, continuous flow heaters or water heaters) obtain combustion air from the room in which they are installed and discharge the exhaust gases into the open air through an exhaust gas system (e.g. a chimney). In combination with an activated vapour extractor hood, room air is extracted from the kitchen and neighbouring rooms - a partial vacuum is produced if not enough fresh air is supplied. Toxic gases from the chimney or the extraction shaft are sucked back into the living space.
- Adequate incoming air must therefore always be ensured.
An incoming/exhaust air wall box alone will not ensure compliance with the limit.
Safe operation is possible only when the partial vacuum in the place where the heat-producing appliance is installed does not exceed 4 Pa (0.04 mbar). This can be achieved when the air needed for combustion is able to enter through openings that cannot be sealed, for example in doors, windows, incoming/exhaust air wall boxes or by other technical means.
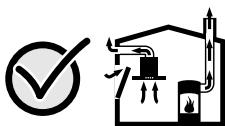
In any case, consult your responsible Master Chimney Sweep. He is able to assess the house's entire ventilation setup and will suggest the suitable ventilation measures to you. Unrestricted operation is possible if the vapour extractor hood is operated exclusively in the circulating-air mode.
Old appliances are not worthless rubbish.
Valuable raw materials can be reclaimed by recycling old appliances.
Before disposing of your old appliance, render it unusable.
This appliance is marked according to the European directive 2002/96/EC on Waste Electrical and Electronic Equipment (WEEE). By ensuring this product is disposed of correctly, you will help prevent potential negative consequences for the environment and human health, which could otherwise be caused by inappropriate waste handling of this product.
The symbol on the product, or on the documents accompanying the product, indicates that this appliance may not be treated as household waste. Instead it should be taken to the appropriate collection point for the recycling of electrical and electronic equipment. Disposal must be carried out in accordance with local environmental regulations for waste disposal.
For more detailed information about treatment, recovery and recycling of this product, please contact your local council, your household waste disposal service or the shop where you purchased the product.
! You received your new appliance in a protective shipping carton.
All packaging materials are environmentally friendly and recyclable.
Please contribute to a better environment by disposing of packaging materials in an environmentally-friendly manner.
Please ask your dealer or inquire at your local authority about current means of disposal.
The extractor hood can be used in exhaust air or circulating air mode.
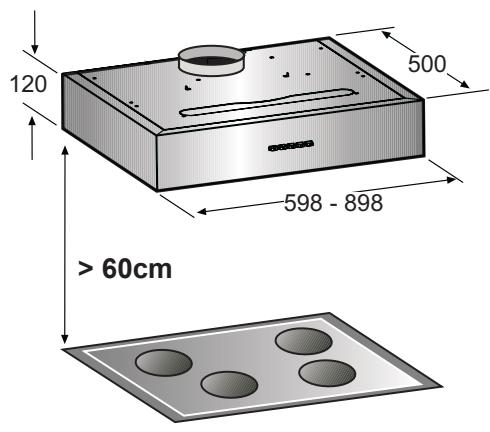
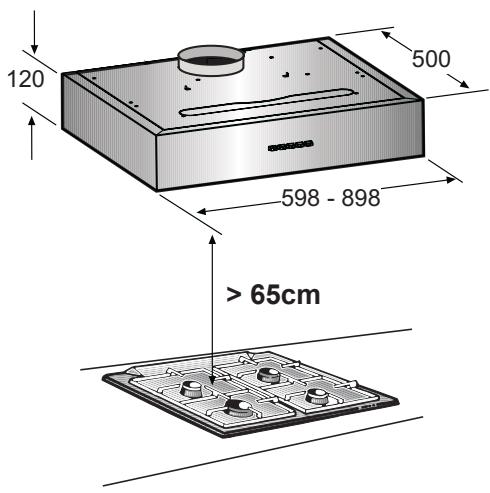
Always mount the extractor hood over the centre of the hob.
The minimum distance between the supporting surface for the cooking vessels on the hob and the lowest part of the range hood must be not less than 60cm from electric cookers and 65cm from gas or mixed cookers.
If the instructions for installation for the gas hob specify a greater distance, this must be adhered to.
Exhaust-air mode
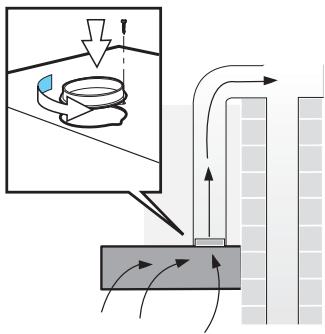
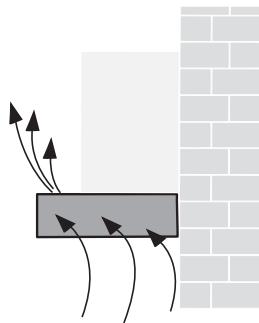
The exhaust air is discharged upwards through a ventilation shaft or directly through the outside wall into the open.
For operating in exhaust-air mode, a one-way flap should be mounted inside the wall ventilation box. If no one-way flap was enclosed with the hood, it can be obtained from a specialist retailer.
Installing the one-way flap:
Snap the one-way flap into the air pipe.
The two lightly sprung flaps must be able to move upwards.
If the exhaust air is going to be discharged into the open, a telescopic wall box should be fitted into the outside wall.
For optimum extractor hood efficiency:
Short, smooth air exhaust pipe.
As few bends in the pipe as possible.
Diameter of pipe to be as large as possible and no tight bends in pipe.
If long, rough exhaust-air pipes, many pipe bends or smaller pipe diameters
are used, the air extraction rate will no longer be at an optimum level and there will be an increase in noise.
Round pipes:
We recommend Internal diameter: 125 mm
Flat ducts must have an internal cross section that equates to that of round pipes.
There should be no sharp bends.
125 ~mm approx. 113 ~cm^2 .
If pipes have different diameters:
Insert sealing strip.
For exhaust-air mode, ensure that there is an adequate supply of fresh air.
Connecting a 0 125 mm exhaust-air pipe:
- Mount the pipe directly onto the air outlet on the hood.
Circulating-air mode
- With activated carbon filter if exhaust-air mode is not possible.
The complete installation set can be obtained from specialist outlets.
The corresponding accessory numbers can be found at the end of these operating instructions.

Risk of electric shock!
The appliance features an EU safety plug. To ensure protective earthing in a Danish socket, the appliance must be connected to a suitable plug adapter. This adapter (permitted up to max. 13 amps) is available from customer service (spare part no. 616581). The mains power supply must correspond to the rating indicated on the plate situated inside the hood. If provided with a plug connect the hood to a socket in compliance with current regulations and positioned in an accessible area. If it not fitted with a plug (direct mains connection) or if the plug is not located in an accessible area apply a bi-polar switch in accordance with standards which assures the complete disconnection of the mains under conditions relating to over-current category III, in accordance with installation instructions.
Warning! Before re-connecting the hood circuit to the mains supply and checking the efficient function, always check that the mains cable is correctly assembled.
Warning! Power cable replacement must be undertaken by the authorized service assistance centre or similar qualified person.
Connect the hood to a norm complying plug only.
The plug should be located in an accessible zone.
The plug must be equipped with a protection circuit.
If after installation the plug can not be reached, a disconnecting device must be envisaged.
Fixed installation:
The fixed installation can be carried out by a qualified and authorized person only.
Envisage an omnipolar switch having a contact opening of at least 3mm, including an automatic circuit breaker.
The cable must be replaced by the manufacturer, the assistance centre or a qualified and authorized person only, in order to avoid any dangers.
Electrical data:
The technical data of the device are on the distinctive label inside the device behind the grease filters.
In case of repair, disconnect the electric supply from the cooker hood.
Length of the feeding cable: 1,30m.
The hood complies with the EMC directive.
Installation

WARNING! Do not connect the appliance to the mains until the installation is fully complete.

Important, in circulating-air mode, first rotate the conversion valve to filtering position (posi
tion F) and then fix the air outlet hole cap, otherwise the conversion valve might jam.
To a wall-hanging cupboard
With 4 screws.
- Dimensions for the mounting boreholes can be found in, or place a template on the base of the wallhanging cupboard.
Selecting the operating mode:
Exhaust-air mode: Position A
Circulating-air mode: Position F
- Mark the mounting holes and make pilot holes with a bradawl.
In exhaust-air mode (upwards) mark the exhaust-air opening and saw out.
In circulating-air mode, apply the plug supplied to close the exhaust hole.
Consider the location of the connection cable; if required, saw out the cupboard.
3. Remove the filter grille (see Instructions for use).
4. Screw the extractor hood to the base of the cupboard.
To the wall
With 4 screws.
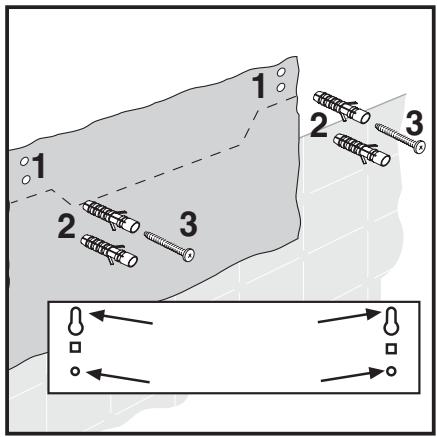
- Mark mounting boreholes.
Dimensions can be found in or use template.
Selecting the operating mode:
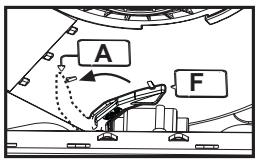
Exhaust-air mode: Position A
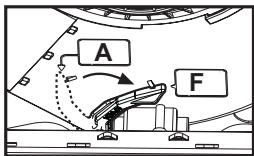
Circulating-air mode: Position F
- Drill 8 mm dia. holes and insert wall plugs flush with the wall.
- Screw in the upper screws (on left and right) until there is a gap of approx. 7 mm between the screw head and the wall.
- Remove the grease filters (see Instructions for use).
In circulating-air mode, apply the plug supplied to close the exhaust hole.

- Secure the nuts inside the box of the hood on the square slots and screw in, from outside, the metric screws supplied to their maximum.
Installation
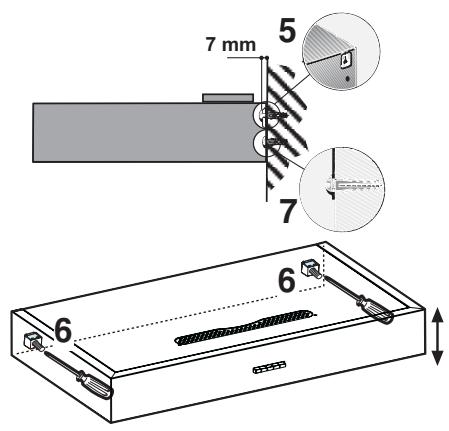
- Hook the hood to the upper screws.
- Adjust the structure of the hood.
- Insert and totally screw the screws in the lower holes for the final fixing.
- Reinstall the grease filters (see Instructions for use)
Final assembly
- Refit the grease filter.
Connect to the power supply.
Air evacuated to the exterior:
Replacing the light bulbs
The hood is equipped with a lighting system based on LED technology.
The LEDs guarantee an optimum lighting, a duration up to 10 times as long as the traditional lamps and allow to save 90% electrical energy.
For replacement, contact the technical service.
Dérangements
Mode Air recycle: Position F
125mm corrisponde a circa 113~cm^2
Utblåsversion: Position A
Atercirkulations-version:Position F
Utblåsversion: Position A
Atercirkulations-version: Position F