
GENIUS 9000 DUO CROSSACTION - GENIUS 9000S SENSI ULTRATHIN - Electric toothbrush ORAL-B - Free user manual and instructions
Find the device manual for free GENIUS 9000 DUO CROSSACTION - GENIUS 9000S SENSI ULTRATHIN ORAL-B in PDF.
| Product Type | Rechargeable electric toothbrush |
| Brand | Oral-B |
| Model | GENIUS 9000 DUO CROSSACTION / GENIUS 9000S SENSI ULTRATHIN |
| Brushing Technology | Oscillating-rotating with pulsations (CrossAction) |
| Brushing Modes | Daily Clean, Gum Care, Tongue Cleaning, Sensitive |
| Built-in Timer | Yes, 2 minutes with 30-second interval reminder |
| Pressure Sensor | Yes, with Smart Ring light (alerts if excessive pressure) |
| Connectivity | Oral-B App (Bluetooth) for personalized tracking |
| Included Brush Head Types | CrossAction, FlossCrossAction, 3D White, Sensi Ultrathin |
| Battery Life | Approximately 12 days (twice daily use) |
| Charging Time | Approximately 12 hours for full charge |
| Charger Type | Wireless inductive (base included) |
| Charge Indicator | Yes, light on the base |
| Handle Material | ABS plastic with soft grip coating |
| Water Resistance | IPX7 (immersion up to 1 meter for 30 minutes) |
| Dimensions (approx.) | 2.5 cm x 2.5 cm x 25 cm |
| Weight (approx.) | 150 g |
| Maintenance | Rinse head after use; clean handle with a damp cloth |
| Head Replacement | Every 3 months recommended (or when bristles wear out) |
| Available Spare Parts | Brush heads, charger, charging base |
| Warranty | 2 years |
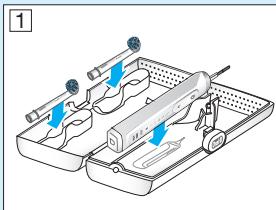
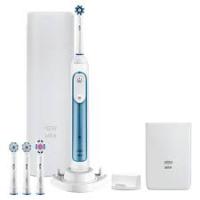
| Package Contents | 1 handle, 4 heads, 1 charger, 1 base, 1 travel case |
Frequently Asked Questions - GENIUS 9000 DUO CROSSACTION - GENIUS 9000S SENSI ULTRATHIN ORAL-B
User questions about GENIUS 9000 DUO CROSSACTION - GENIUS 9000S SENSI ULTRATHIN ORAL-B
0 question about this device. Answer the ones you know or ask your own.
Ask a new question about this device
Download the instructions for your Electric toothbrush in PDF format for free! Find your manual GENIUS 9000 DUO CROSSACTION - GENIUS 9000S SENSI ULTRATHIN - ORAL-B and take your electronic device back in hand. On this page are published all the documents necessary for the use of your device. GENIUS 9000 DUO CROSSACTION - GENIUS 9000S SENSI ULTRATHIN by ORAL-B.
USER MANUAL GENIUS 9000 DUO CROSSACTION - GENIUS 9000S SENSI ULTRATHIN ORAL-B
ZA Consumer Care Line 0860 112 188 (Sharecall charged at local rates)
Internet:
www.oralb.com
www.braun.com
www.service.braun.com
Braun GmbH
Frankfurter StraBe 145
61476 Kronberg/Germany
Charger Type 3757
Handle Type 3765
Travel Case Type 3760
Smart Plug Type 492-5214
English
Welcome to Oral-B!
Before operating this toothbrush, please read these instructions and save this manual for future reference.
IMPORTANT
- Periodically check the entire product/cords/accessories for damage. A damaged or non-functioning unit should no longer be used. If the product/ cords/accessories are damaged, take it to an Oral-B Service Centre. Do not modify or repair the product. This may cause fire, electric shock or injury.
- Usage by children under age 3 is not recommended. Toothbrushes can be used by children and persons with reduced physical, sensory or mental capabilities or lack of experience and knowledge, if they have been given supervision or instruction concerning use of the appliance in a safe way and understand the hazards involved.
- Cleaning and maintenance shall not be performed by children.
- Children shall not play with the appliance.
- Use this product only for its intended use as described in this manual. Do not use attachments which are not recommended by the manufacturer.
WARNING
- If the product is dropped, the brush head should be replaced before the next use even if no damage is visible.
- Do not place the charger, smart plug or charging travel case in water or liquid or store where it can fall or be pulled into a tub or sink. Do not reach for it when fallen into water. Unplug immediately.
- Do not open and disassemble device. For battery recycling please dispose whole device according to local environmental regulations. Opening the handle will destroy the appliance and invalidate the warranty.
- When unplugging, always hold the power plug instead of the cord. Do not touch the power plug with wet hands. This can cause an electric shock.
- If you are undergoing treatment for any oral care condition, consult your dental professional prior to use.
- This toothbrush is a personal care device and is not intended for use on multiple patients in a dental practice or institution.
- Replace brush head every 3 months or sooner if brush head becomes worn.
- Your charging travel case is provided with a special cord set (smart plug), which has an integrated Safety Extra Low Voltage power supply. Do not exchange or tamper with any part of it, otherwise there is risk of an electric shock. Only use the special cord set provided with your appliance.
Important Information
- Your Oral-B toothbrush can be used with your smartphone (find details under «Connecting your toothbrush to your Smartphone»).
- To avoid electromagnetic interference and/or compatibility conflicts, deactivate the radio transmission of your toothbrush handle (5) before using it in restricted surroundings, such as aircrafts or specially marked areas in hospitals.
- Deactivate radio transmission by simultaneously pressing the on/off (3) and mode button (4) for 2 seconds until the radio transmission display (7) goes off. Follow the same procedure to reactivate transmission again.
- Persons with pacemakers should always keep the toothbrush more than six inches
(15 centimeters) from the pacemaker while turned on. Anytime you suspect interference is taking place, deactivate the radio transmission of your handle.
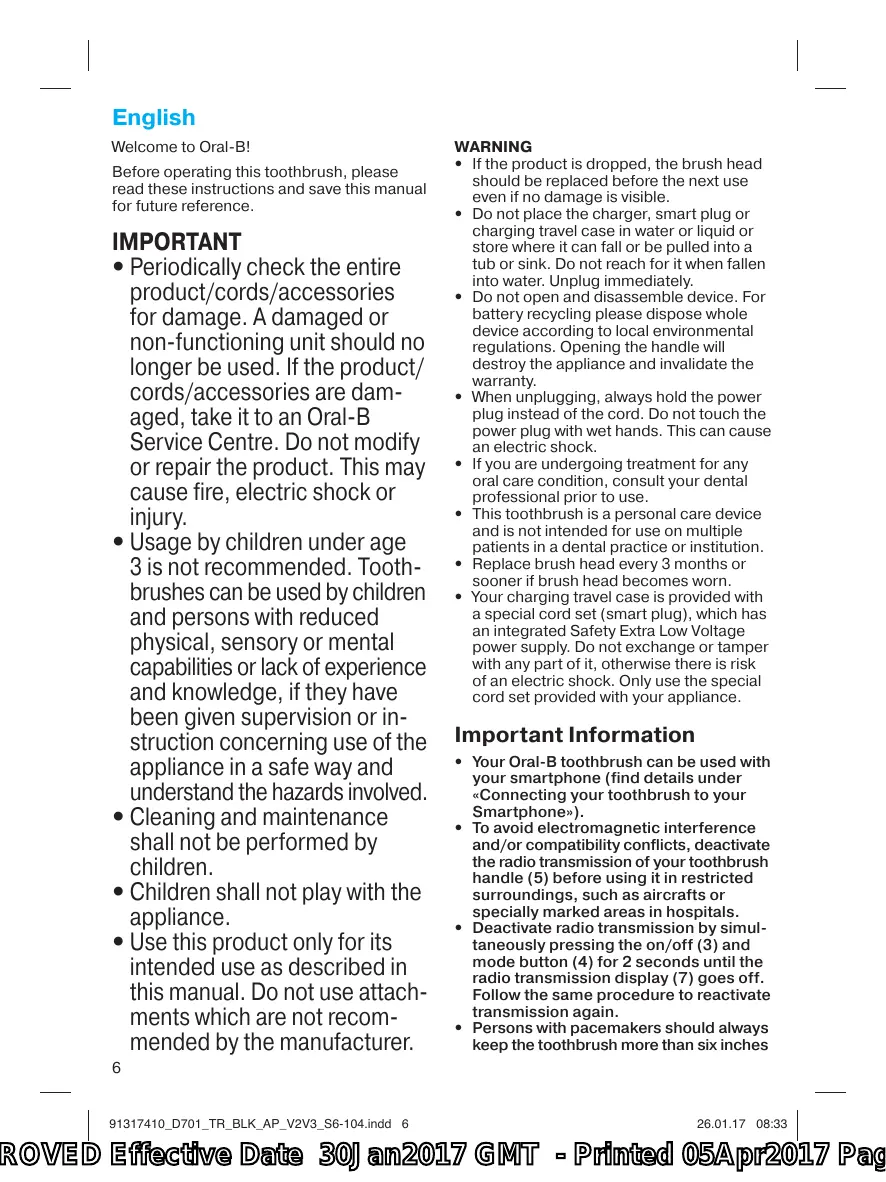
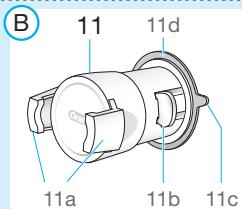
Description
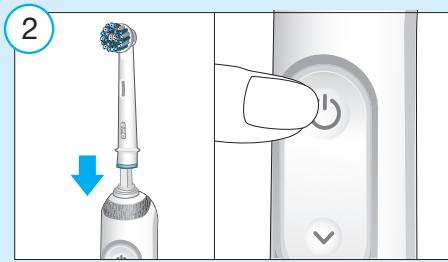
1 Brush head
2 Smart Ring
3 On/off button
4 Brushing mode button
5 Handle
6 Brushing mode display
7 Radio transmission display (with Bluetooth® wireless technology)
8 Charge level display
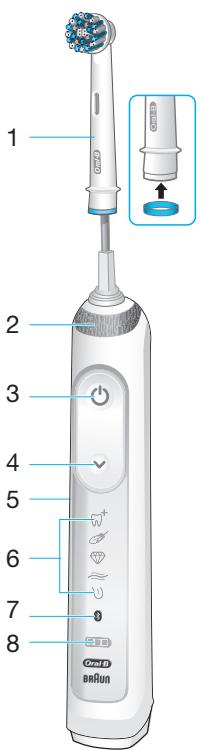
9 Charger
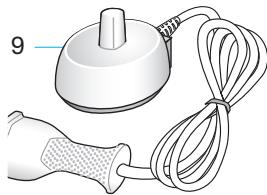
Accessories (depending on model):
10 Brush head compartment with protective cover
11 Smartphone holder
11a Holding brackets
11b Lever arm
11c Pull tab
11d Suction cup
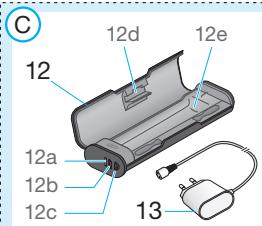
12 Charging travel case
12a Charge indicator light
12b USB port
12c Smart plug port
12d Inner lid (with smartphone holder)
12e Removable inlay
13 Smart plug
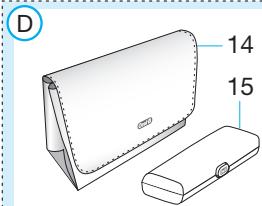
14 Beauty bag
15 Travel case
Note: Content may vary based on the model purchased.
Specifications
For voltage specifications refer to the bottom of the charging unit.
Noise level: 68 dB (A)
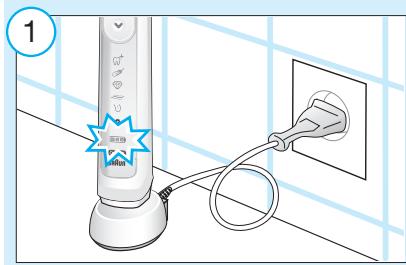
Charging and Operating
Your toothbrush has a waterproof handle, is electrically safe and designed for use in the bathroom.
-
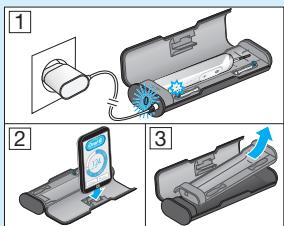
You may use your toothbrush right away or charge it briefly by placing it on the plugged-in charger (9). Note: In case the battery is empty (no lights illuminated on charge level display (8) while charging or no reaction when pressing the on/off button (3)), charge at least for 30 minutes.
-
The charge level is indicated on the charge level display (8). Flashing lights indicate that the battery is charging (picture ①); once it is fully charged, the lights turn off. A full charge takes typically 15 hours and enables up to 12 days of regular brushing (twice a day, 2 minutes). Note: At a very low charge level, the lights might not flash immediately; it can take up to 30 minutes.
- If the battery is running low, a red light is flashing on the charge level display and the motor is reducing its speed. Once the battery is empty, the motor will stop; it will need at least a 30-minute charge for one usage.
- You can always store the handle on the plugged-in charging unit to maintain it at full power; a battery overcharge is prevented by device.
Note: Store handle at room temperature for optimal battery maintenance.
Caution: Do not expose handle to temperatures higher than 50^ .
Using your toothbrush
Brushing technique
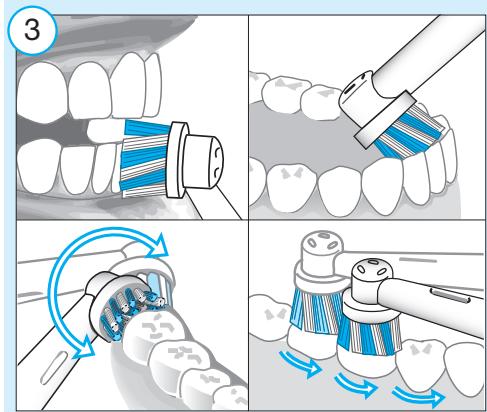
Wet brush head and apply any kind of toothpaste. To avoid splashing, guide the brush head to your teeth before switching on the handle (picture ②). When brushing your teeth with one of the Oral-B oscillating-rotating brush heads guide the brush head slowly from tooth to tooth, spending a few seconds on each tooth surface (picture ③). When using the Oral-B «TriZone» brush head place the toothbrush bristles against the teeth at a slight angle towards the gumline. Apply light pressure and start brushing in back and forth motions, just like you would do with a manual toothbrush.
With any brush head start brushing the outsides, then the insides and finally the chewing surfaces. Brush all four quadrants of your mouth equally. You may also consult your dentist or dental hygienist about the right technique for you.
In the first days of using any electric toothbrush, your gums may bleed slightly.
In general, bleeding should stop after a few days. Should it persist after 2 weeks, please consult your dentist or dental hygienist.
If you have sensitive teeth and/or gums, Oral-B recommends using the «Sensitive»
mode (optional in combination with an Oral-B «Sensitive» brush head).
Smart Ring features
Your toothbrush is equipped with a Smart Ring (2) that has various functionalities indicated via different colors of light: White (default) = Operating and visual timer light (choose individual color via Oral-B™ App settings) Red = Pressure sensor light Blue = Bluetooth® pairing indicator
Timer
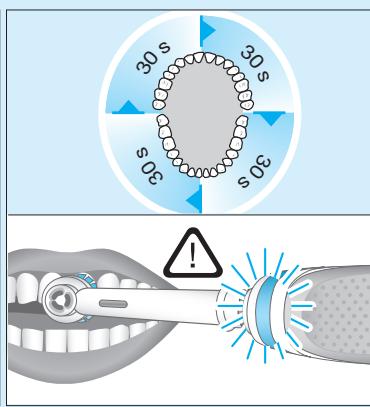
You can choose between «Professional» or «2-Minute» timer.
The «2-Minute» timer signals with a long stuttering sound and a flashing light of the Smart Ring (2) that the professionally recommended 2-minute brushing time has been reached.
The «Professional» timer signals with a short stuttering sound and a flashing light of the Smart Ring at 30-seconds intervals to move to the next quadrant of your mouth (picture ③). A long stuttering sound and a flashing light indicate the end of the professionally recommended 2-minute brushing time.
The timer memorizes the elapsed brushing time, even when the handle is briefly switched off during brushing. The timer resets if pausing longer than 30 seconds, briefly pressing the mode button (4) during pause or placing the handle on the plugged-in charger. Note: During the use of special Oral-B™ App features, the visual timer light may be deactivated.
Timer setup:
Your toothbrush comes with the «Professional» timer activated. To change this, press and hold the mode button (4) for 2 seconds. Toggle between timer selection by pressing the on/off button (3). Confirm selection by pressing the mode button.
- 2 LED's illuminated indicate «2-Minute» timer
4 LED's illuminated indicate «ProfessionaI» timer
Note: You can also set/advance the timer functionality via Oral-B™ App.
Pressure sensor
If too much pressure is applied, the Smart Ring (2) will light up in red, reminding you to reduce pressure. In addition the pulsation of the brush head will stop and the oscillation movement of the brush head will be reduced (during «Daily Clean», «Pro Clean» and «Sensitive» mode) (picture ③).
Periodically check the operation of the pressure sensor by pressing moderately on the brush head during use.
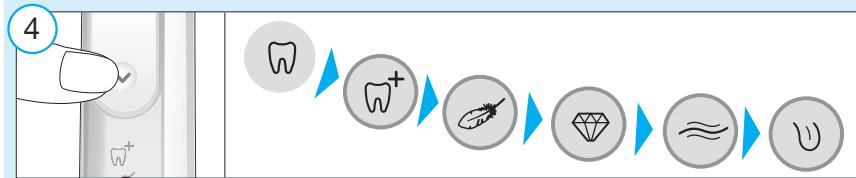
Brushing modes (depending on model)
Your toothbrush offers different brushing modes indicated on the brushing mode display (6) on your handle («Daily Clean» mode does not illuminate on the brushing mode display):
“Daily Clean” - Standard mode for daily mouth cleaning
"Pro Clean" - For an extraordinary clean feeling (operated with a higher frequency)
"Sensitive" - Gentle, yet thorough cleaning for sensitive areas
3D White -Polishing for occasional or everyday use
"Gum Care" - Gentle massage of gums
When operating the «Tongue Clean» mode, we recommend using the «Sensitive» brush head. You can brush your tongue either with or without toothpaste. Brush the whole area of your tongue systematically in gentle movements. The recommended brushing time is 20 seconds; indicated with a flashing light of the Smart Ring.
Your toothbrush automatically starts in the mode selected last. To switch to other modes, successively press the mode button during use (picture 4). To return from any mode back to «Daily Clean» mode, press and hold the mode button (4).
Note: You can also set/advance the mode functionality via Oral-B™ App.
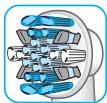
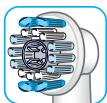
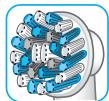
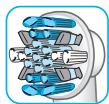
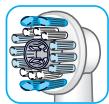
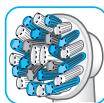
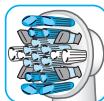
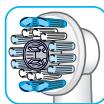
Brush heads
Oral-B offers you a variety of different Oral-B brush heads that fit your Oral-B toothbrush handle.
Our oscillating-rotating brush heads can be used for tooth-by-tooth precision cleaning.
Oral-B CrossAction brush head
Our most advanced brush head.
Angled bristles for a precise clean. Lifts and powers away plaque.
Oral-B FlossAction brush head features micropulse bristles that allow for an outstanding plaque removal in the interdental areas.
Oral-B 3D White brush head features a special polishing cup to naturally whiten your teeth. Please note that children under 12 years old should not use the
features a combination of regular bristles to clean teeth surfaces and ultrathin bristles
for a gentle brushing experience on the gumline.
Most Oral-B brush heads feature light blue INDICATOR® bristles to help you monitor brush head replacement need. With thorough brushing, twice a day for two minutes, the blue color will fade halfway approximately within 3 months, indicating the need to exchange your brush head. If the bristles splay before the color recedes, you may exert too much pressure on teeth and gums.
We do not recommend using the Oral-B «FlossAction» or Oral-B «3D White» brush head with braces. You may use the Oral-B «Ortho» brush head, specifically designed to clean around braces and wires.
Connecting your toothbrush to your Smartphone
The Oral-B™ App is available for mobile devices running iOS or Android operating systems. It can be downloaded for free from App Store(SM) or Google PlayTM.
Your handle has a sensor installed that, together with a «position detection» feature in the app, helps you to detect what areas to brush and for how long so you will never miss a zone. Use it along with your smartphone holder (find details under «Accessories – Smartphone Holder»).
Furthermore, the Oral-B™ App gives you the opportunity to chart your brushing progress and customize your toothbrush settings (for many more benefits see the Oral-B™ App instructions).
- Start the Oral-B™ App. It will guide you through the entire Bluetooth pairing procedure.
Note: Oral-B™ App functionality is limited if Bluetooth wireless technology is deactivated on your smartphone (for directions please refer to your smartphone's user manual).
- Any app instructions will be displayed on your smartphone.
- If Bluetooth wireless technology is activated on your handle, the Bluetooth symbol on the radio transmission display (7) illuminates. Once the handle is paired, the Smart Ring (2) flashes briefly.
- Keep your smartphone in close proximity (within 5 m distance) when using it with the handle. Make sure the smartphone is safely positioned in a dry place.
Note: Your smartphone must support Bluetooth 4.0 (or higher)/Bluetooth Smart in order to pair your handle.
Compatible smartphones are listed in App Store(SM) or Google PlayTM.
Caution: Follow your smartphone's user manual to ensure your phone/charger is designed for use in a bathroom environment.
Check www.oralbappavailability.co.uk for country availability of the Oral-B™ App.
Cleaning recommendations
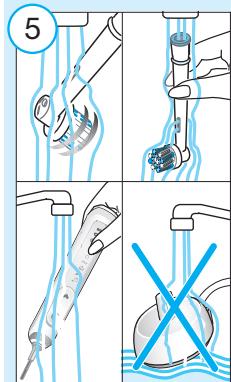
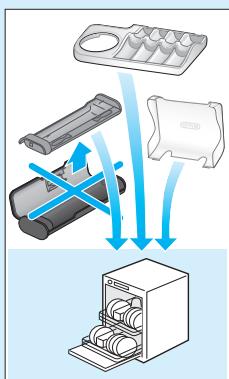
After brushing, rinse your brush head under running water with the handle switched on. Switch off and remove the brush head. Clean handle and brush head separately; wipe them dry before reassembling. Unplug the charging unit before cleaning. Brush head compartment and protective cover are dishwasher-safe. Basic charger should be cleaned with a damp cloth only (picture 5).
Accessories
(dependently on model)
Smartphone Holder
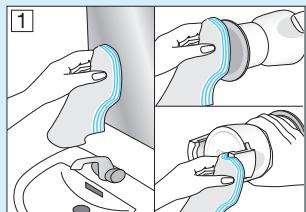
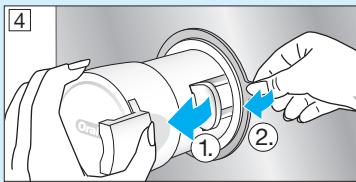
- Before each use, make sure mirror, suction cup surface (11d) and holding brackets (11a) are always clean and dry (picture B1). Use a fuzz-free cloth for cleaning suction cup surface and mirror. In particular, make sure suction cup surface and mirror are free from any contamination (e.g. hair, dust, oil, fuzz, dirt etc.).
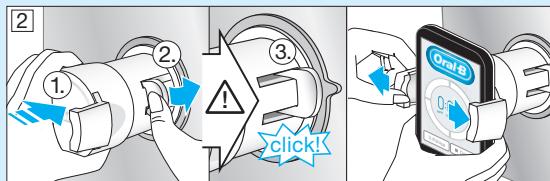
- Press your smartphone holder (11) just with enough pressure, centered at nose level on a sturdy mirror. Then mount the holder by pressing the lever arm (11b) towards the mirror until it snaps in (picture B2). Note: Only affix on mirror to ensure safe and correct conditions. For use in bathroom only. Do not use in automobiles.
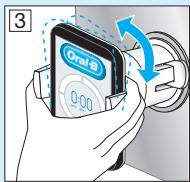
Always make sure the smartphone holder is securely mounted on the mirror before inserting your smartphone. Place your smartphone (portrait) sideways in between the holding brackets (11a) by pressing against one bracket with your phone and sliding the other bracket to the side (picture B2). Follow the same procedure to remove your phone again. - Adjust the overall position for the required angle by moving the ball joint of the holder (picture B3).
- Once done, remove your phone from the holder. Take off the smartphone holder by flipping the lever arm back and pulling the tab carefully (picture B4 1./2.). Affix smartphone holder with each use again.
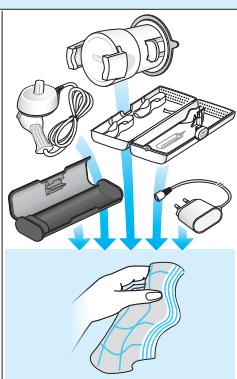
- The smartphone holder should be cleaned with a damp fuzz-free cloth only (picture ⑤). You may use glass cleaner, alcohol or similar products (avoid products with silicone oil).
Make sure the surface is dry and dust free after cleaning. Store in clean and dry place. If not in use, always remove your smartphone from the holder.
Note: Smartphone width required for usage: minimum 58 mm, maximum 83 mm.
Caution: Small parts may come off, keep out of reach of children.
Follow your smartphone's user manual to ensure your phone/charger is designed for use in a bathroom environment.
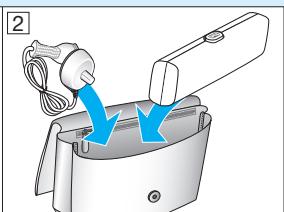
Charging Travel Case
- To charge your handle (5) place it on the pin in the charging travel case (12) and connect it to an electric outlet, using the extra smart plug (13) provided.
- The flashing light (12a) of the charging travel case indicates that the handle is charging. Once the handle is fully charged the light turns off. A full charge can take up to 12 hours (picture C1). Note: You may use the USB port (12b) to charge an electric device while the charging travel case is plugged in. The handle can only be charged with the smart plug (13) (12c) not via USB port.
- The inner lid of the travel case has a built-in smartphone holder (12d), which can hold your smartphone while using (picture C2). Before use, make sure your phone fits the stand and keeps stable.
- The removable inlay (picture C3) (12e) of the travel case is dishwasher-safe (picture ⑤). The outer case should be cleaned with a damp cloth only. Make sure that travel case parts are completely dry before reassembling and toothbrush/brush heads are dry before storing in the travel case.
Note: Clean stains on travel case surface immediately. Store travel case in a clean and dry place.
Follow your smartphone's user manual to ensure your phone/charger is designed for use in a bathroom environment.
Beauty Bag
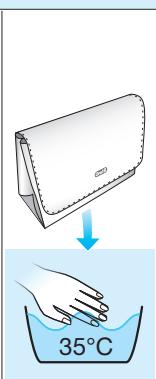
Store your clean and dry toothbrush/brush heads in the travel case (15) and place it inside the beauty bag (14) (picture D1/2). Clean stains on the surface immediately. The
beauty bag should be hand washed only with lukewarm water (30^ - 40^) (picture ⑤ ).Store in clean and dry place.
Subject to change without notice.
Environmental Notice
Product contains batteries and/or recyclable electric waste. For environment protection do not dispose in household waste, but for recycling take to electric waste points provided in your country.

Guarantee
We grant 2 years guarantee on the product commencing on the date of purchase. Within the guarantee period we will eliminate, free of charge, any defects in the appliance resulting from faults in materials or workmanship, either by repairing or replacing the complete appliance as we may choose.
This guarantee extends to every country where this appliance is supplied by Braun or its appointed distributor. This guarantee does not cover: damage due to improper use, normal wear or use, especially regarding the brush heads, as well as defects that have a negligible effect on the value or operation of the appliance.
The guarantee becomes void if repairs are undertaken by unauthorised persons and if original Braun parts are not used.
This appliance is equipped with a Bluetooth Smart approved radio module. Failure to establish a Bluetooth Smart connection to specific smart phones is not covered under the device guarantee, unless the Bluetooth radio module of this appliance is damaged. The Bluetooth devices are warranted by their own manufacturers and not by Oral-B. Oral-B does not influence or make any recommendations to device manufacturers, and therefore Oral-B does not assume any responsibility for the number of compatible devices with our Bluetooth systems. Oral-B reserves the right, without any prior notice, to make any technical modifications
or changes to system implementation of device features, interface, and menu structure changes that are deemed necessary to ensure that Oral-B systems function reliably.
To obtain service within the guarantee period, hand in or send the complete appliance with your sales receipt to an authorised Oral-B Braun Customer Service Centre.
Information Bluetooth® radio module
Although all indicated functions on the Bluetooth device are supported, Oral-B does not ensure 100% reliability in connection, and feature operation consistency. Operation performance and connection reliability are direct consequences of each individual Bluetooth device, software version, as well as the operating system of those Bluetooth devices and company security regulations implemented on the device. Oral-B adheres to and strictly implements the Bluetooth standard by which Bluetooth devices can communicate and function in Oral-B toothbrushes.
However, if device manufacturers fail to implement this standard, Bluetooth compatibility and features will be further compromised and the user may experience functional and feature-related issues. Please note that the software on the Bluetooth device can significantly affect compatibility and operation.
1) Warranty - Exclusions and Limitations
This limited warranty applies only to the new products manufactured by or for The Procter & Gamble Company, its Affiliates or Subsidiaries («P&G») that can be identified by the Braun / Oral-B trademark, trade name, or logo affixed thereto. This limited warranty does not apply to any non-P&G product including hardware and software. P&G is not liable for any damage to or loss of any programs, data, or other information stored on any media contained within the product, or any non-P&G product or part not covered by this limited warranty. Recovery or reinstallation of programs, data or other information is not covered under this limited warranty.
This limited warranty does not apply to (i) damage caused by accident, abuse, misuse, neglect, misapplication, or non-P&G product; (ii) damage caused by service performed by anyone other than Braun or authorized
Braun service location; (iii) a product or part that has been modified without the written permission of P&G, and (iv) damage arising out of the use of or inability to use the Oral-B Smartphone stand/puck, Smartphone mirror holder, or charging travel case ( A ccessories ).
2) Using your smartphone holder
The Oral-B Accessories included in the package has been designed to provide you with a convenient way to position your smartphone while you are using the Oral-B app. Try multiple orientations of your smartphone in the Oral-B smartphone holder prior to use to determine the best positioning of your smartphone in the holder. Be sure to try this in a manner which will not harm your smartphone if it falls out of the stand. Do not use in automobiles.
LIMITATION OF LIABILITY
TO THE EXTENT PERMITTED BY APPLICABLE LAW, IN NO EVENT SHALL P&G ITS DISTRIBUTORS OR SUPPLIERS BE LIABLE TO YOU OR ANY THIRD PARTY FOR ANY DIRECT, INDIRECT, INCIDENTAL, CONSEQUENTIAL, SPECIAL, EXEMPLARY OR PUNITIVE DAMAGES, OF ANY NATURE WHATSOEVER, ARISING OUT OF THE USE OF OR INABILITY TO USE THE ORAL-B ACCESSORIES, INCLUDING, WITHOUT LIMITATION, INJURY TO PERSONS, PROPERTY DAMAGE, LOSS OF VALUE OF ANY THIRD PARTY PRODUCTS THAT ARE USED IN OR WITH THE ORAL-B ACCESSORIES, OR LOSS OF USE OF THE ORAL-B ACCESSORIES OR ANY THIRD PARTY PRODUCTS THAT ARE USED IN OR WITH THE ORAL-B ACCESSORIES, EVEN IF P&G HAS BEEN ADVISED OF THE POSSIBILITY OF SUCH DAMAGES. WITHOUT LIMITING THE FOREGOING, YOU UNDERSTAND AND AGREE THAT P&G HAS NO LIABILITY FOR ANY DAMAGE OR DESTRUCTION TO CONSUMER ELECTRONICS DEVICES OR OTHER PERSONAL PROPERTY THAT ARE CONTAINED ON OR EXTERIOR TO THE ORAL-B ACCESSORIES, OR ANY LOSS OF DATA CONTAINED IN THE FOREGOING DEVICES. IN NO EVENT SHALL ANY RECOVERY AGAINST ORAL-B EXCEED THE ACTUAL PRICE PAID FOR THE PURCHASE OF THE PRODUCT.
Warranty replacement brush heads
Oral-B warranty will be voided if electric rechargeable handle damage is found to be attributed to the use of non-Oral-B replacement brush heads.
Oral-B does not recommend the use of non-Oral-B replacement brush heads.
- Oral-B has no control over the quality of non-Oral-B replacement brush heads. Therefore, we cannot ensure the cleaning performance of non-Oral-B replacement brush heads, as communicated with the electric rechargeable handle at time of initial purchase.
- Oral-B cannot ensure a good fit of non-Oral-B replacement brush heads.
- Oral-B cannot predict the long-term effect of non-Oral-B replacement brush heads on handle wear.
All Oral-B replacement brush heads carry the Oral-B logo and meet Oral-B's high quality standards. Oral-B does not sell replacement brush heads or handle parts under any other brand name.
Trouble Shooting
| Problem | Possible reason | Remedy |
| APP | ||
| Handle does not operate (properly) with Oral-B™ App. | 1. Oral-B™ App is turned off. 2. Bluetooth interface is not activated on smartphone. 3. Radio transmission is deactivated on handle; radio transmission display (7) is turned off. 4. Bluetooth connection to smart phone has been lost. 5. Your smartphone does not support Bluetooth 4.0 (or higher)/Bluetooth Smart. 6. Handle on plugged-in charger. | 1. Turn on Oral-B™ App. 2. Activate Bluetooth interface on smartphone (described in its user manual). 3. Activate radio transmission by simultaneously pressing on/off (3) and mode button (4) for 2 seconds until radio transmission display (7) turns on. 4. Pair handle and smartphone again via app settings. Keep your smartphone in close proximity when using it with handle. 5. Your smartphone must support Bluetooth 4.0 (or higher)/Bluetooth Smart in order to pair handle. Check App Store(SM) or Google Play™ for compatible smartphones. 6. Radio transmission is deactivated while handle is placed on plugged-in charger. |
| Reset to factory settings. | Original app functionality wanted. | Press and hold on/off button (3) for 10 seconds until all indicator lights double blink simultaneously. |
| TOOTHBRUSH | ||
| Handle is not operating (during first use). | Battery has a very low charge level; no lights illuminate. | Charge at least for 30 min. |
| Handle does not operate with existing SmartGuide in household. | 1. Synchronizing with existing SmartGuide failed. 2. Radio transmission is deactivated; radio transmission display (7) is turned off. 3. SmartGuide is not compatible with handle. 4. Two handles are already assigned to SmartGuide. 5. Function is deactivated via App feature. | 1. Synchronize (existing) handle(s) (again) via SmartGuide settings in SmartGuide's battery compartment: Press «h/min» for 3 seconds. Turn on handle that you want to synchronize. Then turn on second handle you want to synchronize. Press «h/min» or «set» to exit synchronization mode. 2. Activate radio transmission by simultaneously pressing on/off (3) and mode button (4) for 2 seconds until radio transmission display (7) turns on. 3. Handle cannot be used with exciting SmartGuide. 4. You can synchronize a total of 2 handles only. Change handles via SmartGuide settings (see 1.) 5. During use of special App features, transmission to Smart-Guide may be deactivated. You can also (de)activate any SmartGuide communication via App. |
| 1. Short stuttering sounds/ flashing light every 30 seconds or after 2 minutes. 2. Handle does not operate any timer. | 1. «Professional timer» or «2-Minute timer» activated. 2. Timer has been modified/deactivated via App. | 1. Set your timer to 2-Minute timer (stuttering sounds/flashing light after 2min); or set your timer to Professional timer (stuttering sounds/flashing light every 30 seconds). Follow steps under «Timer setup」. 2. Use App to change timer settings or perform factory reset (see App Trouble Shootings). |
| Handle does not charge. | 1. Battery is at a very low charger level. 2. Ambient temperature for charging is out of valid range (≤0℃ and ≥60℃). | 1. Charging lights might not flash immediately; it can take up to 30 minutes. 2. Recommended ambient temperature for charging is 5℃ to 35℃. |
This rechargeable toothbrush contains a Bluetooth radio which operates in the 2.4 to 2.48 GHz band with a maximum power of 1mW.
Hereby, Braun GmbH declares that the radio equipment types 3765, 3754, 3764, 3762 and 3767 are in compliance with Directive 2014/53/EU. The full text of the EU declaration of conformity is available at the following internet address: www.oralb.com/ce
Srbija
DobroDosliuOral-B
Pre upotrebe ove Čětkec, molimo vas da pročitate ovo uputstvo u šačuvalte ga u slučaju dā vam zatrebu u budućnosti.
VAZNO
Oral-B Cen3nTnBHa YItpa-TeHka
IanaB OSeCyBa KOMbHaNauJa oJ HOpMaJIHn BlaKaHa 3a YIcTeHe Ha NOBpUHaHa Ta Ha 3a6Mtne I
yIITpa-TeKN BlaKHa 3a HeXHo YeTKaHb Ha HENIaTa.
Nobeketo Oral-B rIabn mHaat cBETNo CIN INDICATOR 3a BnaKha kon Ke Bn nomorHe da ja HauIreYbATE noTpe6bata OD 3ameHa na IraBaTa.Co TeMeHIO YTeKaHe, Dba nATn DHeBNO NO DE MNHTu, PNaBata 6oJa Ke NcUe3He DO noIPOLOBHa HO BnE BnaKHa BO npOcEK O3 Meceun, O3NaUyBajKn Deka Tpe6da Ce npOMeHN IraBaTa Ha YeTKata. DOKONky BIAkHATA NoOHat Da CE uHpat nped Bojata Da Nouche Da ce nobLeKyBa, Toa e3NaK deA BpWITE pnerOJEM npITncok Ha 3a6nte IN HeucaTa.
He npenopaCyBaMe ynoTpe6aHa Oral-B «FlossAction»Ии Oral-B «3D White»
rIaBaHa YeTka co npote3n. MoKe da ja kOpIcNTne Oral-B «Ortho» rIaBaTa Ha yeTka, cSeIJIaHIO nIz3ajHnpaHa 3a YIcTeHe oKOly npOTe3nE I KxIuNTe.
Поврзувашие на ВашатуETka 3a 3abn co ВашиOT Smart телфон
Anlkaunjata Oral-BTM e doctanha 3a cnTe MoBnHn anapatni kon kopructat iOS nI IN AnDpOIN onepaTInBeH cnCTem. Moze da ce npBbEme 6ecnPnAtoH oD App Store(SM) nIg Google PlayTM.
Baata paika Ima HcTalnapc ceH3Op KOJ 3aEaNDo CO OINJaTa 3a «DeTeKUJa Ha no3uJnaja (position detection) BO anIIKaunaja, Bn NOMara da OTkPmeTe KOI OblaCTN Tpe6a Da rN YeTKeTae N KOnky dONrO, Taka ITO HIKORAùHema Da nponyuHTIne 30Ha. YnoTpe6ete ja 3aedHo CO dPkauyot 3a cMapT TeleΦOH (hajdete rN detaJIte Bo DeIOT «Accessories-Smartphone Holder').
POnHaTMy, Oral- B^T M anIIkaunjata Bn OBO3MOXyBa da ro cIeINTe BaWInOT pOuec Ha YeTKaHe N da Tn HArOINTE CeTIpaHbTa Ha YeTKaHe (3a NOBeKe npUdoNBkn NOrPeNHeTe rN hAcOKInTe Ha anIIkaunjata Oral- B^T M
- CtrpTyBaJte Ha Oral-BTM anIIkaunjata. AnIIkaunjata Ke Be BOINH3 CELOCHNOT Bluetooth npocc ha NOBp3yBaHe. 3a6belleka: FynkuOHaHNoCTa Ha Oral-BTM anIIkaunjata e oPraHnueHa DOKoJky Bluetooth e deakTbIpaHn Ha BauNt Smart Telefoh (3a HacOKn Be MOlIMe npOBepTe r yPntCTBOTO Ha BauNt Smart Telefoh)
- Cekoja hacoka od annilkaunjata Ke Bn ce nojabu ha Baunot Smart telefon.
ДokолуеakTNBupanBluetoothHa Bawsata YeTka 3a 3a6n,ce nani CmboJOT 3aBluetooth(7)Ha ekpaHOT.HTom ce NOBp3e paKaTa,SmartRing-ot (2)KpaTK Tpenka.
-Држete ro TelefoHOT BO 6Iln3nHa (BO pazMep OJ 5M) Kora re KO npCHTte co Yetkata 3a 3abN. OcigrpajTe ce DeKa TelefoHOT He na 6e36eHNO n cyBO MeCTO.
3a6eneuka: Baouont Smart tepeon Mopaa no npdybya Bluetooth 4.0 (nni nnohaBep3nu)BluetoothSmart3a da moxe da ce
NOBP3e CO BAuTaT AETKa 3a 3a6n. KomnATb6nHInTe TelenoHn ce HabeJeHn Bo APP StoreSMnHn Ha Google PlayTM.
BHMaHHe: CJIeTeTe ro ynATCTBOTO 3a BaIIMOT cMapr TeLEFO OH 3a de CE yBepNTe DeKa BAIIMOT TELEFO /NoIHaC ce Dn3ajHnPaHI 3a yNtOpe6a BO 6aHa.
Iocete ro cajtot www.orbappavailability.co.uk 3a doctannoct ha Oral-BTM anlkaunjata no 3emjn.
Пpenopakn 3aЧистende
Ipo yetkaheTo ha 3abnte, nlaekhte ja IrabaTao od Yetkata HeKoLky cekyHn noD mna3 co BOa co YklyueHa paKa. Itoa ucknyete ja paKaTa n3BaJeTe ja rIaBata oJyETkata. NcIIaKHeTe r n dBaTa deLa noc6bHO noD mna3 CO BOA n3bOpiWeTe rnped NOBtropHO da rN coCTaBHTe.
Icknyute ja eDHHuata 3a noJIHeBe nped nCTHe. JeIOT OJ rIabata Ha YcTeKaTa I 3aHTINTHIoT KAnak MOKe Da ce nepaT BO MaunHa 3a caIOBn. OCHOBHnot NoIHauT TpeBa da Ce YInCTn CaMo Co BlaJaxHa Kpna (Clnka ⑤).
(BO 3aBnCHOCT OJ MOJeIOT)
IOMOJI Ha ekCTpa NaMeTHHOT IpiNKJIyUOK (13).
- CBeTJIoTo WTo TpEknka (12a) Ha npEHOChATA KytNiJa 3a noJIHeIe INdMnUpa DeKa paKaTa Ce noJIH. IToMpaKaTa ueNoCHO Ke Ce HanoJIH, CBeTJTO ce racn. MoKe Ja Ce noTpE6Hn Do 12 yaca (CInka C1) 3a zeLoCHo noJIHeIe. Hanomena: MokTe Ja ja yItope6bVate YCb-noptata (12b) 3a da HanoJIHnTe eJeKtpoHcKn Yupe,IdoKe Ka npEHOChATA KytNiJa 3a noJIHeIe e BkLyeha. PaKaTama MoKe Ja ce HanoJIHn CaMo Co NaMeTHNt Prnknyok (13)/(12c), a He npEky YCb-noptata.
BHTpeuHnOt kanak Ha npehocHaTa kytnja 3a noJIHeBe Ima BrpaIeH npJau 3a Smartphone (12d) sTo moKe da ro npJx Baunot Smartphone doNeka ro ynoTpe6yBaTe (cNka C2).Ppe Da ro yNoTpe6yBaTe, npOBepTe daIi BaUnOT Telefoh ro cObupa BO dPrXaOT n daIi CTOn CTa6bHNO.
BHaTpeuHocTa wTO ce OTeCTpaHyBa (cNka C3)(12e)Ha npehoCHATA KUTnja MOKe cIIObOHO da ce nepe BO MaunHa 3a caOBn (cNka 5)HaDbopeuHata KUTnja Tpe6a Da CE NCTn camo Co BLnXHa Kpna. Pnpobepete daJIeJeNoBHTe Ha npehoCHata KUTnja ce eJIoNCHO CYBN Ppei NOBTOPHOTMOHNTpaHe n IraBHTe Ha YETKNUKHTe/YeTKUKNITE 3a 3abJa ce CYBN Ppei Da Ce CTabaat BO Hea.
HaNoMaHa: BeDaHa 6pHWeTe rn fIeKeNtE oNIOBpUHaHaTa Ha npeHOChTa KUTna. YbAJte ja npeHOchTa KUTna Ha NCTO n CyBO MecTo.
CleTe Ro yNaTCTBOTo 3a BaIINOT MO6nIeH TeIeFOH 3a Da ce YbepNTe DekaBaIINOT TeIeFOH /PoiHaue Ce IIn3ajHnpaHn3a yNtOpeBa 60 bHa.
Ko3MeTnUkaTaunHa
YbajTe rBaunTe YnCTn YetKn nIgabN BO TaunHaTa 3a NaTyBaHBe (15) nCTabeTe rN BO K03MeTnKata TaunHa (14) (cNka D1/2). YnCTeTe rDamKaTe OJ NOBpUHaTHa BeDnHa. Ko3MeTnKATA TaunHa Tpe6a paHNo da ce nepe co MnaKa BOna (30^ - 40^) (cNka ⑤ ).CTabeTe ja Ha NCTO n cyBO MEcTO.
IpeDmTe Ha npOMeHa 6e3 HajaBa.
ИзВecТуВа№ 3aЖИВOTHаТа СредиHA
Pon3BODOT cOpJx 6aTePMn n/nn peunKnpaaye Jektpu- yen OTnd. 3a zauTntHa
XIBOTHaCpeINHaJaHe Ce
ΦpJa CO OTnAd OJDMoAKInHCTBaTa,3a
peuNKInpaBe Ondecete Ro Do MeCTaTa
PpeBDiEHN 3a CoBcPeBaHe Na eJeKtpnEH
OTnAD BO BAaata 3eMja.


Rapanzija
「rapaTnpame 2 roDHH orpaHnueHa rapaHnjuHa npOn3BODOT 3aOnOHyBaJHKoD DeHOT HA KnyBaHae.Bo pAMKHe TA rapaHTNtO nepNoD Ke OTCTpAHme,6ecPNaTHO,BnIo KAkBn DEpeKTe BO anaparOT KO nactAhanE Od rpeShKnte BO mATEpNJanITE NnI IN3paB0TKata,NnCo NOppabKa NnI cEnOcha 3aMeHa HnAnapATOT kako ITo Ke OndyUHMe OBaa rapaHnjuCa ce ONcHcyBa HnCte 3emjKnade WTo OBOJ ypeD ce Ha6abyBa D Braun NnI He3HHOT Na3HaueH nDCTPn6byTp.
Obaa rapaHunja He noKpBa: uTeTa HaCTaHaT OHe HecooDBeTHa yNtPeb6a,OCoBeHO HaIbAbaTa HaYekTaKA, KAKIO NeΦeKTNo KOnIMaAT HeNaHuNTeJEn eΦeKT Bp3BpeHocTaNN pa6oteHbeto Ha anapato.
TapaHunjata CtaHyBa HebXeUka DOKOLky Ce n3BpUyBaHn NoPpaBKn ODHeOBNaCTEH NlaN a NdoKJy He ce KopncTeHN opnHn HANHn DeNoBn oD Braun.
Oboj anapat e onpemeh co Bluetooth paNo mOyUn HeNcOTATOKOT HA BOCNCTABYBAHBe Ha Bluetooth Smart koHEKUJaCo opeDeHn Smart TEleFOHNe He n OOKPmEOHo CO rapanuJaT oOBOJ anapat,OCBEN BO CnyaJ Kora Bluetooth paNo MOnyNut O OBOJ anapat e OwTeHn Bluetooth e noD rapaHunja Ha NHBNt npOn3BOUntel,a He na Oral-B. Oral-B He BnJa e N he npAIn npenopakn 3a npOn3BOUNTeIOT ha anapatot n 3aToa Oral-B He npEema HnKaBa OgROBPOCT 3a 6pojot HA KomnATn6nHn anapatu Co hAnuTe Bluetooth cmtEm.
Oral-B ro 3aapkya npaboto, 6e3 pnetXoHa hajaba, da Hnnpabn texhnyKMOndiKaunu nnpOmeHa BO HmJneMeHTaunjata Ha cNCTeMOT kaKAPtePNCtIKnte Ha anapatot, INTeppejcot n CTpykTypata HA MeHITo KOI CE HeONXoDnHa 3a CNTeMOT Ha Oral-B da FyHKUHOHPa co cnrgyHocT.
3a da Bn OBO3MOXIME cepBNC BO rapaHTHNOIT nepIOM, npedaeTe RO IINI NCpPaTeTe ro ceJIOT anapat 3aEHO Co cEMTKaBO OBnlaTeh Oral-B Braun cepBcENeIeTap.
Baxhni nHΦopMaζn 3a Bluetooth® padno moyn
Iako cnte Ha3aHaeHn FyHKuHn Ha anapatOT 3a Bluetooth ce noDprXahn, Oral-B he 06e36eYbA 100% cnrypHocST BO KOHEK- ujata n paobotata Ha kaPakTeepCTNkTE. I3BeYBaJbETo HA paobota n CnHyPnoCTa Ha KOHEKUnjata Ce DnpeKeTHe pe3yUtat Ha cekoj 3ace6eHN Bluetooth anapat, COPTBepcKa BEp3nJa KAKo n ONEpatNBHnOT CnCTEM Ha Tne Bluetooth anapatu n perynatNBITE 3a 63e36eNoCT Ha KOMpaHnjaT KaCn CE NmPJIeMeHTnpAHn BO anapATOT.
Oral-B ceДржиdoи cTporo ГИ ИМПлЕм entpaBluetooth cTahdapdnte npeky kon Bluetooth anapatnte moke da kOMyHnIpuaat nФункюнupaataaj Kaj Oral-B cheKtne 3a 3a6n.
Дokолуnpиоьдунгелпе Ha anapatot He ycneat Da ro Имлелметираat OBOJ CTANdap,Bluetooth KOMnATn6bHIOHcTa nkapakTepnCTKNTe Ke 6uDat KOMPomITnpaHn N KOPINCHIKOT MOKE Да ce COOHN COФнКцИОHAJIH N I PNOБLEMN NOBp3aHn COkapakTepnCTKNTe. Be monime, 6uDete n3BecTeHn Deka coФТВЕРот Ha Bluetooth anapatot TOMe 3HaauajHO DA BInjae Ha KMnATn6bHIOHcTA nФункциJaTа.
1)TapaHcunja- nckJyOoNi orpaHnUyBaHa
Obaa orpahnueHa rapaHnjuBa Baxn cAmo 3a HOBn pRom3B0Dn pRom3BeHeN Od NIN 3a KOMpaHnJa Procrer & Gamble, Hej3InHnte FmJnJIu NIN ORpAOnO (P&G" uTO ce UeHTnFknyBaAT CO TpROBCKNOT 3aK, 3aHTnTEHOTO IMe NIN IOROTo uTO ce NojaByBa 3a Braun / Oral-B. Obaa orpahnueHa rapaHnjuHa He ce OdncBuHa H NtY e ENPON3BOJ uTO He e OJ P&G, BKJyUbajKn XapDbep u CoTbep. P&G He oJrOBApa 3a HneIDHO OwTeTyBaBe NIN3aRy6a Ha npOrpAMn, NpOtaOu NIN dpyr InHΦOpMaun 3aCyBaHb BO pON3BOJOT N 3a HNTy e ENPON3BOJ uTO He e OJ P&G NIN del uTo He ro nokpnBa OBaa OrpahnueHa rapaHnjuBa. BrapaJbEto NIN NOBtOPHO INCTaIINpaBe Ha npOrpAMn, NpOtaOu NIN dpyr InHΦOpMaun He e nokpnEHO co OBaa orpahnueHa rapaHnjuA.
Obaa orpaHnueHa rapaHnjuHa He ce OndHeCyBa Ha (i) oWtETyBaHa npEiD3BVKAn OH nHeCpeKeH cIyau, 3JIoynTOpeBa, nOrpeHsHa yOnTOpeBa, 3aHemApBaHe iNn pOn3BOD uTo He e OD P&G; (ii) oWtETyBaBe npEiD3BVKAno pKeY cepBncnPaBe oKD KoJ bIOLO cepBn cWo He e HrauN iNn ABTOp3npan oD Braun; (iii) npOn3BD iNn DeI nTo He6BI MOiΦnUmpaH 6e3 NcMeha Do3BOJa HA P&G, n (iv) oWtETyBaHe uTo npOn3JIeYBa Od yNoTpeBa iNn HEMoXHOCT 3a yNoTpeBa Ha Oral-B dPxau iNn paueH yep, dPxau 3a Smartphone Ha orIeJano iNn npEnocHa kyTjNa 3a noJIneHbe ("DoTaOu")
2) Ynotpe6a Ha npkaoy 3a nameteh Tenefoh
Ддаточite Oral-B Вклунеци В понысу Се Дззаимранд BA ВОВЗМОЖAT Лесно DA RO ПОИЗПОнчate BaWInOT NaMeTeH Tete- Фон Ддосka ща унореты велпakцида Oral-B.ОБдente ce NOBEKEKрathO opиent- Таье на ВашINOT Smartphone BO Драха- ЧOT 3a Smartphone на Oral-B 3a DA obe6be- Дпte Надобразnoцma NaBauNOT Smartphone BO ДрахаOT. HanpaBete ro Toa HA NaCHN HA KOJ HEMA DA FOUOTETIte ВашINOT NaMTeH TeteФOn Или Ha KOJ Hema DA падне od ДрахаOT. He ynotpe6yBaJte ro BO AVTOMOBIL.
OPAHNUYBAHbE HA OJROBOPHOCTA
BO HINTY EDEH CUYAJ, DO OHOJ CTENI KOJ IO3BOJYBA 3AKOHOT, P&G,HEROBITE INCTPBNYETPNIINOBA-BVBAHNA HEMA DA BUNATODOBOPHN3A KAKBNI BUNIO INPEKTTHN, INHINPEKTHN, CUYAJHN, IOCJIENUHN IINIPOCESHNI OUITEYBAHBA OJ BAUSAIINIKOJA BUNIO TPTA CHPAHA, UTO INPOIN3JIENYBAAT OJ YNOTPEBA NIN HEYNOTPEBA HADONATOUITE ORAL-B, BKJUYBUJKN, HO HEOTPAHUYBAJKN CE HAJIHNIOBPEDN, IMOTHN JUTETN, 3AUYBA H A BPEIHOT NIN JUTETN HA KAKBNI BUNIO DPYUNI PON3BOJN, UTO PON3JERJE OJ YNOTPEBATA HAOJDA TOULTE ORAL-B, IINI 3AUYBA H A HAMEHATA H AO DATOUNTE ORAL-B IINI HA KOK BUNIO DPyTN IPOM3BOJN IUTO CE YNOTPEBVAAT 3AEIDHO CO JODATOILTE ORAL-B, DYPRN IDOKOLKY BO P&GBNJIE N3BECTEHN 3A MOXHOCTA 3A
TAKBNIJETNI.HEOGammaYBAJKNCE HAIPETXQIDHONOMEHATO,PA3BINPATE INCE COFJIACYBATE DEKA P&GHEMAODIROBPOHCT3A KAKBA BINGIOTETATAIIMUYHINHTYBAHBEHA KOHN3YMEHTCKN EJEKTOPHCKN YPEDNIIINDPYIIMUHMTLOTECNOITOPEBYBAATCOIODATOLNTEORAL-B,INJIN3AKKBA BNI03AIGBAHA NODATOLNIJTOCE COJPRKAT BO TINEYPEDNIOBHTENCHUYAJKOMPIEH3AUJATAODORA-B HEMDAJA HADMIHYBAPEAJHATA LIEHA IIPATEHA 3A IPON3BOJOT.
Tapaunja 3a 3ameHa Ha rnaBa Ha YeTKa
Oral-B rapaunjata Ke ce nohui nako
UteTATA na eJektpnHata paKa 3a noJIneHe e pe3yIaT aHa yNtpe6bTa Ha rJaBa
Ha YetKa koja He e Oral-B. Oral-B He npenopayuBa yNtpe6a Ha 3aMeHcKn rJaBn 3a
YeKTu Kaon He ce Oral-B.
Oral-B Hema KoHTpOla Bp3 KbAJIteTOT Ha 3aMeHcNk TlAbe 3a YeTka KOI He CE Oral-B. 3aToa, He MoXeMe Da rapaHTn-paMe 3a pa60TaTHa 3aMeHcNk TlAbe 3a YeTka KOI He Ce Oral-B, KaKo 7to E KomyHNIuPAHO Co eJeKTPnHATA paKa 3a NOnHeBe Ha NooyETOKOT OJ pOdaJx6bTa.
- Oral-B He rapaHTnpa 3a HecorNacyBaHbETO Ha 3aMeHcNrIaBn 3a YeTka KOn He ce Oral-B.
Oral-B He Moze da To npdeBnuDnOToPraJHnOteFKn Ha 3aMeHcKn TlaBn 3aYetka KOn He ce Oral-B.
CITe 3aMeHcNfIaBn 3a YeTka Ro IMaat IJorOTOOral-BnIIMcNoJIHyBaAaT BcOcKNe TcAndapn3a KbIaNTet HaOral-B. Oral-B He npOda3aMeHcNfIaBn 3a YeTka IJIn DeIOBn3paPka nOd npyR 6peHn IIN ImE
| ПюбLEM | Можна р�очина | Рeusнiece |
| АликациJA | ||
| Oral-B рачкata He paBOTN ( cooDBeTHO) co anLIkaCNIjata Oral-BTM | 1. Oral-BTM anLIkaCNIjata e nCKnyeha. 2. Bluetooth noBp3yBaHéTo He e akTbIparHo OD baWIoNt smartphone. 3. PaDINO trPahCMNCiJATA He e akTbIparHa; dNcPJIeJOT 3a paDINO tpaHCMNCiJa (7) e nCKnyeh. 4. Bluetooth KoneKciJATA co baWIoNt smartphone e npeKInHATA. 5. BaWiNt smartphone He noDpJxBya 4.0 Bluetooth (nii noNoB moDeI)/Bluetooth Smart. 6. Pachkata e Na yKluyeh noLNaHua. | 1. YknyeTe ja anLIkaCNIjata Oral-BTM. 2. AKTbIparJte ro Bluetooth noBp3yBaHbeHeto Ha bawIoNt smartphone (objacheto BO na hauHnot Ha yNoTpe6a). 3. AKTbIparJte ja paDINO trPahCMNCiJATA co cIMMyIaHo prnTnCKaHbe Ha on/off (3) i KoNchEto 3a moJeI na pAbota (4) 2 cekuHdi doDEka paDINO trPahCMNCIOHOT dNcPJIeJ (7) He ce akTbIpara. 4. Повзete rni pachkata i smartphon-ot nobTOPHO npeky anLIkaCNIjata 3a noDeCyBaHé. Smartphone-ot HeKa 6bnde Bo 6blzHIna kora Ke ce yNoTpe6yBa co paKATA. 5. BawIoNt pamEtEN TeleΦOH MOpA da noDpJxBya Bluetooth 4.0 (nii noBnCoko)/ Bluetooth Smart 3a da ce nobPrze co chTKATA. Probepete Bo App Store(SM) iLi Google PlayTM 3a kompatnbInHite teLEΦOni. 6. PaDINO trPahCMNCiJATA e DeakTbIparHa doDEka pachkata e nobP3aHa Na noLNaH. |
| PecetirpaJIe Na ФабriчКITE поDecуВаь. | ПотрбNe a ФунКцИн�нocT Na opRinHaiHnTa anLIkaCunija. | ПриTuschete i джete ro on/off konCheto (3) 10 cekuHdi doDEka He trpeHnat Два пати сite силajuncki OndeДиш. |
| ЧETKA 3A 3AБИ | ||
| Pachkata Ne paBOTN (Ha npBa yPo- ter6a) | Бatepijata Ima MNoγ HnCKO HnIBO Na noJIneHBe; He cbetn силajuncka. | ПолНе T haJmaJIky 30 mInHytNi. |
| Раоча не paBOTи co NOCTOeuchKnot SmartGuide bo DOMAKINHCT- BOTO. | 1.Синхонизizujiata co NOCTOeuchKnot SmartGuide e Heucneшna. 2. Радо trpAHCMnsjata e DeakTNBipana; ДИСПLEJOT 3a радо trpAHCMnsjca (7) e ИSCKlyueh. 3. Smartguide He e KOMPATN6Bilen co pachkata. 4.ДBE рachn ce Beke noBPZAHNo co SmartGuide. 5.РаobTeHeTo e DeakTNBipano npeky onUzijata ha anIINaKauzijata. | 1.Синхонизizuajte ja (noctoechka)упаКТа(TNOBTOPHO)п配电у DeJOT 3a bateprinajaHa SmartGuide. ПгNTSCHETe Ha «h/min» 3cekyнд.УкLучete ja pachka на koja cakate DA ja синхониЗирate. ПгNTSCHETe «h/min» Ил «Set» 3aда ИЗLEZEte OD ржIMOT 3a sinxhoRus3a zuja. 2.AkTbUHApJIte ja padinno TrpAHCMnsjata co CmMUTaHO prpTtCKaJIe Ha Ha on/off (3)и кОЛЧЕТо 3a ржIM(4) 2сeKYнд,doDEka He CE yKluyu dinCpIeJOT 3a padino TrpAHCMnsjca (7). 3.PaChkata He moKe Da CE yNtpe6b co NOCTOeuchKnot SmartGuide. 4.MoXete DA CsinxhoRus3iPate HajiMHOrgy 2 рachк.ПромeHete rI pachkite CO nOMOsh Ha SmartGuide noCESyBaHbata (nORLEdni 1.) 5.При уNotpe6ba Ha noCE6bHite moXHocTn Ha anIINaKauzijata, можde BAбide DeakTNBipana TPAHCMnsjata co SmartGuide.ИстTo taka moXeTe Da Ja (De)akTNBipate 6IINO Koja SmartGuide komYnkaZuJa npeky anIINaKauzijata. |
| 1.Kpatkn peI- teKny 3BvCu/ TpeKpaHbHa na cnJIaJIuCkHa na seKoN 30 cekyni din Ilin no 2MinHytn. 2.Ha pachkata He paBOTn HHTy eden TaJMeP. | 1.AkTbUHpaHn ce «Professional timer» Ил «2-Minute timer». 2.TajMepot e MOdInΦuizpan/ DeakTNBipan npeky anIINaKauziJa. | 1.ПоODEseTo ro Baushot TajMep Ha 2-Minute TaJMp (peJIteckn 3BvCu/TPePkaJIe Ha cnJIaJIuCkHa noCEse 2 MINHytn); Ил поodeTe ro Baushot TajMep Ha Professional TajMep (peJIteckn 3BvCu/TPePkaJIe Ha cnJIaJIuCkHa na cekyni 30 cekyni).СledeTe rI YekOpriTe 3A «Timer setup». 2.Yonotpe6beJa anIINaKauzijata 3a da rI npOMeHnte noCEsyBaHbata Ha TajMepOT Ilin receTIPaJTe Ha ФabPruKITE noCEsyBaHa (nORLEdHete Ja anIINaKauzijata Trouble Shootings). |
| Pachkata He ce polHn. | 1.BaTeRpijata e Na MHOrgу NIXKO HIBO Ha polIHeHbe. 2.Tempeparatypata Na npocTOpjraTa Kaide ce polIHNi E BOH grAnuSITe Ha TOLerpanzija (≤0°Cи≥60°C). | 1.CsJIaJIuKcATA 3a noJIneHBe moXe Da He TpePka BeJHa, можde DA noTpae Do 30 MINHytn. 2.PIpenopaçaHa tempeparatya Ha npocTOpjraTa Kaide ce polIHNi e od 5°C do 35°C. |
Obaa eIeKtpnHa YeTka 3a 3abn Ha
PONHeBe cOpJxn Bluetooth paINO Koe
paOToN Ha φpeKΦeHunja od 2.4do 2.48
GHz co MaKcImaHa N oK od 1mW.
Cornacno, Braun GmbH deknapupa deka TINOBITE ha paiano onpema 3765, 3754, 3764, 3762 n 3767 ce BO cornachoct co DnpekTbata 2014/53/EU. KomnilteHNOTEKCT HA EU deknapaunjata 3a cornachoct e doctanha Ha cneHATA INTepeHET aDpeca: www.oraIb.com/ce
Бълария
Добреши в Oral-B!
IpeiJa n3nOJI3BaTe Ta3n YeTka 3a 3b6n, MoJr, npOteTe yKa3aHnIa Tn 3aIa3eToTOBa pKOBoODCTBO 3a 6bJeu CnpabKn.
BAXHO
- Перношино поверяразука за повреди.В сунай,ческальт e поvereн,заhecete зарадно устюВ В сервизен цentьр на Oral-BBraun.Ypei, кошTo He pa6otnИи e noBpeDeH,He 6nBa dace n3noJ3Ba.He npomehaTe n He npopabrayeпpoДykta.Toba може д почини пожар,TOKOB yadapИи habaBAhe.
- Пюдуктге e npedha3начeh 3a уnotpe6a OT deca Ha Bb3pact NOД 3 roDIN. Deca c orpaHn- YHnФИЗЧECKN, CEN3OpHN IIN YMCTBENH CNOCO6HOctN, IIN 6e3 OINT N 3HaHnY MoT a DA IN3PON3BaT YETKaT a 3a 3b6n, aKO ca NOd Na6JIIODeHne IIN Ca 6IIN NHCTpyKTIpaHn KAK Da IN3PON3BaT ypeDa nO 6e3OpacEH NaCHN i pa3bnpat Bb3MOXHInTe ONaCHOCTN.
-Почиствашипдрьжka He T顺序Ба Да ce OсьшеCTВЯВа OT Deua.
-ДeцаТа He Tpr6Ba Дa ИЗПОЛ3ВaTуpeда 3a Игра. - I3noJI3BaIte ypeJa cAmo nO npEJa3HaueHHe, CbIaChOn nHCTpyKcIIte 3a yIpOTpe6a. He n3noJI3BaIte 3apJdHi
yctpoicTbA nIu ypeiN, KOITO He ca npenopbuaHn OT npoN3- BOINTEJI.
BHIMAHNE
Bcnya,ue n3nycnete ypeda,flabaTah aYeTeKaTa TpReBaDa ca Ce mEmu,doRu I da HMa BnuNIMa NOBPeDa.
He nocTabraIte 3apJHOTO yCTPOINCTBO BbB BOa HIN TEyHOCT IN He CbXpaHnBaIte HA MRCTO, KbDETO MOKe Da naHEn IIN Da 6bJe DpBnHaTO Bb BAHa INMBAka. He nocraIte Da n3BaIte 3apJHOTO yCTPOINCTBO, AKO e naHANO BbB BOa. N3KnIOHTe HE3a6abHO.
He OTbaprJte nIIN pa3rIIO6BaBATE yCTPOIcTBOTO.AKO ICKATE da peuNKJIpate 6aTePnRA,MOJI DA u3XbBpNIte cIJIATO yCTPOIcTBOTAO.KA OTOBOPITe npkKATA ue NOBPeDInTE yCTPOIcTBOTO n aHJLipate rapaHcNtra.
Korato n3KnIOvBaTe ypeDa, BnHaRn DpbXte nDbpNaIte cIeCena, BMeCTO 3axpaHbAun KaBcIe. He nPiatae cIeCena C MOKPn Pbue, TOBA MoKeJa DoBeJe dTo TKOB yIap.
Bcnya,ye npemnaHabate Kypc Ha lee Hne Ha opanHaTa KxynHa, npdei da n3no3BaTe ypeDa ce KOHCytnpaIte c nekybuaa Bn 3b6oJIekap.
Ta3n cheTka 3a 3b6n e yctpoiCTBO 3a mHa nHa rpnKa n He npeHna3haueHO 3a yNoTpBe6a OT MHOKeCTBO nAuaHeHTN B CTOMaTOJOnuHa nPaKTnKa nn HnCTNTyU.
-ПоДменяптЕглаваТаНВСЕКИЗМЕЦА
NII NIO-paH0, aKО CE N3HOCN.
- UCTPOICTBOTO 3a 3apejdahe e cah6deho CbC cneuaneH ueCenK KOITo C cel6 Be3OAnCHOT, IN0JL3Ba NO HNCbK BOJtack. He Cmehyte NnnpOMeHryTe HNTO eHaJtACT OT HrOe. INaHe IMa PnCK OT eJeKTPnueckn WOk. BInaRn IN3noJI3BaYte CNEUANHnRTIeNcEeKOITo eJAcT OT npOdykTA.
Baxkha nHΦopMaζη
BaWata Oral-B Moke da ce n3noJ3Ba c BaWna cMapTfOH (OTKpNIte NOBcE B pa3dela Kac da cbbpxTe BaWata) Yetka 3a 3b6n C BaWna cMapTfOH).
3a da n36eHHeTe eEKeTpMaHnTHn CMyueHnna /n nn npo6nme n HecbB
MeTUMOcT, DaekTNBnpuAte paAnonpeDaBaHeTo Ha pbkoxBaTKaTa Ha BaWata YetKa 3a 3b6n (5) npedi Da n3NoI3BaTe npi OrpaHnHeH npocTpaHCTBa, KaTO HApimep CamoJIeTIuN CneuaJInHO 0603NaueHnTe 3OH N B6OJIHnI.
Даektubapite paIIOnpedabaHeto, KATO eIHOBpeMeHHo HATNCHeTe 6byToHa 3a BkIOUbaHe/IN3KIOUbHaBe (3) 6byToHa 3a CmHa Na peXIMa (4) 3a 2 cekyniD, IOKaTO ekpaHbT 3a paIIOnpedabaHe (7) ceN3KIOnu. CneDbaiTe CbIata PpoceIpya 3a da AKTUBpate paIIOnpedabaHeto OTHOBO.
JIuCa CneiCMeNKbpr TpRbBA BuHaNr DaIbPkaTcKtAa3b6nHa pa3-CTOHNHe No-TOJMOOT 6 NHuza (15cm) OT NeiCMeIKbpa, DOKATO E BkLIOUeHa. AkoNoo3Inpate, Ye Bb3HKnBAT CMyIeHna, DeakTbNpArpe TaanoppeBaHETO Na BaWata YetKa 3a 3b6n.
OnncaHne
- Yetkausa rnaBa
2 INHTeJIInrEHTeH npbCTeH
3 ByToH 3a BKNIOUBAHe/1N3KNIIOUBAHe
4 ByToH 3a n36Op Ha pexIM
5 PbKoXBaTka
6 Dncnne3apeximHa pa6oTa
7 Диспелза радионрдаванe (c 6e3xunha texhnoIogna Bluteoth®)
8 IINCNIIeI, NOKa3BaUHNBOTOHa 6aTePnraTa
9 3apJnHo
Akcecoapn (B3aBNCMOCT OT MoJeJa):
10 OTdeneHne 3a YeTKaUNTe rIaN CbC 3aunTeH Kanak
11 NocTaBka 3a cMapTfOH
11a CkO6n 3a 3axBa7aHe
11b Pamo
11c HakpaHnK 3a n3dbpNbAHe
11d Benvny3a
12 3apekdaa nTBTeH kaIbΦ
12a CBeTInHeH INDnKaTOp 3a 3apeXdaHe
12b USB nopt
12c OTbOp 3a CmApT uenCeI
12d BbTpeweH kanaK (c nocTabka 3a CmapTfoH)
12e POnBnXKeH anJIInKaTOp
13 CmapT
14 Hececep 3a nbTyBaHe
15 ΠbTeH KaJIbΦ
3a6eIekKa: CbIbPkaHneTo MoKe Ia Bapnpa B 3aBcIMoCT O T 3aKyIeHnMoJeI
Cneunfkaumn
EileKtpuuecko 3axpaHbAhe: BIX IbHOTo Ha 3apdHOTO yCTpOiCTBO.
HnBOHa Wyma:68dB(A)
3apekdahe n ekcploaTaunia
Baaata Yetka 3a 3b6n IMA BOdoyctOuHbna Dpbjkka, Ta e EJeleKtpneckn ObeO3onaeHa n pa3pabOTeHa da 6bJe n3nOJ3BaHa B 6baTa.
- MozeJa n3noJ3BaTe YeTkata cn 3a 3b6n BeDHaRa mHa 3a KpATKO Ja rA 3apeJNTe, KaTo rIocTabITE Ha BkJIouHeO 3apJNDHO yctpoIcBO (9). 3a6beJexKa: Ako 6aTeepraTe e n3TOUeHa (No BpeMe Ha 3apeXdaHeTo HЯMa CBteEUs CBETInHn Ha DnCIIeR, NOKa3BaUHNBOTO Ha 6aTeepraTe (8), nHn HAma peakuN Prn HaTnCKaHae Ha 6byToHa 3a BkJIouBaHe/ n3KJIouBaHe (3)), octabete YetKATA da Ce 3apeJDa hain-Majko 30 MInHytN.
HNBOTO Ha 3apejdahe Ce noka3BaHa
DnCnJIe 3a HNBOTo HA 6aTepeJrTa (8).
MnraIuTe CBETInnHn NOKa3BAt, CE 6aTepe
PnraTe 3apeJda (fUgrypaO); cNeI KaTO
e HnblNo 3apeJeHa, CBETInHnTe Ce
n3KJIuCyBat. TbIhOTo 3apejdaHe OTHEMA
OBKnHOBe 15 Yacn I daBa VB3MOxHoCT
do 12 Dn peOBoHTO MneHe Ha 3b6nTe
(DBa nTn Ha DeH, 2 MNHyTN).
3a6bE9ka:Ha MHORO HNCKO HNBO Ha 3apeXdaHe,CBETLeHHTe MOKe Da He CBETBaT BeHara;MOKe Da OTHeme Do 30 MNHyTN.
Ako 6aTePnraTa e n3ToeHa/Ha n3eepnBaHe, cpeBHe aCBeTlnHa IpemMfRa Ha DnCnIe, NOKa3BaUc HNBO Ta 3aApExJaH e nE. MOTOpb7 HAMaJIbRa CkOPOCTTa cn.CleJ KaTO 6aTePnraTa ce n3ToOni, DnRgATEJr T CnIPA; ue OTHEme HaimaMKo 30 MInHyTu 3apeXdaHe 3a eHa ynOTpe6a.
BnHaN MoXeTe Da CbXpaHraBe pKoX-BaTKaTa HA 3apdHOTO yCTPOIcTB0,3a DaCe NODbPka Ha NbIHa MOuHOCT;ycTroCBTOHe No3BOLBa npeTobapBAhe Ha BaTepnaTa.
3a6eJexKa:Ja cSeBxaHbRA pRn CTaHa TempePaTy 3a ONTmAlHO 3ana3BaHe Ha 6aTePmTa.
BHHMaHHe Hn3JaTaTe pBkoXbAtKaTa Ha Tempepatyna50°C.
H3noJ3BaHe Ha BaWata YetKa
TexHnka 3a MneHe Ha 3b6nte
Hamokpete Yetkaaata rIaba u n3no3- BaIte BCRAKbB VIN pacta 3a 3b6n. 3a da n36berHe npbCKaHTo, NOCTabe TcYtKa aTala rIbna DO 3b6nte cN npedn da BVKnIOuHTe ypeDa (CHIMKA ② ).Korato MneTe 3b6nte Cn C HAKoR OT TpENTAio-BvPTaIte CE YeTKaunr IaBN Ha ORal-B, Nb3raIte 6abHO TO 3b6 KbM 3b6, KaTO 3aDbpKATE YETkauTa rIbNA Ha NOBpXHOCTTa Ha BCEKN 3b6 3a HNKOLO CekyHn (CHIMKA ③ ). Korato n3no3BaTe YETkaaTa rIbaba OrAL-B «TriZone», NoCTabe TcHOnETa bPxy 3b6nte NOD Jek Bbl KbM BeHeua. HatnicKaIte JekO u MMIE 3b6nte C DBINKeHn HAnpei HnHa3ad, KaTTO oBHKOBeHO 6bxTe npABInuC OOBKHOBeHa MexAHNuHa YetKa 3a 3b6n.C BCsKa YETkaa Ta IBaRa 3anOuBaIte KATO mNE Te BbUHATA CTpaHa, NOCEB BTVpeHATA u HAKPAR DbKATEnHITe NOBpXHOCTn. YETkaTe BCNUKu YEtnpur KBaDpaHATA Ha ycTATA eDHaKBO. He HatnicKaIte TBpDe CINHO, PNOCTO OCTABe TcETkata Da CBpUnr cLJata paOta. MoKete CBto Taka Da ce KOHCytnapate cbc CTomatoTolOR OTHOCHO PPABINHATA TEXNka 3a Bac.
Ipe3 nbpBNTe HЯKOLKO dHn,doKaTo
3nON3BaTe YeTKeTA 3a 3b6n,BeHNtE Bm MoXe Da KpbBrtLeKo. IIO npINuNk KbPBEHTo Cnnpa CneI HЯKOLKO dHn.AKO KbPBeHTo PPOdbJnx NOBeOte O2 cEdMNuN,
06bpHete Ce KbM Baunr CTOMaTOnOr. AOK
UmATE YCbCTBNTeJIH 3b6n n/Inn BEuN,
Oral-B npenOpbYa da n3nON3BaTe pexIM
"Sensitive"(B 3abNCIMoCT OT moDeNa)(no
n3bOp B KomBHaAua C yeTkaua rna Laba
Oral-B "Sensitive").
Функциин ha CMapт npbcteHa
Bauinr YeTa 3a 3b6n e cHa6deHa cbc Cmapr npbCTen (2), KOIto mHa pa3JIuHn CyHKUIN, NocOeHN ype3 pa3JIuHn ZBe-TOBE: Bn (no nopa3bnpaHe) = CBeTlnHa, noKa3BaUa ecKnloaatauNra t TaIIme (n36beTe nDnBnDaJEn CBYe3 NaCTPOKIne Ha Oral-BTM npInoXeHneTo)
YepBEN = CBeTINHEn ceH3Op 3a HaTnCK
CnH = Bluetooth® nHdNkAtop
Taimep
Moxete da n36npate mexdy taHmep CneuaJIncT>nn 2-MnHyTeH
TaMepbT 2-MnHyTeH CnHrHaIIm3npa C dIbIg PneKbCBAU 3BvN MmFaUcCBtTlnHa HcMapT npbCTeHa(2),ye npenopbuaHOTO OT cneMaJIaNCTte 2-MnHyTHo YetKaHe e NOCTnIHATO.
TaNMePbT CnEuaNInCT" CNHAnI3npa c KaPbK npeKcBcAaU 3ByK mNfMaUca BcETnHa HA CmAp TnpbCteHa C 30-KeCyJdHn INHeTpB aNl, Ye TpR6BaJa ca CE npEmHe KbM CneBbAaYuAcTBK B YcTHa KAUXHa (CHIMKA ③ ). JbNbF npeKbCbaU 3ByK mNfMaUca CBETLHa NOpCKa3BaK pKaar Ha npenOpbUaHOTo OT CnEuaNInCTNe 2-MnHyTHo YeKaHe.
TaɪmEpbT 3aʌpMaTeBaɪn3MnHaITo BpeMe HaYeTKaHe, DɒŋKOrA pɒkOxBaTkata Ce n3KnIOyBa 3a KpAtro KpBcOe Ha MneHe Ha 3b6nte. TaɪmEpbT ce 3aHnyBa, Ako NaY3aTApOdBλnɪ NOBeOe O'T 30 CekUHn, B tʌkBb CJIuyA HATncHete 3a KpAtro 6byToHa 3a I3bOp Ha pɛɡmɪ (4) No BpeMe Ha nay3a nɪNlNoTOCTaBe Tpe bKoXBaTkata Ha 3apJdHtO yCTpOjCTBO.
3a6eIexKa:Korato n3nOJ3BaTe cneuIaHIn ΦyHKUIN Ha Oral-BTM npIIOxKeHEnTo, CBETJIHaTa HbN3yAJIHn TaIMeP MoXE da Ce npeKbCHe.
HacpoKa Ha TaMepa:
BaWata YetKa 3a 3b6n NIDBA cAKTNBUPAHN TaMep «PpOFeCNOHAnCT».3a Da npOMeHNTe TOBA HATNCHE T 3aDpBXTe 6yToHa 3a n36Op HA pExMM (4) 3a 2cekYHdN. IpeB-KJIOHTe Ha n36Op HA taIMep, KaTO HATNCHE 6yToHa 3a BKJIIOUBAHe / n3KJIIOUBAHe (3).IOTBbPDe tne 36oBa cN C hATNCKAHe Ha 6yToHa 3a pExMM.
Korato CBETT 2 CBEToDnOda TOBa noka3Ba pexIM Ha TaMep «2-MInHyTeH»
KORAto CBETT4 CBEOTIOIDA TOBA NOKa3Ba pekIM Ha TaMep «PpOfecUIOHINCT
3aBeNeJka: MoKTeSe cBtIo Da HacTpOIne/ npOmEnHe:ΦyHKcUInTe Ha TaIMepa Upe3 Oral-BTM pnpIoJooKeHneTo.
Ceh3Op 3a haTnck
PnynpaxKhaHeHa TBbpDe rJAM HaTNC,
CmapT npbCTen (2) ue CBeThe B UepBHeO, KaTO Bn HAnOMHЯ DA HamaI NTe HATNCKa. B DOJIbIHeHne KbM TOBa, NylCaUNrTa Ha rIaBaTaHa YETkata Ne cNpe, A TpenTeHTo E He HAmaIee (No BPeme Ha pexmnte «EkeDHBNO NouchTBAHe«, «PnofoecIOHAnHO NoUcTBAHe» «YubCTBNTeHIn 3b6n)(Фиура ③
PepnoDnHNO npOBeRbAaTe pa6oTaTaNceH3Opa 3a HATNCK, Kato HATNCHEte yMepeHO flabata Ha YEtKaTaN Bpeme Ha yNoTpeBa.
PexumHa Yetkahe(B 3aBcMocT OT MoeIa)
BaWata YeTka 3a 3b6n pa3noJara c pa3- LUNHMeToJHa pa6Ota,POOCUH N BpXy DnCnJIe 3a pEXm Ha YeTkaHE/MnEHe (6) Ha BaWtA pBKOXBAtKa (peXmBt «ExeDnEHBO NOHCTBAHE» He CBETn Ha nCnJIe 3a peXm HA MnEHe):
PexnM „ExeHbHO NouchBaHe" ("Daily Clean") -
CTaHdapTeH pexIM 3a eXeIeHBHO IOuHCTBaHe Ha yCTaTa
Pexm „Дьлбoko поисвае" («Pro Clean») -
3a INKJIIOUHTENHO YUBCTBO HA YNCTO-Ta(pa60Tu C NO-BVNCOKA YecTOTA)
Pexum "YcbCTBNTeIeH" ("Sensitive") - 3a HeKHO, HO cJIIOCTHO IONUCTBAHe Ha YcbCTBNTeJIHn 3OHN.
PexkM „N36eIbau 3D" ("3D White") - 3a peRnoUdHNo pOJIpaHe nJI m Eke- dHeBa yOnTpe6a.
"Гриха за венци" ("Gum Care") - Hexho macaxupahe Na benviTe
PexnM ,PioucTbaHe Ha e3NK" («Tongue Clean») -
3a nepINOduHIO NOUMCTBAHe Ha e3Ika nnEeJHEBHa yN0TpeBa.
Korato cte ha pexim, "PouncCTBaHe Ha e3nk" ("Tongue Clean") npenoppbVbame n30n3BaHTo Ha , "UybCTBnteJIHa" YetkaaIra IraBa. Mokeje Da noocTBe tae 3eNka Cb cn nn6e3 nacta 3a 3b6n. Yekkite zraIata nlouHa e3Nka, nocLeIOBaTeJHo, C HeXHN DBHXENIA. PpenopbYnTeJHATA npOdbJnx-TeHnOCT e 20 cekHyd; o6o3NaYeHa c MrrAa CaTeJInHa HA Cmpt PpbcTeHa. Bawaata Yeteka 3a 3b6n abOTomatMuHO 3anOyba pa6ota b pexIma,KoITo NocJeINO
e 6nI n36paH. 3a da npemHeTe Ha npyrgekm, nocJeIOBaTeJHO HATNCKaTBe 6yTOHa 3a pekm IIO BPEMe HA yNOTpe6a (CHMkA ④ ). 3a da ce BpHEt, OT KOITOn Ha e peKm KbM, ExeJeBHeNO IONUCTBaHe", HATNCHEt N aDpbXte 6yToHa 3a CMrHa Ha peKm(4).
3aBeNeKka:MoKeTe CbUTo TaKa Da 3aJaDeTe /npomEnHe ΦyHKuInTe Ha pexIma4pe3 Oral-BTM npIOnJoxHenHTo.
YeTkauni TnaBn
Oral-B Bn npedna ra 3aHoo6pa3ne ot pa3- liuHNy cheKaunrIaBn Oral-B, KOnto ca npriOdeHNs a pKoXbaTkata Ha Oral-B.
HauNTe TpENTnOo-BbPTaunCe YetKaunrnaBMOrTaJa Ce n3noJ3BaT a3 npeuN3HO nouchTbaHe, 3b6No 3b6.
Yetkaanza rIabe Oral-B CrossAction
Hawaata hai-ycbbpuehCTbaha yetKaasa rnaBa.
Choneta, pa3noloxeHn nO
IbIa, 3a npeuM3HO nouCTBaHe. OCTpaHraBa IIpakata.
YeTeKaUa rIJIbA Oral-B FlossAction
C MKNPONyUNiPaUaSNI BIAKHa, KONTO N03BOJLBArT N3KJIIOHITENHOOTCTpaHbAbe HAIIa
KaTa B MExkDy3b6HnTe npocTpaHCTBa.
YeTeKaUa rIJIbA Oral-B 3D White
CbC cneIaJIHnOJIpaUaBnJIb6HaTnHa 3a cTeCTBeHO n36JIbAbe Na 3b6JIte. MoJIa
3a6eJExTe, Ye Deua nop 12- roDnHbB3pact He Tp8Ba Da n3noN3BaT Ta3n YetKauza IraBa.

Плавату чекая Oral-B Sensi Ultrathin
pa3nOJIra C KOM6HuaMz OTOBNIKHOBEH NkAHa 0IOHCTBaHe H NAOBbPXHOCTTa
Ha 3b6NTe I yIITpaTbHKn BJIaKHa 3a HExHO IOHCTBaHE Ha BEHcNTe.
Повецу Глави на четкite Oral-B Имат CBETLO снИВ BLAKHA c INDICATOR, 3a Да може д СLEДTE KORA Глава на четкота Траьда BA CE смech. C peobHO Yetkahe, DBA NBtN DHEBO 3a DBe MHNUTI, CINHRT CBRT Ye N36№EDHe HANOLOBINA 3a OKOLO 3 Meceua, NOKAZBauN, Ye Tp8Ba DA смehnITE YETKAUATA TгЛABA.AKO CHONHTA tce CmayKaT ПпeДи CBETb DA n36№EDHe, MOKE DA ynpaxнВВATE TBbPDE rOLAM HAITCK Bbpxy 3b6NTe IN BeHNTe.
He npenopbUbaMe da n3noI3BaTe yeKaaUHTe ranaOral-B «FlossAction» annOral-B «3D White» c 6peKeTn. MoKeTe da n3noI3BaTe Oral-B «Ortho», kOTo e cneuAnHIO cb3daJeHa da nouchTa bOkono 6peKeTn I sHHN.
Cbbp3BaHe Ha BaShaTa YeTKa 3a 3b6n KbM cMaprfoHbT Bu
Oral-B He MozeJa rapaHTnpa, Ye CMeHrEmIte YetKauni TnaBn, KOTo He ca ot Mapkata Oral-B, pinnraat DObpe.
Oral-B He MoKe Ia IpeBnIbJIroCpOuHnEeKHT Ha N3HOCSBaHe Ha pbKOXBaTKaTa, BCIECTBnE Ha N3IOJ3BaHETo Ha CMEHNeM YeTKaUr IaBn, KOITo He caOT Mapkata Oral-B.
BcHKn CmehReMn YeTkaun IaBn HocrT IIOrO To Ha Oral-B N OTTOBapar HA BUCOKKa-ueCTBeHnTe CTAndaptn Ha Oral-B. Oral-B HeIpoJaBa CmehReMn YeTkaun IraBn IJN Yactn 3a PbkoXbATKn IOd npya Mapka.
Pa3pewaBaHe ha npo6IeMn
blll bll l 12 ll laaal all
.(joo)
jagiy j. 1 j j j j j j j j j j j j j j j j j j j j j
30 aai j 1
.aa
gall gswy gswy yll
jaiil jiaow jaii ggiw ygdo jao
jooal aagw. adl bll 1g. a
Jaa30oJooJooJoo
. JLa
oJg jIiOJl oJg Jaa Jaiis
JooLooN Lgogao slayy Jgogol joo
..
a 2000
. 1234567890
Jtz oscillating-rotating 1
g 100000000000000000000000000000000000000
olw jolalw ic. (3) ojall) jw J5 jzwl
aaiilo olallll lws! Trizone yuwrjnl w
bdo a .dUl bdo jyddo dgl ydQ 9JtulU
los olalwl g uls clyu uubu1 Ug
. 456
j 1000000000000000000000000000000000000000000000000
eogjS baiy y aygluaia aayb jall axyll plwsl 1y lai kaoa elal no looely paa di
a aalaaa aal algdo aao jgssall g
#
aLzJd all 1
2
jll/1jzjj 3
aJj 4
5
olaljlll aaii iagog yae 6
(sLw°.gjglaa 7
8
9
(1)
10
Silllalol 11
Jololljol 11a
JolJIJIeJ3 11b
wuwu 11c
11d
JwU Lul JnLul ablb 12
juxu juyo 12a
BSU 12b
Sllwlll aoc 12c
()12d
12e
Sll 13
Juaan 14
15
jgl ygall ggl sgl gglal lilxu:abxo
og1
LolgJl
JgE g jy (g) a y
jouol
68 dB (A):Lgals
J
a 1
.1aal Jol Uao wu aaoag ai
g jgall 1d aolil jlll ojw plaiow ci
(9)joluljlcgoggjcbgcjzjzjzj
1gj01gjy) 2xjgjzjyjll jLg:ab
ygl jaiu 8jaiu gaaa aia
1 jj jie bia lae i 5
30 30 30 30 30 30 30 30 30 30 30 30 30 30 30 30 30 30 30 30 30 30 30
bé à l'ayi
(2) . 1uusbaleal 1s! UU.
(jgall gj)olajll jilill laii 10
dilai jalai alizcog dlilw olws elas
jao (6)dlilill aag og aaiw le aiwl
le (yogll) (aog) dlilw
clll aeg og aaiw
《gulab
()() ()
$$ \begin{array}{l} \cdot \dot {p} \dot {a} \dot {1} \dot {1} \dot {0} \ - \left\langle \ddot {a} \dot {a} \dot {u} \dot {u} \dot {u} \dot {u} \right\rangle \ \begin{array}{c} \text {d d d d d d} \ \text {d d d d d d} \ \text {d d d d d d} \ \text {d d d d d d} \ \text {d d d d d d} \ \text {d d d d d d} \ \text {d d d d d d} \ \text {d d d d d d} \ \text {d d d d d d} \ \text {d d d d d d} \ \ - \langle \because j _ {L} u _ {1} u _ {2} u _ {3} u _ {4} \rangle \ \end{array} $$
J 1 J 1 J 1 J 1 J 1 J 1 J 1 J 1 J 1 J 1 J 1 J 1 J 1 J 1 J 1 J 1 J 1 J 1 J 1 J 1 J 1 J 1 J 1 J 1 J 1 J 1 J 1 J 1 J 1 J 1 J 1 J 1 J 1
FlossAction
gll aed 10a j 10yj
gblal no dll aiae alj cswi
.1aii jn lo oolgai
3JgJ-JJgJLJgJ
j 1000000000000000000000000000000000000000000000000000000000000000000000
Sensitive
aaii aie 1yuee joojau J 100 aei yae g juiu jbi 2dll lgl aeai aaii aia

a a a a a a a a a a a a a a a a a a a a a a a a a a a a a a a a a a a a a a a a a a a a a a a a a a a a a a a a a a a a a a a aaa
Juswgl 8-1jgol slg wgs y plzssy y pluizul dss. jlwl gao go 3D uasg
Laii l aiaOrtho 1-1jgol slg al w Jlgl gaaill jlg
y
gJUgauuulagjglg jg gguuunuua uuuu uuuu uuuu uuuu uuuu uuuu uuuu uuuu uuuu uuuu uuuu uuuu uuuu uuuu uuuu uuuu uuuu uuuu uuuu uuuu uuuu uuuu uuuu uuuu uuuu uuuu uuuu uuuu uuuu uuuu uuuu uuuu uuuu uuuu uu
pduocu wDg, gJgJl JdU dUo
13)
jull jolil 12a)
laie gai jiai jai jai jai jai jai jai jai jai jai jai jai jai jai jai jai jai jai jai jai jai jai jai jai jai jai jai jai jai jai jai jai jai jai jai jai jai jai jai jai jai jai jai jai jai jai jai jai jai jai jai jali jali jali jali jali jali jali jali jali jali jali jali
.(C1o) aclw 12
jaiw (12b) USB jiao pluxuol elxuy:abdo
jolalabol 0g jolgol
sall aal gao jao jao saj.dgogao aal .USB iaiz qbrz (12c)/(13) b
53 10000000000000000000000000000000000000
i j 1 (12d)
jJ jJ 5i, pUduuill U. (C2 oyyo) uduuill
Lgolol
JaaI Jlll jll 0jll jsslln jgall a (C3 oall) (12e) aal
jdlalabol jglbll jgall gaa.(5)0gall)
aIbolo 1jJn Jn USt. Ibs allu wOa
5ill loLgaoo ool Jd loloa dlo
Jololal aslolawj/ jIwJl oJ
.
a 1000000000000000000000000000000000000000000
. 100g a bci jko g jaoaill abso baoj .gall
jolal/daI jolal jolal dlal plall
aall 1g0 pduuW pa
Joo
aIg aIbI oLjawal woggl jIwllolwj
(14)
Jusii jI yjg. 12y. (D1/2 oJgall)
(a)g30-40jisclgbsuJusillog
.(5)
. 1
.


a
jaoi jaiy (i) 100000000000000000000000000000000000000000000000000000000000000000000000000000000000000
Sululololololololololololololololololololololololololololololololololololololololololololololololololololololololol
gabll g cgtg ll y-llgcllao cao aal
aai plauu uie g slld daiae gag aayaaall wg dl
g sll dlaqdoaall cagaaag y-llg
yauu plauu uie g -llg no gull algal lola
ayaauee ae yolgl aell glalglal glal
jglsdlgldglalglal all yy aayabls
. jolal
aLgssnnns
g j d yj g aal l g iall y j glll l j
gl j 1 j n jn jn jn jn jn jn jn jn jn jn jn jn jn jn jn jn jn jn jn jn jn jn jn jn jn jn jn jn jn jn jn jn jn jn jn jn jn jn jn jn jn jn jn jn jn jn jn jn jn jn j.
gl gl gl gl gl gl gl gl gl gl gl gl gl gl gl gl gl gl gl gl gl gl gl gl gl gl gl gl gl gl gl gl gl gl gl gl gl gl gl gl gl gl gl gl gl gl gl gl gl gl gl gl gl gl gl gl gl gl gl gl gl gl gl gl gl gl gl gl gl gl gl gl gl gl gl gl gl gl gl gl gl gl gl gl ggl ggl ggl ggl ggl ggl ggl ggl ggl ggl ggl ggl ggl ggl ggl ggl ggl ggl ggl ggl ggl ggl ggl ggl ggl ggl ggl ggl ggl ggl ggl ggl ggl ggl ggl ggl ggl ggl ggl ggl ggl ggl ggl ggl ggl ggl ggl ggl ggl ggl g
aLae jn 10000000000000000000000000000000000000000000000000000000000000000000000000000000000000000000000000000
aS sLwOg zo jzalldia
slll gilll Jaii G aee iJaae
1I y. jzalldia Jao wogao Jolw ge aae aS
jglll lIy 1klll Oo g 1aell 15
Lg zaiall Ckwl Lq no agawa oogglb oag
g tllu ly-urg kswgtaa J. y-urlg Jn no ssu
Jy llu og gailla cksall g uagill
gzzlno o ae alggsa ay-urlg Jauo
aJg jg g Jg Jg Jg Jg Jg Jg Jg Jg Jg Jg Jg Jg Jg Jg Jg Jg Jg Jg Jg Jg Jg Jg Jg Jg Jg Jg Jg Jg Jg Jg Jg Jg Jg Jg Jg Jg Jg Jg Jg Jg Jg Jg Jg Jg Jg Jg Jg Jg Jg Jg J g J g
ggl ggl oog jlogdo
J 3767,3762,3764,3754,3765
JUJI.2014/53/EU 1
gagallglic 1e yyssll syyaaal lky
www.oralb.com/ce:
jai:giell
:
Gaiuall ple 1j j0j0 j0j0j0j0j0j0j0j0j0j0j0j0j0j0j0j0j0j0j0j0j0j0j0j0j0j0j0j0j0j0j0j0j0j0j0j0j0
y
j09g jz509
gaii gai i jia jia jia jia jia jia jia jia jia
2015 《509》:Jta


- English
- IMPORTANT
- WARNING
- Important Information
- Description
- Accessories (depending on model):
- Specifications
- Charging and Operating
- Using your toothbrush
- Brushing technique
- Smart Ring features
- Timer
- Timer setup:
- Pressure sensor
- Brushing modes (depending on model)
- Brush heads
- Connecting your toothbrush to your Smartphone
- Cleaning recommendations
- Accessories
- (dependently on model)
- Smartphone Holder
- Charging Travel Case
- Beauty Bag
- Environmental Notice
- Guarantee
- Information Bluetooth® radio module
- 1) Warranty - Exclusions and Limitations
- 2) Using your smartphone holder
- LIMITATION OF LIABILITY
- Warranty replacement brush heads
- Srbija
- VAZNO
- Поврзувашие на ВашатуETka 3a 3abn co ВашиOT Smart телфон
- Пpenopakn 3aЧистende
- (BO 3aBnCHOCT OJ MOJeIOT)
- Ko3MeTnUkaTaunHa
- ИзВecТуВа№ 3aЖИВOTHаТа СредиHA
- Rapanzija
- Baxhni nHΦopMaζn 3a Bluetooth® padno moyn
- 1)TapaHcunja- nckJyOoNi orpaHnUyBaHa
- 2) Ynotpe6a Ha npkaoy 3a nameteh Tenefoh
- OPAHNUYBAHbE HA OJROBOPHOCTA
- Tapaunja 3a 3ameHa Ha rnaBa Ha YeTKa
- Бълария
- BAXHO
- BHIMAHNE
- Baxkha nHΦopMaζη
- OnncaHne
- Akcecoapn (B3aBNCMOCT OT MoJeJa):
- Cneunfkaumn
- 3apekdahe n ekcploaTaunia
- H3noJ3BaHe Ha BaWata YetKa
- TexHnka 3a MneHe Ha 3b6nte
- Функциин ha CMapт npbcteHa
- Taimep
- HacpoKa Ha TaMepa:
- Ceh3Op 3a haTnck
- PexumHa Yetkahe(B 3aBcMocT OT MoeIa)
- PexnM „ExeHbHO NouchBaHe" ("Daily Clean") -
- Pexm „Дьлбoko поисвае" («Pro Clean») -
- PexnM ,PioucTbaHe Ha e3NK" («Tongue Clean») -
- YeTkauni TnaBn
- Cbbp3BaHe Ha BaShaTa YeTKa 3a 3b6n KbM cMaprfoHbT Bu
- #
- J
- bé à l'ayi
- FlossAction
- 3JgJ-JJgJLJgJ
- Sensitive
- y
- Sululololololololololololololololololololololololololololololololololololololololololololololololololololololololol
- aLgssnnns
- ggl ggl oog jlogdo
Brand : ORAL-B
Model : GENIUS 9000 DUO CROSSACTION - GENIUS 9000S SENSI ULTRATHIN
Category : Electric toothbrush