
HCA62540B - HCA92540B - Refrigerator-freezer BEKO - Free user manual and instructions
Find the device manual for free HCA62540B - HCA92540B BEKO in PDF.



| Product type | Cooker hood |
| Brand | BEKO |
| Model | HCA62540B / HCA92540B |
| Width | 596 mm (HCA62540B) / 896 mm (HCA92540B) |
| Depth | 386 mm (HCA62540B) / 393 mm (HCA92540B) |
| Height | 750-1080 mm (HCA62540B) / 750-1130 mm (HCA92540B) |
| Power supply | 220-240 V, 50 Hz |
| Total power | 316 W |
| Motor power | 210 W |
| Lighting | 2 halogen bulbs of 3 W each |
| Suction capacity | 537 m³/h (HCA62540B) / 577 m³/h (HCA92540B) |
| Air outlet diameter | 120 mm or 150 mm |
| Net weight | 10.4 kg (HCA62540B) / 13 kg (HCA92540B) |
| Controls | 3 digital speed levels |
| Filters | Washable aluminum filter (incl.) + replaceable activated charcoal filter (optional) |
| Automatic shut-off | Yes, after 15 minutes (activation by long press) |
| Minimum distance from hob | 65 cm |
| Installation | Wall-mounted, with or without chimney duct |
| Material | Stainless steel, glass |
| Warranty | Spare parts available for 10 years |
Frequently Asked Questions - HCA62540B - HCA92540B BEKO
User questions about HCA62540B - HCA92540B BEKO
0 question about this device. Answer the ones you know or ask your own.
Ask a new question about this device
Download the instructions for your Refrigerator-freezer in PDF format for free! Find your manual HCA62540B - HCA92540B - BEKO and take your electronic device back in hand. On this page are published all the documents necessary for the use of your device. HCA62540B - HCA92540B by BEKO.
USER MANUAL HCA62540B - HCA92540B BEKO
Please read this user manual first!
Dear Customer,
Thank you for preferring a Beko product. We hope that you get the best results from your product which has been manufactured with high quality and state-of-the-art technology. Therefore, please read this entire user manual and all other accompanying documents carefully before using the product and keep it as a reference for future use. If you handover the product to someone else, give the user manual as well. Follow all warnings and information in the user manual.
Remember that this user manual is also applicable for several other models. Differences between models will be identified in the manual.
Explanation of symbols
Throughout this user manual the following symbols are used:



This product was manufactured using the latest technology in environmentally friendly conditions.
1 Important instructions for safety and environment 22-24
1.1 General safety 22 1.1.1 Electrical safety 22 1.1.2 Product safety 23 1.1.3 Children's safety 24 1.2 Intended use 24 1.3 Compliance with WEEE regulation and disposal of the waste product 24 1.4 Package information 24
2 Technical specifications of your appliance 25-26
3 Installing your appliance 27-32
3.1 Installation accessories.. 27 3.2 Installing the hood onto the wall 28 3.2.1 Boring the hanger holes.. 29 3.2.2 Hammering the wall plugs 30 3.2.3 Installing the hanger screws 30 3.2.4 Hanging the hood onto the wall 30 3.3 Installing the hood flue 31 3.4.1 Using with flue connection 32 3.4.2 Using without flue connection 32 3.5 Flue connection: 32
4 Operating your appliance 33-34
4.1 Digital electronic control with 3 levels . . . 33 4.2 Energy efficient usage: 34 4.3 Operating the hood: 34
5 Cleaning and maintenance 35-36
5.1 Aluminum filter 35 5.1.1 Removing the aluminum filters 35 5.2.1 Replacing the carbon filter 35 5.3 Cleaning 36 5.4 Replacing the lamps 36
1 Important instructions for safety and environment
This section contains safety instructions that will help protect from risk of personal injury or property damage. All warranties will become void if you do not follow these instructions.
1.1 General safety
- Always have the installation and repairing procedures carried out by the Authorised Service Agent. Manufacturer shall not be held responsible for damages arising from procedures carried out by unauthorised persons.
- This appliance is not intended for use by persons (including children) with reduced physical, sensory or mental capabilities, or lack of experience and knowledge. Children should be supervised to ensure that they do not play with the appliance.
1.1.1 Electrical safety
- Disconnect the product from the mains during installation, maintenance, cleaning and repairing procedures.
- If the power cable is damaged, it must be replaced by the manufacturer, after sales service or a similarly qualified person (preferably an electrician) or someone designated by the importer in order to avoid possible risks.
- Operating voltage is 220 to 240 volts.
- If the appliance has a failure, it should not be operated unless it is repaired by the Authorised Service Agent. There is the risk of electric shock!
- Do not route power cable close to hobs. Otherwise power cable may cause fire since it melts down easily.
- Never plug the hood before installation is completed.
- In order to obtain the best performance, the external conductor must not be longer than 4 m. It must not contain more than 2 perpendicular (90°) angles and its diameter must be at least 120 mm.
- Disconnect the appliance before any intervention on the internal parts of the appliance.
1 Important instructions for safety and environment
1.1.2 Product safety
- You can use a pipe with a diameter of 120 mm or 150 mm on the flue connection of the hood.
- Do not make connections to flues connected with stoves, exhaust shafts, or flues with rising flames. Observe the rules set by authorities on the discharge of exhaust air.
- The height between the lower surface of the hood and the upper surface of the stove/oven should not be less than 65 cm.
- Do not operate the hood without aluminum filters and do not remove the filters while it is operated.
- Never touch the hood's lamps after they have been operated for a long time. Hot lamps may burn your hand.
- Avoid big flames beneath the product. Otherwise, particles on the oil filter may ignite and lead to a fire.
- Turn on the hobs after placing pans or pots on them. Otherwise, rising temperature may deform certain parts of your product.
- Turn off the hobs before taking away pans or pots.
- Avoid inflammable materials under the hood.
- Oil may ignite while frying foods. Therefore, be careful about cloths and curtains.
- Never leave the cooker unattended when frying foods; otherwise boiled oil may cause fire.
- There is the risk of fire if your hood is not cleaned in the specified periods.
- Be extremely careful and wear gloves when cleaning the hood.
- We advise you to operate the appliance a few minutes before starting to cook in order to increase the suction power. Thus, you shall have a continuous and stable suction power when the vapors arise.
- Operate your hood for 15 minutes more after the end of cooking or frying in order to remove smell cooking vapour in the kitchen.
- When the hood is in use, especially together with gas cookers, make sure that environment is ventilated with clean air.
- Pay attention not to connect the appliance to the flues used by non-electrical devices. (E.g.: Heater flue).
1
Important instructions for safety and environment
- When a non-electrical device is concurrently used in the same room together with the hood, the negative pressure in the room must be maximum 0.4 mbar in order to prevent hood from sucking other device's exhaust into the room.
1.1.3 Children's safety
- Packaging materials are dangerous to children. Keep packaging materials in a safe place out of reach of children.
- Electrical appliances are dangerous to children. Keep children away from the product. Do not allow children play with the appliance.
1.2 Intended use
- This appliance is intended for domestic use. It is not suitable for commercial use and it must not be used out of its intended use.
- The manufacturer shall not be liable for any damage caused by improper use or handling.
- The period required for the availability of spare parts for the correct operation of the appliance is 10 years.
1.3 Compliance with WEEE regulation and disposal of the waste product
This product does not contain harmful and forbidden materials described in the "Directive on the Restriction of the Use of Certain Hazardous Substances in Waste Electrical and Electronic
Equipment" (WEEE) issued by the T.R. Ministry of Environment and Urbanization.
Complies with the WEEE Directive.
This product has been manufactured with high quality parts and materials which can be reused and are suitable for recycling. Therefore, do not dispose the product with normal domestic waste at the end of its service life. Take it to a collection point for the recycling of electrical and electronic equipment. Please consult your local authorities to learn the nearest collection point. Help protect the environment and natural resources by recycling used products.
1.4 Package information
Ni-MH
The product package is made of recyclable material as per the National Legislation. Do not dispose of the package waste together with the household
waste or other waste and deliver them to the package collection points indicated by the local authority.
2 Technical specifications of your appliance
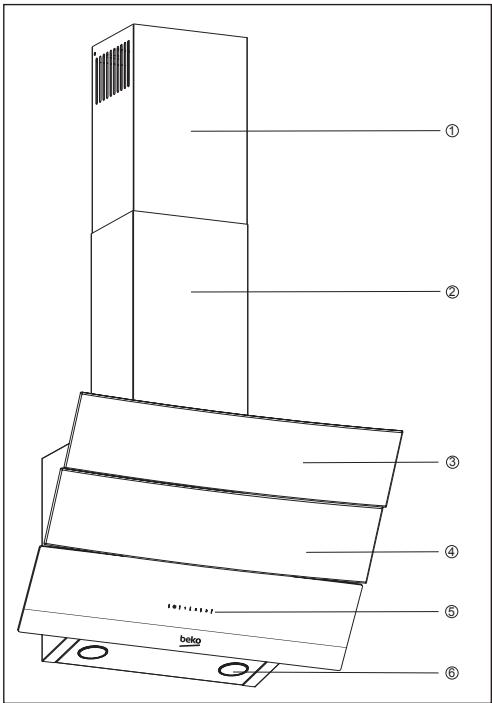
- Internal flue
- External flue
- Glass cover
- Filter (under the glass cover)
- Control panel
- Illumination
(Figure 1)
| HCA 92640 BH | HCA 92640 WH | HCA 62640 W | |
| Width | 896 mm | 896 mm | 596 mm |
| Depth | 393 mm | 393 mm | 386 mm |
| Height | 750 mm / 1130 mm | 750 mm / 1130 mm | 750 mm /1080 mm |
| Supply voltage | 220 - 240 V, 50 Hz | 220 - 240 V, 50 Hz | 220 - 240 V, 50 Hz |
| Control | With 3 levels | With 3 levels | With 3 levels |
| Lamp power | 2 x 3 W | 2 x 3 W | 2 x 3 W |
| Air outlet pipe | 120 / 150 mm | 120 / 150 mm | 120 / 150 mm |
| Capacity | 577 m³/h | 577 m³/h | 537 m³/h |
| Motor power | 1 x 210 W | 1 x 210 W | 1 x 210 W |
| Total power | 316 W | 316 W | 316 W |
| Net weight | 13 kg | 13 kg | 10,4 kg |
| Colour | Black | White | White |
Values stated on the product labels or in the documentation accompanying it are obtained in laboratory conditions in accordance with relevant standards. These values may vary depending on operational and environmental conditions of the product.
2 Technical specifications of your appliance
| HCA 62640 WH | HCA 62640 B | HCA 62640 BH | |
| Width | 596 mm | 596 mm | 596 mm |
| Depth | 386 mm | 386 mm | 386 mm |
| Height | 750 mm /1080 mm | 750 mm /1080 mm | 750 mm /1080 mm |
| Supply voltage | 220 - 240 V, 50 Hz | 220 - 240 V, 50 Hz | 220 - 240 V, 50 Hz |
| Control | With 3 levels | With 3 levels | With 3 levels |
| Lamp power | 2 x 3 W | 2 x 3 W | 2 x 3 W |
| Air outlet pipe | 120 / 150 mm | 120 / 150 mm | 120 / 150 mm |
| Capacity | 537 m³/h | 537 m³/h | 537 m³/h |
| Motor power | 1 x 210 W | 1 x 210 W | 1 x 210 W |
| Total power | 316 W | 316 W | 316 W |
| Net weight | 10,4 kg | 10,4 kg | 10,4 kg |
| Colour | White | White | Black |
3 Installing your appliance
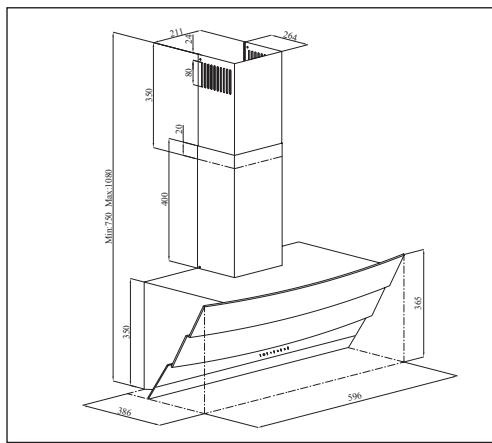
Please consult the nearest Authorised Service Agent for the installation of your hood. *Preparation of location and electrical installation for the product is under customer's responsibility.

Caution!
Remove the protective film (if any) on the hood and flue surface after the installation.
Distance between lower surface of the hood and upper surface of the hob should be at least 65 cm.
Have a qualified electrician make the electrical connection.
Install your appliance so that you can reach the power connection (plug, outlet) easily after installation.
Dimensions are given in mm.
(Figure 3b)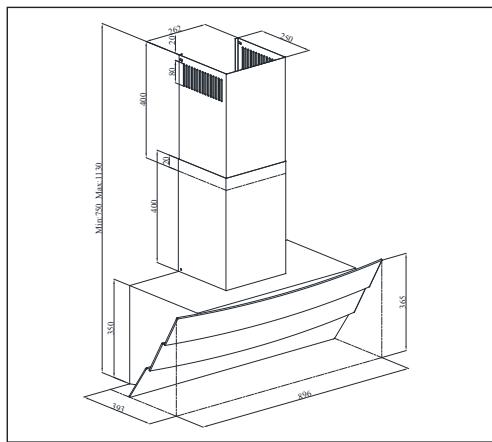
3.1 Installation accessories
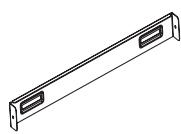
1 x flue connection plate
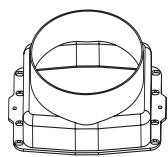
1 x 150 mm plastic flue
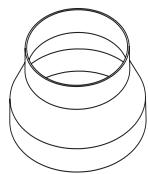
1 x 120/150 mm plastic flue adapter
3 Installing your appliance
Information required for the preparation of the installation place for your hood is given below.
3.2 Installing the hood onto the wall
To install the hood onto the wall, loosen the screws of hanger plates on the motor housing and pull the plates upwards. Then, tighten the screws of the hanger plates. (Figure 3a).
(Figure 3a)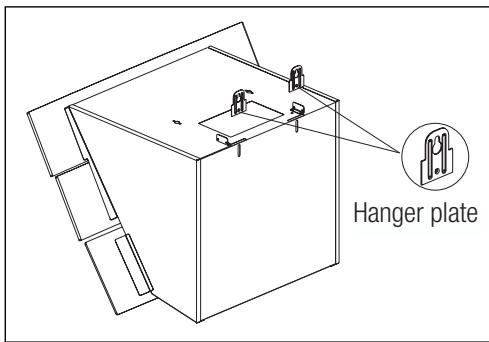
(Figure 3b)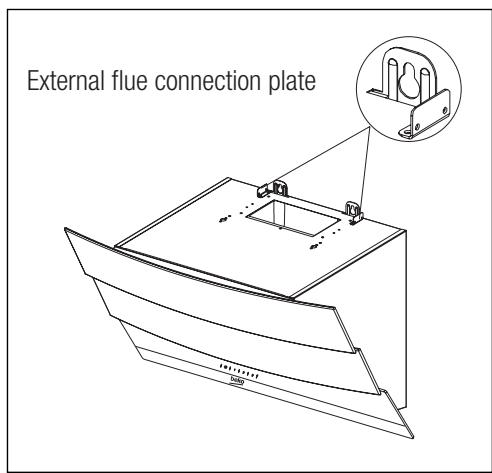
Secure the 150 mm plastic flue adapter onto the top of the body with the 3.5x9.5 screw included in installation accessories (Figure 4).
If you will use a 120 mm flue pipe, install the 120 mm flue adapter onto it.
(Figure 4)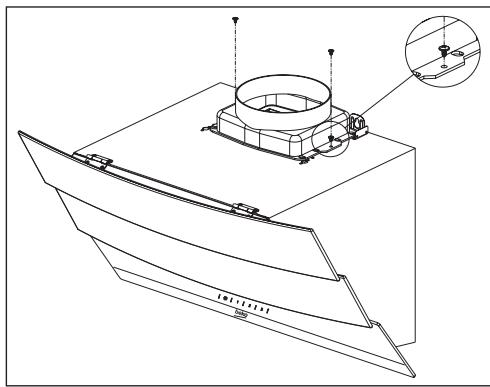
3 Installing your appliance
3.2.1 Boring the hanger holes
Affix the installation template onto the installation place of the hood. Drill the points marked with (X,Y) (Figure 5) using a Ø 10 mm bit and points marked with (Z) (Figure 5) using a Ø 6 mm bit.
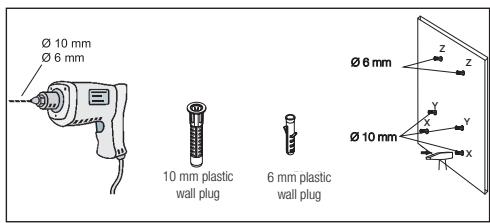
(Figure 5)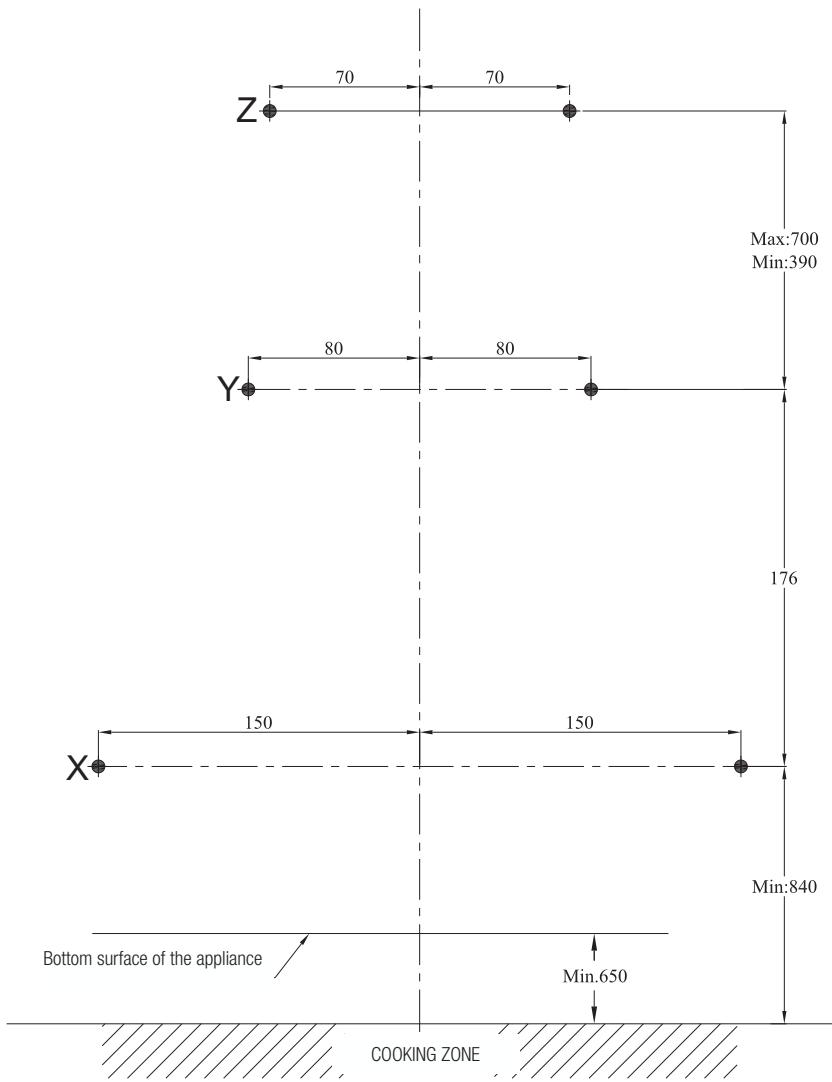
3 Installing your appliance
3.2.2 Hammering the wall plugs
Hammer Ø 10 mm wall plugs (X,Y) into the holes drilled for hanger screws. Hammer 2 × Ø 6 mm wall plugs (Z) into the holes drilled with a Ø 6 mm bit for the external flue connection plate. (Figure 5)
3.2.3 Installing the hanger screws
Install 5.5 × 60 hanger screws into the Ø 10 mm wall plugs (Y) you have hammered into the wall. There must be a gap of 5 mm between the screw head and the wall. (Figure 6)
Connect the internal flue connection plate to the 6 mm wall plugs (Z) on the wall using Ø 3.9x22 screws. (Figure 6)
(Figure 6)
3.2.4 Hanging the hood onto the wall
- Hang the hood onto the screws you have installed into the Y holes.
- Open the side suction window of the hood by pulling it towards yourself. Install the 5.5x60 screws through the X holes located inside in order to secure the appliance.
3 Installing your appliance
3.3 Installing the hood flue
Disconnect the product from mains supply before starting flue installation. Fit the sheet metal flue parts around the body.
Screw the external flue to the external flue connection plates located on the motor housing. (Figure 3b / 7)
(Figure 7)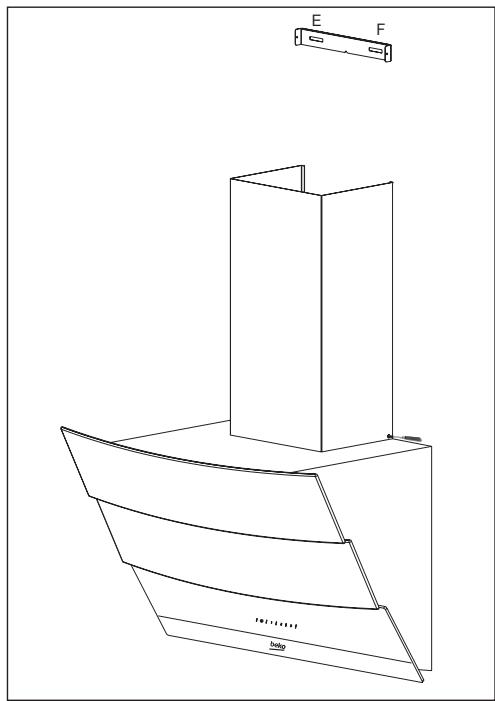
Extend and screw the internal flue from its outer edges onto the flue connection plate which was secured to the wall (Figure 8).
(Figure 8)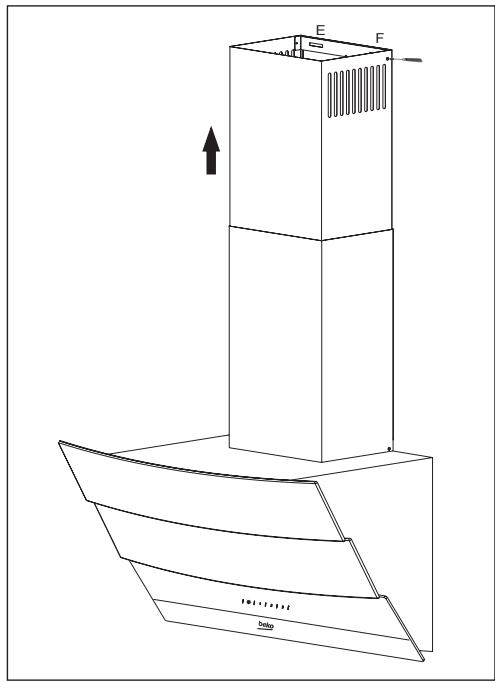
3 Installing your appliance
3.4.1 Using with flue connection
- The vapour is removed via flue pipe which is secured to the connection head on the hood.
- Diameter of the flue pipe should be equal to the diameter of connection ring. To allow the air be removed easily out of the room in horizontal arrangements, the pipe should be slightly tilted upwards (approximately 10°).
3.4.2 Using without flue connection
Air is filtered by the carbon filter and returned to the room. Carbon filter is used when there is no flue in the house. - If the hood will be used without flue connection remove the diverters inside the flue adapter. - Remove the aluminum filter. To install the carbon filter, center the carbon filter on the plastic part on both sides of the fan body, and secure it on the tabs. Secure the filter by turning the tabs to right or left. Install the aluminum filter.
3.5 Flue connection:
Place adapter supplied together with the hood into the ventilation hole located on the top section of the hood. Procure a pipe with a diameter of 120/150 mm. Connect one end of the pipe to the adapter and the other end to the flue.
Make sure that these two connections are secure enough
so that they will not dislocate when the hood is operated at max. speed. Check that the flaps inside flue are functional when tightened with the clamp. Fit the flue connection pipe onto the adapter. If you fit the flue connection pipe inside the adapter, air suction will not occur since the flaps that prevent air backflow will remain closed.
It is not advisable to make connections to the flues connected with stoves or exhaust shafts. Do not make connections to such flues.
Pipe connection must be as short as possible and have minimum number of elbows.
A: Flue outlet pipe
B: Flaps that prevent backflow
C: Plastic flue
3.5.1 Backflow prevention system (N-RV)
When the hood is operated, flaps are closed in order to prevent possible odours and dust from entering into the ambient from outside.
Correct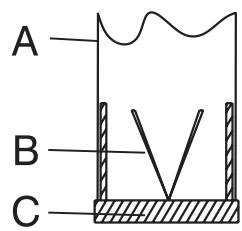
Not correct (Figure 9)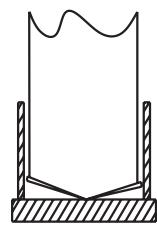
(Figure 9)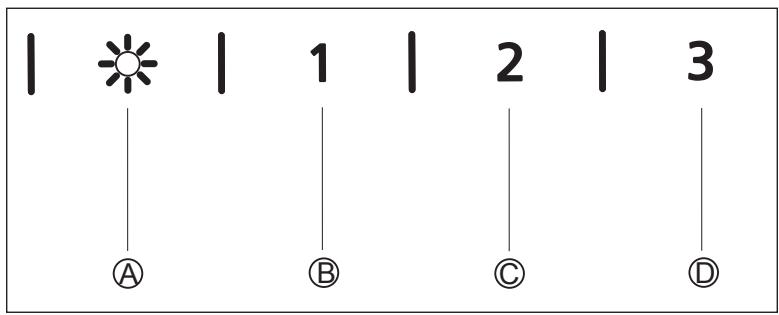
(A): Light On / Off key (B): 1st level key (C): 2nd level key (D): 3rd level key
4.1 Digital electronic control with 3 levels
(A) Light On/Off Key: You can illuminate the cooking area by pressing this key. (B) key: You can start your hood at speed level 1 by pressing this key.
When you press this key again to switch off the appliance, speed level indication on the display disappears.
(C) key: You can start your hood at speed level 2 by pressing this key.
When you press this key again to switch off the appliance, the speed level indication on the display disappears.
(D) key: You can start your hood at speed level 3 by pressing this key.
When you press this key again to switch off the appliance, the speed level indication on the display disappears.
Auto-stop in 15 min.:
This appliance is equipped with an Auto-Stop function which allows the appliance to ventilate the room for an additional period of time in order to remove the unpleasant odour and vapour in the room after the cooking is over. The appliance stops automatically after a certain period of time.
To enable the Auto-stop function, press any of the speed level keys (B, C, D) on the control for longer than 2 seconds. A timer with 15 minutes will be activated.
If you press the same speed level key while the Auto-stop function is enabled, the function will be disabled and the appliance will stop.
If you select a different speed level, this function will be disabled.
If you want your appliance to stop automatically, you must enable the Auto-stop function again.
Periodical cleaning of metal filters:
Filters must be cleaned at about every 60 hours of operation or 4 weeks depending on the frequency of usage.
4 Operating your appliance
4.2 Energy efficient usage:
- When operating the hood, adjust the speed level according to the odour and vapour intensity in order to prevent unnecessary power consumption.
- Use low speeds in normal conditions (1-2), and high speed (3) when smell and vapors are intensified.
- Lights on the hood are intended for illuminating the cooking zone.
Using them to illuminate the ambient/kitchen will result with unnecessary power consumption and inadequate illumination.
4.3 Operating the hood:
- Hood is equipped with a motor having various speed settings.
- For a better performance, we advise you to use low speeds in normal conditions, and high speeds when smell and vapors are intensified.
- You can start the hood by pressing the desired speed level key (B,C,D).
- You can illuminate the cooking area by pressing the light key. (A)
Prior to cleaning and maintenance, unplug the appliance or turn the main switch off or loosen the fuse that supplies the hood.
5.1 Aluminum filter
This filter captures oil particles in the air. You are recommended to clean your filter every month under normal usage conditions. First remove the aluminum filters for this process. Wash the filters with liquid detergent and rinse them with water and install them back after they get dry. Aluminum filters may get discolored as they are washed; this is normal and you don't need to change your filter.
5.1.1 Removing the aluminum filters
- Push the aluminum filter lock forward.
- Then, slightly lower it and pull forward. Otherwise, you may bend the filter. (Figure 10) After the aluminum filter is washed and dried, reinstall the filter to its slot by applying above steps in reverse order.
(Figure 10)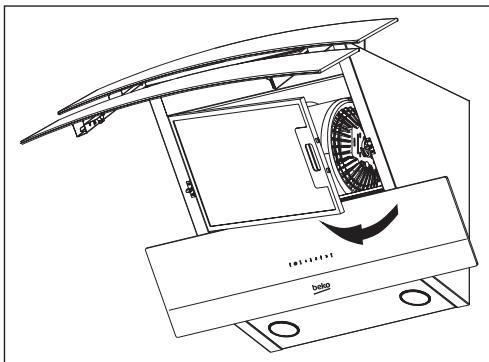
Note:
You can also wash aluminum filters in the dishwasher.
Carbon filter (use without flue)
This filter removes cooking odors. If it is not possible to use a flue, it purifies the air that is circulated inside the kitchen. The carbon filter of your appliance will get clogged over time depending on the frequency of use, style of cooking, and regular cleaning of the aluminum filters.

Caution!
The carbon filter should never be washed.
You may obtain carbon filters from Beko Authorised Service Agents.
5.2.1 Replacing the carbon filter
- Remove the aluminum filters. (Figure 10)
- To remove the carbon filter, turn the tabs counterclockwise and release the filter. (Figure 11) Install the new carbon filter. Install the aluminum filters.
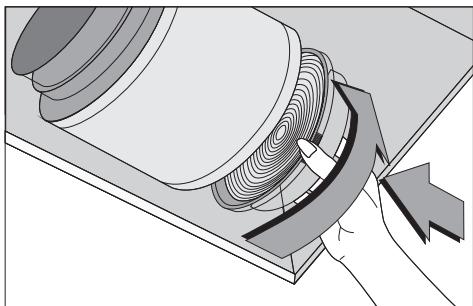
(Figure 11)
Anti-odor filters contain charcoal (active carbon). They must be changed at intervals of approximately 6 months.
Regardless of whether a carbon filter is used or not, aluminum filters must always be installed.
Do not operate your appliance without the aluminum filter in place. Using with a carbon filter will decrease the suction performance of the appliance.
5.3 Cleaning
Pay particular attention to cleaning your hood immediately after frying.
Use a soft cloth soaked with liquid detergent to clean the outer surface of your hood.
Never use abrasive or scratching materials for cleaning.
You may use commercially available cleaning agents for persistent grease, etc., by following the warnings on the product. To avoid scratching the brushed steel body, wipe in the same direction as the brush trace.
Do not use cleaning agents containing hydrochloric acid, bleach, or abrasive powders to maintain the surface quality of your product. Use a cloth dampened with soapy water or a special stainless steel cleaning spray for stainless steel surfaces. Remove the protective foil on the appliance.
If you need to transport the appliance:
- Keep the original packaging of the appliance. Transport the appliance in its original package and follow the transport markings on the original package.
If you do not have the original package:
- Do not place any objects on the hood.
- Protect the outer surface from impacts.
- Pack the appliance so that it will not be damaged during transport.
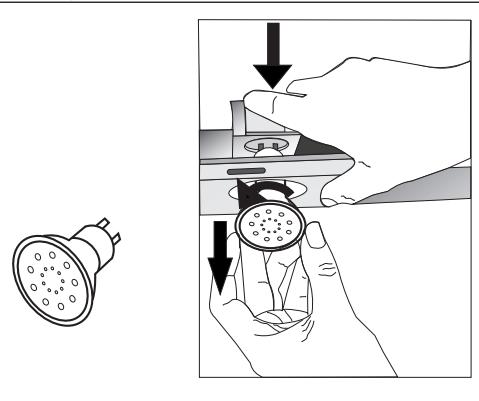
5.4 Replacing the lamps
Disconnect the hood from the mains supply.
This appliance is equipped with 3 W halogen lamps.
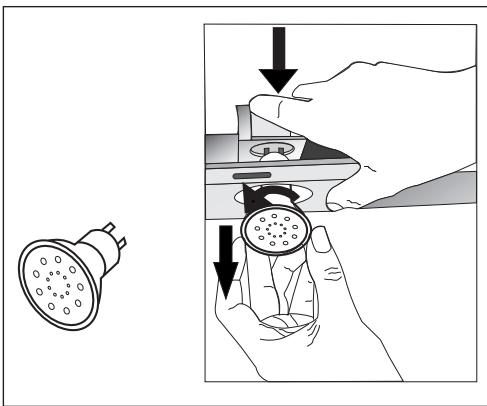
To replace the halogen lamps, press the lamp downwards from the rear section of the lamp holder to release the lamp. Then turn it counterclockwise by 1/4 turn and remove it.
Perform the above steps in reverse order to fit the new lamps.
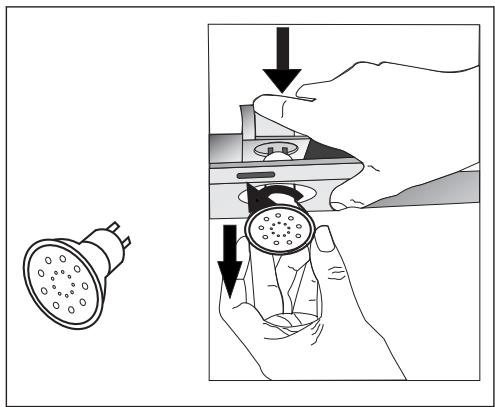
Note:
You may procure lamps from Authorised Service Agents.
5.1 Aluminium filter
Made using the latest technologies in conditions that do not compromise
1 Important instructions on safety and environmental protection 180-183
1.1 General safety rules ..180 1.1.1 Electrical safety 180 1.1.2 Appliance safety 181 1.1.3 Child safety 182 1.2 Intended use . . . 183 1.3 Compliance with the requirements of the Directive on Waste Electrical and Electronic Equipment (WEEE) and product disposal 183 1.4 Information on packaging materials 183
2 Technical characteristics of the appliance 184-185
3 Installation of the appliance 186-191
3.1 Installation accessories. 186 3.2 Wall mounting... 187 3.2.1 Drilling holes in the wall..188 3.2.2 Hammering in dowels . . . 189 3.2.3 Installing the mounting screws .189 3.2.4 Hanging the appliance...189 3.3 Installing the exhaust duct 189 3.4.1 Using the extractor with duct .190 3.4.2 Using the extractor without duct .190 3.5 Connecting the duct:......190 3.5.1 Non-return valve system (N-RV) .191
4 Operation of the appliance 192-193
4.1 Three-button control system with electronic display 192 4.2 Energy-efficient operation:....193 4.3 Operating the extractor: 193
5 Cleaning and maintenance 194-195
5.1 Aluminium filter 194 5.1.1 Removing the aluminium filter .194 5.2.1 Replacing the charcoal filter .194 5.3 Cleaning 195 5.4 Replacing the lamp 195
1
Important instructions on safety and environmental protection
These instructions are for safety and will help eliminate the risk of injury and damage. If the user does not follow these instructions, all warranties will be void.
1.1 General safety rules
Installation and repair of the device must be performed by a representative of an authorized service center. The manufacturer is not responsible for damage caused by work performed by unauthorized persons. This device is not intended for use by persons (including children) with reduced physical, sensory, or mental capabilities, or persons lacking experience and knowledge of using the device. Do not allow children to play with the device.
1.1.1 Electrical safety
- During installation, maintenance, and cleaning, the device must be disconnected from the power supply. - If the power cord is damaged, the manufacturer must replace it; replacement must be carried out by a specialist after appropriate training or by a specialist with equivalent qualifications (preferably an electrician) or by a person authorized by the importer to eliminate possible risks. - Operating voltage - from 220 to 240 V. - Operating the device when it is faulty is prohibited. Faults must be corrected by a representative of an authorized service center. There is a risk of electric shock! Do not lay the power cord near hot surfaces. Otherwise, the power cord may melt, as it is made of plastic.
Important instructions for safety and environmental protection
- Never connect the hood to the power supply until the installation is complete. To achieve high performance of the hood, the outer duct should not exceed 4 m. It should not bend at an angle greater than 90 degrees more than twice, and its diameter should be at least 120 mm.
- Disconnect the hood from the power supply before performing any work on the internal parts of the device.
1.1.2 Installation safety
To connect the hood to the air duct, you can use a pipe with a diameter of 120 mm or 150 mm. Do not connect the hood to air ducts that are connected to chimneys, ventilation shafts, or those in which flue gases are present. Follow the norms and rules established by the authorities for the control of emissions of exhaust gases.
Install the hood so that the distance between the lower surface of the hood and the upper surface of the hob is at least 65 cm. Do not use the hood without aluminum filters and do not remove the filters while the hood is in operation. Do not touch the filters with your hands after prolonged operation. You may burn your hands. - Avoid large flames under the product. Otherwise, parts of the oil filter may become clogged and cause a fire. Turn on the hob surface only after placing pots or pans. In this case, high temperature may cause deformation of some parts of the hood. - When using pots or pans, turn on the hob surface. - Avoid placing flammable materials under the product. - During operation, oil may splatter. Therefore, be careful with hot oil.
1
Important instructions for safety and environmental protection
Do not leave the hood without supervision while it is in operation, as the hot oil may cause a fire. - Failure to follow the instructions for cleaning the hood may lead to a fire. - Be careful and use gloves when cleaning the hood. We recommend turning on the hood a few minutes before starting to cook to increase the suction power. This ensures constant and stable suction power at the moment of steam generation. Do not turn on the hood for 15 minutes after finishing cooking to ensure the removal of fumes and steam from cooking. - If you use the hood, especially with a gas hob, make sure that the room is well ventilated.
Do not connect the device to the air duct if you are using non-electric appliances. (For example, gas stove). - If in the same room with the hood, a non-electric appliance is used simultaneously, the negative pressure in the room must not exceed 0.4 bar to prevent the hood from drawing in exhaust gases from other appliances.
1.1.3 Safety of children
The buyer is responsible for the preparation of the site and the electrical installation of the product.
(Figure 2)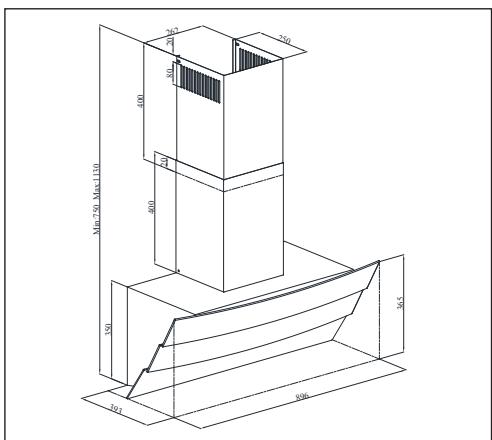
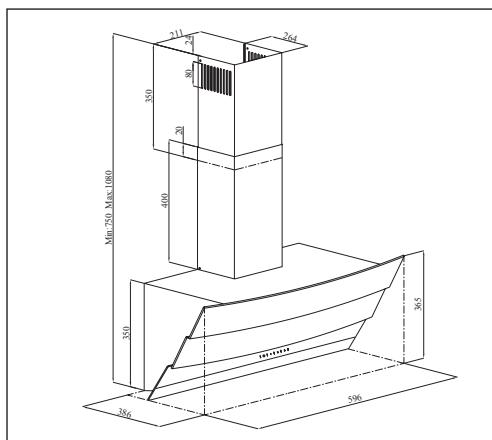
The distance between the lower surface of the hood and the upper part of the hob must be at least 65 cm.
The connection of the device to the electrical network must be carried out by a qualified electrician.
Install the device in such a way that it is accessible for connection to the electrical network (socket).
Dimensions are indicated in mm.
3.1 Installation accessories
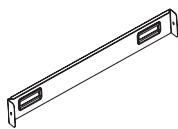
1 x bracket for air duct
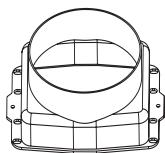
1 x 150 mm plastic air duct
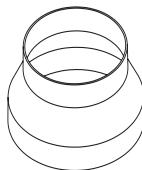
1x0120/150 MM air duct adapter
3 Installation of the hood
Information required for installation of the hood, work with it.
3.2 Installing the hood on the wall
To install the hood on the wall, unscrew the screw of the mounting plate on the housing of the hood and lift the plate up. Then tighten the screw of the mounting plate. (Figure 3a)
(Figure 3a)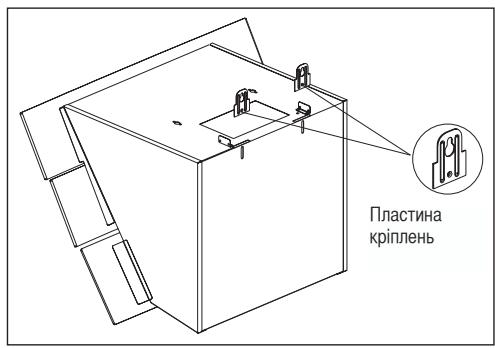
(Figure 3b)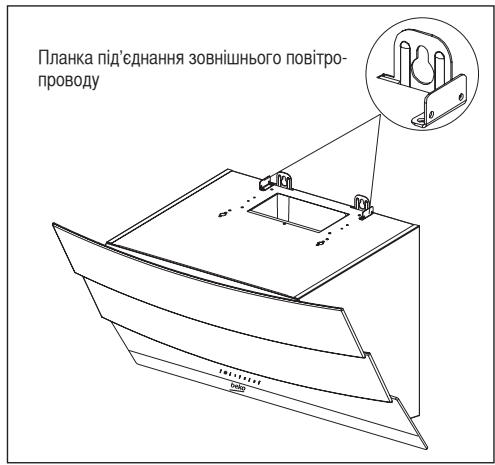
Fix the adapter (Ø 150 MM) to the upper part of the housing with the screws 3.5 x 9.5, which are included in the installation kit (Figure 4).
If you use an air duct Ø 120 MM, install the adapter (Ø 120 MM) on it.
(Figure 4)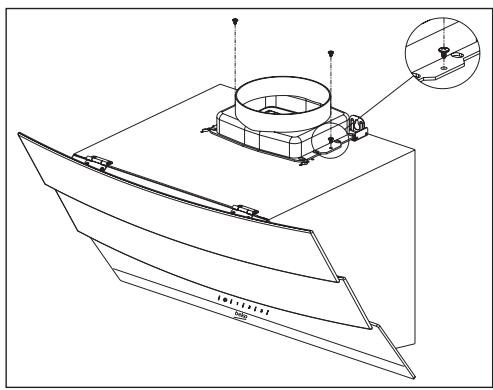
3.2.1 Drilling holes for mounting
Mark the mounting holes for the hood. Drill holes at points (X, Y) (Figure 5) with a Ø 10 MM drill, and holes at points (Z) (Figure 5) with a Ø 6 MM drill.
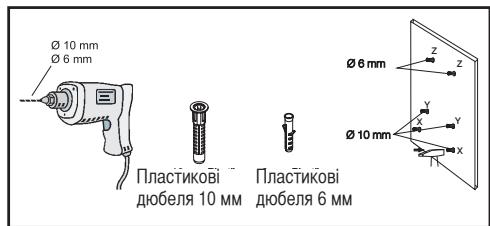
(Figure 5)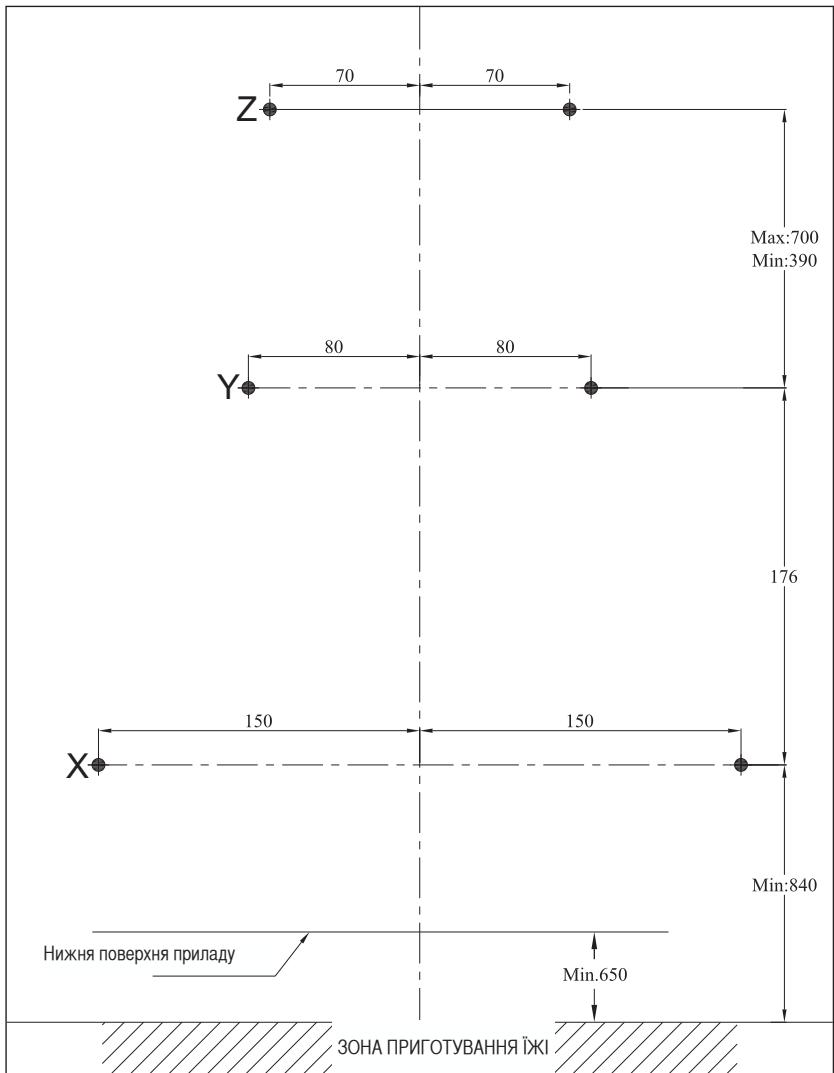
3.2.2 Hammering dowels
Hammer the Ø 10 MM dowels (X, Y) into the holes drilled for the mounting screws. Hammer the 2 x Ø 6 MM dowels (Z) into the holes drilled with the Ø 6 MM drill, for fixing the external air duct. (Figure 5)
3.2.3 Installing the exhaust pipes
Install the 5.5 x 60 mm mounting screws into the holes (Y) drilled in the wall. There must be a distance of 5 mm between the screw head and the wall. (Figure 6)
Secure the exhaust pipe bracket to the wall with 6 mm (Z) screws using 3.9 x 22 mm screws. (Figure 6)
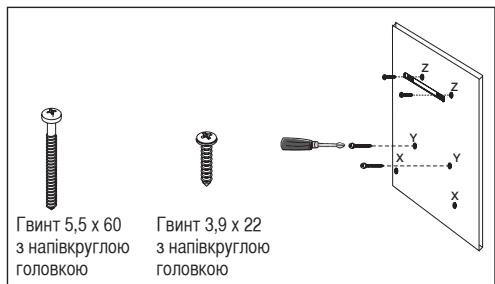
3.2.4 Adjusting the wall-mounted tensioner
Pull the tensioner towards you, positioned in the openings (Y). Open the window for ventilation by pulling it towards you. Install the 5.5 x 60 mm screws into the openings (X) located in the middle to secure the device.
3.3 Installing the ventilation duct for the exhaust
Button (C): Pressing this button once will activate the exhaust at the second speed level.
If you press the button again, the device will turn off, and the speed level will decrease on the display.
Button (D): Pressing this button will activate the exhaust at the third speed level.
If you press the button again, the device will turn off, and the speed level will decrease on the display.
Automatic shutdown after 15 minutes:
This device is equipped with
the "Automatic Shutdown" function, which allows the device to operate for an additional period of time to eliminate residual odors and prepare for cooking. The device will automatically shut off after a certain period of time.
To activate the "Automatic Shutdown" function, press any speed button (B, C, D) on the panel and hold it for 2 seconds. The timer for 15 minutes will activate. If you press the same speed button again while the "Automatic Shutdown" function is active, the function will be deactivated, and the device will shut off.
If you select a different speed level, the function will be deactivated.
If an automatic shutdown is needed, press the "Automatic shutdown" function again.
Periodic cleaning of metal filters:
The filters should be cleaned approximately every 60 hours of operation or every 4 weeks, depending on the frequency of use.
4.2 Energy-efficient operation:
- During use of the hood, set the appropriate speed level depending on the intensity of odors and vapors, to avoid excessive energy consumption. Under normal conditions, set the low speed (1-2), and increase it (3) if the level of vapors and odors becomes more intense. - The lamps are designed for lighting the cooking zone.
Using the hood for lighting the surrounding area or other purposes will lead to unnecessary energy consumption and insufficient lighting.
4.3 Operation of the hood:
The hood is equipped with a motor that has several speed settings. - For better operation under normal conditions, it is recommended to use low speeds, and high speeds if the level of vapors and odors is more intense. - The hood turns on when the button of the required speed level (B, C, D) is pressed. - The lighting of the cooking zone turns on with the help of the button (A).
Before cleaning and maintenance, disconnect the device from the power supply by turning off the main switch or unplugging the power cord of the hood.
5.1 Aluminum filters
This filter retains particles of oil and air. Under normal operating conditions, it is recommended to clean this filter monthly. To do this, remove the aluminum filters. Wash the filters with a mild detergent and rinse them with clean water. Allow the filters to dry and then reinstall them. Aluminum filters may lose their color over time. This is normal, and the filter does not need to be replaced in such a case.
5.1.1 Removing the aluminum filters
- Push the lock of the aluminum filter forward. 2. Then slightly lower it and pull it forward. In this way, you can bend the filter. (Figure 10) After washing and drying the filter, install it back in place, following the above steps in reverse order.
(Figure 10)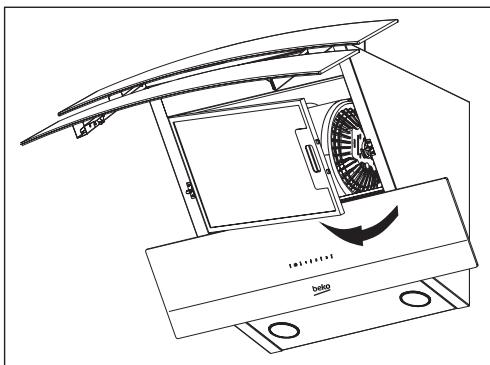
Note:
The carbon filter can be checked in the dishwasher.
Carbon filter (use without ducting)
The filter absorbs odors during cooking. If it is not possible to use ducting, the filter purifies the air that is returned to the kitchen. Over time, the carbon filter may become saturated depending on the frequency of use, the cooking method, and the frequency of cleaning the aluminum filters.

Remove!
The carbon filter is blocked.
Carbon filters can be purchased from authorized service center representatives.
5.2.1 Replacing the carbon filter
Remove the aluminum filters. (Figure 10) - To remove the carbon filter, turn the tabs counterclockwise and remove the filter. (Figure 11) - Install the new carbon filter. Install the aluminum filters.
(Figure 11)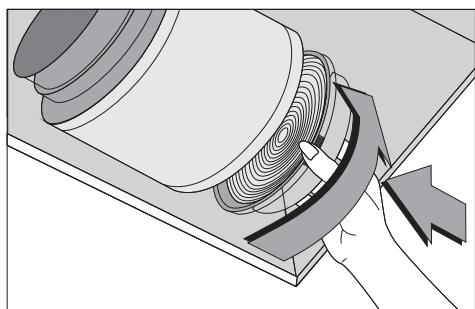
5 Cleaning and technical maintenance
Filters that remove odors contain activated carbon.
Replacement of such filters must be done every few months.
Regardless of whether carbon filters are used or not, aluminum filters must be installed.
Do not use the appliance without aluminum filters. Using carbon filters reduces the suction power of the appliance.
5.3 Cleaning
OuHueHHBnTgXKHeo6XiDHO3diCHIOBaTH BIDpa3y JKnicLa CmaKeHH.
For cleaning the outer surface of the product, use a soft cloth moistened with a mild detergent.
Do not use abrasive materials or materials that can scratch the product surface.
When using cleaning products available on the market that are intended for cleaning stainless steel, follow the instructions for using such a cleaning product. To avoid damaging the matte steel body, wipe the product in the direction in which the matte coating is applied.
To preserve the gloss of the product surface, do not use cleaning agents that contain salt acid, bleach, or abrasive powders. For surfaces with stainless steel, use a cloth moistened with mild soapy water or special sprays for cleaning stainless steel. Remove the protective film from the device.

Attention!
Improper cleaning of the product may lead to damage.
After transporting the device:
Keep the original packaging of the device. Transporting the device must be done in the original packaging and follow the transport markings and original packaging.
If the original packaging is not preserved:
Do not place any objects on the product. Protect the outer surface of the product from impacts. - Pack the device in such a way that it does not get damaged during transportation.
5.4 Replacing the lamp
Disconnect the product from the power supply.
The lamp is a halogen lamp with a G9 base.
To replace the halogen lamp, press it in the direction downwards on the back part of the cartridge. Then turn the lamp counterclockwise by 1/4 turn and remove it.
If you need to install a new lamp, perform the steps in reverse order.
Note:
Lamps can be purchased from authorized service center representatives.
1.1.3 Child Safety
- Packaging materials pose a danger to children. Packaging materials should be stored in a safe place out of reach of children.
- Electrical appliances pose a danger to children. Do not allow children near the appliance.
Important Safety Instructions for Environmental Protection
Do not allow children to play with the appliance.
1.2 Intended Use
- This appliance is intended for household use. The appliance is not suitable for commercial use and should not be used for purposes other than its intended use.
- The manufacturer is not responsible for any damage resulting from improper use or handling of the appliance. The service life of the appliance is 10 years. During this time, the availability of spare parts necessary for the appliance's operation is ensured.
1.3 Compliance with the Directive on Waste Electrical and Electronic Equipment (WEEE) and Appliance Disposal
This appliance does not contain hazardous or prohibited materials as specified in the "Directive on the Restriction of the Use of Certain Hazardous Substances in Electrical and Electronic Equipment" issued by the Ministry of Environment and Urban Planning of the Republic of Turkey.
Electrical and electronic equipment and the disposal of the appliance.
The product complies with the requirements of the EU Directives on the utilization of electrical and electronic equipment.
This product is manufactured from high-quality materials and components that are suitable for reuse and are subject to secondary processing. In this regard, it should not be disposed of with ordinary household waste after its service life. It should be handed over to a collection point for waste electrical and electronic equipment. Information about the nearest waste collection point can be obtained from local authorities. Help protect the environment and natural resources by ensuring the recycling of products that have been taken out of use.
1.4 Information on packaging
Ni-MH
The packaging of the device is made from materials suitable for recycling, in accordance with national legislation.
It is prohibited to dispose of packaging waste with household or other types of waste; it should be handed over to collection points established by local authorities.
2 Technical characteristics of the device
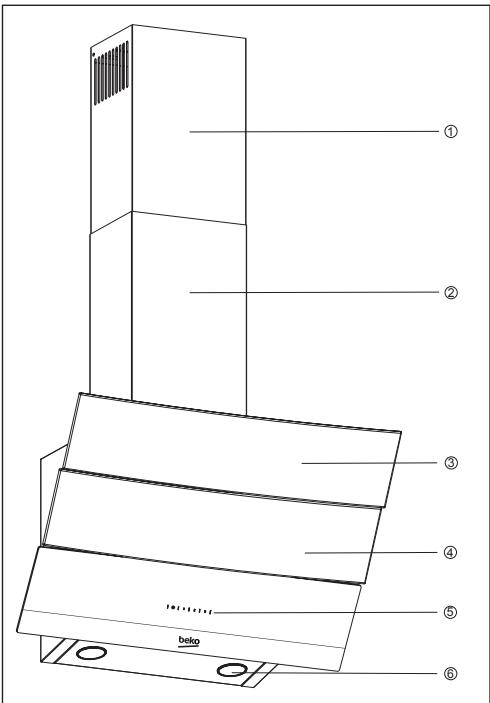
- Inner tube
- Outer tube
- Glass cover
- Filter (under the glass cover)
- Control panel
- Lighting
(Figure 1)
Dimensions are given in mm.
(A): ON/OFF button. (B): Level 1 button. (C): Level 2 button. (D): Level 3 button.
4.1 Electronic control with 3 levels
(A) ON/OFF button: When this button is pressed, the work surface is illuminated.
Button (B): When this button is pressed, level 1 of the extraction speed is set.
Do not neglect cleaning the extractor immediately after cooking.
To clean the external surface of the extractor, use a soft cloth moistened with a mild detergent.
Do not use abrasive or scratching materials to clean the extractor.
Commercially available cleaning products can be used for regular maintenance, etc., following the instructions on the product. To avoid damaging the stainless steel body, wipe it in the direction of the grain.
Do not use cleaning products containing saline acid, bleach, or abrasive powders to preserve the quality of the appliance's surface. Use a cloth moistened with water or a special product for cleaning stainless steel surfaces. Remove the protective film from the extractor.

Caution!
Failure to follow the instructions for cleaning and replacing the extractor filters may lead to a fire hazard.
If it is necessary to transport the appliance:
Keep the original packaging of the extractor. Transport the extractor in its original packaging, following the transport markings on the packaging. If the original packaging is missing: do not place foreign objects on the extractor; protect the external surface from impacts; pack the extractor in such a way as not to damage it during transport.
5.4 Replacing the lamps
Disconnect the extractor from the electrical outlet.
The device is equipped with halogen lamps with a power of 50 W.
To replace the halogen lamps, press the lamp down from the rear part of the holder, then turn the lamp counterclockwise by 1/4 turn and pull it out.
Install the new lamp in the reverse order.
Note.
Lamps can be purchased from authorized technical specialists.


- PLEASE READ THIS USER MANUAL FIRST
- EXPLANATION OF SYMBOLS
- IMPORTANT INSTRUCTIONS FOR SAFETY AND ENVIRONMENT
- TECHNICAL SPECIFICATIONS OF YOUR APPLIANCE
- INSTALLING YOUR APPLIANCE
- OPERATING YOUR APPLIANCE
- CLEANING AND MAINTENANCE
- GENERAL SAFETY
- ELECTRICAL SAFETY
- PRODUCT SAFETY
- CHILDREN'S SAFETY
- INTENDED USE
- COMPLIANCE WITH WEEE REGULATION AND DISPOSAL OF THE WASTE PRODUCT
- PACKAGE INFORMATION
- CAUTION
- INSTALLATION ACCESSORIES
- INSTALLING THE HOOD ONTO THE WALL
- BORING THE HANGER HOLES
- HAMMERING THE WALL PLUGS
- INSTALLING THE HANGER SCREWS
- HANGING THE HOOD ONTO THE WALL
- INSTALLING THE HOOD FLUE
- USING WITH FLUE CONNECTION
- USING WITHOUT FLUE CONNECTION
- FLUE CONNECTION
- DIGITAL ELECTRONIC CONTROL WITH 3 LEVELS
- AUTO-STOP IN 15 MIN
- PERIODICAL CLEANING OF METAL FILTERS
- ENERGY EFFICIENT USAGE
- OPERATING THE HOOD
- ALUMINUM FILTER
- REMOVING THE ALUMINUM FILTERS
- NOTE
- CARBON FILTER (USE WITHOUT FLUE)
- REPLACING THE CARBON FILTER
- (FIGURE 11)
- CLEANING
- IF YOU DO NOT HAVE THE ORIGINAL PACKAGE
- REPLACING THE LAMPS
- ALUMINIUM FILTER
- IMPORTANT INSTRUCTIONS ON SAFETY AND ENVIRONMENTAL PROTECTION
- TECHNICAL CHARACTERISTICS OF THE APPLIANCE
- INSTALLATION OF THE APPLIANCE
- OPERATION OF THE APPLIANCE
- GENERAL SAFETY RULES
- IMPORTANT INSTRUCTIONS FOR SAFETY AND ENVIRONMENTAL PROTECTION
- INSTALLATION SAFETY
- SAFETY OF CHILDREN
- INSTALLATION OF THE HOOD
- INSTALLING THE HOOD ON THE WALL
- DRILLING HOLES FOR MOUNTING
- HAMMERING DOWELS
- INSTALLING THE EXHAUST PIPES
- ADJUSTING THE WALL-MOUNTED TENSIONER
- INSTALLING THE VENTILATION DUCT FOR THE EXHAUST
- AUTOMATIC SHUTDOWN AFTER 15 MINUTES
- PERIODIC CLEANING OF METAL FILTERS
- ENERGY-EFFICIENT OPERATION
- OPERATION OF THE HOOD
- ALUMINUM FILTERS
- CARBON FILTER (USE WITHOUT DUCTING)
- REMOVE
- CLEANING AND TECHNICAL MAINTENANCE
- ATTENTION
- IF THE ORIGINAL PACKAGING IS NOT PRESERVED
- REPLACING THE LAMP
- CHILD SAFETY
- IMPORTANT SAFETY INSTRUCTIONS FOR ENVIRONMENTAL PROTECTION
- COMPLIANCE WITH THE DIRECTIVE ON WASTE ELECTRICAL AND ELECTRONIC EQUIPMENT (WEEE) AND APPLIANCE DISPOSAL
- INFORMATION ON PACKAGING
- TECHNICAL CHARACTERISTICS OF THE DEVICE
- ELECTRONIC CONTROL WITH 3 LEVELS
Brand : BEKO
Model : HCA62540B - HCA92540B
Category : Refrigerator-freezer