
407 - Ice machine ARIETE - Free user manual and instructions
Find the device manual for free 407 ARIETE in PDF.
| Product type | Ice cream maker |
| Brand | ARIETE |
| Model | 407 |
| Power supply | Mains electric (check voltage) |
| Cooling type | Built-in compressor |
| Motor | Removable motor body |
| Removable container capacity | Approximately 1.5 L (fill to 80% max) |
| Timer | Adjustable from 10 to 60 minutes in 10-minute increments |
| Display | Digital display of remaining time |
| Indicator lights | Cooling (I) and mixing (M) |
| Functions | Synchronized mixing + cooling, automatic stop with beep, extended cooling function |
| Container material | Plastic (do not use metal utensils) |
| Safety | Automatic stop after power cut (3-minute countdown) |
| Cleaning | By hand, do not immerse motor body in water, do not put in dishwasher |
| Box contents | Machine, measuring cup, ice cream scoop |
| Included recipes | Several recipes in the manual (vanilla, chocolate, strawberry, lemon sorbet, frozen yogurt) |
| Use | Domestic use only |
| Compliance | Directives 2006/95/EC and 2004/108/EC |
Frequently Asked Questions - 407 ARIETE
User questions about 407 ARIETE
0 question about this device. Answer the ones you know or ask your own.
Ask a new question about this device
Download the instructions for your Ice machine in PDF format for free! Find your manual 407 - ARIETE and take your electronic device back in hand. On this page are published all the documents necessary for the use of your device. 407 by ARIETE.
USER MANUAL 407 ARIETE
The necessary precautions must be taken when using electrical appliances, and these include the following:
- Make sure that the voltage on the appliance rating plate corresponds to that of the mains electricity.
- Never leave the appliance unattended when connected to the power supply; unplug it after every use.
- Never place the appliance on or close to sources of heat.
- Always place the appliance on a flat, level surface during use.
- Never leave the appliance exposed to the elements (rain, sun, etc....).
- Make sure that the power cord does not come into contact with hot surfaces.
- This appliance is not intended for use by persons (including children) with reduced physical, sensory or mental capabilities, or lack of experience and knowledge, unless they have been given supervision or instruction concerning use of the appliance by a person responsible for their safety.
- Children should be supervised to ensure that they do not play with the appliance.
- NEVER PLACE THE POWER BASE OF THE APPLIANCE, THE PLUG OR THE POWER CORD IN WATER OR OTHER LIQUIDS. CLEAN BY WIPING WITH A DAMP CLOTH.
- ALWAYS UNPLUG THE POWER CORD FROM THE ELECTRICITY MAINS BEFORE FITTING OR REMOVING SINGLE ATTACHMENTS OR BEFORE CLEANING THE APPLIANCE.
- Always make sure that your hands are thoroughly dry before using or adjusting the switches on the appliance, or before touching the power plug or power connections.
- Never hang the appliance or angle it more than 45 degrees.
- Place the appliance at least 8 cm away from other items so that there is an excellent heat dispersion.
- Before starting the ice cream maker, be sure that it has been perfectly assembled and that the power base is firmly attached to the lid.
- If the ice cream or sorbet contain fresh ingredients, these must be consumed within one week. Ice cream tastes better cold.
- If the ice cream or sorbet contain raw eggs, do not feed to children, pregnant women or the elderly.
- Never place ingredients in the freezer for pre-chilling as in this way, the mixing paddle could become blocked before the ice cream has actually formed.
- Only use the ice cream maker with the lid fitted.
- Never operate the appliance when it is empty.
- NEVER TOUCH MOVING PARTS.
-
Keep fingers, utensils, etc. at a safe distance from the removable container while the appliance is operating; this is to reduce the risk of damage to people or to the machine itself. NEVER USE SHARP OR METAL UTENSILS OR OTHER ITEMS INSIDE THE CONTAINER. These items can damage the ice cream maker. It is fine to use rubber or wooden utensils when the ice cream maker is switched off.
-
Never remove the power base while the ice cream is being made.
- To extend the freezing function after finishing the ice cream making cycle, it is necessary to remove the power base immediately or risk shortening the useful life of the motor.
- To unplug the appliance, grip the plug and remove it directly from the power socket. Never pull the power cord to unplug the appliance.
- Never use the appliance if the power cord or plug are damaged or if the appliance itself is faulty; in this case, take it to your nearest Authorised Assistance Centre.
- To prevent any risks, if the power cord is damaged, it must be replaced by the manufacturer, its Technical Assistance Service or a similarly qualified person.
- This appliance is designed for HOME USE ONLY and may not be used for commercial or industrial purposes.
- This appliance conforms to the 2006/95/EC and EMC 2004/108/EC directives.
- Any changes to this product that have not been expressly authorised by the manufacturer may lead to the user's guarantee being rendered null and void.
- In the event that you decide to dispose of the appliance, we advise you to make it inoperative by cutting off the power cord. We also recommend that any parts that could be dangerous be rendered harmless, especially for children, who may play with the appliance or its parts.
- Packaging must never be left within the reach of children since it is potentially dangerous.
DO NOT THROW AWAY THESE INSTRUCTIONS
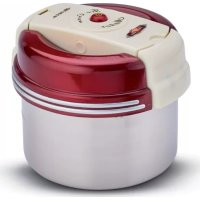
DESCRIPTION OF THE APPLIANCE (FIG.1)
A Appliance body
B Control panel
C Fixed container
D Removable container
E Mixing paddle
F Lid
G Cap for ingredient insertion opening
H Power unit
I Cooling LED
L Display
M Mixing LED
N Timer button
0 Start/Stop button
P Power button
Q Graded goblet
R Ice cream scoop
- Wash all parts that will be coming into contact with the ice cream thoroughly before: fixed container (C), removable container (D), mixing paddle (E), lid (F), graded goblet (Q) and scoop (R).
- Prepare the ingredients for your recipe or one of the recipes in this booklet, mixing together well in a large container.
IMPORTANT: To guarantee the correct operation of the appliance, it is necessary to insert two dessert spoons (approx. 25-30 ml) of food-grade alcohol or other high-strength alcoholic drink between the fixed and removable baskets.
IMPORTANT: It is not necessary to chill the container in a freezer because this ice cream maker has an internal compressor that will chill the ingredients to make the ice cream.
APPLIANCE ASSEMBLY
WARNING: ALWAYS UNPLUG THE POWER CORD FROM THE ELECTRICITY MAINS BEFORE FITTING OR REMOVING SINGLE ATTACHMENTS OR BEFORE CLEANING THE APPLIANCE.
IMPORTANT: Always use the ice cream maker upright and on a flat surface to get the best from the compressor.
- Insert the removable container (D) into the fixed one (C) inside the machine (Fig. 2).
- Place the mixing paddle (E) inside the removable container (D) (Fig. 3).
- Fit the lid (F) onto the appliance body, holding the mixing paddle (E) in the upright position in the centre of the lid and locking it in place by turning it clockwise so that the tabs on the power base slot into the openings on the lid (Fig. 4).
- Close the opening for inserting ingredients with the special cap (G) (Fig. 5).
- Fit the power unit (H) onto the lid (F) and make sure that the motor axle has been inserted properly into the hole on the top part of the mixing paddle (Fig. 6).
INSTRUCTIONS FOR USE
IMPORTANT: Before starting the ice cream maker, make sure that it has been perfectly assembled and the power unit has been firmly attached to the lid.
- Plug the appliance into a mains power socket. Press the power button (P) to supply power to the appliance; the display (L) will show "60.00" meaning that the default operating time is 60 minutes.
- Based on the recipe, press the Timer button (N) to set the operating time: press the button repeatedly until the required time (10, 20, 30, 40, 50, and 60 minutes) is shown on the display (L).
- Pour the previously prepared mixture in through the opening in the lid (F) (Fig. 6).
IMPORTANT: To avoid excessive volumes or waste, make sure that the ingredients never exceed 80% of the capacity of the removable container (D). Remember that ice cream increases in volume while it is being made.
- At this point, press the start button (O) to start up the appliance and it will start to prepare ice cream. At the same time, the mixing process will commence with the mixing paddle (E), together with the chilling process, via the internal compressor and both LEDs (I-M) will switch on.
- When the power button (P) is pressed during the ice cream making process, the appliance will immediately commence a countdown of three minutes, after which the machine will start up again; the chilling and mixing functions will start up together. If, while counting down, the power button (P) is pressed again, the mixing function will commence immediately while the chilling function will only commence after the countdown.
IMPORTANT: If there is a power blackout or the appliance is suddenly disconnected while making ice cream, there will be no automatic countdown function. We recommend starting the machine after 3 minutes, otherwise it will pass into compressor auto-protection mode.
-
When the two processes have been completed and the ice cream is ready, the appliance will stop automatically and an acoustic warning will sound 10 times. The display (L) will read "00.00" to show the end of the countdown.
IMPORTANT: Never remove the power unit (H) while the ice cream is being made. -
Press the stop button (O) and unplug the appliance.
- Remove the power unit (H) and the lid (F), by turning it anticlockwise, and the removable container (D). Place the finished ice cream in another container, using the plastic scoop (R) (Fig. 7);never use a metal utensil, as this could scratch the removable container (D).
- If 10 minutes after the ice cream making process is complete and the acoustic signal has been heard 10 times, the appliance is not switched off using the stop button (O), the "extended chili function" will start automatically so as not to allow the ice cream to melt.
Extended chill function
The appliance starts this function (no mixing) for 10 minutes every 10 minutes for a total of 1 hour before returning to the initial state (power on but appliance not operating).
IMPORTANT: always unplug the appliance when serving the ice cream to prevent any risk of electric shock.
Adjustments while operating
- To stop operation, press the start/stop button (O) for 3 seconds or press the power button (P) once during the ice cream making process.
- While the appliance is operating, it is possible to extend operating times as required by pressing the Timer button (N) repeatedly; each time the button is pressed adds 10 minutes up to a maximum of 60 minutes. Time can only be increased, not decreased.
How to extend operation (after the ice cream has been made).
For a thicker ice cream, after the previously set time is over and the machine has stopped and returned to its original state, it is possible to add a time of 10, 20, 30, 40, 50, 60 minutes by pressing the Timer button (N) and then the start/stop button (O). This way, the appliance will start again for the required time and then stop and return to the extended chill function so that the ice cream does not melt.
CLEANING
WARNING: NEVER PLACE THE POWER BASE OF THE APPLIANCE, THE PLUG OR THE POWER CORD IN WATER OR OTHER LIQUIDS. CLEAN BY WIPING WITH A DAMP CIOTH.
WARNING: ALWAYS UNPLUG THE POWER CORD FROM THE ELECTRICITY MAINS BEFORE FITTING OR REMOVING SINGLE ATTACHMENTS OR BEFORE CLEANING THE APPLIANCE.
IMPORTANT: To extend the life of the ice cream maker, never wash any of its parts in the dishwasher.
Disassemble the appliance as described previously.
Wash the removable container (D), mixing paddle (E), lid (F), goblet (Q) and scoop (R) in warm soapy water. The dry thoroughly.
Clean the fixed container (C), power unit (H) and appliance body (A) with a damp sponge or cloth.
RECIPES
VANILLA ICE CREAM
For 10 portions (1/2 cup):
1 cup full milk
3/4 cup granulated sugar
2 cups cream
1/2 teaspoon pure vanilla extract to flavour
In a medium-sized container, mix the milk and sugar together with a handheld mixer or whisk, until the sugar has dissolved (about 1-2 minutes at low speed). Stir in the cream and vanilla. Switch on the appliance, pour the mix into the removable container (D) through the opening in the lid (F), then leave to mix for about 40 minutes.
Variations:
- Mint flavour: Add 1- 1.5 spoons of mint syrup in place of the vanilla.
- Mint choc chip: Add 100 g plain or semisweet chocolate chips to the mint flavour.
- Walnut: Melt 50g unsalted butter in a pan. Add a cup of chopped walnuts and 1/4 teaspoon of salt. Cook over a medium-low heat until the nuts turn slightly brown. Drain off the butter, leave the walnuts to cool and add to the ice cream mix during the last 5 minutes.
- Biscuits and cream: Add 3/4 cup of vanilla or chocolate shortbread biscuits to the mix
SIMPLE CHOCOLATE ICE CREAM
For 10 portions (1/2 cup):
1 cup full milk
1/2 cup granulated sugar
240 g plain or semisweet chocolate chips
1.5 cups cream
1 teaspoon pure vanilla extract
Heat the milk until it boils. Use a mixer with metal blade to finely chop the sugar and chocolate together. Add to the boiling milk, stir together until the mix is even and smooth, then place in a medium-sized container and leave to cool. Stir in the cream and vanilla extract. Switch on the appliance, pour the mix into the removable container (D) through the opening in the lid (F), then leave to mix for about 40 minutes.
Variations:
- Chocolate and almonds: Add 1/2 teaspoon of pure almond extract to the vanilla. Add 1/2-3/4 cups roasted ground almonds or chocolate covered almonds during the final 5-10 minutes of cooling.
- Biscuits and chocolate: Add 1/2 cup shortbread biscuits during the final 5 minutes of cooling.
- Chocolate and caramel: Add 1/2-1 cup of chopped soft caramel sweets during the final 5 minutes of cooling.
ICE CREAM WITH FRESH STRAWBERRIES
For 10 portions (1/2 cup):
250 g fresh ripe strawberries, washed and chopped into small pieces
1.5 spoons lemon juice
1 cup of sugar (separate)
1 cup full milk
2 cups cream
1 teaspoon pure vanilla extract
In a small container, place the strawberries, lemon juice and 1/3 cup of sugar. Stir together gently and leave the strawberries to marinade in the juice for 2 hours.
In a medium-sized container, mix the milk and sugar together with a handheld mixer or whisk, until the sugar has dissolved (about 1-2 minutes at low speed). Stir in the cream and vanilla. Blend the strawberries and add them to the mix. Switch on the appliance, pour the mix into the removable container (D) through the opening in the lid (F), then leave to mix for about 40 minutes.
Note: the ice cream will look very pale pink; for a deeper colour, add a few drops of red colouring.
Variations:
- The strawberries can be replaced with other fresh fruit or fruit in syrup (raspberries, blackberries, peaches, melon, pineapple, etc. ...)
FRESH LEMON SORBET
For 10 portions (1/2 cup):
2 cups sugar
2 cups water
1 cup freshly squeezed lemon juice
1 spoon finely chopped lemon rind (zest only)
Mix the sugar and water in a medium saucepan and bring to the boil over a medium-high heat. The lower the heat to a minimum without stirring until the sugar has dissolved (about 3-5 minutes). Leave to cool fully (this is the basic syrup, which can be made in larger quantities to have it ready for making fresh lemon sorbets; store in the refrigerator ready for use).
When the syrup has cooled, stir in the lemon juice and rind.
Switch on the appliance, pour the mix into the removable container (D) through the opening in the lid (F), then leave to mix for about 40 minutes.
Variations:
- Pink grapefruit sorbet: replace the lemon with 1-1.5 cups freshly squeezed pink grapefruit and replace the lemon zest with a spoon of finely grated grapefruit zest.
- Orange sorbet: replace the lemon with 1-1.5 cups freshly squeezed orange and replace the lemon zest with a spoon of finely grated orange zest.
CHOCOLATE YOGURT ICE CREAM
For 10 portions (1/2 cup):
1 cup full milk
180 g. plain/milk chocolate chips, etc...
2 cups low-fat vanilla yogurt
1/4 cup sugar.
Put the milk and chocolate into a blender with metal blades and mix together until it is smooth (about 20-30 seconds). Add the yogurt e and sugar and mix together for about 15 seconds. Switch on the appliance, pour the mix into the removable container (D) through the opening in the lid (F), then leave to mix for about 40 minutes.
AVENTISSEMENTS IMPORTANTES
LIRE CES INSTRUCTIONS AVANT L'EMPLOI.
BESCHRIJVING VAN HET APPARAAT (FIG.1)
1/2.Y. JIOKK 3KCTpaKaTa BaHINI
B emkoctb cpeHnix pa3mepob nepeMeaTb pyuHoi MeaJKOI nIN BENHcKOM MOJOKo i caxap do IONHO ractbopeHncaxapa B TeueHne 1-2 MInyt Ha Hn3KoCkOcTn. Doabntb NOMEunBaCINBOK u BaHnJIb. BKIOHTb np6Op, 3aNtB CMECb B CbeMHyO yAsy (D) uepe3 OTBepCTne ha KpbIiKe (F) n pepeMeuBaTb B TeueHne OKOLO 40 MInyt.
Bapuaahmbi:
- Co Bkycom MrtbI: BmecTo BaHnJIi B3rTb 1-1,5 cToJIOBble IIOXKn MHTHO rCUPona.
- Co Bkycom MmTbI N IOKOJa: K MTe Do6aBnTb 100 rp. KycouKOB rOpbKOro nIIN noJyCnaIKOro IOKOJa.
Co Bkycom opexa: Pactonntb b KactpjoIe 50 rp. HeconenHOro cInBOUHO macna. IobabTb OINCTakah n3MeJIbueHHbIX rpeKnx opexOB u 1/4 yaiHoN loxKn coiN. Bapntb Ha cpeHem orHe, noka opexn He npMpyT KopuHBeBtB oTeHok. CInTb opExn OT macna, OxJaNTb N do6abTb KOCHOBHO MacCe B TeueHne PocJeDnX 5 MNHT.
-Пeуньи слвok:Добавит b 3/4淘汰нecочHoro BaHJIbHorO nIишOKолaHORO peehber
UOKOJIADHOE MOPOXEHOE
Ha 10 nopui (1/2 yauku):
1 chaška Šelényhóro MOJOKA
1/2 yaansrpaunopbaHoro caxapa
240 rp ropbkoI nn noJcnaKoI oKoJaKaMn
1,5 yaikn CInBOK
1NoKn3KCTpaKaBaHnn
Harpeb MOIOKO Do KINHeHNA C NOMOsbIO MNUKcepa C MeTaNlUeCKIM HOXOM HATEpeTB 50KOJIaC c caxapom. DObabntb ropayee MOIOKO, pa3MeWaaTb Do OndHOpOJHOtN. IpeJIHTb CMECb B EMKoCTb CpeHrero pa3Mepa n ocTuNDtB. DObabNTb, NOMEuBaB, CNIBKN u BaHnIbHbI 3KCTpAKT. BkJIouHtB np6Op, 3aJIbTb CMECb B CBeMHbI KOHTeHep (D) Upe3 OTBepCTne Ha KpbIiKe (F) n MEsaTb B TeueHne OKOIO 40 MNHyT.
Bapuaahmbi:
- Wokolad i MmhdJIb: DoabuTb 1/2 yaiHOJ loKKn YnCTOrO ekCTpaKaT a MmHdaJIa I BaHIII. DoabuTb 1/2-3/4 cTaKaHa Teptoro JapeHoRo MmHdaJIa IIN MmHdaJIa B Wokolade B TeueHne PocJeHNx 5-10 MmHyT OxJaXdEHHa.
-ПechеньишokonaД:Добавпь 1/2 ушкп чeyньВ.Teчени полднх5MHyT oxлжdeHnry.
-卍KoJaIи“My-My”:ДобавИть 1/2-1 уашк Теръх конфET “My-My"В TeчЕнe NOслeДнx 5 MInHyT OXлajденя.
MOPOXEHOE CO CBEXE KJYBHKOJ
Ha 10 nopui (1/2aauku):
250 rp cbeke 3peo KnybHnKx, XopoO Ounu HHO HapeaHNO Ha He6OJIbIe KycocKn
1,5 JIOKK CBKBeBbJKAToTO JIMMOHHORO COKa
1 chaushka caxapa
1 chaushka zelbHoro MOJOKa
2aushkCJINBOK
1NoXKn3KCTpaKaTaBaHnIi
IomeCTnB He6oJIbUyO eMKoCTb Kny6Hnky, JIMMOHHbI cOK n 1/3 cTaKaHa caxapa, octopoxHo pa3MaTb n HactaNaBaTb Kny6Hnky B COKy B TeueHne 2 YacOB.
B cpeHero pa3Mepa emKoCTn B3bntb Cmecb moJOKa n caxapa BpyHyIO nn BeHcNKOM B TeueHne 1-2 MnHT ha Hn3KO CKOPoCTn DO noHoro pactBopeHna caxapa. BnTb nepemeuHBa CnVBKn BAHNb. B3bntb HactoeHHyO KJy6HNY u DoabnT b Cmecb n3 KJy6HNYu KycOchOB. BKIOHTb PnIbop, 3aNtB Cmecb B CbeMHyo Yauy (D) B OTBepCTne Ha KpbIwke (F) n MeMaTb B TeueHne OKOIO 40 MNHT
PpmeHHe: MOpOKeHoe 6yIeT HMeTb 6JIeHDo-po3OBbl cBET, ecN Bbl XOTnTe CdeJaTb er0 6OJIee JRPKM,do6aBbTe HeCKoJbKO KaneIb KpaCHOrO NIIeBOrO KpaCInTeJ.
BapuaHmbr:
- Moxho 3aMeHnTb Kny6Hky Ha npytne CBeXne ppykTbI nII CNpO n O Bkycu (MaIIHa, eKebNka, nepcKn, Dblr, aHaHaC n T.d.).
CBEXNJIIMOHHbI COPBET
Ha 10 nopui (1/2 yauku):
2 chaikcaxapa
2чашквовы
1UaIka CBExeBIXkAToR JIMMOHHOrO COKA
1.YIIOKKaMeNKoHATEpToJINMOHHOeApbI(TOJIbKOKeJTARaCTb)
Cmeuatb caxap n Bovy B kactpone cpehero pa3mepa n DOBecn To KINHeHna CpeHem OrHe. 3aTeM yMeHbIHTe OOrH do MInHMyma, He pa36abJra, Noka caxap He pAcTBOpNTcR, B TeueHne 3-5 MNHyT. PONHOCTbO OxJaNTb (3TO 6a30bBIM Cnpon, KOtOpBIM MOxHIO pPiROTOBnTB B 6oJIbXN KOnUHeCTbAX, YTObI HmETb NOd pyKoJ, KOrDa Bbl DeJaete Cop6et CO CBEXIM JIMMOHOM, XpaHnTB B XJOIOHbHNKe B rOTOBOM BnDE).
Korda noJyehHbI TaKIM oBa3OM CInpON OCTbIHET, Do6aBHT b JIMoHHbI cOK n ZeDpy; Nepeme- 5aTb do pactBopeHn.
BkIIOHTb npI6Op, 3aJIITb CMeCb B CbEMHbIKHOHeHep (D)Yepe3 OTBepCTne Ha KpbIiKe (F) MeMaTb B TeHeHne OKOIO 40 MNHyT.
Bapuaahmbi:
- Cop6et n3 CBexero po3OBoro rpeinΦpyTa: 3ameHnTb JIMOH Ha 1 Do 1,5 YaIckn CBexeBbIXaTOrO po3OBoro rpeinΦpyTa n 3ameHnTb Zedpy JIMOHa Ha 1 CToIOByo loKky MeIko HapezAHHOu ZeDpbI rpeinΦpyTa.
- Cop6bET n3 CBEXEYbIXaTOrO aneJIbCSnHa: 3ameHHTb IIMOH Ha 1 - 1,5 yauKcN CBEXeR o aneIbCSnHO BORo coka n 3ameHHTb IIMOHHyU cedpy Ha 1 cToIOByU loXky MeIko Hape3aHHo aneIbCSnBOOy ueDpbl.
JOKOLADHOEMOPOXHEOEI3IOYPTA
Ha 10 nopuzu (1/2 yauku):
1 chaika zelbHoro MOJoka
180 rp KycockoB ropbkoro, Moonchoro n T.d. zoKoJaDa
2 YauKHeKnHKeKnHOro BaHnIbHOrO NorgyPta
1/4 yaushknc caxapa.
ПОЛОЖИТМОЛОКИИЗКЕСМЕТДИЕСКIMHOKOMMESHAТ,ПОКACMECBHECTAHOTODHOPODHOB,ВTEUEHNE20-30CEKYNД.ДобавИТБИORYPITcaxap,пepemeшвATBdoПОЛHOnODHOPODHOCTNBEUEHNEprimepeHNO15CEKYND.BKlnOHTbprn6Op,3aIHTbCMECbCBemHyuHaSy(D)чepe3OTBepCTNeHaKpbIuke(F)ипepeMeSHBaTbTEUEHNEOKOLO4MmHT.
WAZNE OSTRZEZENIA
La Ieia gaiy jgall glal Jauaii elil cbljly jaaay
1
J 1
JLaziu JSL
.0jJrJrJrJrJrJrJrJrJrJrJrJrJrJrJrJrJrJrJrJrJrJrJrJrJrJrJrJrJrJrJrJrJr
Juei 1e iabuaa yaiyaaa aea jiaai gao
.(1)(204 150
aiisowiy
aall aieillgaiieell gaiiiee iirll gai jiaai
()
Aaie jIglllglilgllllllllllllllllllllllllllllllllllllllllll
a
1 1
i 1
- S ,令
.5 jai j gclina jbl jalaojui p 11 l j bai j jia Jauw j jai jai ji .V
.EC/1.7EMCY.2,EC/90/7 2aJU JIJI JJIJI JJIJI
piaiialle jbi kii jol jaliell al gianaiiaai ai jill no aiaa no i 19
jlaaiiai ylela Jbi
1 1
.
aIglaiy IeS J ai la lla Jabi yie jbi iiaill gao Jaaill jiaall jao .
i
(1)
1
J 1
1211 1000
aJz N 1
E
F
J/1j 0
G
H
y
j 1 j j j j j j j j j j j j j j j j j j j j j j j j j j j j j j j j j j j j j j j j j j j j j j j j j j j j j j j j
iill jia g oj jai
aall eclg (C) 1111e1111111111111111111
.(R)aaa (Q) aF (F) aE (E) aD (D)
jll jll (P) jll j j lal . jll jll jll jll jll jll
A 7. g a i j 1 1 1 1 1 1 1 1 1 1 1 1 1 1 1 1 1 1 1 1 1 1
Jgss gbs bial jR: aiaaiiaaiaai (N) ciaai jgale biai
(L)
(1) (2011) (3)
e 1
.0yiaie 4a a y j j j .D)
J 10000000000000000000000000000000000000000000000000
$$ . (I - M) \mathrm {i n} \mathrm {s o l v e s} \mathrm {d} S \mathrm {e l i s t i o n} \mathrm {g a m m a} \mathrm {f l u i d} \mathrm {l a b l i a l} $$
Jlillll lglilg jlgll ldl yllll lalac ll (P) ayidll rj jle all al - 1 1 1 1 1 1 1 1 1 1 1 1 1 1 1 1 1 1 1 1 1 1 1 1 1
$$ \begin{array}{c} \text {l a b} \ \text {a l p h a} \end{array} $$
J 1 1 1 1 1 1 1 1 1 1 1 1 1 1 1 1 1 1 1 1 1 1 1 1 1 1 1 1 1
$$ j _ {i j} $$
aegaa 1 . juaa yjlaal ggyy jdaal lks naeaiy iie -
$$ \because \text {j i l l} \text {d e l l} \text {e l l} \text {i l l} \text {j i l l} \llbracket \dots , \dots \rrbracket \text {j a r r a l} \text {a l l} \text {l e} \text {j b i} $$
$$ \therefore \text {d i s t r i b u t i o n} (H) \text {d i s t r i b u t i o n} c. j = 1 $$
$$ \therefore \text {i} \text {j} \text {l} \text {s} \text {l} \text {j} \text {l} \text {l} \text {j} \text {l} \text {l} \text {l} \text {l} \text {l} \text {l} \text {l} \text {l} \text {l} \text {l} \text {l} \text {l} \text {l} \text {l} \text {l} \text {l} \text {l} \text {l} \text {l} \text {l} \text {t o t a l l} (0) \quad \text {d i f f i l l j r j s c l e b a s i z i a l} $$
Ej. (D) alal all cglg yclall w jale oJy (F) 1bll (H)
(1)
$$ \therefore (D) \quad \text {a l r a n d a l e l g h t i s s i s} Y \leq \text {l a l} \text {a l r a n d a l} Y $$
yooe 1000000000000000000000000000000000000000
S 《工全工
$$ \therefore \frac {1}{2} x - 1 > 3 - \frac {3}{2} x $$
aal
aLw la jia aJai 1. Jg jia 1. aol (laill p) aal al o
$$ \left. \left(\text {L i} _ {\text {i}} ^ {\text {i}} \text {i} _ {\text {i}} ^ {\text {i}} \text {i} _ {\text {i}} ^ {\text {i}} \text {i} _ {\text {i}} ^ {\text {i}} \text {i} _ {\text {i}} ^ {\text {i}} \text {i} _ {\text {i}} ^ {\text {i}} \text {i} _ {\text {i}} ^ {\text {i}} \right) \right] $$
jglklll klll jglklll jglklll jglklll jglklll jglklll
aIbI JSeJgai 1.
$$ A l l i a j S a y g b o d J u s t i t l l j o $$
(a)
jgl 10g jg jg jg jg jg jg jg jg jg jg jg jg jg jg jg jg jg jg jg jg jg jg jg jg jg jg jg jg jg jg jg jg jg jg jg jg
jlll l l l (O) 111111111111111111111111111
y 1 y
1 1
aaii iil aill lalil no aie ai
j 1 j j j j j j j j j j j j j j j j j j j j j j j j j j j j j j j j j j j j j j j j j j j j j j j j j j j j j j j j j j j
iill jia g jao all jai
Jblll luee a liy So Juaa y dall jiaai jai ai jai ll bly
Lgaa aagaaaas Ls jgslll cia So
jll (R) aQoLg (Q) 10 (F) 10 (E) 10 (D) 10
.
AaBaaBaaBaaBaaBaaBaaBaaBaaBaaBaaBaaBaaBaaBaaBaaBaaBaaBaaBaaBaaBaaBaaBaaBaaBaaBaaBaaBaaBaaBaaBaaBaaBaaBaaBaaBaaBaaBaaBaaBaaBaaBaaBaaBaaBaaBaaBaaBaaBaaBaaBaaa
法全纯平面
111 1
PwDlJolSjIj
Jswll 1n jj
oo
a#i 1
J 1
bllll llllall aag sioaill caiia iiaiaia 1000000000000000
(F) 1bill lgljgall aallll al (D) jrrnll llgljblil
1y jia aai 2.0aai ai ai jil
:agg C
Pwlll Jalil Jllllly j Jj
Jw jia 11


- DO NOT THROW AWAY THESE INSTRUCTIONS
- DESCRIPTION OF THE APPLIANCE (FIG.1)
- APPLIANCE ASSEMBLY
- INSTRUCTIONS FOR USE
- Extended chill function
- Adjustments while operating
- How to extend operation (after the ice cream has been made).
- CLEANING
- RECIPES
- VANILLA ICE CREAM
- For 10 portions (1/2 cup):
- Variations:
- SIMPLE CHOCOLATE ICE CREAM
- ICE CREAM WITH FRESH STRAWBERRIES
- FRESH LEMON SORBET
- CHOCOLATE YOGURT ICE CREAM
- AVENTISSEMENTS IMPORTANTES
- LIRE CES INSTRUCTIONS AVANT L'EMPLOI.
- BESCHRIJVING VAN HET APPARAAT (FIG.1)
- Bapuaahmbi:
- UOKOJIADHOE MOPOXEHOE
- Ha 10 nopui (1/2 yauku):
- MOPOXEHOE CO CBEXE KJYBHKOJ
- Ha 10 nopui (1/2aauku):
- BapuaHmbr:
- CBEXNJIIMOHHbI COPBET
- JOKOLADHOEMOPOXHEOEI3IOYPTA
- Ha 10 nopuzu (1/2 yauku):
- WAZNE OSTRZEZENIA
Brand : ARIETE
Model : 407
Category : Ice machine