
CD14 - CD player ROTEL - Free user manual and instructions
Find the device manual for free CD14 ROTEL in PDF.

| Product type | Stereo compact disc (CD) player |
| Brand | Rotel |
| Model | CD14 |
| Dimensions (L × H × D) | 430 × 93 × 312 mm (front panel: 80 mm height) |
| Net weight | 5.9 kg |
| Mains power supply | 120 V / 60 Hz (USA) or 230 V / 50 Hz (Europe) |
| Power consumption | 15 W operating, < 0.5 W standby |
| Digital-to-analog converter | Wolfson 24 bits / 192 kHz |
| Audio outputs | Stereo analog (RCA), coaxial digital (75 Ω) |
| Trigger input | 12 V (3 to 30 V AC/DC) for remote power-on |
| Rotel Link connection | 3.5 mm mini-jack for communication between Rotel devices |
| RS232 port | DB-9 for home automation integration |
| Remote control | Infrared RR-D99 (AAA batteries included) |
| Playback functions | Play, pause, stop, track skip, direct access (0-9), forward/backward search, programming (20 tracks), random, repeat, time display |
| Display | Backlit with track, time, mode information |
| Disc tray | Motorized, tray-loading |
| Total harmonic distortion + noise | 0.002% at 1 kHz |
| Signal-to-noise ratio | > 118 dB (A-weighted) |
| Channel separation | > 115 dB at 10 kHz |
| Laser class | Class 1 (safe under normal operation) |
| Double insulation | Yes (no grounding required) |
| Cleaning | Dry cloth or vacuum cleaner (disconnect before cleaning) |
| Spare parts / repairability | No user-serviceable parts inside. Repair by authorized technician only. |
Frequently Asked Questions - CD14 ROTEL
User questions about CD14 ROTEL
0 question about this device. Answer the ones you know or ask your own.
Ask a new question about this device
Download the instructions for your CD player in PDF format for free! Find your manual CD14 - ROTEL and take your electronic device back in hand. On this page are published all the documents necessary for the use of your device. CD14 by ROTEL.
USER MANUAL CD14 ROTEL
Stereo Compact Disc Player
This symbol is to alert the user to the presence of uninsulated dangerous voltages inside the product's enclosure that may constitute a risk of electric shock.

This symbol is to alert the user to important operating and maintenance (service) instructions in this manual and literature accompanying the product.
APPLICABLE FOR USA, CANADA OR WHERE APPROVED FOR THE USAGE
CAUTION: TO PREVENT ELECTRIC SHOCK, MATCH WIDE BLADE OF PLUG TO WIDE SLOT. INSERT FULLY.
ATTENTION: POUR EVITER LES CHOCSE ELECTRIQUES, INTRODUIRE LA LAME LA PLUS LARGE DE LA FICHE DANS LA BORNE CORRESPONDANTE DE LA PRISE ET POUSSER JUSQU AU FOND.
This Class B digital apparatus complies with Canadian ICES-003.
Rotel products are designed to comply with international directives on the Restriction of Hazardous Substances (RoHS) in electrical and electronic equipment and the disposal of Waste Electrical and Electronic Equipment (WEEE). The crossed wheelie bin symbol indicates compliance and that the products must be appropriately recycled or processed in accordance with these directives.
Place the unit on a fixed, level surface strong enough to support its weight. Do not place it on a moveable cart that could tip over.

This symbol means that this unit is double insulated. An earth connection is not required.

CLASS 1
LASER PRODUCT
IMPORTANT FOR LASER PRODUCT
-
CLASS 1 LASER PRODUCT
-
DANGER: Visible laser radiation when open and interlock failed or bypassed. Avoid direct exposure to beam.
- CAUTION: Do not open the top cover. There are no user serviceable parts inside the player; leave all servicing to qualified service personnel.
WARNING!
To reduce the risk of electrical shock, fires, etc.:
- Do not remove screws, covers or cabinet.
- Do not expose the unit to rain or moisture.
- Do not touch the power cord or plug with wet hands.
Notice
The RS232 connection should be handled by authorized persons only.
FCC Information
This equipment has been tested and found to comply with the limits for a Class B digital device, pursuant to Part 15 of the FCC Rules. These limits are designed to provide reasonable protection against harmful interference in a residential installation. This equipment generates, uses and can radiate radio frequency energy and, if not installed and used in accordance with the instruction, may cause harmful interference to radio communications.
However, there is no guarantee that interference will not occur in a particular installation. If this equipment does cause harmful interference to radio or television reception, which can be determined by turning the equipment off and on, the user is encouraged to try to correct the interference by one or more of the following measures:
Reorient or relocate the receiving antenna.(TV, radio, etc.)
- Increase the separation between the equipment and receiver.
- Connect the equipment to an outlet on circuit different from that to which the receiver is connected.
- Consult the dealer or an experienced radio/TV technician for additional help.
Caution
This device complies with part 15 of the FCC Rules. Operation is subject to the following to conditions: (1) This device may not cause harmful interference, and (2) this device must accept any interference received, including interference that may cause undesired operation.
NOTE TO CATV SYSTEM INSTALLER: Call the CATV system or antenna installer's attention to Article 820-40 of the NEC. This provides guidelines for proper grounding and, in particular, specifies that the cable ground shall be connected to the grounding system of the building, as close to the point of cable entry as practical. See installation diagram.
NOTE: This equipment has been tested and found to comply with the limits for a Class B digital device, pursuant to Part 15 of the FCC Rules. These limits are designed to provide reasonable protection against interference in a residential installation. This equipment generates and can radiate radio frequency energy and, if not installed and used in accordance with the instructions, may cause interference to radio or TV communications. There is no guarantee that interference will not occur in a particular installation. If this equipment does cause interference to radio or television reception, which can be determined by turning the equipment off and on, try to correct the interference by one or more of the following measures:
Reorient or relocate the receiving antenna.
- Increase the separation between the unit and the television tuner.
- Connect the unit to an AC power outlet on a different electrical circuit.
- Consult your authorized Rotel retailer for assistance.
Important Safety Instructions
WARNING: There are no user serviceable parts inside. Refer all servicing to qualified service personnel.
WARNING: To reduce the risk of fire or electric shock, do not expose the unit to moisture or water. Do not expose the unit to dripping or splashing. Do not place objects filled with liquids, such as vases, on the unit. Do not allow foreign objects to get into the enclosure. If the unit is exposed to moisture, or a foreign object gets into the enclosure, immediately disconnect the power cord from the wall. Take the unit to a qualified service person for inspection and necessary repairs.
Read all the instructions before connecting or operating the component.
Keep this manual so you can refer to these safety instructions.
Heed all warnings and safety information in these instructions and on the product itself. Follow all operating instructions.
Clean the enclosure only with a dry cloth or a vacuum cleaner.
Do not use this unit near water.
The apparatus should be used in non tropical climate.
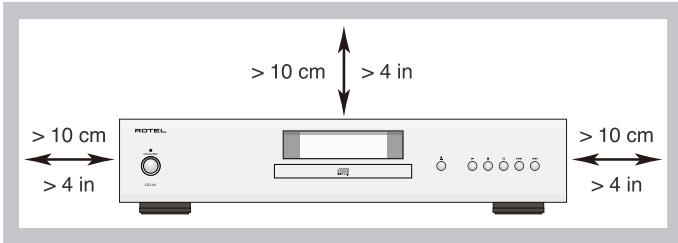
You must allow a minimum 10cm or 4 inches of unobstructed clearance around the unit.
Do not place the unit on a bed, sofa, rug, or similar surface that could block the ventilation openings. If the unit is placed in a bookcase or cabinet, there must be ventilation of the cabinet to allow proper cooling.
Keep the component away from radiators, heat registers, stoves, or any other appliance that produces heat.
WARNING: The rear panel power cord connector is the mains power disconnect device. The device must be located in an open area that allows access to the cord connector.
The unit must be connected to a power supply only of the type and voltage specified on the rear panel. (USA: 120 V/60Hz, EC: 230V/50Hz)
Connect the component to the power outlet only with the supplied power supply cable or an exact equivalent. Do not modify the supplied cable. A polarized plug has two blades, with one wider than the other. A grounding plug has two blades plus a third grounding prong. These are provided for your safety. Do not defeat grounding and/or polarization safety provisions. If the supplied plug does not fit your outlet, please consult an electrician for replacement of the obsolete outlet. Do not use extension cords.
The mains plug is the disconnect of the unit. In order to completely disconnect the unit from the supply mains, remove the main plug from the unit and the AC power outlet. This is the only way to completely remove mains power from the unit.
Do not route the power cord where it will be crushed, pinched, bent, exposed to heat, or damaged in any way. Pay particular attention to the power cord at the plug and where the cord exits the back of the unit.
The power cord should be unplugged from the wall outlet during a lightning storm or if the unit is to be left unused for a long period of time.
Use only accessories specified by the manufacturer.
Use only with a cart, stand, rack, bracket or shelf system strong enough to support the unit. Use caution when moving the unit to avoid injury or damage to the unit.
Immediately stop using the component and have it inspected and/or serviced by a qualified service agency if:
- The power supply cord or plug has been damaged.
- Objects have fallen or liquid has been spilled into the unit.
The unit has been exposed to rain. - The unit shows signs of improper operation.
- The unit has been dropped or damaged in any way.
The batteries in the remote control should not be exposed to excessive temperature such as sunshine, fire or other heat sources.
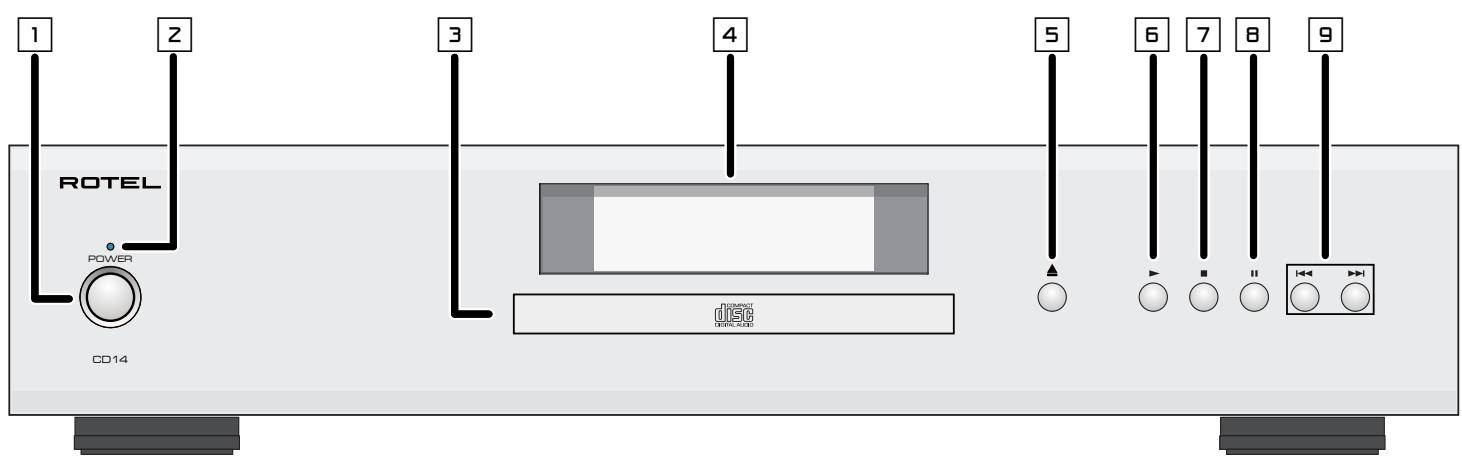
Figure 1: Controls and Connections Commandes et branchements Bedienelemente und Anschlisse Controles y Conexiones
Controllie connessioni
De bedieningsorganen en aansluitingen
Kontroller anslutninger
Opranbl ynpablenia npa3bembl
Telekomande RR-D99
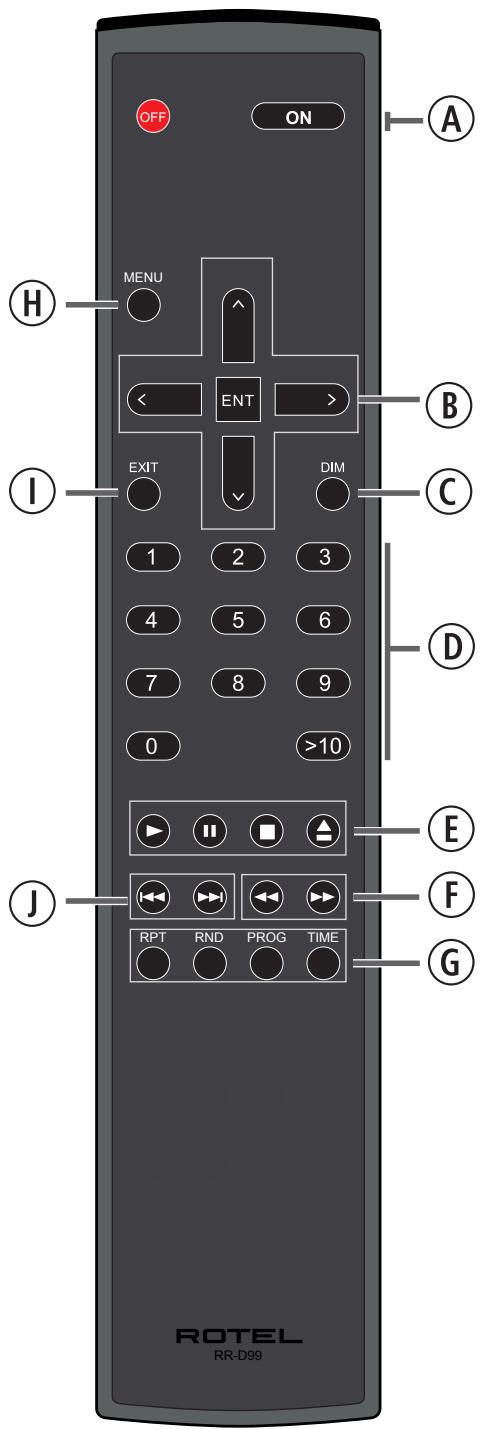
Figure 2: RR-D99 Remote Control
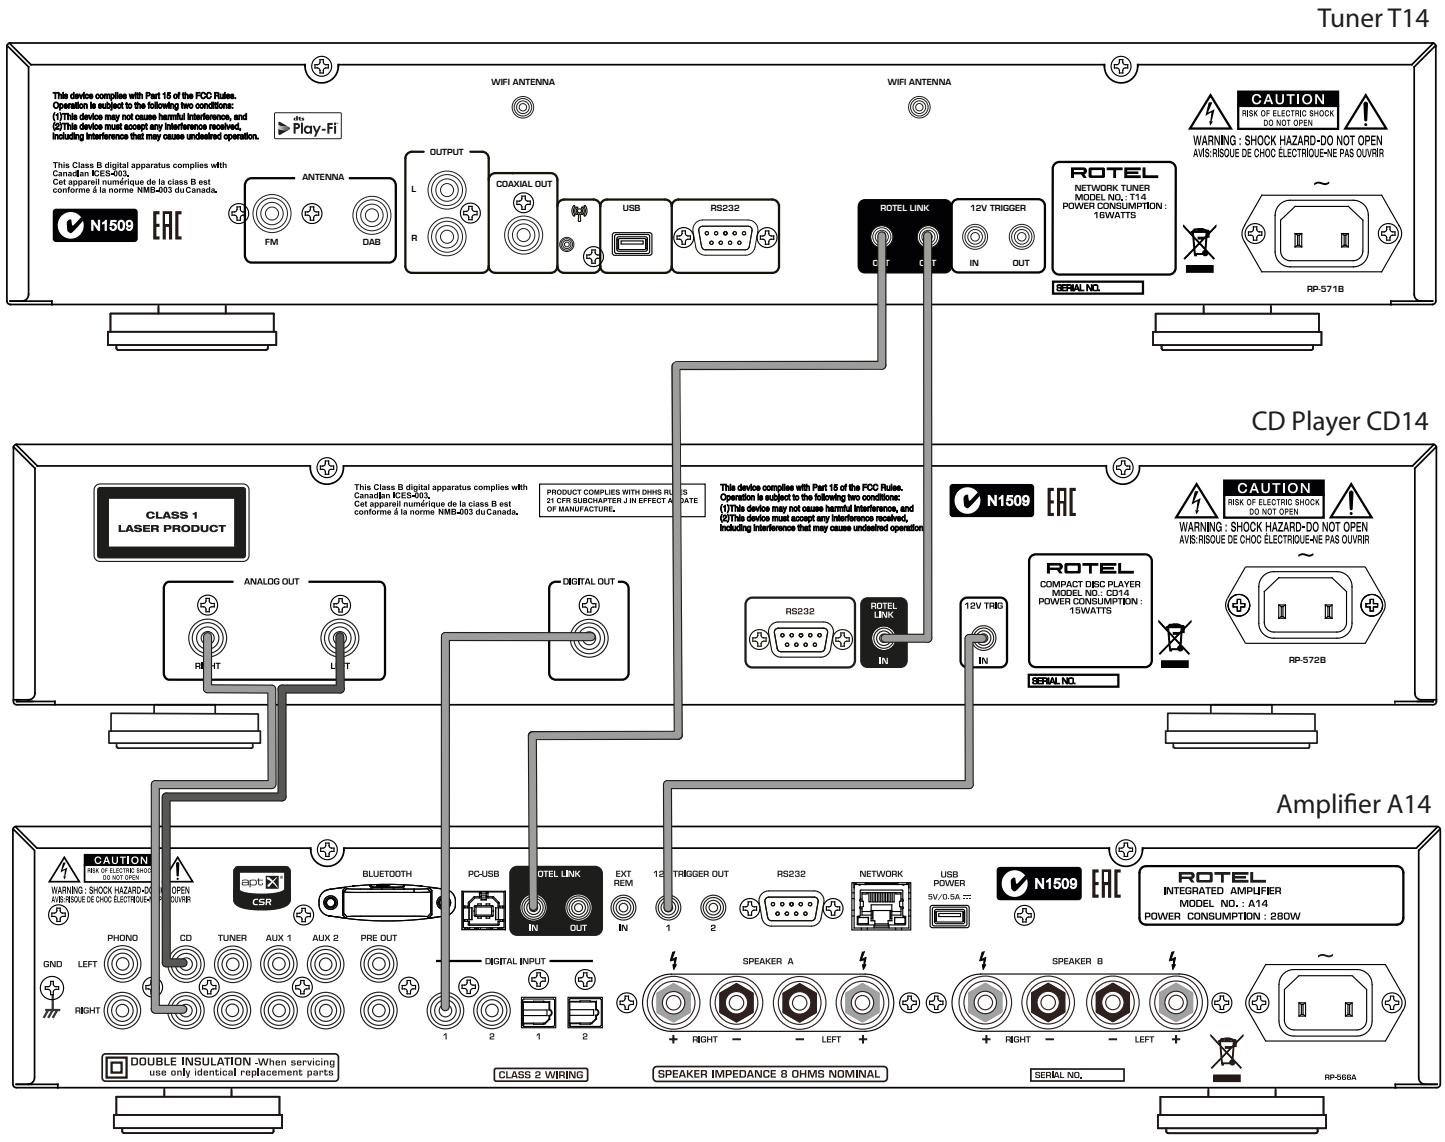
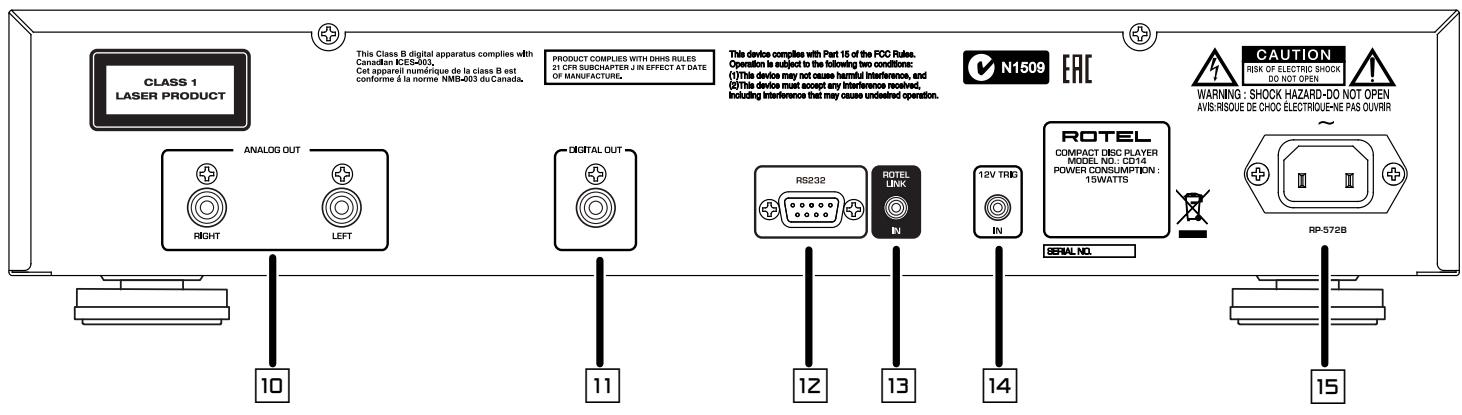
Figure 3: Connections Connexions Anschlussdiagram Conexiones Collegamenti De verbindingen Anslutningar Podcoeunene
Important Notes
When making connections be sure to:
Turn off all the components in the system before hooking up any components, including loudspeakers.
Turn off all components in the system before changing any of the connections to the system.
Remarques importantes
Important Safety Instructions 3
Figure 1: Controls and Connections 4
Figure 2: Remote Control RR-D99 5
Figure 3: Connections 6
Important Notes 7
About Rotel. 8
About the CD14 8
Getting Started 9
A Few Precautions 9
Placement 9
Control Identification 9
AC Power and Control 9
AC Power Input 9
Power Switch 1A and POWER Indicator 2 9
12V Trigger Connection 9
Output Connections 9
Analog Outputs 10
Digital Output 10
Operation 10
Infrared Remote Control 10
Display 10
Disc Tray 10
Transport Control Buttons 10
EJECT Button 10
PLAYButton 10
STOP Button ⑥ 10
PAUSE Button 10
TRACK Buttons 10
DIRECT ACCESS Buttons 10
Search Buttons 11
Additional Features 11
RS232 11
Rotel Link 回 11
Remote Control Advanced Buttons. 12
MENUButton 12
DIMButton 12
Troubleshooting 12
Power Indicator Is Not Illuminated 12
Fuse Replacement 12
No Sound 12
Specifications. 13
About Rotel
Our story began over 50 years ago. Over the decades, we have received hundreds of awards for our products and satisfied hundreds of thousands of people who take their entertainment seriously - like you!
Rotel was founded by a family whose passionate interest in music led them to manufacture high-fidelity components of uncompromising quality. Through the years, that passion has remained undiminished and the family goal of providing exceptional value for audiophiles and music lovers, regardless of their budget, is shared by all Rotel employees.
Rotel's engineers work as a close team, listening to, and fine tuning, each new product until it reaches their exacting musical standards. They are free to choose components from around the world in order to make that product the best they can. You are likely to find capacitors from the United Kingdom and Germany, semiconductors from Japan or the United States, while toroidal power transformers are manufactured in Rotel's own factory.
We all have concerns about our environment. And, as more and more electronics are produced it is especially important for a manufacturer to do all it can to engineer products that have a minimum impact on the environment.
At Rotel, we are proud to do our part. We have reduced the lead content in our products by using special lead-free ROHS solder and components. Our engineers continually strive to improve power supply efficiency without compromise to quality. When in standby mode Rotel products use minimal power to meet global Standby Power Consumption requirements.
The Rotel factory is also doing their part to help the environment through constant improvements to product assembly methods for a cleaner and greener manufacturing processes.
All of us at Rotel thank you for buying this product. We are sure it will bring you many years of enjoyment.
About the CD14
Simply stated, the unit is designed to do one thing—deliver the most detailed, nuanced sound from every disc. The unit will faithfully reproduce all that is recorded on the disc. While the unit was under development, the design team went far beyond the usual measurable technical performance characteristics. Listening panels spent hundreds of hours fine tuning the audio performance, choosing the components that produced the best sound, that would "release the emotion in the music". Whatever the artist and recording engineers put on the disc, the unit will deliver.
That said, the unit does feature some impressive hardware. The digital-to-analogue converter is a state of the art DAC from the world renowned British manufacturer, Wolfson. This very high performance stereo DAC is specifically designed for audio applications such as CD, DVD, and home theatre systems. All this, combined with Rotel's Balanced Design, ensures the unit will deliver the highest level of audio performance. When used in a high-quality audio system, your Rotel CD player will provide years of enjoyment.
Getting Started
A Few Precautions
WARNING: To avoid potential damage to your system, turn off ALL the components in the system when connecting or disconnecting the loudspeakers or any associated components. Do not turn the system components back on until you are sure all the connections are correct and secure.
Please read this manual carefully. In addition to installation and operating instructions, it provides valuable information on various unit system configurations as well as general information that will help you get optimum performance from your system. Please contact your authorized Rotel dealer for answers to any questions you might have. In addition, all of us at Rotel welcome your questions and comments.
Save the shipping carton and all enclosed packing material for future use. Shipping or moving the unit in anything other than the original packing material may result in severe damage to your unit.
If included in the box please fill out and send in the owner's registration card. Also be sure to keep the original sales receipt. It is your best record of the date of purchase, which you will need in the event warranty service is required.
Placement
Use common sense when placing the unit in a cabinet or when stacking other equipment. Make sure that the shelf or cabinet can support its weight. Do not stack heavy components on top of the unit. Avoid placing the unit where it may be subject to excessive heat such as on top of a large power amplifier or near a heat register. For best performance, avoid placing the unit where it may be subject to vibration, such as near a speaker.
Control Identification
This manual shows illustrations of the front and rear panels and the RR-D99 remote control. Each item in the illustrations is identified with a call out. Through out this manual the items referred to in the text are identified by the corresponding call out. The items on the front and rear panels are identified with a number call out, such as 1. The items on the remote control are labeled with a letter call out, such as A.
AC Power and Control
AC Power Input
Your unit is configured at the factory for the proper AC voltage in the country where you purchased it (either 120 volts or 230 volts). The AC line configuration is noted on a decal on the back panel.
NOTE: Should you move your CD player to another country, it may be possible to reconfigure it for use on a different line voltage. Do not attempt to perform this conversion yourself. Opening the enclosure of the unit exposes you to dangerous voltages. Consult a qualified service person or the Rotel factory service department for information.
NOTE: Some products are intended for sale in more than one country and as such are supplied with more than one AC cord. Please use only the cord appropriate for your country/region.
The unit should be plugged directly into a 2-pin polarized wall outlet where possible or into the switched outlet on another component in your audio system. Do not use an extension cord.
Be sure the power switch on the front panel of the unit is turned off (in the "out" position). Then, connect the supplied power cord to the AC power receptacle on the rear of the unit and the AC power outlet.
If you are going to be away from home for an extended period of time such as a month-long vacation, it is a sensible precaution to unplug your CD player (as well as other audio and video components) while you are away.
Power Switch 1A and POWER Indicator 2
The power switch is located on the front panel of your CD player. To turn the CD player on, push the switch in. The LED indicator above the switch will be blue and the display will light up, indicating that the CD player is turned on. To turn the CD player off, push the button again and return it to the "out" position.
When the Power switch is in the ON position, the remote control ON and OFF buttons may be used to activate the CD player or put it in Standby mode. In Standby mode the LED indicator above the power switch is red, but the display is turned off.
NOTE: If you are using a switched outlet to turn on and off your CD player, you should leave the power switch in the "ON" position. When AC power is applied to the unit, it will power up in fully active mode.
12V Trigger Connection 14
The unit can be activated by a 12 volt trigger signal. The trigger input accepts any control signal (AC or DC) ranging from 3 volts to 30 volts. When a cable is connected to the 12V input and a trigger signal is present, the CD Player is activated. When the trigger signal is turned off, the unit goes into standby mode. The front panel power indicator will be red, but the display goes dark and the unit will not operate.
NOTE: When using the 12V Trigger feature, leave the POWER button in the ON position.
NOTE: If you are using other units in the series with Rotel link, please use the Rotel Link connection to turn the units on or off. Do not connect both the Rotel Link and 12V trigger cables. The 12V trigger's power on or off features will override the Rotel Link features.
Output Connections
The CD14 unit gives you a choice of two different kinds of output connections — an analog output signal from the built-in D/A converter for use with conventional analog audio components and a coax digital output which provides an unprocessed digital data signal for use with outboard D/A converters or digital processors.
NOTE: To prevent loud noises that could damage your speakers, turn off all the system components when you make any signal connections.
Analog Outputs
See Figure 3
A pair of standard RCA jacks supplies an analog output signal from the CD14 unit to the source inputs of an audio preamplifier, integrated amplifier, or receiver.
Select high quality audio interconnect cables. Connect the left and right channel outputs of the unit to the corresponding inputs on the preamplifier or other component.
Digital Output
See Figure 3
If you are using an outboard D/A converter or other digital processor, you will need an unprocessed digital data stream from the CD14. Using a standard 75 ohm coax digital cable, connect the CD14's coax digital output to the digital input connector on the outboard D/A converter.
Operation
The unit can be operated using its front panel buttons or from corresponding buttons on the supplied infrared remote control. Specific instructions for each of these controls are detailed below. Most of the buttons are duplicated on the front panel and on the IR remote control. However, there are a few exceptions where the buttons are only available on one or the other. These exceptions are noted in the instructions.
Infrared Remote Control
Before using the IR remote control, it is necessary to install two "UM-4/ AAA" batteries (supplied). Remove the plastic cover on the back of the IR remote, install the batteries (observing the + and - polarity indications), and reinstall the cover.
Display
A back-lit display on the front panel of the unit provides useful information about the status of the unit, activation of special features, and track/time information for the disc being played. Each of these indicators is described in the detailed operating instructions that follow.

Disc Tray 3
A motor-driven disc loading tray located in the center of the unit, accepts a compact disc. Press the eject button then place the disc into the tray, label-side up. Make sure the disc is properly centered before loading. The disc can be ejected by pressing the eject button again.
Transport Control Buttons
These buttons provide basic control functions for the disc transport mechanism. Except where noted, all functions are available on the unit front panel and the IR remote control.
EJECT Button ⑨⑩
To open the tray loading mechanism press the EJECT button . The tray will open allowing the CD to be loaded label side up. To close the tray press the EJECT button again.
If no disc is loaded when the tray is closed the display will read "No Disc". When a disc is loaded, the display will indicate the number of tracks on the disc and the total time of the disc in hours, minutes and seconds.
PLAYButtonE
After the disc is loaded, press the PLAY button to start playing the disc. The number of the track being played and the elapsed time will be shown in the display, along with the PLAY indicator. Normally, the disc will start playing with the first track. However, you can select a different track using the TRACK buttons or the DIRECT ACCESS buttons (see below) before pressing the PLAY button to start playing a different selection.
STOP Button ⑦⑥
Press the STOP button once to stop disc play. Press the PLAY button to resume disc play where it was stopped. If the STOP button is pressed twice, disc play stops, the display shows STOP indicator. When the PLAY button is pressed after pressing the STOP button twice, the disc begins playing from the first track or the first programmed track in PROGRAM mode (see below).
PAUSEButton
This button is used to temporarily suspend play. The disc continues to spin and play will be resumed from the current position. The PAUSE indicator will light in the display. To resume playing the disc, press the PAUSE button again or press the PLAY button.
TRACK Buttons ①
These buttons are used to select tracks on the disc. When a disc is playing, pressing the TRACK button advances to the beginning of the next track. Pressing the TRACK button returns to the beginning of the current track. Pressing the TRACK button twice quickly in succession returns to the beginning of the previous track. The new track number appears in the display.
These buttons are also used to select a track before pressing the PLAY button or when memorizing tracks for the PROGRAM play mode (see below). These selections are made by continuously pressing the TRACK buttons until the desired track is reached.
In PROGRAM mode, the TRACK buttons advance or reverse to the next track in the memorized selection list.
DIRECT ACCESS Buttons ⑥
Remote Only
These ten numeric buttons (labelled 0 through 9) are used to directly access a track from the IR remote control instead of stepping through the tracks using the TRACK buttons.
The first nine tracks on a disc can be selected by pressing the corresponding button. For example, to play the third track, press the 3 button on the remote control.
When accessing track numbers greater than 9, enter the 2 digit track number on the remote control.
Note: The >10 button is not used for this model.
The number of the selected track will appear in the main numeric area at the center of the display.
SEARCH Button
Remote Only
These fast forward and fast reverse buttons / allow fast searching through the currently playing disc. One press of these buttons will fast forward or fast reverse at 2X normal speed. Pressing these buttons repeatedly will fast forward or fast reverse at 4X and 8X normal speed. Pressing the PLAY button returns the player to normal speed. While the fast search function is active, you will hear high-speed audio.
Additional Features
These convenience features add extra functionality to the CD14, including the ability to memorize a group of tracks to be played, to repeat a disc, program, or track over and over, to play the tracks on a disc in random order, and to select from several available time displays.
PROGRAM Button ⑥
Remote Only
This button, labeled PROG, allows you to memorize as many as 20 tracks on the current disc for playback in a specific order. For example, you could instruct the CD14 to play track 5, followed by track 3, followed by track 8.
To begin a program:
- Insert a disc into the tray loader. The CD14 will read the contents of the disc.
- Press the PROG button on the remote control. The PROGRAM indicator will light up in the display, along with "PROG-01" indicating that the unit is waiting for the first track to be memorized.
- Enter the first track number using the DIRECT ACCESS buttons. Your selection will be memorized automatically. Press PROG button again then the display indicator will change to "PROG-02". Continue entering the rest of your selections using the DIRECT ACCESS buttons.
Once you have memorized a play list, the CD14 remains in PROGRAM mode until you eject the disc or press and hold the PROG button for 3 seconds. If you press the PLAY button , the memorized program will play instead of the entire disc, starting with the first selection in the memorized list.
When a PROGRAM has been memorized, most functions that would normally affect the entire disc operate on just the memorized program. For example, the TRACK buttons advance to the next track in the memorized program, not the next track on the disc. Likewise, the REPEAT button (see below) continuously plays the memorized program, not the entire disc.
NOTE: The Random button does not function when playing a program. To activate the Random button the unit must exit Program playback.
NOTE: Direct track access is not available when in the PROGRAM mode.
RANDOM Button ⑥
Remote Only
This instructs the CD player to play tracks from the entire disc in random order. Once all of the selections have been played once, the disc will stop playing, unless the REPEAT Button (see below) has been engaged, in which case the random play will continue until the STOP button is pressed.
REPEAT Button ⑥
Remote Only
This button allows you to repeat the current track or the entire disc continuously until the feature is cancelled by disengaging the REPEAT button or pressing the STOP button. The REPEAT button steps sequentially through the available options. Press the button once and the CD14 will repeat just the current track. Press the button a second time and the CD14 will repeat the entire disc. Press the button a third time to cancel the REPEAT function.
As noted above, REPEAT can be used in conjunction with the RANDOM play feature.
NOTE: The REPEAT function is automatically cancelled when the disc is ejected.
TIME Button ⑥
Remote Only
Normally, the CD14 displays the elapsed time of the currently playing track. The TIME button allows you to step through two alternative time displays. Pressing the button once displays the time remaining in the current track, which counts down as the track continues playing. Pressing the button a second time displays the time remaining on the entire disc (or memorized program). Pressing the button a third time reverts to the standard elapsed time display.
NOTE: If a disc has CD Text information on it, pressing the play button during playback will alternate between standard disc information and any CD Text data being shown on the display.
RS232 12
The unit can be controlled via RS232 for integration with automation systems. The RS232 input accepts a standard straight DB-9 Male-to-Female cable.
For additional information on the connections, software, and operating codes for RS232 control of the CD14, contact your authorized Rotel dealer.
Rotel Link 13
This 3.5 mm stereo mini-jack (labeled ROTEL LINK IN) can optionally attach to Rotel network enabled products with ROTEL LINK OUT connections. This allows the attached Rotel products to communicate with each other and be controlled via the Rotel App (available for download on the iTunes® store).
Remote Control Advanced Buttons
MENUButton
Remote Only
By pressing the MENU button, you can enter the following setup menu:
- DISPLAY DIMMER: Changes the display brightness.
- POWER LED DIMMER: Changes the Power LED brightness.
NOTE: These settings are stored permanently even after the CD14 is powered off.
- VERSION: Shows the current software version.
- AUTO POWER OFF: The unit can be configured to automatically power off if unused for a specified period. If the CD is stopped for the specified "Auto Power Off" time the unit will automatically go to STANDBY mode. The Auto Power Off timer will be restarted if the CD starts to play. The default for Auto Power Off is set to DISABLE.
Valid settings include: DISABLE, 30 mins, 60 mins, 90 mins.
- EXIT: Exits this SETUP menu.
From the remote control, press the up/down arrow buttons to change the contents of the menu, and press ENT to enter the settings or confirm.
NOTE: You can also access the SETUP menu without the remote control. Press the STOP button on the front panel for 5 seconds. Press the TRACK buttons to change the contents of the menu and press STOP button to enter the settings or confirm.
DIM Button ©
Remote Only
Press the DIM button sequentially to change the DISPLAY brightness.
NOTE: Adjustments made using the button are temporary only and not saved after powering off the CD14.
Troubleshooting
Most difficulties in audio systems are the result of incorrect connections, or improper control settings. If you encounter problems, isolate the area of the difficulty, check the control settings, determine the cause of the fault and make the necessary changes. If you are unable to get sound from the unit, refer to the suggestions for the following conditions:
Power Indicator Is Not Illuminated
The Power Indicator and the basic items in the display window should be illuminated whenever the unit is plugged into the wall power outlet and the Power button is pushed in. If it does not light, test the power outlet with another electrical device, such as a lamp. Be sure the power outlet being used is not controlled by a switch that has been turned off.
Fuse Replacement
If another electrical device works when plugged into the power outlet, but the Power Indicator and the display still will not light when the unit is plugged into the wall outlet, it indicates that the internal power fuse may have blown. If you believe this has happened, contact your authorized Rotel dealer to get the fuse replaced.
No Sound
Check the cables between the unit and the amplifier inputs to be sure they are connected properly. Be sure the correct amplifier input is selected. Be sure the tape monitor system of the amplifier has not been activated. Check the wiring between the amplifier and the speakers.
Specifications
| Total Harmonic Distortion + Noise | 0.002% @ 1 kHz |
| Intermodulation Distortion | 0.002% @ 1 kHz |
| Frequency Response (± 0.5 db) | 20 - 20,000 Hz |
| Channel Balance | ± 0.5 db |
| Phase Linearity | ± 0.5 degree |
| Channel Separation | > 115 dB @ 10 kHz |
| Signal to Noise Ratio (A weighting) | > 118 dB |
| Dynamic Range | > 99 dB |
| Digital to Analog Converters | Wolfson 24 bit/192kHz DAC |
| Analog Output impedance | 100 Ohms |
| Digital Output | 0.5 Volt, Peak to Peak |
| Load Impedance | 75 Ohms |
| Power Requirements (AC) | |
| USA | 120V, 60 Hz |
| EC | 230V, 50 Hz |
| Power Consumption | 15 Watts |
| Standby Power Consumption | < 0.5 Watts |
| Dimensions (W, H, D) | 430 x 93 x 312 mm |
| 17" x 3 5/8" x 12 5/16" | |
| Front Panel Height | 80 mm / 3 1/8" |
| Weight (net) | 5.9 kgs, 13 lbs. |
All specifications are accurate at the time of printing. Rotel reserves the right to make improvements without notice.
Rotel and the Rotel HiFi logo are registered trademarks of The Rotel Co., Ltd. Tokyo, Japan.
CAUTION
RISK OF ELECTRIC SHOCK DO NOT OPEN

WARNING : SHOCK HAZARD-DO NOT OPEN AVIS:RIQSUE DE CHOC ELECTRIQUE-NE PAS OUVRIR
This Class B digital apparatus complies with Canadian ICEs-003.
Bouton SEARCH (RECHERCHE) ⑥
This Class B digital apparatus complies with Canadian ICEs-003.
LASERPRODUKT DER KLASSE 1
WICHTIG FÜR LASERPRODUKTE
This Class B digital apparatus complies with Canadian ICES-003.
± 0^5^
115dBα10kHz
118dB
99dB
Wolfson 24 bit / 192kHz DAC
100 Ohms
0^5 voltios de pico a pico
75 ohmios
230 V CA/50 Hz
120 V CA/60 Hz
15 vatioss
< 0.5 ratios
430 × 93 × 312 ~mm .
80 mm
5^9kg
This Class B digital apparatus complies with Canadian ICEs-003.
ALGEMENE WAARSCHUWING!
This Class B digital apparatus complies with Canadian ICES-003.
CLASS 1 LASER PRODUCT
IMPORTANT INFORMATION PER I PRODOTTI LASER
1.PRODOTTO LASER DI CLASSE 1
This Class B digital apparatus complies with Canadian ICES-003.
CLASS 1 LASER PRODUCT
BAXHBIE 3AMEUAHN OTHOCITEJIbHO JIA3EPA
- UctpoCTBO COOTBETCTBYET KLIACCY 1 no KIacCNKauu na3epbIX n3denn
- ONACHOCTb: npn cnHrtn KpbIshK Koprnyca cyuEcTeByet onaCHocTb 6bnyeHnna3epom BmIMoro cneKtpa.N36eraIte nonaadaHn noJ na3epHbI lyu.
3.BHUMAHME:He cHMMaTe BepXHIO KpbIbKy.BHyTpN HcTacte,
DOCTynhIx DnA O6CnyKuBaHnO N0JIb3oBaTeHIO.
IOBepBeTe 6cnyKuBaHnE KBaINΦuNpOBaHmO MaCTepy.
IPENOCTEPEKHENE!
Bo n36eKaHne npaKaHnE 3JleKtpuYeCKM TOKOM NJII BO3rOpaHn:
1.He ydaIaIe BnHTbI nHaHEn KOpNyca.
2.He donyckaiTe BO3dEiCTBnHa annapaTdoJxnn BnAtn.
3.He KaacaiTeceb shHypa nItaHn H stenCeIbHbIX BNILOK MOKpbIMpyKaAM.

3ameyahne
IopcoednHeHne no RS232 donKHO 6bItb ocUyecTbNeHO ToJIbKO aBToPn3OBAHHbIM CNEuaJIACtOM.
HΦopmaζη FCC no ΝλeKtpomarHHTHO COBmecTHMocTn
3To o6OpuyoBaanHe npOteCTnpoBaHn Ha npEmeT 3NeKtpomarHnTHoCObMeCTnMoCTnNoTbEpJxDo,TO OHO yOBDJeTbpOeTpe6oBAnmI dnnzPpOBbIx UyToPcOITB Klacca Class B V aactn Part 15 npaBnFCC.3Tu Tpe6oBaan CphiPMynPoBaHbI dnn ToT,OTb6bl o6eChneHTb pazymHy0 3aunTy OT bPeNbIx n3LyuEnH B JKnbIX NOMeUenHax.3To UyTePOCTBO rHepepyeT,NCIOlb3yeT nMOXET n3LyuTaB 3HeprnHn HpaPaIOuCAtOTax H,6dyuN UCTaHOBLeHHbIM N ICSIOb3YeBMl H Be COOTBeTCTBn CINCTpyKUneH, MoKET cO3DaBaTb NOMExn DnRApaIOCBa3H.
Ondako 30 He rapaHTnpuyET, YTO B HekOTOpbix cnyaXe H Bo3HKnHy Tnomexn Ipnema paIIO nn Tepepa. B TakOM cnyae Bbl MoKeTe nonpOobaB npedpnHbTcneyuOoe:
-Пелерониватыпимную anteHny.(TB,paio n t.n.)
-yBemnHb paCtOAHne mExyUcTpoiCTBOM npeCBnBPOM.
- Икпльбоватд ругю розту за ТВ, радио и.T.
- 06paTntbCra 3a KOcYnbTaunneK dIepeynn KBAIINΦiunpoBaHNO My cIeuaJIaNCTy no paIIO n TB.
IpeodoctepexeHne
3To yctpoiCTBO ydoBnetbopnetTre6oBAHnAM qactn Part 15 npabIN FCC n ABnTc8 cy6bekOM cneidyuuxycoBni: (1)3To yctpoiCTBO He MoKET BblbBaT BpeHbIe NomExn, n (2)3To yctpoiCTBO dONJHO BbldePjHKBaT bIObIe PnHmAmEble NomExn, BKJIOUaT TAKNE NOMExn, KOTopbe MOrTy npInBeCTN KHeXeNaTeNbHbIM OTKIoHEnHMaOT HopMaJIbHo pa60Tb.
3AMEUHINI JILY UCTAHOBUNKOB CNTTEM KABELBHO T0: 06paTne BHMaHHe yCTAHOBUNka anTeHH nIIcNCTeM CATV ha naparpaΦ 820-40 IpaBnI no yCTAHOBKe 3NeKTPoO6OpDobAHnIgA (820-40 of the NEC).BHeI onncabI npBaBnIa3aEmnE, B aCtHOCTn To, YTO «3EMn» UCTpoiCTBa DOLKHa 6bITb NIOcoEIHnEa K 3a3emnHIO 3dAnHn, pnpueM KaK MoJHo 6JIxke K BVDoY KabEn. CM. cpeTeKn I OyCTAHOBKe.
PIMMEYAHNE: 3to 06opuyobanhe npotechtupoBaHO ha npedMe 3neKtpomarHnTHO BOcMECTMocSTn n oodTbepeJdeHo, 7TO OHO yDObNEtBOPaTe Tpe6OBAnHM dIy cIpobbix yCpOCTB KlaCa Class B B aactn Part 15 npabun FCC. 3Tu Tpe6OBAnHc cOpMynpoBaHb IraI TO, 7TO6bl obecneuHT bp pazymHy 3aunTy OT bpehBx H3nyeHb I KInbX NOMEUHIX. 3To yCpOCTBO reHeeppyet, INONb3yET n MoKET n3NyauTa 3Heprtno Ha paNIOuCTotax I, 6dyuY cTahOBLeHHbIM INcNOB3yeMb IM Be COOTBETCBN CINCHTPkUeM, MoKET co3DaBaTb NOMEx nIpaNOCB3H. Het rapaHTnI, YTO B NEKOTOPbX cIyuaX He BO3HNKHYT NOMEX nI prnema paNIO uINTELenepeDAU, KOtOpble MOxHO 6HapyKnBT BKJIouaA n BkJIIOUaA daHHe yCtpoCTBO. B TakOM cIyue Bbl MoKete nonpo6obatbp neepnPHnTB cIeDyoUee:
-ПелершенистовпименунаHTENHNY. (TB,разноИ.T.n.)
- yBennuTb pacCToHHe Mekdy yctpoiCTBOM n TB TIOhePOM.
-Исноьзоват дугю розеткдя TB, padии n.T.I.
- 06paTntbca 3a KOCHyBtauNei K ABTOpN3OBAHHOMy DInnepy Rotel.
Baxkhble uHcTpyKuzn no 6e3oNaChoctn
Ipeynpekndnne: BHTPn OTCyTCTBvOT Detai, 06cnykBaemble nolb3oBateMe. 06paaaiTecb 3a 06cnykBaHmE TOJIbKO K KBaIIHnHnIpOBAHOMy peMOTHOMy nepcoHany.
Ipeynpekdenie: Inna ChnkeHnna OnaHocTn Bo3ropaHn Hn ydaP aNekTpncckm TOKOM, He noDbperaite daHoe n3dene B03deIcTBNO B0bI nnBn. He noDbperaite n3dene B03deIcTBNO KaneBn N6bp13r. He pa3MeuaiTe NHKaKHX npedMetOB, 3anONHeHHbXKnIOKCTMn, TAKNX KAK Ba3bl, Ha YcToPiCTBe. He no3BOnJIte NoctOpOHNM npedMetam nonaDaTb BNYtpb Kopnyca. Ecnnp6op npoBperaetCBO3deIcTBNO Bnarn, HnnoocToPOHNn npedMetnonan BNYtpb Kopnyca, HemeDnenHO oTcoeHNHTe ceteBOH uHyp O t CTHHO pO3eTKN. OTHeNTe np6op K KBaIIHnpuOBAHHom cyneuaHncty dnn OcmToPa n Heo6xOdmoro peMOHa.
IpouHTaIe BCE uHCTpyKUIN nepei NDcoeHNHeHMe N kCkPnyataueN KCMNOHeHTa.
CoxpaHnTE 3TO pyKOBoDCTBO, YTo6bI Bbl MOrJIIN o6BaTaTbC K3Tm HNCTpyKuJAM M NO 6e3ONaCHOCTN.
06paaTBe BnHMaHne Ha BCE npEynPpeKdEnHn INHΦopMaUIO O 6e3ONaCHOCTN B3Tnx HactabNeHHx
Ha cAmOM N3DeJIHN. CnEduYte BcEM INHCTpyKuJAM M NO kCkPnPyatauIN.
Ouichiate Kopnyc Toblko npn moomcu cyxoh trpIKN nIy nbInecoCOM.
He nCnoIb3yIte daHnbl npu6Op B6Ia3N BOBbl.
YCTPOICTBO CNeJeT HcNIOb3OBaTb B He TpOINueCKOM KJIIMATE.
BbIdoJXhbl06cneuHt bMHNmym 10 cm cbo6oJHO npoctpaHCTBa BOKpy yctpoCTBa.
He ctabte np60bHa KpOaBt, DnBaH, KOBeP Hn AnahonTuHyo NobepXHOCTb, KOTopA MoKET nepeKpbItb BeHTnIauIOHHbE OTeBcTna. Ecn np6Op pa3MeueH BKnHKHom nIn CTehHom 1kafo, TAm DoJNkHa 6bItb BeHTnIauzra dI gnJHoO oxJaKeHna.
ДержпгКOMПОЕNTВOTDALEHIMOT6aTapeи,kanopnфepOB,nueeиллкобдpyroannapaTpybl, KOTOPA npOuN3BODNT TENNo.
IPEIOCTEPEXEHNE: CTeBoH pa3bem Ha 3aDnei NaHei PpeHa3NaueH dJa 6bIcTPO OTOeHNHeH N yCTpoCTBa oTNeKTPnueckO cTeN. UcTPO CTBO DOJIXHO oBeCneuBaT CB06DHBIO DCtTy K 3aDHei NaHei, YTO6bl CeBoH Ka6eb MoXHo 6bIIO 6bIcTPO BbIDepHyTB.
DaHnB np60pdoJxKeH 6bTb NcOeHIneH KNTOCHNHyIITaHmY TOnbKO TaKOrTo TnAn HapJxHeH, KOtOpBe yKa3aHbHa 3aDHei NaHEn. (CUSA: 120 B/60 _ EC: 230 B/50 _
IpoednoHnIe KOMIOHENT K NITaOuEe po3eTKe TOnbKo npN NOMOu CeTeBOro Hhypa n3 KOMPNEkTA NOCTABKN, INI erO TOHORO 3KBVBALEHTe. He nepeDEnbIABte NOCTABNEmbI shHyp. PIONpIN3OBAHbI WTEKKeP IMeET DBA HOJEBbIX KOHTAKTa, OINN I3 KOtOpbIX MIpE DpyrTO. 3a3EMNoUcN WTEKKeP IMeET DBA HOJEBbIX KOHTAKTa I TpeTNI 3a3EMNoUcN WtBtpb. OH No6ecNeuBAOT BAsy 6e3ONaCHocTb. HE OKa3bIABteCb OT MEP 6e3ONaCHocTn, PpeDOCTABNEmbIX 3a3EMNoUcM INI pIONpIN3OBAHbIM WTEKKePOM. Ecln NOCTABNEmbI WTEKKeP He noDxOdUT K BAsw e PO3eTKe, 6bpATNTcB K 3neKTpNKy dIra ZAmHe bY cTapeBWeepo3eTKn. He nCNOb3yIte YdInNHHTe NITAHn.
OchOBHnB BUNKa CTeBOrO shypa cnyknt dIra otKIOUeHnAnnapata O t ctn. IJnI NOHOro OKKIOUeHn H3dNnO rTnAIOuEeCtN, BNky CTeBOrO Ka6eNcIeDyET OTOeOeHNrB o TcTeBOI p03ETKn NepemEHnHO ToKa a TaKxse H3dNn. 3To eINHCTBeHHbI CNOCo6, YTOsbI NOHocTBIO ydaJIbT CTeBOe NITAHneOT H3dNn.
He npoknaibaiote ceteboi shyp tam, rge on MoKet 6b1b pa3aBnEn, npekjaT, ckpyen, noDBeRHT Bo3JeCTBNI TO ENI NIO BOPeXJEN KAKM-JN6o Cnpoc6om. O6paaiTe oO6oe BHMaHHe Na ceteBOI shyp B6NJ3N IITeKepaI TAM, rge ON BXoDIT B3aHIO JNAHEny UcpoiCTBA.
CteBov shyp cneyet oToeDnHbTb ot CTHHo pO3eTKN BO BpEmaIrpO3blnnncnp6OpocTabien HeCNPb3yeMbIM dInTeBHOeBpMa.
Icnoj3yIteToJbKO npHaNAdJeXHOctn, yKa3aHHbIe npOn3BovDHTenEM.
Icnobn3yte ToIbKO TeNekky, NoCTaBky, CToHky, KpOnHtEHH NIn NIOKy DoCTaTOHO CNlbHbIM, TOb6bl BbIdepKaTb 3OTn3dEHN. ByIbe OTe cToPOpKbH pN nppeMeUeHN pNbOpa H nOCTabKe IIN CToKe BO n36ExaHne paHeHn IN NIOBpeKdEHN 3dEJIa.
HemeJeHHo NpeKpaTHe IcNoJIb3OBAHHe KOMnoHEnTa I nepeJaTe Ha 06CneEOBaHHe n/IIn 06cnyKUBAHHe KBaIINΦmUPOBaHHO peMOHTHO opraH3aIe e cIi:
Ipo cyueeCTby, nIeep CD14 6bIIN cKoHcTpyuPoBaH c OJHO ueNo IeNoI eNoI eNoI eNoI eNoI eNoI eNoI eNoI eNoI eNoI eNoI eNoI eNoI eNoI eNoI eNoI eNoI eNoI eNoI eNoI eNoI eNoI eNoI eNoI eNoI eNoI eNoI eNoI eNoI eNoI eNoI eNoI eNoI eNoI eNOI eNoI eNoI eNoI eNoI eNoI eNoI eNoI eNoI eNoI eNoI eNoI eNoI eNoI eNoI eNoI eNoI eNoI eNoI eNoI eNoI eNoI eNoI eNoI eNoI eNoI eNoI eNoI eNoI eNoI eNoI eNoI eNoI eNo! Ie No! Ie No! Ie No! Ie No! Ie No! Ie No! Ie No! Ie No! Ie No! Ie No! Ie No! Ie No! Ie No! Ie No! Ie No! Ie No! Ie No! Ie No! Ie No! Ie No! Ie No! Ie No! Ie No! Ie No! Ie No! Ie NO! Ie NO! Ie NO! Ie NO! Ie NO! Ie NO! Ie NO! Ie NO! Ie NO! Ie NO! Ie NO! Ie NO! Ie NO! Ie NO! Ie NO! Ie NO! Ie NO! Ie NO! Ie NO! Ie NO! Ie NO! Ie NO! Ie NO! Ie NO! Ie NO! Ie No! Ie NO! Ie NO! Ie NO! Ie NO! Ie NO! Ie NO! Ie NO! Ie NO! Ie NO! Ie NO! Ie NO! Ie NO! Ie NO!
3To CbndetelbctByeT O TOM, 4TO B CD14 DeiCtBntelbNo IcnoIb3ObaHa BneuatIyouaJ 3JeMentHaa 6a3a. BbICOKKlaccnbl LAP - 3TO npOdyKT BCemnpHO n3BeCTHORo 6pUtaHckOrO npOn3BOJnteJIr Wolfson. 3To cTepeo LAP BBcOKoro Klacca CneuaJIbHO cKOHCTpynpOBaHHbl drr ayDIO npImMeHnI
Ecn n Dnck nonHocbBbIaH, OTo6paKaaETc HADnsc "No Disc". Ecn n Dnck 3aRpyKeH, Na dncnnei BbIOBDITc KOINueCTBO DOpOKe KnCKa N BpeM BOCnpON3BeDEHnB CERO DnCKa B MInHyTax n CeKyHdax.
Khonka PLAY 6
Korda nck 3a pyxhen, 3toi Khoonk 3aynckaetc Bocpon3bdeHne dncka.
B npoucece Bocpon3bdeHnna cncnne oTo6paKaet Homep Tekyuee dopoxkn
In Bpem, npowee c hauana ee Bocpon3bdeHn u CBeTNTc Nndnkatop
ecn do hakatra Khoonk PLAY > Bi By6paJn Dpyruyo dopoxKy Khoonkamn
TRACK n nn DIRECT ACCESS (cm. nke), Bocpon3bdeHne hauHeTc n Hee.
Khonka STOP 7E
Hakmnte Ha KhoNky STOP ⅡЯ octaHOBKn BOCnpo3BedeHnHaKmTe Ha KhoNky PLAY nIy Bo3O6HOBLeHnBocnpo3BedeHnC npexKeHrO MeCTa. EcIn DbaJxbl 6bICToPo HaxaTb KhoNky STOP, BOCnpo3BedeHnOe OCTaHaBnBaETc, Ha DcPnei BbBOINTCsA STOP').EcIn HaxaTb Ha KhoNky PLAY nocle DBykpaTHoro HaxaTn STOP, BOCnpo3BedeHnE DnCKa BHOb bHaHETcS c nepBoJ dopoXkn IIn C NaHaya pOrpamMbI (cm.HnZe).
KhoIIka PAUSE ⑥
BpeMeHHbI ocTaHOB BocnpoIN3BeHnI dNcKa.Inck npOdoJkaeT BpaaTbcS, PO3tOMy MoXHo BO3O6HOBnTB BOCnpoIN3BeHne C MeCTa, rge OHO 6blNO ocTaHOBJIeHO. Ha dinCpnee CBetITcN INdNKaTOP PAUSE. UTo6bl BO3O6HOBnTB BOCnpoIN3BeHne, HaxMITE Na KhoNkY PAUSE I nnI PLAY>.
KhoIKNTRACK ①
3TN KHNKIN CNOJb3yOTcI dIy Bb6opa TpeKOB Ha dIscke. Ecn nIeT BocnpOn3BedeHne Incka, TO haxaTne npabOY KHNKn TRACK▶Bbl3bIbaET nepexoN K Hauany cIeDyUoSeI dopoxKn. HaxaTne neBoi KHNKn TRACK▶ Bbl3bIbaET nepexoN K Hauany TeKyuSeI dopoxKn, a DBA 6bICTpbIX haxaTnI TRACK▶ NopdraN - K Hauany npdeMbNyUeI dopoxKn. Homep Bbl6paHHOJ dopoxKn oTo6paXaETcHa dIscPlee.
Bb6op dopoJCKM MoKHO npOn3BOOHTb KaK BO BpeM RAocpOn3BeDeHnra, TaK IN BpeKIMe OCTaHOBa HIN pOrpaMMPOBaHnra (CM. HNKe).HaXmMaIte He npepeBIOHO Na KhONKy TRACK, Noka He NoRABTcH yXhbl HomeP TpeKa.
KhoIIkN DIRECT ACCESS ①
monbkoHa nynbme
LHPOBbIe KNOKN, NOMeueHbIe OT "0" Do "9", NcNoJIb3yIOCTa dIg PnAmOTo Bb6opa DOpOxKc C NyIbTa, BMeCtO TORO, UTO6bI Do6uPaTbCg Do Hee nyTem nepe6opa c NmOoBIO KHOJOK TRACK.
Первьie DeBЯТbdoPoxKeK bIbIbIpaIOTcI npOCTbIM HaJxAITnEM KHONKn,HaIpymEp, yTO6bI bIb6PaTb TpeTbIO doPoxKky, HaNMIte KHNkY"3".
YtobbBb6paTb Dopoxkky c Homepom 6oJbwe 9, haxaTneM dBe znfoBbIe KHOPIK.
ПРМЕЧАНЕ:Эма к Honka>10 He ucnolbyemca 8 CD14.
Homep Bb6paHHoDopoxKNOtO6paKaTcHaNcPiIee.
KhoNk.SEARCH F
monbkoHa nylme
C nOMOJIbIO 3TINK KHOJOK OCUIeCTBJIaTeTc yCKOpEHHOE BOCnPOn3BeJeHne B HAnpaBHeHIM BpePeIINII HA3aI. PIno ONDHOkPAthOM HAKaTIIN, DICK DBIXeTc C NOBblIeHHoB 2X cKOpocTbIO. IN CblIeH 3ByK BlicOKOCKOPoCTHOrO CHTbIBAHNIA. PInn oNtOPhOM HAKaTIIN KHOJKN IpnO3OJTe NepExoD K nepemOTke CO CKOpocTbIO 4X i8X OT HopMaJIbHOH. HAKaTne KHOJKN PLAY BepHET Bac K HopMaJIbHOMy BOCnPOn3BeJeHInIO. B TO BpEMa KAK cyHNKUIN6bICTpOrO NoINCKa AKTINBHa, 6yIeT CblIeH 3ByK BlicOKOCKOPoCTHOrO CHTbIBAHNIA.
He CBETTcHnDkaTOp nHTaHn
Korda KhoNka nItaHnca CD14 haxata, n BnIka ero shhupa nItaHnB vCTaBneHa B cTeByIO po3eTky,doJXhbI CBETNbCry INDnKaTOP nItaHnI OCHOBhIE 3JIeMeHTbI dncnpe. EcIn OHn He CBeTAY TcR, npOBepbTe HAnuue HapraKeHnB CTeBOI po3eTKe DpyrIM 3JIeKTPoPnp6Opom, HanpImep, lamNoi. Y6eINTEcb, yTO po3eTKa HE KOHTPOIpnyTcRAkum-Il6O BbIKlOuaTeJeM, KOTopbI B daHHbI MOMEt BBkIIOUoyen.
3ameHa npedoxpaHnteIa
Ecnn dpyroon 3neKtpponp6op, nOdknIOeHHbK TToJ KToJKe po3eTke, pa6oTaet, a CD14 - HET, BO3MOxHNO, neperOpEn BHyTpEHHN PnIaBKn PnpEOxApaHTenb npOnrpbBaTeNa. B 3tOM cnyae o6paNTecb B aBTopn3OBaHHy O cepBunchHyoc Lyx6by Rotel dnerero 3ameHbl.
Het 3Byka
Поберп Кабели, посоединяшни ВьхOD CD14 K усilnteю; tot Ль BXOD Bьбан Ha усilnte; He BKIOUчEN li Ha усilntepexIM KOHTPONJI CUNHala, 3aINcblBaemoro Ha MaHRITofoh (Tape Monitor). Поберп Тамже посоединенue усilnteяК кOLOHKaM.
Texhnueckne xapaKtepncTnkn
2-11-4, Nakane, Meguro-ku,
Tokyo, 152-0031
Japan
Rotel of America
54 Concord Street
North Reading, MA 01864-2699
USA
Phone: +1 978-664-3820
Fax: +1 978-664-4109
Rotel Europe
Dale Road
Worthing, West Sussex BN1 2BH
England
Phone: +44 (0)1903 221 710
Fax: +44 (0)1903 221 525
Rotel Deutschland
- APPLICABLE FOR USA, CANADA OR WHERE APPROVED FOR THE USAGE
- This Class B digital apparatus complies with Canadian ICES-003.
- IMPORTANT FOR LASER PRODUCT
- WARNING!
- Notice
- FCC Information
- Caution
- Important Safety Instructions
- Important Notes
- When making connections be sure to:
- Remarques importantes
- About Rotel
- About the CD14
- Getting Started
- A Few Precautions
- Placement
- Control Identification
- AC Power and Control
- AC Power Input
- Power Switch 1A and POWER Indicator 2
- 12V Trigger Connection 14
- Output Connections
- Analog Outputs
- Digital Output
- Operation
- Infrared Remote Control
- Display
- Disc Tray 3
- Transport Control Buttons
- EJECT Button ⑨⑩
- PLAYButtonE
- STOP Button ⑦⑥
- PAUSEButton
- TRACK Buttons ①
- DIRECT ACCESS Buttons ⑥
- Remote Only
- SEARCH Button
- Additional Features
- PROGRAM Button ⑥
- RANDOM Button ⑥
- REPEAT Button ⑥
- TIME Button ⑥
- RS232 12
- Rotel Link 13
- Remote Control Advanced Buttons
- MENUButton
- DIM Button ©
- Troubleshooting
- Power Indicator Is Not Illuminated
- Fuse Replacement
- No Sound
- Specifications
- Bouton SEARCH (RECHERCHE) ⑥
- WICHTIG FÜR LASERPRODUKTE
- ALGEMENE WAARSCHUWING!
- CLASS 1 LASER PRODUCT
- IMPORTANT INFORMATION PER I PRODOTTI LASER
- BAXHBIE 3AMEUAHN OTHOCITEJIbHO JIA3EPA
- 3ameyahne
- HΦopmaζη FCC no ΝλeKtpomarHHTHO COBmecTHMocTn
- IpeodoctepexeHne
- Baxkhble uHcTpyKuzn no 6e3oNaChoctn
- Khonka PLAY 6E
- Khonka STOP 7E
- KhoIIka PAUSE ⑥
- KhoIKNTRACK ①
- KhoIIkN DIRECT ACCESS ①
- KhoNk.SEARCH F
- He CBETTcHnDkaTOp nHTaHn
- 3ameHa npedoxpaHnteIa
- Het 3Byka
- Texhnueckne xapaKtepncTnkn
- Rotel of America
- Rotel Europe
- Rotel Deutschland
Brand : ROTEL
Model : CD14
Category : CD player