
AES800 - Home Appliance BESTRON - Free user manual and instructions
Find the device manual for free AES800 BESTRON in PDF.

| Product type | Espresso machine |
| Brand | Bestron |
| Model | AES800 |
| Color | Not specified (usually stainless steel or black plastic) |
| Water tank capacity | 240 ml |
| Pressure | Not specified (usually 15 bars) |
| Power | Approximately 1000 W (estimate) |
| Voltage | 220-240 V (according to rating plate) |
| Main functions | Espresso, steam (cappuccino, heating liquids) |
| Auto shut-off | Yes, after about 25 minutes |
| Safety | Auto shut-off, portafilter lock, overheating protection |
| Materials | Plastic and metal (steam wand, drip tray) |
| Spare parts | Filter, portafilter, pitcher, steam wand, water tank |
| Cleaning | Removable parts dishwasher safe; body wipe with damp cloth |
| Descaling | Recommended regularly with commercial descaling agent |
| Warranty | 60 months (5 years) from date of purchase |
| Intended use | Domestic |
| Included accessories | Graduated pitcher, measuring spoon with tamper |
| Cup capacity | Minimum 180 ml for cappuccino |
| Dimensions | Not specified (estimate: approx. 25 x 25 x 30 cm) |
| Weight | Not specified (estimate: approx. 3 kg) |
Frequently Asked Questions - AES800 BESTRON
User questions about AES800 BESTRON
0 question about this device. Answer the ones you know or ask your own.
Ask a new question about this device
Download the instructions for your Home Appliance in PDF format for free! Find your manual AES800 - BESTRON and take your electronic device back in hand. On this page are published all the documents necessary for the use of your device. AES800 by BESTRON.
USER MANUAL AES800 BESTRON
natural_image
Black and white photo of a BESTRON VIVA ITALIA 800 electric cream maker with open lid and glass cup (no visible text or symbols)


AES800 INSTRUCTION MANUAL
DE
Bedienungsanleitung
FR
Mode d'emploi
NL
Handleiding
EN
Instruction manual
IT
R. Neyman Quality control
FUNKTIONSWEISE - Allgemein
DÉCLARATION DE CONFORMITÉ CE
R. Neyman
Contrôle qualité
WAT U MOET WETEN OVER DIT APPARAAT
R. Neyman Quality control
WERKING - Algemeen
WERKING - Espresso maken
Congratulations with the purchase of this Bestron product. These instructions tell you how the product works and how to use it. Read the instructions carefully before you start using the appliance. Only use the appliance in the manner described in the instructions. Keep these instructions in a safe place for future reference.
Defects:
If the appliance is defective, do not try to repair it yourself. Always have a qualified mechanic carry out any repairs.
Children:
- This appliance may be used by children over the age of 8 years old and persons with reduced physical, sensory or mental capabilities or lack of experience and know-how, but only if supervised or if they have been instructed on how to use the appliance safely and are aware of its potential dangers.
• Children are not allowed to clean and maintain the appliance, except if they are over the age of 8 years old and supervised. - Keep the appliance and the cable out of reach of children under the age of 8 years old.
- Keep an eye on children to ensure that they do not play with the appliance.
WHAT YOU SHOULD KNOW ABOUT ELECTRICAL APPLIANCES
- Check that the mains voltage corresponds with that shown on the rating plate of an electrical appliance before you use it.
- Check that the socket to which you connect the electrical appliance is earthed.
- Always install electrical appliances on a stable and level surface where it cannot fall over.
- Certain parts of an electrical appliance may become warm or sometimes hot. Do not touch them as you may burn yourself.
- Make sure your hands are dry when you touch an electrical appliance, a cord or a plug.
- Electrical appliances must be able to lose their heat to avoid fire hazards. Therefore, make sure that the appliance has sufficient clearance around it and that it does not come into contact with flammable materials. Electrical appliances must never be covered.
-
Make sure that electrical appliances, cords or plugs do not come into contact with water.
-
Never immerse electrical appliances, cords or plugs in water or any other liquid.
- Do not touch electrical appliances if they have fallen in the water. Immediately pull the plug out of the socket. Stop using the appliance.
• Make sure that electrical appliances, cords and plugs do not come into contact with heat sources, such as a hot hob or open fire. - Never let cords hang over the edge of the sink, a worktop or a table.
- Always remove plug from the socket when you are not using the electrical appliance.
- Remove the plug from the socket by pulling the plug itself and not the cord.
- Regularly check if the cord of the electrical appliance is not damaged. Do not use the electrical appliance if the cord shows signs of damage. If the cord is damaged, it should be replaced by the manufacturer, a technical service provider or a person with an equivalent qualification, to avoid any danger.
- The appliance may not be switched on with the aid of an external time switch, or by a separate system with remote control.
WHAT YOU SHOULD KNOW ABOUT THIS APPLIANCE
- Be careful when using the appliance outdoors.
- Never use the appliance in damp or wet locations.
- Thoroughly clean the appliance after use (see Cleaning and Maintenance).
ENVIRONMENT

- Dispose of packaging material such as plastic and cardboard boxes in the designated containers.
- Do not dispose of this product as normal domestic waste at the end of its life, but hand it in at a collection point for the reuse of electric and electronic equipment. Look for the symbol on the product, the user instructions or the packaging showing the type of waste.
- The materials can be used as indicated. By helping us reuse and process the materials or otherwise recycle the old equipment, you will be making an important contribution towards the protection of the environment.
- Your municipality can tell you where to find the designated waste collection point in your neighbourhood.
CE DECLARATION OF CONFORMITY
This product meets the requirements of European guidelines.

R. Neyman Quality control
OPERATION - General
The expresso machine is only intended for household use.
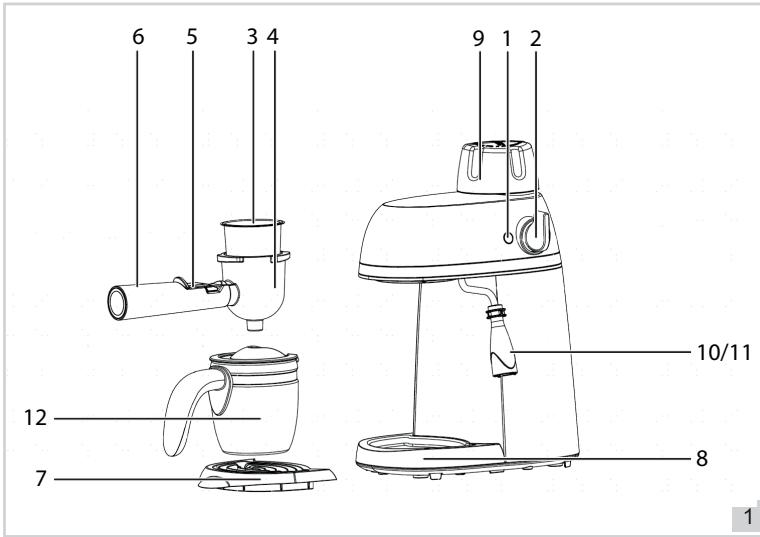
- Indicator light
- Selector switch
- Filter
- Filter holder
- Locking clip
- Filter holder handle
- Drip plate
- Drip tray
- Water reservoir cap
- Steam nozzle
- Protective nozzle
- Jug
OPERATION - Before first use
- Remove the packaging.
- Clean the device. See 'Cleaning and maintenance'.
NOTE:
If the machine is new or you have not used it for a long time, first use it two or three times with just water, no coffee. Please follow the regular user instructions below. Throw away the water afterwards.
OPERATION - Preheating
To make a good hot espresso, we recommend preheating the machine (the filter holder, the filter and the cup) so that the coffee taste cannot be affected by the cold parts.
- Twist the cap (9) off the water reservoir and fill it with up to 240 ml of water. Use the jug with the scaling for this. Firmly close the cap.
- Place the filter (3) in the filter holder (4). Then insert the filter holder into the unit from the INSERT position and turn to the LOCK position.
- Place the jug (12) on the drip plate (7).
- Then connect the device to an electrical outlet. Make sure the selector switch (2) is in the OFF position.
- Move the selector switch to the ESPRESSO position (left). The indicator light (1) turns on.
The brewing process begins. After some time, the jug fills up with hot water.
Note: hot steam is generated during brewing! Parts of the device also get hot. Don't burn yourself!
-
Turn the selector switch to the OFF position when there is no more water coming out of the device. The indicator light turns off. The device is now preheated.
-
Pour the hot water from the jug into the cups.
OPERATION - Making espresso
- Open the cap of the water reservoir and fill the reservoir (careful as the reservoir is hot!) with up to 240 ml of water. Firmly close the cap.
- Remove the filter holder by rotating it to the INSERT position.
- Remove the filter from the filter holder and add ground coffee to the filter with the measuring spoon. Lightly press the coffee with the pestle side of the measuring spoon.
- Place the filter in the filter holder. Then insert the filter holder into the unit from the INSERT position and turn to the LOCK position.
- Remove the hot water (from the preheating) from the cups and jug.
- Place the jug on the drip plate.
- Move the selector switch to the ESPRESSO position (left). The indicator light turns on.
The brewing process begins. After a while, the jug fills up with hot espresso.
Note: hot steam is generated during brewing! Parts of the device also get hot. Don't burn yourself!
-
Turn the selector switch to the OFF position when there is no more water coming out of the device. The indicator light turns off.
-
Pour the hot espresso from the jug into the cups.
-
Unplug the power cord when you are finished.
OPERATION – Emptying filter
- Remove the filter holder by rotating it to the INSERT position.
- Use the locking clip (5) to hold the filter and then tap it empty.
- Allow the filter holder and filter to cool down completely and then rinse clean under the tap.
OPERATION - Frothing milk/Making cappuccino
To make cappuccino, add frothed milk to the espresso.
- First make the espresso (see chapter Making espresso) in a mug with a minimum capacity of 180 ml.
- Fill a jug with approx. 100 ml of milk.
- Hold the steam nozzle (10) approx. 2 cm in the milk and move the selector switch to the STEAM position (right). The indicator light turns on.
- Foam the milk by moving the jug up and down in a rotary movement.
- When the milk has frothed sufficiently, turn the selector switch to the OFF position.
- Pour the frothed milk over the espresso to make a delicious cappuccino.
- Unplug the power cord when you are finished.
OPERATION - Heating fluids
The steam function can also be used to heat drinks. For example, turn cold chocolate milk into a steaming hot cup of chocolate in no time.
- Open the cap of the water reservoir and fill the reservoir (careful as the reservoir is hot!) with up to 240 ml of water. Firmly close the cap.
- Fill a jug or a mug with the desired liquid to be heated.
- Hold the steam nozzle approx. 2 cm in the liquid and move the selector switch to the STEAM position (right). The indicator light turns on.
- Heat the liquid by moving the jug or mug up and down in a rotary movement.
- When the liquid is sufficiently heated, turn the selector switch to the OFF position.
- Unplug the power cord when you are finished.
NOTE:
• Make sure you work carefully, as the hot steam can cause burns.
- The recommended diameter for the jug to froth milk is 70 mm or larger. This is because the milk doubles in volume during frothing.
- Clean the steam nozzle and protective nozzle immediately after use.
- If you have used all the water in the reservoir for the espresso, refill the reservoir with water for steaming.
OPERATION – Automatic switch-off
If you forget to move the selector switch to the OFF position, the unit will automatically switch off after approx. 25 minutes. Turn the selector switch to the OFF position and then to ESPRESSO or STEAM to turn the device on again.
CLEANING AND MAINTENANCE - Cleaning after use
Thoroughly clean the device and the loose parts after each use:
- Unplug the power cord.
- Allow the device and the loose parts to cool down.
- Clean the housing with a damp cloth. Then dry thoroughly with a dry cloth.
- All loose parts are dishwasher safe.
- If the holes in the filter are clogged, use a needle or toothpick to puncture them.
- Store the device in a dry place.
NOTE:
- Do not use aggressive or abrasive cleaning agents or sharp objects (such as knives or hard brushes) when cleaning.
• Never immerse the base in water or any other liquid.
CLEANING AND MAINTENANCE - Descaling
Lime scale builds up, especially in hard water areas. This can cause the filter and pipes in the device to become clogged. Therefore, descale the device regularly. Proceed as follows:
- Fill the water reservoir with water and descaler with a maximum of 240 ml. Check the packaging of the descaler for the correct ratio.
- Place a container with a minimum capacity of approx. 240 ml under the filter holder.
- Set the selector switch to the ESPRESSO position and wait until all the water from the device has run into the container.
- Then set the selector switch to the OFF position and empty the container.
- Repeat the above process twice.
- Then repeat the above process three more times without descaler (so only with clean water) to rinse the appliance clean.
WARRANTY CONDITIONS
Bestron offers a 60-month warranty on this equipment against defects resulting from manufacturing and/or material errors, subject to the following conditions.
- No labour or material costs will be charged during this warranty period.
- Any repairs carried out under the warranty will not extend the warranty period.
- Faulty parts, or in the event of exchange, the faulty equipment itself, will automatically become the property of Bestron.
- The warranty is valid for the first buyer only and is non-transferable.
-
The warranty is not valid for damage caused by:
-
Accidents
- Improper use
- Wear and tear
- Neglect
-
Faulty installation
• Connection to a different mains voltage than indicated on the type plate
• Unauthorised changes
• Repairs carried out by unqualified third parties
• Use in violation with the applicable statutory, technical or safety standards
• Careless transport without suitable packaging or other protection -
Warranty cannot be claimed:
• For damage during transport
• If the serial number of the appliance is removed or changed
-
Items excluded from warranty are:
-
Cords
- Lamps
-
Glass parts
-
The warranty does not entitle the purchaser to compensation for any damage other than replacement or repair of the faulty parts. Bestron cannot in any event be held liable for any indirect or consequential losses caused by or in relation to the equipment it has provided.
- Claims under a warranty may only be submitted to your (online) retailer or directly to the Bestron Service Department. Never send items without being asked to. We may refuse the parcel and you will be liable for the costs. Contact us first and we tell you how the appliance should be packaged and sent.
Each claim under a warranty must be accompanied by the relevant receipt.
SERVICE
If an unexpected problem occurs, please contact the BESTRON service department:
www.bestron.com/service
COMPLIMENTI!
R. Neyman
Controllo qualità
NEED HELP? CHAT WITH US! WHATSAPP CUSTOMER SERVICE

BESTRON.COM/WHATSAPP