
ACM901T - Coffee machine BESTRON - Free user manual and instructions
Find the device manual for free ACM901T BESTRON in PDF.


| Product type | Filter coffee machine |
| Brand | Bestron |
| Model | ACM901T |
| Dimensions (W x D x H) | 25 x 20 x 30 cm |
| Weight | 1.5 kg |
| Power supply | 220-240 V ~ 50/60 Hz, 1000 W |
| Carafe capacity | 1.25 L (10 cups) |
| Coffee type | Ground coffee |
| Permanent filter | Yes, washable |
| Automatic shut-off | Yes, after 40 minutes |
| Keep warm | Yes, hot plate |
| Indicator light | Yes, power-on |
| Housing material | ABS plastic |
| Color | Black / Silver |
| Noise level | < 55 dB |
| Power cord length | 0.8 m |
| Maintenance | Descale every 3 months |
| Spare parts available | Carafe, permanent filter, gasket |
| Warranty | 2 years |
| Repairability index | 7.2 / 10 (estimate) |
Frequently Asked Questions - ACM901T BESTRON
User questions about ACM901T BESTRON
0 question about this device. Answer the ones you know or ask your own.
Ask a new question about this device
Download the instructions for your Coffee machine in PDF format for free! Find your manual ACM901T - BESTRON and take your electronic device back in hand. On this page are published all the documents necessary for the use of your device. ACM901T by BESTRON.
USER MANUAL ACM901T BESTRON
natural_image
Line drawing of a modern coffee maker with a kettle and side arm (no text or symbols)natural_image
Line drawing of a simple outdoor sink with a filter and handle (no text or symbols)R. Neyman Quality control
natural_image
Line drawing of a simple outdoor table with a conical hopper and side table (no text or symbols)natural_image
Line drawing of a simple outdoor table with a filter and handle (no text or symbols)CONDITIONS DE GARANTIE
DÉCLARATION DE CONFORMITÉ CE
SAFETY INSTRUCTIONS - General
- Please read these instructions carefully and retain them for future reference.
- Use this appliance solely in accordance with these instructions.
- This appliance can be used by children older than 8 years and persons with reduced physical, sensory or mental capabilities or lack of experience and knowledge, but only if they have been given supervision or instruction concerning use of the appliance in a safe way and understand the hazards involved.
• Children should be supervised to ensure that they do not play with the appliance. - Cleaning and maintenance must not be done by children, except if they are older than 8 years and supervised.
- Keep the appliance and the cable out of reach of children under 8 years.
• Have any repairs carried out solely by a qualified electrician. Never try to repair the appliance yourself.
SAFETY INSTRUCTIONS - Electricity and heat

Certain parts of the appliance may get hot. Not touch these parts to prevent burning yourself.
- Verify that the mains voltage is the same as that indicated on the type plate on the appliance before use.
- Plug the appliance only into an earthed wall socket.
• Always remove the plug from the socket when the appliance is not in use.
• Always remove the plug from the wall socket by pulling on the plug, not the power cord. - Check the appliance's power cord regularly to make sure it is not damaged. Do not use the appliance if the power cord is damaged. Have a damaged power cord replaced by a qualified service department.
- When using an extension lead always make sure that the entire cable is unwound from the reel.
• Use solely approved extension leads. - Certain parts of the appliance can become hot. Do not touch them, as you may burn yourself.
- The appliance needs space to allow heat to escape, thereby preventing the risk of fire. Make sure that the appliance has sufficient space around it, and does not come in contact with flammable material. The appliance must not be covered.
- Never use the appliance in the vicinity of flammable materials.
- Make sure that the appliance and the power cord do not come in contact with sources of heat, such as a hot hob or naked flame.
• Make sure that the appliance, the power cord and plug do not come in contact with water.
SAFETY INSTRUCTIONS - During use
- Never use the appliance outdoors.
- Never allow the power cord to hang over the edge of the draining board, worktop or table.
• Make sure that your hands are dry before touching the appliance, cable or plug. - Never use the appliance in a humid room.
- Never immerse the appliance, the plug or the power cord in water or other liquid.
- Do not pick up the appliance if it falls into water. Remove the plug from the wall socket immediately. Do not use the appliance any more.
- This appliance may not be used through an external timer or by means of a remote control.
OPERATION - General
The appliance is intended only for domestic use, not for professional use.

- Water reservoir lid
- Filter holder lid
- Water level indicator
- Filter holder
- Glass jug lid
- Glass jug
- Jug grip
-
Keep-warm plate
-
On/off button
- Auto button
- Program button
- Hour button
- Minute button
- Display
- Indicator light 'Heating'
- Indicator light 'Timer'
OPERATION - Setting the time
Before using the coffee maker you need to set its clock to the correct time.
- Put the plug into the socket. The display (14) now shows "12:00".
- Press the program button (11) until the time in the display starts blinking.
- Press the hour button (12) to enter the correct hour. Every time you press the button the time will be adjusted by a single hour. You may also keep the button the pressed to adjust the hours more quickly.
- Press the minute button (13) to enter the correct minute. Every time you press the button the time will be adjusted by a single minute. You may also keep the button the pressed to adjust the minutes more quickly.
- The entered time will be blinking on the display. Press the on/off button (9) to save the entered time. The correct time has now been set.

The coffee maker's clock uses the 24-hour format.
OPERATION - Before first use
Clean the appliance a couple of times by filling it with water only. Please observe the following instructions. Dispose of the water after use.
OPERATION - Brewing coffee
- Open the water reservoir lid (1). Pour an ample amount of water into the reservoir (no less than 2 and no more than 12 cups).
- Open the filter lid (4).
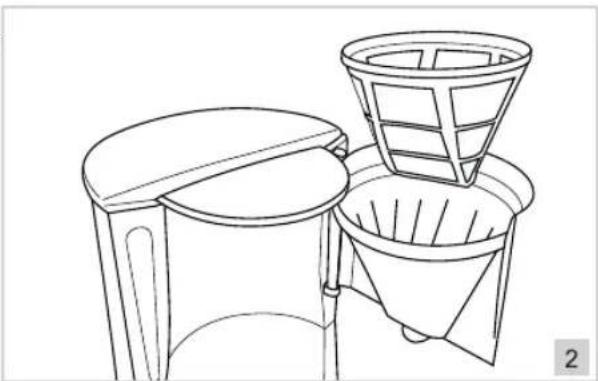
The coffee maker includes a permanent filter (See image 2). There is no need to use a paper filter. However, if you do wish to use paper filters, you are able to place a paper filter (1x4) in place of the permanent filter.
- Fill the filter with the desired amount of ground coffee. (usually 1 level measuring scoop per cup).
- Close the filter lid.
- Place the glass jug (6) onto the keep-warm plate (8).
- Press the on/off button (9) to turn on the appliance. The red 'Heating' indicator light (15) lights up. The coffee is being brewed.
natural_image
Line drawing of a simple outdoor setup with a hopper and side table (no text or symbols)During coffee brewing:
• The pause-and-serve function enables you to pour a cup of coffee before the coffemaker has finished. Replace the carafe quickly, to prevent the filter from overflowing.
- The lid is hot when the appliance is turned on! Be careful when opening the lid during use. The hot steam can cause burns.
- If you wish to halt the brewing prematurely you will need to push the on/off switch.
After coffee brewing:
• The hot plate keeps the coffee warm for 35 minutes.
• After 35 minutes of keeping warm, the appliance will automatically shut off.
OPERATION - Programming the coffee maker for a later time
When you have set the appliance's clock to the correct time, you can program it to brew coffee at a later time
- Press the program button (11). In the display (14) the word "SET" appears.
- Press the hour button (12) to enter the correct hour. Every time you press the button the time will be adjusted by a single hour. You may also keep the button the pressed to adjust the hours more quickly.
- Press the miute button (13) to enter the correct minute. Every time you press the button the time will be adjusted by a single minute. You may also keep the button the pressed to adjust the minutes more quickly.
- The entered time will now be blinking on the display. After a few seconds, it will stop blinking and the current time will reappear on the display.
- Press the auto button (10). The green 'Timer' indicator light (16) lights up.
The timer has now been set. At the entered time, the coffee maker will start brewing coffee. The red 'Heating' indicator light (15) will then light up.
Please note: if power to the device is cut, the programming will be lost and the time will have to be entered again.
CLEANING AND MAINTENANCE
- Switch off the appliance
- Remove the plug from the wall socket, and if necessary allow the appliance to cool.
- Remove the filter holder from the device, and clean it under running water.
- Clean the carafe in hot washing-up water, or put it in a dishwasher.
- Clean the outside of the appliance with a damp cloth and washing-up liquid. Make sure no moisture gets into the appliance.

- Dry the inside of the device after use. This prolongs the durability of your device.
Never immerse the appliance, plug or power cord in water. Never put the appliance in a dishwasher. Only the loose parts may be immersed in water. - Never use corrosive or scouring cleaning agents or sharp objects (such as knives or hard brushes) to clean the appliance.
CLEANING AND MAINTENANCE - Descaling
Limescale can reduce the efficiency of your coffee maker. Limescale is common in areas with hard water. We advise the use of a suitable descaling agent to remove any scale. Always follow the instructions for the descaling agent. The amount of scale will be reduced when you use a water softener.
THE ENVIRONMENT

- Dispose of packaging material, such as plastic and boxes, in the appropriate waste containers.
When this product reaches the end of its useful life do not dispose of it by putting it in a dustbin; hand it in at a collection point for the reuse of electrical and electronic equipment. Please refer to the symbols on the product, the user's instructions or the packaging.
- The materials can be re-used as indicated. Your help in the re-use, recycling or other means of making use of old electrical equipment will make an important contribution to the protection of the environment.
- Contact your municipality for the address of the appropriate collection point in your neighbourhood.
GUARANTEE TERMS
The importer guarantees the appliance against defects caused by manufacturing and/or material faults for 60 months from the date of purchase, subject to the following conditions.
- No charges will be made for labour costs or materials during the warranty period. Any repairs carried out during the warranty period do not extend the warranty period.
- The importer automatically becomes the owner of any faulty parts that he replaces or a faulty appliance (in the event of replacement of the appliance).
- All claims submitted under warranty must be accompanied by the original bill of sale.
- Claims under warranty must be submitted to the dealer where the appliance was purchased or to the importer.
- The warranty is issued solely to the first purchaser and cannot be transferred.
- The warranty does not cover damage caused by:
a. Accidents, incorrect use, wear and/or neglect.
b. Faulty installation and/or use in a manner contravening the prevailing legal, technical or safety regulations.
c. Connection to a mains voltage other than the voltage specified on the type plate.
d. Unauthorized modifications.
e. Repairs carried out by third parties.
f. Careless transport, i.e. without suitable packaging materials or protection.
- No claims may be made under this warranty for:
a. Losses incurred during transport.
b. The removal or changing of the appliance's serial number.
- The guarantee does not cover power cords, lamps or glass parts.
- No claims can be submitted under this warranty for damage other than the repair or replacement of faulty parts. The importer can never be held responsible for any consequential loss or damage or any other consequences, resulting either directly or indirectly from the appliance supplied by the importer.
- In case of claims under guarantee you can contact your dealer where the appliance is purchased. Bestron offers you also the possibility to send the appliance directly to our Service Department. Do not send your appliance without consulting us. The package may be refused and any costs will be for your account. Please contact the Service Department and they will tell you how to pack and send the appliance.
- This appliance is not suitable for professional use.
SERVICE
If a fault should occur please contact the BESTRON service department: www.bestron.com/service
CE DECLARATION OF CONFORMITY
This product conforms to the essential requirements of the following EU safety directives:
• EMC Directive 2004/108/EC
• Low Voltage Directive 2006/95/EC

R. Neyman Quality control
natural_image
Line drawing of a simple outdoor table with a coffee hopper and side table (no text or symbols)
natural_image
Line drawing of a simple outdoor table with a conical hopper and side table (no text or symbols)


- CONDITIONS DE GARANTIE
- DÉCLARATION DE CONFORMITÉ CE
- SAFETY INSTRUCTIONS - General
- SAFETY INSTRUCTIONS - Electricity and heat
- SAFETY INSTRUCTIONS - During use
- OPERATION - General
- OPERATION - Setting the time
- OPERATION - Before first use
- OPERATION - Brewing coffee
- During coffee brewing:
- After coffee brewing:
- OPERATION - Programming the coffee maker for a later time
- CLEANING AND MAINTENANCE
- CLEANING AND MAINTENANCE - Descaling
- THE ENVIRONMENT
- GUARANTEE TERMS
- SERVICE
- CE DECLARATION OF CONFORMITY
Brand : BESTRON
Model : ACM901T
Category : Coffee machine