USER MANUAL IK321BR ELECTROLUX
$$
A = \max. 4 3 m m
$$
Compartment congestion
Compartment congélateur
$$
A = \max 4 3 m m
$$
Description of the appliance. 74
Safety instructions and warnings 75
Range of appliance use. 75
Climate rating 76
Setting up 76
Electrical connection 76
Saving energy 76
Operating and control elements 77
Switching the appliance on and off 77
Setting the temperature. 77
Door open alarm. 78
Temperature alarm 78
Power failure display 78
Child lock. 78
Equipment 79
Interior light. 79
Cooling. 80
ActionCool. 80
Freezing. 80
ActionFreeze 80
Defrosting. 81
Cleaning. 82
Malfunctions 82
Shutting your appliance down 82
Supplied accessories 83
Changing over door hinges 84
Limiting the door opening angle to 90^ 88
Adjusting the resilience of the hinges. 88
Installation options 88
Door panel design 89
Appliance dimensions 90
Installation dimensions. 90
Appliance venting. 91
Installing the appliance. 91
Disposal notes
The appliance contains reusable materials and should be disposed of properly - not simply with unsorted household refuse. Appliances which are no longer needed must be disposed of in a professional and appropriate way, in accordance with the current local regulations and laws.
When disposing of the appliance, ensure that the refrigerant circuit is not damaged to prevent uncontrolled escape of the refrigerant it contains (data on type plate) and oil.
- Disable the appliance.
- Pull out the mains plug.
- Cut through the connection cable.
WARNING
Danger of suffocation due to packing material and plastic film!
Do not allow children to play with packaging material.
Take the packaging material to an official collection point.
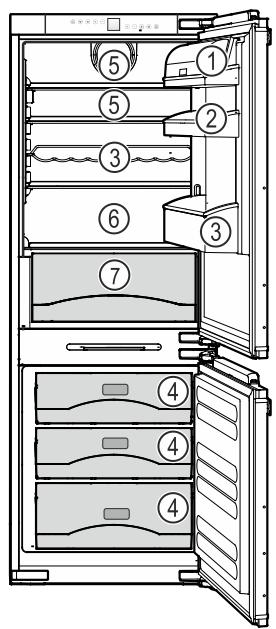
Description of the appliance
① Operating and control elements
② Butter and cheese compartment
③ Adjustable door rack
④ Freezer compartment
(5) Sectioned shelf
⑥ Adjustable shelf
⑦ Bottle grid
⑧ Vegetable drawer
(9) Type plate (next to the drawer on the interior container)
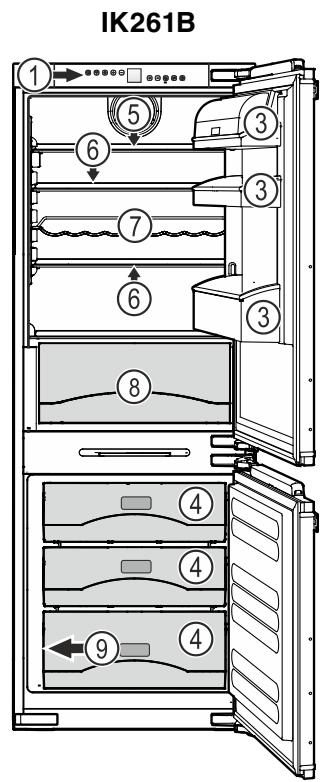


IK321B / IK323B
Safety instructions and warnings
- To prevent injury or damage to the unit, the appliance should be unpacked and set up by two people.
- In the event that the appliance is damaged on delivery, contact the supplier immediately before connecting to the mains.
- To guarantee safe operation, ensure that the appliance is set up and connected as described in these operating instructions.
- Disconnect the appliance from the mains if any fault occurs. Pull out the plug, switch off or remove the fuse.
- When disconnecting the appliance, pull on the plug, not on the cable.
- Any repairs and work on the appliance should only be carried out by the customer service department, as unauthorised work could prove highly dangerous for the user. The same applies to changing the mains power cable.
- Do not allow naked flames or ignition sources to enter the appliance. When transporting and cleaning the appliance, ensure that the refrigerant circuit is not damaged. In the event of damage, make sure that there are no ignition sources nearby and keep the room well ventilated.
- Do not stand on the plinth, drawers or doors or use them to support anything else.
- This appliance can be used by children of 8 years old and over, and also by persons with restricted physical, sensory or mental capacity or lack of experience and knowledge, if they are supervised or have been instructed on safe use of the appliance and understand the resulting risks. Children must not be allowed to play with the appliance. Cleaning and user maintenance must not be carried out by children without supervision.
- Avoid prolonged skin contact with cold surfaces or chilled/frozen food. This could cause pain, numbness and frostbite. In the case of prolonged skin contact, protective measures should be taken, e.g. gloves should be worn.
-
Do not eat ice cream, particularly ice lollies or ice cubes, immediately after taking them from the freezer compartment as there is a risk of "burning" because of the very cold temperatures.
-
Do not consume food which has been stored for too long, as it could cause food poisoning.
- Do not store explosives or sprays using combustible propellants such as butane, propane, pentane, etc. in the appliance. Electrical components might cause leaking gas to ignite. You may identify such sprays by the printed contents or a flame symbol.
- Do not use electrical appliances inside the appliance.
- The LED light strip illuminates the interior of the appliance. It is not suitable for lighting a room.
Range of appliance use
The appliance is suitable solely for cooling food in a domestic environment or similar.
This includes, for example, use
- in staff kitchenettes, bed and breakfast establishments,
- by guests in cottages, hotels, motels and other forms of accommodation,
- in catering and similar services in the wholesale trade.
Use the appliance solely as is customary within a domestic environment. All other types of use are inadmissible.
The appliance is not suitable for storing and cooling medicines, blood plasma, laboratory preparations or similar substances and products covered by the 2007/47/EC Medical Devices Directive. Any misuse of the appliance may result in damage to or spoilage of stored goods.
Furthermore, the appliance is not suitable for operation in potentially explosive atmospheres.
Climate rating
The climate rating indicates the room temperature at which the appliance may be operated in order to achieve full refrigeration performance.
The climate rating is indicated on the type plate.
The position of the type plate is shown in the section entitled Description of the appliance.

Climate rating Room temperature
SN-T +10^ to +43^
Do not operate the appliance outside the specified room temperature range.
Setting up
- Standard EN 378 specifies that the room in which you install your appliance must have a volume of 1m^3 per 8g of R 600a refrigerant used in the appliance, so as to avoid the formation
of inflammable gas/air mixtures in the room where the appliance is located in the event of a leak in the refrigerant circuit. The quantity of refrigerant used in your appliance is indicated on the type plate on the inside of the appliance.
- Only use the appliance when it is installed.
- Do not cover ventilation openings or grille.
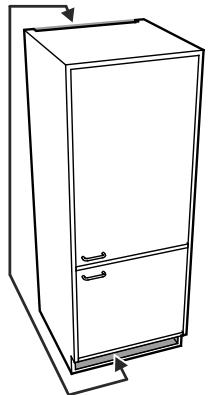
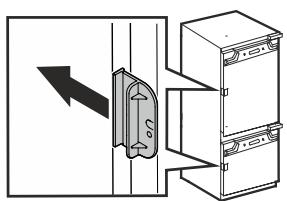
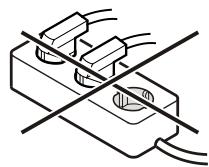
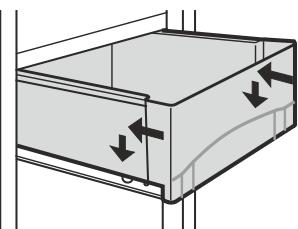
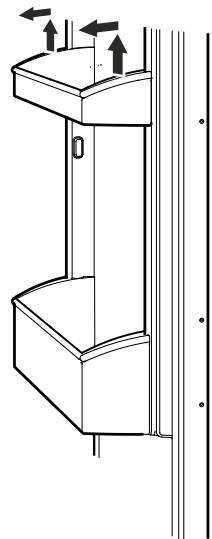
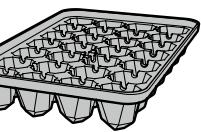
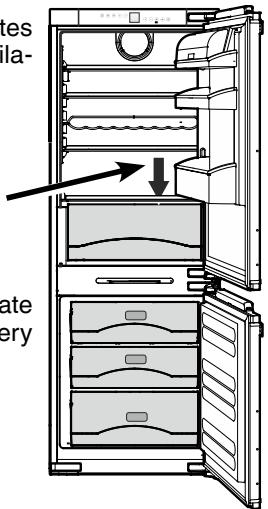
Removing the transportation safety component
Electrical connection
Only operate the appliance with alternating current (AC).
The permissible voltage and frequency are indicated on the type plate. The position of the type plate is shown in the section entitled Description of the appliance.
The socket must be properly earthed and protected by a fuse.
The tripping current of the fuse must be between 10 A and 16 A.
The socket must not be situated behind the appliance and must be easily accessible.
Do not connect the appliance using an extension cable or extension socket.
Do not use stand-alone inverters (conversion of direct current to alternating current/three-phase current) or energy-saving plugs. Risk of damage to the electronic control system!
Saving energy
- Always ensure good ventilation. Do not cover ventilation openings or grille.
- Do not place the appliance in areas of direct sunlight or next to a cooker, radiator or similar object.
- The energy consumption depends on the installation conditions, e.g. the ambient temperature.
- Keep the time the appliance is open to a minimum.
- Store food logically.
- First cool warm food to room temperature before storing it.
- Defrost frozen food in the refrigerator.
Freezer compartment
- Ensure that all food is well packed and covered for storage. This will prevent frost from forming.
- If there is a thick layer of frost in the appliance: defrost the appliance.
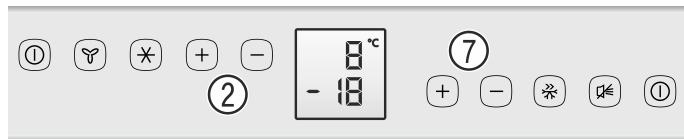
Operating and control elements
The electronic control panel features the "touch capacitance technology".
Any function can be activated by touching the corresponding icon.
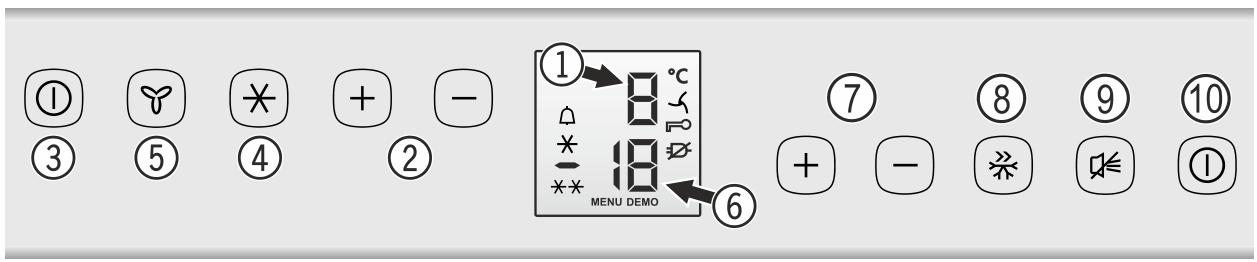
① Temperature display (refrigerator compartment)
② Temperature setting buttons (refrigerator compartment)
③ On/Off button (refrigerator compartment)
④ Action Cool button (the Action Cool button switches the refrigerator compartment to maximum cooling)
⑤ Fan button
⑥ Temperature display (freezer compartment)
⑦ Temperature setting buttons (freeze compartment)
⑧ ActionFreeze button
(9) Mute alarm (refrigerator and freezer)
⑩ On/Off button (refrigerator and freezer)
Switching the appliance on and off
Switching the appliance on
Press the On/Off button ①
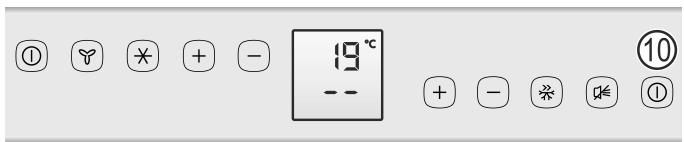
The refrigerator temperature display shows the current interior temperature.
The freezer temperature display shows two dashes.
The current temperature value in the freezer is only displayed once the interior temperature reaches 0^ .
Note
The refrigerator can be switched off (freezer remains switched on).
Switching the refrigerator compartment off
Press the On/Off button ③ for approx. 3 seconds.
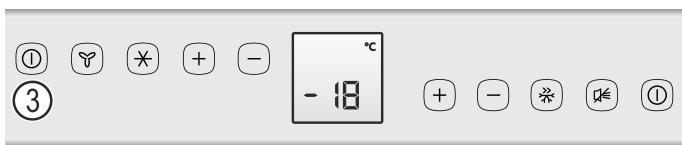
Switching the appliance off
Press the On/Off button (19) for approx. 3 seconds.
Symbols in the display
MENU Setup mode is activated (activating the child lock)
Child lock is activated
ActionCool ON symbol
Fan ON symbol
DEMO Demo mode is activated
Alarm (symbol flashes if the temperature inside the appliance is too high)
Power failure symbol
ActionFreeze is on
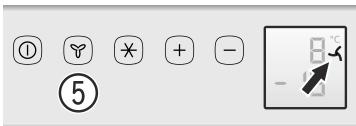
Setting the temperature
The temperature of the refrigerator and freezer compartment can be set separately.
Setting the refrigerator temperature
Press buttons ②.
Setting the freezer temperature
Press buttons ⑦.
- When pressing one of the buttons for the first time, the display will start to flash.
- Pressing this button again enables you to change the temperature setting.
Use button + to reduce the temperature = colder.
Use button - to increase the temperature = warmer.
- The electronic control system will switch over automatically about 5 seconds after the last time you pressed the button, and the actual temperature will be displayed.
If F0 to F9 appears in the display, the appliance has a fault. In this case, contact the customer service department.
Door open alarm
If the door is left open for more than 60 seconds, the audible warning signal will sound.
If the door must be opened for a lengthy period to place items into the appliance, cancel the audible warning signal by pressing the alarm button ⑨.
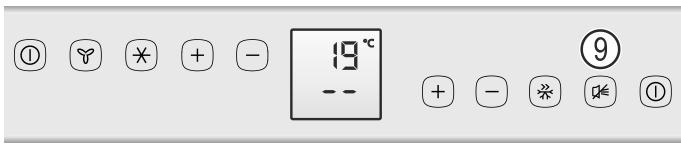
The alarm switches back to standby when the door is shut.
Temperature alarm
If the temperature in the freezer compartment rises too high (is too warm), the audible warning signal will sound, and the symbol and the temperature display will flash.
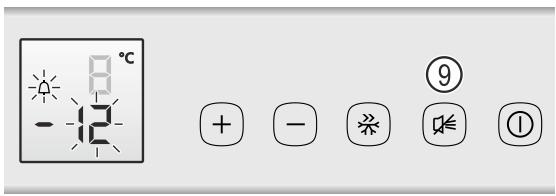
This can be caused by:
- the freezer door being left open for a long time, allowing warm ambient air to enter;
- a long power failure;
- a fault in the appliance.
Cancel the audible warning signal by pressing the alarm button ⑨.
The temperature display will stop flashing and the symbol will go out as soon as it is cold enough inside the appliance.
If the alarm status remains, contact the customer service department.
Power failure display
If appears in the display, the freezer temperature has risen too high due to a power failure.
The temperature display shows the maximum (warmest) temperature in the freezer during the mains failure.
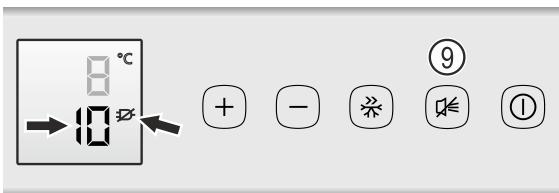
Press the alarm button ⑨ to cancel the display.
Check the quality of the food.
Dispose of spoiled goods.
Do not refreeze thawed food.
If food can still be used, it should be consumed immediately or used to prepare a meal.
Child lock
The child lock is designed to protect the appliance from being switched off accidentally.
Activating the child lock
Press C for 5 seconds. >> Display = MENU
0
00X Display=
On/Off Display= 18
The child lock is activated.
Deactivating the child lock
Press for 5 seconds. >> Display = MENU
C 10
Display=
On/Off Display= 8°c
The child lock is deactivated.
Equipment
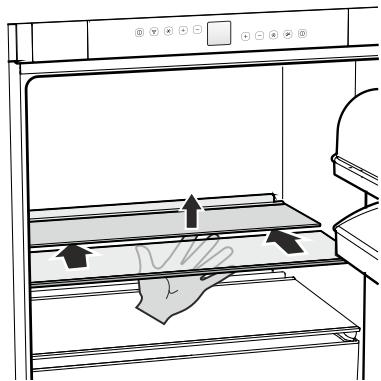
You can re-arrange the storage shelves as required.
Lift the glass shelf, align the recess over the support and replace the shelf in a higher or lower position.
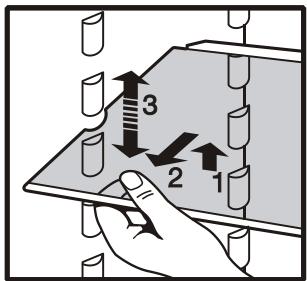
Sectioned shelf
If you need to make space for tall containers, simply slide the front half of the sectioned glass shelf carefully underneath the back half.
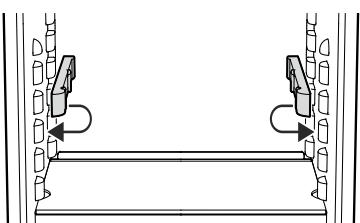
Adjusting the insertion height of the sectioned shelf
Remove the supporting strips and place on the supports above or below the previous position.
Removing the drawer
Pull the drawer out as far as it will go, lift slightly at the back and remove.
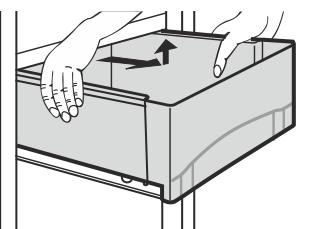
Inserting the drawer
Extend the pull-out rails as far as they will go.
Place the drawer on the rails and slide it right in.
Repositioning the door racks
Lift door rack vertically, lift out to the front and re-insert at a different height, following these steps in the reverse order.
Interior light
The interior light will always switch on when one of the appliance doors is opened.
The light intensity of the LED light corresponds to laser class 1/1M.
Important
The light cover may only be removed by customer service staff.
If the cover is removed, do not look directly at the light through optical lenses from close distance. This can damage your eyes.
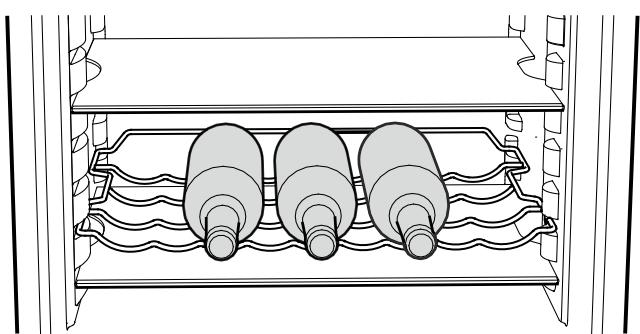
Bottle grid
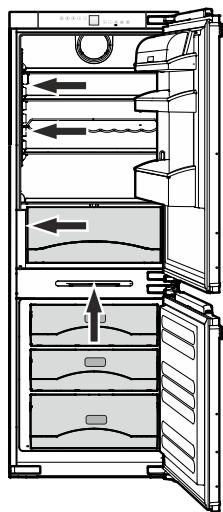
Cooling
Storage example
① butter, cheese
② eggs, cans, tubes
③ bottles
(4) frozen food, ice cubes
⑤ baked goods, pre-cooked meals, drinks
⑥ meat,sausage products,dairy products
⑦ salad, fruit, vegetables, fresh herbs
Note
Food which gives off or absorbs odours and flavours as well as liquids should always be stored covered or in closed containers.
High-percentage alcohols should be tightly sealed and stored upright.
Cooling with fan
With the fan function switched on, a uniform temperature distribution will be attained in the refrigerator compartment.
This is recommended:
- in high room temperatures (approx. 33^ or higher),
- if the air humidity is high (e.g. during the summer).
Switching on
Press the fan button ⑤ - the symbol lights up.
Switching off
Press the fan button ⑤ - the f symbol goes dark.
ActionCool
By activating the ActionCool function, the temperature in the refrigerator compartment will drop to its lowest value. It is recommended if large quantities of food are to be cooled rapidly.
Switching on
Press the ActionCool button ④.
The symbol appears in the display.

Note
The ActionCool function switches off automatically after about 6 hours, but can be switched off earlier.
Switching off
Press the ActionCool button ④.
The 水 symbol goes dark.
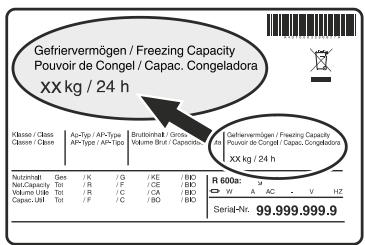
Freezing
The maximum amount of food (in kg) which can be frozen in 24 hours is shown on the type plate ("Freezing capacity").
The position of the type plate is shown in the section entitled Description of the appliance.
CAUTION
Do not freeze bottles and cans of drinks. They can burst during the freezing process.
ActionFreeze
By activating the ActionFreeze function, the temperature in the freezer compartment will drop to the lowest attainable value. Thus food can be rapidly frozen to the core and the quality is preserved.
- Press the ActionFreeze button ⑧ . The × × symbol appears in the display.
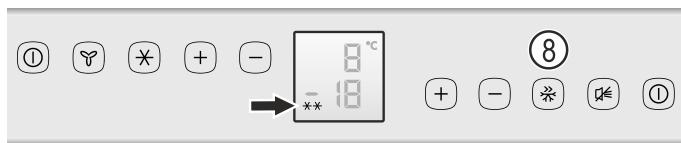
- For small amounts of frozen food, switch on ActionFreeze 6 hours beforehand, and for the maximum quantity 24 hours beforehand.
- Place the fresh food in the freezer.
- Depending on the quantity of food placed in the freezer, the appliance switches back to normal operating mode after 30 to 65 hours.
You should not switch on the ActionFreeze function:
- when placing frozen food in the freezer,
- when freezing up to approx. 2kg fresh food daily.
Notes on freezing
- Pack food which you are freezing yourself in quantities appropriate to your household. To ensure that the food freezes right through, the following quantities should not be exceeded per package: fruit, vegetables: up to 1kg , meat: up to 2.5kg .
- Do not allow fresh food which is to be frozen to come into contact with food already frozen. Always keep packs dry in order to avoid them sticking together.
- Always write the date and contents on the pack and do not exceed the stated storage time for the food.
- Only take out as much food as is immediately required for thawing. Use food which has been thawed in prepared meals as quickly as possible.
Frozen food can be thawed in the following ways:
- in a fan oven
- in a microwave oven
- at room temperature
- in the refrigerator
Making ice cubes
- Fill the ice cube tray with water.
- Place the ice cube tray in the appliance and leave it to freeze.
- The ice cubes can be removed from the tray by twisting or by holding upside down for a short time under running water.
Cold-storage accumulators
In the event of a power failure, the cold-storage accumulators delay the temperature increase in the freezer compartment.
To achieve the best results, place the frozen accumulators on the frozen food in the top drawer.
Defrosting
The refrigerator compartment defrosts automatically.
Freezer compartment
After a long period of operation, a layer of frost or ice can build up on the walls of the freezer compartment. This increases energy consumption.
Important!
Defrost the appliance as soon as the ice thickness is 5mm . Otherwise, the drawers cannot be opened and might become damaged.
- Pull out the plug or switch off the fuse!
- Remove the drawers and glass shelves.
- Wrap the frozen food in paper or blankets and store in a cool place.
- Leave the door of the appliance open while defrosting.
- After a defrosting time of approx. 20 minutes, the layer of frost or ice can be detached from the interior container by hand and removed.
- Mop up the remaining water with a cloth and clean the appliance.
- Re-insert all parts in the appliance.
CAUTION
Risk of damage to the refrigerant circuit and flammability hazard due to leaking refrigerant. Do not use any mechanical devices or other artificial aids for defrosting other than those recommended by the manufacturer.
Cleaning
Before cleaning, always switch off the appliance. Disconnect from the mains or switch off the fuse!
- Clean the inside and equipment with lukewarm water and a little detergent. Do not use chemical solvents or any cleaning agents containing sand or acid.
- Ensure that no cleaning water penetrates into the electrical components or ventilation grille.
- Dry all parts well with a cloth.
- Clean the drain hole in the refrigerator compartment with a thin object, e.g. cotton swab or the like.
- Do not damage or remove the type plate on the inside of the appliance. It is very important for servicing purposes.
CAUTION
Risk of damage to the appliance components and risk of injury due to hot steam.
Do not use steam cleaning equipment to clean the appliance.
Malfunctions
- F0, F1, F2, F3, F4, F5, F6, F7, F8 or F9 appears in the display.
- The appliance has suffered a fault.
Contact the customer service department.
- When inserting the mains plug, the refrigeration unit does not switch on, but a value is shown in the temperature display.
- Demo mode is activated.
Contact the customer service department.
You may be able to rectify the following faults by checking the possible causes yourself:
-
Appliance does not function:
-
Is the appliance switched on?
- Is the plug correctly fitted in the mains socket?
-
Is the fuse intact?
-
Loud running noise:
-
Is the appliance set up firmly on the floor?
-
Does the appliance cause nearby items of furniture or objects to vibrate? Please note that noises caused by the refrigerant circuit cannot be avoided.
-
The temperature is not low enough:
-
Is the temperature setting correct (see "Setting the temperature"?
- Does the separately installed thermometer show the correct reading?
- Is the ventilation system working properly?
- Is the appliance set up too close to a heat source?
If none of the above causes apply and you cannot rectify the fault yourself, contact the nearest customer service department stating the type designation ① PNC number ② and appliance number ③ as indicated on the type plate.
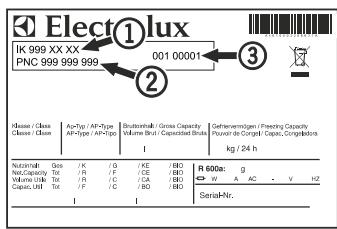
The position of the type plate is shown in the section entitled Description of the appliance.
Shutting your appliance down
If your appliance is to be shut down for any length of time, switch it off and disconnect the plug or switch off or unscrew the fuse.
Clean the appliance and leave the door open in order to prevent unpleasant smells.
The appliance complies with the relevant safety regulations and EC Directives 2004/108/EC and 2006/95/EC.
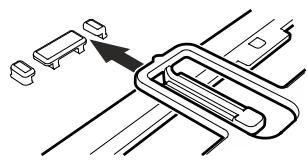
Supplied accessories
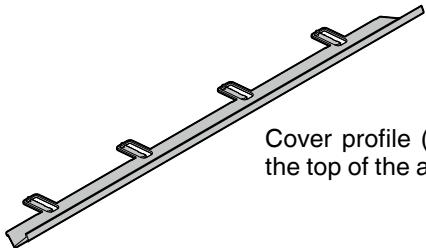
Cover profile (covers the gap between the top of the appliance and the recess)
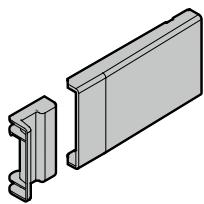
Covers
Installation on the left at the top for right-hand hinged door.
Installation on the right at the top for left-hand hinged door.
Cover
Installation on the left at the bottom for right-hand hinged door.
Installation on the right at the bottom for left-hand hinged door.
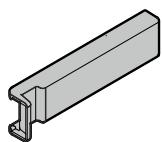
Cover
Installation on the right at the top for right-hand hinged door.
Installation on the left at the top for left-hand hinged door.
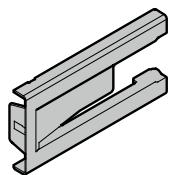
2 pcs.
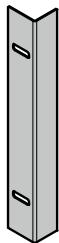
Side cover for the door panel retaining brackets
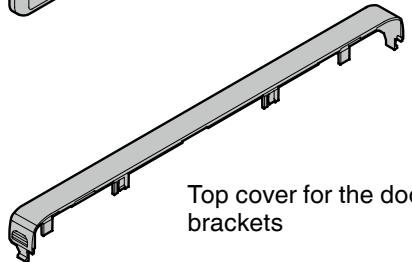
2 pcs.
Top cover for the door panel retaining brackets
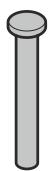
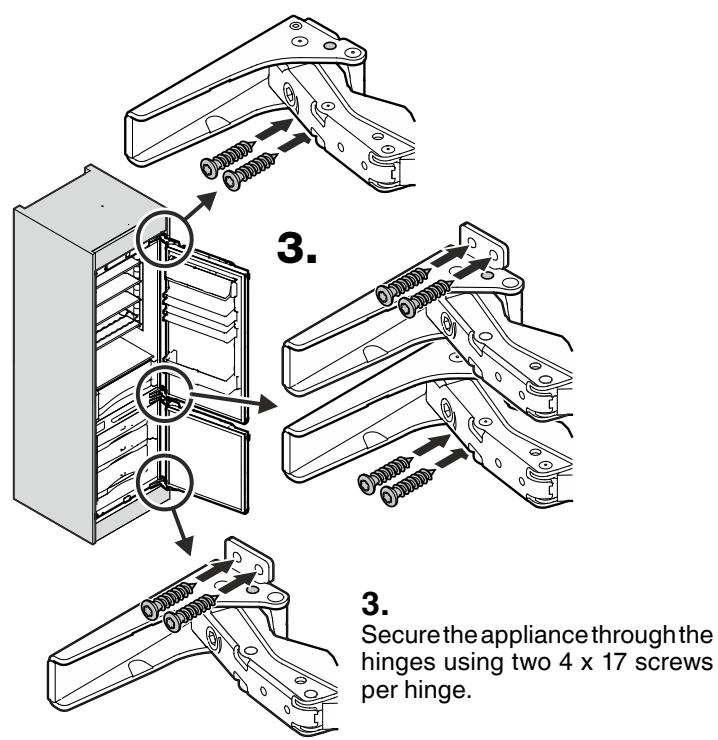
4 pcs.
Pin to restrict the hinge opening angle to 90^
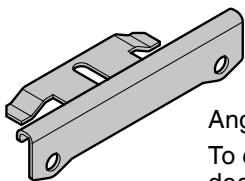
4 pcs.
Angle bracket
To connect the appliance door and the door panel.
4 pcs.
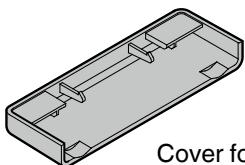
Cover for the angle brackets
6 pcs.
Angle bracket
To connect the appliance door and the door panel.
6 pcs.
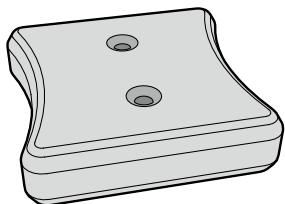
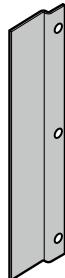
Retaining plate
To connect the appliance door and the door panel.

12 pcs.
12 pcs.
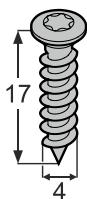
42 pcs.
12 pcs.
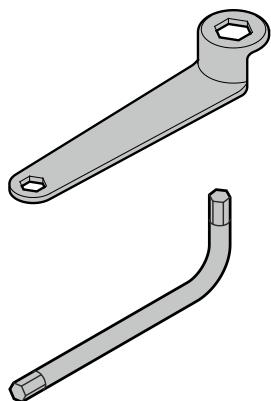
Ring spanner
Allen key
Note
The accessory pack contains all necessary components for an entire range of appliances. Parts may therefore be left over after installation, depending on the appliance type.
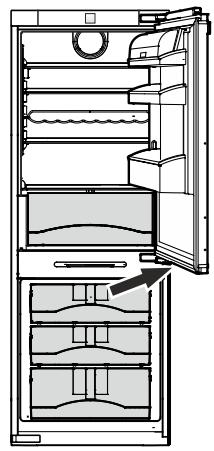
Changing over door hinges
Door hinges should only be changed by a trained expert.
Changing the door hinges must be done by two people.
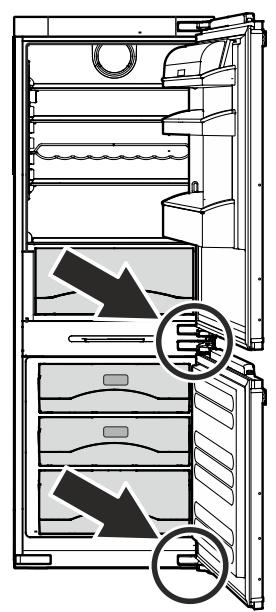
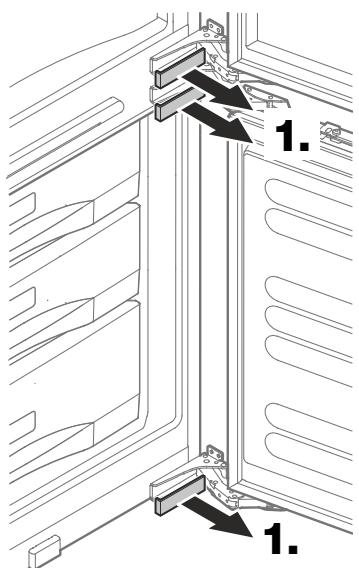
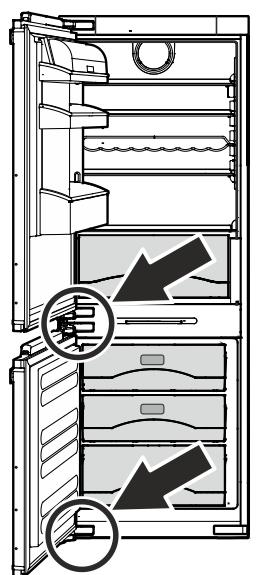
1. Remove the covers from the hinges.
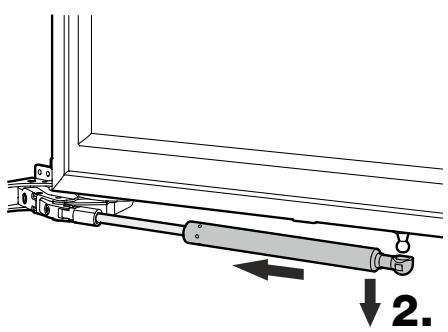
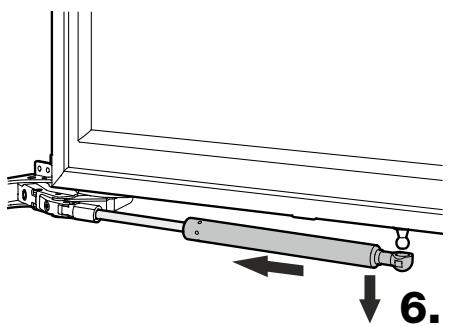
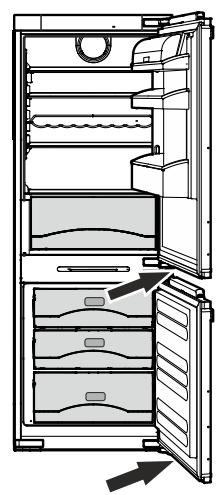
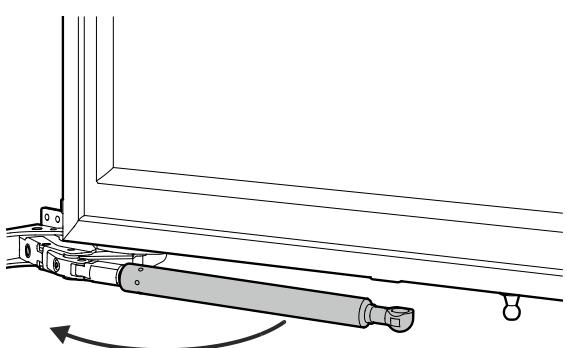
Removing the soft stop mechanism from the freezer door

- Pull soft stop mechanism downwards.
The soft stop mechanism will then contract.
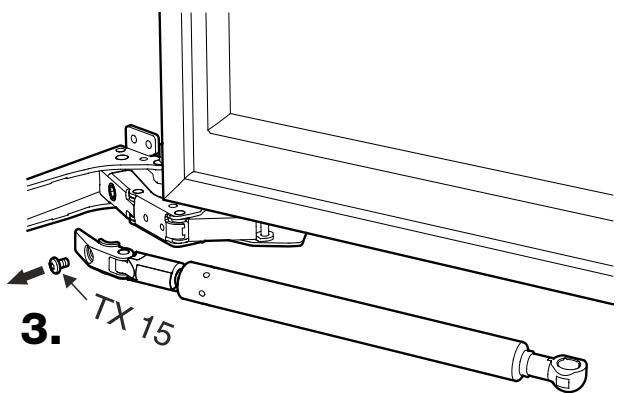
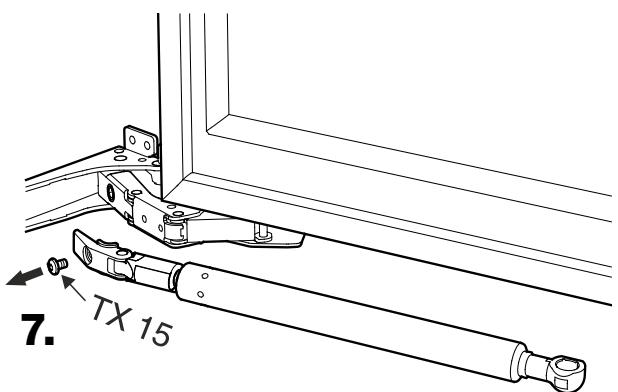
3. Unscrew soft stop mechanism.
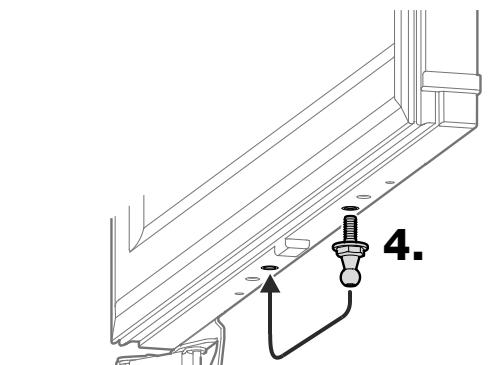
4. Transfer the freezer door ball stud.
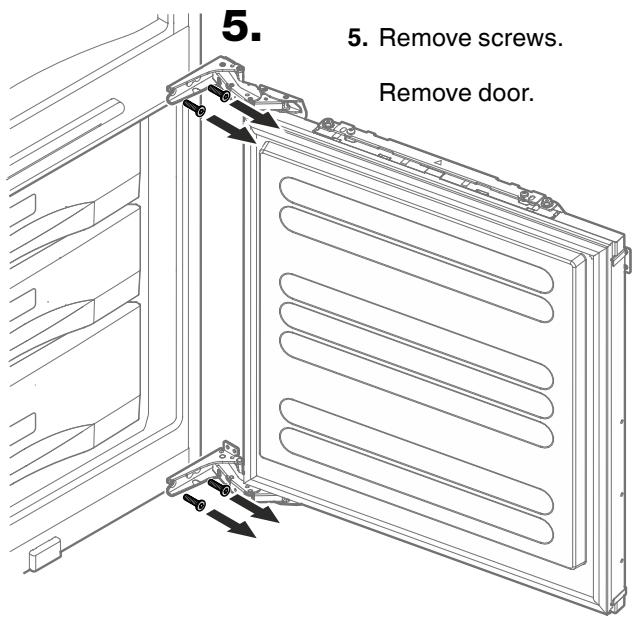
Unscrewing the freezer door
Important
The door must now be held secure by somebody.
Removing the soft stop mechanism from the refrigerator door
- Pull soft stop mechanism downwards.
The soft stop mechanism will then contract.
7. Unscrew soft stop mechanism.
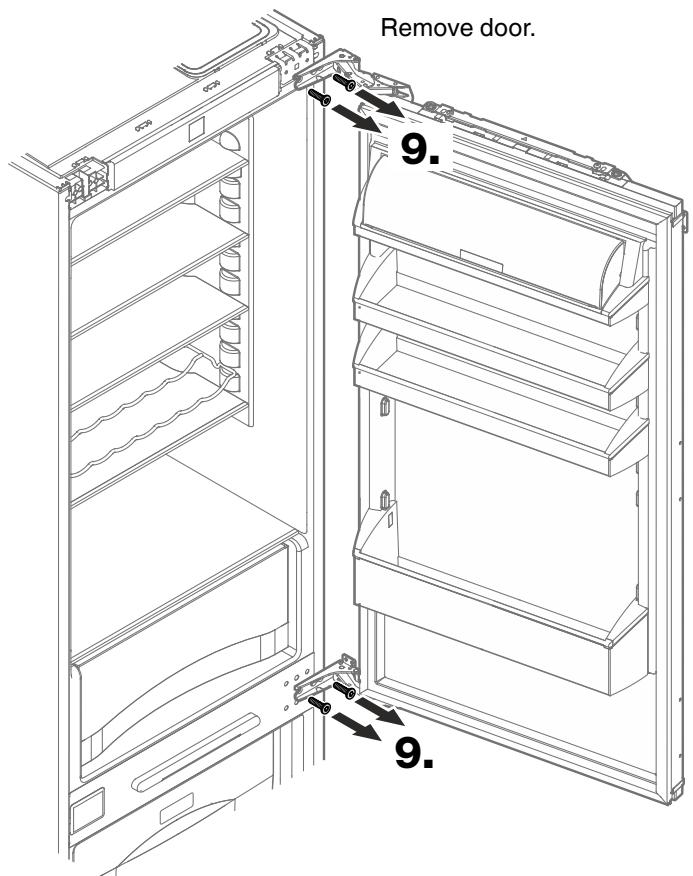
Unscrewing the refrigerator door
Important
The door must now be held secure by somebody.
- Remove screws
Remove door.
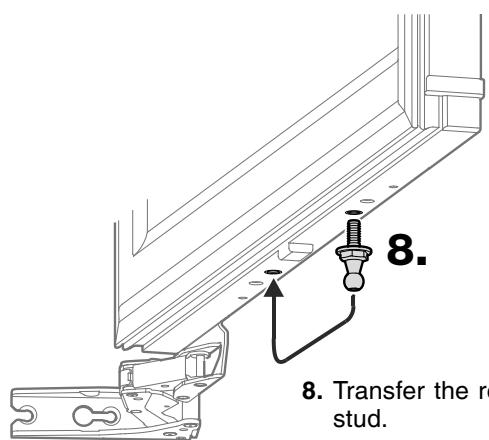
8. Transfer the refrigerator door ball stud.

10. Transfer cover plate to the opposite side.
Note
Screw in the screws, push the bracket to the left as far as it will go, then tighten the screws.
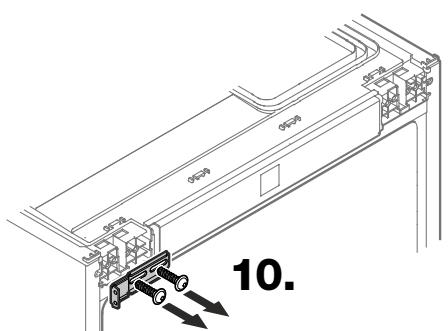
10. Unscrew the top attachment bracket.
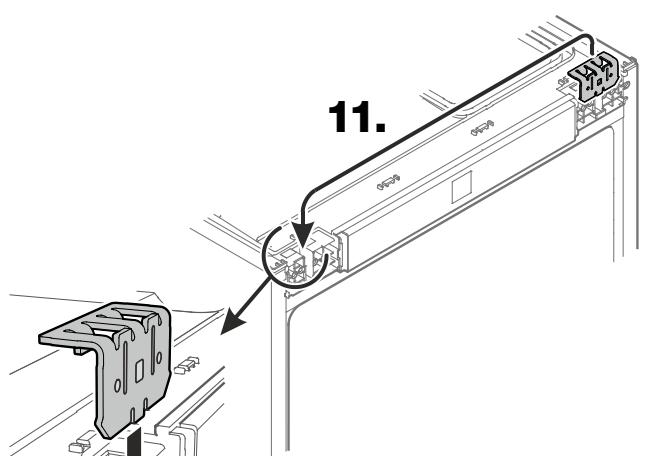
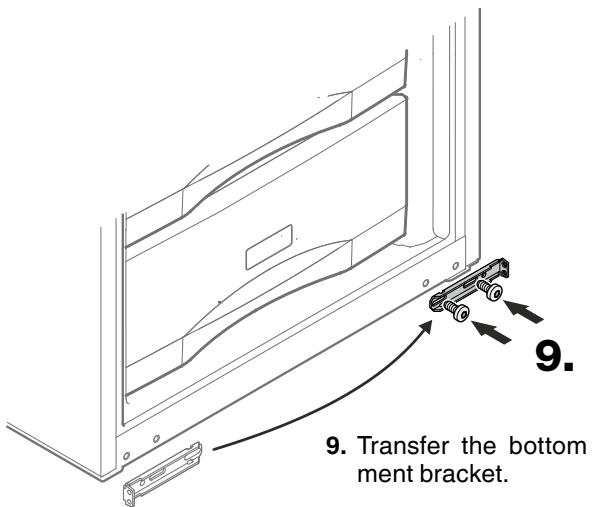
11. Remove the retaining bracket and transfer to the opposite side.
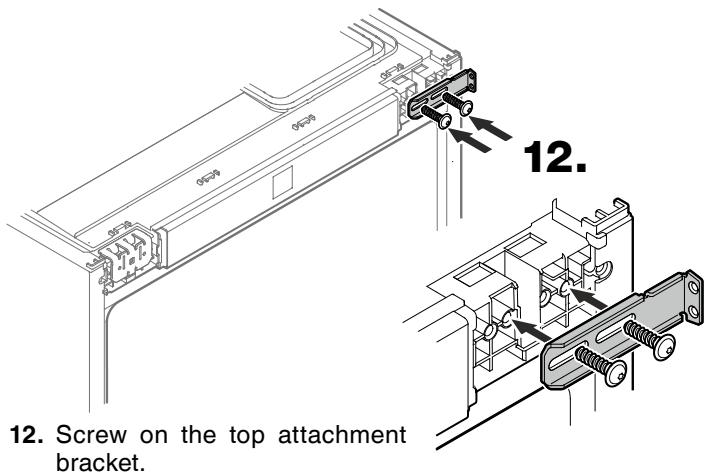
Note
Screw in the screws, push the bracket to the left as far as it will go, then tighten the screws.
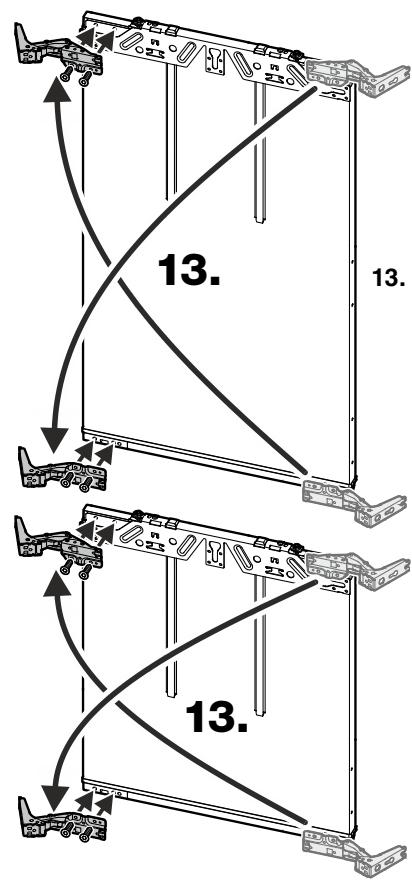
13. Unscrew hinges and re-fit on the opposite side at diagonals to the original position.
GB
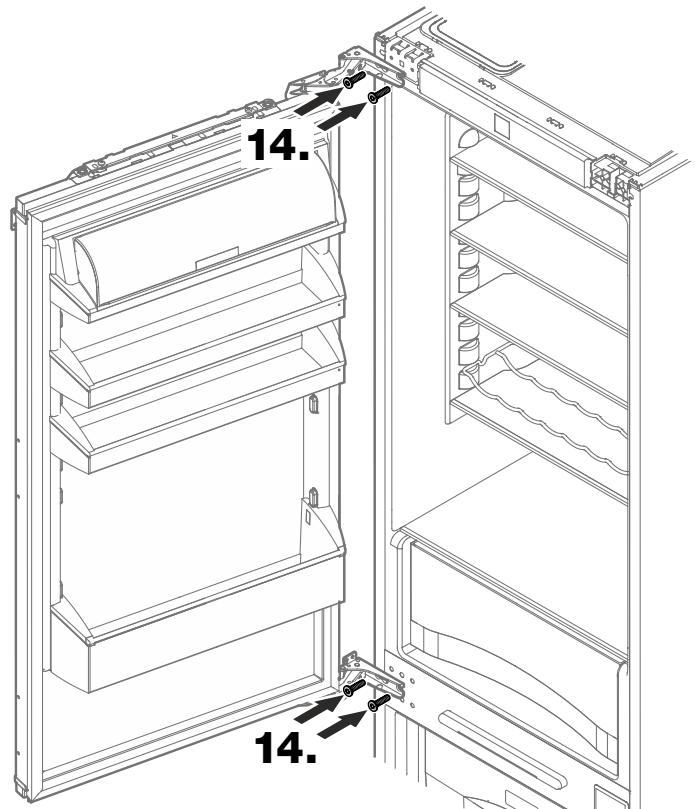
14. Screw on the refrigerator door.
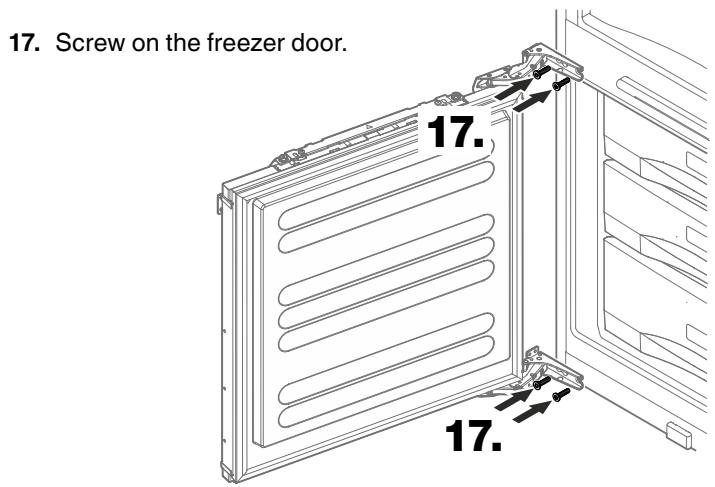
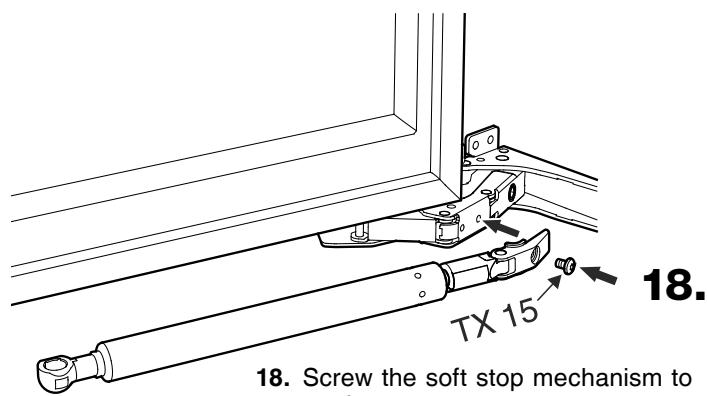
18. Screw the soft stop mechanism to the freezer door hinge.
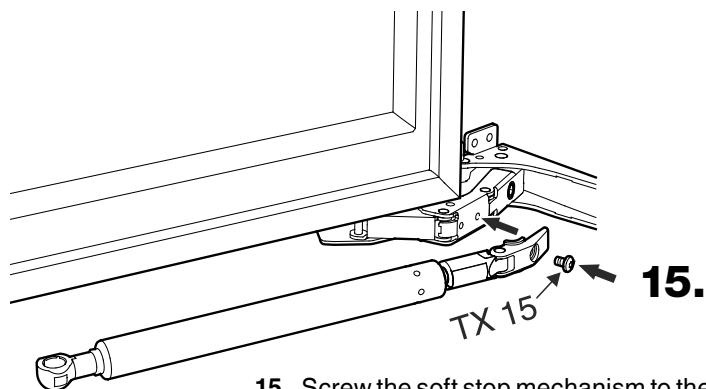
15. Screw the soft stop mechanism to the refrigerator door hinge.
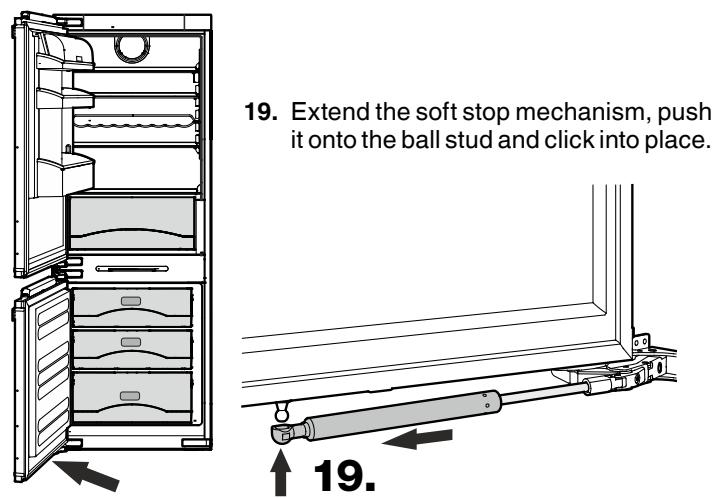
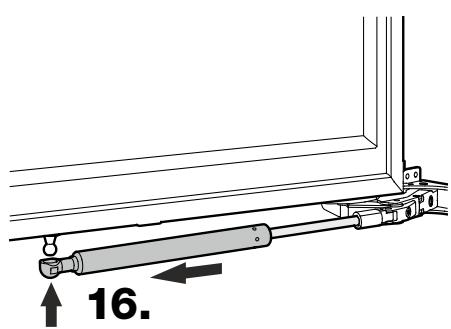
16. Extend the soft stop mechanism, push it onto the ball stud and click into place.
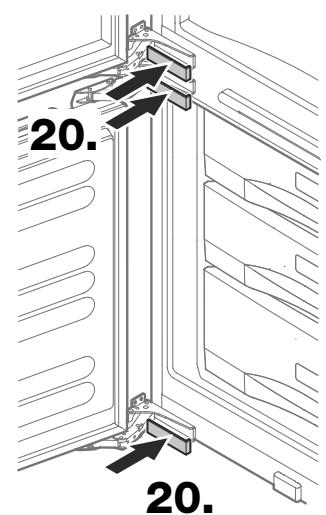
20. Fit covers.
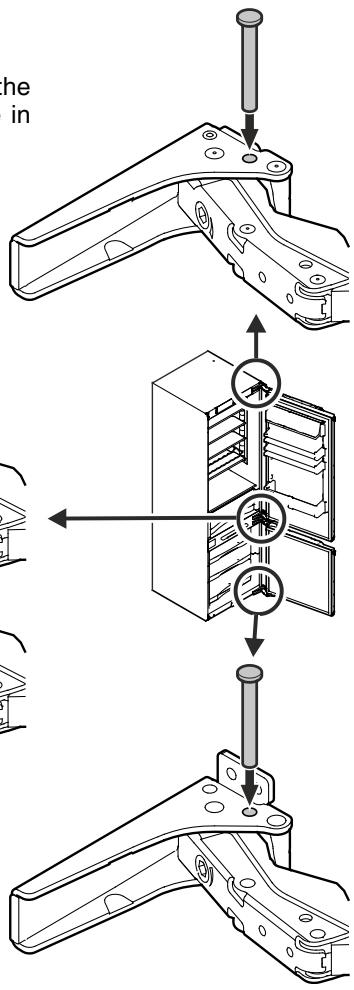
Limiting the door opening angle to 90^
If necessary, limit the maximum door opening angle to 90^ .
Important
It is necessary to remove the refrigerator door in order to be able to insert the pin in the top hinge of the freezer door.
The pins must be inserted before the appliance is installed in the recess.
It is not possible to insert the top pin once the appliance has been installed.
Open the door to just under 90^ .
Fully insert pins (enclosed in the accessory pack) in each hinge in the opening shown.
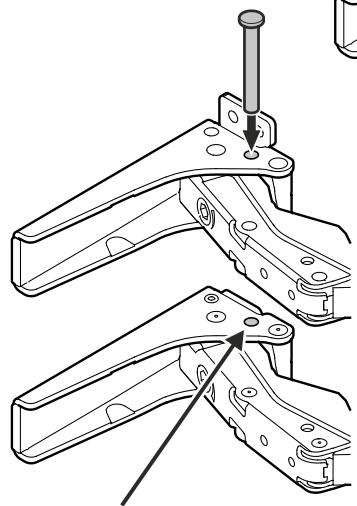
The pin in the top hinge of the freezerdoor canonlybeinserted when the refrigerator door is removed.
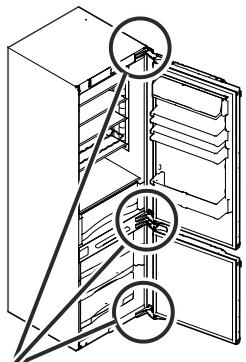
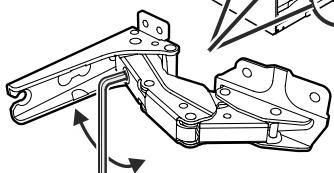
Adjusting the resilience of the hinges
The opening resilience of the door can be adjusted.
- Turn clockwise for stronger resilience.
- Turn anticlockwise for weaker resilience (factory setting).
Installation options
External door panel
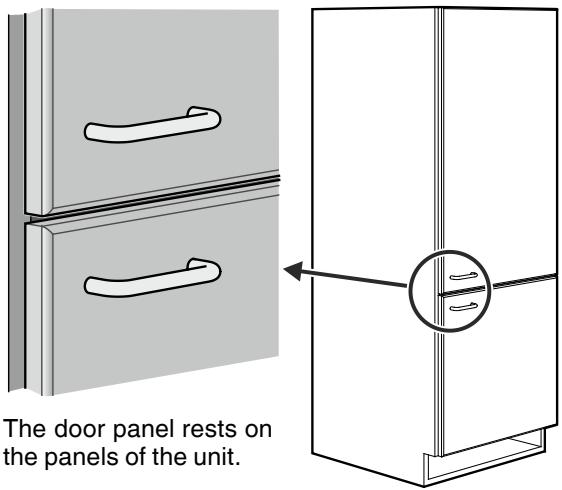
Internal door panel
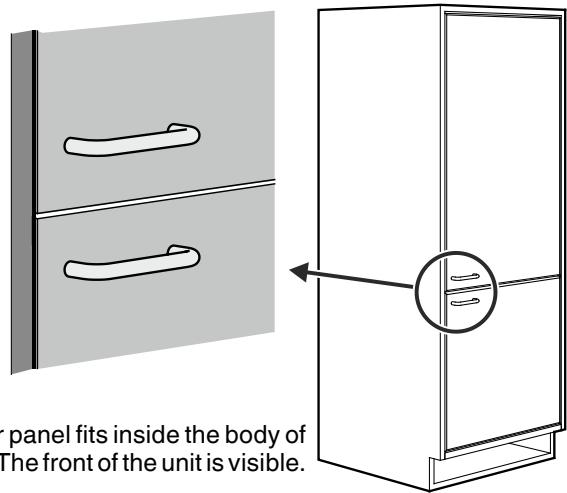
Door panel design
General notes
Maximum panel weight = 15kg
Note
The lower reference point for the height of the refrigerator panel is the midpoint between the hinges (= 5/6 SMS) minus 2 mm.
Recommended minimum clearance between refrigerator and freezer panels = 4mm
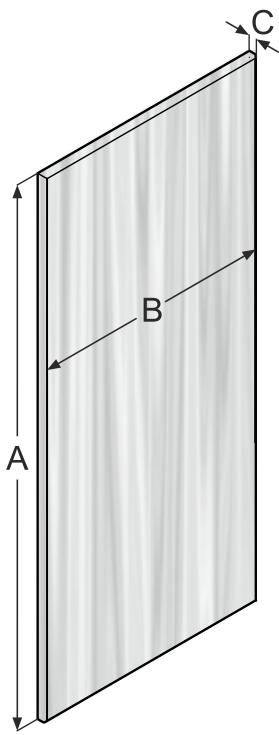
Panel dimensions
Installation option with external door panel
Refrigerator door panel
IK261B
A = 887 mm plus overlapping of the panel at the top
IK311B
A = 1014 mm plus overlapping of the panel at the top
IK321B / IK323B
A = 1141 mm plus overlapping of the panel at the top
B=max.562mm
C = min. 16 mm max. 19 mm
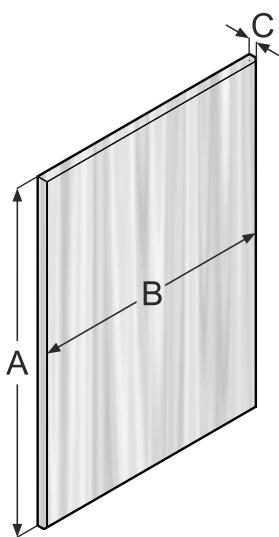
Panel dimensions
Installation option with internal door panel
Refrigerator door panel
IK261B
A=max.884mm
IK311B
A = max. 1011 mm
IK321B / IK323B
A = max. 1138 mm
B=max.544mm
C = min. 16 mm max. 19 mm
Freezer door panel
A = 633 ~mm plus overlapping of the panel at the bottom
B=max.562mm
C = min. 16 mm max. 19 mm
Freezer door panel
A = max. 630 mm
B=max.544mm
C = min. 16 mm max. 19 mm
Appliance dimensions
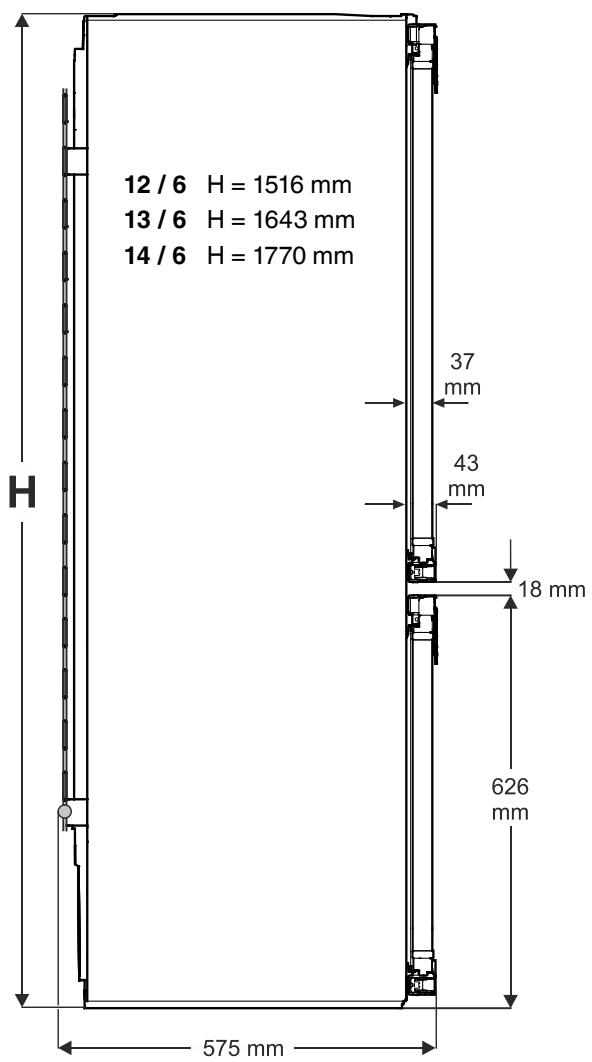
Side view
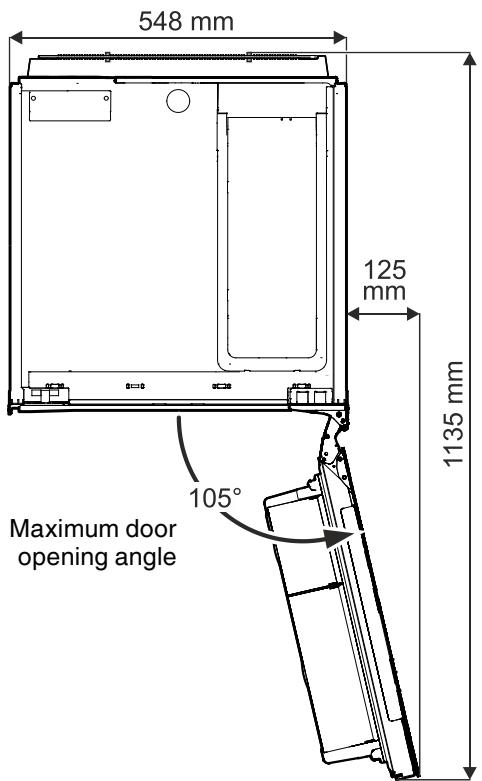
View from above
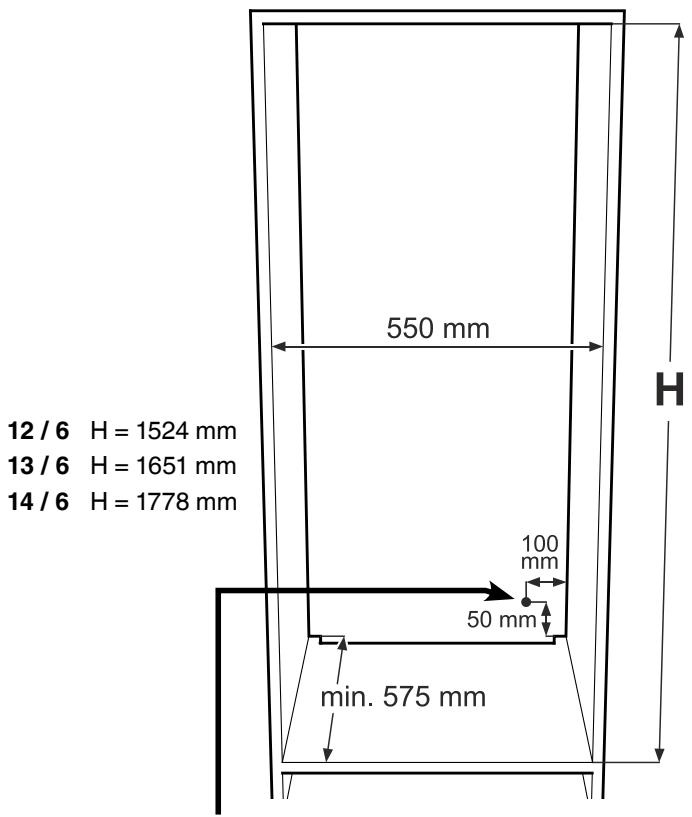
Installation dimensions
Important
In order to avoid any problems when installing the appliance and to avoid damage to the appliance, the following conditions must be complied with.
The kitchen unit must be aligned horizontally and vertically.
Minimum wall thickness of the body of the unit = 16 ~mm .
In this area, the power cord comes out of the appliance rear.
Free length of the power cord = 2000mm
Choose the position of the socket considering these specifications.
The socket must not be situated behind the appliance and must be easily accessible.
Important
The minimum recess depth of 575mm applies to the installation option with external door panel.
In the case of the installation option with internal door panel, the panel thickness must be added to the 575~mm .
Appliance venting
Important
The clear ventilation cross-section must be at least 200cm^2 from the lower ventilation opening right to the upper one.
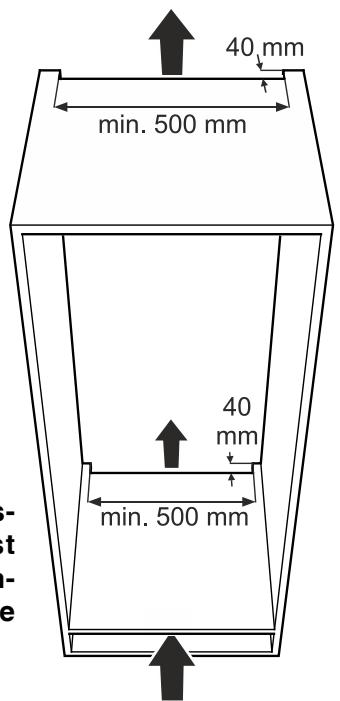
min. 200~cm^2
Types of air outlet
① Directly above the appliance
(2) Above the top unit
③ From the front of the top unit with decor grille
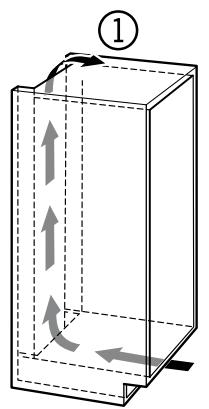
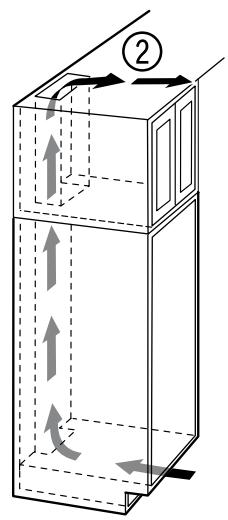
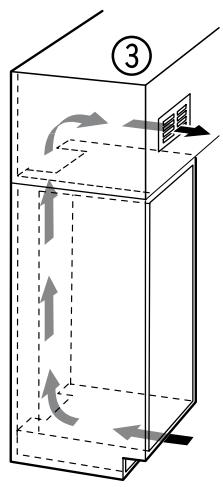
Important
When using decor grilles, it must be taken into account that the clear ventilation cross-section corresponds to the sum of the individual openings in the grille.
A cut-out section of merely 200~cm^2 for installing the ventilation grille is thus not sufficient.
Installing the appliance
1.
Fit cover profile.
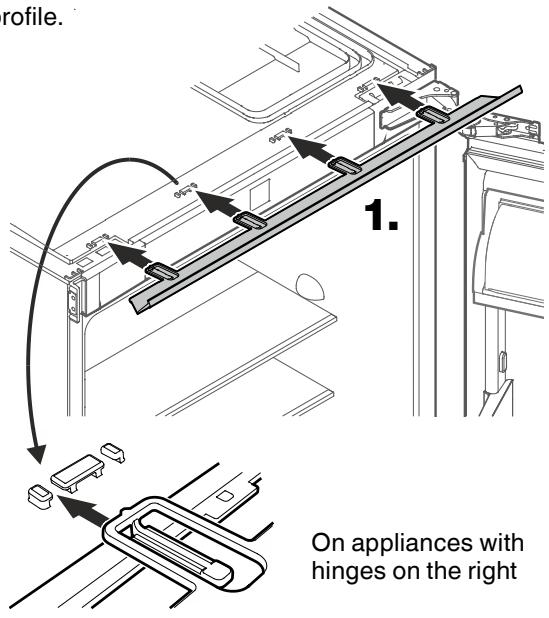
On appliances with hinges on the right
On appliances with hinges on the left
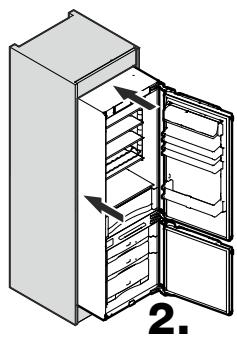
2.
Slide the appliance into the recess.
Route the mains cable towards the socket.
When sliding in the appliance, make sure that the mains cable is not damaged.
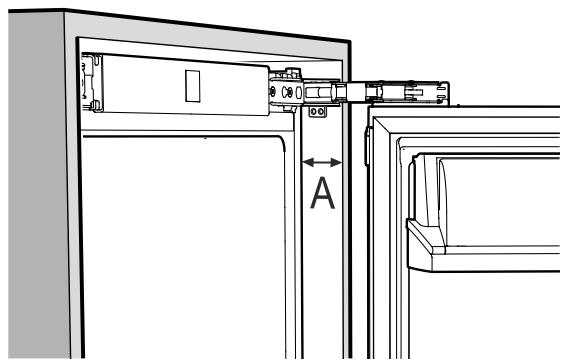
Installation option with external door panel
$$
A = \max. 4 3 m m
$$
Installation option with internal door panel
$$
A = 4 3 \mathrm {m m} + \text {p a n e l t h i c k n e s s}
$$
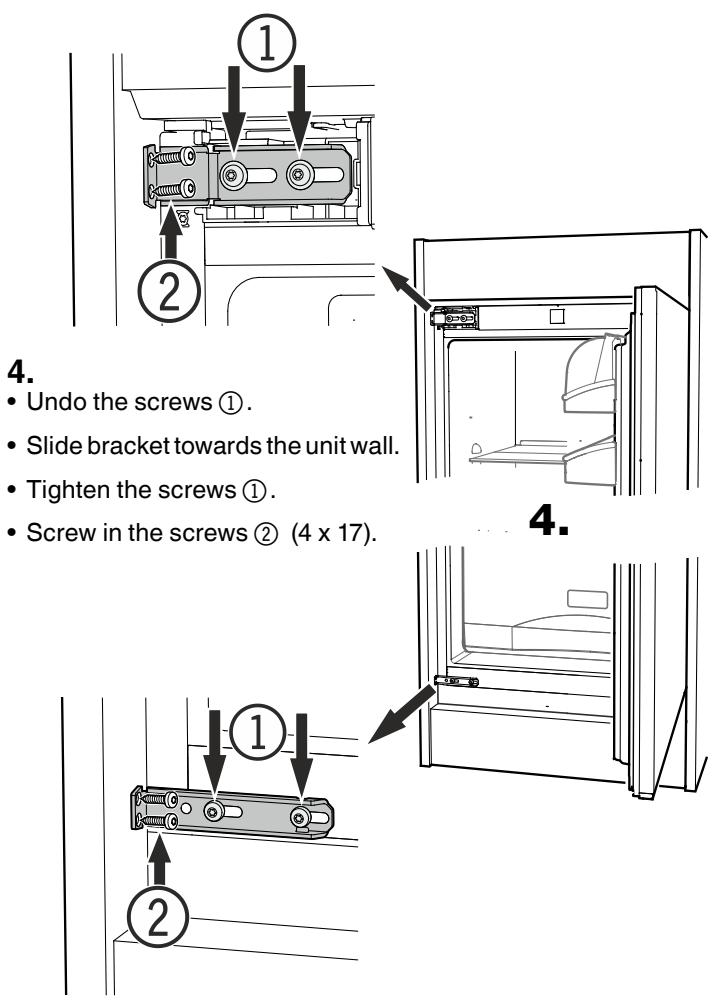
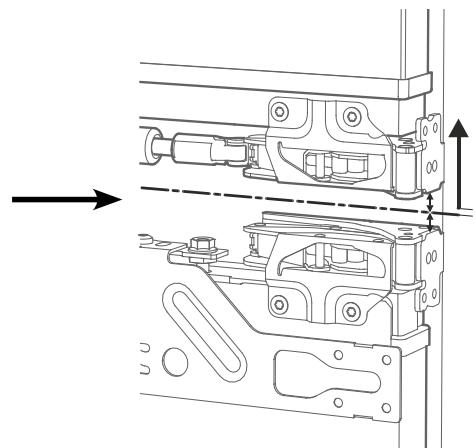
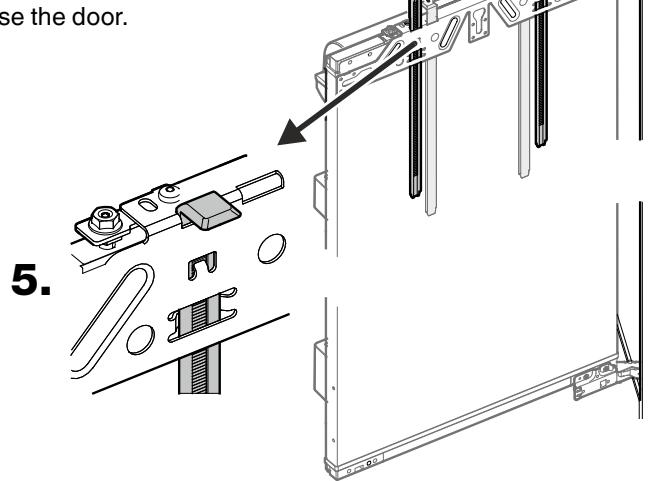
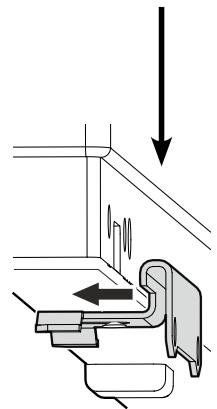
5.
Refrigerator door
Remove mounting strips, insert in the adjacent openings and push downwards as far as they will go.
Close the door.
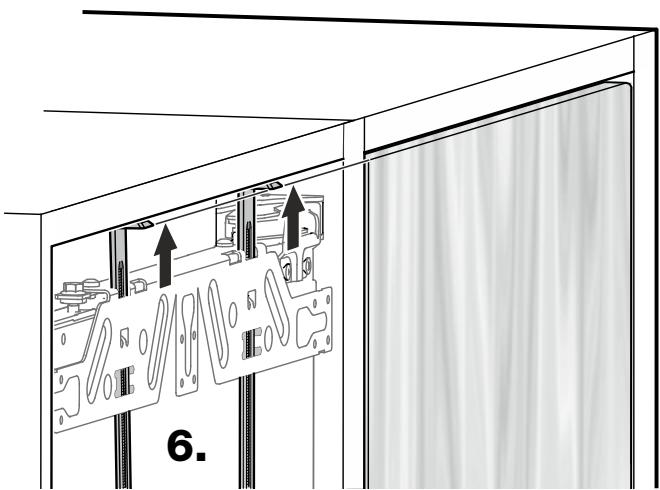
6.
Push the mounting strips upwards.
The bottom edge of the mounting strips must be aligned with the top edge of the adjacent unit door.
Installation option with external door panel
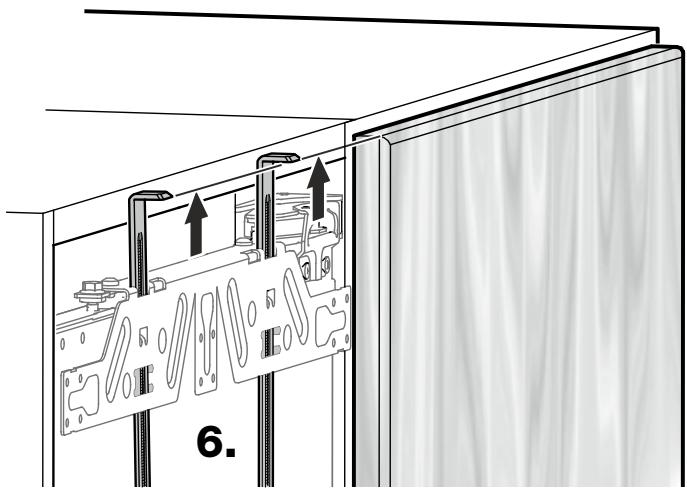
Installation option with internal door panel
7.
Open the refrigerator door.
Unscrew the retaining bracket with the mounting strips.
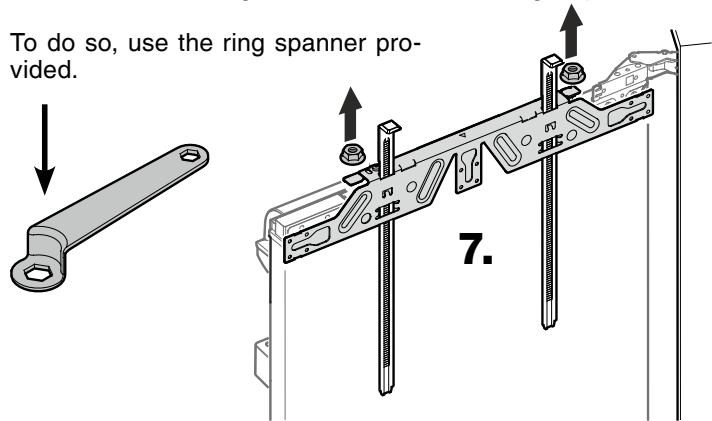
Important
When removing, ensure that the mounting strips do not move.
Mounting the panel attachment elements on the refrigerator panel - model IK261B
8.
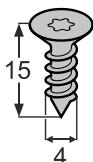
Position the retaining bracket in the middle of the door panel and secure to the door panel using six 4 x 15 screws.
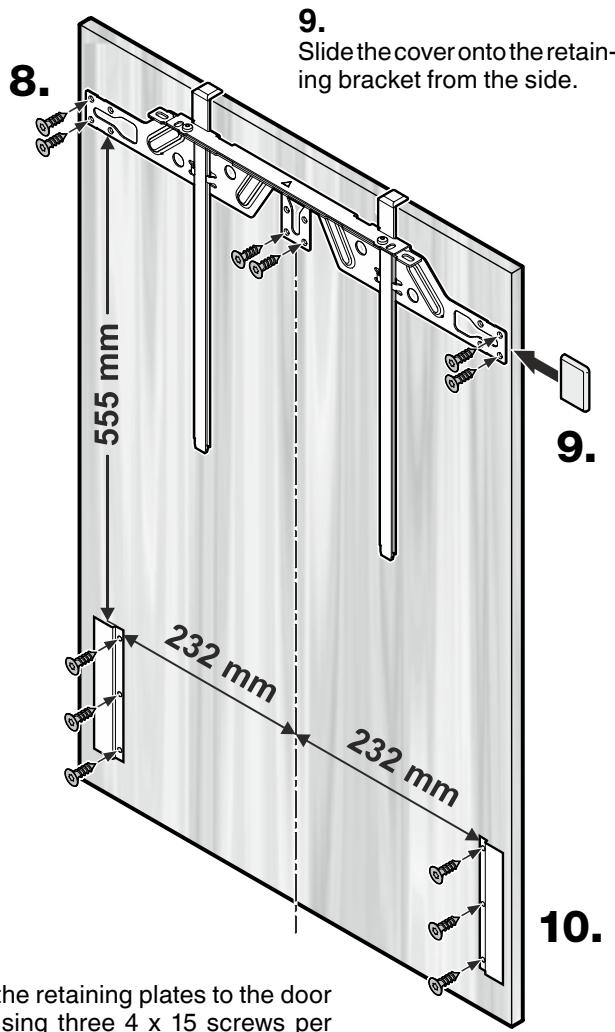
10.
Attach the retaining plates to the door panel using three 4 x 15 screws per plate.
Important
Fit the unit handle to the panel at this stage.
Mounting the panel attachment elements on the refrigerator panel - models IK311B, IK321B and IK323B
8.
Position the retaining bracket in the middle of the door panel and secure to the door panel using six 4 x 15 screws.
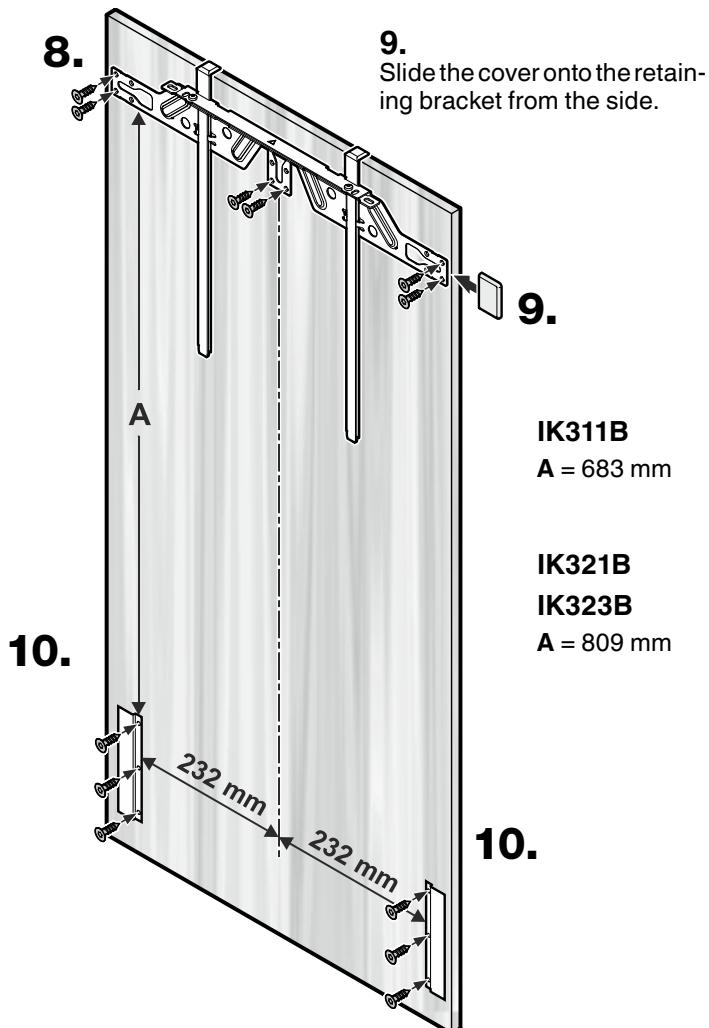
10.
Attach the retaining plates to the door panel using three 4 × 15 screws per plate.
Important
Fit the unit handle to the panel at this stage.
Carry out steps 12 to 14 for both doors.
12.
Pull soft stop mechanism downwards.
The soft stop mechanism will then contract.

13.
13.
Pivot soft stop mechanism to the left.
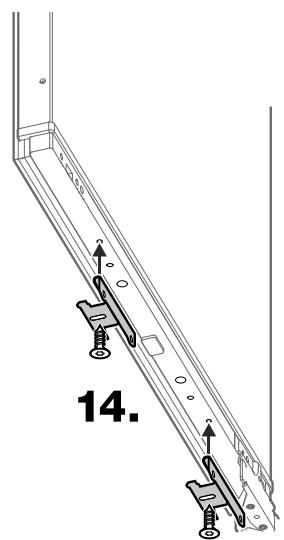
14.
Screw the angle brackets onto the underside of the door using 4 × 15 screws.
Push the bracket to the back as far as it will go, then tighten the screw.
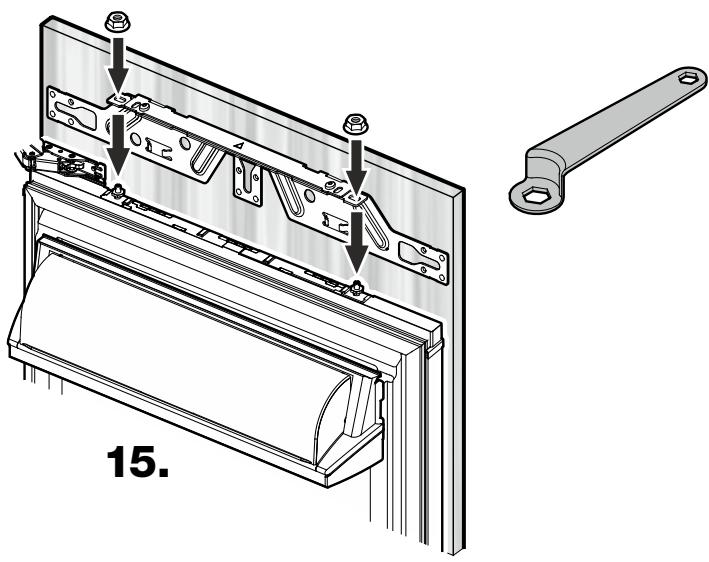
15.
Mounting the refrigerator panel
Place the door panel on the adjusting screws and align in the centre.
Screw the nuts onto the adjusting screws and tighten.
To do so, use the ring spanner provided.
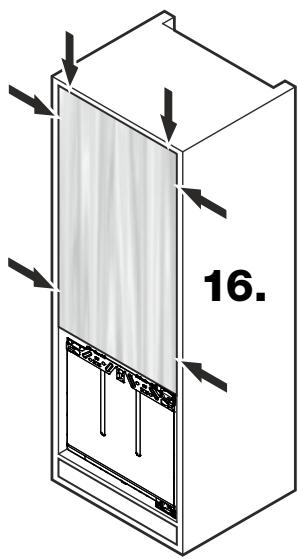
16.
Close the door and check the position of the door panel.
Aligning the refrigerator panel
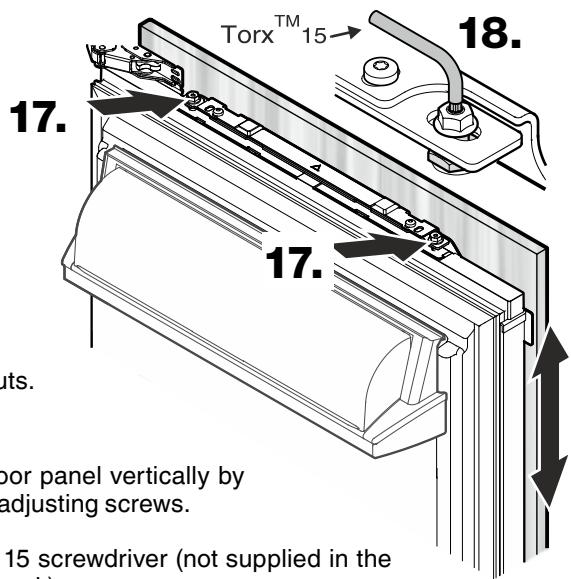
17. Undo the nuts.
18. Align the door panel vertically by turning the adjusting screws.
Use a Torx 15 screwdriver (not supplied in the accessory pack).
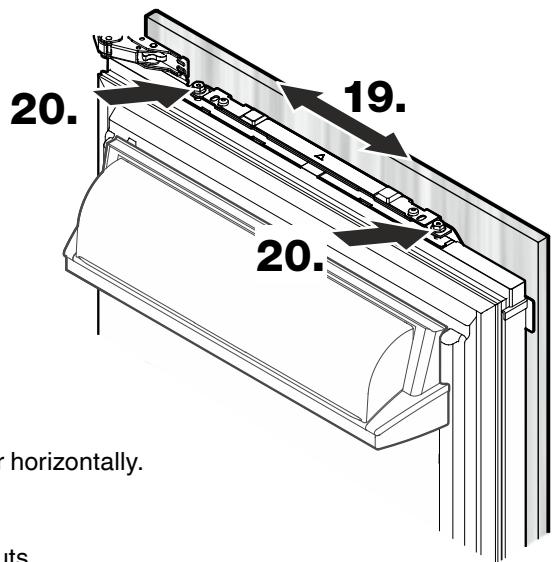
19. Align the door horizontally.
20. Tighten the nuts.
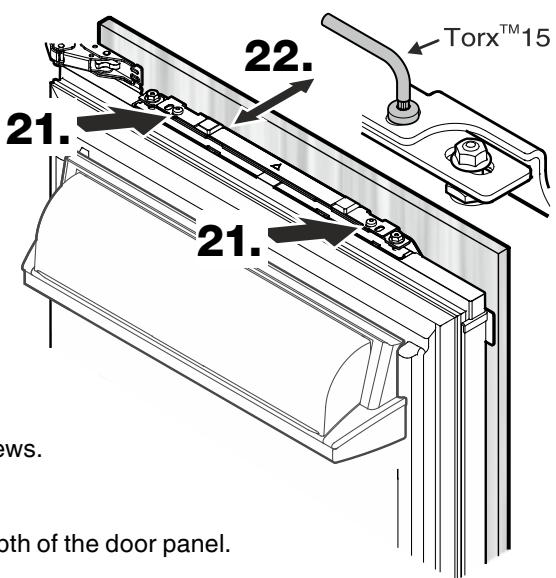
21. Undo the screws.
22. Adjust the depth of the door panel.
Tighten the screws.
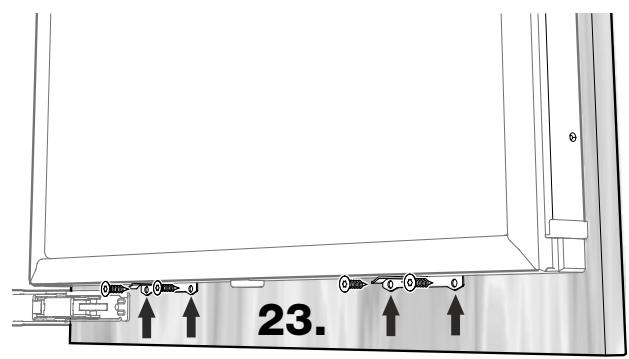
23. Screw the bottom of the door onto the door panel (4 x 15 screws).
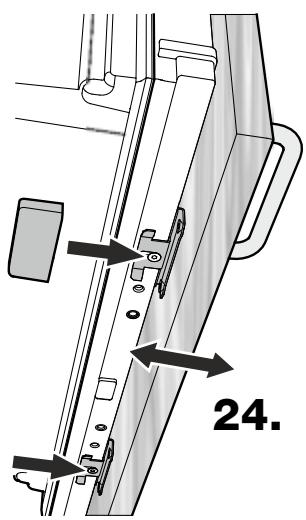
24. Undo the angle bracket screws on the underside of the door.
Adjust the depth of the panel.
Tighten the screws.
Fit the cover to the outer angle bracket.
Note
Do not fit a cover to the inner angle bracket. This is the area where the soft stop mechanism is located.
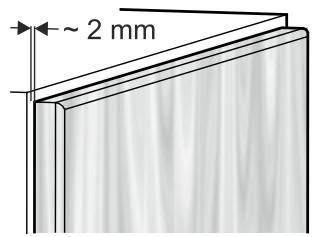
Important
Align external door panels so that there is a gap of approx. 2mm between the door panel and the body of the unit.
This will ensure that the door seal closes properly.

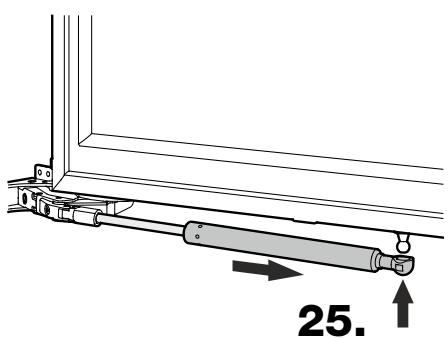
25. Extend the soft stop mechanism, push it onto the ball stud and click into place.
26.
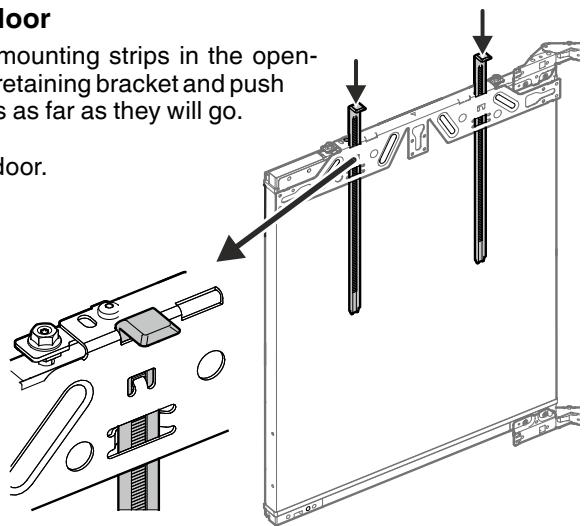
Freezer door
Insert the mounting strips in the openings of the retaining bracket and push downwards as far as they will go.
Close the door.
26.
27.
Slide the mounting strips upwards until the required clearance between refrigerator and freezer panels is achieved.
28.
Remove the retaining bracket with the mounting strips in exactly the same way as for the refrigerator door (see point 7).
Mounting the panel attachment elements on the freezer panel
29.
Position the retaining bracket in the middle of the door panel and secure to the door panel using six 4 x 15 screws.

31.
Attach the retaining plates to the door panel using three 4 x 15 screws per plate.
Important
Fit the unit handle to the panel at this stage.
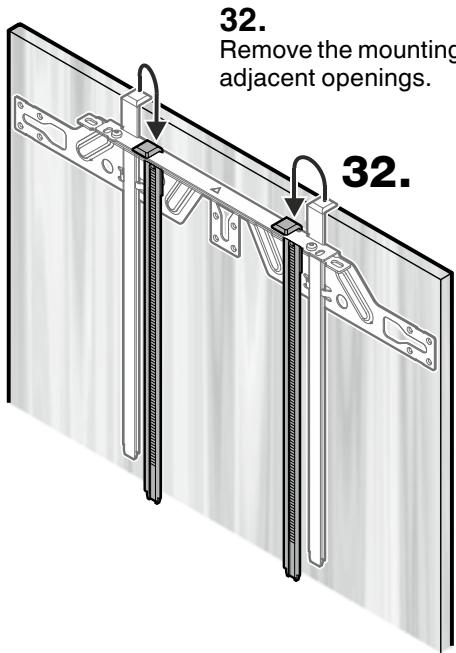
32.
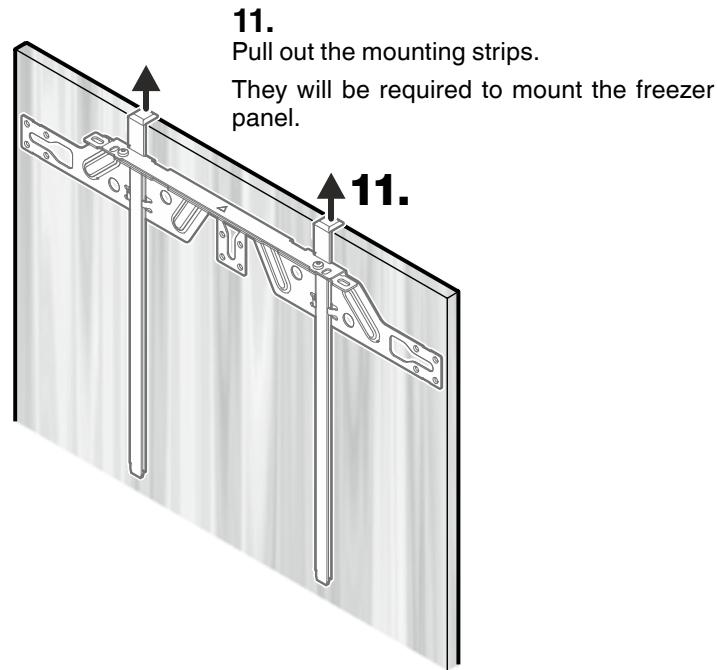
Remove the mounting strips and insert in the adjacent openings.
33.
Mount and align the freezer panel in exactly the same way as for the refrigerator panel (see points 15 to 24).
- Extend the soft stop mechanism, push it onto the ball stud and click into place.
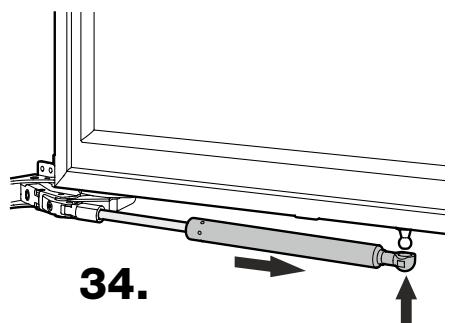
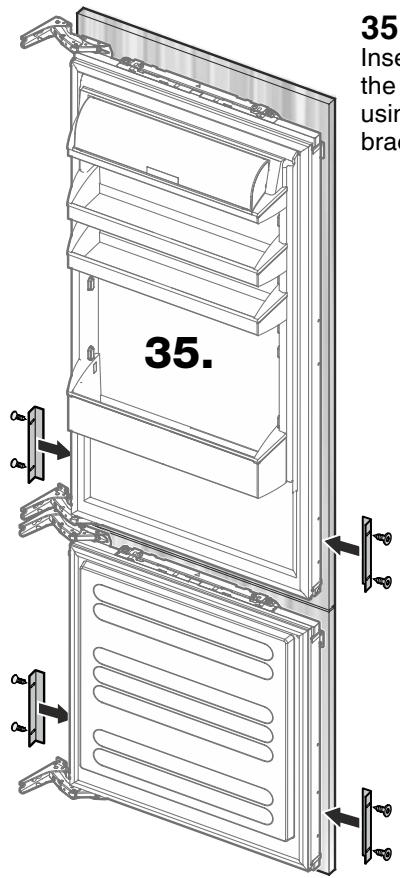
35.
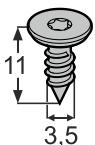
Insert the angle brackets behind the retaining plates and secure using two 3.5 × 11 screws per bracket.
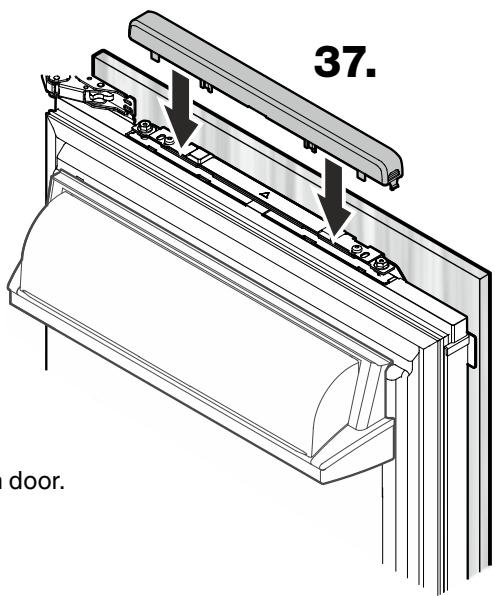
37.
Fit cover to each door.
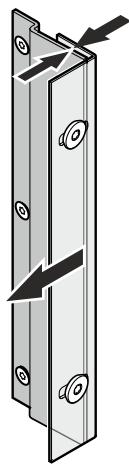
Important
Slide the angle bracket to the left, then tighten the screws.
The angle bracket must be in contact with the retaining plate.
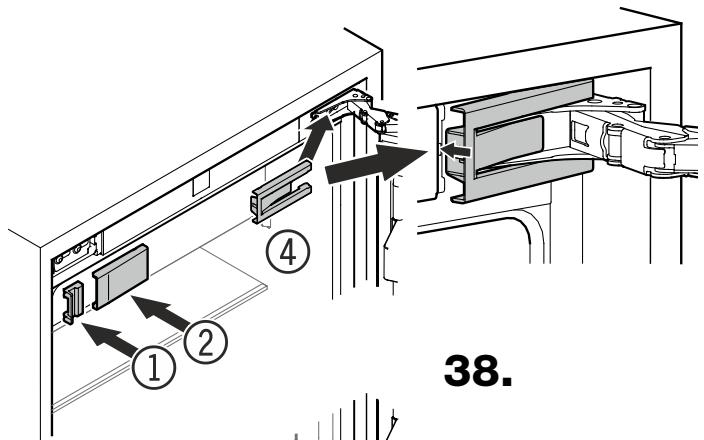

38.

36.
Fit cover caps.
Installation is now complete.
Ersatzteilverkauf / Point de vente de rechange / Vendita pezzi di ricambio / spare parts service
| Servicestellen | Points de service | Servizio dopo vendita | Point of service |
| 5506 Mägenwil/Zürich | | | |
| Industriestr. 10 | | | |
| 9000 St. Gallen | | | |
| Zürcherstrasse 204 e Zürcherstrasse 204 e | | | |
| 4052 Basel | | | |
| St. Jakob-Turm | | | |
| Birssstrasse 320 B | | | |
| 6020 Emmenbrücke | | | |
| Seetalstrasse 11 | | | |
| 7000 Chur | | | |
| Comercialstrasse 19 | | | |
| 3018 Bern | | | |
| Morgenstrasse 131 | | | |
| 1028 Préverenges | | | |
| Le Trési 6 | | | |
| 6928 Manno | | | |
| Via Violino 11 | | | |
5506 Mägenwil, Industriestrasse 10, Tel. 0848 848 111
| Fachberatung, Verkauf/Demonstration, Vente/Consulente (cucina), Vendita/consulting, sales |
| 8048 Zürich, Badenerstrasse 587, Tel. 044 405 81 11 |
| Garantie | Für{jedes Produkt gewähren wir ab Verkauf bzw. Lieferdatum an den Endverbraucher eine Garantie von 2 Jahren. (Ausweis durch Garantieschein, Faktura oder Verkaufsbeleg).Die Garantieleistung umfasst die Kosten für Material, Arbeits- und Reisezeit.Die Garantieleistung entfällt bei Nichtbeachtung der Gebrauchsanweisung und Betriebsvorschriften, unsachgerechter Installation, sowie bei Beschädigung durch ässere Einflüsse, höhere Gewalt, Eingriffe Dritter und Verwendung von Nicht-Original Teilen. |
| Garantie | Nous octroyons sur chaque produit 2 ans de garantie à partir de la date de livraison ou de la mise en service au consommateur (documenté au moyen d'une facture, d'un bon de garantie ou d'un justificatif d'achat). Notre garantie couvre les frais de mains d'oeuvres et de déplacement, ainsi que les pièces de rechange.Les conditions de garantie ne sont pas valables en cas d'intervention d'un tiers non autorisé, de l'emploi de pièces de rechange non originales, d'erreurs de maniement ou d'installation dues à l'inobser-vation du mode d'emploi, et pour des dommages causés par des influences extérieures ou de force majeure. |
| Garanzia | Per anni prodotto concediamo una garanzia di 2 anni a partire dalla data di consegra o dalla sua messa in funzione. (fa stato la data della fattura, del certificato di garanzia o dello scontrino d'acquisto) Nella garanzia sono comprese le spese di manodopera, di viaggio e del materiale.Dalla copertura sono escludi il logoramento ed i danni causati da agenti esterni, intervento di terzi, utilizzo di ricambi non originali o alla inossevanza delle prescrizioni d'installazione ed istruzioni per l'uso. |
| Warranty | For each product we provide a two-year guarantee from the date of purchase or delivery to the consumer (with a guarantee certificate, invoice or sales receipt serving as proof).The guarantee covers the costs of materials, labour and travel.The guarantee will lapse if the operating instructions and conditions of use are not adhered to, if the product is incorrectly installed, or in the event of damage caused by external influences, force majeure, intervention by third parties or the use of non-genuine components. |

