
DIF 14B1 - DIF 14B1 EU - Built-in dishwasher INDESIT - Free user manual and instructions
Find the device manual for free DIF 14B1 - DIF 14B1 EU INDESIT in PDF.

| Product type | Built-in dishwasher |
| Brand | INDESIT |
| Model | DIF 14B1 / DIF 14B1 EU |
| Capacity | 13 standard place settings |
| Dimensions (W x H x D) | 59.5 x 82 x 57 cm |
| Energy class | A+ (scale A+++ to D) |
| Annual energy consumption | 295 kWh |
| Annual water consumption | 3080 litres |
| Eco cycle duration | 190 minutes |
| Noise level | 49 dB(A) |
| Drying efficiency class | A |
| Wash programmes | Eco, Intensive, Normal, Prewash |
| Options | Half load, Delayed start, Multifunctional tablets (depending on model) |
| Water softener | Yes, with hardness adjustment |
| Anti-leak system | Yes, automatic water supply cut-off |
| Number of spray arms | 2 (upper and lower) |
| Filtration type | 3-part filter (cylindrical, cup, stainless steel) |
| Adjustable upper basket height | Yes, with Lift-Up system (depending on model) |
| Left-on consumption | 5.0 W |
| Off consumption | 0.5 W |
| Water connection | Cold or hot water (max 60°C), pressure 0.05-1 MPa |
| Net weight (approximate) | About 40-45 kg |
Frequently Asked Questions - DIF 14B1 - DIF 14B1 EU INDESIT
User questions about DIF 14B1 - DIF 14B1 EU INDESIT
0 question about this device. Answer the ones you know or ask your own.
Ask a new question about this device
Download the instructions for your Built-in dishwasher in PDF format for free! Find your manual DIF 14B1 - DIF 14B1 EU - INDESIT and take your electronic device back in hand. On this page are published all the documents necessary for the use of your device. DIF 14B1 - DIF 14B1 EU by INDESIT.
USER MANUAL DIF 14B1 - DIF 14B1 EU INDESIT
Precautions, advice and Assistance, 17-18
General safety
Disposal
Saving energy and respecting the environment
Assistance
DIF 14B1
Installation, 19-20
Positioning and levelling
Connecting the water and electricity supplies
Advice regarding the first wash cycle
Technical data
Description of the appliance, 21
Overall view
Control panel
Loading the racks, 22-23
Lower rack
Cutlery basket
Upper rack
Adjusting upper rack
Start-up and use, 24
Starting the dishwasher
Measuring out the detergent
Wash cycles, 25
Table of wash cycles
Rinse aid and refined salt, 26
Measuring out the rinse aid
Measuring out the refined salt
Care and maintenance, 27
Shutting off the water and electricity supplies
Cleaning the dishwasher
Preventing unpleasant odours
Cleaning the sprayer arms
Cleaning the water inlet filter
Cleaning the filters
Leaving the machine unused for extended periods
Troubleshooting, 28
| Product Fiche | |
| Brand | INDESIT |
| Model | DIF 14B1 |
| Rated capacity in standard place settings (1) | 13 |
| Energy efficiency class on a scale from A+++ (low consumption) to D (high consumption) | A+ |
| Energy consumption per year in kWh (2) | 295.0 |
| Energy consumption of the standard cleaning cycle in kWh | 1.04 |
| Power consumption of the off-mode in W | 0.5 |
| Power consumption of the left-on mode in W | 5.0 |
| Water consumption per year in litres (3) | 3080.0 |
| Drying efficacy class on a scale from G (low efficacy) to A (high efficacy) | A |
| Programme time for standard cleaning cycle in minutes | 190 |
| The duration of the left-on mode in minutes | 10 |
| Noise in dB(A) Re 1pW | 49 |
| Built-in model | Yes |
| NOTES | |
| 1) The information on the label and fiche relates to the standard cleaning cycle, this programme is suitable to clean normally soiled tableware and it is the most efficient programme in terms of combined energy and water consumption. The standard cleaning cycle corresponds to the Eco cycle. | |
| 2) Based on 280 standard cleaning cycles using cold water fill and the consumption of the low power modes. Actual energy consumption depends on how the appliance is used. | |
| 3) Based on 280 standard cleaning cycles. Actual water consumption depends on how the appliance is used. | |
This appliance was designed and manufactured in compliance with international safety standards. The following information has been provided for safety reasons and should therefore be read carefully.
Keep this instruction manual in a safe place for future reference. If the appliance is sold, given away or moved, please ensure the manual is kept with the machine.
Please read these instructions carefully: they contain important information on installation, use and safety.
This appliance is designed for domestic use or similar applications, for example:
- staff kitchen areas in shops, offices and other work environments;
-farmhouses; - use by guests in hotels, motels and other residential settings;
- bed & breakfasts.
General safety
- The appliance should not be operated by people (including children) with reduced physical, sensory or mental capacities, or by inexperienced people who are not familiar with the product, unless supervision or instructions on how to use it are provided by someone who assumes responsibility for their safety.
- An adult must supervise children at all times to prevent them from playing with the appliance.
- The appliance was designed for domestic use inside the home and is not intended for commercial or industrial use.
- The appliance must be used by adults only to wash domestic crockery in accordance with the instructions in this manual.
- The appliance must not be installed outdoors, even in covered areas. It is extremely dangerous to leave the machine exposed to rain and storms.
- Do not touch the appliance when barefoot.
- When unplugging the appliance always pull the plug from the mains socket. Do not pull on the cable.
- The water supply tap must be shut off and the plug should be removed from the electrical socket before cleaning or maintaining the appliance.
- If the appliance breaks down, do not under any circumstances touch the internal parts in an attempt to perform the repair work yourself.
- Do not lean or sit on the open door of the appliance: this may cause the appliance to overturn.
- The door should not be left open as it may create
a dangerous obstacle.
- Keep detergent and rinse aid out of reach of children.
- The packaging material should not be used as a toy for children.
Disposal
- Disposal of packaging material: observe local legislation so that the packaging may be reused.
- The European Directive 2012/19/EU relating to Waste Electrical and Electronic Equipment (WEEE) states that household appliances should not be disposed of using the normal solid urban waste cycle. Exhausted appliances should be collected separately in order to optimise the re-using and recycling rate of the materials inside the machine, while preventing potential damage to the environment and public health. The crossed-out dustbin symbol is marked on all products to remind the owners of their obligations regarding separated waste collection.
For further information relating to the correct disposal of household appliances, owners may contact the relevant public authority or the local appliance dealer.
Saving energy and respecting the environment
Saving water and energy
- Only begin a wash cycle when the dishwasher is full. While waiting for the dishwasher to be filled, prevent unpleasant odours using the Soak cycle (see Wash cycles).
-
Select a wash cycle that is suited to the type of crockery and to the soil level of the crockery using the Table of wash cycles:
-
for dishes with a normal soil level use the Eco wash cycle, which ensures low energy/water consumption levels.
- If the load is smaller than usual activate the Half Load option* (see Start-up and use).
- If your electricity supply contract gives details of electricity-saving time bands, run wash cycles when electricity prices are lower. The Delayed Start button * (see Start-up and use) helps you organise the wash cycles accordingly.
Phosphate-free and chlorine-free detergents containing enzymes
- We strongly recommend that you use detergents that do not contain phosphates or chlorine, as these products are harmful to the environment.
- Enzymes provide a particularly effective action at temperatures around 50^ . As a result detergents containing enzymes can be used in conjunction with low-temperature wash cycles in order to achieve the same results as a normal 65^ wash cycle.
- To avoid wasting detergent, use the product in appropriate quantities based on the manufacturer's recommendations, the hardness of the water, the soil level and the quantity of crockery to be washed. Even if they are biodegradable, detergents contain substances which may alter the balance of nature.
Assistance
Before contacting Assistance:
- Check whether the problem can be resolved using the Troubleshooting guide (see Troubleshooting).
- Restart the programme to check whether the problem has ceased to exist.
- If the problem persists, contact the Authorised Technical Assistance Service.

Never use the services of unauthorised technicians.
Please have the following information to hand:
- The type of malfunction.
- The appliance model (Mod.).
- The serial number (S/N).
This information can be found on the appliance data plate (see Description of the appliance).
If the appliance must be moved at any time, keep it in an upright position; if absolutely necessary, it may be tilted onto its back.
Positioning and levelling
- Remove the appliance from all packaging and check that it has not been damaged during transportation. If it has been damaged, contact the retailer and do not proceed any further with the installation process.
- Arrange the dishwasher so that its sides or back panel are in contact with the adjacent cabinets or the wall. This appliance can also be recessed under a single worktop (see the Assembly Instruction sheet.)
- Position the dishwasher on a level sturdy floor. If the floor is uneven, the front feet of the appliance should be adjusted until it reaches a horizontal position. If the appliance is levelled correctly, it will be more stable and much less likely to move or cause vibrations and noise while it is operating.
4^ . To adjust the height of the rear foot, turn the red hexagonal bushing on the lower central part at the front of the dishwasher using a hexagonal spanner with an opening of 8mm . Turn the spanner in a clockwise direction to increase the height and in an anticlockwise direction to decrease it (see Building-in Instruction sheet attached to the documentation.)
Connecting the water and electricity supplies
A Connection to the water and electricity supplies should only be performed by a qualified technician.
The dishwasher should not stand on the water hoses or electricity supply cable.
A The appliance must be connected to the water supply network using new hoses.
Never use old or second hand hose sets. Do not reuse hoses from any previously installed dishwasher.
The water inlet and outlet hoses and the electricity supply cable may be positioned towards the right or the left in order to achieve the best possible installation.
Connecting the water inlet hose
- To a suitable cold water connection point: before attaching the hose, run the water until it is perfectly clear so that any impurities that may be present in the water do not clog the appliance; after performing this operation, screw the inlet hose tightly onto a tap with a 3/4 gas threaded connection.
- To a suitable hot water connection point: your dishwasher may be supplied with hot water from the mains supply (if you have a central heating system with radiators) provided that it does not exceed a temperature of 60^ .
A Screw the hose to the tap as described for connection to a cold water supply.
A If the inlet hose is not long enough, contact a specialist store or an authorised technician (see Assistance.)
The water pressure must be within the values indicated in the Technical Data table (see adjacent information.)
The hose should not be bent or compressed.
Connecting the water outlet hose
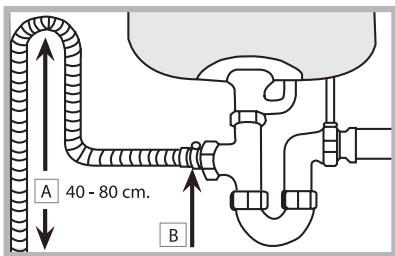
Connect the outlet hose (without bending it) to a drain duct with a minimum diameter of 4cm .
The outlet hose must be at a height ranging from 40 to 80~cm from the floor / surface where the dishwasher rests (A).
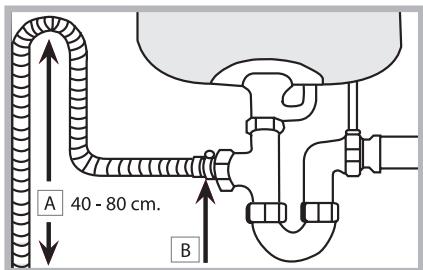
Before connecting the water outlet hose to the sink drain, remove the plastic plug (B).
Anti-flooding protection
To ensure floods do not occur, the dishwasher:
- is provided with a special system which blocks the water supply in the event of anomalies or leaks from inside the appliance.
Some models are also equipped with the supplementary safety device New Acqua Stop*, which guarantees anti-flooding protection even in the event of a supply hose rupture.

WARNING: HAZARDOUS VOLTAGE!
Under no circumstances should the water inlet hose be cut, as it contains live electrical parts.
Electrical connection
Before inserting the plug into the electrical socket, make sure that:
- The socket is earthed and complies with current regulations.
- the socket can withstand the maximum load of the appliance, which is indicated on the data plate located on the inside of the door (see Description of the appliance);
- The power supply voltage falls within the values indicated on the data plate on the inside of the door.
- The socket is compatible with the plug of the appliance. If this is not the case, ask an authorised technician to replace the plug (see Assistance); do not use extension cables or multiple sockets.
Once the appliance has been installed, the power supply cable and the electrical socket should be easily accessible.
The cable should not be bent or compressed.
If the power supply cable is damaged, it must be replaced by the manufacturer or its Technical Assistance Service in order to prevent all potential hazards (see Assistance.)
- Only available in selected models.
Anti-condensation strip*
After installing the dishwasher, open the door and stick the adhesive transparent strip under the wooden shelf in order to protect it from any condensation which may form.
Advice regarding the first wash cycle
After the installation, remove the stoppers from the racks and the retaining elastic elements from the upper rack, if any. Immediately before the fist washing, completely fill the salt dispenser with water and add only then approximately 1 kg of salt (see chapter entitled Rinse aid and refined salt). The water may overflow: this is normal and is not a cause for concern. Select the water hardness value (see chapter entitled Rinse aid and refined salt). - After the salt has been poured into the machine, the LOW SALT indicator light* switches off.
A If the salt container is not filled, the water softener and the heating element may be damaged as a result.
The machine has a buzzer/set of tones (depending on the dishwasher model) to inform the user that a command has been implemented: power on, cycle end etc.
The symbols/indicator lights/LEDs on the control panel/ display may vary in colour and may have a flashing or fixed light (depending on the dishwasher model).
| Technical data | |
| Dimensions | width 59,5 cm height 82 cm depth 57 cm |
| Capacity | 13 standard place-settings |
| Water supply pressure | 0,05 ÷ 1MPa (0.5 ÷ 10 bar) 7,25 – 145 psi |
| Power supply voltage | See appliance data plate |
| Total absorbed power | See appliance data plate |
| Fuse | See appliance data plate |
| CE | This dishwasher conforms to the following European Community Directives: -2006/95/EC (Low Voltage) -2004/108/EC (Electromagnetic Compatibility) -2009/125/EC (Comm. Reg. 1016/2010) (Ecodesign) -97/17/EC (Labelling) -2012/19/EU Waste Electrical and Electronic Equipment (WEEE) |

Overall view
- Upper rack
- Upper sprayer arm
- Tip-up compartments
- Rack height adjuster
- Lower rack
- Lower sprayer arm
- Washing filter
- Salt dispenser
- Detergent dispenser, rinse-aid dispenser and Active Oxygen device*
- Data plate
- Control panel***

Control panel
The number and type of wash cycles and options may vary depending on the dishwasher model.
Tips
Before loading the racks, remove all food residues from the crockery and empty liquids from glasses and containers. No preventive rinsing is needed under running water.
Arrange the crockery so that it is held in place firmly and does not tip over; and arrange the containers with the openings facing downwards and the concave/convex parts placed obliquely, thus allowing the water to reach every surface and flow freely.
Make sure that the lids, handles, trays and frying pans do not prevent the sprayer arms from rotating. Place any small items in the cutlery basket.
Since plastic dishes and non-stick frying pans usually retain more water drops, their drying will be not so good as that of ceramic or stainless-steel dishes.
Lightweight items such as plastic containers should be placed in the upper rack and arranged so that they cannot move.
After loading the appliance, make sure that the sprayer arms can rotate freely.
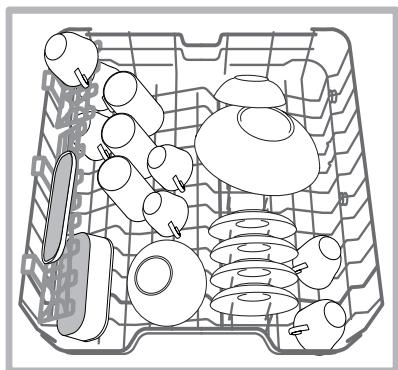
Lower rack
The lower rack can hold pans, lids, dishes, salad bowls, cutlery etc. Large plates and lids should ideally be placed at the sides.
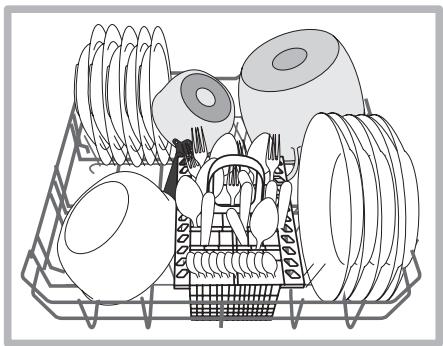
Very soiled dishes and pans should be placed in the lower rack because in this sector the water sprays are stronger and allow a higher washing performance.
*Only available in selected models with different numbers and positions.
Several dishwasher models are fitted with tip-up sectors*. They can be used in a vertical position when arranging dishes or in a horizontal position (lower) to load pans and salad bowls easily.
Cutlery basket
The basket is equipped with top grilles for improved cutlery arrangement. The cutlery basket should be positioned only at the front of the lower rack
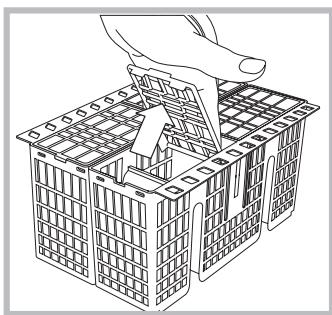
Knives and other utensils with sharp edges must be placed in the cutlery basket with the points facing downwards or they must be positioned horizontally in the tip-up compartments on the upper rack
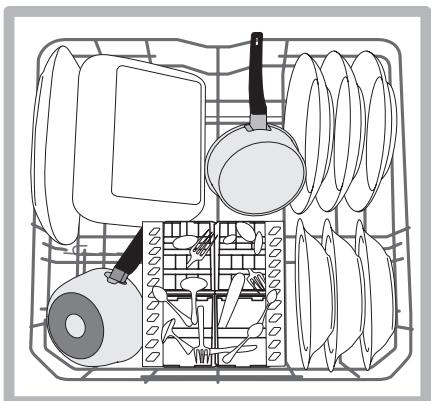
Upper rack
Load this rack with delicate and lightweight crockery such as glasses, cups, saucers and shallow salad bowls.
Several dishwasher models are fitted with tip-up sectors*. They can be used in a vertical position when arranging tea/ dessert saucers or in a lower position to load bowls and food containers.
Tip-up compartments with adjustable position
The side tip-up compartments can be positioned at three different heights to optimize the arrangement of crockery inside the rack.
Wine glasses can be placed safely in the tip-up compartments by inserting the stem of each glass into the corresponding slots.

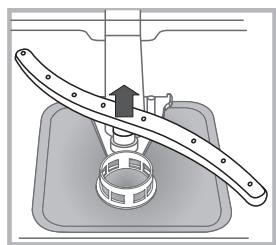
The upper rack can be adjusted for height based on requirements: high position to place bulky crockery in the lower rack and low position to make the most of the tip-up compartments/sectors by creating more space upwards.
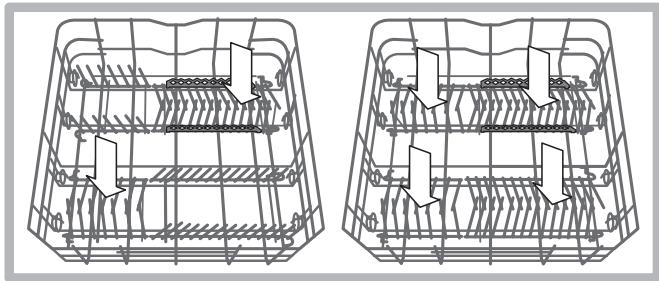
Adjusting the height of the upper rack
In order to make it easier to arrange the crockery, the upper rack may be moved to a higher or lower position.
The height of the upper rack should be adjusted WHEN THE RACK IS EMPTY.
NEVER raise or lower the rack on one side only.
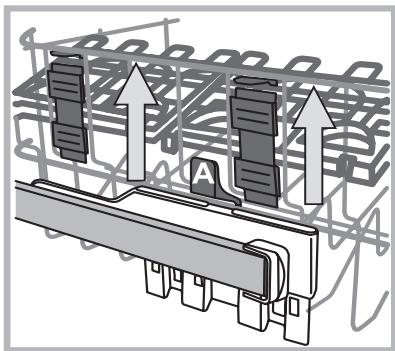
If the rack is equipped with a Lift-Up device* (see figure), lift it up by holding its sides. To restore the lower position, press the levers (A) at the sides of the rack and follow the rack down.
Unsuitable crockery
Wooden crockery and cutlery.
- Delicate decorated glasses, artistic handicraft and antique crockery. Their decorations are not resistant.
- Parts in synthetic material which do not withstand high temperatures.
Copper and tin crockery.
- Crockery soiled with ash, wax, lubricating grease or ink.
The colours of glass decorations and aluminium/silver pieces can change and fade during the washing process. Some types of glass (e.g. crystal objects) can become opaque after a number of wash cycles too.
Damage to glass and crockery
Caused by:
- Type of glass and glass production process.
Chemical composition of detergent.
Water temperature of rinse cycle.
Tips:
- Only use glasses and porcelain guaranteed by the manufacturer as dishwasher safe.
- Use a delicate detergent suitable for crockery.
-
Collect glasses and cutlery from the dishwasher as soon as the wash cycle is over.
-
Only available in selected models.
Starting the dishwasher
- Turn the water tap on.
- Open the door and press the ON/OFF button.
- Measure out the detergent. (see adjacent information).
- Load the racks (see Loading the racks).
- Select the wash cycle in accordance with the type of crockery and its soil level (see Table of wash cycles) by pressing the P button.
- Select the wash options*. (see Special wash cycles and Options).
- Start the wash cycle by shutting the door.
- The end of the wash cycle is indicated by beeps and by the flashing of the indicator light of the selected wash cycle. Open the door, switch off the appliance by pressing the ON/OFF button, shut off the water tap and unplug the appliance from the electricity socket.
- Wait a few minutes before removing the crockery in order to avoid burns. Unload the racks, beginning with the lower level.
A - The machine will switch off automatically during long periods of inactivity in order to minimise electricity consumption.
A If the crockery is only lightly soiled or if it has been rinsed with water before being placed in the dishwasher, reduce the amount of detergent used accordingly.
Changing a wash cycle in progress
If a mistake was made in the wash cycle selection process, it is possible to change the cycle provided that it has only just begun: open the door, taking care to avoid the escaping steam, and press and hold the ON/OFF button; the machine will switch off. Switch the machine back on using the ON/OFF button and select the new wash cycle and any options desired; start the cycle by closing the door.
Adding extra crockery
Without switching off the machine, open the door, taking care to avoid the escaping steam, and place the crockery inside the dishwasher. Close the door: the cycle starts from the point at which it was interrupted.
Accidental interruptions
If the door is opened during the wash cycle or there is a power cut, the cycle stops. It starts again from the point at which it was interrupted once the door has been shut or the electricity supply restored.
- Only available in selected models.
Measuring out the detergent
A good wash result also depends on the correct amount of detergent being used. Exceeding the stated amount does not result in a more effective wash and increases environmental pollution.
Based on how soiled the items are, the amount can be adjusted to individual cases using powder or liquid detergent.
In the case of normally soiled items, use approximately either 35 gr (powder detergent) or 35 ml (liquid detergent). If tablets are used, one tablet will be enough.
If the crockery is only lightly soiled or if it has been rinsed with water before being placed in the dishwasher, reduce the amount of detergent used accordingly.
For good washing results also follow the instructions shown on the detergent box.
For further questions please ask the detergent producers' Advice Offices.
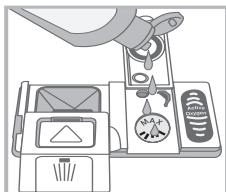
To open the detergent dispenser use the opening device "A".
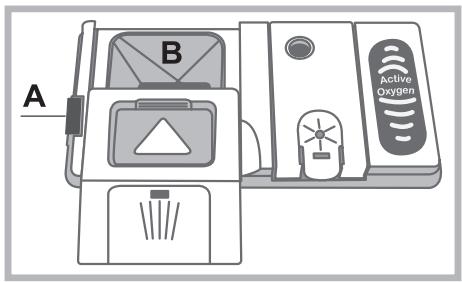
Introduce the detergent into the dry dispenser "B" only. Place the amount of detergent for pre-washing directly inside the tub.
-
When measuring out the detergent refer to the Table of wash cycles to add the proper quantity. Compartment B comprises a level showing the maximum quantity of liquid or powder detergent that can be added to each cycle.
-
Remove detergent residues from the edges of the dispenser and close the cover until it clicks.
-
Close the lid of the detergent dispenser by pulling it up until the closing device is secured in place.
The detergent dispenser automatically opens up at the right time according to the wash cycle.
If all-in-one detergents are used, we recommend using the TABS option, because it adjusts the cycle so that the best washing and drying results are always achieved.
A Only use detergent which has been specifically designed for dishwashers.
DO NOT USE washing-up liquid.
Using excessive detergent may result in foam residue remaining in the machine after the cycle has ended.
The use of tablets is only recommended for models which offer the MULTI-FUNCTIONAL TABLETS option.
To achieve the best results from each washing and drying cycle, powder detergent, liquid rinse aid and salt should be used.
Wash-cycle data is measured under laboratory conditions according to European Standard EN 50242.
Based on the different conditions of use, the wash-cycle duration and data can change.

The number and type of wash cycles and options may vary depending on the dishwasher model.
| Wash Cycle | Drying | Options | Wash Cycle Duration | Water Consumption (l/ cycle) | Energy Consumption (kWh/cycle) |
| 1. Eco | Yes | No | 03:10' | 11,0 | 1,04 |
| 2. Intensive | Yes | No | 02:30' | 16,5 | 1,70 |
| 3. Normal | Yes | No | 02:00' | 16,0 | 1,40 |
| 4. Prewash | No | No | 00:10' | 4,0 | 0,01 |
Instructions on wash-cycle selection and detergent dosage
- The ECO wash cycle is the standard cycle to which the energy label data refers. It can be used to wash crockery with a normal soil level and is the most efficient cycle in terms of energy and water consumption for this type of crockery.
27 gr/ml + 6 gr/ml* - 1 Tab (Quantity of pre-washing detergent) - Heavily soiled dishes and pans (not to be used for delicate items). 30 gr/ml - 1 Tab
- Normally soiled pans and dishes. 27gr / ml + 6gr / ml^** - 1 Tab
- Pre-wash while awaiting completion of the load with the dishes from the next meal. No detergent.
Standby consumption: Left-on mode consumption: 5,0 W - Off mode consumption: 0.5 W
Notes:
To reduce consumption, only run the dishwasher when it is full.
Note for Test Laboratories: for information on comparative EN testing conditions, please send an email to the following address: assistenza_en_lvs@indesitcompany.com
Rinse aid and refined salt
A Only use products which have been specifically designed for dishwashers.
Do not use table/industrial salt or washing-up liquid.
Follow the instructions given on the packaging.
A If using a multi-functional product it is not necessary to add any rinse aid. However, we recommend that you add salt, especially if you live in an area where the water is hard or very hard. (Follow the instructions given on the packaging).
If you do not add salt or rinse aid, the LOW SALT* and LOW RINSE AID indicator lights will stay lit.
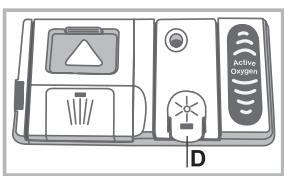
Measuring out the rinse aid
Rinse aid makes it easier for the crockery to dry, as water runs off the surfaces more readily and therefore does not leave streaks or marks. The rinse aid dispenser should be filled:
- When the LOW RINSE AID indicator light* on the control panel is illuminated, a reserve supply of rinse aid is still available for 1-2 cycles;
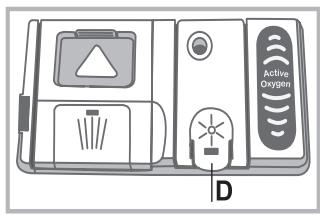
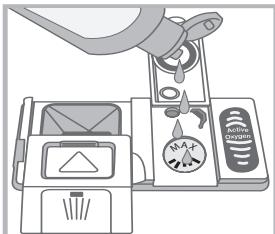
- Open the dispenser "D" by pressing and pulling up the tab on the lid;
- Carefully introduce the rinse aid as far as the maximum reference notch of the filling space - avoid spilling it. If this happens, clean the spill immediately with a dry cloth.
- Press the lid down until you hear a click to close it.
NEVER pour the rinse aid directly into the appliance tub.
Rinse-aid dispenser setting
If you are not completely satisfied with the drying results, you can adjust the quantity of rinse aid.
Switch the dishwasher on and off using the On/Off button. Press the P button 3 times. Switch on using the ON/OFF button, the indicator light of the set level flashes (set to factory level).
Adjust the level of rinse aid supply using the P button; during this procedure the rinse aid indicator light flashes.
Press the ON/OFF button to save the setting.
If the rinse aid level is set to ZERO (ECO cycle), no rinse aid will be supplied. The LOW RINSE AID indicator light will not be lit if you run out of rinse aid.
Up to maximum 4 levels can be set based on the dishwasher model.
- If there are streaks on the crockery, set the adjustment device to a lower number (1-2.)
- If there are drops of water or limescale marks, set the adjustment device to a higher number (3-4.)
Setting the water hardness
Every dishwasher is equipped with a water softener which, by using refined salt specially designed for this type of appliance, supplies water without limescale which is then used to wash the crockery.
This dishwasher offers a setting which helps to reduce pollution and optimises washing performance in accordance with the water hardness level in your area. This information can be obtained from your local water supplier.
Switch the dishwasher on and off using the ON/OFF button. Press and hold the P button for a few seconds until you hear a beep sound. Switch the dishwasher on using the ON/OFF button, the indicator light of the set level flashes (water softener set to medium level).
During this procedure the salt indicator light flashes.
Adjust the hardness level using the P button, (1-2-3-4see water hardness table) up to max. 4 levels.
Press the ON/OFF button to save the setting.
Even if using multi-functional tablets, the salt dispenser should still be filled.
| Water Hardness Table | Average salt container capacity duration** | |||
| level | °dH | °F | mmol/l | months |
| 1 | 0 - 11 | 0 - 20 | 1,1 - 2 | 5 months |
| 2 | 12 - 17 | 21 - 30 | 2,1 - 3 | 3 months |
| 3 | 17 - 34 | 31 - 60 | 3,1 - 6 | 2 months |
| 4* | 34 - 50 | 61 - 90 | 6,1 - 9 | 2/3 weeks |
| For values between 0°f and 10°f, we do not recommend the use of salt. * this setting may cause a slight increase in the duration of the cycles. ** for 1 wash cycle per day. | ||||
(^ dH)= hardness measured in German degrees - ^ f = hardness measured in French degrees - mmol/l = millimoles per litre)
Measuring out the refined salt
In order to obtain the best possible results from a wash cycle, make sure that the salt dispenser is never empty.
Refined salt removes limescale from the water, thus avoiding the formation of deposits on crockery.
The salt dispenser is located in the lower part of the dishwasher (see Description) and should be filled:
- When the green float cannot be seen by simply looking at the cap of the salt dispenser;
- When the LOW RINSE AID indicator light on the control panel is illuminated :

- Remove the lower rack and unscrew the cap (anticlockwise).
- The first time you do this: fill the water tank right up to its edge.
- Position the funnel (see figure) and fill the salt dispenser up to the edge (approximately
1 kg). It is normal for a little water to leak out.
- Remove the funnel* and wipe any salt residues away from the opening; rinse the cap under running water and then screw it on, the head facing downwards so as to let the water flow out of the four slots (star-shaped arrangement) in the lower part of the cap (cap with green float*).
It is advisable to perform this procedure every time you add salt to the dispenser.
Make sure the cap is screwed on tightly so that no detergent can get into the container during the wash cycle (this could damage the water softener beyond repair).
A When necessary, measure out the salt before a wash cycle so that any saline solution which has leaked out of the salt dispenser is removed.
- Only available in selected models.
Shutting off the water and electricity supplies
- Turn off the water tap after every wash cycle to avoid leaks.
- Always unplug the appliance when cleaning it and when performing maintenance work.
Cleaning the dishwasher
- The external surfaces of the machine and the control panel can be cleaned using a non-abrasive cloth which has been dampened with water. Do not use solvents or abrasive products.
- Any marks on the inside of the appliance may be removed using a cloth dampened with water and a little vinegar.
Preventing unpleasant odours
Always keep the door of the appliance ajar in order to avoid moisture from forming and being trapped inside the machine.
- Clean the seals around the door and detergent dispensers regularly using a damp sponge. This will avoid food becoming trapped in the seals, which is the main cause behind the formation of unpleasant odours.
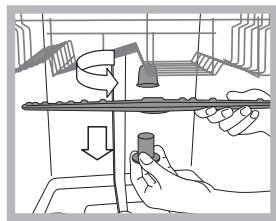
Cleaning the sprayer arms
Food residue may become encrusted onto the sprayer arms and block the holes used to spray the water. It is therefore recommended that you check the arms from time to time and clean them with a small non-metallic brush.
The two sprayer arms may both be removed.
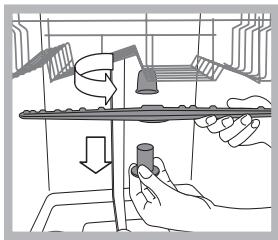
To remove the upper sprayer arm, turn the plastic locking ring in an anti-clockwise direction. The upper sprayer arm should be replaced so that the side with the greater number of holes is facing upwards.
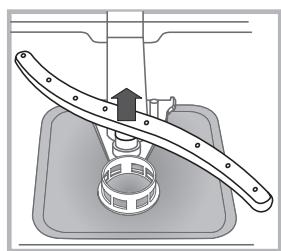
The lower sprayer arm can be removed by pressing on the side tabs and pulling it upwards.
Cleaning the water inlet filter*
If the water hoses are new or have not been used for an extended period of time, let the water run to make sure it is clear and free of impurities before performing the necessary connections. If this precaution is not taken, the water inlet could become blocked and damage the dishwasher.
A Clean the water inlet filter at the tap outlet regularly.
- Turn off the water tap.
- Unscrew the end of the water inlet hose, remove the filter and clean it carefully under running water.
- Re-place the filter and screw the water hose back into position.
Cleaning the filters
The filter assembly consists of three filters which remove food residues from the washing water and then recirculate the water. They should be cleaned if you wish to achieve the best results in every wash.
Clean the filters regularly.
A The dishwasher should not be used without filters or if the filter is loose.
- After several washes, check the filter assembly and if necessary clean it thoroughly under running water, using a non-metallic brush and following the instructions below:
1. Turn the cylindrical filter C in an anti-clockwise direction and pull it out (fig. 1).
2. Remove the cup filter B by exerting a slight pressure on the side flaps (fig. 2);
3. Slide out the stainless-steel plate filter A. (fig. 3).
4. Inspect the trap and remove any food residues. NEVER REMOVE the wash-cycle pump protection (black detail) (fig.4).
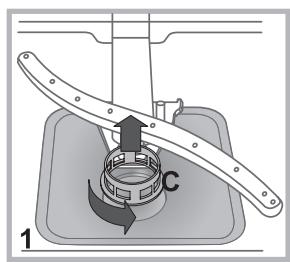
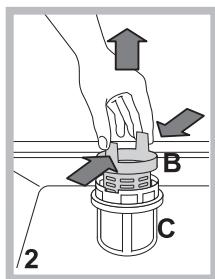
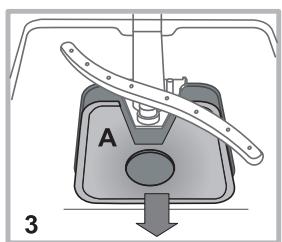
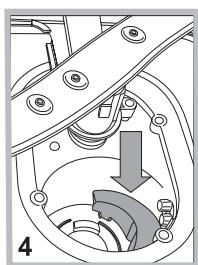
After cleaning the filters, re-place the filter assembly and fix it in position correctly; this is essential for maintaining the efficient operation of the dishwasher.
Leaving the machine unused for extended periods
- Disconnect the appliance from the electricity supply and shut off the water tap.
- Leave the door of the appliance ajar.
-
When you return, run a wash cycle when the dishwasher is empty.
-
Only available in selected models.
Whenever the appliance fails to work, check for a solution from the following list before calling for Assistance.
| Problem: | Possible causes / Solutions: |
| The dishwasher does not start or cannot be controlled. | • Switch off the appliance by pressing the ON/OFF button, switch it back on after approximately one minute and reset the program. • The appliance has not been plugged in properly. • The dishwasher door has not been shut properly. |
| The door won't close. | • The lock was released. Strongly push the door until a "clacking" noise is heard. |
| No water drains out from the dishwasher. | • The dishwasher cycle has not yet finished. • The water inlet hose is bent (see Installation). • The drain duct is blocked. • The filter is clogged up with food residues. |
| The dishwasher makes excessive noise. | • The dishes are rattling against each other or against the sprayer arms. • Excessive foam presence: the detergent has not been measured out correctly or it is not suitable for use in dishwashers. (see Start-up and use). |
| The dishes and glasses are covered in a white film or limescale deposits. | • The level of the refined salt is low or the dosage setting is not suited to the hardness of the water (see Rinse aid and salt). • The lid on the salt dispenser is not closed properly. • The rinse aid has been used up or the dosage is too low. |
| The dishes and glasses are streaked or have a bluish tinge. | • The rinse aid dosage is too high. |
| The crockery has not been dried properly. | • A wash cycle without a drying programme has been selected. • The rinse aid has been used up or the dosage is too low (see Rinse aid and salt). • The rinse aid dispenser setting is not high enough. • The crockery is made from non-stick material or plastic. |
| The dishes are not clean. | • The racks are overloaded (see Loading the racks). • The crockery has not been arranged well. • The sprayer arms cannot move freely. • The wash cycle is too gentle (see Wash cycles). • Excessive foam presence: the detergent has not been measured out correctly or it is not suitable for use in dishwashers. (see Start-up and use). • The lid on the rinse aid compartment has not been shut correctly. • The filter is dirty or blocked (see Care and maintenance). • The refined salt level is low (see Rinse aid and salt). |
| The dishwasher does not take any water in - Tap shut-off alarm. (beeps are emitted* and all the cycle indicator lights flash. The ON/OFF indicator light flashes rapidly and the 2nd and 3rd wash cycle indicator lights flash. | • There is no water in the mains supply. • The water inlet hose is bent (see Installation.) • Turn on the tap and the appliance will start after a few minutes. • The appliance lock has been activated because no action was taken when the beeps sounded. • Switch off the machine using the ON/OFF button, turn on the tap and switch the machine back on after a few seconds by pressing the same button. Re-program the appliance and restart the wash cycle. |
- Only available in selected models.
FR
Français, 29
Sommaire
A 3NeKtpnueckoe IN BODOpPOBODHOI NOIDCOEINHeHMAuHNbI DOJXHBi BbInONHrTbCRO TOnbKO KBaINΦNcIPoBAHbIM TEXHkOM.
A NocydomoeuHa MaunHa He doJxHa daBHTb Ha Tpy6blnHa npoBod 3neKtponTuHn.
A N3dJIne DoJXHO 6bITb NOcOeINHeNo K BOJOpBOy npn oMOuN HObIX Tpy6. He nCpOJIb3yIte 6/y Tpy6bl.
TpybI pOaH NBObl n CnBa n npOBd 3JeKtpOnHTAHnMy MOryt bIt hAnpabJIeHbI BnpaBO nJIN BNeBO dJa ONTImaJIbHOJ yCTaHOBKn MaShInHbI.
IopcoeHHeHne 7JnaHra noaun BObl
K kpaHy xoIOnIOH BOIbI: npOHy npBnHTnte Tpy6y nOaun BOIbIK paHy cpe3bObYbIM OTBepCTneM 3/4 ra3. IpePe3aKpyTKoI daIte CTeHy BOe Do Tex nop, Noka OHa He CTaHET pO3paHNO BO n36exAHne 3acOpEHnMaShnHb HeuNCTOTAMN.
Kkpanhy ropauey BObI: eCNB B aWSeM DOME CEHTpAlN3OBaHHa nCTema OTOpJIeHn, NOCyDOMOeHnA MaUInHa MOKeT 6bITb 3aNtHa ropaey BOoN i3 BOOpnpBOoda, eCN TEmpePaTypa BObI He npEByIshaet 60^
A IpnBnHTnte Tpy6y K KpaHy, KaK OnPcHaHO BblSe dIra NOdCOeDInHeHry XoJOnHOH BObl.
EcnI nnHa BOJOpOBoHOrO IJaHra 6ydt HeIOCTaTOHOn, CneDyET ObaTbCBA CnEuaN3uPObaHHbIM Mara3IN NJI K yNoIHomOeHHOMy caHTexHky (cm. TexHueckoe oBcIyKbAHHe).
A DabnHeHne BOdbI DOJXHO 6bITb B IpeJeIax 3HaueHni, yka3aHHbIX B Ta6nIe TexHnueckne daHHbIe (CM. c6Oky).
IpoBepbTe, YTo6bl BOOpOBoHbI IlaHr He 6bl 3aIOMJIe Hnn cKaT.
IopcoeHHeHne cInBHoro JlnaHra
IopcoeHnHTe cINBHOJ UaHr, He crnbA erO, K CInBHomTypboNPOBOyC MmHMaJIbHbIM DnaMeTpOM 4 CM.
CnBHOJ 7JIaHr DOnJKeH 6bITb paCNoIooKeH Ha BbICote OT 40 Do 80 cm OT nOJa HIN OT pJaTΦOpMbI NocyDOMoeHNO MaunHbI (A).
Ipeep noDcoeINHeHnem CInBHorO ⅢaHaRa K cnfoHy MoKn CHIMITE pnaCTNKOByIO np6ky (B).
3aunTa npOTnB 3aTOnJIeHnA
Bo n36eJahne 3aToPJIeHnI NocyDmOeHuHa MaShHa:
- OchaueHa CnCTeMoI, NpeKpbBaUeI IOnaUy BoIb CnUyae aHOMaJIIN INI INBHTpeHHNX yTeueK.
HeKoTOpbIe MoDEni OChaSeHbI DOnOJIHnTeJIbHbIM 3aUHTbIM yCtpoJcTBOM New Acqua Stop*, npedoxpaHraIoum OT 3aTOnJIeHn DaKe B Cnyuae pa3pbIbBa BOOnpOBoHDoro ShlaHa.

BHIMAHNE: ONACHOE HANPJXEHNE!
Kateropnueckn 3anpeaetcnope3aTb IlaHr noaBn BObl, TAK KaK BdoJIb Hero npoxoJr 3JeMeHTbI NOHapJxKeHnEM.
3neKtpnueckoe noDcoeHHeHne
Ipeep noDcoeHHeHem BnJIK MaunHb K 3neKtpuecko np03tke Heo6xOIMO npOBepntcneDuOee:
- ceTeBa r po3eTKa dONKHa 6bIb CoEiHHeHa C 3a3eMJIeHnEM I COOTBeTCTBOBaTb HOpMaTtBAM;
3JNEKtpnueckarpo3etkaDoljxHa6bItbPaccuTaHaHa MaKcImaJIbHyO Ntpe6IeMyo MoUHocTbN3JeIny, yKa3aHHyO Ha 3aBODCKoTabnueKe, paCNoIooKeHHo C BHYTpHenCTopoHbI DBepuI.
(CM. Onicahne nocydomoeuHoi MaLHHbI);
- HanpjaKeHne cETn 3NEkTPoNTaHnI DOJXHO COOTBeCTBOBaTb DaHHbIM Ha nacnopTHoN TaBnUcKe, paCNOJoxeHHo C BHYTpHeHc CTOpObI DBePcbl MaunHbI;
Cetebarpo3eTKaDOJXHa6bItbCOBMeCTUMaCoUTeNCJIbHOI BnIKo n3dennr. B npOTnbHOM cnyuae npuynte 3amEny BnIKn yNoJNHOMOeHHOMy TexHnky (cM. TexHnueckoe obcnyKbaHHe), He nCOnb3yIte YdNInHtEnn n TpOHNk.
A N3dJIne DOJIKHO 6bITb yCTaHOBNeHO TaKIM O6pa3OM, YTO6bl npOBOD 3JNEKTponHTAHnI N 3JNEKTpopo3eTka 6bln JERKO D0CTynHbI.
A Cetebo Ka6enb N3deHn He DoJxhen 6bItb CoHyt nn cXaT.
A EcnI cTeBoi Ka6eIb NOBpeKdEh, BO n36eXaHne ONaCHOCTn nopuynte erO 3aMeHy npOn3BOuNTeIIO u3DeJIyN IIN yNoIHOMoUeHHOMy LcHTpy TexHnueCKOrO o6CnyKuBaHn. (CM. TexHnueCKoe o6CnyKuBaHne)
Пленka 3ацntыl OT KOндсcaTata*
Iocne yctahOBKn nocydomoeyHm MaunHBn Hnuy KxohHoro 3JeMeNTa OTKpoTte ee dBepu N hakNeIe np03paHyO cAMOKJIeayIOc pNOLOCKy CHN3y DepeBraHHo KxOHHO pa6Oey NOBepxHOCTn DnAee 3aunTbI OT BO3MOXHO KOHDeHCata.
PpeDynpexdHnno nepBomy nCpOJIb3ObaHnIO MaunHbI
Iocne moHTaxa BbHyTb 3aflnyuShK, yCTaHOBJIeHHbIe Ha KOp3nHax, IN CHrTb KpeNEXHbIe pe3nHKn C BepxHeN KOp3nHbI (ecnn NMeOTc).
HenocpeDCTBeHHO nepei nepBoi MoKoI, HENOCpeDCTBeHHO nepei nepBbIM uNKlOM MoKn 3aONHnTe 6aQk CoN BDOi n 3acblte B Hero npimepHo 1 Kr CoN (cm. pa3deI OnonackuameIb u peaehepupuyoua coNb): ecn BOa bJET BbITEKaTb N3 6aUka, 3TO HopMaJIbHOe ABLHeNc. BbIbepnte CTeneHb JxecTKoCTn BObl (cm. pa3deI OnonackuameIb u peaehepupuyoua coNb).
- Поспе загузк соли Иndикатор OTCYTCTBUE COJIИ* rachat.
A Ecni 6aOK He 6yET 3aONHeN COJIbO, CMrYHTeJIb BObl HArpeBaTeIbHbI 3JEMeHT MOrT NOBpeDITbcR.
Maunha OchauheHa akyctnueckmM/3ByKOBBIMn CnHanaM (B 3abncmocTH OT MOeJIN IocydomoeyHOJ Maunhbl), KOTOpbIe npedynpeXdaIOT O BblIOJIHeHHN KOMaHdbI: BKIIoucheHne, KOHeu cKKnla n T.n.
CmBOn/HHnKaTopbHa KOHcOnn ynpaBneHna/Dncnnee MOryT mMeTb pa3HbIe cBeta, MrrA Tb NIn RopeTb NOCTOHHo. (B 3aBNCMOCTH OT MOeJI NocCyDoomoeHoh MaunHbI).
A EcnBbI He doabnre Hn CoN, HN ONoNAcKBaTeJn, nHnDkaTOpbl OTCYCTCBNE COJN* n OTCYCTCBNE OONJACKNBATEJ* 6ydt Bcerda ropeTb, yTO YBnraTeCn HOpMaJIbHbIM.
3aJIbKb OJIoJaCKnBaTeJIa
OnonacknBaTeB obneryaeT cyuKy nocdybI, TaK kaB Oda lyuwe cTeKaET C ee NOBepxHocTHN, Hn Na nocyu TAKIM o6pa3OM He ocTaetc pa3BOIoB nIn nIeTeH. Heo6xoJMo dOJIHTb onoJaacknBaTeB B Do3aTop:
KoTda Ha KOHcOnn ynpaBleHna 3aropaetc HndkaTop OTCYTCTBNE ONOLACKNBATEJ*, octatochnoe KOJIueCTBO ONONACKNBATEJXBAITNT ehe Ha 1-2 zikna;
- OtkpoeTe Do3aTOp "D", Haxkab HaЯ3bIyOK nNoJHbEero Ha KpbIuKe;
- Ocopoxho 3aJeTe ononacknBaTeIb Do MaKcMaJIbHOI OTMeTkn Do3aTopa, n36eRa erO yTeKn. EcnBbl CnyauHIO npOIJIN OnonacknBaTeIb MIMO Do3aTopa, ydaJIte N3NIWeK cyxoi ry6koi.
- 3akpoTe KpbIuKy C uenHcOM.
HKNKOrIa He 3aJIbAte OOnJaCKnBaTeIb HEnOcpeDCTBeHHo B MoeHyIO KaMepy MaunHbl.
D03npoBaHne onoJaCKnBaTeJra
EcnBac He yOBoNtBopRyTe KaYeCTBO cyuKn, MoXHO OtperyNuPoBaT do3y onoJaCKNbATEn.
BkIIOUHTe N BbIKIOUHTe NocydomOeHyu MaunHy KHOKNKO BKJ./BbIKJ. HaxMITE KHOKNy P 3 pa3a. BKIIIOHTe MaunHy KHOKNKO BKJ./BbIKJ. Miraet INHdNkaTOP nporpaMMb 3aDaHHoN Do3bl (3abODCKAHaCTpOJa). OtperynUpyTe Do3npOBaHne ONOpackBaHnRA KHOKNoP B npoceCE BblONHeHn 3ToI ONepaun INHdNkaTOP onOnackBaTeTn Miraet.
Haxmnte KhoNky BKL./BblKl. dIra coxpanenHa cTpoKn. Do3y onoIaacknBaTeIe MoXHO hAcTpoNTb Ha HOnlb (ECO). B 3tOM cIyueae onoIaacknBaTeIb He IcNoJIb3yETc, n HdInkaTop OTCytCTBnI OonoIaacknBaTeIe No npuHHe erO OTCytCTBnI He 3aropaetc.
Moxho 3aataMaKcHymy 4CTeNEHIO3nPOBaHnB 3aBNCMOCTN OT MOeJI NocyDmOeHNo MaunHbI.
- ecn Ha nocyde octaOTcB 6enbIe pa3BOjbl, OTperpynpyTe NOdaCy ONoJaCKnBaTeJIHa MeHbWee 3NaYeHne (1-2).
- ecπi Ha nocyde OCTaIOTcK KaJIi BODbI NII INI IITHa HAKINI, OTperynpyte NoaCy ONoJaCKnBaTeJHa 6Oonee BbICOKoe 3NaueHne (3-4).
Bb6op cTepeH JecTKoCTN BoBi
Bce nocydomoeyhbe Maunhby ykomnneKTOBaHb cmyrntenem BOdbI, KOtOpbI 6JraOapra CneuaJIbHO pereHeepnpuyUeien COIN DnA NOcydOMoeyhIX MaunH ydaJIaRET N3BeCTb IN3 BOdbI,
NcNOJIb3yUOHeIeIgIyMbITbIPOcyDbI.
JaHHa NocydomoeyHaa MaunHa MoKet 6bItb HAcTpoHa TaKIM Oba3OM, YTO6bl COKpatNTb 3aRpa3HeHne OkpyKaHOSei Cpebl IN ONTMn3INPOBaT KaueCTBO MbITb NocyDbl 3aBNCMOCTN OT JecTKOCTN BObl. Bbl MOKeTe y3HaTb CTeNeHb JecTKOCTN BObl BAWeM paOnHe, ObaPATNBUnCb B OprAHn3aUIO BODOCHa6JxHna.
BkIIOHnTE n BbIKHOHTe NocydomOeHyU MaunHy KhoNkoBKJ./BbIKJI. DepxnTe haxaToN KhoNky P HeckoIbKO cekyNDo BkIIOHeHNA 3ByKOBOrO cInHaJa. BkIIOHnTe MaunHy KhoNkoBKJ./BbIKJI. Miraet nHdikatop nporpAmMb3aadHNo CTeneHN (CMrYHnJIb HAcTPOEH Ha CpeHIO CTeNEh JxecTKOCTN).
B npoecce BbIOpHeHnE 3ToI oepaun HndkaTOp cOnn Mraet.
Otperyu npyte CTeneHb XeCTKoCTN BOdbi KHOKNKO P; (1-2-3-4 CM. TaBnUcy XeCTKoCTN BOdbI) BnIOb I DO MAKcMmaJIbHOrO 4-OI CTeneHn.
Haxmnte KhONky BKN./BbIKN.ДЯ coxpaHEnHaHCTPOKn. EcIn Bbl nOJIb3yeTecb MHOrofoyHKUHOHaJIbHbIMn Ta6neTKaMn, 6aOK c pereHepnpuOe CoIbO DOJIKeH 6bITB JIO6OM CJIyuae 3aONHeH.
| Таблиca щecTKоCTN ВODы | Средnia автономность** бачок ду соли | |||
| уровен | °dH | °FH | mmol/l | Месясы |
| 1 | 0 - 11 | 0 - 20 | 1,1 - 2 | 5 месяец |
| 2 | 12 - 17 | 21 - 30 | 2,1 - 3 | 3 месяca |
| 3 | 17 - 34 | 31 - 60 | 3,1 - 6 | 2 месяа |
| 4* | 34 - 50 | 61 - 90 | 6,1 - 9 | 2/3 недени |
Or 0^ da 10^ pekomeHnyetcH He nCIOJIb3OBAbT coJIb.
* PIPN VCTAHOBKE 5. ПОДOLЖИТЕЛБНСТь LИКЛА мОЖET
YBENHITcR. ** 1 UNKIN B DEHB.
(^ d H = J ~ k e T K o C t b ) B HeMeueKnx rpaDycax - °fH = JeeCTKOCTb BO ΦρaHcy3ckNx rpaDycax - MMON/π = MmIMMOJIb/ΠItp)
3arpy3ka perehenpuyoceanoln
Дяхоршero pe3yntaTа мойн HeобхoДМО npOBepЯТь, YTO6bl 6aOK coJIHkoIgIa He 6bl nYCT.
PereHeppyuOaA coIb ydaIeT n3 BOI b I3BecTb, KOTopaB B npOTNBOM clyuae octaetc Ha nocyde.
CpeIcTBA npOTnB HnnpTbIX 3anaXOB
Bcerda octabJnTe DBepu MaunHbI nOly-npNkpBToI BO n36exaHne 3actoBlaXHOCTn.
- Perylaryno npouuau Te nepimetpaNbhe ynploTHen HnBepzbl ndo3aTopoB moUeero cpeDCTBa pni nmoOnn BnaXHo r6Kn. TaKIM o6pa3OM ydaIyOTc8 ocTaKN nn - OCHOBHO npuHbI o6pa3BaHnneHnpraTHbIX 3anaxOB.
Ucstka opocnteien
Octatkn Pnun MOryT npuJInHyTb K nonactm opocnteJe n 3acopntb OTBepCTna, n3 KOtOpbIX BbIXoNT Boa: Bpem O T BpemHn CJIeDyET npOBepTaB opocTeiN n IpouNiataBnx HEMetanJInueckoI ueTKoI.
O6a opocnteJRABJIOTcBcEMhbIM.
Дя сьема Верхимо орocntел небхODиmo OTBnHTnTb npOTnB чacobо CTPTeKN Пл actMaccOByU raRy. Верхни opocntel устанавлиbaetcг OTBepCTnЯMu Вверх.
Дясьеминжиморocител надмпe Haшнонс Cбokов n notarHTe erO BBepx.
OuNTka BOdHOro 0nIbTpa\*
EcnBODOpBOoHOBI INe cHn OH DoJIroe Bpem He IcNoIb3OBAJcR,peep NOcOeINHeHEm DaIte BoDe CTeYb DoTex np, poka OHa He CTaHET np03paHOn. HecobIOJeHne 3TOrO yCNOBm MOKeT npUBeCTN K 3acOpEHnO pINbTpA N K IOBpeKdENIO NocydomOeHNo MaunHbl.
A NepnoDnueckn OunuaiTe BoDhBn FInbTp, paCNoJoxeHHbHa Ha BbIXOe KpaHa.
-ПepeкpoIte BOIoPoPObHbI KpaH.
- OTKpyTnTe Kpa Tpy6bl 3aIrpY3Kn BObl, CHIMITE fNlBtp N aKKypaTHO npOMOIte ero nOd cTpyeB BObl.
- Choba BCTaBtE qnIbTp n 3akpeNITe Tpy6y.
YnCTKaФnJIbTpOBo
Фильтуюшиуз соctоNTИЗtpexФильтpoB,KOTope Cnykata OuchCTkn BOdbДЯ MOКи OT OCTaTKOB NIIJIu BO3BpauaTOBdy BцИркУЛЯЦИО:ДЯ XOPOUxpe3yIbTaTOB MOKN Heo6xOdmo npoUHsA TbФиьтpbI.
A Perynlaepno npouuzaai Te pfnbtpbl.
3anpeaetcnoIb3OBatbcnocydomoeyhoMaunHO63 cnIbTPOB nI C He3akpenHbIM nnIbTpOM.