
MICRO CASA S1CO - Coffee machine ELEKTRA - Free user manual and instructions
Find the device manual for free MICRO CASA S1CO ELEKTRA in PDF.
| Product type | Manual lever espresso machine |
| Brand | ELEKTRA |
| Model | MICRO CASA S1CO |
| Dimensions (H x W x D) | 45-49 cm (height) x 26 cm (base diameter) |
| Weight | 10 kg |
| Boiler capacity | 1.8 liters |
| Power supply | 110 V or 230-240 V, depending on version |
| Operating pressure | Indicated by pressure gauge between green and red indexes |
| Extraction system | Manual lever with distribution group |
| Included filters | 1 single cup filter and 1 double cup filter |
| Included accessories | Dosing spoon, tamper |
| Steam function | Steam wand for cappuccino, hot milk, etc. |
| Body material | Clear varnished steel |
| Cleaning | Damp soft cloth; do not immerse; regular cleaning of filters and nozzles |
| Safety | Drain boiler before filling; do not exceed 3/4 level; use on grounded circuit |
| Maintenance | Periodic descaling of steam nozzles; daily cleaning of groups |
| Repairability | Original spare parts available only from the manufacturer or authorized centers |
| Certifications | IMQ (Italy), VDE/GS (Germany), ELOT (Greece), CE (Europe), QAS (Australia) |
Frequently Asked Questions - MICRO CASA S1CO ELEKTRA
User questions about MICRO CASA S1CO ELEKTRA
0 question about this device. Answer the ones you know or ask your own.
Ask a new question about this device
Download the instructions for your Coffee machine in PDF format for free! Find your manual MICRO CASA S1CO - ELEKTRA and take your electronic device back in hand. On this page are published all the documents necessary for the use of your device. MICRO CASA S1CO by ELEKTRA.
USER MANUAL MICRO CASA S1CO ELEKTRA
ACCESSORI: A RICHIESTA
1) This booklet is an integral and essential part of the product and will have to be handed to the end user.
Carefully read the warnings contained in this booklet as they supply important information concerning safe installation, use and maintenance.
Store this booklet with care for any further need.
2) After removing the package ensure the appliance is whole and undamaged.
In case of doubt do not use the appliance and contact professionally qualified personnel.
The packaging materials (plastic bags, polystyrene, nails etc.) must not be left within reach of children as they could represent potential hazards.
3) Before connecting the machine make sure that the data on the plate correspond with those of the electric mains.
The plate is under the base of the machine.
Installation should be carried out in compliance with current regulations, according to the manufacturer's instructions.
Incorrect installation may cause damage to people, animals or objects, for which the manufacturer cannot be deemed responsible.
Electrical safety of this machine is obtained only when the same is connected correctly to an effectively grounded network, as set forth by current safety regulations.
It is necessary to comply with this fundamental safety pre-requisite and, in case of doubt, request accurate checks of the plant by professionally qualified personnel.
The manufacturer cannot be deemed responsible for any damage caused by not having grounded the machine.
Make sure that the current rating is suitable to the maximum power of the machine as stated on the plate.
In case of doubt contact a professionally qualified person.
This trained person will, in particular, also have to check that the wire section of the plant is suitable to the absorbed power of the machine.
It is not advisable to use adapters, multiple sockets and/or extender cords.
In case their use should be indispensable it is necessary to use only plugs, simple or multiple adapters and extender cords complying with current safety regulations, taking care not to exceed the current rating limit in current value, which is marked on simple adapters and extender cords, and the maximum power limit marked on the multiple adapter.
4) This machine will have to be employed only for its intended use.
Any other use has to be considered improper and therefore dangerous.
The maker cannot be deemed responsible for any damage caused by improper, wrong or unreasonable use.
5) The use of any electrical appliance implies some fundamental rules:
- Do not touch the appliance with wet or humid hands or feet;
- Do not use the appliance barefooted;
- Do not use extension cords in bathrooms or shower rooms;
- Do not pull the feeding cord to disconnect the appliance from the mains;
- Do not expose the appliance to the weather (rain, sunshine etc.), unless expressly expected;
- Do not allow children or not fully capable persons to use the appliance;
- Do not dip in water the appliance to clean it.
6) Before performing any maintenance operation, disconnect the appliance from the mains, unplugging it, or turning off the mains switch.
For cleaning operations follow strictly the instructions contained in this booklet.
7) In case of failure and/or malfunctioning of the appliance, turn it off, avoiding any attempt to repair it or intervene directly.
Contact exclusively professionally qualified personnel.
Any repairs will have to be performed exclusively by the manufacturers or by an authorized service centre, using exclusively original spare parts.
Failure to comply with the above mentioned directions may affect safety of the appliance.
8) To avoid dangerous overheating, we recommend unwinding completely the feeding cord.
9) Do not obstruct aspiration or dissipation grids.
In particular, do not cover the cup-warming surface with cloths or other objects.
10) The feeding cable of this appliance must not be replaced by the user.
In case it should be damaged, turn off the appliance and contact professionally qualified personnel for its replacement.
11) In case you should decide to stop using this kind of appliance, we recommend to make it inoperative by cutting off the feeding cord, after having disconnected the cord from the mains..
We also recommend to render harmless all those parts capable of posing potential hazards.
MICRO CASA PISTON & LEVER
ART. S1 - S1C - S1CO - S1CB

N 14

N. 13

N. 12

N 11
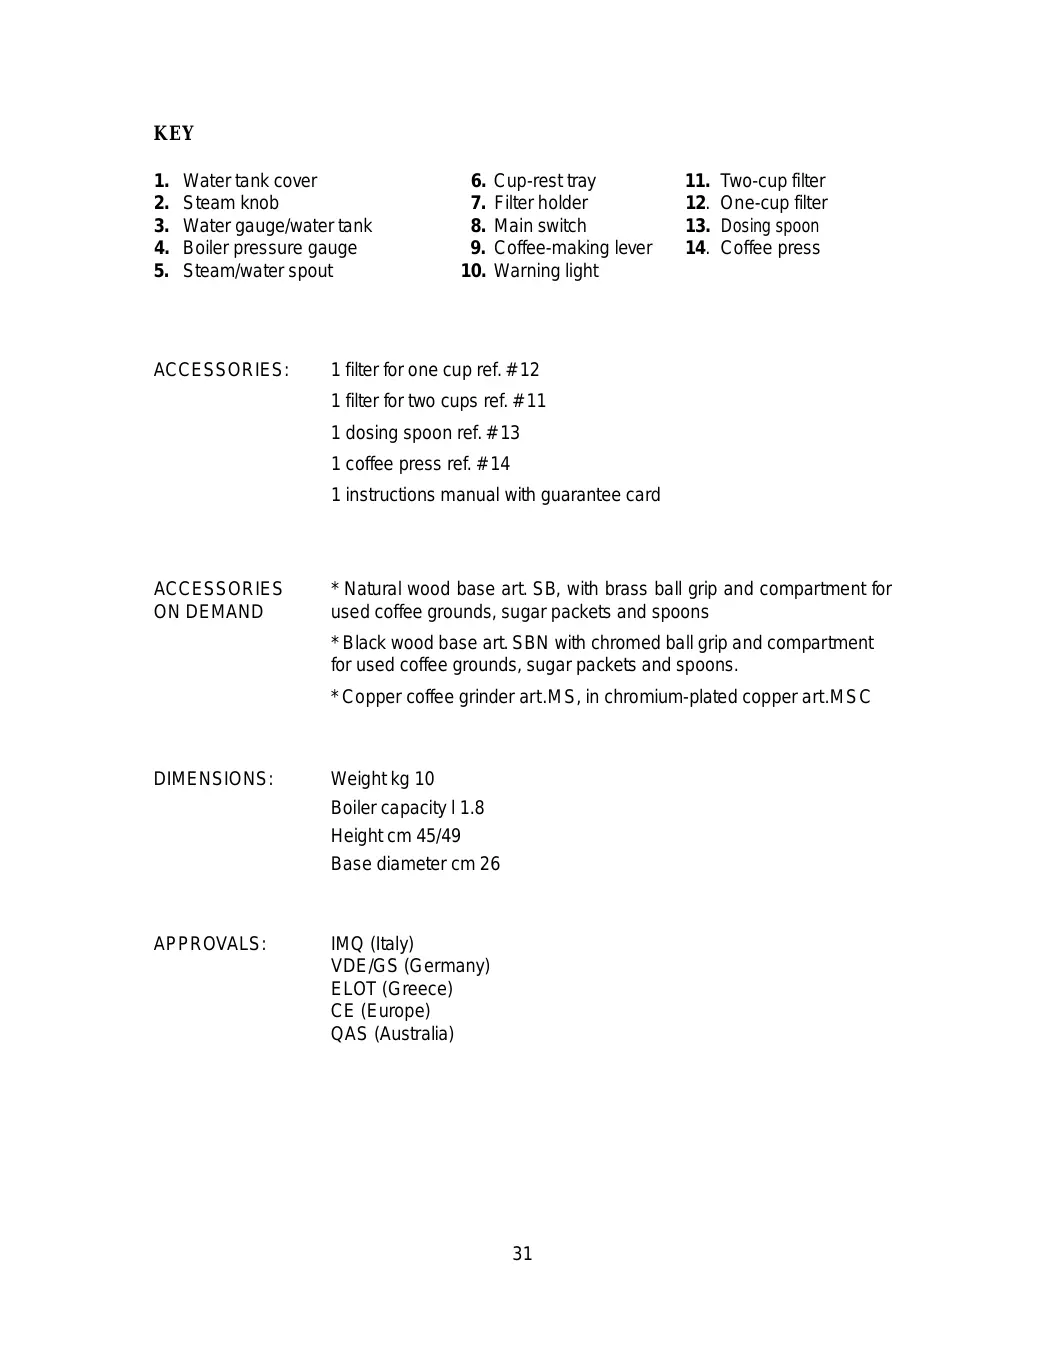
KEY
-
Water tank cover
-
Cup-rest tray
-
Two-cup filter
-
Steam knob
-
Filter holder
-
One-cup filter
-
Water gauge/water tank
-
Main switch
-
Dosing spoon
-
Boiler pressure gauge
-
Coffee-making lever
-
Coffee press
-
Steam/water spout
-
Warning light
ACCESSIONS:
1 filter for one cup ref. # 12
1 filter for two cups ref. # 11
1 dosing spoon ref. # 13
1 coffee press ref. # 14
1 instructions manual with guarantee card
ACCESSORIES ON DEMAND
- Natural wood base art. SB, with brass ball grip and compartment for used coffee grounds, sugar packets and spoons
- Black wood base art. SBN with chromed ball grip and compartment for used coffee grounds, sugar packets and spoons.
- Copper coffee grinder art.MS, in chromium-plated copper art.MSC
DIMENSIONS:
Weight kg 10
Boiler capacity I 1.8
Height cm 45/49
Base diameter cm 26
APPROVALS:
IMQ (Italy)
VDE/GS (Germany)
ELOT (Greece)
CE (Europe)
QAS (Australia)
DIRECTIONS FOR USE
- Always check water level before turning the machine on, because if there is no water the heating element might get damaged. Never fill the boiler above the maximum level of 3/4.
A) When first starting the machine, fill 3/4 of boiler # 3 with cold, drinkable water, lifting cover # 1 and loosening the safety valve top.
B) To turn the machine on press the main switch # 8 (To turn it off press it the other way).
C) Wait for the machine to reach the ideal temperature for perfect output, checking boiler pressure with gauge # 4, needle hand will have to be between the green and the red mark. Also check warning light # 10 which will come off only when optimum operating pressure is reached.
D) To help reaching optimum pressure, turn knob # 2 to blow off for a second and then bring the knob again in the normal/closed position.
- While reaching operating pressure, the machine might make soft boiling sounds which decrease once the pressure is reached.
E) Pull lever # 9 until some water drops come out of filter holder # 7; this operation has the purpose of bringing the brewing group to the perfect temperature.
F) After choosing the filter for one or two cups (# 12, # 11), put it in filter holder # 7, fill it with coffee with doser # 13 and press it with press # 14. Fill the filter until about 3mm underneath its rim.
G) Insert filter holder # 7 in its place. It will close tightly by turning it slightly.
H) Place one or two cups under the spouts of filter holder # 7.
I) Pull lever # 9, wait and release it only when the first drops of coffee start coming out. The lever will return to its starting position and the coffee will start coming out.
For perfect coffee, pull the lever again before it gets to the end of its run. Repeat this operation until you have reached the desired amount of coffee.
The coffee is perfectly ground when the drink comes out in drops for approximately 25-30 seconds.
L) The machine is equipped with a steam spout # 5 to make cappuccino, punch, hot chocolate and tea.
M) To obtain steam turn knob # 2. Let any condense run off first, after which steam will flow with force giving the desired result. Once this operation has been performed, turn steamer knob # 2 in the opposite direction.
- Warning! before filling the tank again:
1) turn the machine off by bringing the main switch # 8 into the "OFF" position,
2) turn steamer knob # 2 and wait for all the steam to come out and for the pressure gauge hand # 4 to be on 0 (zero).
Warning: never fill the boiler over 3/4.
All parts are baked with transparent glaze.
Warning: The machine should be cleaned only with a soft and damp cloth.
Store the packaging in a safe place.
* In case of removal or service the machine should be moved only in its original packaging to avoid any accidents during transport.
PREPARING COFFEE
A) Release the filter holder from the brewing group and throw coffee grounds in the suitable drawer taking care not to damage the filter rim.
B) Fill the filter with a dose of ground coffee, level and press slightly with the coffee press.
Take care no coffee is left on the filter rim. This is to ensure best tightness and to extend the life of the brewing group gasket.
C) Block the filter holder into the unit so it is tightened securely with the brewing group gasket.
D) Place cups under the spouts and start the unit by means of the lever.
E) When you have finished making the coffee leave the filter-holder into the unit until making another cup.
- To obtain good coffee, the grinding is extremely important. It should take 25-30 seconds to make the coffee.
- If the coffee is too coarse you will obtain light coffee with very little white crema, if it is too fine you will obtain dark coffee with no crema.
- A good quality coffee is obtained by using freshly ground coffee of even coarseness (which can be obtained only if the grinder has sharp mills) used in the right quantity (approximately 6/7 grams per dose).
- It is important to use freshly ground coffee, because once it has been ground it quickly loses its aroma, and the fat substances it contains go off. It is therefore advisable to try and finish it by the evening.
- Properly warm cups are extremely important in obtaining creamy coffee.
PREPARED CAPPUCCINO, MILK AND OTHER HOT DRINKS
Dip the spout connected to the steam tap into the drink to be heated, then turn the suitable knob to deliver steam to the spout.
The steam gurgles in the liquid releasing heat, bringing it to the boiling temperature. To whip up milk in order to make cappuccino, use a tall and narrow container filled in half, acting as follows:
A) Place the container underneath the steam spout so that the wand nozzle touches the bottom, turn the steam tap on and bring the milk nearly to the boil.
B) Lower the container so that the wand nozzle is near the surface of the milk, then move the container up and down so the wand nozzle gets in and out of the milk.
Perform this operation several times until the milk has frothed.
To make cappuccino add the hot and frothy milk to the hot coffee.
PREPARING TEA - CAMOMILE - ETC.
Heat up water with the steam spout then add the desired tea bag.
MAINTENANCE AND CLEANING OPERATIONS
Daily cleaning operations
Every evening or at least once a day, it is necessary to clean group shower and brewing group gasket with a cloth or a sponge. Filters and filter holder must then be rinsed in hot water in order to dissolve the fat deposits of coffee.
It is advisable to wash the inside of filters and filter holder in order to prevent scaling and coffee deposits, which might come off while making coffee and end up in the cup as dregs.
Cleaning filters and filter holder
A) Put three teaspoons of coffee machine detergent (our. art. DTB) in approximately half a litre of hot water in a heat-resistant container.
B) Put filters and filter holder in the solution and soak them for approximately 20/30 minutes.
C) Rinse with plenty of running water.
Cleaning the drain water pan
At least once a week clean the drain water pan. To take it out, remove the cupresting grilles first.
Cleaning the body
Simply use a damp cloth (non abrasive).
Do not use any alcohol or solvents on the written or painted parts because they could be damaged.
Cleaning steam spouts
Steam spouts that are used to heat up drinks must be cleaned immediately after use in order to prevent the formation of scaling which might block the holes of the nozzle, and also to prevent the taste of the drinks being currently heated to be contaminated by the drinks you heated before.
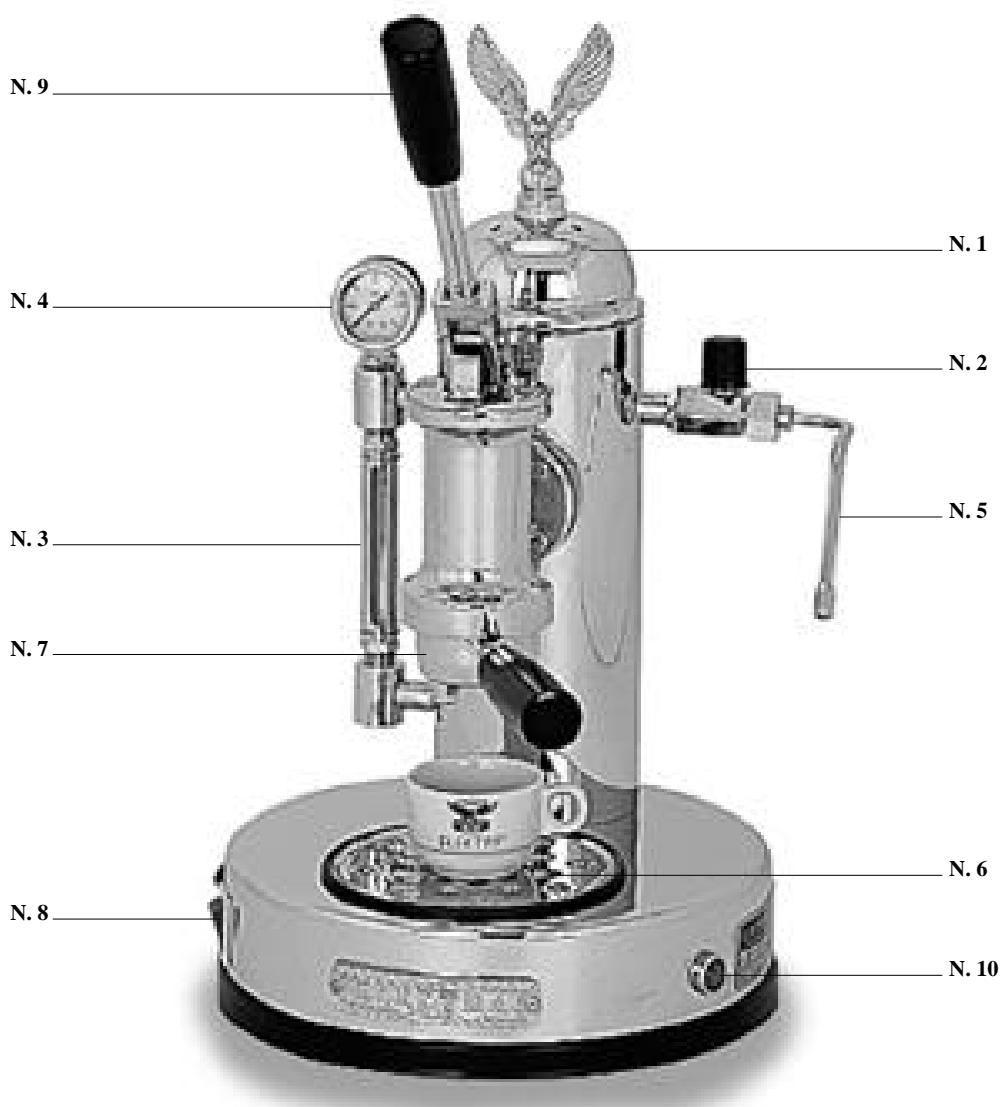
MICRO CASA SEMIAUTOMATICA ART. SX - SXC - SXCD
KEY
-
Water tank cover
-
Boiler water supply button
-
1-cup filter
-
Water tank
-
Coffee brewing button
-
2-cup filter
-
Hot water boiler
-
Steamer knob
-
Doser spoon
-
Pressure gauge
-
Steamer
-
Coffee press
-
Hot water level glass
-
Filter holder
-
Warning light
-
Main switch
-
Drip tray
ACCESSORIES :
1 filter for one cup ref. # 13
1 filter for two cups ref. # 14
1 doser spoon ref. # 15
1 coffee press ref. # 16
1 use and maintenance manual with guarantee card.
ACCESSORIES ON DEMAND:
- Wood base art. SB, with brass grip ball and compartment for used coffee grounds, sugar packets and spoons
- Black wood base art. SBN with chrome grip ball and compartment for used coffee grounds, sugar packets and spoons.
- Copper coffee grinder art.MS, Chrome copper coffee grinder art. MSC
DIMENSIONS:
Weight 12 Kg
Tank capacity 2 I
Boiler capacity 2 I
Height 58 cm
Base diameter 26 cm
APPROVALS:
CE (Europe)
QAS (Australia)
DIRECTIONS FOR USE
- Always check water level before turning the machine on, because if there is no water the heating element might get damaged. Never fill the boiler above the maximum level of 3/4.
A) Fill tank # 2 with cold, drinkable water, after lifting cover # 1.
B) To turn the machine on press the main switch # 6 (To turn it off press the same button the other way).
C) Press immediately button # 7; by doing this the machine takes water from tank # 2 and fills up the boiler # 3.
D) Check the boiler is correctly filled by means of the boiler water level glass # 5. Water should get to 3/4 of the level glass and not fill it completely in order to avoid overloading the boiler.
E) Check the water load in tank # 2 again and, if needed, fill it at least over half of total capacity.
F) Wait for the machine to reach the ideal temperature for perfect output, checking boiler pressure with gauge # 4, whose needle will have to be between the green and the red mark. Also check warning light # 17 which will come off only when optimum operating pressure is reached.
G) To help reaching optimum pressure, turn knob # 9 to blow off for a second and then bring the knob again in the normal/closed position.
- While reaching operating pressure, the machine might make soft boiling sounds which decrease once the pressure is reached
H) After choosing the filter for one or two cups (# 13 or # 14), put it in filter holder # 11, fill it with coffee with doser # 15 and press it with press # 16. Fill the filter until about 3mm underneath its rim.
I) Insert filter holder # 11 in its place. It will close tightly by turning it slightly.
L) Place one or two cups under the spouts of filter holder # 11
M) Press button # 8 which controls the pump.
N) When you have obtained the desired amount of coffee in the cup you must press button # 8 again to disconnect the pump.
The coffee is perfectly ground when the drink comes out in drops for approximately 25-30 seconds.
O) The machine is equipped with a steam spout # 10 to make cappuccino, punch, hot chocolate and tea.
P) To obtain steam turn knob # 9. Let any condense run off first, after which steam will flow with force giving the desired result.
- All parts are baked with transparent glaze.
- Warning: The machine should be cleaned only with a soft and damp cloth
- Store the packaging in a safe place.
- In case of removal or service the machine should be moved only in its original packaging to avoid any accidents during transport.
PREPARING COFFEE
A) Release the filter holder from the brewing group and throw coffee grounds in the suitable drawer, taking care not to damage the filter rim.
B) Fill the filter with a dose of ground coffee, level and press slightly with the coffee press.
Take care no coffee is left on the filter rim. This is to ensure best tightness and to extend the life of the brewing group gasket.
C) Lock the filter holder into the brewing group so it is tightened securely with the brewing group gasket.
D) Place cups under the spouts and start the group by means of the suitable control.
E) When you have finished making the coffee leave the filter-holder into the brewing group until making another cup.
- To obtain good coffee, the grinding is extremely important. It should take 25-30 seconds to make the coffee.
- If the coffee is too coarse you will obtain light coffee with very little white froth, if it is too fine you will obtain dark coffee with no froth.
- Good quality coffee is obtained by using freshly ground coffee of even coarseness (which can be obtained only if the grinder has sharp mills) used in the right quantity (approximately 6/7 grams per dose).
- It is important to use freshly ground coffee, because once it has been ground it quickly loses its aroma, and the fatty substances it contains go off. It is therefore advisable to try and finish it by the evening.
- Properly warm cups are extremely important in obtaining creamy coffee.
PREPARED CAPPUCCINO, MILK AND OTHER HOT DRINKS
Dip the wand connected to the steam tap into the drink to be heated, then turn the suitable knob to deliver steam to the nozzle on the tip of the spout.
The steam gurgles in the liquid releasing heat, bringing it to the boiling temperature. To whip up milk in order to make cappuccino, use a tall and narrow container filled in half, acting as follows:
A) Place the container underneath the steam spout so that the nozzle touches the bottom, turn the steam tap on and bring the milk nearly to the boil.
B) Lower the container so that the nozzle is near the surface of the milk, then move the container up and down so the nozzle gets in and out of the milk.
Perform this operation several times until the milk has frothed.
To make cappuccino add the hot and frothy milk to the hot coffee.
PREPARING TEA - CAMOMILE - ETC.
Heat up water in the teapot with the steam wand then add the desired tea bag.
MAINTENANCE AND CLEANING OPERATIONS
Daily cleaning operations
Every evening or at least once a day, it is necessary to clean the group shower and brewing group gasket with a cloth or a sponge. Filters and filter holder must then be rinsed in hot water in order to dissolve the fat deposits of the coffee.
It is advisable to wash the inside of filters and filter holder in order to prevent scaling and coffee deposits, which might come off while making coffee and end up in the cup as dregs.
Cleaning filters and filter holder
A) Put three teaspoons of coffee machine detergent (our. art. DTB) in approximately half a litre of hot water in a heat-resistant container.
B) Put filters and filter holder in the solution and soak them for approximately 20/30 minutes.
C) Rinse with plenty of running water.
Cleaning the drain water pan
At least once a week clean the drain water pan. To take it out, remove the cupresting grilles first.
Cleaning the body
Simply use a damp cloth (non abrasive).
Do not use any alcohol or solvents on the written or painted parts as they could be damaged.
Cleaning steam wands
Steam wands that are used to heat up drinks must be cleaned immediately after use in order to prevent the formation of scaling which might block the holes of the sprayer, and also to prevent the taste of the drinks being currently heated to be contaminated by the drinks you heated before.

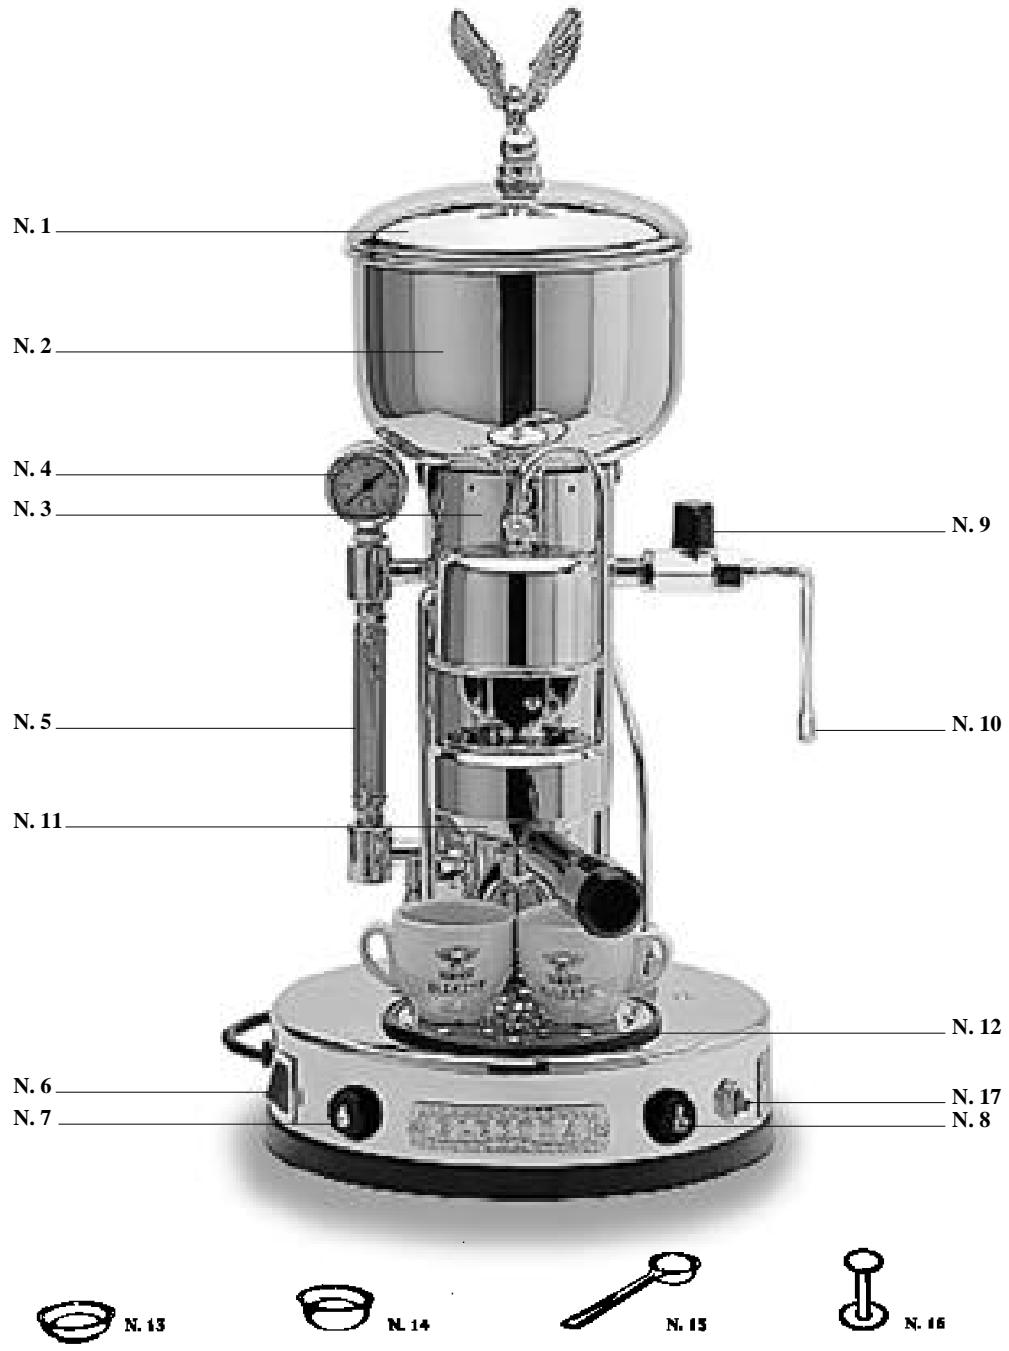
MINI VERTICAL SEMIAUTOMATICA ART. A1 - A1C - A1G

N.14

N. 13

N. 12

N 11
KEY
- Water tank cover
- Filter holder
- Doser spoon
- Steamer knob
- Main switch
- Coffee press
- Water gauge/ water tank
- Coffee output button
- Steam warning light
- Steam button
- Operation warning light
- Cup-warming compartment
- Steam/water spout
- Cup-rest grille
- 2-cup filter
- 1-cup filter
ACCESSIONS:
1 filter for one cup ref. # 12
1 filter for two cups ref. # 11
1 doser spoon ref. # 13
1 coffee press ref. # 14
1 instruction manual with guarantee card.
Wood base art. SA, Black wood base art. SAN
ACCESSIONS
- Copper grinder art. MS, in chrome copper art. MSC
ON DEMAND:
DIMENSIONS:
Weight 13.00kg
Tank capacity 2 l
Height 69 cm
Base diameter 26 cm
APPROVALS:
CE (Europe)
DIRECTIONS FOR USE
- Always check water level before turning the machine on, because if there is no water the heating element could be damaged.
A) Lift cover # 1 and fill tank # 3 with cold, drinkable water.
B) To turn the machine on press the main switch # 8
(To turn it off press the same button the other way), warning light # 10 will come on.
C) Press button # 9 until a few water drops will come out of filter holder # 7; by doing this the machine takes water from tank # 3 and fills up the boiler. Warning light # 15 will come on.
D) Wait for the machine to reach the ideal temperature for perfect output, checking warning light # 15, which will come off only when optimum pressure and temperature are reached.
E) To help reaching optimum pressure, turn knob # 2 during step C to blow off for a second and then bring the knob again in the normal/closed position.
F After choosing the filter for one or two cups (# 12 or # 11), put it in filter holder # 7, fill it with coffee using doser # 13 and press it with press # 14.
Fill the filter until about 3mm underneath its rim.
G) Insert filter holder # 7 in its seat. It will close tightly by turning it slightly.
H) Place one or two cups under the spouts of filter holder # 7
I) Press button # 9 which controls the pump. Coffee grinding is perfect when coffee is delivered in drops for about 25/30 seconds.
L) When you have obtained the desired amount of coffee in the cup you must press button # 9 again to disconnect the pump.
M) The machine is equipped with a steamer # 5 to make cappuccino, punch, hot chocolate and tea.
N) To produce steam press steam button # 4, wait for light # 15 to come off, after about 10 seconds, then turn knob # 2.
Let any condense run off, after which the steam will flow with force giving the desired result. When you have finished, turn the steamer knob # 2 the other way and press steam button # 4, bringing it into its rest position.
O) When steam production is over press button # 9 until a few water drops will come out of filter holder # 7.
- All parts are baked with transparent glaze.
- Warning: The machine should be cleaned only with a soft and damp cloth.
- Store the packaging in a safe place.
- In case of removal or service the machine should be moved only in its original packaging to avoid any accidents during transport.
PREPARING COFFEE
A) Release the filter holder from the brewing group and throw coffee grounds in the suitable drawer taking care not to damage the filter rim.
B) Fill the filter with a dose of ground coffee, level and press slightly with the coffee press. Take care no coffee is left on the filter rim. This is to ensure best tightness and to extend the life of the brewing group gasket.
C) Lock the filter holder into the brewing group so it is tightened securely.
D) Place cups under the spouts and start the group by means of the control # 9.
E) When you have finished making the coffee leave the filter-holder into the unit until making another cup.
- To obtain good coffee, the grinding is extremely important. It should take 25-30 seconds to make the coffee.
- If the coffee is too coarse you will obtain light coffee with very little white froth, if it is too fine you will obtain dark coffee with no froth.
- Good quality coffee is obtained by using freshly ground coffee of even coarseness (which can be obtained only if the grinder has sharp mills) used in the right quantity (approximately 6/7 grams per dose).
- It is important to use freshly ground coffee, because once it has been ground it quickly loses its aroma, and the fat substances it contains go off. It is therefore advisable to try and finish it by the evening.
- Properly warm cups are extremely important in obtaining creamy coffee.
PREPARED CAPPUCCINO, MILK AND OTHER HOT DRINKS
Dip the wand connected to the steam tap into the drink to be heated, then turn the suitable knob to deliver steam to the nozzle on the tip of the spout.
The steam gurgles in the liquid releasing heat, bringing it to the boiling temperature. To whip up milk in order to make cappuccino, use a tall and narrow container filled in half, acting as follows:
A) Place the container underneath the steam spout so that the nozzle touches the bottom, turn the steam tap and bring the milk nearly to the boil.
B) Lower the container so that the nozzle is near the surface of the milk, then move the container so the nozzle gets in and out of the milk.
Perform this operation several times until the milk has frothed.
To make cappuccino add the hot and frothy milk to the hot coffee.
PREPARING TEA - CAMOMILE - ETC.
Heat up water in the teapot with the steam wand then add the desired tea bag.
MAINTENANCE AND CLEANING OPERATIONS
Daily cleaning operations
Every evening or at least once a day it is necessary to clean the group shower and brewing group gasket with a cloth or a sponge. Filters and filter holder must then be rinsed in hot water in order to dissolve the fat deposits of coffee.
It is advisable to wash the inside of filters and filter holder in order to prevent scaling and coffee deposits, which might come off while making coffee and end up in the cup as dregs.
Cleaning filters and filter holder
A) Put three teaspoons of coffee machine detergent (our. art. DTB) in approximately half a litre of hot water in a heat-resistant container.
B) Put filters and filter holder in the solution and soak them for approximately 20/30 minutes.
C) Rinse with plenty of running water.
Cleaning the drain water pan
At least once a week clean the drain water pan. To take it out, remove the cup-resting grilles first.
Cleaning the body
Simply use a damp cloth (non abrasive).
Do not use any alcohol or solvents on the written or painted parts because they could be damaged.
Cleaning steam wands
Steam wands that are used to heat up drinks must be cleaned immediately after use in order to prevent the formation of scaling which might block the holes of the sprayer, and also to prevent the taste of the drinks being currently heated to be contaminated by the drinks you heated before.
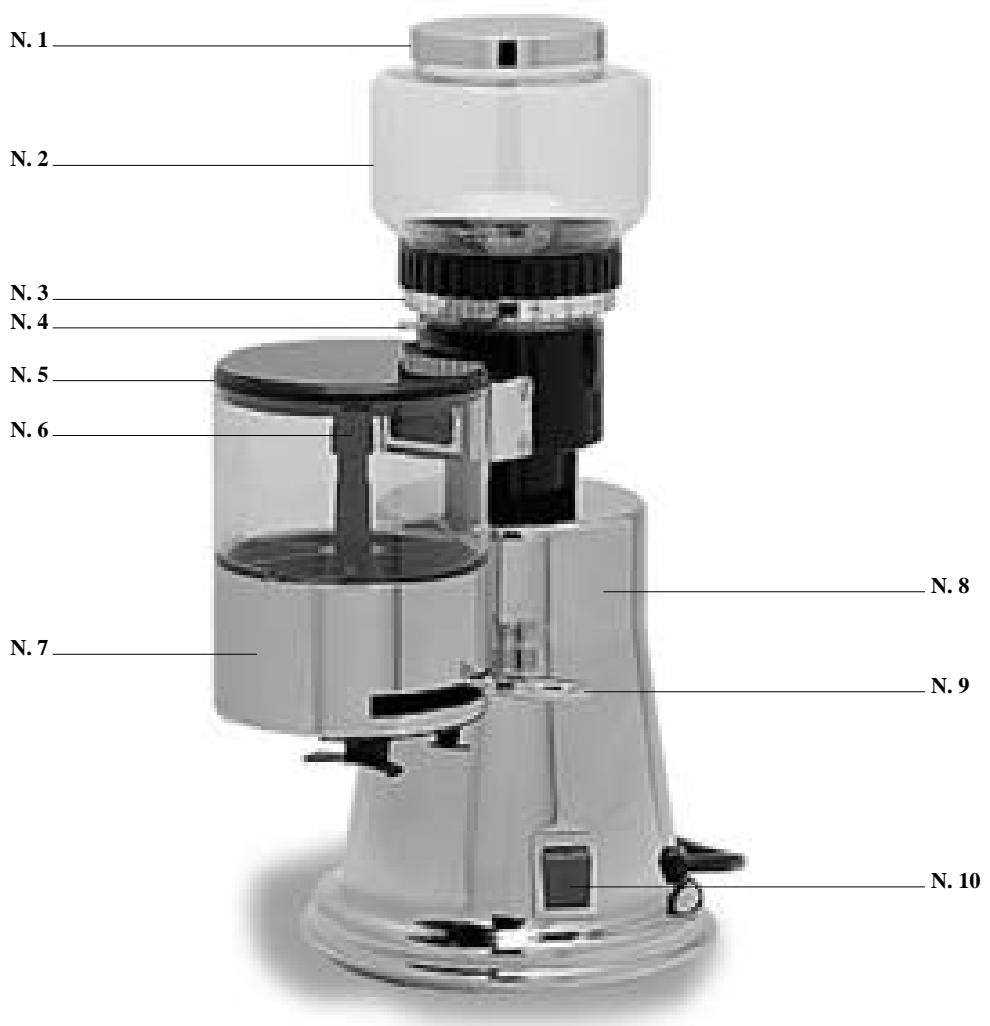
COFFEE GRINDER
ART. MS - MSC

N.11
KEY
- Hopper cover
- Ground hopper cover
- Dosing lever
- Hopper assembly.
- Batch adjustment pin
- Grinding adjustment ring
- Ground coffee hopper
- Adjusting ring stopping pin
- Grinding body
ACCESSIONS:
1 coffee press ref. # 11
1 instructions manual with guarantee card
DIMENSIONS:
Weight 8 kg
Height 38 cm
Depth 26 cm
Base diameter 18 cm
DIRECTIONS FOR USE
A) Put coffee beans in hopper # 2
B) Press switch # 10 until you obtain the desired amount of ground coffee.
C) Extract doses by pulling dosing lever # 9 to its end-of-run then release it to spring back.
Warning:
Never ground coffee hopper # 7 beyond 2/3 of its capacity.
GRINDING ADJUSTMENT
A) Lower stopping pin # 4 of adjusting ring # 3 and hold it down.
B) Turn ring # 3 clockwise to have finer coffee
(Finer coffee is necessary when coffee-brewing is too quick, and therefore output time is less than 25-30 seconds, which is the best timing for a perfect cup of espresso coffee)
C) Turn ring # 3 anti-clockwise for coarser coffee.
(Coarser coffee is necessary when coffee-making is too slow, and therefore output time is more than 25-30 seconds, which as we said before is the best timing for a perfect cup of espresso coffee)
D) Allow the stop pin to click back into place.
ADJUSTING GROUND COFFEE DOSE
A) Turn pin # 6 inside ground coffee hopper # 7 clockwise (less coffee) or anti-clockwise (more coffee).
Warning:
To obtain a perfect cup of espresso coffee it is necessary to use a dose between 6 and 7 grams.
CLEANING AND MAINTENANCE OPERATIONS
Warning:
Disconnect appliance from the power supply before performing any cleaning operations.
A) Remove all movable parts of the machine and wash with plenty of water and neutral soap (never wash them in the dishwasher)
B) Clean the machine body # 8 with a damp cloth (never dip it in water).
C) Make sure there is no ground coffee stuck inside the ground coffee hopper # 7. If there is any, remove it with a paintbrush and a completely dry cloth, and by pulling mill glass lever # 9.
D) Remove bell # 2, and clean the mills and their housing with a paintbrush and a completely dry cloth.
Cleaning operations should be carried out daily for best results.
OTHERWARNINGS
A) Every so often check the wear of mills, bearing in mind that in best conditions they can grind approximately 600 kilos of coffee.
B) The wear of mills can be detected by checking them and also when grinding takes longer or is noisier than usual.
- Store the package in a safe place.
- In case of removal or service the machine should be move exclusively in its original packaging to avoid any accidents during transport.
TO WHICH THIS STATEMENT REFERS COMPLIES WITH THE FOLLOWING DIRECTIVE:
DIRETTIVA MACCHINE 89/392 CEE MACHINES DIRECTIVE 89/932 EEC
(LA MACCHINA É COSTRUITA SECONDO LE SPECIFICHE DEL NOSTRO FASCICOLO TECNICO).
(The APPLIANCE HAS BEEN CONSTRUCTED IN ACCORDANCE WITH THE SPECIFICATIONS IN OUR TECHNICAL BOOKLET).
TIMBRO E FIRMA / STAMP AND SIGNATURE
DATA / DATE
CARTOLINA DI GARANZIA
WARRANTY CARD
GARANTIEKARTE
CARTE DE GARANTIE
Articolo / Article
Tip / Type
Retailer's stamp and signature
N.B.: The pumps are also excluded in the "Divisione Casa" production.
Send in a closed envelope to:
Italian Espresso Coffee Machines
Via A. Volta, 18
31030 DOSSON (Treviso)
ITALY