USER MANUAL FXE6950X CANDY
Safety Instructions. 04
- General warnings.. 05
1.1 Declaration of compliance. 05
1.2 Safety hints 05
1.3 Recommendations.. 05
1.4 Installation. 05
1.5 Electrical connection 05
- Accessories.. 06
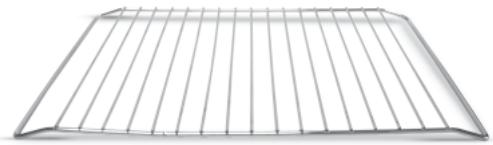
2.1 Oven equipment 06
2.2 Rotisserie.. .06
2.3 U-SEE 06
2.4 Removing and cleaning wire racks.. 06
- Cleaning the oven 06
- Service centre .07
5.Use the electronic programmer 08
5.1 Before using the oven for the first time 09
5.2 How to use the oven 09
5.3 The programmation 10
5.4 Cooking tips 10
- Pyrolytic cycle 11
7.Child safety 11
COIDEPKKAHNE
RU
IpaBnJa TexHnKn Be3onacHocTn. 28
1.Obune MepbI Ipeoctopoxhoctn 29
1.1ДeКларачиСоOTВETCTBWA 29
1.2 Mepbl Ppeoctopoxhoctn 29
1.3 Pekomehdauzn 29
1.4 YctaHOBka 29
1.5 PoiKJIIOUeHne K 3JIeKTPoCeTn 29
2. Texhoolorna Pro/exp'r 30
2.1 PpHaIeKHOCTN DyXOBKn 30
2.2 Bepen 30
2.3 U-SEE 30
2.4 DEmoHTaXn OouCTKa MeTaJIInueCkNx HappaBIAIOUxNx.....30
3.Чистka Духовки 30
4.CepBnchbI LcHTp 31
5. OnscaHne Dusnner 32
5.1 Pered PerpBbIM IcnoIb3ObaHnem DyXOBKn 33
5.2KakPonb3OBaTbcraDyXOBkoi 33
5.3IporpaMMIOBaHne 34
5.4 CoBeTbI Pn PnproToBJIeHnIO Pmui 35
6. Lckl Hnpolntuecko ChcKu 35
7.Amok OT DeTei 36
INDICE
IT
WARNING: The appliance and its accessible parts become hot during use. Care should be taken to avoid touching heating elements.
- Children under 8 Year of age must be kept away from the appliance unless they are continuously supervised.
- This appliance can be used by children aged from 8 years and above and persons with reduced physical, sensory or mental capabilities or lack of experience and knowledge if they have been given supervision or instruction concerning use of the appliance in a safe way and understand the hazards involved.
- Children must not play with the appliance.
- Cleaning and user maintenance shall not be made by children without supervision.
- During use the appliance becomes hot. Care should be taken to avoid touching heating elements inside the oven.
WARNING: Accessible parts may become hot during use. Young children must be kept away.
- Do not use harsh abrasive cleaners or sharp metal scrapers to clean the oven door glass since they can scratch the surface, which may result in shattering of the glass.
- The oven must be switched off before removing the guard, after cleaning, the guard must be replaced in accordance with the instructions.
- Only use the temperature probe recommended for this oven.
- Do not use a steam cleaner for cleaning operations.
- WARNING: Avoid possibility of electric shock - ensure the appliance is switched off before replacing the lamp.
- The means for disconnection must be incorporated in the fixed wiring in accordance with the wiring rules.
- The instructions state the type of cord to be used, taking into account the temperature of the rear surface of the appliance.
- If the supply cord is damaged, it must be replaced by a special cord or assembly available from the manufacturer or its service agent.
- CAUTION: In order to avoid a hazard due to inadvertent resetting of the thermal cutout, this appliance must not be supplied through an external switching device, such as a timer, or connected to a circuit that is regularly switched on and off by the utility.
- CAUTION: Accessible parts may be hot when the grill is in use. Young children must be kept away.
- Excess spillage must be removed before cleaning.
- During self-cleaning pyrolytic operation the surfaces may get hotter than usual and children MUST be kept away.
1. GENERAL WARNINGS
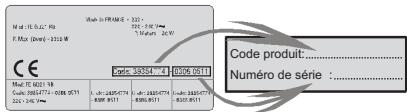
Read the instructions carefully to make the most of your oven. We recommend you keep the instructions for installation and use for later reference, and before installing the oven, note its serial number in case you need to get help from the after-sales service.
When you have unpacked the oven, make sure that it has not been damaged in any way. If you have any doubts at all, do not to use it. Contact a professionally qualified person. Keep packing materials such as plastic bags, polystyrene, or nails out of the reach of children because they are dangerous to children.
The company shall not be liable if the instructions provided in this document are not complied with.
! NOTE: Functions, properties and accessories of ovens which are mentioned in this manual, can be change depending on oven models.
1.1 DECLARATION OF COMPLIANCE
The parts of this appliance that may come into contact with foodstuffs comply with the provisions of EEC Directive 89/109.Appliance
CE complies with European Directives 2006/95/EC and 2004/108/EC, and subsequent amendments. When you have unpacked the oven, make sure that it has not been damaged in any way. If you have any doubts at all, do not use it: contact a professionally qualified person.
Keep packing materials such as plastic bags, polystyrene, or nails out of the reach of children because they are dangerous to children.
1.2 SAFETY HINTS
- The oven must be used only for the purpose for which it was designed. It must only be used for cooking food. Any other use, e.g. as a form of heating, is an improper use of the oven and is therefore dangerous.
- The manufacturers cannot be held responsible for any damage caused by improper, incorrect or unreasonable use.
When using any electrical appliance you must follow a few basic rules.
- Do not pull on the power cable to remove the plug from the socket.
- Do not touch the oven with wet or damp hands or feet.
- Do not use the oven unless you are wearing something on your feet.
- It is not generally a good idea to use adapters, multiple sockets for several plugs or cable extensions.
- If the oven breaks down or develops a fault switch it off at the mains and do not touch it.
- If the cable is damaged it must be replaced promptly.
When replacing the cable, follow these instructions.
Remove the power cable and replace it with one of the H05VV-F type. The cable must be able to bear the electrical current required by the oven.Cable replacement must be carried out by properly qualified technicians.
The earthing cable (yellow-green) must be 10mm longer than the power cable.
Use only an approved service centre for repairs and ensure that only original parts are used. If the above instructions are not adhered to the manufacturers cannot guarantee the safety of the oven.
- The oven you have just acquired has the described technical characteristics and you must not make any modifications to it.
- Do not store flammable products in the oven; they can catch fire if the oven comes on accidentally.
- Do not press on and do not let children sit on the oven door.
- Use kitchen oven gloves, when putting into or removing a dish from the oven.
1.3 RECOMMENDATIONS
- After each use of the oven, a minimum of cleaning will help keep the oven perfectly clean.
- Do not line the oven walls with aluminium foil or single-use protection available from stores. Aluminium foil or any other protection, in direct contact with the hot enamel, risks melting and deteriorating the enamel of the insides.
- In order to prevent excessive dirtying of your oven and the resulting strong smokey smells, we recommend not using the oven at very high temperature. It is better to extend the cooking time and lower the temperature a little.
Identification plate
In addition to the
accessories supplied with the oven, we advise you only use dishes and baking moulds resistant
to very high Temperatures.
1.4 INSTALLATION
The manufacturers have no obligation to carry this out. If the assistance of the manufacturer is required to rectify faults arising from incorrect installation, this assistance is not covered by the guarantee. The installation instructions for professionally qualified personnel must be followed. Incorrect installation may cause harm or injury to people, animals or belongings. The manufacturer cannot be held responsible for such harm or injury.
The kitchen unit in which the oven is to be fitted must be made of material resistant to temperatures of at least 70^ .
The oven can be located high in a column or under a worktop. Before fixing, you must ensure good ventilation in the oven space to allow proper circulation of the fresh air required for cooling and protecting the internal parts. Make the openings specified on last page according to the type of fitting.
1.5 ELECTRICAL CONNECTION
THE ELECTRICAL CONNECTION SHOULD BE CARRIED OUT BY AN APPROVED CONTRACTOR OR TECHNICIAN WITH SIMILAR QUALIFICATIONS.
The installation receiving the appliance must comply with the standard in force in the installation country.
The manufacturer does not accept any responsibility if this provision is not complied with.
Connection to the network must be by earthed socket outlet, or by means of a multipole circuit-breaker, in compliance with the installation country.
The installation must be protected by suitable fuses, and have wires with a large enough cross-section to supply the oven normally.
CONNECTION:
The oven is fitted with a power lead for connecting exclusively to a voltage of 220-240 V AC across the phases or across phase and neutral.
Connection must be carried out having first checked:
-the supply voltage indicated on the meter,
The lead protection wire (green/yellow) connected to the earth terminal of the oven must be connected to the earth terminal of the installation.
Caution:
- Have the earth continuity of the installation checked by an electrician before making the connection.
- The manufacturer will not be liable for any incident, or the possible consequences that may arise from the use of the oven not earthed, or connected to an earth with defective continuity.
NB: Do not forget that the oven may require after-sales service.
Also, locate the socket outlet so that the oven can be connected once it is removed from its space.
Power supply cable: If the power supply cable has to be changed, please have this done by the after-sales service or by someone with similar qualifications.
2. ACCESSORIES (According to model)
2.1 OVEN EQUIPMENT
It is necessary to do an initial cleaning of the equipment before the first use of each of them. Wash them with a sponge. Rinse and dry off.
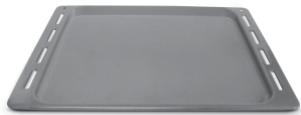
The shelf can take moulds and dishes.
The drip tray catches the juices from grilled foods.
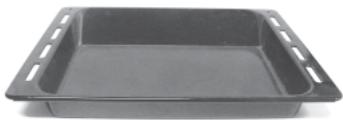
Never use he drip tray as a roasting tray as fat deposits can be quickly spread throughout the oven, which produces excess smoke. Never place the drip tray directly on the oven bottom.
The pizza stone for a crisper pizza equipped according to the model with its stand and the pizza roller.

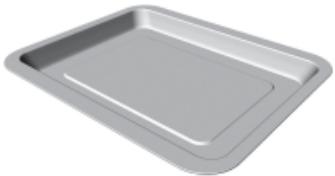
The pastry tray must be placed on the shelf. It is for cooking small pastries like choux, biscuits, meringues, etc... Never place the pastry tray directly on the oven bottom.

2.2 ROTISSERIE
No pre-heating is required for rotisserie cooking.
Cooking with the door closed.
The energy consumption is 90 - 95% less than traditional system.
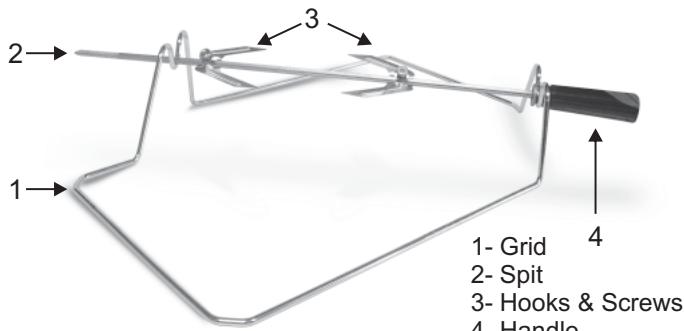
HOW TO USE TURNSPIT
- Unscrew the hooks
- Put the spit into the meat
- Fix the meat with the hooks
- Tighten the screws
- Insert the spit into the motor hole
- The handle
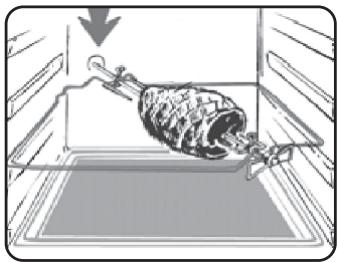
When the oven is in use, any unused accessories should be removed from the oven.
2.3 U-SEE
Is an illumination system which replaces the traditional « light bulb ». 14 LED (for non-pyrolitic versions) or 10 High Power LED (for pyrolitic versions) lights are integrated within the door. These produce white high quality illumination which enables to view the inside of the oven with clarity without any shadows on all the shelves.
Advantages:
This system, besides providing excellent illumination inside the oven, lasts longer than the traditional light bulb its easier and to maintain and most of all saves energy.
-Optimum view
-Long life illumination
- Very low energy consumption, -95% in comparison with the traditional illumination High.
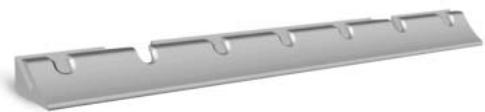
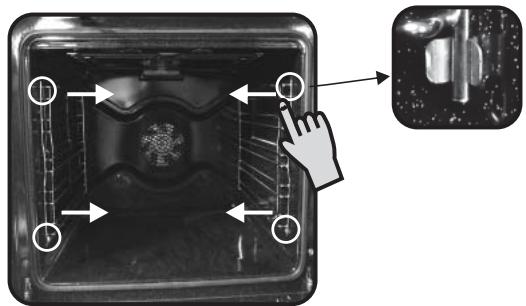
2.4 REMOVERTING AND CLEANING WIRE RACKS
1- Remove the wire racks by pulling them in the direction of the arrows (see below)
2- To clean the wire racks either put them in the dishwasher or use a wet sponge, ensuring that they are dried afterwards.
3-After the cleaning process install the wire racks in reverse order.
3. CLEANING THE OVEN
- Wait for the oven to cool down before doing any cleaning by hand.
- Never clean your oven with abrasive cleaners, wire wool or sharp objects, or the enamel may be damaged beyond repair.
- Only use soapy water or bleach (ammonia) cleaners.
- Never line the oven sides with aluminium foil.
GLASS PARTS
We recommend you wipe clean the glass door with absorbent kitchen paper every time you use the oven. If the spattering is heavy, then you can clean with a well squeezed sponge and detergent, and rinse.
Do not use harsh abrasive cleaners or sharp metal scrapers to clean the oven door glass since they can scratch the surface, which may result in shattering of the glass.
OVENDOOR SEAL
If this gets dirty, clean the oven seal with a slightly damp sponge.
ACCESSORIES
Clean them with a sponge soaked in soapy water. Rinse with clean water and dry off. Avoid abrasive cleaners.
DRIP TRAY
After grilling, remove the drip tray from the oven. Take care to pour the warm grease into a container. Wash and rinse the drip tray in hot water with a sponge soaked in washing up liquid.
If residues remain attached, soak them off in water and detergent.
It can also go in a dishwasher or be cleaned with a commercial oven cleaner.
Never place a soiled drip tray in the oven.
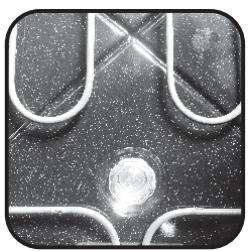
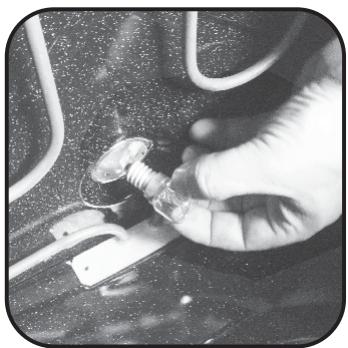
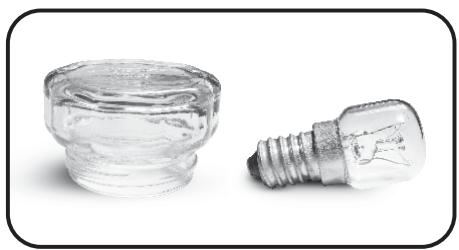
OVEN LIGHTING
Disconnect the power supply from the oven before cleaning or replacing the lamp.
The bulb and its cover are made of material resistant to high temperatures.
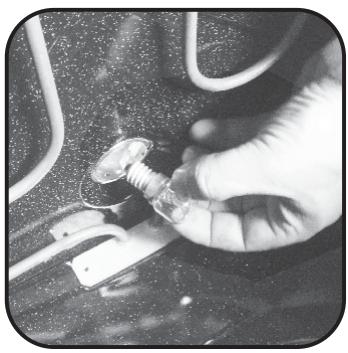
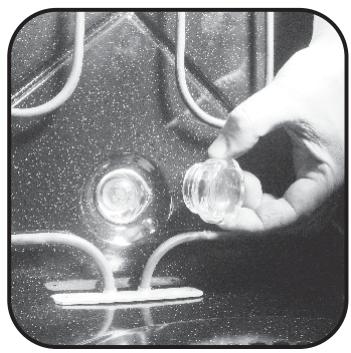
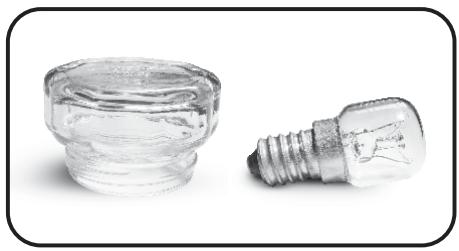
Bulb characteristics:
230 V AC - 25W- E 14 base Temperature 300^ to change a defective bulb, just:
- Unscrew the glass cover,
-Unscrew the bulb,
- Replace it with the same type: see characteristics above,
- After replacing the defective bulb, screw back the protective glass cover.
CLEANING THE DOOR GLASS
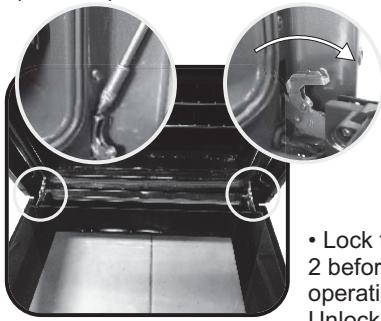
Internal door glass of this oven can be removed and cleaned.
In order to clean the internal glass follow these instructions;
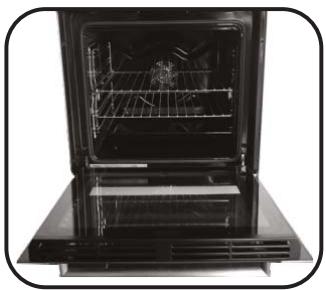
- Open the door of the oven. (Picture1)
Picture 1
Picture 2
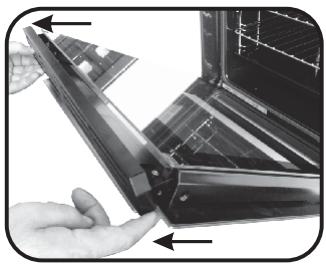
Unlock the hinges when the cleaning operation is finished. (Picture 2)
Picture 3
Picture 6
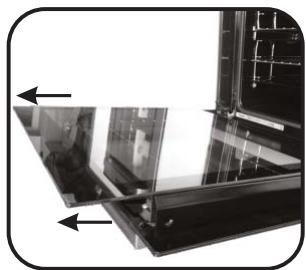
Picture 5
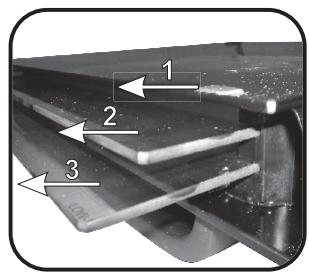
*For Pyrolytic ovens, please remove also 2^nd and 3^rd glasses. (Picture 6)
After cleaning the glass reassemble the parts in the reverse order of removal.
- ON ALL GLASES LOW-E sign must be properly readable and must be positioned on the left corner of the door, close to the left side hinge. In this way the printed surface of the 1^st glass will remain INSIDE the door.
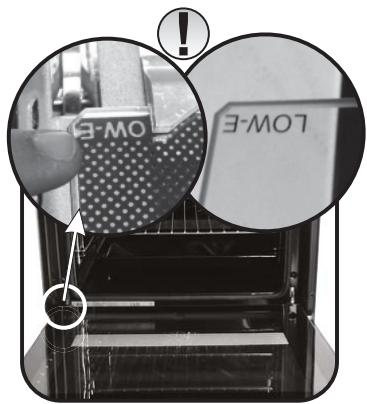
Picture 7
4. SERVICE CENTRE
Before calling the Service Centre.
If the oven is not working, we recommend that:
- Check that, if the oven is properly plugged into the power supply.
If the cause of the fault cannot be detected:
- Disconnect the oven from the mains, do not touch the oven and call the after sales service.
Before calling the Service Centre remember to make a note of the serial number on the serial number specifications plate.
The oven is supplied with a guarantee certificate that ensures that it will be repaired free of charge by the Service Centre whilst under guarantee.
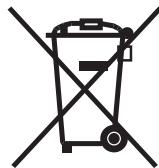
This appliance is marked according to the European directive 2002/96/EC on Waste Electrical and Electronic Equipment (WEEE).
By ensuring this product is disposed of correctly, you will help prevent potential negative consequences for the environment and human health, which could otherwise be caused by inappropriate waste handling of this product.
The symbol on the product indicates that this product may not be treated as household waste.
Instead it shall be handed over to the applicable collection point for the recycling of electrical and electronic equipment Disposal must be carried out in accordance with local environmental regulations for waste disposal.
For more detailed information about treatment, recovery and recycling of this product, please contact your local city office, your household waste disposal service or the shop where you purchased the product.
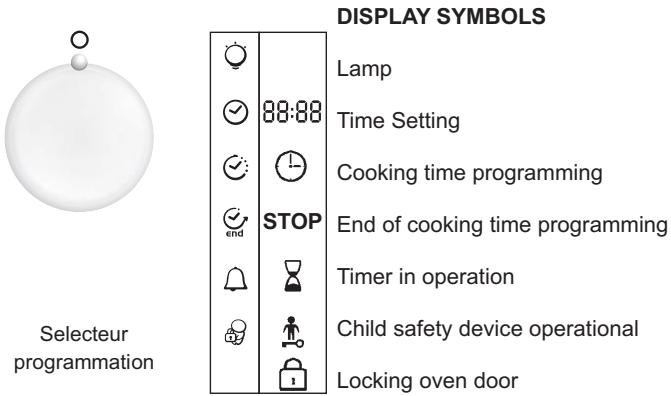
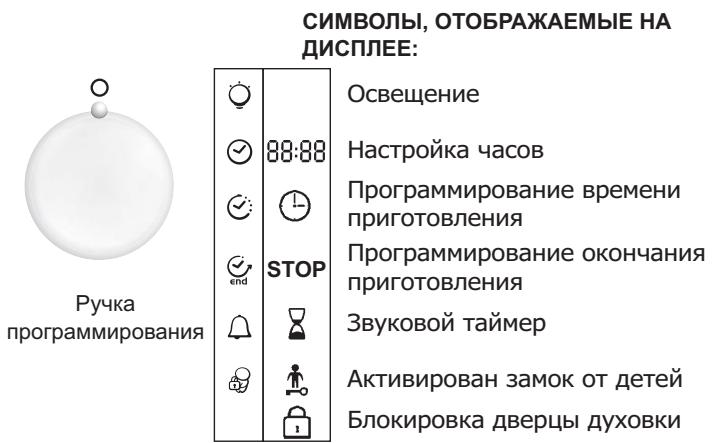
5- USE THE ELECTRONIC PROGRAMMER
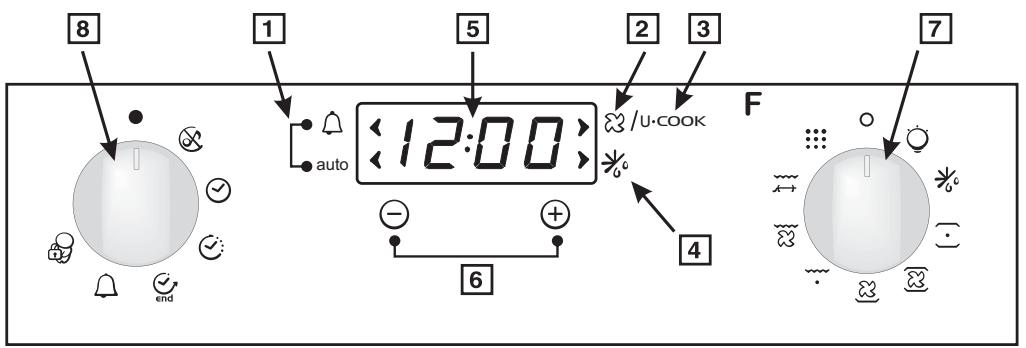
- Minute Minder or Auto light
- Function with fan*
- Function with VARIOFAN*
- Defrost
- Display for Temperature or Time
- Setting buttons
- Function selector knob
-
Function Timer knob
-
ACCORDING TO THE MODEL

WARNING!
The first operation to carry out after the oven has been installed or following the interruption of power supply (this is recognizable the display pulsating and showing 12:00) is setting the correct time.
The Led "o" of the temperature indicator pulsates until the pre-set temperature is not reached.
HOT: When a cooking program is finished, if the oven is still hot, « HOT » appears on the display, alternately with the time displays, even if the two function selectors are switched on OFF.
| FUNCTION | HOW TO ACTIVATE IT? | HOW TO SWITCH IT OFF? | WHAT IT DOES? | WHAT IT IS FOR? |
| SILENCE MODE | ·Rotate the left function selector to the position "Silence mode" | ·Rotate the function selector to the position OFF. | ·Enables you to turn off the sound of the minute minder | ·To turn off the sound of the minute minder |
| SET THE TIME | ·Rotate the left function selector to the position "Set the time". ·Use the buttons "+" or "-" to set the time | ·Rotate the function selector to the position OFF. | ·Enables you to set the time which appears on the display | ·To set the time NB : Set the time when you first install your oven or just after a black out (the clock is showing a pulsating 12.00) |
| COOKING TIME DURATION | ·Turn the right function selector to a cooking function ·Rotate the left function selector to the position "Cooking Time Duration" ·Set the time of cooking by using buttons "+" and "-" ·Lighting Auto appears | ·When the cooking time has elapsed, the oven switch off automatically and the alarm rings for few seconds To stop the cooking functions early, turn the function control to OFF or set the time on 00.00; by rotating the function selector to Cooking Time Duration and by using the buttons "+" and "-" | ·It allows to preset the cooking time required for the recipe chosen. ·When the cooking time is set, turn the function selector toOFF to go back to actual time. ·To view the cooking time selected, turn the left function selector to Cooking Time duration. | ·For cooking the desired recipes |
| END OF COOKING TIME end | ·Turn the right function selector to a cooking function ·Rotate the left function selector to the position "End of cooking" ·Set the end time of cooking by using buttons "+" and "-" ·Lighting Auto appears | ·When the cooking time has elapsed, the oven switch off automatically. ·To stop the cooking functions early, turn the function control to OFF | ·It allows to preset the end of cooking time you want. ·When the cooking time is set, turn the function selector to OFF to go back to actual time. ·To view the cooking time selected, turn the left function selector to End of cooking Time | ·This function is used for cooking we want to program in advance. For example, your recipe needs to be cooked 45 min and to be ready at 12.30pm ; simply set the cooking time duration on 45 min and the end of cooking time on 12.30pm. The cooking will start automatically at 11.45 (12.30 minus 45 min) and will continue until the preset end of cooking time, then the oven will switch itself off automatically |
| MINUTEMINDER | ·Turn the left function selector to the position Minute Minder ·Set the time of cooking by using buttons "+" and "-" | ·Set the time on 00.00 by turning the left function selector to the position Minute Minder, and using the button "-" | ·Sounds an alarm at a few seconds at the end of the set time | ·Allow to use the oven as alarm even if the oven is switch off |
| CHILD LOCK | ·Turn the left function selector to the position Child lock. Press the button "+" during 3 seconds ·Child lock is available when "STOP" appears on display | ·Turn back the left function selector to Child lock and press button "+" during 3 seconds ·Indication STOP disappears | ·The oven cannot be used | Useful especially when children are at home |
5.1 BEFORE USING THE OVEN FOR THE FIRST TIME
PRELIMINARY CLEANING
-Clean the oven before using for the first time:
-Wipe over external surfaces with a damp soft cloth.
-Wash all accessories and wipe inside the oven with a solution of hot water and washing up liquid.
-Set the empty oven to the maximum temperature and leave on for about 1 hour, this will remove any lingering smells of newness. Ensure that the room is well ventilated while this is being done.
- THINGS TO REMEMBER
Confirmation of operation on timer
Modification must be confirmed by pressing the button.
Stopping the oven:
This may be necessary if you have input an incorrect instruction.
To stop the oven .... turn back the function selector knob to the Stop Position.
Child safety device:
To lock the oven controls, select the child safety device. Refer to the section entitled "Programming - The child safety device".
The cooling fan:
This protects the control panel and electronics from heat damage.
It begins and then stops automatically even when the oven is switched off.
Oven lighting:
By turning to the light symbol, you can switch on the oven light when it is not in use.
When the oven is in use, the light stays on during all of the oven functions and when the door is opened.
5.2 HOW TO USE THE OVEN
- THE MANUAL MODE
The cooking methods suggested in manual mode are set out in the table below. A temperature is also suggested for each cooking method. This can be modified within a pre-determined range.
| Function Mode according to the oven model | Pre-set Temperature °C | Pre-determined Temperature °C | Function Booster* |
| Bottom + Fan | 210 | 50-220 | Booster |
| Bottom | 160 | 50-220 | Booster |
| Bottom + Top | 220 | 50-240 | |
| Bottom + Top + Fan | 210 | 50-230 | |
| Circular Heating Element + Fan | 180 | 50-230 | |
| Grill | L2 | L1-L3 | |
| Grill + Fan | 190 | 50-200 | Booster |
| Grill + Turnspit + Fan | 240 | 180-240 | Booster |
| Defrost | 40 | No | |
| Keep Warm | 60 | No | |
| Pizza ** | 230 | 230 | |
| Pyro ** | Pyro | ECO: 425 / 65min SUP: 425 / 1h 30min | |
| *Booster: rapid temperature raised |
| **Oven must have this function |
1- Turn the oven selector knob to the function required to the cooking.
The heating elements in operation for the selected cooking method are displayed.
2- The appropriate temperature according to the cooking method selected is displayed. It can be modified within a pre-determined range - see the table above.
To modify the temperature setting, turn the central button and on the timer confirm the setting by pressing the same button.
... the temperature display is fixed but can be modified during the cooking cycle.
The oven will start cooking and will start to heat up.
The indicator light flashes until the selected temperature has been reached. An audible signal sounds at the end of this operation and the indicator light becomes fixed.
3- A cooking time and an end of cooking time can be programmed by turning the programme selector knob to "cooking time" or "end of cooking time".
The "cooking time" or "end of cooking time" display starts flashing. Using the central button, modify the settings as required and on the timer confirm.
When you have done this, do not forget to turn the programme selector knob back to "stop position" to confirm the new setting.
For more details about programming, refer to the chapter 5.3 entitled PROGRAMMES.
4- At the end of the cooking cycle, turn the function selector knob back to "stop position".
The indicator flashes again, it will remain also turned on after having extinguished the oven and it will extinguish when the inside temperature of the oven is sufficiently low.
COOKING MODE
All cooking should be carried out with the door closed.

- BOTTOM + FAN - The combination of the bottom heating and fan is ideal for fruit flans, tarts, quiches and pastries. It's a food from becoming too dry and encourages bread dough to be the shelf in the bottom position in the oven.

BOTTOM - Using the lower element. Ideal for cooking all boxed dishes. Use this for flans, quiches, tarts, pâté and any that needs more heat from below.

- BOTTOM + TOP - Both top and bottom heating elements are this method is ideal for all traditional roasting and baking. When used meat, roast beef, leg of lamb, game, bread or foil wrapped

- BOTTOM + TOP + FAN - Both top and bottom heating are used in conjunction with the fan, which circulates hot air out the oven. We recommend this method for poultry, pastries, vegetables. By using this method better heat penetration is less and cooking and preheating times are also reduced. The fan option allows you to cook different foods together at different times in the oven all at the same time, providing even heat on but without the risk of mingling tastes and smells. When different foods at the same time allow a further 10 minutes.

CIRCULAR HEATING ELEMENT + FAN - Air that has been blown by the fan onto the different levels. It is ideal for cooking types of food at the same time (e.g. Meet and fish) without stess and smell. It cooks very gently and is ideal for sponge fisheries, etc.

- GRILL - Using the top heating element. Success is guaranteed in the grills, kebabs and gratin dishes. The grill should be pre-heated at a temperature for 5 minutes. White meats should always be kept at some distance from the grill element, the cooking time is longer but the meat will be more succulent. Red meat and fish can be placed directly onto the shelf with the drip tray placed on lower shelf position.

- GRILL + FAN - The top heating element is used in conjunction with an oven which circulates the hot air around the oven. Pre heating is intended for red meats but is not necessary for white meats. This ideal for cooking thicker food items such as pork or poultry. The grill should be placed directly at the centre of the middle of
By sliding the drip tray underneath the shelf it will ensure that any juices are collected. For best results always make sure that the food is not too close to the grill element and turn the food over half way through the cooking time.

- GRILL + TURNSPIIT + FAN - The advantage of using the top compartment at the same time as the fan and rotisserie is that the food is cooked, preventing it from becoming dry and tasteless. The fan is programmed to continue rotating for approximately five after cooking, making full use of the residual oven heat. No pressure is required for rotisserie cooking.

DEFROST - When the dial is set to this position. The fan is hot air around the frozen food so that it defrosts in a few without the protein content of the food being changed or altered. Temperature is preset in 40^ constant, no regulation is possible.

- KEEP WARM - This is recommended to reheat precooked food by positioning the shelf on the second level from top, or to defrost the pizza or pastry by positioning the shelf on the lower level.
Temperature is preset in 60^ constant, no regulation is possible.

- PIZZA - With this function hot air circulated in the oven to a perfect result for dishes such as pizza or cake.

PYRO - The oven takes care of the entire inside oven cleaning facilities are possible ECO, SUPER
5.3 PROGRAMMES
THE TIMER:
The timer works independently of the oven and has no effect on the heating elements. It is simply a reminder.
- Turn the knob to the Timer position. The Timer symbol will appear. The digits 00:00 will appear on the display.
- The minutes will then flash, turn the central button to the required number of minutes and confirm by pressing the same button.
- The hours will flash, turn the central button to the required number of hours and confirm by pressing the same button.
- Turn the knob back to the Stop position.
When the time is up, the cooking time will disappear. An audible signal will sound for 15 seconds and the Timer display will flash (to stop it before the 15 seconds are up, just press the central button).
PROGRAMMING THE COOKING TIME:
Various recipes are pre-programmed with a cooking time. In Manual mode, Defrosting or Keep warm Mode can be pre-set, if required.
- Turn the knob to the Cooking time position. The Cooking time symbol will appear. A pre-programmed cooking time for the various recipes will appear, or 00:00 for other functions of the oven.
- With the minutes flashing, turn the central button to the required number of minutes confirm by pressing the same button.
- With the hours flashing, turn the central button to the required number of hours and confirm by pressing the same button.
- Turn the programme selector knob back to the Stop position to confirm the new cooking time.
When the time is up, the cooking time will disappear from the display. An audible signal will sound for 15 seconds and the Cooking time and STOP symbols will flash.
- Turn the programme function knob back to Stop. If you do not do this, the Cooking time and STOP symbols will continue flashing.
PROGRAMMING THE END OF COOKING TIME:
Various recipes are pre-programmed with a cooking time and therefore with an end of cooking time. In Manual Mode, Defrosting or Keep warm mode can be pre-set, if required.
- Turn the knob to the End of cooking position. The STOP symbol will appear. A pre-programmed end of cooking time for the various recipes will appear, or 00:00 for other oven functions or the time of day will be shown.
- Turn the programme selector knob to confirm the end time.
- The minutes will flash. Turn the central button to indicate the required number of minutes, and confirm your choice by pressing the same button.
- The hours will then flash. Turn the central button to indicate the required number of hours, and confirm your choice by pressing the same button.
NB: With a delayed start, the end of programme time will appear on the display with the "Cooking time" and "STOP" symbols, and only the function Recipe mode of the oven remains.
The oven automatically calculates the start time (end time minus cooking time).
At the end of the cycle the oven switches itself off automatically. For 15 seconds, an audible signal lets you know that the cycle has ended and the "Cooking time" and STOP symbols will flash.
- Turn the function selector knob to Stop. Unless you do this, the symbols will continue flashing.
- This function is typically used with "cooking duration" function.
For example if the dish has to be cooked for 45 minutes and needs to be ready by 12:30;
-
select the required function
-
set the cooking duration time to 45 minutes
-
set the end of cooking time to 12:30.
Cooking will start automatically at 11:45 (12:30 minus 45 mins)
and will continue until the pre-set end-of-
cooking-time, when the oven will switch itself off automatically.
WARNING.
If the END of cooking is selected without setting the length of cooking time, the oven will start cooking immediately and it will stop at the END of cooking time set.
5.4 COOKING TIPS
It is better not to salt meats until after cooking as salt encourages the meat to spatter fat. This will dirty the oven and make a lot of smoke.
Joints of white meat, pork, veal, lamb and fish can be put into the oven cold. The cooking time is longer than in a preheated oven, but it cooks through to the centre better as the heat has more time to penetrate the joint.
Correct preheating is the basis of successful red meat cookery.
GRILLS
Before loading the grill:
Remove the meat from the refrigerator a few hours before grilling. Lay it on several layers of kitchen paper. This improves seizing, making it tastier and avoids it staying cold at the centre.
Add pepper and spices to the meat before grilling, but add any salt after cooking. This way it will seize better and stay juicy. Baste all the food to be cooked with a little oil. This is best done with a wide flat blasting brush. Then sprinkle with more pepper and herbs (thyme, etc.).
Never pierce the food during cooking even when you turn it. This lets the juice out and it becomes dry.
BAKING
Avoid using shiny tins, they reflect the heat and can spoil your cakes. If your cakes brown too quickly, cover them with greaseproof paper or aluminium foil.
Caution: The correct way to use foil is with the shiny side in towards the cake. If not the heat is reflected by the shiny surface and does not penetrate the food.
Avoid opening the door during the first 20 to 25 minutes of cooking:
Soufflés, brioches, sponge cakes, etc. will tend to fall. You can check if cakes are done by pricking the centre with a knife blade or metal knitting needle. If the blade comes out nice and dry, your cake is ready and you can stop cooking. If the blade comes out moist or with bits of cake attached, continue baking but slightly lower the thermostat so that it is finished off without burning.
6. PYROLYTIC CYCLE
**Oven must have this function
The oven is equipped with a pyrolyser cleaning system, which destroys food residues at high temperature. The operation is carried out automatically by means of the programmer. The resulting fumes are rendered "clean" by passing over a Pyrolyser wich starts as soon as cooking begins. As very high temperatures are required by the Pyrolyser, the oven door is fitted with a safety lock.
The pyrolyser can be stopped at any time. The door cannot be opened until the safety lock is displayed.
NOTE : If a hob has been fitted above the oven, never use the gas burners or the electric hot-plates while the Pyrolyser is working, this will prevent the hob from overheating.
TWO PYROLYTIC CYCLE are pre-set.
. ECO PYROCLEAN : Cleans a moderately stained oven.Operates for a period of 65 minutes.
. SUPER PYROCLEAN : Cleans a heavily stained oven.Operates for a period of 90 minutes.
Never use commercially available cleaning products on a Pyrolytic oven!
Tip : Carrying out Pyrolytic cleaning immediately after cooking allows you to take advantage of residual heat, thus saving energy.
Before carrying out a Pyrolytic cycle :
- Remove all accessories from the oven : They cannot withstand the high temperatures and would be damaged by pyrolytic temperatures.
- Remove any large spillages or stains as it would take too long to destroy them. Also excessively large amounts of grease could ignite when subject to the very high temperatures of the Pyrolyticcycle.
- Close the oven door
excess spillage must be removed before cleaning
At the end of the cycle, the indicator flashes again, it will remain also turned on after having extinguished the oven and it will extinguish when the inside temperature of the oven is sufficiently low.
Pyrolysis leaves a white residue on the oven walls. Wait for the oven to cool completely then clean the inside of the oven with a damp sponge to wipe off the residue.
1- Rotate the function selector to the position. On the display, appears the indication "ECO" or "SUP".
2- The preset time is 65min, this can be varied from 65min (Eco mode) to 90min (Sup mode) via the programmer (setting button " + " or " - ]). If the oven is very dirty, it is recommend o increase the time to 90min, if the oven is moderately dirty reduce the cleaning cycle time to 65min.
3- It is possible to delay the start time of the pyroclean cycle by changing the END time via the programmer.
4- After few minutes, when the oven reaches a high temperature, the door will lock automatically.
5- The pyroclean cycle can be stopped at any time by turning the function selector back to '0'.
6- Once the pyroclean cycle has finished, the pyrolysis will switch off automatically. On the display appears the indication "END "and" 日 - 日 until the door is locked.
7- Turn the function selector back to "0", if the temperature is still high, the "0 -- n" indication appears to advise that the door is locked.
7. CHILD SAFETY
This function is essential, especially when children are around. It prevents children from switching the oven on or altering the preset programmes.
This safety system locks the oven control panel while it is operating.
There are two levels of safety :
LEVEL1: Locking selector control knob and the central button.
To activate: Turn the programmation control knob to child safety.
Action : The control knobs are inactive*.
- To deactivate: Turn the programmation control knob to 0.
LEVEL 2: Locking function selector knobs
- To activate : Turn the function selector knob to child safety and keep the central button pressed in for 3 seconds.
Action : All the controls are inactive*.
- To deactivate : the same procedure as for activating. Turn the function selector knob to child safety and keep the central button Pressed in for 3 seconds.
*Note : In all cases, for reasons of safety, even when the controls are locked, the oven can be switched off by turning the selector knob to 0.
1.2 MEPbI INPEIOCTOPOXHOCTN
He noIb3yItec b nepexoHnKamu, TpoHnKaMn n/nn ydInHnteBhIMn shypamn.
B cIyuae noBpeKdEHHa DyXOBKn B pe3yIbTaTe ee naDeHnna IINIO npDpyrO npuHHe, BblkIIOUHTe DyXOBky, OTcoEHNHTe Ka6JIb PNTAHN O T 3JekTPOcETn H He DoTpaNBaITecb DO DyXOBKn.
Bcnyae nobpejdeHnKa6eI nHTaHn erO Heo6xOIMo 3aMeHITb DOJKNbIM o6pa3OM.
OTcoeDHHnTe Ka6eB n 3aMeHnTe ero HObIM Ka6eJEM Tuna H05RRF, H05VVF, nnn H05V2V2-F. Ka6eB dOnJxeh Imetb DoctaToHyu Harpy3OCHyU cNooc6HoCTb, UTo6bl npOnyckatb TOK, Notpe6JraEmbI dyXOBKoI.
3aMeHa Ka6eIa D0JXHa BbIOnHЯTbCg KBaJIInΦnIupoBaHHbIM CneuaJIInCTOM.
ПобOD 3a3eMненя (keJTO-3eJIeHbI) ДОЛжЕн 6ыт bHa 10 MM dInnHHe eOCTaIbHbIX npOBOD Ka6eЯ.
2. TEXHOJIOΓNRA PRO/EXP'R
2.1 ПИнадлесхноCTДУХOBКN
Ipeed nepBbIM nCnoJIb3ObaHnem DuyOBKn BbIMoITe ee npHaJdJIeXHOCTn r6koi. CnIoNCHTe BOIOu N BbCyUHtE. Ha nonky MOxHO CTaBHTb fOpMOChk INIg BAIneUKN KcyOHHy IOncydy.
EcnHaNoDOnHeOCTaJIncbPnIropeBUnHe OCTaTKJxnpa,3amOHTe NoDoH BBODe CMOUcIM CpeDCTBOM.
IopdoTH TAKKHe MOxHO BbIMbITb NocydomoueHoi MaunHe IIN ONUCTnTb C NOMOJIbCneIaJIbHOrO YNCTraIeO CpeDCTBa IIN DxyOBOK.
HnkOrda He yctaHaBnBaIte B dyXOBky rpa3hbl noDIOH.
OCBEUHNEBUYXOBKE
Ipeed BbINOJIHeHEm YnCTK INI 3aMeHbI JAMNoUKN O6ra3aTeJbHOOTcoeINHInTe DyXOBky OTJeNkTPOcTeH.
Jamnouka n ee 3aunTHbI KOJIauKo N3roTOBHeHbI N3 JapocToiKOrO Maepnana.

XapaKmepucmuku JAMnOuKU:
230B nepemehnHO ToKa-25BT-0KoNb E 14,TeMnepaTpya 300^ 4To6blzamHeHTb lamNoUky:
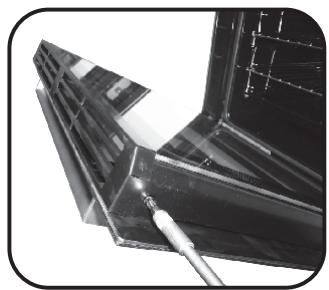
- YdaJIte BnHTbI KaK nOKa3aHo Ha pncyHke 3 (Figure 3)
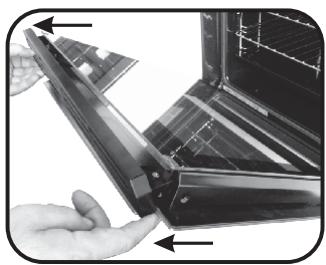
Figure 4
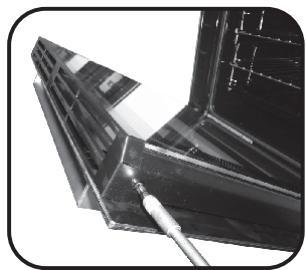
Figure 3
-
CHIMMTE BepxHIO MeTaNIIueckyIO KpbIiKy, IOTaHyB ee BBepx, KaK yka3aHO Ha pncyHke 4 (Figure 4)
-
CHIMMTE CTEKJO, OCTOPOXHO NOTAHBero n3 pamkn DBePcbl, KaK yKa3aHO Ha pncyHke 5 (Figure 5).
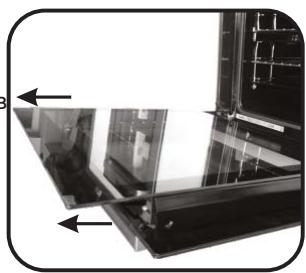
Figure 5
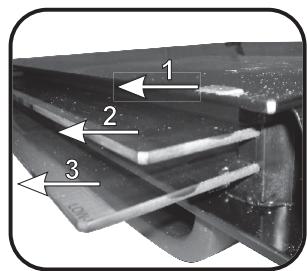
Figure 6
*Длдуховьix shkaФOB c
Пиролитческо OЧNTКО,
пожалійста, снIMITE тakke BTOPOe
ИТръе CTeKNa, кak yKa3aHHo Ha
pncuYKe 6 (Figure 6)
- Pocne 3aBepuHn Oucmku deepu, c6epume ee npou3eodr deucmeur o6pamHomnpaKe
- HA BCEX CTEKJIAX 3нak LOW-EДОЛЖЕн npabINbHO YHTaTcR NДОЛЖЕн 6bITb paCNoJoxeH B JIeBOM yIpy DBePn, PdOM C JIeBOI NeTJIe. TaKIM O6pa3Om, HAneYaTaHHbI CnMBoJ Ha NepBOM CTeKJIe OCTaETcR C BHyTpEHHN CTOpOHbI DBepZbl.
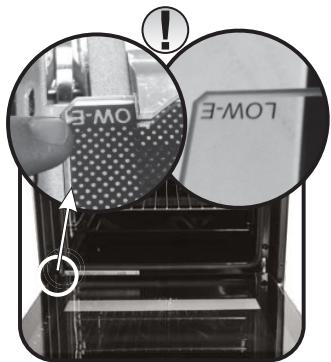
Figure 7
4. CEPBNCbI ΚEHTP
PpeKJde Yem N03BOHHTb B cepBnCHbI cHTp.
Ecnn dyxOBka He pa6oTaet:
-Поберьт,чTOОнпразвиьноюклю悔аКзелкгрсет.
EcnBbI He MoXeTe cAmOCToTcJIbHO onpeJeINrB npuHnHy HEnCnpaBHOCTn:
- OToeHInHe DxyOBky OT 3JIeKtPoCeTn, He npKacaiTeCb K Hei, n o6bpatntecb 3a NOMOuB V CepBnchbl CEHTp.
IpepeTem kakno3BOHnTB CepBnCHbI CEHTP 3aIIuInTe cepHbI Homep n3dEINy, yka3aHHbI B erO nacnpTOH TaBnUKe.
Ecni He nctek cpoK deiCTBnra rapaHTnY, ykaaHbB B rapaHTnHOM TaIOHe, peMOHT n3dENnB CepBnCHom LcHTpe 6yET BblONHe HBeCpIaTHO.
Даньи злкрпорпбор помаркюван в COOTBeTCTBn CТpeBOHЯМN,ИЗПОжEHьIMN BДирктNBe 2002/96/EC OTHOCHTeJIbHO yTINI3aUNI 3лкрпчeckOrO n 3лкрponHoro obopydOBAHNY (WEEE).

DyXOBkHaHnHaeTHarpeBaTbCra, HnauHnAeTCpnpiroTOBneHnEINI. CBeTOBn INDkaTOp 6ydt MrraTb Do Tex np, NOKa TEMnepaTypa B DxyOBKeHeNoIDHMMeTcAo3aDaHnHO3NaueHn.Iocne3TORoNOdaTe 3ByKOBoCnIHan,I3OTTCMBONPPOdoJXAeTropEtbpOBhIMCBETOM.
3 - Bpem nprirotoblenn niiu n Bpem okohua npirotoblen nniun Moryt n3meHantbcra c NOMOUsy uCTahOBKn pykkn Bb6opa nporpaMMb I NOLOKeHHe "Bpem nprirotoblenn nuiu n NIOJKeHne "Bpem OKOHua npiroTOBlenn nuiu". INDkaTOp "Bpem nprirotoblenn nuiu" nui "Bpem OKOHua npiroTOBlenn nuiu" NaHnaet mHaTa. C NOMOUsy ceHTpaNbHOH KhoNKn n3MeHnte yctahOBKn B COOTBETCTBN C BAaUMM Tpe6oBAHnMa, N IOdTBePdNTe 3TOCNOMUcHxKATNAeHTPaNbHOHKNKn.
IocneBbInonHeHn3TnxOhepaun He3a6ydbTeBepHybpykyBb6opa nporpamMbI BnoJoxHeNE CTOp, YTO6bI NOdTBePdNtB HOBblc yCTaHOBKN.
Дллolyнуядогон humelьhoинфорmaцuumнocumelьnoраммюеаня pa6ombi dyxoeku obpamumecb napaepafoy5.3POrPGAMMPOBAHNE
4-B KOHcE ZIKNa pnpiroTOBHeHn PNIu yCTaHOBInTe pyky Bb6opa cyHKunBnOJoxKeHneCTOJI.
Iocne 3aBepseHnna zikla npriroTOBHeHnna niiu HndkaTOp TEMnepaTybl cHOba hauHaet mRaTb. OH bUeT npOdoJxKaTb MraTb IocNe BbIKNoHcHnA dyXOBKn, n OrachET TOnbKO nocJe TORO, KaK TEMnpaTypabdyXOBKeCHn3tBcCraDOCTaTOOHn3KOrO3HaueHnA.
-PEKIMMbIPNIROTOBENHINIIU
PnIroTOBHeHHePiuNBCeRdaDOnXHObByINHrTbcrToNbKoc3aKpbITOn DBepueyxOBKn.
HARPEB CHN3Y+BEHTINJTOP-IVcnoJIb3yIOTcHnKHH HArpeBaTeJIbHbI 3JIeMeHT N BeHTInJTop. 3TOT MeTOd nJeAaJIbHO NOxOINT IJI nprirotOBHeH NkpbITbIX NpIRoB C pkyKTOBOH HauHHKO, INPOXKOB C OTKpbIToH pkyKTOBOH HauHHKO, INPOXKHBIX. Ppi 3TOM BInEHa He nepeCyuHbAEtCn OBeceNeuHbAEtCn NOdbem Tecta.YCTaHOBTENONKYBHNKHeenONOKeHne.
HARPEB CHN3Y - IcnoIb3yeTcHnKHN HArpeBaTeHbHbI 3JemeH.3OTMeTOdJeAeIbHOHOxOuNTIgI npiroTOBHeHJIO6bx MYHbIX n3deJIi. IcnoIb3yIte erO dIgI npiroTOBHeHJOTKpbITbIX pnporOB C ppyKTBOH uIN yroDHOH NaHHKO, pnporOB C 3aBapHBIM KpemOM n pa3NIuHOn HaunHKo, pnpoxKOB C OTKpbIToI ppyKTBOH NaHHKO, pnpoxKOB C MAcOM uIN pbIoN n DpyrO NnU, dJI npiroTOBHeHJAKOTOpOHTpe6yETc6OBeeHNTeHCNBbIHHarpeBCn3Y.
HARPEB CHN3Y + HARPEB CBEPXY - NcnoIb3yHTCBERXHH INnKHH HArpeBaTeNBhle 3neMeHbI. 3TOT metoIeAebHO NOxOHTI TpaDInuOHHO 3axapINBaHNrNiN dIra BbIeKn. OH nCNOJIb3yETcR npi pnpiroTOBJIeHNr YepHO rMaCa, roBAnHbl, HOrn rHeHkA, nnUx, XLe6a, INIINpOdyKTOB, 3aBePhyTbIXBΦOnbIg.
HARPEB CHN3Y + HATPEB CBEPXY + BEHTINJRATOP - IcnoIb3yIOTcBepxHnHHKnHnHarpeBaTeIbHbIe3JIeMeHTbI, aTaKKe pa60taET BeHTINJTAOP, c NOMOJIbIO KOTOPOR OcyUeCTBnEaTcR CUPKnyLZnurTopryo BO3dyxa B dyXOBke. 3TO T MeOD peKomeHdyaeTcR NCNOJIb3OBAtBdIaPnIRTOBLeHnIDOMaUHNeITNtUcBi, BblneUKN, pbl6bn OBOuSei. Pn ICNOJIb3OBAHN 3TOr MOToA oBeCneHBAeTc LuyUWee npOHKnHOBeHnE TeNlA BHytpb NtUe, n TaKKe ChnKaeTcB Bpemr npIRTOBLeHnI NtUe n PnpEapInTehBHorO pa3OrpeBa. MeOD npIRTOBLeHn NtUe C NcNOJIb3OBAHnEM BeHTINJTAOpA IO3BOJnEOTdOHNBoPeMENHO rTOBtB pa3NUnHbIe BNDIHa Pa3HbIX ONkax dYxOBKn. Pn 3TOM oBeCneuHBaTcR BoOee paBHOpHoe paCnpdeJeHnEteNIIaUNpeDfTbpAuaaetcRnFOnOSeHHeOJDHMnBDom NtUe3AnaxAdpyrTOBUnDaNtUe. PnpOHDOBpeMENHomPnpIRTOBLeHnPa3HbIXOBNIUsNCDeNyEtByeNHTBbpeMnpIRTOBLeHnNHa 10MNHT.
KPyIbH HAFPBEATEJbHbI 3JIEMEH + BEHTNJLTop - IcnoJb3yIOTc BepXHH N HxHNN HArpeBaTeJbHbIe 3JIeMeHtbl, a TAKKe HArpeBaTeJbHbI 3JIeMeH T KpyrIoN foOpMbI N OcUSeCTBnAE TcIrpKuIaIg Tropaero Bo3dYxa BdyXOBke. 3To MeTOd PnIRTOBJeHNnIuNCBeHTNJLTopOM.
ΓPЛь -Исплььетс Ворхнй HarpeВатьньй 3лем ent. 3ТOTМETODиdeaHLHONODXODITДЯ рпiroTOBNeHЯр3NHybIX6ILOd HarриLE,Ke6abOB,IrpatINOB(6ПLOda,3aneHHeIeNoIDcblpOM).ΓPnlb DOJIXEN ppeBaRteHBOpa3OgReBaTbCSdo BvICOKO TeMnepaTyB TeueHne 5 MInyT. Kyckn БeNTO Мяca DoJXHbI paCNOJaTaBcRa ODAHAKOBOMpacCTOraHIMOTHarpeBaTeHBOHOrO3lEmeHTaRPIJI.BPemЯ рпiroTOBNEHЯ ПИSi npri 3ToM yBeJIuHbIaETcRA HO MxO NOUyAetc B0lee coYhbIM.YerHoe MЯco IФИne pbIbMoKHO KlaCTb PrpmoHa peWetKy,poD KOtOpuy Heo6XoDmO yctAHOBtB NOДоH dЯ c6opa JNKIOCTN.
33 FRNJIb + BEHTNIJATOP - NcnoJIb3yIOTc BepxHn HArpeBaTeJIbHbI 3eMEnHT N BeHTNIJATOp, C NOMOJIbIO KOTOPORO OcyUeCTBnIeTcA UnpKUYIaIg RopYrEro BO3dXa B DxyOBKe. JIpyPiRTOBLeHnry ChePHorO Mca peKOMeHdyETc npEdBaPntJIbHbI
pa30rpeB dyxOBKN, a Дяпри�OTOBlenHЯ 6eJOrO mca npedbapntelbHbI pa30rpeBdyxOBKHeHTpe6yETc.ПрiroTOBlenHa rPnIe IealbHo nOxDxOaNT dЯ 3axapuBaHЯ 6oIbIux KycOB Mca n DomaHneIPTuCbI. ПрiroTAbInBaemarHaIrpNJIeNpacNoIaraeTcAB YeHTpeCpeDneHIOJIKN.
Дясбoga cokob,КOTOBbie BbIeJЯOTc npi pInyrotobJeHn nIuHa rPnne,poI NOly KHyXHO yCTaHOBuTbNoDOnHДЯсбogaJxNkoCTn.Дя pONUyehnO ONtMaJIbHbIX pe3yNbTaTOB pOcNeIte 3a TeM,yTObI pINyrotabJIbBaemar NIIua He paCnOlaRaIacb CInlKOM 6In3KO OT HArpeBaTeIbHoro 3IeMeHTa rPnIa,ИпepeBepHnTe KUsKn INuI,KOrDa npoiDeTBpeMra,paBHOeIOJOBuHEBpeMeHnnpriTOBJeHnIuI.
33 TPNILb + BEPTJ + BEHTINJYTOP - PpeMnyjecTBOM DaHHoro MeToDa nprirotOBnHn IINs, B KOtOpom NcNOb3yeTcB BepxHn HargBaTeNbHbI 3IeMeHT, BeHTINJyTop, IN BepTeN, JBIAETCTO, UTO NIIa npoxkapBaTc paBHOmePHO, IN pRn 3OTM He CTAHOBITc cyXOi 6e3BkUChOH. BepTe 6yDet npdoJNaTaB BpaAaTbcN npri6bn3ntEBo H o eIe pTb MMHy T nocIe BblKIOUeHn HargBa. 3TO obEcneuBaet noJIHOe nCOnb3OBAHHe OCTaBSeTOcB D yXOBKe TEJIa. Ppi nprirotOBnEHn NIIu Ha BepTeNe ppeBaNTbHbPa3OrpeB dXOBKnHETpe6yETc.
PA3MOPAXKINBAHNE - Korda pyka perynilpoBkn yctahOBnHeA B 3TO IIOJXeHne, C NOMOuB BOHTNlTopa OcUeCTBnIeTcIUPkyIaIe TEPINOBO3dYxa BOKpyr3AmOpOJeHHbIX npOyKToB, YTO oEocneUHaet IX pa3MopaxBaHne B TeYeHne HeCKoJIbKnXMnHyTbe3mHeHncopeJxAHnBnIeIpOTenHOB.
ПОДДЕРЖAHNE ПИЦИВ PA3OFRPETOM COCTOHAHIN- 3TOTpexnIMpeKOMeHdyeTcIЯpa3OgReBaHnI\PuI,pacnoLoXeHHoHaNoJIke,yCTaHOBLeHNoHNa BTOPOI no3nIin CBepxU,IIINДЯ pa3MopaxnBaHnI PnIcbl INN BbIeChn,pacnoLoXeHHbIX HaNoJIke, yCTaHOBLeHNoHaHNkHmHypOBeHb.
IcnoJIb3yETcNoCToHHaTeMnepaTpya 60 ^ C ,TeMnpaTpya He perynpyeTc.
ПИЦА-BэтOMржIMeВdIyOXBKe npOcXODNTцрkyLЯпьВОЗдуха,чToOBecneuINBaETnpEBOcXODHbIepe3yIbTaTbI npnpiNpIroTOBleHnITakx6hNoKaknIzauJIkeKc.
ПИРОЛТИСЕСКА YNCTKA -ВыногняETСЧNTKa BCEx BNYTppeHHnx NOBepxHOCTeДухOBkn-UMeETcЯ Два ржима пироЛТИСЕСКОчYNCTКIN:ECO(3KOHOMHAR)nSUPER(CYNEP)
5.3 ПОГРAMMЮBAHAWE
TAIMEP:
Taimep He ynpablaet pa60toH HArpeBaTeNbHbIX 3IeMeHTOB dYXOBKn. OH nCnOJb3yETc TOJbKO dJIa INdNkaCmBpemeHn.
-Установпente руку порогамmarовая в положене "таймер".Ндисплий пояbraетс симьол таймера и пазрды 00:00.
-ПосnéTOROKakHaCyHTMnRaTbpa3PraIbMnHyT,yCTaHOBnTeHyXHoe KOnUeCTBO MmHyT C NOMOuIbIO NOBOPTa CEHTpAlbHoN KHOKN, IN OIOITBePdIteYCTaHOBkyC NOMOuIbHO HaxaTnA 3TOI KHOKN.
-Посл StTOH NaHnAOT Mngatb pa3pIa Yaca, yCTaHOBInTe HxJHoe KOINueCTBO YACOB C NOMOuBIO NOBOPoTa CEHTpaJIbHOH KHOKN, IN OIOITBEpDNTe YCTaHOBky C NOMOuBIO HaxaTna 3ToH KHOKN.
- UctahOBIne pyuKny npOrpamMnpoBaHnB nOJIOKeHne CTOnI. IocNe TOrO kak nCTeuy 3aDaHHoe BpeM, INDnKaTOp BpeMeHN nprirotOBJIeHnN pIuN uCye3HeT C dncnIeJe. IocNe 3tOro B TeueHne 15 cekyHd 6ydtet nOdaBaTbCzBYKOBoi CnHaN, nHa dncnIee HaunHaET MIRATb CmBOJ STOP (CTOnI). (UTo6bl BbIKNoHTb 3ByKOBoi CnHaN Do TOrO, kak nCTeKYt 15 cekyHd, npocTo HaxMnTe CEHTpaIbHyU KHOKNy).
EcnBpemr OkohuaHn npiroTOBHeHn Bb6paHO 6e3 yCTaHOBKn DInTeIbHOCTN BCEO npiroTOBHeHn, DyXOBKa cpa3y aBTOMaTneCKn NaHET npiroTOBHeHne n PpeKpatNT ZIKJ TOJIbKO bYCTaHOBHeHHoe Bpemr OkOHuaHn.
5.4 COBETbI NO PnIroTOBJeHIO NIIuN
PekomeHdyetc coINTb Mco nocne ero npiroTOBHeHnra, TAK KAK COJIb Bbl3bIbae pa36pbI3rIbAHne Xnpa. Ppi 3Tom DyXOBka 3aqr3HJeTcN o6pa3yETcDblM.
Kyckn 6eIoro mca (cBHHHa, TeJIaTHHa, IargHeHOK), n pbl6a MoryT NOMEuATbcra B xOJOnHyU dYxOBky. Ppni 3tOM BpeM npriTOBOTNeHn nnu 6ydet 6oJIbSe BpeMeHn npriTOBLeHn nnu B npedBapntelbHO pa3OrPeToI dYxOBke, HO Kyckn Mca 6ydyT JnyuWe npoxapnbTaBCra B cpeDInHe, TAK KAc BpeM npOHKnHOBeHn TeNna BHTpb Nsui npri 3tOM yBeJIuNbBaETcra.
PpavnbHbI ppeBapnteHbI pa3orpeB dYXOBKn YBJIETcH Heo6xOaMbIM ycNoBnEM dJa ycNeuHoro nprirotobneHnry cepHoro Mca.
IMeetcIBAPEKIMA INPOJNTNUECKOYUCTKN.
IMeetcBdA ypoBn3aunTbI:
2. TEHNOLOGIJA PRO/EXP'R
2.1 OPREMA PEČICE (odvisno od modela)
2.1 EQUIPMENT DU FOUR
Applying torque more than needed to fix the screws can close the ventilation channels on both sides. Please be sure that, these ventilation channels are 2mm open after installation to furniture.
ATTENZIONE!
GB Fixing in the location
Inside the oven there is a bag with four fixing screws. Fixing: When the oven door is open, holes are accessible, they are located on each side. Use the screws provided to fix the oven.
The manufacturer will not be responsible for any inaccuracy resulting from printing or transcript errors contained in this brochure. We reserve the right to carry out modifications to products as required, including the interests of consumption, without prejudice to the characteristics relating to safety or function.
IT