
BKS6135B - Microwaves BRANDT - Free user manual and instructions
Find the device manual for free BKS6135B BRANDT in PDF.
| Product type | Built-in microwave |
| Brand | BRANDT |
| Model | BKS6135B |
| Installation type | Built-in column |
| Maximum microwave power | 1000 W |
| Power levels | 4 (200 W, 500 W, 700 W, 1000 W) |
| Frequency | 2450 MHz |
| Supply voltage | 230 V ~ 50 Hz |
| Rated current | 16 A |
| Cooking functions | Immediate cooking, delayed cooking, automatic functions (fresh vegetables, frozen vegetables, fish, meat defrost, bread defrost) |
| Turntable | Yes, with stop option |
| Timer | Yes, adjustable up to 99 min 59 s |
| Key lock | Yes (child safety) |
| Keep warm | Yes (automatic activation after cooking) |
| Interior light | Yes, lamp replaceable by after-sales service |
| Cleaning | Do not use steam, abrasive products or metal scrapers |
| Included accessories | Glass turntable, roller support, drive |
| Repairability | Original spare parts available, approved after-sales service |
| Net weight | Approximately 18 kg (estimate) |
Frequently Asked Questions - BKS6135B BRANDT
User questions about BKS6135B BRANDT
0 question about this device. Answer the ones you know or ask your own.
Ask a new question about this device
Download the instructions for your Microwaves in PDF format for free! Find your manual BKS6135B - BRANDT and take your electronic device back in hand. On this page are published all the documents necessary for the use of your device. BKS6135B by BRANDT.
USER MANUAL BKS6135B BRANDT
m = 311 ;
1
RELATIONS CONSOMMATEURS
Thank you for purchasing and placing your trust in a BRANDT product.
We have designed and made this product with you, your lifestyle and your requirements in mind so that it meets your expectations. This product benefits from our know-how, our innovative spirit and the passion that has been guiding us for over 60 years.
In a continuous effort to better satisfy your needs, our customer service department is available to listen and answer all your questions and receive any suggestions you may have.
We also invite you to visit our website www.brandt.com where you will find the very latest innovations, along with some additional, useful information.
BRANDT is pleased to be on hand to offer daily support and to help you make the most of your purchase.

Important: Before using your appliance, read this user guide carefully to familiarise yourself more quickly with its operation.
SAFETY INSTRUCTIONS
IMPORTANT SAFETY INSTRUCTIONS TO BE READ CAREFULLY AND KEPT FOR FUTURE USE.
This guide may be downloaded from the web site of the brand.
Important:
Before starting your appliance, please read this installation guide carefully to familiarise yourself quickly with its operation. Keep this user guide with your appliance. If you sell or give the appliance to anyone else, make sure that you also give them this manual. Please read this advice carefully before installing and using your appliance. It is intended to protect your safety and the safety of others.
-
This appliance is designed for use in domestic and similar applications, such as kitchen areas reserved for the staff of shops, offices and other professional premises; farms; use by customers in hotels, motels and other residential environments; guest house type environments.
-
This appliance may be used by children aged 8 years and older, and by persons with impaired physical sensorial or mental capacities, or without experience or knowledge, if they are supervised or have received prior instructions on how to use the appliance safely and have understood the risks involved. Children must not be allowed to play with the appliance. This appliance should not be cleaned or maintained by unsupervised
children.
- Children must be supervised to prevent them from playing with the appliance.

WARNING:
The appliance and its accessible parts become hot during use. Be careful not to touch the heating elements inside the oven. Children under 8 years old must be kept away from the hob unless they are supervised at all times.
It is dangerous for anyone other than a qualified person to perform maintenance or repairs that requires the removal of the cover providing protection against exposure to microwave power.
Liquids and other foods must not be heated in sealed containers, as they may explode.
If the appliance is being used in combination mode, it is recommended that children only use the oven under adult supervision due to the temperatures involved.
- Only use utensils suitable for usage in microwave ovens.
While heating food items in plastic or paper containers, monitor the micro-wave's contents, since there is
SAFETY INSTRUCTIONS
a risk of spontaneous combustion.
— If smoke appears, stop or unplug the oven and leave the door closed to smother any flames that may appear.
Heating beverages in the microwave oven can cause the sudden and/or delayed splattering of boiling liquid, so care must be taken when handling their containers.
- The contents of baby bottles and baby food jars must be stirred or rearranged and the temperature must be checked before consumption, so as to prevent burning.
—Do not use any metal containers or aluminium trays.
-
It is not recommended to heat eggs in their shells or whole hardboiled eggs in a microwave oven, as they may explode, even after cooking has ended.
-
This appliance is designed to cook with the door closed.
-
The microwave oven is designed to heat food and drinks.
Drying food or linen or heating cushions, slippers, sponges, wet linen and other similar items may cause injury, risk of inflammation or fire.

WARNING:
If the door or door seal is
damaged, the oven should not be used until it has been repaired by an authorised person.
- It is recommended that you clean your oven regularly and to remove any food build-up.
- If the appliance is not cleaned regularly, its surface could become damaged, permanently affecting the appliance's lifespan and possibly causing a safety hazard.
— Do not use a steam cleaner. - Do not use abrasive cleaning products or hard metal scrapers to clean the glass oven door as this will scratch the surface and can cause the glass to shatter.

The electrical plug must be accessible when the hob is led.
It must be possible to disconnect the appliance from the power supply, either using a plug or by fitting a switch on the fixed wiring system in accordance with installation rules.
If the power cable is damaged, it should be replaced by the manufacturer, its after-sales service department or by a similarly qualified person in order to avoid danger.
Centre the oven in the unit so as to ensure a minimum distance of 10 ~mm between the appliance and the surrounding unit. The material of the unit supporting the appliance must be heat-resistant (or covered with a heat-resistant material). For greater stability, attach the oven to the unit
ENGLISH
with 2 screws through the holes provided on the side panels.
This appliance may be installed in a cabinet column, as indicated on the installation diagram.
This appliance must be installed more than 850 ~mm up off the ground.
The appliance must not be installed behind a decorative door to avoid overheating.
1

Description of the oven
1.1 DESCRIPTION OF THE OVEN
A Control panel
Door
C Handle
1.2 DISPLAY
C
m = 311 ;
0
m = 311 ;
1
0
1
Cooking time
End of cooking
Keypad lock
Minute Minder
1.3 BUTTONS

1

2

3

4
1 Set clock and cooking time/Menu
- button
3 + button
4 Start/Pause
1.4 ACCESSORIES
- Turntable
The turntable ensures equal cooking of food throughout with no need to intervene.
It rotates in either directions. If it does not turn, verify that all components are properly positioned. It may be used as a cooking dish. For easy removal, wells are provided on either side.
Rotation is controlled by the drive shaft and the wheel support.
If you take out the support with the drive spindle, make sure you do not let water get into the motor spindle orifice.
Remember to put back the support, the support wheels and the glass turntable.
Do not try to rotate the glass turntable manually, as you could damage the drive system. If it does not turn smoothly, make sure that there is nothing in the well beneath the turntable.
When the turntable is in the stop position, large dishes can be used which cover the entire surface of the oven. In this case, it is necessary to turn the container or to mix its content half-way through the programme.

Installation
2.1 UNPACKING
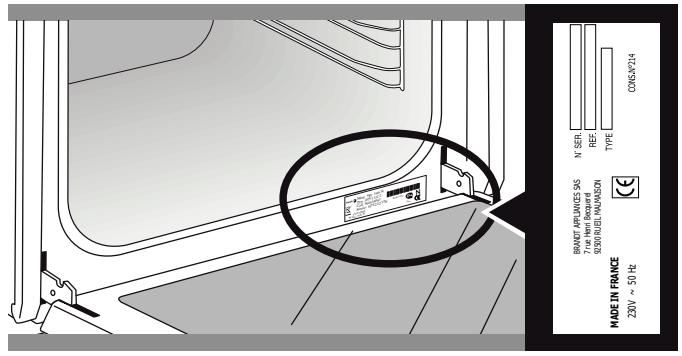
When you receive the appliance, unpack it or have it unpacked immediately. Check its general appearance. Make a note of any reservations on the delivery slip and keep a copy. Remove all the protection elements. Check and respect the appliance's characteristics that appear on the nameplate.
2.2 CHOICE OF LOCATION AND FITTING
This appliance must be installed under a worktop as shown in the installation diagram.
Do not use your appliance immediately (wait approximately 1 to 2 hours) after moving it from a cold location to a hot location, as the condensation may cause a malfunction.
Centre the oven in the cabinet so as to ensure a minimum distance of 10 mm between the appliance and the surrounding unit. The material
ENGLISH
of the cabinet supporting the appliance must be heat resistant (or covered with a heat-resistant material).
For greater stability, attach the oven to the cabinet with 2 screws through the holes provided on the side panels.
1.3 ELECTRICAL CONNECTION
Warning:
Installation should only be performed by installers and qualified technicians.
The appliance must be recess-fitted correctly to ensure electrical safety. The electrical connections should be made before the appliance is installed in its housing.
Ensure that:
- the electrical installation has sufficient voltage (16 Amps),
If the electrical installation in your home requires any changes in order to connect your appliance, contact a professional electrician.
During maintenance operations, the appliance must be unplugged from the electrical grid; fuses must be switched off or removed.
Warning: The
The safety wire (green-yellow) is connected to the appliance's 12 terminal and must be connected to the installation's earth. If the oven malfunctions in any way, unplug the appliance or remove the fuse corresponding to the sector where the oven is hooked up.
Warning:
We cannot accept liability for any accident or incident resulting from non-existent, defective or incorrect grounding.
Warning:
If the electrical installation in your home requires any changes in order to connect your appliance, contact a professional electrician. If the oven malfunctions in any way, unplug the appliance or remove the fuse corresponding to the sector where the oven is hooked up.
3

Setting the clock
3.1 SETTING THE CLOCK
When switching on the display flashes at 12:00.
Set the clock with + or -.
Confirm with
If there is a power cut, the clock flashes.
3.2 CHANGING THE CLOCK
The function selector switch must be in the 0 position.
Press the symbol appears press again.
Adjust the clock setting with + or -
Confirm with
The cooking end time is automatically saved after a few seconds.
3.3 TIMER
This function can only be used when the oven is off.
Press ; the symbol appears.
The minute minder flashes.
Set the minute minder with + and -
Press to confirm. The timer will then start.
Once the time has lapsed, there is a sound signal. To stop it, press any key.
The time appears again in the display.
NB: NB: You can modify or cancel the timer at any time. To cancel, return to the timer's menu and set to 00:00. If you do not confirm, it will be saved automatically after a few seconds.
3.4 KEYPAD LOCKING
Press + and - at the same time until the symbol appears on the screen. To unlock, press + and - until the symbol disappears off the screen.
- Stopping the turntable
If you think that the size of your dish is preventing it from turning correctly, programme the turntable's stop function during cooking.
Press the and - keys at the same time to stop the turntable rotating. The turntable's stopping is confirmed by a beep.
To restart it, press the and - keys at the same time.
Tip:
You must turn the container and mix its contents halfway through the programme when the Stop turntable option is activated.
4 Cooking
OPERATING PRINCIPLE
The microwaves used for cooking are electromagnetic waves. They are commonly found in our environment in the form of radio waves, light and infrared rays.
Their frequency is in the 2450 MHz range.
Their behaviour:
They are reflected by metals.
They travel through all other materials.
They are absorbed by water, fat and sugar molecules.
When food is exposed to microwaves its molecules begin moving rapidly, causing it to heat up.
The penetration depth of waves into the food is approximately 2.5 cm ; if the food is thicker, the centre of the food will be cooked by conduction, as in conventional cooking.
Note that microwaves cause a simple thermal phenomenon within food and are not harmful to health.
Quick reheating drinks, water and dishes that contain a large quantity of liquid.
Cooking food that contains a lot of water (soups, sauces, tomatoes, etc.).
900w:
Cooking fresh or frozen vegetables.
500W:
Cooking fish and seafood.
Cooking dry vegetables over a low heat. Reheating or cooking fragile egg-based foods.
300W:
Cooking dairy products and jam at low heat.
100W:
Defrosting pastries that contain cream.
Reheating:
Reheating position programmed at 2 min 30.
Warning:
Do not use any metal containers or aluminium trays.
4.1 IMMEDIATE COOKING
Turn the function selector to choose the required power.
The display flashes. A cooking time is displayed according to the selected power. Confirm with the key; the cooking starts and the countdown is displayed.
You can modify the cooking time with the + and - keys.
4.2 DELAYED COOKING
Select a cooking mode. Change the time if necessary. Press . The end of cooking symbol flashes to indicate that it can be set.
You can modify the end of cooking time with the + and - keys.
Confirm with


Automatic functions
5.1 AUTOMATIC FUNCTIONS
The automatic functions select the appropriate cooking parameters for you based on the food being prepared and its weight. Select a pre-programmed food from the following list:
Cooking fresh vegetables
Cooking frozen vegetables
: Cooking fish
: Defrosting meat
念 : Defrosting bread**
- For fresh vegetable and fish cooking functions: Halfway through the cooking time, the oven beeps and displays «TURN» to tell you to turn your food over.
** These positions do not allow a delayed start.
Turn the function selector to the automatic function of your choice.
Enter the weight of the food with + and - in 50g steps) then confirm by pressing . The oven starts.
By pressing , you access the cooking end time setting (see the delayed start chapter).


Care
CLEANING THE OUTER SURFACES
Use a window washing product applied to a soft cloth. Do not use abrasive creams or scouring sponges.
Warning
Do not use scouring products, abrasive sponges or metal scrapers to clean the glass oven door as this could scratch the surface and cause the glass to shatter.
CLEANING INSIDE THE OVEN
It is recommended that you regularly clean your oven and remove any food debris on the inside and outside of the appliance. Use a damp sponge and a little soap. If the door or door seal are damaged, the oven should not be used until it has been
repaired by a qualified person. If the oven smells bad or is dirty, boil a cup of water with lemon juice for 2 minutes and clean the walls with a small amount of washing up liquid.
REPLACING THE LIGHT BULB
For all operations on the light bulb, contact the After Sales Department or a qualified professional accredited to work on the brand.


Settings
7.1 SETTINGS MENU
You can adjust different settings on your oven. To do so:
Hold down until you get to the "MENU" display to access the settings mode.
Press again to scroll through the different settings.
Activate or de-activate the different parameters with + and -; see table below:
| bo n | Activate/de-activate the beeping sound of the buttons |
| doF | Activate/de-activate demonstration setting |
| $hoF | Keep warm mode: ON position, function activated. OFF position, function deactivated. |
KEEP WARM FUNCTION
If the door is not opened after the cooking process, after 2 minutes the oven switches to keep warm function for 15 minutes and HH is displayed on the screen.
8 ? Anomalies and solutions
10 After-Sales Service
You may resolve certain little problems yourself:
The oven is not heating.
Check that the oven is correctly connected and that your installation's fuse is not out of service. Increase the selected temperature.
The oven light is not working.
Contact after sales service. Check that the oven is correctly connected.
9 Environment
CARE FOR THE ENVIRONMENT
This appliance's packaging can be recycled. Recycle and help protect the environment by disposing of packaging in local waste containers designed for this purpose.
Your appliance also contains a lot of recyclable material. This logo indicates that used appliances must not be mixed with other waste.
Appliance recycling organised by yourmanufacturer is carried out under
optimum conditions, in accordance with European Directive 2002/96/EC on the disposal of waste electrical and electronic equipment.
Contact your local authority or retailer for information on used appliance collection points close to your home.
We thank you for your help in protecting the environment.
CUSTOMER RELATIONS
For more information about our products, visit our site:
www.brandt.com
ENGLISH
SERVICE CALLS
Any repairs made to your appliance must be carried out by a qualified professional authorised to work on the brand. When calling, please provide the complete references of your appliance (commercial reference, service reference, serial number), so that we can handle your call better. This information appears on the manufacturer's nameplate on the equipment.
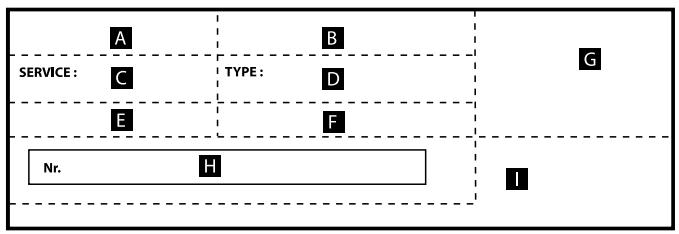
B: Commercial reference
C: Service reference
H: Serial number
Genuine Parts
When having work carried out, insist on the use of genuine, certified spare parts only.

FUNCTION SUITABILITY TESTS
Functional suitability tests in accordance with IEC/EN/NF EN 60705 standards.
The International Electrotechnical Commission, SC.59K, has established a standard for comparative performance tests conducted on various microwave ovens.
We recommend the following for this appliance:
| Test | Load | Approx. time | Power selector | Cookware/Tips |
| Custard (12.3.1) | 1000 g | 16 - 18 min | 500 W | Pyrex 227 On the turntable |
| Savoie cake (12.3.2) | 475 g | 6 - 7 min | 700 W | Pyrex 827 On the turntable |
| Meatloaf (12.3.3) | 900 g | 14 min | 700 W | Pyrex 838 Cover with plastic film. On the turntable |
| Defrosting meat (13.3) | 500 g | 11 - 12 min | 200 W | On a flat plate On the turntable |
| Defrosting raspberries (B.2.1) | 250 g | 6 - 7 min | 200 W | On a flat plate On the turntable |
Drücken Sie die Taste ● ● ● ● ● ● ● ● ● ● ● ● ● ● ● ● ● ● ● ● ● ● ● ● ● ● ● ● ● ● ● ● ● ● ● ● ● ● ● ● ● ● ● ● ● ● ● ● ● ● ● ● ● ● ● ● ● ● ● ● ● ● ● ● ● ● ● ● ● ● ● ● ● ● ● ● ● ● ● ● ● ● ● ● ● ● ● ● ● ● ● ● ● ● ● ● ● ● ● ●●●●●●●●●●●●●●●●●●●●●●●●●●●●●●●●●●●●●●●●●●●●●●●●●●●●●●●●●●●●●●●●●●●●●●●●●●●●●●●●●●●●●●●●●●●●●●●●●●●●●
- RELATIONS CONSOMMATEURS
- SAFETY INSTRUCTIONS
- IMPORTANT SAFETY INSTRUCTIONS TO BE READ CAREFULLY AND KEPT FOR FUTURE USE.
- Important:
- WARNING:
- Description of the oven
- DESCRIPTION OF THE OVEN
- DISPLAY
- BUTTONS
- ACCESSORIES
- - Turntable
- Installation
- UNPACKING
- CHOICE OF LOCATION AND FITTING
- ENGLISH
- ELECTRICAL CONNECTION
- Warning: The
- 3
- SETTING THE CLOCK
- CHANGING THE CLOCK
- TIMER
- KEYPAD LOCKING
- - Stopping the turntable
- Tip:
- Cooking
- OPERATING PRINCIPLE
- 900w:
- 500W:
- 300W:
- 100W:
- Reheating:
- IMMEDIATE COOKING
- DELAYED COOKING
- Automatic functions
- AUTOMATIC FUNCTIONS
- Care
- CLEANING THE OUTER SURFACES
- Warning
- CLEANING INSIDE THE OVEN
- REPLACING THE LIGHT BULB
- Settings
- SETTINGS MENU
- KEEP WARM FUNCTION
- ? Anomalies and solutions
- After-Sales Service
- The oven is not heating.
- The oven light is not working.
- Environment
- CARE FOR THE ENVIRONMENT
- CUSTOMER RELATIONS
- SERVICE CALLS
- Genuine Parts
- FUNCTION SUITABILITY TESTS
Brand : BRANDT
Model : BKS6135B
Category : Microwaves