
PC-MWG1175 - Microwaves PROFICOOK - Free user manual and instructions
Find the device manual for free PC-MWG1175 PROFICOOK in PDF.

| Product type | Microwave with grill function |
| Brand | PROFICOOK |
| Model | PC-MWG1175 |
| Oven volume | 20 liters |
| Microwave power | 800 W |
| Grill power | 1000 W |
| Microwave frequency | 2450 MHz |
| Power supply | 230 V ~ 50 Hz |
| Microwave consumption | 1280 W |
| Grill consumption | 1000 W |
| Net weight | 11.25 kg |
| Protection class | I |
| Control type | Electronic with rotary knob and buttons |
| Display | Digital LED |
| Turntable | Glass, diameter not specified |
| Functions | Microwave, grill, combination, defrost, auto cook, timer, quick start |
| Automatic programs | 8 programs (rice, meat, vegetables, popcorn, drinks, potatoes, pizza, fish) |
| Defrost | By weight (meat, poultry, fish) |
| Combined modes | 2 modes (C-1: 30% microwave + 70% grill, C-2: 55% microwave + 45% grill) |
| Child safety | Control panel lock |
| Multi-stage cooking | Up to 4 stages |
| Delayed start | Yes, up to 23:59 |
| Cleaning | Interior and exterior with damp cloth, turntable and grid dishwasher-safe |
| Included accessories | Glass turntable, guide ring, grid |
Frequently Asked Questions - PC-MWG1175 PROFICOOK
User questions about PC-MWG1175 PROFICOOK
0 question about this device. Answer the ones you know or ask your own.
Ask a new question about this device
Download the instructions for your Microwaves in PDF format for free! Find your manual PC-MWG1175 - PROFICOOK and take your electronic device back in hand. On this page are published all the documents necessary for the use of your device. PC-MWG1175 by PROFICOOK.
USER MANUAL PC-MWG1175 PROFICOOK
- Do not remove any installed parts from inside the oven or anything from the inside of the door!
- The foils on the inside of the door must not be removed!
- The mica sheet (11) is also part of the appliance and must not be removed. It protects the electronic component located behind it from dirt.
UWAGA:
Microwave energy: Do not remove this cover!
WAARSCHUWING: Kookvertraging!
Microwave energy: Do not remove this cover!
| Code | Magnetron | Grill |
| C. 1 | 30% | 70% |
| C. 2 | 55% | 45% |
WAARSCHUWING: Brandgevaar!
Microwave energy: Do not remove this cover!
Instructions d-installation
Microwave energy: Do not remove this cover!
Microwave energy: Do not remove this cover!
Thank you for choosing our product. We hope you will enjoy using the appliance.
Symbols in these Instruction Manual
Important information for your safety is specially marked. It is essential to comply with these instructions in order to avoid accidents and prevent damage to the appliance:

WARNING:
This warns you of dangers to your health and indicates possible injury risks.

CAUTION:
This refers to possible hazards to the appliance or other objects.

NOTE:
This highlights tips and information.
Contents
Overview of the Components 3
General Notes 56
Important Safety Information! 56
Signs and Symbols on the Appliance 58
Overview of the Components 58
Buttons and Controls on the Control Panel 58
Information on Grilling and Combined Operation 58
Suitable Microwave Tableware 58
Notes on Operating and Using the Appliance. 59
What you Should Know about Microwave Operation 59
Notes on Operating the Appliance 59
Initial Operation 59
Installation Instructions 59
Preparation. 59
Setting the Clock. 59
Operating the Microwave 59
Pause or Cancel Cooking 60
Quick Start 60
Heating 60
Heating Table 60
Cooking 60
Hands-on Cooking Tips 60
Cooking Table 61
Grilling 61
Microwave and Grill Combination Modes 61
Tips for Combi Operation 62
Auto Functions 62
Automatic Program Table 62
Defrosting 62
Multi-Stage Cooking 62
Special Functions 63
Auto Start (Timer-Function) 63
Locking (Child-proof Lock) 63
Display Function 63
Cleaning 63
Interior 63
External Walls 63
Accessories 63
Odours 63
Oven Light 63
Troubleshooting 64
Technical Data 64
Disposal 64
Meaning of the "Dustbin" Symbol 64
General Notes
Read the operating instructions carefully before putting the appliance into operation and keep the instructions including the warranty, the receipt and, if possible, the box with the internal packing. If you give this appliance to other people, please also pass on the operating instructions.
- The appliance is designed exclusively for private use and for the envisaged purpose. This appliance is not fit for commercial use.
- Do not use it outdoors. Keep it away from sources of heat, direct sunlight, humidity (never dip it into any liquid) and sharp edges. Do not use the appliance with wet hands. If the appliance is humid or wet, unplug it immediately.
- When cleaning or putting it away, switch off the appliance and always pull out the plug from the socket (pull the plug itself, not the lead) if the appliance is not being used and remove the attached accessories.
- Do not operate the appliance without supervision. If you leave the room you should always turn the appliance off. Remove the plug from the socket.
- The appliance and the mains lead have to be checked regularly for signs of damage. If damage is found the appliance must not be used.
- Use only original spare parts.
- In order to ensure your children's safety, please keep all packaging (plastic bags, boxes, polystyrene etc.) out of their reach.

WARNING:
Do not allow small children to play with the foil. There is a danger of suffocation!
Important Safety Information!
Please read carefully and keep for future use.

WARNING:
- The microwave oven is intended for heating foods and drinks. Drying foods or clothes or heating electric pads, slippers, sponges, wet cleaning rags, or similar can cause injuries, combustion, or fire.
- The microwave oven is not suitable for warming/heating up living animals.
- When the door or the door seals are damaged, the microwave oven must not be used until it has been repaired by a qualified specialist.
- Please do not repair the appliance yourself, but have it repaired by an authorised specialist. Carrying out maintenance or repair work which involves removal of the cover that protects the surroundings from microwave radiation is dangerous unless carried out by an expert.

WARNING:
- If the supply cord is damaged, it must be replaced by the manufacturer, its service agent or similarly qualified persons in order to avoid a hazard.
- Do not heat liquids in closed containers. DANGER OF EXPLOSION!
- Do not place your microwave in a cupboard.
- The appliance requires sufficient space for air circulation in order to function properly. Leave a distance of 20cm above, of 10cm on the back, and of 5cm on both sides of the appliance. Do not cover the appliance. Never block the openings of the appliance. Do not remove the feet.
- Place the appliance with the back facing a wall.
- The appliance and its accessible parts become hot during use. Care should be taken to avoid touching heating elements. Children less than 8 years of age shall be kept away unless they are continuously supervised.
- Only suitable tableware should be used such as: glass, porcelain, ceramics, heat-resistant plastic or special microwave tableware.
- Metallic containers are not permitted for heating food and beverages in the microwave oven. Observe the notes in the chapter "Suitable Microwave Tableware".
- If food is being heated or cooked in combustible materials, such as plastic or paper containers, the microwave oven should be checked frequently due to the risk of fire.
- If smoke is produced, turn the appliance off and remove the plug. Keep the door closed in order to suffocate any flames.
- The contents of babies' bottles and jars of baby food must be stirred or shaken and the temperature checked before use. There is a danger of burns.
- Use oven cloths or kitchen gloves when removing the containers. DANGER OF BURNS!
- Food with a shell or skin, such as eggs, sausages, sealed jars etc. must not be heated up in the microwave as they may explode even when heating by the microwaves is finished.

WARNING: Delay in Boiling!
During boiling, particularly during the reheating of liquids (water), it may happen that the boiling temperature has been reached but the typical bubbles have not yet started to rise. The liquid does not boil evenly. When the vessel is removed this so-called delay in boiling may result in the sudden formation of bubbles when the vessel is knocked, causing the water to boil over. There is a serious danger of burns! In order to achieve even boiling, please place a glass rod or similar item, but nothing metallic, in the vessel.
- This appliance can be used by children aged from 8 years and above and persons with reduced physical, sensory or mental capabilities or lack of experience and knowledge if they have been given supervision or instruction concerning use of the appliance in a safe way and understand the hazards involved.
- Children shall not play with the appliance.
- Cleaning and user maintenance shall not be made by children unless they are older 8 years and supervised.
- Keep the appliance and its cord out of reach of children less than 8 years.
- Any dirt on the door frame/door seal and neighbouring parts must be carefully cleaned with a damp cloth.
- Clean the microwave oven regularly and remove any food residues from the interior.
- If the appliance is not clean the surface may be damaged, affecting its serviceable life and possibly resulting in hazardous situations.
- Do not use any aggressive abrasive cleaners or sharp metal scrapers to clean the glass door. You could scratch the surface. This can destroy the glass.
- Steam cleaner is not to be used.
- Also follow the instructions which are given in the "Cleaning" chapter.
-
Do not operate the appliance with an external timer or separate remote control system.
This appliance is used -
for heating up and cooking solid or liquid foods
- for browning and grilling solid foods.
It is intended for the use in households and for similar applications, such as:
- in staff kitchens of stores, offices, and other industrial areas;
- by guests in hotels, motels, and other housing facilities;
- in agricultural estates;
- in bed and breakfasts.
Signs and Symbols on the Appliance
There is a warning symbol attached to the top surface of the microwave oven:
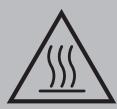
WARNING: Hot Surface!
Risk of Burning!
The temperature of accessible surfaces can get very hot during and after operation.

Read the Instructions!
Also note the information signs on the microwave:
WARNING
1: MICROWAVE AND HIGH VOLTAGE INSIDE. BE SURE NOT TO REMOVE THE ENCLOSURE.
2: THIS APPLIANCE IS EQUIPPED WITH A GROUNDED PLUG FOR YOUR PROTECTION AGAINST POSSIBLE SHOCK HAZARDS AND SHOULD BE CONNECTED TO A PROPERLY GROUNDED OUTLET.
3: THIS Appliance IS TO BE SERVICED ONLY BY PROPERLY QUALIFIED SERVICE PERSONNEL.
4: DISCONNECT POWER PLUG BEFORE SERVICING. REMOVAL OF THE ENCLOSURE WITH PRODUCT ENERGIZED COULD EXPOSE SERVICEMEN TO HAZARDOUS HIGH VOLTAGE POTENTIAL.
Microwave energy: Do not remove this cover!
Overview of the Components
1 Display
2 Control panel
3 Rotary knob
4 Drive shaft
5 Guide ring
6 rotating plate
7 Griller
8 Door latch
9 Viewing window
10 Door handle
11 Mica sheet
Buttons and Controls on the Control Panel
MICRO
Select microwave power setting.
DEFROST
Defrost according to weight.
TIMER/CLOCK
Clock:
In conjunction with the rotary knob for setting the clock.
Timer:
Presets for TIMER function.
START
- Start the program.
- Quick start of microwave operation (always +60 seconds at 100% power).
- Extend cooking time by 10, 30 or 60 seconds during operation, according to the adjusted cooking time (except for the defrost programs and the automatic programs).
- Confirm a selection.
GRILL/COMBI
Grill:
For grilling and scalloping.
Combinations:
Microwave and grill work alternately.
STOP/CANCEL
Reset:
Press 1× to cancel programming.
Stop:
Press 1× to temporarily pause cooking.
Cancel:
Press 2x to stop an activated program early.
Child safety lock: Press and hold for 3 seconds to lock or unlock the control panel respectively.
Rotary Knob
To set time, cooking time, temperature or by combinations.
Information on Grilling and Combined Operation
- As heat radiation is used during grilling and combined operation, please use only heat-resistant tableware. Plastic containers are not suitable.
- When food is only being grilled, metal or aluminium tableware may also be used -but not during combined or microwave operation.
- Do not place anything on top of the housing as this becomes hot. Always leave the ventilation slits uncovered.
- Please use the grilling grid to move the food to be cooked nearer to the heating element.
Suitable Microwave Tableware
- The ideal material for use in a microwave is transparent and allows the microwave radiation to heat the food evenly.
- Round/oval dishes and plates are more suitable than rectangular ones as the food in the corners may overcook.
CAUTION:
Risk of explosion by sealed tableware.
- Open closed containers before cooking or heating.
- Pierce protective plastic foil several times using a fork.
CAUTION: Sparking and Fire Hazard!
- Microwaves cannot penetrate metal. Accordingly, no metal containers or plates may be used in microwave operation.
- Do not use any paper dishes made of recycled material as these may contain small amounts of metal, which may result in sparks or fires.
The list below is intended to help you select suitable microwave tableware:
| Material | Suitable for | ||
| Microwave | Grill | Combination* | |
| Heat-resistant glass vessel | yes | yes | yes |
| Non-heat-resistant glass vessel | no | no | no |
| Heat-resistant ceramic vessel/plate | yes | yes | yes |
| Plastic vessels suitable for microwave use | yes | no | no |
| Kitchen roll | no | no | no |
| Grilling grid | no | yes | no |
| Metal or aluminium ovenware | no | yes | no |
| Aluminium foil and foil containers | no | yes | no |
*) Combination of microwave with grill
Notes on Operating and Using the Appliance
What you Should Know about Microwave Operation
- Your appliance works with microwave radiation, which heats up water particles in food in a very short time. There is no heat radiation and therefore hardly any browning.
- Only food should be heated up with this appliance.
- The appliance is not suitable for baking in floating fat.
- Only 1-2 portions should be heated up at the same time. Otherwise the microwave will become less efficient.
- Microwaves provide their full energy levels immediately. Pre-heating is therefore not necessary.
- Never operate the microwave function when the oven is empty.
-
The microwave oven does not replace your traditional cooker. It is used mainly for:
-
defrosting deep-frozen food
- rapid warming/heating of food or drinks
- cooking meals.
Notes on Operating the Appliance
- Your selection by pressing buttons is confirmed by a signal tone. If this does not occur, then you have not pressed the button properly or you have made an incorrect selection.
- If a program is selected and the START button is not pressed within 2 minutes, then the setting is cancelled. The display will then show the current time again.
- After a program has started, the display will show a countdown timer indicating the remaining operating time.
- 3 signal tones will indicate the end of the program. "E d" will appear in the display. After that the appliance turns off automatically.
- The illumination inside the microwave oven is on permanently. Close the door of the microwave oven to turn off the illumination.
Initial Operation
Installation Instructions
- Install the appliance with the back of the appliance facing the wall.
-
Maintain the following safety clearances:
-
10cm to the back
-
5cm to both sides
-
20cm to the top of the microwave.
- In order to avoid interference with the operation of other appliances, do not place your appliance near other electronic appliances.
Preparation
- Use the handle to open the door.
- Remove any accessories from the cooking chamber and unpack.
- If not yet done: Place the drive shaft on the centre of the bottom inside the oven.
- Install the guide ring in the centre.
- Position the glass rotating plate in such a way that its lower recesses lock onto the centre of the drive shaft.
- Check the appliance for any visible damage, particularly in the area of the door. If any damage is found, the appliance must not be used.
- Make sure the mains voltage to be used corresponds to the voltage of the appliance. Check the rating label for specifications.
- Insert the mains plug into a properly installed power socket.
CAUTION:
- Do not remove any installed parts from inside the oven or from inside the door!
- The mica sheet (11) is also part of the appliance and must not be removed. It protects the electronic component located behind it from dirt.
NOTE:
If there are manufacturing or oil remains on the enclosure or heating element, smoke or odour might occur during the beginning operation. This is normal and will cease after repeated use.
We strongly recommend proceeding as follows:
- Turn on the grill mode and let the appliance operate several times without food to be cooked.
- Ensure sufficient ventilation.
Setting the Clock
NOTE:
As soon as the appliance has been connected to the power supply, all segments light up 3 times. Then a signal will sound and in the display will flash “:”.
- Press the TIMER/CLOCK button once.
- Use the rotary knob to set the desired hour.
- Press the TIMER/CLOCK button to confirm your settings.
- Use the rotary knob to set the desired minutes.
- Press the TIMER/CLOCK button again to activate the new time. The delimiter symbol “:” of the digital time will be flashing on the display.
Operating the Microwave
- Place the food to be heated in a suitable piece of tableware.
-
Open the door and place the vessel in the middle of the glass plate. Then close the door. (For safety reasons the oven only operates when the door is tightly closed.)
-
Press the MICRO button once/repeatedly to select the desired microwave power.
| Power Setting on the Display as Selected in % | Power in Watt (approx.) | Application |
| 100P | 800 | Quick heating |
| 80P | 640 | Cooking |
| 60P | 480 | Simmering |
| 40P | 320 | Defrosting frozen goods |
| 20P | 160 | Melting butter etc. |
- Use the dial control to select a cooking time between 10 seconds and 60 minutes.
- Press the START button. The cooking time depends on the quantity and constituency of the contents of the oven. With a little practice you will soon learn to estimate the cooking time.
NOTE:
Each time you press the START button, the operating period is extended.
- Up to 5 minutes by 10 seconds.
- From 5 minutes to 10 minutes by 30 seconds.
- Over 10 minutes by 60 seconds.
- Preparation of food in a microwave oven is very much faster than in a conventional cooker. Set the cooking time to a low level if you are not sure and continue cooking again if necessary.
- Please note: A cover should be placed over the food when operating the microwave.
Pause or Cancel Cooking
- To pause cooking, press STOP/CANCEL button once or open the door.
- To continue cooking, close the door and press the START button again.
- In order to fully stop the cooking process, press the STOP/CANCEL button twice, thereby resetting all program settings.
Quick Start
You wish to heat food or drinks shortly at the highest power setting?
Quick-start the microwave by directly pressing the START button. The cooking process will start immediately, whereby each time you press the button, cooking time will be extended by 10, 30 or 60 seconds (see "Operating the Microwave").
The power setting of the microwave is thereby 100% .
Heating
Warming and heating are special characteristics of microwaves. Refrigerated liquids and foods can be easily warmed up to room or eating temperature without having to use a lot of pots.
The heating times in the following table are for reference only, as the time depends very much on the original temperature and the texture of the food. It is therefore recommended to check once in a while whether the food is hot enough.
Heating Table
| Edibles / Food | Quantity | Microwave Power in % | Time approx. Min. | Cover |
| Liquids | ||||
| 1 cup | 150g | 100P | 0.5-1 | no |
| 0.5l | 500g | 100P | 3.5-5 | no |
| 0.75l | 750g | 100P | 5-7 | no |
| Tip: Put a glass stick into the container to avoid superheating; stir well before drinking. | ||||
| Plated Meals | ||||
| Cutlet + potatoes and vegetables | 450g | 100P | 2.5-3.5 | yes |
| Goulash with noodles | 450g | 100P | 2-2.5 | yes |
| Meat + lump + sauce | 450g | 100P | 2.5-3.5 | yes |
| Tip: Slightly moisten before cooking; stir occasionally. | ||||
| Edibles / Food | Quantity | Microwave Power in % | Time approx. Min. | Cover |
| Meat | ||||
| Cutlet, breaded | 200g | 100P | 1-2 | no |
| Meatballs, 4 pieces | 500g | 100P | 3-4 | no |
| Joint | 250g | 100P | 2-3 | no |
| Tip: Coat with oil for the breading or crust not to soften. | ||||
| Poultry | ||||
| 1/2 chicken | 450g | 100P | 3.5-5 | no |
| Chicken fricassee | 400g | 100P | 3-4.5 | yes |
| Tip: Coat with oil; stir occasionally. | ||||
| Side Dish | ||||
| Noodles, rice, 1 serving2 servings | 150g | 100P | 1-2 | yes |
| 300g | 100P | 2.5-3.5 | yes | |
| Potatoes | 500g | 100P | 3-4 | yes |
| Tip: Slightly moisten prior to cooking. | ||||
| Soups/Sauce | ||||
| Broth, 1 plate | 250g | 100P | 1-1.5 | yes |
| Soup with solids | 250g | 100P | 1.5-2 | yes |
| Sauce | 250g | 100P | 1-2 | yes |
| Infant Food | ||||
| Milk | 100ml | 60P | 0.5-1 | no |
| Mash | 200g | 60P | 1-1.5 | no |
| Tip: Thoroughly shake or stir. Check temperature! | ||||
Cooking
Hands-on Cooking Tips
Follow the guidelines given in the cooking table and recipe. Monitor the cooking process if you do not yet have as much experience.
You may open the door of the appliance at any time. The appliance will turn off automatically.
It will only continue operation when the door is closed and the START button pressed again.
Refrigerated food needs a longer cooking time than that with room temperature.
The chunkier the food, the longer the cooking time. Meat cut in bigger pieces, for example, requires longer cooking than meat of the same quantity cut into strips. It is recommended cooking larger amounts of food at maximum power and having it simmer at medium power for a more evenly cooking.
Lower foodstuffs cook faster than higher ones; therefore distribute the food as low as possible. Place thinner parts such as chicken legs or fish files in the centre or leave them overlapping.
Smaller amounts cook faster than bigger ones. The following rule of thumb applies:
Double amount = almost double time
Half amount = half time
If you cannot find the exact cooking time for a dish, you may apply the following rule:
Per 100g approx. 1 minute cooking
All foods that you cover on a common stove should be covered in the microwave as well.
A cover will prevent the food from running dry. An upside-down plate, greaseproof paper or microwave cooking foil are all suitable as covers. Cook food that should be getting a crust without cover.
Cooking Table
| Edibles / Food | Quantity | Microwave Power in % | Time approx. Min. | Cover |
| Vegetables | ||||
| Eggplant | 500g | 8 0P | 7-10 | yes |
| Cauliflower | 500g | 8 0P | 13-15 | yes |
| Broccoli | 500g | 8 0P | 6-9 | yes |
| Chicory | 500g | 8 0P | 6-7 | yes |
| Peas | 500g | 8 0P | 6-7 | yes |
| Fennel | 500g | 8 0P | 8-11 | yes |
| Green beans | 300g | 8 0P | 13-15 | yes |
| Potatoes | 500g | 8 0P | 9-12 | yes |
| Stem turnip | 500g | 8 0P | 8-10 | yes |
| Leek | 500g | 8 0P | 7-9 | yes |
| Corn on the cob | 250g | 8 0P | 7-9 | yes |
| Carrot | 500g | 8 0P | 8-10 | yes |
| Pepper | 500g | 8 0P | 6-9 | yes |
| Brussels sprouts | 300g | 8 0P | 7-10 | yes |
| Asparagus | 300g | 8 0P | 6-9 | yes |
| Tomatoes | 500g | 8 0P | 6-7 | yes |
| Zucchini | 500g | 8 0P | 9-10 | yes |
| Tip: Cut vegetables into small pieces and cook with 2-3 spoons of liquid; stir occasionally. Simmer 3-5 minutes; add seasoning just before eating. | ||||
| Fruits | ||||
| Stewed apple or pear | 500g | 8 0P | 5-8 | yes |
| Stewed rhubarb | 250g | 8 0P | 4-6 | no |
| Roast apple, 4 pieces | 500g | 8 0P | 7-9 | yes |
| Tip: Add 125 ml of water; lemon juice will prevent the fruits from discolouring; simmer 3-5 minutes. | ||||
| Meat*) | ||||
| Meat with sauce | 400g | 8 0P | 10-12 | yes |
| Goulash, veal strips | 500g | 8 0P | 10-15 | yes |
| Beef roulades | 250g | 8 0P | 7-8 | yes |
| Tip: Stir occasionally; rest for 3-5 minutes. | ||||
| Poultry*) | ||||
| Chicken fricassee | 250g | 8 0P | 6-7 | yes |
| Chicken soup | 200g | 8 0P | 5-6 | yes |
| Tip: Stir occasionally; rest 3-5 minutes. | ||||
| Fish | ||||
| Fish filet | 300g | 8 0P | 7-8 | yes |
| 400g | 8 0P | 8-9 | yes | |
| Tip: Turn over after half the time has elapsed; simmer 3-5 minutes. | ||||
| Edibles / Food | Quantity | Microwave Power in % | Time approx. Min. | Cover |
| Defrosting and Cooking Vegetables | ||||
| Red cabbage with apple | 450 g | B 0P | 14-16 | yes |
| Spinach leaves | 300 g | B 0P | 11-13 | yes |
| Cauliflower | 200 g | B 0P | 7-9 | yes |
| String beans | 200 g | B 0P | 8-10 | yes |
| Broccoli | 300 g | B 0P | 8-9 | yes |
| Peas | 300 g | B 0P | 7-8 | yes |
| Stem turnip | 300 g | B 0P | 13-15 | yes |
| Leek | 200 g | B 0P | 10-11 | yes |
| Corn | 200 g | B 0P | 4-6 | yes |
| Carrots | 200 g | B 0P | 5-6 | yes |
| Brussels spout | 300 g | B 0P | 7-8 | yes |
| Spinach | 450 g | B 0P | 12-13 | yes |
| 600 g | B 0P | 15-17 | yes | |
| Tip: Cook with 1-2 spoons of liquid; stir occasionally or carefully cut. Simmer 2-3 minutes; add seasoning just before eating. | ||||
| Soups/Stew*) | ||||
| Stew | 500 g | B 0P | 13-15 | yes |
| Soup with solids | 300 g | B 0P | 7-8 | yes |
| Crème soup | 500 g | B 0P | 13-15 | yes |
| Tip: Stir occasionally; simmer 3-5 minutes. | ||||
*) Ready-made food
Grilling
Place the grill rack onto the supplied glass plate. Use suitable heat-resistant tableware or directly put the food onto the grill.
It is not necessary to preheat the grill rack since the grill generates radiant heat immediately.
Proceed as follows for roasting and scalloping:
- Press the GRILL/COMBI button until "E" appears on the display.
- Use the rotary knob to set the desired roasting time between 10 seconds and 60 minutes.
- Press the START button to start.
NOTE:
We recommend turning the food (e.g. meat, sausage) after approx. half of the cooking time has elapsed. The fan continues running when the cooking process is paused.
| Edibles / Food | Quantity | Time approx. Min. | Cover |
| Scalloping toast with cheese | 2-3 slices | 3-4 | no |
| Scalloping soups, e.g. onion soup | 2-3 cups | 10-15 | no |
Microwave and Grill Combination Modes
During those modes the microwave and grill work alternately within a set time.
- Press the GRILL/COMBI button repeatedly to select the desired combination mode.
| Code | Microwave | Grill |
| C. 4 | 30% | 70% |
| C. 2 | 55% | 45% |
- Use the dial control to select a cooking time between 10 seconds and 60 minutes.
- Press the START button.
Tips for Combi Operation
When cooking food with the combined setting of microwave-grill, you should adhere to the following:
The cooking time for big and thick food items, such as roast pork, is respectively longer than for small, lower food. Nevertheless, when roasting, the opposite rule applies. The closer the food is to the grill, the faster it will become brown. I.e., when preparing big joints during combi operation, the roasting time is possibly shorter than for smaller joints.
Auto Functions
Use the auto functions to cook certain amounts of foods automatically. Proceed as follows:
- Turn the rotary knob clockwise and select the desired auto function. Choose one of the settings given in the table below.
- After selecting the automatic program, press the START button. Now use the rotary knob to set the weight.
- Press the START button to start operation.
NOTE:
- Add twice as much water as rice when using the program R. t.
- For the programs R·3 and R·5 add approximately 2-3 tablespoons of water.
- Cut the potatoes into small pieces before using the R - E program.
Automatic Program Table
| Code | Function | Quantity |
| R. 1 | Rice | 0.1 kg |
| 0.2 kg | ||
| 0.3 kg | ||
| R. 2 | Meat | 0.15 kg |
| 0.3 kg | ||
| 0.45 kg | ||
| 0.6 kg | ||
| R. 3 | Vegetables | 0.2 kg |
| 0.3 kg | ||
| 0.4 kg | ||
| 0.5 kg | ||
| 0.6 kg | ||
| 0.7 kg | ||
| 0.8 kg | ||
| R. 4 | Popcorn | 0.1 kg |
| R. 5 | Beverages | 1 cup |
| 2 cups | ||
| R. 6 | Potatoes | 0.45 kg |
| 0.65 kg | ||
| R. 7 | Pizza (Warming up) | 0.2 kg |
| 0.3 kg | ||
| 0.4 kg | ||
| R. 8 | Fish | 0.2 kg |
| 0.3 kg | ||
| 0.4 kg | ||
| 0.5 kg | ||
| 0.6 kg | ||
| 0.7 kg |
Defrosting
NOTE:
- Microwave power when defrosting is 40% (320 W).
- Since the microwaves always penetrate the food from the outside in, larger pieces may not be fully defrosted in their centre. The outer layers may already have started to cook.
- Turn foodstuff such as meat, sausages or bread once after approx. half of the defrost time has elapsed. Close the door and press the START button to continue.
- Factor in a compensation time after the defrost program. This is a standing period during which a temperature compensation takes place through conduction of heat from the outside (defrosted) to the inside (frozen). You can leave the food in the switched off appliance or outside the appliance during the compensation time. The compensation time should be at least as many minutes as the defrost time in the microwave. It depends on the condition of the food.
- If the weight of the food is less than 200g , do not place it in the middle but at the edge of the glass plate.
- You can shorten the compensation times by e.g. separating small pieces of meat or crumbling the remaining frozen chunks of mince after the defrosting time. For sliced bread or sausage, separate the slices during the compensation time.
- Allow fruit to defrost in a bowl with a lid. After around half the defrost time, gently stir the fruit once.
- Cakes or tarts with chocolate icing should not be defrosted in the microwave.
There are two methods by which you may thaw frozen items:
- Use the MICRO button to select H P. Use the rotary knob to set the desired defrost time.
-
To use the defrost program, proceed as follows:
-
Determine the weight of the food.
- Remove the food from its packaging. If it cannot be removed from the packaging, defrost for 30 seconds on maximum microwave power (see "Quick start").
- Place the food to be defrosted onto the plate (fruit into a bowl). Also place meat onto a upturned saucer so that the meat juices can drain. This saucer should never be used for other foods or come into contact with them.
- Repeatedly press the DEFROST button to select one of the defrost functions:
| Edibles | Defrost Program | Weight | Defrost Time |
| Meat | d·/l | 0.1-2.0kg | 1:19-52:52 |
| Poultry | d·/2 | 0.2-3.0kg | 2:38-66:25 |
| Fish | d·/3 | 0.1-0.9kg | 1:32-13:50 |
- Use the rotary knob to set the desired weight.
- Press the START button to start.
Multi-Stage Cooking
You can set the programs in such a way that up to 4 different functions can be carried out in succession.
Assume you select the following programs:
Microwave

Grill
- Select 1. Functions: Press the MICRO button repeatedly to select the desired microwave power.
-
Use the dial control to select a cooking time between 10 seconds and 60 minutes.
-
Select the 2nd function: Press the GRILL/COMBI button until "5-" appears on the display.
- Use the rotary knob to set the desired roasting time between 10 seconds and 60 minutes.
- Press the START button to start operation.
NOTE:
- The change of program is indicated by an acoustic signal.
- This function is not possible with the automatic and defrost programs.
Special Functions
Auto Start (Timer-Function)
The maximum time-delay is 23 hours and 59 minutes.
NOTE:
- First set the clock! Otherwise you may not use this function.
- When using auto start, the defrost function is not available. This program setting does not support quick start cooking.
Example: It is 10:45 h. You want to program the microwave so that it operates at maximum power for 7 12 minutes at 14:20. Proceed as follows for automatically starting the microwave:
| Step | Button | Display | |
| 1 | MICRO | 10.0P | (Power) |
| 2 | 7:30 | (Cooking time) | |
| 3 | Hold down the TIMER/CLOCK button for 3 seconds | 10:45 | (Current time) |
| 4 | 14:45 | (Setting the hours) | |
| 5 | TIMER/CLOCK | 14:45 | (Confirmation of hour) |
| 6 | 14:20 | (Setting the minutes) | |
| 7 | TIMER/CLOCK | 10:45 | (Current time) |
NOTE:
- The Timer function is activated when the “ ” symbol flashes in the display.
- During this programmed setting the functions of the controls are blocked (except: TIMER/CLOCK, STOP/CANCEL and START).
- If you wish to display the start time again, press the TIMER/CLOCK button.
- In order to deactivate the automatic start time, press the STOP/CANCEL button.
- When the pre-set time has been reached, the microwave will start operation. A beep indicates the start.
- If you wish to start the program earlier, then press the START button. The program begins based on the previously selected settings.
WARNING: Risk of Fire!
Always supervise the appliance during operation.
- When using the time-delay function, set the time in such a way that the appliance will be operating under proper supervision.
- Do not operate the microwave empty. If you want to take out the food before the program has finished, you have to cancel the program by pressing the STOP/CANCEL button.
Locking (Child-proof Lock)
- Press and hold the STOP/CANCEL button for 3 seconds to lock the appliance. You will hear a signal tone. The locked condition is shown in the display by “ F F”. The control panel function is blocked.
- Press and hold the STOP/CANCEL button again for 3 seconds to unlock. You will hear a signal tone.
Display Function
If you press the MICRO button during operation, the operating mode will be displayed for 1-2 seconds.
Cleaning
WARNING:
Turn the microwave off and remove the mains plug.
CAUTION:
- Do not use any wire brush or other abrasive objects.
- Do not use any acidic or abrasive detergents.
- Do not use a metal scraper to clean the viewing window. The surface could be scratched and the glass could possibly break.
Interior
- Keep the interior of the oven clean. Splashes and overflowing liquids on the walls of the oven can be removed with a damp cloth. If the oven is very dirty a mild detergent can also be used.
- Wipe off the viewing window on the inside and outside with a damp cloth and remove splashes and stains from overflowing liquids regularly.
External Walls
- The external walls of the microwave should only be cleaned with a damp cloth. Please ensure that no water enters the openings in the housing and therefore inside the appliance.
- Open the microwave door before cleaning the control panel in order to avoid accidentally switching on the appliance.
Accessories
- Clean the glass plate in warm soapy water or in the dishwasher. Dry it before reinstalling it in the microwave.
- Regularly clean the guide ring and the inside of the bottom. You may remove the guide ring and manually clean it. Use a mild detergent or glass cleaner. Dry thoroughly. Make sure to position the ring properly afterwards.
- Clean the grill after each use with a dishwashing detergent or place it in a dishwasher for cleaning.
Odours
In order to remove any unpleasant odours that may emanate from the microwave, place a dish filled with water and lemon juice that is suitable for microwave use in the oven and heat it for approximately 5 minutes.
Then wipe out the oven with a soft cloth.
Oven Light
If you need to replace the lighting in the oven, please contact a specialist workshop near you.
Troubleshooting
Malfunctions are often just caused due to minor problems. Before contacting our customer service, please check the table below:
| Problem | Possible Cause | Notes / Solution |
| Radio or TV reception is interrupted during microwave operation. | The electromagnetic fields of this appliance might interfere with the pictures and sound of special frequencies. | This is normal and not a malfunction. Position the appliances further away from each other. |
| The appliance is not supplied with electricity; the display is black. | Defect wall socket. | Try another wall socket. |
| Check the main fuse in your household. | ||
| “:” will flash in the display. | There was a power failure. | Set the clock again. |
| The appliance does not start operation. The display shows a readout other than the current time. | The door is not properly closed. | Check if there are objects or food remains jammed in the door. |
| The START button was not pressed after selecting the function. | Press the START button to start or continue operation. Press the STOP/CANCEL button to cancel the program. | |
| All controls are locked. | The child-proof lock is activated. The display shows “∅ F F”. | Press and hold the STOP/CANCEL button for 3 seconds to unlock the appliance. You will hear a signal tone. |
| The display shows the current time. The “◎” symbol will flash. | An automatic start mode is programmed. You can see the start time by pressing the TIMER/CLOCK button. Press the STOP/CANCEL- button to cancel the program. | |
| The turntable causes a scratching or aberrant noise. | There are dirt or foreign objects in the area of the turntable shaft. | Remove possible objects and food remains as described under “Cleaning”. |
| The operation is terminated without any obvious reason. | The appliance is defect. | Please contact our customer service. |
Technical Data
Model: PC-MWG 1175
Power supply: 230V\~,50Hz
Power consumption:
Microwave: 1280 W
Grill: 1000 W
Rated microwave power output: 800 W/2450 MHz
Cavity volume: approx. 20 litres
Protection class: I
Net weight: approx. 11.25kg
The right to make technical and design modifications in the course of continuous product development remains reserved.
This appliance has been tested according to all relevant current CE guidelines, such as electromagnetic compatibility and low voltage directives, and has been constructed in accordance with the latest safety regulations.
Disposal
Meaning of the "Dustbin" Symbol
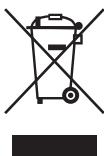
Protect our environment: do not dispose of electrical equipment in the domestic waste.
Please return any electrical equipment that you will no longer use to the collection points provided for their disposal.
This helps avoid the potential effects of incorrect disposal on the environment and human health.
This will contribute to the recycling and other forms of re-utilisation of electrical and electronic equipment.
Information concerning where the equipment can be disposed of can be obtained from your local authority.
Instrukcja obslugi
GRILL/COMBI CONV/COMBI
Grill:
Do grillowania i potraw w panierce.
Kombinatione:
CTC Clatronic Sp. z o.o
Ul. Brzeska 1
45-960 Opole
Usuwanie
Microwave energy: Do not remove this cover!
PykoBoCTBO no 3KcnIyatauN
Cnacn6o 3a Bb6op Haawero npOdykTa. Hadeemc, OH Bam noHpaBntcTc.
CmBOnbl npImeHemble B daHHOM pyKOBoCTBe NOIb3ObaTeTn
Baxhble pekomehdaunIy oecneueHnBaWei 6e3oNaChOCTn
0b03naueHb IIO ocobEHOMy.ObaTeIbHO cJeDyIe 3TmM pekomeh-
daqnM, YTObI IpeODTbPaITb HeCuaCTHbI CnyaI INI NIOLOMKy
N3dEINr:
I P E D U N P E K D E H N E:
IpeDynpexkaetobonapachOCTnIJIa3IOPOBbI IN BO3MOXHOM pUCKe IONUyeHnTpaBMbl.
BHHIMAHNE:
Yka3bIbaeT HbO3MOxHyo ONaCHOCTb IJIyN3JeINn INpyrNX OkpyXaIOxN PpeDMETOB.
IPIPMEUAHNA:
Jaet COBtbi INHOpMaIIO.
ABTomatnueckneФункции 93
Tabnca aTOMaTHuecknx nporpamM 93
Pa3MopaxnBaHne 93
MhoroctyneHuaToe npirotoBJeHne 94
CneuaNbHbIe yHKcun 94
ABTOCTAP(TaMep-Функця) 94
3aHpaHne (6JIOKINPOBka OT dTei) 94
Функция OTobpaжен.. 94
Ynctka 94
BnytpenHra emKocTb neu 94
HapyKhble cTeHKn. 95
PpinaIeJXHOCTN 95
3anaxn 95
BnytpenHe oCbeueHne 95
PeueHne npo6Jem 95
Texnueckne daHHbIe 95
ytnn3aun 95
3naueHne cIMBOLA «KOp3nHa» 95
CoedepkanHe
O63op deTanei npnbopa. 3
ObuaHΦopMaun 86
Baxhhe yka3aHn no texnke 6e3onacchoctn! 86
3HaKIM CmBOLJIbI Ha yCTpoiCtBe 88
O63op deTanei npnbopa. 89
KhONkN i opraHbI ynpaBJeHna naHeJIynpaBJeHn 89
PpimmuHnKpeXmU rpnIb N KOM6n. 89
Iocya dIy MmKpOBoJHOBo neu 89
PpmeaHnno 3Kcnnyataunn nncnoB3oBaHnnp6opa...89
I03HabateBHeK TeMe MmKpOBoJHOBa neb. 89
PpimmuHn no 3Kcpiyataun npi6opa. 90
IoproToBka K pa6oTe 90
INCTpyKcnn no yCTaHOBKe 90
Poirotobka 90
YcTaHOBKa YacOB 90
3Kcnpnyataun MmKpOBoJHOBo neu. 90
PpnoocTahOBJIeHne nIITOMHeA pnproTOBJIeHn.. 91
BbictpbI pyck. 91
Pa3orpeB 91
Ta6nla pa3oRpeBa. 91
TOTOBka 91
CobetbI npn roTOBKe 91
Ta6nla roTobkn 92
IcnoIb3OBAHne rPnJI 92
KombuHnpoBaHHbIepeXmblpnproTOBHeNBA
MnKpOBoHax Ha rPnJIe 93
CobetbI npn nCIOB3OBAHm KOM6o-peKIma. 93
OmbaHOpMaIa
Ipeep nauanom 3Kcnpyaataun npbopa BnHMaTeNbHO npouHTaTe npnlaeMyu INcTpyKuIO NO 3Kcnpyaataunu COxpaHInTe ee B naDeXHom MeCTe, BmecTe C rapaHTnHBIM TaNoHOM, KaccOBbIM YekOM N, NO BO3MOXHOCTN, KAPTOHNKOPO6kO C yNAKOBOHyM MaTePnaIOM. Ecn daTe KOMy-PlnoONlb3OBaTbcra npbOpom, O6a3aTeNbO daTe B npndaCy DaHHUo INcTpyKuIO NO 3Kcnpyaataun.
-Пользуйтесь пиборom TOлько уастов IMобразим И по НаразецИ.пюбор He педнаЗанен Дяг кOMМерчecкOTO И спльзовaning.
- He noIb3yIeTcB npIbOpom nOd OTKpbITbIM He6bOM. IpeOxpaHnTe npIbOp OT Japbl, npIbIX cOInHeuHbIX Lyuei, BnaXHoCTN (Hn B Koem cnUyae He noIpyKaiTe ero B Body) uYapOB o6 ocTpbE yIbl. He npIkaCaiTeCb K npIbOpy BnaXKnIM pyKaAM. Ecn npIbOp yBnaXHnICr NIN HamOK, TyT Xe BbIhTe BnIKy n3 pO3eTkn.
- После Экплугатуц,在 мостахе пинадлесхочт,在 CTКЕ Или NOLOМКЕ пибopa BCERda BbyHIMaTe BUNKy n3 pO3eTKN (TЯнITE 3a BUNKy, a He 3a Ka6eNB).
He octabnIte BkIIOUeHHbI eJIeKtponpnbOpbl 6e3 npncMoTpa. BblXoJa n3 pomeuHnB CcERda BbIKIOuaTe np6op. BblbTe wTekep n3 po3ETKn.
- Пибори Кабель сетевого питаня Heобхдимо ретулрно ob-cпeювать на habличе следов поврждени. Пи обаружени поврждени пользоватся рибором зашиается.
- IcnoIb3yIte TOnIbKO opuRnHaJIbHbIe 3aIuaCTN.
- I3 coo6paXeHn 6e3OpaCHOCTn dIy dTeH He octabTne JexaTb ynaKOBky (PiactNKOBbIe MeuKn, KapTOH, NeHONpACT n T.Д.) 6e3 npncMOTpa.
I PDEyPPEXDEHNE:
He no3BOJnIe TdETM INpTaB c NOnI3TNHeHOB OJIeHkoI.
Onachoctb ydyubla!
Baxhblc yka3aHnno TeXnke 6e3oNaChoctn!
IoxaJyIcTa, TuaTeJIbHO npOHTaIe I COxpaHITe dIra DaJIbHeISeI OJb3OBaHnI.
I PENEYPPEXDEHNE:
Microwave energy: Do not remove this cover!
MinkpoBONHOBA 3Heprna:
3aIpeucaetcHIMMaTb 3Tu KpbIiKy!
O63op detanei npnbopa
1 Dusnnein
2 PanaJIb ynpaBNeHnIa
3BpaaiouynpeyraTOp
4ПивODновВаN
5 HanpaBnaIooee KoiIbIoo
6 CTeKJIaHHa BpaasaIOUaJaCra TapeIka
7 rpnbl
8 3aüeɪka Ha Dbepué
9 CMOTPPOBOE OKHO
10 Puyka dBepzbl
11JIHCTOBOMMUKaHHT
Khonkn n oprahbI ynpaBneHnaHaen ynpaBneHn
MICRO
BbIbePeHte HactpoKy MoUHocTm MmKpOBoJH.
DEFROST
PazmopakimbaHne corglaCHO Becy.
TIMER/CLOCK
Yacbl:
CobmeCTHO C BpaUaIOUIMcpepyIaTOpOM Dnla HAcTPOKn YacOB.
Taimep:
ПюиЗВОДИТnpeДВарпTeьнHyю HabТpoIkyФунКцИN TIMER.
START
3anyck nporpaMMbl.
-БыICTpbIЗлзayucK pa6OТь MmKpoBONH(Bcerda+60cekyHπpN 100%MOUHOCHTN).
- YdHnHaET Bpem npiroTOBHeHna 10,30 nIe 60 ckyHd BO Bpem pa6oTa, corlacho HacTpoEHHomy BpemHn npiroTOBHeHna (KpOme nporpaMM pa3MopaxBaHnN aBTOMaTHuecknx).
-ПоТВерждение Вьбopa.
GRILL/COMBI
PnJIb:
PpnoctaHOBHeHne Hn OTMeHa pnproTOBHeHna
- UTo6bI npNoCTaHOBnTb npIrTOBNeHne, OINH pa3 HaxMInTe Ha KhoNkY STOP/CANCEL nnn oTKpoJIte DBepy.
- TTo6bI npOdoJIKmTb npriOtOBnHe, 3aKpOte DBepu n ChOba HauKMTe Ha KhONKy START.
- UTo6bI NOJIHOCTbIO OCTAHOBnTB IPOUeCC IprIROTOBHeHna, Da pa3a HaxMnte Ha KhoNkY STOP/CANCEL, YTO IpruBeTe K c6pocy BceX IporpaMMhIx HAcTpoE.
Быстpbи nync
BbXOTnTe pa3OrpeTb eNy n HAnITKn 6bICTpo npn cAmo BbICOKO MOUHOCn?
БыстwoВКПЮЧТЕМКРОВЛНовуюпechь,нжавHaKONky START. ПрочпnpriROTOBЛENHЯнчHTСЯЗмДПITeLbHo,кадоe nocJeDyUOоeнжа.TNE KONKNI npOДNTВсрMa npriROTOBЛENHЯHa10,30 Ии60ceynd(cM.«3KcPnPyatauNЯМКРOBOLHOВпechN)
B 3TO Bpemr MoUHocb MmKpOBoJH yCTaHOJIeHa Ha 100%
Pa3orpeB
HarpeBaHne n pa3orpeB ABLIOTc CneuJIbHbIMn XapAKTePNCaMm MKNPOBOHn. 3amOpOKeHHbIe KNDKoCTn n eJa IeRKO MOryT 6bITb pa3o- rptbI DO KOMHaTHOH nII CNCEpBnPoBOUHO TEmpePaTybI 6e3 NcNoJb3OBAHnA MHOKeCTBa EMKoCTeN.
BpMa pa3oRpeBa B Ta6nue HnKe npVBedeH OuBd nA CnpaBKn, OHO B 3NaHTeBHO CTeneHH 3aBNCt OT NaaBHO TMepaTpybl NCTpyKTypbI pOdyKTa. PTo3OMy peKOMeHdyETcB BpMa OT BpMeHN IpoBepaTb DoCTaTOHOCb pa3oRpeBa.
Ta6Jnua pa3oRpeBa
I I P I M E U A H N I:
PekomehdyeTcpeBepHyb6IIO(HaNPmep,Maco,Cocncky)no nCTeueHIN pRIMepHO pONOBHb BVpeMeHN pRTOBHeHNAp npOCTaHOBeHIN pOucecca pRTOBHeHBAENTnIaTOP npoDOnKaET pa60TaTb.
MHOROCTyneHcyaToe npriroTOBJIeHne
BbMOKTeI npOrpaMMnpoBaTb TaKIM O6pa3OM, YTO MOKET BbINOJIHrTaBcNocJeIOBaTeJbHO Do 4 pa3NJuHbIX yHKU.
Donyctm Bbl Bbipann CneyuOnne nporpaMMbl:
MnKpOBoJIHbI

Tpnlb
- BbIbOp 1.Функци: ПocледоваTeьно нахимаTe KhoIGNky MICROДЯ BbIbOpa Heo6xOdmoM MOUHOCTN MmKpOBoJHOBoi NeuN.
- BbIepeHte c nOmoUbpo peryIaTopa Bpem npriroToBneHn oT 10 ceKHyDdo60MmHyT.
- BbIbepeTe 2-yIO cyHKuIO: HaKImaTe KHOIpKy GRILL/COMBI, nokaHa dncnlee He IPOBITcOco6eHne «5-»
4.Длгн�спогитpe6уemorBpemeHnpoJkaPbAHnNcnoJb3yIte BpaauouiCpeYrJTop,Bbl6paBВpEmaT 10 ckyHddo 60 MmHT.
5.ДязanyckaнхмiteКногу START.
IIPIMEYAHNA:
- 06 n3mehen nn porpammbi Bam ykaqet 3BykoBOn cnHaJ.
- 3Ta ΦyHKZI HEBO3MOXHa B IpOgpaMMax pa3MopaxKbAHnI aBTOMaTNUeCKx.
CneuaJIbHbIe yHKn
ABTOCTAPr (TaIMep-ФункциЯ)
MakcimmaJIbna 3aIepKka BpeMeHn CoCTabJraT 23 Yaca n 59 MInHyT.
IIPIMEUYAHNA:
Cnayana hactpoTe yacb!B npotnbHom cnyae Bbl He cmoxeTe BocnoJb3ObaTbcf yHKlnei.
- Пин спюльбовань AVTOCTapTa Функця разморжваня He doctynа. Данная Habстpoika nporpaMMbI He noДерхиBaet npirotoBlenHe B pexime 6bICTporo 3anyca.
He donyckaIte He npabInbHoi yTnIn3aun OTxOIOB. 3TO HAnocIT BpeD OkpykaIoUe CpeDe N OKa3bIbaeT HeRaTINBHOE BO3deIcTBne Ha 3dOpOBBe IIODei.
Oka3bBaIeTe cOdeIcTBne IporpamMe yTnIm3aunn I npymfOpMa m nepepa60Kn 3JeKTPoHHoN n 3JeKTPuYeCKoN TeXnIK.
HOpMaIuO npHKtax yTNIm3aun 6bITOBm TEXnK MoJHO nOly- YntB B MeCThbx OprAHx BJaCTn.
aaii
PC-MWG 1175.
j jj50,230
:ddlld
1280 1995
1000.
j22 2450/1g800.
L 20
I.
11,25
Lluii jaiuui jyglilqgwh aaaagag aiae eajj 1
golgl yolll goll jia gjygl lall gge ggl
.05 1 aIwJg abolabol cIaIb aIaIg .aiaI bIg .gblzog
jgljJ no jalj
"aaalil gioo" joo
aJbI bIaI aIw 3aIyRgS IaIe61 no jolalll pue y:luu
ailll j ojalln 123.0g984b1 n j 123.0g984b1 n j 123.0g984b1 n j 123.0g984b1
aaii 130g aaii 190g aaii 200g aaii g aaii g aaii g aaii
aLlAL START JJg 1e 2
aJgjg j 100000000000000000000000000000
glllgllllgllllgllllll 4PPLMRCO JJp
z
yloosolalalolololol
.1
a 30 a b a l l j 12 12
1.1890 gall alas lalw wll alw wll glac 3
jj( 1) | b_2| = 1
START 3

A. 120jNJI plaiw wIe jgogbl jJl aS aJoo Juae obl aoi
R.6g.R.3 golall uic 1o oS 3-2gai
.
jolw jolw
| الصحيful | الصحيFUL | الجعault |
| الجعault0,1 | الجعault | R. 1 |
| الجعault0,2 | ||
| الجعault0,3 | ||
| الجعault0,15 | الجعault | R. 2 |
| الجعault0,3 | ||
| الجعault0,45 | ||
| الجعault0,6 |
| الإستعمال | الإستعمالالترجمة الحرفية | الإستعمال% مصحيى | الإستعمال | الإستعمال/الإستعمال |
| الإستعمال | 10-9 | 8OP | ال簽署 | ال簽署 |
| الإستعمال | 8-5 | 8OP | ال簽署 | ال簽署 |
| ال簽署 | 6-4 | 8OP | ال簽署 | ال簽署 |
| ال簽署 | 9-7 | 8OP | ال簽署 | ال簽署 |
| الإستعمال | ال簽署 | 8OP | ال簽署 | ال簽署 |
| ال簽署 | 12-10 | 8OP | ال簽署 | ال簽署 |
| ال簽署 | 15-10 | 8OP | ال簽署 | ال簽署 |
| ال簽署 | 8-7 | 8OP | ال簽署 | ال簽署 |
| *.*.*.*.*.*.*.*.*.*.*.*.*.*.*.*.*.*.*.*.*.*.*.*.*.*.*.*.*.*.*.*.*.*.*.*.*.*.*.*.*.*.*.*.*.*.*.*.*.*.*.*.*.*.*.*.*.*.*.*.*.*.*.*.*.*.*.*.*.*.*.*.*.*.*.*.*.*.*.*.*.*.*.*.*.*.*.*.*.*.*.*.*.*.*.*.*.*.*.*.*. *.*.*.*.*.*.*.*.*.*.*.*.*.*.*.*.*. *.*.*.*.*.*.*.*. *.*.*.*.*. *.*. *.*. *.*. *.*. *.*. *.*. *.*. *.*. *.*. *.*. *.*. *.*. *.*. *.*. *.*. *.*. *.*. *.*. *.*. *.*. *.*. *.*. *.*. *.*. *.*. *.*. *.*. *.*. *.*. *.*. *.*. *.*. *.*. *. *. *. *. *. *. *. *. *. *. *. *. *. *. *. *. *. *. *. *. *. *. *. *. *. *. *. *. *. *. *. *. *. *. *. *. *. *. *. *. *. *. *. *. *. *. *. *. *. *. * *. *. *. *. *. *. *. *. *. *. *. *. *. *. *. *. *. *. *. *. *. *. *. *. *. *. *. *. *. *. *. *. *. *. *. *. *. *. *. *. *. *. *. *. *. *. *. *. *. *? *. *. *. *. *. *. *. *. *. *. *. *. *. *. *. *. *. *. *. *. *. *. *. *. *. *. *. *. *. *. *. *. *. *. *. *. *. *. *. *. *. *. *. *. *. *. *. *. *. *、 *、 *、 *、 *、 *、 *、 *、 *、 *、 *、 *、 *、 *、 *、 *、 *、 *、 *、 *、 *、 *、 *、 *、 *、 *、 *、 *、 *、 *、 *、 *、 *、 *、 ( * ) | ||||
| الإستعمال | * | |||
| ال簽署 | * | |||
| * * * * * * * * * * * * * * * * * * * * * * * * * * * * * * * * * * * * * * * * * * * * * * * * * * * * * * * * * * * * * * * * * * * * * * * * * * * * * * * * * * * * * * * * * * * * * * * * * * * * * | ||||
| * * * * * * * * * * * * * * * * * * * * * * * * * * * * * * * * * * * * * * * * * * * * * * * * * * * * * * * * * * * * * * * * * * * * * * * * * * * * * * * * * * * * * * * * * * * * * * * * | ||||
| * | * | |||
| * * * * * * * * * * * * * * * * * * * * * * * * * * * * * * * * * * * * * * * * * * * * * * * * * * * * * * * * * * * * * * * * * * * * * * * * * * * * * * * * * * * * * * * * * * * * * * | ||||
| * * * | * | |||
| * * * * * * * * * * * * * * * * * * * * * * * * * * * * * * * * * * * * * * * * * * * * * * * * * * * * * * * * * * * * * * * * * * * * * * * * * * * * * * * * * * * * * * * * * * * * * * / | ||||
| * * * | * | |||
| * * * * * * * * * * * * * * * * * * * * * * * * * * * * * * * * * * * * * * * * * * * * * * * * * * * * * * * * * * * * * * * * * * * * * * * * * * * * * * * * * / | ||||
| * * * | * | |||
| * * * * * * * / | * | |||
| * * * | * | |||
| * * * | * | |||
| * * * | * | |||
| * * * | * | |||
| * * * | * | |||
| * * * | * | |||
| * * * | * | |||
| * * * | * | |||
| * * * | * | |||
| * * * | * | |||
| * * * | * | |||
| * * * | * | |||
| * * * | * |
jolalplo
s
gJyJdAaglaa aLioo oIgol dJzglj gJgJgJgJgJgJgJgJgJgJgJgJgJgJgJgJgJgJgJgJgJgJgJgJgJgJgJgJgJgJgJgJgJgJgJgJgJgJgJgJg
aIgulgluJe oJrue ploalglgo
a aal 0o o 000
.
aaiyoo aoyo yolal o yolal o yolal o yolal
a0
1 1 1 1 1 1 1 1 1 1 1 1 1 1 1 1 1 1 1 1 1 1 1 1 1 1 1 1 1 1 1 1 1 1 1 1 1 1 1 1 1 1 1 1
iijj j5j 06b 06
a 1 a 1 1 1 1 1 1 1 1 1 1 1 1 1 1 1 1 1 1 1 1 1 1 1 1 1 1 1 1 1 1
.
aee aee eae ee eae eae eae eae eae eae
:
aagll aee
aJgJ aJgJ
aall oolal l bai uSc .gall uall gall a 13!
100
a 1 a 1 1 1 1 1 1 1 1 1 1 1 1 1 1 1 1 1 1 1 1 1 1 1 1 1
aBc gog aDc jg yaa dab gog wjabi no sill pall
| الإستعمال | الإستعمال الترجمة الترجمة الترجمة الترجمة الترجمة الترجمة الترجمة الترجمة الترجمة الترجمة الترجمة الترجمة الTRL الTRL الTRL الTRL الTRL الTRL الTRL الTRL الTRL الTRL الTRL الTRL الTRL الTRL الTRL الTRL الTRL الTRL الTRL الTRL الTRL الTRL الTRL الTRL الTRL الTRL الTRL الTRL الTRL الTRL الTRL الTRL الTRL الTRL | الإستعمال الترجمة الترجمة الTRL الTRL الTRL الTRL الTRL الTRL الTRL الTRL الTRL الTRL الTRL الTRL الTRL الTRL الTRL الTRL الTRL الTRL الTRL الTRL الTRL الTRL الTRL الTRL الTRL الTRL الTRL الTRL الTRL الTRL AL AL AL AL AL AL AL AL AL AL AL AL AL AL AL AL AL AL AL AL AL AL AL AL AL AL AL AL AL AL AL AL AL AL AL AL AL AL AL AL AL AL AL AL AL AL AL AL AL AL Al Al Al Al Al Al Al Al Al Al Al Al Al Al Al Al Al Al Al Al Al Al Al Al Al Al Al Al Al Al Al Al Al Al Al Al Al Al Al Al Al Al Al Al Al Al Al Al Al Al AL AL AL AL AL AL AL AL AL AL AL AL AL AL AL AL AL AL AL AL AL AL AL AL AL AL AL AL AL AL AL AL AL AL AL AL AL AL AL AL AL AL AL AL AL AL AL AL AL (AL AL AL AL AL AL AL AL AL AL AL AL AL AL AL AL AL AL AL AL AL AL AL AL AL AL AL AL AL AL AL AL AL AL AL AL AL AL AL AL AL AL AL AL AL AL AL AL AL AL CAL AL AL AL AL AL AL AL AL AL AL AL AL AL AL AL AL AL AL AL AL AL AL AL AL AL AL AL AL AL AL AL AL AL AL AL AL AL AL AL AL AL AL AL AL AL AL AL AL AL ALA AL AL AL AL AL AL AL AL AL AL AL AL AL AL AL AL AL AL AL AL AL AL AL AL AL AL AL AL AL AL AL AL AL AL AL AL AL AL AL AL AL AL AL AL AL AL AL AL AL A AL AL AL AL AL AL AL AL AL AL AL AL AL AL AL AL AL AL AL AL AL AL AL AL AL AL AL AL AL AL AL AL AL AL AL AL AL AL AL AL AL AL AL AL AL AL AL AL AL AL AL AL AL AL AL AL AL AL AL AL AL AL AL AL AL AL AL AL AL AL AL AL AL AL AL AL AL AL AL AL AL AL AL AL AL AL AL AL AL AL AL AL AL AL AL AL AL AL AL L AL AL AL AL AL AL AL AL AL AL AL AL AL AL AL AL AL AL AL AL AL AL AL AL AL AL AL AL AL AL AL AL AL AL AL AL AL AL AL AL AL AL AL AL AL AL AL AL AL al AL AL AL AL AL AL AL AL AL AL AL AL AL AL AL AL AL AL AL AL AL AL AL AL AL AL AL AL AL AL AL AL AL AL AL AL AL AL AL AL AL AL AL AL AL AL AL AL AL ALL AL AL AL AL AL AL AL AL AL AL AL AL AL AL AL AL AL AL AL AL AL AL AL AL AL AL AL AL AL AL AL AL AL AL AL AL AL AL AL AL AL AL AL AL AL AL AL AL AL AR AL AL AL AL AL AL AL AL AL AL AL AL AL AL AL AL AL AL AL AL AL AL AL AL AL AL AL AL AL AL AL AL AL AL AL AL AL AL AL AL AL AL AL AL AL AL AL AL AL AC AL AL AL AL AL AL AL AL AL AL AL AL AL AL AL AL AL AL AL AL AL AL AL AL AL AL AL AL AL AL AL AL AL AL AL AL AL AL AL AL AL AL AL AL AL AL AL AL AL AP AL AL AL AL AL AL AL AL AL AL AL AL AL AL AL AL AL AL AL AL AL AL AL AL AL AL AL AL AL AL AL AL AL AL AL AL AL AL AL AL AL AL AL AL AL AL AL AL AL LL AL AL AL AL AL AL AL AL AL AL AL AL AL AL AL AL AL AL AL AL AL AL AL AL AL AL AL AL AL AL AL AL AL AL AL AL AL AL AL AL AL AL AL AL AL AL AL AL AL LA AL AL AL AL AL AL AL AL AL AL AL AL AL AL AL AL AL AL AL AL AL AL AL AL AL AL AL AL AL AL AL AL AL AL AL AL AL AL AL AL AL AL AL AL AL AL AL AL AL AU AL AL AL AL AL AL AL AL AL AL AL AL AL AL AL AL AL AL AL AL AL AL AL AL AL AL AL AL AL AL AL AL AL AL AL AL AL AL AL AL AL AL AL AL AL AL AL AL AL MAL AL AL AL AL AL AL AL AL AL AL AL AL AL AL AL AL AL AL AL AL AL AL AL AL AL AL AL AL AL AL AL AL AL AL AL AL AL AL AL AL AL AL AL AL AL AL AL AL AL NAL AL AL AL AL AL AL AL AL AL AL AL AL AL AL AL AL AL AL AL AL AL AL AL AL AL AL AL AL AL AL AL AL AL AL AL AL AL AL AL AL AL AL AL AL AL AL AL AL AL M M M M M M M M M M M M M M M M M M M M M M M M M M M M M M M M M M M M M M M M M M M M M M M M M M ML |
STOP/CANCEL jj j j j j j j j j j j
gullllullglgebdo
y
aBul uIe Ie 10 aab ddo 10 bbl lss
aLcI. STARTJgI JgI 0gJgI 0gJgI 0gJgI 0gJgI 0gJgI 0gJgI 0gJgI 0gJgI 0gJgI 0gJgI 0gJgI 0gJgI 0gJgI 0gJgI 0gJgI 0gJgI 0gJgI 10 gJgI 10 gJgI 10 gJgI 10 gJgI 10 gJgI 10 gJgI
.("uSssu
.100 111 111 111 111 111 111
#
aBbIg llglwll aas uS. aagggkubl uJd dAolz cIy mo nccuWll g adll llae y
aegy jao yla
a a a a a a a a a a a a a a a a a a a a a a a a a a a a a a a a a a a a a a a a
100 100
| العربية | العربية الحرفية العربية | العربية % مسériential | العربية | العربية % مسériential |
| العربية | ||||
| y | 1-0,5 | 10.0P | العربية 150 | العربية 1 |
| y | 5-3,5 | 10.0P | العربية 500 | العربية 0,5 |
| y | 7-5 | 10.0P | العربية 750 | العربية 0,75 |
| العربية. العربية العربية | ||||
| pxi | 3,5-2,5 | 10.0P | العربية 450 | العربية العربية العربية العربية العربية العربية العربية العربية العربية العربية العربية العربية العربية العربية العربية العربية العربية العربية العربية العربية العربية العربية العربية العربية العربية العربية |
| pxi | 2,5-2 | 10.0P | العربية 450 | العربية العربية العربية العربية العربية العربية العربية العربية العربية العربية العربية العربية العربية العربية العربية العربية العربية العربية العربية العربية العربية AL |
| pxi | 3,5-2,5 | 10.0P | العربية 450 | العربية العربية العربية العربية العربية AL |
| العربية | ||||
| y | 2-1 | 10.0P | العربية 200 | العربية العربية العربية العربية العربية العربية العربية العربية AL |
| y | 4-3 | 10.0P | العربية 500 | العربية 4.000AL |
| y | 3-2 | 10.0P | العربية 250 | العربية AL |
| العربية. العربية العربية | ||||
| y | 5-3,5 | 10.0P | العربية 450 | AL |
| pxi | 4,5-3 | 10.0P | العربية 400 | AL |
| العربية | ||||
| pxi | 2-1 | 10.0P | العربية 150 | AL |
| pxi | 3,5-2,5 | 10.0P | العربية 300 | AL |
| pxi | 4-3 | 10.0P | العربية 500 | AL |
| العربية. العربية العربية | ||||
| pxi | 1,5-1 | 10.0P | العربية 250 | AL |
| pxi | 2-1,5 | 10.0P | العربية 250 | AL |
| pxi | 2-1 | 10.0P | AL | AL |
J 1 J 1 J 1 J 1 J 1 J 1 J 1 J 1 J 1 J 1 J 1 J 1 J 1 J 1 J 1 J 1 J 1 J 1 J 1 J 1 J 1 J 1 J 1 J 1 J 1 J 1 J 1 J 1 J 1 J 1 J 1 J 1 J 1 J 1 J
. 10ab o9g cJg oJg Jg jlg aJg g
aclwbu
:ab
oJol ogo Jauw p 3 1j0 jg 8 aaiu uall jaua jauu Jnogj 8y
.0o TIMER/CLOCK 1
.2gblb6dcllll bduuugul uao pdoaol .2
.
.4gblb1 glll bdl jyglw ypa 4
j 5
Aa 1
jglal 1aolal alolll aillbllgagaaagagagag
.539 1
LgSb
:3 LwLgSbI pssu. 4y jolal y laaill Jao 2y kJy
100000000000000000000000000000
Jxj0j6blc0b1d0gj 1J,daa
Joo Joo joo Joo oo Joo oo Joo oo Joo oo Joo oo
cuii jusu oui iouai ui jui aui uai uai uai uai uai uai uai uai
1234567890
WARNING
1: MICROWAVE AND HIGH VOLTAGE INSIDE. BE SURE NOT TO REMOVE THE ENCLOSURE.
2: THIS APPLIANCE IS EQUIPPED WITH A GROUNDED PLUG FOR YOUR PROTECTION AGAINST POSSIBLE SHOCK HAZARDS AND SHOULD BE CONNECTED TO A PROPERLY GROUNDED OUTLET.
3: THIS DEVICE IS TO BE SERVICED ONLY BY PROPERLY QUALIFIED SERVICE PERSONNEL.
4: DISCONNECT POWER PLUG BEFORE SERVICING. REMOVAL OF THE ENCLOSURE WITH PRODUCT ENERGIZED COULD EXPOSE SERVICEMTO HAZARDOUS HIGH VOLTAGE POTENTIAL.
16 = 2 + 3 + 4 + 5 + 6 + 7 + 8 + 10 + 11 + 12 + 13 + 14 + 15 + 16 + 17 + 18 + 19 + 20 + 21 + 22 + 23 + 24 + 25 + 26 + 27 + 28 + 29 + 30 + 31 + 32 + 33 + 34 + 35 + 36 + 37 + 38 + 39 + 40 + 41 + 42 + 43 + 44 + 45 + 46 + 47 + 48 + 49 + 50 + 51 + 52 + 53 + 54 + 55 + 56 + 57 + 58 + 59 + 60 + 61 + 62 + 63 + 64 + 65 + 66 + 67 + 68 + 69 + 70 + 71 + 72 + 73 + 74 + 75 + 76 + 77 + 78 + 79 + 80
Microwave energy: Do not remove this cover!
STOP/CANCEL
a=150y0g0yba 1
Lgagalllaoyolgyo
1 1
Jglll Lgaxi gSoll aoj glsl baxl jaoiog baxl :Jlabu Jol
y
cagaaagg jyjg jg jg jg jg jg jg jg jg
gjbjg jglj
oula o1g3l aluow jy g2yj6b1 1gwhll gwhll
aLusuWU aLso xie aKswuU jgU, hao oJyUd aglo
jagua gia jauo oulo oulo ulgul uS, dai plalall gao
a 1gSb 1 g2g3b 1 1 1 1
aagaae 1000
aie o uo jI kO aI aI b aI aI aI pI aI bI aI eJ aI aI aI aI aI
.
a 9gss a a aalb1 dulb1 c9s
Ee 1 a 1 1 1 1 1 1 1 1 1 1 1 1 1
gluo goj do plo
3.3.3.3.3.3.3.3.3.3.3.3.3.3.3.3.3.3.3.3.3.3.3.3.3.3.3.3.3.3.3.3.3.3.3.3.3.3.3.3.3.3.3.3.
:4
3tt^ t^ t^ 30^ 60^ 10^ 10^ 10^ 10^ 10^ 10^ 10^ 10^ 10^ 10^ 10^ 12^
jusill g jwbl lss aalb jiljll qsl
aGw aluxwcb yoo aalglg axswll
cui5ki jde aole ojbi
1
S_CO II = 12 × CO × 2 = 12
3
0.15g 2gC4
10 5
a=1jll 6
7
WJablaω8
aJjll aJbU 9
U 10
15.61 a2011
aaii aegjde aegggl aaii nolig jll
2g3
MICRO
gglj jgll
DEFROST
TIMER/CLOCK
aslll bajgglwjj
:clwJ
TIMER aabgl a
:
START
( % 100 aIbI IaI laie a6+6
aJbI bll 00000000000000000000000000000000000000000000000000
(aalaljolglgblg jybs
S OBC = S COD + S_ BOC
GRILL/COMBI
wJLWg
:la|g
JoljIy aIgJg Jg 99361
:
!jg jg g jg jg jg :
a.aa aai 1
S OBC = S OBC + S_ AOB
Gssgss sssss
gglgglgglgglgglgglgglgglgglg
grrrall .dlaal lalal alalal alalal
jagoll algolgog gogg cglal
1
jooell alaoos jblzog 0g 1uagc dcoo 1e jblzeg aolly jaojjl iis jdo
.
:4
.5j1 1
:ab
i
clogsbglalallgajllgj
Lg261
- 104
- jgj jgsj
- 101
101
101
101
101
101
101
101 - 100
- 100
99 - 100
99
!dolal oslwul loglozo
J. 1
:
gJbJI JIJI IJIJI gJJIJI gJIJI gJIJI gJIJI gJIJI gJIJI gJIJI gJIJI gJIJI gJIJI gJIJI gJIJI gJIJI gJIJI gJIJI gJIJI gJIJI gJIJI gJIJI gJIJI gJIJI gJIJI
golgiolglgo
. 10000000000000000000000000000000000000
a aaa aa aabw ydo h! paa aagkubol jn plauu wpu cuiu dill uul ull aal
ydi 11j j 11i j 11i j 11i j 11i j 11i j 11i j 11i j
Joo Joo joo joo joo joo joo joo joo joo joo joo joo joo joo joo joo joo joo joo joo joo joo joo joo joo joo joo joo joo joo joo joo joo joo joo joo joo joo joo joo joo joo joo
-1g 100000000000000000000000000000000000000
jlaaiy jba . aalso aegi 3 Jilgull jaoy y
GARANTIEKARTE
warranty card · garantiekaart · carte de garantie · scheda di garanzia · tarjeta de garantia · cartao de garantia · garantikort · karta gwarancyjna · zaručni list · kartica jamstva · carte de garantie · ΓapanuzonHa KapTa · zaručný list · garancijski list · garanciajegy · rapaHTiHnΦopMynp · ΓapaHTnHbI TaJOn ·
PC-MWG 1175
24 Monate Garantie gemäß Garantieerklarung · 24 months warranty according to warranty declaration · 24 maanden garantie volgens garantieverklaring · 24 mois de garantie selon la déclaration de garantie · 24 mesi di garanzia secondo la dichiarazione di garanzia · 24 meses de garantía de ac器o con la declaración de garantía · 24 manedes garanti i henhold til garantibetingelsene · 24 miesiace gwarancjna podstawie oswiadcenia gwarancjngo · záruka 24 mésicu podle prohlasei o záruce · 24 mjesecno jamstvo u skladu s jamstvenom deklaracijom · 24 luni garantie conform declaratiei de garantie · 24 meça a rapanuzinB cBOTBETCTBnC rapanuzonHnata deknapaun · 24-mesaçna záruka podla vyhlasenia o záruke · 24-meesecna garancija, skladno z garancjsko izjavo · 24 honap garancia a garanciafeltetelekben leirtak szerint · rapanTnHa 24 MciCi BIDNOBIO nO 3aBi npo rapanTIO · RapanTn 24 Mecsa cornacho 3aBBENHBIM rapaHTN HbIM npaBnAm · cn
Kaufdatum, Händlerstempel, Unterschrift · date of purchase, dealer stamp, signature · aankoopdatum, dealerstempel, handtekening · date d'achat, tampon du concessionaire, signature · data di acquisto, timbro del rivenditore, firma · fecha de compra, sello del distribuidor, firma · data de compra, carimbo do distribuidor, assinatura · kjopsdato, forhandlsterumpol, signature · data zakupu, pieciec sprzedawyce, podis · datum zakupenji, razitko prodezjce, podisq· datum kupovina, zig trogovac, potpis · data de azchitje, stampila furnizorului, semnatura · Дата на покунлеса, Рочат на по探测ача, Рождз datum nakupu, peciatka ob. chodnika/predajcu, podisq· datum nakupa, zig trogovac, podisq· vasarlas datuma, kereskedo belyezejoje, alairas · Data prinibdannya, neechta knpoaduzha, nidncs · Data prinobepeteneHa, Utsamn prnoadayua, Podinncb
PROFI COOK
www.proficook-germany.de
PROFI COOK
Internet: www.proficook-germany.de
Made in P.R.C.