
CME6106X - Built-in oven CATA - Free user manual and instructions
Find the device manual for free CME6106X CATA in PDF.
| Product type | Built-in oven |
| Brand | CATA |
| Model | CME6106X |
| Power supply | 230 V / 50 Hz |
| Recommended fuse | 13 A |
| Cooking functions | Oven light, Convection, Top element, Bottom element, Circular element with fan, Bottom element with fan, Convection with fan, Grill, Maxi-grill, Grill with fan, Defrost |
| Cleaning | AquaSmart system (steam cleaning) |
| Interior lighting | Halogen lamp G9, 25 W, 300 °C |
| Door | Removable, removable glass for cleaning |
| Timer | Electronic with LED display, cooking duration, end of cooking, delayed start functions |
| Included accessories | Wire shelf, deep tray |
| Side rails | Telescopic slides present |
| Number of levels | 5 shelf positions (level guides) |
| Control panel | 3 knobs (mode, temperature, timer) or with screen depending on model |
| Installation | Direct connection with omnipolar circuit breaker, mandatory grounding |
| Safety | Safe operation with instructions for children and persons with reduced capabilities |
Frequently Asked Questions - CME6106X CATA
User questions about CME6106X CATA
0 question about this device. Answer the ones you know or ask your own.
Ask a new question about this device
Download the instructions for your Built-in oven in PDF format for free! Find your manual CME6106X - CATA and take your electronic device back in hand. On this page are published all the documents necessary for the use of your device. CME6106X by CATA.
USER MANUAL CME6106X CATA
Operating and maintenance instructions for built-in ovens

These instructions are for your safety. Please read the following instructions carefully before proceeding with the installation and use of this appliance. Keep the instruction manuals for future reference.
Warning: All installation work must be carried out by a suitably qualified person, strictly following local building regulations and these instructions.
To avoid the risks that are always present when you use an electrical appliance it is important that this oven is installed correctly and that you read the safety instructions carefully to avoid misuse and hazards. After unpacking the oven please check that it is not damaged. If in doubt, do not use the appliance but contact Customer Services or
Check the package and make sure you have all of the parts listed and decide upon the appropriate location for your product. If this product contains glass please take care with fitting or handing to prevent personal injury or damage to the product. The specification plate shown on this appliance displays all the necessary identification information for ordering replacement parts. If you sell the appliance, give it away, or leave it behind when you move house, please ensure that you pass on this manual so that the new owner can become familiar with the appliance and its safety warnings.
SAFETY
All installation work must be carried out by a suitably qualified person, strictly following local building regulations and these instructions.
- Warning: Ensure that the appliance is switched off at the fused spur before replacing the lamp to avoid the possibility of electric shock.
- Warning: Accessible parts may become hot during use. Children should be kept away.
- Warning: If the door or door seals are damaged, the oven must not be operated until it has been repaired. Contact Customer Services for advice.
- During installation do not allow the supply cord to touch the hot parts of the appliance.
- Make sure that the supply cord is not caught under or in the appliance and avoid damage to the supply cord.
- Do not install the appliance outdoors in a damp place or in an area which may be prone to water leaks such as under or near a sink unit. In the event of a water leak allow the machine to dry naturally. Do not use and contact Customer Services for advice.
- Please dispose of the packing material carefully.
- Do not use flammable sprays in close vicinity to the appliance. Warning: This appliance can be used by children aged from 8 years and above and persons with reduced physical, sensory or mental capabilities or lack of experience and knowledge if they have been given supervision or instruction concerning use of the appliance in a safe way and understand the hazards involved. Children shall not play with the appliance.
- Cleaning and user maintenance shall not be made by children without supervision. Keep the appliance and its supply cord out of the reach of children less than 8 years old.
- If the supply cord becomes damaged, it must be replaced by the manufacturer, its service
agent or similarly qualified persons in order to avoid a danger or injury.
- The appliance is not intended to be operated by means of an external timer or separated remote control system.
- The appliance is for domestic use only and only for cooking food. Do not use this appliance as a source of heat.
- The manufacturer declines all liability for personal or material damage as a result of misuse or incorrect installation of this appliance.
- Danger of burns! During use the appliance becomes hot. Care should be taken to avoid touching heating elements inside the oven.
- Do not lean on the door or place any objects on the door of the appliance. This can damage the door hinges.
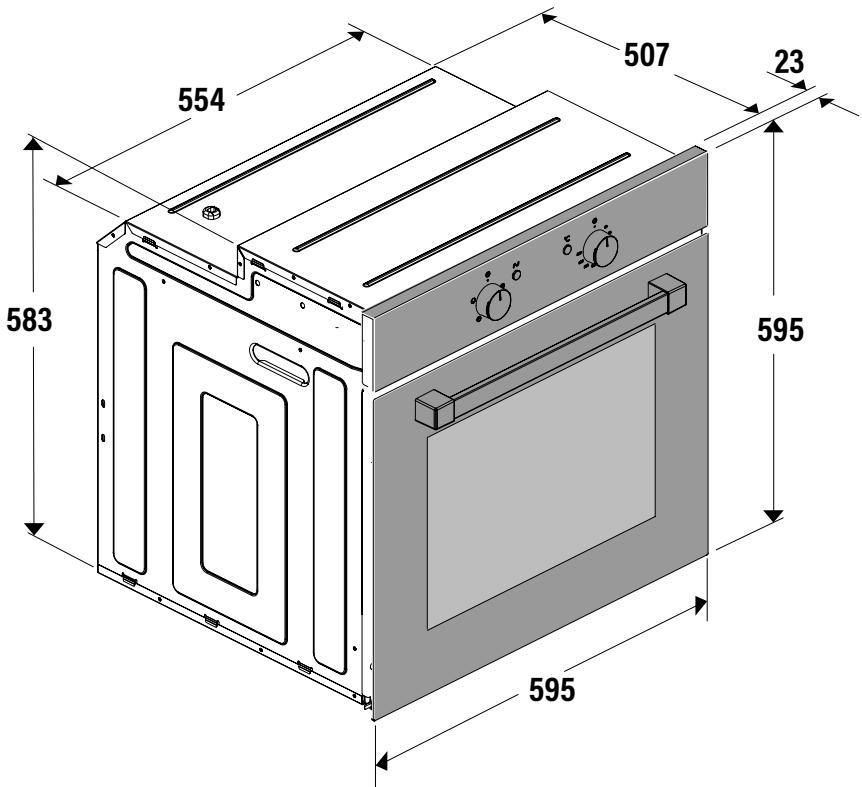
- The oven must be installed in accordance with installation instructions and all dimensions must be followed.
- Before connecting the appliance to the power supply, check that the power supply voltage and current rating corresponds with the power supply details shown on the appliance rating label.
- Never use a damaged appliance! Disconnect the appliance from the electrical outlet and contact your retailer if it is damaged.
- Danger of electric shock! Do not attempt to repair the appliance yourself. In case of malfunction, repairs are to be conducted by qualified personnel only.
- To avoid damaging the cord, do not squeeze, bend or chafe it on sharp edges. Keep it away from hot surfaces and open flames.
- Lay out the cord in such a way that no unintentional pulling or tripping over it is possible. Keep the appliance and its cord out of reach of children. Do not operate the appliance with wet hands or while standing on a wet floor. Always turn the appliance off before disconnecting it from the power supply.
- Disconnect the oven from the power supply when not in use and before cleaning.
- Warning: This appliance is supplied with a three core supply cord and must be connected direct to the mains electricity supply via a omni-polar or double pole switch having a 3mm minimum contact gap on each connector.
- The fused spur should be installed in an easily reachable place so that in case of emergency the appliance can be disconnected from power immediately.
- The fixed wiring must be protected against heat surfaces.
- Do not hang any objects on the handle of the oven door.
- Caution: Do not cover the bottom of the oven with aluminium foil or other objects. There is a risk of fire and damage to the enamel in the oven!
- Do not allow aluminium foil, plastic, paper or fabric contact with heating elements. Never leave the appliance unattended during use, especially when cooking with flammable substances (e.g. hot oil, fat, etc.).
-
Do not store or never use harsh chemicals, sprays, flammable or non-food in or near the oven.
-
This oven is designed specifically for heating or cooking food. The use of corrosive chemicals in heating or cleaning will damage the unit and may cause injury.
- Should any food inside the oven catch fire, keep the door closed. Switch the oven off and disconnect the power supply. Always exercise caution when opening the door.
- Move to the side, and open the door slowly to vent the hot air and/or steam. Make sure your face is away from the opening and make sure there are no children or pets near the oven.
- 5 Only use utensils that are suitable for use in this type of oven.
- 5 The oven should be cleaned regularly and any food deposits removed.
- Do not use harsh abrasive cleaners or sharp metal scrapers to clean the oven door glass. They can scratch the surface, which may result in shattering of the glass.
- A steam cleaner is not to be used.
- Warning: The appliance and its accessible parts become hot during use. Care should be taken to avoid touching heating elements.
- Children less than 8 years of age shall be kept away unless continuously supervised.
- The appliance must not be installed behind a decorative door in order to avoid overheating.


INSTALLATION


All installation must be carried out by a competent person or qualified electrician. Before connecting the mains supply ensure that the mains voltage corresponds to the voltage on the rating plate.
Direct Connection
This appliance must be connected directly to the mains using an omnipolar circuit breaker with a minimum opening of 3mm between contacts.
The installer must ensure that the correct electrical connection has been made and that it complies with the wiring diagram.
The cable must not be bent or compressed.
Regularly check the power cord for damage. If the supply cord becomes damaged, it must be replaced by the manufacturer, its service agent or similarly qualified persons in order to avoid a hazard.
Warning: This is a Class i appliance and MuST be earthed.
This appliance is supplied with a 3 core mains cable coloured as follows:
- Brown = L or Live
- Blue = N or Neutral
- Green and Yellow = E or Earth
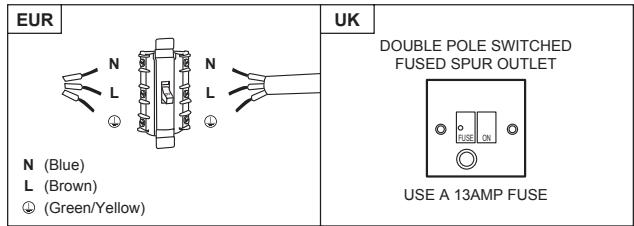
The fuse must be rated at 13 amps.
To avoid the risks that are always present when you use an electrical appliance it is important that this appliance is installed correctly and that you read the safety instructions carefully to avoid misuse and hazards. Please keep this instruction booklet for future reference and pass it on to any future owners. After unpacking the appliance please check that it is not damaged. If in doubt, do not use the appliance but contact Customer Services.
The manufacturer declines all liability for damage caused to persons and objects due to incorrect
or improper installation of the appliance. Any permanent electrical installation must comply with the latest wiring regulations applicable to your country and for your own safety a qualified electrician or contractor should undertake the electrical installation.
Installation


BEFORE YOU START
Switch on the appliance at the switched fused connection unit. The appliance is ready for use.
WARNING: Read the instructions before using the appliance.
Check the package and make sure you have all of the parts listed. Decide on the appropriate location for your product. This product contains glass, please take care when fitting or handling to prevent personal injury or damage to the product.
If you sell the appliance, give it away, or leave it behind when you move house, make sure you also pass on this manual so that the new owner can become familiar with the appliance and its safety warnings.
Note! Before using the oven for the first time we recommend that the oven is switched on and set to its highest temperature. Keep the oven door closed and leave the appliance on for 1.5 hours with nothing in it.
Ensure adequate ventilation during this process by opening doors and windows in the room. Any odours created during this operation are due to the evaporation of substances used to protect the appliance during storage prior to installation.
FUNCTION & SETTINGS
| ICON | FUNCTION | DESCRIPTION |
| OVEN LIGHT | Automatic when selecting the cooking mode for all models. The oven light remains on when using the oven. | |
| CONVECTION MODE | Provides traditional cooking with heat from the upper and lower elements. | |
| UPPER ELEMENT MODE | For gentle cooking, browning or keeping cooked dishes warm. | |
| LOWER ELEMENT MODE | For slow cooking and heating food. | |
| FAN-ASSISTED CIRCULAR ELEMENT MODE | Provides uniform heating with the fan and allows different dishes to be cooked at the same time on different levels. | |
| FAN-ASSISTED LOWER ELEMENT MODE | This provides heating by semi-convection with the lower element for delicate dishes. | |
| FAN-ASSISTED CONVECTION MODE | This provides convection heating of the upper and lower elements for uniform cooking. | |
| GRILL | For gratinating and browning food. | |
| MAXI-GRILL | As above, but the grill element provides a larger area for roasting. | |
| FAN-ASSISTED GRILL | This provides fast browning so that food remains juicy. For convection baking, this is the most energy-efficient function. | |
| THAWING MODE | The fan works without heat to reduce the thawing time for frozen food. |
| Food | Programme and temperature | Time | Position | Preheat | Accessories | |||
| meat and poultry | Beef 1,5 Kg | 190°C | 210°C | 50 - 60 min | 1 | no | ||
| Pork 1,5 Kg | 150°C | 180°C | 85 - 95 min | 2 | no | |||
| Lamb 1,5 Kg | 200°C | 220°C | 40 - 50 min | 2 | no | |||
| Turkey 4 Kg | 170°C | 190°C | 115 - 125 min | 1 | no | |||
| Chicken 1,25 Kg | 210°C | 230°C | 50 - 60 min | 1 | no | |||
| vegetables | Roasted red peppers 1,25 Kg | 190°C | 210°C | 30 - 40 min | 2 | no | ||
| Stuffed tomatoes 4 servings | 200°C | 220°C | 15 - 19 min | 2 | no | |||
| fish and seafood | Baked Hake/Cod 1,5 Kg | 210°C | 230°C | 7 - 9 min | 2 | yes | ||
| Roasted lobster 1 Kg | 220°C | 240°C | 4 - 5 min | 4 | yes | |||
| sundry | Pizza | 200°C | 220°C | 18 - 22 min | 1 | yes | ||
| Defrosting, all types of food | 75°C | 2 | no | |||||
| Fermenting dough for bread/cakes | 40°C - 50°C | 40°C - 50°C | 25 - 30 min | 0 | no | |||
| PERFORMANCE TESTING ACCORDING TO STANDARD IEC/EN60350 | 8.4.1 Butter cookies | 175°C | 22 min | 3 | yes | Deep Tray | ||
| 8.4.2 Fairy Cakes | 185°C | 23 min | 2 | yes | Deep Tray | |||
| * 160°C | 45 min | 3 | no | Deep Tray/standard | ||||
| 8.5.1 Fat-free sponge cake | 180°C | 25 min | 1 | no | Mould on grill | |||
| * 180°C | 40 min | 3 | no | 2 moulds on 1 grills and deep | ||||
| 8.5.2 Apple tart | 185°C | 40 -45 min | 2 | no | Grill | |||
| * 180°C | 50 - 55 min | 3 | no | 2 moulds on 1 grills and deep | ||||
| 9.1 Surface browning | * 250°C | 2 - 3 min | 4 | Pre-heat for 5 min | Cook 2-3 min. on grill | |||
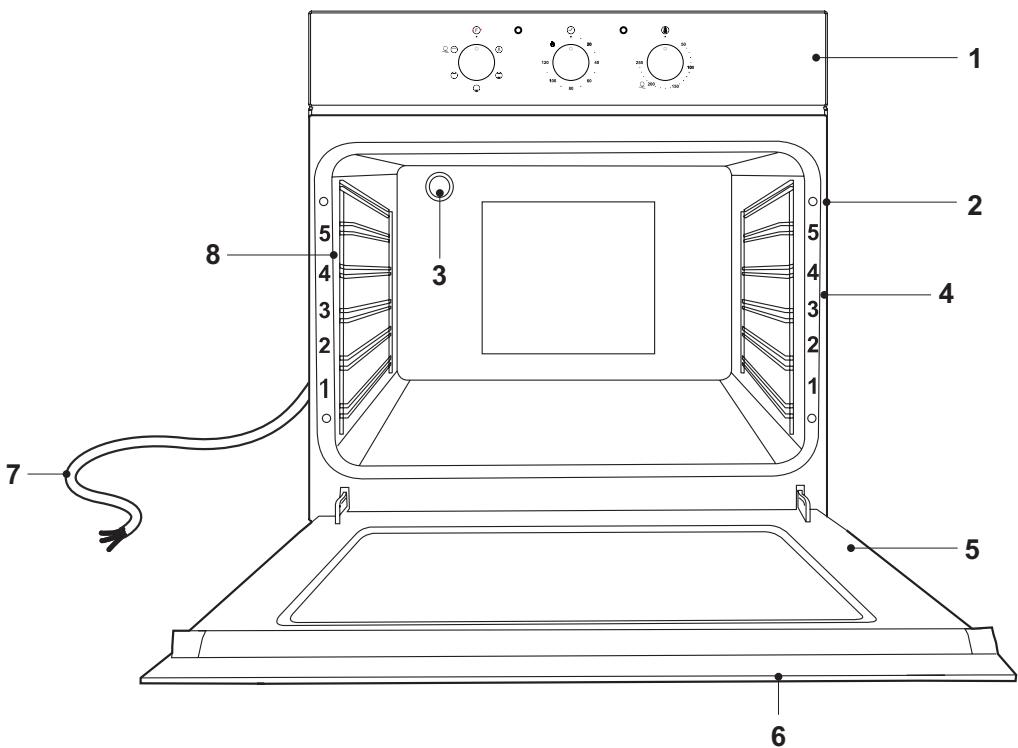
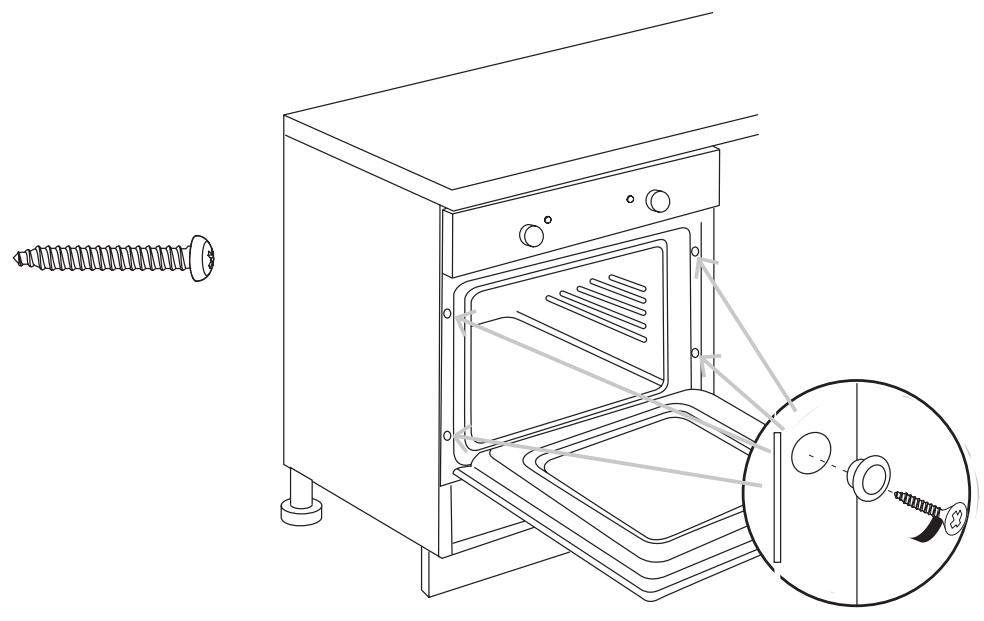
- Control panel.
- Fixing openings (4x).
- Oven lamp.
- Shelf level markings.
-
Door.
-
Door handle.
- Power cable.
- Side rails.
Switching on / off

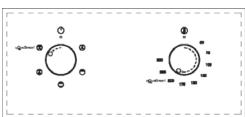
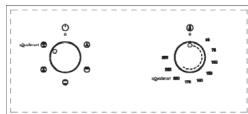
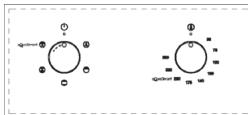
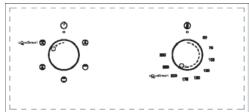
Control panel with 3 knobs
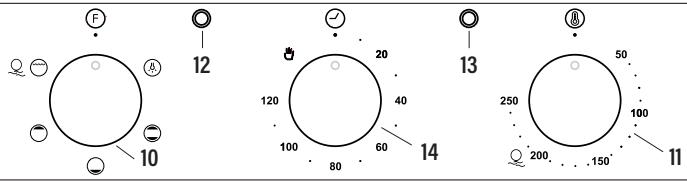
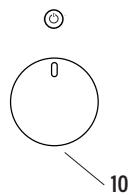
- Oven function selector knob.
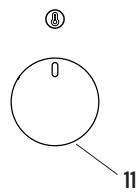
- Thermostat control knob.
- Power indicator light.
- Oven operating light.
-
Timer.
-
Rotate the cooking mode knob (10) to a desired cooking mode.
- Rotate the temperature knob (11) to a desired cooking temperature.
- The oven now switches on and starts operation. The power indicator (13) and temperature indicator (12) light up.
- Once the thermostat controls are in the desired position, turn the knob clockwise to the maximum position and then turn it anti-clockwise to the desired time; at the end of this set time the buzzer will sound. The timer only indicates the end of the set time, but it does not stop the function being used.
-
After cooking:
-
Set the temperature knob (11) to ⑧ position.
- Set the cooking mode knob (10) to F position.

Control panel with display

- Oven function selector knob.
- Thermostat control knob.
- Minus button.
- Confirm button.
- Plus button.
- Display
Before first use
To remove any residue from the oven that may have been left from the manufacturing process, you should select the fan oven function and set the thermostat to its maximum temperature setting.
It is perfectly normal for a smell to be produced during this process.
You should make sure that any windows in the room are left open during this process.
It is advisable for you not to remain in the room whilst the burning off process is taking place.
You should leave the oven on maximum setting for 30 - 40 minutes.
After the oven cavity has cooled, it should then be cleaned with warm soapy water, using either a sponge or soft cloth. No abrasive cleaners should be used.
- Outer parts of the oven should be cleaned with warm soapy water, using either a sponge or soft cloth. No abrasive cleaners should be used.
We would recommend that an appropriate stainless steel cleaner and polish is regularly used on the stainless steel surfaces of this appliance.
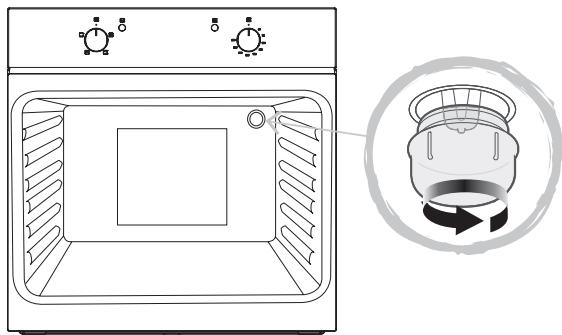
The Indicator lights
① is the "on/off light" for the electric timer and oven working. When the oven is connected with electricity, the LED display will be on, and will be constantly on, the other three functions of the timer lights are off. After chosen the cooking function and temperature, the oven starts to work without timer.
is the "Cooking Duration Function Light", and it's used to set the desired cooking time length.
is the "End Cooking Function Light", and it's used together with the "Cooking Duration Function".
C is the "Cooking Indicting Light", and when the oven is heating, it will light up. Vice versa, when the oven is not heating, it will go off.
Setting the clock
The default setting of clock is 12:00; the default setting of cooking duration is 1 hour and the default setting of end cooking time is 12:00.
When the oven is connected with electricity, the LED display and ① will be constantly on, One can set up the clock now. Pressing the "OK" key, the "Hour" display will be blinking, and pressing the < and > keys could adjust the number. Press "OK" key again, the "Minute" display will be blinking, and use < and > to set the minute. Press "OK" again, the clock setting is done.
Setting cooking duration
Press "ok" till the "Cooking Duration Light " is on and blinking together with the "Hour" display, press < and > key to set the cooking duration in hour; press "ok" again, the "Minute" display will be blinking for adjustment.
After the cooking period length is adjusted, press "OK" again to confirm it. Then the "Cooking Duration Light " is constantly on, and the display will be showing the set cooking duration, and starts counting downwards if the required cooking function and temperature are all set.
When the set cooking duration is reached, the light starts to blink and the alarm will ring 10 times. The indicator will be off. Then this oven will be out of this function by pressing any key now, and the lights go off, while the LED display goes back to clock and the will be light up.
If one wants to stop the oven during the cooking duration operation, it could be done by press "ok" key at any time.
Setting the end cook function
Press "OK" till the "End Cooking Function Light " is on and blinking together with the "Hour" display, press < and > key to set the end cooking time in hour; press "OK" again, the "Minute" display will be blinking for adjustment.
After the end cooking time is adjusted, press "OK" again to confirm it. Then the "End Cooking Function Light " is constantly on, and the display will back to the current time, and starts to accumulate time if the required cooking function and temperature are all set.
When the set cooking duration is reached, the light starts to blink and the alarm will ring 10 times. The indicator will be off. Then this oven will be out of this function by pressing any key now, and the lights go off, and the will be light up.
If one wants to stop the oven during the cooking duration operation, it could be done by press "ok" key at any time.
Setting delayed cooking
The "Delayed Cooking" function will only work after the "Cooking Duration" function is set in use. After setting the cooking duration function, press "OK" again, the "Delayed Cooking Function Light ..." will be on and blinking together with the "Hour" display.
Set the required cooking finishing time as you do with setting the "Cooking Duration". When the finishing time is adjusted, press "ok" to set it. Then the "Delayed Cooking Function Light " is constantly on, and the time showing on the display is back to clock.
The system will automatically calculate the cooking starting time, and when it's reached, oven starts heating, and , , and ^ will all light up.
When the set cooking finishing time is reached, the light will start blinking and the alarm will ring 10 times and the indicator will be off. This oven will be out of this function by pressing any key now, and , , and ^ C lights go off, while the LED display goes back to clock. The ① will light up.
If one wants to stop the oven during the cooking, it could be done by pressing "ok" key once at any time.
Example 1: Setting cooking duration
The time is 15:30 now, and you need to set the cooking time for 2 hour and 15 minutes.
Press "OK" till the and "1" on the timer are blinking. The default setting of cooking duration is 1 hour, showing as 1:00. Use > to adjust "1" to "2", and press "OK" again, "00" starts to blink. Then use > to adjust "00" to "15", then press "OK" again, the cooking duration of 2 hour 15 minutes is set.
Turn the oven to your desired cooking function and temperature, the oven starts to work, the display shows 2:15, and starts to count down, and the and ^ C lights will be on ( ^ C light may go off from time to time).
When 2 hour and 15 minutes is reached, oven stops, and the display will go back to clock showing the current time, and the 空 will starts to blink with alarm warning ten times and the ① indicator will be off. Press any key to get out of this setting, and display goes back to clock. And the ① will light up.
Example 2: Setting the end cook function
The time is 15:30 now, and you want to finish the cooking at 17:30.
Press "OK" till the and "12" on the timer are blinking. Use > to adjust "12" to "17", and press "OK" again, the minute digit "00" starts to blink. Then use > to adjust "00" to "30", then press "OK" again, the end cooking time is set.
Turn the oven to your desired cooking function and temperature, the oven starts to work, the display shows 15:30, and starts to accumulate time, and the and ^ lights will be on ( ^ light may go off from time to time).
When 17:30 is reached, oven stops, and the will starts to blink with alarm warning ten times and the ① indicator will be off. Press any key to get out of this setting, and the ① will light up.
Example 3: Setting delayed cooking
It's 8:00 now, and you want to finish the cooking at 16:00, and cooking time needs to be 45 minutes.
Press "OK" to set the cooking time length to 45 minutes as per above example. Press "OK" again, the and "12" on the timer start to blink. Adjust the timer to 16:00, and press "OK" again to confirm it. The display goes back to the current time. Then turn the oven to your desired cooking function and temperature.
The oven starts to work automatically at 15:15, and the , , and ·^ lights will be on ( ^ light may go off from time to time). At 16:00, the oven will stop working, both and lights start to blink and the alarm will warn ten times and the ① indicator will be off. Press any key to get out of the setting, and the ① will light up.
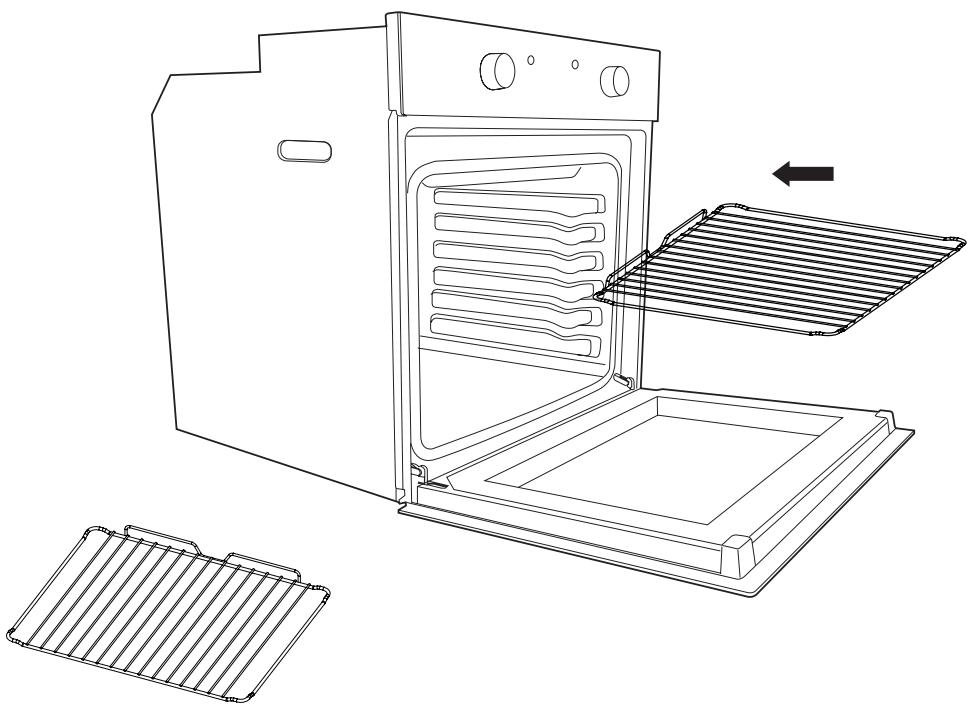
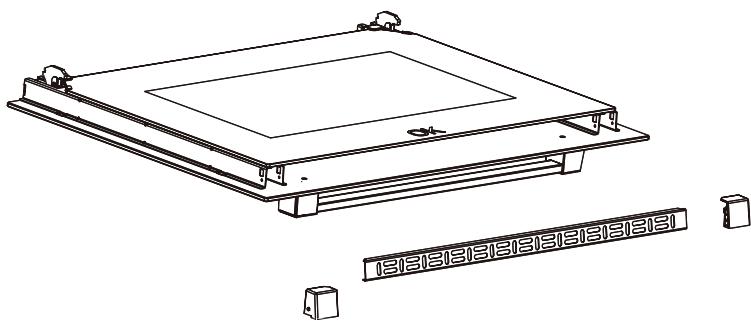
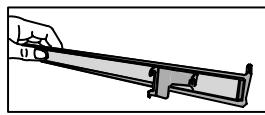
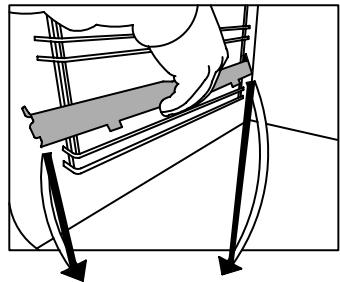
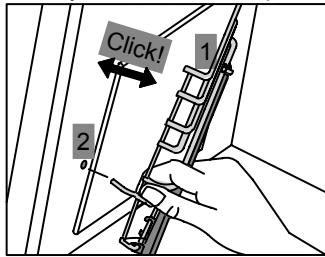
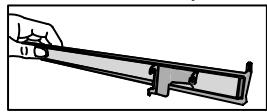
Oven accessories
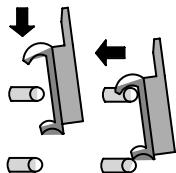
The oven can be provided with lateral guides fitted to the oven wall. Insert the grid and oven sheet provided on the lateral guides. To remove the guides proceed as follows for the two types:
To remove the lateral guides:
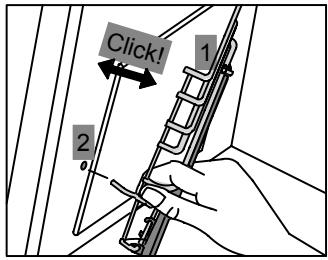
To remove the lateral telescopic guides:


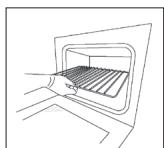
Cleaning
Before cleaning or performing maintenance, disconnect the oven from the power supply. To extend the life of your oven, it must be cleaned frequently, keeping in mind that:
- Do not use abrasive powders or corrosive substances which could ruin the surfaces.
- The inside of the oven should preferably be cleaned immediately after use, when it is still warm, with hot water and soap. The soap should be rinsed away and the interior dried thoroughly. Avoid using abrasive detergents (for example cleaning powders, etc.) and abrasive sponges for dishes
or acids (such as lime scale remover, etc.) as these could damage the enamel. If the grease spots and dirt are particularly tough to remove, use a special product for oven cleaning, following the instructions provided with the product. - If the oven is in use for an extended period of time, condensation may form. Once the oven has cooled, remove the condensation using a dry cloth.
- There is a rubber seal surrounding the oven opening which creates a heat seal. Check the condition of this seal on a regular basis. If necessary, clean it and avoid using abrasive products or objects to do so. Should it become damaged, please contact the customer services helpline. We recommend you avoid using the oven until it has been repaired.
- Never put aluminium foil at the bottom of the oven, as the build up of heat could compromise cooking and even damage the enamel.
-
Clean the glass door (5) using non-abrasive products or sponges and dry it with a soft cloth.
-
Open the door (5).
- Clean all oven accessories with warm water or washing up liquid and polish dry with a soft clean cloth.
- Clean the oven interior with a soft clean cloth.
- Wipe the front of the appliance with a damp cloth.
- Let the oven and all accessories dry well.
WARNING: Always switch off the electricity supply before carrying out maintenance work on the hood. In the event of a fault, contact customer services.
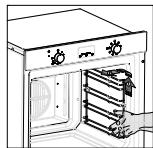
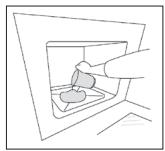
Oven cleaning system equipped with the AQUASMART SYSTEM
1 Take out the internal components: tray, screen, side screens.

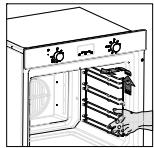
2 Pour 200ml of soapy water on the bottom of the oven.
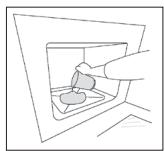
3 Turn on aQuoSmart and set the oven at 200^ for 15 minutes
4 Move the temperature control from 200^ to 0^ . Let the oven cool down for 20 minutes.
5 Move the AquaSmart function to 0. Wipe clean with a rag or soft cloth.
Replacing the oven light bulb
- Remove all pans and grills from inside the oven to easily access the lamp cover (3).
- Unscrew the glass cover and remove the old lamp. Dispose of it safely and ecologically.
- Insert a new G9 halogen lamp into the lamp holder. Note: Please do not handle the lamp with bare skin to avoid reducing its life. Use a cloth or tissue.
- Replace the lamp cover.

25 W, 300 °C, Tipo G9
WARNING! Ensure that the appliance is switched off and completely cool before replacing the lamp to avoid the possibility of electric shock or burns.
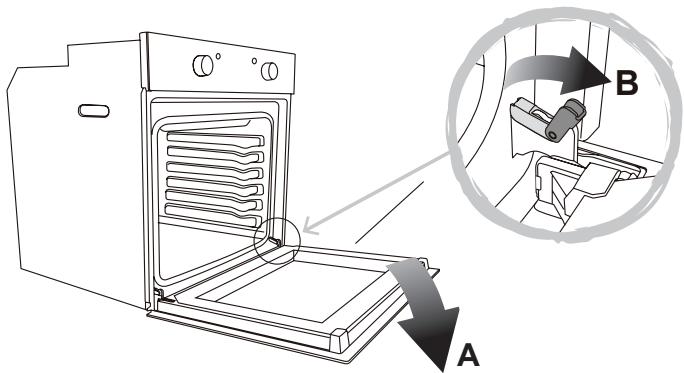
Removing the Door From the Oven
To simplify cleaning interior of the oven, the door (5) can be removed. Follow below steps to do so:
- Open the door (5) fully to position "A".
- Lift the two mobile links of the hinges to position "B".
- Close the door (5) to the half-way position.
- Lift the door (5) upwards and remove it by sliding the hinges outwards. Hold the door (5) by the sides close to the hinges when doing this.
After cleaning, replace the door (5) in the reverse order.
Removing the Rear Glass for Cleaning
- To simplify cleaning, the rear glass panel can be removed.
- After loosening 2 screws fixing the side supports of the glass, remove the supports and then the glass panel. Handle with care!
After cleaning, replace the glass panel in the reverse order. - Inner glass must be placed so that the "ok" is visible.
TROUBLE SHOOTING
| FAQS | Solution |
| What should I do if the oven does not heat up? | Check to see if one of the following actions resolves the issue: The oven may not be switched on. Switch on the oven. (→ Switching On/Off). Check to see if the required settings have been applied. A household fuse may have blown or a circuit breaker may have tripped. Replace the fuses or reset the circuit. If this happens repeatedly, call the Service Centre. |
| What should I do if, even though the oven function and temperature have been set, the oven does not heat up? | There may be problems with the internal electrical components. Call the Service Centre. |
| What should I do if I cannot change the set temperature? | Make sure to have used the temperature knob (→ Control elements). |
| What should I do if the oven light does not illuminate? | The oven light is faulty. Replace the oven light bulb (→ Replacing the oven light bulb). |
| The grill does not heat up properly? | The grill power is set too low. Turn the temperature control to a higher temperature. |
The oven can be provided with lateral guides fitted to the oven wall. Insert the grid and oven sheet provided on the lateral guides. To remove the guides proceed as follows for the two types:
Como desmontar as guias laterais:

Como desmontar as guias telescóicas:
Limpieza
CBETOBbIe INdNkaTopbI
① CBeTOB0 INHnIKaTOp «BKN./BbIKN»ДЯ paOToI peu N ee 3neKtpUeCKo TaNMepe. Korda duXOBka nOdknIOHeKa 3neKtpUeCKo CETn, CBeTOIoNDbI DmCnPei ByET BKnIOUeH NOcTOrHNO, I Tpu OcTaIbHbe FyHKuIN TaIMepa -OTKIOUeHb.IocNe BbIbopa FyHKuIN pIriTOBHeHIn N TeMpepaTyIpeHb HauHcT paOToTb 6e3 TaIMepa.
3TO CBETOBO INHINKATOP PNOJONKITeNBHOCTN PNPROTOBNEHNA, KOTOpbI NcPOnb3yETcA DnY YCTaHOBKn HUXHOI PNOJONKITeNBHOCTN BPEMEHN PNPROTOBNEHNA.
3TO CBETOBOINHdNkATOP OKOHuaHnI PPINTOBOBHeHn, KOITOpbI INcNoJIb3yeTcBMeCTe CO CBETOBbIM HdNkATOPOM npoDOnKHTenbHOCTn PPINTOBOBHeHn.
3TO CBeTOBO INHnKaTOp Ipocecca npiroTOBHeHnI, KOToPbI 3aRopaetc npn HArpeBaHm Neu. AnalorNHyBM O6pa30M, KOrda ney He HarpeBaETc, OH noracHT.
YctaHObKa yAcOB
UctaHOBka yacob no ymoJuaHHIO - 12:00; 3haueHne no ymoJuaHHIO dIJI npOdoJXKeJIbHOCTN pInrTOBHeHncoCTabJIeT 1 Yac, a 3haueHne no ymoJuaHHIO dIJI OKOHauHHn pInrTOBHeHn - 12:00.
Korda dYxOBka noDKnUeHa K 3JneKTPnuecko CetN, CBETODnHbI DnCnneI N ①6ydet BkIoueh NOCTOHHO, nocJe yero MOxHNo npCTynITb K HactpoKe Yacob. PpH haxaTmN KnaBnUn "OK", DnCnneI "Ac" HaCHET MIRatb.ДЯ yCTaHOBN HxHON UΦpbI HaxIMaTe KnaBnUn HaxMITE KnaBnUn "OK" eIe pa3, DnCnneI "Munhyta" HaHTet MIRatb.ДЯ yCTaHOBN HxHON UΦpbI HaxIMaTe KnaBnUn .ДЯ 3abepseHnHaCTPOKN eIe pa3 HaxMITE Ha "OK".
YcTaHOBka npoOJIknteJIbHOCt nPnIroTOBHeHnA
Hakimai Te Ha " OK " Do Tex nop, noka CBeTOBoi INDkaTOP npoONKInTebHOCTn npiroTOBHeH He 3arOpNTc n He hauHET MInrTa BMeCTe C dncPiJeem "Ac". HaxMITE KnaBUn < n > yCTaHObTE npoONKInTebHOCTb npiroTOBHeH Nacax. Choba haxMITE Ha "OK", dncPiEn "MinHyTa" hauHET MInrTaB.
Iocne yctaHOBKn npdoJXnteBHOCTn npoCecca npiroTOBHeNna HaxMnte eue pa3 Ha “OK”dIy IIOITBePckDeHH. Iocne yctaHOBKn Heo6xOIMbIX FyHKm npiroTOBHeNna N Tempeatypbl CBetOBOH INDkaTOp npdoJXnteBHOCTn npiroTOBHeNna 6ydet NOCTOHN BkLNouen,Ha DnCnnee 念 6ydet OToobpaKaTbC yCTaHOBHeHH na pdoJXnteBHOCTb npiroTOBHeNna, n HauHETcRa OBpaTHb OTcET BpemeHn.
Iocne doctnkeHn yCTaHOBJIeHHo npOdoJNKeTJIbHOCTn npiroTOBHeHn CBETOBOn HndkaTOp HaHTet Mrratb n 3ByKOBo CnHrAn np03ByuHT 10 pa3.NHdkaTOp OBlkIOuHTc. TaKIM o6pa3OM, 3Ta ney b6ydet OTKnUohemaOT 3ToN cyHKUn npn Haxatm Ha NIObY KnaBnSy, CBETOBBe INHdkaTOpbl nOrachyt, HcBTODINOHDom DInCnPee NoRbTcAcsbl, N oKOH 6yDet CBETNTbcra.
Ppimep 1: YcTaHObKa npoDoJIxHtEnbHocTn npriTOBJIeHn
Bpem 15:30, n Bam Hyxho yctahOBtB Bpem npirotoBneHn 2 yaca n 15 MmhyT.
HaximaiTe Ha "ok", noka n"1"Ha taimepe He hauhyt MiraTb. 3haeHne no ymoJuaHIO dI npOdoXniteBbHOCTn npiroTOBHeHnry - 1 lac, noka3aHnoe kak 1:00. IcnoNb3yIte>dnI n3MeHeHnra "1" Ha "2", n CHOba HaxmITE oK, - "00" Hauhet MiraTb. 3aTem nCNoB3yIte>dnI n3MeHeHnra "00" Ha "15", 3aTem cHOBA haxmITE Ha "oK" DnI npOTBePKeHnry UcTaHOBKn npOdoXniteBbHOCTn npiroTOBHeHnra 2 yaca 15 mHyT.
UcTaHOBnTe HuyKHyO fHyKmIO npriTOOBHeHn I TempeaTyp, ney BkIIOHTcra, Ha dncJIeE OTo6pa3NTc 2:15, n NaHHeTc oTCuET, a TaKke 3aropTcra CBetOBbIe INdIKaTOpbl 念 n ^ C (INdIKaTOp ^ C MoKet nepNoDInueckn BbIKNIOuaTbcR).
Korda npoIyT 2 yaca n 15 MNHT, ney BbIKJIOHTcN, n Ha DNCLJIe OTO6pa3NTcT EkyUeBpeM. INHdkaTOp NaHET MIRATb, 3ByKOBOI CnHaN IPO3ByNT 10 pa3, n INHdkaTOp ① Norachet. HaxmTe Ha NIObyo KlaBNIu, YTO6bl BbIITN n3 3ToI HAcTPOIKN, n DNCLJIe NepeKIIIOHTcN ha Yacbl. CBeTOBoi INHdkaTOp ① 3aropntc.
Ppimep 2: YctaHObKa ΦyHKcUN KOHc npriroTOBJIeHn
Bpme 15:30, n Bam Heo6xmo 3aokHHTb npoucc pnpiroTOBnE H B 17:30.
Haxmaite Ha "ok", noka 12"Ha taImepe He hauhyt MiraTb. IcnoIb3yIte >ДЯИЗMeHEna "12" Ha "17", И ChOBa Haxmite Ha "ok", -00" hauhET MiraTb. 3aTe mIcnoIb3yIte >ДЯИЗMeHEna "00" Ha "30", 3aTe ChOBa Haxmite "ok" ДЯ NOITBepKdEHHa YCTaHOBKn.
UctaHOBHTe HxHkyo fynKcIIO npriTOBHeHn I TeMnepaTpy, ney BkNIOHTcra, Ha nCnnee OTO6pa3NTc 15:30, n NaHnetc oTcHET, a TaKke 3aIoparTcBcTeOBbI eHdNKATOpbl C (HdNKatop C moKet nepioDnueckn BbIKJIOuHaTbc).
Korda hactynit 17:30, neyb bblknoHTcra, n HndnkaTOp 2HaHHeT mRaTb, 3ByKOBo CNrHaN npO3ByUT DecaTb pa3, n HndnkaTOp 6ydt BblnoyeH. Haxmnte Ha IIO6yI KlaBnUy, YTO6bI BblTN 3ToH hAcTpoKn, n HndnkaTOp 3aRopntcra.
PpIMep 3:YcTaHOBka 3aIepXKn PpIroTOBJIeHNs
Ceyac 8:00, n Bam Heo6xOIMo 3aKOHHTb npiroTOBHeHne B 16:00, n Bpemr npiroTOBHeHnroDolXHO COCTABTb 45 MNHyT.
Haxmnte Ha "OK", YTObIy UCTAHOBITb PpOJONKHTeJIbHOCTb BpeMeHN pPnIROTOBHeHry 45 MHyT B COOTBETCTBnC npUBeDeHHbIM bIe IpMepom. Haxmaite Ha " OK", Noka "12" Ha taImepe He hauHyT MnraTb. YctAHOBITE TaImeRHa 16:00, n Haxmnte Ha "OK" dIyNoTBePKeHJeHry. Ha dinCnIee OTObpaKaetcTe KyuIeBpeM. 3aTEM yCTAHOBITe HyKHHyO fYHKZIO npIROTOBHeN r Tempepatypy.
Ieub AToMaTHueckn BkJIouHITcB 15:15, n INHdNkaTOpb I , , nC3aRoprTcN (INHdNkaTOpCMOKET nepIOuHecKn BbIKJUOaTbcra). B 16:00 neyb nepectaHep raBoTaB, n Oba INHdNkaTOpa HauHyT MmRaTb, 3ByKOBO mIHnHaI npO3BuHT DecaTb pa3, n INHdNkaTOp ① norachet. HaxMnte Ha IIObyo KnaBnSy, YTObbl BbItn N3 3ToI HAcTpoKn, n INHdNkaTOp ①3aRopNTcN.
BHIMAHNE
- BbHmam DaBepu, CneIeNte 3a Tem, YToBb BmEcTe C DBePceE Bb He BByHIn CnCTemy 6bOKIpOBKn PeTeb, TAK KAK B 3OTM CUYae MEXAHm3M NeteJIbHOrO 3aTBopa pe3KO BepHeTcR B INCXoHoe IIOJKeHne.
Kateropueckn 3anpeuataertn oprpytaBdpey B Body.
TtobydaJIb6okObIe HanpaBnaHouIe:
ДяТOrO,УTObI ydJIaJIbT b6OKOBbIe HAnpaBJIouJIne IeCKOnJIueCckNx:

OuInCTka
Ipeed OuchKoH NnPiPoBeHeHem TexHnueckoro 6cnyXnBaHnO tKJIouaTe npi6Op ot nctOuHnKa nHTAHn.
YtobipnoDnntb cpoK cnykbo dyxohoro 0kaopa, peryIaRHO bInonHnTe Ounchky, yuTbBaJcneDuioee:
- He nCnoJIb3yIte abpa3nBbI InpoJok nn Koppo3nOHHO-AKTNBHbIe BeIecTBA, KOtOpblc MOrYT nobpeDITb NOBepxHocTN npu6opa.
- PekomeHdyetc OunuTaB BHyTpHenHe NOBepxHocTn DyXoBOr ShkaFa HEnOpceDCTBeHHO NoCne IcNoIb3OBAHnI Do TOrO, KaK OHN ycNEOT OCTbITb, IcNoIb3yra TropaYIO BDOy MblIO. CMOteMbINO BODOn HAcxyo BByTPnte BHyTpHenHe NOBepxHocTn. He IcNoIb3yTe abpa3INBhIE MoIOUne cpeDCTBa (HaNPImep, YNCTaUnn npOswok n T. d.), abpa3INBhie ry6kn dnynocydI KNCLOTHbI paCTBOpbl (HaNPImep, cpeDCTBa dlyaJe ydaJIeHnna HAKINN n T. d.), TaK KaK 3TO MOKeT
npuBecTN K NOBpexDeHIO 3MaJInpOBaHHo NOBepxHOCTN.ДЯ yCTpaHEnHcINbHbIX 3aRpy3HeHInCNoIb3yIte CneUaJIbHbIe YNCTaIuHcpeDcTBdJa Dny dYXOBbIX UkaΦOB, cJeDy npNJlaRaEmbIM K HmNHCTpyKUmaM. - Ecnn duyxoboi shkaΦ pa6oTaet B TeueHne npOIoXnTeJbHOrO BpeMeHN, MoKET o6pa3oBaTc8 KOHeHCat. I0xntecb, KOrda duyxoboi shkaΦ octbIeT, N BbITpIte o6pa3oBaBUnsC8 KOHeHCAT cyxoh TKaHbI.
- Duyxoboi ukaq hmeet pe3nHObI yNtOHTeB, kOTOpBI oOecneuBaET TENOn3oJIaIIO. PeryIpyH npOBepaIte coCToAHHe 3TOr OyNtOHTeN. OunlaeTyeNtOHTeNo MEpe HeoXoIMOCIn 6e3 nCnONb3OBAHNA abpa3nBbIX BeueCTB nII npEMeTob. B clyuae NobpexKeHry NpIoTHTeA oBpaNTeCB b LcHTp o6cnjxHBnHa Hn KIneHToB. He peKomeHdyetcna CnONb3oBaTb dYxoboi ukaF do BOCCTaHOBJeHn yNtOHTeJra.
- Hikorda He klaadte aIohmHneBvO foJbry Ha dNo dYXOBOro 6kaΦa, TAK KAKaKanJIbaeMOE TeNIO MOKET HeraTINBHO NOBnAytb Ha IPOcEe IpiRTOBHeHn IiUsn I daKe NObpeDITb 3MaJInpOBaHHyIO NOBepxHocTb.
-
Ounuata Te cTeKJIaHHyD BepeUy (5) C nOMOuBcpeDCTB nIIN r6oK, He coepkaux abpa3nBhie BueeCTBa, n Hacyxo npotnpaTe MraKo TkAhbio.
-
OtkpoiTe DBepu (5).
- Ouchntte Bce De TaJIIN DUYXOBORO UkaPc a NcNoJIb3OBAHnEM TeIIOB BOIy IJIIM MOIOe JxNIOKCTN Hacyxo IpOTpITe MRAKOJ YICTOJ TKAHbI.
- Ouchntte BHTpeHHne NOBepxHOCTn DyXOBOrO shka c NOMOulbMO MrgKo YNCTO TKAHn.
- Постпге Лицевю поворховсь ппбора влжног Тканью.
5.Octabte dyxoboi uka do nonHoro BbcbixaHn BCex nobepxHOCTe.
IPEyIPEXJEHNE. Bceda omknouaume 3neKmponumahue npu npoebeHu pa6om no mexnueckomy obcnyxuehuro dyxOBO2O wkafa. Ppu ohnapykeHu u Henoiaok obspamumecb e LcHMP obcnyxuehua Kluehmoe.
OuHCTKA IyXOBbIX ⅢKAFOB, OBOPYIOBAHHbIX CNTTEMOI AQUASMART
1OCTaB npHaIeJXHocTn n3 DuyxOBoro 1ka: noDOnH,peWetKy, bokOBbIe peWetKn.

2 Hanitb 200 mJ BObl C MOUcIM cpeCTBOM Ha dHO dyxoBoro ukaqpa.
3 Bклочь aQuaSmart Teyehne 15 MInHyT npn TempepaType 200^
3aMeHa IaMnbl DyXOBORo 1kaΦa
- BbIbTe n3 BHyTpHHeRo npoctpaHCTBa dYxOBOro 1kaFaB Ce npOTNBn I peWetKn, YTObbl noJyUHb CBO6OHNbI DoCTyn K 3aunTHoN KpbIwke lamnbI (3).
- OTKpyTNTe 3aunTHyU CTeKJIaHHyU KpbIuKy I N3BNeKInTe CTapYU IaMny. YtJIN3nPyIte ee COOTBETCTBYUOUM O6pa3OM.
BCTabbTe B natoHOByU ranoReHOByU JAmny G9. PpImeuaHne. He npKacaiTeCb K JAmne roIbIM pykamn, YTO6bl npedOTbpaTb CokpaueHne cpoKa ee cnjxkbI. IcnoJIb3yJTe TkaHb IINI caIqfeTKN. - YctaHOBInTe KpbIiKy IaMnbl.
IPEyIeHNE! 6edumecb, ymo npubop nonhocmbo ocbbl, u omknluoyume e2o om cemu, npexde yem npucmynumb K 3aMeHe lambl, ymo6bl u36eXamb pucka nopaxehnur 3neKmpueckum mokom unu noJyuHnur oko206.
25 W, 300 °C, Tipo G9
YctpaHHe HeNCpBaBHOCTe
- Warning: All installation work must be carried out by a suitably qualified person, strictly following local building regulations and these instructions.
- SAFETY
- INSTALLATION
- Direct Connection
- Warning: This is a Class i appliance and MuST be earthed.
- BEFORE YOU START
- Switching on / off
- Control panel with 3 knobs
- Control panel with display
- Before first use
- The Indicator lights
- Setting the clock
- Setting cooking duration
- Setting the end cook function
- Setting delayed cooking
- Example 1: Setting cooking duration
- Example 2: Setting the end cook function
- Example 3: Setting delayed cooking
- Oven accessories
- Cleaning
- Oven cleaning system equipped with the AQUASMART SYSTEM
- Replacing the oven light bulb
- Removing the Door From the Oven
- Removing the Rear Glass for Cleaning
- TROUBLE SHOOTING
- Limpieza
- CBETOBbIe INdNkaTopbI
- YctaHObKa yAcOB
- Ppimep 1: YcTaHObKa npoDoJIxHtEnbHocTn npriTOBJIeHn
- Ppimep 2: YctaHObKa ΦyHKcUN KOHc npriroTOBJIeHn
- PpIMep 3:YcTaHOBka 3aIepXKn PpIroTOBJIeHNs
- BHIMAHNE
- OuInCTka
- OuHCTKA IyXOBbIX ⅢKAFOB, OBOPYIOBAHHbIX CNTTEMOI AQUASMART
- 3aMeHa IaMnbl DyXOBORo 1kaΦa
Brand : CATA
Model : CME6106X
Category : Built-in oven