USER MANUAL CL-E300 CITIZEN
LINE THERMAL PRINTER
MODEL CL-E300/CL-E303/
CL-E300EX/CL-E303EX
User's Manual
If you want to dispose of this product, do not mix it with general household waste. There is a separate collection systems for used electronics products in accordance with legislation under the WEEE Directive and is effective only within European Union.
Ge
Compliance Statement for European Users
CE marking shows conformity to the following criteria and provisions:
Low Voltage Directive (2014/35/EU), EMC Directive (2014/30/EU), and RoHS directive (2011/65/EU)
Full text of the EU declaration of conformity is available at the following internet address:
http://www.citizen-systems.co.jp/en/printer/download/eu_doc.html
FCC Compliance Statement for American Users
This equipment has been tested and found to comply with the limits for a Class B digital device, pursuant to Part 15 of the FCC Rules.
These limits are designed to provide reasonable protection against harmful interference in a residential installation. This equipment generates, uses and can radiate radio frequency energy and, if not installed and used in accordance with the instructions, may cause harmful interference to radio communications.
However, there is no guarantee that interference will not occur in a particular installation. If this equipment does cause harmful interference to radio or television reception, which can be determined by turning the equipment off and on, the user is encouraged to try to correct the interference by one or more of the following measures:
Reorient or relocate the receiving antenna.
- Increase the separation between the equipment and receiver.
- Connect the equipment into an outlet on a circuit different from that to which the receiver is connected.
- Consult the dealer or an experienced radio/TV technician for help.
Pursuant to FCC regulations, you are cautioned that any changes or modifications not expressly approved in this manual could void your authority to operate this equipment.
Sicherheitshinweis
EMI Compliance Statement for Canadian Users
This Class B Information Technology Equipment (ITE) complies with Canadian CAN ICES-3(B)/NMB-3(B).
This equipment generates and uses radio frequency energy and if not installed and used properly, that is, in strict accordance with the manufacturer's instructions, may cause interference to radio and television reception. This Information Technology Equipment (ITE) does not exceed the Class B limits for radio noise emissions from digital apparatus set out in the Radio Interference Regulations of the Canadian Department of Communications. This equipment is designed to provide reasonable protection against such interference in a residential installation.
However, there is no guarantee that interference will not occur in a particular installation. If this equipment does cause interference to radio or television reception, which can be determined by turning the equipment off and on, the user is encouraged to try to correct the interference by one or more of the following measures:
Reorient or relocate the receiving antenna.
- Increase the separation between the equipment and receiver.
- Connect the equipment into an outlet on a circuit different from that to which the receiver is connected.
- Consult the dealer or an experienced radio/TV technician for help.
- Before using this product, be sure to read through this manual. After having read this manual, keep it in a safe, readily accessible place for future reference.
The information contained herein is subject to change without prior notice.
- Reproduction or transfer of part or all of this document in any means is prohibited without permission from Citizen Systems.
- Note that Citizen Systems is not responsible for any operation results regardless of omissions, errors, or misprints in this manual.
- Note that Citizen Systems is not responsible for any trouble caused as a result of using options or consumables that are not specified in this manual.
- Except explained elsewhere in this manual, do not attempt to service, disassemble, or repair this product.
- Citizen Systems Japan Co., Ltd. shall not be liable for damages caused by improper or incorrect usage or by the usage environment.
- Data is basically for temporary use and not stored for an extended period of time or permanently. Please note that Citizen Systems is not responsible for damage or lost profit resulting from the loss of data caused by accidents, repairs, tests or other occurrences.
- If you find omissions, errors, or have questions, please contact your Citizen Systems dealer.
NOTICE
IN NO EVENT SHALL CITIZEN (INCLUDING ANY OF ITS PARENT, SUBSIDIARY OR AFFILIATED COMPANIES) BE LIABLE TO PURCHASER OR OTHERS FOR ANY COLLATERAL, CONSEQUENTIAL, INDIRECT, INCIDENTAL, GENERAL OR EXEMPLARY DAMAGES, INCLUDING WITHOUT LIMITATION ANY DAMAGES INCurred AS OR IN CONNECTION WITH ANY LOSS OF USE, DATA, REVENUES OR PROFITS, ARISING OUT OF OR CONNECTED IN ANY WAY WITH THE PURCHASE OR USE OF ITS PRINTER PRODUCTS (INCLUDING PARTS, SUPPLIES, SOFTWARE, FIRMWARE, OR OTHER ITEMS OR SERVICES SOLD OR LICENSED BY IT), HOWSOEVER ARISING AND REGARDLESS OF THE FORM OF ACTION (INCLUDING NEGLIGENCE) AND WHETHER CITIZEN HAS BEEN INFORMED OF THE POSSIBILITY THEREOF.
WARRANTY: TERMS AND CONDITIONS OF ANY WARRANTY APPLICABLE TO THIS AND OTHER CITIZEN PRODUCTS, TOGETHER WITH OTHER USEFUL INFORMATION ABOUT CITIZEN PRODUCTS AND SERVICES, CAN BE FOUND AT THE CITIZEN (U.S./CSA) WEBSITE:
https://www.citizen-systems.com/us/
THE WARRANTY, IF ANY, APPLICABLE TO ANY CITIZEN PRODUCT AND SERVICE SHALL BE THAT OF THE APPLICABLE CITIZEN SELLING ENTITY, IN EFFECT ON THE DATE OF PRODUCT OR SERVICE PURCHASE.
Use of the Made for Apple badge means that an accessory has been designed to connect specifically to the Apple product(s) identified in the badge and has been certified by the developer to meet Apple performance standards.
Apple is not responsible for the operation of this device or its compliance with safety and regulatory standards.
Please note that the use of this accessory with an Apple product may affect wireless performance.
- CITIZEN is a registered trademark of Citizen Watch Co., Ltd.
- QR Code is a registered trademark of DENDSO WAVE INCORPORATED.
- Ethernet is a registered trademark of Fuji Xerox Corporation.
- Bluetooth® is a registered trademark of Bluetooth-SIG Inc.
- Android is registered trademarks of Google Inc, in the United States and/or other countries.
- Datamax® is a registered trademark of Honeywell International Inc.
- Maxi Code is a registered trademark of UPS.
- Zebra®, Eltron®, ZPL2™, and EPL2™ are registered trademarks of ZIH Corp., USA
- PDF417 is a trademark or registered trademark of Motorola, Inc. in the U.S. and other countries.
- TrueType™ is a trademark of Apple Inc.
- All other trademarks are the property of their respective owners.
- Citizen Systems use these trademarks in accordance with the license of relevant owners.
Copyright© CITIZEN SYSTEMS JAPAN CO., LTD. 2020
SAFETY PRECAUTIONS...WHICH SHOULD BE STRICTLY OBSERVED
Before using this product for the first time, carefully read these SAFETY PRECAUTIONS. Improper handling may result in accidents (fire, electric shock or injury). In order to prevent injury to operators, third parties, or damage to property, special warning symbols are used in the User's Manual to indicate important items to be strictly observed.
- After having read this Manual, keep it in a safe, readily accessible place for future reference.
- Some of the descriptions contained in this manual may not be relevant to some printer models.
The following describes the degree of hazard and damage that could occur if the printer is improperly operated by ignoring the instructions indicated by the warning symbols. Be sure to read this information carefully.

WARNING
Neglecting precautions indicated by this symbol may result in fatal or serious injury.

CAUTION
Neglecting precautions indicated by this symbol may result in injury or damage to property.

This symbol is used to alert your attention to important items.
| Warnings |
| WARNING |
| ■Do not perform any of the following actions as they may result in damage or malfunction of the device, overheating, the generation of smoke, fire, or electric shock. If the device is damaged or defective, turn off the power, dis- connect the power plug from the electrical outlet, and contact your retailer.
·Do not step on, drop, hit, or otherwise subject the device to significant force or impact.
·Do not use the device in environments of poor ventilation or in a manner that blocks device vents.
·Do not use the device in environments, such as laboratories, where chemical reactions occur or environments exposed to air that contains salt or toxic gases.
·Use the device in environments at specified power supply voltage and frequency (100 to 240 V and 50/60 Hz).
·Do not connect or disconnect the power cord or an interface cable by holding the cable itself. Do not pull or carry the device while cables are under load.
·Do not drop or insert small objects such as clips or push-pins into the device.
·Do not connect too many power cords to a single electrical outlet.
·Do not spill tea, coffee, juice, or other beverages onto the device. Do not subject the device to insecticides. If liquid is spilled onto the device, turn off the power, disconnect the power plug from the electrical outlet, and contact your retailer.
·Do not disassemble or modify the device.
·Do not use non-specified AC adapters.
·Use only the included power cord. Do not use the included power cord with other devices.
·Do not use deformed or damaged power cords.
·Do not unnecessary process power cords.
■Exposed wire due to damaged power cords or melted sheaths may cause current leakage, malfunction, or electric shock. Contact your retailer if the power cord becomes damaged.
·Do not place objects around the power plug. |
| PRECAUTIONS IN HANDLING THE PRINTER |
| CAUTION |
| Caution label is attached in the position shown in the following figure. Carefully read the handling precautions before using the printer. |
| These labels indicate that the head becomes hot, so touching it may cause burns, and touching the auto cutter and manual cutter when opening the paper cover may cause cuts on hands. |
- Do not touch the area around the thermal head during or right after the printing process. This area will be hot and may cause burns.
- Do not drop or insert small objects such as clips or pins into the printer. Doing so may result in failure.
- Exercise caution when carrying or transporting the device. Dropping the device may damage other objects or cause injury.
- Make sure to open the printer cover fully when it needs to be opened. Failure to do so may result in the printer closing unexpectedly, which may cause injury.
- Exercise caution when the printer cover is open. Contact with edges may result in injury.
- Do not open the printer cover while the printer is printing.
- Do not use thinner, trichlene, benzene, ketone-based solvents, or cleaning cloths with chemicals to clean the case surface.
- Do not use the device in environments exposed to significant levels of oil, metal shavings, waste, and dust.
- Do not spill liquids onto the device or expose the device to spray chemicals.
- Do not step on, drop, hit, or otherwise subject the device to significant force or impact.
- Make sure to use the control panel correctly. Pressing buttons randomly may cause malfunction and even failure. Do not use sharp objects including tips of pens to operate the control panel.
- If some abnormality occurs during use, immediately stop using the device and disconnect the power plug from the electrical outlet.
- Do not disassemble the device for repairs in case of failure. Always contact the dealer for repairs.
- The auto cutter has internal blades near the media discharge port. Never insert hands inside the media discharge port whether the printer is operating or not.
- There is a risk of the thermal head being damaged by static electricity. Take measures to prevent the charging of static electricity in advance, and do not directly touch the thermal head heating element and connector terminal parts when handling the printer.
- Clean the platen regularly because printing or cutting at the correct position may become impossible if it is dirty.
| PRECAUTIONS ON PRINTER INSTALLATION |
| CAUTION |
| ·Do not use or store the device in environments exposed to excessive heat, moisture, direct sunlight, near heaters, extremely high or low altitudes, excessive humidity, or excessive dust.
·Do not use the device in environments, such as laboratories, where chemical reactions occur.
·Do not use the device in environments exposed to air that contains salt or toxic gases.
·Place printers on level, stable surfaces in environments with good ventilation. (Do not place the printer such that the vents are against walls.)
·Do not place objects on top of the device.
·Using the device near radios or televisions or plugging the power cord into the same electrical outlet as used by such devices may cause reception interference.
·Use the device in environments at specified power supply voltage and frequency.
·Use only the included power cord. Do not use the included power cord with other devices.
·Do not place objects or step on power cords.
·Do not pull or attempt to carry the device by the power cord or an interface cable.
·Do not connect too many power cords to a single electrical outlet.
·Do not bundle the power cord.
·Hold the power cord by the power plug to connect and disconnect to/from electrical outlets.
·Ensure connectors are properly connected. In particular, reversing the polarity may damage internal parts.
·Turn the power switch off before connecting or disconnecting interface cables.
·Do not run long signal lines or make connections with noisy devices to the extent possible. If necessary, use shielded twisted pair cables for signal lines and take any other necessary steps to ensure signal integrity.
·Place the device near an electrical outlet and ensure that the power plug can be unplugged easily so that the power to the device can be cut quickly if necessary.
·Use electrical outlets with ground terminal screws. Using electrical outlets without ground terminals may result in injury due to static electricity.
·Do not install the printer in a location where there is vibration or in an unstable location. |
THE TABLE OF CONTENTS
1. GENERAL OUTLINE 14
1.1 Features 14
1.2 Unpacking 16
1.3 Model Classification 17
2. Part Names and Function 19
2.1 Front of Printer 19
2.2 Operation panel 22
2.3 FEED Key Operation Depending on Printer Status 23
2.4 Rear of Printer 24
2.5 Inside of Printer 26
3. SETUP 29
3.1 Printing Preparation Process 29
3.2 Loading Paper 30
3.3 Adjusting Media Sensor Positions 54
3.4 Connecting the AC Adapter 56
3.5 Connecting the Printer to a Host Computer 58
3.6 Connecting with a Peripheral Device 60
3.7 USB Power Supply Port 61
3.8 Install the Printer Driver 62
4. Configuring Printer Settings Using the Specialized Utility......63
4.1 List of Settings 64
4.2 Obtaining the LabelPrinterUtility 72
4.3 Using the LabelPrinterUtility 72
5. Configuring the Wired LAN Network Settings Using the Utility Software 73
5.1 Network Seeker 73
5.2 NetToolK 76
6. Configuring Printer Settings Using LinkServer 82
6.1 LinkServer user roles 82
6.2 LinkServer menu configuration 83
6.3 LinkServer connection procedure 84
7. Configuring the Printer Using the Operation Panel 88
7.1 Sensor Adjustment Mode 90
7.2 Test print mode 92
7.3 Configuration Print Mode 94
7.4 Emulation switching mode 95
7.5 HEXDumpMode 96
7.6 Initialization Mode 97
8. Online Configuration Mode 99
9. Clearing Jobs Stored in the Printer 100
10. Cutter manual operation mode 100
11. Maintenance 101
11.1 Plastic Surface of Printer and Platen 102
11.2 Thermal head 102
11.3 Peeler 102
12. Appendices 103
12.1 Error/Alarm Indications 103
12.2 Troubleshooting 105
12.3 Basic Specifications 108
12.4 Usage Conditions 121
12.5 Storage Conditions 121
12.6 Interfaces 122
1. GENERAL OUTLINE
Thank you for purchasing the Citizen Systems Line Thermal Printer CL-E300 / CL-E303 / CL-E300EX / CL-E303EX.
This printer is a line direct thermal printer developed for labels, tags, tickets, and many other applications.
1.1 Features
< Compact and Stylish Design >
- Boasting the smallest footprint in the industry, this printer was designed to be compact to free users from placement restrictions.
- The stylish design enables the device to be used in different environments.
- Exterior color options include black and pure white.
- This printer utilizes the direct thermal method and a thermal print head and includes a 32-bit RISC CPU with a maximum operating frequency of 216MHz and thermal history control to provide high-speed, high-quality performance up to 8 IPS with the CL-E300/CL-E300EX model and up to 6 IPS with the CL-E303/CL-E303EX model.
< Adjustable Sensors Provided as Standard >
- Adjustable media/black line sensors are provided as standard so that the detection position can be adjustable horizontally. This enables sensors to be placed at detection positions suitable for different types of media.
- Standard interfaces include a 9-pin, DSUB RS-232C interface, full-speed USB 2.0 port, and an Ethernet port that supports 10BASE-T and 100BASE-TX. These interfaces enable high-speed connections to many peripheral devices (CL-E300/CL-E303).
- Support is available for RS-232C, Bluetooth, wired LAN, wireless LAN (2G/5G), and wired/wireless LAN interface with USB host thanks to an interchangeable interface board (CL-E300EX/CL-E303EX).
- XML print functions are provided for the wired/wireless LAN interface (CL-E300EX/CL-E303EX).
- Manual media cutters are installed at the top and bottom of the media discharge port to cut media after being printed for better usability in many different environments.
- The operation panel has been designed to have a different color than the main exterior color for better visibility and stress-free operation.
- Thermal heads and platen rollers can be easily replaced without the use of tools.
- Use the LabelPrinterUtility developed by Citizen to configure printer settings from a host computer.
- The built-in LinkServer™ printer tool can be used over wired LAN or USB connections (Android device) to change settings and perform other operations (CL-E300/CL-E303).
- Printer includes functionality to enable users to quickly adjust head balance.
< Models with cutter, models with peeler and models with AC adapter storage case are available >
- Models equipped with an auto cutter and models equipped with a peeler are also available.
- The auto cutter models that are available include the integrated fixed blade/adjustable blade model1 and the interchangeable fixed blade/adjustable blade model2.
- Models that allow you to store the AC adapter at the bottom of the printer are also available.
1.2 Unpacking
Make sure the following items are included with your printer.
| NAME | Exterior appearance |
| Printer | Standard model and optional interface model |
| Model with AC adapter storage case |
| Integrated cutter model |
| Separable cutter model |
| Peeler model |
| AC adapter | * All models except models with an AC adapter storage case |
| AC cord | |
| Media shaft | |
| Media shaft guide | |
| USB cable | |
| CD-ROM | |
| Quick Start Guide
Safety Instructions | |
1.3 Model Classification
Model numbers indicate printer features according to the following system.
- Model name
CL-E300:203 DPI
CL-E303:300 DPI
CL-E300EX:203 DPI
CL-E303EX: 300 DPI
- Fixed value
- Market
A: Asia
C: China
E: Europe
U: North America
- Body case color
B:Black
W: Pure white
- Interface
CL-E300/CL-E303
N: USB port, wired LAN, and serial port
CL-E300EX/CL-E303EX
RS: Serial RS-232C
BT:Bluetooth
ET: Wired LAN
HET: Wired LAN + USB host
WX2/WX5: Wireless LAN (2.4G/5G)
HWX5: Wireless LAN + USB host
NN:USB
- Cutter/Peeler
N: None
BC: Integrated cutter
PC: Separable cutter
PE: Peeler
- AC adapter storage case
A: Not available
S: Available
Certain combinations may not be available. Please contact us for inquiries on desired configurations.
2. Part Names and Function
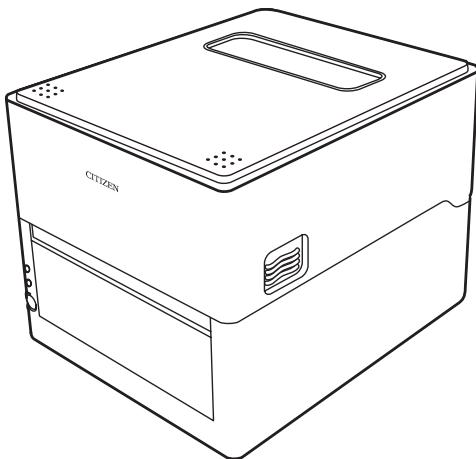
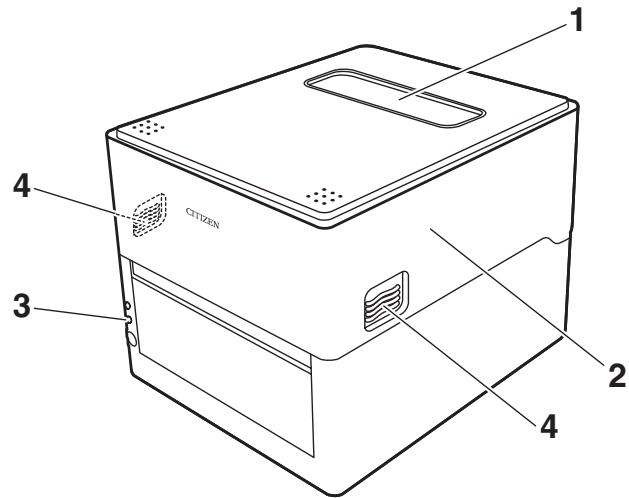
2.1 Front of Printer
Standard model and optional interface model
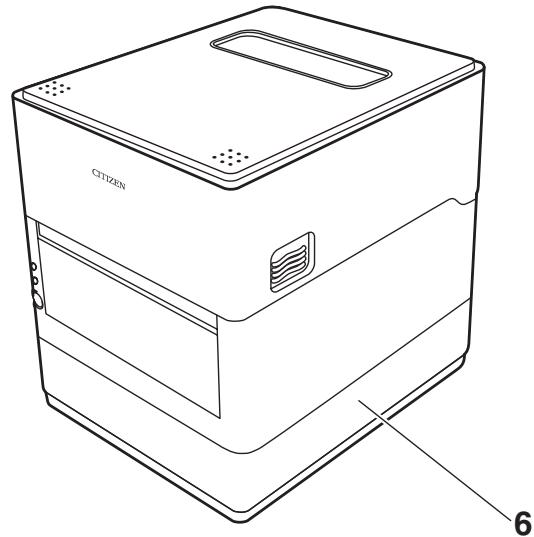
Model with AC adapter storage case
- The figure illustrates the standard model with AC adapter case.
Integrated cutter model
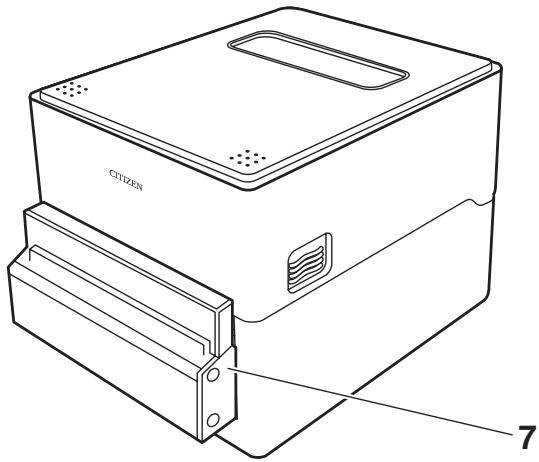
Separable cutter model
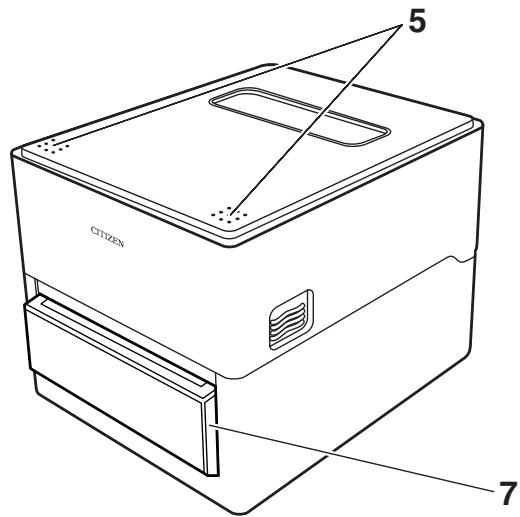
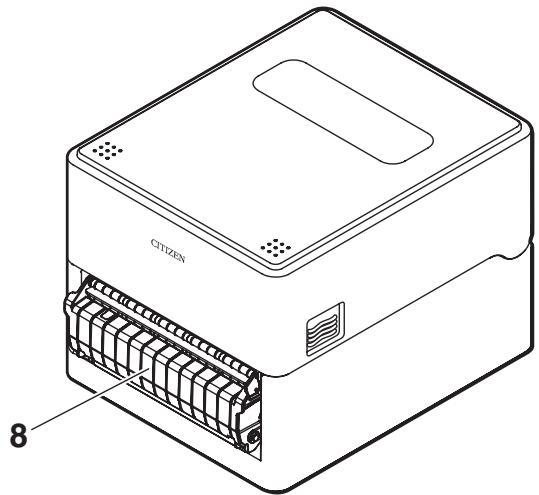
- Media window
Enables users to check the media level.
- Top cover
Opens upward so users can replace or set media.
- Operation panel
Includes 2 LEDs and 1 key.
Enables users to perform different printer operations and check printer status.

Refer to 2.2 Operation panel
- Cover release buttons
The cover is opened by pressing the buttons on both the right and left sides.
- Push marks
- AC adapter case
- Auto cutter
- Peeler
2.2 Operation panel
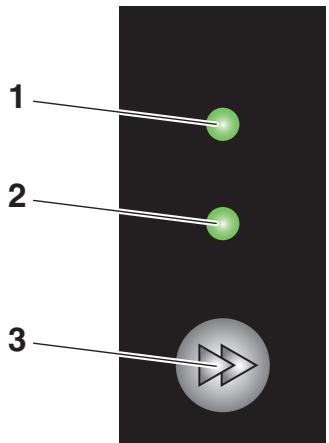
The operation panel includes 2 LEDs and 1 key.
- Power LED
Turns on when the power is turned on and turns off when the power is turned off.
- Status LED
Turns on or flashes in green, red, and amber depending on the printer status.
| Color | Lights/ flashes | Status |
| Green | On | Printer is online |
| Flashes | Receiving data |
| Amber | On | Startup |
| Red, green, amber | Flashes | Error or alarm |
| - | Off | Paused |
- FEED key
2.3 FEED Key Operation Depending on Printer Status
Startup
Turning on the power to the printer while pressing and holding the FEED key with the cover closed changes starts the printer in the special function mode.

Refer to 7. Configuring the Printer Using the Operation Panel
Online state (status LED is solid green)
(1) Press the FEED key while the printer is not receiving data to feed media.
- If label media is specified, the printer automatically stops after detecting the beginning of media. If continuous media is specified, the printer stops after a certain amount of feed operation.
- If Tear off mode is selected in the Function Select setting, the printer feeds media to the tear-off position.
- For models with a cutter, the printer will feed media to the cut position and then cut the media.
(2) Press and hold the FEED key for at least 3 seconds while the printer is not receiving data to change the operation mode to the online configuration mode.

Refer to 8. Online Configuration Mode
(3) Continue to press and hold the FEED key for about another 5 seconds without releasing it so that the buzzer emits 4 tones and the cut operation is performed once. This function is enabled for only the integrated cutter.
Printing (status LED is solid or flashing in green)
Press the FEED key while the printer is printing or receiving data to pause the printer.
The status LED turns off, and the printer pauses.
- If the FEED key is pressed while the printer is printing, the printer will finish printing the current label and then stop.
Press the FEED key again to resume printing operation for the remaining labels in the print job.
Paused (status LED is off)
Press and hold the FEED key to change to the clear job mode.

Refer to 9. Clearing Jobs Stored in the Printer
Error/alarm has occurred (status LED flashes in red, green, or amber)
Press the FEED key to clear the error or alarm.
2.4 Rear of Printer
Standard model
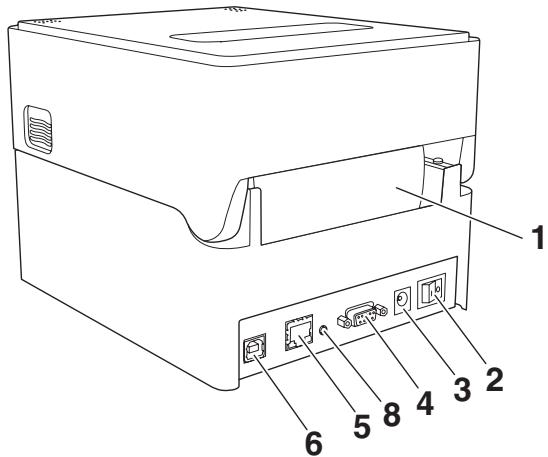
Model with AC adapter storage case
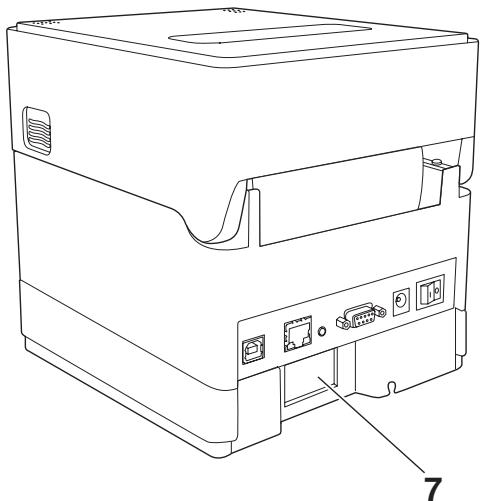
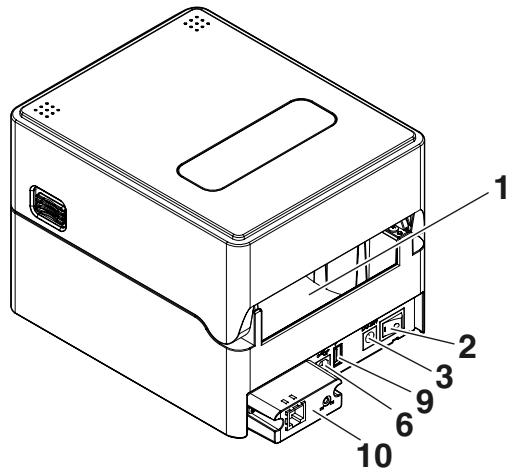
- External media feed port This port is used to feed media into the printer.
- Power switch Turns the printer power supply on and off.
- DC jack Connects to the included AC adapter.
- Serial interface (9-pin D-SUB male)
- Ethernet Interface
- USB interface
- AC port
- Panel button This button prints and initializes network settings.
- USB power supply connector Supplies power to USB devices.
- Interface connector (Wired LAN, etc.) Connect to the interface cable.

CAUTION
Do not connect a USB cable to the Ethernet interface. Doing so may damage connectors/interfaceres.
2.5 Inside of Printer
Standard model and optional interface model
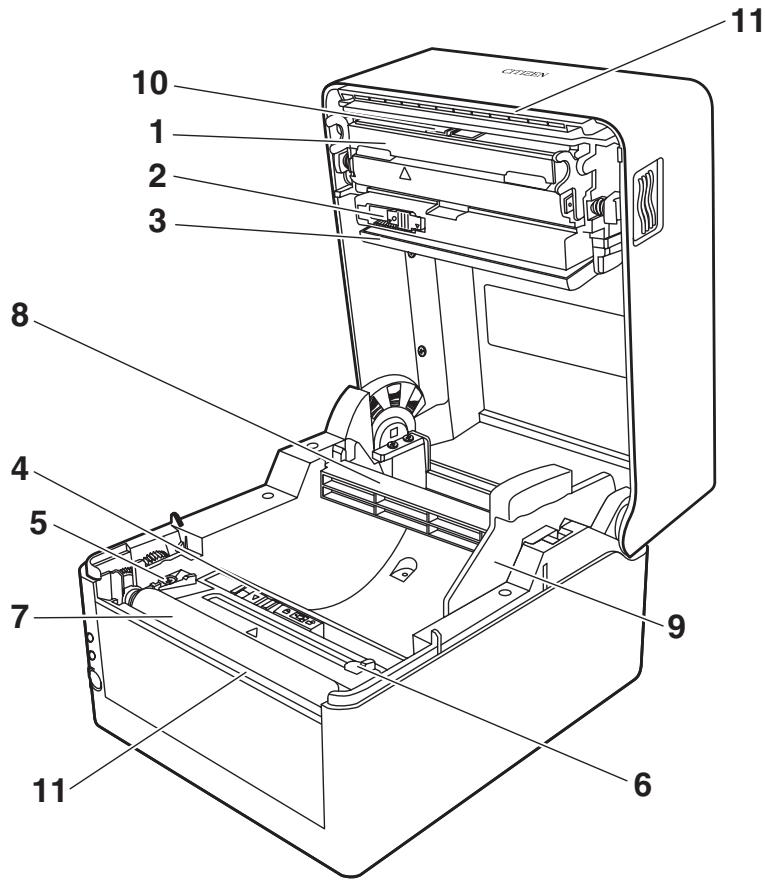
Integrated cutter model
Separable cutter model
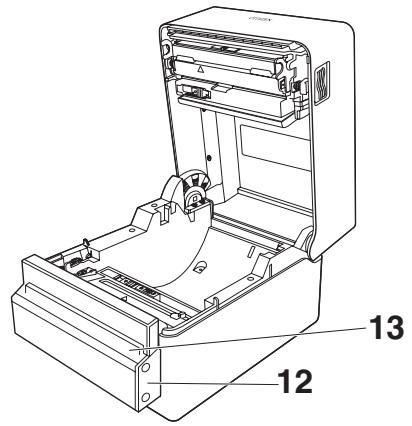
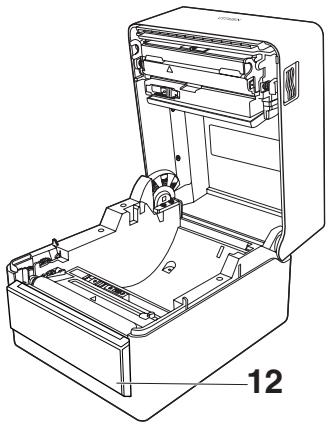
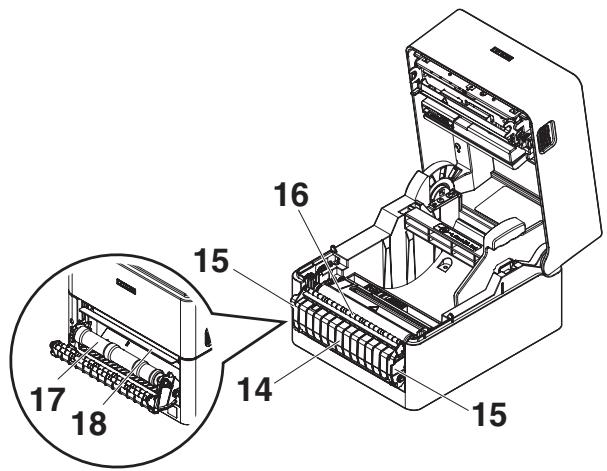
Peeler model
- Thermal head
Prints characters and graphic data on paper (paper rolls).
- Upper sensor
This sensor detects the media position.
- Media damper
When using roll media, absorbs tension generated by media feed operations to prevent print errors.
- Bottom sensor
This sensor detects the media position.
Devices are equipped with lock mechanisms.
- Fixed left-side media guide
- Adjustable right-side media guide
- Platen roller
This roller transports media.
- Media shaft
-
Media shaft guide
-
Head balance adjustment slider
- Manual cutter (Upper/Bottom)
12.Auto cutter
- Media discharge port
14.Peeler cover
15.Opening handle
- Media hold-down bar
17.Peeler roller
- Peeling plate
3.1 Printing Preparation Process
The printer must be set up according to the following process before printing can be performed.
Refer to the description of each section for detailed information on each step of the process.
- Unpack and check the package contents

Refer to 1.2 Unpacking
- Physical installation
- Loading Media

Refer to 3.2 Loading Paper
- Adjusting Media Sensor Positions

Refer to 3.3 Adjusting Media Sensor Positions
- Connecting the AC Adapter

Refer to 3.4 Connecting the AC Adapter
- Connecting the Printer to a Host Computer

Refer to 3.5 Connecting the Printer to a Host Computer
- Operation Check

Refer to 7.2 Test print mode
- Installing the Printer Driver onto the Host Computer

Refer to 3.8 Install the Printer Driver
- Installing the Configuration Application onto the Host Computer

Refer to 4.2 Obtaining the LabelPrinterUtility
- Printing
Perform a test print from the printer driver installed on the host computer.
3.2 Loading Paper
Loading roll media (Standard model and cutter model)
- Press the cover release buttons on both the right and left sides to open the top cover.

CAUTION
Note the following precautions when the top cover is open.
- Do not touch the thermal head.
-
Do not touch the cutter blades.
-
Insert the media shaft through the core of the media roll and then install the media shaft guide.
-
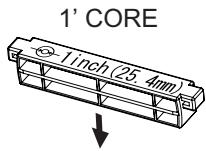
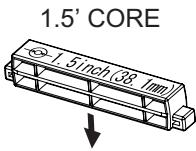
The media shaft is designed to accommodate both 1-inch and 1.5-inch media roll cores by flipping it upside down. The media shaft has markings indicating which side supports the different core sizes. Select the media shaft orientation in accordance with the size of the media roll core.

CAUTION
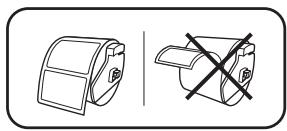
- Use media rolls that have the print surface on the outer side. Do not use media rolls that have the print surface on the inner side. Labels may peel when such media roll is back-fed.
-
If the media shaft is not installed correctly, the top cover or bottom of the printer will prevent media from feeding properly and cause paper jams.
-
Set the media so that the media shaft guide is on the right side of the media when looking at the front of the printer.
-
Press the media shaft guide onto the media roll so that the center of the media aligns with the center of the media shaft and then set the media into the printer.
-
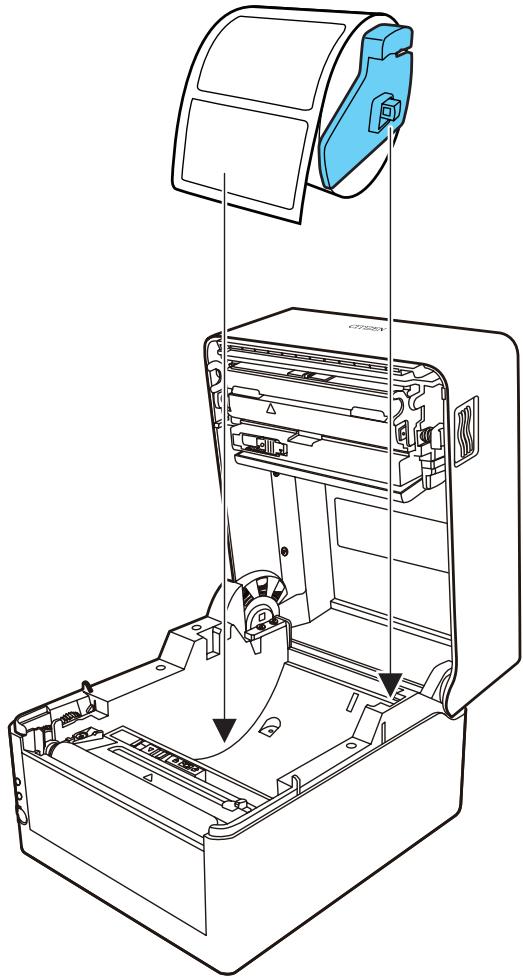
Assemble the media shaft and media shaft guide.
- Insert the media shaft through the core of the media roll and then set the assembly into the printer.
- Set the media in the printer and slide the media to the left from the perspective of looking at the front of the printer. Insert the media shaft guide into the paper at this position.

CAUTION
Too much abutment force by media shaft guide may cause improper feeding of media, which may negatively impact print quality.
- If using an integrated cutter model, insert the media through the cutter slit.
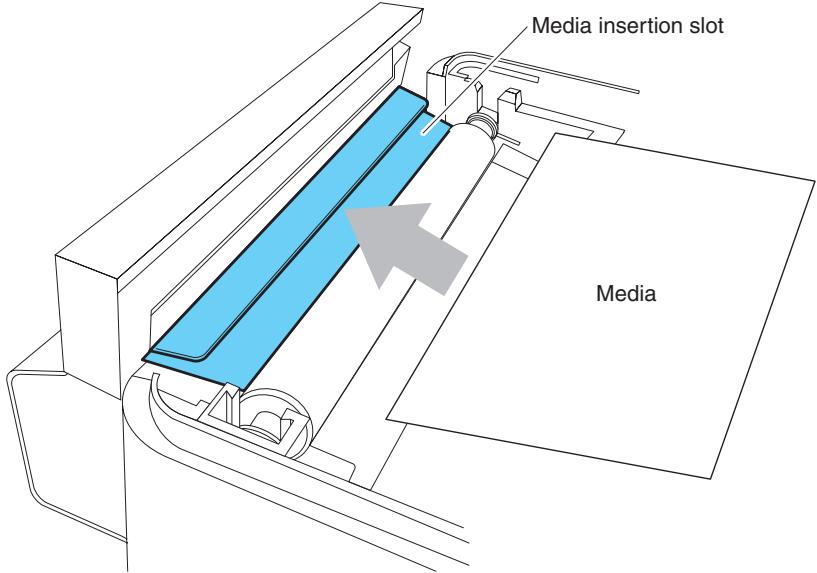

CAUTION
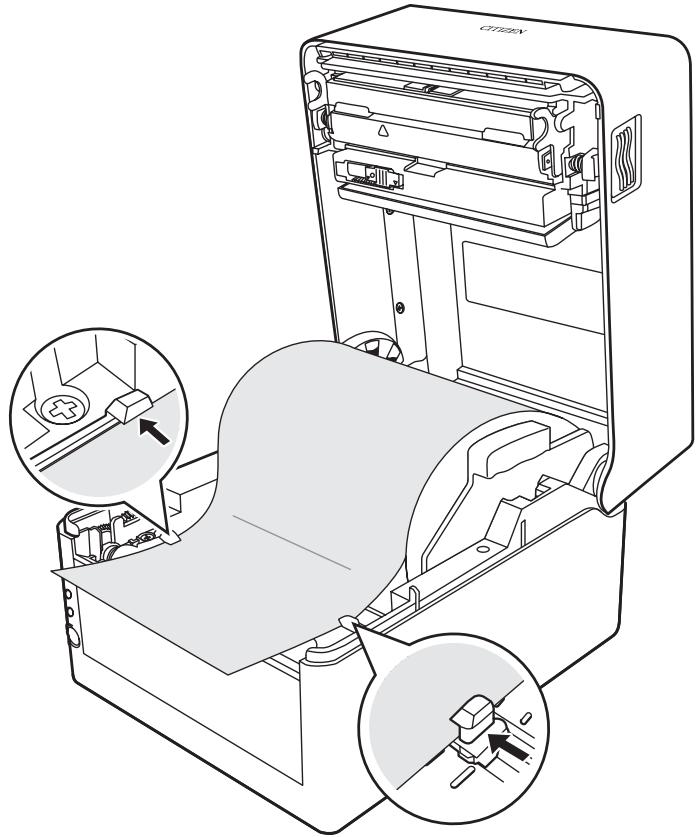
Insert media into the slit correctly. Failure to do so may result in improper feeding of media, which may cause paper jams.
From the front of the printer, set in front of the edge of media by approximately 10mm

CAUTION
Too much abutment force of the right movable paper guide may cause improper feeding of media, which may negatively impact print quality.
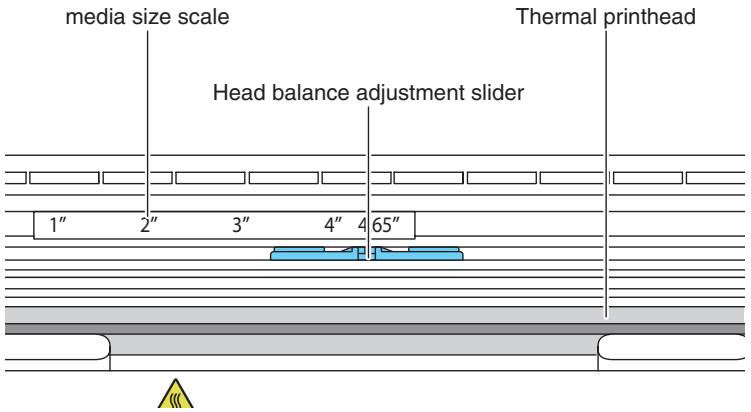
- Slide the head balance adjustment slider located near the thermal head along the media size scale (inch) so that the position of the notch in the slider matches the media width.

CAUTION
Adjust the head pressure horizontal balance carefully so as not to damage the thermal head. Damaged thermal heads will result in poor printing, paper jams, and malfunction.
- Close the top cover.

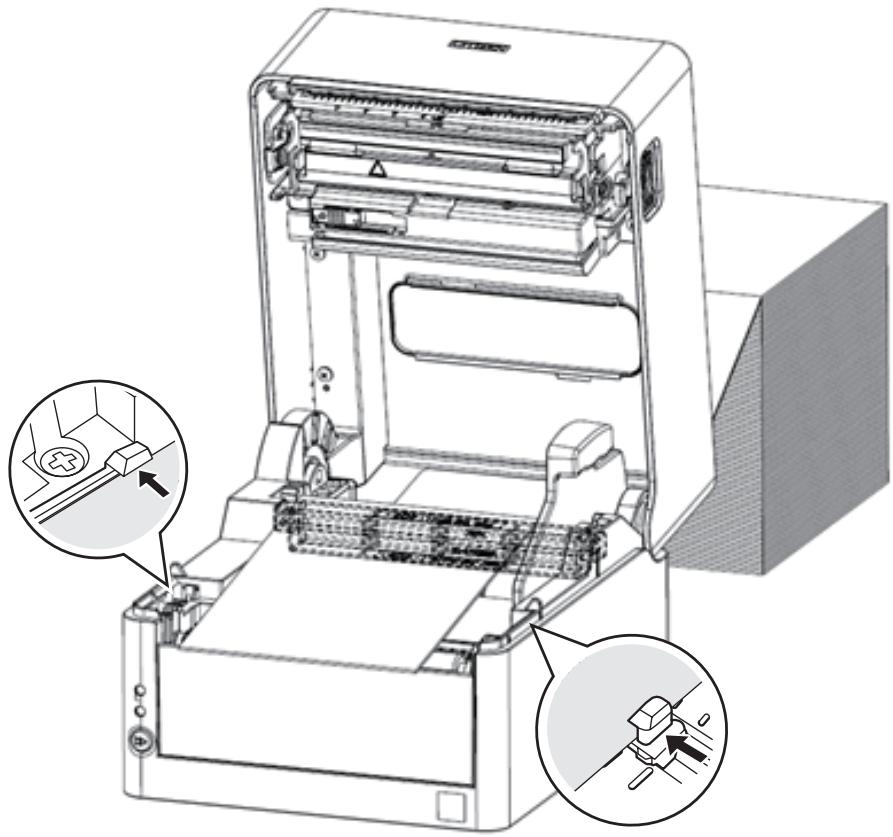
CAUTION
Press the push marks on left and right sides at the top of the top cover and ensure that the top cover hooks on each side lock securely. If the top cover is not securely locked, this may cause print errors, paper jams, and malfunction.
1. Check whether the print mode is set to peeling mode.
Check whether the value of "Function Select" in the "After Print Setup" menu is set to "Peel".

Refer to 4.1 List of Settings

CAUTION
The peeler model can only be used in the peeling mode.

Refer to 3.2 Loading Paper
3. Peel the label from the backing paper.
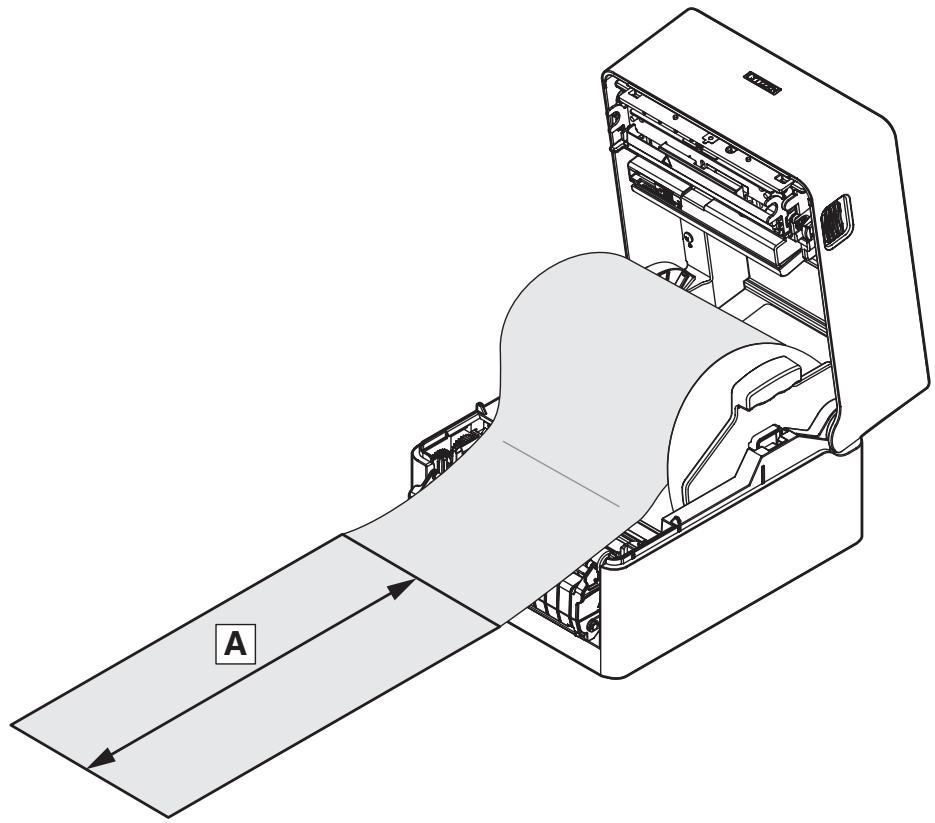
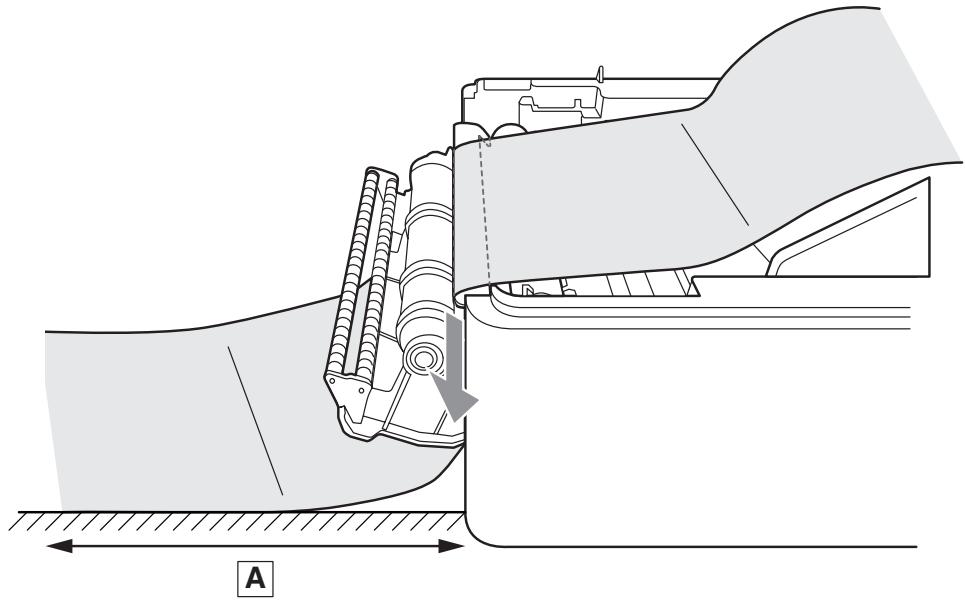
Make sure that the area with the backing paper only is at least 20~cm from the end of the backing paper (illustration A).
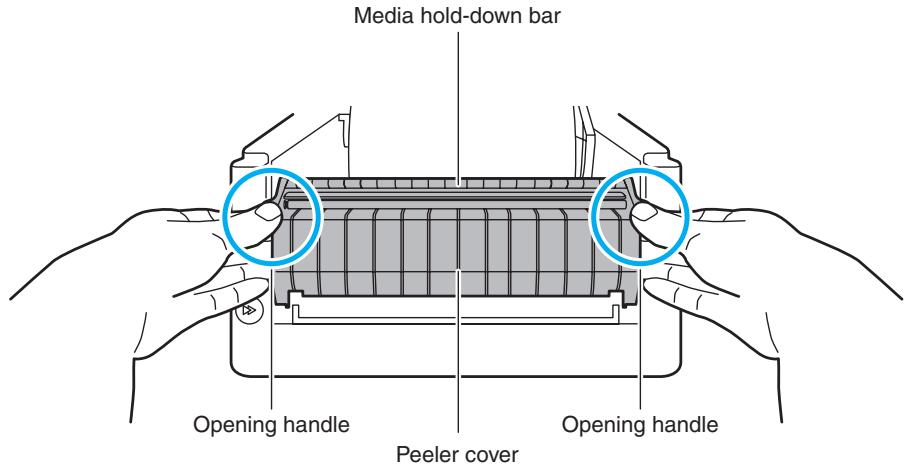
- Grip the opening handles with both hands, and gently pull forward.

CAUTION
If the media hold-down bar is held down with a finger and the peeler cover is opened, there is a possibility of damage to the media hold-down bar.
■ Do not apply a strong downward force to the peeler cover while it is open. Doing so may damage the peeler.
- When the peeler cover is open, pass the backing paper between the peeling plate and the peeler roller.
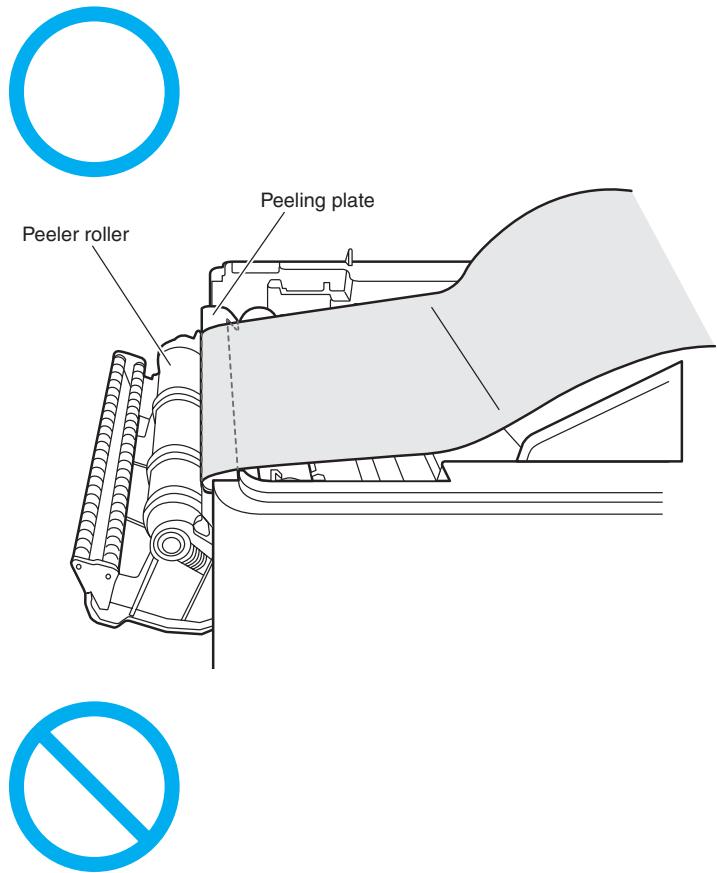
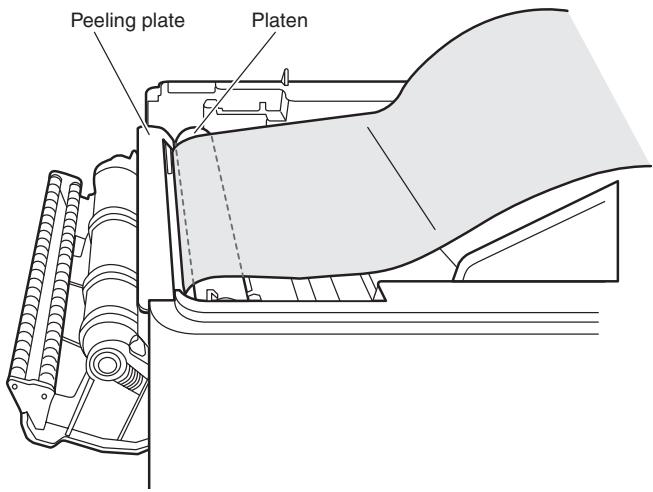
- Pull down the backing paper further, so that it extends at least 7cm from the peeler cover (illustration A).
- Make sure the media is in abutment with the left media guide and then adjust the position of the right media guide in accordance with the media width.
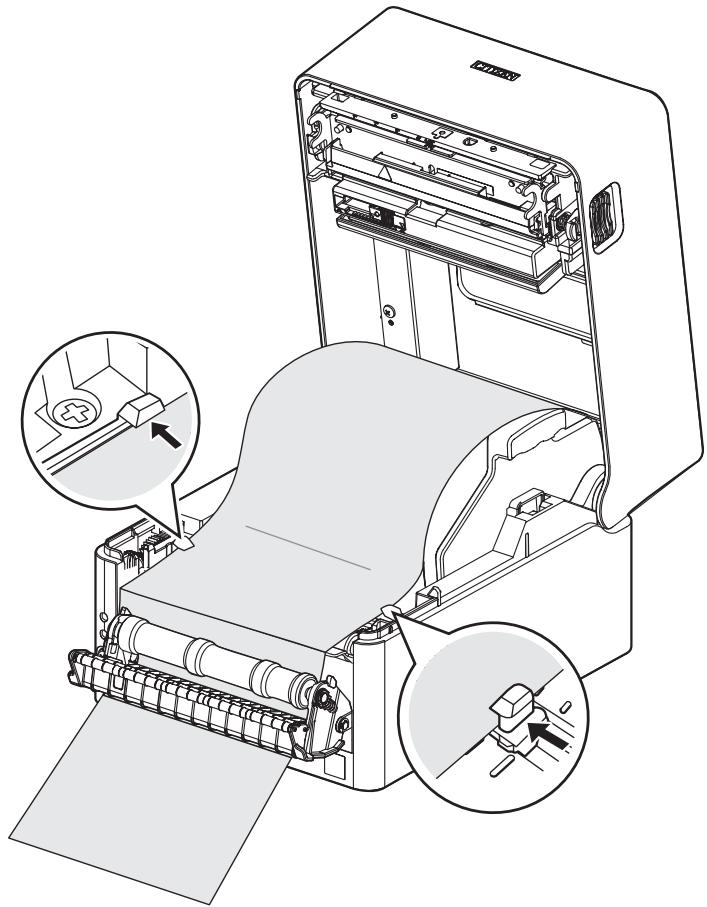
- Slide the head balance adjustment slider located near the thermal head along the media size scale (inch) so that the position of the notch in the slider matches the media width.
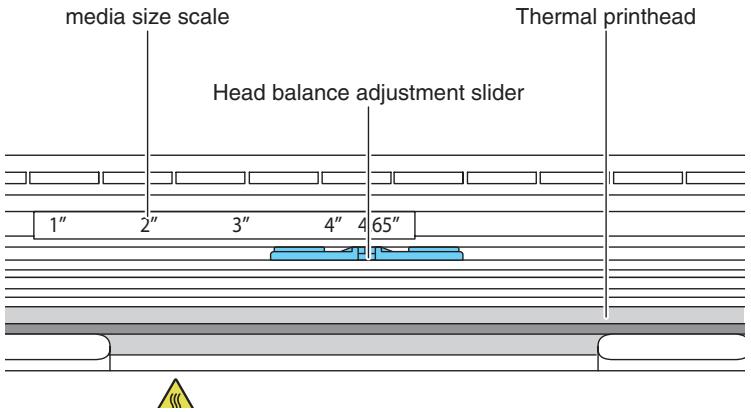

CAUTION
Adjust the head pressure horizontal balance carefully so as not to damage the thermal head. Damaged thermal heads will result in poor printing, paper jams, and malfunction.
9. Close the top cover.
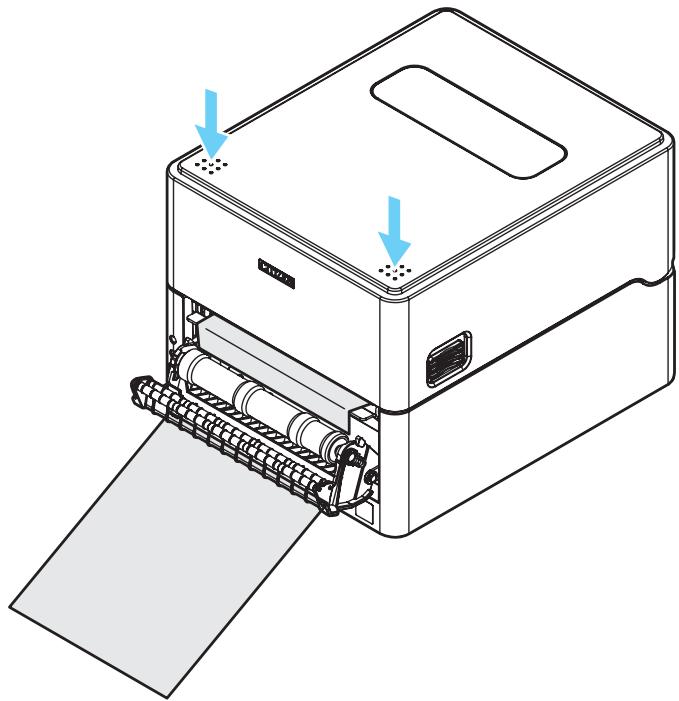

CAUTION
Press the push marks on left and right sides at the top of the top cover and ensure that the top cover hooks on each side lock securely.
If the top cover is not securely locked, this may cause print errors, paper jams, and malfunction.
- Pull the backing paper extending from the peeler cover downwards, and eliminate the slack.
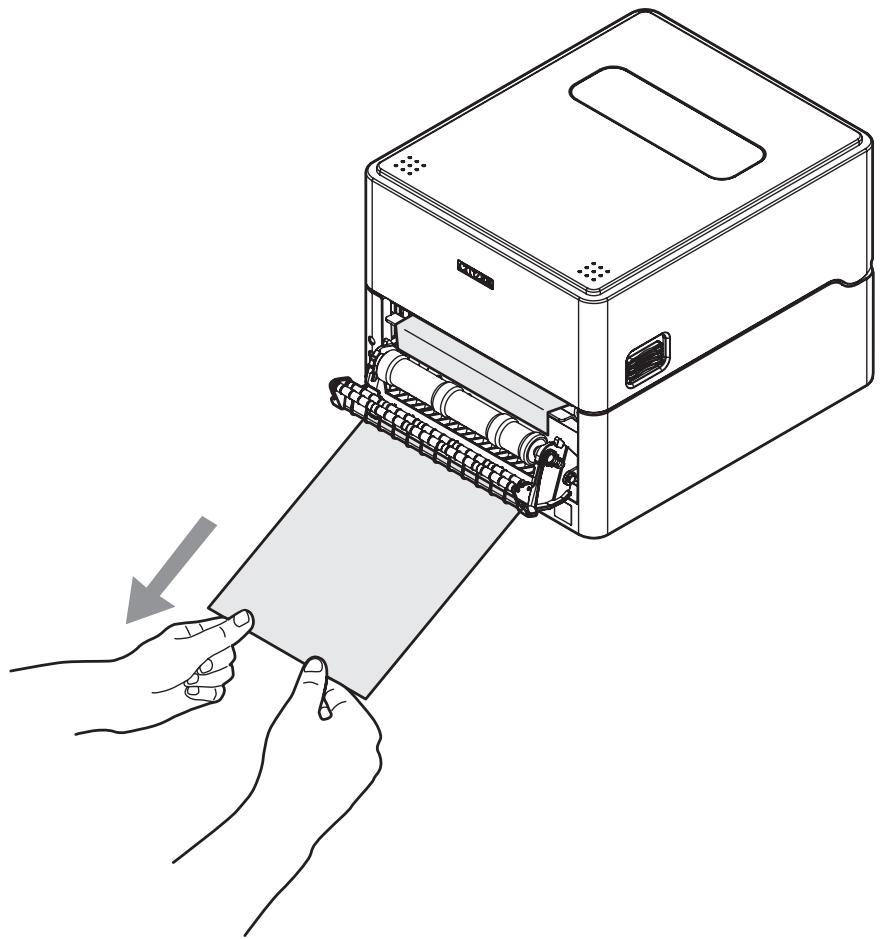
11. Close the peeler cover.
Turn on the power to the printer, and press the FEED key on the operation panel.
Feed the media and check that it stops at the position where one label has been peeled.
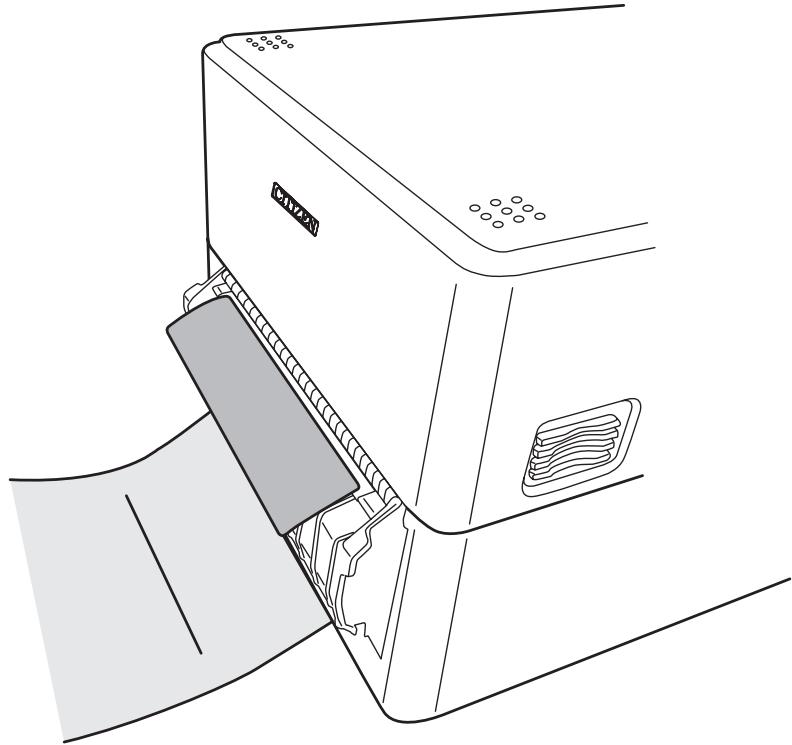

CAUTION
If the peeled label has not stopped at an appropriate position, due to differences in media types, media width, etc., adjust the MACHINE PEEL POSITION using the label printer utility extension function.

Refer to 4.2 Obtaining the LabelPrinterUtility

CAUTION
- Do not apply a strong downward force to the peeler cover while it is open. Doing so may damage the peeler.
If the peeling sensor is exposed to strong light such as direct sunlight, the peeling sensor may malfunction and the peeler may not operate correctly.
If the media does not peel normally and becomes wound around the peeler roller or the platen, or if there is a paper jam, open the peeler cover and remove the media. If the media, etc., within the peeler cannot be removed, do not apply unreasonable force, but contact your retailer or representative office.
■ When label media or backing paper is wound around the peeler roller, the peeler does not operate normally. Only use the peeler after eliminating the blockage.
- Allow the backing paper after peeling to hang in a vertical direction of the printer installation surface. Also, when a large quantity of the backing paper after peeling has accumulated, the backing paper does not hang vertically, and the backing paper may become entangled in feet causing the printer to fall or an injury. It is recommended that the backing paper be disposed of before it has accumulated in a large quantity.
If the peeled label media is removed by peeling in the parallel or downward direction, deviation of the media may occur. Be sure to peel away from the backing paper in the upward direction.
If the peeler cover is left closed for a long period of time, the components around the platen may become deformed. During transport, keep the peeler cover open.
External media feed cannot be used. Set label media with a roll outer diameter of 127 or less in the printer for use.
If the media width changes after long-term use, there is a possibility that printing or feeding will be affected, depending on the state of wear of the platen and the peeler roller. If it is not possible to clean the platen and peeler roller or to improve the adjustment of the head balance and the media guide, it is recommended that the thermal head or the platen be replaced.
■ It is recommended that the platen be replaced after 5 to 10km (50,000 to 100,000 labels of length 10cm ), because the printing quality is affected.
If dust or dirt is adhering to the peeling sensor, the peeling sensor may not operate correctly, so it should be periodically cleaned.
If label media adhesive or paper dust are deposited on the platen, the peeler roller or the media hold-down bar, deviation of the peeling position or peeling defects may occur, so it is recommended that they be cleaned when replacing the media.

Refer to 11. Maintenance
- Press the cover release buttons on both the right and left sides to open the top cover.
- Insert the fanfold media through from the external media feed port at the back of the printer.

CAUTION
Note the following precautions when the top cover is open.
- Do not touch the thermal head.
-
Do not touch the cutter blades.
-
Leaving the specified gap from the printer, place the fanfold paper so that it is at the same height as the printer and becomes parallel with the printer as shown in the figures below.
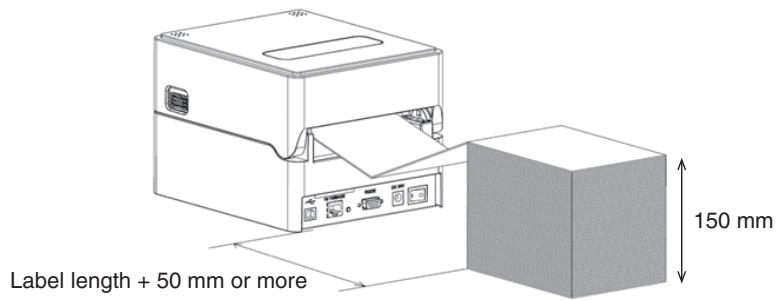
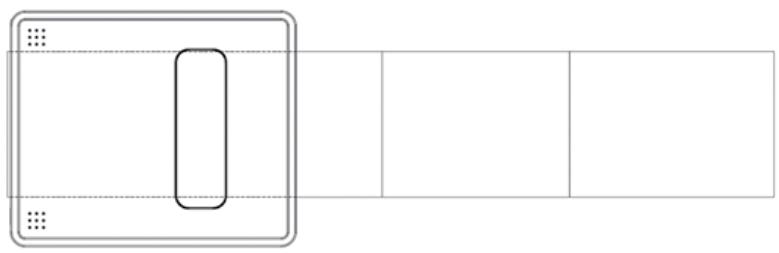
Place the fanfold media so that it is parallel with the printer.
- Insert the fanfold media through below the media shaft and set the media shaft guide by aligning it with the media width.
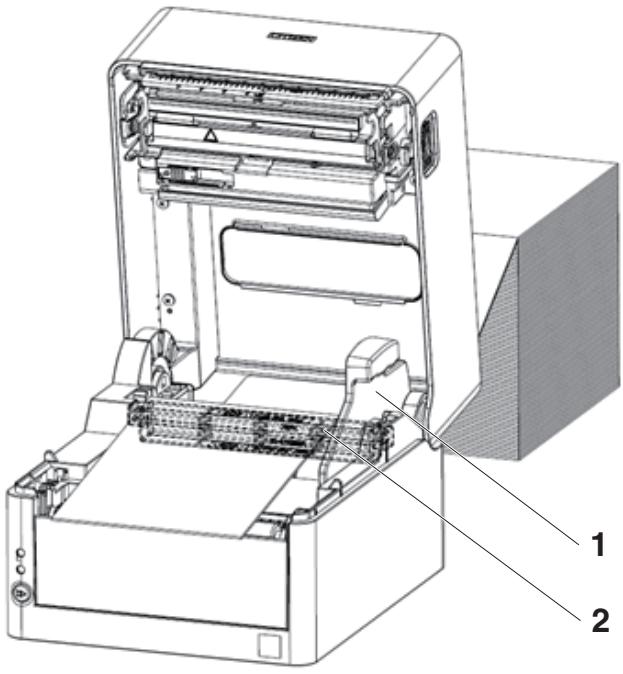
- Media shaft guide
-
Media shaft
-
If using an integrated cutter model, insert the media through the cutter slit.
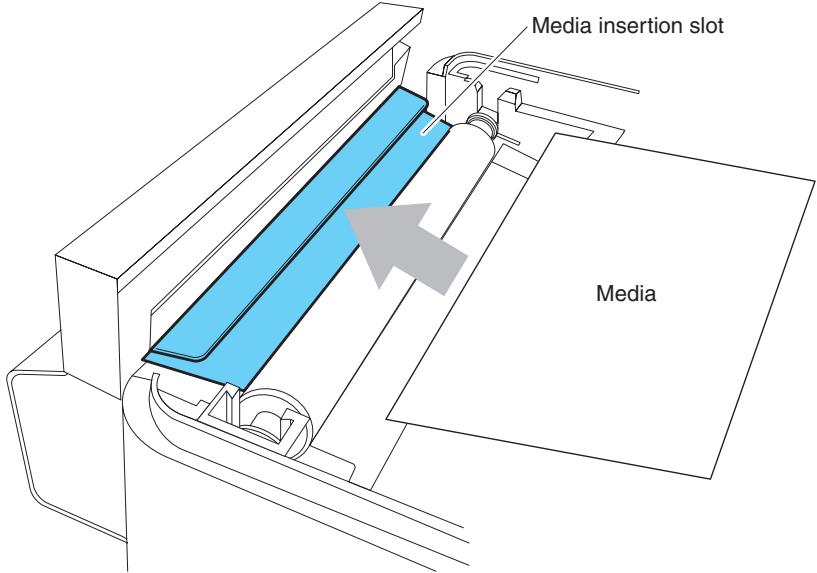

CAUTION
Insert media into the slit correctly. Failure to do so may result in improper feeding of media, which may cause paper jams.
From the front of the printer, set in front of the edge of media by approximately 10mm

CAUTION
Too much abutment force of the right movable paper guide may cause improper feeding of media, which may negatively impact print quality.
- Slide the head balance adjustment slider located near the thermal head along the media size scale (inch) so that the position of the notch in the slider matches the media width.
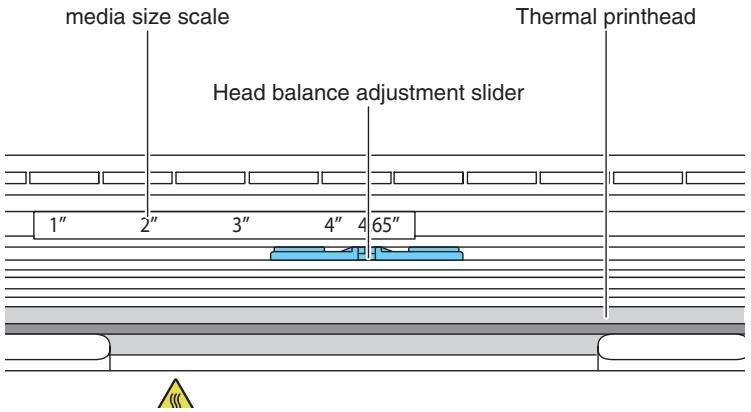

CAUTION
Adjust the head pressure horizontal balance carefully so as not to damage the thermal head. Damaged thermal heads will result in poor printing, paper jams, and malfunction.
- Close the top cover.

CAUTION
Press the push marks on left and right sides at the top of the top cover and ensure that the top cover hooks on each side lock securely. If the top cover is not securely locked, this may cause print errors, paper jams, and malfunction.
- For models with cutters
When cutting media with perforated lines with the auto cutter, adjust the media stop position so that the media is cut at a position after a perforated line.
When making the adjustment, set the vertical printing position to a value larger than the media stop position. Otherwise, the media may come off the platen during back feeding.
Adjust each setting using the printer driver or LabelPrinterUtility.
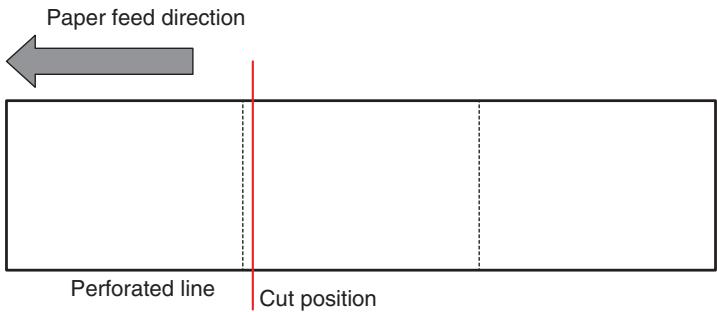
- For standard models
When tearing manually, the media can be torn at the position of the perforated line. When adjusting the paper stop position, set the vertical printing position to a value larger than the media stop position. Otherwise, the media may come off the platen during back feeding.
Adjust each setting using the printer driver or LabelPrinterUtility.

CAUTION
Do not directly cut the label part in cutter models. Doing so may cause the label media adhesive to accumulate on cutter blades, which could result in failure.
Refer to the following specification table for information on the types of media compatible with this printer.
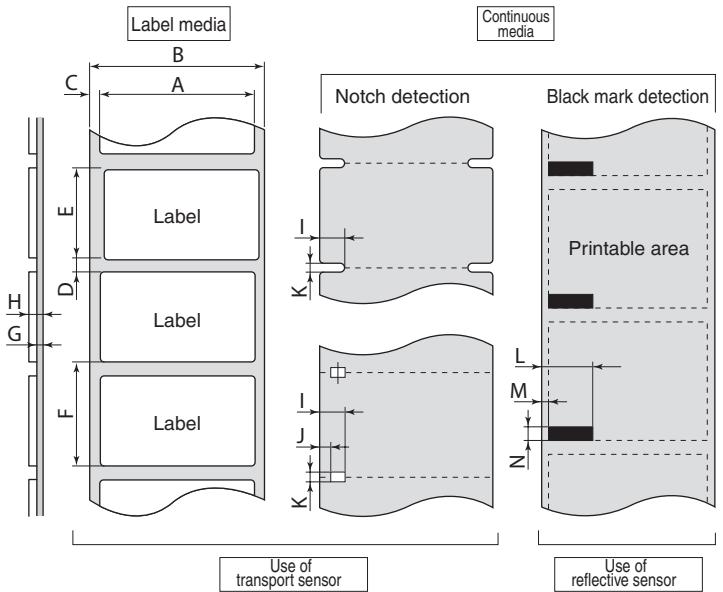

Direction of media feed
| Minimum value | Maximum value |
| mm | inch | mm | inch |
| A | Label width | 21.50 | 0.83 | 118.00 | 4.65 |
| B | Backing paper width | 25.40 | 1.00 | 118.00 | 4.65 |
| C | Left edge position of label | 0 | 0 | 2.54 | 0.10 |
| D | Label gap length | 2.54 | 0.10 | 2,539.75
(CL-E300/
CL-E300EX)
1,270.00
(CL-E303/
CL-E303EX) | 99.99
(CL-E300/
CL-E300EX)
50.00
(CL-E303/
CL-E303EX) |
| E | Label length | 6.35
25.40
(Peeler model) | 0.25
1.00
(Peeler model) | 2,539.75
(CL-E300/
CL-E300EX)
1,270.00
(CL-E303/
CL-E303EX)
120.00
(Peeler model) | 99.99
(CL-E300/
CL-E300EX)
50.00
(CL-E303/
CL-E303EX)
4.72
(Peeler model) |
| F | Label pitch | 8.89
27.94
(Peeler model) | 0.35
1.10
(Peeler model) | 2,539.75
(CL-E300/CL-
E300EX)
1,270.00
(CL-E303/CL-
E303EX)
122.54
(Peeler model) | 99.99
(CL-E300/
CL-E300EX)
50.00
(CL-E303/
CL-E303EX)
4.82
(Peeler model) |
| G | Backing paper thickness | 0.06 | 0.0025 | 0.125 | 0.0049 |
| H | Total media thickness
(standard / integrated
cutter) | 0.06 | 0.0025 | 0.19 | 0.0075 |
| Total media thickness
(separable cutter) | 0.06 | 0.0025 | 0.15 | 0.0059 |
| Total media thickness
(Peeler model) | 0.06 | 0.0025 | 0.17 | 0.0067 |
| I | Notch right edge position | 8.3 | 0.32 | 60.80 | 2.39 |
| J | Notch left edge position | 0 | 0 | 57.20 | 2.25 |
| K | Notch length | 2.54 | 0.10 | 17.80 | 0.70 |
| L | Black line right edge
position | 15.00 | 0.59 | 66.50 | 2.62 |
| M | Black line left edge
position | 0 | 0 | 51.50 | 2.02 |
| N | Black line length | 3.18 | 0.125 | 17.80 | 0.70 |
- Use the transmissive sensor when using media that has both gaps between labels and black lines.
Use the transmissive sensor when using fanfold media.
- Cutting at perforated lines is not recommended because an extremely large amount of paper dust and paper scraps will be generated.
Furthermore, cleaning the platen at the start of use is recommended.
- If the label pitch is 1 inch or less, configure an accurate label pitch with the [Small Media Adjustment] setting.
- Use carbon-based ink with an OD value of at least 1.5 to print black lines.
- The stop position and cut position may change depending on the width or type of media that is used.
Adjust these positions using the Paper Position setting.
This section describes the procedure to adjust sensors when loading media. Transmissive and reflective sensors can be used for the media sensors.
The printer comes from the factory equipped with a transmissive sensor. The media sensor must be replaced with a reflective sensor for certain types of media.

Refer to 7.1 Sensor Adjustment Mode
Range of Paper Sensor Adjustment
The following figure illustrates the range of media sensor adjustment.
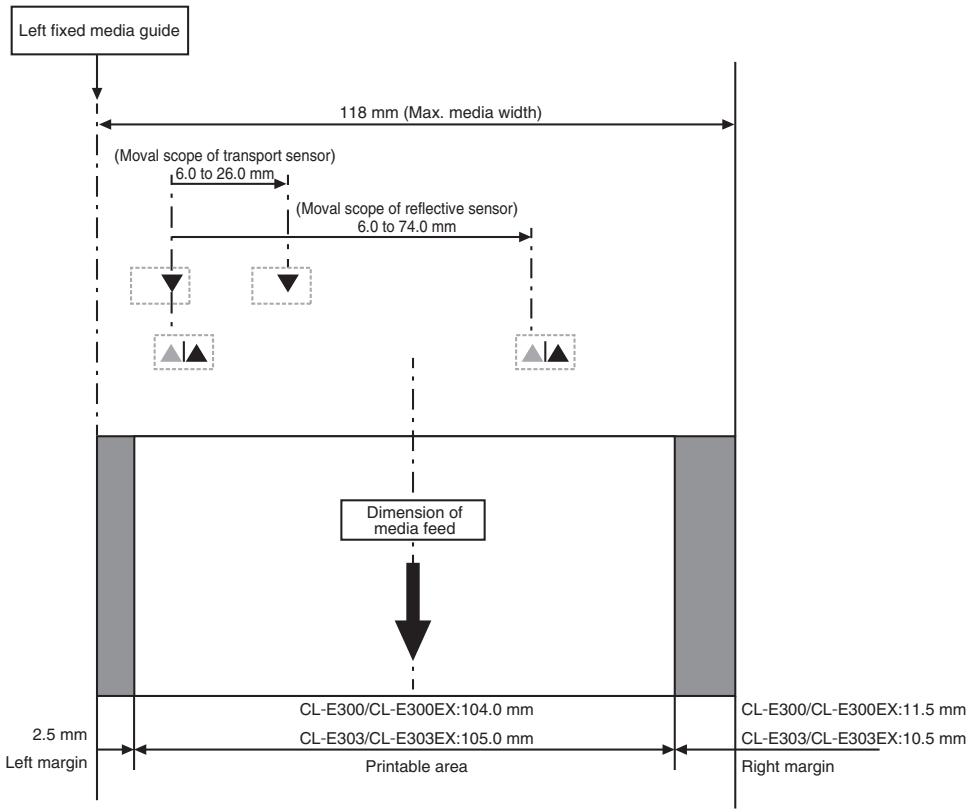
Move the bottom sensor and upper sensor by the same number of steps from the position of the triangle () .
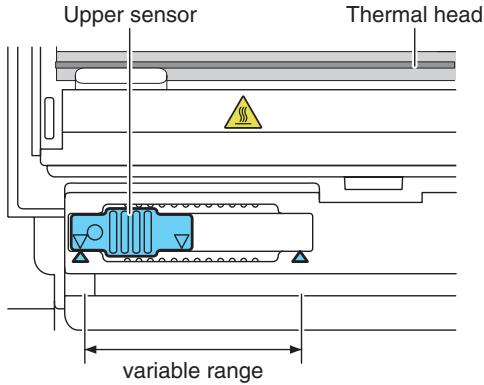
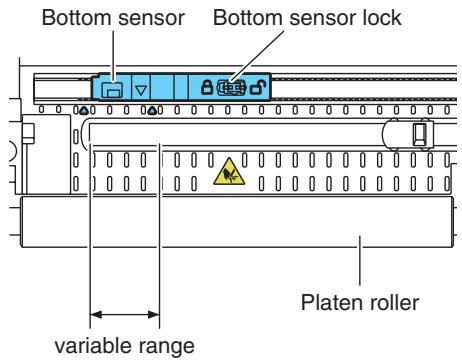
The range of bottom sensor and upper sensor horizontal adjustment is 10 steps between the triangle marks (▲).
Use a pen or other object with a narrow tip to unlock the bottom sensor and then reposition it. Lock the sensor in place once the new position has been determined.

CAUTION
- The bottom sensor and upper sensor must be in alignment with each other.
- Attempting to move the sensor while still locked may damage it.
Reflective Sensor Adjustment
- Set the bottom sensor at a position so that the center of the sensor window is in alignment with the center of the black line.
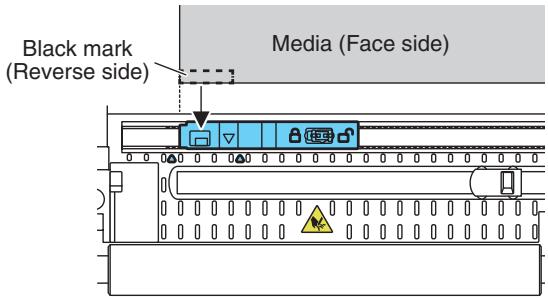

CAUTION
- Do not install the upper sensor directly above the bottom sensor. Normal operation may not be possible.
3.4 Connecting the AC Adapter

CAUTION
Standard model
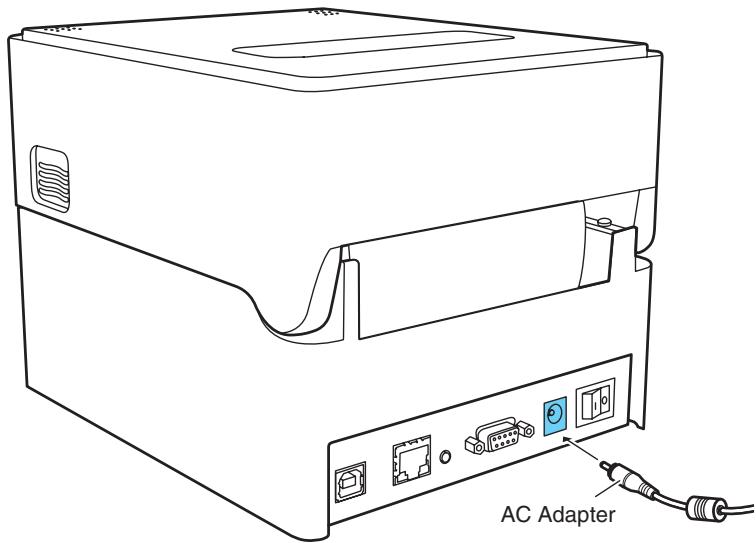
Optional interface model
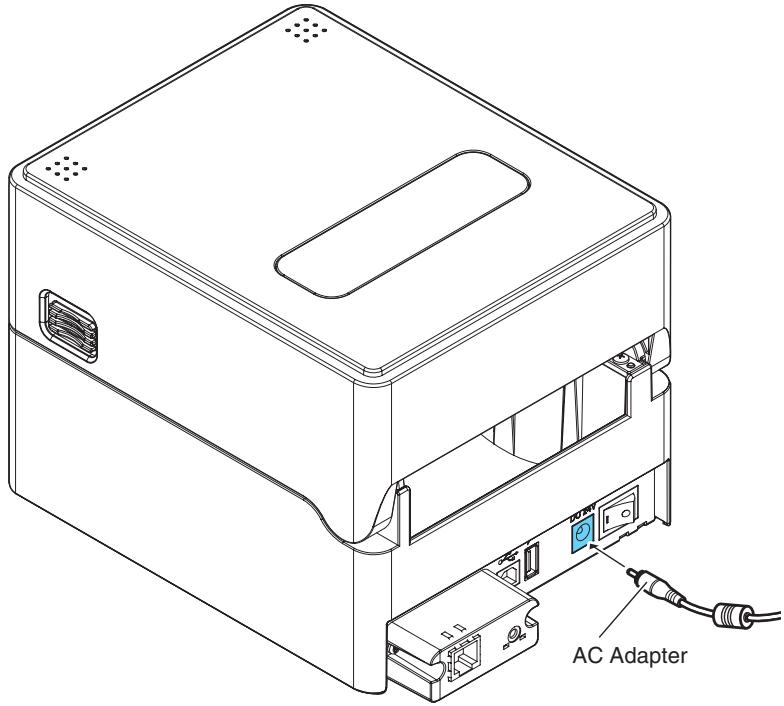
- Insert the plug of the AC cord into the AC port.
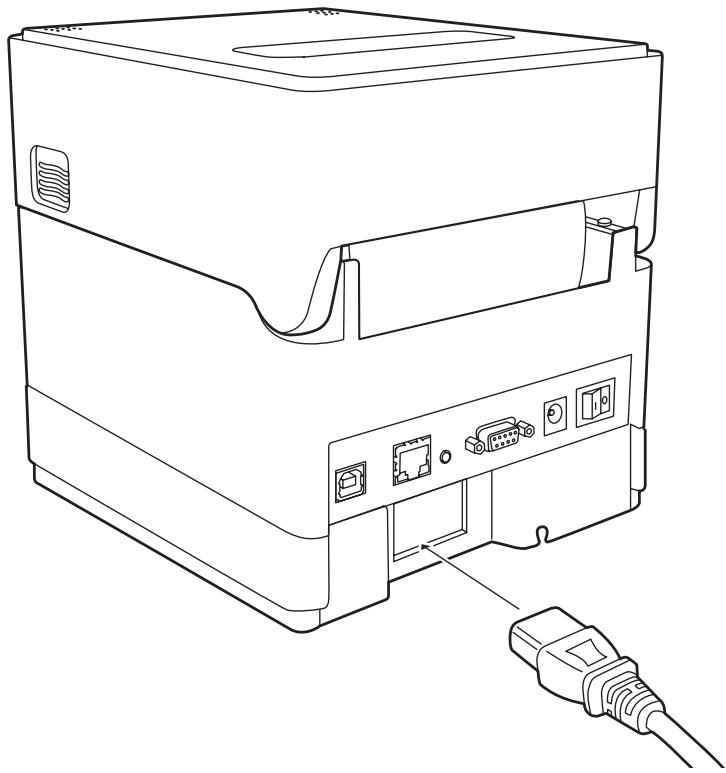
3.5 Connecting the Printer to a Host Computer
Use the following procedure to connect this printer to a host computer.

CAUTION
- Interface cables are required to connect the printer to a host computer.
- Do not connect a USB cable to the wired LAN interface. Doing so may damage connectors.
-
When using an expansion interface, do not use two or more interfaces at the same time (the printer gives priority to USB on the main unite side).
-
Turn off the power to the printer and host computer.
- Insert the cable into the appropriate interface port at the back of the printer.
Tighten any locking screws to secure the cable.
CL-E300/CL-E303
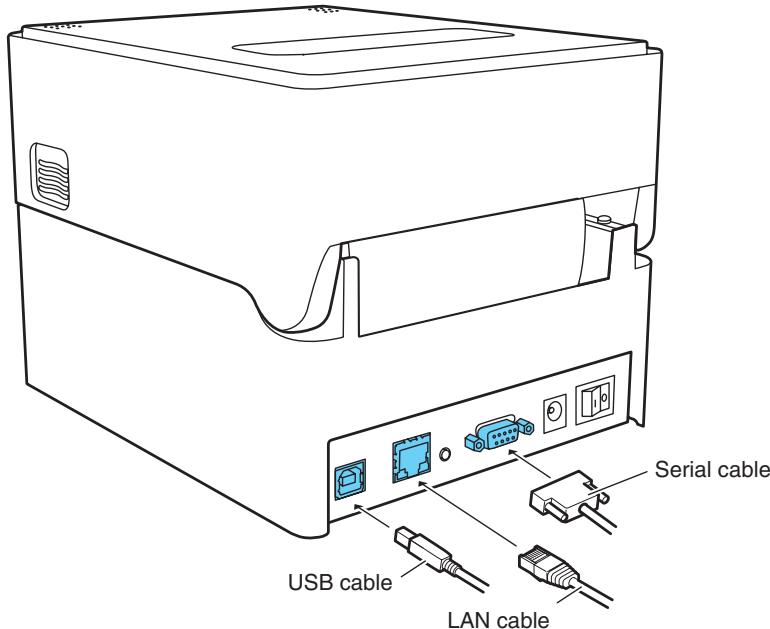
CL-E300EX/CL-E303EX
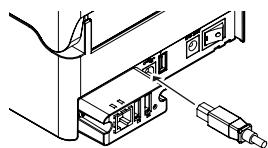
USB cable (Type-B)
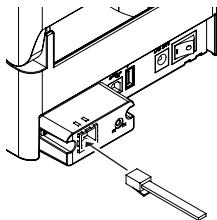
LAN cable
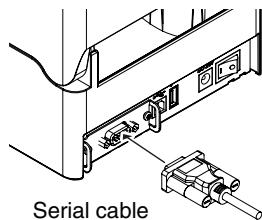
Serial cable
- Insert the other end of the cable into the appropriate interface port in the host computer.
Tighten any locking screws to secure the cable.
Using an Ethernet connection
Configure network settings as necessary.

Refer to 5. Configuring the Wired LAN Network Settings Using the Utility Software

Refer to 5.2 NetToolK
3.6 Connecting with a Peripheral Device
Connect a peripheral device as described in the following procedure. For details on this board, including explanations about the USB host function and XML peripheral device support, refer to the separate manual.
- Turn off the power.
- Connect the cable of a peripheral device to this port.
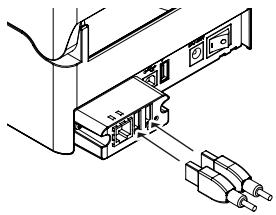
USB cable (Type-A)

CAUTION
A peripheral device cannot be controlled if it is connected to the USB power supply port. Be sure to connect it to the USB port of the interface board.
3.7 USB Power Supply Port
Power (max. 2.1 A) can be supplied to a mobile device or other USB device by connecting the cable of the USB device to the power supply port.
Connecting Mobile Device or Other Device
- Turn off the power.
- Connect the cable of a mobile device or other device to the USB power supply port.
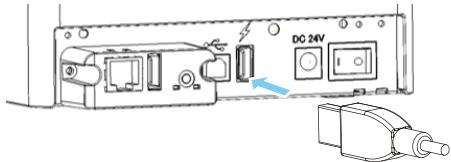

CAUTION
This port does not support USB data communication.
■ Power may not be able to be supplied depending on the USB device to be used. In this case, use the device's dedicated AC adapter or battery charger.
A USB cable for power supply is not included with this product. Use a commercially available USB cable or the one that comes with the USB device.
3.8 Install the Printer Driver
Install the printer driver onto the host computer.
Printer drivers are available for download from the Citizen Systems support website.
The latest documentation, drivers, utilities, and other support information are also available from this website.
https://www.citizen-systems.co.jp/en/printer/download
Once a printer driver has been downloaded, follow the on-screen instructions to install the driver.
4. Configuring Printer Settings Using the Specialized Utility
Use the LabelPrinterUtility configuration application to change printer settings.
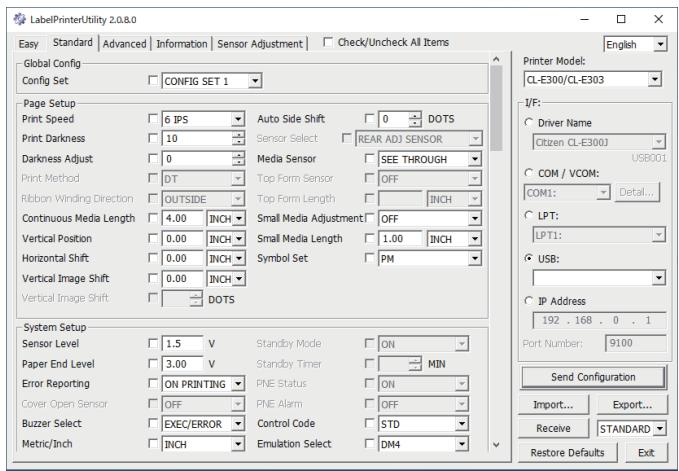
Refer to the following sections for more information on obtaining and using LabelPrinterUtility.

Refer to 4.2 Obtaining the LabelPrinterUtility

Refer to 4.3 Using the LabelPrinterUtility
4.1 List of Settings
This section describes the procedures to configure printer settings using the LabelPrinterUtility.
For details on changing various settings of a wired/wireless LAN expansion interface board, refer to the following explanation.

Refer to 5.2 NetToolK
The following table lists the settings configurable with "LabelPrinterUtility".
| Home menu | Sub menu | Default | Configurable range | Notes |
| Page Setup - 1 | Print Speed | 6 IPS | CL-E300/CL-E300EX:2 to 8 IPSCL-E303/CL-E303EX:2 to 6 IPS | Sets the print speed* In the peeler model, even when this is set to 5 IPS or higher, the setting is 4 IPS. |
| Print Darkness | 10 | 00 to 30 | Adjusts the print density |
| Darkness Adjust | 00 | -10 to 10 | Fine adjustment of the density command |
| Continuous Media Length | 4.00 inch101.6 mm | CL-E300/CL-E300EX:0.25 to 99.99 inch6.4 to 2539.7 mmCL-E303/CL-E303EX:0.25 to 50.00 inch6.4 to 1,270.0 mm | Sets the length of continuous mediaThe lower row shows millimeter values when using the printer in mm mode |
| Vertical Position | 0.00 inch0.0 mm | -1.00 to 1.00 inch-25.4 to 25.4 mm | Adjusts the printing start position |
| Horizontal Shift | 0.00 inch0.0 mm | -1.00 to 1.00 inch-25.4 to 25.4 mm | Adjusts the horizontal image position |
| Page Setup - 2 | Vertical Image | (Datamax)0.00 inch0.0 mm | 0.00 to 32.00 inch0.0 to 812.8 mm | Adjusts the start position for creating images |
| (Zebra/Eltron)000 dots | -120 to 120 dots |
| Auto Side Shift | 0 dots | 0 to 15 dots | Shifts the horizontal print position by the specified number of dots for each sheet/label. This is useful when significant load is placed on the portion of the thermal head, such as when printing vertical borders. |
| Media Sensor | See Through | See ThroughReflectNone | Selects the type of label sensor type |
| Small Media Adjustment | Off | OnOff | Setting for small label support |
| Small Media Length | 1.00 inch25.4 mm | 0.25 to 1.00 inch6.4 to 25.4 mm | Sets the length for small label media |
| Symbol Set | PM | 50 options | Sets the character set |
| System Setup | Sensor Level | 1.5 V | 0.0 V to 3.3 V | Sets the sensor threshold |
| Paper End Level | 3.00 V | 0.01 V to 3.30 V | Sets the paper end level |
| Error Reporting | On Printing | On Printing Immediate | Error reporting setting |
| Buzzer Select | Exec/Err | Exec/Err All Error Key None | Sets the conditions at which the buzzer is triggered |
| Metric/Inch | Inch | Inch mm | Sets the unit of measure |
| Max Media Length | 10.00 inch 254.0 mm | CL-E300/ CL-E300EX: 1.00 to 99.99 inch 25.4 to 2539.7 mm CL-E303/ CL-E303EX: 1.00 to 50.00 inch 25.4 to 1,270.0 mm | Sets the maximum length of label media |
| Settings Lock | Off | On Off | Prevents changes via setting commands |
| Keyboard Lock | Off | On Off | Prevents changes via key operation |
| Control Code | STD | STD ALT ALT-2 | Changes the command mode for DMX mode (only when Datamax® emulation is selected) |
| Media Power Up | Off | On Off | Sets the media length measuring function when the power is turned on (only when Zebra® emulation mode is selected on international models) |
| CI Lock | Off | On Off | Prevents changes via CI commands (only when Zebra® emulation mode is selected on international models) |
| Emulation Select | DM4 (Datamax®) ZPI2 (Zebra®) | DM4 DMI DPP ZPI2 EPI2 | Datamax®/Zebra® compatibility selection DM4 Datamax® 400 DMI Datamax® IClass™ DPP Datamax® Prodigy Plus® ZPI2 Zebra® ZPL2TM EPI2 Zebra® EPL2TM |
| Emulation Auto Detect | Full Auto | On Off Full Auto | Sets the emulation sensing function (international models only) |
| After Print - 1 | AutoConfigure | On | OnOff | Enables/disables the auto configu-
ration of optional equipment.
On Enables auto configuration
(automatically sets each mode
when equipped with a cutter or peeler, regardless of the Function
Select setting)
Off - Disables auto configuration.
Turn this setting Off and select op-
eration with Function Select when
you do not want to use the cutter if
installed.
* In the peeler model, print modes
other than the peeling mode can-
not be used, so the AutoConfigure
must be On. |
| Function Select | Tear | OffTearCut On(only valid for models
with cutters)
Peel(enabled only for the
peeler model) | Selects the operation mode when
AutoConfigure is Off. Each op-
tion has a specified media stop
position. Enables operation of the
applicable device when selected. |
| Cutter Action
*Only valid for
models with
cutters | Backfeed | BackfeedThrough | Cutter action setting
Prints only when AutoConfigure
for a model with a cutter is On or
when [Backfeed] is selected for the
Function Select setting.
The [Backfeed] option performs a
back-feed after each cut operation.
The [Through] option continues the
print operation at the trailing edge
of each sheet/label from the first
sheet/label to the n-1 sheet/label
when the number of copies is set
to n. A back-feed operation is then
performed at the trailing edge of
the last sheet/label or when print-
ing a single sheet/label. |
| After Print - 2 | Paper Position | 0.00 inch0.00 mm | STD0.00 to 2.00 inch0.0 to 50.8 mmCut/Tear/Peel-1.00 to 1.00 inch-25.4 to 25.4 mm | Adjusts the stop position.This setting is dependent on the Metric/Inch setting.Each device has an initial stop position as configured with the settings previously described. This setting sets a relative value from these other settings. |
| Feed Key Action | Feeds Media | Repeat Last SetRepeat Last One Feeds Media | Changes the operation of the FEED keyRepeat Last SetReprints a set of labels.This setting is ignored when Ze-bra®* emulation mode is selected.Repeat Last OneReprints the last page only.Prints only 1 sheet/label from the current number when using counts.Feeds MediaFunctions as the FEED key.Disables reprinting. |
| Interface - 1 *1 | RS-232C Baud Rate *3 | 9600 | 115200576003840019200960048002400 | Sets the baud rate of the serial interface |
| RS-232C Parity *3 | None | NoneOddEven | Sets the communication parity of the serial interface |
| RS-232C Length *3 | 8 bits | 8 bits7 bits | Sets the data length for the serial interface |
| RS-232C Stop bit *3 | 1 bit | 1 bit2 bits | Sets the stop bits for the serial interface |
| RS-232C X-ON *3 | Yes | YesNo | Enables/disables X-ON flow control for the serial interface |
| USB Device Class | Printer | PrinterVCOM | Sets the USB device class |
| USB VCOM Protocol | Auto | AutodTRX-ON | Sets the USB VCOM protocol (flow control) |
| IPv4 Address *4 | 169.254.001.010 | 000.000.000.000 to 255.255.255.255 | Sets the IPv4 network address |
| IPv4 Subnet Mask *4 | 255.255.000.000 | 000.000.000.000 to 255.255.255.255 | Sets the IPv4 subnet mask |
| IPv4 Gateway *4 | 000.000.000.000 | 000.000.000.000 to 255.255.255.255 | Sets the IPv4 gateway |
| IPv4 DHCP *4 | On | OnOff | Enables/disables IPv4 DHCP |
| Host Name *4 | CL-E300:CL-E321/300Print ServerCL-E303:CL-E331/303Print Server | Any length from 0 to 31 characters long using single-byte letters ( uppercase and lowercase), numbers, and symbols | Name to assign to the device to identify the printer |
| Port Number *4 | 9100 | 1024 - 65535 | Print port number |
| Interface - 2 *1 | Timeout *4 | 60 | 0 - 300 | Timeout time (in seconds) for con- nection with host machine When the set number of sec- onds elapses without data being received from the host in the state in which a session is established, a timeout occurs and the session is disconnected. If this is set to 0, there will be no timeout. |
| Action at timeout *4 | Close all | Close all Move next | Pending session processing when timeout Sets whether to disconnect all other sessions or to enable send- ing and receiving when there are two or more sessions established and a timeout occurs for the ses- sion that was established first |
| Transmits buffered data *4 | Disable | Disable Enable | Transmission data processing when host machine not connected |
| IPv6 *4 | On | On Off | Enables/disables IPv6 |
| Fixed IPv6 Address *4 | On | On Off | Enables/disables IPv6 static net- work address |
| IPv6 Address *4 | 0.0.0.0.0.0.0.0.0.0.0.0.0.0.0.0.0.0.0.0.0.0.0.0.0.0.0.0.0.0.0.0.0.0.0.0.0.0.0.0.0.0.0.0.0.0.0.0.0.0.0 | 0.0.0.0.0.0.0.0.0.0.0.0.0.0.0.0.0.0.0.0.0.0.0.0.0.0.0.0.0.0.0.0.0.0.0.0.0.0.0.0.0.0.0.0.0.0.0.0.0.1.0.0.0.0.0.0.0.0.0.0.0.0.0.0.0.0.0.0.0.0.0.0.0.0.0.0.0.0.0.0.0.0.0.0.0.0.0.0.0.0.0.0.0.0.0.0.0.0.0.10.0.0.0.0.0.0.0.0.0.0.0.0.0.0.0.0.0.0.0.0.0.0.0.0.0.0.0.0.0.0.0.0.0.0.0.0.0.0.0.0.0.0.0.0.0.0.0.0.00.0.0.0.0.0.0.0.0.0.0.0.0.0.0.0.0.0.0.0.0.0.0.0.0.0.0.0.0.0.0.0.0.0.0.0.0.0.0.0.0.0.0.0.0.0.0.0.0.08.0.0.0.0.0.0.0.0.0.0.0.0.0.0.0.0.0.0.0.0.0.0.0.0.0.0.0.0.0.0.0.0.0.0.0.0.0.0.0.0.0.0.0.0.0.0.0.0.0.8.0.0.0.0.0.0.0.0.0.0.0.0.0.0.0.0.0.0.0.0.0.0.0.0.0.0.0.0.0.0.0.0.0.0.0.0.0.0.0.0.0.0.0.0.0.0.0.0.088.0.0.0.0.0.0.0.0.0.0.0.0.0.0.0.0.0.0.0.0.0.0.0.0.0.0.0.0.0.0.0.0.0.0.0.0.0.0.0.0.0.0.0.0.0.0.0.0.0 | Sets a IPv6 network address Example: If the network address you wish to set is 2001:0db8:0000: 0123:4567:89ab:cdef:feed, specify the value for each network address field in decimal notation separated by periods as shown below. 32.1.13.184.0.0.1.35.69.103.137.1 71.205.239.254.237 |
| IPv6 Prefix Length *4 | 64 | 1 - 128 | IPv6 prefix length setting (in bits) |
| IPv6 Gateway *4 | 0.0.0.0.0.0.0.0.0.0.0.0.0.0.0.0.0.0.0.0.0.0.0.0.0.0.0.0.0.0.0.0.0.0.0.0.0.0.0.0.0.0.0.0.0.0.0.0.88.0.0.0.0.0.0.0.0.0.0.0.0.0.0.0.0.0.0.0.0.0.0.0.0.0.0.0.0.0.0.0.0.0.0.0.0.0.0.0.0.0.0.0.0.0.0.0.0.88.88.88.88.88.88.88.88.88.88.88.88.88.88.88.88.88.88.88.88.88.88.88.88.88.88.88.88.88.88.88.88.88.8888888888888888888888888888888888888888888888888888888888888888888888888888888888888888888888888888 | | |
1 Contains menus of option interface settings that can be configured for this printer.
3 CL-E300/CL-E303 or Serial Interface option card model only
*4 CL-E300/CL-E303 only
| Home menu | Sub menu | Default | Configurable range | Notes |
| Interface (Enabled only when a Bluetooth interface board is installed.) | Bluetooth Security Setting | Medium | Medium High | Sets the security level of the Bluetooth interface |
| Bluetooth Connection Destination | All Devices | All Devices Authenticated Devices | Sets the connection destination of the Bluetooth interface |
| Bluetooth Device Search | On | On Off | Sets device searching of the Bluetooth interface |
| Bluetooth iOS Reconnect Request | On | On Off | Sets the reconnect request made to iOS by the Bluetooth interface |
| Bluetooth PIN Code | - | **** | PIN code of the Bluetooth interface The initial setting is the last 4 digits of the 12-digit address (excluding the : ) |
| Bluetooth Device Name | - | CL-E300_XX CL-E303_XX | Device name of the Bluetooth interface |
| Global Configu-
ration | - | Config Set 1 | Config Set 1
Config Set 2
Config Set 3 | Configuration number setting |
| Machine Infor-
mation | Model Number
*2 | - | CL-E300 | Displays the model name
* Appears as “CL-E300EX” for the
CL-E300EX model, “CL-E303” for
the CL-E303 model, and “CL-
E303EX” for the CL-E303EX model |
| Serial Number | - | RH********** | Displays the serial number |
| Boot Version
*2 | - | *. * | Displays the boot version |
| ROM Version
*2 | - | ********** | Displays the ROM version |
| ROM Date
*2 | - | **/**/** | Displays the ROM creation date |
| ROM Check-
Sum
*2 | - | **** | Displays the ROM checksum |
| Head Check
*5 | - | ** | Displays whether the resistance
value of the head is within the
specification range |
| Print Counter | - | ****.*** km | Displays the print counter |
| Service Counter | - | ****.*** km | Displays the service counter |
| Cut Counter | - | ********** | Displays the cut counter only for
models with cutters |
| Sensor Monitor
*2 | - | *. V | Displays the sensor level |
| Optional
Interface
*5 | - | ********** | Displays the type of interface board
installed |
| MAC Address | - | *. . . . . . . . . . . . . . . . . . . . . . . . . . . . . . . . . . . . . . . . . . . . . . . . . . . . . . . . . . . . . . . . . . . . . . . . . . . . . . . . . . . . . . . . . . . . . . . . . . . . .
displays the MAC address |
2 This cannot be obtained with LabelPrinterUtility. To check the value, print the list of settings.
5 CL-E300EX/CL-E303EX only

Refer to 7.3 Configuration Print Mode
4.2 Obtaining the LabelPrinterUtility
- Access the following URL from a PC to download the LabelPrinterUtility. https://www.citizen-systems.co.jp/en/printer/download
- Save the downloaded LabelPrinterUtility.exe to the desired folder.
4.3 Using the LabelPrinterUtility
- Start LabelPrinterUtility.exe.
Refer to the user manual for more information on using the application.
5. Configuring the Wired LAN Network Settings Using the Utility Software
You can check and change the settings of the wired LAN interface board by using utility software that runs in Windows.
The utility software includes CITIZEN Network Seeker which can be used with CL-E300/CL-E303 and NetToolK which can be used with CL-E300EX/CL-E303EX.
5.1 Network Seeker
(1) Starting Network Seeker
After obtaining the program "NetSeeker.exe" from the CD-ROM or our website, double click the program. A dialog box appears.
Start a search for printers by clicking the "Seek" button.
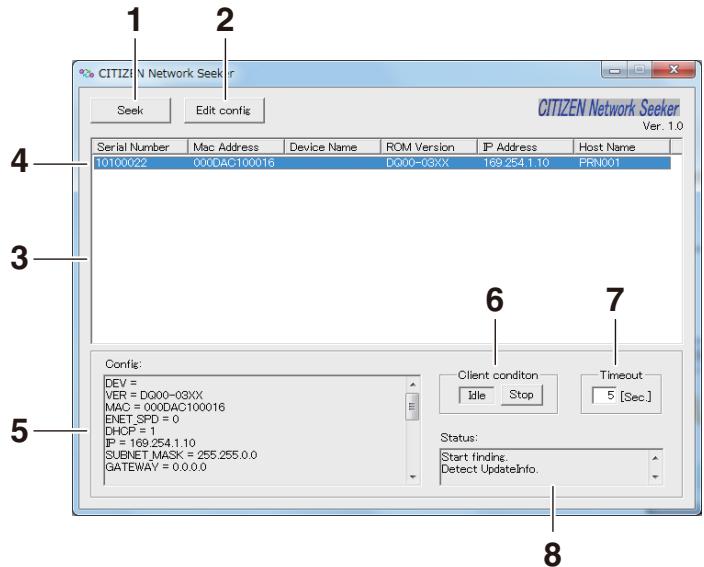
Start a search for Ethernet interface boards on the network.
Waits for a response during the time configured with [Communication timeout].
Change the settings of the selected board.
Single click to select a board and double click to change settings.
- Board information
Single click to select a board and double click to change settings.
- Configuration display section
View the settings of the selected board.
- Client condition display
When "Busy" is displayed, operations to search, change settings, and so on are prohibited.
If you click "Stop", the "Busy" status is cleared forcibly.
- Communication timeout
You can configure the time-out duration for searches and other operations.
- Status log
View the status of the utility.
(2) Changing Settings
You can configure an Ethernet interface board by selecting it at the main dialog box, and then clicking "Edit config".
These are unalterable parameters.
These parameters are for display purposes only.
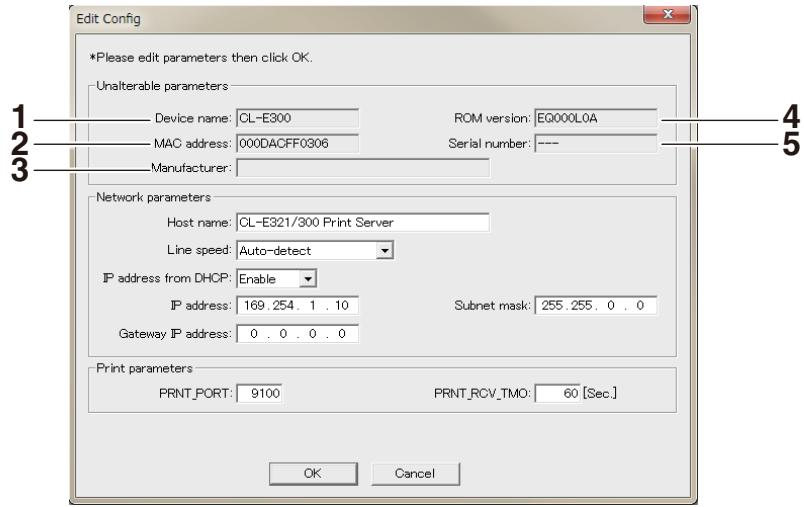
- Device name
- MAC address
- Manufacturer
- ROM version
- Serial number
These are changeable parameters. Users can change these parameters.
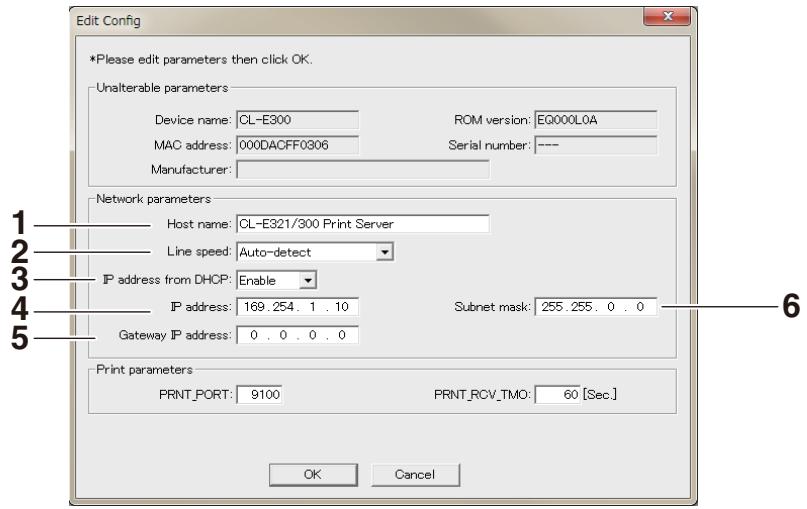
- Host name
- Line speed
- IP address from DHCP
- IP address
- Gateway IP address
- Subnet mask
(1) Installing the NetToolK
After obtaining "NetToolkSetup.exe" from the CD-ROM or our website, start it.
Refer to the user manual for more information on using the installer.
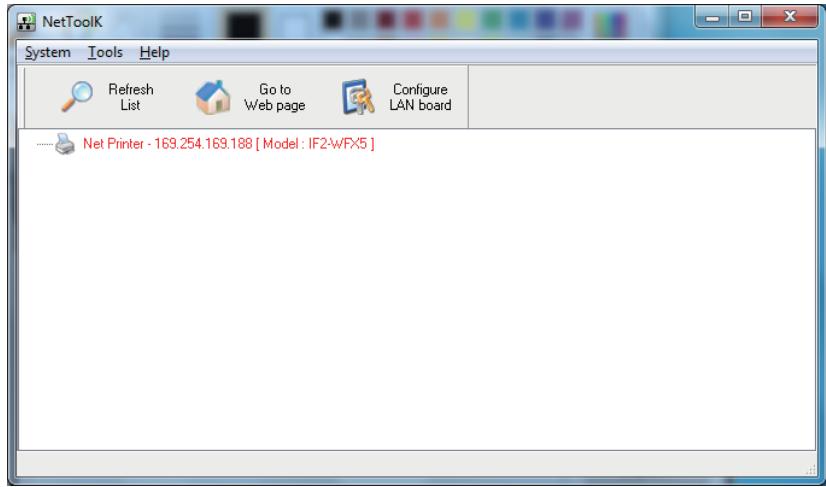
(2) Information list window
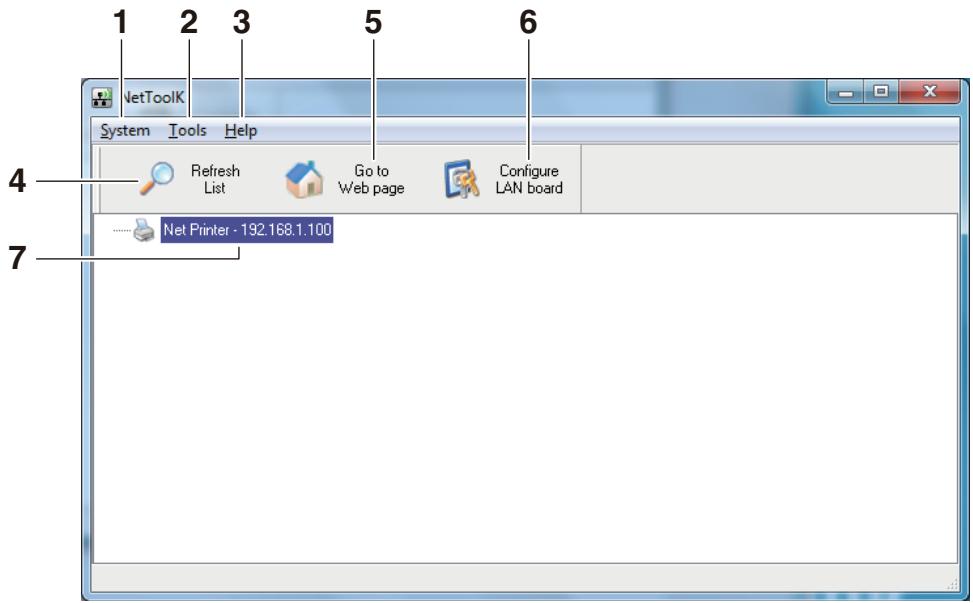
- "System"
Select "System" - "Exit" to exit the NetToolK.
- "Tools"
Select "Tools" - "Settings" to switch the display of the LAN interface board information.
When the "Show LAN board information" check box is selected, the LAN interface board operation status can be displayed as shown below.
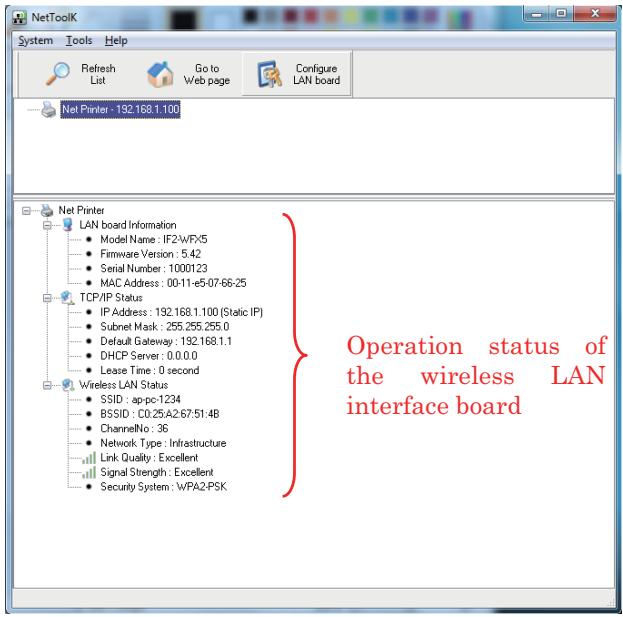
- "Help" menu
Select "Help" - "About" to display the version information of NetToolK.
- "Refresh List" button
Refresh the list of the LAN interface board. The application periodically refreshes the list, but you can refresh the list manually by clicking this button.
- "Go to Web Page" button
Select the LAN interface board you want to configure, and then click "Configure using a web browser". The browser starts and displays the Web manager.
- "Configure the LAN Board" button
Select the LAN interface board you want to configure, and then click "Configure Select the LAN See Board". See Setup Window.
- LAN interface board list
The list displays the LAN interface boards connected to network.
The LAN interface boards connected to the same subnet are displayed.
(3) Setup Window
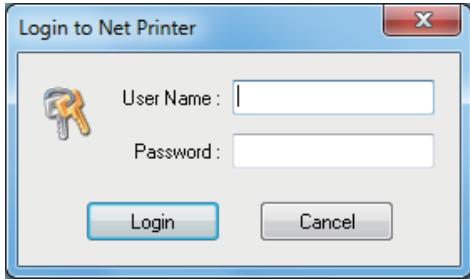
You can configure the LAN interface board by selecting the LAN interface board from the list screen and clicking "Configure the LAN Board".
To login at the login screen, enter a username and password.
Username: admin (factory default)
Password: admin (factory default)
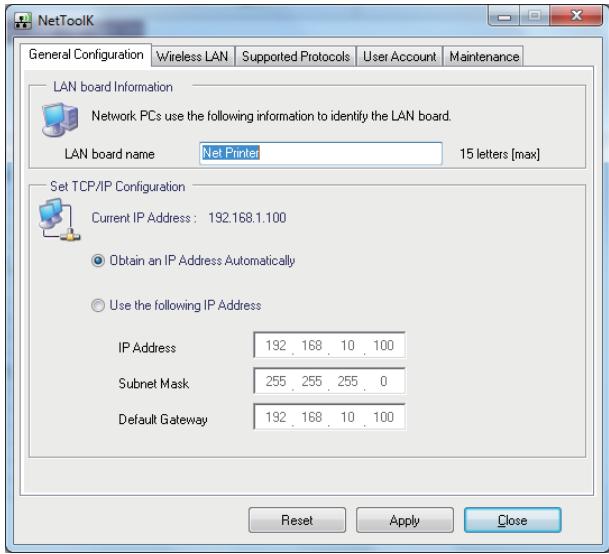
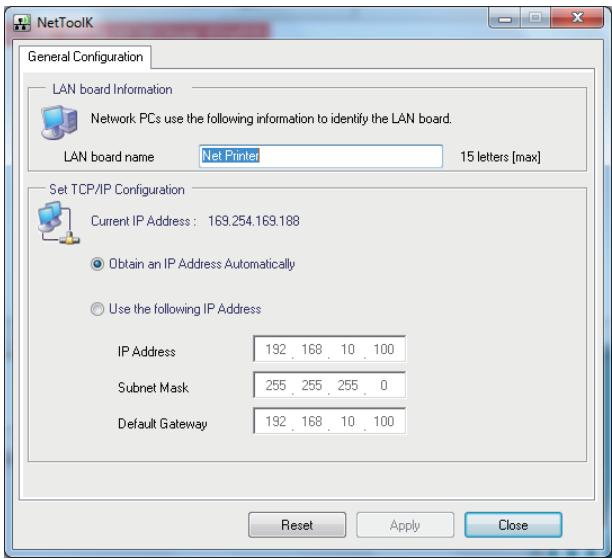
1. "General" Tab
Use the "General" tab to configure WLAN board name and IP address.
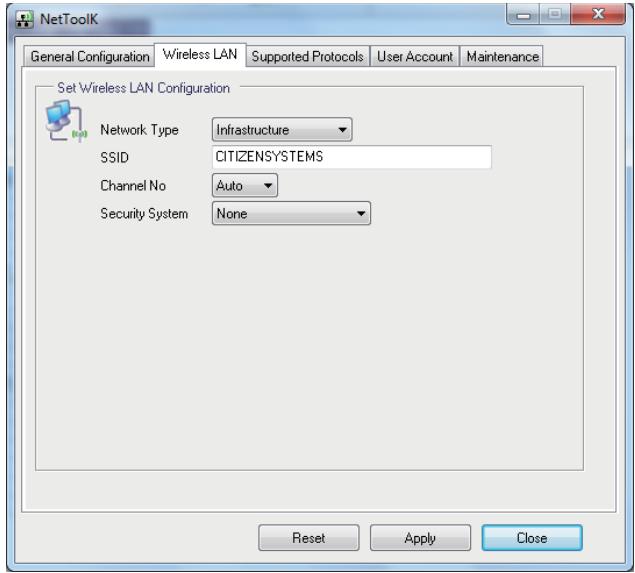
2. "Wireless LAN" Tab
Use the "Wireless LAN" tab to configure LAN.
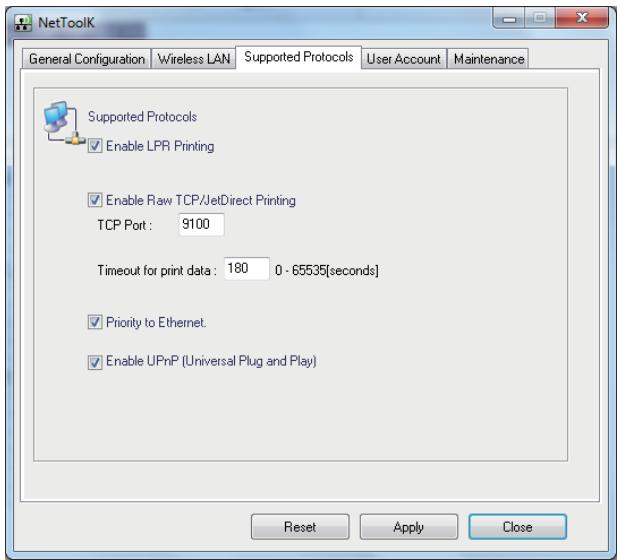
3. "Supported Protocols" Tab
Use the "Supported Protocols" tab to enable LPR and the RAW protocol, set printer timeout duration, enable "Priority to Ethernet", and enable UPnP.
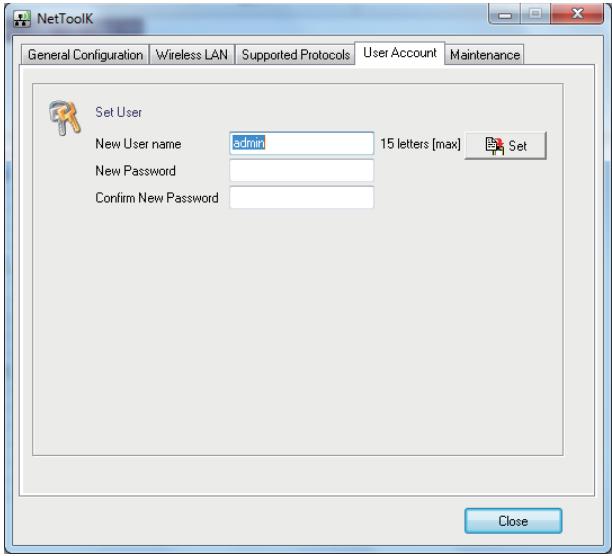
4. "User Account" Tab
Use the "User Account" tab to change the administrator name and password.
5. "Maintenance" Tab
Use the "Maintenance" tab to restart the wired/wireless LAN interface board, return the settings to the factory default settings, and update the firmware.
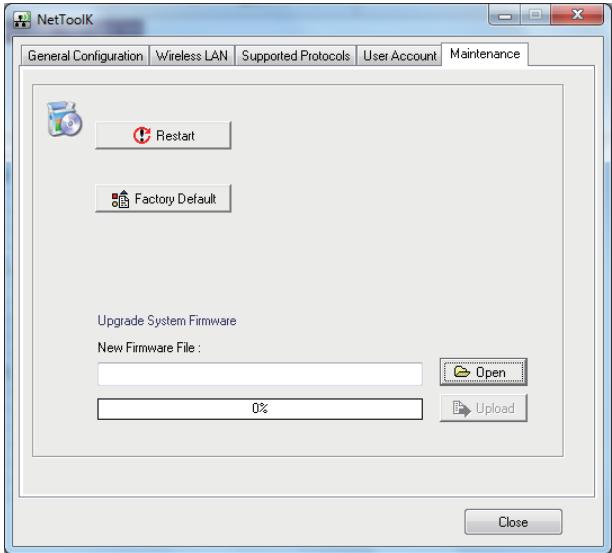
- Contact us for details on updating the firmware.

CAUTION
- If you forget the new username and password, settings must be returned to the factory default settings.
- If the computer at which you are performing configuration and LAN interface board have different subnet values, a message like the one shown below appears in red letters.
If this message appears, set the IP address using the "Configure WLAN Board" button before configuring the LAN interface board.
Only the server name and IP address can be configured.
Configure the IP address correctly one time before configuring the wireless LAN interface board.
6. Configuring Printer Settings Using LinkServer
Printer and network settings can be configured using a Web browser or Android app via the LinkServer function built into the CL-E300/CL-E303.

CAUTION
For Android, you need to download the app and provide a USB cable yourself.
The Android app can be downloaded from Google Play.
https://play.google.com/store/apps/details?id=com.citizen.app.linkserver
6.1 LinkServer user roles
LinkServer has the following three user roles available: User, Operator, and Administrator
The menus that appear for each user role can be changed to restrict operational access to LinkServer.
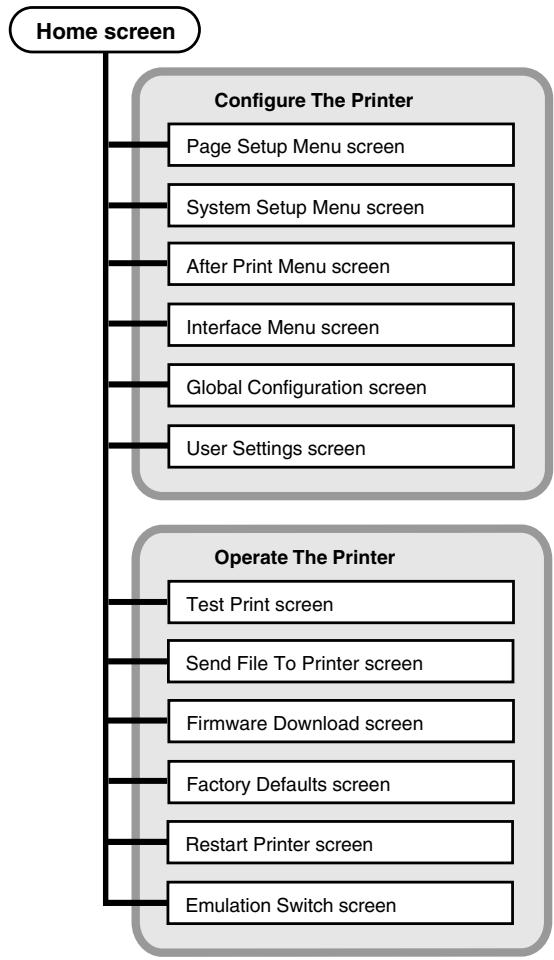
The Home screen for the user role appears when first connecting.
The following figure illustrates the LinkServer menu configuration.
6.3 LinkServer connection procedure
Wired LAN
1. Open a Web browser and enter the IP address of the desired printer into the address bar (area circled in red).
The example illustrates the entry of "http://169.254.1.10".
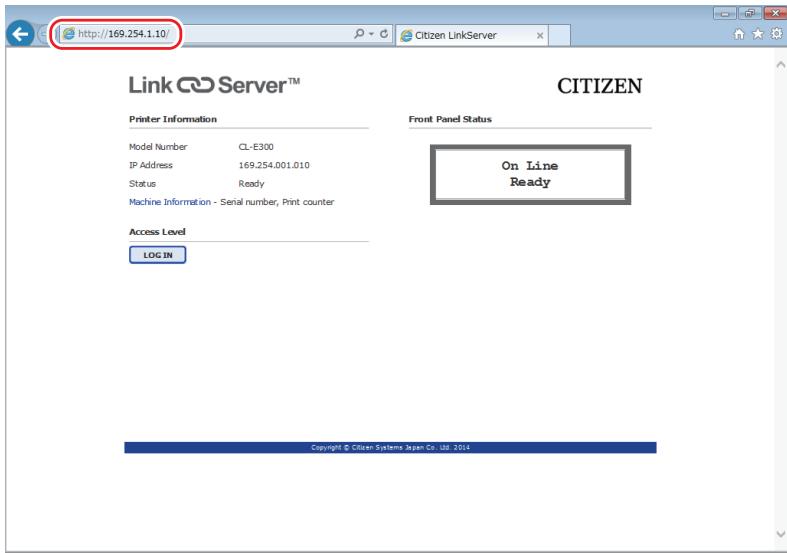
2. Press the [LOG IN] to display the authentication window.
![CITIZEN CL-E300 - Press the [LOG IN] to display the authentication window. - 1](/content/2024/11/218613/images/dc69fc9be398a3f281a6fc5b6c091fdeb2c3e553809ac487dbb083687b0714a3.jpg)
3. Enter your user name and password.
The default authentication credentials for the Operator role are as follows.
- User name: Operator
- Password: Operator
The default authentication credentials for the Administrator role are as follows.
- User name: Admin
- Password: Admin
The user name and password for the Operator and Administrator roles can be changed in the User Settings menu. User names and passwords can contain up to 20 single-byte, alphanumeric characters and symbols.
After successful authentication, the Home screen for the Operator or Administrator role appears.
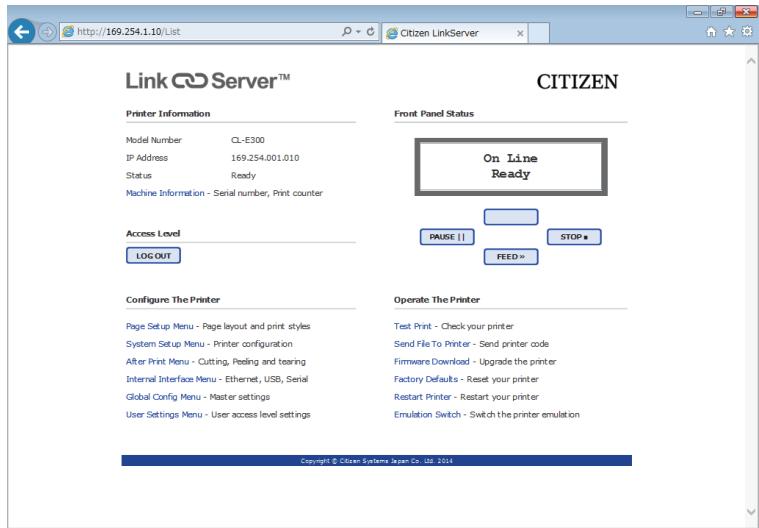
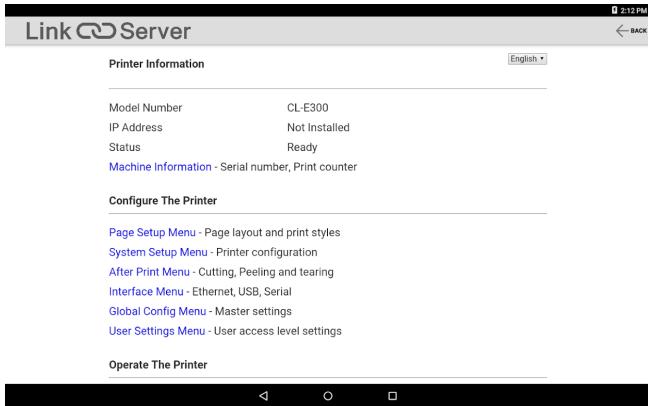
Administrator Home Screen
The menus that appear for the User and Operator roles can be changed from the User Settings menu.
- Printer Information: Displays printer information.
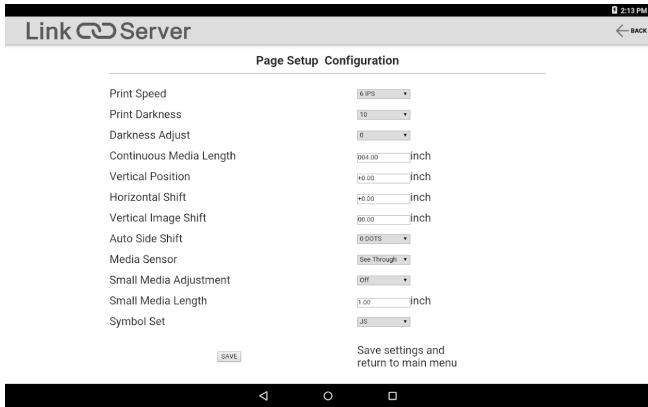
- Configure The Printer: Provides access to the same settings as configured with LabelPrinterUtility.
- Operate The Printer: Used to operate the printer.
The Home screen for the User role appears again after logging out.
USB (Android device)
1. Preparation
You will need a so-called USB OTG (On-The-Go) adapter.
Which has a micro USB or Type-C male connector on the Android side (depending on your Android device) and a Type-A female connector on the other side.
Then you can connect a regular USB cable for printer which has a Type-A male and Type-B male to connect to a printer.
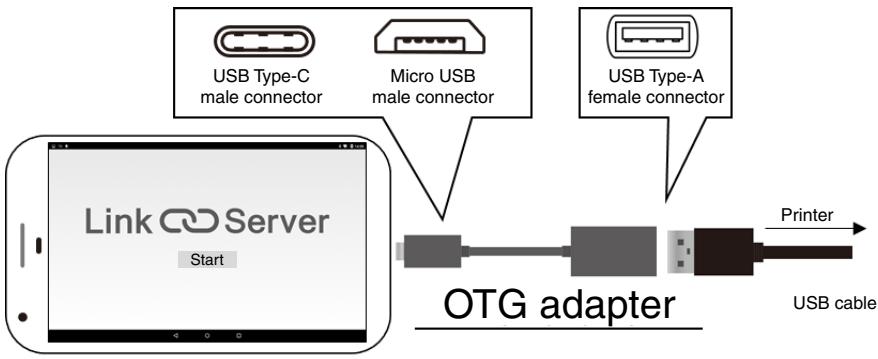
2. Usage
The LinkServer app automatically starts up when a supported printer model is connected by USB to your Android device.
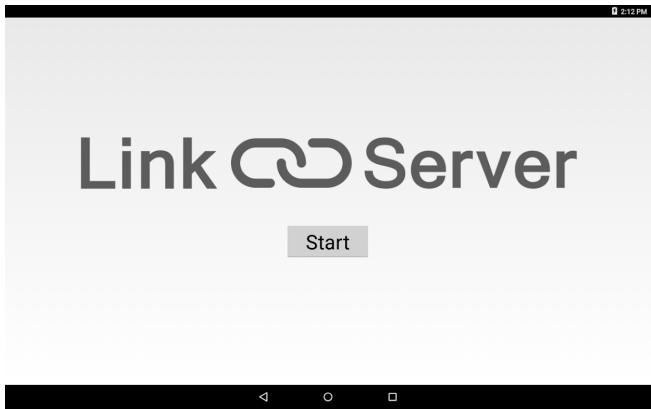
The app shows you the printer information or lets you set up the printer.
Press "SAVE" to apply changes.
The printer will automatically restart and save the new settings.
Wait until the printer starts up completely if you wish for further operations.
7. Configuring the Printer Using the Operation Panel
The following operations can be performed from the control panel after changing the printer operation mode to the special mode.
- Adjust media sensors
- Print test samples
Print the settings configuration
- Change emulation modes
HEXdumpmode
- Initialize the printer
*This device is not equipped with the [Menu Configuration Mode] featured in other models.
- With the top cover closed, turn on the power to the printer while pressing and holding the FEED key.
The printer changes to the special mode.
The buzzer emits 3 short tones and the status LED flashes alternately in green and red.
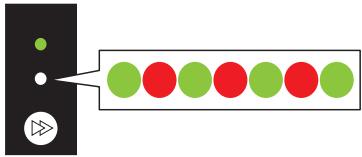
- Press the FEED key to select the desired operation mode.
| Mode | Buzzer | Status LED |
| Color | Interval |
| Special function mode | 3 short tones | Alternately in green and red | Flashes quickly |
| |
| Press the FEED key ↓ |
| Sensor Adjustment Mode | 1 short tones | Green | Flashes |
| |
| Press the FEED key ↓ |
| Test print mode | 2 short tones | Green | Flashes quickly |
| |
| Press the FEED key ↓ |
| Configuration print mode | 3 short tones | Amber | Flashes |
| |
| Press the FEED key ↓ |
| Emulation switching mode | 4 short tones | Amber | Flashes quickly |
| |
| Press the FEED key ↓ |
| HEX dump mode | 5 short tones | Red | Flashes |
| |
| Press the FEED key ↓ |
| Initialization mode | 6 short tones | Red | Flashes quickly |
| |
| Press the FEED key ↓ |
| Returns to the sensor adjustment mode. |
- Once the desired operation mode has been selected, press and hold the FEED key for at least 3 seconds.
- Release the FEED key once the buzzer emits a long tone.
The printer is now in the desired operation mode.
- After finishing use of operation modes, press and hold the FEED for at least 3 seconds to return to the normal startup mode.
After you have finished configuring each mode, restart the printer.
- To return to the normal startup mode without selecting an operation mode after changing to the special function mode, press and hold the FEED key for at least 3 seconds.
- If you continue to press and hold the FEED key for at least 3 seconds after the buzzer emits a long tone, the buzzer will emit 4 short tones, and then printer restarts.
The printer restarts, and changes to normal mode.
7.1 Sensor Adjustment Mode
Use this mode to adjust media sensors (upper or lower) in accordance with the media used.
Set the sensor position and media before starting this adjustment procedure.
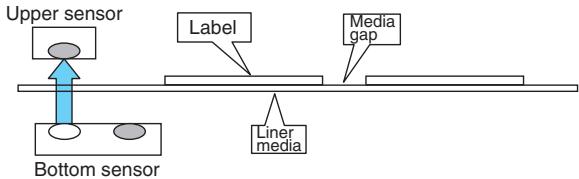
- Align the bottom sensor and upper sensor with each other at the same position.

Refer to Transmissive Sensor Adjustment
- Peel a label and set the media so that only the backing paper (glassine paper) reaches the platen roller and media sensor.
If the media has black lines, do not set the media so that a black line is between the sensors.
- Adjust the sensors.

Refer to Sensor adjustment
- Adjust the reflective sensor so that it is underneath the media.
- Set the media so that the media covers the platen roller and media sensor.
Set that media so that black lines or gaps between labels do not cover the sensor.
- Using continuous media and label media without gaps between labels
- Set the media so that a section without a black line (or label face stock for label media) does cover the platen roller and media sensor.
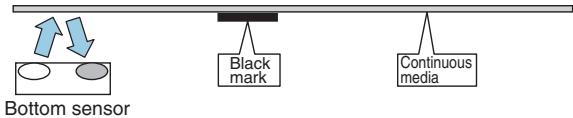
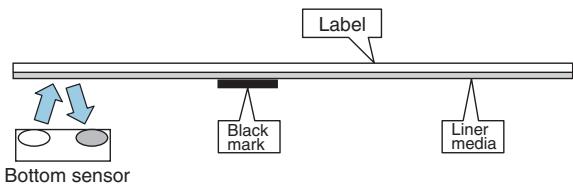
Do not install the upper sensor directly above the bottom sensor.
Normal operation may not be possible.
Using label media with gaps
Peel a label and set the media so that only the backing paper (glassine paper) reaches the platen roller and media sensor.
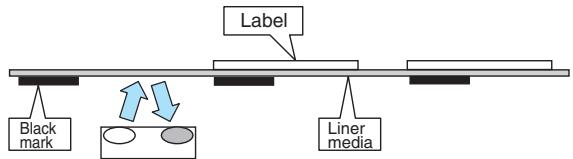
Bottom sensor
3. Adjust the sensors.

Refer to Sensor adjustment
Sensor adjustment
- Turn on the power to the printer while pressing and holding the FEED key to start the printer in special function mode.
- Press the FEED key once to select sensor adjustment mode.
The buzzer emits 1 short tone.
The status LED also flashes in green.
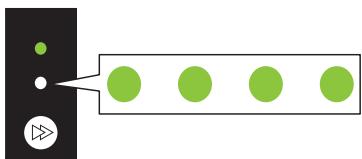
- Press and hold the FEED key for at least 3 seconds.
- Release the FEED key once the buzzer emits a long tone and then press the FEED key again.
The printer is now in sensor adjustment mode.
- Press the FEED key to select either transmissive sensor or reflective sensor.
Each press of the FEED key toggles between transmissive sensor and reflective sensor options.
| Sensor | Buzzer | Status LED |
| Color | Interval |
| Transmissive sensor | 1 short tones | Green | Flashes |
| |
| Press the FEED key ↓ |
| Reflective sensor | 2 short tones | Green | Flashes quickly |
| |
- Press and hold the FEED key for at least 3 seconds.
- Release the FEED key once the buzzer emits a long tone.
The sensor adjustment process starts.
- Once sensors have been adjusted, the buzzer emits 1 short tone.
-
The buzzer emits 1 long tone if sensor adjustment fails. If this happens, check the sensor and media positions.
-
To save and complete the sensor adjustments, press and hold the FEED key for at least 3 seconds.
The buzzer emits 4 short tones, and the printer restarts.
7.2 Test print mode
This mode prints the test sample.
This printer can print test samples to label media and continuous media.
Printing test samples is a quick way to check print quality.
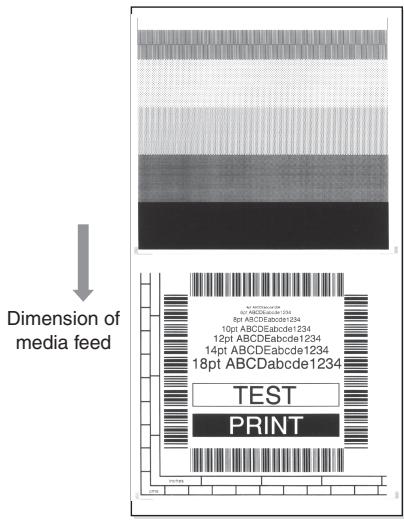
Load media and then perform the following procedure.
- Turn on the power to the printer while pressing and holding the FEED key to start the printer in special function mode.
- Press the FEED key twice to select test print mode.
The buzzer emits 2 short tone.
The status LED also flashes quickly in green.
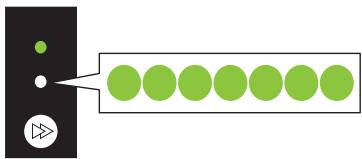
- Press and hold the FEED key for at least 3 seconds.
- Release the FEED key once the buzzer emits a long tone.
The printer is now in test print mode.
- Press the FEED key to select the media.
Each press of the FEED key toggles between label media and continuous media.
| Media | Buzzer | Status LED |
| Color | Interval |
| Label media | 1 short tones | Green | Flashes |
| |
| Press the FEED key ↓ |
| Continuous | 2 short tones | Green | Flashes quickly |
| |
- Press and hold the FEED key for at least 3 seconds.
- Release the FEED key once the buzzer emits a long tone.
The test print process starts.
-
Once the test sample has been printed, press the FEED key to print another test sample without a feed operation.
-
Once the test sample has been printed, turn the power to the printer off and on again to reset the printer in the normal startup mode.

CAUTION
Normal mode printing can also be performed when the printer is in test print mode. Note that pressing the FEED key while the printer is in test print mode will not feed media. Instead, it will print a test sample.
7.3 Configuration Print Mode
This mode is used to print the printer settings configuration when using continuous media mode. Printing the current settings configuration is a quick way to check the current configuration.
Example of printed settings configuration
| Model Number | : | CL-E300 |
| Serial Number | : | RH********** |
| Boot Version | : | 0.0 |
| ROM Version | : | **************** |
| ROM Date(DD)//MM//YY) | : | **/**/** |
| ROMCheck Sum | : | **************** |
| Print Counter | : | 0001.234km |
| Service Counter | : | 0001.234km |
| Cut Counter | : | 0 |
| Sensor Monitor | : | 1.50V |
| MAC Address | : | ff:ff:ff:ff:ff |
| [Global Config Menu] |
| Config Set | : 1 |
| [PageSetup Menu] |
| Print Speed | : 6 IPS |
| Print Date | 10 |
| Action |
| Feed Key Action | : Feeds Menu |
| [Interface Menu] | |
| RS-232C Baud rate | : 9600 bps |
| RS-232C Parity | : None |
| RS-232C Length | : 8 bit |
| RS-232C Stop bit | : 1 bit |
| RS-232C X-ON | : Yes |
| USB Device Class | : Printer |
| USB VCOM Protocol | : Auto |
| IPv4 Address | : 000.000.000.000 |
| IPv4 Subnet Mask | : 000.000.000.000 |
| IPv4 Gateway | : 000.000.000.000 |
| IPv4 DHCP | : On |
| IPv6 | : On |
Load media and then perform the following procedure.
- Turn on the power to the printer while pressing and holding the FEED key to start the printer in special function mode.
- Press the FEED key 3 times to select configuration print mode.
The buzzer emits 3 short tone.
The status LED also flashes in amber.
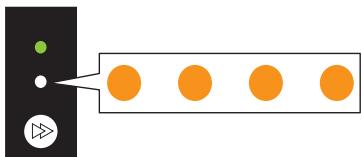
-
Press and hold the FEED key for at least 3 seconds.
-
Release the FEED key once the buzzer emits a long tone.
The configuration print process starts.
Once the configuration has been printed, the printer will be in the online state.
- To print configurations that include default settings, continue pressing and holding the FEED for at least 3 seconds without releasing your finger at step 4.
- Release the FEED key once the buzzer emits a long tone and then press the FEED key again.
The process to print a configuration that includes default settings starts.
Once the configuration has been printed, the printer will be in the online state.
7.4 Emulation switching mode
This mode is used to change the command set used.
- Turn on the power to the printer while pressing and holding the FEED key to start the printer in special function mode.
- Press the FEED key 4 times to select emulation switching mode.
The buzzer emits 4 short tone.
The status LED also flashes quickly in amber.
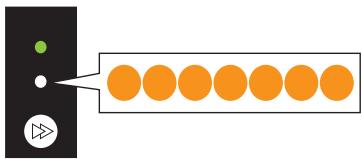
- Press and hold the FEED key for at least 3 seconds.
- Release the FEED key once the buzzer emits a long tone.
The printer is now in emulation switching mode.
5. Press the FEED key to select an emulation switching mode.
Each press of the FEED key cycles through the emulation mode options of Datamax mode, Zebra mode, and Eltron mode.
| Emulation mode | Buzzer | Status LED |
| Color | Interval |
| Datamax mode | 1 short tones | Green | Flashes |
| |
| Press the FEED key ↓ |
| Zebra mode | 2 short tones | Green | Flashes quickly |
| |
| Press the FEED key ↓ |
| Eltron mode | 3 short tones | Amber | Flashes |
| |
| Press the FEED key ↓ |
| Returns to Datamax mode. |
6. Press and hold the FEED key for at least 3 seconds.
7. Release the FEED key once the buzzer emits a long tone and then press the FEED key again.
The selected emulation mode is set, and the printer restarts.
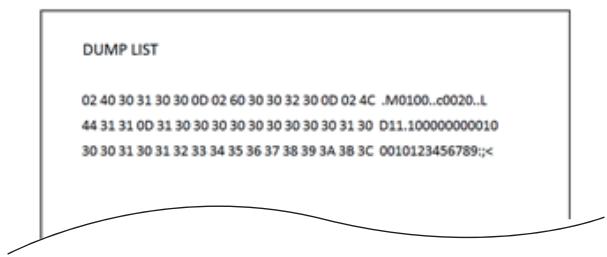
7.5 HEX Dump Mode
This mode is used to print a hex dump list (data received by the printer represented in hex values) for confirmation of the data content.
Example of dump list printing
Load media and then perform the following procedure.
- Turn on the power to the printer while pressing and holding the FEED key to start the printer in special function mode.
2. Press the FEED key 5 times to select HEX dump mode.
The buzzer emits 5 short tone.
The status LED also flashes in red.
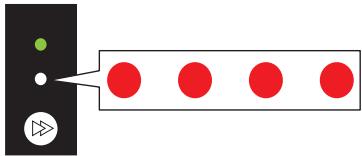
3. Press and hold the FEED key for at least 3 seconds.
4. Release the FEED key once the buzzer emits a long tone.
The printer is now in HEX dump mode.
Each press of the FEED key toggles between label media and continuous media.
| Media | Buzzer | Status LED |
| Color | Interval |
| Label media | 1 short tones | Green | Flashes |
| |
| Press the FEED key ↓ |
| Continuous | 2 short tones | Green | Flashes quickly |
| |
6. Press and hold the FEED key for at least 3 seconds.
7. Release the FEED key once the buzzer emits a long tone and then press the FEED key again.
The hex dump list print process starts.
8. Once the HEX dump list has been printed, turn the power to the printer off and on again to reset the printer in the normal startup mode.
7.6 Initialization Mode
This mode is used to initialize printer settings and the user memory area.
1. Turn on the power to the printer while pressing and holding the FEED key to start the printer in special function mode.
2. Press the FEED key 6 times to select initialization mode.
The buzzer emits 6 short tone.
The status LED also flashes quickly in red.
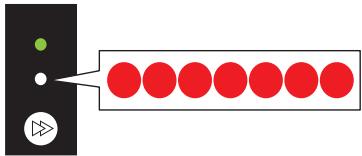
3. Press and hold the FEED key for at least 3 seconds.
4. Release the FEED key once the buzzer emits a long tone.
The printer is now in initialization mode.
5. Press the FEED key to select initialization of settings or initialization of the user memory area.
Each press of the FEED key toggles between settings initialization and user memory area initialization.
| Initialization option | Buzzer | Status LED |
| Color | Interval |
| Settings initialization | 1 short tones | Green | Flashes |
| |
| Press the FEED key ↓ |
| User memory area initial-ization | 2 short tones | Green | Flashes quickly |
| |
6. Press and hold the FEED key for at least 3 seconds.
7. Release the FEED key once the buzzer emits a long tone and then press the FEED key again.
Once the selected initialization process completes, the printer restarts.
8. Online Configuration Mode
- Press and hold the FEED key for at least 3 seconds while the printer is online and not receiving data.
The printer is now in online configuration mode.
The buzzer emits 3 short tones and the status LED flashes alternately in green and red.
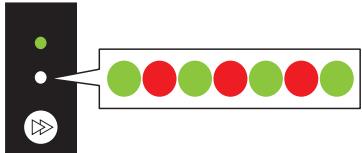
- Press the FEED key to select media sensor mode.
| Media sensor mode | Buzzer | Status LED |
| Color | Interval |
| Transmissive sensor mode | 1 short tones | Green | Flashes |
| |
| Press the FEED key ↓ |
| Reflective sensor mode | 2 short tones | Green | Flashes quickly |
| |
| Press the FEED key ↓ |
| Continuous media mode | 3 short tones | Amber | Flashes |
| |
| Press the FEED key ↓ |
| Bluetooth connection update mode * | 4 short tones | Amber | Flashes quickly |
| |
| Press the FEED key ↓ |
| All Bluetooth pairing information deletion mode * | 5 short tones | Red | Flashes |
| |
| Press the FEED key ↓ |
| Returns to the transmissive sensor mode. |
- Press and hold the FEED key for at least 3 seconds.
- Release the FEED key once the buzzer emits a long tone.
The selected media sensor mode is set.
- Only when a Bluetooth interface board is installed
9. Clearing Jobs Stored in the Printer
Jobs stored in the printer can be cleared when the printer is paused.
- Press the FEED key if the printer is printing or receiving data.
The printer is now paused.
- Press and hold the FEED key for at least 3 seconds.
The buzzer emits 1 short tone.
- Release the FEED key.
One job has been cleared.
Alternatively, continue to press and hold the FEED key for at least 3 second without releasing
your finger until the buzzer emits 2 short tones.
- Release the FEED key once the buzzer emits 2 short tones.
All jobs have been cleared.
10. Cutter manual operation mode
- Press and hold the FEED key for at least 3 seconds while the printer is online and not receiving data.
The printer switches to online configuration mode.
The buzzer emits 3 short tones and the status LED flashes alternately in green and red.
- Press and hold the FEED key for at least another 5 seconds without releasing it.
- The buzzer emits 4 tones and the cut operation is performed once.
This function is enabled for only the integrated cutter.
11. Maintenance
Perform printer maintenance on a regular basis to ensure that the printer is always in good working condition.
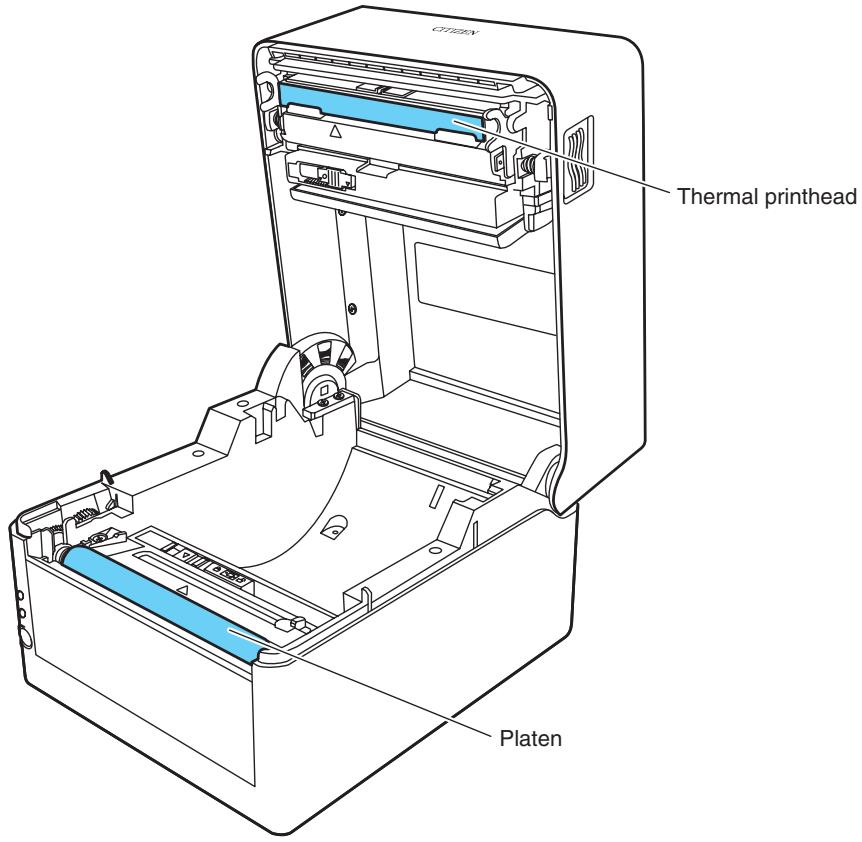

CAUTION
Excluding ethyl alcohol, do not use solvents such as benzene, acetone, thinner, or others to clean the printer. Doing so may cause the printer surface or other parts to deform.
11.1 Plastic Surface of Printer and Platen
- Use a soft cloth or cotton swab dipped with a small amount of ethyl alcohol to wipe off dust and dirt.

CAUTION
Using an excessive amount of ethyl alcohol to clean the platen may cause surface deformation, which would result in unstable feed operation.
11.2 Thermal head
- Use a cotton swab dipped with a small amount of ethyl alcohol.

CAUTION
The thermal head is hot immediately after printing. Do not touch the thermal head at this time.
- Do not touch the thermal head with bare hands or do not allow metals to come into contact with the thermal head.
11.3 Peeler
Peeled label detection sensor
- Use a soft cloth or cotton swab to wipe off dust and dirt.
Peeler roller
- Use a soft cloth or cotton swab dipped with a small amount of ethyl alcohol to wipe off dust and dirt.

CAUTION
You may get injured by the peeling plate during cleaning. Take sufficient care.
12.1 Error/Alarm Indications
The status LED and buzzer are used to confirm error status when errors occur in the printer.
| Status LED | Buzzer | Error | Error description (in bold) and resolution |
| Flashes in red | 2 short tones | Head Up Error | Top cover is not closed correctly.
• Close the top cover correctly. |
| Flashes in red | 3 short tones | End of Media Error | Printer has run out of media.
Media is not set correctly.
• Open the top cover and load media or set the media correctly. |
| Flashes in red | 4 short tones | Media Load Error | Label gaps or black lines cannot be detected.
• Check the media sensor positions.
• Readjust the media sensors.
• Make sure the selection of transmissive sensor, reflective sensor, or continuous media matches the type of media used.
Media cannot be transported.
• Open the top cover, remove any media blocking transport, and set the media again. |
| Flashes in red | 6 short tones | Cutter Error | Cutter is not operating.
• Open the top cover and remove any media or other object blocking cutter operation.
• If the cutter does not operate after removing foreign objects, the cutter may not be connected or installed correctly or may have failed. Contact your retailer.
Home position cannot be detected.
• The auto cutter may have failed. Contact your retailer. |
| (model with cutters) |
| Peeler Error | The peeler cannot be recognized.
• Turn the power to the printer off and on again.
• If the peeler does not operate after turning the power off and on again, it may not be correctly connected or installed, or there may be a breakdown.
Contact your retailer. |
| Flashes in amber | Rep-
etitions of long
tones | Head Low
Temperature Error | The thermal head is at a low temperature (approximately -10°C).
• Use the printer in proper environments of at least 0°C.
The thermal head is not connected.
• Check the cable connection with the thermal head. |
| Flashes alter-nately in red and green | Rep- etitions of long tones | RS-232C Communication Error | Parity error Framing error Receive buffer is full Transmission buffer is fullCheck the communication settings. |
| Flashes alter-nately in red and amber | Rep- etitions of long tones | Hardware Error | A hardware error has been detected. Immediately turn off the power to the printer and contact your retailer. |
| Flashes in amber | None | Head High Temperature Alarm Motor High Temperature Alarm | The thermal head or feed motor is at a high temperature. Printing stops if the thermal head reaches approximately 70°C or more while printing. Printing resumes automatically once the temperature falls to approximately 60°C or lower. Printing stops if the feed motor reaches approximately 95°C or more while operating. Printing resumes automatically once the temperature falls to approximately 85°C or lower. |
| Flashes in red | None | Head Check Alarm | The heater element resistance value of the thermal head is abnormal. A thermal head with a number of heater elements differing from the specifications is installed. We recommend contacting your retailer and requesting replacement of the thermal head. * The CL-E300/CL-E303 does not have a broken head element check function so if there are vertical white lines that you sus-pect are caused by a broken head element, clean the thermal head and then perform a print check in the test print mode. If the white line problem is not resolved, the head element may be broken. |
12.2 Troubleshooting
This section explains the corrective action to take when trouble occurs with the printer or an error message is displayed.
- Items to check when a malfunction occurs
When the printer malfunctions during operation, take corrective action with reference to the following table.
If the corrective action does not solve the problem, consult with the service personnel at the dealer where you purchased the printer.
| Indication | Check | Corrective action |
| The LED do not light up when printer power is connected. | Is the plug of the power cord correctly inserted into the electric outlet? | Insert the plug of the power cord correctly in the electric outlet. |
| Is the connector of the power cord correctly inserted into the power inlet of the printer? | Insert the connector of the power cord correctly into the power inlet of the printer. |
| Is the power cord damaged? | Replace the power cord. Consult with the dealer where the printer was purchased to make sure you obtain a cord made especially for the printer.
Note: Do not use any power cord except one made especially for the printer. |
| Is power supplied to the electric outlet the printer is connected to? | Check to make sure power is supplied to the outlet.
If there are any problems, make sure power is supplied to the building.
Or find out if a power failure has occurred. |
| Is the main fuse in the building's fuse box burnt out? | If necessary, replace the main fuse in the building's fuse box, and reset the main breaker.
Ask a qualified serviceman to carry out the replacement. |

Refer to 3.4 Connecting the AC Adapter
| Indication | Check | Corrective action |
| Paper is feeding, but nothing is printed. | Is the thermal printhead dirty?
Is a label stuck to the head? | If it is dirty, remove the dirt with the attached head cleaner (Sold separately).
If a label is stuck to the thermal printhead remove it.
Note: Do not use a metal object to remove a label stuck to the inside of the printer.
(This may damage the thermal printhead.)
If adhesive label material is stuck to the thermal printhead, remove it with a soft cloth soaked in ethyl alcohol. |

Refer to 11. Maintenance
| Indication | Check | Corrective action |
| The printer is not printing neatly. | Are the media correctly set? | Correctly set the media. |
| Is the printing density too high or too low? | Set the appropriate printing density using the menu or control software. |
| Is the platen dirty?
Is it deformed? | If it is dirty, clean it with ethyl alcohol.
If it is deformed, replace it.
Note: Consult with the dealer that supplied the printer concerning the replacement. |
| Is the thermal printhead dirty?
Is a label stuck to the head? | If it is dirty, remove the dirt with the attached head cleaner (Sold separately).
If a label is stuck to the thermal printhead remove it.
Note: Do not use a metal object to remove a label stuck to the inside of the printer. (This may damage the thermal printhead.)
If adhesive label material is stuck to the thermal printhead, remove it with a soft cloth soaked in ethyl alcohol. |
| Is the printer's head pressure balance correct for the width of the media that is used? | Use the slider to adjust the head pressure of the thermal print head. |

Refer to 3.2 Loading Paper

Refer to 4.1 List of Settings

Refer to 11. Maintenance
| Indication | Check | Corrective action |
| The printing position changes. | Are the media correctly set? | Correctly set the media. |
| Is the platen dirty? | If it is dirty, clean it with ethyl alcohol. |
| Is it deformed? | If it is deformed, replace it. |
| Note: Consult with the dealer that supplied the printer concerning the replacement. |
| Are the data contents and the command signals from the host appropriate? | If an error message is displayed, check the content of the software and the communication status set by the host computer. |
| Are the menu values set appropriately? | Set the correct menu values using the operating panel or the host computer. |
| Are the sensitivities of the media sensors appropriate for the media that is used? | Set the media sensitivity to appropriate values. |
| If this does not solve the problem, change the "Sensor level" that is set in the "System setup." |

Refer to 2.2 Operation panel

Refer to 3.2 Loading Paper

Refer to 4.1 List of Settings

Refer to 11. Maintenance
12.3 Basic Specifications
Printing
| Item | Description |
| Print method | Direct thermal |
| Resolution | CL-E300/CL-E300EX | Main scanning line density: 203 dots/inch (8 dots/mm) |
| Sub-scanning line density: 203 dots/inch (8 dots/mm) |
| Head dots: 864 dots (effective dots: 832) |
| CL-E303/CL-E303EX | Main scanning line density: 300 dots/inch (11.8 dots/mm) |
| Sub-scanning line density: 300 dots/inch (11.8 dots/mm) |
| Head dots: 1248 dots (effective dots: 1240) |
| Max. print width | CL-E300/CL-E300EX | 104 mm / 4.1 inch |
| CL-E303/CL-E303EX | 105 mm / 4.1 inch |
| Max. print length | CL-E300/CL-E300EX | (Datamax) 2539.7 mm/99.99 inch(Zebra) 2540.0 mm/100.00 inch |
| CL-E303/CL-E303EX | 1,270.0 mm / 50.00 inch |
| Print density | Print density is adjustable with software |
Print speed
| Item | Description |
| Print speed setting | CL-E300/CL-E300EX | 2 to 8 inch per second in 1-inch increments (7 to 8 inch per second possible at normal temperature using a print density of 10 and the recommended direct thermal media) |
| CL-E303/CL-E303EX | 2 to 6 inch per second in 1-inch increments |
| Peeler model | 2 to 4 inch per econd in 1-inch increments |
Print mode
| Item | Description |
| Batch mode | Normal printing (single or multiple sheets) |
| Tear off mode | Back-feeds to the tear-off position after printing is complete. (Labels may peel when roll media is back-fed.) |
| Cut mode | Prints while cutting after every specified number of sheets/labels. Two types of cut mode operations are available.
• Back-feed
• Cut-through
(Cut-through pauses printing to cut the previous label when it reaches the cut position. Printing resumes after the cut operation, but a gap may be formed at the location where printing was paused.) |
| Peeling mode | The label is peeled from the backing paper after label printing. |
Media
| Item | Description |
| Media types | Roll, fanfold media
(Continuous label media, die-cut media, continuous tag media, and continuous ticket media) |
| Roll media orientation | Outer surface |
| Recommended media | Label media (Ricoh 150LA-1), tag media (Ricoh 130LHB) |
| Max. media width | 118.0 mm / 4.65 inch |
| Min. media width | 25.4 mm / 1.00 inch |
| Min. label width | 21.5 mm / 0.85 inch |
| Min. label pitch*1 | 8.89 mm / 0.35 inch*2
(Peeler model: 27.94 mm / 1.10 inch) |
| Max. label pitch | CL-E300/CL-E300EX | (Datamax) 2539.7 mm/99.99 inch
(Zebra) 2540.0 mm/100.00 inch
(Peeler model: 122.54 mm / 4.82 inch) |
| CL-E303/CL-E303EX | 1,270.0 mm / 50.00 inch
(Peeler model: 122.54 mm / 4.82 inch) |
| Max. media thickness | standard model | 0.19 mm / 0.0075 inch |
| integrated cutter model |
| separable cutter model | 0.15 mm / 0.0059 inch |
| Peeler model | 0.17 mm / 0.0067 inch |
| Max. media length | CL-E300/CL-E300EX | Standard model and cutter model:
(Datamax) 2539.7 mm/99.99 inch
(Zebra) 2540.0 mm/100.00 inch
(Peeler model (max. label length): 120 mm / 4.72 inches |
| CL-E303/CL-E303EX | Standard model and cutter:model:
1,270.0 mm / 50.00 inch
Peeler model (max. label length): 120 mm / 4.72 inches |
| Min. media length*1 | 6.35 mm / 0.25 inch*2
(Peeler model: 25.40 mm / 1.00 inch) |
| Min. media thickness | 0.0635 mm / 0.0025 inch |
| Loaded roll diameter | Max. external diameter: 127 mm / 5 inch |
| Media core: 25.4 or 38.1 mm / 1 or 1.5 inch
(Peeler model: 38.1 mm / 1.5 inches) |
1 To use media with a pitch of less than 1 inch, enable the [Small Media Adjustment] setting.
2 For models with a cutter, the cutter operation will not be performed if the media length is less than 25.4 mm (1 inch).
| Item | Description |
| Datamax® emulation | One-dimensional | Code 3 of 9 .UPC-A .UPC-E .EAN-13 (JAN-13) .EAN-8 (JAN-8) ·Interleaved 2 of 5 .Code 128 .HIBC (Code 3 of 9 using Modulus 43) ·Codabar (NW-7) ·Int 2 of 5 (Interleaved 2 of 5 using Modulus 10) ·Plessey ·Case Code ·UPC2DIG Add ·UPC5DIG Add ·Code 93 ·Telepen ·ZIP ·UCC/EAN128 ·UCC/EAN128 (for K-MART) ·UCC/EAN128 Random Weight ·FIM |
| Two-dimensional | Maxi Code ·PDF-417 ·Data Matrix ·QR Code ·Aztec ·GS1 Databar Omnidirectional (RSS-14) ·GS1 Databar Truncated (RSS-14 Truncated) ·GS1 Databar Stacked (RSS-14 Stacked) ·GS1 Databar Stacked Omnidirectional (RSS-14 Stacked Omnidirectional) ·GS1 Databar Limited (RSS Limited) ·GS1 Databar Expanded (RSS Expanded) |
| Zebra® emulation | One-dimensional | Code 11 ·Interleaved 2 of 5 ·Code 39 ·EAN-8 ·UPC-E ·Code93 ·Code128 ·EAN-13 ·Industrial 2 of 5 ·Standard 2 of 5 ·ANSI COD-ABAR ·LOGMARS ·MSI ·Plessey ·UPC/EAN Extensions ·UPC-A ·POSTNET ·Planet |
| Two-dimensional | Code49 ·PDF-417 ·CODA BLOCK ·Maxi Code ·Micro PDF-417 ·Data Matrix ·QR Code ·TLC39 ·Aztec ·GS1 Databar Omnidirectional (RSS-14) ·GS1 Databar Truncated (RSS-14 Truncated) ·GS1 Databar Stacked (RSS-14 Stacked) ·GS1 Databar Stacked Omnidirectional (RSS-14 Stacked Omnidirectional) ·GS1 Databar Limited (RSS Limited) ·GS1 Databar Expanded (RSS Expanded) |
| Eltron® emulation | One-dimensional | Code39 ·Code93 ·Code128 ·Codabar ·EAN-8 ·EAN-13 ·German Postal Code ·Interleaved2of5 ·POSTNET ·Planet ·Japanese Postnet ·UCC/EAN-128 ·UPC-A ·UPC-E ·UPC-Interleaved2of5 ·Plessey(MSI-1) ·MSI-3 |
| Two-dimensional | Aztec ·Data Matrix ·MaxiCode ·PDF-417 ·QR Code ·GS1 Databar Omnidirectional (RSS-14) ·GS1 Databar Limited (RSS Limited) ·GS1 Databar Stacked (RSS-14 Stacked) ·GS1 Databar Truncated (RSS-14 Truncated) |
Fonts
| Item | Description |
| Datamax® emulation | 1. 7 types of fixed-pitch fonts2. OCR fontsOCR-A*3 and OCR-B*33. Proportional fontsCG Tiumvirate smooth fontCG Tiumvirate bold smooth fontCL-E300/CL-E300EX: 6, 8, 10, 12, 14, 18, 24, 30, 36, and 48 pointsCL-E303/CL-E303EX: 4, 5, 6, 8, 10, 12, 14, 18, 24, 30, 36, and 48 pointsCharacter sets: Compliant with code page 8504. TrueType™ rasterizer5. Kanji fonts (Gothic)JIS 1st level Kanji, JIS 2nd level Kanji, Special symbol, Extended Kanji 16 dot, 24 dot, 32 dot, 48 dot |
| Zebra® emulation | 1. 5 types of fixed-pitch fonts2. OCR fontsOCR-A*3 and OCR-B*33. Proportional fontsCG Tiumvirate Condensed Bold4. TrueType™ rasterizer5. Kanji font (Gothic)JIS 1st level Kanji, JIS 2nd level Kanji, Special symbol, Extended Kanji 24 dot |
| Eltron® emulation | 1. 5 types of fixed-pitch fonts2. 2 types of fixed-pitch fonts |
*3 Depending on the reader, OCR font recognition may be poor.
Symbol Sets*4
| Item | Description |
| Single-Byte sets (Datamax®, Zebra® Emulation) | -PC866U Ukrainian*5 -PC Cyrillic -ISO 60 Danish/Norwegian -Desk Top -ISO 8859/1 Latin 1 -ISO 8859/2 Latin 2 -ISO 8859/9 Latin 5 -ISO 8859/10 Latin 6 -ISO 8859/7 Latin/Greek -ISO 8859/15 Latin 9 -ISO 8859/5 Latin/Cyrillic -ISO 69: French -ISO 21: German -ISO 15: Italian -Legal, Math-8 -Macintosh -Math -PC-858 Multilingual -Microsoft Publishing -PC-8 -PC-437 USA -PC-8 D/N -PC-437N -PC-852 Latin/Greek -PC-862 Latin/Hebrew -Pi Font -PC-850 Multilingual -PC-864 -Latin/Arabic -PC-8 TK -PC-437T -PC-1004 -PC-775 Baltic -Non-UGL -Generic Pi Font -Roman-8 -Roman-9 -ISO 17: Spanish -ISO 11: Swedish -Symbol -PS Text -ISO 4: United Kingdom -ISO 6: ASCII -Ventura International -Ventura Math -Ventura US -Windows 3.1 Latin 1 -Wingdings -Windows 3.1 Latin 2 -Windows 3.1 Baltic (Latv, Lith) -Windows 3.0 Latin 1 -Windows Latin/Cyrillic -Windows 3.1 Latin 5 |
| Double-byte sets (Datamax® Emulation) | -EUC -JIS -Shift JIS -Unicode -KS Code -GB Code |
*4 Use it when drawing a TrueType font. Eltron® Emulation does not support a TrueType font.
*5 "PC866U Ukraine" is supported only in Datamax® emulation.
Control Languages
Supports the Datamax® language, Zebra® language and Eltron® language
Digital Processing Components
| Item | Description |
| CPU | 32-bit RISC CPU (max. operation frequency of 216 MHz) |
| ROM | 16 MBytes of flash ROM (user area: 4 MBytes) |
| RAM | 32 MBytes of SDRAM (user area: 4 MBytes) |
| Item | Description |
| Transmissive sensor | Detects label gaps, tag notches, and out of media state |
| Reflective sensor | Detects black lines on back of media and out of media state |
| Peeled label detection sensor | Detects peeled label (peeler model only) |
Communication interfaces
| Item | Description |
| Serial | RS-232C, 9-pin D-SUB female connectorBaud rates: 2400, 4800, 9600, 19200, 38400, 57600, and 115200 bps |
| USB | Full-speed USB 2.0 (12 Mbps), Type B connector |
| Ethernet | 10BASE-T / 100BASE-TX, RJ45 connector |
| Item | Description |
| integrated | USB | Full-speed USB 2.0 (12 Mbps) |
| Optional interface | Serial | RS-232C, 9-pin D-SUB male connector
Baud rates: 2400, 4800, 9600, 19200, 38400, 57600, and 115200 bps |
| Bluetooth | (Bluetooth3.0)+
Full-speed USB 2.0 (12 Mbps) |
| Wired LAN | 10BASE-T / 100BASE-TX, RJ45 connector |
| Wireless LAN | (IEEE802.11a/b/g/n)+Ethernet
(10BASE-T / 100BASE-TX) |
| USB host+
Wired/Wireless LAN | Full-speed USB 2.0 (12 Mbps)x2+
Ethernet (10BASE-T / 100BASE-TX) |
Indicators and switches
| Item | Description |
| LED | Power on (green), status/errors/alarms (green, red, and amber) |
| Buzzer | Alarms, warnings, and other indications |
| Operation keys | 1 (Performs feed and other operations) |
| Panel button | CL-E300/CL-E303: Prints and initializes the wired LAN settingsCL-E300EX/CL-E303EX: Prints and initializes the expansion interface board settings |
| Head-up detection switch | Detects head-up states |
| Power switch | Turning the Power On/Off |
Power supply
AC adapter (CEC Level VI-compliant)
Input: 100 to 240 VAC, 50/60 Hz
Output: 24 VDC, 2.5 A
Dedicated USB power supply port (CL-E300EX/CL-E303EX)
Output: 5 VDC, (Max.) 2.1 A
Supported Standards
VCCI: CISPR32: 2016 Class B
- UL: 60950-1st, 2nd Edition
CSAC22.2 No.60950-1-07, 2nd Edition
FCC: 47 CFR Part 15, Subpart B, Class B
60950-1:2006/A11:2009/A1:2010/A12:2011/A2:2013
EN:55032:2012ClassB
EN:55035:2017
EN:61000-3-2:2014
EN:61000-3-3:2013
- EN301 489-17 V3.1.1 (Wireless Lan/Bluetooth Interface option card model only)
- EN301 489-1 V2.1.1 (Wireless Lan/Bluetooth Interface option card model only)
EU: RoHS (2011/65/EC)
Energy Star: Energy Equipment, Version2.0
- CCC: GB4943.1-2011, GB/T9254-2008, and GB17625.1-2012
BIS / UL CoC(Mexico) / S-mark SIN(AC Adapter) / RCM(Australia) / EAC(Russia)
Reliability
| Item | Description |
| Head | When the recommended paper is used under our given printing conditions:
Wear resistance 50 km (damage due to foreign matter being caught in the head is not applicable) |
| Platen | Platen 100 km
(replacement recommended after 5 to 10 km in the peeler model only) |
| Auto cutter | Integrated type:
Min. 300,000 cuts (60 μm ≤ paper thickness < 150 μm)
Min. 100,000 cuts (150 μm ≤ paper thickness ≤ 190 μm)
Interchangeable type:
Min. 300,000 cuts (60 μm ≤ paper thickness < 85 μm, paper width ≤ 4 inches)
Min. 200,000 cuts (85 μm ≤ paper thickness ≤ 150 μm, paper width ≤ 4 inches)
Min. 150,000 cuts (85 μm ≤ paper thickness ≤ 150 μm, paper width ≤ 2 inches) |
Environmental conditions

Refer to 12.4 Usage Conditions

Refer to 12.5 Storage Conditions
Electrostatic Voltage
EN61000-4-2:2009-compliant
AC Power Consumption
| Item | Description |
| CL-E300 | 100 V/50 Hz: 1.5 W standby,66 W during operation(USB, print speed of 8 IPS, print density of 10, printing rate of 12.5 %)220 V/50 Hz: 1.7 W standby,64 W during operation(USB, print speed of 8 IPS, print density of 10, printing rate of 12.5 %) |
| CL-E303 | 100 V/50 Hz: 1.7 W standby,60 W during operation(USB, print speed of 6 IPS, print density of 10, printing rate of 12.5 %)220 V/50 Hz: 1.7 W standby,58 W during operation(USB, print speed of 6 IPS, print density of 10, printing rate of 12.5 %) |
| CL-E300EX | 100 V/50 Hz: 1.5 W standby,73 W during operation(USB, print speed of 8 IPS, print density of 10, printing rate of 12.5 %)220 V/50 Hz: 1.7 W standby,65 W during operation(USB, print speed of 8 IPS, print density of 10, printing rate of 12.5 %) |
| CL-E303EX | 100 V/50 Hz: 1.7 W standby,62 W during operation(USB, print speed of 6 IPS, print density of 10, printing rate of 12.5 %)220 V/50 Hz: 1.7 W standby,58 W during operation(USB, print speed of 6 IPS, print density of 10, printing rate of 12.5 %) |
Weight
Standard model and optional interface model: 2.0kg
- Standard model and optional interface model (with AC adapter storage case): 2.7 kg
Integrated cutter model: 2.3kg
- Separable cutter model: 2.2 kg
- Peeler model: 2.2 kg
Accessories
- AC adapter
AC cord
Media shaft
Media shaft guide
USB cable
- CD-ROM
Quick Start Guide/Safety Instructions
Factory Options (the default setting)
- Cutter (integrated or interchangeable)
- AC adapter case
- Optional interface
Peeler
External Dimensions*6
Standard model
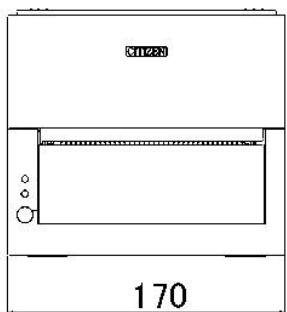
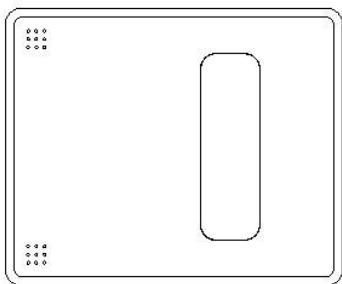
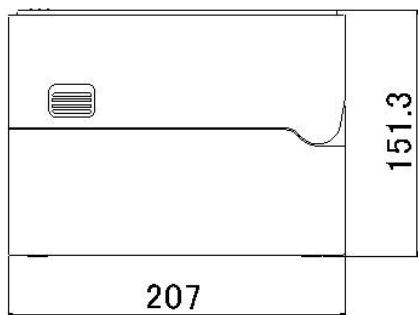
Model with AC adapter storage case
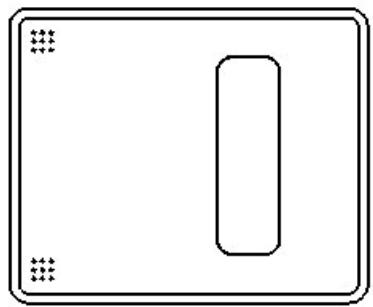
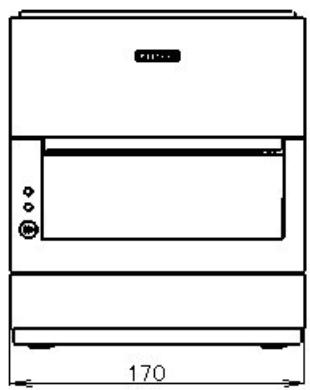
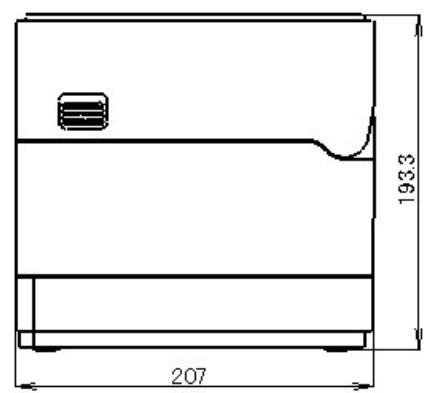
Integrated cutter model
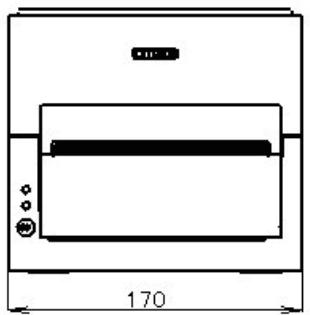
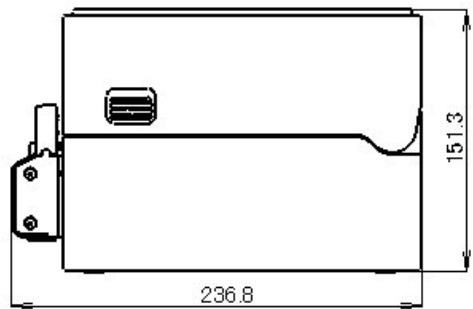
Separable cutter model
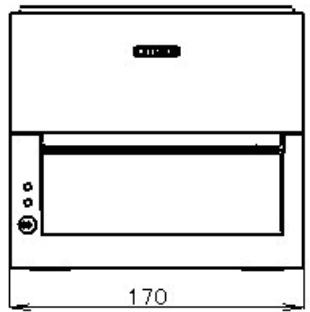
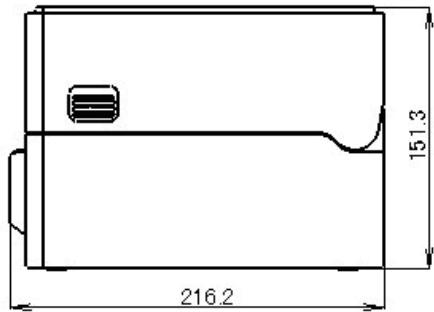
Optional interface model
Increase in size due to expansion interface board: Max. 20 mm
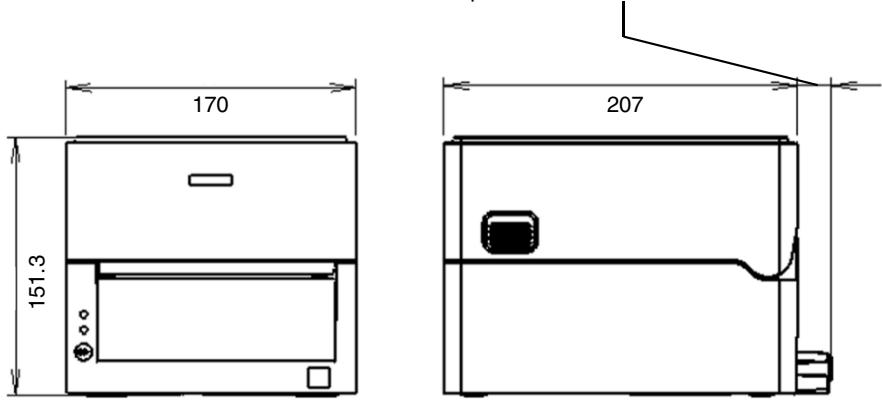
Peeler model
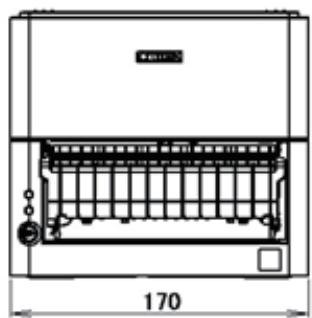
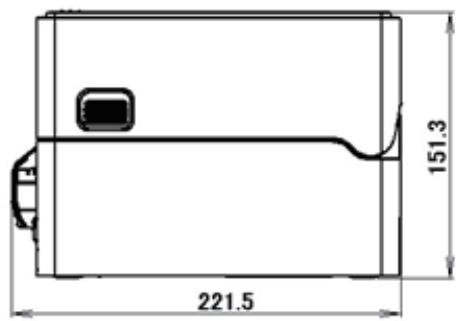
*6 Dimensions are design values. Actual dimensions may vary due to variance in manufacturing processes.
12.4 Usage Conditions
(1) Safe operating temperature: 0 to 40^
(2) Safe printing temperature: 5 to 35^
(3) Humidity: 30 to 80% RH (no condensation)

Operating assurance temperature Printing assurance temperature
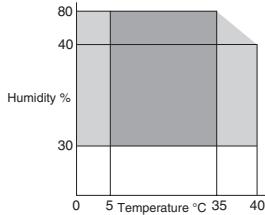
Conditions assuring operation and printing
12.5 Storage Conditions
(1) Temperature: -20 to 60^ (excluding record sheet)
(2) Humidity: 5 to 85% RH (excluding record sheet, no condensation)
*However, for storage at high temperature and humid environments, the combination of 40^ and 85% RH (no condensation) is taken as the worst value.
12.6 Interfaces
Serial Interface (CL-E300/CL-E303)
Interface Specifications
| Transfer method | Start-stop synchronization method, full-duplex communication |
| Signal level | RS-232C |
| Baud rates | 2400, 4800, 9600, 19200, 38400, 57600, and 115200 bps |
| Data length | 7 bits or 8 bits |
| Stop bits | 1 bits or 2 bits |
| Parity | Even, odd, or none |
| Interface | 9-pin D-SUB female connector (CL-E300/CL-E303)9-pin D-SUB male connector (CL-E300EX/CL-E303EX) |
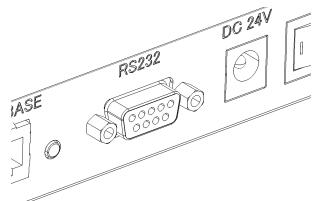
- CL-E300/CL-E303 female connector
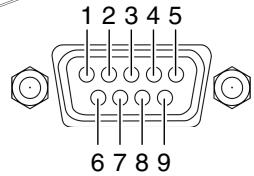
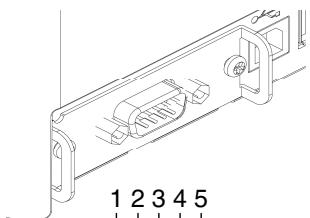
- CL-E300EX/CL-E303EX male connector
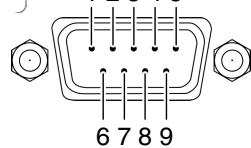
Signal Line/Pin Assignment
| Signal code | Signal | Pin No. | Function |
| INIT | Reset | 1 | Reset printer signal line |
| RXD | Receive data | 2 | Signal line used by printer to receive data from external devices |
| TXD | Transmit data | 3 | Signal line used by printer to send data to external devices |
| DTR | Data terminal ready | 4 | Signal line used by printer to notify external devices that printer is ready to communicate |
| SGND | Signal line ground | 5 | Signal line ground reference |
| DSR | Data set ready | 6 | Signal line used by external devices to notify printer that they are ready to communicate |
| RTS | Request to send | 7 | Signal line used by printer to notify external devices that the printer is read to receive data |
| CTS | Clear to send | 8 | Signal line used by external devices to notify printer that they are ready to receive data |
| VCC | +5 V | 9 | (Factory use only) |
XON / XOFF Protocol
a Conditions for XON code output
- Communication is possible after the power is turned on.
- Scenario in which the receive buffer has less than 128 bytes available causing output of the XOFF code followed by the receive buffer then having at least 1,024 bytes available.
b Conditions for XOFF code output
- Scenario in which the receive buffer has less than 128 bytes available.
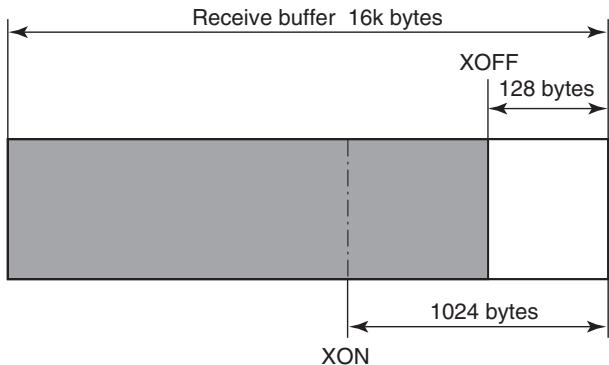
DTR Protocol
a Conditions when DTR signal state changes to Ready (High)
Scenario in which the receive buffer has at least 128 bytes available.
Note that once the receive buffer has less than 1,024 bytes available causing the DTR signal to change to the Busy (Low) state, the DTR signal state remains in the Busy (Low) state until the receive buffer has at least 1,024 bytes available.
b Conditions when DTR signal state changes to Busy (Low)
Scenario in which the receive buffer has less than 128 bytes available.
USB Interface
Specifications
| Standard | Compliant with Universal Serial Bus Specification 2.0 |
| Transmission speed | Supports Full-speed 12 Mbps transfer |
| Receive buffer | 16 kB receive buffer |
| Connector | USB Type B connector |
Signal Line/Pin Assignment
| Signal code | Signal | Pin No. | Function |
| VBUS | USB power | 1 | USB power (+5 V) |
| D- | Negative signal line | 2 | Negative signal line |
| D+ | Positive signal line | 3 | Positive signal line |
| GND | GND | 4 | GND |
Bluetooth interface (CL-E300EX/CL-E303EX)
Specifications
| Version | Bluetooth 3.0 + EDR |
| Profile | Serial Port Profile (SPP)
iPod Accessory Protocol (iAP) |
| Power class | Class 2 (10 m line of sight) |
| Frequency band | 2.400 to 2.483 GHz |
| Electrical specifications | Approx. 3 mA (average 27 mA during communication, maximum 70 mA) |
| Device name | “CL-E300_XX”, “CL-E303_XX”(XX is the last two digits of the Bluetooth device address, default setting) |
Names of parts
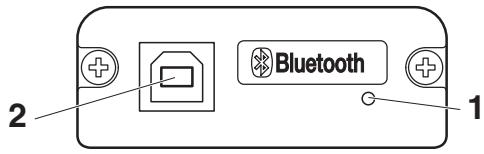
1. Status LED
The Bluetooth communication/connection/errror status is indicated by this LED.
2. USB connector
Data can be exchanged by USB communication.

CAUTION
When using this interface board as a USB interface, do not connect USB cables to both the main unit side and interface board side.
If USB cables are connected to both, priority will be given to communication of the one connected to the connector on the main unit side.
Bluetooth status LED
| Status | Description | Status LED (green) |
| Detection standby | Standing by for detection and connection | |
| Connection standby | Standing by for connection | |
| iAP connection | Data session unopened | |
| Ready to communicate | (SPP/iAP) data transfer is possible | |
| Error | Error or settings be-ing configured | Unlit |
Pairing operation
You need to perform the operations below the first time you establish a Bluetooth connection for Bluetooth data communication.
- Detect Bluetooth devices
- Configure pairing settings
1. Detecting Bluetooth devices
Confirm that Bluetooth is enabled on the host PC before searching for Bluetooth devices.
This product will be indicated as "CL-E300_XX" or "CL-E303_XX" (XX is the last 2 digits of the unique Bluetooth device address) when detected in the device search.
Select this product from among the detected devices.
2. Configuring pairing settings
Normally, selecting the printer during device detection will transition directly to pairing settings.

CAUTION
Some host PC configurations and models may not transition directly to pairing settings after the printer is selected during device detection.
Functions
- Communication status display by LED
- Security settings available (authentication, encryption, and device search restriction)
This product is provided with the two security levels of high and medium.
The difference between the security levels is whether or not there are authentication requests and encryption requests.
An authentication request is required when starting a service search or iAP/ SPP connection, and there is the following relationship for the authentication and encryption requests of the two security levels, including whether or not there is support for SSP on the device.
Device without support for SSP
| Security setting | Service search authentication request | PIN code connection authentication | SPP connection authentication request | Encryption request |
| Medium | No | Yes | Yes | Yes |
| High | Yes | Yes | Yes | Yes |
Device with support for SSP
| Security setting | Service search authentication request | PIN code connection authentication | SPP connection authentication request | Encryption request |
| Medium | No | No | Yes | Yes |
| High | Yes | No | Yes | Yes |
- Pairing information retention function (maximum 8; most recent 8 if 8 is exceeded)
- Connection approval by means of secure simple pairing (SSP) or a PIN code The initial value of the PIN code is the last 4 digits of the 12-digit address (excluding the colon " · " that is printed by a self test print, and if the PIN code contains any alphabet letters (A to F), specify them in uppercase.
(Example: When 01:23:45:67:89:AB, the initial PIN code is 89AB.)
For a host with the SSP function, pairing is achieved without any additional operation.
For a host without the SSP function, you will be asked for a PIN code so enter the PIN code.
5. Connection update function
Executing "Bluetooth connection update mode" in the online configuration mode transitions to the discoverable state.
Also, executing "All Bluetooth pairing information deletion mode" in the same configuration mode deletes the saved pairing information and transitions to a discoverable state.
If the pairing information on the host is deleted, the device may not be displayed when you perform a device search again unless you also delete the pairing information on the printer.
If that happens, delete the pairing information with the connection update switch to transition to the discoverable state.
6. Auto reconnection
With iOS device Bluetooth communication, a connection between a paired iOS device and the printer is not automatically restored after it is lost. However, when auto reconnection is enabled, the printer tries to reconnect with an iOS device after two-way communication is enabled and automatically restores the connection.

CAUTION
Even when "No" is indicated for a request, do as requested if there is a request from the connected party.
Encryption for the security medium setting is enabled only for an authenticated iAP/SPP connection.
This function is enabled when shipped from the factory.
Auto reconnection can take some time to connect when the host is not an iOS device.
- Even if the partner device is an iOS device, the conditions below can interfere with the auto reconnection function.
- When you want Bluetooth communication to cut off after printing is complete
- When there are multiple iOS devices printing on the same printer
Under such conditions, disable auto reconnection.
Since processes such as the initial setup of the Bluetooth module are performed when the power is turned on, startup may take several seconds to complete.
When large amounts of data will be transferred from a host, perform control such as transfer time and transfer data amount adjustment on the user side so that the transfer data buffers on both the printer and host do not become full.
For pairing information deletion and reconnecting, refer to the following.

Refer to 8. Online Configuration Mode
Supported Protocols
| Supported Protocols | ARP, IP, and TCP |
| Transport layer protocols | TCP and UDP |
| Application layer protocols | DHCP, HTTP, SNMP, and Raw Socket Port |
Raw Socket Port
Performs bidirectional communication of print data and printer status.
| Port No. | 9100 (user-configurable) |
| Direction of port communication | Bidirectional |
| Max. socket connections | 8 |
| Printable connections | 1 (other sockets are reserved) |
| Timeout | Default: 60 seconds
Configurable between 0 and 300 seconds.
Value of 0 disables timeouts. |
HTTP Server
The Web monitoring function can be used to configure printer and network settings. Refer to the pages describing the Web monitor for more information.

Refer to 6. Configuring Printer Settings Using LinkServer
| Port No. | 80 |
| Max. simultaneous connections | 4 |
| HTTP version | HTTP/1.1 |
DHCP
Automatically retrieves IP address information from a DHCP server within 60 seconds after the power is turned on.
If IP address information cannot be retrieved automatically, a fixed IP address (default is 169.254.1.10) is applied.
SNMP Agent
| SNMP Version | SNMPv2 (Trap function not supported) |
| Port No. | 161 |
| Supported MIBs | HOST-RESOURCES-MIB and Citizen-MIB (Private) |
| Community name | public |
Connector Connections
| Pin No. | Signal | Function |
| 1 | TX+ | Transmit (positive) |
| 2 | TX- | Transmit (negative) |
| 3 | RX+ | Receive (positive) |
| 4 | N.C. | - |
| 5 | N.C. | - |
| 6 | RX- | Receive (negative) |
| 7 | N.C. | - |
| 8 | N.C. | - |
Compatible connectors
Printer: RJ-45 connector
LED operation
The following table describes port LED operation.
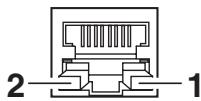
- Network communication speed indicator
| Communication speed | LED (Green) |
| 100 Mbps | On |
| 10 Mbps/disconnected | Flashes |
- Network status indicator
| Status | LED (amber) |
| Connecting | On |
| Disconnected | Off |
| Exchanging data | Flashes |

CAUTION
■ To check the current Ethernet settings, press the Ethernet panel button located next to the Ethernet interface to printout the settings.
■ To initialize Ethernet settings, press and hold the Ethernet panel button for at least 3 seconds. Once the buzzer emits a short tone, press and hold the Ethernet panel button again within 3 seconds for at least 3 seconds.
Specifications
Interface main part
| Wireless (*1) | Access method | Infrastructure |
| Security | WPA2-PSK (encryption: AES, TKIP) |
| WPA-PSK (encryption: AES, TKIP) |
| WEP (key length: 64-bit/128-bit) |
| Ethernet | Standard | 10BASE-T/100BASE-TX,
full duplex/half duplex auto negotiation |
| Port | RJ-45 |
| Network | IP version | IPv4 |
| Protocol | TCP, UDP, HTTP, ICMP, DHCP, SNMP |
| Port for printing | RAW (9100 port: user-configurable), LPR |
| IP address setting | Manual, DHCP |
| Hardware | Operation panel | 4 LEDs, (2 on panel and 2 on RJ45 connector),
1 button |
| USB ports | Connector: USB-A x 0/1/2
USB standard: USB 2.0 High Speed |
| Software | Setting change procedure | Browser, PC configuration tool, cloud |
| Firmware updates | Browser, PC configuration tool, cloud |
| Supported platforms | Windows 7, Windows 8, Windows 10, HTML5 browser |
USB_Wi-Fi adapter part (*1)
| Model number | WU606n | WN-AC433UK |
| Wi-Fi specifications | Supported standards | IEEE802.11n
IEEE802.11g
IEEE802.11b | IEEE802.11n
IEEE802.11a
IEEE802.11g
IEEE802.11b |
| No. of channels | 1 to 13 channels | 2.4 GHz band:
1 to 13 channels
5.2 GHz band:
36/40/44/48 channels
5.3 GHz band:
52/56/60/64 channels
5.6 GHz band:
100/104/108/112/116/
120/124/128/132/136/140 channels |
| Frequency band | 2.4 GHz band
(2.412 to 2.472 MHz) | 2.4 GHz band
(2.412 to 2.472 MHz)
W52: 5.2 GHz band
(5150 to 5250 MHz)
W53: 5.3 GHz band
(5250 to 5350 MHz)
W56: 5.6 GHz band
(5470 to 5725 MHz) |
| Transmission speed | IEEE802.11n:
Max. 150 Mbps
IEEE802.11g:
Max. 54 Mbps
IEEE802.11b:
Max. 11 Mbps | IEEE802.11n: Max. 150 Mbps
IEEE802.11a: Max. 54 Mbps
IEEE802.11g: Max. 54 Mbps
IEEE802.11b: Max. 11 Mbps |
*1 Only when using wireless LAN
Connecting a USB Device
The function assigned to each USB port differs.
Connect the USB device to be connected to the correct place in reference to the following figure.
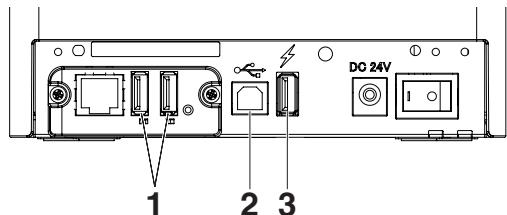
Wired/Wireless LAN
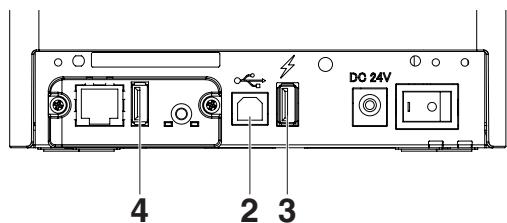
USB host model
Wireless LAN
- For peripheral device control or wireless LAN adapter connection
Connects a peripheral device or wireless LAN adapter.
- For host computer communication
Connect with a host computer.
The printer and host computer will communicate via USB.
- For supplying power
Connect a mobile device or other USB device.
Power can be supplied to a connected USB device.
- This port does not support USB data communication.

Refer to 3.7 USB Power Supply Port
- For wireless LAN adapter connection
Connect a wireless LAN adapter.
Board operations are performed using the panel button on the rear of the LAN board.
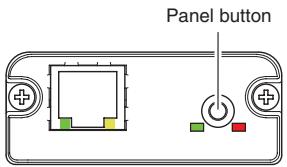
Ethernet
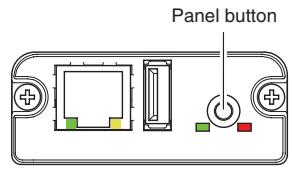
Wireless LAN
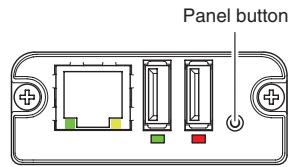
Wired/Wireless LAN USB host model
Turn on the printer. Operation of this board will start about 20 seconds later.
- Printing LAN setup information
Press the panel button.
Hold down the panel button. A buzzer* will sound once to indicate that setting mode has been entered.
- You can use setting mode to read factory settings.
-
If no operation is performed for 3 seconds in configuration mode, the mode switches back to normal mode.
-
Returning to factory settings
Enter the board setting mode, and then hold down the panel button. This returns the board to its factory settings.

CAUTION
The board will automatically restart after this operation is complete. After clearing settings, you will need to re-configure network settings.
LED Functions
The tables below explain how to interpret LED indications.
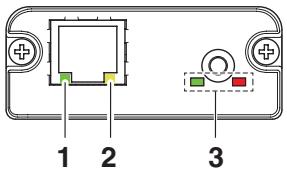
Ethernet
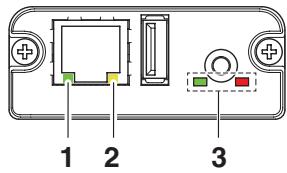
Wireless LAN
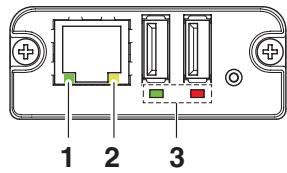
Wired/Wireless LAN USB host model
1. Wired LAN transmission speed
| Transmission speed | LED (green) |
| 100 Mbps | Lit |
| 10 Mbps/Not connected | Unlit |
2. Wired LAN connection/transmission status
| Connection status | LED (yellow) |
| Connected | Lit |
| Not connected | Unlit |
| Data transmission in progress | Flashing |
3. Wired/Wireless LAN status
| Connection status | LED (green) | LED (red) | Description |
| No printer connection | Unlit | — | Board is not connected with a printer. |
| Printer connec-tion | No network connection | Lit | Unlit | Board is connected with a printer. |
| Connected by wired LAN | Lit | Flashing (1-second cycle) | Getting an IP address from the DHCP server over wired LAN. |
| Wired LAN operation | Lit | Lit | Network operation being performed over wired LAN. |
| Connected by wireless LAN * | Flashing (2-second cycle) | Flashing (1-second cycle) | Connecting to an access point or getting an IP address from the DHCP server over wireless LAN. |
| Wireless LAN operation * | Flashing (2-second cycle) | Lit | Network operation being performed over wireless LAN. |
| Resource error | Alternate flashing (1-second cycle) | Board is unable to operate normally. |
| System error | Alternate flashing (0.2-second cycle) | Board is unable to operate normally. |
*: Only when using wireless LAN
Web Manager
The interface board has a Web Manager function that can be used to connect to the board with a web browser and change board settings.
Starting up Web Manager
- Start up a web browser.
- In the address field, input the board's IP address and then press [Enter].
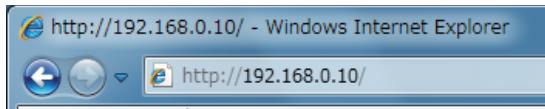
HOME Screen
This is the Web manager home screen.
The following screen is an example for a wireless LAN.
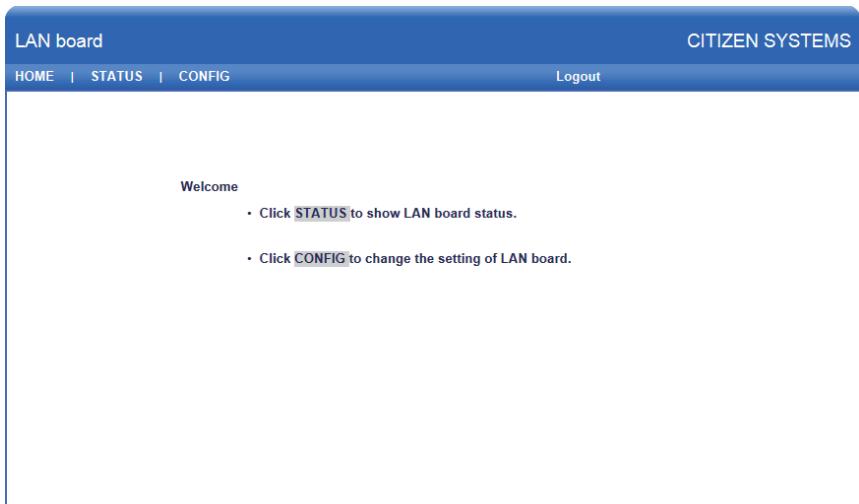
Copyright © 2012 CITIZEN SYSTEMS JAPAN CO.,LTD. All rights reserved.
Here, press the [CONFIG] button.
CONFIG Screen
This will display the Login dialog box shown below. Log in as an administrator and then configure interface board settings.
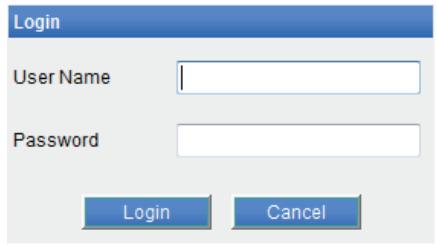
- User Name
Input a board administrator user name. (Initial setting: admin)
- Password
Input the administrator user password. (Initial setting: admin)
After inputting an administrator user name and password, click the [Login] button. This displays the setting screen.
For details about settings, refer to the separate manual.
CITIZEN SYSTEMS AMERICA CORPORATION
363 Van Ness Way, Suite 404 Torrance, CA 90501. USA
Tel: (310) 781-1460 Fax:(310) 781-9152
http://www.citizen-systems.com
CITIZEN SYSTEMS EUROPE GmbH
Elizabeth House, 56-60 London Road
70329 Stuttgart
Staines-Upon-Thames, TW18 4HF
Germany
United Kingdom
Tel: +49 (0) 711 49032-0
Tel: +44 (0) 20 8893 1900
Fax:+49 (0) 711 49032-45
Fax: +44 (0) 20 8893 0080
http://www.citizen-europe.com