
CMP-25L - Thermal printer CITIZEN - Free user manual and instructions
Find the device manual for free CMP-25L CITIZEN in PDF.

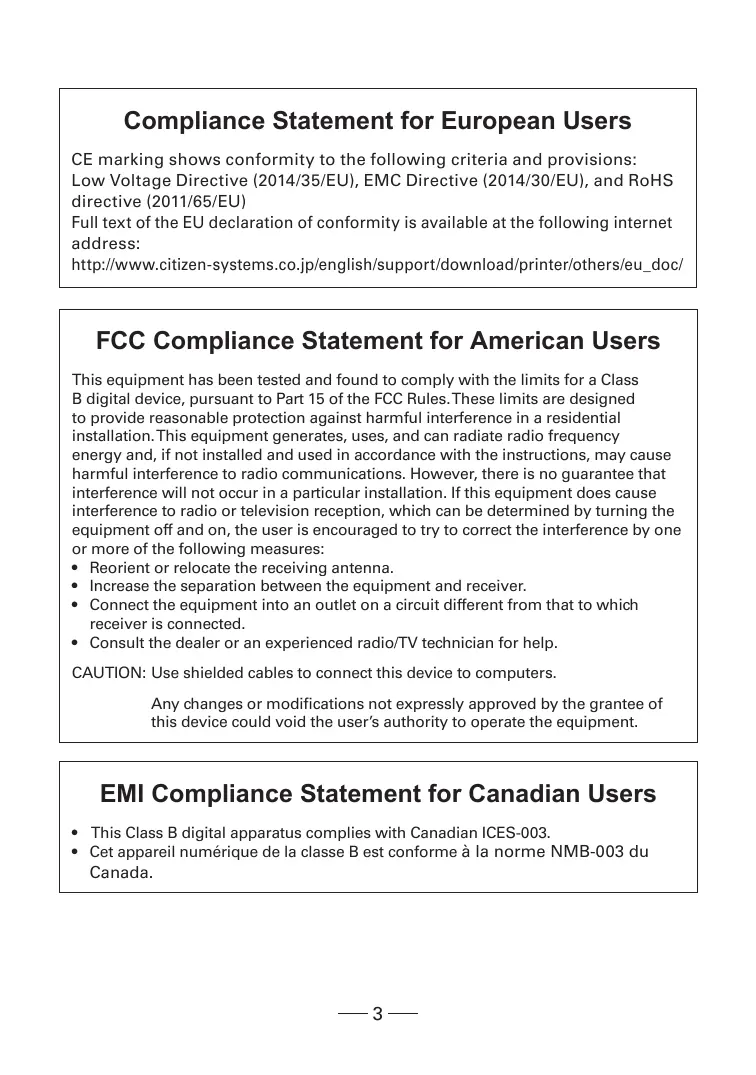

| Product type | Portable thermal printer |
| Brand | Citizen |
| Model | CMP-25L |
| Print technology | Direct thermal |
| Print resolution | 203 dpi (8 lines/mm) |
| Paper width | 58 mm |
| Print speed | Up to 50 mm/s |
| Connections | Bluetooth, USB |
| Power supply | Rechargeable lithium-ion battery 7.4 V / 1500 mAh |
| Battery life | Approximately 8 hours of continuous use |
| Dimensions (W x D x H) | 150 x 100 x 50 mm |
| Weight | Approximately 500 g |
| Operating temperature | 0 °C to 40 °C |
| Display | Status LED |
| Maintenance and cleaning | Clean the print head with a cotton swab soaked in isopropyl alcohol |
| Safety | Use only the supplied power adapter |
| Spare parts | 58 mm thermal paper roll, replacement battery |
| Repairability | Repairability index not communicated |
| General information | Class B digital device complies with ICES-003 and NMB-003 |
Frequently Asked Questions - CMP-25L CITIZEN
User questions about CMP-25L CITIZEN
0 question about this device. Answer the ones you know or ask your own.
Ask a new question about this device
Download the instructions for your Thermal printer in PDF format for free! Find your manual CMP-25L - CITIZEN and take your electronic device back in hand. On this page are published all the documents necessary for the use of your device. CMP-25L by CITIZEN.
USER MANUAL CMP-25L CITIZEN
MOBILE THERMAL PRINTER
MODEL CMP-25
User's Manual
If you want to dispose of this product, do not mix it with general household waste. There is a separate collection systems for used electronics products in accordance with legislation under the WEEE Directive (Directive 2002/96/EC) and is effective only within European Union.

Compliance Statement for European Users
CE marking shows conformity to the following criteria and provisions:
Low Voltage Directive (2014/35/EU), EMC Directive (2014/30/EU), and RoHS directive (2011/65/EU)
Full text of the EU declaration of conformity is available at the following internet address:
http://www.citizen-systems.co.jp/english/support/download/printer/others/eu_doc/
FCC Compliance Statement for American Users
This equipment has been tested and found to comply with the limits for a Class B digital device, pursuant to Part 15 of the FCC Rules. These limits are designed to provide reasonable protection against harmful interference in a residential installation. This equipment generates, uses, and can radiate radio frequency energy and, if not installed and used in accordance with the instructions, may cause harmful interference to radio communications. However, there is no guarantee that interference will not occur in a particular installation. If this equipment does cause interference to radio or television reception, which can be determined by turning the equipment off and on, the user is encouraged to try to correct the interference by one or more of the following measures:
- Reorient or relocate the receiving antenna.
- Increase the separation between the equipment and receiver.
- Connect the equipment into an outlet on a circuit different from that to which receiver is connected.
- Consult the dealer or an experienced radio/TV technician for help.
CAUTION: Use shielded cables to connect this device to computers.
Any changes or modifications not expressly approved by the grantee of this device could void the user's authority to operate the equipment.
EMI Compliance Statement for Canadian Users
- Before using this product, be sure to read through this manual. After having read this manual, keep it in a safe, readily accessible place for future reference.
- The information contained herein is subject to change without prior notice.
- Reproduction or transfer of part or all of this document in any means is prohibited without permission from CITIZEN SYSTEMS.
- Note that CITIZEN SYSTEMS is not responsible for any operation results regardless of missing, error, or misprinting in this manual.
- Note that CITIZEN SYSTEMS is not responsible for any trouble caused as a result of using options or consumables that are not specified in this manual.
- Except explained elsewhere in this manual, do not attempt to service, disassemble or repair this product.
- Note that CITIZEN SYSTEMS is not responsible for any damage attributable to incorrect operation/handling or improper operating environments which are not specified in this manual.
- Due to the nature of thermal paper, printed data should be considered for temporary use, not stored for a long period or permanently. Please note that CITIZEN SYSTEMS is not responsible for damage or lost profit resulting from the loss of data caused by accidents, repairs, tests or other occurrence.
- If you find loss of information, error, or uncertain matter, please contact your CITIZEN SYSTEMS dealer.
- If you find any disordered or missing page (s), contact your CITIZEN SYSTEMS dealer for replacement.
SAFETY PRECAUTIONS
What the Icons Mean
Precautions and notices necessary to follow for preventing hazards to the user or other person or their properties are defined as shown below. Hazards and degrees of damage that may be caused by ignoring the instructions are categorized as shown below. Please be familiar with the content of these definitions before reading this manual.
| DANGER | Indicates the case that may result in death or serious injury. |
| WARNING | This symbol indicates that using the product improperly in defiance of this symbol may result in death or serious injury. |
| CAUTION | This symbol indicates that using the product improperly in defiance of this symbol may result in injury or damage to properties. |
Definition of the icons

This symbol indicates the hazard that needs precautions.

This symbol indicates prohibited actions.

This symbol indicates mandatory actions.
Precautions in Handling Printer

WARNING

- If the product continues to be used when heat or smoke is generated or an abnormal odor is produced, a fire may occur. Immediately turn the printer power off, and carefully but quickly remove the battery, then contact our service agent.

- If any foreign matter (metal tip, water, liquid) enters the product, immediately turn the printer power OFF, and carefully but quickly remove the battery, then contact our service agent. Ignoring this instruction may result in a fire.

CAUTION

- This equipment is not suitable for use in locations where children are likely to be present.
- Do not place the printer on a shaky table or other unbalanced place. The printer may drop or fall resulting in injury.
-
Avoid using or storing in the following place. Damage to printer may be caused.
-
In a car parked in a sunny place, a place exposed to direct sunlight, near heat generating equipment, or the like.
- A place where temperature or humidity is excessively high or low, or its change is radical.
- A dusty place.
-
A place likely to get a splash of water or liquid.
-
Avoid dropping, impacting or vibrating the printer otherwise damage may be caused.
- Avoid entry of foreign material. Otherwise, fault may occur.
- Do not use volatile liquid (thinner, benzine, etc.) or wet cloth when cleaning the printer. Deterioration or discoloration may occur. Use a dry, soft cloth for cleaning.
- Do not move the printer or give any shock or vibration to it while the printer is in operation or in standby operation. The printer power may be disconnected and the print data may be lost.
Precautions on Using Printer

WARNING

- Do not touch the print head or paper cutter while replacing print paper. Heated print head may cause burn. The cutter may cause injury to the hand.

CAUTION

-
Use of print paper other than specified may result in not only deteriorated print quality but shortened life of print head (printing portion).
-
Do not tap or rub the print head with edged or hard material.

- When condensation is present on the print head, dry it completely before printing. Printing with condensation may damage the print head.
Precaution on Overheating

CAUTION

- To prevent the motor from overheating, continuous printing (or feeding) of the printer should be 1.5m or less in print length. After printing for this distance we recommend a pause of at least 30 seconds for cooling.
Precautions on Using Battery

DANGER

- Leaked liquid from the battery may result in loss of eyesight if it enters the eye. Immediately wash eyes with fresh water and get medical care.
- If liquid from the battery is ingested, immediately seek medical attention.
-
Keep the following in mind when handling battery. Otherwise, liquid leakage, heat generation, and explosion may result.
-
Do not throw battery into fire or do not apply heat.
- Do not peel or scratch the external battery casing.
- Soldering is prohibited.
- Do not give strong shock to battery or throw it away.
-
Do not short-circuit the positive and negative terminals with a metal such as metal wire.
-
Never disassemble or modify battery. Otherwise, liquid leakage, heat generation, or explosion may occur.

WARNING

- If battery liquid attaches to skin or cloth, immediately wash it out with fresh water. Otherwise, skin disorder may be caused.

CAUTION

- Risk of explosion if battery is replaced by an incorrect type.
- Dispose of used batteries according to the instructions.
- Use only the approved external charger or charge the battery within the printer.
- Never use another charger or one that looks to be similar.

CAUTION

- Do not dip battery in water or sea water. Wet battery may generate heat or may be subject to corrosion.
- Do not use or leave battery at high temperature. Using or leaving battery in a place of high temperature may result in liquid leakage, deteriorated performance, or shortened lifetime.
- Keep battery beyond the reach of a baby or child. Pay attention not to let a child take out the battery.
- If the battery is used for the first time, be sure to charge it completely before use.
- If any abnormality is found while the battery is in use, stop the operation and carry the battery in local sales agent.
- The battery in the printer is shipped partially charged. Please fully charge the battery prior to using the printer.
Precautions on Installing New Paper

CAUTION

- Before printing, confirm that print paper is set straight forward at the exit from the print (thermal) head. Skewed setting may result in paper jamming.
- To prevent skewed insertion of paper, use the following form for the end of paper.

OK






Precautions on Using Thermal Paper

CAUTION

- Print density may change with different kinds of paper and atmosphere temperature.
-
Observe the following when using thermal paper. Thermal paper is not resistant to discoloration, deterioration in quality, and thin printing.
-
Do not leave printed thermal paper exposed to light for a long time.
- Avoid exposure to high temperature, humidity, liquid, or sunlight.
- When keeping the printer thermal paper on a board, do not use paste, adhesive, or adhesive tape containing volatile organic solvent.
- For long-time storage, use thermal paper of high storage type or copy it with plain paper copier.
- Avoid contact with a film of vinyl chloride for a long time.
- Avoid using ammonia. Do not put thermal paper near the paper copied by use of ammonia.
- Avoid putting sweat or grease from your hands on the surface (printed or to be printed) of thermal paper.
-
Store thermal paper in a dark place with average temperature below 25^ C and relative humidity below 65% .
-
Using print paper with a thickness outside the recommended range may cause improper print quality.
Precautions on Using Special Serial Cable

WARNING

- With one side of the connector connected to this product, do not touch the metal part of the other connector.

CAUTION

- Static electricity may cause breakdown of internal circuit of this product.
- Do not leave this product with a cable wound around it for a long time. Disconnection or discoloration may result.
- Plugging and unplugging the contactor shall be done securely in the correct direction.
Precautions on Using Charger

CAUTION


- Do not use the product at a voltage and frequency other than specified.
- Do not use Charger other than specified.
- Before use, confirm that the power receptacle has sufficient capacity.
- Do not connect to the power receptacle where multiple connections are used.
- Do not step on, tap, or put any object, on the cable of the Charger.
- Before connecting or disconnecting Charger, turn the printer power OFF. Do the operation securely.
THE TABLE OF CONTENTS
1. GENERAL OUTLINE 14
1.1 Unpacking 14
1.2 Basic Specifications 15
1.3 Model Classifications 17
1.4 Explanation of Printer Parts 18
2. OPERATION 24
2.1 Installing the Battery 24
2.2 Removing Battery 25
2.3Charging the Battery 26
2.4 Using Cigarette Jack Charger 27
2.5 Belt Clip Usage 28
2.6 Shoulder Strap Installation 29
2.7 Roll Paper installation 30
2.8 Diagnostic Test 31
3. INTERFACE 32
3.1 Interface Cable Connection 32
3.2 Bluetooth Communication 33
3.3 Wi-Fi Communication 33
4. PRINTER CLEANING 34
4.1 Printer Head Cleaning 35
4.2 Platen Roller Cleaning 35
5. ROLL PAPER 36
6. LABEL 37
- "Made for iPod," "Made for iPhone," and "Made for iPad" mean that an electronic accessory has been designed to connect specifically to iPod, iPhone, or iPad, respectively, and has been certified by the developer to meet Apple performance standards. Apple is not responsible for the operation of this device or its compliance with safety and regulatory standards. Please note that the use of this accessory with iPod, iPhone or iPad may affect wireless performance.
- iPad, iPhone and iPod touch are trademarks of Apple Inc., registered in the U.S. and other countries.
- iPad Air and iPad mini are trademarks of Apple Inc.
- QR Code is a registered trademark of DENSEWAVE INCORPORATED.
- Bluetooth® is a registered trademark of Bluetooth-SIG Inc.
- Wi-Fi is a registered trademark of Wi-Fi Alliance.
CITIZEN is a registered trademark of Citizen Watch Co., Ltd.
CITIZEN est une marque enregistrée de Citizen Watch Co. Ltd.
Copyright © 2017 by CITIZEN SYSTEMS JAPAN CO., LTD.
1. GENERAL OUTLINE
CMP-25 is a full featured portable line thermal printer, which can be used in a large variety of job environments.
Bluetooth/Wi-Fi communication with a PDA or similar device is useful for business activities at the point of sale or service.
1.1 Unpacking
Standard
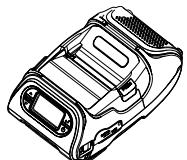
Printer
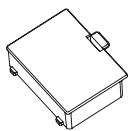
Battery
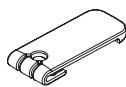
Belt Clip (Screw included)
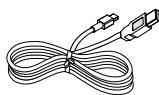
USB Cable
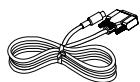
Serial Cable
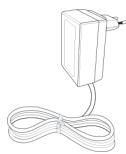
Recharger (EU Plug included)
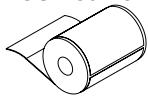
Paper Roll
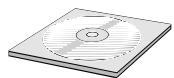
CD-ROM

Quick Start Guide
Optional
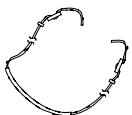
Strap
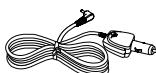
Cigar jack
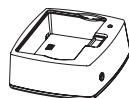
Battery Holder (Cradle)
1.2 Basic Specifications
| Printing | Method | Direct Thermal |
| Speed | 127 mm/sec. | |
| Width | 48 mm, 384 Dots/line | |
| Resolution | 203 DPI | |
| Dot Pitch | 8 Dot/mm, 0.125 Pitch | |
| Character | FontA to H, FontGS, Resident TTF (Font0), Downloadable TTF | |
| Barcode | 1D: Code11, ITF, Code39, Planet, EAN-8, UPC-E, Code93, Code128 etc. (ZPLII)2D: QR, PDF417, MicroPDF417, Maxicode, Datamatrix, Aztec, TLC39, RSS14 | |
| Emulation | ZPL Command compatible | |
| Sensor | Black-Mark Upper/Lower, Gap, Cover open | |
| Drop Resistance | 1.5m onto concrete | |
| LCD | FSTN LCD 128 x 64 dots | |
| Paper | Paper type | Thermal Paper |
| Width | 12.7 to 58 mm | |
| Thickness | 0.06 to 0.16 mm | |
| External Diameter | Max. Φ 56 mm | |
| Internal Diameter | 12.5 mm ± 0.5 mm | |
| Reliability | Thermal Printer Head | 50 km |
| Battery | Continuous printing: 4490 labels (100mm length) | |
| Standby: 85 hours (USB/Serial only model)70 hours (Bluetooth model)33 hours (WiFi model) | ||
| Communications | Standard | Serial (RS-232C), USB |
| Optional | Bluetooth Smart ready 4.2 or Wi-Fi (802.11a/b/g/n) | |
| Battery Charger | Input | AC100 to 240V, 50/60 Hz |
| Output | 8.4 V, 800 to 1200 mA | |
| Battery | Battery type | Li-ion |
| Output | 7.4 V, 2600 mAh/19.24 Wh | |
| Charging time | Less than 3 hours | |
| Size | WxDxH (mm) | 166 mm x 174 mm x 82 mm |
| WxDxH" | 6.5 inch x 6.8 inch x 3.2 inch | |
| Weight | 590 g (including battery) | |
| Environment Sealing | IP42 | |
| Temperature | Operation | -10 to 50°C*1 |
| Storage | -20 to 60°C | |
| Humidity | Operation | 35 to 80% |
| Storage | 10 to 90% | |
*1 This does not guarantee printing quality at low temperature.
1.3 Model Classifications
Classified by the following designation.
CMP-25BTUZL
Emulation (Default)
Z :ZPL2
Destination (AC cord)
U : North Americas and European
Interface
None:USB and Serial
BT : USB, Serial and Bluetooth
(iAP supported) *
WF : USB, Serial and WiFi
- iAP is necessary to connect to Apple iOS device.

NOTE
There are no products available for some of the combination of symbols.
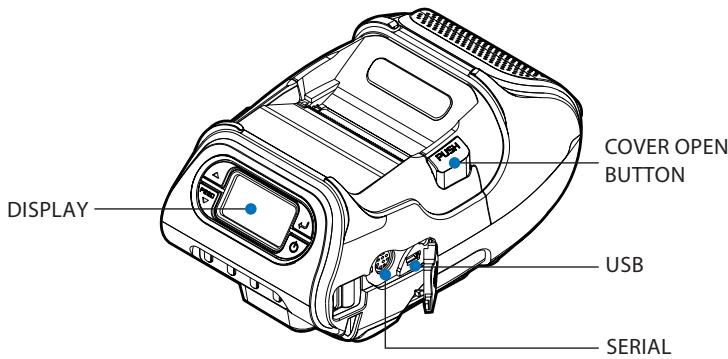
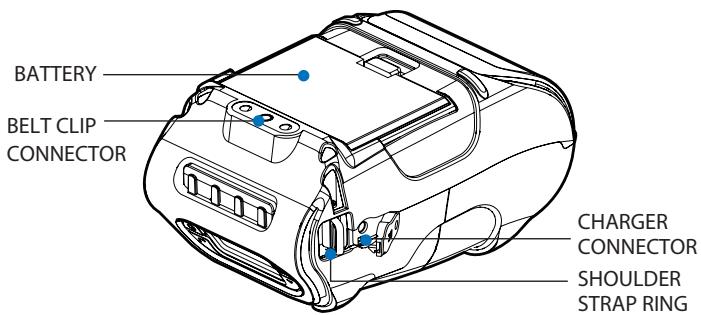
1.4 Explanation of Printer Parts
1.4.1 Printer Appearance
Front
Bottom
1.4.2 Operation Panel
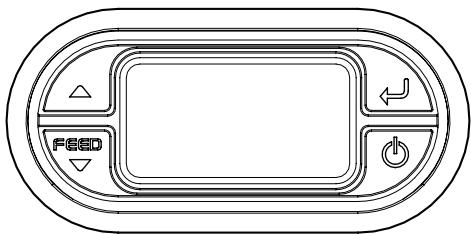
| Button | Name | Function |
| FEED | Paper Feed / Down Button | Advances the supply. Clears error message. Moves down through menu options. 1. Refer to “2-8” for DiagnosticTest information. 2. Refer to the service manual regarding Hexadecimal Dumping. |
| ← | Enter Button | Selects the highlighted menu option. |
| △ | Up Button | Moves up through menu options. |
| Power Button | Turns the printer on and off. Press to turn power on. Press for three seconds to turn power off. Wakes the printer from sleep mode. |

NOTE
- The battery status icon in LCD indicates amount of power remaining. Actual run-time remaining depends on factors such as the contents of output, distance to computer, etc.
- When the battery level is very low, high density printing can result in the printer switching off during printing resulting in possible loss of data.
1.4.3 Ready Screen (initial screen)
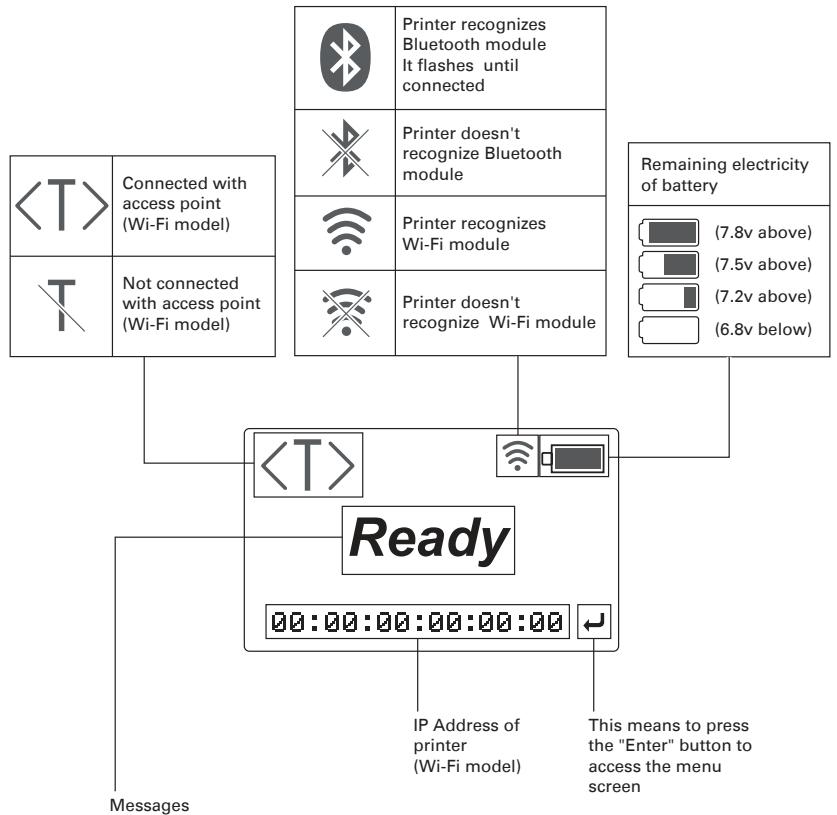
| Language | Ready / Online | Paper Out | Cover Open | Can’t see gap or | Battery Low |
| English | Ready | Media Out | Cover open | Check media type | Battery Low |
| François | Prêt | Fin de papier | Capot ouvert | Vérifier consommable | Batterie faible |
| Deutsch | Online | Papier zu Ende | Abdeckung offen | Prüfe Media Typ | Batterie schwach |
| Espanol | Lista | Sin Papel | Cubierta Abierta | Verificar Papel | Bateria Baja |
1.4.4 Menu operation
Here we explain how to adjust the display brightness as an example.
(1) Press the Enter ( ) button to enter the Menu.
(2) Press the Up (△) or Paper Feed/Down (∨) button to select Tool Box.
Tool Box: Using this menu, you can customize various system settings to achieve optimal performance from this printer.
Language: Using this menu, you can change the system language.
(3) Press the Enter ( ) button.
Password input screen appears.
(4) Press the Up () and Enter () buttons in the following sequence: , , , , .
If the password is entered correctly, the Tool Box menu screen will appear.
(5) Press the Power (D) button to exit the menu.
1.4.5 Menu displayed on the LCD / Operation Panel
| Top | 2nd | 3rd | 4th | 5th | Choices | |
| Tool Box | (Password1) | Diagnostic | Printer | Test Label | Test Print/Grey Scale/Exit | |
| Sensors | Black Mark/Peeler/Gap/Peel Switch/Exit | |||||
| Printhead | Head Temp/Exit | |||||
| Battery | ||||||
| View Total | Print Inch/Service In/Exit | |||||
| Exit | ||||||
| Display | Backlight | |||||
| Pixel | ||||||
| Exit | ||||||
| Keyboard | ||||||
| RAM | ||||||
| Data Dump | ||||||
| About | ||||||
| Exit | ||||||
| Setup | Media Heat | Standard/Special/High Power/Exit | ||||
| Backlight | Enable/Disable/Exit | |||||
| LCD Cont | ||||||
| Printer | Contrast | |||||
| Supply Pos | ||||||
| Print Pos | ||||||
| Margin Adj | ||||||
| SensorMode | Gap/BM Lower/BM Upper/Continuous/Exit | |||||
| Sensor Cal | Gap/BM Lower/BM Upper/Peel/Exit | |||||
| Detect | Disable/Exit | |||||
| Exit | ||||||
| SerialPort | Baud Rate | 1200/2400/4800/9600/1 9200/38400/57600/1152 00/Exit | ||||
| Parity | No/Odd/Even/Exit | |||||
| Data Bits | 7/8/Exit | |||||
| Stop Bit | 1/2/Exit | |||||
| Flow Ctrl | No Flow/DTR Flow/RTS Flow/"Xon/Xoff"/Exit | |||||
| Exit | ||||||
| PowerMngmt | Sleep Mode | Disable/10Sec/20Sec/30Sec/1Min/2Min/5Mi n/10Min/30Min/1Hour/Exit | ||||
| Power Off | Disable/10Min/20Min/30Min/Exit | |||||
| Exit | ||||||
| Tool Box | (Password1) | Setup | Wireless | Status | ||
| Configure | IP Address | |||||
| SubnetMask | ||||||
| Gateway | ||||||
| Power Mode | CAM/PSP/Exit | |||||
| SSID | ||||||
| Exit | ||||||
| Print Info | ||||||
| Reset | ||||||
| Exit | ||||||
| Bluetooth | Security | Enable/Disable/Exit | ||||
| Change PIN | ||||||
| Local Name | ||||||
| Address | ||||||
| Print Info | ||||||
| Exit | ||||||
| Exit | ||||||
| Service | (Password2) | Totals | View | Print Inch/Service In/Exit | ||
| Modify | Print Inch/Service In/Exit | |||||
| Clear | Print Inch/Service In/Exit | |||||
| Exit | ||||||
| Default | ||||||
| File Sys. | Clear File/Exit | |||||
| Exit | ||||||
| Exit | ||||||
| Language | English | |||||
| Francais | ||||||
| Deutsch | ||||||
| Espanol | ||||||
| Exit | ||||||
| Message shown on LCD in Sleep mode | "Sleep Mode / Press Power Key to wake up" |
2. OPERATION
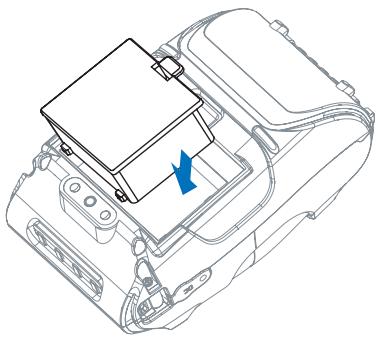
2.1 Installing the Battery
(1) Remove the battery. Insert the battery as shown.
(2) Replace the battery.
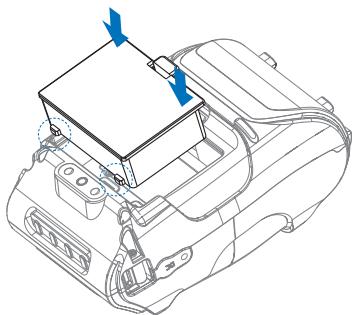

NOTE
You must fully charge the battery when you receive the printer. Batteries can be charged in the printer or in an optional external cradle.
2.2 Removing Battery
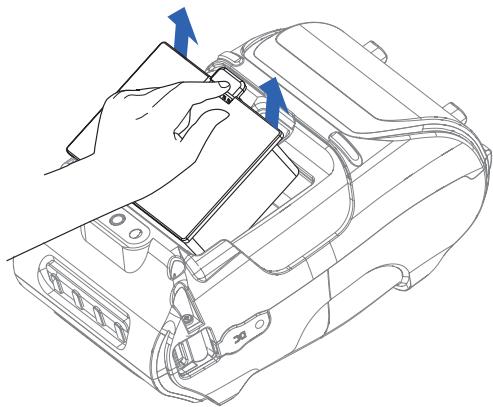
Remove the battery. Lift out the battery.
2.3 Charging the Battery
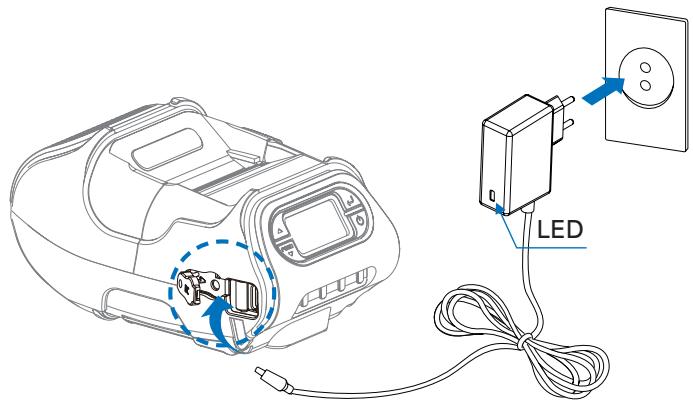
(1) Be sure that the printer is turned off.
(2) After open the DC JACK cover, insert DC JACK into the printer.
(3) Plug the power cord to electrical outlet.
The status of lamp in charging
| Status | Charging | Charging Completed |
| Charging Lamp | Red | Green |

NOTE
If there is trouble while charging the battery, the charge indicator LED blinks green. Try unplugging and reconnecting charger, charging should resume. Charging is complete when the LED changes to solid green.
2.4 Using Cigarette Jack Charger
Optional
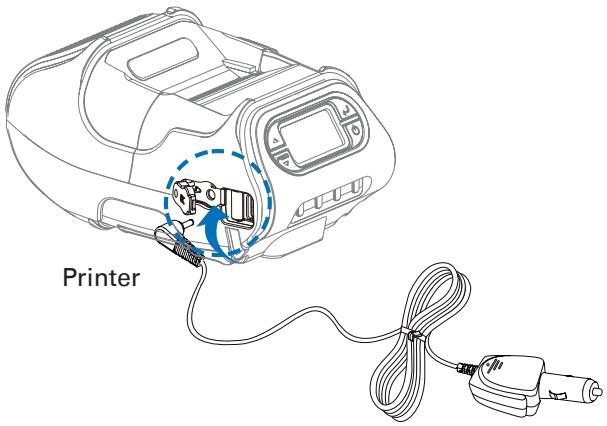
Connect the vehicle charger to the printer.
| Input | 12 V to 24 V |
| Output | 8.4 V / 0.8 V to 1.2 A |
Plug the vehicle charger to the cigarette socket on your vehicle.

NOTE
Connect the vehicle charger to the printer.
2.5 Belt Clip Usage
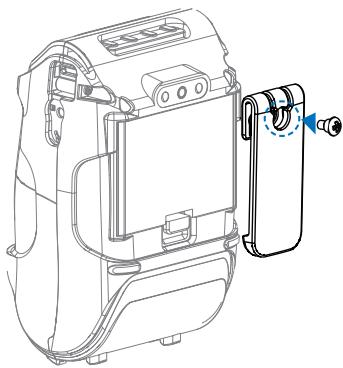
(1) Insert screw into belt clip.
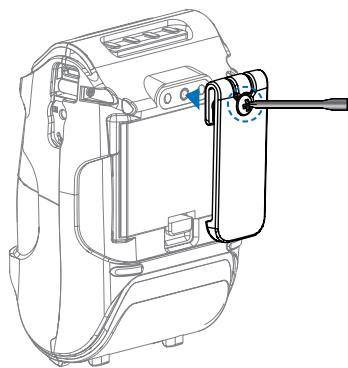
(2) Tighten the screw with driver as shown.

NOTE
The belt clip is included with the printer but is not required to be used or installed!
2.6 Shoulder Strap Installation
Optional
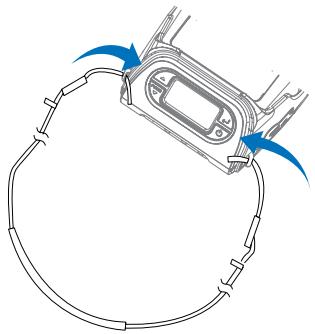
(1) Insert the strap into the hook of the printer.
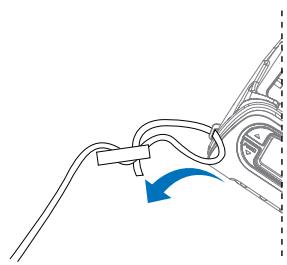
(2) Place the end of the strap into the hook of shoulder strap.
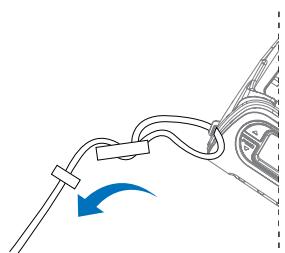
(3) After pulling out the end of the strap tightly, put it into the clip to be fastened.
2.7 Roll Paper installation
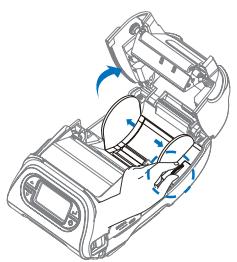
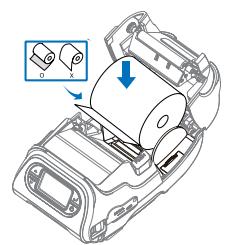
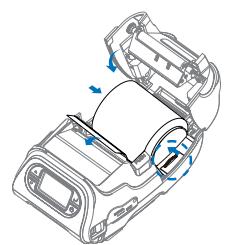
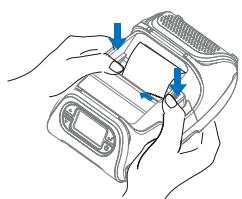
(1) Open the Paper cover by pressing the Open button and set the width of paper guide by turning the knob with finger.
(2) Put the stock in so it unrolls from the bottom. Remove the stock core when it is empty. Pull a short length of stock out of the printer.
(3) Close the cover.
(4) Close the paper with both hands and run the paper line up by pressing feed button.

NOTE
If the users close the cover with one hand, it would not be closed completely.
Please use both hands to close.
2.8 Diagnostic Test
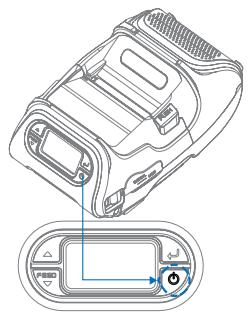
(1) Turn off the printer.
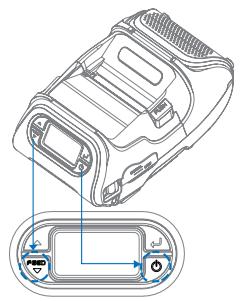
(2) Press and hold the feed button and power button.
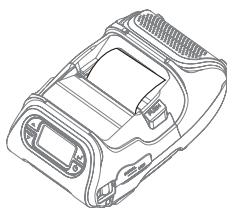
(3) The information label prints.

NOTE
- For Hex Dump mode, do steps 1 to 2 then press the feed button.
- After printing ASCII pattern, the diagnostic test is complete.
- If the feed button is not pressed to go to Hex Dump mode, the printer exits diagnostics after three seconds.
3. INTERFACE
3.1 Interface Cable Connection
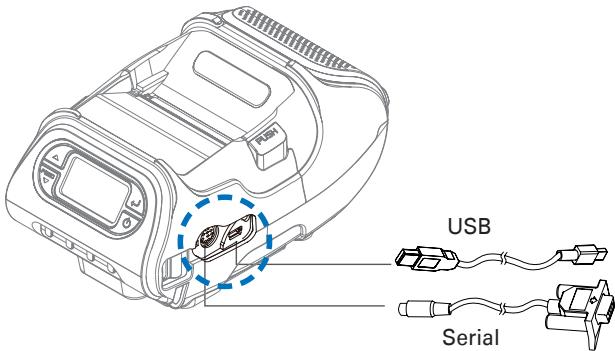
(1) Connect the USB or Serial cable to the cable connector on the printer.

NOTE
Use only the cables offered by the printer manufacturer.
(2) Connect the interface cable into the USB or Serial port of the device (PDA, PC, etc.).
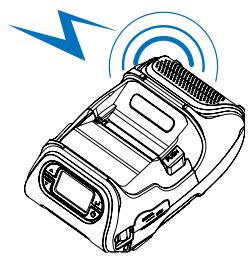
This product can communicate with other devices via Bluetooth or WiFi communication and cable.
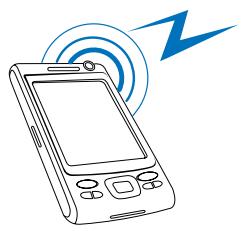
3.2 Bluetooth Communication
Optional
(1) Printer can be connected to the PDA and PC which can do wireless communication.
(2) By using Bluetooth function supported in PC, printer can be connected.

NOTE
Refer to the System Administrator Guide for more information.
3.3 Wi-Fi Communication
Optional
(1) The Printer can be connected to devices equipped with Wi-Fi (802.11a/b/g/n) communication capacity. (PDAs, PCs, etc.)
(2) Use the Wi-Fi (802.11a/b/g/n) connection function supported by the device to connect to the printer.

NOTE
Refer to the Wi-Fi (802.11a/b/g/n) Manual for more details on connection.
4. PRINTER CLEANING
If the interior of the printer is dusty, printing quality can be lowered. In this case, follow the instructions below to clean the printer.
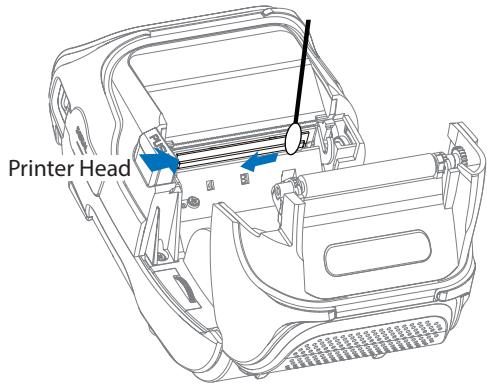
4.1 Printer Head Cleaning
(1) Use an applicator swab moistened with an isopropyl alcohol to clean the printer head and remove any dust.
(2) Once cleaning is complete, allow the printer to dry then install the stock and close the cover.

NOTE
- Make sure to turn the printer power off prior to cleaning.
- The printer head can become very hot during printing; allow the printer approximately 10 minutes to cool before cleaning.
- Do not touch the printer head, it can be damaged by static electricity.
- Take care not to allow the printer head to become scratched and/or damaged in any way.
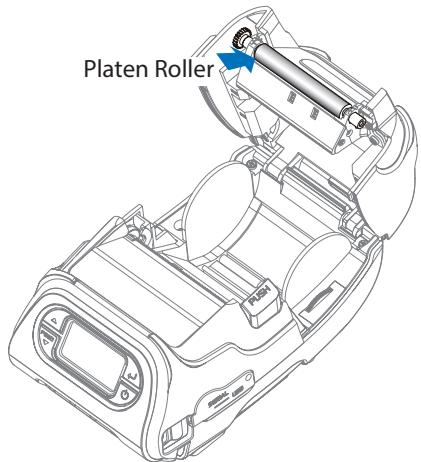
4.2 Platen Roller Cleaning
(1) Clean the platen roller with a clean soft cloth moistened with isopropyl alcohol or a cleaning pen.
(2) Turn the platen roller with your finger to clean the entire surface.
5. ROLL PAPER
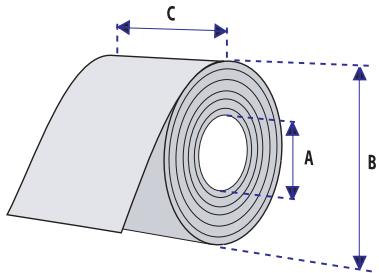
| Core | |
| Diameter (A) | 12.5 mm +/-0.5 mm |
| Roll | |
| Max.diameter (B) | Max. 56 mm |
| Max.media width (C) | 58±0.5 mm |
| Min.media width (C) | 12.7 mm |
| Max.media thickness | 0.16 mm |
| Min.media thickness | 0.06 mm |

CAUTION
Protect the media against sand, grit, and other hard particles during printing and storage. Keep the cover closed. Even very small foreign particles may cause severe harm to the delicate printhead.
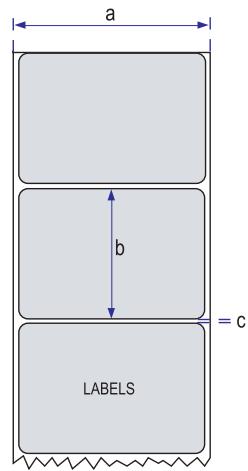
6. LABEL
| <-- a --> Media width (liner) | |
| Maximum | 58±0.5 mm |
| Minimum | 8.7±0.5 mm |
| <-- b --> Label length | |
| Minimum | 12.7 to 300 mm |
| <-- c --> Label gap height | |
| Maximum | 8.3 mm |
| Minimum | 1.8 mm |
| Liner | |
| Opacity | 50 to 75% |
CITIZEN SYSTEMS AMERICA CORPORATION
363 Van Ness Way, Suite 404
Torrance, CA 90501. USA
Tel: (310) 781-1460
Fax:(310)781-9152
http://www.citizen-systems.com
CITIZEN SYSTEMS EUROPE GmbH
Elizabeth House, 56-60 London Road
Staines-Upon-Thames, TW18 4HF
United Kingdom
Tel: +44 (0) 20 8893 1900
Fax: +44 (0) 20 8893 0080
- MOBILE THERMAL PRINTER
- MODEL CMP-25
- User's Manual
- Compliance Statement for European Users
- FCC Compliance Statement for American Users
- EMI Compliance Statement for Canadian Users
- SAFETY PRECAUTIONS
- What the Icons Mean
- Definition of the icons
- Precautions in Handling Printer
- WARNING
- CAUTION
- Precautions on Using Printer
- Precaution on Overheating
- Precautions on Using Battery
- DANGER
- Precautions on Installing New Paper
- Precautions on Using Thermal Paper
- Precautions on Using Special Serial Cable
- Precautions on Using Charger
- THE TABLE OF CONTENTS
- GENERAL OUTLINE 14
- OPERATION 24
- INTERFACE 32
- PRINTER CLEANING 34
- ROLL PAPER 36
- LABEL 37
- GENERAL OUTLINE
- Unpacking
- Standard
- Optional
- Basic Specifications
- Model Classifications
- CMP-25BTUZL
- NOTE
- Explanation of Printer Parts
- Printer Appearance
- Front
- Bottom
- Operation Panel
- Ready Screen (initial screen)
- Menu operation
- OPERATION
- Installing the Battery
- Removing Battery
- Charging the Battery
- The status of lamp in charging
- Using Cigarette Jack Charger
- Belt Clip Usage
- Shoulder Strap Installation
- Roll Paper installation
- Diagnostic Test
- INTERFACE
- Interface Cable Connection
- Bluetooth Communication
- Wi-Fi Communication
- PRINTER CLEANING
- Printer Head Cleaning
- Platen Roller Cleaning
- ROLL PAPER
- LABEL
- CITIZEN SYSTEMS AMERICA CORPORATION
- CITIZEN SYSTEMS EUROPE GmbH
Brand : CITIZEN
Model : CMP-25L
Category : Thermal printer