USER MANUAL 14S42 D WAD929C - 14S42 D WAD929C VALBERG
This product is guaranteed for 2 years from the date of purchase* against any failure resulting from a manufacturing or material defect. This warranty does not cover defects or damage resulting from incorrect installation, improper use or abnormal wear of the product.
*as shown on the sales receipt.
CONDITION DE GARANTIE
FR
Thank you for choosing this VALBERG product.
Chosen, tested and recommended by ELECTRO DEPOT,
the products of the VALBERG brand are easy to use,
reliable and of an impeccable standard.
Thanks to this appliance, you can be sure that each
use will bring you satisfaction.
Welcome to ELECTRO DEPOT.
Visit our website: www.electrodepot.fr www.electrodepot.be
A
Appliance overview
Description of the appliance
B
Using the appliance
Before using your dishwasher Installation instructions Loading the racks Quick use guide Using your dishwasher Programming the dishwasher
C
Useful information
Cleaning and maintenance Troubleshooting tips Error codes
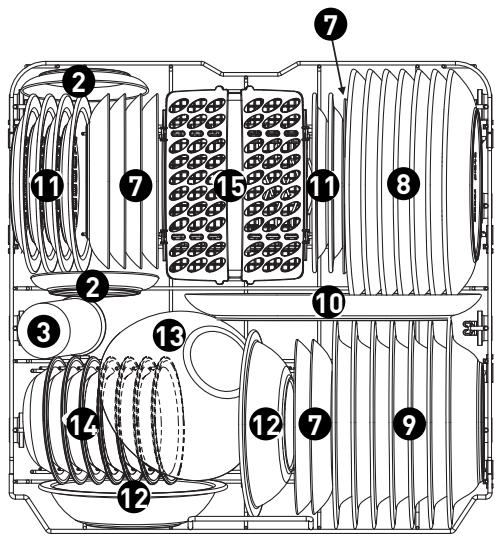
Description of the appliance
NOTE: To ensure that your dishwasher performs optimally, read all the operating instructions before using it for the first time.
1 Inner hose
Lower wash arm
Salt compartment
5 Micro-filter
Detergent compartment
6 Cutlery rack
Upper rack
8 Lower rack
A Cutlery compartment
Upper wash arm
Cup compartment
NOTE : Illustrations are for illustrative purposes only, specifications vary by model. Please refer to your specific model.
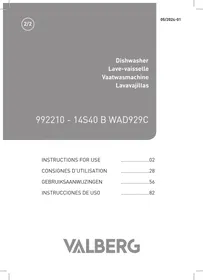
Before using your dishwasher
- Before using your dishwasher:
- Set the water softener
- Load salt into the water softener
- Load the rack
- Fill the compartment
NOTE : Please refer to the “Water Softener” chapter if you need to adjust the water softener.
Loading salt into the water softener
- Always use salt meant to be used in a dishwasher.
- The salt compartment is located underneath the bottom rack and must be filled following the below instructions:
WARNING :
- Only use salt specifically designed for dishwashers!
Any other type of salt that is not specifically intended for use in a dishwasher, especially table salt, will damage the water softener. In the event of damage caused by the use of unsuitable salt, the manufacturer declines any warranty and any liability for the damage caused.
- Wait until you are ready to start a wash cycle before filling the salt tank.
This will prevent any grains of salt or salt water that may have been spilt and left on the bottom of the machine for some time from causing corrosion.
- Follow the steps below to add regenerating salt:
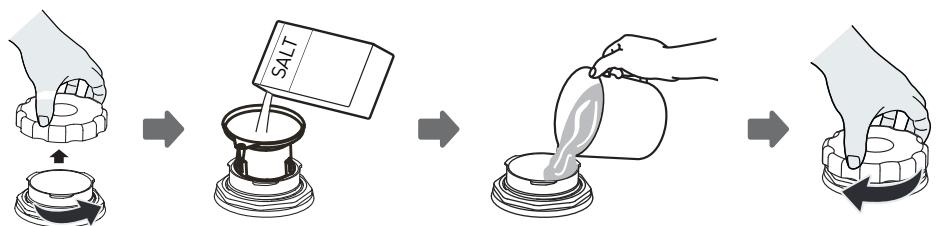
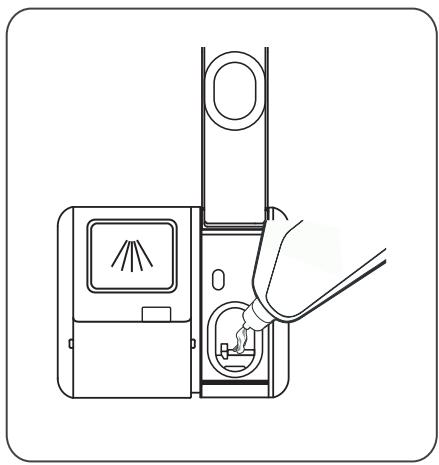
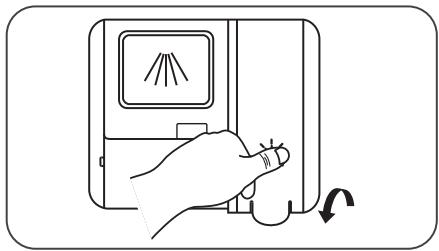
- Remove the bottom rack and unscrew the compartment cap.
- Place the tip of the funnel (provided) into the hole and pour in about 1.5kg of regenerating salt.
- Fill the salt compartment with water to the maximum limit. A small amount of water may spill out of the compartment, which is normal.
- After filling the compartment, screw the cap back on tightly.
-
The salt indicator light will turn off once the compartment is filled with salt.
-
Immediately after filling the salt compartment, a wash programme must be started. If not, the filtration system, pump or other important parts of the machine may be damaged by the salt water. This is not covered by the warranty.
NOTE:
- The salt compartment should only be filled with the salt indicator light () turns on in the control panel. Depending on how easily the salt dissolves, the salt indicator light may remain on even though the compartment is full.
- CAUTION: Risk of corrosion and perforation of the tank or parts of the appliance
- If you spill any salt in the cavity during filling, please immediately rinse the spot where the salt is spilt or start a wash programme. Be especially careful when starting a programme with a delayed start.
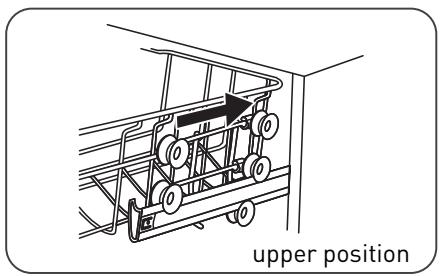
Instructions on using the rack
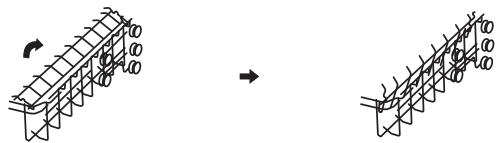
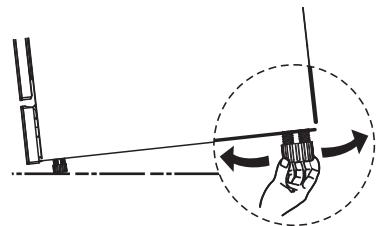
Adjusting the top rack
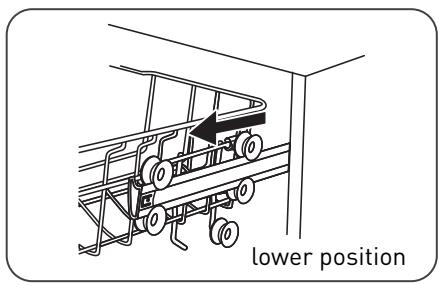
- Remove the top rack.
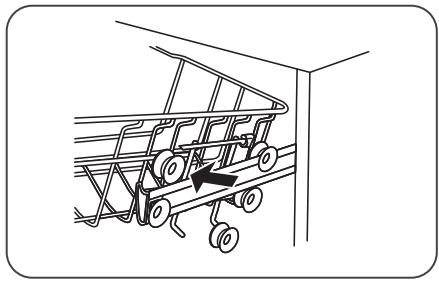
- Reposition the top rack on the upper or lower castors.
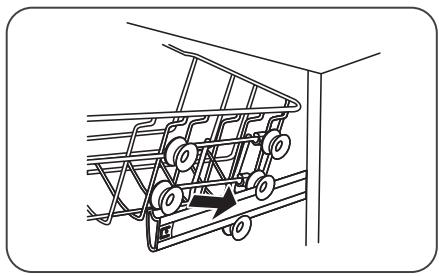
- Push the top rack to the back of the machine.
Folding the cup shelves
- To make room for larger items in the top rack, lift the cup shelf upwards. You can then lean large glasses against the shelf. You can also remove the shelf if not needed.
Folding the rods
- The rods in the bottom rack are used to hold plates and dishes. They can be folded down to make room for large items.

Installation instructions
WARNING : Risk of electric shock
Disconnect the power supply before installing the dishwasher. Failure to do so could result in death or electric shock.
WARNING : For your personal safety:
- Do not use an extension cord or adapter with this unit.
- Under no circumstances should you cut or remove the ground connection from the power cord.
- CAUTION: Risk of overheating, fire and electric shock:
- Please observe the technical data of the device in the data sheet attached to the notices (voltage, frequency, power, water pressure requirements, etc.) depending on your installation.
- A 20A circuit breaker or 16A fuse on the appliance's dedicated circuit must be used.
The cross-section of the supply cables must be 2.5 mm^2 and the differential switch 30 mA .
- The outlet must be equipped with a protective ground plug. If the plug is not suitable or is damaged, replace it and check the electrical installation to ensure that it meets the above requirements.
WARNING: Check that the installation is properly grounded before using it.
Water supply and drainage
Cold water connection
-
Connect the cold water supply hose to a 1.9cm threaded fitting and ensure that it is tight.
-
If the water supply hoses are new or have not been used for a long time, run the water to check that it is clear.
- This is necessary to avoid the risk of the water supply being clogged, which could damage the appliance.

Standard supply hose
WARNING : A hose connected to a sink sprayer can burst if it is installed in the same water line as the dishwasher. If your sink is equipped with one, it is recommended to disconnect the pipe and plug the hole.
How to disconnect the safety supply hose?
- Shut off the water supply.
- Unscrew the safety supply hose from the tap.
Drain hose connection
- Insert the drain hose into a drain pipe with a minimum diameter of 4cm , or let it run into the sink, making sure to avoid bending or pinching it.
- The height of the drain pipe should not exceed 1000mm .
- The free end of the hose should not be immersed in water to avoid backflow.
WARNING : Ensure that the drain hose is securely fastened either in position or in position.
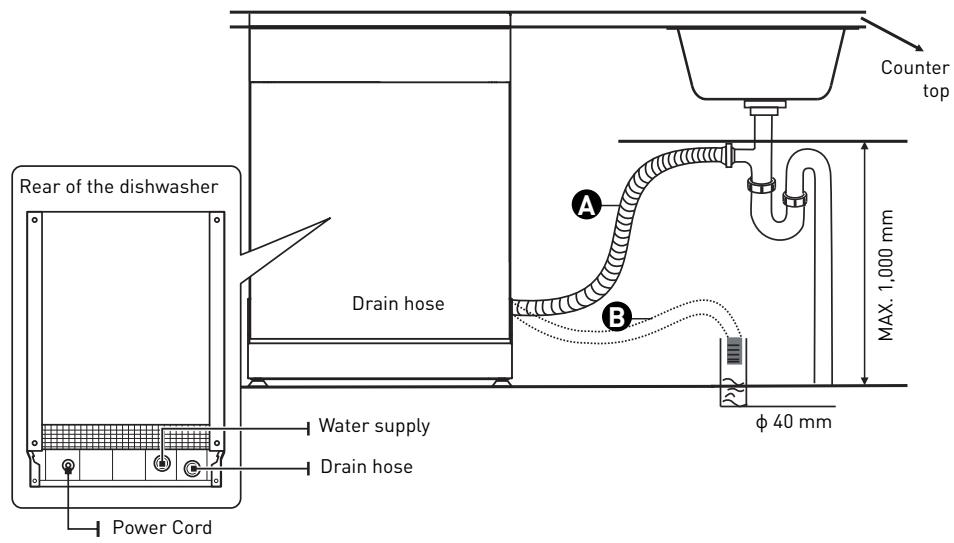
Draining excess water from the hoses
- If the sink is more than 1000mm above the floor, excess water from the pipes cannot be drained directly into the sink.
- It will be necessary to empty it into a suitable basin or container, placed outside the appliance and lower than the sink.
Water outflow
- Connect the drain hose. Make sure it is securely fastened to prevent water leakage.
- Make sure the drain hose is not twisted or crushed.
Hose extension
- If you need a drain hose extension, make sure you use a similar drain hose.
- It should not be longer than 4 metres, otherwise, the cleaning performance of your dishwasher may be reduced.
Connecting the siphon
- The wastewater connection must be within 100cm (maximum) from the bottom of the tank.
- The water drain hose must be attached.
Positioning the unit
- Place the dishwasher in the desired location. The back of the unit should rest against the
wall behind it, and the sides against adjacent cabinets or walls.
- This dishwasher has drain and water supply pipes that can be positioned on the left or right side for easy installation.
Levelling the appliance
Once the appliance has been positioned in the required location, the height of the dishwasher can be changed by turning the adjustment feet. The unit must never be tilted by more than 2^ .
NOTE : This chapter applies only to independent dishwashers.
Independent installation
Installation between existing cabinets
- The height of this dishwasher is designed to allow the appliance to be installed between existing cabinets of the same height in modern fitted kitchens.
- The feet can be adjusted to the correct height.
- The laminated top surface of the appliance does not require any special maintenance, as it is resistant to heat, scratches and stains.

Underneath an existing counter
(if installing under a counter)
- In most modern fitted kitchens, there is a single worktop under which cabinets and appliances are installed.
- If doing so, remove the dishwasher cover by unscrewing the screws under the rear edge of the top part [A].
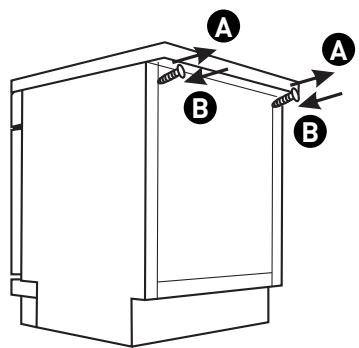
WARNING : After removing the worktop, the screws must be screwed back in under the rear edge of the top (B).
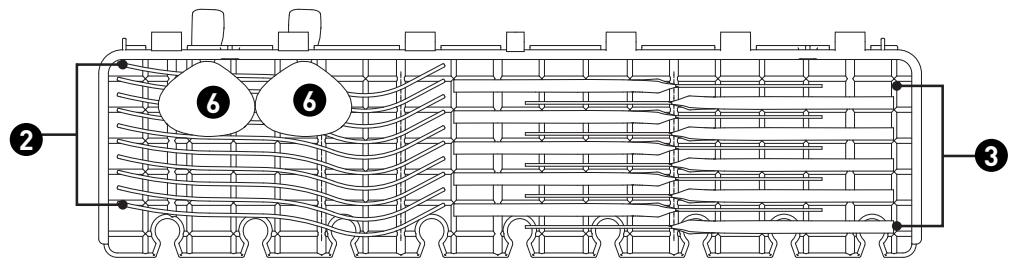
Loading racks
Loading racks:
Top rack:

Number
1
Item
2
Cups
3
Saucers
4
Glasses
5
Tall cups
6
Small saucepan
Bottom rack:
Number
Item
7
Dessert plates
8
Dinner plates
9
Soup plates
10
Oval dish
11
Melamine dessert plates
12
Melamine bowls
13
Glass bowls
14
Dessert cups
15
Cutlery rack
Cutlery compartment:
NOTE : Place lightweight cutlery on the shelf. They must not weigh more than 1.5 ~kg in total.
Cutlery rack:
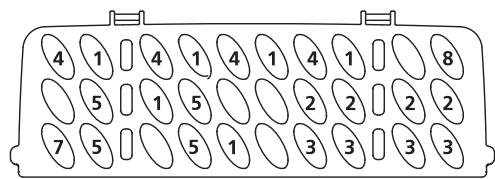

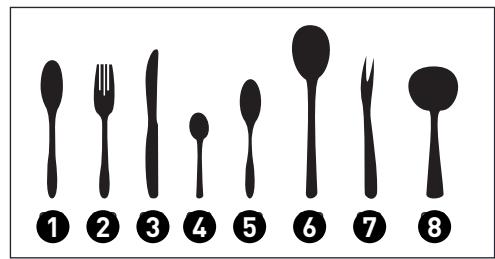
| Number | Item |
| 1 | Tablespoons |
| 2 | Forks |
| 3 | Knives |
| 4 | Teaspoons |
| 5 | Dessert spoons |
| 6 | Serving spoons |
| 7 | Serving forks |
| 8 | Ladels |
Information for comparability testing according to the standard
Capacity: 14 place settings
Position of the top rack: lower position
Programme: ECO
Adjusting the rinsing aid: 6
Adjusting the water softener: H3
Quick use guide
Please read the relevant chapters in the user guide for more detailed operating instructions.
- Installing the dishwasher.
(Pleases refer to the chapter "INSTALLATION INSTRUCTIONS".)

- Removal of larger residues from the cutlery.
- Loading the racks.
- Filling the dispenser.
- Selecting a programme and starting the dishwasher.
Using your dishwasher
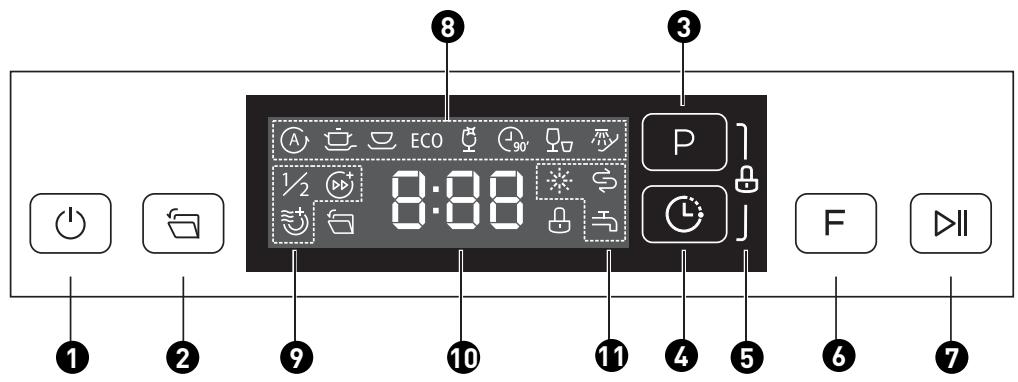
Control panel
Control (buttons)
| 1 | Power button | | Press this button to turn on your dishwasher; the screen will light up. |
| 2 | Automatic opening | | When this function is activated, the dishwasher door opens automatically at the end of the programme, which improves the drying. This function is activated by default. |
| 3 | Programmes | P | Press this button to select the appropriate wash programme; the corresponding indicator light will turn on. |
| 4 | Delay Start | L | Press this button to set the number of hours to delay the wash cycle. You can delay the start of the wash for up to 24 hours. Each press of this button delays the start of the wash by one hour. |
| 5 | Child lock | | This option allows you to lock the buttons on the control panel, except for the power button, so that children cannot accidentally start the dishwasher by pressing the panel buttons.
To lock or unlock the buttons on the control panel, press and hold the “Programme” and “Delayed start” buttons simultaneously for 3 seconds. When you press this button, the corresponding indicator lights up. |
| 6 | Functions | F | Press this button to select a function and the corresponding indicator will light up. |
| 7 | Start/Pause | II | Press this button to start the selected wash programme or interrupt the programme in progress. |
Display

Programme indicator lights

Function indicators
ECO
ECO
This is the standard programme for normally soiled dishes, such as lightly soiled pots, plates, glasses and pans.

Auto
For lightly, normally or heavily soiled dishes, with or without stuck-on food residue.

Intensive
Very dirty dishes, including pots and pans with stuck-on food.

Universal
For normally dirty items, such as lightly soiled plates, glasses and cooking utensils.

Glasses
For glasses and lightly soiled dishes.

90 min.
For normally soiled loads requiring a quick wash.

Fast
A shorter cycle for lightly soiled dishes that do not require drying.

Soak
To rinse dishes that you plan to wash later in the day.

Half load
When you only have about 6 place settings to wash, you can choose this function to save energy and water. (It cannot be used with the Auto, Fast and Soak programmes). When this button is pressed, the corresponding indicator lights up.

Turbo+ Speed
This function reduces the washing time. (This cannot be used with the Auto, Fast, and Soak programmes). When this button is pressed, the corresponding indicator lights up.

Additional drying
This function allows the dishes to be dried further. (It cannot be used with the Auto, Fast, and Soak programmes). When this button is pressed, the corresponding indicator lights up.

Screen
Displays remaining time, waiting time, error codes, etc.
| Rinse aid
If the “” indicator lights up, it means that the rinse aid level in the dishwasher is low and the rinse aid compartment needs to be filled. |
| Warning indicator | Salt
If the “” indicator lights up, the dishwasher is low on salt and a refill is required. |
| Water tap
If the “” indicator lights up, it means that the tap is shut off. |
Water softener
- The water softener must be adjusted manually, using the water hardness indicator.
- The water softener is designed to remove minerals and salts from the water that would have a harmful or undesirable effect on the operation of the appliance. The higher the mineral content of your water, the more calcareous it is.
- The softener should be adjusted according to the hardness of the water in your area. Your local water authority can give you information on the hardness of the water in your area.
Setting the salt consumption
| WATER HARDNESS | Setting
the water
softener | Salt
consumption
(grammes/
cycle) |
| German
degrees °dH | French
degrees
°fH | English
degrees
°Clark | Mmol/l |
| 0 - 5 | 0 - 9 | 0 - 6 | 0 - 0.94 | H1 | 0 |
| 6 - 11 | 10 - 20 | 7 - 14 | 1.0 - 2.0 | H2 | 9 |
| 12 - 17 | 21 - 30 | 15 - 21 | 2.1 - 3.0 | H3 | 12 |
| 18 - 22 | 31 - 40 | 22 - 28 | 3.1 - 4.0 | H4 | 20 |
| 23 - 34 | 41 - 60 | 29 - 42 | 4.1 - 6.0 | H5 | 30 |
| 35 - 55 | 61 - 98 | 43 - 69 | 6.1 - 9.8 | H6 | 60 |
1°dH = 1.25°Clark = 1.78°fH = 0.178 mmol/l
Factory setting: H3
Contact your local water company for information on the hardness of your water.
NOTE : Please refer to the chapter “Loading salt into the water softener”, if your dishwasher runs out of salt.
NOTE : If your model does not have a water softener, you can skip this section water softener.
- Water hardness varies from place to place. If hard water is used in the dishwasher, deposits will form on dishes and utensils. This appliance is equipped with a special softener that uses a salt compartment specifically designed to remove limescale and minerals from the water.
Preparing and loading dishes
- Consider buying utensils that are labelled "dishwasher safe".
- For delicate items, select a programme with the lowest possible temperature.
- To avoid damage, do not remove glasses and cutlery from the dishwasher immediately after the programme has finished.
Dishwasher safe cutlery/dishes
Not dishwasher safe:
- Cutlery with wooden, horn, porcelain or mother-of-pearl handles.
- Plastic items that are not heat resistant.
- Older cutlery with glued parts that do not withstand high temperatures.
- Glued dishes or cutlery.
- Items in pewter or copper.
- Crystal glasses.
- Steel items prone to rusting.
- Wooden platters.
- Items made from synthetic fibres.
Dishwasher safe to a limited extent:
- Some types of glass can become dull after many washes.
- Silver and aluminium objects tend to discolour during washing.
- Varnished patterns may fade if they are frequently machine washed.
Recommendations for loading the dishwasher
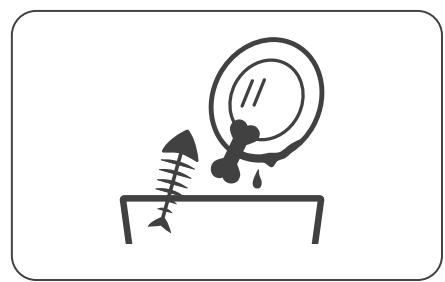
- Remove any large food scraps. Soften the remains of burnt food on cooking utensils.
- It is not necessary to rinse the dishes under running water.
- To optimise the performance of your dishwasher, follow these loading tips.
(The characteristics and appearance of the dish and cutlery racks may vary according to the model.)
Place items in the dishwasher as follows:
NOTE : Very small items should not be washed in the dishwasher as they could easily fall out of the rack.
Unloading dishes
To avoid water dripping from the top rack onto the bottom rack, we recommend emptying the bottom rack first and then the top rack.
WARNING : Dishes will be hot! To avoid damage, wait about 15 minutes after the end of the programme before removing glasses and cutlery from the dishwasher.
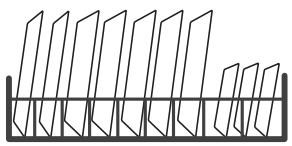
Loading the top rack
- The top rack is designed to store more delicate and lighter dishes, such as glasses, saucers, coffee or tea cups, as well as plates, small bowls and shallow dishes (provided they are not too soiled).
- Position dishes and cooking utensils so that they cannot be moved by the water jet.
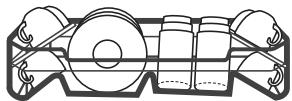
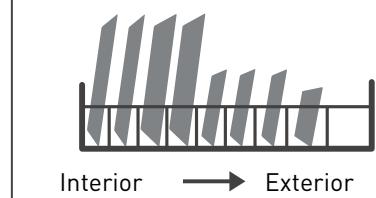
Loading the bottom rack
-
We suggest that you place large items and hard-to-clean items in the lower basket: pots, pans, lids, serving dishes and salad bowls, as shown in the diagram below.
-
It is best to place serving dishes and lids to the side of the dish racks to avoid blocking the rotation of the upper wash arm.
- The maximum recommended diameter for plates placed in front of the detergent compartment is 19cm , so as not to obstruct the opening.
Loading the cutlery compartment
- The cutlery must be placed in the cutlery compartment by separating them and positioning them in the correct direction.
- Make sure that the utensils are not nested, as this may affect the performance of your appliance.
WARNING : Do not allow cutlery to protrude from the bottom of the rack. Always place sharp utensils with the point downwards!
NOTE : For optimal washing, please load the racks according to the standard loading recommendations.
Functioning of rinse aid and detergent
- The rinse aid is released during the last rinse to prevent the water from forming droplets on your dishes, which can leave marks and stains.
- It also improves drying by allowing water to run off the dishes.
- Your dishwasher is designed to use liquid rinse agents.
WARNING : Always use a branded rinse aid for your dishwasher. Never fill the rinse aid compartment with any other substance (such as dishwasher cleaner or liquid detergent). This will damage your appliance.
When should the rinse aid compartment be refilled?
The frequency with which the rinse aid compartment should be filled depends on the frequency of dishwashing and the rinse aid setting used.
- The rinse aid indicator [··] lights up when a refill is required.
- Avoid overfilling the rinse aid compartment.
Fonctioning of detergent
- The chemical components of detergent are needed to remove the dirt, crush it and remove it from the dishwasher.
- Most commercial-grade detergents are suitable for this purpose.
WARNING : Correct use of detergent
- Only use detergents specifically designed for use in a dishwasher. Store your detergent in a cool, dry place.
- Only place powdered detergent in the compartment when you are ready to start the dishwasher.
Dishwasher detergent is corrosive! Keep dishwasher detergent out of the reach of children.
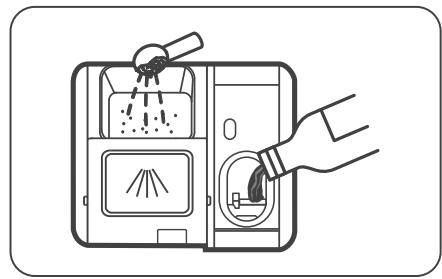
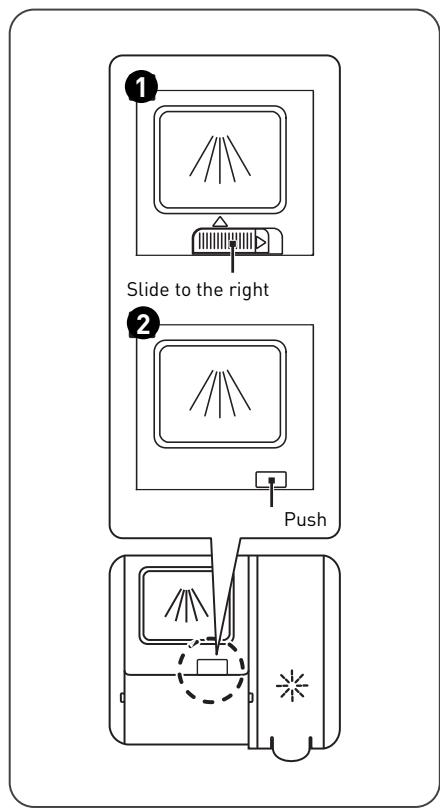
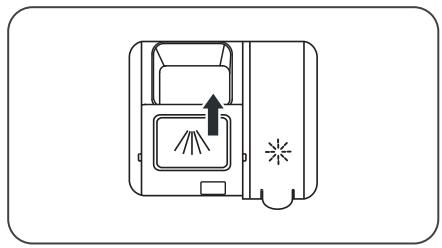
Filling the rinse aid compartment
- Remove the rinse aid compartment cover by lifting the tab.
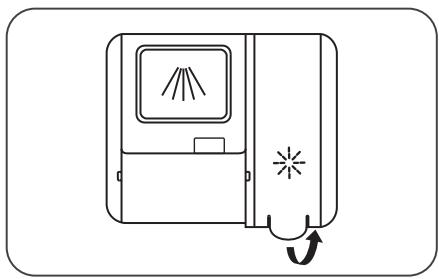
- Pour the rinse aid into the compartment, taking care not to overfill it.
- Then close the compartment by lowering the cover.
Setting the rinse aid compartment
The order in which the settings are displayed is as follows: D1 -> D2 -> D3 -> D4 -> D5 -> D1. The higher the number, the more rinse aid the dishwasher will use.
- Wait 5 seconds or press the power button to confirm the setting and exit the setting mode.
Filling the detergent compartment
- Please choose the right opening method for your product.
1 Open the cover by sliding the release latch.
Open the cover by pressing the release latch.
- Add detergent to the large cavity A for the main wash cycle.
For optimal washing, especially if the dishes are very dirty, pour a small amount of detergent on the door. This additional detergent dose will be activated during the prewash phase.
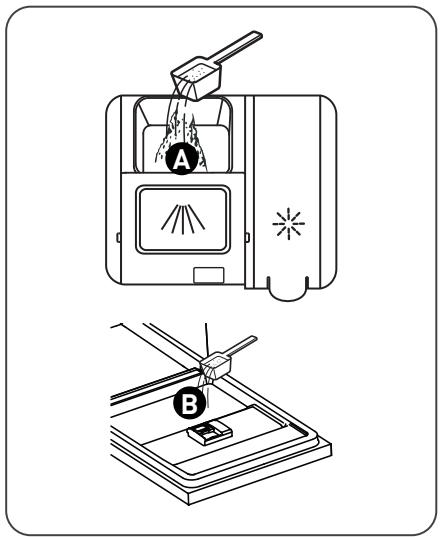
- Close the cover by sliding it forward while pressing down.
NOTE:
- Please note that the settings may vary depending on the degree of soiling of the dishes.
- Please follow the manufacturer's recommendations on the detergent packaging.
Programming the dishwasher
Washing cycle table
- The table below shows which programmes are most suitable depending on the amount of food residue on the dishes and the amount of detergent required.
- It also provides various information on the programmes.
() means: that you should fill the rinse aid compartment.
| Programmes | Cycle description | Pre-wash/ main cycle detergent | Duration of operation (min) | Energy (kWh) | Water (l) | Rinse aid |
| A Auto | Pre-wash (45°C) | | | | | |
| Wash (45~55 °C) | 22 g (1 or 2 tablet(s)) | 80 - 150 | 0.896 - 1.784 | 11.3 | ● |
| Rinse Rinse (60°C) | | | | - 15.1 | |
| Dry | | | | | |
| Intensive | Pre-wash (50°C) | | | | | |
| Wash (65°C) | 4/18 g (1 or 2 tablet(s)) | 205 | 1.245 | 18.8 | ● |
| Rinse Rinse (60°C) | | | | | |
| Dry | | | | | |
| Universal | Pre-wash (45°C) | | | | | |
| Wash (55°C) | 4/18 g (1 or 2 tablet(s)) | 175 | 1.154 | 15.1 | ● |
| Rinse Rinse (55°C) | | | | | |
| Dry | | | | | |
| ECO | Wash (50°C) | | | | | |
| Rinse Rinse (50°C) | 4/18 g (1 or 2 tablet(s)) | 198 | 0.849 | 10.8 | ● |
| Dry | | | | | |
| Programmes | Cycle description | Pre-wash/ main cycle detergent | Duration of operation (min) | Energy (kWh) | Water (L) | Rinse aid |
| Glasses | Pre-wash/Wash (50°C) Rinse Rinse (50°C) Dry | 4/18 g (1 tablet) | 120 | 1.144 | 15.3 | ● |
| 90' 90 min. | Wash (60°C) Rinse Rinse (50°C) Dry | 22 g (1 tablet) | 90 | 1.325 | 12.2 | ● |
| Fast | Wash (45°C) Rinse (45°C) | 12 g (1 tablet) | 30 | 0.984 | 11.4 | ○ |
| Soak | Pre-wash | | 15 | | 4.1 | ○ |
Starting a wash cycle
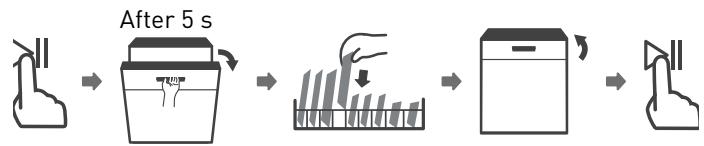
- Take out the top and bottom racks, load the dishes and then put them back in. It is recommended to load the bottom rack first and then the top rack.
- Pour the detergent.
- Insert the plug into the socket. For power supply information, please refer to the "Product Sheet". Ensure that the water supply is open at full pressure.
- Close the appliance door, then press the power button to start the machine.
- Choose a programme; the corresponding indicator will light up. Then press the "Start/Pause" button and the dishwasher will start its cycle.
Change of programme during a cycle
- A wash cycle can only be changed if it has recently started. If it is later in the cycle, the detergent may have already been released and the machine may have already drained the wash water.
- If this is the case, the dishwasher will need to be reprogrammed and the detergent compartment refilled.
To reprogram the dishwasher, follow the instructions below:
-
Press the "Start/Pause" button to stop the wash.
-
Press the "Programmes" button for more than 3 seconds to cancel the program.
- Press the "Programmes" button to select the program of your choice.
- Press the "Start/Pause" button; the dishwasher will start after 10 seconds.

Adding forgotten dishes
- You can add forgotten dishes at any time before the detergent compartment is opened.
To do so, follow the instructions below:
- Press the "Start/Pause" button to stop the wash.
- Wait 5 seconds before opening the door.
- Add the forgotten dishes.
- Close the door.
- Press the "Start/Pause" button; the dishwasher will start after 10 seconds.
WARNING : It is dangerous to open the door during the cycle, as the hot steam could burn you.
Cleaning and maintenance
Maintenance of the exterior of the appliance
Door and door seal
- Clean the door seals regularly with a soft damp cloth to remove food residues.
- When loading the dishwasher, food and drink residue may drip down the sides of the dishwasher door.
- These surfaces are outside the tank and the water from the wash arms does not reach them.
- Any residue should be wiped off before closing the door.
Control panel
- If cleaning is necessary, the control panel should only be wiped with a soft damp cloth.
WARNING:
- To prevent water from entering the door lock and electrical components, never use any type of cleaning spray.
- Never use abrasive pads or cleaners on the external surfaces of the unit, as they may scratch the finish. Some paper towels may also scratch or leave marks on the surface.
Maintenance of the interior of the appliance
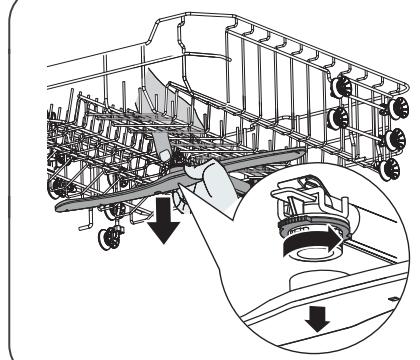
Filtration system
- The filtration system at the bottom of the tank traps large residue during the wash cycle. The residue collected can clog the filters. Check the condition of the filters regularly and clean them under running water if necessary.
- Follow the steps below to clean the tank filters.
NOTE : Illustrations are for guidance only, filter system and wash arm models may vary.
- Hold the pre-filter and turn it counterclockwise to release the filter. Pull the filter up and out of the dishwasher.
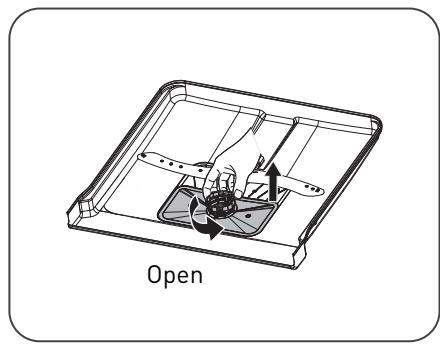
- Pull the fine filter down to remove it from the filter unit. The pre-filter can be separated from the main filter by gently pressing the tabs at the top of the filter and pulling the filter out.
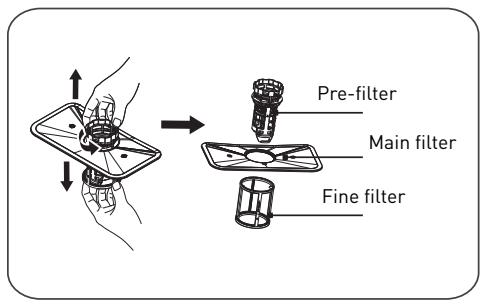
- Larger food residue can be cleaned by rinsing the filter under running water. For more thorough cleaning, use a soft cleaning brush.
- Reassemble the filters in the reverse order of disassembly, replace the filter unit and turn it clockwise to the arrow corresponding to the closed position.

WARNING :
- Do not overtighten the filters. Replace the filters correctly and in order, otherwise large residue could enter the system and cause a blockage.
- Never use the dishwasher without replacing the filters. If the filters are not replaced correctly, the performance of the appliance may be impaired and dishes and utensils may be damaged.
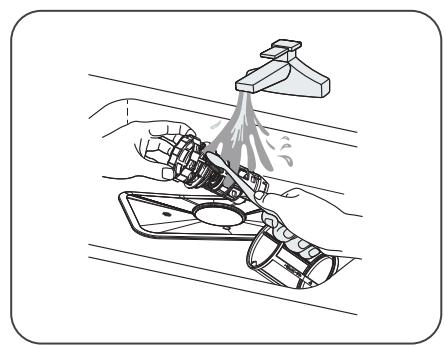
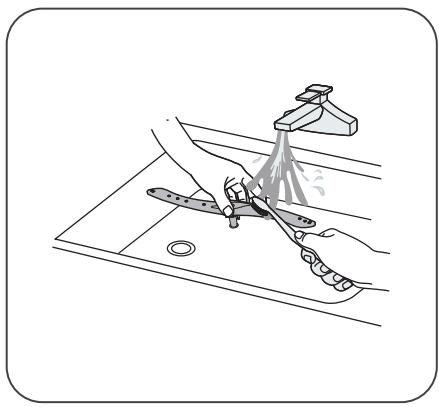
Washing arms
- You should clean the wash arms regularly to prevent chemicals in hard water from clogging the jets and wash arm bearings.
-
To clean the wash arms, follow the instructions below:
-
To remove the upper washing arm, hold the centre nut still and rotate the scrub arm counter-clockwise to remove it.
- To remove the lower washing arm, pull it up.
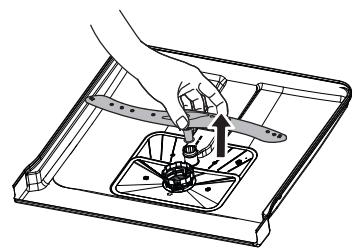
- Wash the washing arms with warm soapy water and use a soft brush to clean the jets. Put them back after rinsing them well.
General maintenance of the dishwasher
Precautions against freezing
-
In winter, you should take measures to protect your dishwasher from freezing. After each wash cycle, please follow the procedure below:
-
Switch off the power to the dishwasher at the source.
- Turn off the water supply and disconnect the water supply hose from the water tap.
- Drain the water from the inlet pipe and tap. (use a bucket to collect the water).
- Reconnect the water supply hose to the tap.
- Remove the filter at the bottom of the tank and use a sponge to soak up the water in the settling tank.
After each wash
- After each wash, turn off the water supply to the appliance and leave the door ajar to prevent moisture and odours from
forming inside.
Disconnecting the plug
- Always remove the plug from the socket before cleaning or servicing.
Do not clean with solvents or abrasive substances.
- Do not use solvents or abrasive cleaning agents to clean the exterior and rubber parts of the dishwasher. Use only a cloth with warm soapy water.
- To remove stains or dirt from the interior surface, use a cloth moistened with water and a little vinegar, or a cleaning product specially designed for dishwashers.
In case of prolonged disuse
- We recommend that you perform a no-load wash cycle, then disconnect the plug from the socket, turn off the water supply, and leave the appliance door ajar. This will help the door seals last longer and prevent odours from forming inside the appliance.
Moving the machine
- If you need to move the unit, try to keep it in an upright position. If necessary, you can lay it on its back.
Seals
- One of the factors contributing to the formation of odours in the dishwasher is the presence of food residue stuck in the seals. Regular cleaning with a damp sponge will prevent this from happening.
Troubleshooting tips
Before calling a technician
Consulting the tables on the following pages may save you the trouble of calling a technician.
| Problems | Possible causes | Solutions |
| The dishwasher does not start | A fuse has blown or the circuit breaker has tripped. | • Replace the fuse or reset the circuit breaker.
• Remove all other appliances using the same circuit as the dishwasher. |
| The device is not turned on. | • Check that the dishwasher is switched on and that the door is closed. Make sure the power cord is properly connected to the wall socket. |
| The water pressure is low. | • Check that the water supply is correctly connected and that the water tap is open. |
| The dishwasher door is not closed properly. | • Be sure to close the door by engaging the latch. |
| The water in the dishwasher does not drain | The drain hose is clogged or kinked. | • Check the drain hose. |
| The filter is clogged. | • Check the pre-filter. |
| The kitchen sink drain is clogged. | • Check that the kitchen sink drains properly.
• If it is the kitchen sink that is blocked, you will need a plumber rather than a dishwasher technician. |
| Problems | Possible causes | Solutions |
| Presence of foam in the tank | The detergent is unsuitable. | • Only use a specific dishwasher detergent to avoid foaming. If this happens, open the dishwasher and let the foam evaporate. Add 4 litres of cold water to the dishwasher tank. Close the dishwasher door, then select any cycle. The dishwasher will first drain the water. Open the door once the emptying phase is complete and check that the foam has disappeared. |
| • Repeat if necessary. |
| Rinse aid has been spilt. | • Always wipe up any spilt rinse aid immediately. |
| The inside of the tank is stained | A detergent containing dye may have been used. | • Make sure your detergent does not contain any dyes. |
| White film on the inner surface | Minerals present in hard water. | • To clean the inside of the appliance, use a damp sponge with dishwasher detergent and wear rubber gloves. |
| • Never use cleaning agents other than dishwasher detergent to avoid the risk of foaming. |
| Rust stains on cutlery | The objects concerned are not resistant to corrosion. | · Avoid putting items that are not corrosion resistant in the dishwasher. |
| You did not start a programme immediately after adding regenerating salt. Salt got into the wash cycle. | · Always run a no-load wash programme after adding salt. |
| · Do not select the Turbo function (if available on your model) after adding regenerating salt. |
| The cover of the water softener is loose. | · Check that the cover of the water softener is closed. |
| Impact noise from dishwasher | A washing arm is tapping against an object in a rack. | · Stop the programme and rearrange the objects in the way of the wash arm. |
| Clattering noise from the dishwasher | Dishes are moving in the dishwasher. | · Interrupt the programme and rearrange the dishes. |
| Impact noise from water pipes | This may be related to the installation on-site or the diameter of the pipes. | · This has no influence on the functionality of the dishwasher. |
| · If in doubt, contact a qualified plumber. |
| Problems | Possible causes | Solutions |
| The dishes are not clean | The dishes were not loaded correctly. | ·Please refer to the chapter “Preparing and loading dishes”. |
| The programme was not powerful enough. | ·Select a more intensive programme. |
| Insufficient detergent has been released. | ·Use more detergent, or change it. |
| Objects are blocking the movement of the washing arms. | ·Rearrange items so that the wash arms can rotate freely. |
| The filter unit is not clean or has not been correctly inserted in the bottom of the tank. This can block the wash arm jets. | ·Clean and/or insert the filter correctly.
·Clean the wash arm jets. |
| Glasses are cloudy | Use of a combination of soft water and too much detergent. | ·Use less detergent if your water is soft and select a shorter cycle to wash glasses. |
| White spots appear on dishes and glasses | In areas with hard water, limescale deposits can occur. | ·Add more detergent. |
| Black or grey marks on dishes | Aluminium utensils rubbed against the dishes. | ·Use a slightly abrasive cleaner to remove these marks. |
| Detergent remains in the compartment | Dishes are blocking the detergent compartment. | ·Load the dishes correctly. |
| Dishes do not dry | Incorrect loading. | ·Load the dishwasher as described in this guide. |
| The dishes were taken out too soon. | ·Do not empty your dishwasher immediately after washing.
·Open the door halfway so that the steam can escape.
·Wait until the temperature inside has dropped and the dishes are not too hot to the touch before taking them out.
·Start by unloading the bottom rack to avoid dripping water onto clean dishes from the top rack. |
| The wrong programme has been selected. | ·With a short programme, the wash temperature is lower, which reduces washing performance.
Choose a programme with a long wash time. |
| Use of cutlery with poor quality coating. | ·Water drainage is more difficult with these objects.
·This type of cutlery or crockery should not be put in the dishwasher. |
Error codes
In the event of a malfunction, the dishwasher will display error codes to help you identify the problem:
| Codes | Meaning | Possible causes |
| E1 | Longer filling time. | The taps are not open, the water supply is blocked or the water pressure is too low. |
| E3 | The required temperature is not reached. | Malfunction of a heating element. |
| E4 | Overflow. | A dishwasher component is leaking. |
| Ed | Loss of communication between the main and display PCBs. | Open circuit or broken communication wiring. |
WARNING :
- In case of overflow, turn off the main water supply before calling a technician.
- If there is water at the bottom of the tub due to an overflow or small leak, this water must be removed before restarting the dishwasher.
Merci!
Detergenscompartment
6 Bestekmand
7 Bovenste mand
8 Onderste mand
A Bestekcompartment
B Bovenste sproeiarm
Kopjescompartment