USER MANUAL DC 8 B W566C - DC 8 B W566C VALBERG
This product is guaranteed for a period of 2 years from the date of purchase* against any failure resulting from a manufacturing or material defect. This warranty does not cover defects or damage resulting from incorrect installation, improper use or abnormal wear of the product.
*as shown on the sales receipt.
CONDITION DE GARANTIE
FR
Thank you for choosing this VALBERG product.
Chosen, tested and recommended by ELECTRO DEPOT,
the products of the VALBERG brand are easy to use,
reliable and of an impeccable standard.
Thanks to this appliance, you can be sure that each
use will bring you satisfaction.
Welcome to ELECTRO DEPOT.

Preview of the appliance
Description of the appliance

Using the appliance
Installation
Operation
Control panel
Drying program table

Useful information
Care and maintenance
Troubleshooting
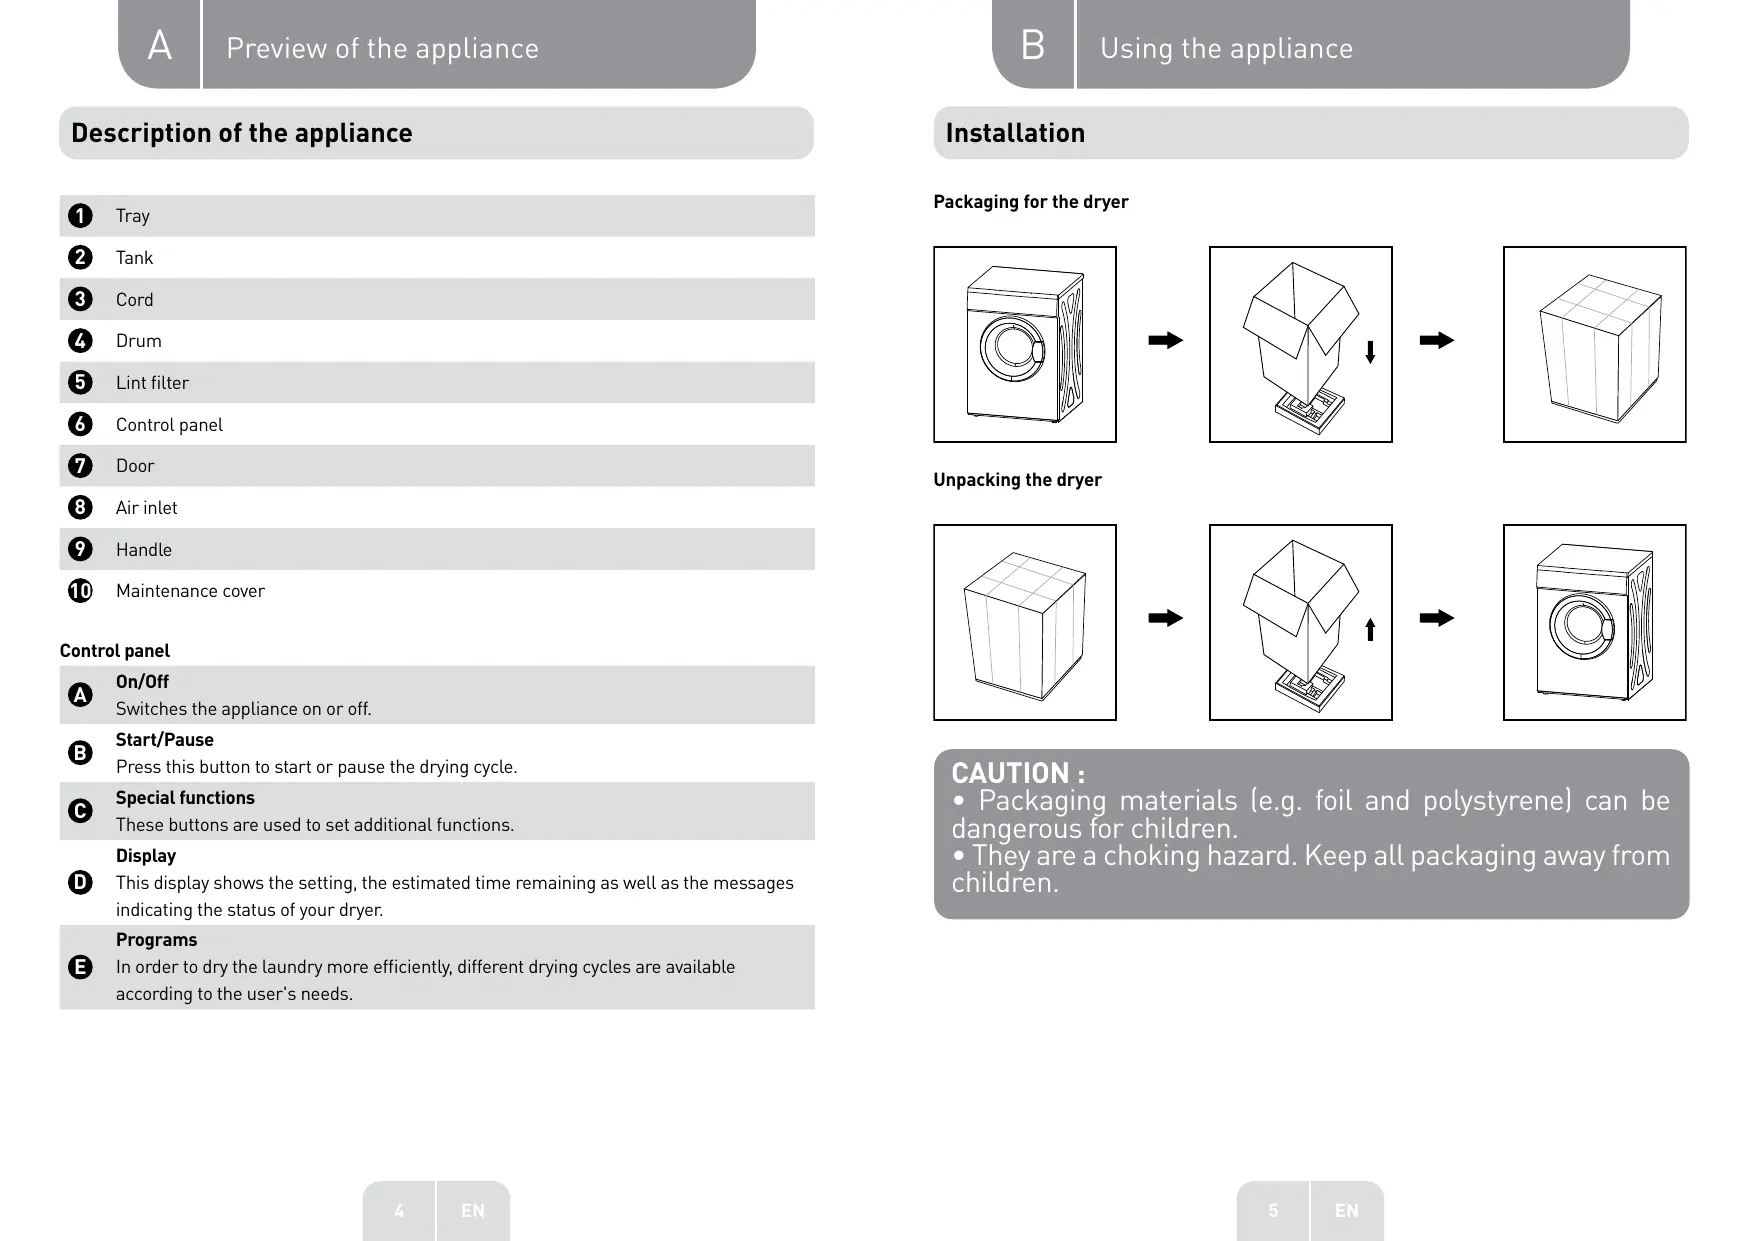
Description of the appliance
1 Tray
Tank
3 Cord
Drum
5 Lint filter
6 Control panel
Door
Air inlet
9 Handle
10 Maintenance cover
Control panel

On/Off
Switches the appliance on or off.

Start/Pause
Press this button to start or pause the drying cycle.

Special functions
These buttons are used to set additional functions.
Display
This display shows the setting, the estimated time remaining as well as the messages indicating the status of your dryer.
Programs
In order to dry the laundry more efficiently, different drying cycles are available according to the user's needs.
Installation
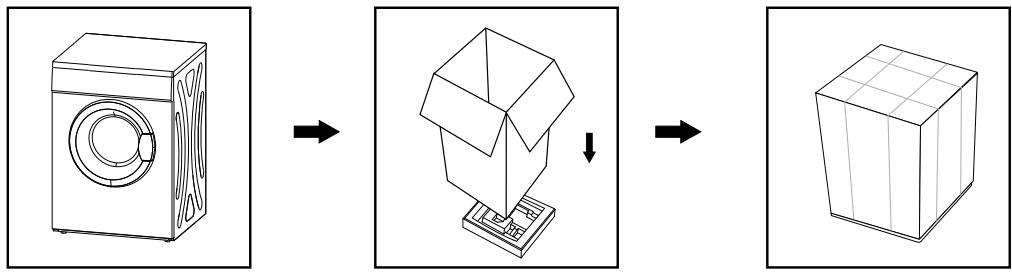
Packaging for the dryer
Unpacking the dryer
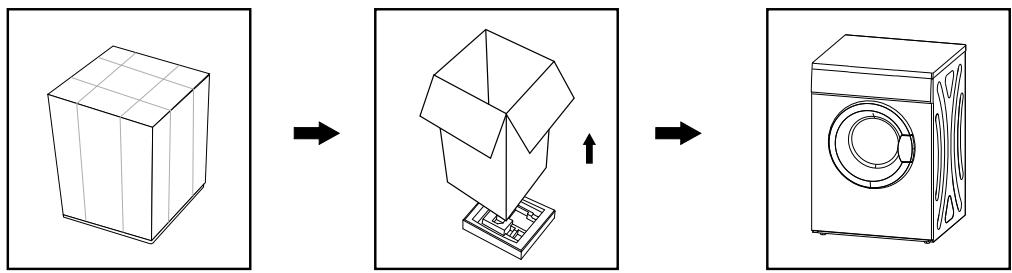
CAUTION :
- Packaging materials (e.g. foil and polystyrene) can be dangerous for children.
- They are a choking hazard. Keep all packaging away from children.
Installation
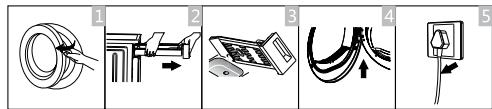
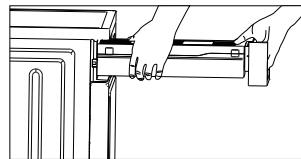
For your convenience, it is possible to connect your condensing dryer to the water drain.
Please note! As the drain hose is not included in the delivery, we recommend that you buy one separately. Your dryer is equipped with a hose, but it is too short.
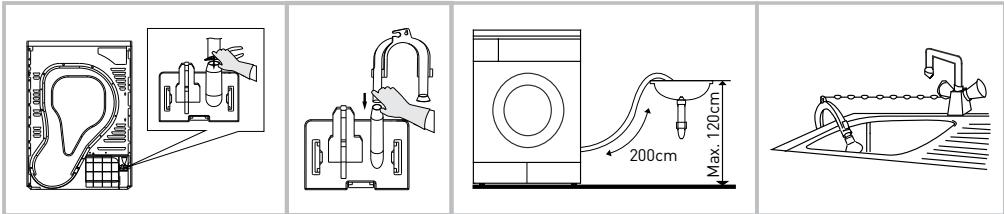
- Use pliers to extract the drain hose.
- Insert the drain hose into the hose connector.
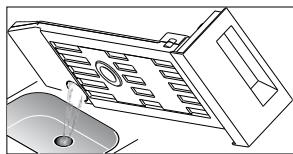
- Install the hose holder on the sink or any other washbasin.
Transportation
Use caution when moving the appliance. Never grasp the appliance by its protruding parts. Do not use the door of the appliance as a handle during delivery.
Installation location
- For convenience, install the dryer near your washing machine.
- The dryer should be installed in a clean, dust-free location. Air must be able to circulate freely around the appliance. Never obstruct the air intake located at the front, or the air intake grilles located at the rear of the machine.
- In order to minimise vibration and noise while the dryer is operating, the appliance should be placed on a firm level surface.
- Never remove the feet. Be careful not to clutter the surrounding floor by fitting long-pile rugs, wooden planks or the like. This is likely to cause a build-up of heat which may interfere with the correct operation of the appliance.

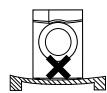

Levelling
Once the appliance is in the permanent position, in which it will be operating, check that it is perfectly level using a spirit level. If not, adjust the appliance's feet using a tool.
Power supply connection
- Make sure that the voltage of the power supply is identical to the specified voltage of the dryer.
- Do not connect your dryer using a multi-socket, universal plug or universal socket.
Operation
Quick operation
NOTE : Before use, ensure that the appliance is correctly installed.
Dry

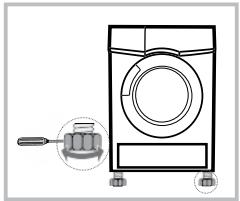
Switch on


Program selection

Select the default function or mode

Start
After drying
The alarm sounds or the message "0:00" is displayed.
- Open the door and take out the laundry
- Remove the tank
- Empty the condensation water
- Clean the filter
- Switch off the power
NOTE: If you use a switch, press the button to switch off the power directly.
CAUTION : Before the very first cycle, there may still be some of the grease or dust generated during manufacturing or transportation inside the dryer. To avoid contaminating your laundry, follow these instructions:
- Load some clean cloths into the drum.
- Plug in the appliance.
- Select the "Fast" program and press the "Start/Pause" button.
-
Once this program is finished, follow the instructions in the "Cleaning and Maintenance" section to clean the lint filter and condenser.
-
Before you start drying, make sure your clothes have been spun in the washing machine. High-speed spinning reduces drying time and saves energy.
- To ensure that your clothes dry evenly, sort your clothes according to the type of fabric and the correct drying program.
- Before drying, close zips, hooks or eyelets, button your clothes and fasten fabric belts, etc.
- Do not over-dry your clothes; excessive drying may crease your laundry.
- Do not dry laundry containing rubber or any other similar elastic material.
- The door can only be opened if the dryer has finished the current cycle. This is to avoid any burns from the hot surfaces of the machine or condensation.
- Clean the lint filter and always empty the tank after use to avoid any increase in drying times and energy consumption.
- Never put dry-cleaned clothing in the dryer.
Reference weight for dry clothing (per unit)

Clothing composed of a blend of different fabrics (about 800 g)

Jacket [about 800 g, in cotton]

Jeans (about 800g )

Towels (about 900 g, in cotton)

Sheet (about 600g in cotton)

Work clothing (about 1120 g)

Night clothing (about 200g )

Long-sleeved shirt (about 300 g, in cotton)

Short-sleeved top (about 180 g, in cotton)

Underwear (about 70g in cotton)

Socks (about 50g, blend of materials)
NOTE :
- Never overload the drum.
- Do not load soaking wet laundry. The dryer may be damaged or catch fire.
- Not suitable for drying wool or silk materials.
Please note that some textiles are not suitable for tumble drying. Always refer to the following symbols:

Drying

Tumble drying possible

Do not tumble dry

Do not dry

Air-dry/Hang

Drip-dry

Dry flat

Dry in the shade

Dry clean

Do not dry clean

Dry clean on a normal cycle (all solvents tolerated)

Dry clean on a normal cycle (all solvents except trichloroethylene)
Control panel

Delay Start

Time

Drying level

Child lock

Anti-crease mode

My cycle

Remaining time indicator/Error message

Clean the filters (warning)

Empty the water tank (warning).
Program selector
- Press the [On/Off] button. When the LED display lights up, turn the program selector knob to select the program you want.
- To add additional options, select the functions [Delayed start], [Time], [Drying level], [Quick drying], [Signal] or [Anti-crease].
Starting a program
- Press the [Start/Pause] button.
Once the program has started, the drum starts to rotate, the operation indicator located in the display area starts flashing, and the remaining time is displayed and progresses automatically.
End of program
-
When the program is finished, the drum stops rotating, the buzzer sounds, the display shows "000" and the indicator for the last phase of the cycle flashes. The dryer starts the [Anti-crease] function if the user does not remove the laundry after one minute. Press the [On/Off] button to turn off the power and unplug the appliance.
-
If the dryer stops unexpectedly during drying and when the dryer displays indications, refer to the "Troubleshooting" section to resolve the problem.
Other functions
- Instructions relating to the [Delayed start] function
This function is used to delay the drying of the laundry for up to 24 hours. The delayed start time means that the program will start x hours later. When the delayed start program is enabled, the indicated time decreases and the delayed start icon flashes.
Detailed procedure
- Load your laundry and make sure the machine door is closed.
- Press the [On/Off] button, then turn the program selector to select the program you want.
-
Depending on your needs, you can add the [Anti-crease] or [Signal] function.
-
Press the [Delayed start] button.
- Press and hold the [Delayed start] button to select the duration of the delayed start.
- After pressing the [Start/Pause] button, the dryer will start. The drying cycle will start once the selected duration has elapsed.
- If you press the [Start/Pause] button again, the delayed start function will pause.
-
To cancel the delayed start function, press the [On/Off] button.
-
Instructions relating to the [Time] function
When you select the hot air, cold air or refresh program, you can use the [Time] button to adjust the drying time in 10-minute steps.
- Instructions relating to the [Drying level] function
This function is used to adjust the level of drying of the laundry. There are four levels.
For each level, 10 minutes are added to the drying time.
- The Drying level function can only be activated before the program starts.
-
Press the [Drying level] button several times to select the drying time.
-
Except for the [Cotton iron], [], [Wool], [Hot air], [Cold air] and [Refresh] programs, all the other programs can be used with the [Drying level] function.
-
Instructions relating to the [Anti-crease] function
At the end of the drying cycle, the anti-crease process lasts 30 minutes (default) or 120 minutes (if selected). The indicator of the [Anti-crease] function lights up when it is selected. This function prevents the laundry from creasing. The laundry can be removed during the anti-crease phase. Except for the [Cold air], [Refresh] and [Wool] programs, all the other programs can be used with this function.
- Instructions relating to the [My cycle] function
This function is used to set and save your favourite program, which you use frequently.
-
Use the program selector button to select the required program and other drying functions.
-
Press and hold the [Drying level] or [Quick dry] button for 3 seconds until the beep sounds: the required program has been saved.
-
Place the program selector in the [My cycle] position; your favourite program is then ready to be launched. If you want to change the settings of [My Cycle], repeat steps (1) and (2).
-
Instructions relating to the [Child lock] function
-
This machine has a special child lock function; this prevents children from pressing the buttons or causing malfunctions.
-
When the dryer is running, outside of the standby mode, press the [Anti-crease] and [Signal] buttons simultaneously for more than 3 seconds to activate the Child lock function. When the Child lock function is activated, the screen displays the Child lock icon and none of the buttons can be activated except the [On/Off] button. In Child lock mode, press the [Anti-crease] and [Signal] buttons simultaneously for more than 3 seconds to deactivate the Child lock function.
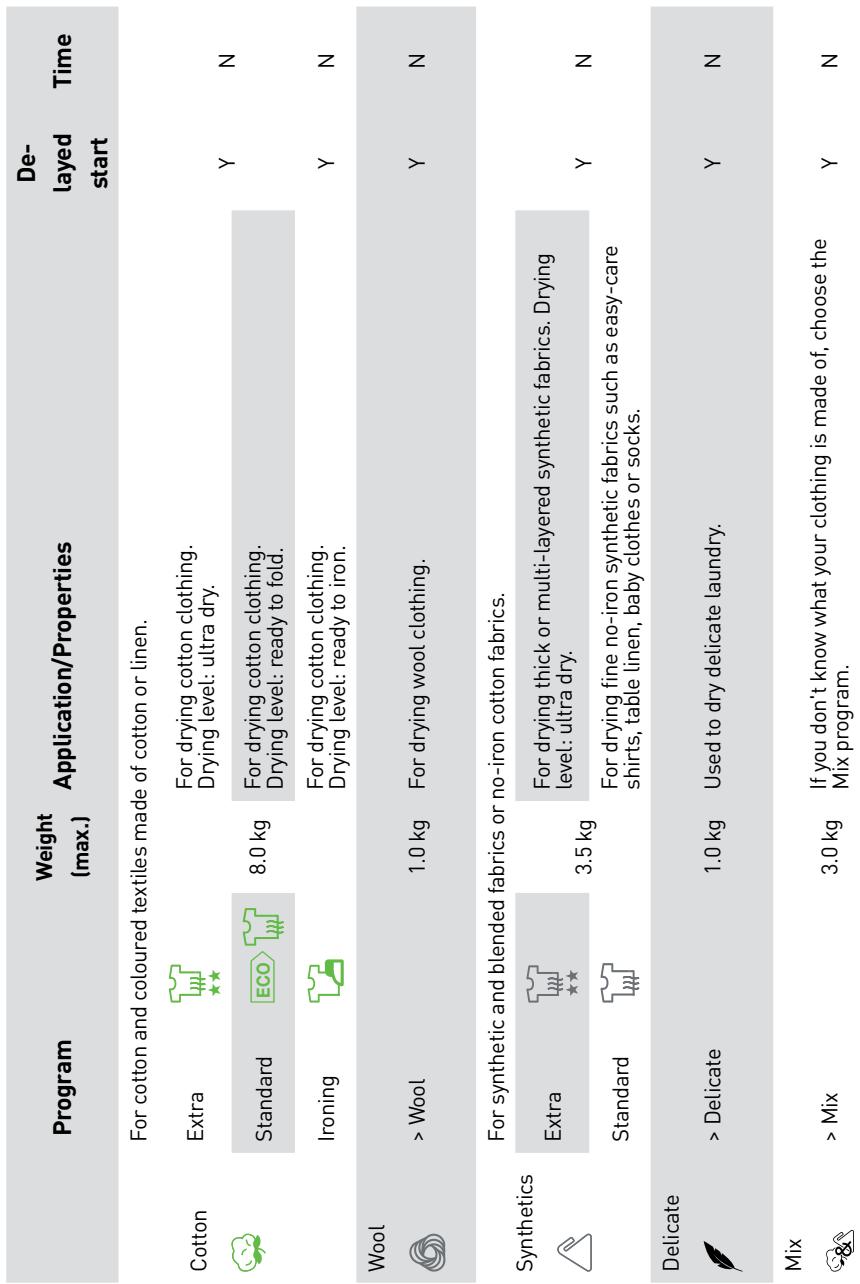
Drying program table
| Program | Weight
(max.) | Application/Properties | De-layed start | Time |
| Special ★ | Bed linen | | 4.0 kg | For drying bed linen and similar loose-fitting clothing. | Y | N |
| Jeans | | 6.0 kg | For drying jeans or leisure clothing which has been spun-dried at high speed in a washing machine. |
| Sports | | 3.0 kg | For drying sports clothing, lightweight fabrics and polyester fabrics that are not meant to be ironed. |
| Shirts | | 3.0 kg | For drying easy-care clothing such as shirts and blouses, with the anti-crease function to minimise ironing. |
| My cycle | > My cycle | | - | Define and save your favourite program. | Y | - |
| Time | Hot air | | - | For heating clothes for at least 10 minutes and no more than 120 minutes (in 10-minute steps). | Y | Y |
| Cold air | | - | For refreshing clothes without hot air for at least 10 minutes and no more than 30 minutes (in 10-minute steps). |
| Refresh | | - | For refreshing clothes that have been confined for a prolonged period, for at least 20 minutes and no more than 150 minutes (in 10-minute steps). |
NOTE :
- This symbol is associated with the energy efficiency of the standard cotton program. The latter complies with the current EN 61121 standard and is more suited to drying standard cotton textiles loaded according to the set capacity.
- Thick or multi-layered fabrics, including bed linen, jeans, jackets, etc., are not easy to dry.
It is therefore advisable to use the Cotton Extra program for this type of laundry.
- With unusual fabrics and thick, multi-layered clothing that are not easy to dry, it is best to choose the appropriate program and drying time as some parts may remain damp after the program is completed.
NOTE :
- For minimum drying efficiency, please note that it takes about 75 minutes for your appliance to dry an amount of cotton laundry equal to 70% of the maximum allowable load. Laundry, which has already been spun-dried in a washing machine, will go from about 60% humidity to 12% humidity, making it easier to iron.
Care and maintenance
Cleaning the lint filter
Let the dryer cool down.
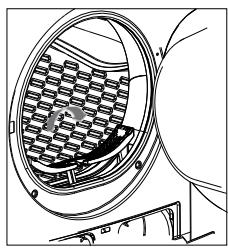

- Open the door.
- Pull the lint filter upwards to remove it from the machine.
- Clean the lint filter: remove residues from the lint filter by hand or rinse it with water, and dry it thoroughly.
- Replace the lint filter.
NOTE:
- The residues that build up on the lint filter prevent air from circulating, which increases the drying time and energy consumption; this is why the lint filter should be cleaned after each use.
- Before cleaning, unplug the power cord!
- The dryer should never be operated without its filter!
- Clean the lint filter after each use to prevent residues from building up inside the dryer.
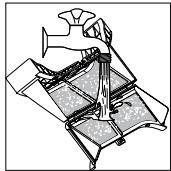
Wash air condenser
Let the dryer cool down.
Residual water may run out. Place an absorbent cloth under the maintenance cover.
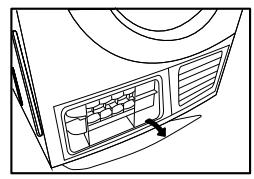
- Unlock the maintenance cover.
- Open the maintenance cover completely.
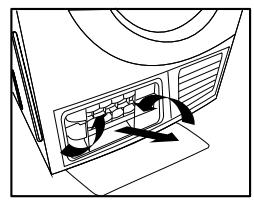
- Screw both locking levers towards each other.
-
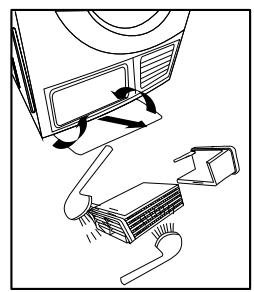
Remove the condenser.
-
Thoroughly clean the condenser and leave it to drain completely.
- Clean the seals.
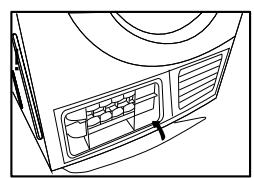
- Reinsert the condenser using the button.
- Unscrew both blocking levers.
- Close the maintenance cover until it clicks into place. If you use the dryer regularly, clean the condenser every three months. Take care not to damage the condenser!
CAUTION:
- Clean with water only and do not use any objects with sharp edges. Never use the machine without the condenser!
- During the drying cycle, water may build up between the window and the door seal. This does not affect the operation of your dryer!
Empty the water tank
- Hold the water tank with both hands and pull it towards you.
- Tilt the water tank to pour out the condensed water.
- Re-insert the water tank.
CAUTION:
- Empty the tank after each use. If it reaches its maximum capacity during a drying program, the program is paused and the "E" icon flashes.
- Once the tank is empty, the dryer can be restarted by pressing the [Start/Pause] button.
- Do not drink the condensation water.
- Do not use the dryer without the tank.
Troubleshooting
| Problem | Cause | Solution |
| "E30" | Heating problem | Contact your local |
| "E32" | Problem with the humidity sensor | support service if the problem |
| "E33" | Problem with the temperature sensor | persists. |
CAUTION : Repairs may only be conducted by authorised technicians.
- Before contacting the customer service, make sure you assess the problem yourself beforehand and properly adhere to the instructions.
- Even if the problem is covered by the warranty, you will be charged for the technician's advice.
| Problem | Solution |
| The display screen does not light up. | Check the electricity supply.
Check that the plug is properly connected.
Check the selected program. |
| XXX lights up. | Press the [On/Off] button.
Empty the water tank.
If the symbol stays lit, call the customer service. |
| XXX lights up | Clean the heat exchanger.
Clean the lint filter. |
| The dryer does not start. | Make sure the door is properly closed.
Check that the program is correctly selected. |
| Drying is not optimal or the drying time is too long. | Make sure that the start button has been properly activated.
Clean the lint filter and heat exchanger.
Empty the tank.
Check the drain hose.
The location where the dryer is installed is too confined.
Clean the humidity sensors.
Keep the air inlet clean.
Use a program with a higher drying level or longer time setting. |
CAUTION :
If you cannot resolve the problem by yourself and need help:
- Press the [On/Off] button.
- Disconnect the mains plug and contact the customer service
Merci!
Jas (ongeveer 800 g, in katoen)

Jeans (ongeveer 800 g)