
CF 198 F W742C - CF 198 F W742C - Fridge Freezer VALBERG - Free user manual and instructions
Find the device manual for free CF 198 F W742C - CF 198 F W742C VALBERG in PDF.
| Product type | Chest freezer |
| Brand | VALBERG |
| Model | CF 198 F W742C |
| Climate class | SN, N, ST, T (10°C to 43°C) |
| Temperature adjustment | 5 levels (MIN to MAX) + SUPER mode |
| Super freeze mode | Yes, activation by SET button, max duration 52 h |
| Defrosting | Manual, via drain channel and drain plug |
| Power supply | 220-240 V ~ 50 Hz |
| Earthing | Mandatory |
| Warranty | 2 years |
| Required space | Sides 10 cm, rear 10 cm, top 70 cm |
| Interior cleaning | Warm water and mild soap |
| Condenser cleaning | Annually, with brush or vacuum cleaner |
| Safety | Unplug before maintenance, do not use steam cleaner |
| Provided accessories | 1 basket |
| Wheels | Yes (4 wheels) |
| Lid handle | Yes |
| Drain channel | Yes |
| Drain plug | Yes |
| LED indicators | Yes, for display |
Frequently Asked Questions - CF 198 F W742C - CF 198 F W742C VALBERG
User questions about CF 198 F W742C - CF 198 F W742C VALBERG
0 question about this device. Answer the ones you know or ask your own.
Ask a new question about this device
Download the instructions for your Fridge Freezer in PDF format for free! Find your manual CF 198 F W742C - CF 198 F W742C - VALBERG and take your electronic device back in hand. On this page are published all the documents necessary for the use of your device. CF 198 F W742C - CF 198 F W742C by VALBERG.
USER MANUAL CF 198 F W742C - CF 198 F W742C VALBERG
This product is guaranteed for a period of 2 years from the date of purchase* against any failure resulting from a manufacturing or material defect. This warranty does not cover defects or damage resulting from incorrect installation, improper use or abnormal wear of the product.
*as shown on the sales receipt.
CONDITION DE GARANTIE
natural_image
Line drawing of a closed refrigerator with lid open, showing internal compartments and ventilation slots (no text or symbols)1

text_image
70 cm 10 cm 10 cm2
text_image
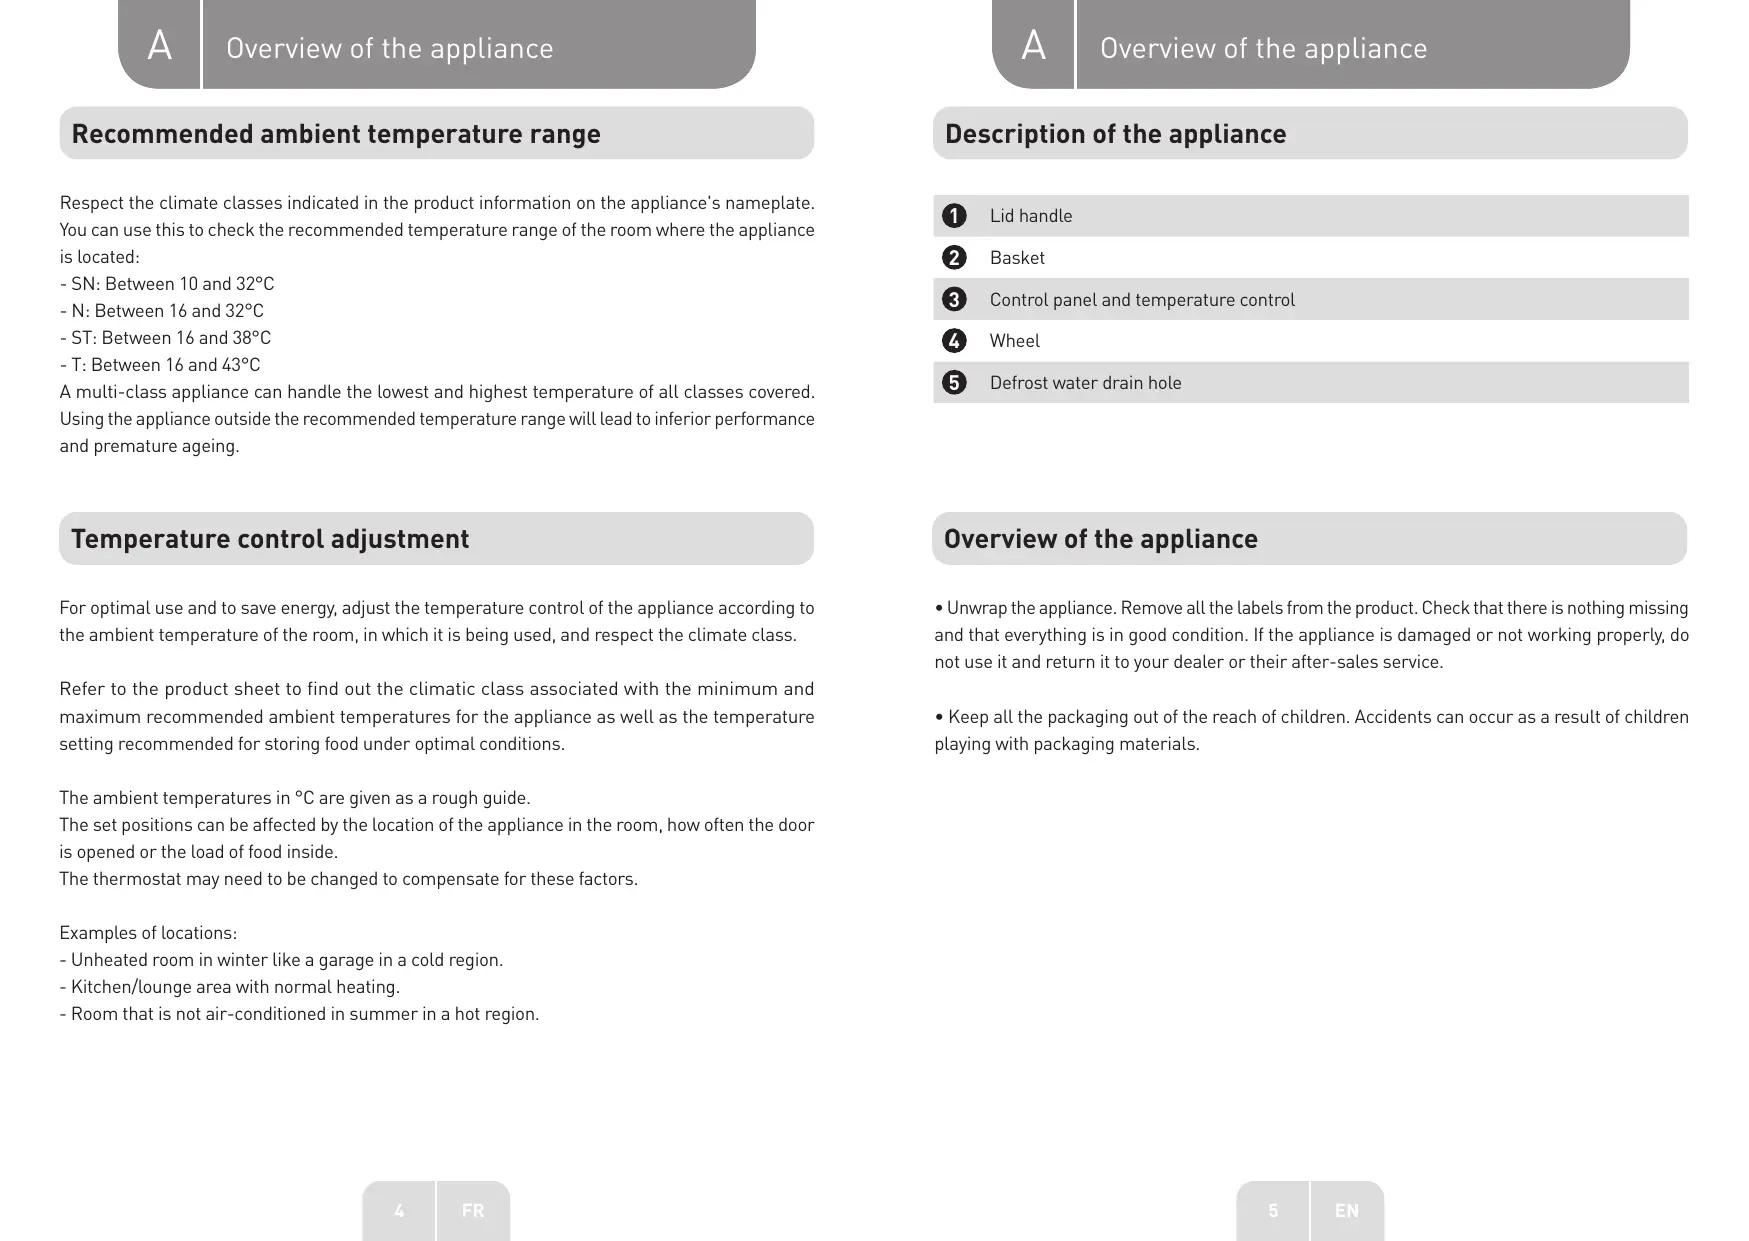
MIN NORMAL MAX SUPER RUNNING SET OFF 3'S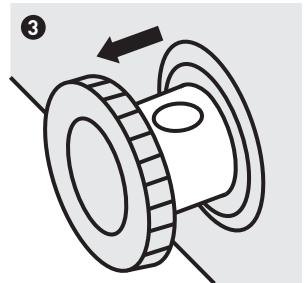
natural_image
Mechanical diagram showing a gear assembly with an arrow indicating motion (no text or symbols)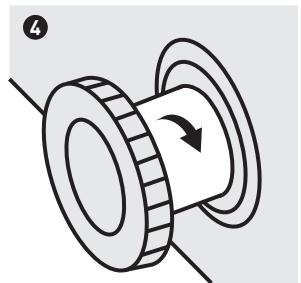
natural_image
Diagram of a mechanical pulley or rotor assembly with a rotating arrow indicating rotation (no text or symbols)Thanks!
Thank you for choosing this VALBERG product. Chosen, tested and recommended by ELECTRO DEPOT, VALBERG branded products are easy to use, reliable, and of an impeccable standard. With every use of this appliance, you can be sure of complete satisfaction.
Welcome to ELECTRO DEPOT.
Visit our website: www.electrodepot.fr
Table of contents

Overview of the appliance
Recommended ambient temperature range
Temperature control adjustment
Description of the appliance
Overview of the appliance

Using the appliance
Installation
Initial use
Temperature setting
Useful advice

Useful information
Cleaning and maintenance
Defrosting the freezer
Troubleshooting
Recommended ambient temperature range
Respect the climate classes indicated in the product information on the appliance's nameplate. You can use this to check the recommended temperature range of the room where the appliance is located:
- SN: Between 10 and 32°C
- N: Between 16 and 32°C
- ST: Between 16 and 38°C
- T: Between 16 and 43°C
A multi-class appliance can handle the lowest and highest temperature of all classes covered. Using the appliance outside the recommended temperature range will lead to inferior performance and premature ageing.
Temperature control adjustment
For optimal use and to save energy, adjust the temperature control of the appliance according to the ambient temperature of the room, in which it is being used, and respect the climate class.
Refer to the product sheet to find out the climatic class associated with the minimum and maximum recommended ambient temperatures for the appliance as well as the temperature setting recommended for storing food under optimal conditions.
The ambient temperatures in ^ C are given as a rough guide.
The set positions can be affected by the location of the appliance in the room, how often the door is opened or the load of food inside.
The thermostat may need to be changed to compensate for these factors.
Examples of locations:
- Unheated room in winter like a garage in a cold region.
- Kitchen/lounge area with normal heating.
- Room that is not air-conditioned in summer in a hot region.
Description of the appliance
1 Lid handle
2 Basket
4 Wheel
3 Control panel and temperature control
5 Defrost water drain hole
Overview of the appliance
- Unwrap the appliance. Remove all the labels from the product. Check that there is nothing missing and that everything is in good condition. If the appliance is damaged or not working properly, do not use it and return it to your dealer or their after-sales service.
- Keep all the packaging out of the reach of children. Accidents can occur as a result of children playing with packaging materials.
Installation
Necessary space
1 Recommended gaps around the product:
Sides 10 cm
Back 10cm
Above 70 cm
Location
The appliance should not be located near to sources of heat such as radiators, boilers, direct sunlight, etc. Make sure that air can flow freely around the back of the element. For better performance, there should be a gap of at least 100mm between the appliance and any overhanging wall-mounted units. Ideally, the appliance should not be positioned under wall units. The appliance can be correctly levelled by adjusting the feet at the base of the appliance.
WARNING :
It must be possible to disconnect the appliance from the electricity supply; The plug must be easily accessible after installation.
Electrical connection
Before connecting the appliance, make sure that the voltage and frequency indicated on the nameplate correspond to your domestic power supply. This appliance must be earthed. The plug on the power cable must have a prong for this earth connection. If the domestic power supply is not earthed, contact a qualified electrician to connect the appliance to a separate earth connection according to the statutory requirements for supplying electrical power. The manufacturer disclaims all liability if the aforementioned safety measures are not respected. The appliance is compliant with European directives.
Initial use
Cleaning the interior
Before using the appliance for the first time, wash the interior and all internal accessories with warm water and a neutral soap to remove the odour that is a feature of new products. Then, dry it thoroughly.
WARNING :
Do not use abrasive powders or detergents as they will damage the finish.
Temperature setting
Power supply connection
When plugging in the appliance, all the LEDs flash at the same time. The appliance then returns to the mode that was set before it was shut down.
Temperature setting
2 Configuration: press the SET button to enter the temperature adjustment mode. The temperature indicator bar increases to the next level with each press of the button. Once you have cycled through all the levels, it returns to the minimum level. The temperature is set from the MIN level to the MAX level. The MAX level corresponds to the coldest temperature. The temperature is set automatically 5 seconds after the last press of the button.
- Super freeze: press the SET button several times consecutively from the MAX level to switch to SUPER freeze mode. The indicator bar on the left will turn off. The SUPER indicator light will switch on. This mode is set automatically 5 seconds after the last press of the button. The compressor switches to SUPER freeze mode.
- If the SUPER mode continues to run for 52 hours and it is not stopped manually, the system automatically exits this mode and returns to the NORMAL temperature level.
Freezing fresh food
- The freezing compartment is used to freeze fresh food and to keep food frozen and deep-frozen for a long period of time.
- Place the fresh food that you wish to freeze in the lower compartment.
- The maximum quantity of food that can be frozen in 24 hours is indicated on the nameplate.
- The freezing process takes 24 hours: do not add any other food to be frozen during this period.
Storing deep-frozen food
- When switching on the appliance for the first time or after a period of non-use. Before placing the product in the compartment, run the appliance for at least 2 hours at a high setting.
WARNING :
Should the food thaw accidentally, e.g. if the power supply has been disconnected for a period longer than the value displayed in the "temperature holding time" section of the technical characteristics table, the defrosted food must be consumed quickly or cooked immediately and then refrozen (after cooking).
Defrosting
Before using frozen or deep-frozen food, it can be thawed in the refrigerator compartment or at room temperature, depending on the time available.
Small amounts or pieces of food can be cooked from frozen as soon as they are taken out of the freezer. In this case, they will take longer to cook.
Useful advice
Tips for freezing
Here is some important advice for properly freezing food.
- The maximum quantity of food that can be frozen in 24 hours is indicated on the nameplate.
- The freezing process takes 24 hours. Additional food products should not be added during this period.
- You should only freeze fresh, perfectly clean, high-quality food products.
- Prepare small portions so that they can freeze through quickly; this give you the option of only defrosting the quantity that you need.
- Wrap food in aluminium foil or place it in a polythene bag and make sure the packages are properly sealed.
- To avoid increasing the temperature of frozen products, do not allow fresh food to come into contact with food which is already frozen.
- Food, which is low in fat, and lean meat keeps better and for longer periods than fatty foods. Salt reduces the storage time of food.
- Water turns to ice. If consumed immediately after being removed from the freezer compartment, there is a risk of cold burns to the skin.
- It is advisable to mark each individual package with the freezing date so that you can keep track of the storage time.
Advice for storage of frozen food
To optimise the performance of this appliance:
- make sure that the deep-frozen product has been stored appropriately by the seller;
- be sure that the frozen product was transferred from the store to the freezer within the shortest possible period of time;
- Do not open the door too often and do not leave it open for longer than necessary.
- Defrosted food products quickly deteriorate and should not be refrozen.
- Do not exceed the storage period specified by the food manufacturer.
Cleaning and maintenance
For reasons of hygiene, the interior of the appliance, including the interior accessories, should be cleaned regularly.
WARNING:
Essential oils and organic solvents can damage plastics, e.g. lemon juice or juice from the zest of oranges, butyric acid or any cleaning products containing acetic acid.
- Do not allow these substances to come into contact with appliance parts.
WARNING :
The appliance must not be plugged into the socket during cleaning. Electrocution hazard! Before cleaning, switch off the appliance and unplug it, or switch off the circuit breaker or fuse. Never clean the appliance with a steam cleaner. Humidity could build up in the electronic components creating an electrocution hazard! Warm vapours can cause damage to plastic parts. The appliance must be dry before you switch it back on.
- Do not use abrasive cleaners.
- Remove the food from the freezer. Keep it covered in a cool place.
- Switch off the appliance and unplug it, or switch off the circuit breaker or fuse.
- Clean the appliance and interior accessories using a cloth and lukewarm water. After washing, rinse with fresh water and wipe down until completely dry.
- The dust that builds up on the condenser increases energy consumption. That's why it's important to carefully clean the condenser on the back of the appliance once a year with a soft brush or vacuum cleaner. ^1)
- Once all the parts are dry, restart the appliance.
^1) If the condenser is at the back of the appliance.
Defrosting the freezer
- The freezer will gradually get covered with ice. The ice must be removed. Never use pointed metallic tools to scratch the ice off the evaporator as you could damage it. When the ice becomes very thick on the inner lining, it must be fully defrosted:
- Unplug it from the power supply. Remove the drain plug inside the freezer. Defrosting usually takes a few hours. For faster defrosting, keep the freezer door open.
3 For draining, place a container under the exterior drain plug. Pull out the drain knob.
4 Turn the drain knob through 180°. This will make the water drain into the container. When defrosting is finished, push the drain knob. Replace the drain plug inside the freezer compartment. Keep an eye on the container used to collect the drain water so that it doesn't overflow.
- Wipe down the inside of the freezer and plug it back in.
- Reposition the temperature control on the function required.
Troubleshooting
| Problem | Possible cause | Solution |
| The device does not work. | The appliance isn't plugged in or is disconnected. | Plug it in. |
| The fuse has blown or is faulty. | Check the fuse and replace it if necessary. | |
| The plug is defective | The plug is defective | |
| The freezing temperature of the appliance is excessive. | The temperature setting is too cold or the appliance is operating on the MAX setting. | Temporarily turn the temperature control to a warmer setting. |
| The food is not sufficiently frozen. | The temperature is not set correctly. | Read the section on Adjusting the initial temperature. |
| The door has been left open for an extended period. | Only open the door for as long as is necessary. | |
| A large amount of warm food has been placed in the appliance in the past 24 hours. | Temporarily turn the temperature control to a colder setting. | |
| The appliance is near a heat source. | Read the section on installation location. | |
| A lot of ice has built up on the door seals. | The door seal is not airtight. | Carefully warm the leaking sections of the door seal with a hair-dryer (on a cold setting). While doing this, reshape the heated door seal with your hand in order to position it correctly. |
| Unusual noises | The appliance is touching the wall or another object. | Move the appliance slightly. |
| A component, e.g. a pipe at the back of the appliance, is touching another part of the appliance or the wall. | If necessary, carefully bend the component so that it is no longer touching. |
If the problem re-occurs, contact the after-sales service. This information is necessary in order to quickly provide the appropriate assistance.
