
2D 206 F S180C - Fridge Freezer VALBERG - Free user manual and instructions
Find the device manual for free 2D 206 F S180C VALBERG in PDF.
| Product type | Fridge-freezer |
| Brand | VALBERG |
| Model | 2D 206 F S180C |
| Dimensions (W x D x H) | 592-612 mm x 940 mm x 1105-1125 mm |
| Net weight (approx.) | 55 kg |
| Power supply | 220-240 V, 50 Hz |
| Climate class | SN, N, ST, T (10°C to 43°C) |
| Refrigerator capacity | Approximately 180 L |
| Freezer capacity | Approximately 70 L |
| Defrost type | Refrigerator: automatic; Freezer: manual |
| Interior lighting | LED, 2 W max |
| Compressor | Inverter (silent) |
| Door reversibility | Yes, possible from right to left |
| Thermostat | Positions 0 (off) to 7 (coldest), 1 for warmest |
| Included accessories | Freezer shelf, refrigerator shelves, vegetable drawer, door balconies |
| Shelf material | Tempered glass and plastic |
| Noise level | ≤ 42 dB(A) |
| Energy consumption | Class A+ (approximately 280 kWh/year) |
| Manufacturer warranty | 2 years, upon presentation of receipt |
| Maintenance | Regular cleaning with warm water, manual defrosting of freezer if frost >10 mm |
Frequently Asked Questions - 2D 206 F S180C VALBERG
User questions about 2D 206 F S180C VALBERG
0 question about this device. Answer the ones you know or ask your own.
Ask a new question about this device
Download the instructions for your Fridge Freezer in PDF format for free! Find your manual 2D 206 F S180C - VALBERG and take your electronic device back in hand. On this page are published all the documents necessary for the use of your device. 2D 206 F S180C by VALBERG.
USER MANUAL 2D 206 F S180C VALBERG
flowchart
graph TD
    A["Step 1"] --> B["Step 2"]
    B --> C["Downward Arrow"]
    C --> D["Step 3"]

text_image
Diagram illustrating a mechanical device with labeled components and directional arrows indicating motion or assembly.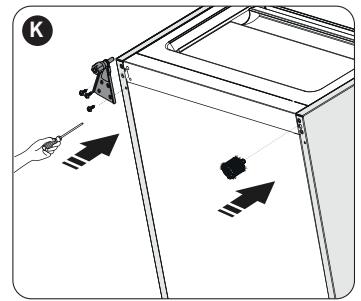
text_image
Diagram showing a hand holding a small object near an open refrigerator with directional arrows indicating movement or force.
text_image
Diagram showing hand positioning of a refrigerator with a downward arrow indicating motion or change, labeled with letter L and directional arrows.
text_image
Diagram showing a hand using a screwdriver to adjust a door lock, with an arrow indicating direction and label 'M' in the corner.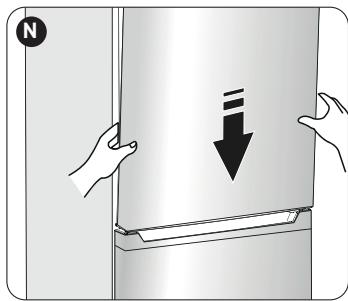
text_image
Diagram showing hands holding a refrigerator with a downward arrow indicating force or change, labeled with 'N' in the corner.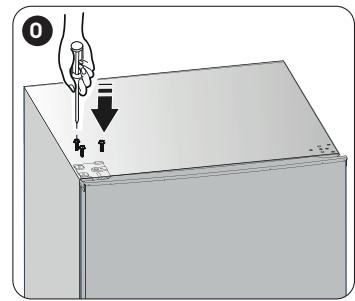
text_image
0 小刀 小刀
natural_image
Illustration of two hands installing or adjusting a rectangular panel with arrows indicating downward motion (no text or symbols)WARRANTY CONDITION
EN
This product is guaranteed for a period of 2 years from the date of purchase* against any failure resulting from a manufacturing or material defect. This warranty does not cover defects or damage resulting from incorrect installation, improper use or abnormal wear of the product.
*as shown on the sales receipt.
CONDITION DE GARANTIE
FR
text_image
Technical diagram of a refrigerator with numbered components and labeled parts in Chinese
natural_image
Diagram of a car interior showing a hand pressing down a lever with directional arrows indicating motion (no text or symbols)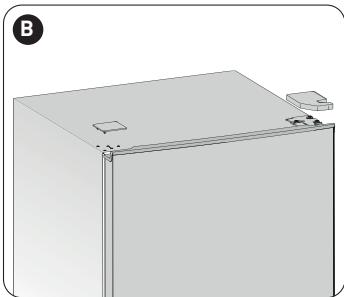
natural_image
3D rendering of a rectangular appliance with a small side panel and label B (no text or symbols on the object itself)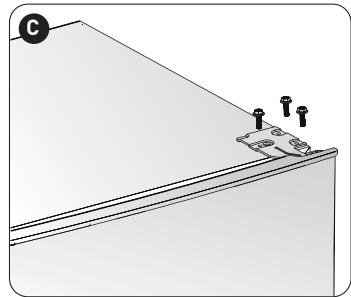
natural_image
Diagram of a structural joint with labeled points and connection markers (no text or symbols present)
flowchart
graph TD
    A["①"] --> B["②"]
    B --> C["③"]
    style A fill:#f9f,stroke:#333
    style B fill:#ccf,stroke:#333
    style C fill:#cfc,stroke:#333

text_image
E H3 PBC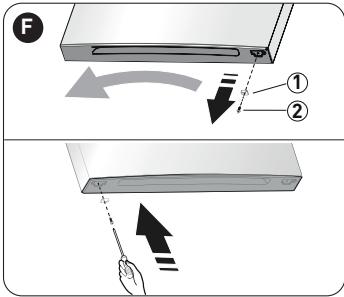
text_image
F ① ②
text_image
Diagram illustrating a door repair or cleaning process with labeled steps and directional arrows indicating movement.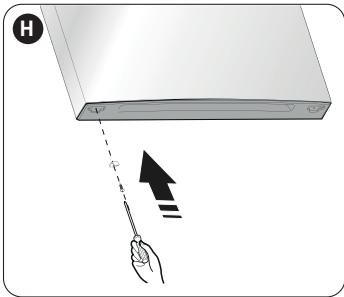
text_image
HThanks!
Thank you for choosing this VALBERG product. Chosen, tested and recommended by ELECTRO DEPOT, VALBERG branded products are easy to use, reliable, and of an impeccable standard. With every use of this appliance, you can be sure of complete satisfaction.
Welcome to ELECTRO DEPOT.
Visit our website: www.electrodepot.fr
Table of contents

Overview of the appliance
Recommended ambient temperature Setting the thermostat Description of the appliance Installation of your new appliance Inverting the door

Using the appliance
Using your appliance Operation

Useful information
Maintenance and cleaning Useful tips and advice Troubleshooting
Ambient temperatures of use
Respect the climate classes indicated in the product information on the appliance's nameplate. You can use this to check the recommended temperature range of the room where the appliance is located:
- SN: Between 10 and 32°C
- N: Between 16 and 32°C
- ST: Between 16 and 38°C
- T: Between 16 and 43°C
A multi-class appliance can handle the lowest and highest temperature of all classes covered. Using the appliance outside the recommended temperature range will lead to inferior performance and premature ageing.
Adjusting the thermostat
For optimal use and to save energy, adjust the temperature control(s) of the appliance according to the ambient temperature of the room in which it is being used, and respect the climate class.
Refer to the product sheet to find out the climatic class associated with the minimum and maximum recommended ambient temperatures for the appliance as well as the temperature setting recommended for storing food under optimal conditions.
The ambient temperatures in ^ C are given as a rough guide.
The set positions can be affected by the location of the appliance in the room, how often the door is opened or the load of food inside.
The thermostat may need to be changed to compensate for these factors.
Examples of locations:
- Unheated room in winter like a garage in a cold region.
- Kitchen/lounge area with normal heating.
– Room that is not air-conditioned in summer in a hot region.
Description of the appliance
1 Freezer tray
2 Control box and LED lighting
3 Refrigerator shelf
4 Vegetable crisper rack
5 Crisper
6 Adjustable feet
7 Freezer door
8 Upper door shelves
9 Lower door shelf
10 Refrigerator door
11 Freezer
12 Refrigerator
PLEASE NOTE
Due to the constant development of our products, your refrigerator may differ slightly from the description provided in this instruction manual, but its functions and use remain the same. To get more space in the freezer, you can remove the shelf inside the freezer.
Installing your new appliance
Before using the device for the first time, please note the following tips.
Ventilation of the appliance
CAUTION!
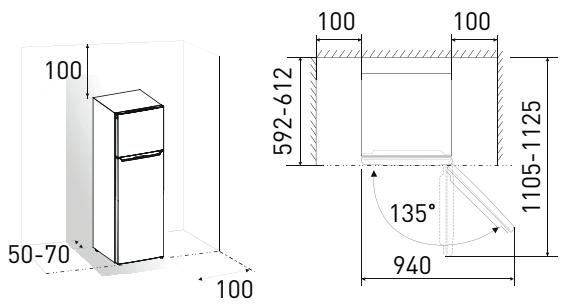
To improve the efficiency of the cooling system and save energy, you must maintain good ventilation around the unit. For this reason, sufficient clearance should be left around it. It is recommended to leave a space of 50-70 mm between the rear wall of the appliance and the wall, a minimum space of 100 mm above the appliance, a minimum space of 100 mm between its side walls and the walls, as well as a free space at the front that allows the door to open to 135°. Please observe the following diagrams.
text_image
100 50-70 100 100 592-612 135° 940 1105-1125PLEASE NOTE
This appliance functions properly for climate classes N to ST, as shown in the table below. If exposed to temperatures above or below the specified range for an extended period of time, the unit may malfunction.
• Install your appliance in a dry location to prevent damage from moisture.
- Keep your appliance away from direct sunlight, rain or frost. Keep your appliance away from heat sources such as cookers, fires and radiators.
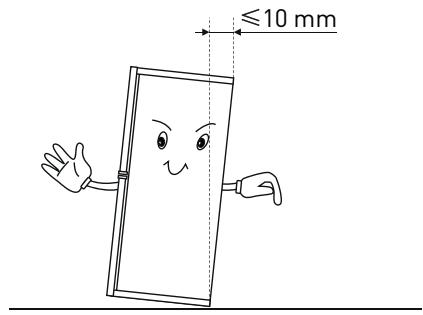
Levelling the appliance
- To ensure proper levelling and air circulation at the back and bottom of the appliance, you may need to adjust the feet.
- You can set them manually with a suitable key.
To allow the doors to close automatically, tilt the top of the appliance back about 10 mm.
text_image
≤10 mmInverting the door
If necessary, the direction of the door opening can be reversed from the right (as supplied) to the left.
WARNING
When reversing the door, the appliance must be unplugged. Make sure the power plug is pulled out of the socket.
Tools you will need
| Not included | ||
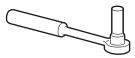 | 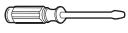 |  |
| Socket spanner 8 mm | Thin flat-head screwdriver | Spatula |
 |  |  |
| Cross-point screwdriver | Monkey spanner | Spanner 8 mm |
| Additional part (in the plastic pouch) | ||
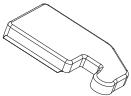 | ||
| Left hinge cover | ||
PLEASE NOTE
If necessary, the refrigerator can be placed on its rear side for better access to the base.
To avoid damage to the rear wall, we recommend that you rest the appliance on soft foam packaging or similar material. To reverse the door, the following steps are generally recommended.
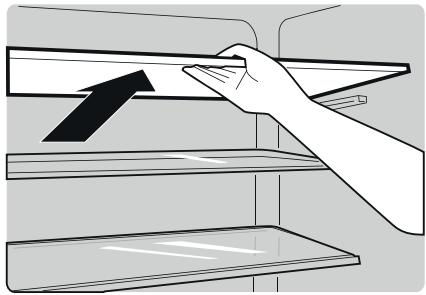
A Set the refrigerator vertically. Open the doors to remove all the shelves (to avoid damaging them), then close the doors.
Remove the door shelf
B Use a spatula or a thin, flat screwdriver to prise off the screw hole cover on the top left corner of the refrigerator and the right hinge cover on the top right corner of the refrigerator.
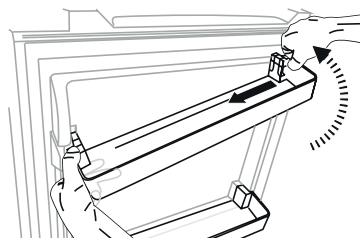
C Unscrew the self-tapping collar screws used to secure the top right hinge using an 8mm socket spanner or screwdriver (while doing so, please hold the top door with your other hand).
D Remove the upper hinge pin, transfer it in the opposite direction and tighten it firmly before storing it in a safe place.
E Remove the top door from the centre hinge by carefully lifting the door vertically.
PLEASE NOTE
When removing the door, pay attention to the washers between the centre hinge and the bottom of the freezer door: they may remain attached to the door. Do not lose them.
F Place the top door on a smooth surface with the outer panel facing up. Loosen the screw ② and the stopper① and install them on the left side, tightening them firmly.
G Unscrew the two self-tapping collar screws used to secure the centre hinge and remove the centre hinge that holds the bottom door in place.
H Place the bottom door on a smooth surface; with the outer panel facing up. Loosen the screw ② and the stopper ① and install them on the left side, tightening them firmly.
Remove the screw hole covers on the left of the centre cover plate and place them on the right (as shown below).
Place the refrigerator on some soft foam packing or similar material. Remove both the adjustable foot and the bottom hinge by unscrewing the self-tapping collar screws.
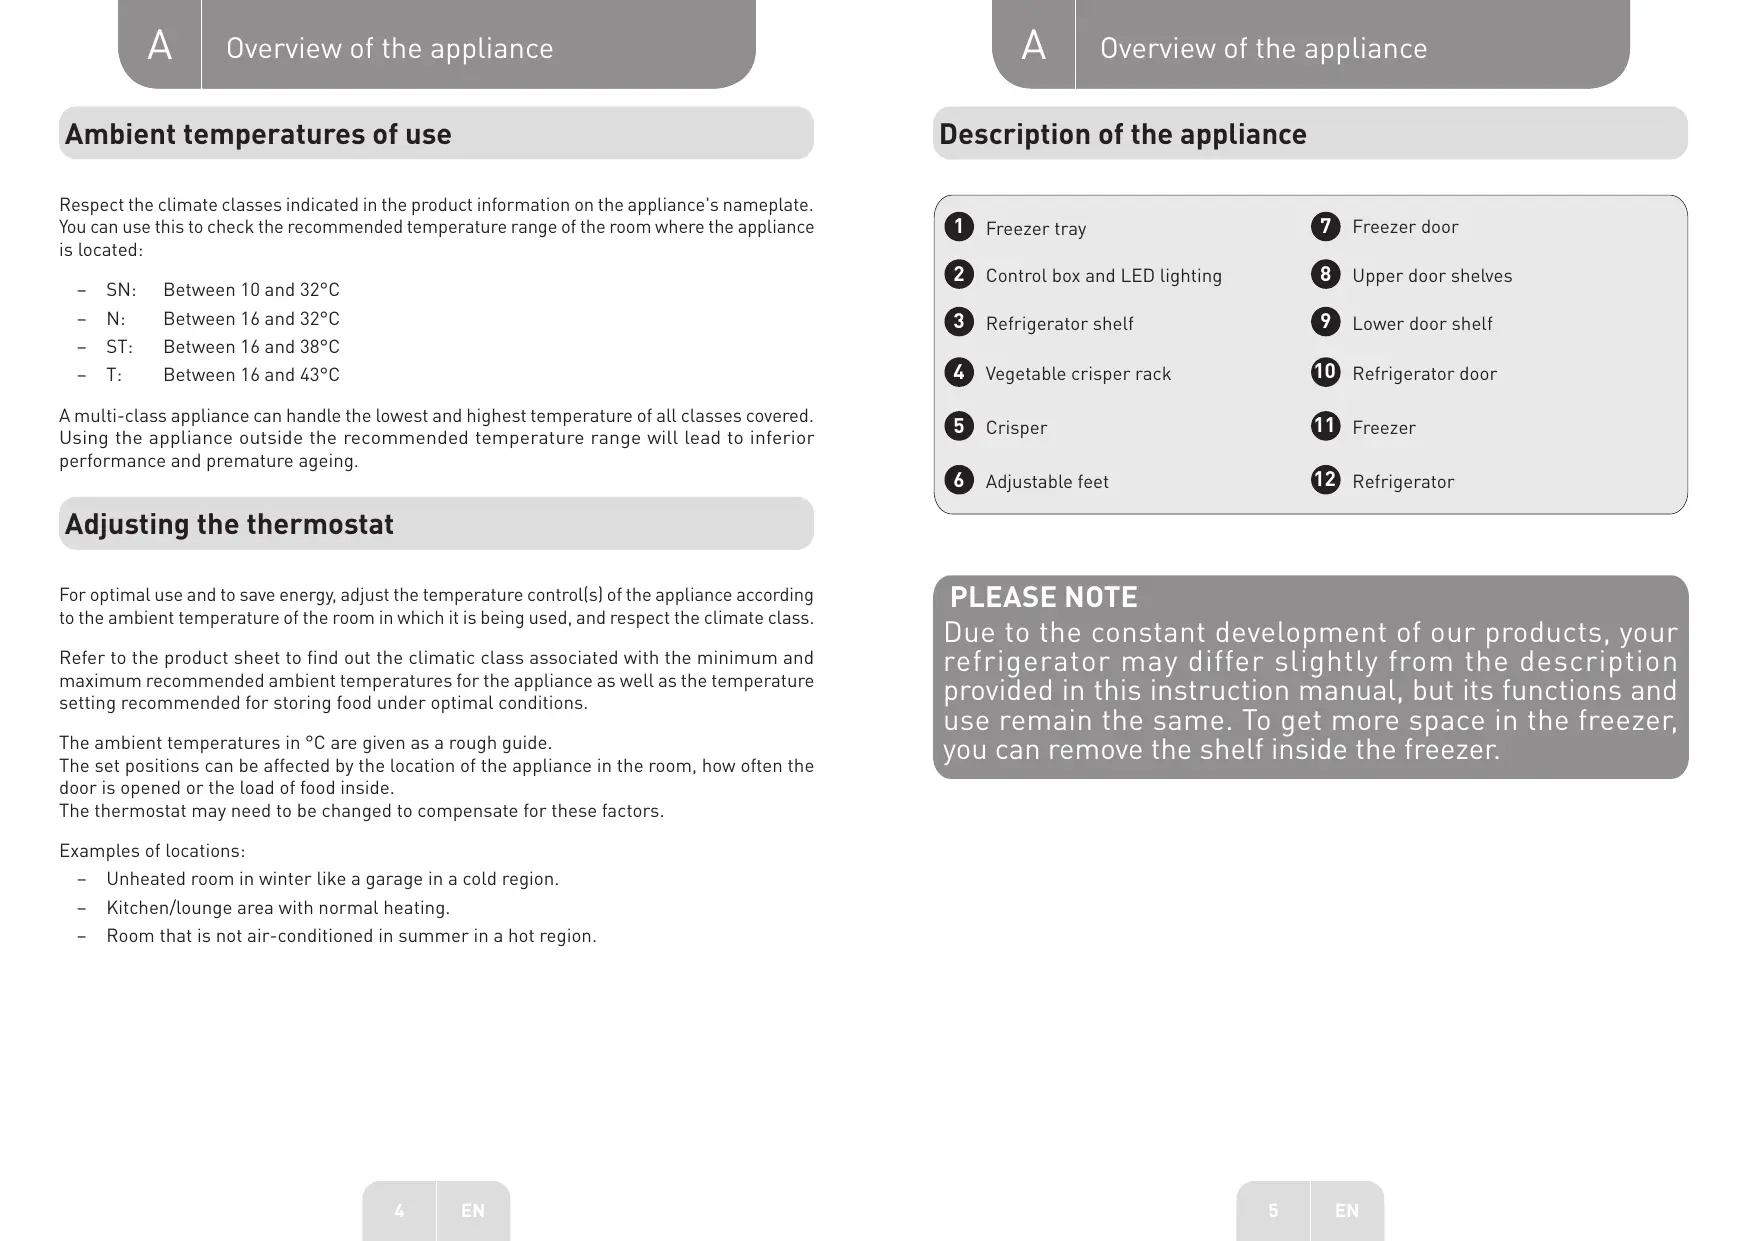
K Install the bottom hinge on the left side, securing it with self-tapping collar screws. Install the adjustable foot on the other side and secure it.
L Transfer the bottom door to the appropriate position, place the bottom hinge, insert the hinge pin into the bottom hole of the refrigerator door and tighten the bolts.
M Turn the centre hinge 180 degrees and place it in position. Insert the centre hinge pin into the top hole of the refrigerator door and tighten the bolts.
N Transfer the top door into position. Secure the door level and insert the centre hinge pin into the bottom hole of the freezer door.
0 Transfer the top hinge and insert the top hinge pin into the top hole of the freezer door, adjusting the position of the freezer door (while doing so, please hold the top door with your other hand). Secure the top hinge with the self-tapping collar screws.
P Install the screw hole cover on the top right corner of the refrigerator. Install the top hinge cover (found in the plastic pouch) on the left corner of the unit. Put the other top hinge cover away in the plastic pouch.
Q Open the top door, install the door shelves and close it.
CAUTION
When reversing the door, the appliance must be unplugged. Remove the power plug from the mains socket beforehand.
Using your appliance
Accessories 1)
Removable shelves/trays
- Various glass and plastic storage shelves or racks are included on your appliance. Depending on the model, the refrigerator has different combinations and features.
- The refrigerator walls are fitted with different runners so that you can position the shelves as you wish.
natural_image
Illustration of a hand placing a tray with an arrow on the shelf (no text or symbols)Removing and installing door shelves
Warning: the door shelf must not be removed and installed by the user! If the door shelf is damaged, contact customer service for assistance. To replace the door shelf, following these steps:
Remove the door shelf
Press the right inner side of the door shelf while holding the left side.
When the shelf catch has come off the refrigerator door, remove the shelf by tilting it upwards.
natural_image
Illustration of a hand holding a metal frame with arrows indicating direction (no text or symbols)First, tilt the left side of the door shelf, making sure that the catch is properly inserted into the door. Then press the right inner side down into place.

natural_image
Line drawing of a hand holding a tool interacting with an open refrigerator (no text or symbols)Refrigerator compartment
- For storing food that does not need to be frozen. It has different sections for different types of food.
Freezer compartment 2)
- For the freezing of fresh food and the long-term storage of frozen or deep-frozen food.
Thawing food products 2)
• In the refrigerator compartment.
- At room temperature.
• In a microwave oven.
• In a traditional or convection oven.
- Once defrosted, food must not be refrozen under any circumstances.
-
If the appliance has the corresponding accessories and functions.
-
If the appliance has a freezer compartment.
Crisper
• To store fruit and vegetables.
Operation
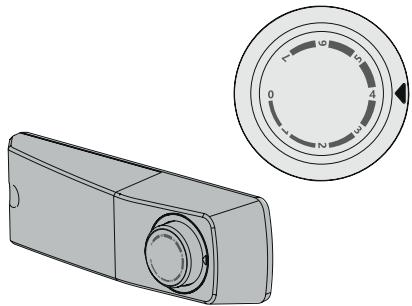
Switching on and setting the temperature
- Insert the plug of the connecting cable into a socket equipped with a grounding contact. When the refrigerator compartment door is opened, the interior light comes on. Once the refrigerator is installed, wait 5 minutes before plugging it in. Do not place any food inside until the temperature inside has dropped sufficiently.
- The temperature selector switch is located on the right side of the refrigerator compartment.
Position "0" means:
The appliance is off.
Turn the dial clockwise to switch on the appliance.
Position "1" means:
Highest temperature, warmest setting.
Position "7" (furthest) means:
Lowest temperature, coldest setting.
natural_image
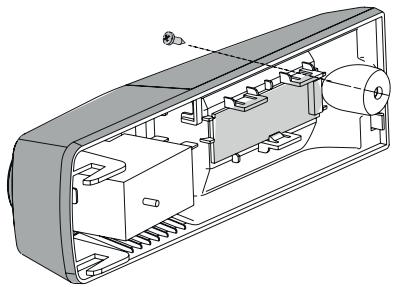
Technical illustration of a rectangular device with a circular dial showing 0 to 10 units (no text or symbols on the device itself)Replacing the LED lighting
CAUTION
If the LED light is damaged, USERS MUST NOT REPLACE IT BY THEMSELVES!
Replacing the LED lighting by inexperienced persons may result in injury or serious malfunction. This must be replaced by a qualified person to avoid any danger. Contact your local service centre for assistance.
- Before replacing the LED light, switch off the appliance and unplug it or remove the corresponding fuse or switch the circuit breaker.
• LED lighting features: 220-240 V, 2 W max. - Disconnect the plug from the mains socket.
- To replace the LED light, unscrew the screw.
- Replace the defective LED light.
• Turn the refrigerator back on.
natural_image
Technical line drawing of a mechanical device showing internal components and housing (no text or symbols)
flowchart
graph TD
    A["LED"] <--> B["LED"]
Care and maintenance
• Before servicing the appliance, switch it off and remove the plug from the mains socket.
- Do not clean the appliance with metal objects, steam cleaners, essential oils, organic solvents or abrasive cleaners.
- Do not use sharp objects to remove ice from the appliance. Use a plastic scraper.
- Any electrical operations required when maintaining the appliance should be carried out by a qualified electrician or another competent person.
- An approved maintenance centre should carry out maintenance on this appliance; Only original spare parts may be used.
-
If the appliance is equipped with a frost removal function.
-
If the appliance has a freezer compartment.
For hygiene reasons, the appliance (and its external and internal accessories) should be cleaned regularly (at least once every two months).
CAUTION
When cleaning, the appliance must be unplugged from the mains because of the risk of electric shock. Risk of electrocution! Before cleaning, switch off the appliance and remove the power plug from the mains socket.
Exterior cleaning
- Wipe the control panel with a soft, clean cloth.
- Spray water on the cleaning cloth rather than directly on the surface of the appliance. This will moisten the surface evenly.
- Clean the doors, handles and surfaces of the appliance with a neutral detergent and wipe with a soft cloth.
CAUTION
- Do not use sharp objects; they may scratch the surface.
- Do not use thinner, car detergent, chlorine bleach, essential oils, abrasive cleaners, or organic solvents such as benzene for cleaning.
These may damage the surface of the device and could cause a fire.
Interior cleaning
You should clean the inside of the appliance regularly.
Clean the inside of the freezer with a dilute solution of bicarbonate of soda, then rinse with lukewarm water using a wrung-out cloth or sponge. Wipe down the shelves and trays so that they are completely dry before replacing them. Dry all surfaces and attachments thoroughly.
Although the appliance removes frost automatically, a layer of frost may regularly form inside the freezer or if it is left open too long. If the frost layer becomes too thick, choose a time when there is little food in your refrigerator and proceed as follows:
- Remove food and accessory trays, unplug the appliance and leave the doors open. Ventilate the room properly to speed up the defrosting process.
- Once defrosting is complete, clean your freezer as described above.
CAUTION
Do not use sharp objects to remove frost from the freezer compartment. The appliance should only be reconnected to the mains and switched on again when the interior is completely dry.
Cleaning the door seals
Make sure to keep the door seals clean. If there is sticky food and drink residue, the seals may stick to the appliance and tear when you open the door. Wash the joints with a neutral detergent and lukewarm water. Rinse and dry thoroughly after cleaning.
CAUTION
The appliance may only be switched on again when the door seals are completely dry.
Replacement of the LED lighting:
Warning: the LED lighting must be replaced by a competent person!
If the LED light is damaged, contact customer service for assistance.
Defrosting
Why you should defrost the appliance:
- Water in the food or that gets into the air inside the refrigerator when the doors are opened can form a layer of frost inside the appliance. As the frost layer thickens, it reduces the cooling effect of the appliance. When it is more than 10 mm thick, you should defrost the appliance.
Defrosting the refrigerator
- This compartment is automatically regulated by switching the temperature control on and off; it does not require defrosting. The defrosting water will automatically flow into a drip tray via a drain pipe at the back of the refrigerator.
Defrosting the freezer
- The freezer is defrosted manually. Before doing so, remove the food from the freezer.
- Remove the ice cube tray and any food from the trays or place them temporarily in the refrigerator compartment.
- Set the temperature knob to the "0" position (the compressor will turn off) and leave the freezer door open until the ice and frost have completely melted and accumulated at the bottom of the freezer. Wipe up the water with a soft cloth.
- To speed up the defrosting process, you can place a bowl of hot water (about 50°C) in the freezer compartment and scrape off the ice and frost with a defrosting spatula. Once defrosting is complete, be sure to set the temperature control knob to the initial position.
- To avoid warping of the interior of the appliance, it is not recommended to heat the freezer compartment by directly applying hot water or using a hairdryer.
- It is also not advisable to scrape off ice and frost or to remove food from containers that were frozen with it, using sharp tools or wooden rods, so as not to damage the inner lining or the surface of the evaporator.
CAUTION
Before defrosting, switch off the appliance by turning the temperature control to the "0" position.
IMPORTANT
The appliance should be defrosted at least once a month. If the door is opened regularly or if the appliance is used in an extremely humid environment, you are advised to defrost the appliance once a fortnight.
Extended periods of disuse
- Remove all refrigerated elements.
- Switch off the appliance by turning the temperature control to the "0" position.
- Remove the power plug from the mains socket, turn off the power or disconnect the power supply.
- Clean the appliance thoroughly (see “Cleaning and maintenance”).
- Leave the door open to prevent odours from forming.
PLEASE NOTE
If the appliance has a freezer compartment.
Useful tips and advice
Energy-saving tips
• We recommend that you follow these energy-saving tips.
- Avoid leaving the door open for long periods.
- Make sure that the appliance is away from any heat source (direct sunlight, electric oven, etc.).
- Do not set the temperature to any colder than necessary.
- Do not place hot food or evaporating liquid in the appliance.
- Install the appliance in a well-ventilated and moisture-free place. Please refer to the section "Installing your new appliance".
- If the diagram shows the correct combination of shelves, crispers and racks for your appliance, please do not change it. This combination is designed to be the most energy-efficient configuration.
Tips for refrigerating fresh food
- Do not place hot food directly in the refrigerator or freezer; this would raise the interior temperature, thus increasing the activity of the compressor, which would then consume more energy.
• Cover or wrap food; especially if it has a strong flavour.
- Store food in such a way that air can circulate freely around it.
Refrigeration tips
- Meat (all kinds) and food packaged in polyethene: wrap and store on the glass shelf that rests on the crisper. Always observe the shelf life of foods and consume them by the dates recommended by the manufacturers.
- Prepared dishes, cold dishes, etc.: these products should be covered and may be placed on any of the shelves.
- Fruit and vegetables: these should be placed in the specially provided crisper.
- Butter and cheese: they should be wrapped in aluminium foil or airtight plastic film.
- Bottles of milk: these should be capped and kept in the door trays.
Tips for freezing
- When switching on for the first time or after a period of non-use, allow the appliance to run for at least 2 hours at the highest settings before placing food in the freezer compartment.
- Prepare small portions so that they can freeze through quickly and so that you have the option of only defrosting the quantity that you need.
- Wrap the food in aluminium foil or airtight polyethene film.
- Do not allow fresh, unfrozen food to touch food that has already been frozen to prevent the temperature of the food from rising.
- Frozen products, if eaten straight from the freezer, can cause frostbite on the skin.
Advice for the storage of frozen food.
- Ensure that the frozen food has been properly stored by the food distributor.
- Once defrosted, food spoils quickly and should never be refrozen. Avoid exceeding the use-by date indicated by the manufacturer.
Switching off your appliance
If the appliance is to be taken out of service for an extended period of time, the following steps should be taken to prevent the formation of mould in the appliance.
- Remove all food.
- Disconnect the power plug from the mains socket.
- Clean and dry the interior thoroughly.
- Ensure that all doors are wedged open slightly to allow air to circulate.
To avoid contaminating food, please observe the following instructions.
- Leaving the door open for a long time can cause the temperature inside the appliance to rise considerably.
- Clean food contact surfaces and accessible drainage systems regularly.
-
In the refrigerator, store raw meat and fish in suitable containers so that they do not come into contact with or drip onto other foods.
-
The “two star” freezer compartments are suitable for storing pre-frozen food, storing or making ice cream or making ice cubes.
- The “one, two and three star” compartments are not suitable for freezing fresh food.
| Order | Compartment type | Target storage temperature [°C] | Appropriate food |
| 1 | Refrigerator | +2 ~ +8 | Eggs, prepared dishes, pre-packaged food, fruit and vegetables, dairy products, cakes, drinks and other foods. Compartment not suitable for freezing. |
| 2 | Freezer (***)* | ≤ -18 | Seafood (fish, shrimp, crustaceans), freshwater products and meat products (recommended conservation: 3 months. The longer you keep food in the freezer, the more it loses taste and nutrients). Compartment suitable for freezing fresh foodstuffs. |
| 3 | Freezer *** | ≤ -18 | Seafood (fish, shrimp, crustaceans), freshwater products and meat products (recommended conservation: 3 months. The longer you keep food in the freezer, the more it loses taste and nutrients). Compartment not suitable for freezing fresh food. |
| 4 | Freezer ** | ≤ -12 | Seafood (fish, shrimp, crustaceans), freshwater products and meat products (recommended conservation: 2 months.) The longer you keep food in the freezer, the more it loses taste and nutrients). Compartment not suitable for freezing fresh food. |
| 5 | Freezer * | ≤ -6 | Seafood (fish, shrimp, crustaceans), freshwater products and meat products (recommended conservation: 1 month.) The longer you keep food in the freezer, the more it loses taste and nutrients). Compartment not suitable for freezing fresh food. |
| 6 | No star | -6 ~ -0 | Fresh pork, beef, fish and chicken, some pre-packaged processed foods, etc. (It is recommended to consume them on the same day, or preferably within 3 days maximum).Airtight, partially processed foods (foods not suitable for freezing) |
| 7 | Refrigerator compartment | -2 ~ +3 | Fresh pock, beef, chicken, fresh/ frozen freshwater products, etc. (7 days below 0°C and above 0°C.It is recommended to consume them on the same day, or preferably within 2 days). Seafood (storage below 0°C for 15 days, it is recommended not to store above 0°C). |
| 8 | Fresh foods | 0 ~+4 | Fresh pork, beef, fish and chicken, prepared dishes, etc. (It is recommended to eat them the same day, or preferably within 3 days). |
| 9 | Wine | +5 ~+20 | Red, white, sparkling wine, etc. |
PLEASE NOTE
Please store the different foods according to the compartments or the target storage temperature of the purchased products.
- If the refrigeration appliance is left empty for an extended period of time, please turn off the power, defrost, clean, dry and leave the doors open to prevent mould from forming inside the appliance.
Cleaning the water dispenser (for appliances with a water dispenser):
- Clean the water tanks if they have not been used for 48 hours. Flush the water system connected to a water supply if water has not been drawn for 5 days.
Troubleshooting
If you have a problem with your appliance or are concerned that your appliance is not working properly, there are a few simple things you can check before contacting customer service; please observe the information below. It will help you to carry out some simple checks before contacting customer service.
CAUTION
Never try to repair the appliance yourself. If the problem persists after carrying out the above checks, contact a qualified electrician, an authorised technician or the point of sale where you purchased the product.
| Problem | Possible cause and solution |
| The appliance is not working | Check that the power cord is correctly plugged into the mains socket. |
| Check the fuse or circuit of your power supply and replace it if necessary. | |
| The ambient temperature is too low. Try setting the indoor temperature to a cooler level to solve the problem. | |
| Odours are emitted from the compartments | The interior of the appliance may need to be cleaned. |
| Some foods, containers or packaging give off odours. | |
| The appliance is making a noise | The following noises are quite normal:Compressor running noises.Noise from the compartment or other compartments.Gurgling sound similar to that of boiling water.Dry noise during automatic defrosting.Rattling noise before the compressor starts up. |
| Other unusual noises may be due to the following reasons; in this case, please check and remedy the problem:The appliance is not level.The rear wall of the appliance is touching the wall.Bottles or containers have fallen or rolled inside the appliance. | |
| The motor is running continuously. | It is normal to hear the motor noise regularly. It will need to run more in the following circumstances:The temperature setting is colder than necessary.A large quantity of hot food has recently been placed in the appliance.The temperature outside the appliance is too high.The doors have been opened too often or for too long.After installing your appliance or if it has been switched off for an extended period. |
| A layer of frost has formed in the compartment | Make sure that the food placed in the appliance allows sufficient ventilation. Check that the door is closed. To remove the frost, please refer to the “Cleaning and maintenance” section. |
| The temperature is too high | You may have opened the doors too often or for too long, or the correct closing of the doors may be impeded by an obstacle. There may also be insufficient clearance at the sides, back and top of the appliance. |
| The interior temperature is too low | Increase the temperature according to the instructions in the “Operation” section. |
| Doors have trouble closing | Check that the top of the refrigerator is tilted back 10-15 mm to allow the doors to close automatically and ensure that nothing inside the appliance is preventing the doors from closing. |
| Water is leaking onto the floor | The water tank (located at the bottom and rear of the appliance) may not be properly levelled or the drain nozzle (located under the top wall of the compressor) may not be correctly positioned to direct water into the tank. It is also possible that the water drain is clogged. You may need to move the fridge away from the wall to check the tank and nozzle. |
| The lighting does not work | The lightbulb may be damaged. To replace the lighting, please refer to the “Operation” section. |
Merci !
natural_image
Illustration of a hand placing a tray with an arrow on the shelf (no text or symbols)natural_image
Diagram of a door handle mechanism with arrows indicating motion direction (no text or symbols)natural_image
Line drawing of a refrigerator interior with hand holding a tool, no text or symbols presentnatural_image
Technical illustration of a rectangular device with a circular dial and its side view (no text or symbols)natural_image
Technical line drawing of an internal electronic device casing with visible internal components and a bolt (no text or symbols)
flowchart
graph LR
    A["LED"] --> B["LED"]
    style A fill:#f9f,stroke:#333
    style B fill:#bbf,stroke:#333
natural_image
Illustration of a hand placing a tray on a shelf with an arrow indicating direction (no text or symbols)natural_image
Technical line drawing of a mechanical component with arrows indicating motion or force direction (no text or symbols)natural_image
Line drawing of a refrigerator interior with hand holding a tray (no text or symbols)Koelcompartiment
natural_image
Technical illustration of a rectangular device with a circular dial and its side view showing internal components (no text or symbols)natural_image
Technical line drawing of a device casing with internal components and mounting holes (no text or symbols)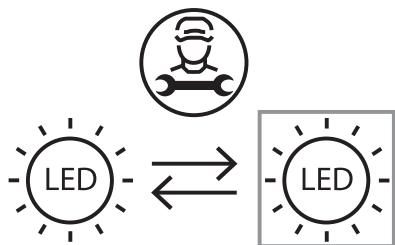
flowchart
graph TD
    A["LED"] --> B["Worker Icon"]
    B --> C["LED"]
natural_image
Illustration of a hand placing a tray on a shelf with an arrow indicating direction (no text or symbols)natural_image
Diagram of a door handle mechanism with arrows indicating motion (no text or symbols)natural_image
Line drawing of a refrigerator interior with hand holding a tray (no text or symbols)natural_image
Technical illustration of a rectangular device with a circular dial showing 0 to 4 units, alongside its side view (no text or symbols present)natural_image
Technical line drawing of an electronic device casing with internal components and a bolted head (no text or symbols)
flowchart
graph TD
    A["LED"] --> B["Worker Icon"]
    B --> C["LED"]
