
BI 1D 199 F W742C - BI 1D 199 F W742C - Fridge VALBERG - Free user manual and instructions
Find the device manual for free BI 1D 199 F W742C - BI 1D 199 F W742C VALBERG in PDF.

| Brand | VALBERG |
| Model | BI 1D 199 F W742C |
| Category | Built-in refrigerator |
| Product type | Refrigerator with freezer compartment |
| Climate class | SN (10-32°C), N (16-32°C), ST (16-38°C), T (16-43°C) |
| Temperature setting | Electronic thermostat with 5 levels (refrigerator), automatic freezer at -18°C |
| Operating modes | Smart mode (automatic), Super mode (max cold 54h), user settings |
| Door open alarm | Sounds after 90 seconds of opening |
| Door opening direction reversal | Possible, reversal kit provided |
| Built-in installation | Complete installation kit (guides, slides, seals) |
| Interior lighting | LED class G, replacement by professional only |
| Cleaning and maintenance | Regular interior cleaning; condenser to be cleaned once a year; drainage hole to be checked |
| Power supply | 220-240 V, 50 Hz, mandatory grounding |
| Warranty | 2 years (excluding installation defects or abnormal use) |
| Included accessories | Glass shelves, vegetable bin, bottle racks, installation kit |
Frequently Asked Questions - BI 1D 199 F W742C - BI 1D 199 F W742C VALBERG
User questions about BI 1D 199 F W742C - BI 1D 199 F W742C VALBERG
0 question about this device. Answer the ones you know or ask your own.
Ask a new question about this device
Download the instructions for your Fridge in PDF format for free! Find your manual BI 1D 199 F W742C - BI 1D 199 F W742C - VALBERG and take your electronic device back in hand. On this page are published all the documents necessary for the use of your device. BI 1D 199 F W742C - BI 1D 199 F W742C by VALBERG.
USER MANUAL BI 1D 199 F W742C - BI 1D 199 F W742C VALBERG
This product is guaranteed for a period of 2 years from the date of purchase* against any failure resulting from a manufacturing or material defect. This warranty does not cover defects or damage resulting from incorrect installation, improper use or abnormal wear of the product.
*as shown on the sales receipt.
CONDITION DE GARANTIE
FR
Thank you for choosing this VALBERG product. The VALBERG products which have been chosen, tested and recommended by ELECTRO DEPOT, are easy to use, reliable and of an impeccable standard. Satisfaction guaranteed every time you use this appliance.
Welcome to ELECTRO DEPOT.
Visit our website: www.electrodepot.fr

Overview of the appliance
Recommended ambient temperature Temperature control adjustment Components

Using the appliance
Upside down door
Installation
Initial use
Control panel
Operation

Useful information
Cleaning and care Troubleshooting Disposing of your old appliance
Recommended ambient temperatures
Respect the climatic classes indicated in the product information on the appliance's nameplate. You can use this to check the recommended temperature range of the room where the appliance is located:
SN: Between 10 and 32^
- N: Between 16 and 32^ C
SN: Between 16 and 38^
- Tel.: Between 16 and 43^ C
A multi-class appliance can handle the lowest and highest temperature of all classes covered. Using the appliance outside the recommended temperature range will lead to inferior performance and premature ageing.
Temperature control adjustment
For optimal use and to save energy, adjust the temperature control(s) of the appliance according to the ambient temperature of the room in which it is being used and respect the climatic class.
Refer to the product sheet to find out the climatic class associated with the minimum and maximum recommended ambient temperatures for the appliance as well as the temperature setting recommended for storing food under optimal conditions.
The ambient temperatures in ^ C are given as a rough guide.
The set positions can be affected by the location of the appliance in the room, how often the door is opened or the load of food inside.
The temperature control may need to be changed to compensate for these factors.
Examples of locations:
- Room which is unheated in winter, such as a garage in a cold region.
- Living area which is normally heated, such as a kitchen.
- Room with no air conditioning in summer in a hot region.
Components
Control panel and light
Crisper
Glass shelves
5 Bottle racks
3 Crisper lid
Upside down door
Tools required: Phillips screwdriver/flathead screwdriver/Allen key.
- Make sure that the appliance is unplugged and empty.
- To remove the door, the appliance must be tilted backwards. Lay the appliance on a solid object so that it cannot slip while the opening direction of the doors is being reversed.
- All the parts that have been removed must be kept in a safe place so that the door can be replaced.
- Do not lay the appliance down flat as this could damage the cooling system.
We recommend that the appliance should be handled by 2 people during assembly.
Unscrew the upper hinge. Lift off the door and place it on a padded surface to prevent scratching.
2 Remove the pin from the lower hinge from right to left.
3 Unscrew the pin from the upper hinge. Then reverse the hinge and screw in the pin on the hinge.
Replace the door and the upper left hinge. Make sure that the door is aligned horizontally and vertically and that the seals are closed on all sides before tightening the lower hinge. Use a spanner to tighten the hinge if necessary.
Installation
5 Installation kits
① Guide × 2
② Guide cover x2
③ Runner x2
(4)Runner cover x 2
⑤ ShortShort screw x15
(6) Long screw × 2
⑦ Rubber seal
Installing the appliance
6 Make sure that the dimensions of the unit and ventilation conditions are suitable.
Take care to push the appliance carefully into the unit. Make sure that the opening side is as close as possible to the wall of the unit.
Screw a guide into the holes located at the side of the appliance door using short screws. Insert the runner in the guide and then fully open and close the appliance door and the wooden door to make sure that the wooden door can easily close completely.
①Runner
② Screws
③ Guide
Open the appliance door and the wooden door at the same time and mark the position in which the runner can function effectively at all angles when closing and opening the door. Remove the runner from the guide and attach the runner to the wooden door using 2 short screws. Then attach the runner cover to the runner.
Unscrew the guide from the appliance door.
Repeat steps 2 to 5 to attach another runner and another runner cover.
①Runner
② Screws
10 Assemble 2 guides on runners and attach them using short screws. Then attach the runner covers to the runners.
1 Check again that the door can open and close easily and that the appliance if properly sealed. If this is not the case, make some slight adjustments to the appliance. Then attach the lower support to the wooden unit using 2 long screws.
12 Attach the upper support to the wooden unit using short screws.
13 Attach the rubber seal in the space between the appliance and the wooden unit on the opening side of the door.
Positioning
Install this appliance in a place in which the ambient temperature corresponds to the climate class indicated on the nameplate.
Location
of heat sources such as radiators, boilers, sunlight, etc. Make sure that air can circulate freely around the back of the unit. To guarantee optimum performance, appliances which are positioned below an overhanging element should be at a minimum distance of at least 100mm between the top of the appliance and the wall element. Ideally the appliance should not be positioned underneath wall elements. The equipment can be correctly levelled by adjusting the feet at the bottom of the appliance.
CAUTION
It must be possible to disconnect the appliance from the electricity supply; The plug must be easily accessible after installation
Electrical connection
Before connecting the appliance, make sure that the voltage and frequency indicated on the nameplate correspond to your domestic power supply. This appliance must be earthed. There is a pin in the power supply plug for this purpose. If the household socket is not earthed, you should contact a qualified electrician to connect the appliance to a separate earthing point in line with the statutory requirements for power supplies. The manufacturer accepts no liability if the above-mentioned safety measures are not respected. The appliance is compliant with European directives.
Initial use
Cleaning the inside
Before using the appliance for the first time, wash the interior and all internal accessories with lukewarm water and a neutral soap to remove the characteristic odour of new products. Dry thoroughly.
WARNING
Do not use abrasive powders or detergents as they will damage the finish.
Control panel
12 Buttons
B1 - Press this button to adjust the refrigeration compartment cycle setting from 1, 2, 3, 4 to 5.
B2 - Press this button to select either Smart or Super mode and user settings.
Lights
L1 - Indicates the refrigeration compartment setting.
L2 - comes on after selecting the Smart mode.
L3 - comes on after selecting the Super mode.
Operation
Temperature setting
- Press the Mode button (B2) to select the user settings.
- Press the Adjust button (B1) to adjust the refrigerator settings. A lower setting corresponds to a lower temperature. The freezer temperature is controlled automatically at around - 18 °C.
Smart node
- Press the Mode button (B2) to select the Smart mode.
- The appliance operates automatically according to the dominant ambient temperature around the appliance.
Super mode
- Press the Mode button (B2) to select the Super mode.
- The appliance operates to increase the cold setting in the freezer compartment to its highest level. After 54 hours, the initial defined temperature is automatically reset.
Switching off the appliance
- Press the second Adjust button (B1) and keep it held down for 5 seconds to switch off the appliance. Press the button again for 5 seconds to switch on the appliance.
Refrigerator door opening alarm
- The alarm sounds if the door is left open for 90 seconds and only stops when the door is closed.
Accessories
15 Removable shelves
The refrigerator walls are fitted with a series of guides so that the shelves can be positioned as required.
Positioning the bottle racks in the door
16 Removable shelves
The bottle racks can be removed from the door in order to store packs of food of different sizes. The following steps should be taken to make these adjustments: Gradually pull the shelf in the direction of the arrows until it dislodges.
Cleaning and care
For hygiene reasons, the interior of the appliance including interior accessories should be cleaned regularly.
WARNING
The appliance must not be plugged into the mains during cleaning. Risk of electrocution! Switch off the appliance and unplug it from the power supply, or switch off the circuit breaker or remove the fuse before cleaning. Never clean the appliance using a steam cleaner. Moisture could accumulate around the electronic parts creating a risk of electrocution! Warm vapours can cause damage to plastic parts. The appliance must be dry before you switch it back on.
WARNING
Essential oils and organic solvents can damage plastic elements, e.g. lemon juice or juice from orange zest, butyric acid or any cleaning product containing acetic acid.
- Do not allow this type of substance to come into contact with the appliance parts.
- Do not use abrasive cleaning products.
Take the food out of the freezer. Keep the food completely covered in a cool place. - Switch off the appliance and unplug it from the power supply, or switch off the circuit breaker or remove the fuse.
- Clean the appliance and the interior accessories with a cloth and warm water. After washing, rinse with clean water and wipe down until completely dry.
- The accumulation of dust on the condenser increases energy consumption. The condenser at the back of the appliance should therefore be cleaned carefully once a year using a soft brush or vacuum cleaner.
- Switch the device back on once all the elements are dry.
1) If the condenser is at the back of the appliance.
Cleaning the drainage hole
17 Clean the drainage hole located at the back of the refrigeration compartment periodically to prevent defrosting water from entering the refrigerator. Use a cleaning product to clean the hole.
Changing the Light
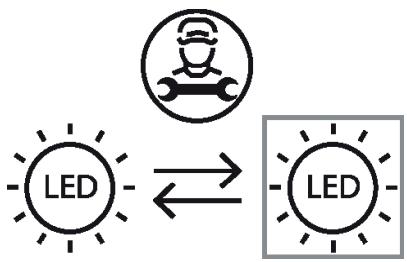
This product contains a light source of energy efficiency class G.
Light source in this product can only be replaced by qualified professionals.
Please contact after-sales service if the light source fails.
The light source shall be removed at the end of the product's useful life, with sorting and recycling done separately.
Troubleshooting
| Fault | Possible cause | Oplossing |
| The appliance does not work. | The appliance is switched off. | Press the Adjust button for 5 seconds to switch on the appliance. |
| The appliance is not plugged in or has been disconnected. | Plug in the appliance | |
| The fuse has blown or is faulty. | Check the fuse. Replace if necessary. | |
| The plug is defective. | Operating faults must be repaired by an electrician. | |
| The food is too warm. | The temperature is not correctly set. | Please consult the Adjusting the initial temperature section. |
| The door has been left open for an extended period. | Only open the door for as long as is necessary. | |
| A large amount of warm food has been placed in the appliance during the past 24 hours. | Turn the temperature control temporarily to a colder setting. | |
| The appliance is near a heat source. | Please consult the Installation position | |
| Excessive cooling of the appliance | The temperature setting is too cold. | Turn the temperature regulator temporarily to a warmer setting. |
| Unusual noises. | The appliance is not level. | Adjust the wooden unit if it is not level. |
| The appliance is touching the wall or other items. | Move the appliance slightly. | |
| A component (e.g. a pipe) at the back of the appliance is touching another part of the appliance or the wall. | If necessary, carefully fold the component to move it slightly. | |
| There is water on the floor. | The water drainage hole is blocked. | See the Cleaning section. |
| Contact the repair centre if the malfunction persists. | ||
Merci!

- CONDITION DE GARANTIE
- Recommended ambient temperatures
- Temperature control adjustment
- Components
- Upside down door
- Installation
- Installing the appliance
- Positioning
- Location
- CAUTION
- Electrical connection
- Initial use
- Cleaning the inside
- WARNING
- Control panel
- Buttons
- Lights
- Operation
- Temperature setting
- Smart node
- Super mode
- Switching off the appliance
- Refrigerator door opening alarm
- Accessories
- Removable shelves
- Positioning the bottle racks in the door
- Removable shelves
- Cleaning and care
- Cleaning the drainage hole
- Changing the Light
- Troubleshooting
- Merci!
Brand : VALBERG
Model : BI 1D 199 F W742C - BI 1D 199 F W742C
Category : Fridge