
NZ64B6058GK/U1 - NZ64B6056GK/U1 - NZ64B6058GK/U1 - Hob SAMSUNG - Free user manual and instructions
Find the device manual for free NZ64B6058GK/U1 - NZ64B6056GK/U1 - NZ64B6058GK/U1 SAMSUNG in PDF.
| Product type | Induction hob |
| Brand | SAMSUNG |
| Compatible models | NZ64B6058GK/U1, NZ64B6056GK/U1, NZ63B6056GK/U1, NZ63B6058GK/U1 |
| Supply voltage | 220-240 V~, 50/60 Hz |
| Maximum adjustable power | Up to 7400 W (configurable: 3000 W, 4000 W, 7400 W) |
| Number of cooking zones | 4 |
| Control type | Touch (sensitive keys) |
| Boost Max function | Yes, additional power on each zone |
| Flex Zone function | Yes (depending on model, left cooking zone expandable) |
| Keep warm function | Yes |
| Timer | Yes, programmable automatic shut-off |
| Pause/Resume function | Yes |
| Child lock | Yes, control panel lock |
| Wi-Fi connection | Yes, via SmartThings |
| Hood control via Bluetooth | Yes, compatible with Samsung hoods |
| Residual heat indicator | Yes (display H or h) |
| Safety shut-off | Yes, automatic after inactivity period |
| Cleaning | Glass scraper for stubborn dirt, specific ceramic hob cleaner |
| Surface type | Ceramic glass |
Frequently Asked Questions - NZ64B6058GK/U1 - NZ64B6056GK/U1 - NZ64B6058GK/U1 SAMSUNG
User questions about NZ64B6058GK/U1 - NZ64B6056GK/U1 - NZ64B6058GK/U1 SAMSUNG
0 question about this device. Answer the ones you know or ask your own.
Ask a new question about this device
Download the instructions for your Hob in PDF format for free! Find your manual NZ64B6058GK/U1 - NZ64B6056GK/U1 - NZ64B6058GK/U1 - SAMSUNG and take your electronic device back in hand. On this page are published all the documents necessary for the use of your device. NZ64B6058GK/U1 - NZ64B6056GK/U1 - NZ64B6058GK/U1 by SAMSUNG.
USER MANUAL NZ64B6058GK/U1 - NZ64B6056GK/U1 - NZ64B6058GK/U1 SAMSUNG
The following symbols are used in this User Manual: 3
Model name & serial number 3
Safety instructions 3
Disposing of the packaging material 7
Proper disposal of your old appliance 7
Correct Disposal of This Product (Waste Electrical & Electronic Equipment) 7
Installing the hob 8
Safety instructions for the installer 8
Tools you will need 8
Connecting to the mains power supply 8
Installing into the countertop 9
Components 11
Before you start 11
Cooking zones 11
Control panel 12
Induction heating 13
Safety shutoff 13
Residual heat indicator 14
Temperature detection 14
Cookware 14
Using the touch buttons 18
Operating noises 18
Initial cleaning 18
Operation 18
Switching the appliance on 18
Switching the appliance off 18
Selecting cooking zone and power level 19
Max Boost 20
Using the Flex zone (Only for Flex zone applied models) 20
Flex zone Plus (Only for Flex zone plus applied models) 21
KeepWarm 22
Timer 22
Pause/Resume 22
Quick stop 22
Child safety lock 23
Maximum power limit 23
Sound on/off 24
Smart Connect 24
Hood control 25
Maintaining your appliance 25
Hob 25
Light soiling 25
Stubborn soiling 26
Problem dirt 26
Hob frame (option) 27
To avoid damaging your appliance 27
Troubleshooting and service 27
Troubleshooting 27
Service 29
Using this manual
Please take the time to read this owner's manual, paying particular attention to the safety information contained in the following section, before using your appliance. Keep this manual for future reference.
If transferring ownership of the appliance, please remember to pass the manual on to the new owner.
The following symbols are used in this User Manual:
WARNING
Hazards or unsafe practices that may result in severe personal injury or death.
CAUTION
Hazards or unsafe practices that may result in minor personal injury or property damage.
CAUTION
To reduce the risk of fire, explosion, electric shock, or personal injury when using your hob, follow these basic safety precaution.
NOTE
Useful tips, recommendations, or information that helps users manipulate the product.
Model name & serial number
Both the model name and the serial number are labeled underneath the hob base.
For later use, write down the information or attach the additional product label (located on the top of the product) onto the current page.
Model Name
Serial Number
Safety instructions
The safety aspects of this appliance comply with all accepted technical and safety standards. However, as manufacturers we also believe it is our responsibility to familiarize you with the following safety instructions.
WARNING
This appliance is not intended for use by persons (including children) with reduced physical, sensory or mental capabilities, or lack of experience and knowledge, unless they have been given supervision or instruction concerning use of the appliance by a person responsible for their safety.
Children should be supervised to ensure that they do not play with the appliance.
This appliance can be used by children aged from 8 years and above and persons with reduced physical, sensory or mental capabilities or lack of experience and knowledge if they have been given supervision or instruction concerning use of the appliance in a safe way and understand the hazards involved. Children shall not play with the appliance. Cleaning and user maintenance shall not be made by children without supervision. The means for disconnection must be incorporated in the fixed wiring in accordance with the wiring rules.
Safety instructions
This Appliance should be allowed to disconnection from the supply after installation. The disconnection may be achieved by having the plug accessible or by incorporating a switch in the fired wiring in accordance with the wiring rules.
If the supply cord is damaged, it must be replaced by the manufacturer, its service agent or similarly qualified persons in order to avoid a hazard.
The method of fixing stated is not to depend on the use of adhesives since they are not considered to be a reliable fixing means.
WARNING: If the surface is cracked, switch off the appliance to avoid the possibility of electric shock.
During use the appliance becomes hot. Care should be taken to avoid touching heating elements inside the hob.
WARNING: Accessible parts may become hot during use. Young children should be kept away.
A steam cleaner is not to be used.
Metallic objects such as knives, forks, spoons and lids should not be placed on the hob surface since they can get hot.
After use, switch off the hob element by its control and do not rely on the pan detector.
The appliance is not intended to be operated by means of an external timer or separate remote-control system.
CAUTION: The cooking process has to be supervised. A short term cooking process has to be supervised continuously.
The appliance must not be installed behind a decorative door in order to avoid overheating.
WARNING: The appliance and its accessible parts become hot during use. Care should be taken to avoid touching heating elements. Children less than 8 years of age shall be kept away unless continuously supervised.
WARNING: Unattended cooking on a hob with fat or oil can be dangerous and may result in a fire.
NEVER try to extinguish a fire with water, but switch off the appliance and then cover flame e.g. with a lid or a fire blanket. WARNING: Danger of fire: Do not store items on the cooking surfaces.
WARNING: Use only hob guards designed by the manufacturer of the cooking appliance or indicated by the manufacturer of the appliance in the instructions for use as suitable or hob guards incorporated in the appliance. The use of inappropriate guards can cause accidents.
The surfaces are liable to get hot during use.
This appliance can be used by children aged from 8 years and above and persons with reduced physical, sensory or mental capabilities or lack of experience and knowledge if they have been given supervision or instruction concerning use of the appliance in a safe way and understand the hazards involved. Children shall not play with the appliance. Cleaning and user maintenance shall not be made by children unless they are older than 8 and supervised. Keep the appliance and its cord out of reach of children less than 8 years.
CAUTION
Be sure the appliance is properly installed and grounded by a qualified technician.
The appliance should be serviced only by qualified service personnel. Repairs carried out by unqualified individuals may cause injury or serious malfunction. If your appliance is in need of repair, contact your local service centre. Failure to follow these instructions may result in damage and void the warranty. Flush - mounted appliances may be operated only after they have been installed in cabinets and workplaces that conform to the relevant standards. This ensures sufficient protection against contact for electrical units as required by the essential safety standards.
If your appliance malfunctions or if fractures, cracks or splits appear:
- switch off all cooking zones;
- disconnect the hob from the mains supply; and
- contact your local service centre.
If the hob cracks, turn the appliance off to avoid the possibility of electric shock. Do not use your hob until the glass surface has been replaced.
Safety instructions
Do not use the hob to heat aluminium foil, products wrapped in aluminium foil or frozen foods packaged in aluminium cookware.
Liquid between the bottom of the pan and the hob can produce steam pressure. Which may cause the pan to jump.
Always ensure that the hotplate and the base of the pan are kept dry.
The cooking zones will become hot when you cook.
Always keep small children away from the appliance.
Keep all packaging materials well out of the reach of children, as packaging materials can be dangerous to children.
This appliance is to be used only for normal cooking and frying in the home. It is not designed for commercial or industrial use. Never use the hob for heating the room.
Take care when plugging electrical appliances into mains sockets near the hob. Mains leads must not come into contact with the hob.
Overheated fat and oil can catch fire quickly. Never leave surface units unattended when preparing foods in fat or oil, for example, when cooking chips.
Turn the cooking zones off after use.
Always keep the control panels clean and dry.
Never place combustible items on the hob, it may cause fire.
There is the risk of burns from the appliance if used carelessly.
Cables from electrical appliances must not touch the hot surface of the hob or hot cookware.
Do not use the hob to dry clothes.
Users with Pacemakers and Active Heart Implants must keep their upper body at a minimum distance of 30~cm from induction cooking zones when turned on. If in doubt, you should consult the manufacturer of your device or your doctor. (Induction hob model only)
Do not attempt to repair, disassemble, or modify the appliance yourself.
Always turn the appliance off before cleaning.
Clean the hob in accordance with the cleaning and care instructions contained in this manual.
Keep pets away from the appliance because pets may step on the controls of the appliance, causing an malfunction.
Disposing of the packaging material
WARNING
All materials used to package the appliance are fully recyclable. Sheet and hard foam parts are appropriately marked. Please dispose of packaging materials and old appliances with due regard to safety and the environment.
Proper disposal of your old appliance
WARNING
Before disposing of your old appliance, make it inoperable so that it cannot be a source of danger. To do this, have a qualified technician disconnect the appliance from the mains supply and remove the mains lead.
The appliance may not be disposed of in the household rubbish.
Information about collection dates and public refuse disposal sites is available from your local refuse department or council.
Correct Disposal of This Product (Waste Electrical & Electronic Equipment)

(Applicable in countries with separate collection systems) This marking on the product, accessories or literature indicates that the product and its electronic accessories (e.g. charger, headset, USB cable) should not be disposed of with other household waste at the end of their working life. To prevent possible harm to the environment or human health from uncontrolled waste disposal, please separate these items from other types of waste and recycle them responsibly to promote the sustainable reuse of material resources.
Household users should contact either the retailer where they purchased this product, or their local government office, for details of where and how they can take these items for environmentally safe recycling.
Business users should contact their supplier and check the terms and conditions of the purchase contract. This product and its electronic accessories should not be mixed with other commercial wastes for disposal.
For information on Samsung's environmental commitments and product specific regulatory obligations e.g. REACH visit: https://www.samsung.com/uk/ sustainability/environment/
Installing the hob

WARNING
Be sure the new appliance is installed and grounded only by qualified personnel.
Please observe this instruction. The warranty will not cover any damage that may occur as a result of improper installation.
Technical data is provided at the end of this manual.
Safety instructions for the installer
- A device must be provided in the electrical installation that allows the appliance to be disconnected from the mains at all poles with a contact opening width of at least 3mm . Suitable isolation devices include line protecting cut - outs, fuses (screw type fuses are to be removed from the holder), earth leakage trips and contactors.
- With respect to fire protection, this appliance corresponds to EN 60335 - 2 - 6. This type of appliance may be installed with a high cupboard or wall on one side.
The installation must guarantee shock protection. - The kitchen unit in which the appliance is fitted must satisfy the stability requirements of DIN 68930.
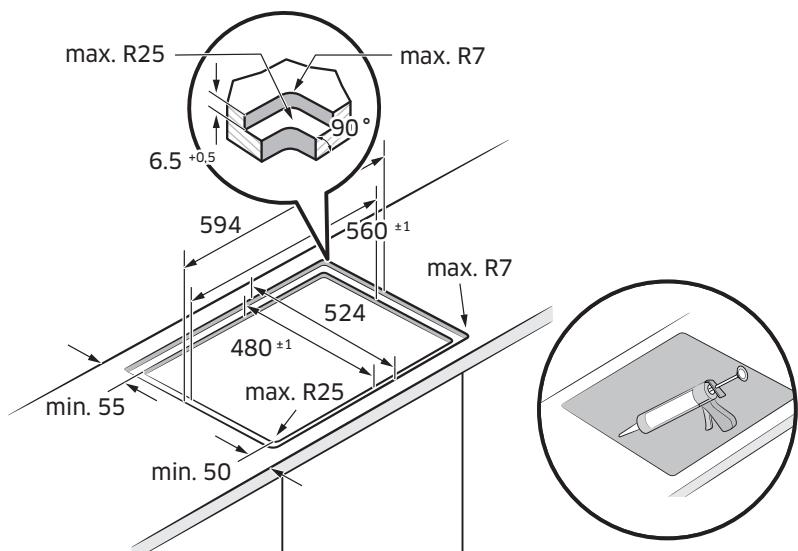
- For protection against moisture, all cut surfaces are to be sealed with a suitable sealant.
- On tiled work surfaces, the joints in the area where the hob sits must be completely filled with grout.
- On natural, artificial stone, or ceramic tops, the snap action springs must be bonded in place with a suitable artificial resin or mixed adhesive.
- Ensure that the seal is correctly seated against the work surface without any gaps. Additional silicon sealant must not be applied; this would make removal more difficult when servicing.
The hob must be pressed out from below when removed.
A board can be installed underneath the hob. - The ventilation gap between the worktop and front of the unit underneath it must not be covered.
Tools you will need

Pencil

Phillips Head Screwdriver
Ruler or Straightedge
Safety Glasses
Saber Saw

Drill
Connecting to the mains power supply
Before connecting, check that the nominal voltage of the appliance, that is, the voltage stated on the rating plate, corresponds to the available supply voltage. The rating plate is located on the lower casing of the hob.

WARNING
Shut off power to circuit before connecting wires to circuit.
The heating element voltage is AC 230 V~. The appliance also works perfectly on networks with AC 220 V~ or AC 240 V~. The hob is to be connected to the mains using a device that allows the appliance to be disconnected from the mains at all poles with a contact opening width of at least 3 mm, eg. automatic line protecting cut - out, earth leakage trips or fuse.

WARNING
The cable connections must be made in accordance with regulations and the terminal screws tightened securely.

WARNING
Once the hob is connected to the mains supply, check that all cooking zones are ready for use by briefly switching each on in turn at the maximum setting with suitable cookware.

WARNING
Pay attention (conformity) to phase and neutral allocation of house connection and appliance (connection schemes); otherwise, components can be damaged. Warranty does not cover damage resulting from improper installation.

WARNING
If the supply cord is damaged, it must be replaced by the manufacturer, its service agent or similarly qualified persons in order to avoid a hazard.
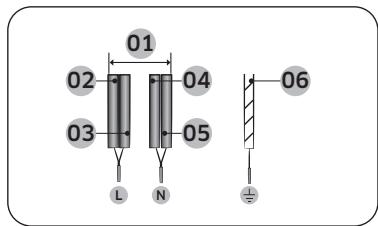
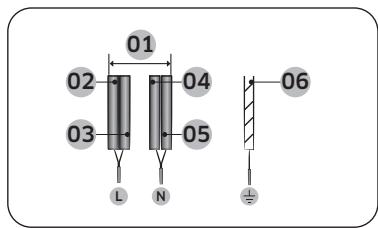
1N~ (32A)
| 01 | 220-240 V~ | 04 | Blue |
| 02 | Black | 05 | Gray |
| 03 | Brown | 06 | Green/Yellow |
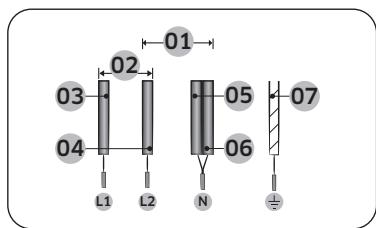
2N~ (16A): Separate the 2-phase wires (L1 and L2) before connection.
| 01 | 220-240 V~ | 05 | Blue |
| 02 | 380-415 V~ | 06 | Gray |
| 03 | Black | 07 | Green/Yellow |
| 04 | Brown |

2 x 1N~ (16A): Separate the wires before connection.
| 01 | 220-240 V~ | 05 | Brown |
| 02 | Black | 06 | Gray |
| 03 | Blue | 07 | Green/Yellow |
| 04 | 220-240 V~ |

WARNING
For correct supply connection, follow the wiring diagram attached near the terminals.
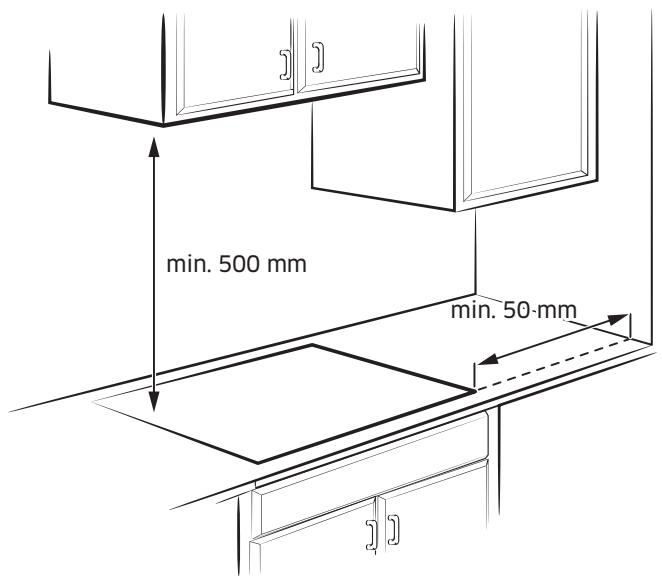
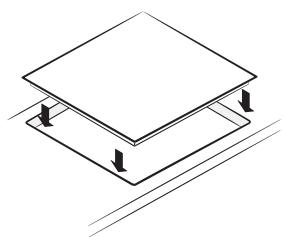
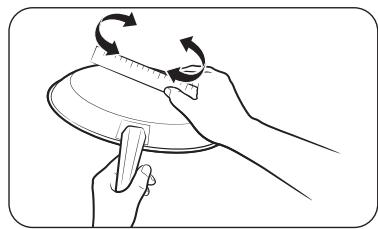
Installing into the countertop
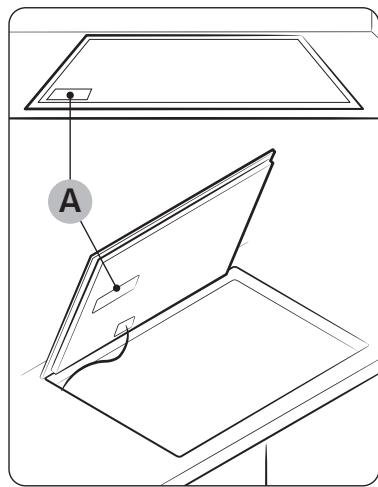
A. Serial number

NOTE
Make a note of the serial number on the appliance rating label prior to installation. This number will be required in the case of requests for service and is no longer accessible after installation, as it is on the original rating plate on the upperside or underside of the appliance.

NOTE
Pay special attention to the minimum space and clearance requirements.

NOTE
The bottom of the hob is equipped with a fan. If there is a drawer under the hob it should not be used to store small objects or paper, since they could damage the fan or interfere with the cooling if they are sucked into it.
Flushed Fit Type (Only NZ6*FK model can be installed)
Before you start
Components
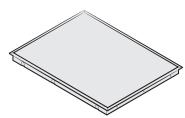
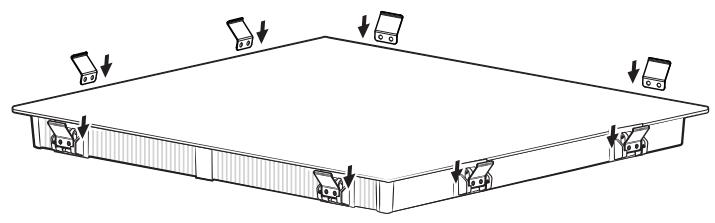
Induction hob
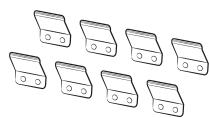
Bracket Spring
Cooking zones
NZ64B6056**
NZ64B6058**
NZ63B6056**
NZ63B6058**
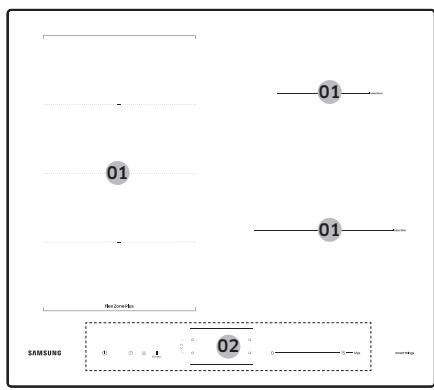
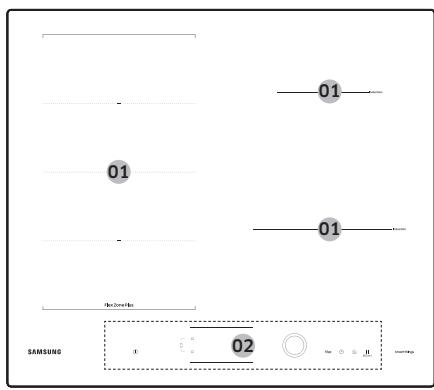
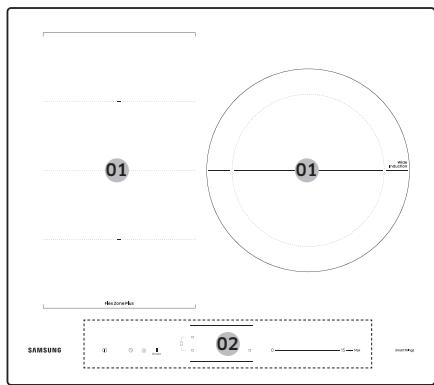
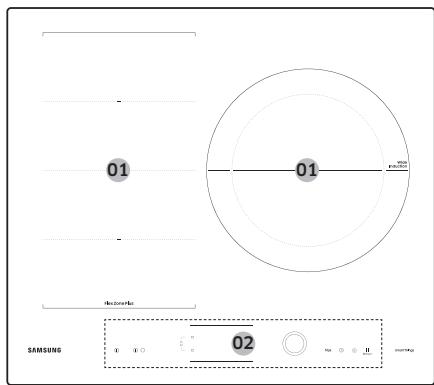
| 01 | Induction cooking zone |
| 02 | Control panel |
Before you start
Control panel
Control panel 1 - NZ64B6056**

Control panel 2 - NZ64B6058**

Control panel 3 - NZ63B6056**

Control panel 4 - NZ63B6058**

| 01 ① On/Off | To activate and deactivate the hob. |
| 02 ① Timer | To turn timer on or off and set timer. |
| 03 ① Keep warm | To keep cooked food warm. |
| 04 ① Δ(3sec) Pause & Lock | To switch all cooking zones on to the low power setting. Press 3 seconds to lock or unlock the control panel. (Child safety lock) |
| 05 ① Flex zone | To select the flex zone. |
| 06 ① Cooking zone | To select the cooking zone. |
| 07 Max Max Boost | To activate the function. |
| 08 Display | To show for heat settings, residual heat, and Wi-Fi connection. |
| 09 Control bar | To set a heat setting and increase or decrease the time. |
| 10 Control knob | To set a heat setting and increase or decrease the time. |
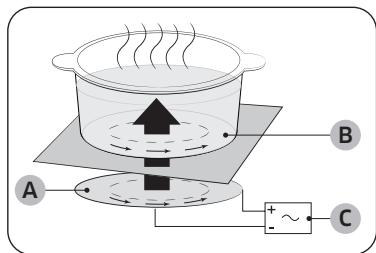
Induction heating
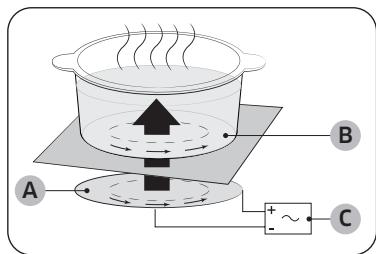
A. Induction coil
B. Induced currents
C. Electronic circuits
- The Principle of Induction Heating: When you place your cookware on a cooking zone and you turn it on, the electronic circuits in your induction hob produce "induced currents" in the bottom of the cookware which instantly raise cookware's temperature.
- Greater speed in cooking and frying: As the pan is heated directly and not the glass, the efficiency is greater than in other systems because no heat is lost. Most of the energy absorbed is transformed into heat.
Safety shutoff
If one of the cooking zones is not switched off or the power level is not adjusted after an extended period of time, that particular cooking zone will automatically switch itself off.
The cooking zones switch themselves off at the following times.
| Power level | Switch off |
| 1-3 | After 6 hours |
| 4-6 | After 5 hours |
| 7-9 | After 4 hours |
| 10-15 | After 1.5 hours |

NOTE
If the Hob is overheated because of abnormal operation, [H] will be displayed. And the Hob will be switched off.

NOTE
If cookware is unsuitable, too small, or no cookware has been placed on the cooking zone, 将 will be displayed. And after 1 minute the corresponding cooking zone will be switched off.

NOTE
Should one or more of the cooking zones switch off before the indicated time has elapsed, see the "Troubleshooting".
Other reasons why a cooking zone will switch itself off
All cooking zones will switch themselves off if liquid boils over on the control panel.
The automatic shutoff will also be activated if you place a damp cloth on the control panel. In both of these instances, the appliance will need to be switched on again using the On/Off ① key after the liquid or the cloth has been removed.
Residual heat indicator
When an individual cooking zone or the hob is turned off, the presence of residual heat is shown with an H (for "hot") in the corresponding cooking zone display. Even after the cooking zone has been switched off, the residual heat indicator goes out only after the cooking zone has cooled. You can use the residual heat for thawing or keeping food warm.
WARNING
As long as the residual heat indicator is illuminated, there is a risk of burns.
WARNING
If the power supply is interrupted, the H h symbol will go out and information about residual heat will no longer be available. However, it may still be possible to burn yourself. This can be avoided by always taking care when near the hob.
Temperature detection
If for any reason the temperatures on any of the cooking zones were to exceed the safety levels, the cooking zone will automatically reduce to a lower power level. When you have finished using the hob, the cooling fan will continue to run until the hob's electronics has cooled down. And the cooling fan switches itself off depending upon the temperature of the electronics.
Cookware
Use flat-bottomed cookware that completely contacts the entire cooking zone. Check for flatness by rotating a ruler across the bottom of the cookware. Be sure to follow all the recommendations for using cookware.
- Use cookware made with the correct material for induction cooking.
- Use quality cookware with heavier bottoms for better heat distribution. This gives best cooking results.
- Match the cookware size to the quantity of food being prepared.
- Do not let cookware boil dry. This may cause permanent damage in the form of breakage, fusion, or marring that can affect the ceramic hob. (This type of damage is not covered by your warranty).
- Do not use dirty cookware or cookware with heavy grease buildup. Always use cookware that is easy to clean after cooking.
CAUTION
- The cooking zones may appear cooled down after they have been turned off. However, the glass surface may be hot from residual heat transferred from the cookware. The risk of burns is still present.
- Do not touch hot cookware directly with your hands. Always use oven mitts or pot holders to protect your hands from burns.
- Do not slide cookware across the hob surface. Doing so may permanently damage the hob.
Cookware for induction cooking zones
The Induction burner can only be turned on when cookware with a magnetic base is placed on one of the cooking zones. You can use the cookware identified as suitable below.
| Material | Suitability |
| Steel, enameled steel, cast iron | Yes |
| Stainless steel | Yes (If magnet sticks to the bottom of the cookware) |
| Aluminum, copper, brass, glass, ceramic, porcelain | No |
NOTE
- Cookware appropriate for induction cooking is labelled as suitable by the manufacturer.
Certain cookware can make noises when being used on induction cooking zones.
These noises do not indicate that the hob is malfunctioning and do not affect its operation in any way. - Special stainless-steel cookware may not be suitable for induction cooking. Check if the base of the cookware is attracted by a magnet.
Cookware sizes for induction cooking zones
Induction cooking zones adapt automatically to the bottom size of the cookware up to a certain limit. However, the magnetic part of the bottom of the cookware must have a minimum diameter depending upon the size of the cooking zone. For best results, use cookware whose ferromagnetic diameter match that of a burner. If the cookware is not sensed by the burner, try a smaller sized burner.
NOTE
For Cookware diameter, please refer to the model's Cooking zones specifications.
Other induction cookware
Some cookware has thin magnetic material on the bottom to work with an induction heating hob. These cookware has weak magnetism and may not work well. (Weak magnetism means a magnet does not stick firmly or the area where the magnet sticks is small.)
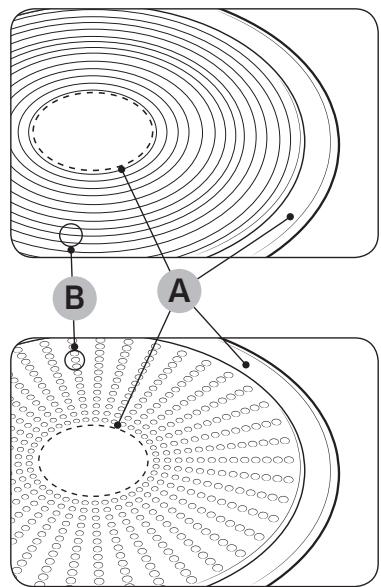
A. Area where magnet does not stick
B. Area where magnet sticks
Even though cookware are designed for an induction hob, the heating performance could be weak or sometimes the hob may not detect the cookware depending on the size and strength of the magnetic area on the bottom of the cookware.
When using large cookware with a smaller ferromagnetic element, only the ferromagnetic element heats up. Consequently, heat might not be uniformly distributed.
Suitability test
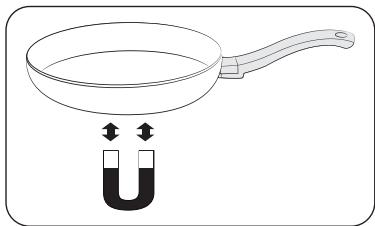
Cookware is suitable for induction cooking if a magnet sticks to the bottom of the cookware and the cookware is labelled as suitable by the cookware manufacturer.
- You can recognise good cookware by their bases. The base is supposed to be as thick and flat as possible.
- When buying new cookware, pay special attention to the diameter of the base. Manufacturers often give only the diameter of the upper rim.
- Do not use cookware which have damaged bases with rough edges or burrs. Damaged cookware can scratch the ceramic hob permanently if you slide them across the surface.
- When cold, cookware bases are normally bowed slightly inwards (concave). They must not be bent outwards (convex).
If you want to use a special type of cookware, for example, a pressure cooker, a simmering pan, or a wok, please follow the manufacturer's instructions.
Correct positioning
| Correct | Incorrect |
| Flat-bottomed cookware and straight sides | Cookware with curved or warped bottoms or sides |
| The cookware meets or exceeds the recommended minimum size for the cooking zone. | The cookware does not meet the minimum size required for the current cooking zone. |
| The cookware rests completely on the hob surface. | The cookware rests on the hob trim or does not rest completely on the hob surface. |
| The cookware is properly balanced. | The heavy handle causes the cookware to tilt. |
Energy saving tips
| √ |
| X |
Follow these tips to save power consumption.
Always put cookware on a cooking zone before you turn the corresponding burner on.
- Keep the cooking zones and cookware bases clean. Otherwise, more power will be consumed.
- Firmly close the cover of cookware if available. This will reduce power consumption.
- Turn the working burner off before the end of the cooking time. Use the residual heat to keep food warm.
Correct positioning
You can test cookware to see if they are suitable for use with the product.
- Press the On/Off ① key for 1-2 seconds to turn on the hob.
- Press the Pause & Lock key for 3 seconds to activate the child safety lock.
- Press the Timer key for 3 seconds to activate the cookware suitability test mode.
- Place the cookware on the one of the cooking zones, and then press and hold the Cooking zone key for 3 seconds.
| Display | Description |
| 0 | Cookware is unsuitable |
| 1 - 7 | Cookware is suitable, but inefficient |
| 8 - 10 | Cookware is suitable |
Before you start
Using the touch buttons
To operate the touch buttons, touch the desired button with the tip of your pointed finger until the relevant displays illuminate or go out, or until the desired function is activated.
Ensure that you are touching only one button when operating the appliance. If your finger is too flat on the button, an adjacent button may be actuated as well.
Operating noises
If you can hear.
- Cracking noise: cookware is made of different materials.
- Whistling: you use more than two cooking zones and the cookware is made of different materials.
- Humming: you use high power levels.
- Clicking: electric switching occurs.
- Hissing, Buzzing: the fan operates.
The noise are normal and do not refer to any defects.
WARNING
Do not use cookware of different size and material.
Using cookware of different sizes or materials may cause noises and vibrations.
NOTE
Using low power levels (1-5) may cause clicking noises.
Initial cleaning
Wipe the ceramic glass surface with a damp cloth and ceramic hob glass cleaner.
WARNING
Do not use caustic or abrasive cleaners. The surface could be damaged.
Operation
Switching the appliance on
The appliance is switched on using the On/Off ① key. Press the On/Off ① key for approximately 1-2 seconds.
NOTE
After the On/Off ① key has been actuated to switch on your appliance, a power level must be selected within approximately 20 seconds. Otherwise, the appliance will switch itself off for safety reasons.
Switching the appliance off
To completely switch off the appliance, use the On/Off ① key.
Press the On/Off ① key for approximately 1-2 seconds.
NOTE
After switching off a single cooking zone or the entire cooking surface, the presence of residual heat will be indicated in the digital displays of the corresponding cooking zones in the form of an H, h two steps for "hot". The temperature is lowered, H, h will be disappeared.
Selecting cooking zone and power level
- For selecting the cooking zone, press the corresponding Cooking zone key.
- For setting and adjusting the power level, use the Control bar or Control key or Control knob.
| Control bar | 0 | 15 | Max |
| Control Knob | Max | ||

NOTE
The default level is set to 15 when selecting the cooking zone.
- If more than one key is pressed for longer than 8 seconds, will show in the cooking zone display.
Suggested settings for cooking specific foods
The numbers in the table below are guidelines. The power level required for various cooking methods depend on a number of variables, including the quality of the cookware being used and the type and amount of food being cooked.
| Power level | Cooking method | Examples for Use |
| 14-15 | Warming / Sautéing / Frying | Warming large amounts of liquid, boiling noodles, searing meat, browning goulash, braising meat |
| 8-11 | Intensive frying | Steak, sirloin, hash browns, sausages, pancakes / griddle cakes |
| 7-10 | Frying | Schnitzel / chops, liver, fish, rissoles, fried eggs |
| 5-7 | Boiling | Cooking up to 1.5 l liquid, potatoes, vegetables |
| 2-4 | Steaming / Stewing / Boiling | Steaming and stewing of small amounts of vegetables, boiling rice and milk dishes |
| 1-2 | Melting | Melting butter, dissolving gelatine, melting chocolate |

NOTE
You will need to adjust the power level according to specific cookware and foods.
Operation
Max Boost
The Max Boost function makes additional power available to the each cooking zones. (example : bring a large volume of water to the boil)
After Max Boost times, the cooking zones automatically sets back to the highest heat setting.

NOTE
- In certain circumstances, the Max Boost function may be deactivated automatically to protect the internal electronic components of the hob. For example, It is impossible to output max power on Flex zone rear and Flex zone front at the same time.
Refer to your model's Cooking zones specification for Max Boost time.
Power management
The cooking zones have a maximum power available to them.
If this power range is exceeded by switching on the Max Boost function, Power Management automatically reduces the power level of cooking zone.
The display for this cooking zone alternates for some seconds between the set power level and the maximum possible power level. After then, the display changes from the set power level to maximum possible power level.
Using the Flex zone (Only for Flex zone applied models)
The Flex function can operate complete left side cooking zone for using large size cookware. (example : oval cookware, fish kettle)
- Press the Flex zone key.
- For setting and adjusting the power level, use the Power level key.

NOTE
- Press the Flex zone key during operating, Flex zone function will be off.
- If you press the Flex zone key while each burner operation different level, burner set at a high level.
Flex zone Plus (Only for Flex zone plus applied models)
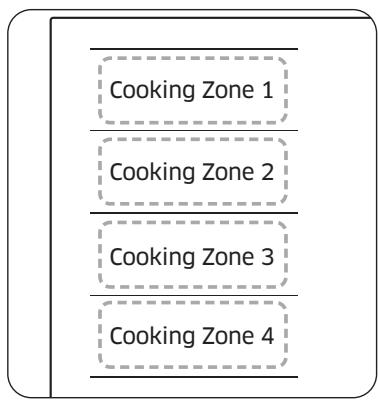
The Flex zone is the large cooking area located on the left side of the hob (see the figure left) that is specially designed to accommodate multiple pots and pans of varying shapes and sizes at once. The Flex zone has four zones that are operated by individual inductors, allowing you to cook regardless of where cookware is placed on a cooking zone.
With Flex zone Plus, you can use a combination of different cooking zones to enlarge the cooking area. Press the Flex zone key to use the cooking zone as follows.
| Cooking Zone 1 | Cooking Zone 1 | Cooking Zone 1 | Cooking Zone 1 |
| Cooking Zone 2 | Cooking Zone 2 | Cooking Zone 2 | Cooking Zone 2 |
| Cooking Zone 3 | Cooking Zone 3 | Cooking Zone 3 | Cooking Zone 3 |
| Cooking Zone 4 | Cooking Zone 4 | Cooking Zone 4 | Cooking Zone 4 |

NOTE
- When using only one cooking zone, the diameter of the bottom of the cookware must be less than 14 ~cm .
The hob may take 5-10 seconds to recognise the position of cookware.
Noises may occur while the hob recognise the cookware. - Do not remove cookware during cooking. For safety purposes, the hob automatically stops if cookware has been removed for more than 5 seconds.
Using the Flex zone Plus (Only for Flex zone plus applied models)
- Press the Flex zone key.
- For setting and adjusting the power level, use the Power level key.

NOTE
- If you press the Flex zone key during operating, Flex zone function will be off.
- If you press the Flex zone key while each cooking zone is operating at different levels, it will be automatically adjusted to higher level.
- When moving or adding cookware to a new Flex zone, cancel the current operation, and then press the corresponding Cooking zone key to activate the cooking zone.
Operation
Keep Warm
- Use this function to keep cooked food warm. Press the corresponding Cooking zone key.
- Press the Keep warm key.
- The cooking zone display will be changed.
- Press the Keep warm key again to turn off the cooking zone.
Timer
Using the timer as a safety shutoff
If a specific time is set for a cooking zone, the cooking zone will shut itself off once this period of time has elapsed. This function can be used for multiple cooking zones simultaneously.
Setting the timer
The cooking zone(s) for which you want to apply the safety shutoff must be switched on.
- Press the Timer key.
- Set timer by repeatedly pressing the Timer key.
- To cancel the timer settings, hold the Timer 心 key for 3 seconds.

NOTE
- To change the settings quicker, press and hold any of the Timer key until the desired value is reached.
- When the timer is terminated, it sounds a beep several times. However, the cooking zone will not be turned off.
Pause/Resume
The Pause/Resume function simultaneously switches all cooking zones that are switched on to the low power setting and then back to the power level that was previously set. This function can be used to briefly interrupt and then continue the cooking process e.g. to take a telephone call.
When the Pause/Resume function is activated, all keys except for the Pause & Lock ^ and the On/Off keys are disabled.
To resume cooking, press the Pause & Lock key again.
| Control Panel | Display | |
| To Switch On | Press the Pause & Lock II (3sec) key | II |
| To Switch Off | Press the Pause & Lock II (3sec) key | Return to previous power level |
Quick stop
This option reduces the step and time it takes to stop cooking.
To switch off a cooking zone, press the Cooking zone key for 2 seconds.

NOTE
The Flex zone key does not support quick stop function.
Child safety lock
You can use the child safety lock to safeguard against unintentionally turning on a cooking zone and activating the cooking surface. Also the control panel, with the exception of the On/Off ① key (Only turn off control), can be locked in order to prevent the settings from being changed unintentionally, for example, by wiping over the panel with a cloth.
Switching the child safety lock On/Off
- Press the Pause & Lock _ (5sec) key for approximately 3 seconds. An acoustic signal will sound as confirmation.
- Press any key. L will appear in the displays, indicating the child safety lock has been activated.
- For switching the child safety lock off, press the Pause & Lock key again for 3 seconds. An acoustic signal will sound as confirmation.

NOTE
- Regardless of power on/off, child lock is activated.
- You can set the child safety lock during cooking. To turn off the burner with the child safety lock on, press the On/Off ① key or turn off the child safety lock first and then press the corresponding Cooking zone ② key.
Maximum power limit
This function allows you to adjust the maximum power of the unit.
- Keep the power off.
- Press the Pause & Lock key for approximately 3 seconds to turn on the child safety lock.
- Press the left front Cooking zone key and right front Cooking zone key at the same time for approximately 3 seconds.
- Press the Timer key for approximately 3 seconds. The displays will show P_ and current maximum power.
- You can adjust the power limit using the Pause & Lock key. (3000 W, 4000 W, 7400 W)
- Press the On/Off ① key to set the setting.

NOTE
In low-power (3000 W, 4000 W) mode, the power level will be adjusted automatically.
Sound on/off
- Press the On/Off ① key for approximately 1-2 seconds.
- Press the Timer key for 3 seconds within 10 seconds after the power has turned on.
- Sound will turn off and DF will be displayed in the display.
- To change the sound setting, repeat steps 1 and 2. Sound will turn on and n will be displayed in the display.

NOTE
It is not possible to change the sound settings after 10 seconds from turning the power on.
Smart Connect
The hob has built in Wi-Fi module that you can use to sync the hob with the SmartThings app. On the smartphone app, you can:
- monitor the operating status and the power level settings of the hob elements.
check and change the timer settings.
Functions that can be operated from the SmartThings app may not work smoothly if communication conditions are poor or the product is installed in a place with a weak Wi-Fi signal.
How to connect the hob
Before you can use the remote features of your Samsung hob, you must pair it to the SmartThings app.
- Download and open the SmartThings app on your smart device.
- Press the On/Off ① key for approximately 1-2 seconds to turn the hob on.
- Press the Pause & Lock key for approximately 3 seconds to turn on the child safety lock.
- Follow the app's instructions, and then press and hold the Max key for 3 seconds.
- While the connection is being made, the Wi-Fi indicator will links. Once the process is complete, the indicator glows without blinking. Now the hob is connected successfully.
- If the Smart Connect Wi-Fi indicator does not turn on, follow the instruction in the app to reconnect.

NOTE
- Make sure to set the Smart Connect function only when no hob operation is in process.
For further instructions, refer to the web manual at www.samsung.com
Wi-Fi On/Off
To change the Wi-Fi On/Off, repeat steps 2 to 4.
Maintaining your appliance
Hood control
This product features a Bluetooth device that you can use to connect the hob to Samsung hood control models. Through the Bluetooth connection, you can use the hood control function on the SmartThings app.
To find out more about Samsung hood control-enabled models, visit www.samsung.com.
To connect to a hood control model
- Download and run the SmartThings app on your smartphone. Then, complete the Smart Connect procedure to connect to the hob.
- Follow the Bluetooth instructions of the hood control model and activate the Bluetooth connection.
- Press and hold the Timer 口 and Pause & Lock 口 keys simultaneously to make the Bluetooth connection. When the Bluetooth connection is successfully established, 口 appears on the display.
- Follow the instructions in the user manual of the hood control model and the App guide to use the hood control.

NOTE
- If the Smart Connect connection is not successful, you cannot use the SmartThings app to monitor and control the hood.
- Without a Smart Connect connection to the hob, you can use a Bluetooth connection to pair the hob with the hood and sync them. To do this, follow steps 2 and 3 above.
Hob

WARNING
Cleaning agents must not come into contact with a heated ceramic glass surface: All cleaning agents must be removed with adequate amounts of clean water after cleaning because they can have a caustic effect when the surface becomes hot. Do not use any aggressive cleaners such as grill or oven sprays, scouring pads or abrasive pan cleaners.

NOTE
Clean the ceramic glass surface after each use when it is still warm to the touch. This will prevent spillage from becoming burnt onto the surface. Remove scales, watermarks, fat drippings and metallic discolouration with the use of a commercially available ceramic glass or stainless steel cleaner.
Light soiling
- Wipe the ceramic glass surface with a damp cloth.
- Rub dry with a clean cloth. Remnants of cleaning agent must not be left on the surface.
- Thoroughly clean the entire ceramic glass cooking surface once a week with a commercially available ceramic glass or stainless steel cleaner.
- Wipe the ceramic glass surface using adequate amounts of clean water and rub dry with a clean lint - free cloth.
Maintaining your appliance
Stubborn soiling
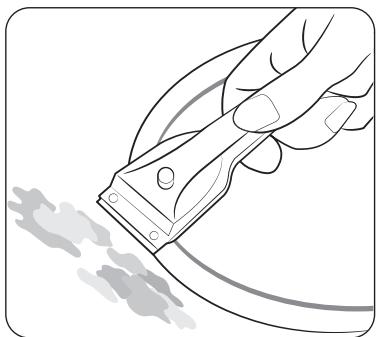
- To remove food that has boiled over and stubborn splashes, use a glass scraper.
- Place the glass scraper at an angle to the ceramic glass surface.
- Remove soiling by scraping with the blade.
NOTE
Glass scrapers and ceramic glass cleaners are available from specialty retailers.
Problem dirt
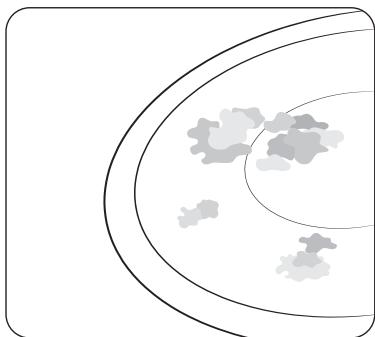
- Remove burnt-on sugar, melted plastic, aluminium foil or other materials with a glass scraper immediately and while still hot.
WARNING
There is a risk of burning yourself when the glass scraper is used on a hot cooking zone:
2. Clean the hob as normal when it has cooled down. If the cooking zone on which something has melted has been allowed to cool, warm it up again for cleaning.
NOTE
Scratches or dark blemishes on the ceramic glass surface, caused, for example, by a pan with sharp edges, cannot be removed. However, they do not impair the function of the hob.
Troubleshooting and service
Hob frame (option)
WARNING
Do not use vinegar, lemon juice or scale remover on the hob frame; otherwise dull blemishes will appear.
- Wipe the frame with a damp cloth.
- Moisten dried debris with a wet cloth. Wipe and rub dry.
To avoid damaging your appliance
- Do not use the hob as a work surface or for storage.
- Do not operate a cooking zone if there is no pan on the hob or if the pan is empty.
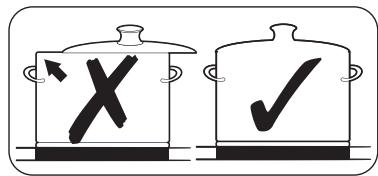
- Ceramic glass is very tough and resistant to temperature shock, but it is not unbreakable. It can be damaged by a particularly sharp or hard object dropping onto the hob.
- Do not place pans on the hob frame. Scratching and damage to the finish may occur.
- Avoid spilling acidic liquids, for example, vinegar, lemon juice and descaling agents, onto the hob frame, since such liquids can cause dull spots.
- If sugar or a preparation containing sugar comes into contact with a hot cooking zone and melts, it should be cleaned off immediately with a kitchen scraper while it is still hot. If allowed to cool, it may damage the surface when removed.
- Keep all items and materials that could melt, for example, plastics, aluminium foil and oven foils, away from the ceramic glass surface. If something of this nature melts onto the hob, it must be removed immediately with a scraper.
Troubleshooting
A fault may result from a minor information that you can correct yourself with the help of the following instructions. Do not attempt any further repairs if the following instructions do not help in each specific case.
WARNING
Repairs to the appliance are to be performed only by a qualified service technician. Improperly effected repairs may result in considerable risk to the user. If your appliance needs repair, please contact your customer service centre.
| Problem | Possible cause | Solution |
| What should I do if the cooking zones are not functioning? | ·The fuse in the house wiring is not intact. | ·If the fuses trip a number of times, call an authorised electrician. |
| What should I do if the cooking zones will not switch on? | ·The On/Off ① key was accidentally actuated. ·The control panel is partially covered by a damp cloth or liquid. | ·The appliance is properly switched on. ·Clean the control panel. |
| What should I do if the display except for H, H the residual heat indicator suddenly disappears? | ·The On/Off ① key was accidentally actuated. ·The control panel is partially covered by a damp cloth or liquid. | ·The appliance is properly switched on. ·Clean the control panel. |
| What should I do if, after the cooking zones have been switched off, residual heat is not indicated in the display | ·The cooking zone was only briefly used and therefore did not become hot enough. | ·If the cooking zone is hot, please call a local service centre. |
| Information code | Possible cause | Solution |
| CO | There is a problem with the burner temperature sensor. | Restart the appliance using the On/Off ① key. If the problem continues, disconnect power for more than 30 seconds. Then, restart the appliance and try again. If the problem still continues, contact a local service centre. |
| C1 | The temperature is sensed higher than specified. | |
| C2 | There is a problem with the PBA sensor. | |
| R2 | The DC Motor fails to operate because of problems with the PCB or wiring, or electrical disturbance on the motor blade. | |
| d0 | A key is being pressed for more than 8 seconds. | Check if the key is wet or is being pressed. If the problem continues, restart the appliance using the On/Off ① key. If the problem still continues, contact a local service centre. |
| F0 | Communications between main and sub PCBs fail. | Restart the appliance using the On/Off ① key. If the problem continues, disconnect power for more than 30 seconds. Then, restart the appliance. If the problem still continues, contact a local service centre. |
| F2 | The touch-enabled IC communicates abnormally. | |
| UP | It is out of normal voltage (220 ~ 240 V). | Check home power environment. |
| u | If the cooking container is not suitable for the induction, or operates without the cooking container, it is displayed. | Use a cooking container suitable for inductions. |
What should I do if the cooking zone will not switch on or off?
This could be due to one of the following possibilities:
- The control panel is partially covered by a damp cloth or liquid.
The child safety lock is on. and display L.
What should I do if the display is illuminated?
Check for the following:
- The control panel is partially covered by a damp cloth or liquid. To reset, press the On/Off ① key.
If liquid has overflowed on control panel, please wipe the liquid.
What should I do if the [ ] display is illuminated?
Check for the following:
The hob is overheated because of abnormal operation.
After hob is cooled down, press the On/Off ① key for resetting.
What should I do if the display is illuminated?
Check for the following:
Cookware is unsuitable, too small, or no cookware has been placed on the cooking zone.
If you use suitable cookware, displayed message will automatically disappear.
What should I do if the cooling fan runs after the hob is turned off?
Check for the following:
- When you have finished using the hob, the cooling fan runs by itself for cooling down.
After the hob's electronics has cooled down or elapsed max time (10 minutes) the cooling fan will be turned off. - If you request a service call because of an information made in operating the appliance, the visit from the customer service technician may incur a charge even during the warranty period.
Service
Before calling for assistance or service, please check the section "Troubleshooting". If you still need help, follow the instructions below.
Is it a technical fault?
If so, please contact your customer service centre.
Always prepare in advance for the discussion. This will ease the process of diagnosing the problem and also make it easier to decide if a customer service visit is necessary.
Please take note of the following information.
What form does the problem take?
Under what circumstances does the problem occur?
When calling, please know the model and serial number of your appliance. This information is provided on the rating plate as follows:
Model description
S/N code (15 digits)
We recommend that you record the information here for easy reference.
Model:
Serial number:
When do you incur costs even during the warranty period?
- If you could have remedied the problem yourself by applying one of the solutions provided in the section "Troubleshooting".
- If the customer service technician has to make several service calls because he was not provided with all of the relevant information before his visit and as a result, for example, has to make additional trips for parts. Preparing for your phone call as described above will save you the cost of these trips.
QUESTIONS OR COMMENTS?
| COUNTRY | CALL | OR VISIT US ONLINE AT |
| AUSTRIA | 0800 72 67 864 (0800-SAMSUNG) | www.samsung.com/at/support |
| BELGIUM | 02-201-24-18 | www.samsung.com/be/support(Dutch) www.samsung.com/be_fr/support(French) |
| DENMARK | 707 019 70 | www.samsung.com/dk/support |
| FINLAND | 030-6227 515 | www.samsung.com/fi/support |
| FRANCE | 01 48 63 00 00 | www.samsung.com/fr/support |
| GERMANY | 06196 77 555 77 | www.samsung.com/de/support |
| ITALIA | 800-SAMSUNG (800.7267864) | www.samsung.com/it/support |
| CYPRUS | 8009 4000 only from landline, toll free | www.samsung.com/gr/support |
| GREECE | 80111-SAMSUNG (80111 726 7864) only from land line (+30) 210 6897691 from mobile and land line | www.samsung.com/gr/support |
| LUXEMBURG | 261 03 710 | www.samsung.com/be_fr/support |
| NETHERLANDS | 088 90 90 100 | www.samsung.com/nl/support |
| NORWAY | 21629099 | www.samsung.com/no/support |
| PORTUGAL | 210 608 098 Chamada para a rede fixa nacional Dias úteis das 9h às 20h | www.samsung.com/pt/support |
| SPAIN | 91 175 00 15 | www.samsung.com/es/support |
| SWEDEN | 0771-400 300 | www.samsung.com/se/support |
| SWITZERLAND | 0800 726 786 | www.samsung.com/ch/support(German) www.samsung.com/ch_fr/support(French) |
| UK | 0333 000 0333 | www.samsung.com/uk/support |
| IRELAND (EIRE) | 0818 717100 | www.samsung.com/ie/support |
| COUNTRY | CALL | OR VISIT US ONLINE AT |
| ALBANIA | 045 620 202 | www.samsung.com/al/support |
| BOSNIA | 055 233 999 | www.samsung.com/ba/support |
| NORTH MACEDONIA | 023 207 777 | www.samsung.com/mk/support |
| BULGARIA | 0800 111 31 - Бразлатен за BCNUCKи оператори *3000 - Сени на[eин градский разковения等方面的 tariffs на мобiliansей оператор 09:00 до 18:00 - Понеделник до пétбk | www.samsung.com/bg/support |
| CROATIA | 072 726 786 | www.samsung.com/hr/support |
| CZECH | 800 - SAMSUNG (800-726786) | www.samsung.com/cz/support |
| HUNGARY | 0680SAMSUNG (0680-726-7864) | www.samsung.com/hu/support |
| MONTENEGRO | 020 405 888 | www.samsung.com/support |
| POLAND | 801-172-678* lub +48 22 607-93-33* (* opłata według taryfy operadora) | http://www.samsung.com/pl/ support/ |
| ROMANIA | 0800872678 - Apel Gratisit *8000 - Apel tarifat în rețea | www.samsung.com/ro/support |
| SERBIA | 011 321 6899 | www.samsung.com/rs/support |
| SLOVAKIA | 0800 - SAMSUNG (0800-726 786) | www.samsung.com/sk/support |
| LITHUANIA | 8-800-77777 | www.samsung.com/lt/support |
| LATVIA | 8000-7267 | www.samsung.com/lv/support |
| ESTONIA | 800-7267 | www.samsung.com/ee/support |
| SLOVENIA | 080 697 267 (brezplačna številka) | www.samsung.com/si/support |
| KOSOVO | 038 40 30 90 | www.samsung.com/support |
QUESTIONS OU COMMENTAIRES?
| PAYS | APPELEZ-NOUS | OU VISITEZ-NOUS EN LIGNE À |
| AUSTRIA | 0800 72 67 864 (0800-SAMSUNG) | www.samsung.com/at/support |
| BELGIUM | 02-201-24-18 | www.samsung.com/be/support (Dutch) www.samsung.com/be_fr/support (French) |
| DENMARK | 707 019 70 | www.samsung.com/dk/support |
| FINLAND | 030-6227 515 | www.samsung.com/fi/support |
| FRANCE | 01 48 63 00 00 | www.samsung.com/fr/support |
| GERMANY | 06196 77 555 77 | www.samsung.com/de/support |
| ITALIA | 800-SAMSUNG (800.7267864) | www.samsung.com/it/support |
| CYPRUS | 8009 4000 only from landline, toll free | www.samsung.com/gr/support |
| GREECE | 80111-SAMSUNG (80111 726 7864) only from land line (+30) 210 6897691 from mobile and land line | www.samsung.com/gr/support |
| LUXEMBURG | 261 03 710 | www.samsung.com/be_fr/support |
| NETHERLANDS | 088 90 90 100 | www.samsung.com/nl/support |
| NORWAY | 21629099 | www.samsung.com/no/support |
| PORTUGAL | 210 608 098 Chamada para a rede fixa nacional Dias úteis das 9h às 20h | www.samsung.com/pt/support |
| SPAIN | 91 175 00 15 | www.samsung.com/es/support |
| SWEDEN | 0771-400 300 | www.samsung.com/se/support |
| SWITZERLAND | 0800 726 786 | www.samsung.com/ch/support (German) www.samsung.com/ch_fr/support (French) |
| UK | 0333 000 0333 | www.samsung.com/uk/support |
| IRELAND (EIRE) | 0818 717100 | www.samsung.com/ie/support |
| PAYS | APPELEZ-NOUS | OU VISITEZ-NOUS EN LIGNE À |
| ALBANIA | 045 620 202 | www.samsung.com/al/support |
| BOSNIA | 055 233 999 | www.samsung.com/ba/support |
| NORTH MACEDONIA | 023 207 777 | www.samsung.com/mk/support |
| BULGARIA | 0800 111 31 - Бразлaten за вс neuropи оператори *3000 - Сени на[eин范围内ожд有必要马上объединения сpropeд тарфата на мбийнист оретатор 09:00 до 18:00 - Понеделник до пétбк | www.samsung.com/bg/support |
| CROATIA | 072 726 786 | www.samsung.com/hr/support |
| CZECH | 800 - SAMSUNG (800-726786) | www.samsung.com/cz/support |
| HUNGARY | 0680SAMSUNG (0680-726-7864) | www.samsung.com/hu/support |
| MONTENEGRO | 020 405 888 | www.samsung.com/support |
| POLAND | 801-172-678* lub +48 22 607-93-33* (opłata według taryfy operatora) | http://www.samsung.com/pl/ support/ |
| ROMANIA | 0800872678 - Apel Gratis ※8000 - Apel tarifat in retea | www.samsung.com/ro/support |
| SERBIA | 011 321 6899 | www.samsung.com/rs/support |
| SLOVAKIA | 0800 - SAMSUNG (0800-726 786) | www.samsung.com/sk/support |
| LITHUANIA | 8-800-77777 | www.samsung.com/lt/support |
| LATVIA | 8000-7267 | www.samsung.com/lv/support |
| ESTONIA | 800-7267 | www.samsung.com/ee/support |
| SLOVENIA | 080 697 267 (brezplačna številka) | www.samsung.com/si/support |
| KOSOVO | 038 40 30 90 | www.samsung.com/support |
Induktionskochfeld
Benutzerhandbuch
NZ64B6056 / NZ64B6058
NZ63B6056 / NZ63B6058
Inhalt
Temperatureregistering 14
Kogegrej 14
| Strømindstilling | Sluk |
| 1-3 | After 6 timer |
| 4-6 | After 5 timer |
| 7-9 | After 4 timer |
| 10-15 | After 1,5 timer |

BEMERK
Nume model 山 numar de series 3
U3noA3BaHe Ha moBa pkoBogcmBo 3
Bpko8ogcmBomo 3a nompe6umela ca u3no3BaHc cleghme cumBou: 3
ImeHaMogelaU cepueH Homep 3
Hcmpykuuu 3a6e3onacnocm 3
U3xBbPpAHe Ha onakoBchua Mamepua7
IpaBuaHOn u3xBpbLnHe Ha BaWua Cmap ypeg 7
IpaBuaHOn u3xBbPAnHe Ha npogykma
(Omnagbuz om ekempueecko u ekempoHno o6opy8aHe) 7
HcmaIupaHeHa nloyama 8
UHcmpykuu 3a 6e3onacnocm 3a UHcmaIupauoMo Auue 8
Heo6xogumu uhcmpymehmu 8
C8bp3BaHe kBm ealekmpueckomo 3axpaHBaHe 8
HcmaaupaneBnoma 9
Komnohehmu 11
Ipegu ga 3anouheme 11
3oHu 3a zomBene 11
Panae3aynpaBaeHue 12
IngykcuoHno 3aepBahe 13
3aumno u3kIoUBaHe 13
Ingukamop 3a ocmmbnu monluha 14
UcmaHoB8BaHeHa memnepamypama 14
TomBapcku cgo8e 14
U3noA3BaHe Ha ceH3OpHume 6ymoHu 18
Pabomnu wymoBe 18
IbPBoHaaHNo noUcsmBaHe 18
Pa6oma 18
BkIouBaHe na ypega 18
U3kIIOuBaHe na ypega 18
U36op Ha 30Ha 3a 20mBHe u HuBo Ha MouHocm 19
YBeIuHaBHe Ha MoUHocmma 20
I3no3BaHe ha 3oHaMa Flex (cAmO 3a MogeAu cbc 3oHa Flex) 20
30Ha Flex Plus (cama 3a mogeau cbc 30Ha Flex) 21
3ana3eme monu 22
Taumep 22
Pay3a/nogno8Bahe 22
Бьрзо сиранe 22
3akluoyBaHe 3a 3auuma Ha geua 23
Aumum 3a MakcumaHa Moohocm 23
BkIIOU8aHe/u3KIOU8aHe Ha 3Byka 24
Smart Connect 24
UnpaBAnueHaab6cop6amopa 25
IoggbpkaheHa ypega 25
Плоча за зомбени 25
Aeko 3ambpcBahe 25
Ynopumo 3ambpc8Bahe 26
Ipo6aemno 3ambpcBahe 26
PamkaHa nlochama (onzua) 27
3a ga u36e2heme no8pega Ha ypega 27
OmcpaHaBe Ha Heu3npaBHocmu u cepBu3upaHe 27
OmcpaH8BaHe Ha Heu3npaBHoCmu 27
O6cIyKBaHe 29
ИзnoλЗВане на моВа рьkoВogсмВо
Omgeleme 8peme ga npouememe moBa pkoBogcmBo ha co6cmBeHuka, kamo o6bpHeme oco6eNo BHumane Ha unHopMauzma 3a 6e3onacnocm, c6gpbkaa ca 8 clegBaua pa3geA, npegu ga u3noA3Bame ypega. 3ana3eme moBa pkoBogcmBo 3a 6bgeu cnpaBku.
Ako npegaBame npumekaHuemo Ha yega Ha gpy2, He 3a6paBmae ga npegageme pboKoBogcmBomo Ha HoBua co6cmBeHuk.
B pko8ogcm8omo 3a nompe6umeA ca u3noA3BaHu clegHume cumBoAU:
I PDEyIpyEKAEHNE
Onachocmu uu onach nu npakmuku, koumo mozam ga goBegam go mekku meAechu hapaHaBau uu cmbpm.
BHUMAHNE
Onachocmu uu onach nu npakmuku, koumo mozam ga goBegam go Aeku meAecHu hapaHaBau uuu noBpega Ha umyuuecmBo.
BHIMAHHE
3a ga haama ume pucka om noxap, ekcnlo3u, moko8 ygp uu hapaHBahe npu u3no3Bahe Ha nIoYama, clegBaume me3u ochoBnu npegna3Hu mepku.
3A6EAEKKA
Ioe3HcB8emu, npenopbku ulu unphiopmaue, koryo nomaza ha nompe6umeame gapa6omam c npogykma.
Ime Ha mogeLa u cepueH Homep
Imemo Ha mogeaa u cepuunhurn homep ca om6eJ3aHn ha emukem nog ochoBama naOyama.
3a no-hamambshna ynompe6a 3anuweme uHΦopmauzma uu npukpeneme gonbHumeA emukem Ha npogykma (pa3noLoKeH B zoPama qacm Ha npogykma) kBM mekyama cmpahuca.
ImeHaMoga
Cepueh Homep
Инсмрукцuu 3a 6e3onacHocm
Mepkume 3a 6e3onachocm Ha moBa ycmpoucmbo cbomBemcBam Ha Bcuju npemu cmangapmu 3a mexnuka u 6e3onachocm. Bbnpeku moBa, kamo npou3Bogumeu, Hue uy8cmBame kamo cBoe 3agbAkeHue ga Bu 3ano3Haem cbc clegHume uHcmpykuu 3a 6e3onachocm.
A INPEAUYPEXKAEHNE
To3u ypeg He en pegHa3haen 3a ynompe6a om Auza (BkauoumelHo geua) c hamaeHu cemBHu uAU yMcmBenu cnoc6Hocmu, c Hegocmambueh onum u no3hanu, ocBEN akO He ce Ha6IoogaBam UAU He ca um gagehu unHcmpykuu omHocHO ynompe6ama Ha ypega om Auue, om2oBopHo 3a mXhama 6e3onacHocm.
Deuama mpr6Ba ga 6bgam nog hag3Op, 3a ga ce zapaHmupa, ye Hma ga cu u2paam cypega.
To3u ypeg moke ga ce u3no3Ba om geua nag 8-2oguusha Bb3pacm u om Aua c hamaelenu fU3uuecku,cemBhu uU ymcBenu cnoc6nocmu, c Hegocmambueh onum u no3haun,ako ce ha6IogaBam uU ca um gagenu uncmpykuu 3a ynompe6ama na ypega no 6e3onaceH naun u me pa3upam onacnocmume. Deuama He 6uBa ga cu u2paarm cyega. POnucmbaHemo u nogpbkkama om nompe6umela He mpr6Ba ga ce u3BbPwBam om geua 6e3 nag3op. PpekbAhemo Ha Bp3kama mpr6Ba ga 6bge BzpageboB8 ukcupahomo oka6eBAhe cnopeg npaBulama 3a okabEBAhe.
Инсмрукцu 3a 6e3onacnocm
IpekbcBaanmo Ha Bpb3kama Ha ypega mpr6Ba ga e Bb3Moxkno cleg moHmack. ToBa moKe ga ce nocmu2He, kamo ocuzypume gocmbn go uencea unu B2pagume npekbC8auchn npaBulama 3a oka6eBbAhe.
Ako 3axpaHBauzum ka6e en noBpegen, mou mpr6Ba ga 6bge 3aMeHen om npou3BogumeI, he2oB cepBu3en npegcmaBumeI uIu Iuue cbc cxogHa kBaIuΦukaIua, 3a ga ce u36e2He onacHocm. Iocouhenm Memog Ha φukcupaHe He mpr6Ba ga 3aBucu om Ienula, mbu kamo me He ce cyumam 3a HageXgHu Naunu 3a φukcupaHe.
ПЕДУПЕЖDEHNE: Ako noBbpxHocmma e HanykaHa, u3kIouceme ypega, 3a ga u36e2Heme onacHocmma om moko8 ygap.
Ypegbme haojaBa no BpeMe ha pa6oma. Tp6Ba ga ce u362Ba gokocBaHemo Ha haopeBamehume elemehmu BbB
BbmpewHoemmaHa nIoouama.
ПЕДУПЕЖДEHNE: Omkpumume уacmu може ga ce haagsem no BpeMe Ha pa6oma. ПаЗeme Maʌkume geua hacmpaHu.
He mpr6Ba ga ce u3no3Ba napocmpyuka.
MemaHume npegmemu kamo hokOBe, BuliUci, IbJkuU u kanaU He mpr6Ba ga ce nocmaBam Bbpxy nIoUama, 3aUomo moKe ga ce Ha2opeuIm.
Cleg u3noA3BaHe u3kIoUcHeme nIoUama u He pa3Umaume Ha gemekmopa 3a mu2aHu.
Eeekmpoypegbm He enpegha3haueh ga pa6omu nocpegcmBom BbHneH maUmep uU omgeHa cucmema 3a gucmaHuoHno ynpaBHeHue.
BHNMAHNE:Пюесьм на зомБен mpЯ6Ba ga 6bge Ha6IoGaBaH. Kpamkume npouecu на зомБeнmpЯ6Ba ga ce Ha6IoGaBam nocmoryHNo.
Ype8b m He mpr6Ba ga ce moHmupa 3ag gekopamuBnu Bpamu, 3a ga ce u36e2He npe2p8BaHe.
ПЕДУПЕЖDEHNE:У pegьm u omkpumume уacmu мozam ga ce hazpeям no Брeme на pa6oma.Tpr6Ba ga ce BnMaBa ga ce u36a2Ba gonupb m go hazpeBameLhume eLemEnmu. Deua, koumo ca noMaAku om 8 2ogUnu,mp6Ba ga He ce go6LuXkaBam go fypHama, ocBen akO He ca Na6luogaBanu HenpeKbchamo.
ПЕДУПЕЖDEHNE: zomБенemo 6e3 nag30р Бьрух nLOua c Ma3HuHa uU oUo може ga e onacHo u ga goBege go noxkap.
HINKOTA He ce onumBaume ga zacume o2bH c Boga, a u3kIoueme yega u nocLe nokpuime nnambka c kanak uu noxkapHo ogeraIo.
ПЕДУПЕЖDEHNE: Onachocm om noжар: He cxbpaньаum npegmemu Bbpxy noBbpxhocmume 3a 2omBehe.
IPEyIPEKDEHNE: 3no3Baume camo npegna3umeu 3a
zomBapcu nloyu, koumo ca pa3pa6omehu om npou3BoogumeA
Ha kyxHeNcku ypeg ulu nocoueHu kamo nogxogruo om
npou3BoogumeA ha ypega 8 uncmpykuzume 3a ynomp6a, ulu
maku8a, koumo ca B2pagenu. I3no3BaHemo Ha Henogxogruo
npegna3umeu moke ga goBege go 3Anonoyku.
Iobbpxhocmme moke ga ce ha2opezma n0 Bpeme Ha u3noA3BaHe. To3u ype9 moke ga ce u3noA3Ba om geua hag 8-2oguusha B63pacm U om Aua c hamaenu fU3uecku,cemBnu Uau ymcBenu cnoc6hocmu, c heqcmambuen onum u no3hanu,ako ce H6IoogaBam uu ca um gagehu uncmpykuu 3a ynompe6ama Ha ypega no 6e3onaceH aunu me pa36upam onacnocmume. Deuama He 6uBa ga cu u2paarm cyega. POnucmbahemo u noggpbkkama om nompe6umeIe He mpr6Ba ga ce u3BbpuBam om geua, ocBeH akO He ca Ha B63pacm hag 8 2oguHu ca H6IoogaBau.
Apbjkmye ypega u 3axpaHBauzma my ka6eI galeu om geua, no-MaIku om 82oguHu.
BHIMAHNE
Iopuxkeme ce ypegbm ga 6bge npaBuaHOn uHcmaUpaH u 3a3emohom kBaAuphiuaPamexnuk.
Upeb mmp6Ba ga ce 06cIyKBa mexHuecku cmo om kBaIuΦuupan cepBuzen nepcoHa. Pemohmume, u3Bpweu om HekBaIuΦuupanxopa, mozam ga npuunHm hapaHaBahe uu cepuo3Ha Heu3npaBnocm. Ako ypeb m Bu mpr6Ba ga 6bge peMoHmuapan, ce cBpxkeme C mecHnra cepBu3eH ueHmbp. Hecna3BaHemo Ha me3u unHcmpykuu moKe ga goBege go no8pega ug aHyUpa zapauca.
Upegume 3a BapaKgaHe moZam ga ce u3noA3Bam camo cleg kamo ca Mohmupanu B ukafoBe u pa6omHu nIomOBe, koumo om2oBapm Ha cboMBeHume cmaHgapmu. ToBa ocuzypBa gocmambyna 3auuma cpeuy konmakm c ealekmpuecku ypegu, kakBomo e u3uckBaHemo Ha npuLoKumme cmaHgapmu 3a 6e3onacnocm. Ako ypegbM Bu e Heu3npaBEn uu ce no8Bm cynBaHua, HanykBaHua uu NaenBaHua:
uzkIouyeme Bcuku 30nU 3a 2omBene;
- u3kʌlʊeme nʌoma om eʌlekmpo3axpaHBaHemo u
ce cBpKeme c mecmnue cepBuzen eHmbp.
Ako nIoouama ce Hanyka, u3kIoUcHeme ypega, 3a ga u36e2Heme onacHocmma om moko8 ygap. He u3no3Baume nIoUaMA, gokamo cMbKLeHama noBbpxHocm He 6bge cMeHeHa.
Инсмрукцuu 3a 6e3onacnocm
He u3noλ3Baǔme nλoγama 3a hαρβBaHe ha aλymuHueBo φολuo, npogykmu, yBμmU B aλymuHueBO φολuo, uλu 3ampa3eHu xpaHu, onakoBaHu B aλymuHueBu cβgoBe.
TeuHocm MeKggy gBHomO Ha cBga u nIoYama MoKe ga cB3gage napHo hAraZaHe.ToBa moKe ga hakapa cBga ga nogckoU.
Bunazu ce yBepaBame, ye nloyama u ocnoBama ha c6ga ca cyxu. 3Onume 3a 2omBehe ce haopeuBam, kozamo 2omBume.
Bunazu nazeme maikume gea galey om yega.
Ia3eme Bcuku onakoBbnu MamepuaU u3BbN o6ce2a ha geua, mbu kamo onakoBbnuhme mamepuaU moke ga ca onacHu 3a geua.
To3u ypeg mpr6Ba ga ce u3noA3Ba camo 3a HopmaHNO 2omBeHe u nbpjkehe B gomaun ycAoBua. Tou he npegHa3nueh 3a mbp2oBcka uu npomuUeHa ynompe6a.
Hukozha He u3no3Baume nIoUama 3a omonIeHue Ha nomeenuemo. BnmaBaumepnu BkIouBaHe Ha eIekmpoypegu B koHmakmu B 6u3ocm go nIoUama. MpekoBume ka6eLu He mpr6Ba ga ce gonupam go nIoUama.
Ipezprama Ma3nHa u oAuo Mozam ga ce 3anaAam 6bp30. Hukoza He ocmaBraume ypegume 6e3 hag3op, kozamo npuzomBame xpaHu B Ma3nHa uA uOuo, kamo Hanp. npu npuzomBane Ha unc.
Cleg ynompe6a u3kAIOUBaIme 30Hume 3a 20mBeHe.
Bunazu nazeme nahela 3a ynpaBleHue yucm u cyx.
He nocmaBjaume 3anaAumu npegmemu Bbypxy nIoayama, 3auomo.
moke ga npegu3Bukam noxap.
Cbuecm8yBa onachocm om u32apnru om ypega, akc ce u3noa3Ba HenpegnazuBo.
Ka6eIume ha eIekmpuuecku ypegu He mpr6Ba ga gokocBam 2opeuzama noBbpxHocm Ha nIoUa ma uu Ha2opeuenceHu c6goBe.
He u3no3Baume nIooyama 3a cywehe Ha gpexu.
Pompe6umeu c neucmeukbpu u akmuBnu cbpgeHu umnlaHmu mpr6Ba ga noggbpkam muHmalaHo pa3cmoHue om 30 cm om unhykquohume 3oHu 3a 2omBene, kozamo ca Bkluoyehu. Ako ce koale6aeme, ce cBbpkeme c npou3BogumeHa ycmpoUcBomo uu Baushra lekap. (Camo 3a Mogela c unhykquoHna nloa)
He ce onumBaume ga pemohmupame, pa32Io6Bame uu u3meHame ypega camu.
Bunau u3kauBaume ypega npegu noucmbane.
Pouucmbaume nIooyama B cboBemcBue c uncmpykuume 3a noucmbahe u 2puku, Bkauene H hacmouo o pkoBogcmBo.
Apbjme gomauhume An6umu Hagaue om ypega, mbu kamo moke ga cmbnam Bbpxy elemehmume 3a ynpaBHeue Ha ypega u ga npuunm Heu3npa8Hocm.
N3xBbPnHe Ha onakoBcHnMaMamepua
I PDEAUYPEXAEHNE
Bcuku Mamepua, u3no3BaHu 3a onakoBaHe ha yega, ca HanbHpo peukLupyemu.
UacmoBume yacmu u yacmume om mBbpga nHa ca mapkupaHn no cbomBemnua HauH.
13xBpIyme onakoBchume MamepuaU cmapume ypegu, kamo hagAekHo cna3Bame
Mepkume 3a 6e3onachocm u okoLambda cpega.
PpAbuHou 3x6bpaHe Ha BaWua cmap ypeg
I PDEAUYPEXAEHNE
Ipegu ga u3x8bPmme cmapu cu ypeg, zo HanpaBeme hezogen 3a ynompe6a, makae ga He moke ga 6bge u3mouHuk Ha onacHocm. 3a ga HanpaBume moBa, mpr6Ba kBaUfUpuAn mexHuk ga u3kLIOUypega om MpekoBomo 3axpaHBeHe u ga omcmpaHUmpekoBua ka6eA.
Ypegbm He moke ga ce u3xBbpyc 6umoBume omnagbu.
Информача за gamume за сбupaанe u nyбluчиmaунknmoBe за npegaBahe ha omnagbuz mojkeme ga noIyumoe om MecmHa mca cayk6a no omnagbuzme ulu om obuzhama.
PpaBuaHo u3x8bPaIHe ha npogykma (Omnagbu om eAlekmpuuecko u eAlekmpoHNo 06opygBahe)

(npuokumbo 8bpxkaBcu cuscmemu 3pa43geAhoC6bupahe) Ta3u Mapkupo8ka Bpxy npogykma, akcecoapu uuu neamhu Mamepuauo 03nauaBa, ye npogykmbu u HezoBu eekmpueecku akcecoapu (hanp. 3aprgno, CyaWAMku, USB ka6eA) Hmpe6Ba ga ce u3x8bpIamc 6muBu omnagbu ha kpar Ha ekcnloamaunHuaXuBom. 3a npegomBpamBahe Ha eBemmyAuHu yBpeKgaHe Ha npupogama uuOBeuskomo 3gpaBe om HekoHpmuPAno u3x8bpIaHe Ha omnagbu omgeAumeme3u eAEMehmu om gpyume munoBe omnagbu u zu peukLupaMe om2oBopHo, 3a ga nognomoHeme ycmoUbomo noBmOpNo u3no3BaHe Ha mapeuaAume.
Hempbz08ckume mpr6Ba ga ce cBpxkam cmb20Beca Ha gpe6Ho, om kozomo ca 3akynu npogykma, uU Mecmhune op2aHu 3a nogpo6Ha unΦopMaucu kbg e u kak Moke ga omhecam me3u npegmemu 3a npupogoc6o6pa3Ho peuzukLupahe.
Tb20Bckume nompe6umelmp68a ga ce cBbpxam c gocmaBuka cu u ga npoBepn npaBuama u ycAoBuma Ha go20Bopa 3a nokyna.To3u npogyk m u hezoBume eEekmpOnHu akcecoapu He mp68a ga ce cmecBam c gpyu mTb20Bcu omnagbu 3a u3xBbpAHe.
3a unφopmaúŋ ommocno 2ρuχkume Ha Samsung 3a okolhama cpega u cneuφuHume 3a npogykma hopmamubhu 3agbλkeuŋ, Hanp. REACH, nocememe agpec: https:// www.samsung.com/uk/sustainability/environment/
I PEPaYnPExKAEHNE
Iopuzkeme ce hoBum ypeg ga 6bge uHcmaunpaH u 3a3emeh cmo om kBaunuupua npepcoHa.
Cna3Baume ma3u uncmpykuqura. Tapauncauma He nokpuBa hukak8u noBpegu, koumo Mozam ga Bb3hukham 8 pe3yam Ha HenpaBuaHo uHcmaUupaHe.
Texhueckume gahnu ca gagenu 8 kpa ha moBa pbkoBogcm8o.
Hcmpykuuu 3a 6e3onacHocm 3a uHcmaLupaaoMo Auce
B eIekmuueckama uHcmaauaqma mpa6Ba ga uma ycmpoucmbo, koemo no3Boa8a Ha ypega ga 6bge u3kauoyen om eIekmuueckama mpeka c Bcuuku nouocu npu upuHa ha konmakmua omBop om hau-malko 3 MM. Pogxoguzume u0lauoohnu ycmpoucmba 6kauyam 3auumen npekbcbay, npegna3umeu (npegna3umeu me om 6unmoB mun mpa6Ba ga ce u3Bagam om facohkama), npekbcau 3a ymeuka Ha 3a3emraBaHemo u konmakmopu.
- Ito omnohenue ha npomuBonoXkapHama 6e3onacHocm mo3u ypeg om2oBapra Ha EN 60335-2-6. To3u mun ypeg moKe ga ce uHcmaUupa go Bucok 6iofem uu cmeha om egHama cmpaHa.
- Искmaцано мряб8а ga заранмupa зацima om eλe KMчесku ygapu.
Kyxhenckuam wkaf, 8 koMu ce uHcmaUpa ypegbm,mpa6Ba ga om2oBapra ha u3uckBaHuaMa 3a cma6uHocm Ha DIN 68930.
3a 3auma om 8la2a 8cuuku u3pr3anu noBbpxhocmu mpr6Ba ga 6bgam 3aneyamahu c nogxogau ynmbhume.
- Ppu 06luo8aHu c nlochku pa6omhu no8bpxhocmu fyuume 8 zohama, kbgemo e pa3nooKeHa nloyama 3a zomBene, mpr6Ba ga 6bgam hantbHno 3anbHeHu c fyuupaa Cmec.
- Ppu nIomOBe om ecmecmBEn uu u3kycmBEn kambk uuu om kepaMuka mpr6Ba ga ce nocma8am npykuHnume ck6u, 3aIeneHu c nogxogra u3kycmBeHa cMoLa uuu cmecen agxe3u8.
- Iozpujkeme ce ynmbmheuemo ga e nocmaBeno npaBuaHo kbm pa6omhama noBbpxHocm, 6e3 npolyku. He mpr6Ba ga ce go6aBgo nbaHumeen cuukoho8 ynmbhmue; moBa 6u HanpaBauO CBAaHemo no-mpyHo npu hyxga om cepBu3.
- Ppu c8BaIHe nIooYama mpr6Ba ga ce hamuche NaBbH om goIhama yacm.
- Pog nIoayama moKe ga ce uHcmaUpa nIoM.
- BeHmuaaOnHHn m omBop mKg yopHama u npegHama uacm Ha ypega nog Hezo He 6uBa ga ce nokpuBa.
Heo6xogumu uhcmpymehmu
MoU8
Kpbcmama omBepmka
UHuaWaa6oHa HuaHuuka

Ppegn3Hu ouula
Ca6AnmpuoH
Apekka
C8bP3BaHe kM eIekmpuueckomo 3axpaHBaHe
Ppegu cBp3BaHe npoBepeme gaU homuHaHomoHanpeKeHue Ha ypega, m.e. HanpeKeHEuMo, nocOeHo Ha fupMeHama ma6eKa, om2oBapr Ha haAunHomo 3axpaHBaIo HanpeKeHue. OupMeHama ma6eKa ce HAmupa Bbpxy goAnHua kopnyc Ha nloaHa.
I PDEyIpyEKAEHNE
Изкалуеме зхаразовим кьм Верuzama, npegu ga сьвржеме кбеламе Кьм Верuzama. Hanpeхенемо на HaaspeВamelma elememme AC 230 V~. Ypegmbсьpo pa6omu nepfekmnoсmpexu c Hanpexehue AC 220 V~ uAU AC 240 V~.ПLOUAMA mpr6Ba ga ce cBbpxeКьмЗхраразовим, kamo ce u3no38a ycmpooucMBo, no3BovlaBoNo ha ypega ga ce omgeЯ om 3axpaHavem oM BcuKu noAUCu C wupuna ha konhmakma om nohe 3 MM, kamo hap. aBmomamuen 3auumen npekbC8a, npekbC8a Na Bepuzama 3a ymeyka Na 3emra um npegna3umeA.
I PDEaYIPEKdEHNE
Ka6eIhume c8bpr3BauHmpe6Ba gaceu3Bpwham 8cbomBemcmBue c pa3nopeg6ume u BunmoBemeHa kIeMume gacezamezham go6pe.
I PEPaYI PEPXAEHNE
Cleg kamo nloyama e cBbpr3aHa kBm eekmp03axpaHbHemO, npoBepeme gau BcuKu 30nU ca zomobu 3a u3no3BaHe, kamo 3a kpmko Bkluhume noclegoBameHObka 30Ha ha MakcumaHa cmene h c noceMaBeH nogxogra Cbg.
I PDEyIpyEKAEHNE
Cna3Baume (cbomBemcmbuemo) Ha 4a3ama u Hyaama Ha cBb3BaHemo Ha ypega kBm gomaunama mpeka (cxemu 3a cBb3BaHe); B npomuBeH cIyauk oMnoHeHMume moke ga ce no8pegam.
TapaHuaMa He nokpuBa no8pegu, B3hukHaU om HenpaBuaen MoHmaK.
I PDEyI PEXKAEHNE
Ako 3axpaHbauqam ka6e eno8pegen, moMmp6Ba ga 6bge 3aMehen om npou3Bogume, He20 cepBuzen npegcmabumeu uuuuue cbcxogHa kBaUufukaua, 3a ga ce u36eane onachocm.
1N~ (32 A)
HngykuzoHNo 3a2p8aHe
A.ИngykuzoHna606uHa
B. IHHgyuupaH mok
C. EλekmρονHu Bepuzu
- Ppunuzn ha ungykuoHnmo 3a2p8Bahe: kozamo nocmaBume zomBapckuca6g Bbpxy 3ohama 3a zomBeHe u y 6kIoucme, elekmpoHnme Bepu2u B ungykuoHnama nloya npou3BeXqgam ,UngyucpaHmok" 8 gohama qacm Ha c6ga, koemo He3a6aBho noBuaaBa memnpamypama.
- По-Вucoka ckopocm npu 20mBene u nþpxehe: mþu kamo ce 3a2p8Ba gupekmno nλoγama, a He cmbkλomo, eφukacnocmmæ e no-20λma om ma3u Ha gpyu cuscmemu, 3aωomo hma 3a2y6a Ha monμu. Μουм uλama a6cop6upaHa eHepzua ce mpaHcΦopMupa B monμuHa.
3aumho u3kA04BaHe
Ako egha om 3oHume 3a zomBehe He e u3kAnuyeHa uu Hacmpoukama 3a Hu8o Ha MoUHocm He e npomeHeHa cAg gBb2 nepuog om BpeMe, ma3u koHkpemHa 30Ha 3a zomBehe ue ce u3kAnu aBmomamuHno.
30hme 3a zomBehe ce u3kAIOBam camu cAeg cAegHme nepuogu om 8peMe.
N3noa3BaHe Ha 3oHama Flex (cAmo 3a Mogeau cbc 3oHa Flex)
Функцуma Flex може ga уnpa6ьа вьама вьа 30на 3a 20мБе 3a u3no3ВаHe Ha 2oAmu 2omBapcku CBgoBe (Hanpumep: oBaMu 20mBapcku CBgoBe).
- Hamucheme 6ymoHa 3a 30Hama Flex
- 3a ga hacmpoume u pezynpame HuBomo Ha Mauhocm, u3noa3Baume 6ymoHa Power level (HuBo Ha Mauhocm).

3A6EAXKKA
- Hamucheme 6ymoHa 3a 30Hama Flex no BpeMe Ha pa6oma, fynkuqma Ha 30Hama Flex ue 6bge u3kauheHa.
Ako hamucheme 6ymoHa 3a 3ohama Flex , gokamo Bceku komIoH pa6omu Ha pa3auHo HuBo, komIoHbM ue 6ge 3agagen Ha BucoKo HuBo.
30Ha Flex Plus (camo 3a Mogeu c6c 30Ha Flex)
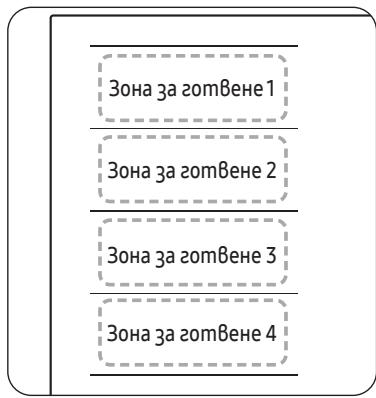
3oHama Flex e 20aMa 30Ha 3a 20mBeHe omABo Ha nOuAma 3a 20mBeHe (BuXme fUzypama BBo), kOmo e cneuaAHO npegHa3HaueHa ga no6upa HraKOAnko CbGa c pa3AuHa 20eMuHa U φOpMa egoBpeMeHHo. 3oHama Flex uma Yemupu 3Onu, kouMo ce hazp8am om omgeAhu unHykmopu, koemo Bu no3oAba Ga 20mBume, He3aBucumo om moBa kge e nocmaBeh Cgbm Bbpxy 3oHama 3a 20mBeHe.
CbC 3oHama Flex Plus Mojkeme ga u3no3Bame kom6uHaZou om pa3AuHu 3oHu 3a 2oMBeHe, 3a ga y8eUuUme 3oHama 3a 2oMBeHe. Hamuche 6ymoHa 3a 3oHama Flex , 3a ga u3no3Bame 3oHama 3a 2oMBeHe, kakmo cAegBa.
| 3ona 3a 2omBehe1 | 3ona 3a 2omBehe1 | 3ona 3a 2omBehe1 | 3ona 3a 2omBehe1 |
| 3ona 3a 2omBehe2 | 3ona 3a 2omBehe2 | 3ona 3a 2omBehe2 | 3ona 3a 2omBehe2 |
| 3ona 3a 2omBehe3 | 3ona 3a 2omBehe3 | 3ona 3a 2omBehe3 | 3ona 3a 2omBehe3 |
| 3ona 3a 2omBehe4 | 3ona 3a 2omBehe4 | 3ona 3a 2omBehe4 | 3ona 3a 2omBehe4 |

3A6EΛΕΚKA
Kozamo u3noλ3Bame camo egha 30Ha 3a 2omBHe, guamemþbM ha gþHomo Ha cbga mpr6Ba ga e no-maBk om14 cm.
- Mozam ga u3munam 5 - 10 cekyngu, npegu nloyama 3a zomBene ga pa3no3hae no3uquma ha cbga.
- Ppu pa3no3HaBaHemo Ha cbga moke ga ce ueym 3Byu.
He omcmpaHBaUme zomBapckuca8n no 8peMe ha zomBehe. Om cbo6paKeHua 3a 6e3onacNoCm nloyama 3a zomBehe aBmomamuHcnpa,ako zomBapckuam c8g e 6u npemaxham 3a no8eue om 5 cekHygu.
№3BaHe Ha 30Ha Flex Plus (cAmo 3a Mogeu CbC 30Ha Flex)
- Hamucheme 6ymoHa 3a 3ohama Flex
- 3a ga hacmpoume u pezyuapame HuBomo Ha Moushocm, u3noA3Baume 6ymoHa Power level (HuBo Ha Moushocm).

3A6EΛΕΚΚΑ
Ako Hamucheme 6ymoHa 3a 3ohama Flex no BpeMe Ha pa6oma, yHKuMa Ha 3ohama Flex ue ce u3kAnu.
Ako hamucheme 6ymoHa 3a 3ohama Flex , gokamo Bcka 30ha 3a zomBene pa6omu Ha pa3luHn Hu8o, mraBmamamuHNo ue 6bge hacmpoeHa ha no-Bucoko Hu8o.
Kozamo npemecmBame uu go6aBame cbgoBe kbm HoBa 30ha Flex, omMehememekyuama onepauu u gokoche mcbemnue 6ymo30ha 3a zomBeHe , 3a gaakmuBupame 3ohama.
3ana3ememon
- Μιναλβαμεme mατυφύγα, 3a gα nogθβρκαme zomΒεhama xραha monλa.
Hamucheme cβοΜενΗγδγούmη Κοῦ ὅτα Αγα Μανβενό - Hamucheme 6ymoHa 3ana3eme monAu
- Ducnnaem Ha 3oHama 3a 2omBene ue ce npomehu.
- Hamucheme omho8o 6ymoHa 3ana3eme monlu 山 3a ga u3kIoume 3ohama 3a zom8ene.
Taumep
N3no3BaHe ha maumepa kamo 3auumno u3kA4Bae
Ako e 3agageho onpegeleho 8peme 3a gageha 30ha 3a 2omBene, mue ce u3kluoyu, cleg kamo mo3u nepuog om 8peme u3mee. Ta3u fynkua moke ga 6bge u3noa3BaHa 3a MHO2o 3OHu 3a 2omBehe egHo8pemehno.
HacmpouBahe ha maumepa
30hume 3a zomBene, 3a koumo uckame ga npuOxkume 3auumno u3kAnu8ahe,mp6Ba ga 6bgam 8kAnuoyenu.
- Hamucheme 6ymoHa Taumep 日
- Hacmpoume maumepa c MHOzOKpamHo Hamuckane Ha 6ymoHa Taumep 已
- 3a ommaHa ha hacmpoukume Ha maumepa 3agpbkme 6ymoHa Taumep 已 3a 3 cekyhgu.

3AbeEeKKA
3a ga npomehume hacmpoukume no-6b3o,Hamucheme u 3agpbxkme 6ymoha Taumep 口 go gocmu2ane ha keaHama cmouHocm.
Kozamo maumpuku, mou u3gaBa 38ykoB cu2haN hko ko nmu. Bnpeku moBa 30hama 3a 2omBehe Hma ga 6bge u3kUOeHa.
Pay3a/nogHo8BaHe
Функцуma Пay3a/nogноьаhe egноьремно npe8kλιчьа 8cuuku 8kλιουчenu 30hu 3a 2om8ehe Na hacmpouka c no-hucka мошнocm u nocle opbamno Ha 3agagenomo npegu mo8a HuBo Ha mошнocm. Ta3u Функцу моcke ga ce u3noλ3Ba 3a kpmko npekbcBahe u nogноьаhe Na npoцca Ha 2om8ehe, Hanpumep 3a 8guzahe Ha meλefoha.
Ppu akmuBupahe Ha fynkuzma Puy3a/nogho8Bahe Bcuku 6ymoHc u3kloueHue Ha Puy3a u 3akluO8BaHe II BkluO8BaHc/N3kluO8BaHe ①ca geakmuBupaH.
3a ga noghoBume zomBeHemo,Hamucheme omHoBo 6ymoHa Puy3a u 3akAnuBaHe II (see).
| Панел 3a урараБavenе | Дucлел' | |
| За 8КлочВанe | Hamuscheme 6у мona Пay3a u 3akлочВанe II (5sec) | II |
| За 9КлочВанe | Hamuscheme 6у мona Пay3a u 3akлочВанe II (5sec) | Врьшале къ м пregушно нubо на моцун检м |
Бьрзспразнe
Ta3u onuur hamaBb Bpememo 3a cnupahe Ha zomBehemo.
3a u3kIIOU4BaHe Ha 30Ha 3a 20mBeHe Hamucheme 6ymoHa 30Ha 3a 20mBeHe 3a 2 cekyHgu.

3A6EΛΕΚKA
Kombineeritav keeduala+
(üksnes mudelitele, millel on funktsoon Kombineeritav keeduala+) 21
Soojas hoidmine 22
Taimer 22
Peatamine/jatkamine 22
Kiirseiskamine 22
Lapselukk 23
Maksimumvoimsuse piirang 23
Heli sisse-/valjalulitamine 24
Nutikasuhendamine 24
https://www.samsung.com/uk/sustainability/environment/

OPOZORILO
https://www.samsung.com/uk/sustainability/environment/
A VINI RE
Sigurohuni qè pajisja e re tè jegè instaluar dhe tokëzuar vetem nga personel i kualifikuár. Ju lutemi, ndiqeni kète udhézim. Garancia nuk do tè mbulojë asnjè demtim tè rende qè mund tè shkaktohet si rrjedhoje e instalimit jo né ményren e duhur. Né fund tè kétij manuali jegen tè dhénat teknike.
Udhezimet e sigurise per instaluesin
CaIOBn 3a roTbeHe 14
YnoTpe6aHaKoPunHbataHaDOpnp 18
3Byu np pa6oTeheTo 18
Почетно чостеbe 18
Pa6ota 18
BknyBaHbHa ypeDoT 18
IcknyuBaHbeHa ype,doT 18
I36npaHbHe Ha 30Ha 3a roTbeHbE HNBo Ha MOKHOCT 19
Makc.3acnlyBahe 20
KopncTeHe Ha Flex 30Hata (Camo 3a moJeIte uTo ce npImeHyBaat co Flex 30Ha) 20
Flex 30ha nlyc (Camo 3a moJeIte ITO ce npImeHyBaAT co Flex 30ha nlyc) 21
OdpkyyBaHbToTnlo 22
Tajmep 22
Pay3a/Прдолжуbahe 22
Брзо залиралье 22
БeЗб endocha 6paBa 3a Deua 23
OrpaHnUyBaHeHaMaKcImaJIHaTaMoKHOCT 23
BknyBaHe/ncKnyBaHe 3Byk 24
Smart Connect 24
KoHTpOlaHaacnnpaTopoT 25
OdpkByBaHbeHa ypeDoT 25
Плоча за ratbehe 25
JIecHa HeuNCTOTnJa 25
Tbprdkopna HeuicToTnja 26
ПюбLEMатина Heuchstotnija 26
PamkaHaIIOUaTa3a roTbeHe (Ouju) 27
3a da ce n36eHne oWTeYBaHbe Ha ypeIOT 27
PeuabaBe npo6JIemn cepBnc 27
Peuabahe npo6nem 27
CepBic 29
KopncTe№Ha OBa yNaTCTBO
IpeKopncTeHeHa ypeoT,OboJTe BpeMe Da ro npouHTaTe OBA ynatCTBO 3a conCTBeHnKOT,OBpHyBaJknOC6eHoB BHMaHne Ha 6e36eHocnTe INΦOpMaun CoDPKaHN BO CneHnOt JeL. CyBaJte Ro OBA ynatCTBO 3a nHa ynotpe6a.
Ako ja npenehecybaTe conctbeHocTa Ha ypeIOT, He 3a6opabajTe da ro npedeJaTe ynaTCTBOTo Ha HOBnOT cOnCTBeHnK.
Bo Oba ynataCTBO 3a ynoTpe6a ce KopncTa T cIeHNBe Cm60JN:
I PDEyIpyBAHbE
Опаснои Иебe3бeДи пактуки ШTO може за peЗуNTираAT со Teшka Teleche NaOBpeDA nII n CMPT.
BHUMAHINE
Опаснои НебеЗдни практуки Што може за рezулtnupaаТ сюmonа телесна пова илштета на ИМOTOT.
BHIMAHINE
3a da ce haMaJIn pI3NkoT oJ IOxap, ekCIIIO3NJa, cTpyeH ydAp IINI TELeCSHa NOBpeJa npi KopInCTeHe Ha IIIOUaTa 3a rOToBeHe, cIeJeTe rN OBne OCHOBHn 6e36eHNOCHN MepKn Ha npETNa3JIINBOCT.
HANIOMEHA
Kopncn coBertn, npenopakn nnnn HOpMaun mTo nM nomaraat Ha Kopncnnte da MaHnynpaat cO npOn3BdoT.
ImeHaMoJeNoTn cepncKb6pOj
I MeTo Ha MoJeIot I cepncknot 6poJ ce O3NaYeHn PoI OCHoBaTa Ha IIIOuHa 3a rOToBeHe.
3a noounehka yontpe6a, 3aanweTe rHnHOpMaunite nIi 3aneneTe ja donolnHteHaTa eteketa na npoun3bODoT (ce haofo B0 ropnHnot deI od npoun3bODoT) Ha TeKOBHata cTpaHnla.
ImeHaMoDJIeNOT
Cepnck6poj
БeЗб endocn ynpaTCTBa
6e36eHochnTe acneKtn Ha OoJ ypeI ce Bo cornaCHoCT co CITE npiΦaTeHN texHnUKN 6e36eHochn CTahdapn. Cenak, kako npou3BoDInTeN, Hne IcTo Taka cMeTame Deka e Haawa oJroBOPHOCT Da Be 3aNo3HaemE co CNeHnTE 6e36eHochn yNaTCTBa.
A I P E D U N P E D Y B A H E
Oboj ypei He e HameHET da ro Kopnctat Iuca (Bknyubajn deua) co HamaJIeHn fI3NcK, cTeIINH nIIM MeTaNH cNoC6HOCTN, IINI CO HeIOCTaTOK Ha NCKyCTBO n 3HaEHe, OCBEN aKO IInCe ODROBOPHO 3a HNBHaTa 6e36eJHOCT He IM OBO3MOJn HAd3Op IINI yPaTCTBa 3a KOpNCTeHBe Ha ypeDToT.
IeuaTpe6a da 6nDat noi ha3Op 3a da ce ocunrgyn deka He cn ngpaat co ypeodt.
Oboj ypeJ moJe Da ro KopnctaT Deca Ha Bo3pact OJ 8 roDHHI NOBeKe I Nua Ca HamaJIeHn FIn3NcK, CetINHn I Nm MeHTaJIHn Cno6HOCTn I Nn HeIOCTaTOK Ha NCKyCTBO I 3HaEHe DOKoLKy IM Ce OBO3MOKJat Na3Op I Nn YpaTCTBa 3a KopnCTeHbE Ha ypeJOT Ha 6e36eJen NaHH I n pa36npaAT BkLyuHne To npacHOCTn. DeaTa He Tpe6a Da Irpaat Co ypeJOT. YncTeHbETo I KOpnsCHNuKOTO OdpJxUbaHe He CMeat Da rO BrPsaT Deca 6e3 Na3Op.
CpeiCTBaTa 3a ncknyBaHe Mopa Da 6nDaT BrgaDeHn BO fNkCHOTo OxNchBaHe BO cOrnaCHOCT CO npabInata 3a OxNchBaHe.
ПО моNTираьeTO, на Oвоj урет Tпeба дa My ce ДОЗВОЛдa ce ИСКлuyн oД НаюуBaьeTo. ИСКлuyчыьeTo мож e Дa ce NOCTURHc со ппстан до ппклuyчokOT nlln CO BградуBaьe Ha пpeKENHyBauch BO ФИКСНОТ OЖИЧУВаьe BO соглachocT CO правилata 3a OЖИЧУВаьe.
БeЗб endocn ypaTCTBa
Ako ka6eIOT 3a HanojyBaHBe e OwTeTeH, Mopa Da rO 3aMeHn Ipn3BODInTeIOT, HeROBnOT cepBncep nIi CnUH0 KBAJIuΦnKyuBaHn InuCa co ZeI da ce n36eRhe onaCHOCT.
HabeJeHnOT MeToI Ha fNkCupaJIe He Tpe6a Da 3aBnCn OJ yIpOte6aTa Ha IeINla 6nJejKn Tne He Ce CMeTaat 3a CnIpyHn cpeCTBa 3a fNkCupaJIe.
ПЕДУПЕДУBAHBE: Ако поршинatable e наукнота, Исклүүе төуpeдт за за n36ергөтeme можност od CTpyeн удap.
3a Bpeme Ha ynoTpe6ata, ypeoT ce BxkeuTyBa. Tpe6a Da ce BnImaba Da ce n36eHne Do npaHe Ha rpejHnte eIemEnTo BO BHaTpeHocTa Ha PloOaTa 3a rotBeHe.
Ako plochata 3a roTbeHe haNyKHe, ncknyte To ypeoT 3a da
n36eHete moxnoct oD ctpyeH yap. He KopnicTe je plochata 3a
roTbeHe dokeKa He ce 3aMeHn CtaKleHaTa NobpshHa.
He kopnstete ja nloyata 3a roTbe he 3a da 3arpeBaTe aIyMnHymcKa oIiJa, npOn3BODn 3aBNTkAHN BO aIyMNHyMcKa oIiJa nn 3amP3HaTa XpaHa CnakyBaHa BO aIyMNHyMcKn CaIOBn 3a roTbe He. TeuHocTa nomeIy dHOTO Ha Tabata n Iloyata 3a roTbe He MoJc Da npedn3Bvka npITcOK od napeata. LTo moJc Da npedn3Bvka Tabata da NOTCKOKHe.
CekoraoshocnhypeTeIIOUaTa3arotBeHcNCHOBaTaHaTabaTdaCe Ondjkat cyBn.
3oHnte 3a roTbeHe ke Ce BxkeWtAT Kora roTbnte.
Cekorawdpxkete rMaJIte deca hAcTaHa oD ypeDoT.
Држete Г сITE материда за пakуваъ поалень уд дофат на Deца, 6идевл materида за пakуваъ може за вдат onаши за Deцараз.
Oboj ypei Tpe6a da ce Kopnctn cmo 3a HopMaJIHO roTBeHe i npxeHe BO domOT. ToJ He e dI3ajHnpaH 3a KOMepzJaHa nIINHdycptpncKa ynoTpe6a.
Hnkoraa He KopncTe je Ja PlocaTa 3a rOtBeHe 3a Da ja Ja 3arpeeTe npocToPiJa.
BnImabajte kora npiknyuBaTe eJeKtpuHn ypeDi BO uTekepnte Ha Mpejata Bo 6Ii3Ha Ha IIOUaTa 3a rOTBeHe. MpejHnte BODOBn He Cmeat Da doJdaT BO KOHTaKT CO IIOUaTa 3a rOTBeHe.
I P E, D U N P E, D Y B A H E
NcknyeTo hanojyBaHbeto Ha KOIto nped da rn Nobp3e Te KxuTe CO KOJIoTO.
HaHOnOH Ha rpeJHnOt eIemEnT e AC 230 V~. UpeJOT ncto taKa coBpSeHo pa60Tu Ha mpeJi co AC 220 V~ nnn AC 240 V~. IIOuata 3a rotBeHe Tpe6a Da ce npKnyu Ha eJeKtpnHaTa MpeJaCo NOMoH Ha ypeJ ShTO OBO3MOxBya UpeJOT Da Ce NCKnyu OD eJeKtpnHaTa MpeJa Ha CITE NOLOBn Co 5npHnHa H OTBOPOT Ha KOHTAKTOT OJ HajMaJIky 3 mm, Ha np. ABToMaTcKO NCKLyUyBaHe 3a 3aStITNa Ha liHHjata, NCKLyUyBaHa 3apaDi NCTeKyBaHe Ha 3a3eMjYBaHeTo nII INpeROpYBaHe Ha OCINrpyBaQOT.
IPTE.DYTPE.DYBAHbE
Ka6eNcKInTe BpCKn MOpa Da ce HApPabat BO cOrIaChOCT CO npOniCnTe N do6po 3aTeHATn 1paΦoBn Ha TepMHaJIne.
IPTEyTIPTEyBAHbE
Ötkako плоча та отveье ce noьрзе co elekeTpnuHaТ Мржа, поверете дали спту ЗOTи 3a отveье ce noДгтвен 3a унтpe6a co краТКВКУчВаBJе Ha cekoja nO peД ha MaKcIMaJIHаТа NOCTaBka CO COODBETHСадOBИЗТоRTveьe.
A I P E D U N P E D Y B A H E
Ako ka6eIOT 3a HanojyBaHbe e OwTeTeH, Mopa da ro 3aMeHn npOn3BODnteIOT, HeroBnOT cepBncep nlln CInuHo KBaIINΦkUyBaHn IInca co ZeI da Ce n36eHne OnaCHOCT.

1N~ (32A)
| 01 | 220-240 V~ | 04 | Сина |
| 02 | Црна | 05 | Сива |
| 03 | Кафеава | 06 | Зелега/Жоблта |
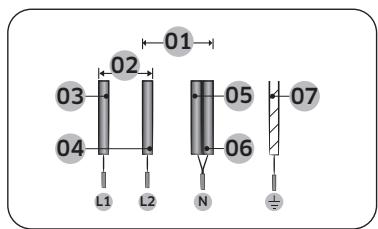
2N~(16A):OdJeIeTe rn 2-Фa3HnTe JnCn (L1 n L2) nped noBp3yBaHbETo.
PpabuHNO n03nOHHpahe
| Правлино | Нерравлино |
| Садови за(rotveны с рамно дно и правистрани | Садови за(rotveны с поckриberи ялс витkaши дно ялсстрани |
| Садови за(rotveны ja усколны ват ялп наиминуваат пелорачанata мимимална гolemina на зоната за(rotveны. | Садови за(rotveны не ъ усколны ват мимимална гolemina до сбара заTekobнatable зона за(rotveны. |
| Садови за(rotveны bo.notюност лжат на поршinata на плочata за(rotveны. | Садови за(rotveны leжат на павOT на плочATA за(rotveны. |
| Садови за(rotveны с правлино балансангarians. | Тechкatinga на рedingзвкувahа habendhybahe на садови за(rotveны. |
Cobetn 3a 3auteega Ha eheprnja
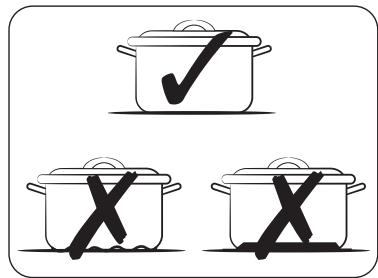
CneTe Tn OBn e COBtN 3a Da 3aUHTe nOTPOuBaUka Ha eHeprNJata.
- Cekoraш CTaBeTe rncaDoBHTe 3a rotBeHHe Ha 30Ha 3a rotBeHBe nped Ja ja BkLyuHtE COOdBETHATA pHHra.
Odpjxuybjte rnuuchtn30HnTe 3a rotBeHe n ochoBnTe Ha caDOBnTe 3a rotBeHe.Bo cnpotuBHO,Ke ce TpoOn nobEke eheprna.
Ubrpo 3atBopete ro Kaanok H a caobnte 3a rotbehe, aKe e doctaneH. Oba ke ja Hamaln NotpouByaKaTHa eheprnjata.
Icknye ja pinnrnaTa 7to pa60n nped 3aBpSuBaHcTo Ha BpeMeTo 3a rotBeHe. KopncTeJe ja npeocTahata ToTnHa 3a da ja oDpxyBaTe xpaHata TOnla.
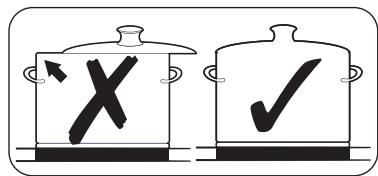
PpabuHNO n03nOHHpahe
Mоже ду петерate caювпe 3a rotbehe 3a da bduite daли ce cooDBetn 3a ynpotpe6a co npou3BOIDOT.
- Пптисhevу сею Konчeto 3a вклuyваьe/нckлuyваьe ① 1-2 cekyндзда ща вклuyчite почараза з ratotbeHe.
- Пптиссные сокутоа пayз и заимлочье 3сякунддда ща щаaktnвира te 6e36ednochataбрава здаца.
- Пптисе Г кочуета 3a Tajmep ① 3cekyндза да Г aKTINBnpate peKIMOT 3a TECT Ha COOДБETHOCT Ha caD0T 3a rotBeHc.
- Ctabete rncaObHTe 3a rotBeHe Ha eHaTa OJ 30HnTe 3a rotBeHe n IIOToa npITnCHte To n dpKeTe ro kOnyTe 3a 3oHa 3a rotBeHe 3 cekyHn.
| Ekpan | Опис |
| 0 | СадовITE за гогтBEиbe се несоДВeTHи |
| 1-7 | СадовITE за гогтBEиbe се-coоДВeTHи, Но неефИкасни |
| 8-10 | СадовITE за гогтBEиbe се-coоДВeTHи |
Предда започе
YnOtpe6a Ha KOnuHbata Ha Donnp
3a da pa6oTIne co KOnuHbata Ha DoNup, DoPte To cKaHoTo KOnue Co BpBoT Ha BnpeHnO T IpCT DoNeKa CooDbETnTe ekpaHn He CBeTHaT Nll He Ce n3rachat Nll DoKeKa He ce aKtBnPa cakaHaTa fYHKcNja.
Ocunpyte Ce deka donnpate camo eHNO konue KORA pa6oTnte co ypeDTo. Ako npctot Bn e npemhory nCnpjxeh Ha konyeto, Moxe da ce aKTHBnpa n CocEHOto konye.
3Byu npa6oTeheto
Ako MoKe Ia cnyuHneTe.
3BykHa nykahe: caoBte 3a roTbeHe ce HapabeHn od pa3nUHN MaTepnjann.
Cbnpkahe: Kopncntte noBeke oD nDe 30Hn 3a rotBeHe u caOBeTe 3a rotBeHe ce HappaBHeN oD pa3JIuHn MaTepuJau.
3yeHe: KOpNCTIte BnCOKn HnBOa Ha MOKHOCT.
KlncKaHe:HaCTaHbAeIeKTpUHO npeΦpUyBaHe.
-Шштень,брмченьа:работи вентнатур.
3ByuIte Ce HopMaJIHn I He yIaTyBaAT Ha HnKaKbN deΦeKTH.
I PDEyIPEyBAHc
He kopnstete caobn 3a roTbehe co pa3nnuHn rOleMHa n MaTepnjaJ.
KopncTeHbTo caOIOBn 3a roTBeHbe co pa3nnuHn rOleMnHn nn MaTePnJaNN MoKe da npedn3BnKa 3Byu n Bn6paun.
HANIOMEHA
KopncTeHbTo HnCKn HnBOa Ha MokHoCT (1-5) MoJe da npedn3Bnka 3Byu Na KInKaHe.
PouetHo uCTeHe
I36pniSeTe ja KepamuKata CTaKHe NaovBnHa CO BlaJHNa Kpna N CpeDCTBO 3a YNCTeHKepeamuKo CTaKNo Ha IIOUHTe 3a FOTBHe.
I P E, D U Y P E, D Y B A H E
He kopructete kayctuHn nnn a6pa3nBn cpeidCTBa 3a YnCTeHbe. Nobpunhata moKe da ce oWtETn.
Pa6ota
BknyuBaHéHa ypeoT
UpeIOT cE BknyuBa cO konHcTe 3a BknyuBaHe/ncknyuBaHe .PnPITnCHeTe ro konHcTe 3a BknyuBaHe/ncknyuBaHe np6bnKHO1-2 cekyni.
HANIOMEHA
Ötkako konqueto 3a BknyuBaHe/ncknyuBaHe ① Ke ce akTbnpa 3a da ro Bknyu ypeDoT, HNBOTo Ha moKHOCT MOpa da ce n36epe Bo pok od npn6nnKHo 20 cekyn.Bo cnpotNBHO, ypeDOT camnoT ke ce ncknyu oD 6e36edHocn npuHHn.
NcknyBaBeHaypeoT
3a notponHO ncknyybahe Ha ypeoT, KopncTeTe ro konuTeTo 3a BknyyBahe/ ncknyybahe ①.
PpntncheToKoOpHeTo3aBknyuBaHBe/ncknyuBaHBe ① npi6nJxHo1-2ceyn.
HANIOMEHA
IIO NCKLNUyBaHBe Ha eHa 30Ha 3a rOTBeHBe nIeIaT a NobpUHa 3a rOTBeHBe, IpiNcycTBOTO Ha pneOCTaHATA TOIInHa Ke ce NOKaJHe Ha dIgntaIHNte ekpaHn Ha COOdBETHnTe 30Hn 3a rOTBeHBe BO oBNIk Ha H, H, H, H, H, H, H, H, H, H, H, H, H, H, H, H, H, H, H, H, H, H, H, H, H, H, H, H, H, H, H, H, H, H, H, H, H, H, H, H, H, H, H, H, H, H, H, H, H, H, H
Temnepatypata ce hamaNyBa, Hke nce3He.
I36npaBe Ha 30Ha 3a roTBeHb e HNBO Ha MOKHOCT
- 3a n36npaHe Ha 30HaTa 3a roTBeHb, npITncHeTe rO COOBETHOTo KOJIe 3a 30Ha 3a roTBeHb
- 3a noctabyaBHe nHaIyoDbAHe Ha HbOTo Ha MOKHOCT, KOpNCHTe rN KOHTpOHaTaJIeHTa INI KoHTpOHNTE KOnuHbA.
EkpaHOT 3a OBaa 30Ha 3a rOBeHe haNImHuO ce MeHyBa Ha HeKoIky cekyHnI nOmeYI NOCTaBeHOT HINBO HA MOKHOCT I MaKcIMaJIHOT O MOxHO HINBO HA MOKHOCT. I NotoA, ekpaHOT CE MeHyBa OD NoCTaBeHOT HINBO HA MOKHOCT Ha MaKcIMaJIHOT MOxHO HINBO Ha MOKHOCT.
KopncTeHe Ha Flex 3oHaTa (Camo 3a MoJeInTe 7To ce npImeHyBaat Co Flex 3oHa)
OrpaHnUyBaHe Ha MaKcImaHHaTa MoKHOCT
ObaaФункиJA Bn OBO3MOJyBa HArOyBaHBe Ha MaKcImaHaTa MoKHOCT Ha ypeIoT.
1.Држete ro hanojyBaHeto ncknyeHo.
2.ПиТиСHTe ro konчeto 3a Пay3a n 3aknyuBaHbe II npi6IinXHo 3 cekyHn 3a da ja bKluynte 6e36edHocnata 6paba 3a deca.
3. Пптиссные ГКончето 3а Лева предна 30а 3a roTbeHe n konчето 3a Decha npedna 30а 3a roTbeHe nctobpeMeHo, риблжно 3 сekунд.
4. Пптисе Г кочуета 3a Tajmep!прблжно 3 секун.Екразов Кпркakxe P.И.TeКOBHmaМКСмДи МokhoCT.
5. Moze da ro haroДITE orpaHnUyBaHeTo Ha MOKHoCTa CO KOnHeTo 3a
Пay3a nЗakLnyuBaHe II (3000 W, 4000 W, 7400 W)
6. Пптиссенто ГКончето 3a Вклуваьe/ИСКлуваьe ① 3a Да ѳ постаNTe noctabkata.

HANOMEHA
Bo pexkIm ha hncka mokhoct (3000 W, 4000 W), HnBTo Ha mokhoct ke ce hafoa ABTomatcKn.
BknyuBaHe/ncknyuBaHe 3ByK
1.пгИТСНЕТо кОПЧЕТа ВКЛУЧУBA№/нСКЛУЧУBA№ ① пиБлижно 1-2 секунди.
2. Ппчснete ro konчeto 3a Tajmep 念 3cekyHn BO pOK oJ 10 cekyHn OTKaKo ce BkIyUnno HanojyBaHbeto.
3. 3BykOT Ke ce nckluyn Ha ekpaHOT Ke ce npkaKe DF.
4. 3a MeHyBaHHe Ha NoctabKaTa 3a 3ByK, NobTope Te rN YeKOpnte1 n 2. 3ByKoT Ke ce BkIyUn Ha ekpaHot Ke ce npnKaJke On.

HANOMEHA
He mOxHNO MeHyBaHBe Ha nocTabKInTe 3a 3Byk no10 cekyHn Od BknyBaHBe Ha HanojyBaHbeto.
Smart Connect
Плоча за за roтveье Има вгаден мodyн за Wi-Fi专项整治 за ra по кориспес за ja синхонистаре плоча за roтveье co anлкauида SmartThings. Ha anлкauида на nametchnot.Teleфон, може за:
- Ги Нальуновate CTaTycOT Ha pa60TaTaN IOCTaBknte 3a HNBO Ha MOKHOCT Ha
- селем entite Ha ПLOUaTa 3a ROTBeHe.
- Trn npOBepyBaTe mMeHyBaTe NoCTaBKnTe 3a TajMep.
PamkaHa nloyata 3a roTbeHe (onuja)
A IPEyIpyBAHbE
He KopinCTeOcET, cok od JIMMOH INIOTcPaHbA H 6nIrop Ha pAmkata Ha nIIOuAta 3a rotBeHe; BO CnpOTINBO, Ke ce NojABaT DocAdHn FneKn.
- ɪəsɒpɪnʌpɪe ja paʌmʌkɑta co Bʌlaɪkʌhɑ kɒpʌa.
- HablaaJHHe Tn nCyuSeHIne OCTaToCu Co BLaJHa Kpna. I36PnUWeTe n CyuSeTe.
3a da ce n36erhe owtetyBaIbe Ha ypeDoT
He kopructe ja nloata 3a roTbe KaKo pa60tha noBpuHa nlln 3a cKnlaDnpahe.
He ynpabaybajte co 30Ha 3a roTBeHbe aKO Ha pIoOaTa 3a roTBeHbe Hema Taba nIi aKO Tabata e npa3Ha.
Kepamukoto cakno e Mhory zBpcto n OTnopHo Ha TempepatyeH oK, Ho He e HeckpruBo.Toa moKe da ce oUteTn oD ocObeHo octap nIIN TBpd npEmdet wTo Ke naHe Ha pIoouata 3a rotBeHe.
He ctabajte tabn ha paMKata ha nloyata 3a roTbe. Moke da dojde do rpebe n OHTeYBaHbHe na fHnHtOT.
- I36eHbajTe Da NCTypaTe KncenI TeHuOCTn, Ha npimep, OceT, cok od lamohn IcpeiCTBa 3a OTcpaHbAbe 6nroP bp3 paMkata Ha nloaTa 3a rotBeHe, 6ndejkn TaKBIne TeHuOCTn MoKe Da npedn3BvKaat DoCaHN daMKn.
- Ako uekep nll npenapat tto coqpxn uekep dojde BO donnp co jeeka 30ha 3a roTbeHe i ce cToPi, Tpe6a BeDnAa Da ce nCnCTn Co KjHcKa cTpyraJa oDoeka e cE yUte Jeeoka. Ako ce Do3BOni Da ce OlaDi, Toa MoKe da ja oUTeN nobPunHa ta Kora Ke ce otctpaHyBa.
-Држete Г сITE п dedмети И матершалу StTo 6и можeled Да ce StOnaT,Ha npimep,пл actиka, anymnHymckа Фолиja и Фолин 3a pepha HabcTaPaHa OД Керамчкataстaklenha NOBpshna.Ако HeStO od OBOJ BvId ce StOni Ha ПLOUaTа 3a rotBeHb, BeDAH MOPa DA ca otCTpaHn CO CTpyraJIka.
Peuabahe npo6lemn
Mоже да настане гршka како рezултат od погравипто сампесьдя ѳ поразвіпісо симош на сіл\'ніве упал'tь. He obúd'yajte ce да правіпесдополнітелни поразвікі akо сіл\'ніte упал'tь ве поmaraat BO cekoj подин'vehen clyuaj.