
MWG 3001 H EB - Microwave Oven BOMANN - Free user manual and instructions
Find the device manual for free MWG 3001 H EB BOMANN in PDF.
| Product type | Built-in microwave oven with grill and convection |
| Brand | BOMANN |
| Model | MWG 3001 H EB |
| Category | Microwave oven |
| Installation type | Built-in |
| Interior capacity | 25 liters |
| Net weight | 15.30 kg |
| Power supply | 230 V~, 50 Hz |
| Power consumption (Microwave) | 1400 W |
| Power consumption (Grill) | 1300 W |
| Power consumption (Convection) | 2300 W |
| Microwave power | 900 W |
| Microwave frequency | 2450 MHz |
| Cooking modes | Microwave, Grill, Convection, Combined (Microwave+Grill+Convection) |
| Number of microwave power levels | 5 (10, 8, 6, 4, 2 OP) |
| Special functions | Automatic defrost, Automatic cooking (8 programs), Timer, Quick start, Child lock |
| Included accessories | Glass turntable, Grill rack, Guide ring |
| Door material | Glass |
| Interior lighting | Yes |
| Protection class | I |
| Care and cleaning | Clean with a damp cloth and mild detergent. Do not use abrasive products or steam cleaners. |
| Safety | Child safety lock, automatic stop when door opens, overheat protection |
Frequently Asked Questions - MWG 3001 H EB BOMANN
User questions about MWG 3001 H EB BOMANN
0 question about this device. Answer the ones you know or ask your own.
Ask a new question about this device
Download the instructions for your Microwave Oven in PDF format for free! Find your manual MWG 3001 H EB - BOMANN and take your electronic device back in hand. On this page are published all the documents necessary for the use of your device. MWG 3001 H EB by BOMANN.
USER MANUAL MWG 3001 H EB BOMANN
Built-in microwave oven with grill and convection oven
natural_image
Modern stainless steel microwave oven with digital display and control buttons (no readable text or symbols)CE
- Do not remove any installed parts from inside the oven or anything from the inside of the door!
- The foils on the inside of the door must not be removed!
- The mica sheet is also part of the appliance and must not be removed. It protects the electronic component located behind it from dirt.
POZOR:
Microwave energy: Do not remove this cover!
Warnung
natural_image
Line drawing of a microwave oven mounted on a cabinet (no text or symbols)natural_image
Line drawing of a microwave oven with open door opening (no text or symbols)WAARSCHUWING: Kookvertraging!
Microwave energy: Do not remove this cover!
natural_image
Line drawing of a microwave oven mounted on a cabinet (no text or symbols)natural_image
Line drawing of a microwave oven with open door (no text or symbols)⚠️ WAARSCHUWING: Brandgevaar!
Microwave energy: Do not remove this cover!
natural_image
Line drawing of a microwave oven mounted on a cabinet (no text or symbols)natural_image
Line drawing of a microwave oven with open door opening (no text or symbols)| Affichage | Micro-ondes | Grill | Convection |
| C.1 | 30% | - | 70% |
| C.2 | 55% | - | 45% |
| 6.1 | 30% | 70% | - |
| 6.2 | 55% | 45% | - |
Thank you for choosing our product. We hope you will enjoy using the appliance.
Symbols in these Instruction Manual
Important information for your safety is specially marked. It is essential to comply with these instructions in order to avoid accidents and prevent damage to the appliance:

WARNING:
This warns you of dangers to your health and indicates possible injury risks.

CAUTION:
This refers to possible hazards to the appliance or other objects.

NOTE: This highlights tips and information.
Contents
Overview of the Components.... 3
General Notes...... 39
Important Safety Instructions! 39
Information Plates and Symbols on the Appliance 41
Overview of the Components.... 41
Buttons and Controls on the Control Panel 41
Avoiding Fire Hazards with Built-in Appliances.... 42
Mounting Accessories 42
Installation Instructions 42
Dimensions of the Cupboard 42
Installation (Steps. 2 to 4) 42
Information on Grilling and Combined Operation 43
Suitable Microwave Tableware 43
Notes on the Function and Use the Appliance.... 43
What You Should Know about Microwave Operation 43
Notes on the Function of this Appliance 43
Initial Operation.... 44
Setting the Clock....44
Operating the Microwave.... 44
Pause or Stop Cooking 44
Quick Start 44
Warming 44
Heating Table 45
Cooking 45
Hands-on Cooking Tips 45
Cooking Table 45
Grilling 46
Convection...... 46
Combinations of Microwave, Grill and Convection...... 46
Tips for Combi Operation....46
Auto Functions...... 46
Automatic Program Table.... 47
Defrosting 47
Multi-Stage Cooking 47
Special Functions 47
Auto Start (Timer-Function) 47
Locking (Child-proof Lock) 48
Display Function....48
Cleaning 48
Interior 48
External Walls 48
Accessories....48
Odours....48
Oven Light 48
Troubleshooting.... 48
Technical Data....49
Disposal 49
Meaning of the “Dustbin” Symbol 49
General Notes
Read the operating instructions carefully before putting the appliance into operation and keep the instructions including the warranty, the receipt and, if possible, the box with the internal packing. If you give this appliance to other people, please also pass on the operating instructions.
- The appliance is designed exclusively for private use and for the envisaged purpose. This appliance is not fit for commercial use.
- Do not use it outdoors. Keep it away from sources of heat, direct sunlight, humidity (never dip it into any liquid) and sharp edges. Do not use the appliance with wet hands. If the appliance is humid or wet, unplug it immediately.
- When cleaning or putting it away, switch off the appliance and always pull out the plug from the socket (pull the plug itself, not the lead) if the appliance is not being used and remove the attached accessories.
- Do not operate the appliance without supervision. If you leave the room you should always turn the appliance off. Remove the plug from the socket.
- The appliance and the mains lead have to be checked regularly for signs of damage. If damage is found the appliance must not be used.
- Use only original spare parts.
- In order to ensure your children's safety, please keep all packaging (plastic bags, boxes, polystyrene etc.) out of their reach.

WARNING:
Do not allow small children to play with the plastic foil.
There is a danger of suffocation.
Important Safety Instructions!
Read carefully and keep for future reference.

WARNING:
- The microwave oven is intended for the heating of food and beverages. Drying of food or clothing and heating of heating pads, slippers, sponges, damp cleaning cloths and similar may result in injuries, ignition or fire.
- The microwave oven is not suitable for warming/heating up living animals.
- When the door or the door seals are damaged, the microwave oven must not be operated until it has been repaired by a trained person.

WARNING:
- Please do not repair the appliance yourself, but have it repaired by an authorised specialist. It is hazardous for anyone other than a trained person to carry out any service or repair operation which involves the removal of any cover which gives protection against exposure to microwave energy.
- If the supply cord is damaged, it must be replaced by the manufacturer, its service agent or similarly qualified persons in order to avoid a hazard.
- Liquids or other food must not be heated in sealed containers. They are liable to EXPLODE.
- The appliance and its accessible parts become hot during use. Care should be taken to avoid touching heating elements. Children less than 8 years of age shall be kept away unless they are continuously supervised.
- Only suitable tableware should be used such as: glass, porcelain, ceramics, heat-resistant plastic or special microwave tableware.
- Metallic containers are not permitted for heating food and beverages in the microwave oven. Observe the notes in the chapter “Suitable Microwave Tableware”.
- If food is being heated or cooked in combustible materials, such as plastic or paper containers, the microwave oven should be checked frequently due to the risk of fire.
- If smoke is produced, turn the appliance off and remove the plug. Keep the door closed in order to suffocate any flames.
- The contents of babies' bottles and jars of baby food must be stirred or shaken and the temperature checked before use. There is a danger of burns.
- Use oven cloths or kitchen gloves when removing the containers. DANGER OF BURNS!
- Food with a shell or skin, such as eggs, sausages, sealed jars etc. must not be heated up in the microwave as they may explode even when heating by the microwaves is finished.

WARNING: Delay in boiling!
During boiling, particularly during the reheating of liquids (water), it may happen that the boiling temperature has been reached but the typical bubbles have not yet started to rise. The liquid does not boil evenly. When the vessel is removed this so-called delay in boiling may result in the sudden formation of bubbles when the vessel is knocked, causing the water to boil over. There is a serious danger of burns! In order to achieve even boiling, please place a glass rod or similar item, but nothing metallic, into the vessel.
- This appliance can be used by children aged from 8 years and above and persons with reduced physical, sensory or mental capabilities or lack of experience and knowledge if they have been given supervision or instruction concerning use of the appliance in a safe way and understand the hazards involved.
• Children shall not play with the appliance. - Cleaning and user maintenance shall not be made by children without supervision.
- Any dirt on the door frame/door seal and neighbouring parts must be carefully cleaned with a damp cloth.
- Clean the microwave oven regularly and remove any food residues from the interior.
- If the appliance is not clean the surface may be damaged, affecting its serviceable life and possibly resulting in hazardous situations.
- Do not use harsh abrasive cleaners or sharp metal scrapers to clean the oven door glass. You could scratch the surface. This can destroy the glass.
- Steam cleaner is not to be used.
- Also follow the instructions which are given in the “Cleaning” chapter.
-
Please do not operate the appliance with an external timer or a separate remote control system.
• This appliance is used -
for heating up and cooking solid or liquid foods
- for browning and grilling solid foods.
It is intended for the use in households and for similar applications, such as:
- in staff kitchens of stores, offices, and other industrial areas;
- by guests of hotels, motels, and other housing facilities;
- in agricultural estates;
- in bed and breakfasts.
Information Plates and Symbols on the Appliance
There is a warning symbol attached to the top surface of the microwave oven:
WARNING: Hot surface!
Risk of burning!
The temperature of accessible surfaces can get very hot during and after operation.

Read the instructions!
Also note the information signs on the microwave:
WARNING
1: MICROWAVE AND HIGH VOLTAGE INSIDE. BE SURE NOT TO REMOVE THE ENCLOSURE.
2: THIS APPLIANCE IS EQUIPPED WITH A GROUNDED PLUG FOR YOUR PROTECTION AGAINST POSSIBLE SHOCK HAZARDS AND SHOULD BE CONNECTED TO A PROPERLY GROUNDED OUTLET.
3: THIS DEVICE IS TO BE SERVICED ONLY BY PROPERLY QUALIFIED SERVICE PERSONNEL.
4: DISCONNECT POWER PLUG BEFORE SERVICING. REMOVAL OF THE ENCLOSURE WITH PRODUCT ENERGIZED COULD EXPOSE SERVICEMEN TO HAZARDOUS HIGH VOLTAGE POTENTIAL.
Microwave energy: Do not remove this cover!
Overview of the Components
Picture A
1 Control panel
2 Door opener
3 Grill
4 Guide ring
5 Drive axle
6 Turntable
7 Door latches
8 Viewing window
Picture B: Symbols on the Control Panel
1 Lights up in time display / Flashes when the timer is activated
2 Appears when the "Microwave" mode is active
3 Appears when the "Convection" mode is active
4 Appears when the "Defrost" mode is active
5 Temperature indicator
6 Convection
7 Defrost
8 Auto function
9 Appears when the "Grill" mode is active
10 Grill
11 Power indicator
12 Microwave
Buttons and Controls on the Control Panel
MICRO
Microwave: Select power setting of the microwave
COMBI/GRILL/CONV
Grill: For roasting and scalloping
Combi: Grill, microwave and convection operate in turns
Convection: Convection without microwave operation; select a temperature
DEFROST/AUTO/TEMP/CLOCK
Defrosting: In combination with the knob for defrosting by weight
Auto: Selection of the automatic programs
Temperature: Setting the temperature in convection mode
Clock: In combination with the turning knob for setting the clock
Timer: In combination with the turning knob for setting the timer
STOP/CANCEL
Stop: Press once to stop cooking
Delete: Press twice to delete function
Lock: Press and hold the STOP/CANCEL button for 3 seconds in order to lock (child-proof lock) or unlock the control panel
START
- Starting the function
- Quick start of the microwave (always 60 seconds at 100% power)
- Prolonging the cooking time by 10 seconds during operation (except when using auto function)
- Confirming a setting
TIME, WEIGHT
Rotary knob: Rotary knob for setting the time, cooking time or weight settings
Avoiding Fire Hazards with Built-in Appliances
Always observe the instructions contained in the section "Installation Instructions".
- Only use the provided installation materials when mounting your appliance.
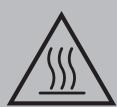
- When installing the microwave oven, please adhere to the dimensions shown in drawing 1.
- The rear wall of the cupboard must be removed!
- There is a ventilation slot at the bottom of the mounting frame. Keep it clear at all times.
Mounting Accessories
1 × Drilling template
8 × Screws, short
1 × Screw, long
1 × Dummy plug
2× Standing feet
1 × Spacer (already mounted)
Installation Instructions
This microwave oven must be installed in a tall cupboard. Please note the following instructions:
- Remove everything that is fragile from the adjacent cupboards.
- For the installation, the cupboard must meet the following conditions:
- The cupboard must not have any cracks, splinters or other damages. All joints must be stable.
- The cupboard must be designed to support at least 40 kg.
- The microwave oven must be installed at a height of at least 85 cm.
- The rear wall of the cupboard must be removed to allow sufficient ventilation of the microwave oven.
- The side walls of the cupboard must be at least 19 mm thick.
- The installation depth of the cupboard has to be at least 550 mm.
- It is important that there is a power socket within reach of the appliance's power cable.
- Check that the mains voltage is correct before you connect the plug to the socket. You will find the information about the appliance on the rating label for specifications.
- Only connect the appliance to a tested socket.
- The power socket must be easily accessible so that the plug can be quickly removed in case of an emergency.
- Important! Do not plug in the appliance until the installation has been completed!
- Further information and instructions can be found on the drilling template provided.

WARNING:
- Adhere to the dimensions given in the instructions.
- Only use the included installation accessories.
- Screws which are screwed in too deeply (or are too long) can damage the appliance or represent a potentially fatal safety hazard.
Dimensions of the Cupboard
Prepare a built-in cupboard/niche according to the following dimensional drawing Diagram 1.
1
Installation (Steps. 2 to 4)
2
- This figure is an example only. The dimensions may vary as these depend on the thickness of the wall cabinet.
-
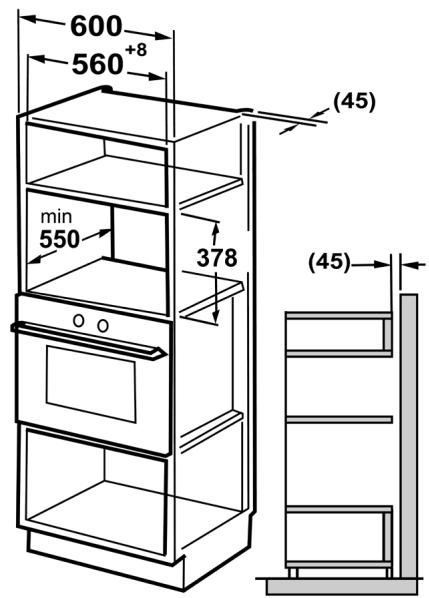
The original drilling template is enclosed with the appliance. Proceed as follows:
-
Check if your cabinet has a smooth, flat bottom and right size.
-
Tape the template onto the bottom plane of cabinet. Make sure the centre line of the template is in the middle of the cabinet.

NOTE:
Make sure the front edge of template is even with the cabinet front edge.
- Make marks on the bottom plane of cabinet according to the hole "X" of the template.

CAUTION: Do not drill holes in the bottom cabinet.
-
After make marks according to the instruction, remove the template.
-
Mount the standing feet at the marked positions.
3
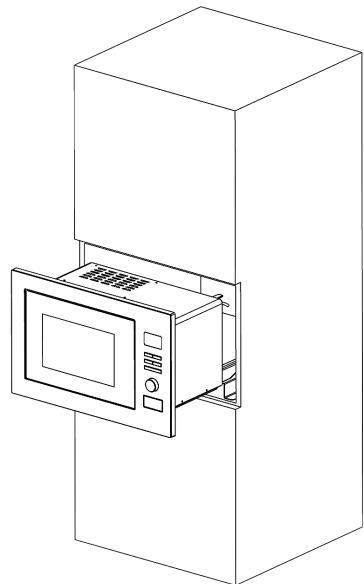
natural_image
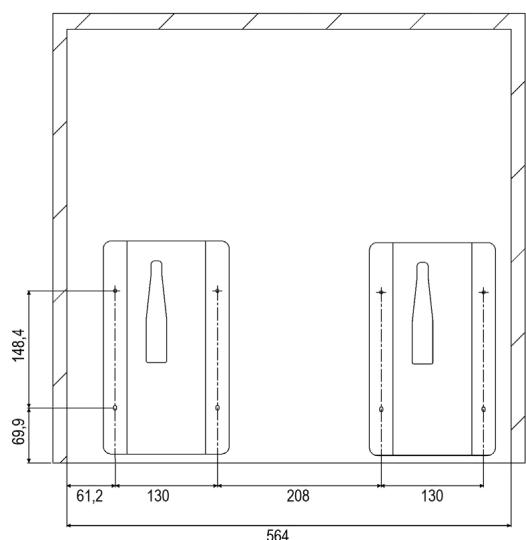
Line drawing of a microwave oven mounted on a cabinet (no text or symbols)- Install the microwave. Place the feet of the microwave in the large opening of the pre-mounted feet.
- Push the microwave into the cabinet up to the stop.
4
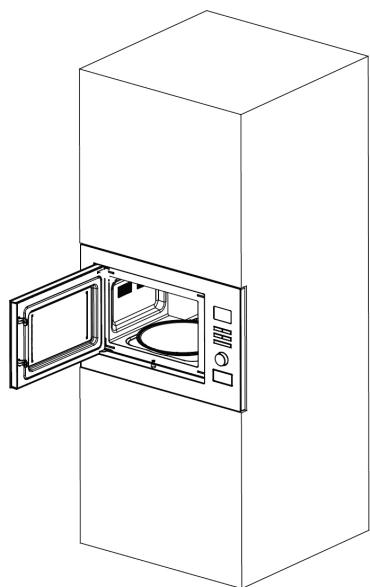
natural_image
Line drawing of a microwave oven with open door opening (no text or symbols)- Open the door of the microwave.
- Secure the microwave with the long screw.
- Seal the opening with the dummy plug.
Information on Grilling and Combined Operation
- As heat radiation is used during grilling and combined operation, please use only heat-resistant tableware. Plastic containers are not suitable.
- When food is only being grilled, metal or aluminium tableware may also be used – but not during combined or microwave operation (see table “Suitable Microwave Tableware”).
• Always leave the ventilation slits uncovered. - Please use the grilling grid to move the food to be cooked nearer to the heating element.
Suitable Microwave Tableware
- The ideal material for use in a microwave is transparent and allows the microwave radiation to heat the food evenly.
- Round/oval dishes and plates are more suitable than rectangular ones as the food in the corners may overcook.

CAUTION:
Danger of explosion from tightly sealed cookware.
- Open sealed containers before cooking or heating.
- Pierce plastic protective films several times with a fork.

CAUTION: Sparking and fire hazard!
- Microwaves are not able to penetrate metal, so that no metal vessels or plates should be used.
- Do not use any paper dishes made of recycled material as these may contain small amounts of metal, which may result in sparks or fires.
The list below is intended to help you select suitable microwave tableware:
| Material | Suitable for | |||
| Microwave | Grill | Convection | Combi-nation* | |
| Heat-resistant glass vessel | yes | yes | yes | yes |
| Non-heat-resistant glass vessel | no | no | no | no |
| Heat-resistant ce-ramic vessel/plate | yes | yes | yes | yes |
| Plastic vessels suitable for micro-wave use | yes | no | no | no |
| Kitchen roll | yes | no | no | no |
| Metal or aluminium ovenware | no | yes | yes | no |
| Grilling grid | no | yes | yes | no |
| Aluminium foil and foil containers | no | yes | yes | no |
*) Combination of microwave with grill/convection or of grill with convection
Notes on the Function and Use the Appliance
What You Should Know about Microwave Operation
- Your appliance works with microwave radiation, which heats up water particles in food in a very short time. There is no heat radiation and therefore hardly any browning.
- Only food should be heated up with this appliance.
- The appliance is not suitable for baking in floating fat.
- Only 1-2 portions should be heated up at the same time. Otherwise the microwave will become less efficient.
- Press the STOP/CANCEL button to stop the cooking process.
- Microwaves provide their full energy levels immediately. Preheating is therefore not necessary.
- Never operate the microwave function when the oven is empty.
- The microwave oven does not replace your traditional cooker. It is used mainly for:
- defrosting deep-frozen food
- rapid warming/heating of food or drinks
- cooking meals
Notes on the Function of this Appliance
- Your selection by pressing buttons is confirmed by a signal tone. If not, you did not press properly.
- If you set a program but do not press the START button within 2 minutes, the setting will be cancelled. The display will then show the current time again.
- When starting a program, the remaining operating time will be displayed. The countdown runs.
- 3 signal tones will indicate the end of the program. The appliance then switches itself off automatically. The following will appear in the display: "E n d". These beeps repeat every 3 minutes until you open the door or press the STOP/CANCEL button.
- The casing is cooled by a cooling fan. The cooling fan may continue to operate after a program is finished.
Initial Operation
- Press the door opener to open the microwave door. The door swings open.
- After removing all the accessories from inside the oven, unpack them and place the sliding ring in the middle.
- Position the glass plate on the drive axle in such a way that it locks into the dents of the drive shafts and is lying flat.
- Check the appliance for any visible damage, particularly in the area of the door. If any damage is found, the appliance must not be used.
- Remove any protective foils that may be adhered to the housing.
- Make sure the mains voltage to be used corresponds to the voltage of the appliance. Check the rating label for specifications.
- Insert the mains plug into a properly installed power socket.
CAUTION:
- Do not remove any installed parts from inside the oven or from inside the door!
- The mica sheet is also part of the appliance and must not be removed. It protects the electronic component located behind it from dirt.
i NOTE:
If there are any oil or other residues from the manufacturing process on the housing or heating element, smoke or odours may initially be produced.
This is normal and will not occur after the oven has been used a few times.
The following procedure is strongly recommended:
- Turn the appliance to the grill function and allow it to run several times without any food inside.
- Please ensure sufficient ventilation.
Setting the Clock
i NOTE:
As soon as the appliance has been connected to the power supply, all icons in the display light up 3 times. Then a signal sounds and the display will show "1:00".
- Hold down the DEFROST/AUTO/TEMP/CLOCK button for about 3 seconds. The hour indicator flashes.
- Use the turning knob to set the desired hour.
- Press the DEFROST/AUTO/TEMP/CLOCK button to confirm your settings.
- Use the turning knob to set the desired minutes.
- Press the DEFROST/AUTO/TEMP/CLOCK button again to activate the new time. The delimiter symbol “:” of the digital time will be flashing on the display.
Operating the Microwave
- Place the food to be heated in a suitable piece of tableware.
- Open the door and place the vessel in the middle of the glass plate. Then close the door. (For safety reasons the oven only operates when the door is tightly closed.)
- Press the MICRO button once/repeatedly to select the desired power setting.
| Power setting on the display as selected in % | Power in Watt (approx.) | Application |
| 10 OP | 900 | Quick heating |
| 8 OP | 720 | Cooking |
| 6 OP | 540 | Simmering |
| 4 OP | 360 | Defrosting frozen food |
| 2 OP | 180 | Melting cheese etc. |
-
Use the turning knob to set the desired cooking time between 10 seconds and 60 minutes.
-
Pres the START button to start operation. The cooking time depends on the quantity and texture of the food. After a few times trying you will quickly learn to estimate the cooking time.
i NOTE:
- Each time pressing the START button will prolong the operating time by 10 seconds.
- Cooking in a microwave is much faster than on a stove. If you are not sure, set a shorter cooking time and continue operation if necessary.
Pause or Stop Cooking
- If you wish to pause the cooking operation, press the STOP/CANCEL button once or open the door.
• To continue cooking, close the door and press START again. - In order to fully stop the cooking process, press the STOP/CANCEL button twice, thereby resetting all program settings.
Quick Start
You wish to heat food or drinks shortly at the highest power setting?
Quick-start the microwave by directly pressing the START button. The cooking process will start immediately, whereas each time pressing the button will prolong the cooking time by 10 seconds.
The power setting of the microwave is thereby 100%.
Warming
The warming and heating of food is a particular strength of the microwave. Liquids and foods that are in the refrigerator can be easily brought up to room temperature or the right temperature for consumption without the need for many pots.
The heating times contained in the following table are only rough guides as the time depends very much on the starting temperature and the composition of the food. You are therefore advised to check from time to time whether the dish is already hot enough.
Heating Table
| Edibles/Food | Quantity | Microwave Power in % | Approx. time in minutes | Cover |
| Liquids | ||||
| 1 cup | 150g | 100P | 0,5-1 | no |
| 0,5l | 500g | 100P | 3,5-5 | no |
| 0,75l | 750g | 100P | 5-7 | no |
| Tip: Put a glass stick into the container to avoid superheating; stir well before drinking | ||||
| Plated Meals | ||||
| Schnitzel, potatoes and vegetables | 450g | 100P | 2,5-3,5 | yes |
| Goulash with noodles | 450g | 100P | 2-2,5 | yes |
| Meat, dumpling and sauce | 450g | 100P | 2,5-3,5 | yes |
| Tip: Moisten slightly beforehand, stir from time to time. | ||||
| Meat | ||||
| Schnitzel, coated with breadcrumbs | 200g | 100P | 1-2 | no |
| Meatballs, 4 in total | 500g | 100P | 3-4 | no |
| Joint | 250g | 100P | 2-3 | no |
| Tip: Brush with oil so that the breadcrumbs or crust do not become soft. | ||||
| Poultry | ||||
| Half a chicken | 450g | 100P | 3,5-5 | no |
| Chicken fricassee | 400g | 100P | 3-4,5 | yes |
| Tip: Brush with oil, stir from time to time | ||||
| Side Dish | ||||
| Noodles, rice 1 portion 2 portions | 150g | 100P | 1-2 | yes |
| 300g | 100P | 2,5-3,5 | yes | |
| Potatoes | 500g | 100P | 3-4 | yes |
| Tip: Moisten slightly beforehand. | ||||
| Soups/Sauces | ||||
| Broth, 1 plate | 250g | 100P | 1-1,5 | yes |
| Soup with solids | 250g | 100P | 1,5-2 | yes |
| Sauce | 250g | 100P | 1-2 | yes |
| Infant Food | ||||
| Milk | 100ml | 60P | 0,5-1 | no |
| Mash | 200g | 60P | 1-1,5 | no |
| Tip: Thoroughly shake well or stir. Check the temperature! | ||||
Cooking
Hands-on Cooking Tips
Follow the guidelines given in the cooking table and recipe. Monitor the cooking process if you do not yet have as much experience.
You may open the door of the appliance at any time. The appliance will turn off automatically.
It will only continue operation when the door is closed and the START button pressed again.
Refrigerated food needs a longer cooking time than that with room temperature.
The chunkier the food, the longer the cooking time. Meat cut in bigger pieces, for example, requires longer cooking than meat of the same quantity cut into strips. It is recommended cooking larger amounts of food at maximum power and having it simmer at medium power for a more evenly cooking.
Lower foodstuffs cook faster than higher ones; therefore distribute the food as low as possible. Place thinner parts such as chicken legs or fish filets in the centre or leave them overlapping.
Smaller amounts cook faster than bigger ones. The following rule of thumb applies:
Double amount = almost double time
Half amount = half time
If you cannot find the exact cooking time for a dish, you may apply the following rule:
Per 100 g approx. 1 minute cooking
All foods that you cover on a common stove should be covered in the microwave as well.
A cover will prevent the food from running dry. An upside-down plate, greaseproof paper or microwave cooking foil are all suitable as covers. Cook food that should be getting a crust without cover.
*) Ready-made food
Cooking Table
| Edibles / Food | Quantity | Microwave Power in % | Approx. time in minutes | Cover |
| Vegetables | ||||
| Eggplant | 500 g | 8 OP | 7-10 | yes |
| Cauliflower | 500 g | 8 OP | 13-15 | yes |
| Broccoli | 500 g | 8 OP | 6-9 | yes |
| Chicory | 500 g | 8 OP | 6-7 | yes |
| Peas | 500 g | 8 OP | 6-7 | yes |
| Fennel | 500 g | 8 OP | 8-11 | yes |
| Green beans | 300 g | 8 OP | 13-15 | yes |
| Potatoes | 500 g | 8 OP | 9-12 | yes |
| Stem turnip | 500 g | 8 OP | 8-10 | yes |
| Leek | 500 g | 8 OP | 7-9 | yes |
| Corn on the cob | 250 g | 8 OP | 7-9 | yes |
| Carrot | 500 g | 8 OP | 8-10 | yes |
| Pepper | 500 g | 8 OP | 6-9 | yes |
| Brussels sprouts | 300 g | 8 OP | 7-10 | yes |
| Asparagus | 300 g | 8 OP | 6-9 | yes |
| Tomatoes | 500 g | 8 OP | 6-7 | yes |
| Zucchini | 500 g | 8 OP | 9-10 | yes |
| Tip: Cut vegetables into small pieces and cook with 2-3 spoons of liquid; stir occasionally. Simmer 3-5 minutes; add seasoning just before eating. | ||||
| Fruits | ||||
| Stewed apple or pear | 500 g | 8 OP | 5-8 | yes |
| Stewed rhubarb | 250 g | 8 OP | 4-6 | no |
| Roast apple, 4 pieces | 500 g | 8 OP | 7-9 | yes |
| Tip: Add 125 ml of water; lemon juice will prevent the fruits from discolouring; simmer 3-5 minutes. | ||||
| Meat* | ||||
| Meat with sauce | 400 g | 8 OP | 10-12 | yes |
| Goulash, veal strips | 500 g | 8 OP | 10-15 | yes |
| Beef roulades | 250 g | 8 OP | 7-8 | yes |
| Tip: Stir occasionally; rest for 3-5 minutes. | ||||
| Poultry* | ||||
| Chicken fricassee | 250 g | 8 OP | 6-7 | yes |
| Chicken soup | 200 g | 8 OP | 5-6 | yes |
| Tip: Stir occasionally; rest 3-5 minutes. | ||||
| Fish | ||||
| Fish filet | 300 g | 8 OP | 7-8 | yes |
| 400 g | 8 OP | 8-9 | yes | |
| Tip: Turn over after half the time has elapsed; simmer 3-5 minutes. | ||||
| Defrosting and Cooking Vegetables | ||||
| Red cabbage with apple | 450 g | 8 OP | 14-16 | yes |
| Spinach leaves | 300 g | 8 OP | 11-13 | yes |
| Cauliflower | 200 g | 8 OP | 7-9 | yes |
| String beans | 200 g | 8 OP | 8-10 | yes |
| Broccoli | 300 g | 8 OP | 8-9 | yes |
| Peas | 300 g | 8 OP | 7-8 | yes |
| Stem turnip | 300 g | 8 OP | 13-15 | yes |
| Leek | 200 g | 8 OP | 10-11 | yes |
| Corn | 200 g | 8 OP | 4-6 | yes |
| Carrots | 200 g | 8 OP | 5-6 | yes |
| Brussels spout | 300 g | 8 OP | 7-8 | yes |
| Spinach | 450 g | 8 OP | 12-13 | yes |
| 600 g | 8 OP | 15-17 | yes | |
| Tip: Cook with 1-2 spoons of liquid; stir occasionally or carefully cut. Simmer 2-3 minutes; add seasoning just before eating. | ||||
| Soups/ Stew* | ||||
| Stew | 500 g | 8 OP | 13-15 | yes |
| Soup with solids | 300 g | 8 OP | 7-8 | yes |
| Crème soup | 500 g | 8 OP | 13-15 | yes |
| Tip: Stir occasionally; simmer 3-5 minutes. | ||||
Grilling
Place the grill rack onto the supplied glass plate. Use suitable heat-resistant tableware or directly put the food onto the grill.
It is not necessary to preheat the grill rack since the grill generates radiant heat immediately.
Proceed as follows for roasting and scalloping:
- Press the GRILL/COMBI CONV/COMBI button until "5." appears on the display.
- Use the rotary knob to set the desired roasting time between 10 seconds and 60 minutes.
| Edibles/Food | Quantity | Approx. time in minutes | Cover |
| Scalloping toast with cheese | 2-3 slices | 3-4 | no |
- Press the START button to start.

WARNING:
Only touch the door at the frame. Risk of burns!
Convection
Convection enables you to cook food as in a traditional oven. The microwave is not active. The heat is generated by a heating element on the fan. We recommend preheating the oven to the correct temperature before placing food inside.
- Place the food into the appliance.
- Press the COMBI/GRILL/CONV button until “C.” appears on the display.
- Select the desired temperature by repeatedly pressing the DEFROST/AUTO/TEMP/CLOCK button.
- Use the turning knob to set the desired cooking time between 10 seconds and 60 minutes.
- Press the START button to start operation.
i NOTE:
The set temperature is reached once the temperature indicator stops flashing.
Combinations of Microwave, Grill and Convection
When using these settings, microwave, grill and convection will operate in turns.
| Display | Microwave | Grill | Convection |
| C.1 | 30% | - | 70% |
| C.2 | 55% | - | 45% |
| 6.1 | 30% | 70% | - |
| 6.2 | 55% | 45% | - |
- Press the COMBI/GRILL/CONV button repeatedly to select the desired combi setting.
- Use the turning knob to set the desired cooking time between 10 seconds and 60 minutes.
For the programs C·1 and C·2 the temperature must first be selected before you can use the rotary knob. Select the temperature via the DEFROST/AUTO/TEMP/CLOCK button. - Press the START button to start operation.
i NOTE:
Tips for Combi Operation
When cooking food with the combined setting of microwave-grill, you should adhere to the following:
The cooking time for big and thick food items, such as roast pork, is respectively longer than for small, lower food. Nevertheless, when roasting, the opposite rule applies. The closer the food is to the grill, the faster it will become brown. I.e., when preparing big joints during combi operation, the roasting time is possibly shorter than for smaller joints.
Use the grilling grid for roasting in order to achieve a quick and even browning.
Auto Functions
Use the auto functions to cook certain amounts of foods automatically. Proceed as follows:
- Select the desired automatic program by repeatedly pressing the DEFROST/AUTO/TEMP/CLOCK button. Choose one of the settings given in the table below.
- Use the turning knob to set the desired weight.
- Press the START button to start operation.
Automatic Program Table
| Code | Function | Display |
| AC-1 | Rice | 0,1-0,3kg |
| AC-2 | Meat | 0,15kg |
| 0,3kg | ||
| 0,45kg | ||
| 0,6kg | ||
| AC-3 | Vegetables | 0,2-0,8kg |
| AC-4 | Popcorn | 0,1kg |
| AC-5 | Beverages | 1 cup |
| 2 cups | ||
| AC-6 | Potatoes | 0,45kg |
| 0,65kg | ||
| AC-7 | Pizza | 0,2-0,4kg |
| AC-8 | Fish | 0,2-0,7kg |
Defrosting
Using the defrost program you may automatically defrost your food.
i NOTE:
- Since the microwaves always penetrate the food from the outside in, larger pieces may not be fully defrosted in their centre. The outer layers may already have started to cook.
- In case the weight of the food is less than 200 g, place it on the edge and not in the centre of the glass tray.
- Turn over foods such as meat, sausage, bread once after approx. half the defrosting time.
- Factor in a compensation time after the defrost program. This is a standing period during which a temperature compensation takes place through conduction of heat from the outside (defrosted) to the inside (frozen). You can leave the food in the switched of appliance or outside the appliance during the compensation time. The compensation time should be at least as many minutes as the defrost time in the microwave. It depends on the condition of the food.
- You can shorten the compensation times by e.g. separating small pieces of meat or crumbling the remaining frozen chunks of mince after the defrosting time. For sliced bread or sausage, separate the slices during the compensation time.
- Allow fruit to defrost in a bowl with a lid. After around half the defrost time, gently stir the fruit once.
- Cakes or tarts with chocolate icing should not be defrosted in the microwave.
To use the defrost program, proceed as follows:
- Determine the weight of the food.
- Remove the food from its packaging. If it cannot be removed from the packaging, defrost for 30 seconds on maximum microwave power (see "Quick start").
- Place the food to be defrosted onto the plate (fruit into a bowl). Also place meat onto a upturned saucer so that the meat juices can drain. This saucer should never be used for other foods or come into contact with them.
- Press the DEFROST/AUTO/TEMP/CLOCK button and select the defrost program "d EF".
- Use the turning knob to set the desired weight.
- Press the START button to start operation.
Multi-Stage Cooking
You can set the programs in such a way that up to 4 different functions can be carried out in succession.
Assume you select the following programs:
Heating with microwave

Grilling
- Press the MICRO button once/repeatedly to select the desired microwave power setting.
- Use the turning knob to set the desired cooking time between 10 seconds and 60 minutes.
- Press the COMBI/GRILL/CONV button until "S." appears on the display.
- Use the turning knob to set the desired cooking time between 10 seconds and 60 minutes.
- Press the START button to start operation.
i NOTE:
- The change of program is indicated by an acoustic signal.
- The automatic programs cannot be used for gradual cooking.

WARNING: Risk of burns! Only touch the door at the frame.
Special Functions
Auto Start (Timer-Function)
The maximum time-delay is 23 hours and 59 minutes.
i NOTE:
- First set the clock! Otherwise you may not use this function.
- When using auto start, the defrost function is not available. This program setting does not support quick start cooking.
Example: It is 10:45h. You want to program the microwave so that it operates at maximum power for 712 minutes at 14:20. Proceed as follows for automatically starting the microwave:
| Step | Button | Display | |
| 1 | MICRO | 10 0P | (Power) |
| 2 | 7:30 | (Cooking time) | |
| 3 | Hold down the DEFROST/AUTO/TEMP/CLOCKbutton for 3 seconds | 10:45 | (Current time) |
| 4 | 14:45 | (Setting the hours) | |
| 5 | DEFROST/AUTO/TEMP/CLOCK | 14:45 | (Confirmation of hour) |
| 6 | 14:20 | (Setting the minutes) | |
| 7 | DEFROST/AUTO/TEMP/CLOCK | 10:45 | (Current time) |
i NOTE:
- The Timer function is activated when the “💡” symbol flashes in the display.
- During this programmed setting the functions of the controls are blocked (except: DEFROST/AUTO/TEMP/CLOCK, STOP/CANCEL and START).
- Press the START button, if you want to start the cooking process beforehand. The microwave starts with the previously selected settings.
- If you wish to display the start time again, press the DEFROST/AUTO/TEMP/CLOCK button.
i NOTE:
- In order to deactivate the automatic start time, press the STOP/CANCEL button.
- When the pre-set time has been reached, the microwave will start operation. A beep indicates the start.
WARNING: Risk of Fire!!
• Always supervise the appliance during operation.
- When using the time-delay function, set the time in such a way that the appliance will be operating under proper supervision.
- Do not operate the microwave empty. If you want to take out the food before the program has finished, you have to cancel the program by pressing the STOP/CANCEL button.
Locking (Child-proof Lock)
- Press and hold the STOP/CANCEL button for 3 seconds to lock the appliance. You will hear a signal tone. The locked condition is shown in the display by "L O C". The control panel function is blocked.
- Press and hold the STOP/CANCEL button again for 3 seconds to unlock. You will hear a signal tone.
Display Function
Pressing the MICRO button during microwave, grilling, combination or convection mode, will display the mode or temperature setting.
Cleaning
WARNING:
Turn the microwave off and remove the mains plug.
CAUTION:
- Do not use any wire brush or other abrasive objects.
- Do not use any acidic or abrasive detergents.
- Do not use a metal scraper to clean the viewing window. The surface could be scratched and the glass could possibly break.
Interior
- Keep the interior of the oven clean. Splashes and overflowing liquids on the walls of the oven can be removed with a damp cloth. If the oven is very dirty a mild detergent can also be used.
- Wipe off the viewing window on the inside and outside with a damp cloth and remove splashes and stains from overflowing liquids regularly.
External Walls
- The external walls of the microwave should only be cleaned with a damp cloth. Please ensure that no water enters the openings in the housing and therefore inside the appliance.
- Open the microwave door before cleaning the control panel in order to avoid accidentally switching on the appliance.
Accessories
- The glass plate should occasionally be cleaned with washing-up liquid or in the dishwasher.
- Regularly clean the guide ring and the inside of the bottom. You may remove the guide ring and manually clean it. Use a mild detergent or glass cleaner. Dry thoroughly. Make sure to position the ring properly afterwards.
- Clean the grill after each use with a dishwashing detergent or place it in a dishwasher for cleaning.
Odours
In order to remove any unpleasant odours that may emanate from the microwave, place a dish filled with water and lemon juice that is suitable for microwave use in the oven and heat it for approximately 5 minutes. Then wipe out the oven with a soft cloth.
Oven Light
If you need to replace the lighting in the oven, please contact a specialist workshop near you.
Troubleshooting
Malfunctions are often just caused due to minor problems. Before contacting our customer service, please check the table below:
| Problem | Possible Cause | Notes/Remedy |
| Radio or TV reception is interrupted during microwave operation. | The electromagnetic fields of this appliance might interfere with the pictures and sound of special frequencies. | This is normal and not a malfunction. Position the appliances further away from each other. |
| The appliance is not supplied with electricity; the display is black. | Defect wall socket. | Try another wall socket. |
| Check the main fuse in your household. | ||
| The display does not show the current time. | There was a power failure. | Set the clock again. |
| The appliance does not start operation. The display shows a readout other than the current time. | The door is not properly closed. | Check if there are objects or food remains jammed in the door. |
| The START button was not pressed after selecting the function. | Press the START button, or press the STOP/CANCEL button to cancel the function. | |
| All controls are locked. | The child-proof lock is activated. The display shows “L OC”. | Press and hold the STOP/CANCEL button for more than 3 seconds to unlock. |
| The turntable causes a scratching or abradant noise. | There are dirt or foreign objects in the area of the turntable shaft. | Remove possible objects and food remains as described under “Cleaning”. |
| The operation is terminated without any obvious reason. | The appliance is defect. | Please contact our customer service. |
Technical Data
Model: MWG 3001 H EB
Power supply: 230 V\~, 50 Hz
Power consumption
Microwave: 1400 W
Grill: 1300 W
Convection: 2300 W
Rated microwave power output: 900 W/2450 MHz
Cavity volume:......approx. 25 litres
Protection class:....I
Net weight: ....approx. 15,30 kg
The right to make technical and design modifications in the course of continuous product development remains reserved.
This appliance has been tested according to all relevant current CE guidelines, such as electromagnetic compatibility and low voltage directives, and is manufactured according to the latest safety regulations.
Disposal
Meaning of the "Dustbin" Symbol
Protect our environment: do not dispose of electrical equipment in the domestic waste.
Please return any electrical equipment that you will no longer use to the collection points provided for their disposal.
This helps avoid the potential effects of incorrect disposal on
the environment and human health.
This will contribute to the recycling and other forms of re-utilisation of electrical and electronic equipment.
Information concerning where the equipment can be disposed of can be obtained from your local authority.
Návod k obsluze
Microwave energy: Do not remove this cover!
natural_image
Line drawing of a microwave oven mounted on a cabinet (no text or symbols)natural_image
Line drawing of a microwave oven with open door opening (no text or symbols)- POZOR:
- Warnung
- WAARSCHUWING: Kookvertraging!
- ⚠️ WAARSCHUWING: Brandgevaar!
- Symbols in these Instruction Manual
- WARNING:
- CAUTION:
- Contents
- General Notes
- Important Safety Instructions!
- WARNING: Delay in boiling!
- Information Plates and Symbols on the Appliance
- WARNING: Hot surface!
- Risk of burning!
- Read the instructions!
- WARNING
- Overview of the Components
- Picture A
- Picture B: Symbols on the Control Panel
- Buttons and Controls on the Control Panel
- MICRO
- COMBI/GRILL/CONV
- DEFROST/AUTO/TEMP/CLOCK
- STOP/CANCEL
- START
- TIME, WEIGHT
- Avoiding Fire Hazards with Built-in Appliances
- Mounting Accessories
- Installation Instructions
- Dimensions of the Cupboard
- NOTE:
- Information on Grilling and Combined Operation
- Suitable Microwave Tableware
- CAUTION: Sparking and fire hazard!
- Notes on the Function and Use the Appliance
- What You Should Know about Microwave Operation
- Notes on the Function of this Appliance
- Initial Operation
- i NOTE:
- Setting the Clock
- Operating the Microwave
- Pause or Stop Cooking
- Quick Start
- Warming
- Cooking
- Hands-on Cooking Tips
- Double amount = almost double time
- Half amount = half time
- Per 100 g approx. 1 minute cooking
- Grilling
- Convection
- Combinations of Microwave, Grill and Convection
- Tips for Combi Operation
- Auto Functions
- Defrosting
- Multi-Stage Cooking
- Heating with microwave
- Special Functions
- Auto Start (Timer-Function)
- WARNING: Risk of Fire!!
- Locking (Child-proof Lock)
- Display Function
- Cleaning
- Interior
- External Walls
- Accessories
- Odours
- Oven Light
- Troubleshooting
- Technical Data
- Disposal
- Meaning of the "Dustbin" Symbol
- Návod k obsluze
Brand : BOMANN
Model : MWG 3001 H EB
Category : Microwave Oven