NM 25 TG WH - Microwave Oven NODOR - Free user manual and instructions
Find the device manual for free NM 25 TG WH NODOR in PDF.
User questions about NM 25 TG WH NODOR
0 question about this device. Answer the ones you know or ask your own.
Ask a new question about this device
Download the instructions for your Microwave Oven in PDF format for free! Find your manual NM 25 TG WH - NODOR and take your electronic device back in hand. On this page are published all the documents necessary for the use of your device. NM 25 TG WH by NODOR.
USER MANUAL NM 25 TG WH NODOR
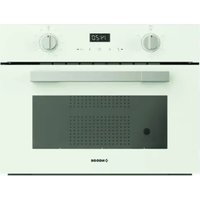
Microwave Oven INSTRUCTIONS MANUAL MODEL: NM 20 DX
Read these instructions carefully before using your microwave oven, and keep it carefully.
If you follow the instructions, your oven will provide you with many years of good service
PRECAUTIONS TO AVOID POSSIBLE EXPOSURE TO EXCESSIVE MICROWAVE ENERGY
a) Do not attempt to operate this oven with the door open since this can result in harmful exposure to microwave energy. It is important not to break or tamper with the safety interlocks.
b) Do not place any object between the oven front face and the door or allow soil or cleaner residue to accumulate on sealing surfaces.
c) WARNING: If the door or door seals are damaged, the oven must not be operated until it has been repaired by a competent person.
ADDENDUM
If the apparatus is not maintained in a good state of cleanliness, its surface could be degraded and affect the lifespan of the apparatus and lead to a dangerous situation.
Specifications
| Model: | NM 20 DX |
| Rated Voltage: | 230V~ 50Hz |
| Rated Input Power(Microwave): | 1250W |
| Rated Output Power(Microwave): | 800 W |
| Oven Capacity: | 20 L |
| Turntable Diameter: | Ø 245mm |
| External Dimensions: | 595x316x388mm |
| Net Weight: | 14 kg |
IMPORTANT SAFETY INSTRUCTIONS
WARNING
To reduce the risk of fire, electric shock, injury to persons or exposure to excessive microwave oven energy when using your appliance, follow basic precautions, including the following:
- Warning: Liquids and other foods must not be heated in sealed containers since they are liable to explode.
- Warning: It is hazardous for anyone other than a competent person to carry out any service or repair operation that involves the removal of a cover which gives protection against exposure to microwave energy.
- This appliance can be used by children aged from 8 years and above and persons with reduced physical, sensory or mental capabilities or lack of experience and knowledge if they have been given supervision or instruction concerning use of the appliance in a safe way and understand the hazards involved.
Children shall not play with the appliance. Cleaning and user maintenance shall not be made by children unless they are older than 8 and supervised.
- Keep the appliance and its cord out of reach of children less than 8 years
- Only use utensils suitable for use in microwave ovens.
- The oven should be cleaned regularly and any food deposits should be removed.
- Read and follow the specific:"PRECAUTIONS TO AVOID POSSIBLE EXPOSURE TO EXCESSIVE MICROWAVE ENERGY".
- When heating food in plastic or paper containers, keep an eye on the oven due to the possibility of ignition.
- If smoke is emitted, switch off or unplug the appliance and keep the door closed in order to stifle any flames.
- Do not overcook food.
- Do not use the oven cavity for storage purposes. Do not store items, such as bread, cookies, etc. inside the oven.
-
Install or locate this oven only in accordance with the installation instructions provided.
-
Eggs in the shell and whole hard-boiled eggs should not be heated in microwave ovens since they may explode, even after microwave heating has ended.
-
This appliance is intended to be used in household and similar applications such as:
-
staff kitchen areas in shops, offices and other working environments;
- by clients in hotels, motels and other residential type environments;
-farm houses; -
bed and breakfast type environments.
-
If the supply cord is damaged, it must be replaced by the manufacturer, its service agent or similarly qualified persons in order to avoid a hazard.
- Do not store or use this appliance outdoors.
- Do not use this oven near water, in a wet basement or near a swimming pool.
- The temperature of accessible surfaces may be high when the appliance is operating. The surfaces are liable to get hot during use. Keep cord away from heated surface, and do not cover any events on the oven.
- Do not let cord hang over edge of table or counter.
- Failure to maintain the oven in a clean condition could lead to deterioration of the surface that could adversely affect the life of the appliance and possibly result in a hazardous situation.
- The contents of feeding bottles and baby food jars shall be stirred or shaken and the temperature checked before consumption, in order to avoid burns.
- Microwave heating of beverages can result in delayed eruptive boiling, therefore care must be taken when handling the container.
- The appliance is not intended for use by persons (including children) with reduced physical, sensory or mental capabilities, or lack of experience and knowledge, unless they have been given supervision or instruction concerning use of the appliance by a person responsible for their safety.
- Children should be supervised to ensure that they do not play with the appliance.
- The appliances are not intended to be operated by means of an external timer or separate remote-control system.
- Accessible parts may become hot during use. Young children should be kept away.
- Steam cleaner is not to be used.
- During use the appliance becomes hot. Care should be taken to avoid touching heating elements inside the oven.
- Only use the temperature probe recommended for this oven.(for ovens provided with a facility to use a temperature-sensing probe.)
- WARNING: The appliance and its accessible parts become hot during use. Care should be taken to avoid touching heating elements. Children less than 8 years of age shall be kept away unless continuously supervised.
- The microwave oven must be operated with the decorative door open.(for ovens with a decorative door.)
- Surface of a storage cabinet can get hot.
To Reduce the Risk of Injury to Persons Grounding Installation
DANGER
Electric Shock Hazard
Touching some of the interna components can cause serious personal injury or death. Do not disassemble this appliance.
WARNING
Electric Shock Hazard
Improper use of the grounding can result in electric shock. Do not plug into an outlet until appliance is properly installed and grounded.
This appliance must be grounded. In the event of an electrical short circuit, grounding reduces the risk of electric shock by providing an escape wire for the electric current. This appliance is equipped with a cord having a grounding wire with a grounding plug. The plug must be plugged into an outlet that is properly installed and grounded.
Consult a qualified electrician or serviceman if the grounding instructions are not completely understood or if doubt exists as to whether the appliance is properly grounded. If it is necessary to use an extension cord, use only a 3-wire extension cord.
- A short power-supply cord is provided to reduce the risks resulting from becoming entangled in or tripping over a longer cord.
- If a long cord set or extension cord is used:
1) The marked electrical rating of the cord set or extension cord should be at least as great as the electrical rating of the appliance.
2) The extension cord must be a groundingtype 3-wire cord.
3) The long cord should be arranged so that it will not drape over the counter top or tabletop where it can be pulled on by children or tripped over unintentionally.
CLEANING
Be sure to unplug the appliance from the power supply.
- Clean the cavity of the oven after using with a slightly damp cloth.
- Clean the accessories in the usual way in soapy water.
- The door frame and seal and neighbouring parts must be cleaned carefully with a damp cloth when they are dirty.
- Do not use harsh abrasive cleaners or sharp metal scrapers to clean the oven door glass since they can scratch the surface, which may result in shattering of the glass.
- Cleaning Tip---For easier cleaning of the cavity walls that the food cooked can touch: Place half a lemon in a bowl, add 300ml (1/2 pint) water and heat on 100% microwave power for 10 minutes.
Wipe the oven clean using a soft, dry cloth.
UTENSILS
See the instructions on "Materials you can use in microwave oven or to be avoided in microwave oven." There may be certain non-metallic utensils that are not safe to use for microwaving. If in doubt, you can test the utensil in question following the procedure below.
Utensil Test:
- Fill a microwave-safe container with 1 cup of cold water (250ml) along with the utensil in question.
- Cook on maximum power for 1 minute.
- Carefully feel the utensil. If the empty utensil is warm, do not use it for microwave cooking.
- Do not exceed 1 minute cooking time.
CAUTION
Personal Injury Hazard
It is hazardous for anyone other than a competent person to carry out any service or repair operation that involves the removal of a cover which gives protection against exposure to microwave energy.
Materials you can use in microwave oven
| Utensils | Remarks |
| Aluminum foil | Shielding only. Small smooth pieces can be used to cover thin parts of meat or poultry to prevent overcooking. Arcing can occur if foil is too close to oven walls. The foil should be at least 1 inch (2.5cm) away from oven walls. |
| Browning dish | Follow manufacturer's instructions. The bottom of browning dish must be at least 3/16 inch (5mm) above the turntable. Incorrect usage may cause the turntable to break. |
| Dinnerware | Microwave-safe only. Follow manufacturer's instructions. Do not use cracked or chipped dishes. |
| Glass jars | Always remove lid. Use only to heat food until just warm. Most glass jars are not heat resistant and may break. |
| Glassware | Heat-resistant oven glassware only. Make sure there is no metallic trim. Do not use cracked or chipped dishes. |
| Oven cooking bags | Follow manufacturer's instructions. Do not close with metal tie. Make slits to allow steam to escape. |
| Paper plates and cups | Use for short-term cooking/warming only. Do not leave oven unattended while cooking. |
| Paper towels | Use to cover food for reheating and absorbing fat. Use with supervision for a short-term cooking only. |
| Parchment paper | Use as a cover to prevent splattering or a wrap for steaming. |
| Plastic | Microwave-safe only. Follow the manufacturer's instructions. Should be labeled “Microwave Safe”. Some plastic containers soften, as the food inside gets hot. “Boiling bags” and tightly closed plastic bags should be slit, pierced or vented as directed by package. |
| Plastic wrap | Microwave-safe only. Use to cover food during cooking to retain moisture. Do not allow plastic wrap to touch food. |
| Thermometers | Microwave-safe only (meat and candy thermometers). |
| Wax paper | Use as a cover to prevent splattering and retain moisture. |
Materials to be avoided in microwave oven
Utensils
Remarks
| Aluminum tray | May cause arcing. Transfer food into microwave-safe dish. |
| Food carton with metal handle | May cause arcing. Transfer food into microwave-safe dish. |
| Metal or metaltrimmed utensils | Metal shields the food from microwave energy. Metal trim may cause arcing. |
| Metal twist ties | May cause arcing and could cause a fire in the oven. |
| Paper bags | May cause a fire in the oven. |
| Plastic foam | Plastic foam may melt or contaminate the liquid inside when exposed to high temperature. |
| Wood | Wood will dry out when used in the microwave oven and may split or crack. |
SETTING UP YOUR OVEN
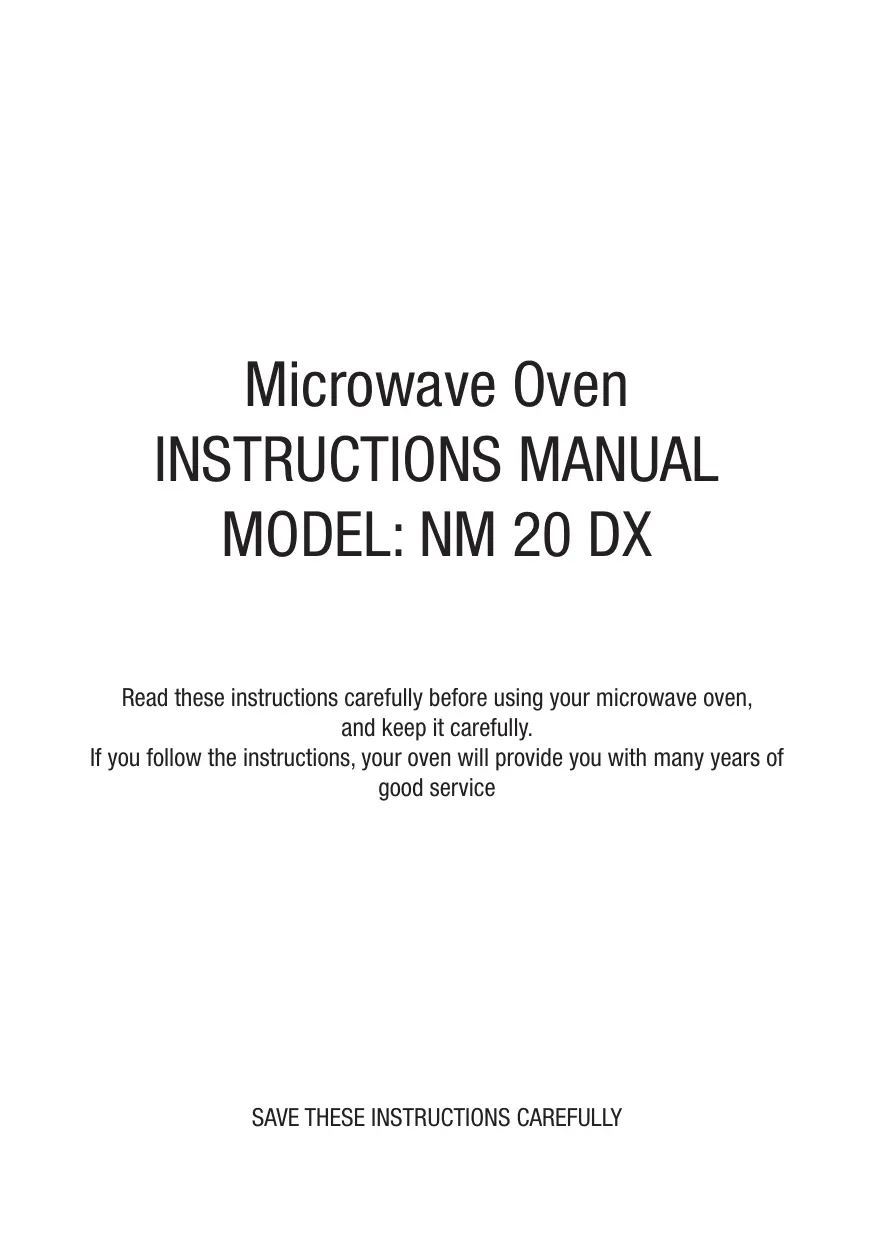
Names of Oven Parts and Accessories
Remove the oven and all materials from the carton and oven cavity. Your oven comes with the following accessories:
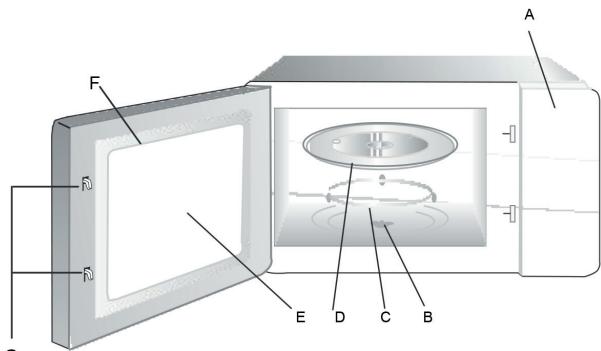
G
Grill Rack (Only be used in grill function and be placed on the glass tray)
A) Control panel
B) Turntable shaft
C) Turntable ring assembly
D) Glass tray
E) Observation window
F) Door assembly
G) Safety interlock system
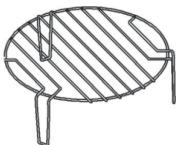
Turntable Installation
a. Never place the glass tray upside down. The glass tray should never be restricted.
b. Both glass tray and turntable ring assembly must always be used during cooking.
c. All food and containers of food are always placed on the glass tray for cooking.
d. If glass tray or turntable ring assembly cracks or breaks, contact your nearest authorized service center.
Installation and connection
- This appliance is only intended for domestic use.
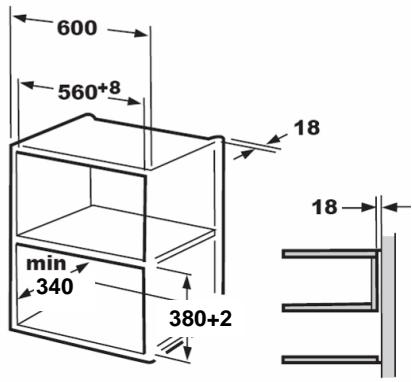
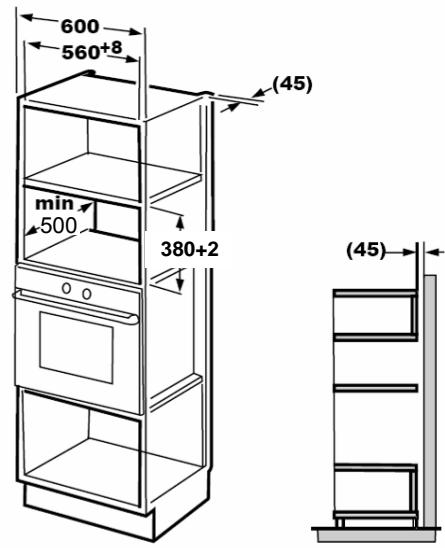
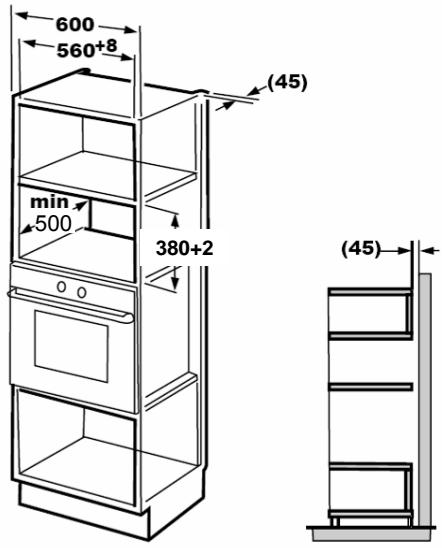
- This oven is intended for built-in use only.It is not intended for counter-top use or for use inside a cupboard.
- Please observe the special installation instructions.
- The appliance can be installed in a 60cm wide wall-mounted cupboard (at lease 55cm deep and 85cm off the floor).
- The appliance is fitted with a plug and must only be connected to a properly installed earthed socket.
- The mains voltage must correspond to the voltage specified on the rating plate.
- The socket must be installed and connecting cable must only be replaced by a qualified electrician. If the plug is no longer to accessible following installation, an all-pole disconnecting device must be present on the installation side with a contact gap of at lease 3mm.
- Adapters, multi-way strips and extension leads must not be used. Overloading can result in a risk of fire.
The accessible surface may be hot during operation.
Installation Instructions
Please Read the Manual Carefully Before Installation
Please Note:
Electrical connection
EThe oven is fitted with a plug and must be only connected to a properly installed earthed socket. In accordance with the appropriate regulations, the socket must only be installed and the connecting cable must only be replaced by a qualified electrician.
If the plug is no longer accessible following installation and all-pole isolating switch must be present on the installation side with a contact gap of at least 3mm.
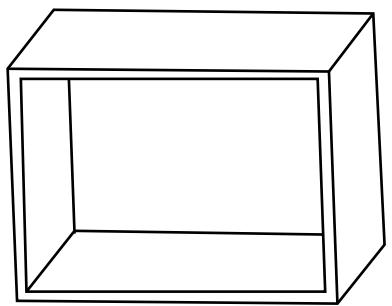
A. Built-in furniture
The built-in cabinet shall not have a rear wall behind the appliance. Minimum installation height is 85cm.
Do not cover ventilation slots and air intake points.
1.
2.
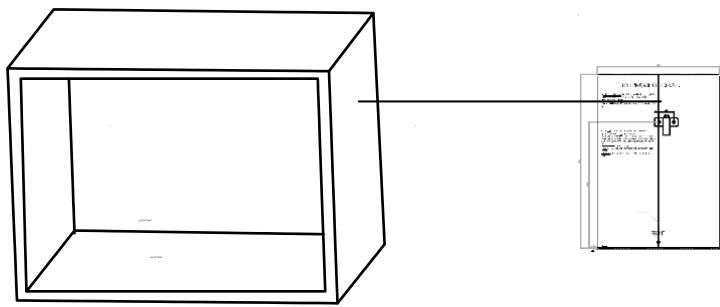
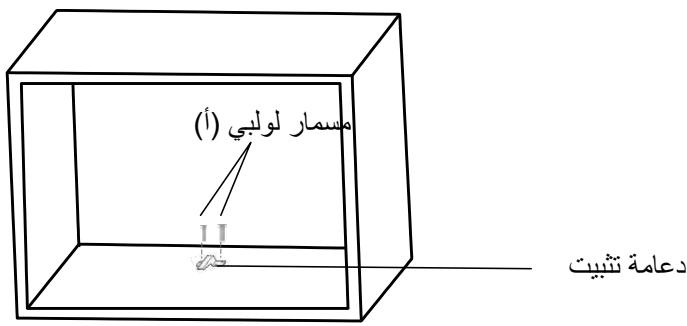
B.Prepare the cabinet
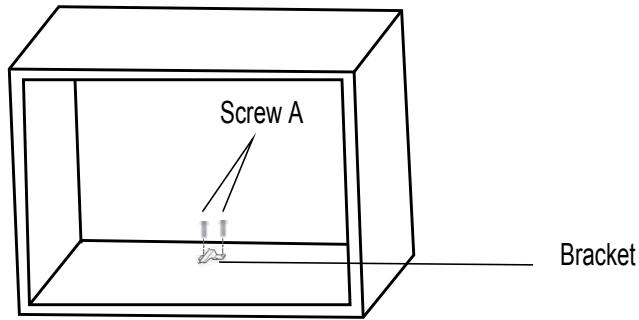
- Read the instruction on the BOTTOM CANINET TEMPLATE, put the template on the bottom plane of cabinet.
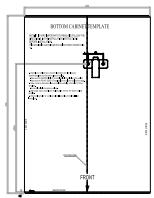
- Make the marks on the bottom plane of cabinet according to marks"a" of of the template
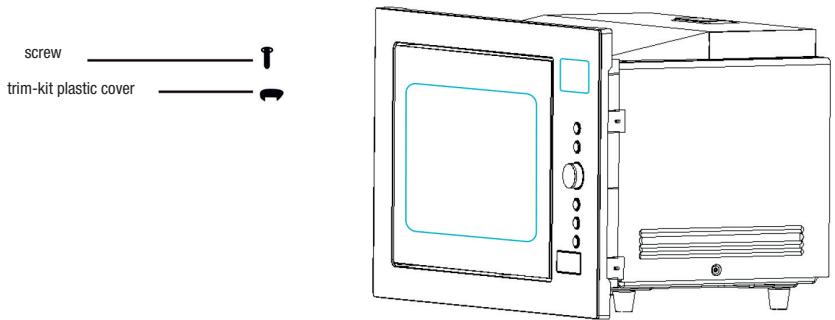
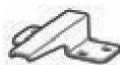
Screw A

Bracket
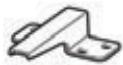
- Remove the bottom cabinet template and fix the bracket with screw A.
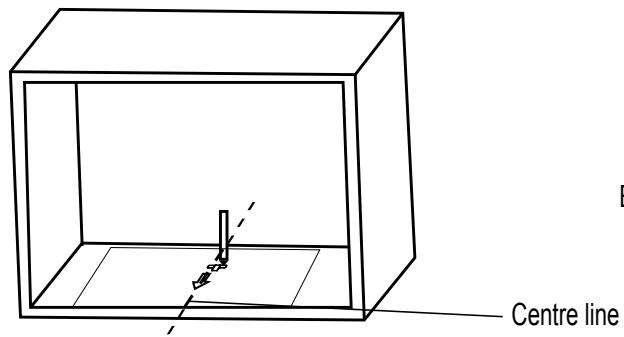
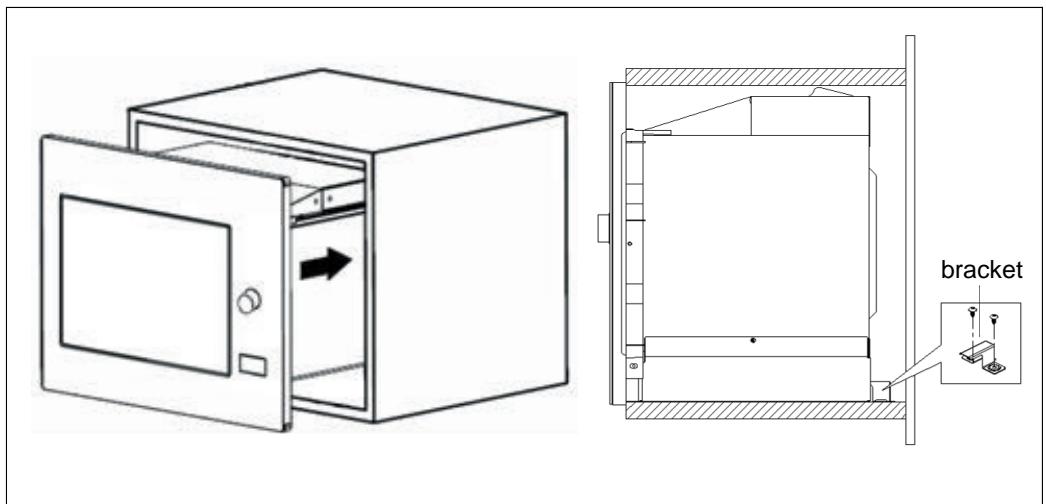
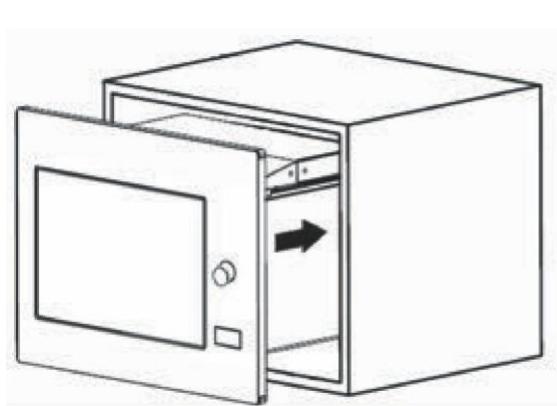
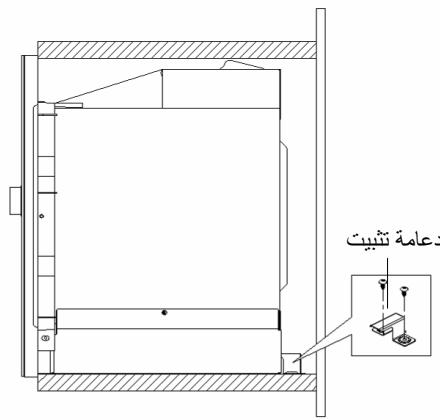
C.Install the oven
-
Install the oven to the cabinet
-
Make sure the back of the oven is locked by bracket.
- Do not trap or kink the power cord.
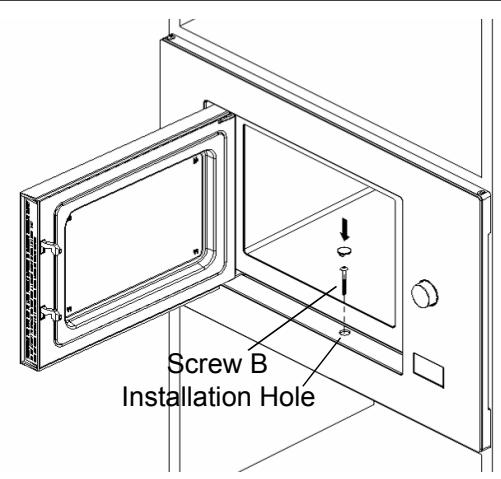
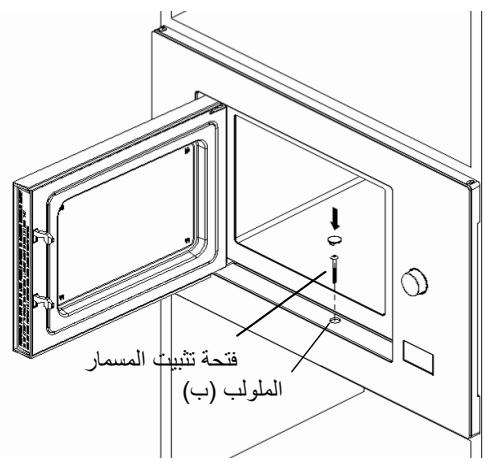
- Open the door, fix the oven to the cabinet with Screw B, at the installation hole.
DISPLAY


A1


A5
A2


A6
A3


AT
A4


A8


MicroWave

Weight Defrost

Time Defrost

Kitchen Timer / Clock

Menu

Stop/Clear

Start/+30Sec./Confirm
Operation Instructions
1. Clock Setting
When the microwave oven is electrified, the LED will display "0:00", buzzer will ring once.
1) Press Kitchen Timer/Clock twice to select clock function, the hour figures will flash.
2) Turn "..." to adjust the hour figures, the input time should be within 0--23.
3) Press G Kitchen Timer/Clock, the minute figures will flash.
4) Turn "h" to adjust the minute figures, the input time should be within 0--59.
5) Press Clock/Kitchen Timer to finish clock setting. ":" will flash, and the time will light.
Note: 1) If the clock is not set, it would not function when powered.
2) During the process of clock setting, if you press "STOP/CLEAR", it will exit the setting state.
2. Microwave Cooking
Press Microwave. the LED will display "P100".
Press Microwave. for times or turn
"P50". "P30" or "P10" will display for each added press. Then press Start/+30Sec./Confirm " to confirm, and turn " " to set cooking time from 0:05 to 95:00. Press Start/+30Sec./Confirm again to start cooking.
Example: If you want to use 80% microwave power to cook for 20 minutes, you can operate the oven as the following steps.
1) Press Microwave. once, the screen display "P100".
2) turn " " to choose 80% microwave power.
3) Press Start/+30Sec./Confirm to confirm, and the screen displays "P 80".
4) Turn " " to adjust the cooking time until the oven displays "20:00".
5) Press Start/+30Sec./Confirm to start cooking.
NOTE: the step quantities for the adjustment time of the coding switch are as follow:
Microwave Power Chart
| Press | Once | Twice | Thrice | 4 times | 5 times |
| Microwave Power | 100% | 80% | 50% | 30% | 10% |
"Micro/Grill/Combi."
Pad instructions Display
Microwave Power
| 1 | P100 | 100 % |
| 2 | P80 | 80 % |
| 3 | P50 | 50 % |
| 4 | P30 | 30 % |
| 5 | P10 | 10 % |
3. Quick Start
1) In waiting state, Press Quick Start to start cooking with 100% power, each added press will increase 30 seconds cooking time up to 95 minutes.
4. Defrost By Weight
1) Press (kg) : Weight/Time Defrost once, and the oven will display "dEF1".
2) Turn " " to select the weight of food from 100 to 2000 g.
3) Press Start/+30Sec./Confirm to start defrosting.
- Defrost By Time
1) Press (kg / )^* : Weight/Time Defrost twice, and the oven will display "dEF2".
2) Turn "h" to select the defrost time. The MAX time is 95 minutes.
3) Press Start/+30Sec./Confirm to start defrosting. The defrost power is P30, and it will not be changed.
6. Auto Menu
1) Press "Auto Menu", "Auto" and "COOK" will light. And "A-1" will flash.
2) Turn " " to select the function you want.
3) Press "Auto Menu" button to confirm the menu.
4) Turn " to select the weight of food. "g" will light.
5) Press " Quick Start/Start " to start. "g" will go out, " " and " AUTO " will flash.
Auto menu Chart
| Menu | Weight(g) | Display | Power |
| A-1 REHEAT | 200 | 200 | 100% |
| 400 | 400 | ||
| 600 | 600 | ||
| A-2 VEGETABLE | 200 | 200 | 100% |
| 300 | 300 | ||
| 400 | 400 | ||
| A-3 FISH | 250 | 250 | 80% |
| 350 | 350 | ||
| 450 | 450 | ||
| A-4 MEAT | 250 | 250 | 100% |
| 350 | 350 | ||
| 450 | 450 | ||
| A-5 PASTA | 50(with water 450 ml) | 50 | 80% |
| 100(with water 800 ml) | 100 | ||
| A-6 POTATO | 200 | 200 | 100% |
| 400 | 400 | ||
| 600 | 600 | ||
| A-7 PUZZA | 200 | 200 | 100% |
| 400 | 400 | ||
| A-8 SOUP | 200 | 200 | 80% |
| 400 | 400 |
7. Inquiring Function
1) In cooking states of microwave,grill and combination, press " 串 ", the current power will be displayed for 3 seconds.
2) In pre-set state, press " 1 " to inquire the time for delay start cooking. The pre-set time will flash for 3 seconds, then the oven will turn back to the clock display.
3) During cooking state, press " | " to check the current time. It will be displayed for 3 seconds.
8. Lock-out Function for Children
Lock: In waiting state, press Stop/Clear for 3 seconds, there will be a long beep denoting entering the children-lock state and the current time will display if the time has been set, otherwise, the LED will display "F
Lock quitting: In locked state, press Stop/Clear for 3 seconds, there will be a long "beep" denoting that the lock is released.
Trouble shooting
Normal
Microwave oven interfering TV reception
Radio and TV reception may be interfered when microwave oven operating. It is similar to the interference of small electrical appliances, like mixer, vacuum cleaner, and electric fan. It is normal.
Dim oven light
In low power microwave cooking, oven light may become dim. It is normal.
Steam accumulating on door, hot air out of vents
In cooking, steam may come out of food. Most will get out from vents. But so me may accumulate on ool place like oven door. It is normal.
Oven started accidentally with no food in
It is forbidden to run the unit without any food inside. It is very dangerous.
| Trouble | Possible Cause | Remedy |
| Oven can not be started. | 1) Power cord not plugged in tightly. | Unplug. Then plug again after 10 seconds. |
| 2) Fuse blowing or circuit breaker works. | Replace fuse or reset circuit breaker (repaired by professional personnel of our company) | |
| 3) Trouble with outlet. | Test outlet with other electrical appliances. | |
| Oven doesnot heat. | 4) Door not closed well. | Close door well. |
| Glass turntable makes noise when microwave oven operates | 5) Dirtyroller rest and oven bottom. | Refer to “Maintenance of Microwave” to clean dirty parts. |

According to Waste of Electrical and Electronic Equipment (WEEE) directive, WEEE should be separately collected and treated. If at any time in future you need to dispose of this product please do NOT dis-pose of this product with household waste. Please send this product to WEEE collecting points where available.
Installation et raccordement
Début/+30Sec./Confirmer
3To yctpoiCTBO doJNHO 6bIb 3aemHeo. IpiK oporTcOM 3aMbKaHNHa KOpNy cYctpoiCTBa 3aemHeine ChnJaet OanaChOte bopaeHnnaeEHHnnaeHnnaeHnnaeHnnaeHnnaeHnnaeHnnaeHnnaeHnnaeHnnaeHnnaeHnnaeHnnaeHnnaeHnnaeHnnaeHnnaeHnnaeHnnaeHnnaeHnnaeHnnaeHnnaeHnnaeHnnaeHnnae HnnaeHnnaeHnnaeHnnaeHnnaeHnnaeHnnaeHnnaeHnnaeHnnaeHnnaeHnnaeHnnaeHnnaeHnnaeHnnaeHnnaeHnnaeHnnaeHnnaeHnnaeHnnaeHnnaeHnnaeHnNAEHHNAAEHHNAAEHHNAAEHHNAAEHHNAAEHHNAAEHHNAAEHHNAAEHHNAAEHHNAAEHHNAAEHHNAAEHHNAAEHHNAAEHHNAAEHHNAAEHHNAAEHHNAAEHHNAAEHHNAAEHHNAAEHHNAAEHHNAAEHHNAAEHHNAAEHHN
06paTntecb K KBaHInΦmIcnpoBaHnomy 3neKtpnky IINI TexnHKy IO no6cnyJmbaHnIO, ecNI He ybepeBb I BOINOM HOHMAMHN Tpe6oBaHmIK C nCTeMe 3a3eMJIeHnI INI pNIMCmEHnX OTHOCHTbHO nPpABuHbOCTN 3a3eMJIeHn3TOrO yCTPOCTBA. PpN HEo6xoImocTN NtOJIb3OBAHnY yDInHInTeTEnCneDyET npIMeHnT ToJbKO TPEXKnHbY yDInHInTeB.
- MinkpoBolnoBovai neyb ochauneHa KopoTKM CeteBbIM HHypOM Bo 36exaHme ONaCHOCTM 3aTyTaCbR B DInHHOM UHype IIN CTOTKHyTbCRA 06 Hero.
2.ПиИСПОЛБЗOBAHINУДПИНTEьHOrOунура UNI Ka6Я сбИЮдайтсе Дуюшпte Tpe6OBAHIN.
1) Yka3aHnHa MaKcMmAbHbA 3eKtpuCecka Hary3ka Ha yDInHHTelbHbI hHyp IIN Ka6enb DoJXHa 6bITb He MeHbIe, cHOMHaHbHa J3eKtpuCecka MoUHOCb MIKPOBONHOB Onei.
2)Ду新股аетси NCNLOB3OBAHNE toIbKO TpeXKINbHorO ydINHHTe r cKIMIoJ 3aEMLneHnA.
3) Ipnoklndky ydninHnTeI CnlyeYt BbInonHnTb Tak, YTO6bl OH He CBnCaI C KpbIaKc CTOna HIN PpInaBka, rde ero MOryT DoCTaTb DeTI INN Ectb BO3MOxHc07B CnuyaHIO 3a Hero 3aueHNTcb.
O4MCTKA
Y6eJntecb TOM, YTO yCTpoCTBO OTKJIIOUeHO OT cETN.
- Nocne nCnoB3oBaHnO uChTe BHyTpEnHHe NOBepXHOCTn Neu C nOMoUbIcJeKa BnaJxHOr TpAnKn.
- 0uHCTIte DOnoJIHHTeBhIbe IpuHaIeXHoCTn ObUHybIM CnOcO6m B pAcTBope MOUeero CpeDCTBa.
- Pamy dBeprn, ynpnoTHHeHne n npnlraIoue qactn OoctoPkoHO oOHTNE c NOMoBb BnaJXHO TpRKnE, eCIn Ha Hnx Ectb 3aqr3HeHnA.
- He donnyckaetca nCnOlb3OBaHne arpeccNBbXb 6abp3AIBbXb YNCTaXb CpeCTB Nm OCTpbXb METAnLIeCKNX CKpe6KOB DnI OUYCTKn CTekna DBeprn Neu, TAK KAK 3TO MOKeT NOUpaanatb NOBepxHOCTb, IN B pe3yJbTaTe, PnIPBEcT N Ka3PpUWeHIO CTekJa.
- CCobET no ONUCTke: 3OT CnOCo6 NOMoAer oUHCTNtB CTENKIMapebI MKNPOBOJHOBOI neu, KOToPbe HaxOJaTcBA KOnTaKe T cNIuee. IpoTpIte ney c NOMOJIbIO MARKOI cyXOIT PAnIKI. IOnMeCTITE NIOBUNHy NIMOHa B INaIy, Do6aBbTe 300 Ml BObl n IporpeiTe Ha MaKcImaJIbHO MOUHOCTH b TEeHne 10 MNHT. HauNtO npotpIte MKNPOBOJHOBOI ney MBKOI cyXOIT KAnHeBO calFetKOI.
NOCYDA
Cm. yka3aHnB pa3dene «IonyctMbIe HneOyCTMbIe MaTePnAJIb I dRn IcNoIb3oBaHnB M MInKpOBoHIOHO neuN». OnpedeneHHyO HeMeTaNueckyO nocdy Ne6e3OnaCHO NcNoIb3oBaTb B MInKpOBoHIOHO neuN. Ppi HAnuM cOmHeHn, pOBepbTe Takyo nocdy cnEduoIm 6pbzOM.
Pnpaok npovbepkn nocyb:
- Помсгите в мінкровлочую чьb один CTахан xолдноь Вбы (250 ml)В 6e3oanaCHOM Дяп рпмehнь в мінкровлочь的新 Котhteоне Вмесе с подөжшшп поверке поcodи.
- BkIIOUHTe MKNPOBOHOBYIO Neb Ha MaKcIMaJIbHyIO MOIoHOCTb Ha OJHy MNHyTu.
- Octopoxno noTporai Te nocdy, ecn nycta nocya Tennay, ee npmeneHne I pyrotobK B MmKpOboHOBIO neu 3anpeuaetc.
- He donyckaIte pa60ty neu 60lee odHoi MNHytbl.
BhimaHne
Onachoctb hecaacthblx cnuyaeB
K BbIIOJIHeHIO cepBcHbIX n peMOHTbIX paOt, BKIIouaIoXn DeMOHTax kPaHa, 3aunuaioeTo ot o6nyeHm MIKPOBoHOBo Hneprmei, DOnyUcKaETCA TOJbKO pOIdrTOBNeHHbI hAdJeKaaMm 6bp30m nepcoHaN.
Donyctmble K nCnOJb3OBaHHIO B MmKpOBONHOB O neu MaTePnaIbI
| Посуда | Примочаюнia |
| Аліюмініевая Фόльга | Толък дія Нарьванія. He6òьшіе гаддікіе отpe3ки Фόльгі можно Испьзвові дія Нарьванія тонкіи кужов міра сілі піцьі дія р dedупразождініrupe3мерій т\'елівові обра6otкі. Востміхо НОЗИКИВOVЕ NCKP, ecnіфόьгі haxодіті сілішkom 6\'и3\'ko K CTENKAM peu -MinHmʌьнaj дістанціо от CTEN peuДODЖнɑ coCTABЛТь 2,5 CM. |
| Глазуровныtie tarpeлікі | С...\\\\\\\\\\\\\\\\\\\\\\\\\\\\\\\\\\\\\\\\\\\\\\\\\\\\\\\\\\\\\\\\\\\\\\\\\\\\\\\\\\\\\\\\\\\\\\\\\\\\\)\ |
| С...\\\\\\\\\\\\\\\\\\\\\\\\\\\\\\\\\\\\\\\\\\\\\\\\\\\\\\\\\\\\\\\\\\\\\\\\\\\\\\\\\\\\\\\\\\\\\\\\\)\ | С...\\\\\\\\\\\\\\\\\\\\\\\\\\\\\\\\\\\\\\\\\\\\\\\\\\\\\\\\\\\\\\\\\\\\\\\\\\\\\\\\\\\\\\\\\\\\\\\\\) БысOTе He Meeee 5 MM NaD noborothtbI yctpoCTBOM. HEnpaBInlbHoe Испьзвовіе может\ при'vestи К паломke Noborothoro uystpoiCTBa. |
| С...\\\\\\\\\\\\\\\\\\\\\\\\\\\\\\\\\\\\\\\\\\\\\\\\\\\\\\\\\\\\\\\\\\\\\\\\\\\\\\\\\\\\\\\\\\\\\\\)\ | С...\\...\...\...\...\...\...\...\...\...\...\...\...\...\...\...\...\...\...\...\...\...\...\...\...\...\...\...\...\...\...\...\...\...\...\...\...\...\...\...\...\...\...\...\...\...\...\...\...\...\...\...\\...\...\...\...\...\...\...\...\...\...\...\...\...\...\...\...\...\...\...\...\...\...\...\...\...\...\...\...\...\...\...\...\...\...\...\...\...\...\...\...\...\...\...\...\...\...\...\...\...\\...\\...\...\...\...\...\...\...\...\...\...\...\...\...\...\...\...\...\...\...\...\...\...\...\...\...\...\...\...\...\...\...\...\...\...\...\...\...\...\...\...\...\...\...\...\...\...\...\...\...\* |
| С...\\\\\\\\\\\\\\\\\\\\\\\\\\\\\\\\\\\\\\\\\\\\\\\\\\\\\\\\\\\\\\\\\\\\\\\\\\\\\\\\\\\\\\\\\\\\\\\\\ | С...\\\\\\\\\\\\\\\\\\\\\\\\\\\\\\\\\\\\\\\\\\\\\\\\\\\\\\\\\\\\\\\\\\\\\\\\\\\\\\\\\\\\\\\\\\\\\\\\)\ |
3anpeeHHbIe K hCnObl3oBaHmIO B MmKpOBoHOBo Neu MaTePnaBbl
a a a a a a a a a a a a a a
j 1
23
.ogall golalllie aorallgaiy jlll
dai (L) aaii iiaai iaiiaai jieill li.24
j 1 j 1 j 1 j 1 j 1 j 1 j 1 j 1 j 1 j 1 j 1 j 1 j 1 j 1 j 1 j 1 j 1 j 1 j 1 j 1 j 1 j 1 j 1 j 1 j 1 j 1 j 1 j 1
y peale ci pi i 11 11 11 11 11 11 11 11 11
jilll lalell 0 jaii iil jai.28
jaiy jay gall jai will public aolao jaiil jai
.
.30
a a a a a a a a a a a a a a a a a a a a
(.)
glll lss sllll gllll lglj jgj:31
Jr Jy jy 1d .jdy jdy jdy jdy
Jibbl sll gaiy jusill malie aollo ooi jil
a a 1
J
j j 32
(.jj j jjjj jjjjj 12).
Aiiyssll Aoiy e ojiyill Aei ycbu 33
Ig bai g Jy
- iaii 15
1
ai = 12 - ai - 1
1.2
a a a a a a a a a a a a a a a a a a a
jia jiall jai jiyi jil l jui jiu jiu jiu
Cil 8 joc Jbcil Jia jao adinai jay jell lss .3
a a a a a a a a a a a a a a a a a a a
puee 1y jy jy ddy y dy y dy y dy dy dy dy dy dy dy dy dy dy dy dy dy dy dy dy dy dy dy dy dy dy dy dy dy dy dy dy dy dy dy dy dy dy dy dy dy dy dy dy dy dy dy dy dy dy dy dy dy dy dy dy dy dy dy dy dy dy dy dy dy dy dy dy dy dy dy dy dy dy dy dy dy dy dy dy dy dy dy dy dy dy dy dy dy dy dy dy dy dy dy dy dy dy dy dy dy dy dy dy
aiai jayj yjai jai jai jai jai jai jai jai jai jai jai jai jai jai jai jai jai jai jai jai jai jai jai jai jai jai jai jai jai jai jai jai jai jai jai jai jai jai jai jai jai jai jai jai jai jai jai
ai jj jbjjbjjj
jlll lllllllllllll
aallll llae yll Labu w
JbIyUjua 4uull JSL, jyblbi.4
8n
J 5
y all j y j k j j j j j j j j j j j j j j j j j j j j j j j j j j j j j j j j j j j
eJrrll:ssssssssssssssssssssssssssssssssssssssssssssssssssssssssssssssssssssssssss
juaalall jaeil jaiell jaoeil jaiila
"
jll 1 a 2 3 4 5 6 7 8
Aiey 1i j
j 9
1
Aa 10
Jia 11
.1J 1
j 12
4aJyll 5jill cai klaiei l a, a n j jll 13
1.12
J 1
1
calibill, ay jidll calibill 15.15
JSLal 1sall Jgall jlllall
ai a ai 分母最小值为 k .
aai aai jsljll jiaai
1
joll jolal
S OBC = S COD + S BOC - S BOC
aJ 16
eiklll 3 1
Jbbs
2
chw 100000000000000000000000000000000000000000000000000000000
a aaa aaa aaa aaa aaa aaa aaa
aiai
jbs
auiy iiau jbi
ylll llll lllllllllllllll
CaiSaoaaiy. slgll Lai d gill ybjilai auii
jiee1i
#
a
aaiy aay yaae aee
jll jn nn 11 11 jll lss
Ji
J 1
jbln jnnl lll l l l l l l l l
J 1
isIg jyjlll Jia 1JyJz jz jz jz jz
j 1
J 44y j 45j
1 1111111111111111
jL 15 Laj cKs 15 j J jJ jll
aai jss
y
jiaasll jblalld julilill juslslb jzjgl.1
A
2.2
j j j j j j j j j j j j j j j j j j j j j j j j j j j j j j j j j j j j j j j j j j j j j j j j j j j j j
aill 1y yll aill ay lal y
aalal aal alal alal alal alal alal alal alal alal alal alal alal alal
J 1
ailll lglalg 1y 1y 1y 1y 1y 1y 1y 1y 1y
1
:cll jll
aaln aaa aaiy aai yaiy ai yai (Ja 250) aaiy ai ay aai yaiy ai yai yai yai yai yai yai .1
a 2
a 3
.4
aeggssalln jldlgalaaal
a a a a a a a a a a a a a a a a a a a a a a a a a a a a a a a a a a a a
ailll aiee eae ae aalal alalal alalal alalal alalal
yI yll llll lll lll lll lll lll lll lll lll lll lll lll lll
3 3 3 3 3 3 3 3 3 3 3 3 3 3 3 3 3 3 3 3 3 3 3 3 3 3 3 3 3 3 3 3 3 3 3 3 3 3 3
8.
jglll jgjjl lss
J 1 1 1 1 1 1 1 1 1 1 1 1 1 1 1 1 1 1 1 1 1 1 1 1 1 1 1 1 1 1 1 1 1 1 1 1 1 1 1 1 1 1 1 1 1 1 1 1 1 1 85
4ab = 10
A
1

1.
2.
Jn Jdawll ilall gicilll lglg dai jdljdlg 1
.
lll al lss gall "i" ciaal all aylaa aai jall no Jauyll ilal llal ciaalll 2.

()
ii

( x,y) = 1( x,y,) ( b - c)
(1) all locally all 32,42,52,62,72,82,92,102,112,122,132,142,152,162,172,182,192,202,212,222,232,242,252,262,272,282,292,302
aill aai jaiai all jall (u) glal jauwally jai jali g n jall g 5.5
DISPLAY


A1
A5

A2
A6

A3
A7

A4
A8


S OBC = S COD + S_ BOC

j0gJwJg

2000

a_c = 12

a

1

.1JUgUgUgUgUgUgUgUgUgUgUgUgUgUgUgUgUgUgUgUgUgUgUgUgUgUgUgUgUgUgUgUgUgUgUgUgUgUgUgUgUgUgUgUgUgUgUgUgUgUgU
gablll laljnl gao laol jisil nssjgl gabll paaa aaii dllg yraac aagjg kla iai oiae salllln jy aas
acull buca.1
1.1, 1.1, 1.1, 1.1, 1.1, 1.1, 1.1, 1.1, 1.1, 1.1, 1.1, 1.1, 1.1, 1.1, 1.1, 1.1, 1.1, 1.1, 1.1, 1.1, 1.1,
aell 2gall jaa g, jia " ball aal
.0--23 jnnn nn n nn n nn n nn n nn n nn n nn n nn n nn n nn n nn n nn n nn n nn n nn n nn n nn n nn n nn n nn n nn n nn n nn n nn n nn n nn n nn n nn n nn n nn n nn n nn n nn n nn n nn n nn n nn n nn n nn n nn n nn n nn n nn n nn n nn n nn n nn n nn n nn n nn n nn
. 3
.0--59jnnn nn nnnnnnnnnnnnnnnnnnnnnnnnnnnnnnnnnnnnnnnnnnnnnnnnnnnnnnnnnnnnnnnnnnnnnnnnnnnnnnnnnnnnnnnnnnnnnnnnnnnnnnnnnnnnnnnnnnnnnnnnnnnnnnnnnnn
Aclll bia yiey jiey. jaiy all ibiyjw " 1" aay "." Aclll baia elqy " iial all cia jy" ie baii (5
aIbally ogyjie jzll Jax jls acwl bdo pJ (1
Aull 2
2.1
P100" jssll ssssssssssssssssssssssssssssssssssssssssssssssssssssssssssssssssssssssssssssss
10% 100% 100%
10"P10",P30",P50",P80",P100"
A. 12 30SEC/Jux
all 1
(0:05-95:00 123456789)
- 12 30/1000
jzjjiei jyijil 1
5 0-1
10 1-5
30 5-10
10-30
5 30-95
"jcbll 1 jlaal alall jc paiuill " 1 0"le bial (aaiial bialiin 2
Acllll aie 3 3aalaae
3 1
alal.9
gablll lall aal gabll alal gll "laall le bainll 10/30/2010" ciao lc bainll (1
Jy 100000000000000000000000000000000000000000000000000
Ae aee eae ae aee aee aee aee aee aee aee