USER MANUAL SBS 529 WD F X742C - SBS 529 WD E X742C VALBERG
This product is guaranteed for a period of 2 years from the date of purchase* against any failure resulting from a manufacturing or material defect. This warranty does not cover defects or damage resulting from incorrect installation, improper use or abnormal wear of the product.
*as shown on the sales receipt.
CONDITION DE GARANTIE
FR
Thank you for choosing this VALBERG product.
Chosen, tested and recommended by ELECTRO DEPOT,
VALBERG branded products are easy to use, reliable,
and of an impeccable standard.
With every use of this appliance, you can be sure of
complete satisfaction.
Welcome to ELECTRO DEPOT.
Visit our website: www.electrodepot.fr
| A Overview of the appliance | Recommended ambient temperature
Temperature control adjustment
Description of the appliance
Control panel |
| B Using the appliance | Installation
Before using the appliance for the first time
Daily use
Using the water dispenser |
| C Useful information | Useful hints and tips
Cleaning and maintenance
Troubleshooting
Disposing of your old appliance |
Ambient temperatures of use
Respect the climate classes indicated in the product information on the appliance's nameplate. You can use this to check the recommended temperature range of the room where the appliance is located:
SN: Between 10 and 32^
- N: Between 16 and 32^ C
ST: Between 16 and 38^
- T: Between 16 and 43^ C
A multi-class appliance can handle the lowest and highest temperature of all classes covered. Using the appliance outside the recommended temperature range will lead to inferior performance and premature ageing.
Adjusting the thermostat
For optimal use and energy savings, adjust the temperature control(s) of the appliance according to the ambient temperature of the room, in which it is being used, and respect the climate class.
Refer to the product sheet to find out the climate class associated with the minimum and maximum recommended ambient temperatures for the appliance as well as the temperature setting recommended for storing food under optimal conditions.
The ambient temperatures in ^ C are given as a rough guide.
The set positions can be affected by the location of the appliance in the room, how often the door is opened or the load of food inside.
The temperature control position(s) may need to be changed to compensate for these factors.
Examples of locations:
- Unheated room in winter like a garage in a cold region.
- Kitchen/lounge area with normal heating.
- Room that is not air-conditioned in summer in a hot region.
Description of the appliance
1 Freezer shelf
6 Refrigerator vegetable drawer
Refrigerator shelf
7 Adjustable feet
3 Refrigerator door tray
Freezer drawer
Water tank
9 Freezer drawer cover
5 Refrigerator vegetable drawer cover
Freezer door tray
Control panel
Press this button to set the freezer (left-hand side) compartment temperature from -14^ to -22^ .
Press this button to set the refrigeration (right-hand side) compartment temperature from 2^ to 8^ , or to turn if off ("OFF"). If you choose "OFF", the refrigeration compartment will be turned off.
Press this button to select the operating mode: "SMART", "ECO", "SUPER COOLING", "SUPER FREEZING" or USER SETTING (no symbol shown).
Press and hold this button for 3 seconds to lock the other 3 buttons. Press this button for 1 second to unlock the other 3 buttons.
DISPLAY
| A | In “SMART” mode, the refrigerator automatically adjusts the temperature of both compartments, depending on the internal and ambient temperatures. |
| B | In “ECO” mode, the refrigerator selects the setting allowing for minimal energy consumption |
| C | In “SUPER COOLING” mode, the refrigeration compartment operates at its lowest temperature for approximately 2 hours. At the end of this time, the temperature set before activating this mode is automatically re-established. |
| D | In “SUPER FREEZING” mode, the freezer compartment operates at its lowest temperature for approximately 6 hours. At the end of this time, the temperature set before activating this mode is automatically re-established. |
| E | “LOCK”: this symbol lights up if the buttons are locked. |
| F | Displays the temperature set for the freezer compartment |
| G | Displays the temperature set for the refrigeration compartment |
Door open alarm
If one of the doors remains open for 90 seconds, an alert will sound regularly until the door is closed.
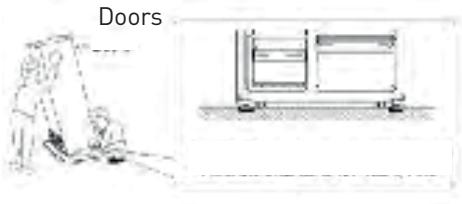
Installation
If your kitchen door opening is not wide enough for the refrigerator to pass through, the doors and handles of the appliance can be removed by following the procedure below.
Removing the handles
Tool required: spanner from the accessories bag.
- Ensure that the appliance is unplugged and empty
- All the parts removed must be kept so that the handles can be replaced afterwards.
- Unscrew the handles using the spanner.
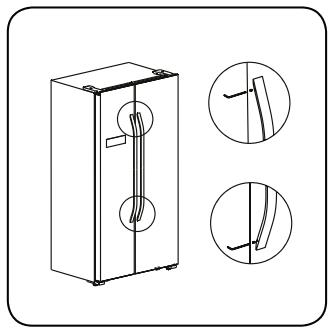
Pull on the handles to remove them.
- One the appliance is in place, replace the handles by reversing the above procedure.
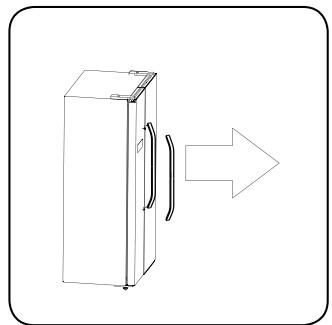
Removing the handles
Tool required: Phillips screwdriver, flat screwdriver.
- Ensure that the appliance is unplugged and empty.
- The appliance must be tilted backwards slightly to remove the door. It must rest on a solid surface, to prevent it sliding while the door is removed.
- All the parts removed must be kept so that the door can be replaced afterwards.
- Do not lay the appliance flat, as this would risk damaging the cooling system.
- It is preferable for the appliance to be handled by 2 people during assembly.
- Unscrew the hinge cover using the Phillips screwdriver.

Unplug the electrical loom.
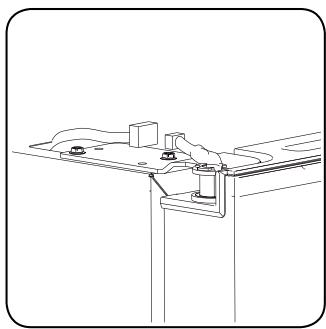
Unscrew the upper hinge.
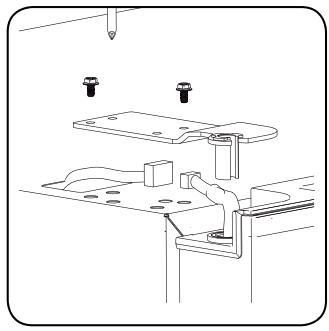
- Lift off the door and place this on a soft, padded surface. Then remove the other door following the same procedure.
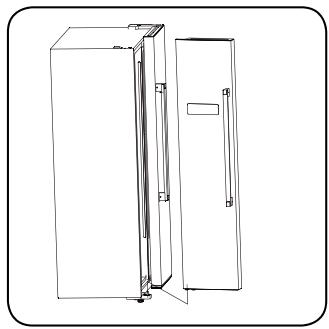
Unscrew the lower hinges.

- One the appliance is in place, replace the doors by reversing the above procedure.
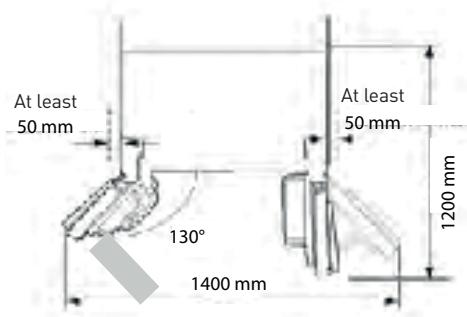
Space required
- Choose a location which is not directly exposed to sunlight.
- Ensure there is sufficient space to be able to open the refrigerator doors easily.
- Select an area where the floor is level (or almost level).
- Make sure that there is sufficient space for the refrigerator to be installed on a level surface.
- Allow space to the right, left, rear and above the appliance when you install it. This will help to reduce its electricity consumption and thus your energy bills.
Levelling and stabilizing the refrigerator
- Level and stabilize the refrigerator by adjusting the feet.
- Turn the feet clockwise to raise these up manually.
- Turn the feet anticlockwise to lower these manually.
Placement
Install this appliance in a place in which the ambient temperature corresponds to the climate class indicated on the nameplate.
Location
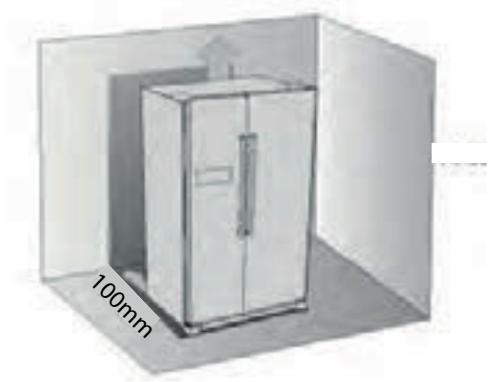
- The appliance must be installed at a distance from heat sources, such as radiators, boilers, direct sunlight, etc. Ensure that air can circulate freely at the rear of the appliance. For optimum operation, if the appliance is placed under a wall cabinet, the distance between the top of the appliance and the wall cabinet must be at least 100mm . In as far as possible, it is always preferable not to position the appliance under wall cabinets. The appliance can be levelled precisely thanks to one or more adjustable feet at the bottom.
CAUTION
You must be able to unplug the appliance from the mains; the socket must therefore be easily accessible after installation.
Electrical connections
- Before plugging in the appliance, check that the voltage and frequency shown on the rating plate match your domestic electricity supply.
This appliance must be earthed. The plug on the power cord is equipped with a pin for this purpose. If your domestic electricity supply socket is not earthed, earth the appliance in another way, in accordance with the regulations in force and after consulting a qualified electrician. The manufacturer declines any liability if the aforementioned safety measures are not taken. This appliance complies with European regulations.
Before using the appliance for the first time
Cleaning the inside
- Before using the appliance for the first time, wash the interior and all the interior accessories with warm water and a neutral soap, in order to remove the characteristic new appliance smell. Then dry thoroughly.
NOTE
Do not use abrasive detergents or scouring powders, as these damage the appearance of the appliance.
Daily use
Freezing fresh food
- The freezer compartment allows for freezing fresh food and keeping frozen food for a long period of time.
- Place the fresh food you wish to freeze into the lower compartment.
- The maximum quantity of food that can be frozen in 24 hours is indicated on the nameplate.
- The freezing process takes 24 hours: do not add other food to be frozen during this time.
Storing deep-frozen food
- When using for the first time or after an extended period of downtime, allow the appliance to run at the lowest temperature setting for at least 2 hours before placing products in the compartment.
NOTE
In the event of accidental defrosting (for example, if the power is cut for a period longer than shown in the technical specifications table under the heading "Rise in temperature period"), the defrosted food must be eaten quickly or cooked immediately and then refrozen (after cooking).
Defrosting
-
Before use, deep-frozen or frozen food items can be thawed in the refrigerator compartment or at room temperature, depending on how much time you have to do this.
-
Small or chopped food items can even be cooked from frozen without defrosting. In this case, the cooking time is longer than usual.
Accessories
Removable shelves
- The refrigerator walls are fitted with a series of runners allowing the shelves to be positioned as desired.
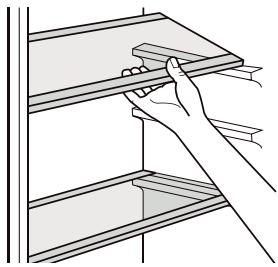
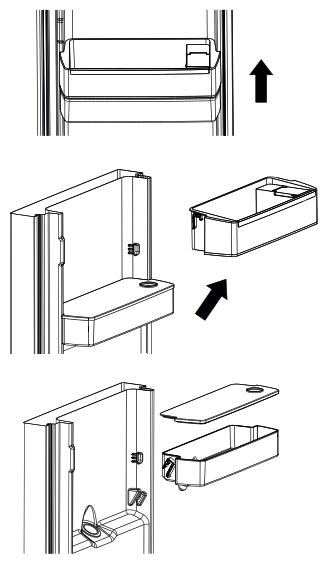
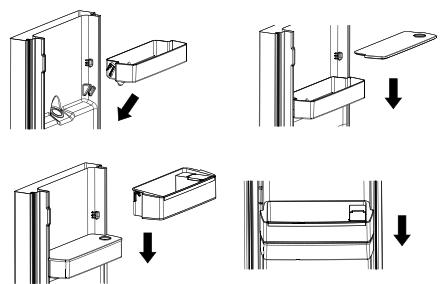
Positioning the door shelves
- The door trays can be positioned at different heights so that you can store food containers of varying sizes. To adjust these settings, proceed as follows: pull the tray gradually in the direction of the arrows until this comes away completely. Then reposition these to suit your needs.
Using the water dispenser
- The water dispenser allows you to have cold water, without needing to open the refrigeration compartment door.
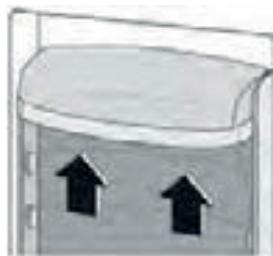
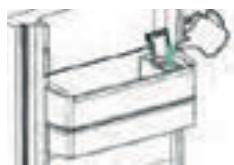
Before using the dispenser for the first time
- Before using the water dispenser for the first time, remove and clean the water tank located inside the refrigeration compartment.
- Start by lifting and removing the tank tray, then remove the water tank and its cover. Remove the cover in order to clean this and the tank.
- Once the elements are cleaned, reposition the water tank, cover and tank tray, following the instructions below.
- Clean the dispenser lever on the outside of the refrigerator door.
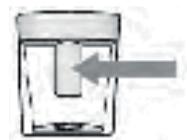
Filling the water tank
- Open the small cover.
- Fill the tank with drinking water up to the 3 L mark.
- Close the small cover.
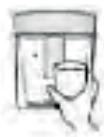
To serve yourself with water
- To get water, push gently on the dispenser lever with a glass or other recipient.
- To stop the water running, move your glass away from the dispenser lever.
CAUTION
Do not fill the water tank with liquids other than drinking water. Drinks such as fruit juice, sodas or alcohol are not suitable for use in the tank. If you fill the water tank with such liquids, this risks malfunctioning and suffering irreversible damage. Some chemical additives and ingredients in such drinks can also attack and damage the tank. Only use clean and pure drinking water. The tank capacity is 2.5 L. Do not overfill.
Useful hints and tips
Tips for freezing
To help you get the most out of the freezing process, here are a few important tips:
- The maximum quantity of food that can be frozen in 24 hours is indicated on the nameplate.
- The freezing process lasts 24 hours. You must not freeze further foodstuffs during this period.
- Only freeze fresh food, of excellent quality and which is perfectly clean.
- Separate the food into small portions in order to allow it to freeze quickly and completely, and to then be able to defrost only the amount required.
- Wrap food in tin foil or plastic bags and check that the packages are sealed.
Do not allow fresh, unfrozen food to come into contact with food which is already frozen as this would increase the temperature of the latter.
- Food which is low in fat keeps better and for longer periods than fatty foods. Salt reduces the storage time of food.
- If eaten when taken straight out of the freezer compartment, ice lollies may cause skin burns from the cold.
- You must comply with the storage period shown on product packaging.
Tips for storing frozen food
In order for this appliance to operate optimally you must:
- Ensure that the frozen food has been stored correctly by the vendor;
- Be sure to move frozen food from the store to your freezer as quickly as possible;
- Avoid opening the door frequently or leaving this open for longer than necessary. Once defrosted, food deteriorates quickly and cannot be refrozen. Do not exceed the shelf life specified by the food manufacturer.
Advice for the refrigeration of fresh food
For optimum results:
- Do not put hot food or liquids which evaporate in the refrigerator.
- Cover or wrap the food, especially if it has a strong flavour.
Refrigeration advice
Useful tips :
-
Be sure to wrap the food in plastic bags and place these on the glass shelves above the vegetable drawer.
-
To prevent any risks, do not keep it like this for more than a day or two.
Cooked food, cold dishes, etc.: these must be covered and can be stored on any shelf.
- Fruit and vegetables: these must be completely clean and placed in the specific drawer(s) supplied.
- Butter and cheese: this must be placed in specific hermetic containers or wrapped in tin foil or plastic bags as hermetically as possible.
- Bottles of milk: these must be capped and kept in the door trays.
- If they are not wrapped, bananas, potatoes, onions and garlic must not be kept in the refrigerator
Cleaning and maintenance
For hygiene reasons, the interior of the appliance and its interior accessories should be cleaned regularly.
CAUTION
The appliance must not be plugged into the mains during cleaning. Risk of electric shock! Before cleaning, turn off the appliance and unplug the power cord, or cut the circuit breaker or remove the fuse.
Changing the Light
This product contains a light source of energy efficiency class G.
Light source in this product can only be replaced by qualified professionals.
Please contact after-sales service if the light source fails.
The light source shall be removed at the end of the product's useful life, with sorting and recycling done separately.

CAUTION
Never clean the appliance with a steam cleaner. Humidity can build up inside the electrical components, leading to a risk of electric shock! Hot steam also risks damaging plastic parts. The appliance must be dry before you switch it back on.
NOTE
Essential oils and organic solvents may damage plastic parts. For example: lemon juice or the juice from orange peel, butyric acid or cleaning products containing vinegar.
- Do not allow these substances to come into contact with appliance parts.
- Do not use any abrasive product.
- Remove food from the freezer. Keep this completely covered in a cool place.
- Turn off the appliance and unplug the power cord, or cut the circuit breaker or remove the fuse.
- Clean the appliance and interior accessories using a cloth soaked in lukewarm water. After cleaning, wipe the appliance with fresh water and dry it.
- Once everything is dry, turn the appliance back on.
Troubleshooting
CAUTION
Before trying to resolve issues, unplug the appliance from the mains. Only qualified electricians or other competent persons may perform the troubleshooting operations not indicated in these instructions for use.
NOTE
The appliance emits noise under its normal operating conditions (compressor, coolant circulation).
| Problems | Potential causes | Solutions |
| The device does not work. | The plug is not or is badly inserted into the mains socket. | Insert the mains plug properly. |
| The fuse has blown or is faulty. | Check the fuse and replace if necessary. |
| The power point is faulty. | Malfunctions in the electrical supply must be repaired by an electrician. |
| The food is too warm. | The temperature has not been set correctly. | Refer to the instructions on setting the initial temperature. |
| The door has remained open for a long period. | Only open the door for the time needed. |
| A large amount of hot food has been placed in the appliance in the last 24 hours. | Temporarily set the temperature to a cooler position. |
| The appliance is close to a heat source. | Refer to the “Location” chapter |
| The appliance is too cold. | The temperature is set to too low a position. | Temporarily set the temperature to a warmer position. |
| Unusual noises. | The appliance is not level. | Readjust the feet of the appliance. |
| The appliance is touching the wall or other objects. | Move the appliance slightly. |
| A part (a pipe, for example) at the rear of the appliance is touching another part of the appliance or the wall. | If necessary, bend the part carefully to move it away. |
| There is water on the floor. | The water outlet is blocked. | Refer to the “Cleaning and maintenance” chapter. |
| The side panels are hot. | This is normal. Heat is exchanged inside the side panels. | Wear gloves to touch the side panels if necessary. |
If the malfunction recurs, contact our after-sales service centre.
Merci!