
AKP 460/IX - Built-in oven WHIRLPOOL - Free user manual and instructions
Find the device manual for free AKP 460/IX WHIRLPOOL in PDF.
| Brand | Whirlpool |
| Model | AKP 460/IX |
| Product type | Built-in electric oven |
| Dimensions (W x H x D) | Approximately 595 x 595 x 575 mm |
| Net weight | Approximately 35 kg |
| Power supply | 230 V ~ 50 Hz, max power 3000 W |
| Power cable type | H05 RR-F 3 x 1.5 mm² |
| Capacity | Approximately 70 liters |
| Cooking functions | Traditional heat, Convection, Grill, Turbo grill, Defrost, Lighting |
| Electronic programmer | Timer, cooking duration, delayed end of cooking |
| Cleaning | Catalytic side panels (self-cleaning) |
| Safety | Safety thermostat, door lock during self-cleaning (if pyrolysis), automatic shutdown not specified |
| Interior lighting | Bulb 25-40 W / 230 V, type E-14, T300°C |
| Included accessories | Grill, drip tray, baking tray, rotisserie (depending on model), grease filters, catalytic panels |
| After-sales service | Original spare parts available |
| Energy class | Not specified (estimated A) |
| Noise level | Not specified |
Frequently Asked Questions - AKP 460/IX WHIRLPOOL
User questions about AKP 460/IX WHIRLPOOL
0 question about this device. Answer the ones you know or ask your own.
Ask a new question about this device
Download the instructions for your Built-in oven in PDF format for free! Find your manual AKP 460/IX - WHIRLPOOL and take your electronic device back in hand. On this page are published all the documents necessary for the use of your device. AKP 460/IX by WHIRLPOOL.
USER MANUAL AKP 460/IX WHIRLPOOL
User and maintenance manual

IMPORTANT SAFETY INSTRUCTIONS
YOUR SAFETY AND THAT OF OTHERS IS VERY IMPORTANT
This manual and the appliance itself provide important safety warnings, to be read and observed at all times.

This is the danger symbol, pertaining to safety, which alerts users to potential risks to themselves and others.
All safety warnings are preceded by the danger symbol and the following terms:

DANGER

WARNING
Indicates a hazardous situation which, if not avoided, will cause serious injury.
Indicates a hazardous situation which, if not avoided, could cause serious injury.
All safety warnings give specific details of the potential risk present and indicate how to reduce risk of injury, damage and electric shock resulting from improper use of the appliance. Carefully observe the following instructions:
- The appliance must be disconnected from the power supply before carrying out any installation work.
Installation and maintenance must be carried out by a qualified technician, in compliance with the manufacturer's instructions and local safety regulations.
Do not repair or replace any part of the appliance unless specifically stated in the user manual.
Regulations require that the appliance is earthed.
The power cable must be long enough for connecting the appliance, once fitted in its housing, to the power supply socket.
- For installation to comply with current safety regulations, an all-pole disconnect switch with minimum contact gap of 3mm must be utilized.
- Do not use multiple plug adapters or extension leads.
- Do not pull the power supply cable in order to unplug the appliance.
The electrical components must not be accessible to the user after installation.
- Do not touch the appliance with any wet part of the body and do not operate it when barefoot.
This appliance is designed solely for use as a domestic appliance for cooking food. No other type of use is permitted (e.g.: heating rooms). The Manufacturer declines all responsibility for inappropriate use or incorrect setting of the controls.
The appliance is not intended for use by persons (including children) with any physical, sensory or mental impairment, or without experience and knowledge of the appliance, unless supervised or previously instructed in its use by those responsible for their safety.
The accessible parts of the appliance may become very hot during use. Young children should be kept away from the appliance and supervised to ensure that they do not play with it.
During and after use, do not touch the heating elements or interior surfaces of the appliance - risk of burns. Do not allow the appliance to come into contact with cloths or other flammable materials until all the components have cooled sufficiently.
At the end of cooking, exercise caution when opening the appliance door, letting the hot air or steam exit gradually before accessing the oven. When the appliance door is shut, hot air is vented from the aperture above the control panel. Do not obstruct the vent apertures.
- Use oven gloves to remove pans and accessories, taking care not to touch the heating elements.
- Do not place flammable materials in or near the appliance: a fire may break out if the appliance is inadvertently switched on.
Do not heat or cook sealed jars or containers in the appliance. The pressure that builds up inside might cause the jar to explode, damaging the appliance.
- Do not use containers made of synthetic materials.
Overheated oils and fats catch fire easily. Always remain vigilant when cooking foods rich in fat and oil.
- Never leave the appliance unattended during food drying.
If alcoholic beverages are used when cooking foods (e.g. rum, cognac, wine), remember that alcohol evaporates at high temperatures. As a result, there is a risk that vapours released by the alcohol may catch fire upon coming into contact with the electrical heating element.
Scrapping of household appliances
This appliance is manufactured with recyclable or reusable materials. Dispse of it in accordance with local waste disposal regulations. Before scrapping, cut off the power supply cable.
For further information on the treatment, recovery and recycling of household electrical appliances, contact your competent local authority, the collection service for household waste or the store where you purchased the appliance.
INSTALLATION
After unpacking the oven, be sure that it has not been damaged during transport and that the oven door closes properly. In the event of problems, contact the dealer or your nearest After-sales Service. To avoid any damage, only remove the oven from its polystyrene foam base at the time of installation.
PREPARING THE HOUSING UNIT
Kitchen units in contact with the oven must be heat resistant (min 90^ ).
- Carry out all cabinet cutting work before fitting the oven in the housing and carefully remove all wood chips and sawdust.
After installation, the bottom of the oven must no longer be accessible.
- For correct appliance operation, do not obstruct the minimum gap between the worktop and the upper edge of the oven.
ELECTRICAL CONNECTION
Be sure the power voltage specified on the appliance dataplate is the same as the mains voltage. The dataplate is on the front edge of the oven (visible when the door is open).
Power cable replacement (type H05 RR-F 3 x 1.5 mm²) must be carried out by a qualified electrician. Contact an authorized service centre.
GENERAL RECOMMENDATIONS
Before use:
- Remove cardboard protection pieces, protective film and adhesive labels from accessories.
- Remove the accessories from the oven and heat it at 200^ for about an hour to eliminate the smell and fumes from the insulating materials and protective grease.
During use:
- Do not place heavy objects on the door as they could damage it.
- Do not cling to the door or hang anything from the handle.
- Do not cover the inside of the oven with aluminium foil.
- Do not pour water into the inside of a hot oven; this could damage the enamel coating.
- Do not drag pots or pans across the bottom of the oven as this could damage the enamel coating.
- Be sure that the electrical cables of other appliances do not touch hot parts of the oven or become trapped in the door.
- Do not expose the oven to atmospheric agents.
SAFEGUARDING THE ENVIRONMENT

Disposal of packing material
The packing material is 100% recyclable and is marked with the recycle symbol () . The various parts of the packing must therefore be disposed of responsibly and in full compliance with local authority regulations governing waste disposal.
Scrapping the product
This appliance is marked in compliance with European Directive 2002/96/EC, Waste Electrical and Electronic Equipment (WEEE).
- By ensuring this product is disposed of correctly, you will help avoid potential negative consequences for the environment and human health, which could otherwise be caused by inappropriate waste handling of this product.
The symbol on the product or on the accompanying documentation indicates that it should not be treated as domestic waste but must be taken to an appropriate collection centre for the recycling of electrical and electronic equipment.
Energy saving
Only pre-heat the oven if specified in the cooking table or your recipe.
- Use dark lacquered or enamelled baking moulds as they absorb heat far better.
Switch the oven off 10/15 minutes before the set cooking time. Food requiring prolonged cooking will continue to cook even once the oven is switched off.
DECLARATION OF CONFORMITY (C ∈
This oven, which is intended to come into contact with foodstuffs, complies with European Regulation (C) n. 1935/2004 and has been designed, manufactured and sold in conformity with the safety requirements of the "Low Voltage" directive 2006/95/CE (which replaces 73/23/CEE and subsequent amendments), the protection requirements of "EMC" 2004/108/CE.
TROUBLESHOOTING GUIDE
The oven does not work:
- Check for the presence of mains electrical power and if the oven is connected to the electrical supply.
- Turn off the oven and restart it to see if the fault persists.
The door will not open:
- Turn off the oven and restart it to see if the fault persists.
- IMPORTANT: during self-cleaning, the oven door will not open. Wait until it unlocks automatically (see paragraph "Cleaning cycle of ovens with pyrolysis function").
The electronic programmer does not work:
If the display shows the letter "F" followed by a number, contact your nearest After-sales Service. Specify in this case the number that follows the letter "F".
AFTER-SALES SERVICE
Before calling the After-Sales Service:
- See if you can solve the problem yourself with the help of the suggestions given in the "Troubleshooting guide".
- Switch the appliance off and back on again it to see if the fault persists.
If after the above checks the fault still occurs, get in touch with the nearest After-sales Service.
Always specify:
a brief description of the fault;
the type and exact model of the oven;
- the service number (number after the word Service on the rating plate), located on the right hand edge of the oven cavity (visible when the oven door is open). The service number is also indicated on the guarantee booklet;
your full address;
- your telephone number.
SERVICE
0000 000 0000
If any repairs are required, please contact an authorised After-sales Service (to guarantee that original spare parts will be used and repairs carried out correctly).
CLEANING

WARNING
- Do not use steam cleaning equipment.
Clean the oven only when it is cool. - Disconnect power before servicing.
Oven exterior
IMPORTANT: do not use corrosive or abrasive detergents. If any of these products unintentionally comes into contact with the appliance, clean immediately with a damp cloth.
Clean the surfaces with a damp cloth. If it is very dirty, add a few drops of washing up detergent to the water. Finish off with a dry cloth.
Oven interior
IMPORTANT: do not use abrasive sponges or metallic scrapers or scourers. Over time, these can ruin enamelled surfaces and the oven door glass.
After every use, allow the oven to cool then clean it preferably while it is still warm in order to remove built-up dirt and stains caused by food residues (e.g. food with a high sugar content).
Use proprietary oven detergents and follow the manufacturer's instructions to the letter.
Clean the door glass with a suitable liquid detergent. The oven door can be removed to facilitate cleaning (see MAINTENANCE).
The top heating element of the grill (see MAINTENANCE) can be lowered (some models only) to clean the roof of the oven.
N.B.: during prolonged cooking of foods with a high water content (e.g. pizza, vegetables, etc.) condensation may form on the inside of the door and around the seal. When the oven is cold, dry the inside of the door with a cloth or sponge.
Accessories:
Soak the accessories in water with washing up detergent immediately after use, handling them with oven gloves if still hot.
Food residues can be easily removed using a brush or sponge.
Cleaning the rear wall and catalytic side panels of the oven (if present):
IMPORTANT: do not use corrosive or abrasive detergents, coarse brushes, pot scourers or oven sprays which could damage the catalytic surface and ruin its self-cleaning properties.
Operate the oven empty with the fan-assisted function at 200^ for about one hour
- Next, leave the appliance to cool down before removing any food residue with a sponge.
MAINTENANCE

WARNING
Use protective gloves.
Ensure the oven is cold before carrying out the following operations.
- Disconnect power before servicing.
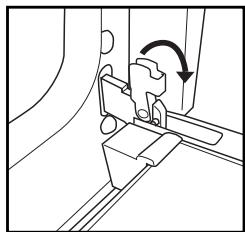
REMOVING THE DOOR
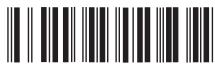
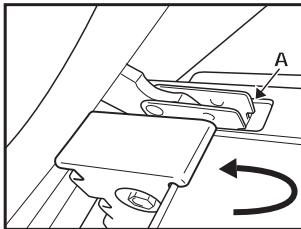
To remove the door:
- Open the door fully.
- Lift the catches and push them forwards as far as they will go (Fig. 1).
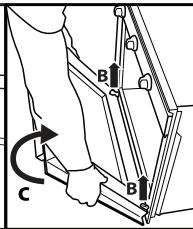
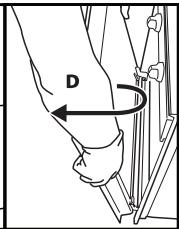
- Close the door as far as it will go (A), lift it up (B) and turn it (C) until it is released (D) (Fig. 2).
To refit the door:
- Insert the hinges in their seats.
- Open the door fully.
- Lower the two catches.
- Close the door.
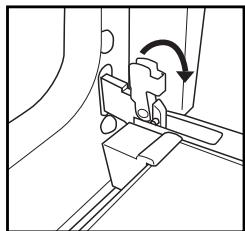
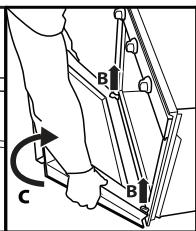
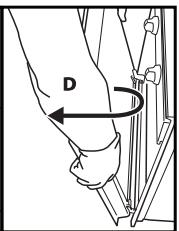
Fig. 1
Fig. 2
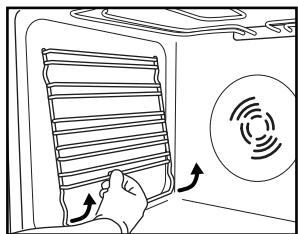
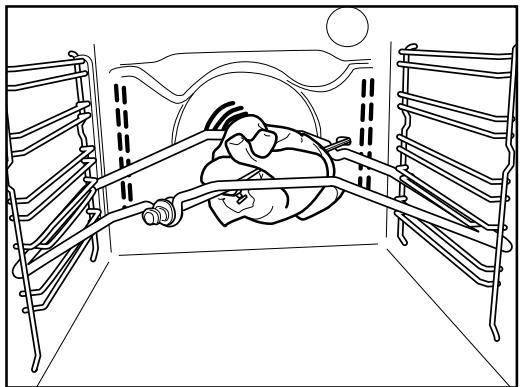
MOVING THE TOP HEATING ELEMENT (SOME MODELS ONLY)
- Remove the side accessory holder grilles (Fig. 3).
- Pull the heating element out a little (Fig. 4) and lower it (Fig. 5).
- To reposition the heating element, lift it up, pulling it slightly towards you, be sure it comes to rest on the lateral supports.

- Disconnect the oven from the power supply.
- Unscrew the lamp cover (Fig. 6), replace the lamp (see note for lamp type) and screw the lamp cover back on (Fig. 7).
- Reconnect the oven to the power supply.
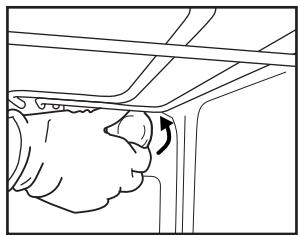

Fig. 6
Fig. 7
N.B.:
Only use 25-40W/230V type E-14, T300°C incandescent lamps.
Lamps are available from our After-sales Service.
IMPORTANT:
- Do not use the oven until the lamp cover has been repositioned.
INSTRUCTIONS FOR OVEN USE

FOR ELECTRICAL CONNECTION, SEE THE PARAGRAPH ON INSTALLATION
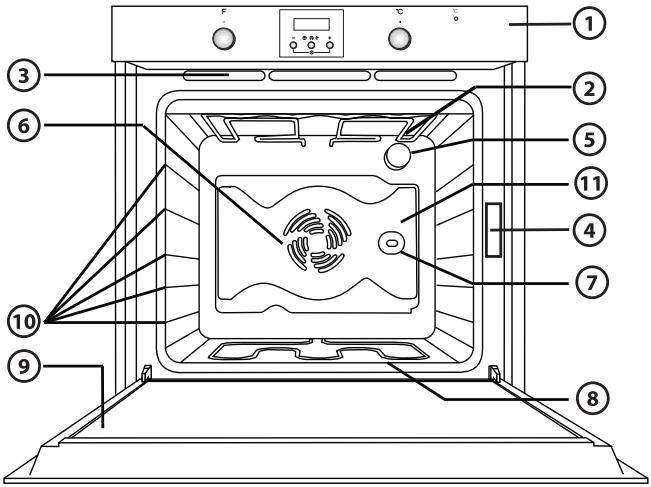
- Control panel
- Upper heating element/grill
- Cooling system (if present)
- Dataplate (not to be removed)
- Light
- Baking ventilation system (if present)
- Turnspit (if present)
- Lower heating element (not visible)
- Door
- Position of shelves
- Rear wall
N.B.:
- At the end of cooking, after the oven has been switched off, the cooling fan may continue to run for a while.
- Your product may appear slightly different from the drawing.
COMPATIBLE ACCESSORIES
(for the accessories supplied with oven refer to the tech fiche)
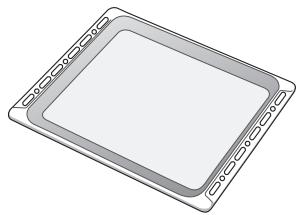
Fig. 1
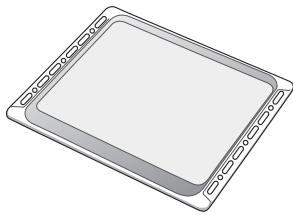
Fig. 2
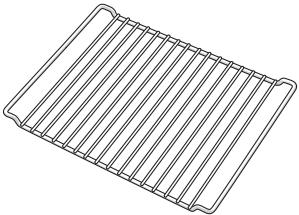
Fig. 3
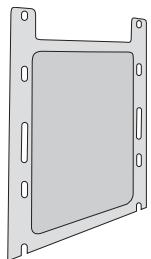
Fig. 4
Fig. 5
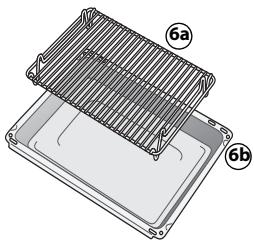
Fig. 6
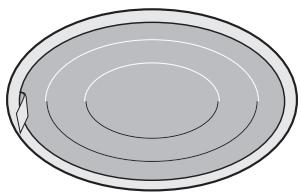
Fig. 7
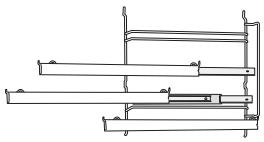
Fig. 8

Fig. 9
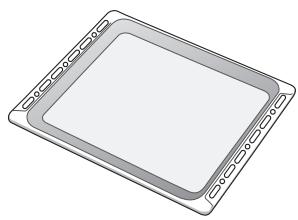
Drip-tray (Fig. 1)
For collecting fat and bits of food when placed under the wire shelf, or as a plate for cooking meat, chicken and fish, etc., with or without vegetables. Pour a little water into the drip-tray to avoid spatters of fat and smoke.
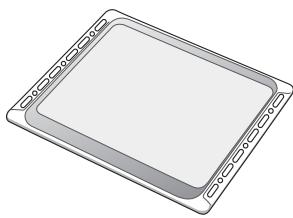
Baking tray (Fig. 2)
For baking biscuits, cakes and pizzas.
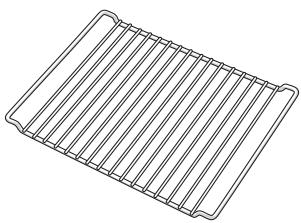
Wire shelf (Fig. 3)
For grilling food or as a support for pots, cake tins and other cooking receptacle. It can be placed on any available level. The wire shelf can be inserted with its curvature facing up or down.
Catalytic side panels (Fig. 4)
These panels have a special microporous enamel coating that absorbs fat spatters. It is advisable to do an automatic cleaning cycle after cooking particularly fatty food (see CLEANING).
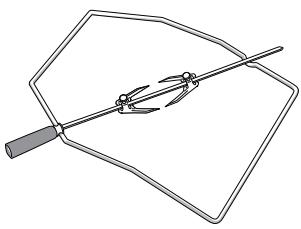
Turnspit (Fig. 5)
Use the turnspit as indicated on Fig. 9. Also check "Recommended use and tips" section for advice.
Grill Pan Set (Fig.6)
The set comprises a wire shelf (6a) and an enamelled recipient (6b). This set must be placed on the wire shelf (3) and used with the Grill function.
Grease filter (Fig. 7)
Use only for particularly greasy cooking. Hook it on the rear wall of the oven compartment, opposite the fan. It can be cleaned in a dishwasher and used with the fan-assisted function.
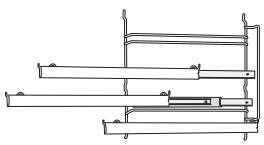
Sliding shelves (Fig. 8)
They allow the wire shelves and drip-trays to be pulled half out during cooking. Suitable for all the accessories, they can be cleaned in a dishwasher.

N.B.: The knobs are retractable. Press the knobs in the middle and they pop up.
N.B.: Your product may appear slightly different from the drawing.
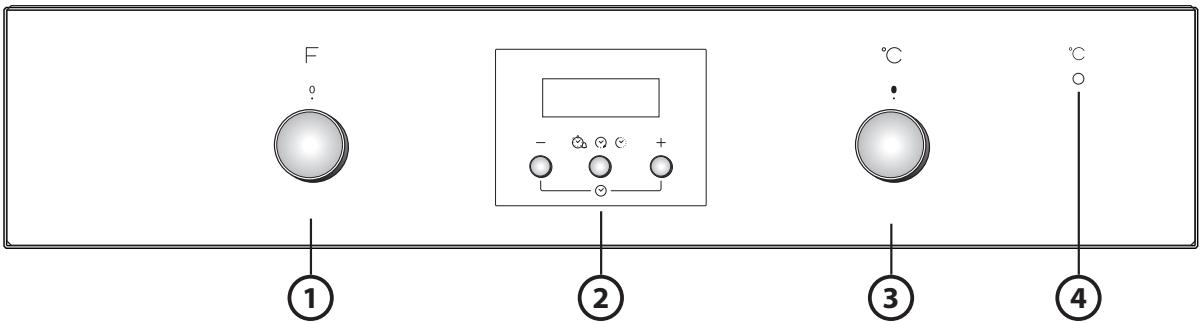
- Function selector knob
- Electronic programmer
- Thermostat knob
- Red thermostat led
- Turn the selector knob to the required function.
The oven light switches on. - Turn the thermostat knob clockwise to the required temperature.
The thermostat led lights up, switching off again when the oven reaches the selected temperature.
At the end of cooking, turn the knobs to "0".
USING THE ELECTRONIC PROGRAMMER
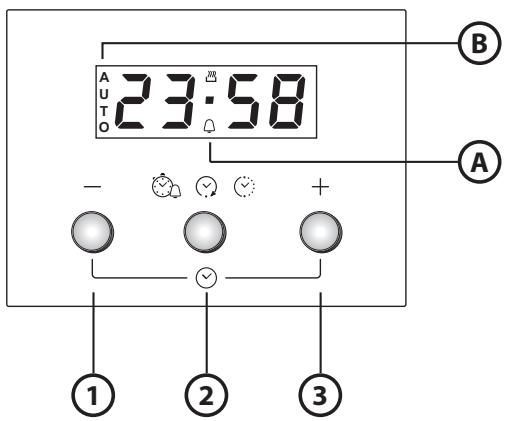
Using the oven for the first time
Setting the time of day and the tone of the acoustic signal.
Upon connection of the oven to the mains power supply, AUTO and 0.00 flash on the display. To set the time of day, press buttons - and + at the same time: the central dot flashes. Set the time of day using the buttons + and -. Having selected the desired value, press the middle button. The display shows "ton 1". To select the desired tone, press button -. Having selected the preferred tone, press the middle button. To change the time of day, proceed as described above.
Setting the timer
To set the timer, long-press the middle button: the display shows 0.00 and the bell symbol flashes. Set the timer using the button + (the maximum programmable value is 23 hours and 59 minutes). The countdown begins after a few seconds. The display shows the time of day and the bell remains lit, confirming the timer has been set. To view the countdown and change it if necessary, press the middle button again.
Setting cooking time
After selecting the cooking mode and temperature using the knobs, press the middle button: the display shows 0.00 and the bell symbol flashes. Press the middle button again: on the display and 0.00 appear in sequence and AUTO flashes. Set cooking time using the buttons + and - (the maximum programmable value is 10 hours). After a few seconds the display shows the time of day and AUTO remains lit, confirming the setting. To view the remaining cooking time and change it if necessary, press the middle button for 2 seconds and then press it again a second time. At the end of the set time, the symbol switches off, the alarm sounds and AUTO flashes on the display. Press any button to deactivate the alarm. Return the functions and temperature knob to zero and press the middle button for two seconds to end cooking.
- Button - : to decrease the value shown on the display
- Button : for selecting the various settings:
a. Timer
b. Cooking time
c. Cooking end time setting
- Button + : to increase the value shown on the display
A. The symbol indicates that the timer function is in operation
B. The AUTO symbol confirms the setting has been made
Delaying cooking end time
After selecting cooking time, press the middle button: the display shows End, cooking end time and AUTO flashing in sequence. Press the button + to view the desired cooking end time (cooking can be delayed by a maximum of 23 hours and 59 minutes). After a few seconds the display shows the time of day, the symbol switches off and AUTO remains lit, confirming the setting. To view cooking end time and change it if necessary, press the middle button and then press it again twice. At the end of the countdown, the symbol lights up and the oven proceeds with the selected cooking mode.
FUNCTION DESCRIPTION TABLE
| FUNCTION | DESCRIPTION | |
| O | OFF | To stop cooking and switch off the oven. |
| LAMP | LAMP | To switch on the oven light. |
| CONVENTIONAL | FUNCTION suitable for cooking any type of dish on one shelf. Preheat the oven to the required temperature and place the food in it when the set temperature is reached. It is advisable to use the second or third shelf for cooking. This function is also suitable for cooking frozen convenience foods; follow the instructions on the food packaging. | |
| CONVECTION BAKE | To bake cakes with liquid filling (sweet or savoury) on a single level. This function is ideal also for cooking on two levels. If necessary, switch the positions of the dishes to cook food more evenly. | |
| GRILL | To grill steak, kebabs and sausages, to cook vegetables au gratin and to toast bread. Preheat the oven for 3 - 5 min. During cooking the oven door must remain closed. When cooking meat, pour a little water into the drip tray (on the first level) to reduce smoke and fat spatters. Ideally the meat should be turned during cooking. | |
| TURBO GRILL | To grill large joints of meat (roast beef and other roast meats). The oven door must be kept closed during the cooking cycle. When cooking meat, it is advisable to pour water in the drip-tray placed on the first level. This will reduce smoke and spattering of fat. Turn the meat during grilling. | |
| DEFROST | This function can be used to speed up the thawing of food at room temperature. The food should be placed in the oven in its wrapping to avoid it from drying out. | |
| Recipe | Function | Pre-heating | Shelf (from bottom) | Temp. (℃) | Time (min) | Accessories |
| Leavened cakes | Yes | 2 | 160-180 | 35-55 | Wire shelf + cake tin | |
| Biscuits / Tartlets | Yes | 3 | 170-180 | 15-40 | Baking tray | |
| Choux buns | Yes | 3 | 180 | 30-40 | Baking tray | |
| Vols-au-vent / Puff pastry crackers | Yes | 3 | 180-200 | 20-30 | Baking tray | |
| Meringues | Yes | 3 | 90 | 120-130 | Baking tray | |
| Lamb / Veal / Beef / Pork | Yes | 2 | 190-200 | 90-110 | Drip tray or wire shelf + pyrex dish | |
| Chicken / Rabbit / Duck | Yes | 2 | 190-200 | 65-85 | Drip tray or wire shelf + pyrex dish | |
| Turkey / Goose | Yes | 2 | 190-200 | 140-180 | Drip tray or wire shelf + pyrex dish | |
| Baked fish / en papillote (fillet, whole) | Yes | 2 | 180-200 | 50-60 | Drip tray or wire shelf + pyrex dish | |
| Lasagne / Baked pasta / Cannelloni / Flans | Yes | 2 | 190-200 | 45-55 | Wire shelf + pyrex dish | |
| Bread / Focaccia | Yes | 2 | 190-230 | 15-50 | Drip tray or baking tray | |
| Pizza | Yes | 2 | 230-250 | 7-20 | Drip tray or baking tray | |
| Toast | Yes | 4 | 200 | 2-5 | Wire shelf | |
| Vegetable gratin | Yes | 3 | 200 | 15-20 | Wire shelf + pyrex dish | |
| Grilled fish fillets and steaks | Yes | 3 | 200 | 30-40 | Wire shelf + pyrex dish | |
| Sausages / Kebabs / Spare ribs / Hamburgers | Yes | 4 | 200 | 30-50 | Grill + drip tray with water on 1st shelf, turn halfway through cooking | |
| Filled pies (cheesecake, strudel, apple pie) | Yes | 1 | 180-200 | 50-60 | Drip tray or wire shelf + pyrex dish | |
| Meat & potato pies (vegetable pie, quiche lorraine) | Yes | 1 | 180-200 | 35-55 | Wire shelf + cake tin | |
| Stuffed vegetables (tomatoes, peppers, courgettes, aubergines) | Yes | 2 | 180-200 | 40-60 | Wire shelf + pyrex dish | |
| Meat & potato pies (vegetable pie, quiche lorraine) | Yes | 1/3 | 180-190 | 45-55 | Grill +pan, switch levels halfway through cooking | |
| Pizzas / Focaccia | Yes | 1/3 | 230-250 | 12-30 | Baking tray+drip tray, switch levels halfway through cooking | |
| Biscuits / Tartlets | - | 1/3 | 170-180 | 20-40 | Baking tray+drip tray, switch levels halfway through cooking | |
| Choux pastry | - | 1/3 | 180 | 35-45 | Baking tray+drip tray, switch levels halfway through cooking | |
| Vols-au-vent / Puff pastry crackers | - | 1/3 | 180-200 | 20-40 | Baking tray+drip tray, switch levels halfway through cooking | |
| Roast chicken | - | 2 | 200 | 55-65 | Grill + drip tray with water on 1st level | |
| Roast potatoes | - | 3 | 200 | 45-55 | Drip tray | |
| Roast Beef underdone | - | 3 | 200 | 30-40 | Grill + drip tray with water on 1st level | |
| Leg of lamb / Knuckle | - | 3 | 200 | 55-70 | Grill + drip tray |
N.B.: cooking times and temperatures are approximate for 4 portions.
How to read the cooking table
The table indicates the best function to use for any given food, to be cooked on one or more shelves at the same time. Cooking times start from the moment food is placed in the oven, excluding pre-heating (where required). Cooking temperatures and times are purely for guidance and will depend on the amount of food and type of accessory used. Use the lowest recommended values to begin with and, if the food is not cooked enough, then move on to higher values. Use the accessories supplied and preferably dark coloured metal cake tins and oven trays. You can also use pans and accessories in pyrex or stoneware, but bear in mind that cooking times will be slightly longer. To obtain best results, follow the advice given in the cooking table for the choice of accessories (supplied) to be placed on the various shelves. When cooking food that contains lots of water, preheat the oven.
Cooking different foods at the same time
Using the "CONVECTION BAKE" function (if present), you can cook different foods which require the same cooking temperature at the same time (for example: fish and vegetables), using different shelves. Remove the food which requires less cooking time and leave food which requires longer cooking time in the oven.
Desserts
Cook delicate desserts with the conventional function on one shelf only. Use dark coloured metal cake tins and always position them on the wire shelf supplied. To cook on more than one shelf, select the forced air function and stagger the position of the cake tins on the shelves, aiding optimum circulation of the hot air.
To check whether a raising cake is cooked, insert a wooden toothpick into the centre of the cake. If the toothpick comes out clean, the cake is ready.
If using non-stick cake tins, do not butter the edges as the cake may not rise evenly around the edges.
If the cake "sinks" during cooking, set a lower temperature the next time, perhaps reducing the amount of liquid in the mixture and mixing more gently.
- For sweets with moist fillings (cheesecake or fruit pies) use the "CONVECTION BAKE" function (if present). If the base of the cake is soggy, lower the shelf and sprinkle the bottom of the cake with breadcrumbs or biscuit crumbs before adding the filling.
Meat
Use any kind of oven tray or pyrex dish suited to the size of the piece of meat being cooked. For roast joints, it is best to add some stock to the bottom of the pan, basting the meat during cooking for added flavour. When the roast is ready, let it rest in the oven for another 10-15 minutes, or wrap it in aluminium foil.
- When you want to grill meat, choose cuts with an even thickness all over in order to achieve uniform cooking results. Very thick pieces of meat require longer cooking times. To avoid the meat from burning on the outside, lower the position of the wire shelf, keeping the food farther away from the grill. Turn the meat two thirds of the way through cooking.
To collect the cooking juices it is advisable to place a drip-tray with half a litre of water directly under the grill on which the meat is placed. Top-up when necessary.
Turnspit (only in some models)
Use this accessory to evenly roast large pieces of meat and poultry. Place the meat on the spit rod, tying it with string if chicken, and check that it is secure before inserting the rod in the seat located on the front wall of the oven and resting it on the respective support. To avoid smoke and to collect cooking juices, it is advisable to place a drip-tray with half a litre of water on the first level. The rod has a plastic handle which must be removed before starting to cook, and used at the end of cooking to avoid burns when taking the food out of the oven.
Pizza
Lightly grease the trays to ensure the pizza has a crispy base. Scatter the mozzarella over the pizza two thirds of the way through cooking.
Rising function (present only in specific models)
It is always best to cover the dough with a damp cloth before placing it in the oven. Dough proving time with this function is reduced by approximately one third compared to proving at room temperature (20 - 25^) . Proving time for a 1Kg batch of pizza dough is around one hour.
DÜLEZITÉ BEZPEÇNOSTNÍ POKYNY
VASE BEZPECNOST I BEZPECNOST JINYCH OSOB JSOU VELMI DULEZITE
Tukovy filter (Obr.7)
Používajte iba pri préprave mimoriadne mastných Jedál. Zaveste ho na zadné stenu rúry napro ti ventilátoru. Móze sa umývat' v umývačke riadu a používa sa pri pečeni s ventilátorom.
Zásvné listy (Obr. 8)
Umożnju vytiahnut rosty a pekáce poças pečenia. Su vvhodné pre vsetky prosti prisluěsntva, možu sa umyvat' umyväčke riadu.
POZNÁMKA: Aby sa vysunuli a dai použit, zatačte ich v strede.
POZNÁMKA: Váš vyrobok moze vyzerat trochu inak než vyrobor na obrázku.
- Gombik ovladania funkci
- Elektronicky programátor
- Ovladaci gombik termostatu
- Červéná kontrolka termostatu
AKO ZAPNUT RURU
- Otoče ovladaci gombík pre volbu funkci ni zaželenú funkciu.
Rozsvieti sa osvetlenie rury.
Gombik termostatuto otocte smerom vpravo do polohy zelanej teploty.
TPEBOAHNA K KYXOHHO MEBEN,NCIOJIb3YEMOI IPN BCTPAVAHNI DYXOBKN
MaTePnAa KxOHOH Me6eIN, HaxOJaIeCBA HENOCpeCTBHeHOM KOHTaKe Tc DxyoBKOJ, OJIOKeH 6bITb yTOIyHBIM K BbIOKM TEMpePaTpaM (He MeHee 90^
IpeKd eem yctaHaBnBaTb DxOBky CBOIO HnHy, noDToBtBe B KxyOHHO Me6eNt Bce Heo6xoIMble OTBepCTna I paAInTe BCE cTpyKKn nOnIIKN.
Iocne 3aBepweHn yCTaHOBKn DOcTyn K HmXHeN qAcTn DyXOBKn DoJXeH 6bTb HeBO3MOxHe.
B uejx npabnboho paobto 3a0p mekdy bepxne nanebjo dyoBkn n hnxne kpmko pa6oey nobepxoctn (ctoneuhi) donxhen bcergda octBaatbcra CBO6OdbHIM.
ПОДКЛЮЧЕНЕ KЗLEKТРУECHКО CETN
IpoBpe, TTo6bHnApJKeHne, yKa3aHHoe H aNcnpTHo TaBnUe Ke 3dEIna, COOTBeTCTBOBaNo HapJKeHIO cTe N B BaWeM Dome. NaCnOpTHa TaBnUka yctahOBHeHa B nepedHe uactn duXobKn (BnuHa npu OTKpbToi DBepe).
Bo3MOxHbI 3aMeHbI Ka6eJII NITAHINI (TIna H05 RR-F 3 x 1,5 MM2) DoJIxHbI BbIIOJIrTbcra TOnbKO KBaIIIMΦUIpOBaHHbIM IepcoHaIo. 06paIaITeCb B ETHX cyuayAxBaTOpIN3OBAHbIe cepBcHbIe ceHTpbI.
YKA3AHM OBSETO XAPAKTEPA
IpeepnepBbIM nCnoIb3ObaHem npn6opa
- ChmMITE KapToHbIe npokJaKn, NaKHeeHbIe npO3paHbIe pIeHKn I3TuKeTkn C npHaadJeXHoCTe K dYxOBKe.
BbHbTe npHaadJeXHoCTn 13 dYxOBKn n pa3oRpeIe ee do 200^ n octaBte npn 3ToI TeMnepaType Ha qac, YTO6bl yCTPNITb 3aIax n DbIM, BblJeMaIe H3OJIauIOHHbIM MaTePnaIOM n 3aUHTHO KoHCNCTEHTOI CMA3KOI.
BnpouecceKcnnnyatauun
He cTaBbTe TaJKeIbe IpeMtebl Ha DBepy; 3To MoKet PnIBeCTN K eE NOBpeJdeHIO.
He onipaItecb Ha DBepu yDxOBKn u He BeuaiTe HnKaKnx PpeMToB Ha pyUky DBepuI.
He 3aKpbBaIe nOIOCTb DxyOBKn OIbToI.
He hainbaite BOy HENOCpeCTBeHNO BHTpb ropuey duyxOBKn;B npOTNBHom Cnyae MOXHO NOBpeNTb 3MaIb.
He DnBraTe KAcTpHOn n CKBOpOdbI NO dHy dYxOBKn, B npOTMBHom cJyae MoKHO noaapanaTb 3MaJeBOe nokpItne.
CneiTe 3a Tem, TcOb6I eNekTpnuecKne npoB0da dpynX eNeKtpnpn6OpOB, HaxOJaunxca OkoLo dYxOBKn, He Kacalnc ee HaRpeBaIoUxnxca Yactei n He 3aCTpeBaIIN B DBePce dYxOBKn.
He noDBepraiTe duXOBky Bo3eJCTBnO aTMocepHbIX aKtopoB.
3AUHTA OKPYXAOUeI CPEbl

ydaaneHne ynaKOBouhIx MaTepHaIOB
YnakoobHyb MaTepeHAn donyckaet 100% BToPunHyu nepepa6Oky, O yem CBUdTeBcTByeT COOTBeCTBcyIoum CmBOL He cIeDyET bIbpaBtbaTa3niuHbte aactn YnakoBKn BMeTe C 6bITOBbIM Mycopom. OH nOnJHKb 6bItb nepepa6OtaHb B COOTBeCTBmC DeIeCTBvUoMM MeCTbHM HOpMaMn.
ydaeneHne n3dennB bTOxObl
-Данhoeизденисабжende Маркповь В сответсьи cЕрпескй дуpeктувь 2002/96/EC no ytллзаци щелктуческого и щелктуного\
obopydobаня (WEEE).
06ecneuBna npaBnIbHyU yTnIIN3aunIO daHNOrO n3denn, Bbl nOMoKeTe ppeoTbpaNTb noTeHnAInbHbIe HeRaTbHbIe nCleIcTBnI dNOKpykaIouei cpebl 13doPoBbBy YeNoBeKa.
CMMBOJ,IMMeIOUHcHa H3DEINI INB COpOBoNTbHOB IOKymeHTaUN,YKa3bIBaET Ha TO,TO DaHHoe I3dEJIme He MoKet 6bIy DAJIeHO B OTXObI KaK 6bITOBMyocop,aD0JXHO 6bITb DOCTaBHe BO CootBTCTByUHNI PyHK T c6opaI Npepa6OTKN 3NEKTPNecKOrO 3NEKTPOHnO 06OpyDoBaHN.
3KOHOMN3JIeKTo3Heprn
IoiB3yIeTcB yHKnCneI npEaBapntelbHoro HarpeBa TOnbKO B Tom Cnyae,ecn 3TO yKa3aHO B Tabnue peKOMeHaaunno nO pnproToBnEnHIO 6NIOJ NIN B IcNoB3yeMOM BamPeCeNTe.
Iopb3yTeBcTEmhBIMm3MaJIIpOBaHbIMnΦOpMaMn,06ecneuBaIOUImNΦΦeKTHBHe nOrIoUeHne Tenla.
BbiklouaTe dyxOBky 3a 10-15 MmHyT do ncteHnna 3aDaHnro BpeMeH npiroTOBnHn. Ecn n daDobedeHn 6IIO d IO TBOHOCTn Tpe6yetc 6Oblse BpemeH, TO npri BbIKIOueHn dyxOBKn pnoeccx nx npiroTOBHeHn 6yed TpoJOnkTa7b.
3AABJIeHne O COOTBETCTBnN (€
Даньnp6op npedna3nuehдя kontakTc niiueBbIM npodyKTAMn COOTBCTByeT NOJIOKeHnMa PernameHa Ebponeckoro Cobeta (C €) N° 1935/2004. Пибop pazpabotan, n3rOToBHeN n BblnyuE h B npoJaxy B COOTBEcTBn C tpe6oBaHnMa N O630NaChocTn DInpeKTHBbI N O H3KOBolbTHOMy o6opydobAHnIO 2006/95/CE (zamEnyUeJe DipeKTHBy 73/23/EEC n PoCneDyUOuNe I3MeHHeHn) n Tpe6oBaHnMa N O 3aunite DInpeKTHBbI N O3eKTPomarHHTHO CoMecTmOCtN (3MC) 2004/108/EC.
PYKOBODCTBO NO YCTPAHEHNI HENCPABHOCTEIN
DyXOBka He pa6oTaert
- Поверп te habичne habражень BA cTe n To, IPAbaNlbHo IIN NOKIIuOeHa DyXOBKa K 3JeKtpnuecko CTeN.
BbKIOUHTe HBOB BKNIOUHTe DyXOBKY, UTo6bl PnOBePntb, YcTpaHeHa Nn HenoJaKa.
AbepuHa oTkpbIbAetc
BbIKIOUHTe IN BHOBb BKIOUHTe IyXOBky, UTo6bl npOBeptb, yCTpaHaI Hn HenoJaKa.
BAXHO: Bo Bpemra BbIIOHHeHn OIepaunm CaMOOHCTKN DBepea dYxOBKn 3a6IOKnpoBaHa. Heo6xoIMMo DOJzDaTcEe aBTOMaTHueCKo pa36IOKnpOBKn (cm. pa3dEn "Lckn YIcSTkn dYxOBOK c fynKUne IINPOJIITNUeCKO ONUCTKN").
He pa6oTaET 3neKtpOnHoe nporpaMMpyUooee yctpoiCTBO
EcnHaDnCnleeOTo6paKaTaC8yBkBaF"BMcTe CUnlOM,6bMaTteCB6mKaiMnCEpBnChNbIeHTP.PnIaTOMcoo6uTeYncNo,CneDuoyuee3a6yKBoF."
ПОСЛЕПОНДАЖНОЕ OSСЛУЖИBAHAHNE
Ipejde yem o6paatabcaBcepBuChnbu eHTP
- Ppno6yIte yctpaHnB HeuCnpaBHOCTc camOCToAeTbHo, cIeYyaK3aHaMm, pInBHeDHeBIM B pa3Jepe "PykoBocTBO o YcTaPaeHHIO HeuCnpaBHOCTe".
- Bbkiouhte np6op u Bkliouhte ero cHOba, yTo6bl npOBeepntb, ycTaPHeHa IIN HcNpabBHOctb.
Ecn noce BblonHennBaIeOnncanHbIX DeIcTBn HEnCpabNocbYcTpaHntb He ydAnoc,To 6paTeCbB 6nnKaaM cepBnchbIeHTp.
PnE3OM COO6uNTe:
KpaTKoe OINCaHHe HEnCnPaBHOCTM;
TINMMOJElbDyXOBKIA;
cepBncbHmOpep (uCnlo nocne cnoBa "Service"Ha nacnopTHO Tabnue, paononoKeHHo C npaBOI CTopoHbI Ha BHTpeHe CTENKe dYxOBKn; OHa BuDHa npn OKpItOn IDbepue DyXOBKn). CepBncbHmOpetakke yka3AH B rapaTHInHom 063TeNbCTBe;
BaWnPONHbIaDpeC;
BaH HOMep TeIefoHa.
SERVICE
0000 000 0000
B Cnyuae Heo6xOdMocTn peMOHTa dYxOBKn 6bpaaITeCb b ABTOpIN30BaHbI cepBcHbI ceHTp (B TAKOM cepBcHOM ceHTpe rapaHTnpyETcaNCIONb30BaHHe opIRINHaJIbHbIX 3anaChbIX qAteN I npABInbHoe BblIOJIHeHne peMOHTa pnp6opa).
IIOCTABKN 3AIIYACTEIN BO3MOXHbI B TEUEHNE 10 JET.
000 «Bnepnnyn Cu-Ai-3c>
TenefohtopaeylinnBPO:
3y6apeB nepeynok, 15/1
8-800-100-57-31
MocKBa, Poccna, 129164
YBOPKA IPINBOPA

OCTOPOXHO
He nnonb3yIe IaI yIcTkn dYxOBKn npObIe IcHCTaIue yCtpoIcTaB.
BbInonHnIte uNCTky dYXOBKn TOnbKO nOcNe TOR, KaK OHa OCTbIHET.
Ipeed BbInonHeHnem Kaknx-yn6o pa60r yxOy oToCoeDnHre Tnp6op oT cTe 3NeKtpOnTuHa.
BheuHne noBepxHoctn duXOBKn
BAXHO: He nCnoIb3yIe Bbl3bIbAIOUe Koppo3HIO nn 6pa3nBhble YCHCTaUe cpeCTBa. Pnp CnyaHOM nonaDaHHn TaKHX cpeCTB Na nobepxHOCTb DxyOBKn HemeDneHNO IpOtpNTe ee BnaXHO TpIKNo.
- IpOtnpaIte NOBepXHocTn DuyxOBKn BlaJXHON TprAknO. PIn CINbHom 3aqr3HeHNIO6AbNITe B BODy He60JIbOe KOJIneCTBO cpeCTBa dJaMbITbAnocdyI. 3aKaHmBaY bOpKpy, BbITpaIte pnp6op Hacyxo cyoH TprAknO.
BHytpenhne nobepxhoctn dYXOBKn
BAxHO: He noIb3yItebc r6kamc n a6pa3nBbHbIM cnoem nII MeTaNHeeCKMm MoaIkaMn. IocToHHoe noIb3oBaHne TaKMM cpecdtBAMn npBOJNT K NOBpeXdEHIO NOKpbITNI mAnIpOBaHbIX NOBepXHOCTeN i CTeKnA DBePcbl.
Iocne kaojdo IcnoJIb3OBAHnI Heo6xoJIMo DaT b dyXOBKe 0ctbIb N OuchTb ee (npEIOuHTeNbHe, NOA dyXOBKa ige Tepna)OT cIeDob Hara npTeH, KOTOpBle MOyT PNOBJIb3cP npnpUroPAHmOCTaKOB pnoDyKTOB (HaNPmEp, pnoDyKTOCB BblcOKM COpedjKaHemCaxapa).
Ponb3yItecb YcHCTBAMn, PpeHa3NaueHHbIMn CneuaJIbHO nJyXOBOK, nCleNyTe yKa3aHnMn 13rTOBUTeJ.
-ДлЯMbIbЯ STEKlna DBePcBly DuxOBKn NOJb3yUTeCb COOTBEcTBYIOUMN JxNkMm MOIOUMn CpeCTBaMn.ДлЯ TOrO YTo6bl O6JIeRHTb YHCTky DuxOBKn, MoJHo ChrTaB DbeUpy (cM.pa3dEn "TEX05CInYXINBAHNE").
IyHcTNBepxHn BHTn DxyOBKn npDyCMOTpeHa BO3MOXHOCTb (TolbKO B HEKOTOpbIX MoDEJAX) ONyCTNtB BepxHn HArpeBaTeNbHbN 3JeMeHT rnpA (cm. pa3dE "TEX06CJyXNBAHVE").
IINMUEAHME: B pe3yltate dInntelbHoro npiroTOBHeNn npOdyKToB C bblcOKm CodepKaHNm Bnarn (hAnpIMep, nUzcb, oBOuSe n T.n.) Ha BNYtpenHe CTOpOHe DBePcHb N OKoN O DBepHO npOkaJn MOKeT o6pa3OBbBaTbc KaONHeCAt. Iocne toro kak dYxOBka OCTbHET, Heo6XoJIMO npocuytB DBepy U3HyTpN, NoJIb3yrc CanfekOn mnn rgyKoN.
PpHaJdJIeXHcOCTn
3amouHTb pinnadnEeKHOCTN nocne IHNCIOJIb3OBAHnB B OBe CO cpeCDTBOM DnI MaITb IocyDbl; eCNI pinnadnEeKHOCTN Ie TropAHe, PONb3yTeCb CNEUaJIbHbIMn BapeKAMn.
0ctatkn nniu nJeKo ydaIaIOCTc NOMOoi bIO uetkn nn Iy6Kn.
Ucstka 3aJHeN CTeHKn U60KOBbIX KAtaJIHTnueCkNx NaHeNe (ecnn npEycMTopehbl)
BAxHO: HnB3a PnB3oBaTbCn DnI qNCTKn KATAHnTuCecknx NaHeJe a6pa3uHBbIMn CpeDCTBaMn, JKeCTKMMu 5eTcKaMn, r6kAmn DnI KaCTpObl nIi CNPeem dIyXOBok, TAK KAK 3TO MoJET NIOBpeXdEHHIO NOKpbITMy NaHeJe, B e3yJIbTaTe Yero OHI TepraOT CBOIO CnOCo6HoCTb K ABTOOChTE.
OCTaBbTe NcTyO duXoBky BkIIOuEHHoB B pexKIMe C BeHTINJIaTOpOM Pnpi TEmpePaType 200°C pImMePHO ha ODNH cac.
- Ito OKOHuaHIn cIKNla YnCTKn, npin octbIbWei dYxOBKe, ydaJIte, ecIN Heo6XoDMIO, oCTaTKn npOdyKTOB, nonb3yAc bNaxHOHry6KOJ.
TEXO6CJIyXKUBAHNE

OCTOPOXHO
-Пользейт ec kухонныMu pykaBuaAM.
- Ipeed npoBeHHeM HnKeOpncAHHbIX onepauiy6eJeTc6b, yTo dYxOBka octbila.
- Ipeed BbInOpHeHnEM KaKnx-Ni6o pa60T yXOy OToCoeDnHrTe Pnp6op O t cTu 3NeKtPOnITaHn.
CHATME DBEPUbl
Chartne DBepubl
1.ПлноctьюОТкpoиTeДеруДуховК.
2. PodnHmMtTe pKkCaTOpbI u CbNbHe TEs Nx BnepeD oynopa (Pnc.1).
3. 3aKpoTe Dbeepu, HacKnOJIbKO tTo BO3MoXHko (A), NpOHNIMTe ee (B) n NobepHnTe (C) TaK, YTO6bl DBepu Oka3aIaCb ChrToi (D) (Pnc. 2).
UCTAHOBKA DBepuHa MeCTO
- BCTaBbTe peTnB CBOnrHe3da.
2.ПлнocьюОТкpoITEДеруДуховК. - Onyctnte ChOba fKCaTOpbl.
- 3akpoite Depeyu.
Pnc.1
Pnc.2
I3MEHEHNE IIOLOXEHNA BEPXHEO HAPBATEBHOHO ΘEMEHTA (TOLbKO B HEKOTOpBX MODEJAX)
CBEHNA O IOKJIIOUeHNN K 3EKETPUeCKO CETN IIPBUEHebI B PA3JELE, IOCBAAEEHHOM YCTAHOBKE DYXBKN
- NaheIb ynpaBneHn
- BepxHn HArpeBaTeNbHbI 3JeMeHT/tpnB
- CnCTema oxJaXdEnHra (ecnn npedyCMTopeHa)
- NacnopTna Ta6JIuKhA (He CHmMaTb)
- JAmnoOyKn
- CnCTema BeHTnlaIauHn npu BbIneChe (ecnn npdeUcMTopeHa)
- BerteN (ecn taKoBoI npedyCMTopeH)
- HxHnHn HaRpeBaTeIbHbN 3JeMeHT (He BnDeH)
9.Дерца - Bo3MoXHbIe NIOJKeHn IIOK
- 3aDnna CteHka
ПРМЕЧАНО:
B KOnZe IpOcecca PnIroTOBJIeHn, NocIe BbIKIooHEn IyXOBKn, OxJaKDaIOUm BeHTINaTOp MoKeT IpoJoJkaTb pa6oTaB TteHHe eIe HeKOToPoro npOMeJyTKa BpeMeHn.
- Pnno6peTeHHb Bamn 6byTOB0 np6Op MoXeT HEMHOrO OTNIuATcBa OT NOKa3AHHO Ha NIJIIOCTpaIIM.
NCIOJIb3YEmbIe IIPINHAADJIEXKHOCTN
(cnncok npinnaedneKHOCTe, nocTaNbEmbIX B KOMnKeTe c DxyOBKOi, CM. B TEXHueckOM ONncaHH)
Pnc.1
Pnc.2
Pnc.3

Pnc.4
Pnc.5

Pnc.6

Pnc.7
Pnc.8
Pnc.9
BbIbIbIXHbIe noIKN (Pnc.8)
3TNIOKNIOBOLHOT BbDnBAtb HanoOBHnypeeTknNpOITNBnIgnaC6opaJnpaBOBpeMnpiroTOBHeHn. Moryt nCnoB3oBaTcBMeTe CnIO6bIMn pInHaNDJeKHOCTMa; DonyckaT MoKy B NocydomoEchOn MaAnHe.

BAJKJIIBI IHCTPYKl3 3 TEXHIKN B3NEKN
TB0B BJIACHA BE3NEKA TA BE3NEKA IHUINX DYXE BAKJINIIBI
Ley noc6nHK 3 ekplnyataii, a takok cam pnpuaM icTatyb BaxJyBv IHOpMaioi zoO npaBn texHkN 6e3neKn, knx 3aBxDi Heo6xIHO doTPmByatncb.

Ie cIMBON He6e3neKn, kynnnonepenKaE npo moKJbNpn3nk k nDk KopnctyBaay, taik i dniinHux.
Ipej ycima nobiDomJIeHHaMn Ipo He63neky cTOnAIMyTB CmB0JIH He63neKe Ta TepmiH:

HE6E3NEKA

YBAGA
Bka3yHa Hebe3neuHy cnTuayio, yKa, kKIO II He yHnKHyTn, cnpuHHe BaXkI yskOJKeHHa.
Bka3yHa He6e3neuH cyTuayauizou,raKaKuo II He yHnKHyTNMOxE cnpuunHn TaKKi yuKOxdHenH.
Yci NobidomnH, 0c TcOyTcBcTexHInK 6e3neK, DetalbHO OINcYbT oTeHcHHy He63neKy, BkA3yToB, k3MeHUnTI pN3NK TlneChNX yUkoJKeHb, cPnUHeHnx eNeKtpuHm CTpymom y BnauKaHcy HnpaBnIbHoro KOpCTyBaHHa npuaIaOM. Cybopo DToPmuyTeCb Taknx npabn:
- Ipeed BUKOHaHHam 6ybIb-kyKINx pObit, NOB'3aHnX 3 MOtaxem, Heo6XiHn BiD'EnHATn PpNlaD BiD enEKeTpOmepexi.
BCTaHOBLeHHn npinady ta Iyore Tox6cnyroByaHHN NOBHHI BIKOHyBaTnc KBaJIiKOBaHM faxIbEeM 3 DOpTmAHNHm IHCTpyKuI BnPo6Hnka i YHHNX MicueBHX HopM 3 TexhIKs 6e3neKn. He Do3BOJAEbCpemOnTyBaTu npinad npobOnTu 3amH ydy-b-AXN XoTn HkU O cyoro CneuaJIbHO He BImarag NocioHK 3 ekclnyatauii. - 3rɪdno 3 texhɪyHIMM HOpMaMn, 3aεmJIeHnY ζbOrO npɪpʌny e 06OB'ЯЗКOBIM.
Kabel eneKtpoxnBneHn noBHeH MaTH IOBxHy,IOCTaTHIO Ira TORO,IO6 nID'EDHaTn npilaad,nicra Noro OCTaTOHOro BCTaHOBnHn,do eNEKTpuHoi p03eTKI. - 3riDIO 3 npaBnAmM 3 texHikn 6e3neKn, npiuaI cniI oIbIaNHaTI 6aRaTOnIOKCHM po3MnKaUeM 3 BiCTaHII MIX KOHTaMNI OOHMeHHe 3 MM
He BnKopncTObuYte noDbBiH pe3eTk, noDobXyBaui.
HeTgHtB3aKa6eBJeEeKToxNbIeHHn3MeTOU BiKIIuOeHHnPpIyAdyBi eKeTPOXINBLeHHA. - Picna BCTaHOBJIeHHN npIaMy Ioro eNeKTPuHHi KOMNoHEHTn He NOBUNHI 3aJIiHaTcN pIncTyNHmI DnKOpNCyBaA.
He cnid doToppkaTnca do duXBOOi 7afo BOnOrIMu ChuaTHAMn TiTa Ta nepe6byatn 6iJa npnuady bocohix.
LzyduXb0a 1pni3NaHeBnHTKO0D IpnIPOTuBaHHY iKi B Domaunix yMoBX.3a6OpOHeBO BnKOpNCToByBatn Pnpuad 3 6yDb-RAKOIO HINIO METOIO (HapnKnad,ДЯ obirBaHHN pPmIeHb).Bnpo6HNe He Hece KdoHOi BiNobiaJbHocT 3a HacnIKn HeHaJIeJHOro BnKOpNCTaHH Npnuad Ta HeDoTPMaHHN nepeniiueHx BmOr.
LcH npnnaHne npn3nauhen dIy BnKOpCTaHHN dItbMn a60 oc6aMn, kAi BnacIIok PCNXUHOu Hf i3NUHOe HnoBHOUHNOCHT a6o HeNoctTaHbOro DocBiDy Ta 3HaHb He MoKyTb KopNCYBaTnCp npuaDom CaMOCTIHoo, a TInbKn iNd HargnOAm a60 iN KepiBnucTBMo OC6u, kAa BiDnOBiJa3 ax HIO be3 ixHIO be3neky.
-Пд acnprotoBaHHЯixi noBepxHnipoNauDmy moKybduJyke hargpBaTnc. He do3BolnaTe dIrrnpe6byTu 6m3bKo Bi npuHaTy Ta rpaTncb HMM.
HeDtOtpKaIteCbdoHarpBiaBnHexeMeTeNtB a60 BHyTpIiHix NOpEpxoHb npilaNy nid cac 63pa3y JnicJ3aKiHcHHe HOro p60To y 3B'3ky 3 He63neKIOOnikB.3AnobiraTe KOHTAKTy npilaNy 3TKaHnAMn ab6 iHsIMM 3aMMCTmM MaTePiaJamn ax Do Ioro OxIoJKeHHa.
Iicra 3akinyehn npriotuybaHH iXi DberpTa dyxboo iu BknpBaTe obepeHXNo, noctynobO BinpyaHrnape nobipra a60 napy. KOnn DberpTa duxybooi uHnneHepi, rape neobiptra bXoDHTb uee3 OTbOpN, oio mictbca Hnd naHennIO KepyBaHH. He 3akpuBaTe BeHTmuaHni OTbOpN.
BnMaTe nocyd Ta o6naDHaHH, KopncTyOuHc3 3axNCHMn pyKaBnAaMn Ta He DoTopkaOChc BIdKpTmMn YacTHNaHmTi Da Harpitnx Nobepxohb. - He 3aIiwaIte 6IbI npIauy Bpuoib i3 3aIIMCTnx MATEpianib: kIIO npIauA BnuAko BO yBIMKHeTcB, ce MOKe npIzBecn IIO cIaIaXyBaHNa BOrHIO.
He rotyuTe H ne po3irpiaaTe iky y repmetnHNo 3akpntomy nocdyi. BhaCniDok 3poCTAHN TnCKy BCEpeDnHIO nocdy octAHNI MOKe Bb6xHyTu N nooKoDHT npnilad. - He kopructyItecb nocydom, BIVOTOBHeHIM i3 CHTeTuHx MATEpiaiB.
Hadmipno p03irpi t Jx np Ta Ma cna Moxyb Ierko 3aropitnc. Byte 3abxdyxe ybaXhi nic npiroTybaHHcTpaB, 0o MictyBeNKy KInkCtB XnpiB Ta Macen.
-Пд ус пиротуваим яki hikоли не залишайт рплад 6e3наглд.
Pam'raTae, 0o aKorolbHn Hanoi, BnKOpriCTOBuBaHn Iy npriOTyBaHHI xH (HaNpKnlaO KoHbK, pOM a60 BNHO), npu BnCOKHX TeMnepaTpyax BnnapoBrytbcA, a ToMy icHy e Pn3IK TOrO, 0o Bnnapu anKorolbHnx HanoiB Mozytb MOnyTB 3aRopitc npu KOHTAKTI 3 HapitIMm ENEKTpuHMN KOMPOHeHTAmn npnilaNy.
Ytunlizia npuna
- Lcien npnnaBnroTOBnEHO 3 MaTePiJIaIB, npndaTHnx IJy nobTOpho BnKOpCTaHHa. Ytunizy Te npnaD BiIObIDHO DO HOPM, BCTAHOBHeHX MicceBmOpraHAMn BnAdn. Ipeep ytni3aicio BIKJIOUITb npnaD Bi ENeKTpOmepejx.
3a DetalbhiioiHphiopmaicioo do6cnyrobyahn, pmoHTy ta ytniaauizboro nobytoboro enektpuHoro npnnaDy 3bepHitbcra do miuebux opranib Bna, komyahbhoi cnykbi a6oB maraHH.
BCTAHOBJIENH
Iicna po3nakybanHH nepebipte duXoby uhaaBHCt bnoKoJxHb, 3abDaHNx i nd TpaHcnpTyBaHnA, aTakOx Te, uii DbepuTa 3auHHOTcb HaneXHM uHOM. y BuNaDCy BnuHKHeHH 6y-b-axn np6bnm 3BepHtCb do B mRa3IN abo do cHTpy Texo6cnyTOByBaHH. Uo6 he nouKoDttn pinnad ni d ac noro BCTahOBLeHH, nihononiieTun Heohy ynakOBky 3himiT bine i nd ac noro BCTahOBHeHH.
IIITOTOBKA MICUДIЯ BCTAHOBLEHNAIPIVAJY
- Поверхи Me6nbI, до ппяготь до духобошафи, поинни Бут Термocтikmн (Витримвати HarpiBaHнdo до сонай менше 90°C).
Bukohai Te BCI ToJIpHi PO6ToN, Heo6XiHNI DnA BbUyBaHnA DxyOBoI 7aΦn, CtapaHNO pnp6epiTbepe'hTI trPicK Ta TnPcY.
Pcna BCTaHOBnEHn npIaNy Ioro HnxHn NOBepxHne NoOBHHa 3aIIuHaTcnpCTynHOIO nKOpNCTyBaHa.
Ioo6 duXOBk npauoBana HopMaIbHO, 3aIIuTe mHimaIbHy BiCTaHbMIX II BepXbIO IOBepXHeO Ta CTInbHnueO.
IIIKIIOUeHHNoEJEKTPOMEPEXKI
Ipebipre, 6o6 happya i npTyKHiCTb npnauy BiNobiDAMXapaKTepnCTkam eJeKtpOmepeki. EtKcTKa 3 TexHcHmMxapaKTepnCTkAmMiCtTbCra Ha nepeDi noBepxhi npnauy (ii BnuHo, KOJI DBePzra Ta yxOBoi 7afo BiuHneHi).
Heo6xio, 306 3aminy ka6eHIO eNEKtpoxkBneHHa (TIN H05 RR x 1,5 MM2) BVKOHyBaB KBAJIΦIKOBAHm faxIBEc. 3BepHITbcn do aBtropn3ObaHOro cHTpy Texo6CnyTOyBaHHa.
3AMIHA JAMTOUKY U DYXOBIIM USAO
AK KEPYBATN DYXOBKOIO
- Поверпь ручky поемкаа на Вдобійу Temnéратур.
ydyxobii yphiyiBIMKhetbca lamnoka. - Поверпь ручky тетмоста за 3a рогинниковою стейково на Невохидун Temnéратур.
IINKAtop TepMOCTaTa 3aROpntbC i BIMKHeTbC, KOJIyXOBKa DocrHne Bn6paHOi TEMpePaTpy.
HanaaHTyBaHHa Yacy roTsyBaHHa
Iicna Bn6bpyeKmmy roTyBaHHa i Tempepatrya 3a donomoroo pyok, HATNCiBcepeHIO KNOKy: dncnnne noka3yTImme 0.00, a CMBON dzBOHy 6nMaTMe.
HaTNCiBt cepeHIO KhoNky 3HOby: Ha DCnneB iBDo6paNTbcra Ta 0.00, kYi chepyBaTMyTcra, a CMBon AUTO 6nMaTImme. BCTahOBiTa cac rotyBaHHa 3a
DonomoroKhoNk+ (maxcmmaJIbe moKJInBe 3NaueHHa cKnadae 10 rOdnu). 3a KInka cekynd Ha dcnilneB iDio6paNTbcra cac do6n, a CMBon AUTO
npodobKyBaTMte ropitn, NiDTBePdXkyUOnn HanaSTyBaHHa. Ioo6 noDnBHTC, cknBkn Ue Yacp TpBaTMe rotyBaHHa, I3MHNr NOro 3a Heo6xIDHcti, HATNCiBt
ha cepeHIO KNOKy Ta ytpmnyTe II npotarrom 2 cekynd, a Notim HATNCiBt II ue pa3. Koln MInHe BCTAHOBLeHn Yac, CMBon 3rache, nponyHae 3ByKOBn CnHan
i Ha DCnneI oNUe 6bnmatn CmBol AUTO. Ioo6 BmKHyTN 3ByKOBn CmHAn, HATNCiBt Ha 6yNb-ky KhoNky. Ioo6 npinnHITn rotyBaHHa, NobepHItb fynKcII Ta
pyuKy TepepatypnHa Hynl i HATNCiBt cepeHIO KNOKy, yTPmuyOnii npotarrom DBOx cekynd.
3aTpIMKa Yacy 3aBepWeHnroTyBaHHa
BCTAHOBIBWUHc rOtYBaHHa, HATNCHITb cepdHIO KhoNkU: Ha dncnIe BIDo6pa3ntbCg End, qac roTyBaHHa i CMBON AUTO 6nIMMaTmMyb no cep3i. HATNCHITb KhoNky +, 0o6 nobauHTu BCTAHOBIEHn uac 3abepeHHra roTyBaHHa (ca3abepeHHra roTyBaHHa MOxHa BIDKnactn MaKcImalbHo ha 23 roDHHn. 3a KInbKa cekyHd Ha dncnIe BiDoo6pa3ntbCra cac doBn, CMBON , a CMBON AUTO npoDobXyBaTMte roPitn, niTBePdxJuOn hnaaHTBaHHa. 0o6 noDINBttncr yac 3abepeHHra roTyBaHHa, i 3miHNTu Noro 3a Heo6xIDHOCTi, HATNCHITb Ha cepeHHIO KhoNkU, a Notim HATNCHITb Ha Hei ue Dbiu. Picra 3abepeHHa ZBOPOTHO BIDNIky Yacy 3acBtNTbC MMBON , i dyXOBka npoDobXHTp npaioBAtu y BCTAHOBIEHOMy pexkmi roTyBaHHa.
TABINZI OINCSY FYNKLI
| Функция | Опс | |
| O | OFF | Шоб плинисту поочesc ratувань та вимкиудховку. |
| - | Ламточka | Для вklюочень вуtrішього освітlenнь духовки. |
| - | Трашийский PEЖИМ | Ча рункци有很大лдг рину ratувань срав удь-якого туну на odni poliц. ПорріITE duxobkdu no notriбhoittemпегатурии i nochав'tе рordукту в неіпісядосгеленив bctahoblenoi temneatур. Рекоменьу委书记 Висportовыотудугу abo trétю poliцьдг ratувань. Cha рункци takож ni'dxodn'tь дд рину ratувань за мороженихhanibfabprakatí; dotprimyteсь Inctrpukciи ha yanakovcu prordyktrib. |
| - | ВиліКання 3 KOHBEKUÇIÇÜ | Для виліkanня пирогів 3 рidkoю naunikkoю (conokkixx abo conoknx) ha odni poliц. Cha рункци takож ideално niodxodn'tь дд рину ratувань üki ha dbox pibnax. 3a heobxidnocti minayte stcapbiv miicamm du for 6ilb wip ribhomiphorotrotybanhh. |
| - | ГРИЛь | Для рину ratувань на grpini steikiv, shaшникiv i cosncok, zanikahna oboviv i pičmaжувань rpirok. ПорріITE duxobkyprotaуrom рindblizno 3-5xb. Пд чac ratувань дberpzata duxobknu nobinhni 6byt zakpnti. Пд чac рину ratувань m'Яca halinbaite troxnu bodn b nddoh (bctahobleney na nepshomny pibni), уоб унknhytu utboeHHa dummy ta po3bpn3kyubannyжир.Бадан do diuhi nepeberpytu m'яco b proceci ratybanha. |
| - | ТYPБО ГПЛь | Для рину ratувань на grpini BEVIKKX nopuzi M'Яca (poctbiq chu inhe cmaxe HeM'aco).Дерцета duxobk nuobnHni 6bytЗakrttmii πid quac zuokluy prinruybatnny. Пд чac рину ratувань m'Яca pekomehdyetbca hailnbatu BOVD INDIO, BCTAHOBleniy na nepshomny pibni, уоб 3mehuHTN uTBOeHHa dummy ta po3bpn3kyubannyжир. Пеberperte IM'Яco πid qac myoro rotuybanha na grpini. |
| - | P03MOPOXYBAHHA | Ча рункци有很大у Виморостовуbatся дд ринscokereноу розморожувань роруktiv ри kIMnatii tempepatул.Прordукту сід кlacttu в duxobkuy b yanaobuzi, уоб унknhytuix Bucixahnry. |
TABINZI PNIIGOTYBAHNA
Tpox 3mauye DeKo, 06 niua mana xpyctky ochOBy. IotpycItb niuy cnpom Moaepena Chee3 Dvi TpeTnH uacy roTyBaHna.
Функцяпдюmyticra(haABhaTINbKbBOKpemnxMoeJax)
3aBxdi 6aKaHO NaKpBaTu TcTO BOLoro TO KAnHO, nepu HIX CTaBnTo NOr y dXOBky. Yac BnCTOIOBAHnT TcTa npu BnKOpCTAHHi ciEi FyHKU3MeHuyETcb npn6IINHO Ha ONDy TpeTHy y nopIBHHI 3 nCtOIOBAHHm npu KIMHaTHNI TEMNepaTypi (20-25°C). Yac BnCTOIOBAHH1 kT TcTa IJnPiu CTaHObNTb npn6IIN3HO odHy rOdy.