LX9-3-MG - Cordless vacuum AEG - Free user manual and instructions
Find the device manual for free LX9-3-MG AEG in PDF.
| Vacuum cleaner type | Bagless cyclonic canister vacuum cleaner |
| Power supply | Mains (power cable with cord rewinder) |
| Dust container capacity | Approximately 3 L (estimation) |
| Filters | Fine dust filter (washable), pre-motor filter (washable), cone filter (washable) |
| Included accessories | FlowMotion brush (or FlowMotion LED), turbo brush, mini turbo brush, ParketoPro brush, FlexProPlus brush, extra long flexible crevice tool, 3-in-1 accessory, AeroPro hose, telescopic tube |
| Main functions | Power control (manual or remote control), brush adjustment pedal, front LED lighting (depending on model), parking position |
| Maintenance and cleaning | Empty the container when the level reaches MAX; regular filter cleaning (rinse with water, dry 24 h); clean rotating brushes |
| Safety | Do not vacuum liquids, hot or sharp objects; do not use without filters; unplug before maintenance; do not let children play with the appliance |
| Spare parts and repairability | Use genuine AEG parts; contact an authorized service center for any repairs; warranty does not cover damage caused by vacuuming liquid or using non-compliant accessories |
| General information | Household use only; store in a dry place; weight and dimensions not specified in the manual |
Frequently Asked Questions - LX9-3-MG AEG
User questions about LX9-3-MG AEG
0 question about this device. Answer the ones you know or ask your own.
Ask a new question about this device
Download the instructions for your Cordless vacuum in PDF format for free! Find your manual LX9-3-MG - AEG and take your electronic device back in hand. On this page are published all the documents necessary for the use of your device. LX9-3-MG by AEG.
USER MANUAL LX9-3-MG AEG
Bagless canister vacuum cleaner
GB INSTRUCTION BOOK. 6
DE GEBRAUCHSANWEISUNG. 9
AR 12
ES LIBRO DE INSTRUCCIONES. 15
FA
FR MODE D'EMPLOI 21
GR EFXEPIIIO OADHIGN 24
IT ISTRUZIONI 27
NL INSTRUCTIE BOEK. 30
PT LIVRO DE INSTRUÇÉS 33
1
OVERVIEW OF THE PRODUCT
K
R*

AA
CERTAIN MODELS ONLY
2
INSTALLATION
1
2
3
4
5
6
*
Ref: AA
7


Ref: LITHIUM CR1632
3
USING THE PRODUCT
- CERTAIN MODELS ONLY

8
9

10
11
3
USING THE PRODUCT
* CERTAIN MODELS ONLY
4 DUST EMPTYING

5 CLEANING THE FILTERS
5
CLEANING THE FILTERS
6
MAINTENENCE
- CERTAIN MODELS ONLY
18
7
SYSTEM CHECK

19
5

D
SAFETY PRECAUTIONS
This appliance can be used by children aged from 8 years and above and persons with reduced physical, sensory or mental capabilities or lack of experience and knowledge if they have been given supervision or instruction concerning use of the appliance in a safe way and understand the hazards involved.
Children shall not play with the appliance.
Cleaning and maintenance shall not be done by children without supervision.
WARNING: Turbo nozzles* have a rotating brush where parts can get entrapped. Please use them with caution and only on intended surfaces. Please turn the vacuum cleaner off before removing entrapped parts or cleaning the brush.
Batteries must be removed from the remote control in the handle / LED lighted nozzle before scrapping the product**.
*Certain models only.
**Information on how to remove the battery is in section 6 and 7.
Always disconnect the plug from the mains before cleaning or maintaining the appliance or when removing the battery. The battery is to be disposed of safely.
If the cord is damaged, it must be replaced only by an authorized AEG service centre in order to avoid a hazard.
LX9 should only be used for normal vacuuming indoors and in a domestic environment. Make sure the vacuum cleaner is stored in a dry place. All service or repairs must be carried out by an authorized AEG service centre. Packaging material, e.g. plastic bags should not be accessible to children to avoid suffocation.
Never use the vacuum cleaner:
In wet areas.
Close to flammable gases, etc.
When the product shows visible signs of damage.
On sharp objects or fluids.
When the floor nozzle shows visible signs of a damages.
On hot or cold cinders, lighted cigarette butts, etc.
On fine dust, for instance from plaster, concrete, flour, hot or cold ashes.
Do not leave the vacuum cleaner in direct sunlight.
Avoid exposing the vacuum cleaner to strong heat or freezing temperatures.
Never use the vacuum cleaner without its filters.
Do not try to touch the brush roll while the cleaner is switched on and the brush roll is turning.
When the wheels are blocked.
Do not use your vacuum cleaner if the filters are injured or broken.
Power cord precautions
Check the plug and cord regularly. Never use the vacuum cleaner if the plug or cord is damaged.
Damage to the vacuum cleaner's cord is not covered by the warranty. Never pull or lift the vacuum cleaner by the cord.
Using the vacuum cleaner in the above circumstances may cause serious personal injury or damage to the product. Such injury or damage is not covered by the warranty or by AEG.
SERVICING AND WARRANTY
All service or repairs must be carried out by an authorized AEG service centre.
Damage to the vacuum cleaner's cord is not covered by the warranty. Damage to the motor caused by; vacuuming liquid, immersing appliance in liquid or using appliance with a damaged hose and nozzle is not covered by the warranty.
DISPOSAL

This symbol on the product indicates that this product contains a battery which shall not be disposed with normal household waste.

This symbol on the product or on its packaging indicates that the product may not be treated as household waste.
To recycle your product, please take it to an official collection point or to an AEG service center that can remove and recycle the battery and electric parts in a safe and professional way. Follow your country's rules for the separate collection of electrical products and rechargeable batteries.
Hereby, AEG Home Care and SDA, declares that the Vacuum Cleaner with radio equipment type HER2 and HER3 is in compliance with Directive 2014/53/EU.
ENGLISH
Thank you for choosing AEG LX9 vacuum cleaner. Always use original accessories and spare parts to get the best results. This product is designed with the environment in mind. All plastic parts are marked for recycling purposes.
BEFORE STARTING
- Read this manual carefully.
- Check that all parts described are included.
- Pay special attention to the safety precautions!
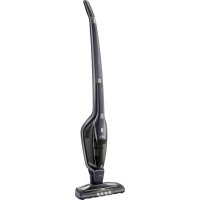
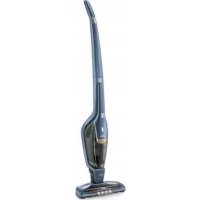
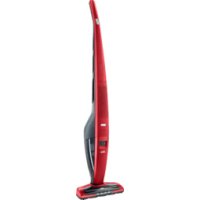
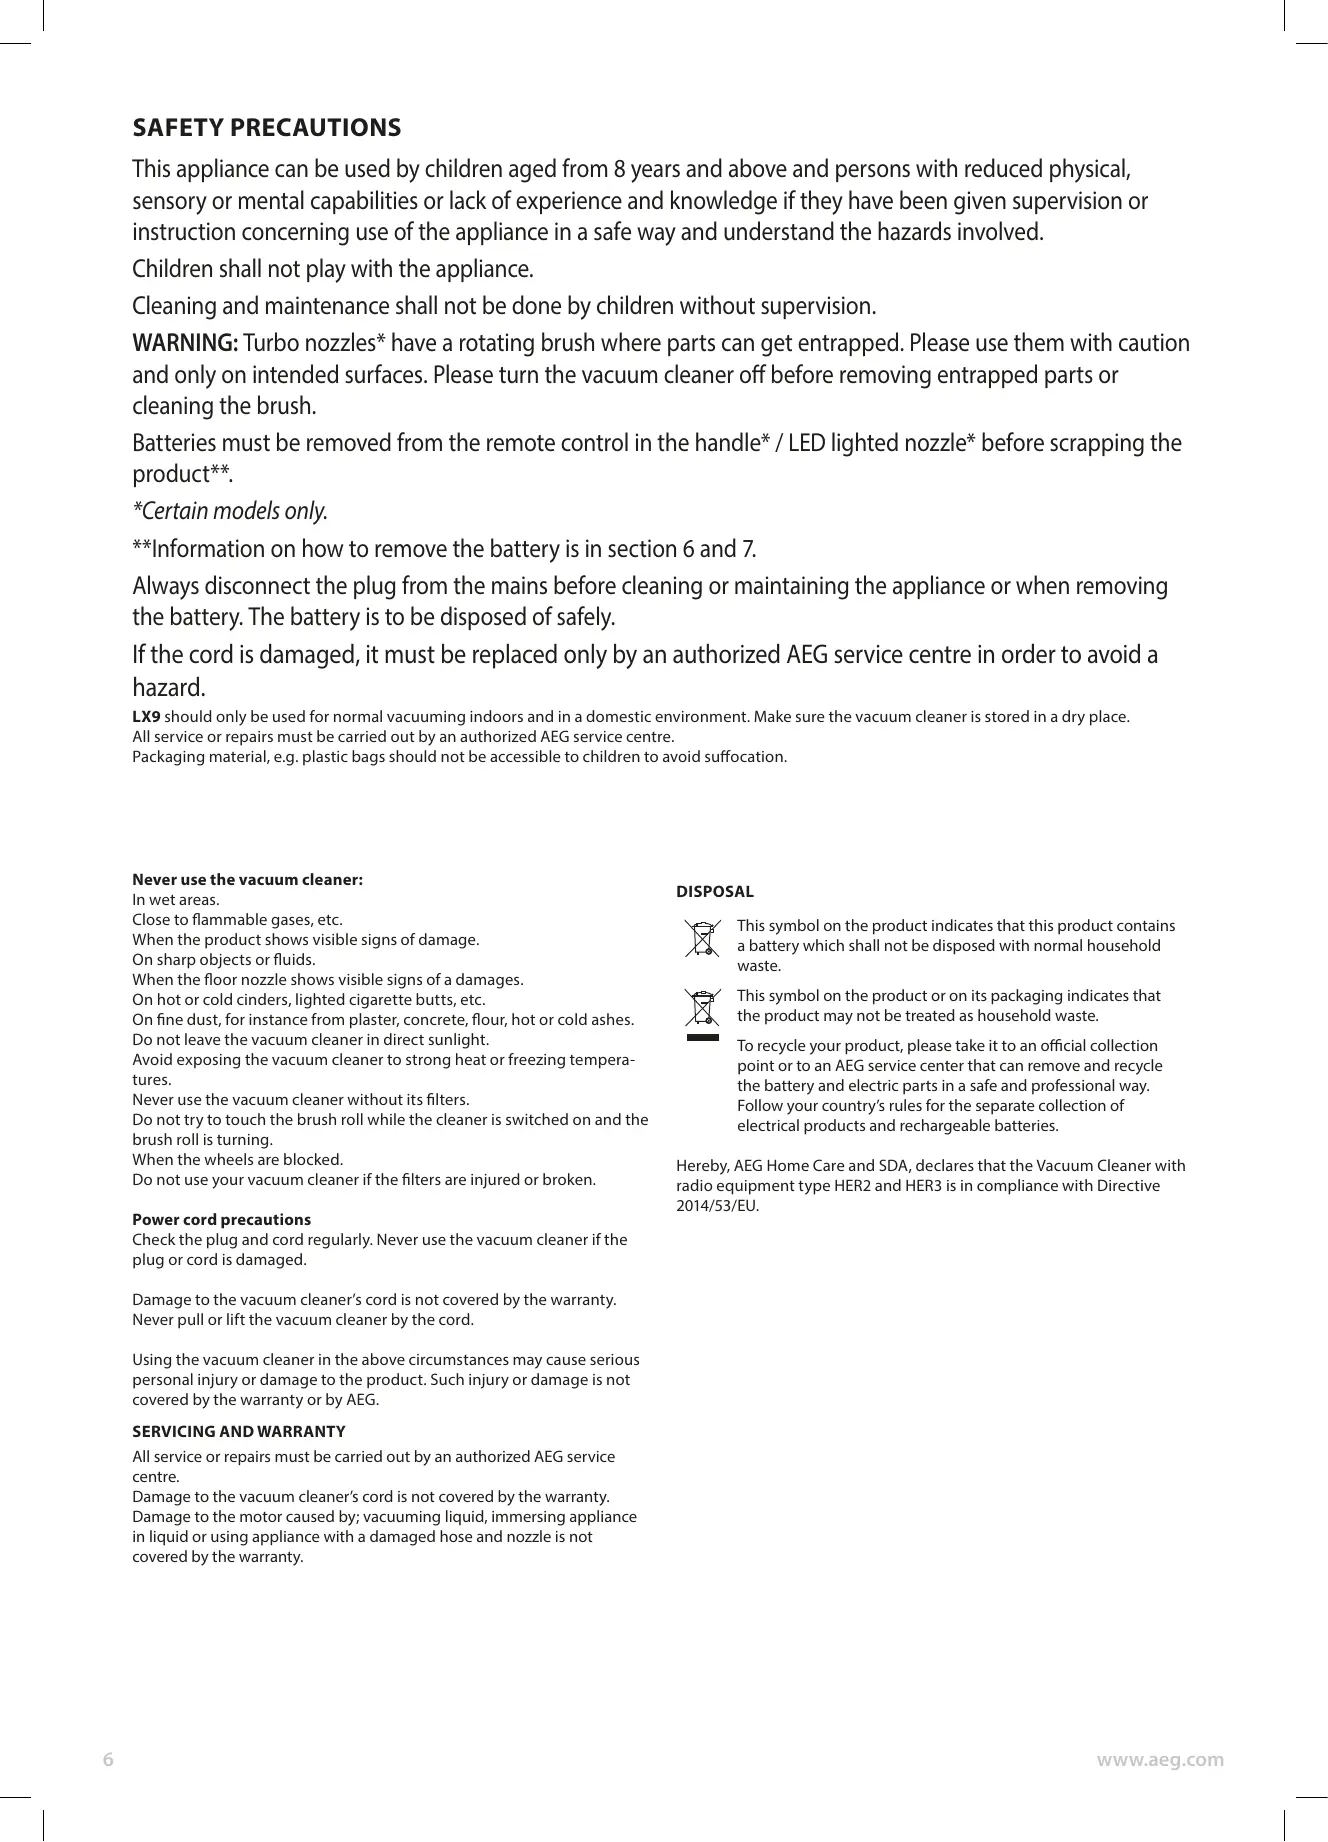
DESCRIPTION OF LX9 VACUUM CLEANER
A. Display (see versions later)
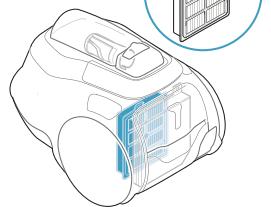
B. Filters lid
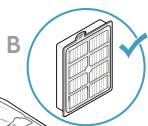
C. Fine dust filter
D. Pre-motor filter
E. Parking slots
F. Power cord
G. Carry handle
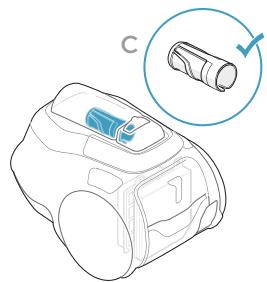
H. Cyclone compartment and nose cone filter
I. Air channel
J. Dust compartment
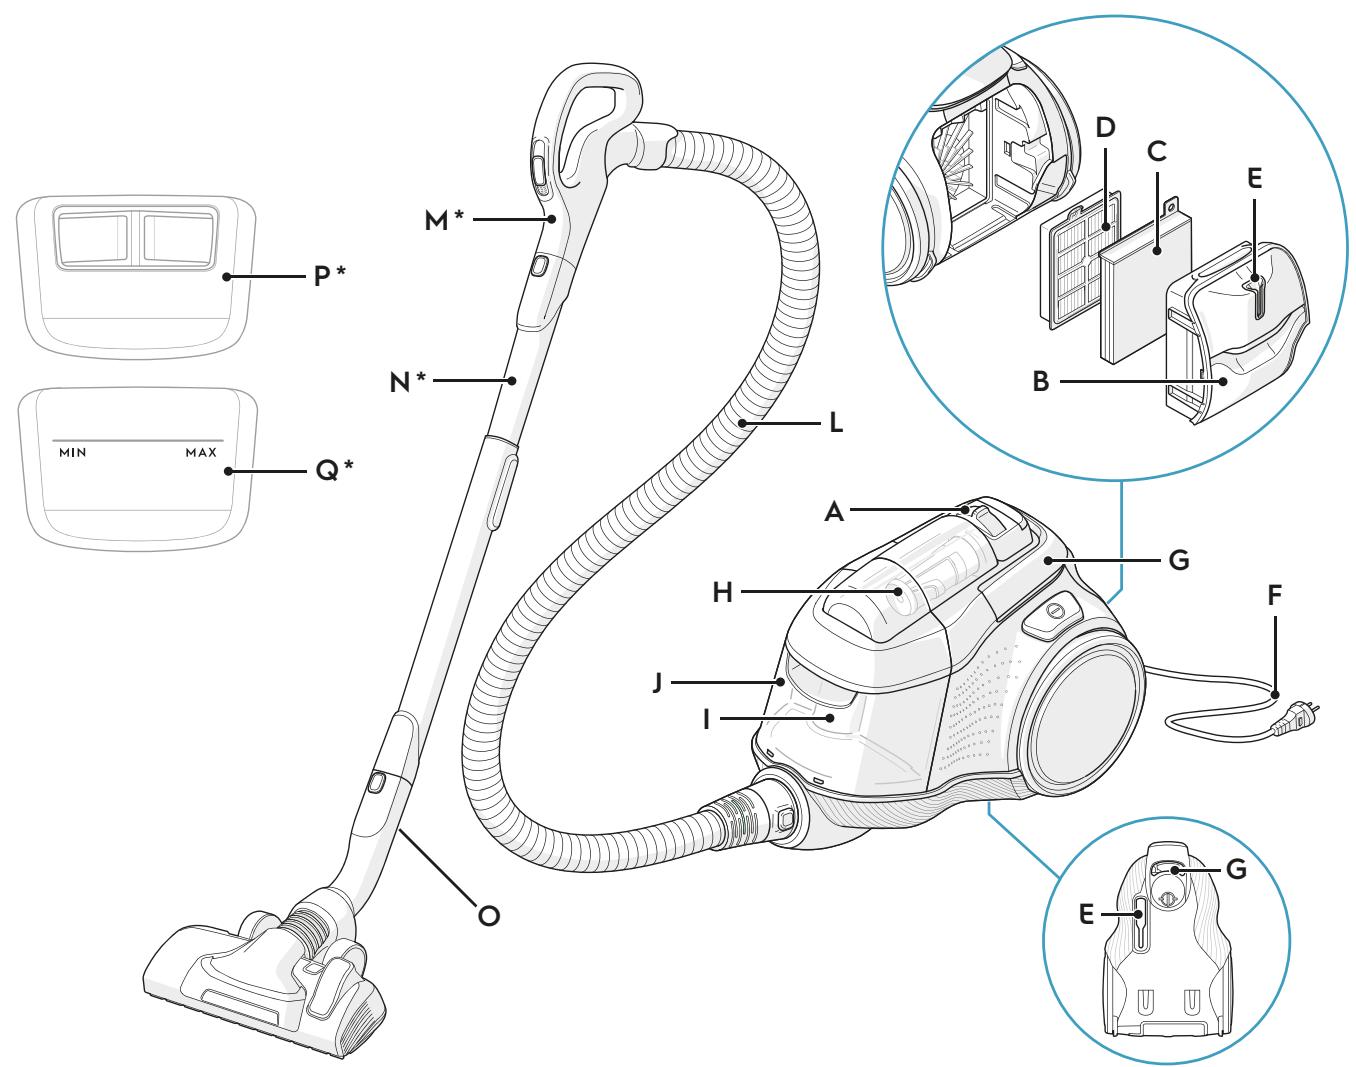
K. AeroPro 3in1 tool
L. AeroPro hose
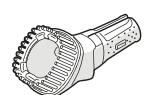
M. AeroPro handle (see versions later)
N. AeroPro telescopic tube
O. Parking clip
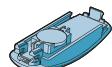
P. Display for models with rotary knob manual control*
Q. Display for models with remote control
R. AeroPro Classic handle
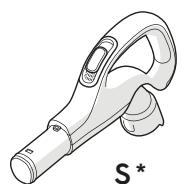
S. AeroPro Ergo handle
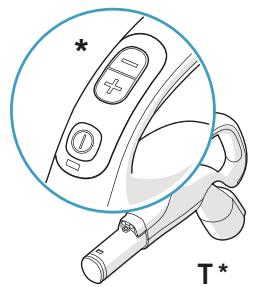
T. AeroPro Remote Control handle
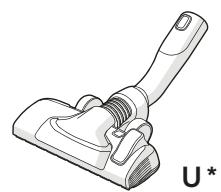
U. FlowMotion nozzle
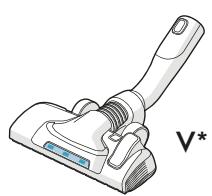
V. FlowMotion LED nozzle (with front lights)
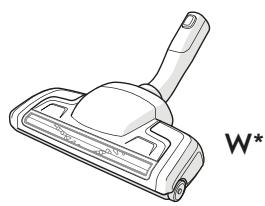
W. AeroPro Turbo nozzle
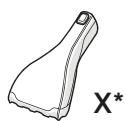
X. AeroPro Mini Turbo nozzle
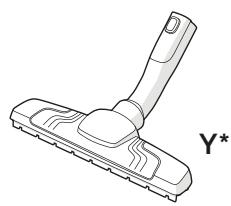
Y. ParkettoPro nozzle
Z. AeroPro FlexProPlus nozzle
AA. AeroPro Long crevice nozzle
- Certain models only
HOW TO USE THE VACUUM CLEANER
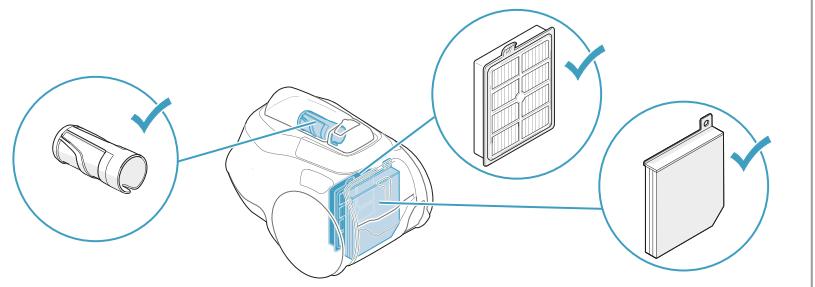
1 Check that all filters are properly placed before using the vacuum cleaner.
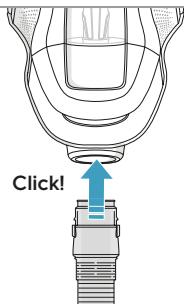
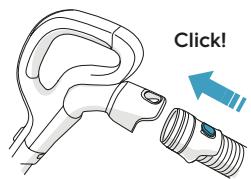
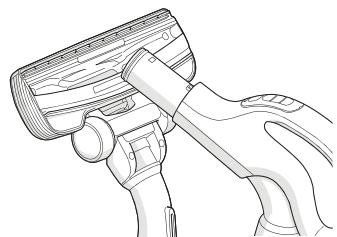
2 Insert the hose into the cleaner (to remove it, press the lock buttons and pull). Insert the hose into the hose handle until the lock button clicks (to release it, press the lock button and pull).
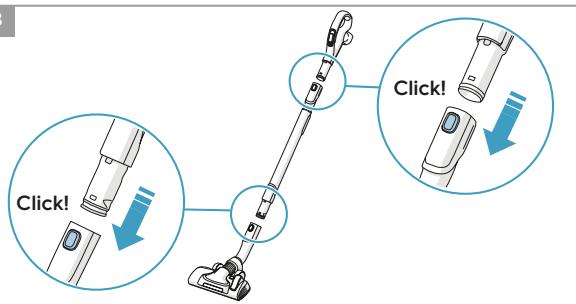
3 Attach the telescopic tube to the nozzle. Attach the telescopic tube to the hose handle (to remove it, press the lock button and pull).
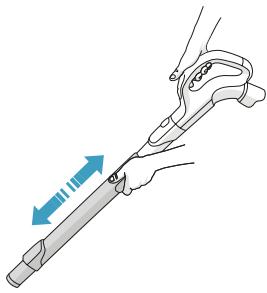
4 Adjust the telescopic tube by holding the lock with one hand and pulling the handle with the other hand.
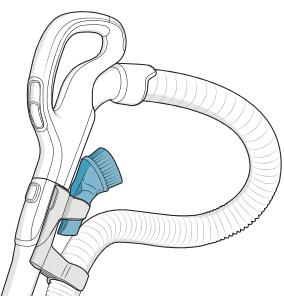
3IN1 ACCESSORY TOOL
5 You can fasten the clip-on holder and 3in1 tool under the handle to have it easily accessible. The tool has 3 functions, see pictures on next page.
CHANGING THE BATTERIES*
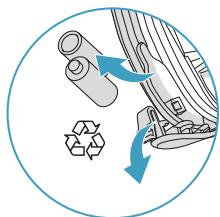
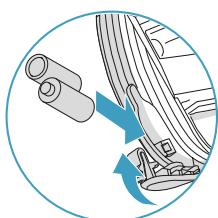
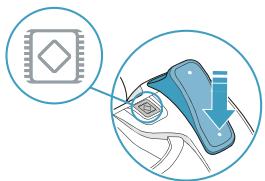
6 Nozzle with front lights: Before first use, remove the protective film (on top of the batteries). Change batteries when front lights start blinking fast. Use 2 AA batteries.
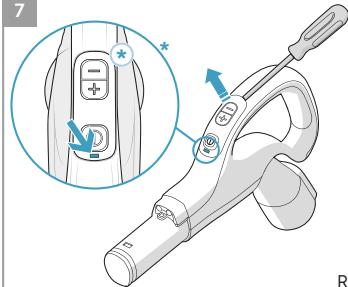
7 Handle with remote control: Change battery when light indicator turns red or is not responding when pressing any button. Use only batteries type LITHIUM CR1632.
NB: Remove the batteries from the product before scrapping. Follow your country's rules for collection of batteries and electrical products.
START/STOP THE VACUUM CLEANER AND ADJUST SUCTION POWER
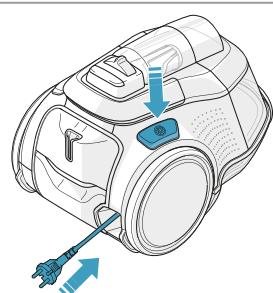
8 Pull out the power cord and plug it into the mains. Press the ON/OFF button to turn the cleaner on/off. Models with remote control can also be operated by the ON/OFF button on the handle.
9 After cleaning, push the REWIND button to rewind the cable.
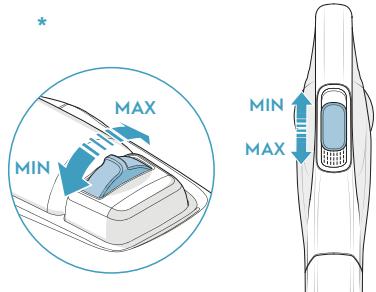
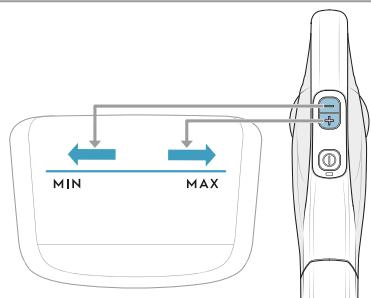
10 Adjust suction power (manual control models): Turn the rotary knob on the cleaner or use the air valve on the handle.
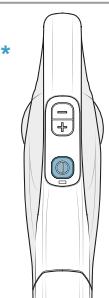
Adjust suction power (remote control models): Press +/- button on the handle. MIN/MAX and symbols indicators on display will show level of power.*
VACUUMING WITH THE UNIVERSAL NOZZLE (V^*,W^*)
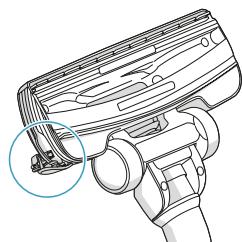
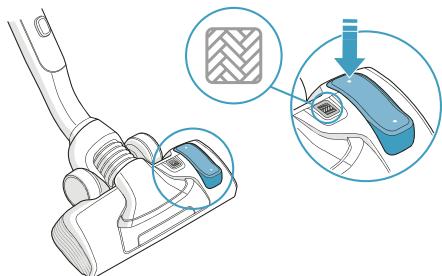
11 Change nozzle setting with the pedal. Icon illustrates recommended floor type (hard floor or carpet).
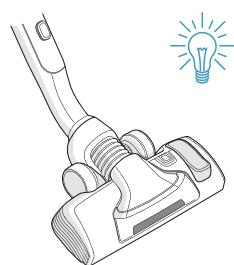
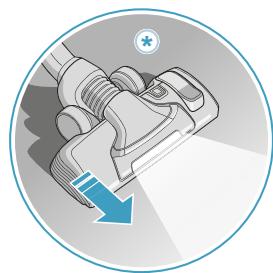
FlowMotion LED nozzle*: Move the nozzle forward. The front light turns on automatically after a few seconds. When the nozzle is not used, the light turns off automatically after a few seconds.
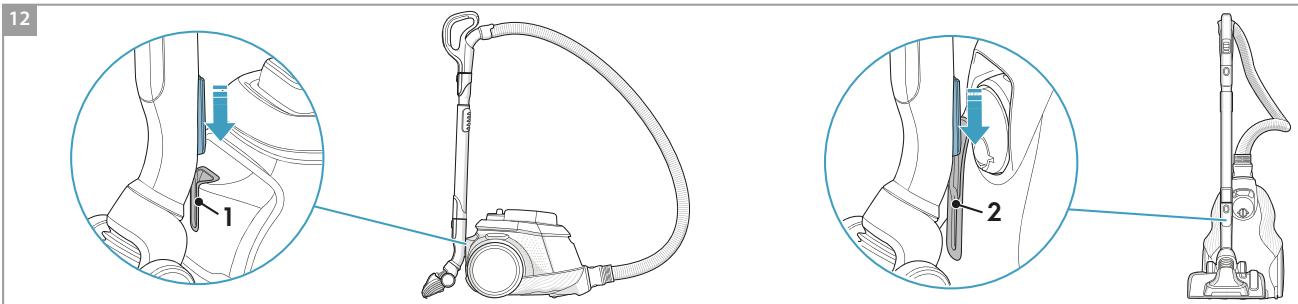
PARKING POSITIONS, MOVING THE VACUUM CLEANER
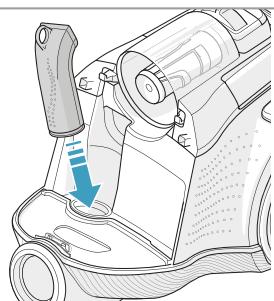
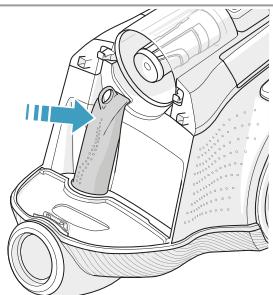
12 Use parking position (1), at the back of the vacuum cleaner, when you pause while vacuuming.
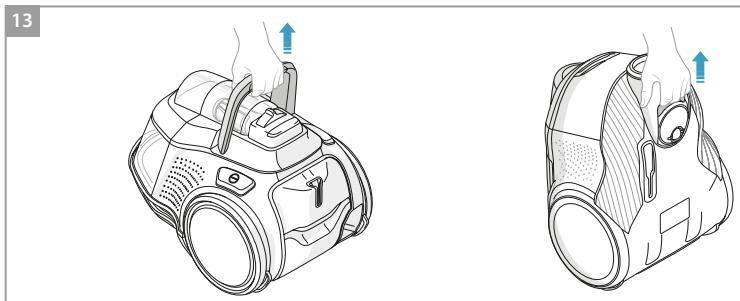
Use parking position (2), underneath the vacuum cleaner, to carry and store the vacuum cleaner.
13 The vacuum cleaner has two carrying handles.
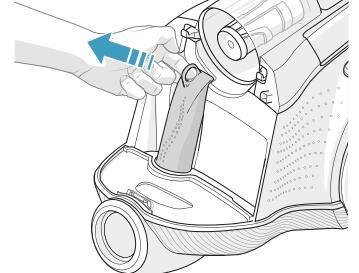
EMPTYING THE DUST COMPARTMENT
14 Empty the dust compartment when the level of dust has reached the maximum limit ("MAX"-mark).
Press the release button and pull to remove the dust compartment.
Hold the dust compartment over a dust bin. Press the unlock button underneath the lid, open the lid by swinging it outwards. Empty dust into the dustbin. Refit in reverse order.
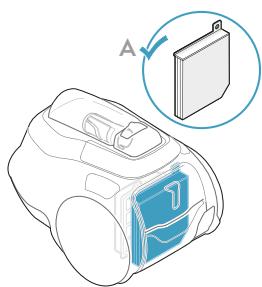
REPLACING THE FILTERS
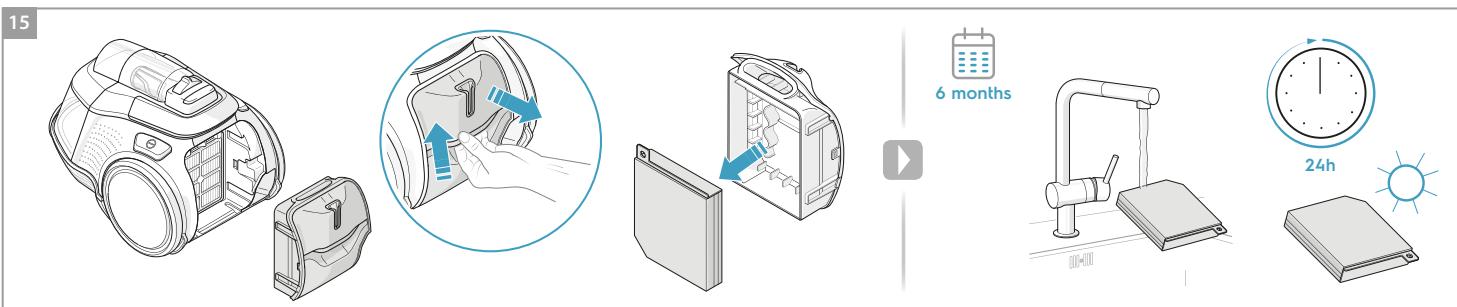
15 Pull the FILTER button to open the filter lid.
Clean the fine dust filter after six months of use. Pull the tab on the frame to remove the fine dust filter. Rinse the filter under running water.
NB: Do not use cleaning agents. Let the filter dry completely (min. 24 h in room temperature) before putting back!
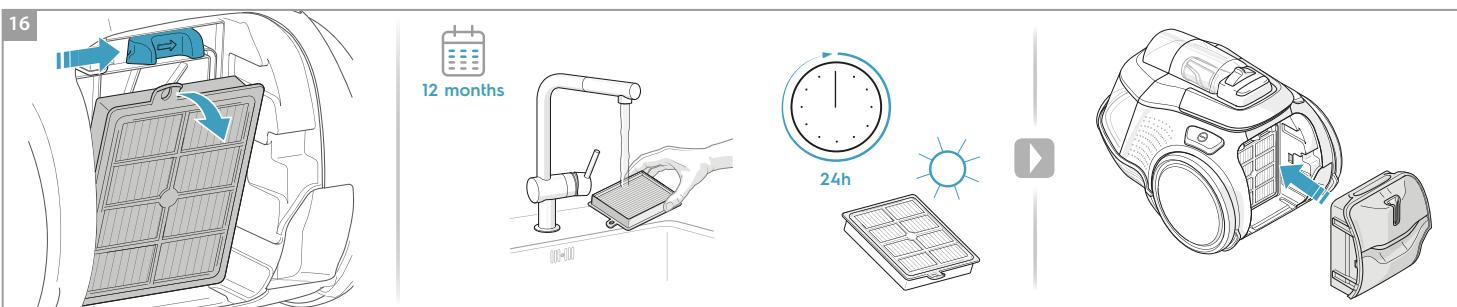
16 Press and slide the lock mechanism to the right to release the premotor filter. Remove the filter by pulling the filter frame tab.
Clean the pre-motor filter after twelve months of use.
Only use original s-filter PureAdvantage, ref: EFSXXX. Rinse the inside (dirty side) in lukewarm tap water. Tap the filter frame to remove the water. Repeat the process four times.
NB: Do not use cleaning agents. Avoid touching the filter surface.
Let the filter dry completely (min. 24 h in room temperature) before putting back! Change the washable filter at least once a year or when it is very dirty or damaged.
After replacing the filters, close the filter lid until it is clicked back into place.
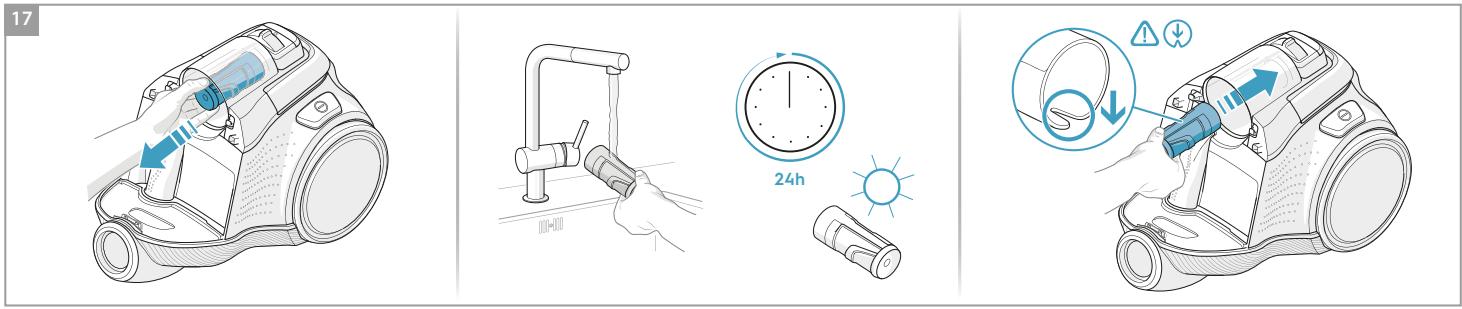
17 Cleaning the nose cone filter: the nose cone filter is located inside the cyclone compartment. Clean the nose cone filter if dust has entered. Pull the nose cone filter to remove. Remove dust with your hand.
Clean under running water if heavily soiled. Refit in reverse order.
NB: Do not use cleaning agents. Let the filter dry completely (min. 24 h in room temperature) before putting back!
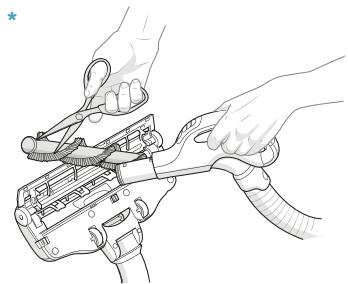
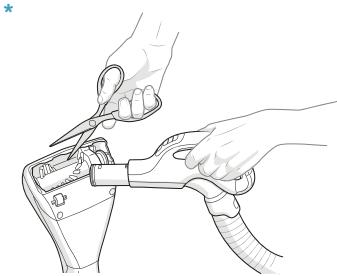
CLEANING THE UNIVERSAL NOZZLE (V^*,W^**) AND THE TURBO NOZZLE (X^*)
18 Disconnect the universal nozzle from the tube. Clean with the hose handle.
Disconnect the turbo nozzle from the tube and remove entangled threads etc by snipping them away with scissors. Use the hose handle to clean the nozzle. *
Enjoy a great cleaning experience with LX9!
AEG reserves the right to change products, information and specifications without notice.
| NOZZLE/ACCESSORY | USE FOR: | NOZZLE/ACCESSORY | USE FOR: | ||
| K. 3in1 accessory tool* | 3 tools in 1: 1. Dusting tool for hard surfaces (bookshelves, skirting boards etc). 2. Upholstery tool for textiles (curtains, upholstery etc). 3. Crevice tool for narrow spaces (behind radiators etc). | U. FlowMotion nozzle* V. FlowMotion LED nozzle* | Universal nozzle: - For all floor types, secures best dust pick up on both carpets and hard floors. - Change nozzle setting with the pedal. Icon will show recommended floor type. - Front light helps to detect dust and dirt in dark spaces (under furniture etc). PureVision only | ||
| W. Turbo nozzle* | Carpet nozzle: - Brushes and vacuums at the same time (best pick up of hair, fibres etc). - Brush roller is driven by the airflow of the vacuum cleaner. - Not suitable for carpets with very deep piles and long fringes, anti-slip carpets like door mats or water resistant carpets. Use universal nozzle instead. | X. Mini Turbo nozzle* | Upholstery nozzle: - Brushes and vacuums at the same time (best pick up of hair, fibres etc). - For textile furniture, car seats, mattresses etc. - Brush roller is driven by the airflow of the vacuum cleaner. - Not suitable for carpets with very deep pile and long fringes as it can get stuck in the rotating brush roll. | ||
| Y. ParketoPro nozzle* | Hard floor nozzle: - For gentle cleaning of hard floor (parquet, wooden floor, tiles etc). - Best dust pick up on hard floor with crevice. | Z. FlexProPlus nozzle* | Hardfloor nozzle: - For reach under/between furniture, corners and other obstacles. - Can easily turn 180 degrees for direct access to narrow spaces. | ||
| AA. Long crevice nozzle* | Extra long tool: - For areas hard to reach (top of shelves etc). - For narrow spaces (behind radiators, under car seats etc). | ||||
Models with manual power regulation
- follow graphics on cleaner for optimal performance.
TROUBLESHOOTING
| PROBLEM | SOLUTION |
| The vacuum cleaner does not start | ·Check that the cable is connected to the mains. ·Check that the plug and cable are not damaged. ·Check for a blown fuse. ·Check if the battery indicator lamp in the remote control handle responds (certain models only). |
| The cleaner stops | The cleaner might be overheated: disconnect it from the mains; check if the nozzle, tube, hose or filters are blocked. Let the cleaner cool down for 120 minutes before plugging it in again. If the cleaner still does not work, contact an authorized AEG service centre. |
| Reduction of suction capacity versus normal | ·Check if the dust compartment is full or blocked. ·Check if the air channel and inlet or outlet connection is blocked and needs to be cleared. ·Check if the pre-motor filter is clogged and needs changing. ·Check if nozzle is blocked and needs to be cleared. ·Check if hose is blocked by squeezing it gently. However, be careful in case the obstruction has been caused by glass or needles caught inside the hose. Note: The warranty does not cover any damage to the hose caused by cleaning it. |
| Water has been sucked into the vacuum cleaner | It will be necessary to replace the motor at an authorized AEG service centre. Damage to the motor caused by the penetration of water is not covered by the warranty. |
| For any further problems, contact an authorized AEG service centre. | |
SICHERHEITSHINWEISE
a a a a a a a a a a a a a a a a a a a a a a a a a a a a a a a a a a a a a
all jblal
jies
J 1
b b 11 11 11 11 11 11 11 11 11 11 11 11 11 11
ailll llll 1 j 1 1 1 1 1 1 1 1 1 1 1 1 1 1 1 1 1 1 1 1 1
**i111111111111111111111111111
baaiiieouijibg
.76 6
J 1 1 1 1 1 1 1 1 1 1 1 1 1 1 1 1 1 1 1 1 1 1 1
aiaol o jyogda yjy
AEG 1Jn Jn Jn Jn Jn Jn Jn Jn Jn Jn
Jalalll ad
AEG 1500000000000000000000000000000000000000000000000000000000000
jieell no jaiisill
jbsy jb yg aal gll glll lgsaagall adall llss

Jn Jn Jn Jn Jn Jn Jn Jn Jn Jn Jn Jn Jn Jn Jn Jn Jn Jn Jn Jn Jn Jn Jn Jn Jn Jn Jn Jn Jn Jn Jn Jn Jn Jn Jn Jn Jn Jn Jn Jn Jn Jn Jn Jn Jn Jn Jn Jn Jn Jn Jn

53/2014 53/2014
aikai jni jai gale jaljai jai jai jai Jx9
S_ OBC = 12 · CO · BC = 12 × CD × 5
AEG 15
1 1
jll jlll llll jll jll
1.2jll j jlll l j jlll l l l l l l
. 1
a a a a a a a a a a a a a a a a a a a a
jdlll jdyjlyy11 aaiisall
- gil 2. glul olal y
.0jjoo 1JooSi loo
a
aalblll cull blll
lll 111111111111111111111111111
ab( a + b) = 12
aaii aaiiaai aiil bll iaiii
ailll lllnna la lalba a ylyydsall aasll a
a a a a a a a a a a a a a a a a a a a a a a a a
y 1 y
aikai kdi, ggl
12
jlll jll ljj jll jll
elbll gialgialg blll jiljllge binal. JcLwJgJyJyJyJy
y j 1. jll l y j j j j j j j j j j j j j j j j j j j j j j j j j j j j j j j j j j
S OBC = S BOC + S_ BOC
J
jlll lbcil FILTER jz 15
jlll jlll jlll jlll jlll jlll jlll
jcljilil jiei jilil jilil jilil jilil
4 4 4 4 4 4 4 4 4 4 4 4 4 4 4 4 4 4 4 4 4 4 4 4 4 4 4 4 4 4 4 4 4 4 4 4 4 4 4 4 4 4 4 4 4
1s j 4s j s (a j)
y jilj jilj jilj jilj jilj jilj jilj jilj jilj jilj jilj jilj jilj jilj jilj jilj jilj jilj jilj jilj jilj jilj jilj jilj jilj jilj jilj jilj jilj jilj jilj jilj jilj jilj
jilll jll! jll
aaii jia jie jiu liu liu jiu jilai
.EFSXXX:PureAdvantage s jss
jiall jalle baii. juiilni jilie cai (xunll jaj) jldi jjall abai
4 all 1
Jolai jaliil sjl. jiliil zhu wul gini akbiail Jolgall giosiui y: abdo
jlll yiey i jy 14 24
ailll llll lllnnsy loie jplal g Jil 1e sdo
AilS. g jaiy j j jilj 10bc jie j jilj
jbj jucyiy jdu y gai bgy jilg a gill bgy jil
jll jll jll aall bgsa jll jll jll jll jll jll aall bsgs
.
(24) (25) 1elai jilal jilali jilai jilai jilai jilai jilai jilai jilai jilai jilai jilai jilai jilai jilai jilai jilai jilai jilai jilai jilai jilai jilai jilai jilai jilai jilai jilai jilai jilai jilai jilai jilai jilai jilai jilai
- 0.当且仅当 x0 A. x0 0 .
(^*X) yjill aagallg (^**W.^*V) 1dell aagall
a j 1000000000000000000000000000000000000000000
1 1
* aill bial jai jai jia gao jia jia jia jia jia jia
IX9 1
Jaa 1000 aag aag aag aag aag aag AEG aag baa

Jgallal gaii. AEG LX9 aayyssll annsall jy
e 1
S ACD = S COD + S DCE - S CDE
1
A. .
1122 2000 1122 2000
LX9 a1yjssaas
OE BC
3in1 AeroPro 12.1. K
AeroPro L
jbl) AeroPro .M
(1)
AeroPro
Cui shi 0
Jaaai jai jai jai jai aai P
S OBC = S COD + S BOC - S BOC
*
aill yll aill alil
1
2
(1) ( a + b) ( a^2 - ab + b^2) = a^3 + b^3 .
(1)
3
(aii)15i jjjgicbiiaiejil)jbj
4
1a3
3le 1sJus Jusss Jusss Jusss 1 3 3 3 3 3 3 3 3 3 3 5
ailll aalll lll
\*
()aaiall 1j0oJooJooJooJooJooJooJoo
()
AA 2
7
j 1
.LITHIUM CR1632
aaii dally xia gai ai. Aia yalil lji jai i aaii jai jai all jy
aLgSlllglal
b#i# 0g b# g a#y#
On/Off jg biai gai iial aill 8
y jlll ljlll ksskai kll (j)
gol (jol) ON/OFF jll pduu 1000
*.
ailllll (g) REWIND jzj 9
9
paas ydi jy dai ykdi yj: (y)
.
i. j. 1111111111111111111111111111111
(1) a4 = a1 + 2d( a_1 + 3d)
= 1
(^*W.^*V) aalea aegy ojg jall ayjrgsll aunisall
J 1 J 1 J 1 J 1 J 1 J 1 J 1 J 1 J 1 J 1 J 1 J 1 J 1 J 1 J 1 J 1 J 1 J 1 J 1 J 1 J 1 J 1 J 1 J 1 J 1 J 1 J 1 J 1 J 1
AEG jzj AEG jzj
AEG K 1
y
AEG jzcls jzj y sbjdy bll ayy yalai
cokl kki jy jy gnnn nn nnnn nn nnnn nn nnnn nn nnnn nn nnnn nn nnnn nn nnnn nn nnnn nn nnnn nn nnnn nn nnnn nn nnnn nn nnnn nn nnnn nn nnnn nn nnnn nn nnnn nn nnnn nn nnnn nn nnnn nn nnnn nn nnnn nn nnnn nn nnnn nn nnnn nn
jol jol 45 cwl s jy sl jy s jy aai jai jai jai jai jai jai jai jai jai jai jai jai

(sallj g oBss 420g juii jgiuuiy yol gai jai jai Jai Jai Jai

Jg Jg Jg Jg Jg Jg Jg Jg Jg Jg Jg Jg Jg Jg Jg Jg Jg Jg Jg Jg Jg Jg Jg Jg Jg Jg Jg Jg Jg Jg Jg Jg Jg Jg Jg Jg Jg Jg Jg Jg Jg Jg Jg Jg Jg Jg Jg Jg Jg Jg Jg
Jz Jz Jz Jz Jz Jz Jz Jz Jz Jz Jz Jz Jz Jz Jz Jz Jz Jz Jz Jz Jz Jz Jz Jz Jz Jz Jz Jz Jz Jz Jz Jz Jz Jz Jz Jz Jz Jz Jz Jz Jz Jz Jz Jz Jz Jz Jz Jz Jz Jz Jz
LX9
1 1
AEG jao 1j y bgsy jy baa y la y aai
.2
: 1
得到 S = S1 S = S2
J 1 J 1
2000 1
Lla la jui (la jj g)
jduila g jw jy 42 w y f12 jwsl (g)
2.2y1gjzjxss 2j jj jjj jjj jjj jjj
y
s j 1
i 1 j 1 j
a
a
j j 1
3y
j 1 j 1 1 1 1 1 1 1 1 1 1 1 1 1 1 1 1 1 1
jio jao
a
ii 1
j 1
a
13
10 2
1
13
sglg 1
(《MAX》Cle)zbsyBbSs
- · = 14 ( + ) ^2 - ( - ) ^2 .
1 1
J 1
1 1
la jie jie jie jie
15
S_ OBC = 12 · CD · BC = 12 × CD × 3
ii (s) 4i j. i5 ji ai oik ai j oikai oia oia j (w) j (w) j (w) j (w) j (w)
1 1
2015 Sui 1olS i jiu 1i1i jiu o jiu 1ii1o1aiu oii gai (gl) 2 gl
124
2g 1j jgsa jy jilai li 2i k Jaa Cw, Cwau 4j p jilSc g yd jla i j
125 126
Jus oos jol oalul ola oj g jw jg j
EFSXXX: s filter PureAdvantage
.
()
S ACD = S COD + S_ CDA
iiie 1iie iie 115 115 115 115 115 115
S ACD = S COD + S BDO - S ADB
(1)
在 Rt ABN 中:
10 10
ai = 12,bi = - 12
J 1
j 1
j 1 j 1 j 1 j 1 j 1 j 1 j 1 j 1 j 1 j 1 j 1 j 1 j
S OBC = S BOC + S CBA - S CBO
S J 105 jj 0j 1. j 0j 0j 0j j
124
(^*X) 1 (20 (^*W,^*V)
.
i j 1234567890
*.s oJluljU jS Jsi
LX9 1
120 22 22 22 22 22 22 22 22 22 22 22 22 22 22 22 22 22 22 22 22 22 22 22 22 22 22 22
2 个

AEG LX9 45
I 1
i 1
()
1
1y
LX9
Jjik sljdrslglda slgrlalai .Q jjjglgla 4) jllai .A
2j = 0
( 1,2,( 2) ,0)
*AeroPro 0R
S OBC = S COD + S BOC - S BOC
*AeroPro S.
jL
*AeroPro 1
Jy juii D.
PrecisionFlow* ∪ju.u
()
PrecisionFlow LED ∪ ∪ .V
F
( 1,2,·s ,1) ( 1,2,·s ,1)
S OBC = S COD + S BOC - S BOC
*AeroPro JJW.J.W
aLbgsjzjjgksuH
*AeroPro 2000
a5^3 = a1^3 + 2^3
*ParkettoPro Jj.Y
S S = 12 · AC · PD
*AeroPro FlexProPlus JZ
AeroPro 品
*AeroPro JJLJJAA
AeroPro Silius.L
1420 1
jjj jjj AeroPro .M
( 1 + u1 - 1) + ·s + ( 1 - 1) + ( 1 - 1) < u1 + ·s + s1
AeroPro
0
s1s2s3s4s5s6s7s8s9.P
*Ji jii
jy jz j0dai
1
2
j j j j j j j j j j j j j j j j j j j j j j j j j j j j j j j j j j j
S APQ = S AQP + S_ QPQ
3
(20 1
4
j3
5
S OBC = S BOC + S_ BOC
3 3
\*
laSj.laSjSj j 6
2j. 11s
S.aaa AA
y jao jao jao jao jao jao jao jao jao jao jao jao jao jao jao jao jao jao jao jao jao jao jao jao jao jao jao jao jao jao jao jao jao jao jao jao jao jao jao jao jao jao jao jao jao jao jao jao jao jao jae 7
gai jgi slgjgl jbi gai jgi jgi jgi 1
CR1632
()
*JSSaIaIaI (S)ON/OFF
9
9
10
S OBC = S COD + S BOC - S BOC
1 1 1
*.jnnn nn nnnnnnnnnnnnnnnnnnnnnnnnnnnnnnnnnnnnnnnnnnnnnnnnnnnnnnnnnnnnnnnnnnnnnnnnnnnnnnnnnnnnnnnnnnnnnnnnnnnnnnnnnnnnnnnnnnnnnnnnnnnnnnnnnnnnn
(^*W:^*V) 4ale ggs od jgal aill gssll aie
aagaaagaaagaaagaaagaaagaaagaaagaaagaaagaaagaaagaaagaaagaaagaaagaaagaaagaaagaaagaaagaaagaaagaaagaaagaaagaaagaaagaaagaaagaaagaaagaaagaaagaaagaaagaaagaaagaaagaaagaa
()
jz jz jz jz jz jz jz jz jz jz jz jz jz jz jz jz jz jz jz jz jz jz jz jz jz jz jz jz jz jz
REPLACEMENT DES FILtres
VOOR U VAN START GAAT
ASSISTÊNCIA E GARANTIA
Get usage advice, brochures, trouble shooter, service information: www.AEG.com

Register your product for better service: www.AEG.com/productregistration

Buy Consumables & Accessories for your appliance: www.AEG.com/shop
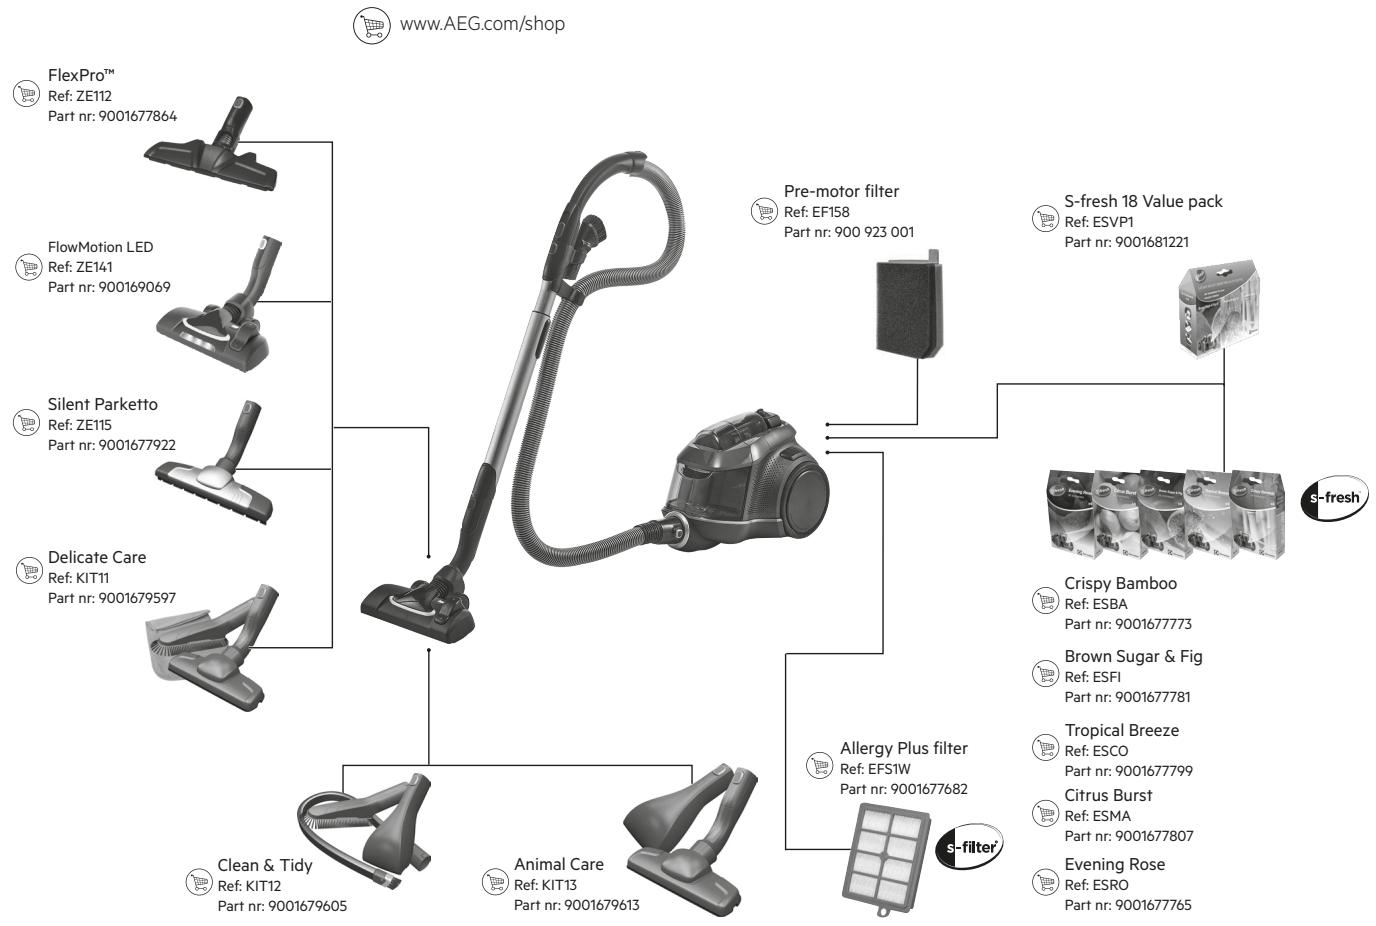
CONSUMABLES & ACCESSORIES
CUSTOMER CARE AND SERVICE
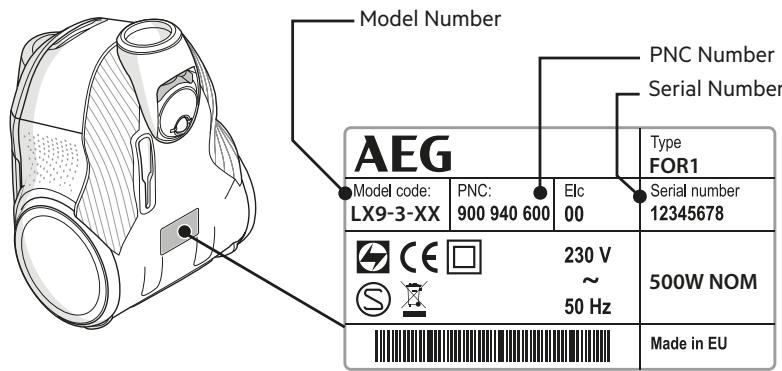
When contacting Service, ensure that you have the following data available:
- Model Number
- PNC number
- Serial number
The information can be found on the rating plate.
aeg.com/shop