
CS5 COMFORT - Vacuum Cleaner EWT - Free user manual and instructions
Find the device manual for free CS5 COMFORT EWT in PDF.
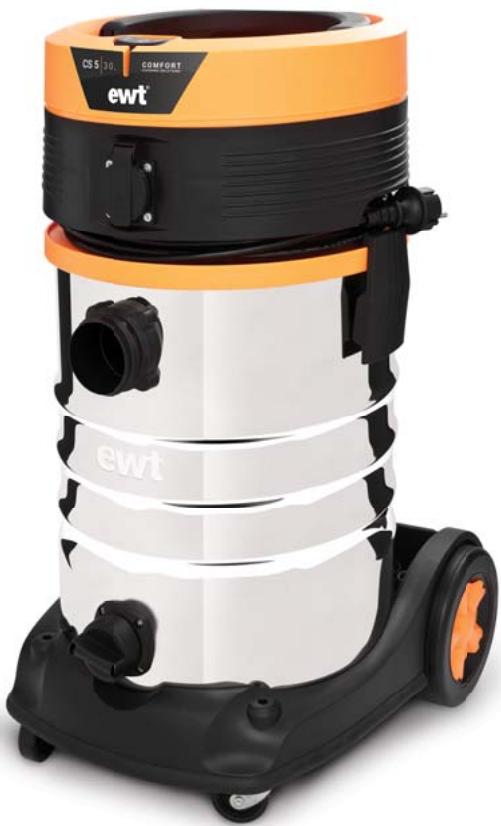
| Product type | Water and dust vacuum |
| Brand | EWT |
| Model | CS5 COMFORT |
| Power consumption | 1000 W |
| Supply voltage | 230 V ~ 50 Hz |
| Tank volume | 30 L |
| Pipe diameter | 35 mm |
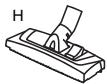
| Hose length | 3.5 m (Anti-Crush) |
| Power cord length | 6 m |
| Integrated Comfort socket | Yes, for tools up to 2200 W |
| Tank material | Stainless steel |
| Motor type | Dual Core Motor |
| Blower function | Yes |
| Dust bag capacity | 30 L (paper bag) |
| Filter for dry vacuuming | ECO WELL cartridge filter, HEPA 13 |
| Filter for wet vacuuming | Foam filter |
| Included accessories | 2-position combination brush, squeegee brush, upholstery brush, crevice nozzle, round brush, telescopic tube, all diameters adapter, air regulator |
| Weight (approx.) | Approximately 8 kg |
| Dimensions (approx.) | 45 cm x 45 cm x 60 cm |
| Warranty | 2 years |
| Availability of spare parts | 5 years minimum after end of production |
| Intended use | Domestic: vacuuming of non-hazardous dust and liquids, blower function |
Frequently Asked Questions - CS5 COMFORT EWT
User questions about CS5 COMFORT EWT
0 question about this device. Answer the ones you know or ask your own.
Ask a new question about this device
Download the instructions for your Vacuum Cleaner in PDF format for free! Find your manual CS5 COMFORT - EWT and take your electronic device back in hand. On this page are published all the documents necessary for the use of your device. CS5 COMFORT by EWT.
USER MANUAL CS5 COMFORT EWT
RECOMMANDATIONS ET MISES EN GARDE
IIMPORTANTS AVERTISSEMENTS DE SECURITÉ
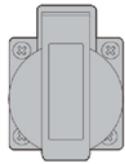
Image B:Prise Confort
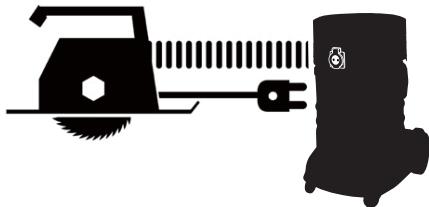
Table of contents 26
Warranty 27
Safety instructions and warnings 27
Specifications 33
Location of parts 34
General assembly instructions 35
Starting up 36
Dry vacuum operation 37
Wet vacuum operation 39
Blowing operation 40
Maintenance 41
42
43
Troubleshooting 44
Environmental protection 45
Exploded product view 46
Parts list 47
Thank you for purchasing this EWT® wet/dry vacuum cleaner. Feel confident that with EWT® you are obtaining a high quality product engineered for optimal performance. This wet and dry vacuum cleaner is capable of picking up liquids and dry materials.
FOR YOUR SAFETY: CAREFULLY READ AND UNDERSTAND ALL INSTRUCTIONS
WARRANTY
EWT® takes pride in producing a high quality, durable product. This EWT® product carries a limited two (2) year warranty against defects in workmanship and materials from date of purchase under normal household use. If the product has to be used for commercial, industrial or rental use, a 90 day limited warranty will apply. Warranty does not apply to defects due to direct or indirect abuse, negligence, misuse, accidents, repairs or alterations and lack of maintenance. Please keep your receipt as proof of purchase. This warranty gives you specific legal rights, and you may have other rights, which vary from state to state.
SAFETY INSTRUCTIONS AND WARNINGS
IMPORTANT SAFETY INSTRUCTIONS
Read and understand all instructions before using this wet and dry vacuum cleaner.
Safety is a combination of common sense, staying alert and knowing how your vacuum cleaner works. Use this wet and dry vacuum cleaner only as described in this manual. To reduce the risk of personal injury or damage to your wet and dry vacuum cleaner, use only EWT® recommended accessories.
Dear customer,
Thank you for choosing one of our appliances.


IMPORTANT: PLEASE READ THESE INSTRUCTIONS FOR USE CAREFULLY. ALWAYS COMPLY WITH ALL REQUIREMENTS WITH REGARD TO SAFETY AS WELL AS THE SAFETY PRECAUTIONS AND INSTRUCTIONS. THE APPLIANCE MUST ONLY BE USED IN ACCORDANCE WITH THE STANDARDS AND USES FOR WHICH IT IS INTENDED. OTHERWISE THIS MAY RESULT IN MATERIAL AND/OR PERSONAL DAMAGE AND RESULT IN THE CANCELLATION OF THE GUARANTEE. PLEASE KEEP THESE INSTRUCTIONS IN A SAFE PLACE FOR FUTURE USE.
WARNING AND GUIDELINES CONCERNING SAFETY
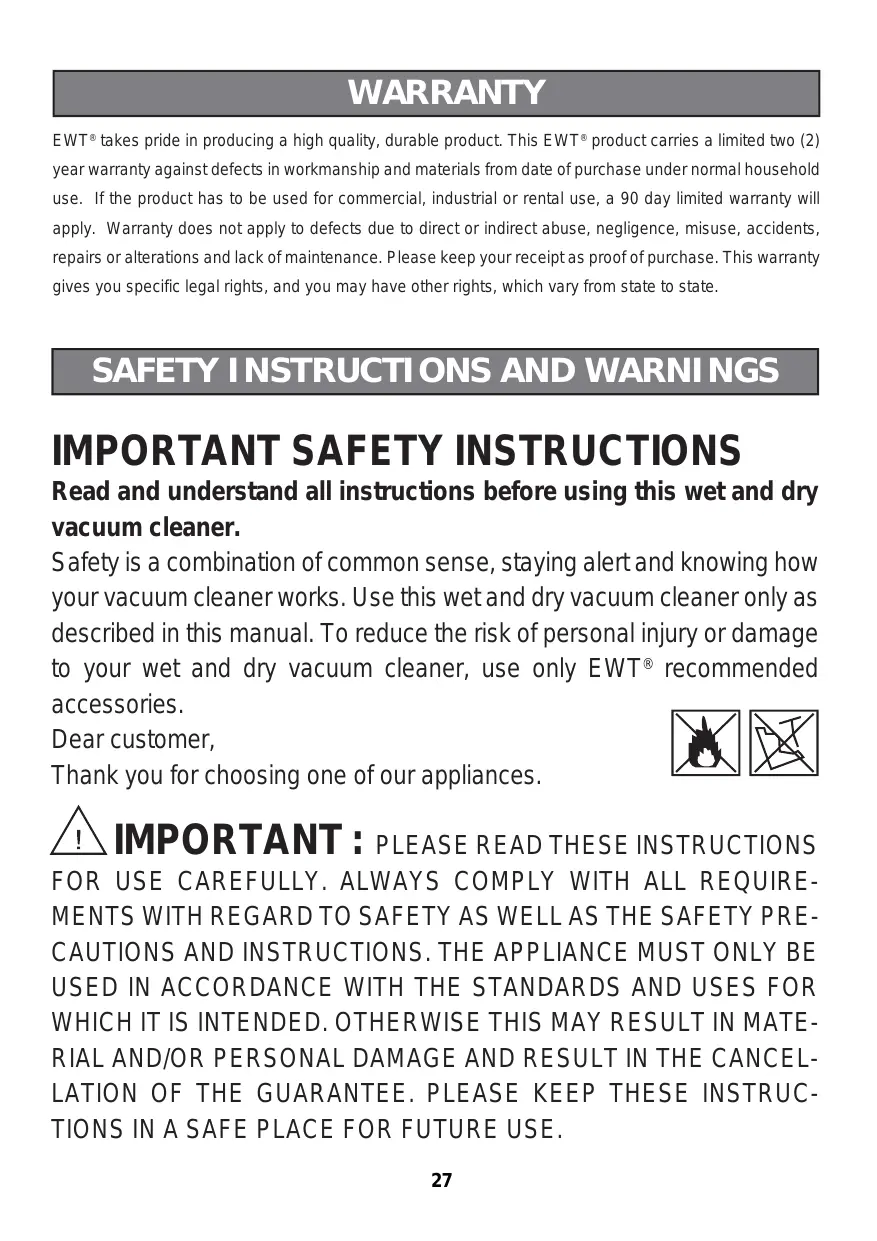
- This appliance complies with current safety regulations for electrical appliances. Improper use may result in both personal and material damage. Please read these instructions for use fully and carefully before operating the appliance. You should keep the instructions for use, the guarantee coupon and proof of purchase as well as the packaging as far as this is possible.
- This appliance has been designed exclusively for personal use and for its intended purpose. The appliance is not suitable for industrial use. Do not use the appliance outdoors (since it has not been specifically designed for use outdoors). The appliance should not be exposed to heat, direct sunlight or high humidity (rain, for example). The appliance should not be immersed in liquids of any kind and beware of the risk of damage presented by damp or wet hands. Disconnect immediately from the mains if the motor of the appliance becomes wet or damp. Never place the appliance in water.
- This wet and dry vacuum cleaner should only be used and stored in the home.
- The purpose of the appliance is for vacuuming materials which do not present a health hazard and non-inflammable liquids.
- The connections should not be brought close to your face (especially the eyes, ears, etc.). Do not point the nozzle at people or animals. The appliance must only be used for the purposes for which it is
- intended. Use for other purposes is at the user's own risk and may be dangerous.
- Uses other than those for which the appliance is intended and unsupervised use are not allowed.
- The manufacturer cannot be held responsible for damages resulting
from improper or incorrect use of the appliance.
- The appliance should only be connected to a 230 volt AC current. Protection of the electrical socket by a 16 amp fuse is recommended. For your safety, always make sure your electrical circuit is protected by a circuit breaker.
- Make sure that a suitable dust bag is correctly placed in its housing before using the appliance. Unsuitable or badly fitted dust bags may cause the appliance to malfunction and result in the cancellation of the guarantee.
- If the electric cable is damaged it should be replaced either by the manufacturer, the approved after-sales service or someone with similar qualifications in order to avoid danger.
- Do not vacuum ashes, hot coals or similar, glass splinters of a certain size or pointed objects.
- Do not vacuum toner powder, used, for example, in printers and photocopiers, since it may conduct electricity. Furthermore, it may not be completely filtered by the vacuum cleaner filter system and may be returned to the air in the room by the blower.
- Never vacuum asbestos or asbestos dust.
- Never vacuum inflammable or toxic liquids like petrol, oil, acid or other volatile substances.
- Never vacuum liquids heated to more than 60^ , or toxic or inflammable dust.
- Never place the appliance on its side. Always keep it in a sufficiently stable, horizontal position, especially on stairs.
- Always unplug from the mains after use and before cleaning or replacing a filter or any other accessory.
- Repairs to electrical appliances should always be carried out by a qualified specialist. Improper repairs may lead to serious risks for the user.
-
Never place the appliance near to a very hot stove or radiator.
-
This appliance may only be used by children aged from 8 years and above and persons with reduced physical, sensory or mental capabilities or lack of experience and knowledge if they are under supervision and have been instructed in the correct use of the appliance and understand the hazards involved. Children should never play with the appliance. Do not allow children to clean or handle the appliance without supervision.
- Always switch the appliance off before cleaning or moving it and unplug it from the mains if you are not going to use the appliance for any length of time. To unplug the appliance always pull the plug out, never pull on the electric cable. Also, remove any special accessories which may be installed on the appliance.
- Keep the appliance clean. Do not use solvents, or cleaning products containing solvents when cleaning the appliance.
- When the appliance is switched on, do not leave unattended. If you have to leave the area where you are working, switch the appliance off or unplug from the mains (don't pull on the electric cable, take the plug out).
- To protect children from the risks inherent in the use of domestic electrical appliances, please make sure there is no risk of tripping over the cable and that children do not have access to the appliance.
- Do not use the appliance if you are under the effects of medication, alcohol or drugs, if you are under medical treatment or if you are tired. Check regularly that neither the appliance nor the electric cable are damaged. Never use a damaged appliance.
- Do not try to repair the appliance yourself. Always put repairs in the hands of an authorised technician. A damaged cable must be immediately replaced by the manufacturer or a qualified electrician with a cable of the same type to avoid any risk of electric shock or injury.
- Only use original spare parts and accessories. Unauthorised use of another brand of spare parts or accessories may be dangerous and
result in the cancellation of the guarantee.
- Check the float switch frequently.
- Switch off and disconnect immediately from the mains if you detect any liquid leaking onto the appliance.
- Never place the appliance in water. Make sure that no water runs onto the appliance.
- Always comply with legal requirements when disposing of dirty water.
- Always store the appliance in a dry and safe place out of the reach of children.
- Pay special attention to the following "special safety instructions".
Special safety instructions:
- Do not vacuum hot ashes or pointed or sharp-edged objects.
- Do not use the appliance in damp places.
- Do not use the appliance without a dust bag (except when vacuuming liquids). Make sure the dust bag is always fitted correctly in the appliance.
- When using the appliance, make sure that the brush or nozzle does not vacuum anybody's hair, clothes or limbs.
- Keep the vacuum cleaner away from sources of heat such as radiators, stoves, etc.
Recommendations with regard to disposal:
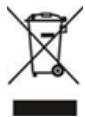
This appliance has electrical and electronic components and should not be disposed of with domestic waste. It is essential to comply with current local legislation.
Use as a blower:
- Point only towards the work area.
- Do not use the appliance as an air spray.
- Do not point directly at passers-by or people.
- Keep children away from the appliance.
- Wear protective goggles.
SPECIFICATIONS
| Power consumption | 1000 W |
| Mains voltage | 230V ~ 50Hz |
| Container capacity | 30 L tank |
| Pipe system | Ø35 mm |
| Anti-Crush Flexible | 3,5 m |
| Cable | 6 m |
| Plug (Prise Confort) | Yes |
| Container material | Inox |
| Motor type | Dual Core Motor |
| Blow function | Yes |
| Cable storage around the head | Yes |
| Space for accessories | Yes |
| Combined 2-Position Brush | 1 |
| Squeezegee brush | 1 |
| Furniture brush | 1 |
| Split mouthpiece | 1 |
| Round nozzle | 1 |
| Telescopic tube | 1 |
| Adaptor for all diameters (Ø35 mm) | 1 |
| Dust filters | 1 Dust bag (30L) 1 ECO WELL Cartridge filter, HEPA 13 |
| Liquid filter | 1 Foam filter |
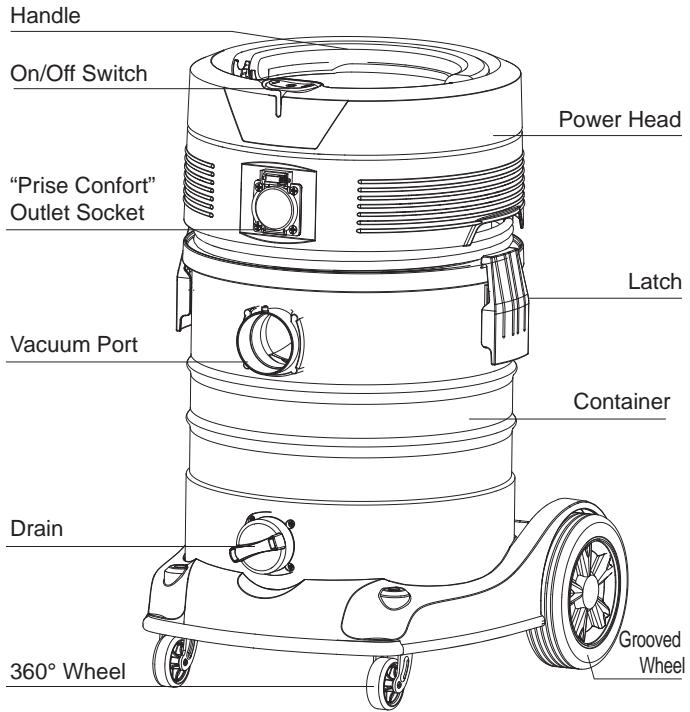
LOCATION OF PARTS

D


E
G
L


N

、


Q
NOTE: The hose and accessories for this wet and dry vacuum cleaner are 35mm diameter.
Carefully remove the contents of the box. Check each component with the help of the list below.
A Wet/Dry vacuum cleaner 1
B Anti-Crush Hose 1
C Extension wand 1
D Dust bag 1
E Foam sleeve filter 1
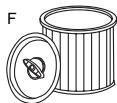
F ECO WELL Cartridge filter 1
G Air regulator handle 1
H Main Brush 1
I Floor nozzle 1
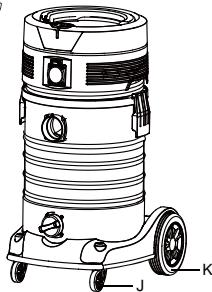
J 360^ Wheel 2
K Large grooved wheel 2
L Crevice tool 1
M Utility tool 1
N Adaptor 1
O Round nozzle 1
P Operator's Manual 1
Q “R” Lock Pin 2
GENERAL ASSEMBLY INSTRUCTIONS

GENERAL ASSEMBLY
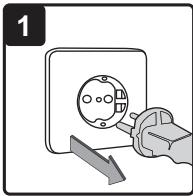
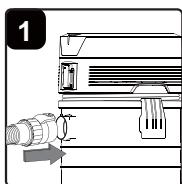
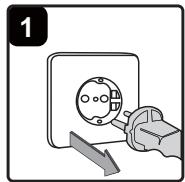
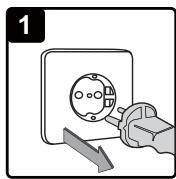
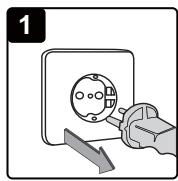
- Make sure that it is not plugged into the mains (Fig. 1).
- Undo the 2 container clasps which hold the upper part (Fig. 2).
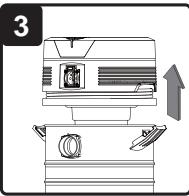
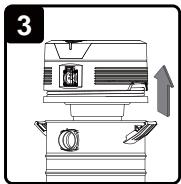
- Lift off the upper part (Fig. 3).
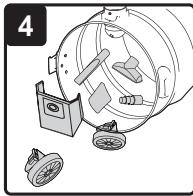
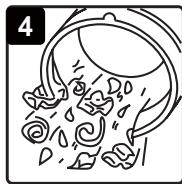
- Remove the accessories from the container (Fig. 4).
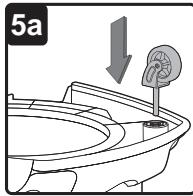
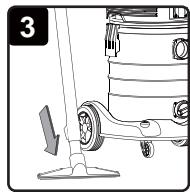
- Replace the container and insert the 2 feet with rollers. Check that they are pushed in correctly (Fig. 5a).
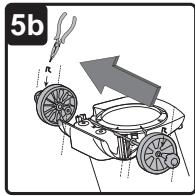
- To assemble the 2 large notched wheels; slide the bar which will hold the two wheels in the corresponding location on the bottom of the vacuum cleaner. Place a washer, then the wheel, then another washer on the other side of the wheel. Fasten by threading the hook into the hole located on the bar. Finally, fit the orange wheel cover (Fig. 5b).
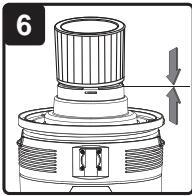
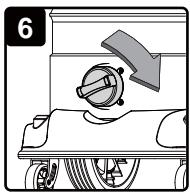
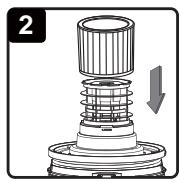
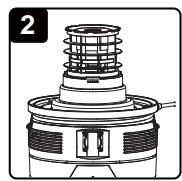
- For dry vacuuming, install the supplied cartridge filter and dust bag (Fig. 6, Fig 7).
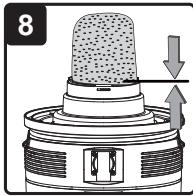
- For wet vacuuming, install the supplied foam filter (Fig. 8).
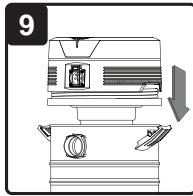
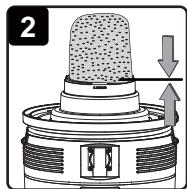
- Align the top section with the clasps, and snap into place by applying pressure until clasps latch into place (Fig. 9).
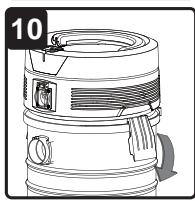
- Hook the clamps into the upper section and let them snap into place by pressing the clamps downwards (Fig. 10).
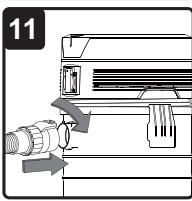
- Place the large end of the hose on the front air intake stub on the tank (Fig. 11).
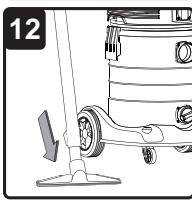
- Choose the desired accessories and push onto the suction tube (Fig. 12).
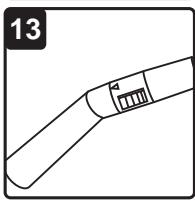
- Use the air-leak slider that is included on the handle section (Fig. 13).
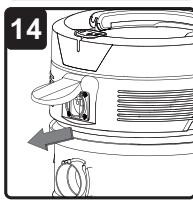
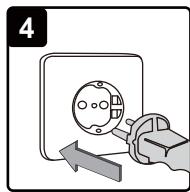
- Plug the power tool into the "Integrated Socket" on the vacuum cleaner. Plug the vacuum cleaner into the mains (Fig. 14).
- After using and cleaning the appliance, store the accessories by attaching them to the corresponding holders on the vacuum cleaner.
STARTING UP

A
B
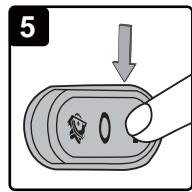
Image A: Positions
Position "I": Start
Position "Prise Confort: Power is controlled by the power tool.
Position "O": Stop
Image B : Integrated socket
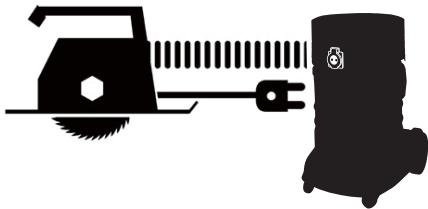
Power tools such as: drills, saws or sanders up to max, 2200W can be plugged directly into the integrated electrical socket (21) on the vacuum cleaner.
Connect the hosepipe (Ø35mm) to the dust extraction outlet on the power tool using the adaptor supplied for the tool. (You will find other suitable adaptors in specialist and DIY stores).
Plug the power tool into the "Integrated Socket" on the vacuum cleaner. Plug the vacuum cleaner into the mains.
WARNING:
Only plug the vacuum cleaner into an earthed socket with a 16 Amp capacity.
Start the power tool and run it briefly at high speed. After a short lapse of time, the vacuum cleaner starts up and vacuums the dust and shavings produced.
DELAYED SHUT DOWN
After the power tool is switched off, the vacuum cleaner continues to work for a certain time in order to vacuum the dust and shavings remaining in the power tool and the hosepipe.
You must first read and understand the section on "precautions and guidelines regarding safety" and take them into account.
Guidelines: Never vacuum dangerous substances.
The use of an unsuitable dust bag will result in the cancellation of the guarantee.
When vacuuming fine dust (plaster, cement, etc.), always use a cartridge filter together with a fine dust bag (optional). If these are not in place, dust and particles may penetrate the motor and damage it. If these instructions are not followed, the guarantee may be cancelled.
- Make sure the appliance is not plugged into the mains (Fig. 1).
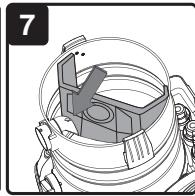
- To prepare your appliance for vacuuming dust, check that the cartridge filter is clean and dry and place it correctly in the centre of the filter housing.
Push down until the elastic fits right around the upper part of the float cage (Fig. 2).
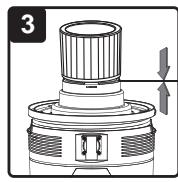
- Check that the filter completely covers the float cage. Also check that the edges of the cartridge filter are correctly placed under the elastic ring (Fig. 3).
- Slide the dust bag over the suction port on the container. Press down until it is firmly in place. Take care not to damage the dust bag (Fig. 4).
-
Replace the upper part on the container and fix with the container clasps (Fig. 5).
-
Insert the largest end of the hosepipe into the suction port on the front of the container and lock it by turning it to the right. Select the desired nozzle or extension(s) and fit them onto the hosepipe (Fig. 6).
- Make sure the Start/Stop switch on the appliance is in the "Stop" position ("O" position) before plugging into the mains. Plug it into the mains (Fig. 7).
- Start the motor with the Start/Stop switch in the "Start" position ("l" position) (Fig.8).
- When you have finished vacuuming, stop the motor by putting the Start/Stop switch in the "Stop" position ("O" position). Unplug from the mains.
Check the dust bag regularly and replace it when it is 2/3 full. The bag is manufactured so that only air may pass through the paper and not the dust, this is why a used dust bag should not be reused.
Guidelines:
Do not use the dust bag to vacuum wet objects or with sharp edges.
$$ O = O F F $$
$$ I = O N $$

$$ = \text {P r i s e C o n f o r t} $$
When using a cartridge filter, you should first remove the foam filter or the reusable cloth filter. Insert the filter by the top in the filter housing and lock the base. After prolonged use it can be cleaned by tapping it or by using a small brush.

BEFORE YOU START
WARNING!
You must first read and understand the section on "precautions and guidelines regarding safety" and take them into account.
Guidelines: Never vacuum dangerous substances.
- Make sure the appliance is not plugged into the mains. Check that the container is clean and dust free (Fig. 1).
- Remove the dust bag and the cartridge filter. Leave only the foam filter on the filter housing. Replace the upper part of the container and close the container clasps (Fig. 2).
DO NOT USE a cartridge filter for vacuuming liquids
- Insert the largest end of the hosepipe into the suction port on the front of the container and lock it by turning it to the right. Select the desired nozzle or the extension(s) and fit them onto the hosepipe (Fig. 3).
- Make sure the Stop/Start switch on the appliance is in the "Stop" position ("O" position) before plugging into the mains (Fig. 4).
- Start the motor (Start/Stop switch in the "Start" position ("I" position) (Fig. 5).
When you have finished vacuuming, stop the motor by putting the Start/Stop switch in the "Stop" position ("O" position). Unplug from the mains.
- After use, open the drain plug, empty the container and dry it.
IMPORTANT! If you wish to vacuum large quantities of liquid from a sink, a tank or similar, do not place the whole of the nozzle in the liquid, but leave a little room so that are can be vacuumed along with the liquid. The appliance is fitted with a float switch which blocks vacuuming when the container is full. You can tell when vacuuming stops because the motor turns faster. If this happens, stop the appliance immediately and disconnect from the mains. Take into account that a full container can be very heavy. Remove the upper part of the container and pour the liquid into a suitable recipient or into a runoff. You can then continue vacuuming once you have reinstalled the upper part. After vacuuming liquids, stop the appliance and disconnect from the mains. Empty the container and clean and dry it on the inside and the outside before storing it.
Reminder! The foam filter should be removed after vacuuming liquids and a cartridge filter or a dust filter installed before starting to vacuum dry waste.
BLOWING OPERATION

- Push the large end of the flexible hose into the blower connection in the top of the motor housing (Fig. 1).
- Ensure the power switch is turned off and plug into the power supply (Fig. 2).
- Switch on the power (Fig. 3).
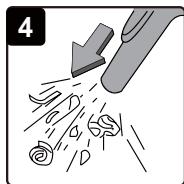
- The unit will now blow through the vacuum hose, and can be used to clear obstructions within the pipe (Fig. 4).
WARNING! If the hose is still blocked after a few seconds, turn off the unit and clear the hose manually.
MAINTENANCE

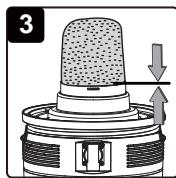
- Verify that the power cable is disconnected from the outlet (Fig. 1).
- Disconnect the hose from the container (Fig. 2).
- Undo the clasps and remove the top section from the container (Fig. 3).
- Clear all dirt or debris from the container and hose (Fig. 4).
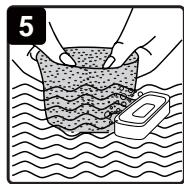
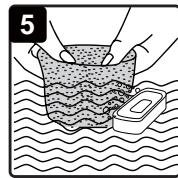
- Clean the foam filter or dust filter by washing it with a mild soapy solution (Fig. 5).
- Check the hoses, clasps, and power cable to verify that they have not been damaged.
- Check the float switch after removing the foam filter. To do this, take the upper part by the handle and turn it over carefully so that the filter housing is turned upwards. The float switch should be able to move freely up and down.
IMPORTANT! Clean or change the cartridge filter regularly for best performance. ALWAYS USE CARTRIDGE FILTER FOR DRY VACUUMING. If the machine is used without the cartridge filter (or reusable cloth filter), the motor will burn out and the warranty will be voided. Always keep spare filters on-hand.
NOTICE! The filters included are made of high quality materials designed to stop small dust particles. The cartridge filter should be used for dry pick-up only. A dry cartridge filter is necessary to pick up dust. If the cloth filter is wet, it will clog quickly and be very difficult to clean. Handle the filter carefully when removing it for cleaning and replacing it. Check the filters for tears or small holes, a small hole can let dust pass through and out of the cleaner. Do not use a filter with holes or tears, replace it immediately.
WARNING! ALWAYS DISCONNECT THE PLUG FROM THE POWER OUTLET BEFORE REMOVIDING THE POWER HEAD FROM CONTAINER.
INSTALLING AND CLEANING
CARTRIDGE FILTER
Installing Cartridge Filter
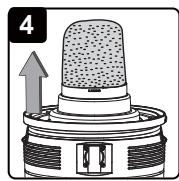
- Verify that the power cable is disconnected from the outlet (Fig. 1).
- Remove power head and place in upside down position.
- Install the cartridge filter over the filter cage with the flat end of the filter towards the vacuum power head. Carefully push filter in until it stops against the power head (Fig. 2, Fig. 3).
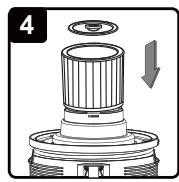
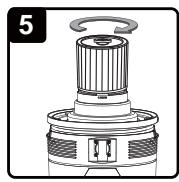
- Place filter retainer on top of cartridge filter over the raise lip (Fig.4) and tighten down by turning retainer clockwise, do not over tighten (Fig. 5). Replace the power head on to the container.
Removing and Cleaning Cartridge Filter
- Unlock and remove the filter retainer by tuning retainer handle counter clockwise.
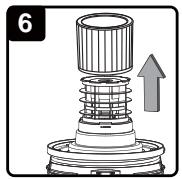
- Carefully hold and pull the cartridge filter up for removal (Fig. 6).
- Clean the cartridge filter by gently tapping or brushing dirt off. Cleaning should not be done indoors in living areas. For optimal performance a new filter is recommended.
- Install cleaned or new filter into place as instructed above in steps 2 and 3 of Installing Cartridge Filter.
- Wet filters should be removed and allowed to air dry for 24 hours before installing onto the filter cage.
INSTALLING AND CLEANING FOAM
SLEEVE FILTER
Installing Foam Sleeve Filter
- Verify that the power cable is disconnected from the outlet (Fig.1).
- Remove power head and place in upside down position (Fig.2).
- Carefully slide foam sleeve filter down over the filter cage making sure the whole cage is covered (Fig. 3).
- Replace the power head on to the container.
Cleaning Foam Sleeve Filter
- With the removed power head in the upside down position, carefully remove foam sleeve filter. (Fig. 4)
- Use a mild soap and water solution to wash foam sleeve filter and rinse with clean water. (Fig. 5)
- Allow filter to air dry before installing and using again.
TROUBLESHOOTING
| Symptom | Possible Causes | Corrective Action |
| Vacuum will not operate. | 1) No power supply. | 1) Check power supply-cable, breakers,fuses. |
| 2) Malfunction of electric cable, switch or motor. | 2) Have a specialist check and repair or replace the defective component. | |
| 3) Container full of liquid. | 3) Empty container. | |
| Dust comes from motor cover. | 1) The dust filter is missing or damaged. | 1) Attach or replace dust filter. |
| Reduced efficiency and motor/speed vibration. | 1) Dust bag full | 1) Replace dust bag |
| 2) There is a blockage in the nozzle, the hose, or the container inlet, or the dust filter is blocked by fine dust. | 1) Check the nozzle,the hose,and the container inlet for blockage. Take off the dust filter, and wash and clean it. Reuse it when it is dry. It is recommended to use a new dust filter. |
ENVIRONMENTAL PROTECTION
IMPORTANT NOTICE:
RECYCLING ELECTRIC AND ELECTRONIC EQUIPMENT
In accordance with the recent European directive 2002/96/EC with regard to the disposal of electric and electronic equipment (WEEE), this material is marked with a barred waste bin which indicates the product must not be disposed of together with domestic waste.
It should be taken to a suitable collection point for the treatment, evaluation and recycling of WEEE waste (more information from your local council) or taken to a distributor on the "1 for 1 free" (recovery by the distributor does not give the right to remuneration or replacement). With this gesture towards the environment, you the consumer, or user, are contributing to the preservation of natural resources and the protection of personal health.
Spare filters :
Foam filter:
ECO WELL cartridge filter:
30 L dust bags (5 units):
Ref.: CGNT45120309
Ref.: ACCARTECOWELL
Ref.: CGNT45120272, Compatible with CGNT45120274
Subject to technical modifications.
EXPLODED VIEW PARTS LIST

PARTS LIST
| NO. | PART DESCRIPTION | QTY | NO. | PART DESCRIPTION | QTY |
| 1 | Handle | 1 | 14 | Adaptor | 1 |
| 2 | Power Head Assembly | 1 | 15 | Air Regulator Handle | 1 |
| 3 | Safety Float Valve | 1 | 16 | Combined 2- Position Brush | 1 |
| 4 | Filter basket | 1 | 17 | Floor Nozzle | 1 |
| 5 | Latch Assembly | 2 | 18 | Utility Nozzle | 1 |
| 6 | Latch Seat Assembly | 2 | 19 | Crevice Tool | 1 |
| 7 | Hose Inlet assembly | 1 | 20 | Round nozzle | 1 |
| 8 | Tank | 1 | 21 | Anti-Crush Flexible | 1 |
| 9 | Drain Assembly | 1 | 22 | Telescopic tube | 1 |
| 10 | Integrative Base | 1 | 23 | Foam Sleeve Filter | 1 |
| 11 | Wheel Assembly | 2 | 24 | ECO WELL Cartridge Filter | 1 |
| 12 | Caster Assembly | 2 | 25 | Dust Bag | 1 |
| 13 | Wheel Shaft | 1 |
Bedienungsanleitung
30L