USER MANUAL UF NF 274 E X742C VALBERG
This product has a 2-year warranty as of the date of purchase*, covering any fault resulting from a manufacturing or material defect. This warranty does not cover defects or damage resulting from incorrect installation, improper use or abnormal wear of the appliance.
*upon presentation of the sales receipt.
WARRANTY CONDITIONS
FR
Thank you for choosing this VALBERG product. Chosen, tested and recommended by ELECTRO DEPOT, the products of the VALBERG brand are easy to use, reliable and of an impeccable standard. Thanks to this appliance, you can be sure that each use will bring you satisfaction.
Welcome to ELECTRO DEPOT.
Visit our website: www.electrodepot.fr

Preview of the appliance
Description of the appliance

Using the appliance
Installation
User interface
Daily Use

Useful information
Cleaning
Troubleshooting
Description of the appliance
1 LED Light 2 Shelves 3 Drawers Cover
4 Freezer Drawers 5 Leveling Feet 6 Balconies
Above picture is for reference only. Real appliance probably is different.
Installation
Space Requirement
- Select a location without direct exposure to sunlight;
- Select a location with enough space for the refrigerator doors to open easily;
- Select a location with level (or nearly level) flooring;
- Allow sufficient space to install the refrigerator on a flat surface;
- Allow clearance to the right, left, back and top when installing. This will help reduce power consumption and keep your energy bills lower.
- It is advisable to keep at least 10 mm gap at two sides.
Positioning
Install this appliance at a location where the ambient temperature corresponds to the climate class indicated on the rating plate of the appliance: for refrigerating appliances with climate class:
- extended temperate: this refrigerating appliance is intended to be used at ambient temperatures ranging from 10°C to 32°C ;[SN]
- temperate: this refrigerating appliance is intended to be used at ambient temperatures ranging from 16°C to 32°C ;[N]
- subtropical: this refrigerating appliance is intended to be used at ambient temperatures ranging from 16°C to 38°C ;[ST]
- tropical: this refrigerating appliance is intended to be used at ambient temperatures ranging from 16°C to 43°C ;[T]
Location
The appliance should be installed well away from sources of heat such as radiators, boilers, direct sunlight etc. Ensure that air can circulate freely around the back of the cabinet. To ensure best performance, if the appliance is positioned below an overhanging wall unit, the minimum distance between the top of the cabinet and the wall unit must be at least 50 mm. Ideally, however, the appliance should not be positioned below overhanging wall units. Accurate leveling is ensured by one or more adjustable feet at the base of the cabinet. This refrigerating appliance is not intended to be used as a built-in appliance.
WARNING:
It must be possible to disconnect the appliance from the mains power supply; the plug must therefore be easily accessible after installation.
Electrical connection
Before plugging in, ensure that the voltage and frequency shown on the rating plate correspond to your domestic power supply. The appliance must be earthed. The power supply cable plug is provided with a contact for this purpose. If the domestic power supply socket is not earthed, connect the appliance to a separate earth in compliance with current regulations, consulting a qualified electrician. The manufacturer declines all responsibility if the above safety precautions are not observed. This appliance complies with the E.E.C. Directives.
Door Reversibility
Before reversing the door, please be prepared below tools and material: straight screwdriver, cross screwdriver, spanner and the components included in the poly bag:
Easy open handle x1
Handle cover x2
Screw x2

Left Aid-Closer x1 Left Top Hinge Cover x1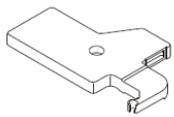
- Remove upper wire box covers.


- Unscrew right top hinge cover, and disconnect connectors of door switch and display.


- Unscrew and remove the top hinge, and then remove the door.

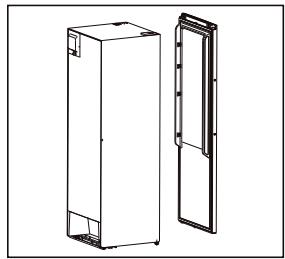
- Remove the right aid-closer, and take out left aid-closer from accessories bag and install it at left side.

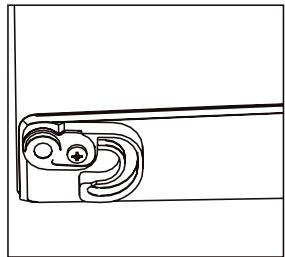
- Unscrew the bottom hinge, and remove the adjustable foot from the left side to the right side.
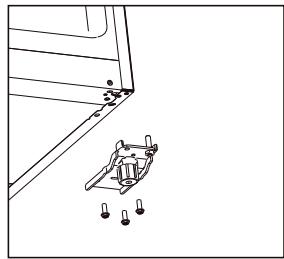

- Unscrew and move the bottom hinge pin from the right side to the left side, then install the bottom hinge on the left side of the appliance.
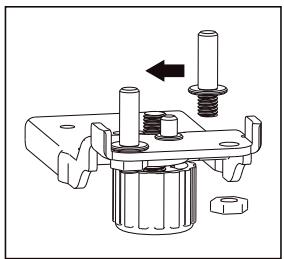

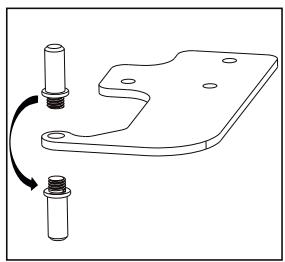
- Unscrew and move the top hinge pin from bottom side to upper side. Remove door switch from right hinge cover and then install it in left hinge cover which is placed in accessory bag.
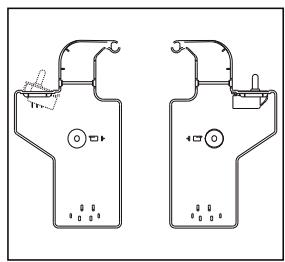
- Unscrew and move the top decorative cover on the left side, and install it on the right side.


- Detach the Fridge and the Freezer door gaskets and then attach them after rotating.

- Install the door, and then move the connecting wires from right side to left side.
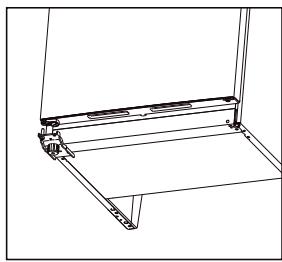
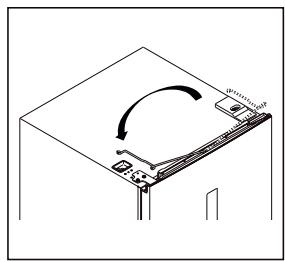
- Install the top hinge to the left side, please slightly adjust the top hinge while installing to make sure gasket is well sealed.

- Connect connectors of door switch and display, and install the left top hinge cover.
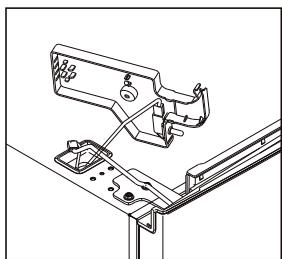
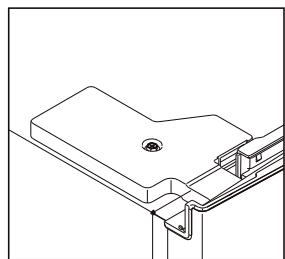
- Install the upper wire box covers to the right side.


Easy open handle installation
- Remove the screw hole covers.
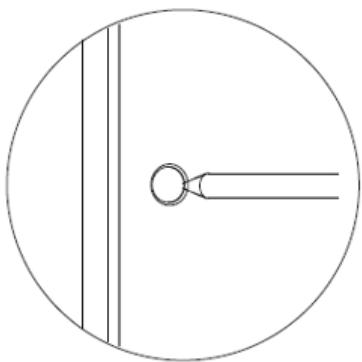
- Take out the easy open handle which is placed in crisper drawer, and install it.

- Install the easy open handle covers.

Space Requirement
- Keep enough space for the door to open.
- It is advisable to keep at least 10 mm gap on both sides.

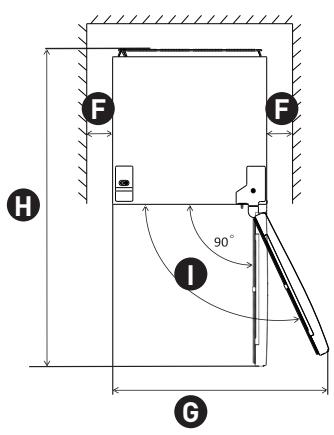
A 600
F min = 10
B 700
G 835
C 1850
1323
D min = 50
115°
E min = 50
NOTE:
This refrigerating appliance is not intended to be used as a built-in appliance.
Levelling the unit
- To do this adjust the two levelling feet at front of the unit.
- If the unit is not level, the doors and magnetic seal alignments will not be covered properly.

User interface
Using the Control Panel User interface introduction

Operation Interface
| FREEZER | Temperature control of the appliance |
| SUPER | Select and deselect super mode control |
| ALARM/ECO | Clear door opening alarm, select and deselect ECO Mode |
| LOCK | Locking and unlocking |
LED Display
1 Display window for preset temperature Super mode icon 3 ECO mode icon Locking and unlocking icon
Illustration of the buttons
All buttons are valid only in unlocking status. Short beep after per touching of buttons.
FREEZER: temperature control of the appliance available only for user defined mode
Touching "FREEZER" button consecutively, the temperature will change in a circle from -14°C -22°C , stop touching and after 5 seconds flashing, temperature is set.
| Thermostat setting for ambient T°C : NORMAL ≈ +24°C (± 4°C) | -18°C |
| Thermostat setting for ambient T°C : COLD ≈ +16°C (± 4°C) | -18°C |
| Thermostat setting for ambient T°C : HOT ≈ +32°C (± 4°C) | -18°C |
SUPER: select and deselect super mode
- Press the "SUPER" button to select super mode. After the super mode icon flashes for 5 seconds, super mode is selected.
- When super mode is selected, the super mode icon will light up, and the display window will show -25°C. In super mode, touching the "FREEZER" button will cause the super mode icon to flash 3 times, but the freezer temperature cannot be changed.
- To exit super mode,
- Press the "SUPER" button to deselect super mode,
- Or after 50 hours of super mode without any operation, the refrigerator will automatically stop it and return to the previous setting.
WARNING:
In super mode, the noise of the appliance may be slightly higher than normal running.
ALARM/ECO: Clear door opening alarm and high temperature alarm, select and deselect ECO mode.
- Short touching the "ALARM/ECO" button clears the door opening alarm and high temperature alarm. Touching the "ALARM/ECO" button for 3 seconds selects ECO mode. After the ECO mode icon flashes for 5 seconds, ECO mode is selected.
- When ECO mode is selected, the ECO mode icon will light up, and the display window will show different preset temperatures, depending on the ambient temperature (Ta) of where the appliance is placed, as below.
| Ambient
Temperature (Ta) | Ta ≤13°C | 14°C < Ta ≤20°C | 21°C < Ta ≤27°C | 28°C < Ta ≤34°C | Ta > 35°C |
| Preset
Temperature | -18°C | -18°C | -18°C | -16°C | -15°C |
- In ECO mode, the "FREEZER" button will not respond to any touching. Touching the "ALARM/ECO" button for 3 seconds deselects ECO mode. LOCK: Locking and Unlocking.
- Touching the "LOCK" button for 3 seconds locks the control panel, and the locking and unlocking icon will be « 🅐 ».
- In locking status, touching any button will cause the locking and unlocking icon to flash 3 times.
- Touching the "LOCK" button for 3 seconds unlocks the control panel, and the locking and unlocking icon will be « 🏽 ».
- In unlocking status, all buttons are available.
- If no operation in 25 seconds, the control panel will be locked automatically.
Door opening alarm
- If the door keeps opening for 90 seconds, door opening alarm sounds.
- Close the door to stop the door opening alarm.
- Or short touching "ALARM/ECO" button to clear door opening alarm.
High temperature alarm
- If high internal temperature of the appliance is detected, high temperature alarm will sound, «ht» and detected temperature will display alternately on display window.
- Short touching "ALARM/ECO" button to stop door opening alarm.
- High temperature display will disappear automatically only if detected temperature goes back to normal.
Daily Use
First use
Cleaning the interior
Before using the appliance for the first time, wash the interior and all internal accessories with lukewarm water and some neutral soap so as to remove the typical smell of a brand new product, then dry thoroughly.
IMPORTANT:
Do not use detergents or abrasive powders, as these will damage the finish.
Daily use
Place different foods in different compartments according to the table below.
Freezer drawer(s)/shelf
- Foods for long-term storage.
- Bottom drawer/shelf for raw meat, poultry, fish.
- Middle drawer/shelf for frozen vegetables, chips.
- Top drawer/shelf for ice cream, frozen fruit, frozen baked goods.
Storing frozen food
When first starting up or after a period out of use, before putting the product in the compartment, let the appliance run at least 2 hours on the higher settings.
IMPORTANT:
In the event of accidental defrosting, for example if the power has been off for longer than the value shown in the technical characteristics chart under "rising time", the defrosted food must be consumed quickly or cooked immediately and then re-frozen (after cooking).
Temperature setting recommendation: -18°C is recommended.
Under recommended setting, the best storage time of freezer is no more than 1 month.
The best storage time may reduce under other settings.
Thawing
Deep-frozen or frozen food, prior to being used, can be thawed in the freezer compartment or at room temperature, depending on the time available for this operation.
Small pieces may even be cooked still frozen, directly from the freezer. In this case, cooking will take longer.
Accessories
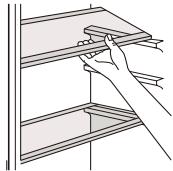
Movable shelves
The walls of the refrigerator are equipped with a series of runners so that the shelves can be positioned as desired.
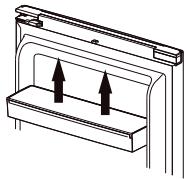
Positioning the door balconies
Door balconies can be disassembled for cleaning. To disassemble, proceed as follows: gradually pull the balcony in the direction of the arrows until it comes free. After cleaning, reposition it.
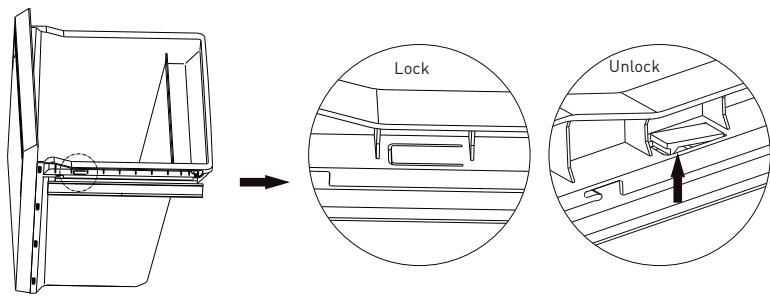
Disassembling the bottom drawer
- Pull out the bottom drawer to the stopper position.
- Push up the elastic buckles on both sides of the bottom drawer.
- Pull out the bottom drawer.
Helpful hints and tips
Hints for freezing
To help you make the most of the freezing process, here are some important hints:
- The maximum quantity of food which can be frozen in 24 hours is shown on the rating plate.
- The freezing process takes 24 hours. No further food to be frozen should be added during this period;
- Only freeze top quality, fresh and thoroughly cleaned foodstuffs;
- Prepare food in small portions to enable it to be rapidly and completely frozen and to make it possible to subsequently thaw only the quantity required;
- Wrap up the food in aluminium foil or polythene and make sure that the packages are airtight;
- Do not allow fresh unfrozen food to touch food which is already frozen, thus avoiding a rise in temperature of the latter;
- Lean foods store better and longer than fatty ones; salt reduces the storage life of food;
- Water ices, if consumed immediately after removal from the freezer compartment, can possibly cause the skin to be freeze burnt;
- It is advisable to show the freezing in date on each individual pack to enable you to keep track of the storage time.
- It is advisable to show the freezing in date on each individual pack to enable you to keep track of the storage time.
Hints for storage of frozen food
To obtain the best performance from this appliance, you should:
- Make sure that the commercially frozen foodstuffs were adequately stored by the retailer;
- Be sure that frozen foodstuffs are transferred from the food store to the freezer in the shortest possible time;
- Not open the door frequently or leave it open longer than absolutely necessary.
- Once defrosted, food deteriorates rapidly and cannot be refrozen;
- Do not exceed the storage period indicated by the food manufacturer.
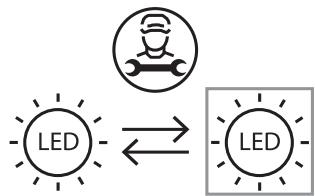
Replace the lamp
- This product contains a light source of energy efficiency class G.
- The light source in this product can only be replaced by qualified professionals.
- Please contact after-sales service if the light source fails.
- The light source shall be removed at the end of the product's useful life, with sorting and recycling done separately.
Cleaning
For hygienic reasons, the appliance interior, including interior accessories, should be cleaned regularly.
CAUTION:
The appliance may not be connected to the mains during cleaning. Danger of electrical shock! Before cleaning, switch the appliance off and remove the plug from the mains, or switch off or turn out the circuit breaker or fuse. Never clean the appliance with a steam cleaner. Moisture could accumulate in electrical components, danger of electrical shock! Hot vapors can lead to damage of plastic parts. The appliance must be dry before it is placed back into service.
Ethereal oils and organic solvents can attack plastic parts, e.g., lemon juice or the juice from orange peel, butyric acid, cleansers that contain acetic acid.
- Do not allow such substances to come into contact with the appliance parts.
- Do not use any abrasive cleaners.
- Remove the food from the freezer. Store it in a cool place, well covered.
- Switch the appliance off and remove the plug from the mains or switch off or turn out the circuit breaker of fuse.
- Clean the appliance and the interior accessories with a cloth and lukewarm water. After cleaning wipe with fresh water and rub dry.
- After everything is dry place appliance back into service.
Troubleshooting
IMPORTANT:
Before troubleshooting, disconnect the power supply. Only a qualified electrician of competent person must do the troubleshooting that is not in this manual.
There are some sounds during normal use (compressor, refrigerant circulation).
| Problem | Possible cause | Solution |
| Appliance does not work | Mains plug is not plugged in or is loose | Insert mains plug. |
| Fuse has blown or is defective | Check fuse replace if necessary. |
| Socket is defective | Mains malfunctions are to be corrected by an electrician. |
| Appliance freezes too much | Temperature is set too cold or the appliance runs at SUPER mode. | Set temperature warmer |
| The food is not frozen enough. | Temperature is not properly set. | Please look in the initial Temperature Setting section. |
| Door was open for an extended period. | Open the door only as long as necessary. |
| A large quantity of warm food was placed in the appliance within the last 24 hours. | Turn the temperature regulation to a colder setting temporarily. |
| The appliance is near a heat source. | Please look in the installation location section. |
| Heavy build up of frost on the door seal. | Door seal is not air-tight. | Carefully warm the leaking sections of the door seal with a hair dryer (on a cool setting). At the same time shape the warmed door seal by hand such that it sits correctly. |
| Unusual noises | Appliance is not level. | Re-adjust the feet. |
| The appliance is touching the wall or other objects. | Move the appliance slightly. |
| A component, e.g. a pipe, on the rear of the appliance is touching another part of the appliance or the wall. | If necessary, carefully bend the component out of the way. |
If the malfunction shows again, contact the Service Center.
These data are necessary to help you quickly and correctly. Write the necessary data here, refer to the rating plate.
Thank you!