
CCVB15 - Vacuum Cleaner CANDY - Free user manual and instructions
Find the device manual for free CCVB15 CANDY in PDF.
| Brand | CANDY |
| Model | CCVB15 |
| Product type | Electric cooker with ceramic hob and electric oven |
| Dimensions (W x D x H) - 60x60 model | 598 x 600 x 850 mm |
| Dimensions (W x D x H) - 50x60 model | 510 x 600 x 850 mm |
| Power supply | 220-240 V ~ 50/60 Hz (single-phase) or 380-415 V 3N~ (three-phase) |
| Total power | 8.4 kW (60x60 model) / 6.6-6.8 kW (50x60 model) |
| Number of cooking zones | 4 ceramic zones |
| Types of cooking zones | 1 halogen/highlight zone, 3 radiant zones |
| Oven functions | Traditional cooking, natural convection, fan-assisted heat, grill, turbo grill, rotisserie, pizza |
| Electronic programmer | Yes (timer, cooking duration, end of cooking) |
| Oven lighting | Yes (replaceable high-temperature bulb) |
| Cleaning | Catalytic (self-cleaning) on some models |
| Safety | Residual heat indicator, programmed automatic shut-off |
| Supplied accessories | Grid, drip tray, rotisserie |
| Spare parts | Specific high-temperature oven bulb |
| Surface type | Heat-resistant ceramic glass |
Frequently Asked Questions - CCVB15 CANDY
User questions about CCVB15 CANDY
0 question about this device. Answer the ones you know or ask your own.
Ask a new question about this device
Download the instructions for your Vacuum Cleaner in PDF format for free! Find your manual CCVB15 - CANDY and take your electronic device back in hand. On this page are published all the documents necessary for the use of your device. CCVB15 by CANDY.
USER MANUAL CCVB15 CANDY
Thank you for choosing one of our products. To get the most out of your cooker we recommend that you:
- Read the notes in this manual carefully: they contain important instructions on how to install, use and service this cooker in safety. Keep this booklet in a safe place for easy, future reference.
- In the case of the sale or transfer of the appliance, this manual should be given together with the appliance in order to guarantee the proper transfer of the information on installation/usage of the appliance and the relative warnings.
- All accessible parts are hot when the appliance is in operation, take care to not touch these elements. When the cooker is first switched on it may give off acrid smelling fumes—this smoke is harmless we suggest to operate the cookers for 2 hours while empty.
1.1. SYMBOLS USED IN THIS USER MANUAL
For easier comprehension, the symbols below are used in this user manual.

Safety Information
Information for Environment Protection
This appliance complies with the EU E.E.C directives.
1.2. DECLARATION OF COMPLIANCE
All parts of this appliance that may come into contact with foodstuffs comply with the provisions of EEC Directive 89/109. The appliance complies with European Directives 2006/95/EC and 2004/108/EC, and subsequent amendments. The appliance also complies with 93/68 General Directives and subsequent amendments.
1.3. SAFETY HINTS
-
The cooker must be used only for the purpose for which it was designed: it must only be used for cooking food. Any other use, e.g. as a form of heating, is improper use of the cooker and is therefore dangerous.
-
The manufacturers cannot be held responsible for any damage caused by improper, incorrect or unreasonable use.
-
When using any electrical appliance you must follow a few basic rules. If the appliance breaks down or develops a fault switch it off, disconnect it from mains, do not touch it, call the authorised Service.
-
This appliance is not intended for use by persons (including children) with reduced physical, sensory or mental capabilities, or lack of experience and knowledge, unless they have been given supervision or instruction concerning use of the appliance by a person responsible for their safety.
-
Children should be supervised to ensure that they do not play with the appliance.
-
An oven by its very nature becomes very hot. Especially the glass of the oven door. Do not allow children to go near the oven when it is hot, especially when the grill is on.
Always use gloves to remove food from the oven.
-
Always keep your appliance clean, for safety and health reasons. Fat and food residues may cause fire.
-
Do not insert your hand between oven hinges. Keep children away.
-
Make sure that all the knobs are in the OFF position when the appliance is not in use.
-
The oven drawer is to store empty trays or to keep food warm.
-
Do not put flammable, explosive or cleaning materials like nylon bags, paper, cloths, etc, into the drawer.
-
Use only heat resistant pots and pans. Do not use flammable materials.
-
It is dangerous to modify or to attempt to modify the properties of the appliance.
-
Particular attention is necessary when you are frying: do not leave the appliance unattended.
The appliance is heavy. Take care when moving.
-
The emission of hot air is normal while the appliance is working.
Do not close the vents on the oven. -
Some spillage on the appliance may occur, when placing food on or into the appliance or when removing food with excess fat or water. Clean such residues immediately after cooking, in order to prevent unpleasant smells and possible fires.
-
When using any electrical appliance you must follow a few basic rules:
*It is not generally a good idea to use adapters, multiple
sockets for several plugs and cable extension.
*Do not pull the power cable to remove the plug from the socket.
*Do not touch the oven with wet or damp hands or feet.
*If the main cable is damaged it must be replaced promptly:
*When replacing the cable, follow the instructions given below:
*Cable replacement must be carried out by qualified technicians. Use only an approved service centre for repairs end ensure that only original parts are used.
*When necessary, remove the power cable and replace it with one of the H05RR-F, H05VVF, and H05V2V2-F type. The cable have the capacity for the electrical current required by the product.
-
Do not leave the appliance unattended before it has cooled down.
-
WARNING: The appliance and its accessible parts become hot during use. Care should be taken to avoid touching heating elements.
Children under 8 Year of age must be kept away from the appliance unless they are continuously supervised.
- This appliance can be used by children aged from 8 years and above and persons with reduced physical, sensory or mental capabilities or lack of experience and knowledge if they have been given supervision or instruction concerning use of the appliance in a safe way and understand the hazards involved.
Children must not play with the appliance.
-
WARNING: Unattended cooking on a hob with fat or oil can be dangerous and may result in fire.
-
NEVER try to extinguish a fire with water, but switch off the appliance and then cover flame e.g. with a lid or a fire blanket.
-
WARNING: Danger of fire: do not store items on the cooking surfaces.
-
WARNING: If the surface is cracked, switch off the appliance to avoid the possibility of electric shock.
-
During use the appliance becomes hot. Care should be taken to avoid touching heating elements inside the oven.
-WARNING: Accessible parts may become hot during use. Young children must be kept away.
-
Only use the temperature probe recommended for this oven.
-
If present, do not to stare into halogen lamp hob elements.
-
CAUTION: In order to avoid a hazard due to inadvertent resetting of the thermal cutout, this appliance must not be supplied through an external switching device, such as a timer, or connected to a circuit that is regularly switched on and off by the utility.
-
CAUTION: Accessible parts may be hot when the grill is in use. Young children must be kept away.

If the above instructions are not adhered to, the manufacturer cannot guarantee the safety of the cooker
1.4. USEFUL TIPS
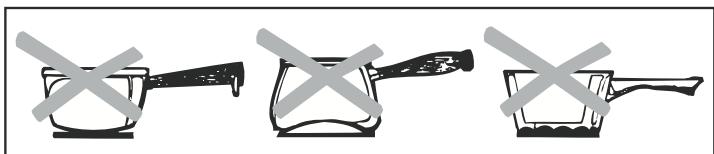
- Do not use deformed or unbalanced pans.
- Clean the grill and the fat collecting tray carefully before initial usage.
- When using cleaning sprays, do not spray on heaters or on the thermostat.
-Make sure that oven shelves are correctly placed. - Do not cover oven parts with aluminium foil.
1.5. TECHNICAL DATA
| FEATURES | TOTAL ELECTRIC POWER |
| 60 x 60 4 Hilight Heater and Electrical Oven | 8.4 kW |
| 50 x 60 4 Hilight Heater and Electrical Oven | 6.6- 6.8 kW |
Rating plate (located at the rear of the cooker)
2. INSTALLATION
Installation have to be made by qualified personnel. The manufacturer have no obligation to carry this out. If the assistance of the manufacturer is required to rectify faults arising from incorrect installation, this assistance is not covered by the guarantee.
The installation instructions for professionally qualified personnel must be followed. Incorrect installation may cause harm or injury to people, animals or belongings. The manufacturer cannot be held responsible for such harm or injury.
WARNING! Care must be taken regarding where the appliance is placed! It can only be installed in a continuously ventilated room.
Electrical connections must always be disconnected before any repair, installation or modification.
- Before positioning your appliance, check the properties of the energy supply and make sure that your appliance is regulated accordingly.
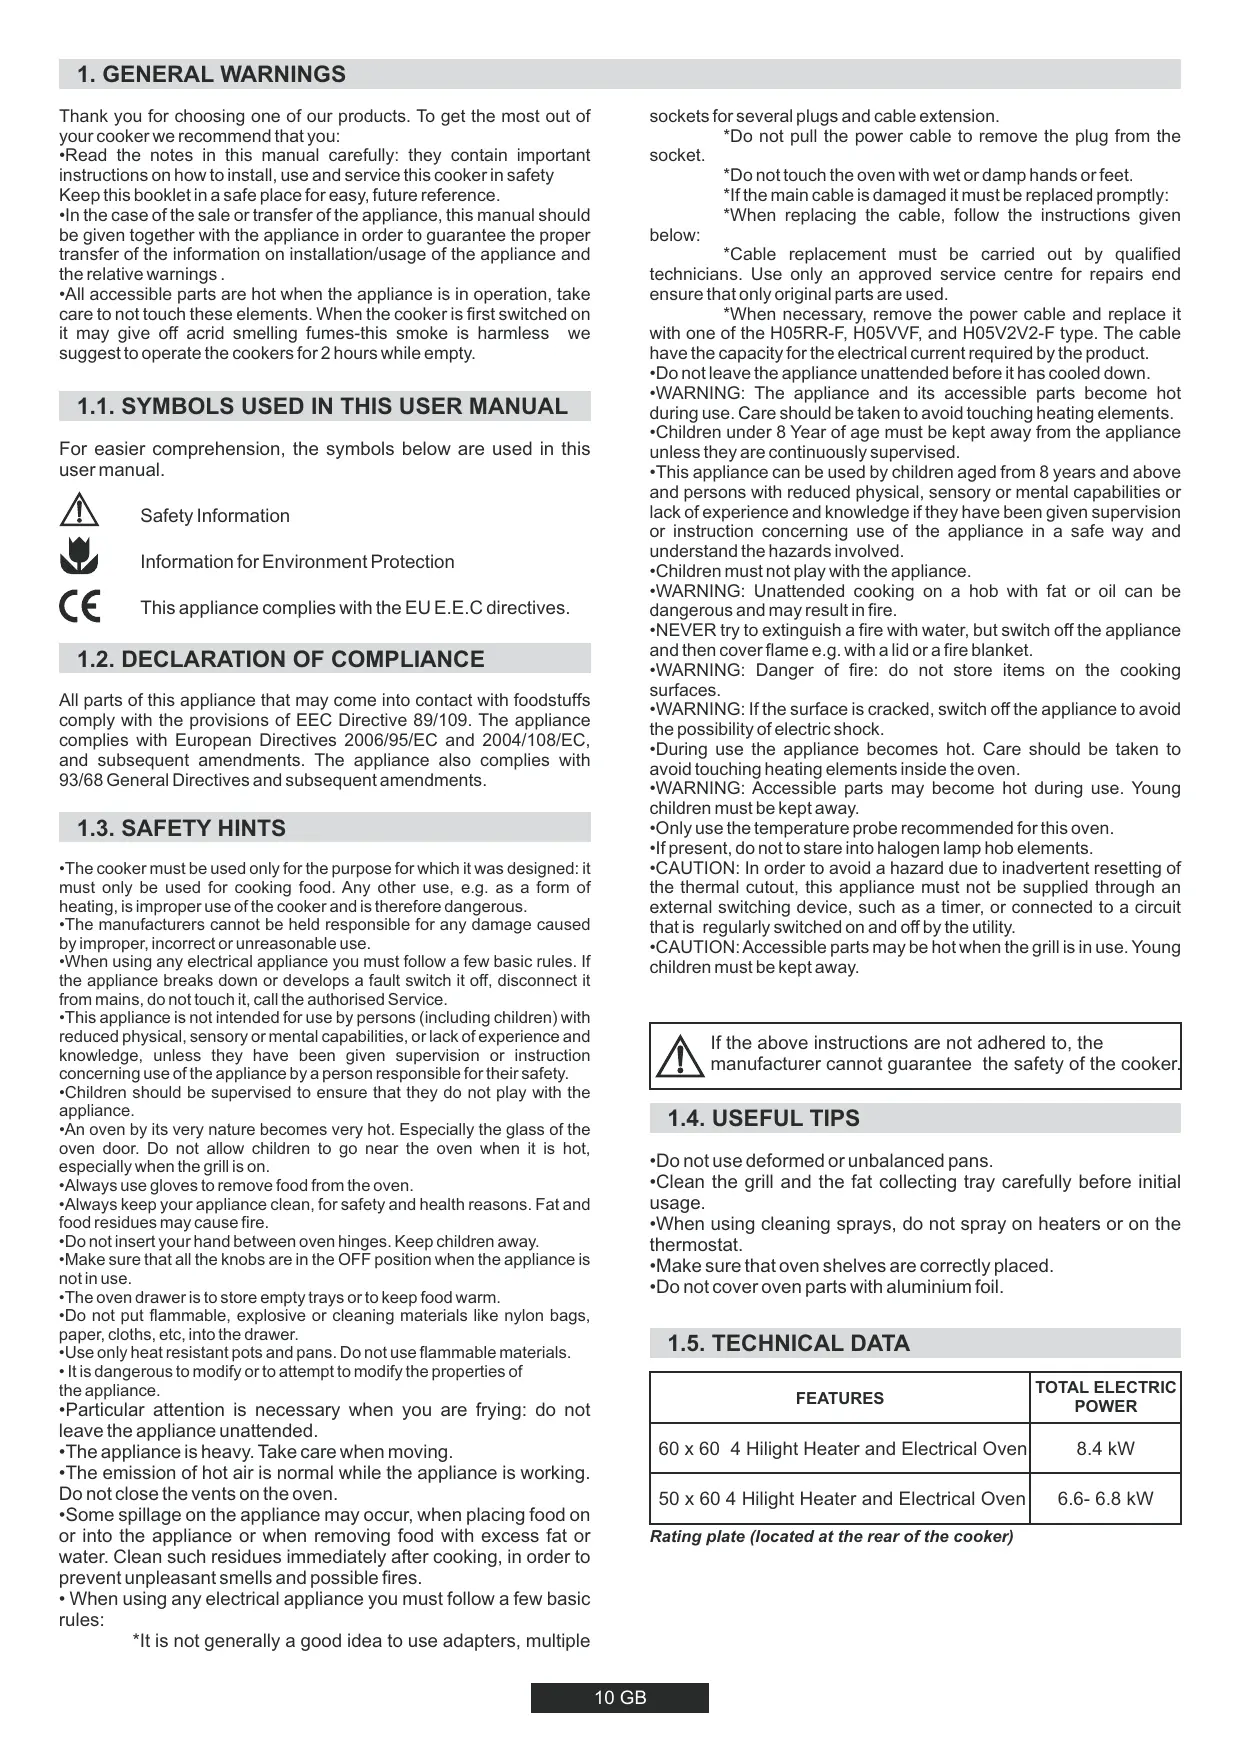
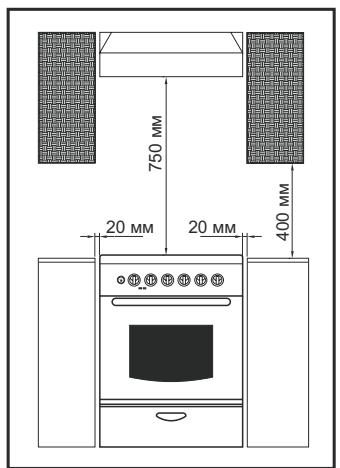
- The appliance must not be installed near flammable materials (e.g. furniture, curtains, etc.)
- If the range is placed on a base, measures must to be taken to prevent the appliance slipping off the base.
2.1. POSITIONING
This appliance is of the "X" type and it has been designed on the presumption that the adjacent work tops will be no higher than the cook top surface.
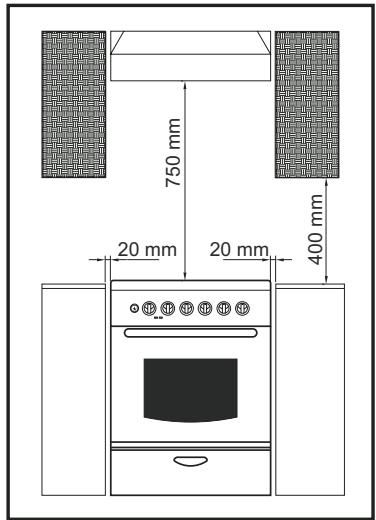
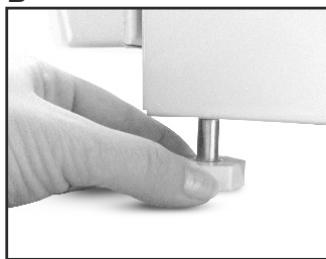
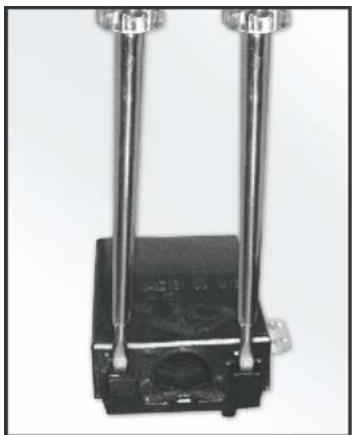
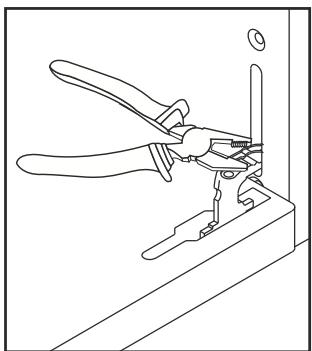
2.2. FEET ADJUSTMENT
Your appliance has adjustable feet at the lower corners of its chassis.
- The feet can be adjusted individually with the aid of a wrench to guarantee that the oven is perfectly balanced and levelled, so that any liquids in the pans is horizontal.
Adjustable feet and wheels.
A
B

C
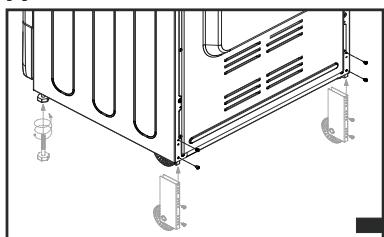
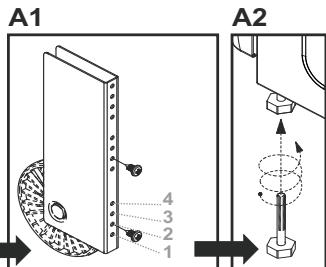
- The maximum height of cooker will be 868mm by fixing the adjustable front feet and rear wheels to the 4th hole.
- Rear wheels should be fixed to the 2nd hole (picture A1), standard height. Thus, standard height will be 850 ~mm .
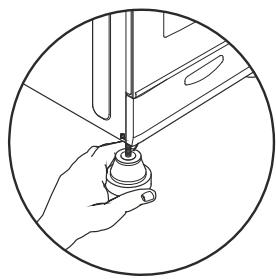
Adjustable feet.
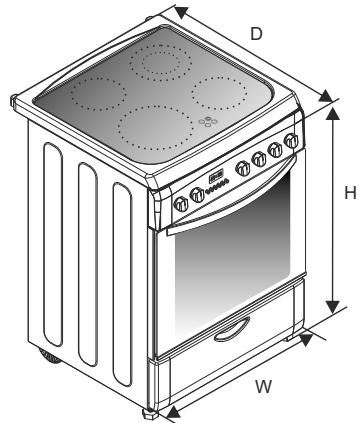
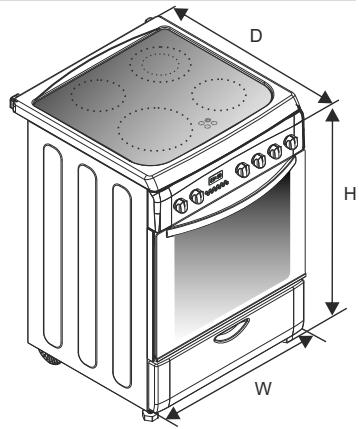
2.3. DIMENSIONS OF THE APPLIANCE
| 60 x 60 | 50 x 60 | |
| Height (mm) | 850 | 850 |
| Width (mm) | 598 | 510 |
| Depth (mm) | 600 | 600 |
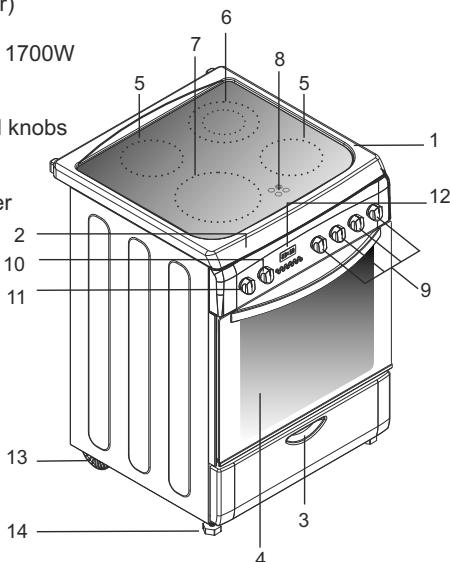
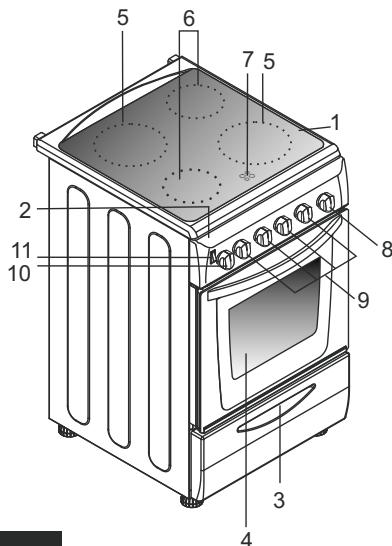
2.4. GENERAL APPEARANCE AND DEFINITION OF THE APPLIANCE
This User Manual has been drawn up as a guide for several models. Some of the properties mentioned in this manual may not exist in your appliance.
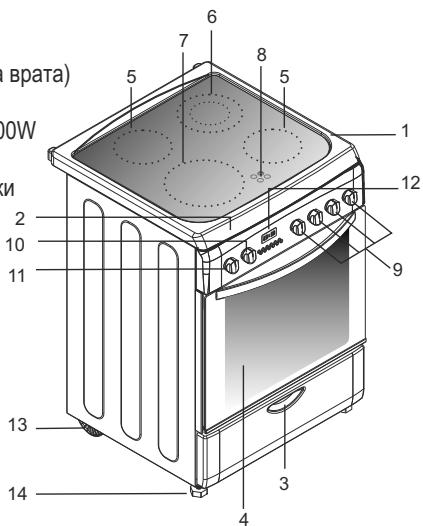
60 × 60 COOKER
1-Cook top
2- Control panel
3-Drawer
4-Oven door (Front door)
5-Hilght Heater 1200W
6- Double Hilight Heater 1700W
7-Hilight Heater 2300W
8- Warning Lamps
9-Hilght heaters control knobs
10-Oven knob
11- Thermostat knob
12- Electronic programmer
13-Moving Foot
14-Bolt Foot
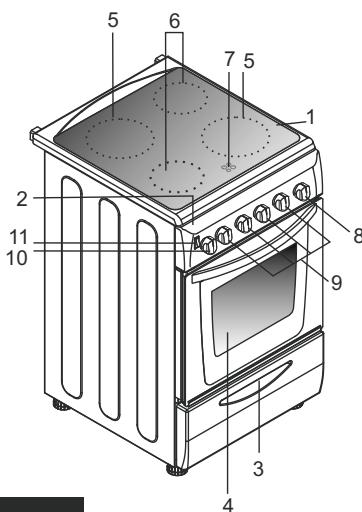
50 × 60 COOKER
1-Cook top
2- Control panel
3-Drawer
4-Oven door (Front door)
5-Hilight Heater 1800W
6-Hilght Heater 1200W
7- Warning Lamp
8-Timer knob
9-Hilight heaters control knobs
10-Oven knob
11-Fan knob
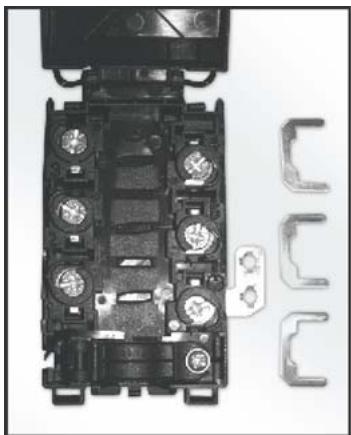
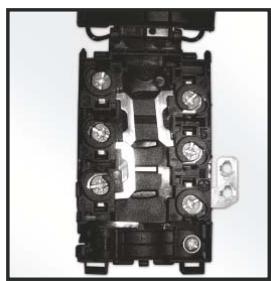
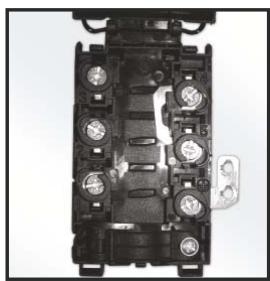
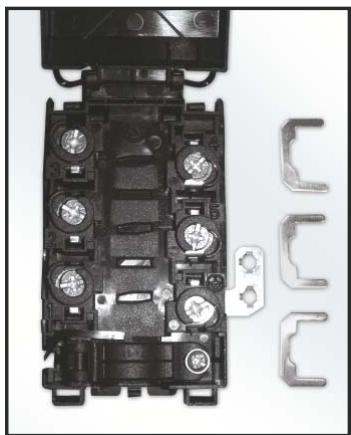
2.5. COOKERS WITHOUT ENERGY CABLE
Cable box connection types
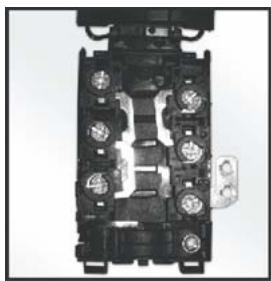
1- Monophase connection
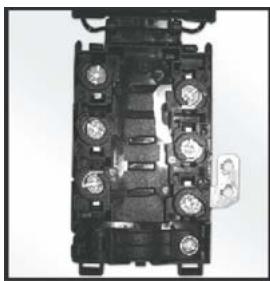
2- Three-phase connection
Attention: A poor clamping can draw away risks dangerous heating at the level of the cable feeding
| Monophase 220-240 V~ | Three-phase 380-415V3N~ | |
| Fuse | 25 A | 3 x 16 A |
| Cable - Section | 3 G 2.5 mm² | 5 G 1.5 mm² |
| Cable - Type | H05VV-F ou H05RR-F | H05VV-F ou H05RR-F |
| 3 | N | 4 | |
| 2 | 5 | 1/- PE | |
| 1 | L | 1/- PE | |
| L1: Phase shunt 1-2 and shunt 2-3 N: Nautral shunt 4-5 T Earth | 1 Phase 2 Phase 3 Phase 5 Neatural shunt 4-5 T Earth | ||
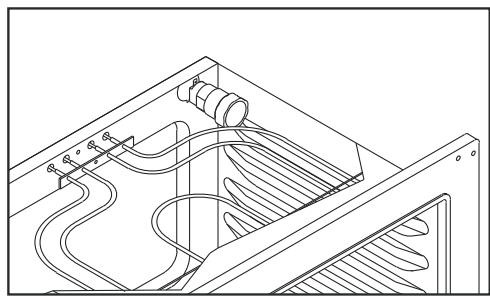
2.6. ELECTRICAL CONNECTION
Cookers can be presented with or without energy cable. Cable connection should be done by Autorited service according to following instructions.
The electrical connection must be made according to the standards and regulations in force. Before making the electrical connection, check the following:
-
Is the capacity of the electrical connections and safety fuses in the building sufficient to cope with the load of the appliance? (Check with the adhesive info label)
-
Does the electricity supply line have an earth connection conforming with the standards in force? A proper earth connection must exist in your home. If there is not a proper earth connection at your home, please apply to an authorized technician to deal with this problem.
-
Is the socket or the multi-pole switch at a easily reachable point after the installation of the appliance?
-
A plug conforming to standards should be connected to the mains cable and the cable should be inserted into a safe socket.
-
A multi-pole switch must be used between the appliance and the electricity line if a direct electrical connection to the appliance is required. (It must comply with standards and be appropriate for the load)
The green-yellow ground cable must not be interrupted by a switch. The brown phase cable (from the "L" coded connector of the oven) must always be connected to the phase line of the mains.
-
The power line must be positioned so that it is not exposed to temperatures higher than 50^ C .
-
When the power cable must be changed, a cable with a cross section appropriate to the indicated power must be used. The green-yellow ground cable should be approximately 2 cm longer than phase and neutral cables.
-
Check the heaters by switching them on for 3 minutes, after having completed the connection.
-
The manufacturer will not accept responsibility for damages arising due to non-compliance with the safety standards.
If an appliance is not fitted with a supply cord and a plug, or with other means for disconnection from the supply mains having a contact separation in all poles that provide full disconnection under overvoltage category III conditions, the instructions shall state that means for disconnection must be incorporated in the fixed wiring in accordance with the wiring rules.
3.1.DESCRIPTION OF COOKING ZONES
Highlight zone
A metallic conductor strip is spread uniformly over the whole surface unit. It is effective within 3 seconds and is suitable for steady, even and also lengthy cooking.
The glass-ceramic cook top benefits from greater heat output which is generated by the highlight cooking zones thereby accelerating the cooking process. Modifications to the design of the hob have not affected the capacity of the glass to withstand high temperatures, but they have improved controllability.
With the "Sprinter" facility, reduced cooking times of up to 15% can be achieved, depending on the method of cooking and the type of saucepans used.
- Multi-circuit heating elements offer the advantage that several cooking zone sizes can be used with one heating element.
3.2. COOKTOP COOKWARE ADVICE
Efficient cooking
The extra large highlight zone, will depending on the dimensions of the cook ware and/or the quantity of food being cooked, provide even higher performance levels.
Using good quality cookware is critical for obtaining the best performance from your hob.

Use pans with a large enough diameter to completely
cover the surface unit the size of the pan should be no smaller than the heated area. If it is slightly wider the energy will be used at maximum efficiency.
3.3. THE CHOICE OF COOKWARE
The following information will help you to choose cookware which will give good performance.
Stainless Steel
Highly recommended. Especially good with a sandwich clad base. The sandwich base combines the benefits of stainless steel (appearance, durability and stability) with the advantages of aluminium or copper (heat conduction, even heat distribution).
Aluminium
Heavy weight recommended. Good conductivity.
Aluminium residues sometimes appear as scratches on the cook top but can be removed if cleaned immediately. Because of its low melting point, thin aluminium should not be used.
Cast Iron
Usable, but not recommended. Poor performance. May scratch the surface.
Copper Bottom/stoneware
Heavy weight recommended. Good performance, but copper may leave residues which can appear as scratches. The residues can be removed, as long as the hob is cleaned immediately. However, do not let these pots boil dry. Overheated metal can bond to glass hobs. An over heated copper pot will leave a residue that will permanently stain the cook top.
Ensure that the base of the pot or pan is dry
when filling pans with liquid or using one that has been stored in the refrigerator, ensure that the base of the pan is completely dry before placing it on the hob. This will help to avoid staining the cook top.
Always use good quality cookware with perfectly flat and thick bases
Using this type of cookware will prevent hot spots that cause food to stick. Thick metal pots and pans will provide even distribution of heat.
Porcelain/enamel
Good performance only if the base is thin, smooth and flat.
Glass-ceramic
Not recommended. Poor performance. May scratch the surface.
Suitability of Cooking Pans
Keep in mind that larger pans have larger heating surfaces.
This will help them to cook the food faster than pans with smaller heating surfaces.
Always use pan sizes proportionate to the amount of the food to be cooked. In order to prevent splashing, do not use very small pans, especially for foods with excess liquid. If you use excessively large pans for quick cooked foods, sausages and liquids will stick and residues will remain attached to the pan after being emptied.
Closed pans and baking trays or moulds are suggested for cooking sweets. Splashed sugar and juices from an open pan may stick to the cooker surface and will be difficult to remove. This is especially important for pans used for roasting or pressurized cooking at high temperature.
Do not leave burners unattended without a pan or with an empty pan on top.
Check the suitability of cooking pans with respect to the following criteria;
They should be heavy.
They should completely cover the burner surface; they may be a little bigger but no smaller.
Base surfaces should be completely flat and fit well on the cooking surface.
- Some parts of the food may be heated while others remain cold due to the uneven distribution of heat under the pan. Therefore, continuous stirring of the food being cooked is necessary in the case of thin-bottomed pans. Heat is more effectively and evenly distributed with thick-based pans.
- Use of very small pans is not recommended. Wider, low-sided pans are more suitable for more effective and quicker cooking than small, deep pans.
- You cannot shorten cooking time by using a small pan over a large burner. You will only waste gas in this way. However, a pan with a lid will save energy.
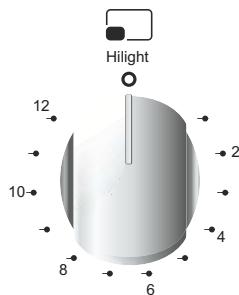
3.4. CONTROL KNOBS OF THE VITROCERAMIC COOKTOP
HOW TO OPERATE THE COOKTOP
Locate the sign corresponding to the cooking zone that you need.
Turn the control knob to the required cooking setting.
Initially we recommend that the heat zone be set at the highest position until the contents of the saucepan have reached the required temperature; the heat can then be reduced to the required cooking setting.
The residual heat indicator light will come on when the cook top surface temperature reaches 60 degrees or above.
It will remain on even if the cook top is switched off and will only go out when the cook top surface has cooled down.
| Position | Some Tips | ||
| 1 | 1-2 | Very Low | To keep a dish hot, melt butter and chocolate... |
| 2 | 3-4 | Low | Slow cooking, sauces, stews, rice pudding poached eggs... |
| 3 | 5-6 | Moderate | Beans, frozen foods, fruit, boiling water... |
| 4 | 7-8 | Medium | Steamed apples, fresh vegetables, pasta, crepes, fish... |
| 5 | 9-10 | High | More intense cooking, omelettes, steaks... |
| 6 | 11-12 | Very High | Steaks,chops, frying... |
To switch off the cook top, turn the knob to "O".
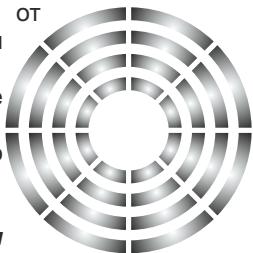
- The oval heating zone consists of two heating areas: a circular area and an oval shaped section. Turn the control knob from 1 to 12 to regulate the circular area. To operate the oval section, simply turn the control knob to position12 and then select a position from 1 to 12.
- The heating area consists of two concentric zones. The inner circle is activated when the knob is turned to any of the positions from 1 to 12. The outer ring will only be activated when the control is turned beyond 12 up to a maximum power.
4. USE OF THE OVEN
4.1. GRILLING
- Grilling gives food a rich brown colour quickly. Depending on the quantity of the food, you can switch the grill on to different positions. Almost all food can be cooked under the grill except for very lean game and meat rolls.
- Meat and fish that is going to be grilled should first be lightly doused with oil.
- Place a fat collecting tray beneath during grilling. Put some water into the tray to prevent unpleasant smells and to prevent the fat catching fire.
- Grilling is usually preferred for cooking pieces of meat, for example steaks, which are not too thick, different sized meat parts, cleaved hunted birds, fish, some vegetables (e.g. courgettes, aubergines, tomatoes, etc.) together with meat and fish products on spits.
Oil the fish lightly before putting it directly under the grill.
Add salt on meat after cooking, salt fish into the cleavage before cooking.
- The distance from the grill will depend on the thickness of the meat or fish. If the distance is correctly judged, the outer parts will not be burnt and the inside will not remain raw.
- Prevent unpleasant odours and smoke caused by dripping fats and sauces by pouring 1-2 glass of water into the fat-collecting tray.
- You can also use the grill for toasting, toasted bread or sandwiches, for example, and also to cook certain fruits (bananas, grapefruit or pineapple slices, apples etc.). However, fruit must not come into contact with the heating elements.

Never cover oven inner walls or the bottom with aluminium foil. Accumulated heat can damage the oven enamel and your meal.
4.2. SUGGESTIONS FOR COOKING
Traditional Cooking
Heat is generated from the upper and lower heaters. Generally, the middle shelf position is preferable for cooking. However, if the top or bottom surface of the food must be cooked more, place it on the upper or lower shelf.
Convection Cooking (with Fan)
- The food is cooked by evenly distributed preheated air blown into the oven by the help of the fan located on the inside back wall of the oven.
It is possible to cook several dishes simultaneously on different shelves thanks to the evenly distributed heat inside the oven. - This type of oven is also very useful for defrosting frozen food. It can also be used for sterilizing canned food, preparing fruit syrups, and dehydrating fruits and mushrooms.
4.3. COOKING CAKES
- Unless otherwise suggested, preheat the oven for at least 10 minutes before use. Do not open the oven door when cooking cakes otherwise they will not rise (cakes or dishes with yeast and soufflés). The blast of cold air which will enter the oven will prevent rising. You can check whether cakes are properly cooked by inserting a rod into the dough. If the rod comes out dry when you pull it out, it means that the cake is properly cooked. Do not check in this way until at least three quarters of the cooking time has elapsed.
Please keep in mind the following tips
- If the surface of the food is cooked well but it is still raw or partly raw inside, it must be cooked longer at a lower temperature.
- On the other hand, if the surface of the food is too dry, it should be cooked at a higher temperature for a shorter time.
4.4. COOKING PIZZA
- Thermostat setting at maximum
- Preheating time 15 min (20 min if possible)
- Position of the tray in either one of the two lowest position
Cooking time 20 min.
4.5. COOKING FISH
Small fish can be cooked at the maximum temperature from start to finish. Medium sized fish must be cooked at the maximum temperature at the beginning and then the temperature must be slowly reduced. Larger fish must be cooked at lower temperatures from start to finish. Check the cut at the bottom of fish to understand whether it is cooked properly. In order to understand whether the fish properly grilled or not, check the cleavage at the bottom of the fish. The colour (for grilled fish) should be an even matt white. This is not the case for salmon and trout.
4.6. COOKING MEATS
- The minimum quantity of meat to be cooked in the oven is 1kg . Otherwise, the meat will be too dry.
If you require well done meat, use less fat. If meat has a little fat, there is no need to use oil. If one side of the meat is fatty, place this side up. The melted fat will sufficiently grease the part below. Red meats should be taken out of the fridge at least 1 hour before the cooking. - Otherwise the meat may become tough due to the temperature difference. Do not use salt before cooking, especially when grilling meat. Salt will draw the blood and juices out of the meat which will consequently prevent the roasting of the upper surface of the meat.
- Add salt to roast meat only after half of the cooking time has elapsed.
- Place the meat to be roasted in a wide, shallow pan.
- Deep sided containers / pans act as a shield against the heat. Meat can be placed in the oven in a heat resistant pan or directly onto the grill. Insert a fat / gravy collecting tray beneath the grill. Sauces must be added at the beginning if the food is cooked for a short time, while it would be better to add sauces in the last half hour if the food is cooked for a longer time.
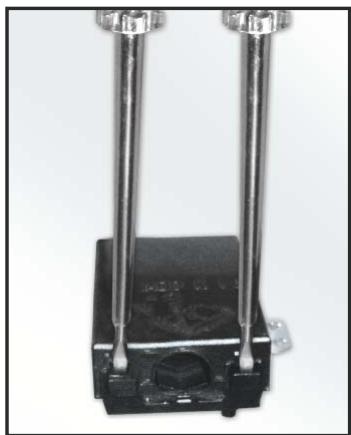
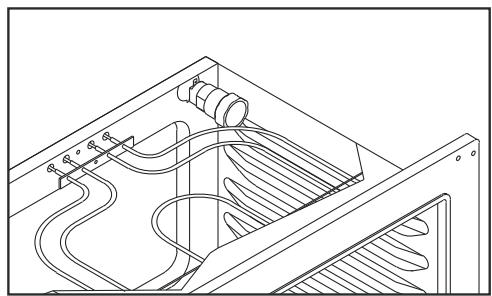
4.7. COOKING TURN SPIT
- The cooker is equipped with a metal turnspit, two forks and a hook used to support the spit.
-Instruction for use: - Remove all accessories from the oven;
- Put the deep pan on the bottom of the oven or on the lowest bench;
- Stick the turnspit through the meat, centered between the two forks;
- Fix the turnspit into the drive hole located in the bottom wall, then hang the support hook in the drive located at the top front of the oven cavity and around the edge of the turnspit.
- Preheating is not necessary with the turnspit.
- Cooking Time Recommended In Turnspit Position;
| Cooking time (min) | Electric Oven |
| Beef (1kg) | 20/30 |
| Lamb, sheep (1kg) | 30/40 |
| Veal, Poultry (1kg) | 60/70 |
| Pork (1 kg) | 65/75 |
4.8. USING THE END OF COOKING TIMER
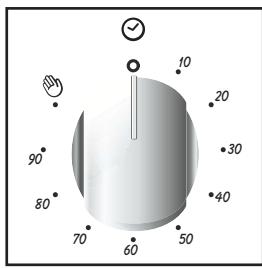
This control enables to set the desired cooking time (max. 90 min.) the oven will automatically switch off at the end of the set time.
The timer will count down from the set time return to the 0 position and switch off automatically.
For normal use of oven set the timer to the position.
To set the oven ensure the timer is not on the O position.
4.9. USING THE MINUTE TIMER
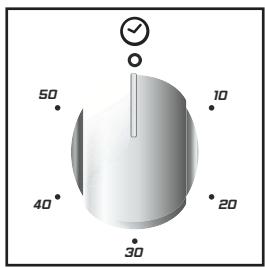
To set the cooking time, turn dial one complete revulsion and then position the index to the required time. When the times has lapsed, the signal will ring for a few seconds.
4.11. ELECTRIC OVEN
| Position | Oven Function |
| F | Function |
| °C | Temperature |
| ℃ | Cooking time |
| ○ | Not in function |
| ←→ | Turn spit and grill heater |
| ◇ | Lamp |
| ◇ | Grill heater |
| × | Grill heater and fan |
| × | Fan |
| × | Upper heating element and fan |
| × | Lower heating element and fan |
| × | Upper heating element, lower heating element and fan |
| ◇ | Lower and upper heating element |
| ◇ | Upper heating element |
| ◇ | Lower heating element |
| ◇ | Manual |
| PIZZA | Pizza |
4.10. USE OF THE ELECTRONIC PROGRAMMER
| FUNCTION | HOW TO ACTIVA | HOW TO SWITCH IT OFF | WHAT IT DOES | WHAT IT IS FOR |
| MINUTE MINDER | •Press and hold the button▲ •Press the buttons▼or▲to set the required time •Release all the buttons | •When the set time as elapsed an audible alarm is activated (this alarm will stop on its own, however it can be stopped immediately by pressing the button) □ | •Sounds an alarm at the end of the set time. •To check how long is left to run press the button▲ | •Allows to use the oven as alarm clock (could be activated either with operating the oven or with out operating the oven) |
| MANUAL FUNCTION | •Press the button □ •Set the cooking function with the oven function selector | •Turn the oven function selector to position“○” | •Enables you to operate the oven. | •For cooking the desired recipes |
| COOKING TIME | •Press and hold the TIMER button •Press the buttons▼or▲to set the lenght of cooking required •Release all buttons •Set the cooking function with the oven function selector | •When the time is elapsed the oven will switch off automatically. Should you wish to stop cooking earlier either turn the function selector to 0, or set time to 0:00(TIMER and▼▲buttons) | •It allows to preset the cooking time required for the recipe chosen. •To check how long is left to run press the TIMER button. •To alter/change the preset time press TIMER and▼▲buttons | •At the end of the cooking set time, the oven will switch off automatically and an audible alarm will ring. |
| END OF COOKING | •Press and hold the END button •Press the buttons▼▲to set the time at which you wish the oven to switch off •Release the buttons •Set the cooking function with the oven function selector | •At the time set, the oven will switch off. To switch off manually, turn the oven function selector to position“○”. | •Enables you to set the end of cooking time •To check the preset time press the END button •To modify the preset time press buttons END+▼▲ | •This function is typically used with “cooking time” function. For example if the dish has to be cooked for 45 minutes and needs to be ready by 12:30, simply select the required function, set the cooking time to 45 minutes and the end of cooking time to 12:30. •Cooking will start automatically at 11:45 (12:30 minus 45 mins) and will continue until the preset end of cooking time, when the oven will switch itself off automatically WARNING! If the END of cooking is Selected without setting the length of cooking time, the oven will start cooking Immediately and it will Stop at the END of cooking time set. |
Setting the correct time:
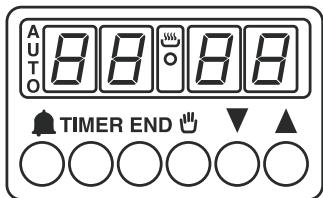
WARNING : the first operation to carry out after the oven has been installed or following the interruption of power supply (this is recognizable the display pulsating and showing )
- Press and hold the TIMER and END buttons (▶ and ↓)
- Set time with buttons
- Release all buttons
ATTENTION the oven only operates if set on manual function or preset time.
N.B.: on some models the symbols are replaced by + and - .
In the programming of a timer with 5 buttons, for manual function, press "TIMER" and "END" buttons simultaneously
TIMER END

Traditional and Hot Air Circulation Cooking Methods; Weights (Gr)
TYPE OF THE FOOD Traditional Cooking Method
| Weight (Gr) | TYPE OF THE FOOD | Traditional Cooking Method | Hot Air Circulation Method | Cooking times (Minutes) | NOTES | ||
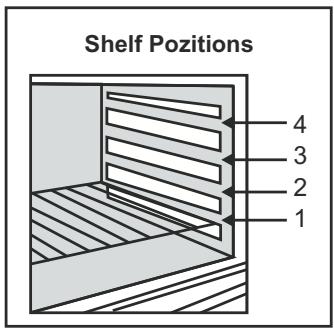
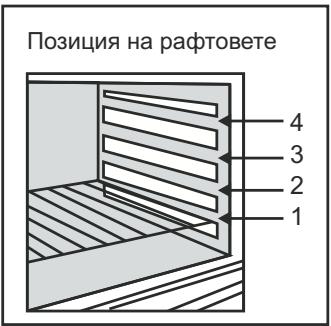
| CAKES AND DESSERTS | Shelf Position | Tempera-ture(℃) | Shelf Position | Tempera-ture(℃) | |||
| Dough with stirred egg | 2 | 180 | 2 (1 and 3) | 160 | 45 - 60 | ||
| Dough | 1 | 180 | 2 (1 and 3) | 160 | 20 - 35 | ||
| Small Cakes | 2 | 180 | 2 (1 and 3) | 160 | 20 - 30 | ||
| Cheese Cake | 1 | 175 | 2 | 150 | 60 - 80 | ||
| Apple Pie | 1 | 180 | 2 (1 and 3) | 160 | 40 - 60 | ||
| Strudel | 2 | 175 | 2 (1 and 3) | 150 | 60 - 80 | ||
| Jam tart | 2 | 180 | 2 (1 and 3) | 160 | 45 - 60 | ||
| Small cakes | 2 | 180 | 2 (1 and 3) | 160 | 15 - 25 | ||
| Biscuits | 2 | 180 | 2 (1 and 3) | 160 | 10 - 20 | ||
| Cream cakes | 2 | 100 | 2 (1 and 3) | 100 | 90 - 120 | ||
| 1000 | BREAD | ||||||
| White Bread | 1 | 200 | 2 | 175 | 45 - 60 | ||
| 500 | Rye Bread | 1 | 200 | 2 | 175 | 30 - 45 | |
| 500 | Sandwich | 2 | 200 | 2 (1 and 3) | 175 | 20 - 35 | Inside the closed oven on dishes 8 pieces on a tray Under the grill |
| PASTRY | |||||||
| Macaroni | 2 | 200 | 2 (1 and 3) | 175 | 40 - 50 | ||
| With vegetable | 2 | 200 | 2 (1 and 3) | 175 | 45 - 60 | ||
| Small pastries | 2 | 200 | 2 (1 and 3) | 175 | 35 - 45 | ||
| Lasagne | 2 | 200 | 2 | 175 | 45 - 60 | ||
| MEATS | |||||||
| Roast beef | 2 | 200 | 2 | 175 | 50 - 70 | Cook on grill | |
| 1000 | Roast pork | 2 | 200 | 2 | 175 | 100 - 130 | Cook on grill |
| 1200 | Roast veal | 2 | 200 | 2 | 175 | 90 - 120 | Cook on grill |
| 1000 | British style roast beef | 2 | 220 | 2 | 200 | 50 - 70 | Cook on grill |
| 1500 | Lamb | 2 | 200 | 2 | 175 | 110 - 130 | Leg |
| 1200 | Chicken | 2 | 200 | 2 | 175 | 60 - 80 | Full size |
| 1000 | Turkey | 2 | 200 | 2 | 175 | 210 - 240 | Full size |
| 4000 | Duck | 2 | 175 | 2 | 160 | 120 - 150 | Full size |
| 1500 | Goose | 2 | 175 | 2 | 160 | 150 - 200 | Full size |
| 3000 | Rabbit | 2 | 200 | 2 | 175 | 60 - 80 | In parts |
| 1200 | FISH | ||||||
| Whole fish | 2 | 200 | 2 (1 and 3) | 175 | 40 - 60 | 2 Fishes | |
| 800 | Fillet | 2 | 200 | 2 (1 and 3) | 175 | 30 - 40 | 4 Fillets |
NOTE :
1) Cooking times do not include pre heating. Preheating the oven for about 10 minutes is advisable especially for cakes, pizzas and breads.
2) Indicates tray positions for cooking several dishes simultaneously.
3) All cooking operations must be carried out with oven door closed.
| FOOD TYPES | QUANTITY | COOKING ON GRILL | COOKING TIMES (Minutes) | |||
| N. OF PARTS | WEIGHT | SHELF POSITION | TEMPERATURE (℃) | UPPER SECTION | LOWER SECTION | |
| Beefsteak | 4 | 800 | 4 | max | 10 | 8 |
| Grilled cutlet | 4 | 600 | 4 | max | 12 | 8 |
| Sausage | 8 | 500 | 4 | max | 10 | 6 |
| Chicken parts | 6 | 800 | 3 | max | 30 | 20 |
| Mixed grill | 4 | 700 | 4 | max | 12 | 10 |
| Milky desserts | 4 | 400 | 4 | max | 13 | 10 |
| Tomato slices | 8 | 500 | 4 | max | 12 | -- |
| Fish fillets | 4 | 400 | 4 | max | 8 | 6 |
| Scallops | 6 | --- | 4 | max | 12 | -- |
| Toast | 4 | --- | 4 | max | 8 | -- |
| Bread slices | 4 | — | 4 | max | 2-3 | 1 |
5. CLEANING AND MAINTENANCE
Before all cleaning and maintenance :
- Disconnect mains voltage.
- If the oven is hot, wait till it has cooled down.
- Never use a steam or high pressure spray to clean the appliance.
- Never use abrasive cleaners, wire wool or sharp objects to clean the glass oven door.
- Clean enamelled surfaces with warm, soapy water or with suitable brand products. On no account use abrasive powders that may damage surfaces and ruin the appearance of the cooker.
It is very important to clean the oven each time it is used.
- Use detergents and abrasive metal pads for the stainless steel grills.
- The glass surfaces such as the top, the oven door and the warming compartment door must be cleaned when they are cold.
- Damage caused by failure to respect this rule is not covered by the guarantee.
- Do not use abrasive products, metal cleaning pads, sharp objects, rough cloths, or chemical products and detergents that can permanently damage the catalytic lining.
- It is a good idea to use deep roasting trays for fatty foods such as joints of meat etc. and to put a tray underneath the grill to catch surplus fat.
- Cleaning and user maintenance shall not be made by children without supervision.
- Do not use a steam cleaner for cleaning operations
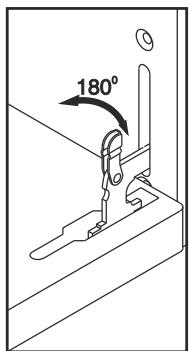
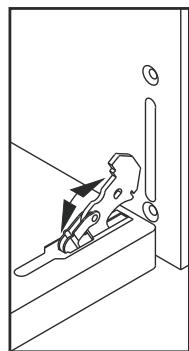
Cleaning of Oven Door
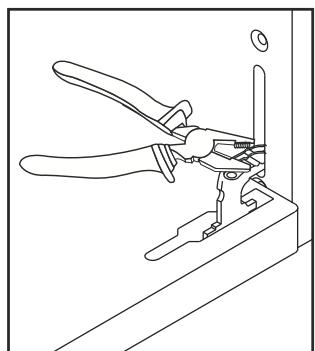
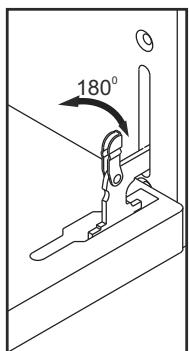
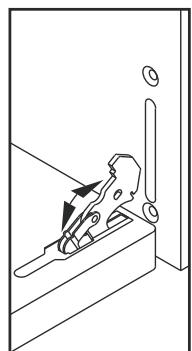
For thorough cleaning of the oven door, it is advisable to remove the same, as shown in below.
Open the door completely, turn the two feet on the hinge arms 180^ . Close the door partly by a 30^ . Remove the door by slightly lifting the it at this position.
For replacing the door, follow the steps above in the reverse order. Before carrying out any maintenance work on the hob, allow it to cool down.
Only products, (creams and scrapers) specifically designed for glass ceramic surfaces should be used. They are obtainable from hardware stores.
Avoid spillages, as anything which falls on to the hob surface will quickly burn and will make cleaning more difficult.
It is advisable to keep away from the hob all substances which are liable to melt, such as plastic items, sugar, or sugar-based products.
Do not use harsh abrasive cleaners or sharp metal scrapers to clean the oven door glass since they can scratch the surface, which may result in shattering of the glass.
MAINTENANCE
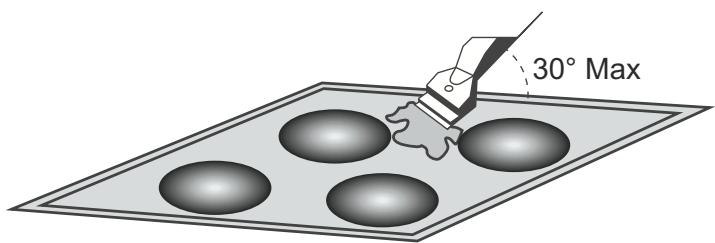
- Place a few drops of the specialised cleaning product on the hob surface.
- Rub any stubborn stains with a soft cloth or with slightly damp kitchen paper.
- Wipe with a soft cloth or dry kitchen paper until the surface is clean.
If there are still some stubborn stains
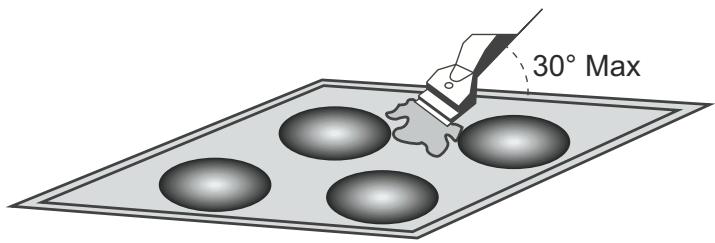
- Place a few more drops of specialised cleaning fluid on the surface.
- Scrape with a scraper, holding it at an angle of 30 to the hob, until the stains disappear.
- Wipe with a soft cloth or dry kitchen paper until the surface is clean.
-Repeat the operation if necessary.
AFEWHINTS
Frequent cleaning leaves a protective layer which is essential to prevent scratches and wear. Make sure that the surface is clean before using the hob again. To remove marks left by water, use a few drops of white vinegar or lemon juice.
Then wipe with absorbent paper and a few drops of specialised cleaning fluid.
The control knobs can be removed for a complete cleaning.
However, you must care not to let any liquid go into the open zones, and then to push the knobs fully on fitting back.
The glass ceramic surface will withstand scraping from flatbottomed cooking vessels, however, it is always better to lift them when moving them from one zone to another
Do not use a sponge which is too wet.
Never use a knife or a screwdriver.
A scraper with a razor blade will not damage the surface, as long as it is kept at an angle of 30^ .
Never leave a scraper with a razor blade within the reach of children.
Never use abrasive products or scouring powders.
The metal surround
to safely clean the metal surround wash with soap and water, rinse, then dry with a soft cloth.


To Replace the inside light
- Switch off the mains power supply and unscrew bulb.
Replace with an identical bulb that can withstand very high temperatures. - Never use steam or a vaporizer for cleaning.
- WARNING: Avoid possibility of electric shock - ensure the appliance is switched off before replacing the lamp.
5.1. CATALYTIC SELF - CLEANING OVEN
- Special self-cleaning panels covered in a micro-porous coating are available on some of our models. If they are fitted, the oven no longer needs to be cleaned by hand.
- The lining must be porous for self-cleaning to be effective.
- Excessive splattering of fat may block the pores and therefore hinder self-cleaning. This self-cleaning capacity may be restored by switching on the empty oven to maximum for about 10-20 minutes.
- If the walls of the oven are so thickly coated in grease that the catalytic lining is no longer effective, remove surplus grease with a soft cloth or sponge soaked in hot water. All catalytic linings currently on the market have a working life about 300 hours. They should therefore be replaced after about 300 hours.
6. SERVICE CENTRE & TROUBLESHOOTING
- If the oven is not working, before calling the service centre we recommended that:
- You should check that the oven is properly plugged into the power supply.
The oven does not heat up
Are the oven control knobs at the correct position?
The cooking time is too long
Has the correct temperature been selected?
Smoke comes from the oven
It is advisable to clean the oven after each use. If fat which splashes during the cooking of meat is not cleaned, it will cause an unpleasant smell and smoke the next time you use the oven. (See the Cleaning and Maintenance chapter)
The oven light does not come on
- The light might be faulty. To change the bulb, please see the relative page.
- If you have checked the above and the oven still does not work properly, contact the nearest authorized service for assistance
- Model and Production Number (PNC or ENR).
The cooking zones do not simmer or only fry gently
Only use flat-bottomed pans. If light is visible between the pan and the hob, the zone is not transmitting heat correctly.
The pan bottom should fully cover the diameter of the selected zone.
The cooking is too slow
Unsuitable pans are being used. Only use flat bottomed utensils, that are heavy and have a diameter at least the same as the cooking zone.
Small scratches or abrasions on the hob's glass surface
Incorrect cleaning or rough-bottomed pans are used; particles like grains of sand or salt get between the hob and the bottom of the pan. Refer to the "CLEANING" section; make sure that pan bottoms are clean before use and only use smooth bottomed pans. Scratches can be lessened only the cleaning is done correctly.
Metal marks
Do not slide aluminium pans on the hob. Refer to the cleaning recommendations.
You use the correct materials, but the stains persist.
Use a razor blade and follow the "CLEANING" section.
Dark stains
Use a razor blade and follow the "CLEANING" section.
Light surfaces on the hob
Marks from an aluminium or copper pan, but also mineral, water or food deposits; they can be removed using the cream cleaner.
Caramelisation or melted plastic on the hob.
Refer to the "CLEANING" section.
The hob does not operate or certain zones don't work
The shunts are not positioned correctly on the terminal board.
Have a check made that the connection is done in compliance with the recommendations.
The control panel is locked.
Unlock the hob.
Frequency of on/off operations for cooking zones
The on-off cycles vary according to the required heat level:
- low level: short operating time,
high level: long operating time.
"H" display, residual heat indicator, blinking
The electronic temperature is too high. A technician should verify the fitting in compliance with the recommendations.
7. PROTECTION OF THE ENVIRONMENT

- After positioning the appliance, packaging materials must be correctly disposed of for safety and environmental purposes.
- Before disposing of old equipment, cut the power cable in order to render the equipment unusable.
- This appliance is marked according to the European directive 2002/96/EC on Waste Electrical and Electronic Equipment (WEEE).
- By ensuring this product is disposed of correctly, you will help prevent potential negative consequences for the environment and human health, which could otherwise be caused by inappropriate waste handling of this product.
- The symbol on the product indicates that this product may not be treated as household waste. Instead it shall be handed over to the applicable collection point for the recycling of electrical and electronic equipment
- Disposal must be carried out in accordance with local environmental regulations for waste disposal.
- For more detailed information about treatment, recovery and recycling of this product, please contact your local city office, your household waste disposal service or the shop where you purchased the product.
1. AVISO GENERAL
Cneuannct, BbIOnnHJouuN ycTaHOBky PnITbI, DOnXeH Co6nIodaTb HcTpyuONo yCTaHOBKe. HenpabInbHaay cTaHOBKa MoTeT HaHeCTN Bpe 3dOpOBtIO JIoDeN JxKbOThBx, A TokeP npVBctN K nopYe IMyueCTBa. IpnON3BODInTeB He HeCET OTBETCTBEHHOCTNa TAKe NTOpEn.
IPEDyPENPEXDEHNE! Heo6xOIMO npaBnIbHO BbIpaTb MeCTO IINy UcTaHOBKn PIIITb! PIIITa MoKET 6bITb YcTAHOBNeHa TOJIbKO B KOMHaTe C NOCTOHNOB BEHTNIJcIeN. IpeE BdBInONHeHMe pEMoHTa, YcTAHOBKn IINMOdUΦKaIcIIN PIIITb HEo6xOIMO OTCoeDInHb KaIeIb PtNTAHN O T3JEKTPOCETI.
ecJN 6bItoBn 3NeKtPnpBOp yCTaHabJNaeTcRa H OCHOBAHIN, TO Heo6XoIMO pInHrBoCOTBETCTBlyUOuNE MepblnTO, YTObOH He MO CCKOJIb3Hyb C OCHOBAHIA.
2.1.PA3MELSEHNE
Данная плNTаяВЛЯТСТУ ПИТОМ TYNA "X"и СпpoEkТИрOBaH C yHTOMTO,чTo paCNoJIOKeHьIe рДOM C HIM pa6Oчe NOBepxHocTINHaxOДТСЯHa yPobHe He BbIe YpOBHЯ BapOchON NOBepxHocTIN.
2.2. PEGYJINPOBKA BbICOTbl HOXEK
MeNkyo pbl6y moKHO rOTOBnB npu maKcImaJIbHOI TEMpePAType oT hauJaNo KOHca ee npiroTOBHeHn. Pbl6y cpeHNx pa3MepOB CJeDyET rOToBnB ChauJa npu MaKcImaJIbHOI TEMpePAType, a 3aTeM TempeApa TOnJXHa NoCTeNEHNO CHNXaTbCry.KpyNHyo pbl6y CJeDyET rOToBnB npu MmHMaJIbHOI TEMpeAtpye OHTaJaNo KOHca ee npiroTOBHeHn. LBeT pa3pe3a Ha 6pUoKe npabInbHO npiroTOBHeHno Ha rpIne pbl6bI DoJXeH 6bITb MaTOBO-6eNbIM. 3To He OTHOCITc K JIOCOsO H open.
Yucmka deepu dyxoxku
Ipeed Tem KaK PnCTyNTb K YnCTKe BApOuHoi NOBepxHOCTN, DaTe eN OCTbIHytb.
Ecnu He ydaemcya daumb cce pmaHa
-HahecnTe Ha BapOHyo NOBepXHocTb eue HeckoIbKO kaneIb cneuaIbHorO uNCTaIe OcpeCTBa.
OuHCTIte BapouHyo NOBepxHocTb C NOMOUsCkpe6ka, DEpKa eRo IyrIOM 30 rpaDycob K NOBepxHocTn. YcHCTIte Do Tex nop, noka JraTHa HeNCue3HyT.
-ПротраитЕ мягков Тканью Ип Влaxнов Кухоннов Буmarи, пoka nobepхнoctь He CTaHET YnCTOJ.
Bcnyae Heo6xOIMOCTn NOBTOpnte 3Ty onepaunio.
HECKOJIbKO IONE3HbIX COBETOB
YacTbIe YnCTKn OBeCneuHBAIoT NOnUyHeHne 3aUnTHoro CNoR, KOToPbI npedOTBpauaet Obpa3oBaHne Uapann H nN3HOC BApOuHOH NOBepxHOCTI. IpeE IOBtOpHbIM INcONJb3ObaHMeM BApOuHOH NOBepxHOCTINPOBepbTe, cTO hAЯJBLaTeC TnCTO. IpydaneHry nTeH, OCTabNeHHbIX BODo, HAHeCITE HeCKONbKO Kaenb YKCyca nnN JImMOHHO KNCnOTbI.
3aTeM npoTnpe npomokatelbHOB 6yMarOu HaheCtHe HeCKoJIbKO KaIeNb CneuaJIbHOH UcCTraUe KJNDKoCTN.
He nOJIb3yI TeCb CINJIbHO CMOUeHNO rγδKoI.
HnKoIa He nOJIb3yITeCb HOXOM IJIN OTBePTKoI.
Ckpe6ok C 6pntBHeHHbIM Je3BnEM HnKOrda He NOBpeiNT NOBepxHocTb, ecnn OH pacnonaraetcnoyrrnom 30 K nobepxHocTn.
XpaHnTe cKpe6ok C 6pntBHeHbIM JIe3BnEm B HeNoctyHOM dJIa DeTei MeCTe.
HnkOrda He noIb3yITeCb a6pa3nBbIMu YnCTaUIMn CpeDCTBaMn Nskypkam.
MemaJIuuecka pamKa
BbIMoTe MeTaJIInueckyIpo pAmKyMbIbHOI BOIO,3aTEM YICTOI BOIO, a 3aTEM BbCyUHTE C NOMOuBIO MRAKOI TKAHI.
3aMeHaJaMnOuKu BHympu dyxO6ku
-
Bbiklouhnte 3neKtpoNTaHne n BbIbepHnTe lamnochy. Bbepnite HobyIO IanaOChy, KOTOPa MoXET BbldePknBaTb BO3dEiCTBnB YBCOKOI TempepaTypbl.
-
HinkoIa He nOJIb3yITeScB dIJI YIcTkn NaporeHepaTOPOM.
Pnuma He HaapeBaemcra
HIO nocybl DOJXHO NnHOCTbIO NOKpbIBaTb BbIbpaHHyo 3OHy HarpeBa.
Iuza zomobumc cnwkom MeJeHHO
IcnoIb3yETcHnOxOJaKxOHHaNocuJa. IOnb3yITeCb TOIbKO TjKeJIoK KyXOHHO NocUoC nIOCKIM dHOM, DnaMeTp KOTOpO He MeHSe DnAmEtPa 30HbI HarpEba.
He6oIbIwe zapanunblu nIu nomepmocmu Ha cmeKJHHOI eapouHou noeepxHocmu
YnCTKa 6bIa BbIOnJIHeHa HEnpaBnJIbHO, INI INCNoJIb3OBAJIacb Nocya C HEPOBHbIM IHom (MeKJy BapOuHoi NOBepXHO U INOM NocyIbI nonaII 3epHa INI YactuIcBoCoIN). CM. pa3dien "YnCTKA".
Провьп,чTOДно nocудыяВЛЯETСЧИСТБМ,ИчTOИСПОЛБ3YEETСТToJbKO nocya c ПLOOCKIM ДHom.ОбразOBAHNEцapAnH MOKHOppeTbPATnTb ToJbKO c NOMOUsbIO npaBUNbHOИСТКN.
CnebI Memannla
He nepeaBraTe aIOMHnEByIO nocdy IO BapOCHoN NOBepXHOCTN. Cm. peKomeHdaUIN OTHCInTeJbHO BbINOJIHeHNA UcTKn.
BbI noJIb3yeTeScb IoJXoJyUIMN YIcTЯUIMN CpeICTBaMn, HO IYTHa He ydaJIaIOTc.
IcnoJIb3yIe cKepe6ok c 6pntBHeHHbIM Je3BnEM, cm. pa3dJI "YICTKA".
Temhble nmaHa
IcnoJIb3yIte cKepe6ok c 6pntBHeHHbIM Je3BnEm, cm. pa3dJe "YICTKA".
Tyskblte yuactkn Ha Bapouhnoi noBepxhoCTn.
Cnebl, octablenhhe aIINOMHHeBOI IN MeHOn NocyDo, a TaKKe MNHepaJIbHbIe OTIOXKeHnI, PTHa, OCTabLeHHbIe BOOn I NIISeI, MOryt 6bITb ydaIeHbI c NOMOJIbU YNCTraJcero Kpema. PnirOpaHne paClJIaBHeHHo NNactMaCCbI Ha BapOCHo NOBepxHOCTN.
Bapouhna noeepxHocmb uIu HekomopbIe u3 ee 3OH HaapeBa HaapeBaIomcra
HenpaBnIbHo yctaHOBneHbI 3akopauHbAIOUcne nepembyKn Ha KJIeMMHO KOJIOKe. PpOBepbTe, YTO COeINHeHry BblONHeHbI npaBnIbHO.
PanaJIb ynpaIeJHua 3a6nokupoeHa
Pa36nokpyteBapouhyIO nobepxhoctb
InumelbHocmb uKJa 8KnJIOueHua/8bIKJIOueHua 30H HaapeBa
Динтелбовсьцлпа Вклочен�/Выклоченя 30н harpeBa 3aBUCNT OTИСПЛБ3уEMOурВнHaPReBa
·Hn3kyn ypoBehb HarpBa: MaNoe Bpemr Znkna BKJIOUcEHn/ByIKNIOUcEHn
- BbCOKn ypoBHeH HArpeBa: 6oNbIooe BpeMzIKNa BKJIIOUHeHr/BlKJIIOUHeHn
Ha duclnlee muzaem uhdukamop ocmmouhozo hapeba "H"
CnIshKOM BbICOKa TeMnepaTpa 6noka 3NeKtpoHnKu. TexHKn DOnJKeH nPoBepNTb, YTO HAcTpOuKn BblIOJIHeHbI B COOTBeTCTBUN C peKOMeHdaQunMn.
7. OXPAHA OKPYKAKIOUEN CPEIbI

-Дя toro, yto6bI He 3aqr3H8b OkpykaOu7y cpey, nocne yctahOBkn PnNTbI npabNlbHo yTnIn3npyTe ynaKOBouhble MaTePnAbl.
-Пелед Tem КАнзбавиься OT OТравошero CBОИ срOK
3л ektpo npin6opa, capжыte C Hero Kaбeь ппаня ДЯТУТOrO, YTOБИ
3л ektpo npin6opн Heья 6blINO 6bONJIse ИСпОЛьЗВОВТь.
-Данньй элкгпорпбор помаркиюван B COOTBECTBUN C Tpe6obAHnIMN, ИЗЛожЕНьIMN BДиректNBe 2002/96/EC OTHOCINTELbHO yTtINI3aцIN элкгпчecKOrO n элкгронHOrO oБорудованя (WEEE).
-Праиьно ВыллпяуТиЛиЗациДаHHOrO n3ДeелЯ,ВыI
NOMOXTe PpeДOTВрATNTb 3aRpy3HHeHne OkpyXaIOSeI CpeDbI
HaHeCEHnE BPeDA 3ДОРБУTOJIQUDeI.
-3TOT CmB0J yka3bIbaeT Ha To, YTO daHHOe N3dJIne He DoJXHO Bbl6paCbIbATcR, KAK O6bUHb 6blTOBoM MyCop. BMeCTO 3TORo OHO DOnJXHO 6blb OTnpaBNeHO Ha NyKKT c6Opa OTClyKuBWeO CBOi CpOK 3NeKtpnueCKOrO n 3NeKtPOnHOrO 6OpyIDOBaHnI DnBa BblONJIHeHnEero NocJeDyUoSeYtINlN3aCnN I NOBtOPHOrO INCNoIb3OBaHnMaTepeNaIOB.
-Утллзаця Данноюзделяdoлжнвьлпнгьсь COOTBETCTBnC MeCTHbIMN 3akOHAMN NO OxpaHe OkpykaIoошe Cpebl.
-Пя полученя 6олеи порбнoi Инфорmaци OTHOCHTьно 6оботк, BOCCTaHOBJIeHЯ N NOBTOpHOrO IcNoJIb3OBaHnI MaTePnaJIOB DAHHORO I3dEJIЯ, CBxKITecb C opraHamI MeCTHO BnactN, cnyk6oB BBIBO3a 6blTOBbIX OTXODOB, IJIN TOPROBOIoprAHN3aUnei, B KOTopoR Bbl Prno6peNi daHHOE I3dEJIne.
1. ΓENIKEΣ ΠΛHPOΦΟPIEΣ
1.5. TEXHnueCKn DAHHN
| XAPAKTEPNUCTUKN | СИЛА HA TOKA |
| 50 x 60 пechки 4 Сbveteши КOTЮни и[eilektpruchescn | 6.8 kW |
| 60 x 60 пechки 4 Сbveteши КOTЮни и[eilektpruchescn | 8.4 kW |
TabeIc xapaekmuku (Ha 3aHama cmpaHa Ha nekama)
2. MOHTAX
MONTAXA Tp6Ba Da ce HnnpaBn OT KbaIuФnUpaH O nIe. Ipn3BODnteJr Hma 3aIbJIxKeHne 3a TOBA.AKO nOmoa ot npOn3BODnteJr e 3a OTcpaHraBaHe Ha DeΦeKtn pRn He npaBnJIen MOHTAXTOBa HE E BKNIOUeHO B rapaHcIyTa.
2.3. PA3MEPN HA YPEDA
| 50 x 60 | 60 x 60 | |
| Височина(mm) | 863 | 863 |
| ШирINA (mm) | 510 | 600 |
| Дълбочина(mm) | 600 | 600 |
2.4.ObuXAPAKTEPNUCTIKA HA YPEDA
Toba ynbTbaHe 3a pa6oTa e HanpaBeHo KaTOpbKOBoIDCTBO 3a HЯКоЛko MoJena. HяКоI OT xapaKTePncTnKe TcNoMeHaTи B yNbTbaHTo MOKe n Da He ce OTHacrT 3a BaUInr TypeD
60x60EJEKTPNUECKANEUKA
1-ⅡnoT
2-KoHTponHa Ta6ena
3- Yekmeidenke
4-BpataHaΦyphata(npedhaBpata)
5-CBeTeU KOTJIOH 1200W
6-ДбоинCBeTeuKOTJOH 1700W
7-CbeteuKOTJIOH 2300W
8- npdeynpeinteHIN JAMnHKn
9-KoHTpOJIHn 6bToHn 3a KOTJIOHNTe
10-ByToH 3a cyphHaTa
11- BytoH 3a TepMoCTat
12- EJIeKToPOnH npOrpMaTOp
13-ПОДВИЖНКрауЕТа
14-KpaetaHa BnHT
50x60LNIOPET
1-ПлOT ha neukkata
2-KoHT poJH oTa6 nO
3- Yekmendze
4- Bpata Ha phpyhata (npedha Bpata)
5-CBeTeU KOJIOn 1800W
6-CBeTeU KOJIOn 1200W
7-ламма 3a синданзранe
8- Byton 3a TaMepa
9-KoHTpOJIHH 6yToHn 3a KOTNoHInTe
10- Byt OH 3 a
11-Бнтуэтнэза ВerteilntaTOp
2.5. ПECHК BE3 ELEKTPNUECKN KABEJI
Tn Ha Cbþr3BaHe Ha Ka6eJa
1- eɪnhoΦa3Ho Cbþp3BaHe
2-Tpna3Ho Cbvp3BaHe
BhimaHne: Po-cna6a ck06a moKe Ja npeDn3Bvka onaCHOCT OTOKap nopadi nperepaBaHe Ha Ka6ena
| Еднофазен 220-240 V~ | Трифazен 380-415V3N~ | |
| Предаител | 25 A | 3 x 16 A |
| Кабел - наразецno | 3 G 2.5 mm² | 5 G 1.5 mm² |
| Кабел - Тип | H05VV-F ou H05RR-F | H05VV-F ou H05RR-F |
| 3 | N | 4 |
| 2 | 5 | 1/- PE |
| 1 | L | 1/- PE |
| L1:Фаза Бхов 1-2и Бхов 2-3 N:Нуla Бхов4-5 T-3a3eЯВанe | 1-Фаза 2-Фаза 3-Фаза 5-Нуla Бхов 4-5 T-3a3eяВанe | |
2.6.EJEKTPNUECKO Cbbp3BAHE
IeKInTe 3a roTBeHe MoRat Da ce npOn3BexdA T c nnn 6e3 eNeKtpnueckn Ka6en.
Cbbp3BaHeTo Ha Ka6eNa Tp6Ba Da ce HnpaBn OT OToPn3npaH cepBn3.
CneBaiKcIeHNTe HNcTpkyuN:
Cbpb3BaHeTo KbM eJ. Mpekata Tp86Ba Da e B cbIaNacHocT C DeiCTBaUnTe Hape6n n peryNaTIN. PpeJn da CbPKeTe KbM Mpekata npOBepe:
-Дали калцnteta Ha elektpruecka tа NHctanaцяппдпаителite Ha crpa daT a OTROBapr T ha KOHCymaцяТаHa ypeda?
-Даи eнгспогнсалягета e 3a3eMeHa? Baшиг Тдом ТрябВа
Да Има павилно 3a3eMЯBaHe. ри Лпca Ha TakoBa
Консултірази Te ce CTEXHкИ OТСТраHete npo6JIema.
JaIN KOHTaTcNeIMoHTaKaHa NeuKaTa eJeCHOIOCTbneH?
-3a da cBbpxe Te ypea KbM en. MpekaT a n3noJ3BaIte Ka6eJn 1eencen.
-He npenopbUbame n3noJI3BaHeto Ha pa3KnOHTeIN. 3JeHoKbIITb Ka6e Hte Tp8Ba Da 6bJe 6nOKnpaH B uenceJa. KaFBA N Ka6e e 0a3a ( KoJnPacn C "L" Ha neyKaTa)u BnHaTn Tp8Ba Da 6bJe CbP3aH c 0a3aTa Ha uenceLa.
-Ka6ena Tpr6Ba Da 6bJe nocTabeH Taka, Ye da He ce n3nara Ha Tempepatya HAd 50^
-Korato en. Ka6ena Tpr6Ba da ce CMeHn, Tpr6Ba da ce N3PON3Ba cboDbTeH Ka6eJ CbIJaCHO CINaTa Ha TOka.
3eeneHO-ksbTna Ka6en Tpe6a Da 6nE NO-dbIbI npu6n3ntHo 2cmOTxuata3aΦa3aHyna.
-Пюверете награвателто кato BKнючтей руда за 3а минуtn.
-ПОНЗВОДТЕЯ He HOCI OTROBOPHOCT 3a NOBpeDI Bb3HINKHaJI N BCJECDBVE Ha HecpA3BaHe Ha 6e3OpaChN МерКи ИНСТPyKcIInTe.
- Поньдпелу He NOema OTROBOPHOCT 3a NOBpeNi B cIeIcTBnE Ha Hecna3BaHe Ha INHCTpyKcUnTe 3a 6e3onachOCT.
Ako daen ypeDHee o6OpyDbAHCbC
3axpaHbAaKa6eIiueIeIcIeJIINcIpyrncpeIcTBa3aI3KIIIOVAheOT 3axpaHbAaTa eIeKtpnuecka Mpeka, BbB BCNUKn IIOUcN, KOINTO OCNtpyraBbAT nbJHOTOn3KIIIOVAbe OT CBpBXHaNPexEHe KaTeOpnI III, INCTpykTOpNTeNoC0uBAt, ye CpeIcTbATA3aI3KJIIOUvBaHeTpraBa Da 6bDaT BKlIOUeH N BbB fNKcnpaHOToOKa6eJIyBaHeB
CbOTBeTCTBnEcnPpaBnlaTa3aOKa6eJyBaHe.
3.1.ОПИСАНЕ HA 3OHATA 3A ГOTBEHE
CeemJUHHa 3OHa
MetaHnHa HaraBateIeNoctabeHno zIaNaT a NobbpxocT. EfeK TINbHa e 3a 3 cek yHdn n e noIgrotBeHa n 3a dJbnro rotBeHe.
CTbKIO-KepaHnna PLO TbnarOdapeHne Ha no-tolmaT aOBbpxHOCT n reHepnpaHa TOJIIna yckopraBa rTOBeHeTo. IpomnA B Dn3 aHn HnE BoOn dNo H amJaB aHn A T ePMOn3DpbXKnB OCT Ta H NoNdo6PBA KONT pona.
C "Sprinter" ypeja hamajra Ba BpeMeTo 3a rotBeHe c 15% B 3aBnCnMoCT OT MeToJa Ha rotBeHe nIIN I3NoJI3BaHIne CbDoBE.
3oHa Ha cEBmIuHa
ToBa e KOM6HaCaIg OTe XaIoreHn (1/3) n lamna (2/3). Tempepatypata Ce noBuaMHO 6b3o. YdoHa e 3a nbpxeHe Ha MeCO, 6bp30 roTBeHe, KbTeTo e HuxHo Bucoka Tempepatypata 3a KpaTKO BpeMe.
3oHa Ha monnluHa
Ipeplara do6pa dnoy3na Ha tonnHa KOrato e HxKHO 13KJIIOUHTeJHa npeun3HocT.
3.2. COBETN 3A FOTBEHBE HA IJOTHATA
EpeKTnBHOCTTa Ha rotBeHTo 3aBnCn OT BnDa n KOJIuYeCTBOTo XpaHa KOrTo npn RotBtTe.
3a no-Do6bp pe3yntat n3no13BaIte npDxOJaUcBDOBe u npu6Opn.
TolmaTNOBbpxHOCT Ha NIOTa CbI0 NOO6pBa eEeKTHBHOCTTa HA rotBeHeTO.
N3noJ3eaUme cbooee c 20JMy duamembpoumo 3aema
LJnata NOBbpxHOCT roJIeMmHaTa Ha cJa He TpI6Ba da 6bJe IOMaIka OT rOpeuata 30Ha. EHeprnaT a ce e n3PON3Ba MAKcIMaHNO eFKeTINBHO aKO cbda e MaNko no shipok.
3.3.N3BOP HACbIOBE
CneBbauata HnΦopMaζη Μe Bn NOMorHe da n36peTe NOxOaIcBDOBe.
Cmomaha
Ochoobata OCTOMaHa KOMbHnpa NO3nte O TcOMaHa n CaHbNCTeHN, pni KoEToTO3n CbD Ce XapaKTEpH3npa C, (BbHsEHN BnID, N3DbPjXJINBOCT N bJnroTpaHOCCT) IpeDmCTBO IpeI aJyMnHeBNTe CbDOBe (3aqrBaHe, No-Do6pa DnCTpn6yUma Ha TOJIHHaTa.
AnymuHuym
Texkute cboBe ca 3a npednoHTAHn nopadn do6pata TOnIIOponBODMoCT AnymHneBITE cboBE Morat da Odpackat KepamuHnna Pnot. Tp6Ba Da ce nouchtn nToA cJeD BCRAKO NOJ3BaHe Ha TaKbBTINCboDE
MeDhuochoBu Hacbdoseme
Ipenopbvat ce Tekkn. DoobponpeidctabrHe, Ho Moke daoctabaTcneBbB Nd HndpackotnH. Moke da CeOTcpanHrpapanBHNTEAKOBedHarace NouchtmOeNa.KakTo n da e, He octabTepa3Hc bDoBeHa IJota, KOtO Morat da octabTcnei, KOnTOHe MORa T da ce NouchTt BeHara.
Ybepeme ce, yeochoeama hacbdosemee cyxa
Korato 3apekdaTeCbDoBe CteuHoc nnnn3non3BaTeCbDoBe, Koutoca 6nInBxnaDnHnk,yBepete ce,yeBO OCHOBaT hacbdaecyxa.Toba uenomorhe dahe ce octabrtcneOnOTTX.
BuHau u3non3eaume kauecmeeHu cboe cudeaJHo aJadku u mbHKU OCHOBU.
I3noJI3BaHeTo Ha TaKbTIN CbIOBe IpeIoTbPaTЯBa NOneBaNHeTo Ha XpaHa. TbHKInTe OCHOBn Ha CbIOBeTe N03BOJRAb TObpa TOJIONPBoDmOCT.
IopueJaan
Iobpi pe3yntatn caMo aKO OCHOBaTe e TbHka n IpaKa.
CmkbKno-kepaMuka
He ce npenopbUva. MoKe da HapaHn IIOta.
Cbomemcmauucbdoeu3a2ombehe
BnHaHn n3noJ3BaIte CbIOBe C NOUTH eNHaKBN pa3Mepu C KOITNOHa. N3noJ3BaHTo H aNo-MaIKN CbIOBe Ha No-ROJMA mOBbpxHOCT HRAMa da yCKOpn rOToBeHTo, HAnpoTINB Ue NCyUn XpaHATA u Ze n3xa6n Nobeue eHeprna. Zn3noJ3BaIte CbIOBe c KanaK. Cocobe n 3axap Morat Da noJeHNAT NO DbHOTo Ha CbIOBeTe. IIO BpeMe Ha rotBeHe He octaBaIte CbIOBeTe 6e Na3Op.
I3non3BaIte cbdoBe cnopeD cneHnTe Kpntepn I:
Tp6Ba da ca TeKKn.
Tp6Ba n3qJIo da NOKPnBAt KOTNoHa,MOKe Da ca NO-ROIeMn HO He n PO-MaKn. OChOBaTa Ha cbDa Tp6Ba Da e rJaKa.
TpaIuHnHaJIeH MeToI N MeToI 3a roTbeHe C ToIbI Bb3duX; TerIIO (Gr)
TINXPAHA TpaDnuznoHaJIeH MeToD Ha rOTBeHe
| Терло (Gr) | ТПЛ XРАHA | Травлишален Метем на говende | Метем на ratвени с一步一步 на Торл в бдун | Вре'mе на говende (Mину'tи) | БЕLEЖКИ | |
| TOPTN И DECEPTN TopTa с яиca Малka topta TopTa TopTa сирени Питаяблka Шрдел TopTa с мармалад Малka topta Бисквітetedа TopTa | Позида над разфобete | Tempepa тура (℃) | Позида над разфобete | Tempepa тура (℃) | ||
| 2 | 180 | 2 (1 n 3) | 160 | 45 - 60 | ||
| 1 | 180 | 2 (1 n 3) | 160 | 20 - 35 | ||
| 2 | 180 | 2 (1 n 3) | 160 | 20 - 30 | ||
| 1 | 175 | 2 | 150 | 60 - 80 | ||
| 1 | 180 | 2 (1 n 3) | 160 | 40 - 60 | ||
| 2 | 175 | 2 (1 n 3) | 150 | 60 - 80 | ||
| 2 | 180 | 2 (1 n 3) | 160 | 45 - 60 | ||
| 2 | 180 | 2 (1 n 3) | 160 | 15 - 25 | ||
| 2 | 180 | 2 (1 n 3) | 160 | 10 - 20 | ||
| 2 | 100 | 2 (1 n 3) | 100 | 90 - 120 | ||
| XЛЯБ И ПИZA Бял xляб Ръжен xляб Сандыч Пица | 1 | 200 | 2 | 175 | 45 - 60 | |
| 1 | 200 | 2 | 175 | 30 - 45 | ||
| 2 | 200 | 2 (1 n 3) | 175 | 20 - 35 | ||
| 1 | 220 | 2 (1 n 3) | 200 | 20 - 35 | ||
| ПACTA Мakapони Със зеленчuk Малки тесенни Лазаня | 2 | 200 | 2 (1 n 3) | 175 | 40 - 50 | |
| 2 | 200 | 2 (1 n 3) | 175 | 45 - 60 | ||
| 2 | 200 | 2 (1 n 3) | 175 | 35 - 45 | ||
| 2 | 200 | 2 | 175 | 45 - 60 | ||
| MECO Пech的效果 Пech的效果 Пech的效果 Пech的效果 Пech的效果 Пech的效果 Пech的效果 Пech的效果 Пech的效果 Пech的效果 Пech的效果 Пech的效果 Пech的效果 Пech的效果 Пech的效果 Пech的效果 Пech的效果 Пech的效果 Пech的效果 Пech的效果 Пech的效果 Пech的效果 Пech的效果 Пech的效果 Пech的效果 Пech效果 Пech效果 Пech效果 Пech效果 Пech效果 Пech效果 Пech效果 Пech效果 Пech效果 Пech效果 Пech效果 Пech效果 Пech效果 Пech效果 Пech效果 Пech效果 Пech效果 Пech效果 Пech效果 Пech效果 Пech效果 Пech效果 Пech效果 Пech效果 Пech效果 Пech的效果 Пech效果 Пech效果 Пech效果 Пech效果 Пech效果 Пech效果 Пech效果 Пech效果 Пech效果 Пech效果 Пech效果 Пech效果 Пech效果 Пech效果 Пech效果 Пech效果 Пech效果 Пech效果 Пech效果 Пech效果 Пech效果 Пech效果 Пech效果 Пech结果 Пech效果 Пech效果 Пech效果 Пech效果 Пech效果 Пech效果 Пech效果 Пech效果 Пech效果 Пech效果 Пech效果 Пech效果 Пech效果 Пech效果 Пech效果 Пech效果 Пech效果 Пech效果 Пech效果 Пech效果 Пech效果 Пech效果 Пech效果 Пech效果 Пech结果 Пech结果 Пech效果 Пech效果 Пech效果 Пech效果 Пech效果 Пech效果 Пech效果 Пech效果 Пech效果 Пech效果 Пech效果 Пech效果 Пech效果 Пech效果 Пech效果 Пech效果 Пech效果 Пech效果 Пech效果 Пech效果 Пech效果 Пech效果 Пech效果 Пech结果 Пech果果 Пech果果 Пech果果 Пech果果 Пech果果 Пech果果 Пech果果 Пech果果 Пech果果 Пech果果 Пech果果 Пech果果 Пech果果 Пech果果 Пech果果 Пech果果 Пech果果 Пech果果 Пech果果 Пech果果 Пech果成果 Пech果果 Пech果果 Пech果果 Пech果果 Пech果果 Пech果果 Пech果果 Пech果果 Пech果果 Пech果果 Пech果果 Пech果果 Пech果果 Пech果果 Пech果果 Пech果果 Пech果果 Пech果果 Пech果果 Пech果后果 Пech果果 Пech果果 Пech果果 Пech果果 Пech果果 Пech果果 Пech果果 Пech果果 Пech果果 Пech果果 Пech果果 Пech果果 Пech果果 Пech果果 Пech果果 Пech果果 Пech果果 Пech果果 Пech果果 Пech果 果 Пech果果 Пech果果 Пech果果 Пech果果 Пech果果 Пech果果 Пech果果 Пech果果 Пech果果 Пech果果 Пech果果 Пech果果 Пech果果 Пech果果 Пech果果 Пech果果 Пech果果 Пech果果 Пech果果 Пech果结果 Пech果果 Пech果果 Пech果果 Пech果果 Пech果果 Пech果果 Пech果果 Пech果果 Пech果果 Пech果果 Пech果果 Пech果果 Пech果果 Пech果果 Пech果果 Пech果果 Пech果果 Пech果果 Пech果果 Пech结果果 Пech果果 Пech果果 Пech果果 Пech果果 Пech果果 Пech果果 Пech果果 Пech果果 Пech果果 Пech果果 Пech果果 Пech果果 Пech果果 Пech果果 Пech果果 Пech果果 Пech果果 Пech果果 Пech果果 Пech结果 Пech果果 Пech果果 Пech果果 Пech果果 Пech果果 Пech果果 Пech果果 Пech果果 Пech果果 Пech果果 Пech果果 Пech果果 Пech果果 Пech果果 Пech果果 Пech果果 Пech果果 Пech果果 Пech果果 | 2 | 175 | 50 - 70 | |||
| 2 | 175 | 100 - 130 | ||||
| 2 | 175 | 90 - 120 | ||||
| 2 | 200 | 50 - 70 | ||||
| 2 | 175 | 110 - 130 | ||||
| 2 | 175 | 60 - 80 | ||||
| 2 | 175 | 210 - 240 | ||||
| 2 | 175 | 120 - 150 | ||||
| 2 | 175 | 150 - 200 | ||||
| 2 | 175 | 60 - 80 | ||||
| 2 | 200 | 40 - 60 | ||||
| 2 | 200 | 30 - 40 | ||||
3A6ENEUKA:
1) BbB BpemTo 3a rotBeHe He e BKJIoueHo 3aqrpaBaHeto.3aqrpaBaHeto Ha φypHaT a OKoI O kOIO 10 MmN. ce npenopbUba oc6eHo 3a Topn, nla n XJ6.
2)Показва позицята на tabитЕ кORAТО ROTВITE NOВЕЧЕ рсг endHOBpeMeHHO.
3) BcnuKn Oepaun Ha roTbeHe Tp8Ba da ce npabT cbc 3aTbpeHa ypHa.
| ТIN П ХАHA | КОЛИЧECTBO | ГOTBEHE HA CKAPA | ВРЕМЕ HA ГOTBEHE (МИнун) | |||
| ПAPЧETA | TEГЛО | ПОЗИЦЯ HA RAФTOBE | STEMПЕРATYPA (°C) | ГорHA чАСТ | ДOLHA чАСТ | |
| Говекда пьржOLA | 4 | 800 | 4 | Мakсимальна | 10 | 8 |
| Котлети на скара | 4 | 600 | 4 | Мakсимальна | 12 | 8 |
| Колбасi | 8 | 500 | 4 | Мakсимальна | 10 | 6 |
| Пишики части | 6 | 800 | 3 | Мakсимальна | 30 | 20 |
| Смесena скара | 4 | 700 | 4 | Мakсимальна | 12 | 10 |
| Млесни.DeсятNi | 4 | 400 | 4 | Мakсимальна | 13 | 10 |
| Парчета домат | 8 | 500 | 4 | Мakсимальна | 12 | -- |
| Рибно сипe | 4 | 400 | 4 | Мakсимальна | 8 | 6 |
| Миди | 6 | --- | 4 | Мakсимальна | 12 | -- |
| Тостови | 4 | --- | 4 | Мakсимальна | 8 | -- |
| Прapчета xяб | 4 | - | 4 | Мakсимальна | 2-3 | 1 |
5. NOUHCTBAHE IN IODIaPbXKA
PpeiBcRAKO nouchTbaHe nnoDpBxka:
-ИЗклоче тахсанвальkaбен.
-Ako neukatae ropeuca u3yakaiTe dokaTo ce oxlaani
- Hikora He n3non3BaIe npa nIi cnpe C Bucoko HaIrahe 3a
ЧИСТЕну урEDA.
- Hnkora He n3non3BaIte a6pa3nBHN cpeICTBA, XuCa nnOCTpn IpeMTe 3a YnCTeHe Ha CTbKlOTO Ha BpaTaTa.
-EmaiiipaHaTnOBpXHOCTuCTeC TOnla Boa n canyHnn CbscBODBeTHO CpeDcTBo 3a unc TeHe.He n3PON3BaIte a6pa3NB KOnTO MoKe Da HApacka NobpXHOCTTa N Bua. BaxHo e da YnCTNTe cyphata CneD BCaKO pON3BaHe
-ИЗползваite прахи Гба 3а поочстванe
-CTbKJIeHaTnOBbpxHOCt Ha BpaTaTa TpI6Ba Da ce NoUInCTn camo KOrato e XnaDHa.
BpeDnte npEi3BkAHH OT HeCnA3BaHe Ha npaBnJaTa He Ce BKJIIOUeHn B rapaHcNata.
-He n3noI3BaIte abpa3nBn, MeTaN H YeTKN, OCTpN IpeDMeTN, rpy6n MaTePnaJI NJIN XUMKajN IN PpeNaPaTNI KOnTO MoKe TpaHNObPeDN KaTaJIa3Atopa.
KenateJIHo e da n3noJI3BaTe nbI6oka Taba 3a rotBeHe Ha Ma3HO MecO I NOCTaBete CbD IOd ckapaTa 3a cb6npaHe Ha Ma3HHaTA.
-Почиствано и подрьжкata He Тразбва дa ce octabrt Ha deza be3 Na6nIoJeHne.
- He n3noI3BaIte napoUncTaUka 3a noUncTbaHe.
Ioucmeane Ha epaama Ha cyphama
3aIIOCTHOYINCTeHeHaBpTaTaHaΦypHata,ceIpeNOpbUba DaCeN3Kapa,KaKTOeNOKa3aHOHaCHIMKaTAt.
OTbopete Bpata Na3zJIO, 3aBbptete DBeTe Kpaeta Ha 180°. 3Tbopete YactnHO Bpata Na 30°.Дрьнгte Bpata C BHIMATEJIHO NOBdIraHe OT Ta3N N03nZma 3a BpbuaHe Ha Bpata, CbIHTe CTbIKn IO O6paTHnpeJ.PpeJIN BCaKO nOuHCTBaHe Ha IILOTA, Tpr6Ba IpeDbapITeJIHO Da e OXlaJeHa.
I3nol3BaIte camo npenapatn (KpeMoBe n CtpbraJkn) CneuaJIHO cb3daJeHn 3a CTbKJIeHn I KepaMmHn IOBbpxHOCTN KOINTo HE MoRAT da Tn NOBpeJaT.
I368raBte I3JIa XpHa Ha IIPOTa 6b3O Da 3aROPn Ipr KoETo YIcTeHTo CTaba NO-TPyDNo. INePOpbYBaMe Da OTcpaHInTE BCNUKIMATEPHN OT IIPOTA KOnTO MORa Da ce pa3TONaT KaTO INaCTMaCa, 3axap N 3axapHN I3DeJIN
IODAPbJKA
-Изuinete HЯколко кankи OT npenapata 3a NOUcTbaHe Ha nIToTa.
-ИЗтьржete BCички 3aCbхналпет ha C Meka Kbpna.
-ИЗбьшete NOВьрхHOCTa ДOKATO CE NOUCHТВa C MeKa KuxHeHcKa KbPna.
Ako ce oue ca ocmahaJIy npOpmu nemHa
-ИЗСИПЕТООSUHЯКОЛКOKANKOTnpenapata3aNouchTbaHeHa nIPOTA.
-ИЗтбржete CBС CTРБгДКа,ΚАТЯ ДБрЖNTe NOД bгЛ 30 cПлOTa, DOKATO NOUHCTNTE NETHATA.
-ИЗбьршete c KBpna Илп КухнECHka xaptnя ДOKATO NOYICTBaTe.
-ПОВТОРЕТеakoeHужноTHOBO
HЯКОЛКОСьВETA
No-yeCTOTO NOUcTBaHe He N03BOJyBa Da ce HaIpaCka NIOTa NOBbpxHOCTa Tp6Ba Da e YnCTa IpeDi NOBTOPHOTO IN3NOJ3BaHe. 3a Da OTCpaHHTe NeTHa IN3CuInTe HAKOJIKO KAnKn OcET NIN JIMMOHOB COK.
CneT TOBA n36bpeTe C xapTnI N cpeCTBO 3a NOUcTBAHe. KOHTPOJHInTe 6yTOHN MOrAT Da CE n3Kapat np INoUcTBAHe.
He cnaaume meuocm Ha ozolheme Mecma
Icled moea nocmaeeme 6ymohume no mecmama u M.
3a da npedeotbpaTte HaDpackBaHe Ha IIOta, pnpnpemecTbaHe Ha cBIOBe C TnAko DbHO XeNaTeHNO e npedBapNTenHO da rN NOBdInrHete a He Da rN BnauHt.
He n3noJ3BaIe TbBpIe HAMokpeHaTb6a.
He n3noJ3BaIte Hox KInet Hma da noBpei nOBbpxHocTa, Bce dokaTo IbPknTe npd bIbn 30^
Hnkora He octabaIte KInIeTa Ha DMaCTO IOCTbNHO Ha Deca Hnkora He n3PON3BaIte a6pa3NBnNIN KInuza 3a NOUcTBAHe.
Memlana noBbpxHocm
3a 6e3oNaCHO NOuNCTBaHe Ha MeTaIHaT a NOBbpxHOcT I3NoJI3BaIte CaIyH I NcPnAKeHTe, CNeI TOBa IOnCyUWeTe Cbc CyXa KbPna.
3a cMaHa Ha eBmpeuHama JAmna
-ИЗклочete 3axpanBaциKa6eJи OTBnHTeTe JAmnata.Подмehete CиdeHTnUHa TepmoyctOnYnBa JAmna.
- Hikora He n3non3BaIte npa 3a nouchTbaHe.
BHIMAHHE:3a da n36eHHeTe Bb3MOxKeH TOKOB ynap -n3KJIIOUeTe yCTPOIcTBOTOppeDn Da CMeHrTe IAmnata.
5.1. NOUÇICTBAHE HA ΦΥPHATA
CneuaHn cAmOnOuHcTBaUe Ce nAHeN C MmKporpaHyHa oBnoKa ca Ha pa3NoJoxKeHne npn HkON MoJeN.
-Ппекално Пьрсан Ma3HOTи MoKe Да 3aNYuAT NOpTe n
camOnOuNCTBaHETo Да He e epeKtNBHO. ToBa camOnOuNCTBaHe
nMa Bb3MOxHOCTa Да ce NOdHOBn CJIeD BCЯKO n3NoJ3BaHe, C
BkJIIOUHaHe Na pRa3Ha Фурha 3a MaKcIMyM 10-20 MInHyTn.
-Ako cTeHnTE Ha cypHaTa ca NtBTHO NOKPHTN C Ma3HNHa KaTaN3aTopa He e epeKTHBeH,OTCTpaHeTe rC MeKa KbpNa IINrB6a HanoEHa C B0da. BcUckn KaTaN3aTopu Ha nazapa IMat JxBOT ot OKoNo 300 yaca.CJeDobateJHo Tpr6Ba da ce npDMeHrT cIeD 300 yaca.
6. CEPBUN3EH UENTbP & PNOBJIEMN
-Ako neukata He pa6otn npedn da n3BnuKate cepBn3 PnpopbYBaMe:
PpOBepeTe daJIneNeKaTa e npabUNHO BKNIOeHa B KOHTaKTa
Фурнама He 3a2p8a
The manufacturer will not be responsible for any inaccuracy resulting from printing or transcript errors contained in this brochure. We reserve the right to carry out modifications to products as required, including the interests of consumption, without prejudice to the characteristics relating to safety or function.