TECHNICORDER ISIO SC - TECHNICORDER ISIO STC - Satellite receiver TECHNISAT - Free user manual and instructions
Find the device manual for free TECHNICORDER ISIO SC - TECHNICORDER ISIO STC TECHNISAT in PDF.

| Product type | UHD digital satellite receiver with Internet access |
| Brand | TechniSat |
| Model | DIGIT ISIO STC / DIGIT ISIO STC+ (TECHNICORDER ISIO SC / STC) |
| Reception | DVB-S/S2 (satellite), DVB-C (cable), DVB-T (terrestrial) |
| Resolution | Ultra HD (4K) via HDMI |
| Connectivity | HDMI, USB 2.0, SD/MMC card reader, RJ45 Ethernet, built-in Wi-Fi, Bluetooth (optional dongle) |
| Main functions | DVR recording, Timeshift, multimedia (photo, music, video), EPG, HbbTV, teletext, parental control, simplified ISI mode, ISIPRO channel list |
| Antenna inputs | 2 x LNB (satellite), 1 x RF IN (cable/terrestrial) |
| Audio outputs | HDMI, digital optical and coaxial, analog stereo (RCA) |
| Power supply | Mains adapter 230 V / 50-60 Hz |
| Power consumption | Not specified (estimated ~15 W operation, <1 W standby) |
| Dimensions (W x D x H) | Approximately 30 x 20 x 5 cm (estimate) |
| Weight | Approximately 1 kg (estimate) |
| Maintenance and cleaning | Clean with a soft, dry cloth. Do not use abrasive products or solvents. |
| Safety | Do not open the casing (risk of electric shock). Do not expose to humidity or heat sources. Disconnect during thunderstorms. |
| Spare parts and repairability | Contact TechniSat technical service or an authorized dealer. The manufacturer's warranty is 2 years (3 years if registered with marketing consent). |
| General information | Manufactured by TechniSat Digital GmbH, Germany. Compliant with CE standards. Delivered with remote control, mains adapter, batteries, quick start guide, and for the STC+ an HD+ card. |
Frequently Asked Questions - TECHNICORDER ISIO SC - TECHNICORDER ISIO STC TECHNISAT
User questions about TECHNICORDER ISIO SC - TECHNICORDER ISIO STC TECHNISAT
0 question about this device. Answer the ones you know or ask your own.
Ask a new question about this device
Download the instructions for your Satellite receiver in PDF format for free! Find your manual TECHNICORDER ISIO SC - TECHNICORDER ISIO STC - TECHNISAT and take your electronic device back in hand. On this page are published all the documents necessary for the use of your device. TECHNICORDER ISIO SC - TECHNICORDER ISIO STC by TECHNISAT.
USER MANUAL TECHNICORDER ISIO SC - TECHNICORDER ISIO STC TECHNISAT
Digital Multituner-UHD Receiver with Internet access

Dear Customer,
Congratulations for choosing the DIGIT ISIO STC / DIGIT ISIO STC+ digital receiver.
The operating manual supplied is intended to help you to utilise the comprehensive functions of your new digital receiver to the fullest extent. We have kept the operating instructions as brief as possible and have used terminology that everybody can understand.
The range of functions of your receiver is constantly being expanded by means of software updates. This means that additional steps in the operation may be added that are not yet described in this operating manual, or the operation of existing functions may be changed. For this reason, you should occasionally visit the TechniSat homepage, to download the latest version of the operating manual.
We hope you enjoy your TechniSat DIGIT ISIO STC / DIGIT ISIO STC+ !
Your
TechniSat Team
TechniSat hereby declares that the DIGIT ISIO STC / DIGIT ISIO STC+ is compliant with the basic requirements and other relevant provisions of the 1999 / 5 / EC directive. The declaration of conformity can be found at the following address:
http://www.technisat.com/de_DE/konformitaetserklaerung/?productID=10861
The device also bears the CE mark.

This device is intended for use in all countries of the European Union and in Switzerland, Norway, Liechtenstein and Iceland. Operation within the frequency range 5150 MHz - 5350 MHz is only permitted in enclosed spaces.

HDMI, the HDMI logo and High Definition Multimedia Interface are brands or registered trademarks of HDMI Licensing LLC.
This product contains copyrighted technologies, which are protected by U.S. patents and other rights for the protection of the intellectual property of the Rovi Corporation. Reverse engineering and disassembly are prohibited.
This item incorporates copy protection technology that is protected by U.S. patents and other intellectual property rights of Rovi Corporation. Reverse engineering and disassembly are prohibited.
Manufactured under licence from Dolby Laboratories. Dolby and the double-D symbol are trademarks of Dolby Laboratories.
1 Illustrations
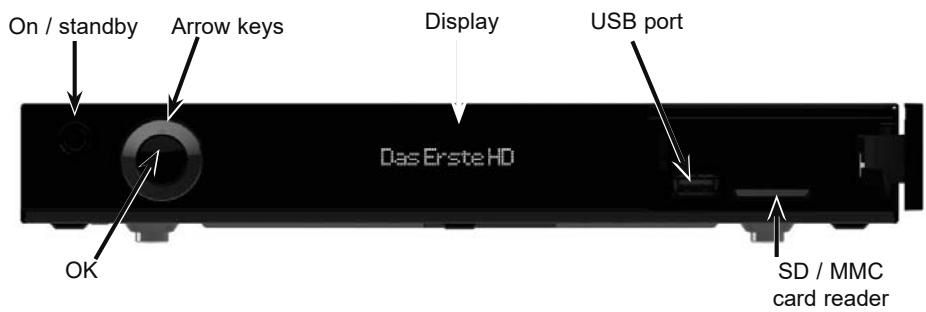
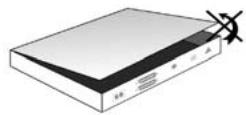
Front of TV
Inserting the CONAX / NAGRAVISION (HD+) smartcard:
Insert the CONAX / NAGRAVISION (HD+) smartcard (gold chip facing down and to the front as you insert it) and push it in as far as it will go.
Inserting the Cl / Cl+ module:
Consult the CI / CI+ module and card manufacturer's instructions.
Insert the desired Smartcard into the corresponding CI module.
Now carefully insert the Cl module into the slot.
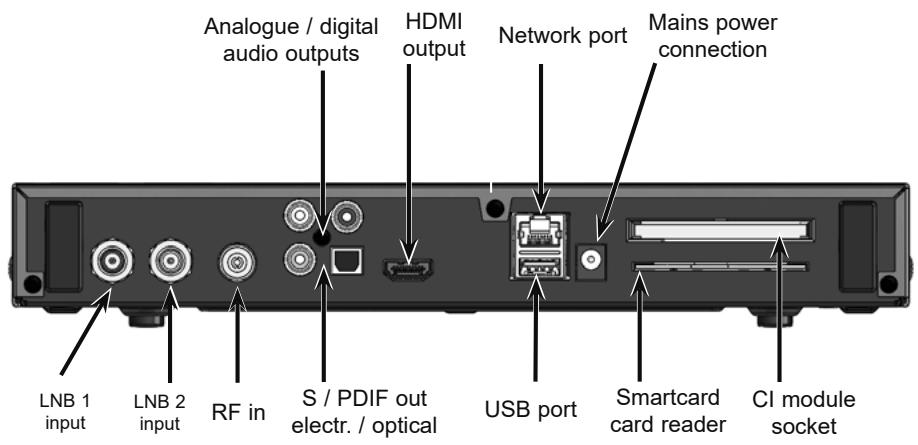
Rear sight
2 Please read this first
Before connecting and using the device, first check that everything has been supplied and familiarise yourself with the safety instructions.
Included within the scope of supply for the DIGIT ISIO STC / DIGIT ISIO STC+:
1 digital receiver, 1 quick start guide, 1 CD-ROM,
1 remote control, 1 power supply, batteries (2x 1.5V microcells)
Also for DIGIT ISIO STC+:
1 HD+smartcard
2.1 Safety advice
For your own protection, you should read the safety precautions carefully before using your new receiver.
The manufacturer accepts no liability for damage caused by inappropriate handling, or by non-compliance with the safety precautions.
Function-related discharge current may occur with electrical equipment. This is acceptable and poses no risk, even if it is experienced as a slight "tingling". To prevent such discharge current, mains operated devices (receivers, TVs etc.) must always be installed or connected with the power switched off, i.e. all devices must be disconnected from the mains.
- Only operate the receiver in a temperate climate.


- To ensure adequate ventilation, place the receiver on a flat, horizontal surface and do not place any objects on top of it. There are ventilation slots here to allow heat to be dissipated from the interior of the unit.
- Do not place any burning objects, such as lit candles, on top of the receiver.

- Do not expose the receiver to water droplets or water spray, and do not place any objects filled with liquid, such as vases, on top of it. If water gets into the unit, immediately disconnect the mains plug and inform the service department.

- Do not operate any sources of heat near the device that may also heat it up.


-
Do not obstruct the ventilation slots.
-
Do not open the device under any circumstances! You risk receiving an electric shock. Any necessary repairs to the receiver should only be carried out by qualified service personnel.
In the following circumstances, you should disconnect the device from the mains power and consult an expert:
the power cable or mains plug is damaged
the device has been exposed to moisture or liquid has got into it
there are significant malfunctions
there is severe external damage
2.2 Periods of non-use
During a storm or lengthy period of non-use (e.g. holiday), the receiver should be disconnected from the mains and the antenna cable removed.
Before you disconnect the receiver from the mains, you should first switch it to standby mode and wait until the time appears in the display or the red LED light is displayed.
2.3 Important notes on operation
Operation of the digital receiver is simplified through the use of so-called "On Screen Displays" (OSD). This also means that the number of keys on the remote control unit is reduced.
All functions are displayed on screen, and can be controlled by means of a few control buttons.
Functions that are logically related are combined into a "MENU". The selected function will be highlighted.
The red, yellow, blue and green "function" keys are indicated by coloured bars at the bottom of the screen. In the various menus, these coloured bars represent different functions, which can be implemented by pressing the appropriately coloured keys (multi-function keys) on the remote control. The "function keys" are only active when a brief description is displayed in the appropriate field.
The button identifications and terms that appear in the OSD menu are shown in bold type in this operating manual.
Help: where available, press the blue function key in the menus to display the help text; press again to close the help window.
2.4 Important information on data security
Before handing your receiver over to your supplier for maintenance purposes, we recommend that you remove all storage media or data carriers.
The recovery of data is not part of the maintenance and repair work. TechniSat assumes no warranty for the loss or damage of data during the repair.
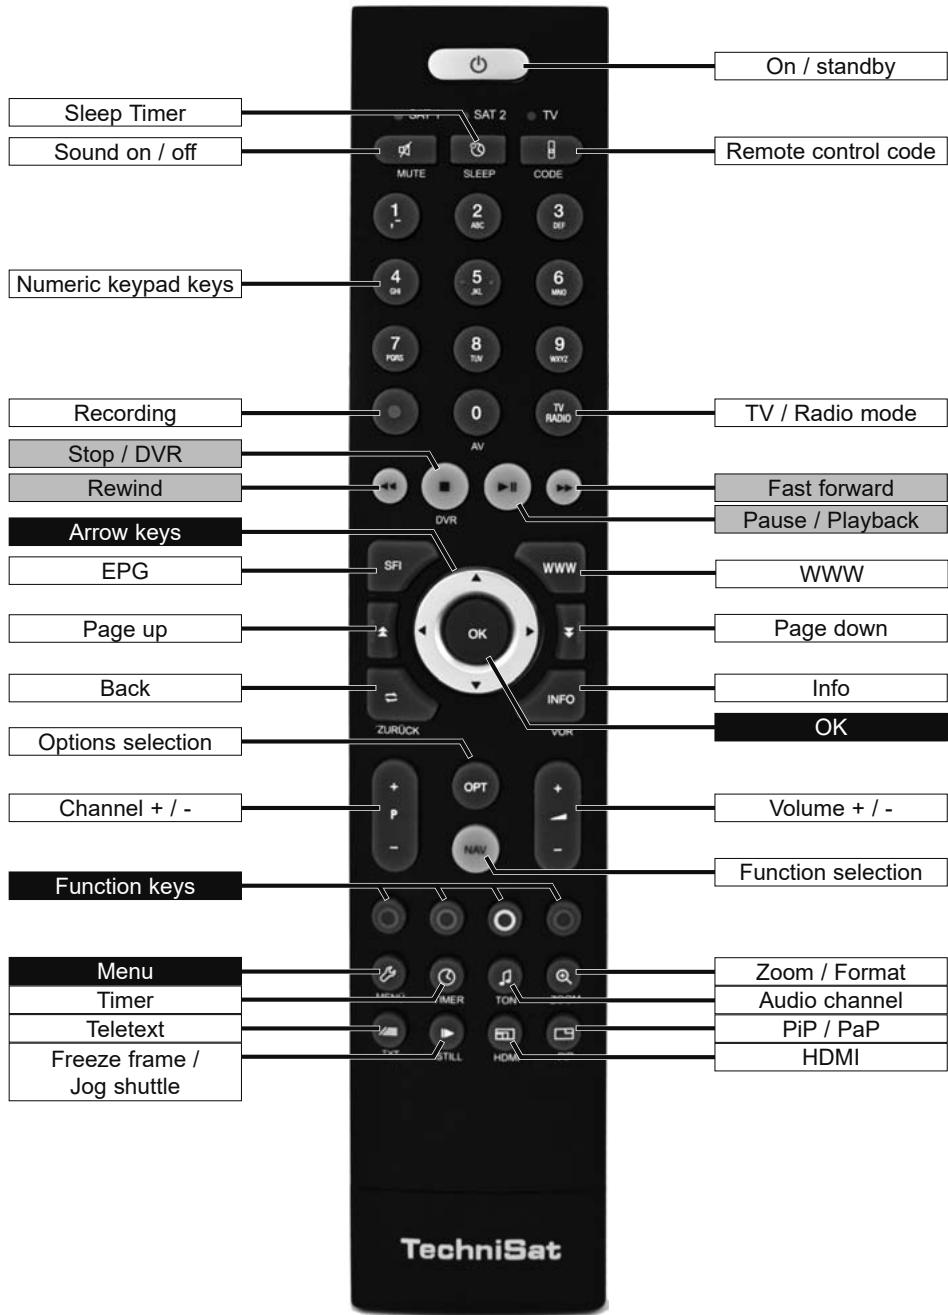
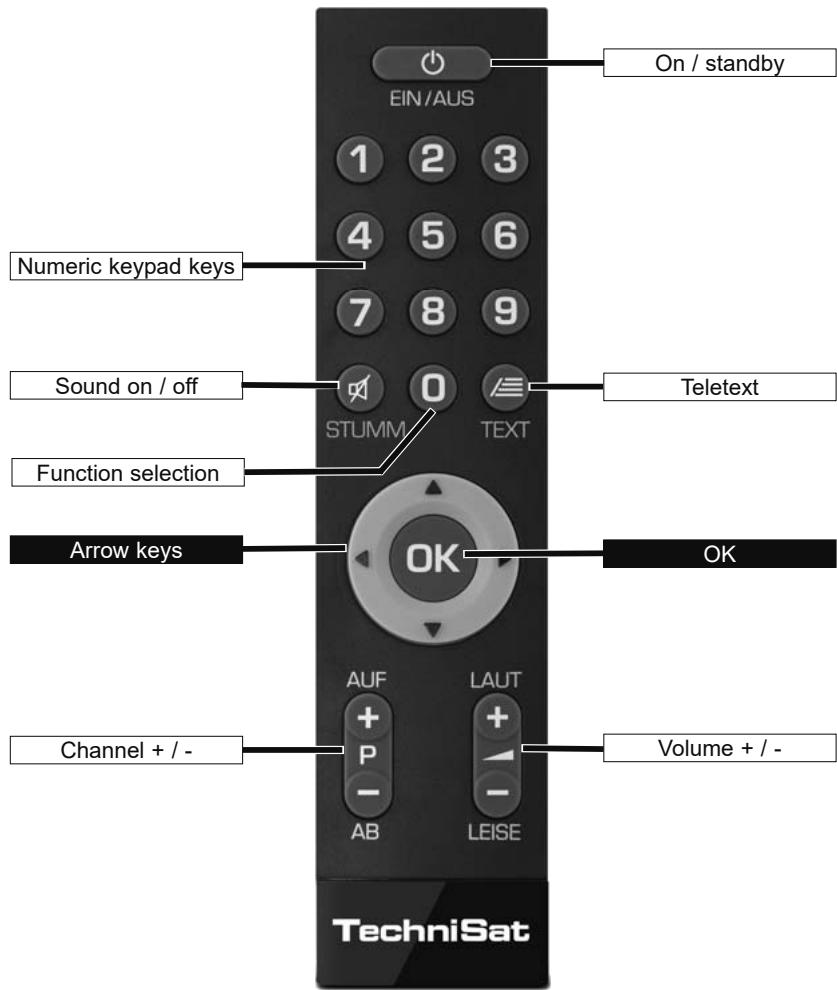
2.5 Remote control / Changing the battery
Open the cover on the battery compartment at the rear of the remote control by pressing gently on the point indicated and pressing in the direction of the arrow.
Insert the supplied batteries, ensuring that the poles are the right way around (indicator visible in battery compartment).
Close the battery compartment again.
2.6 Disposal advice
The packaging material used for your receiver consists entirely of recyclable materials. Please sort the components appropriately, and dispose of them in line with your local waste disposal regulations.

At the end of its useful life span, this receiver may not be disposed of with your regular household waste. It must be taken to a recycling collection point for electrical and electronic equipment.
This is indicated by the symbol on the product, the operating manual or the packaging.
The materials used can be re-used in accordance with their labelling.
By ensuring that valuable raw materials in old equipment are re-used, you can make a valuable contribution towards protecting our environment.
Please contact your local authority for the location of the nearest recycling point.
Please ensure that spent batteries removed from the remote control are not disposed of in your regular household refuse, but are correctly disposed of either in special bins for problem waste, or at retail trade collection points.

3 Optional accessories
3.1 Optional IsiZapper remote control
IsoZapper (Item No. 0000 / 3773) is an optional remote control that is specially designed for operation in ISI mode (see Point 16).
4 Connecting the DVB receiver
a Network connection
b Connecting the LNB 1 to the LNB input 1 of the DVB receiver. (Please note: The LNB must be connected with the LNB Input 1 when operating using an antenna signal.)
c Connecting the LNB 2 to the LNB input 2 on the DVB receiver.
d HDMI connection from the DVB receiver to the TV.
e Connecting the audio outputs to a hi-fi / surround sound system.
f Connecting the DVB receiver to the network / Internet.
g Connecting the cable connector (digital) and / or the DVB-T antenna with the RF IN antenna input on the DVB receiver.
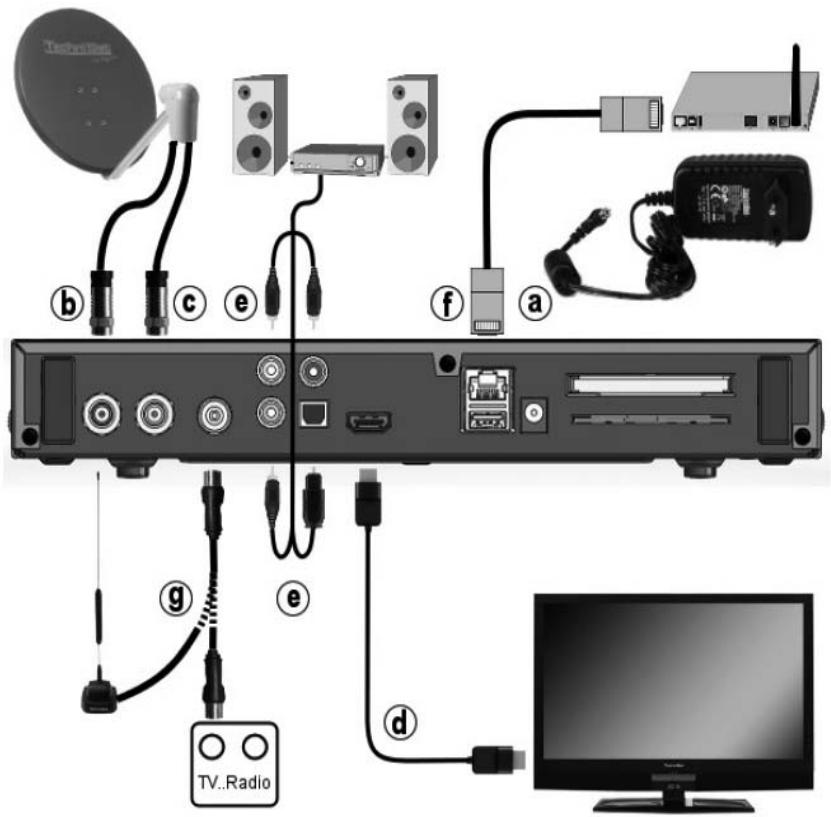
The following references (a b c etc.) relate to the illustrations beginning from the previous page.
4.1 Mains power connection
The digital receiver should only be connected to the mains power supply once you have finished making all the connections to the various other components. This will prevent damage to the digital receiver or other components.
a Once you have made all the other connections in accordance with the following sections, use the mains adapter supplied to connect the receiver to a 230V / 50 - 60Hz mains power outlet.
4.2 External unit
4.2.1 Operating with 2 DVB-S antenna signals
To be able to use the full scope of DVB-S functions on the digital receiver you should operate the receiver on two separate antenna signals / antenna cables that are set up identically.
b, c Connect the LNB inputs 1 and 2 on the digital receiver to your external unit using a suitable coaxial cable.
Also, note Point 8.6 (DVB-S antenna configuration) in your operating manual.
4.2.2 Operating with 1 DVB-S antenna signal
In exceptional cases, you can also operate the receiver using just one DVB-S antenna signal. However, in this event the recording and PiP functions are only available to a limited extent. (see Point 8.6.3 in your operating manual)
b Connect the LNB input 1 on the digital receiver to your external unit using a suitable coaxial cable
Also, note Point 8.6 (DVB-S antenna configuration) in your operating manual.
4.2.3 Operating with DVB-C / T antenna signals
The digital receiver can receive signals according to the DVB-C or DVB-T standard. As an option, reception parallel to the DVB-S is also possible.
Connect the RF IN antenna input on the digital receiver to your external unit using a suitable coaxial cable.
Also, note Point 8.7 (DVB-T antenna configuration) in your operating manual.
It is not possible to receive analogue television via a cable or antenna!
4.2.4 Operating with a rotating system
b During operation on a rotating system, connect the DiSEqC motor (level 1.2) with LNB input 1.
4.3 Connecting to a TV
d Connect the receiver (HDMI output) and TV (HDMI input) using an HDMI cable. If your TV is appropriately equipped, it will automatically switch to the HDMI input when the digital receiver is switched on.
4.4 Hi-fi / surround sound amplifier
To achieve the best possible sound quality, you can connect your digital receiver to a hi-fi / surround sound amplifier.
4.4.1 Digital
e If your amplifier has an appropriate electrical or optical input, connect the electrical or optical DIGITAL AUDIO OUT socket to the electrical or optical input on your amplifier.
Depending on the signal provided by each broadcaster, sampling rates of 32, 44.1 and 48kHz are available. In addition, where broadcast, the Dolby Digital signal is also available on this output.
4.4.2 Analogue
e Connect the Audio R and Audio L cinch sockets on the digital receiver to an input on your hi-fi amplifier using a suitable cable. (e.g. CD or AUX. Note, the phono input is not suitable!)
4.5 USB port
The USB port is used for updating the operating software and transferring data.
In addition, using the film, music or image playback functions (Points 9.18, 9.19 or 9.20 in your operating manual.) access MPEG, MP3 or JPG files and more on the USB storage medium.
Your device has internal WLAN, which enables wireless integration into your existing WLAN network. If required you can also insert an external WLAN dongle, e.g. the TELTRONIC ISIO TC USB-WLAN adapter (item no. 0004 / 3633) into the USB port for this purpose.
In this regard, please also note Point 8.5.2 WLAN settings in your instruction manual. The use of a Bluetooth dongle (item no. 0000 / 3635) is also possible, e.g. to connect Bluetooth audio receivers with the receiver.
When connecting a USB storage medium you should also note Point 12 (storage medium selection).
4.6 SD / MMC card reader
The SD card reader is used for updating the operating software and transferring data (DVR recordings or image, music and video files) to or from the used storage medium. In addition, using the image, music or film playback functions (Points 9.18, 9.19 and 9.20 in your operating manual) you can access the corresponding files (See Technical Data, Point 24 in your operating manual.) on the SD / MMC card.
When connecting an SD / MMC storage card you should also note Point 12 (Storage medium selection).
4.7 Network port (RJ45)
f You can use the network port to connect the receiver to your existing network. This allows you to use the watchmi and Internet functions, UPnP functions, access to network drives and the program provider's HbbTV applications. Furthermore, this enables you to record to and playback from network drives.
In this regard, please also note Point 8.5 Network settings in your operating manual.
5 Basic operation
Dear Customer
The following section starts by covering basic operation as well as recurrent operating steps for the TV. This should make it easier to read the instruction manual, since it avoids repeated description of identical steps at each individual stage.
If a function or setting for the device has to be different from the basic operation, the difference in operation is described in detail at the relevant point in the instruction manual.
Your device uses the so-called "On Screen Display". This simplifies operation of the television since the buttons on the remote control can take on different functions. This makes it possible to reduce the number of buttons.
In this On Screen Display (abbreviated to OSD), selected functions or settings are emphasised by means of highlighting.
Furthermore, you will see a line at the bottom edge of the screen in which the various buttons on the remote control are shown with their current functions.
In this instruction manual, the terms shown in the OSD as well as the buttons to be pressed are distinguished from the rest of the text by the print format used.
Warning - indicates an important note, which you absolutely should observe in order to avoid problems with the device, loss of data or unwanted operation.
Tip - indicates a note about the function described as well as other functions associated with it and any others to be observed with reference to the respective place in the instruction manual.
5.1 Switching the device on / off
When the device is on standby, you can switch it on by pressing the On / Standby button on the remote control / device.
When operating normally you can switch the device to standby mode by pressing the On / Standby button.
When switching the device on / off, also note Point 9.1 in your operating manual.
5.2 Calling up the main menu and navigating through the menus / functions
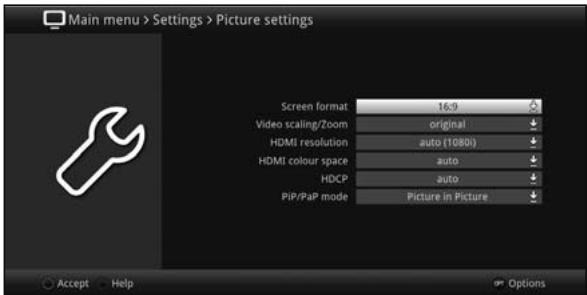
The following example will illustrate how you reach the main menu and call up a submenu. The objective of the example is to call up the Picture settings menu.
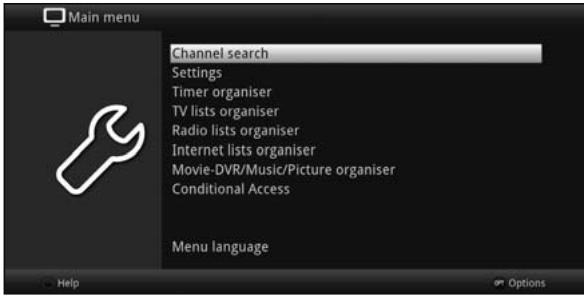
Press the Menu button. The main menu appears on the screen.
Select the Settings menu item by using the arrow keys to move the highlight to this item.
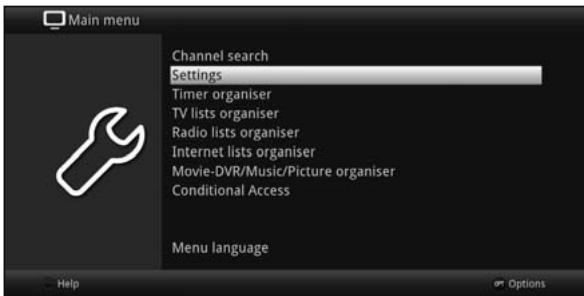
Press the OK button to open the Settings menu.
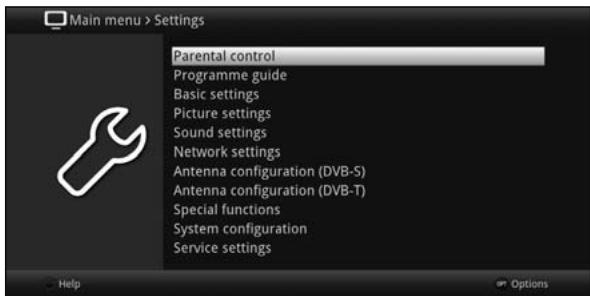
Now use the up / down arrow keys to highlight the Picture settings item.
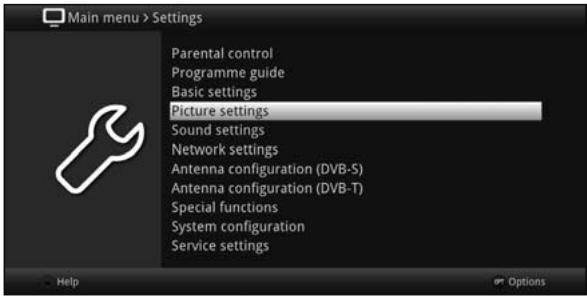
The Picture settings menu is opened by then pressing the OK button.
i
You can also highlight the individual menu points in the same way as you highlight an item on a submenu to open it and alter the respective settings.
i
The menu items in some menus have to be highlighted by moving sideways. This is done by pressing the right / left arrow keys.
i
By pressing the up / down arrow keys it is possible to move the highlight from line to line, and to move upwards and downwards page by page using the page up / down buttons.
i
You will see the so-called menu path in the uppermost line of the menu. This shows you the menu you are currently in and the path you took to reach this menu. In the example shown this is Main menu > Settings > Picture settings. The menu path is also shown throughout the instruction manual and shows you how you can reach the respective menu with the settings described.
i
If the blue function key with Help is displayed in the bottom line on the screen, a Help page can be displayed by pressing this button and hidden by pressing it again.
5.3 Accepting settings / Exiting menus and functions
In some menus and functions the changes made must be accepted manually in order to save them permanently. If this does not happen, the function or the values that existed before the change was made will be reset automatically on exiting the menu.
If an Accept field or the green function key with Accept is displayed in the bottom line of the screen, you can see that the changes made must be saved manually to be accepted.
By highlighting Accept using the right / left arrow keys and confirming with the OK key or by pressing the green Accept function key, the changes are saved and you are returned to the next menu level up.
Alternatively:
Press the Return button.
A request appears asking whether the changes you made should be applied.

Use the right / left arrow keys to highlight Yes or No and confirm using the OK button.
Depending on your selection, the changes will now be saved or discarded and you are returned to the next menu level up.
Alternatively:
Press the Menu button to leave the menu directly.
The settings that need to be saved manually will be reset in this case.

If the green function key with Accept is not displayed on the bottom line of the screen, the changes are saved automatically on exiting the menu.
5.4 Changing a setting
You can apply settings by means of arrow selection, using the selection list, the numeric keypad and the virtual keypad. The television specifies the method that can be used to change a highlighted setting. You can see this from the following displayed symbols:
- Arrow selection method (Point 5.4.1)
Arrows are shown on the left or right edge of the highlight.
- Arrow selection method (Point 5.4.2)
The symbol is shown on the right edge of the highlight.
- Numerical keypad method (Point 5.4.3)
Virtual keypad (Point 5.4.4)
The symbol is shown on the right edge of the highlight.
5.4.1 Arrow selection method
If is shown on the left and on the right next to the set value, you can alter this using the left / right arrow keys.
5.4.2 Selection list
If v is shown on the right next to the set value, the value can be changed using the selection list.

Press the OK button to open the selection list.

Highlight the setting you want using the up / down arrow keys.

i By pressing the up / down arrow keys it is possible to move the highlight from line to line, and to move upwards and downwards page by page using the page up / down buttons.
Confirm by pressing the OK button. The selection list closes again and the selected setting is shown in the menu.

5.4.3 Entering numbers
Enter the new setting you want using the numeric keypad key if a question mark m or a number value 1234 is shown inside the highlight.
5.4.4 Virtual keyboard
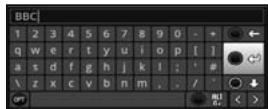
If is shown on the right next to the set value, the value can be changed using the selection list. You have three different keyboard options when using this data entry method. You can switch the keyboard layout between the so-called QWERTY keyboard and the alphabetic keyboard; an SMS keyboard can also be used at any time. The functionality of the QWERTY keyboard is identical to that of the alphabetic keyboard. They only differ in the arrangement of the various letters, numbers, characters and symbols.
Press the OK button to open the virtual keyboard. The keyboard now appears in alphabetic form.

You can switch to the QWERTY keyboard and back to the alphabetic keyboard by pressing the Option button.
You can now enter the term you want as follows.
Arrow keys: Moves the highlight to the keys of the virtual keyboard.
OK: The highlighted character is added to the end of the term, or the highlighted function is executed.
/ Yellow function key: the keyboard switches between upper / lower case.
/ Red function key: pressing / holding deletes the symbol before the blue highlight / entire entry.
/ Green function key: the entered term is accepted.
/ Blue function key: the keyboard switches to alternative symbols.
: Moving the blue highlight within the term.
The SMS keyboard is operated using the numeric keypad on both the alphabetical and the QWERTY keyboard and can be used at any time. The coloured buttons thus incorporate the functions described above.
Press one of the numeric keypad keys 0 - 9, to select the various letters, numbers, characters and symbols.
After the initial pressing of a numeric keypad key, the first letter of the corresponding character sequence is highlighted.
The highlight then moves one field to the right for every additional press of the same numeric pad key.
Press as many times as necessary to reach the desired character. This will be added to the entered term after a short delay.
The various numeric pad keys are assigned the following displayed letters, numbers, characters and symbols.
0: 0 1 7 2 (C)
1:
2: a b c 2
3: d e f 3
4: h14
5:
6: m n o 6 c
7: D q r s 7 8
8: U V B G
9: Wx yz 9
Once you have reached the field you want with the highlight, you can then begin selecting the next character immediately since, in this case, the character is directly added to the term. If you wish to continue directly selecting a character from the same numeric pad key, you can add the previously highlighted character to the term by pressing the right arrow key.
5.5 Options selection
In some menus and operating modes (e.g. TV mode, music / images playback etc.), you have the option of calling up additional functions and options via the options selection function.
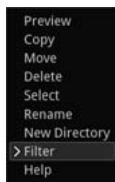
Pressing the Option button opens the option selection in the lower right-hand corner of the screen.
In this example we can see the option selection for the channel list.
Every additional press of the Option moves the highlight down one line each time.

Some options are selected directly in this window. Other options for a number of subordinate selection options are located in the options groups. Highlighting one of these options groups automatically opens another window on the left.
You can use the up / down arrow keys within the options group to highlight one of the options listed there.
i By pressing the up / down arrow keys it is possible to move the highlight from line to line, and to move upwards and downwards page by page using the page up / down buttons.
The highlighted option is selected by pressing the OK button and you exit the options selection area.
If you do not want to select an option or wish to leave the options selection area without making any changes, simply press the Option button until it is hidden.
6 Initial installation
After you have read the safety instructions and connected the device as described in Chapter 5, you can then switch it on.
On initial installation of the TV, the AutolInstall installation wizard starts automatically. The installation wizard allows you to make the most important settings for your digital receiver in the simplest way possible.
Each step of the installation explains which settings can be made.
In the installation wizard start window, you can cancel the initial installation by pressing the red function button. The receiver then begins to run default pre-programming.
In the ensuing installation steps, you can press the OK key to accept the preselected settings and move on to the next step of the installation.
i By pressing the Back key, you can go back to the previous installation step, so you can correct any wrong entries at any time.
The initial installation shown here simply serves as an example.
The exact process for the initial installation will depend on the settings you select. Therefore, please follow all instructions displayed on screen carefully.
Operating language
When the installation wizard starts, you will first see a window for selecting the operating language
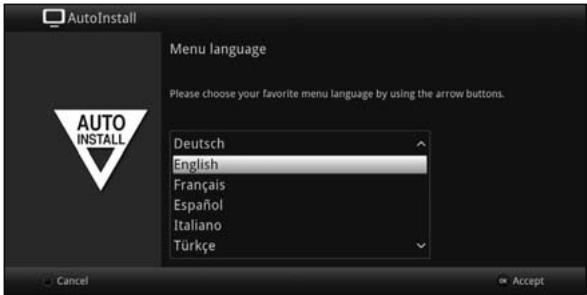
Use the arrow keys to highlight the operating language you want.
The preferred audio language will be set automatically according to this selection. As described in Point 7.4.1 in your operating manual, you can adjust the setting at any time.
Press the OK button to accept the setting and move on to the next stage of the installation wizard.
Country setting
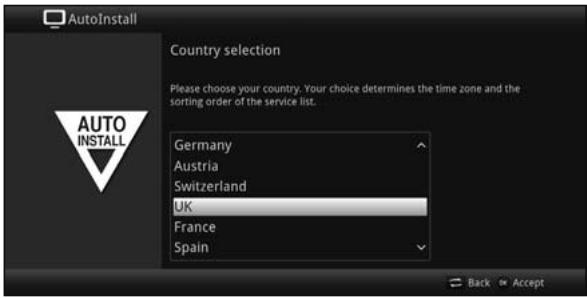
Use the arrow keys to select the country where the device is to be operated.
Automatic setting of the local time as well as changing to summer / winter time will take place based on your selection.
Channels will also be automatically sorted in the installation wizard according to this setting as well as following a channel search.
Press the OK button to open the selection list.
Screen format
Use the right / left arrow keys to set the picture format for the connected TV.
The screen format on the TV will be automatically adjusted according to your selection.
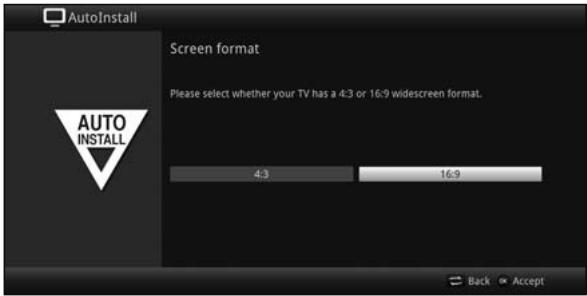
Press the OK button to open the selection list.
Selecting reception signals
In this section in the installation wizard, select which antenna cables you have connected to the receiver or which types of reception you wish to use.
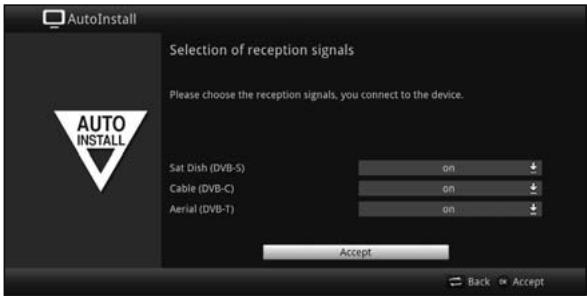
Use the up / down arrow keys to select the reception signal with the availability that you wish to switch on or off.
DVB-S for digital satellite channels;
DVB-C for digital cable channels;
DVB-T for digital terrestrial channels;
Press the OK button to open the selection window; highlight the setting you want with the up / down arrow keys and close the window by pressing the OK button again.
To get to the next step of the installation, use the arrow keys to highlight the
Accept field and confirm with the OK button.
Number of antenna signals (DVB-S)
In this section in the installation wizard, select how many antenna cables are connected to the receiver.
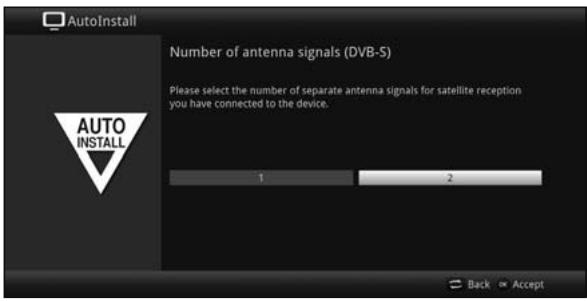
Use the right / left arrow keys to select whether you have connected 1 or 2 DVB-S antenna signals.
Confirm with the OK button to open the selection list.
Antenna configuration (DVB-S)
In this step of the installation, you can adapt your digital receiver setup to the configuration of your antenna (DVB-S).
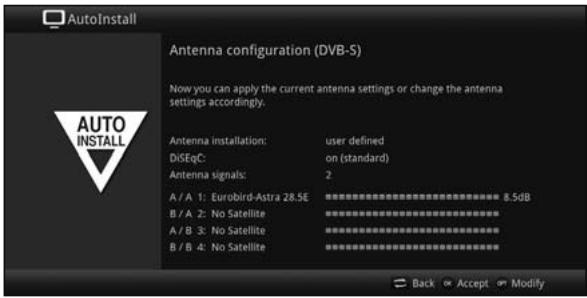
If you want to accept the default antenna setting, press the OK button.
If the configuration of your reception equipment does not conform to the default setting, press the Options key.
Now, as described in greater detail in Point 8.6 in your operating manual, apply the appropriate antenna settings for your reception equipment and then press the Back button to return to the antenna configuration overview.
Then confirm with the OK button to accept the settings.
Antenna configuration (DVB-T)
When using an active DVB-T antenna that does not have its own power supply, or if you do not want to use this, your receiver's antenna amplifier can be supplied via the coaxial cable by activating the Antenna feed. To do so, set the antenna supply to.
Furthermore, in this step a channel spectrum with the signal levels of the channels is displayed. Using this spectrum you can align your DVB-T antenna for optimal reception.
If the DVB-T source has been disabled as described in the "Selecting the reception signal" step, the next available installation wizard screen appears in place of this one.
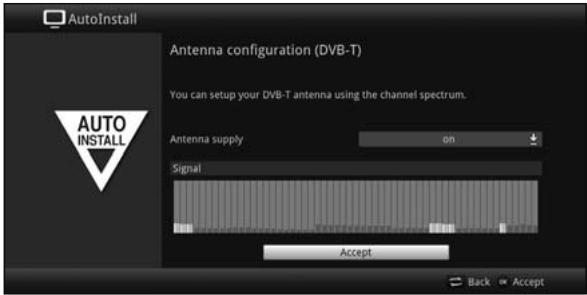
Use the up / down arrow keys to highlight the antenna supply field and confirm by pressing the OK button.
Switch the antenna supply on or off by highlighting the corresponding entry with the up / down arrow keys and confirm using the OK button.
To get to the next step of the installation, use the arrow keys to highlight the Accept field and confirm with the OK button.
Network configuration
In this step, the TV automatically checks the network configuration.
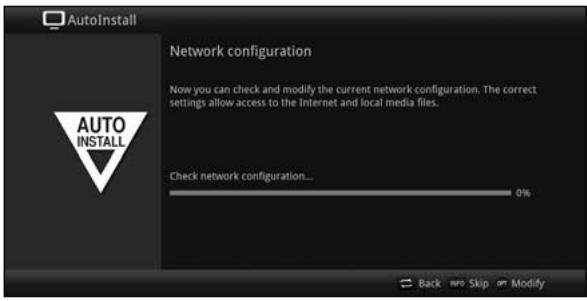
If you do not want to run the network configuration check, press the Info button.
If you want to check or change the network settings, press the Options button.
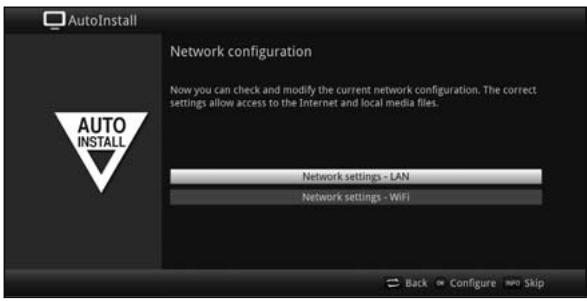
Use the up / down arrow keys to select whether you want to configure a LAN or WLAN network and press the OK button.
Now apply the network settings as described in Point 8.5 in your operating manual.
Press the Info button to accept the settings. The network configuration check will then restart.
Channel search / ISIPRO
You have various options for searching for new channels or updating the channel list. You can use the ISIPRO channel list function to download a new channel list for your receiver from the satellite or run a channel search.
To download an up-to-date channel list, use the up / down arrow keys to highlight the ISIPRO channel list update line.
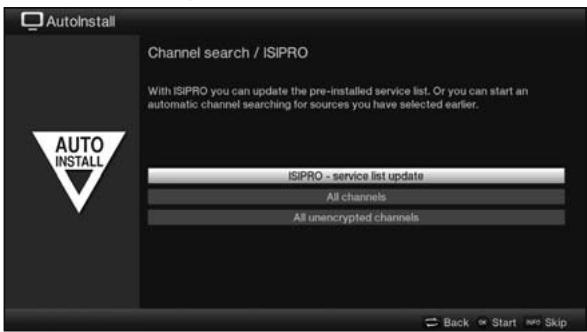
To download the available current channel list, use the up / down arrow keys to highlight the ISIPRO - channel list update line and start the process by pressing the OK button.
The current channel list will now be downloaded via satellite. Please pay attention to subsequent screen displays.
If you wish to perform a broadcaster search instead of updating the channel list via satellite, or if the DVB-S reception signal has not been configured, use the up / down arrow keys to highlight the All channels or the
All unencrypted channels field and then start the channel search by pressing the OK button
In this search, all selected satellites in the antenna configuration are automatically scanned for channels. This procedure may take several minutes. Please note all subsequent messages displayed on screen.
After a program list update or a satellite search, all additional reception types are then searched for. This procedure may take several minutes. Please note all subsequent messages displayed on screen.
If you skip the channel search / channel list update, the default channel list will be loaded.
Regional programmes
Some broadcasters transmit channels with varying regional content. On this page you can now specify which of these regional channels you prefer. The selected regional channel is automatically set by switching to the relevant broadcaster.
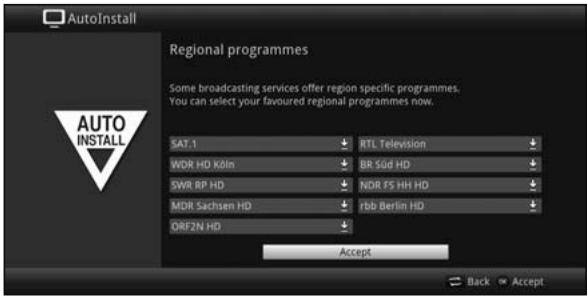
Use the arrow keys to highlight the broadcaster that you wish to set as your preferred regional channel.
Press the OK button to open a window with the regional programming available for this broadcaster.
Use the up / down arrow keys to select your preferred regional channel.
Press the OK button to close the window again.
To accept the selected regional programming, use the arrow keys to highlight the Accept field.
Press the OK button to move on to the next step of the installation.
Software updates
The digital receiver will now check whether a new version of the software is available for the receiver.
If a new software version is available, you can carry out an automatic software update.
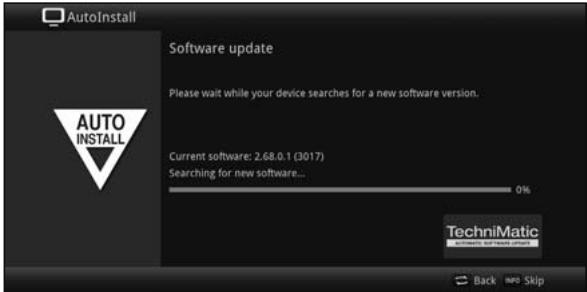
If you do not want to wait for a search for new software or a software download, you can skip this step if you wish by pressing the Info button.
If the search for new software or updates is skipped, your device will run another check at the time set in accordance with Point 18.5.2 in your operating manual and automatically download the software, as long as this setting is left active and the device is in standby mode at that time.
If there is no new TV software available, you can press the OK button to go to the next step in the installation wizard.
If, on the other hand, new TV software is found, the automatic software update can be started by pressing the OK button.
The message "Updating software. Please wait" is displayed on the screen along with a progress bar showing the progress of the download. Two additional progress bars then appear showing the progress of the individual updating steps. AutolInstall will then resume.
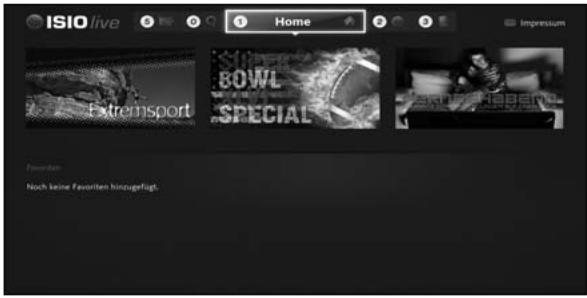
ISIO Internet list updates
The receiver has a pre-programmed ISIO list with web links. These can be automatically updated.
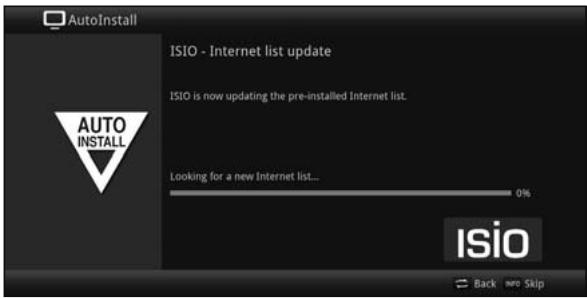
If you do not want to wait for the current ISIO Internet list to load, you can skip this process by pressing the Info button.
watchmi
In this step, you can activate the watchmi service and select the desired channels that are to be added to the TV list and the EPG overview.
The watchmi service is an online service operated by FUNKE Digital TV Guide GmbH.

Activate the watchmi service by using the left / right arrow keys to select the on or off option and then press the OK button.
Select Start tutorial to view a brief introductory guide.
To do so you require an Internet connection.
The General Terms & Conditions (Ts&Cs) for the use of the watchmi service will also be displayed.
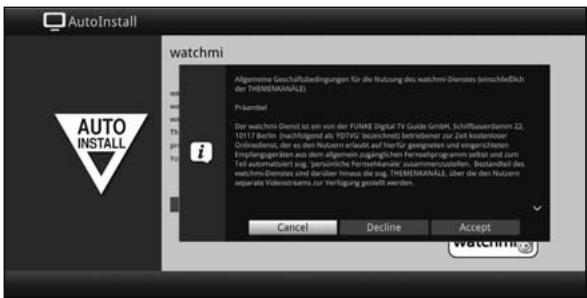
Use the up / down arrow keys to scroll through the Ts&Cs page by page.
Use the right / left arrow keys to select any of the following options:
Cancel: The Ts&Cs are closed and you can now decide once again whether you want to switch watchmi on or off. The preselection is set to on.
Decline: The Ts&Cs are closed and you can now decide once again whether you want to switch watchmi on or off. The preselection is set to off.
> Accept:
you here by accept the Ts&Cs. the data is then updated and in the next step you have the option of selecting your desired channels.
Next, the up-to-date data for the watchmi channels is loaded.
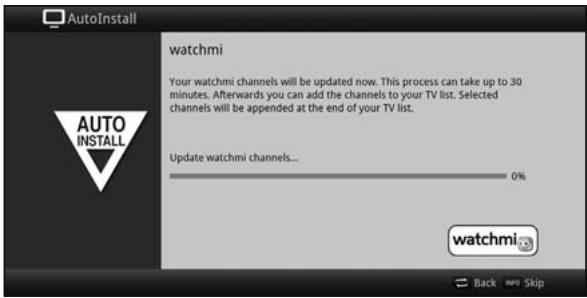
After updating, you have the option of selecting channels and adding them to your TV list.
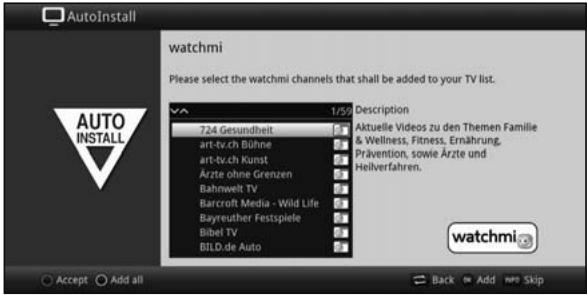
Using the up / down arrow keys you can scroll the selection bar through the channels and then select the highlighted channels using the OK button.
The selected channels appear with a check mark next to them.
Highlight a selected channel once again and press the OK button. This channel will be removed again.
A brief description of the highlighted channel appears on the right hand side.
Using the yellow function button you can blanket select all channels.
To finally accept your selections, press the green function button.
These settings can also be changed at any time. The options can be found under Point 12.
Loading EPG data
Your digital receiver has an electronic programme guide (EPG). You must first get the receiver to download the EPG data from the satellite to enable electronic programme guide data to be displayed.
For this reason, the receiver will automatically start downloading the EPG data after the channel list update or channel search is completed. This process can take up to 30 minutes.
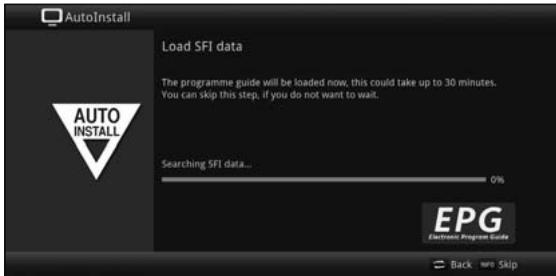
If you do not want to wait for the EPG data to download, you can skip the process by pressing the Info button.
The EPG data will then be automatically updated the following night, or you can update it manually at any time.
If the EPG update has been skipped, your TV will download the EPG data automatically at the point in time set under Point 15.2 in your operating manual, as long as the automatic EPG updating function (Point 15.1 in the operating manual) remains activated and the device is also in standby mode at that moment.
Additionally, you can run the update manually at any time (Point 15.7 in the operating manual).
Product registration
By registering your product you can take advantage of further benefits and also help us tailor our products and our service to better suit your needs.

To do so you require an Internet connection.
Exiting the installation wizard
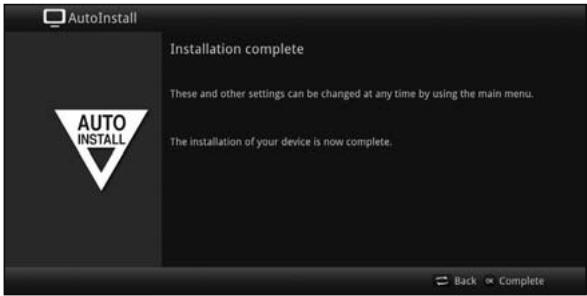
Confirm the final message from the installation wizard by pressing the OK button.
7 Operating the unit
7.1 Switching on
Switch the digital receiver on by pressing the On / standby button either on the device or on the remote control.
7.3 Switching off
Press the On / Standby button either on the device or on the remote control to switch the device off again.
The receiver is now in ready mode (standby). Therefore, the time is displayed in the receiver's display panel if activated (Point 8.2.4 in your operating manual). If the time is not displayed, this still needs to be acquired by the receiver. To do this, switch the receiver on and set it to receive e.g. ZDF for approx. 30 seconds to automatically acquire the time.
7.4 Selecting a channel
7.4.1 Using the channel up / down buttons
Use the up / down arrow keys on the receiver to select a channel, or use the Channel + / - buttons on the remote control to scroll up or down the channel settings.
7.4.2 Using the numeric pad keys
Use the numeric keypad keys to enter the number of the channel you want.
For example:
| 1 | for channel slot 1 | |||
| 1, | then 4 | for channel slot 14 | ||
| 2, | then 3, | then 4 | for channel slot 234 | |
| 1, | then 5, | then 6 | then 7 | for channel slot 1567 |
When entering channel numbers with multiple digits, you have approx. three seconds after pressing a key to complete the entry.
If you wish to enter a number consisting of only one, two or three digits, you can speed up the entry procedure by keeping the key depressed a little longer on the last digit.
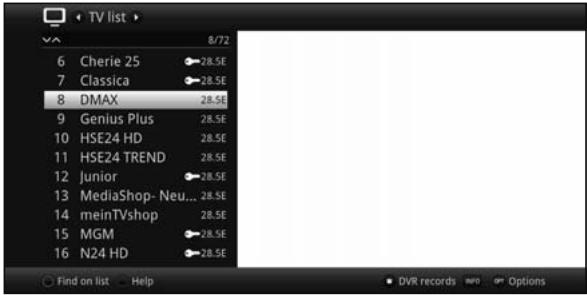
7.4.3 Using the Navigator (channel list)
Press the OK button.
The channel list navigator will appear. In TV mode only TV channels are shown, and in radio mode only radio channels are shown.
The channel currently selected is highlighted.
You can view additional data about the current programme by pressing the INFO button.
7.4.3.1 Selecting a channel
You can now use the up / down arrow keys to move the page up or down, and the numeric pad keys to highlight the desired channel.
Press the OK button to select the highlighted channel.
7.4.3.2 Selecting a list
To make it easier for you to find channels, your device provides various channel lists. You can select one of your favourites lists (see Point 13.1 in your operating manual) and sort or filter the channels according to various criteria.
Press the OK button.
The active channel list will appear.
Now use the Options selection function to open the desired channel list
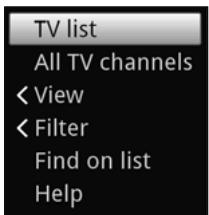
View
The View option allows you to change the channel display order. The available options are Sort by channel number (sorting by channel slot number) or Sort by name (alphabetical sorting).
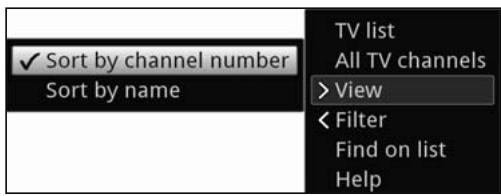
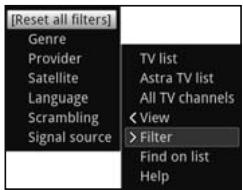
Filter
By setting one or more filters, you can limit the display to certain channels that fulfil the desired criteria.
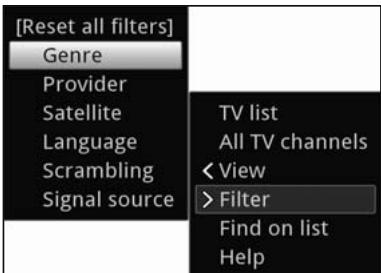
Highlight the Filter option and press the OK button.
Now select the desired filter group and press the OK button once more.
Now select the desired filter option from the list that appears and confirm the selection using the OK button.
The channel list now only shows channels that match the desired criteria. To filter this list further, repeat the steps described above and thus apply additional filters.
To remove all filters
Open the Options menu using the OPT button.
Select the Filter option and press the OK button.
Now select [Reset all filters] and press the OK button.
The full channels list is now displayed again.
7.4.5 Calling up blocked channels
If a programme is selected that is blocked by the parental control function, the message Device PIN will be displayed on the screen.

Use the numeric keys to enter your PIN code.
The channel you want will be displayed.
Or
Switch to a channel that is not blocked.
If global parental control is enabled, the device PIN code will be requested again when the blocked channel is switched on. To make things easier for you, you need enter the PIN code only once during each operating phase.
When doing so pay careful attention to the information and settings for global and user-dependent parental control (TechniFamily) under Point 16.2 in your operating manual.
If a channel is blocked on account of it being an encrypted channel, please also note Point 9.5.3 in your operating manual.
7.4.6 Returning to last channel selected
Press the Back button on the remote control to return to the last channel selected.
Press the button again to return to the channel you were previously watching.
7.4.7 Switching between TV / radio
You can use the TV / Radio button to switch between TV and radio mode.
The device switches to the last radio channel listened to.
Alternatively, you can also switch between TV and radio operation as described under points 9.4 and 9.17.
To do this also note the setting for OSD Radio / Music in point 8.8.1.4 in the instruction manual.
7.4.8 Infobox
After each channel change, and for the duration configured under point 8.8.1.3 in your operating manual, an Infobox appears on the screen. It can also be called up manually by pressing the Info button on the remote control.

This Infobox displays the channel slot and name of the selected channel, the title of the current programme and the currently active channel list.
The progress bars are coloured yellow according to the amount of transmission time already expired for the current programme. If the beginning of the progress bar is coloured red the transmission started too early, and if the end of the progress bar is coloured red the current programme has overrun.
Additional programme properties are also displayed:
For example:
for Teletext
165 for 16:9 programmes
for encrypted channels
for Dolby Digital broadcasts
for subtitles
HbTV for HbbTV
The current time is shown in the right-hand upper corner of the screen.
7.5 Receiving encrypted channels
Your receiver is equipped with an integrated CONAX and NAGRAVISION decryption system (smartcard reader) and a Common Interface for accepting a CI / Cl+ module. This enables you to receive and view encrypted channels. To do this, you must first either insert a CONAX or an HD+ smartcard into the integrated card reader, or insert a CI / Cl+ module with a valid smartcard into the slots provided.
Insert the CONAX or HD+ smartcard into the card slot in the integrated card reader (gold-coloured chip facing down, and in the direction of insertion).
or
Insert a CI / CI+ module into the slot.
Insert the smartcard into the CI / Cl+ module card slot. Ensure that the gold-coloured chip on the smartcard is facing upwards, in the direction in which the card is inserted.
If you now select an encrypted channel, the digital receiver will automatically check the card reader and the CI / Cl+ slot and will display the channel in decoded form, assuming a valid smartcard and an appropriate CI / Cl+ module with a valid smartcard has been inserted.
7.6 Volume control
You have the option of adjusting the volume via your digital receiver. This facilitates operation of the receiver, as it means you can access all the major functions on a single remote control, and will only rarely have to resort to using the remote control for the TV.
To adjust the volume of your TV, press Volume + to increase the volume, and Volume - to decrease it.
During volume adjustment, the currently set volume is displayed at the top of the screen.

When you switch on the digital receiver, sound will be reproduced at the volume level last set. When operating a Bluetooth audio device, please also note Point 8.4.7 in your operating manual (headphone settings).
The volume control and mute button also control and mute the digital audio outputs (not in the case of the Bitstream setting).
7.6.1 Switching to mute
To switch the sound off (mute), press the Sound on / off button - press this button again to switch the sound back on.
Throughout the time that the volume is switched to mute, the symbol appears at the upper right of the screen.
When operating a Bluetooth audio device, e.g. headphones, its volume can be controlled when switched to mute without unmuting the device.
7.7 Selecting a different language / sound option
For some channels you have the option of selecting a different sound option (Dolby Digital, Stereo or Audio Channel 1 or Audio Channel 2) or another language.
If various audio options or languages are available for a channel, this will be displayed to you with the Audio message, together with the currently selected audio option or language, at the bottom of the extended channel information.
If a configured programme is also broadcast in Dolby Digital sound, the symbol also appears in the infobox.
Using the Options selection you can select the language / sound option you want via the Sound option.

7.8 Freeze frame
Press the Freeze frame button; the current TV picture will be displayed as a still image.
Press this key again to resume normal operation.
The sound will continue to play normally during freeze frame.
7.9 Teletext
Your receiver can display teletext information on channels that broadcast teletext data. This is displayed by the m symbol in the Info box.
Switch teletext on by pressing the Teletext button.
7.10 HbbTV
HbbTV (Hybrid broadcast broadband TV) is a technology that enables broadcast and Internet content to be linked. This enables access to interactive added-value services and multimedia offerings from programme providers.
The symbol in the Infobox indicates that the programme provider is offering an HbbTV application.
Display and use of the HbbTV application is determined by the data received. As a general rule, it is operated as described below.
Switch to a channel that is broadcasting HbbTV data.
After a few seconds, the box appears at the lower right of the screen indicating the availability of HbbTV content.
Launch the HbbTV application by pressing the red function key.
Depending on the speed of the Internet connection, there may be slow response times or short interruptions.
In the HbbTV application you can use the arrow keys or the keys displayed there to move the highlight.
You can use the OK button to confirm the highlighted item and call this up, as long as the highlighted item has additional subitems.
You can exit the HbbTV application by pressing the Back button or by pressing the colour button displayed in the application itself.
During operation please be sure to take note of messages and displays on the screen.
7.11 Subtitles
When switching on a transmission, which is broadcast with subtitles, the subtitles icon appears in the Info box.
Using the Options selection function under the Subtitles menu item, you can select the subtitles you wish to display.
The device can display both teletext subtitles and DVB subtitles. The display of the two kinds of subtitle may be different.
Please note that subtitles can only be displayed if the broadcaster actually broadcasts the corresponding data. If the broadcaster merely broadcasts the subtitle ID, but no data, the subtitles cannot be displayed.
If you want your device to automatically play back programmes with subtitles, configure your device to Automatic Subtitle Playback as described under Point 8.4.2 of your operating manual.
Note that DVB subtitles are only available during the playback of a DVR recording if this was manually or automatically selected at the time of recording
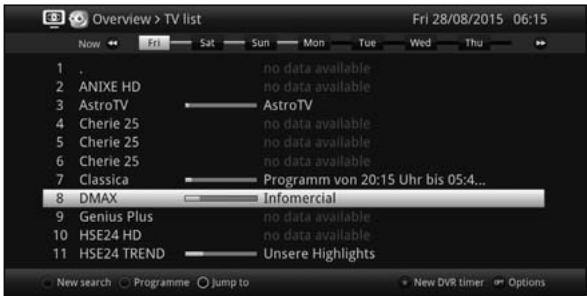
8 EPG Overview
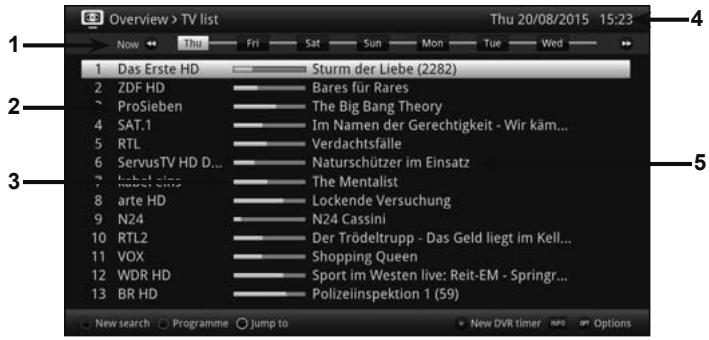
1: Viewing time > indicates when programmes are to be shown.
Time line > a graphical display of the viewing time in the form of progress bars.
2: Channel name with the corresponding channel slot within the active channel list.
3: Progress bars or the start / stop time of the programme being shown.
4: Current date and time.
5: Programmes on the channel being shown.
Using the right / left arrow keys you can move the viewing time forwards or backwards.
The progress bar on the time line moves forwards or backwards in keeping with the viewing time.
Using the yellow function key, you can switch directly to a view of the programmes currently running and the programmes coming up next, and the configured prime time viewing slots.
You can specify your preferred prime times as described under Point 15.5 in your operating manual.
By pressing the up / down arrow keys, it is possible to move the highlight from line to line, and to move upwards and downwards page by page using the Page up / down buttons.
If further information regarding the highlighted programme is available, you can call this up and hide it again by pressing the Info button.
By pressing the OK button you can switch directly to the highlighted channel.
9 Timer recordings
Your device has the following timer functions:
1. DVR timer
This function is used to switch your digital receiver on and off to record the programme selected as per Point 11.4.1 in your operating manual onto the selected recording medium while you are out.
If the device has been switched on by the DVR Timer this is indicated by DVR Timer being shown on the display.
i Some menu items are blocked and therefore cannot be called up or edited.
2. Channel-switching timer
If your receiver is in normal operating mode, it will switch to the programmed channel slot at the set time.
In contrast to using the DVR timer option, the receiver and remote control remain fully functional, and will not be switched off at the end of the programme.
3. Alarm
If your receiver is in standby mode, it is switched on when the programmed channel slot is reached at the set time.
In contrast to using the DVR timer option, the receiver remains fully functional and will not be switched off.
4. Series timer
To make it easier to find programmes, you can search for programme data highlighted in the EPG using any terms. The series timer function is used to automatically generate ongoing DVR timer settings for the programmes you find. The timer settings are also retained after the EPG data has been updated. This removes the need for repeated manual programming of timers, e.g. to record episodes in a TV series.
In order to ensure that DVR timers are only automatically generated for the desired programmes, you must apply the settings with as much detail as possible. Otherwise, the number of generated timers can become very high.
Overlaps with other timers can occur as a result of automatic DVR timer generation, meaning that it may not be possible to execute all timers.
In the case of series timer generation, the settings for the timer lead-in and lead-out times and Perfect Recording (Point 9.15.4) will be taken into consideration.
Caution!!!
Ensure that the receiver has acquired the correct time. During use, this is displayed in the Infobox, and in standby mode in the panel display (if activated). If this is not the case, switch the receiver to a major channel such as ZDF for approx. 30 seconds, to acquire the time.
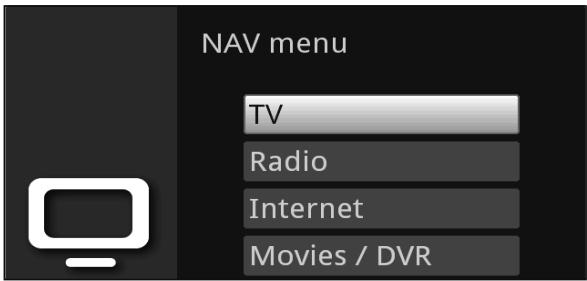
10 Selecting a function
You can open the Navigation menu (NAV menu) to select the function you want by pressing the function selection button.
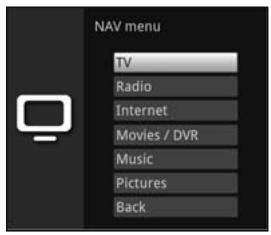
Use the up / down arrow keys to highlight the function you want to access.
TV: TV mode: play back TV programmes.
Radio: Radio mode: play back radio programmes.
Internet: Internet mode: call up the web links available in the Internet list.
Movies / DVR: Film / DVR navigator: call up video files on a device connected to the USB port or stored on an approved network drive or available via UPnP.
Music: Music navigator: call up music titles on a device connected to the USB port or stored on an approved network drive or available via UPnP.
Pictures: Image navigator: call up images files on the internal hard drive, a connected USB device, stored on an approved network drive or available via UPnP.
Confirm with OK to select the highlighted function.
11 Using the Internet list to call up websites
When in Normal mode, press the WwW button twice. or
If a website has already been opened, press the WWW button once. The Internet List Navigator now appears. The web link last called up is highlighted.
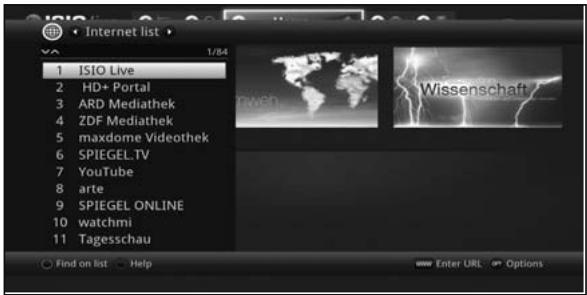
You can now use the up / down arrow keys, the Page up / down buttons and the numeric pad keys to highlight the desired web link.
Pressing the OK button opens the highlighted web link. The time it takes for the selected site to be displayed depends on the selected site and the bandwidth of your DSL connection.
12 Storage medium selection
If a storage medium is inserted during ongoing TV or radio operation (see also Point 4.5 USB Port and 4.6 SD / MMC card reader), a selection list appears with the possible operating options:
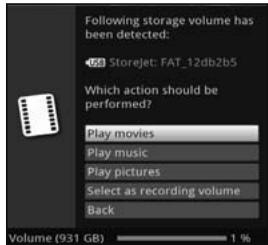
Select Film playback to switch to film playback for this storage medium (see Point 9.18 in your operating manual).
Select Music playback to switch to music playback for this storage medium (see Point 9.19 in your operating manual).
Select Image playback to switch to image playback for this storage medium (see Point 9.20 in your operating manual).
Select Select as recording medium if this new storage medium is to be used as the recording medium.
Note that this selection overrides the setting applied in Point 11.4 in your operating manual (Managing recording media) and can be changed here at any time.
You can exit this selection page and return to the previous view without changing any settings by pressing Back.
13 DVR Recording
Before starting a DVR recording, please define which storage medium should be used as a recording medium as outlined under Point 11.4.1 in your operating manual.
The following recording modes are available for DVR recording:
1. Instant recording
Select this type of recording to immediately record the programme currently being broadcast at the push of a button.
2. Timer-controlled recording
This function is used to switch your digital receiver on and off to record the selected programme onto the recording medium while you are out. The timer can be either manually programmed or automatically programmed via the EPG function.
3. Timeshift recording
Timeshift recording enables timeshifted TV viewing. You can start to play back a programme while it is still recording (= timeshifting).
In order to use as many recording options as possible, you must connect your receiver to two separate DVB-S antenna lines. This makes the following combinations of recording and playback possible:
- Record a programme and simultaneously play back any other programme (including different reception ranges) or any DVR recording.
- Simultaneously record two programmes, even if these are received in different reception ranges.
- Simultaneously record two different programmes and play back an already recorded programme.
If it is only possible to connect the device to one antenna line, only limited recording and playback options will be available.
- Record a programme and simultaneously play back another programme from the same reception range or any DVR recording.
- Simultaneously record two programmes from the same reception range.
- Simultaneously record two programmes from the same reception range and play back an already recorded programme.
13.1 Instant recording
13.1.1 Starting recording manually
Option 1
Switch to the channel on which the programme you want to record is being broadcast.
Press the Record button to record the current programme.
The programme will continue to be played on the screen while the recording is running. You will be notified when the recording starts by means of a note in the Infobox.
Press the Play / Pause button to play back the current programme from a particular point.
The recording is started in the background and a freeze frame image is displayed on the screen.
To continue playing back the programme from this point, press the Play / Pause button again.
You are now watching the programme with a time delay to the live broadcast (Timeshift), while the programme continues to be recorded in the background.
Option 2
If you are watching a programme and are interrupted by e.g. a telephone call, you can press the Play / Pause button to pause the programme and start recording it at the same time.
The recording is started in the background and a freeze frame image is displayed on the screen.
To continue playing back the programme from this point, press the Play / Pause button again.
You are now watching the programme with a time delay to the live broadcast (Timeshift), while the programme continues to be recorded in the background.
13.1.2 Ending recording manually
First select the recording to be ended by selecting the channel on which the recording is running as described under Point 9.4.
Pressing the Stop button generates a query as to whether the recording should be saved or discarded.
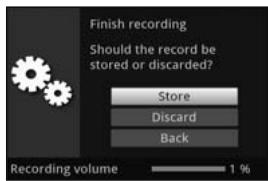
Select Save to save the recording, Discard to discard the recording or Back to continue with the recording.
13.1.3 Ending recording automatically
Option 1
After pressing the On / Standby button a query appears as to what should happen to the ongoing recording.
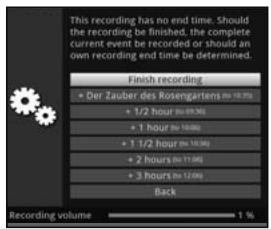
Select the line with the desired action.
If you have selected End recording the query as to what should happen to the recording, as described under Point 10.1.1.2 in your operating manual, appears.
If you have selected the programme title or one of the specified times, the receiver now records the whole of the current programme, or records it up to the selected time, and then switches to Standby. The screen switches off immediately after the selection is made.
Option 2
Pressing the Record button causes a window to open containing all available functions.

You can, for example, select +1 hour whereby the receiver will continue to record the channel and then automatically stop recording.
13.2 Timer recordings
You can use the DVR timer to record programmes to an attached recording medium while you are out. Your receiver also has a channel-switching timer. In terms of their programming, these timer types differ only in names (see Point 9.15 in your operating manual). You can programme the timers manually as described in this section, or use the EPG function.
Ensure that the receiver has acquired the correct time. During use, this is displayed in the Infobox and in standby mode in the panel display (if activated). If this is not the case, switch the receiver to a major channel such as ZDF for approx. 30 seconds, to acquire the time.
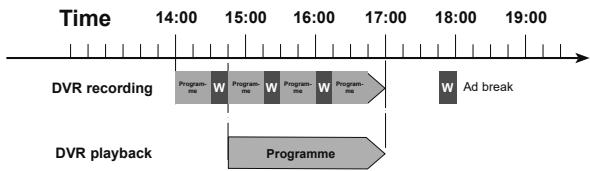
13.3 Timeshift function
The Timeshift function allows you to record and play back at the same time. This enables "timeshifted" viewing.
Hence, you can start watching the beginning of a recording and skip through any sections already recorded (e.g. advertising slots). The live broadcast of the programme continues
to be recorded at the same time. (see the following examples)
Example: Skipping ad breaks
Do you want to watch a programme without annoying ad breaks?
With the DVR you can simply skip recorded ad breaks.
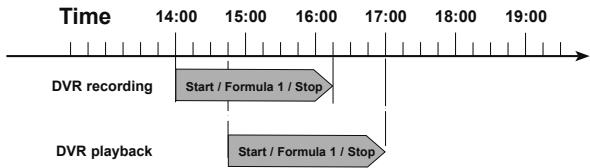
Example: Timeshifted playback
Have you missed the start of the Formula 1 race? No problem!
The DVR shows you the race with a time delay, as it also continues to record.
Starting the Timeshift function
Press the Play / Pause button.
The programme playback is paused and recording of the programme in progress starts simultaneously. The recording continues in the background, and a freeze frame image is displayed on the screen with a message in the upper right area of the screen and in the Infobox.
To continue playing back the programme from this point, press the Play / Pause button again.
You are now watching the programme with a time delay to the live broadcast (Timeshift), while the programme continues to be recorded in the background.
In order to move to a certain point in an ongoing recording you can use the Playback and Pause functions as well as fast forward / rewind and the jog shuttle functions, as described in Point 10.2.4 in your operating manual.
Pressing the Info button brings up the Infobox with a progress bar indicating the length of the recording / playback.
14 DVR playback
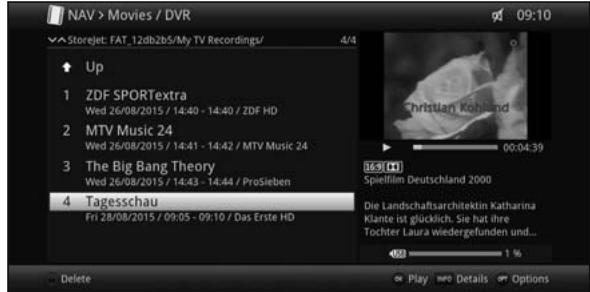
You can access the DVR recordings via the DVR Navigator.
14.1 Calling up the DVR Navigator / Starting DVR playback
The DVR Navigator can be called up in the following ways. Depending on whether you are in TV or radio mode, a list appears with all the TV or radio recordings stored on a connected USB storage medium, an inserted SD / MMC card or an available network drive.
When doing so pay careful attention to the information and settings for global and user-dependent parental control in Point 8.3.5 of the instruction manual.
Using the Info button, you can display the programme information and hide it again by re-pressing the button.
You can start to play back a recording by highlighting it and confirming with OK.
14.1.1 When in TV mode
In TV mode press the Stop/DVR button to switch directly to the DVR Navigator.
or
Open the channel list navigator by pressing the OK button and switch to the DVR navigator by pressing the Stop/DVR button.
or
In the Function selection select the Films / DVR item.
Now call up the My Recordings folder on your connected recording medium.
14.1.2 From playback of a running / existing DVR recording
Press the OK button to open the DVR navigator.
or In the Function selection select the Films / DVR item.
Now call up the My Recordings folder on your connected recording medium.
14.2 Pause / Freeze frame
To pause playback of a recording (freeze frame), press the Pause / Play button during playback.
Press the Pause / Play button again to resume playback from the same location.
14.3 Fast forward and rewind
Your DVR has fast forward and rewind functions so you can get to a specific place in a recording.
During playback, press the Fast Forward or the Rewind button.
The display "Fast Forward " or "Rewind " appears. The recording is played back at 4x speed in the selected direction.
Pressing the Fast Forward or Rewind button again increases the speed to 16x.
The display "Fast Forward " or "Rewind " appears.
Pressing the Fast Forward or Rewind button once again increases the scan speed to 16x.
The display "Fast Forward" or "Rewind" appears.
By pressing the Fast Forward or Rewind yet again, you can jump forwards or backwards in 10-minute intervals.
When you get to the place you want in the recording, you can return to normal playback mode by pressing the Pause / Play button.
14.4 Setting tags
Skip as described above to a location in the recording where you want to add a tag.
Pressing the Record button sets a tag at the selected location.
14.5 Skipping between tags
During playback, you have the option of navigating directly to locations in the recording where you have set tags.
Using the Tag menu item in the Options selection, select the tag to skip to the location you want in the recording.
14.6 Ending playback
Press the Stop button to end playback.
Playback will end and your receiver will return to normal mode. In doing so the receiver "takes note" of the place in the recording where playback ended. If you start playing this recording again, it will automatically resume at the point where you previously left off.
15 Encryption system
Under this menu item you can go to the submenus of the inserted smartcard and the CI-/CI+ module.
Call up Main menu > Conditional Access.
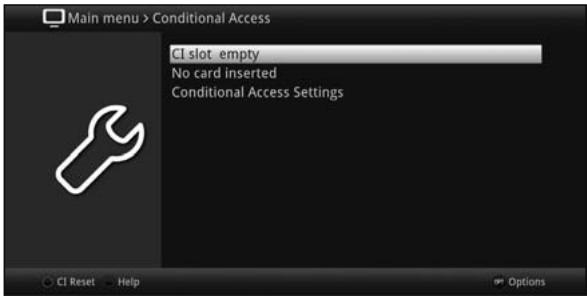
Select the inserted CI- / CI+ module to access its submenu and apply settings.
Note that the submenu now shown is provided by the module and can therefore differ from module to module.
15.1 Conditional Access Settings
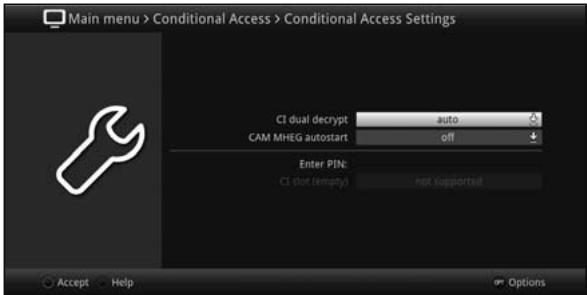
CI dual decryption
With CI dual decryption it is possible to simultaneously receive two different encrypted programmes with just a CI module and a valid smartcard.
For the CI dual decryption, select on or auto (for automatic detection), or switch the function off.
Please note that both channels to be decrypted must be on the same transponder.
CAM-MHEG Autostart
If a CAM-MHEG application is available for an application, this can be started automatically.
Set the CAM-MHEG Autostart item to on or switch the function off.
PIN input
Here you can set a PIN for the respective CI slot. This pin is required to support DVR recordings with parental control restrictions.
This setting is only available if this function is supported by your CI / CI+ module.
Manually initialising the Cl / Cl+ module
By pressing the green function button, CI Reset you can manually initialise the inserted CI / CI+ module.
16 ISI mode
The numerous functions and added value make watching television with TechniSat a wonderful and complex experience, with a wide range of possibilities. ISI mode cuts down the large number of options and is therefore ideal for children or older people who do not feel comfortable with the host of configuration options when operating the device. If the mode is activated it is no longer possible to accidentally make changes with the remote control. At the same time, ISI mode displays simplified channel information in large text on the screen for people with visual impairment and, if desired, offers a clearly legible digital time display.
Activate ISI mode as described under Point 8.8.1.6 in your operating manual.
With ISI mode active, the following functions are now disabled:
Automatic updates
- Films / DVR / Music / Images
- Internet / HbbTV
watchmi
- Mobile Apps
- UPnP Renderer
- Direct WLAN - TechniCast
- EPG / Timer
i Access to the various menus is also blocked, although you still have access to the menu to disable ISI mode.
ISI mode can also be used with the IsiZapper remote control, which is optimised for ISI mode, see also Point 3.1 (Optional IsiZapper remote control).
16.1 Switching the device on / off (ISI mode)
When the device is on standby, you can switch it on by pressing the On / Standby button on the remote control / device.
When operating normally you can switch the device to standby mode by pressing the On / Standby button.
16.2 Channel selection (ISI mode)
16.2.1 Using the channel up / down buttons
Use the up / down arrow keys on the receiver to select a channel, or use the Channel + / - buttons on the remote control to scroll up or down the channel settings.
16.2.2 Using the numeric pad keys
Use the numeric keypad keys to enter the number of the channel you want.
For example:
| 1 | for channel slot 1 | |||
| 1, | then 4 | for channel slot 14 | ||
| 2, | then 3, | then 4 | for channel slot 234 | |
| 1, | then 5, | then 6 | then 7 | for channel slot 1567 |
When entering channel numbers with multiple digits, you have approx. three seconds after pressing a key to complete the entry.
If you wish to enter a number consisting of only one, two or three digits, you can speed up the entry procedure by keeping the key depressed a little longer on the last digit.
16.2.3 Using the Navigator (channel list)
Press the OK button.
The channel list navigator will appear. In TV mode only TV channels are shown, and in radio mode only radio channels are shown.
The channel currently selected is highlighted.
You can now use the up / down arrow keys, to move the page up / down and the numeric pad keys to highlight the desired channel.
Press the OK button to select the highlighted channel.
16.3 Switching between TV / radio
Using the 0 button, call up the NAV menu.
You can now use the up / down arrow keys to highlight the desired operating mode (TV or Radio), or Back to leave the menu.
Pressing the OK button confirms the selection and switches to the selected operating mode.
The device switches to the last selected channel.
16.4 Volume control (ISI mode)
You have the option of adjusting the volume via your digital receiver. This facilitates operation of the receiver, as it means you can access all the major functions on a single remote control, and will only rarely have to resort to using the remote control for the TV.
To adjust the volume of your TV, press Volume + to increase the volume, and Volume - to decrease it.
During volume adjustment, the currently set volume is displayed at the top of the screen.

When you switch on the digital receiver, sound will be reproduced at the volume level last set. When operating a Bluetooth audio device, please also note Point 8.4.7 in your operating manual (headphone settings).
The volume control and mute button also control and mute the digital audio outputs (not in the case of the Bitstream setting).
22.4.1 Switching to mute
To switch the sound off (mute), press the Sound on / off button - press this button again to switch the sound back on.
Throughout the time that the volume is switched to mute, the symbol appears at the upper right of the screen.
When operating a Bluetooth audio device, e.g. headphones, its volume can be controlled when switched to mute without unmuting the device.
16.5 Teletext (ISI mode)
Your receiver can display teletext information on channels that broadcast teletext data.
16.5.1 Switching on Teletext
Switch teletext on by pressing the Teletext button.
16.5.2 Page selection
Use the numeric keypad keys 0 to 9 to enter the 3-digit page number of the teletext page you want.
i Your input will be displayed in the upper left-hand corner of the screen.
Because the Teletext pages cannot all be transmitted simultaneously by the channel, it can take a few seconds before the pages are displayed.
This happens if it is not yet possible to read the requested page in the memory, e.g. if requested by calling up Teletext immediately after changing channel.
16.5.3 Teletext subpages
If Teletext subpages exist for a selected Teletext page, the already loaded subpages are indicated to the left, alongside the Teletext display. As soon as a new subpage is available, this is automatically displayed.
Use the OK button to show a specific subpage.
The column on the left side of the screen is enabled. Subpages that have already been acquired are displayed.
Use the up / down arrow keys to select the desired subpage.
You can exit the display of specific subpages by pressing OK.
16.5.4 Mixed viewing mode
Pressing the Teletext button again enables mixed viewing mode. This means that the teletext is superimposed on the TV picture.
16.5.5 Exiting teletext
Pressing the Teletext takes you back to normal mode.
17 Software update via USB interface
In addition to the automatic software updates via the Internet and DVB sources, you have the option of updating the receiver's software via the USB interface and the SD / MMC card reader.
To be able to run the software update via the USB interface or the SD / MMC card reader, you first need to download the current software version from the Technisat homepage (www.technisat.de).
The update can be performed with standard USB Flash Sticks and SD / MMC cards that are formatted in FAT32 format.
Now copy the software file with the extension“.cpad” onto the Stick or the SD / MMC card.
If you only want to perform a single update, now also copy the singleupdate or for multiple updates the autoupdate file onto the USB stick or the SD / MMC card.
Please note that the singleupdate and autoupdate files have no file extension! Please also take note of your PC's folder settings for hiding file extensions.
The USB stick or SD / MMC card should not contain multiple cpad software files. In addition, the "autoupdate" and "singleupdate" files should not both be present at the same time.
Now switch the receiver to standby and insert the USB flash stick into a USB port or the SD / MMC card into the SD / MMC card reader on the receiver. Now switch the receiver on.
The update procedure will now be displayed, with the following steps.
The message "Loading software from data medium" appears
- A progress bar then appears showing the loading of the software.
- Once the software is 100% loaded, additional progress bars appear, one showing the progress of the individual update steps and the other the overall update progress.
The display shows the progress of the loading of the software and the individual update steps.
When the update is complete the TV picture appears again. The receiver can now be switched to standby and the USB stick or the SD / MMC card removed.
The update should not be interrupted at any stage by extracting the USB stick or the SD / MMC card, or by cutting off the power supply, as this can cause the receiver to malfunction.
18 Troubleshooting guide
| Fault | Possible cause | Remedy |
| Remote control does not work | Wrong remote control code used | Set the correct remote control code (see Point 8.2.5) |
| Batteries are spent | Replace the batteries (see Point 3.5) | |
| Various channels not shown in channel list | Wrong channel list selected | Select a different channel list (see Point 9.4.3.1) |
| Channels such as DSF and Tele 5 have interference at certain times on | On account of “DECT Telephones” (radio telephones) | Increase distance between base station and receiver |
| Sound OK, no TV picture | Radio mode called up and radio background image is switched off | Check setting (see Points 8.8.1 and 9.4.7) |
| Picture not fully visible or distorted | Picture format not correctly set | Check picture format (see Point 8.3.1) |
| Wrong picture display / zoom selected | Check picture display / zoom in the menu (see Point 8.3.2) | |
| Check zoom setting (see Point 9.12) | ||
| No picture, no sound, display not on | No mains voltage | Check mains adapter and plug |
| No picture via HDMI | Configured HDMI resolution is not supported by TV | Correct HDMI resolution (see Point 8.3.3) |
| No sound via HDMI, picture OK | Wrong HDMI sound format selected | Check HDMI sound format (see Point 8.4.5) |
| No sound or wrong audio playing | Dolby Digital active or wrong audio language selected | Check setting in menu (see Point 8.4.1 and Point 8.4.3) |
| Check Dolby Digital / language selection (see Point 9.7) | ||
| Cannot receive channels that were previously being received | Antenna defective or not correctly adjusted | Check antenna |
| Channel transferred to a different transponder | Run a search (see Point 17) | |
| Channel no longer being broadcast | None | |
| Intermittent appearance of square blocks in the picture. Switches to freeze frame intermittently, no sound. Screen black at certain times with the message "no signal". | Heavy rain or snow | Remove snow from dish |
| Antenna incorrectly adjusted | Adjust antenna | |
| Dish too small for your location | Use larger antenna | |
| Obstacle between dish and satellite, (e.g. a tree) | Mount dish with "clear line of sight" | |
| No picture, no sound display on | Short circuit in the LNB connection | Switch off receiver, resolve short circuit, switch receiver back on |
| Faulty or missing cable connection | Check all cable connections (see Point 5) | |
| Defective LNB | Replace LNB | |
| Incorrect external unit installed at receiver | Correct the setting (see Point 8.6) | |
| Antenna incorrectly adjusted | Adjust antenna | |
| Antenna cannot be rotated | Motor not compatible with DiSEqC 1.2 | Use a suitable motor |
| Time not displayed while in standby mode | Time not acquired | Play e.g. ZDF for 30 seconds |
| Standby clock is switched off | Switch standby clock on (see Point 8.2.4) | |
| Text in e.g. Infobox or SFIplus detailed information is hard to read at a distance | Character size set to "small" | Check picture format (see Point 8.8.1.1) |
| Receiver cannot be operated, switched on or off | Defective data stream -> receiver blocked | Hold down the On / standby button on the receiver or the remote control for approx. 5 seconds. |
| Pull out mains adapter for approx. 5 seconds and then re-connect the device | ||
| Perform Flash-Reset: Warning! This will cause all settings to be lost. > Remove mains adapter from the receiver > Simultaneously press and hold down the standby and the up arrow keys on the device. > With the Standby and the up arrow keys pressed down, re-insert the mains adapter > Keep both buttons pressed down for approx. 5 sec. then release. "Factory setting" appears in the display. | ||
| USB device not recognised | USB device formatted for wrong file system | Format USB device for FAT32 file format |
| Device switches off independently after a certain period of time | Auto Standby function is switched on | Check Auto Standby setting and disable if necessary. (see Point 8.2.7) |
| PC cannot connect to receiver; receiver cannot connect to network | Wrong network settings | Check network settings (see Point 8.5) |
| Network cable connected incorrectly | Check network connection | |
| DVR recording no longer possible | Selected storage medium is full | Delete existing recordings |
| Attach and configure another storage medium. (see Point 11.4.1) | ||
| Deletion of DVR recordings not possible | File system on storage medium is corrupt | Check storage medium (Point 11.4.2) |
| DVR recordings not displayed | Selected storage medium is not attached. | Connect configured storage medium (see Point 11.4.1) |
| Modify setting for storage medium (see Point 11.4.1) | ||
| A second encrypted channel cannot be played. | The two selected channels are not located on the same transponder | Select two channels that are located on the same transponder (see Points 9.4 and 9.4.10) |
| CI dual encryption is not switched on | Switch on CI dual encryption (see Point 20.1) | |
| The CI / CI+ module being Module is not "Dual-Decrypt" compatible | Use "Dual-Decrypt" compatible module |
Your TV bears the CE symbol and complies with all requisite EU standards.
Subject to change for amendments and printing errors Version 08/15.
Duplication and reproduction only with the publisher's approval
TechniSat and DIGIT ISIO STC / DIGIT ISIO STC+ are registered trademarks of
D-54541 Daun, Germany
www.technisat.de
Technical Hotline
Mon - Fri 8am - 8pm
+49 (0) 3925 / 9220 1800
Caution!
If you encounter a problem with this equipment,
please contact our Technical Hotline in the first instance.
If the TV needs to be sent to us for any reason
please only use the following address:
D-39418 Stassfurt, Germany
27 HD+ General Terms & Conditions
1. Scope, object of the contract and HD+ card
1.1 These general terms and conditions of HD PLUS GmbH, with its head office located at Betastrasse 1-10, 85774 Unterföhring, Germany ("HDP") apply exclusively for the HD+ service.
1.2 HDP cedes possession of a data medium ("HD+ card") to the user in accordance with these general terms & conditions. The software / data stored on the HD+ card (together the "HD+ Software") are the only technical requirement for the decrypted reception of certain digitally encrypted TV broadcasts ("programming") via a digital receiver with HD+ certification ("HD+ Service").
1.3 HDP grants the user a non-exclusive, non-transferrable licence for the proper use of the HD + software on the HD + card, for the purpose of the decryption of programming in accordance with the contract. This right is limited to the Federal Republic of Germany. The user is prohibited from using the HD + card outside of Germany. HDP can demand that the HD + card only be used in conjunction with an appropriate digital receiver. HDP is also entitled to ensure this by digital means (so-called pairing of the digital receiver and the HD + card).
1.4 The activation of the HD + card is the responsibility of the user. The HD + card may not be used in any other manner than that agreed. The user is not entitled to copy, modify, disassemble, decompile or apply other procedures to the HD + software in order to determine its source code or its structure or to make themselves aware of or influence processes or other status information without authorisation. Your statutory decompilation rights remain unaffected.
1.5 The digital receiver, the playback device (e.g. TV) and the programming are expressly not included within the service. Certified digital receivers are available commercially. Their installation is the responsibility of the user. In the case of technical or general problems with the digital receiver, responsibility for customer service lies with the manufacturer of the digital receiver.
1.6 The number and composition of the channels may change during the contractual period.
1.7 HDP reserves the right to upgrade the software on the HD + card and the digital receiver, as required for the use of the HD + service and for its expansion or modification at regular intervals and free of charge, or to update, expand or modify the existing HD + software. Regardless of existing regulations, HDP's liability in the event of data losses is limited to typical recovery costs.
1.8 HDP reserves the right to block or no longer support HD + cards that enable unauthorized use of the HD + service or an encryption environment as a result of legal violations, including by third parties. Extension of the HD + service following expiry of the activation period, in accordance with Section 3.1, is not possible in the case of blocked or no longer supported HD + cards.
2. User group and conditions of use
2.1 The HD+ service is available to natural persons of at least 18 years of age and is intended exclusively for private, non-commercial use. Use outside of the private household and forwarding to third parties are not permitted.
2.2 A pre-requisite for use of the HD + service is a digitally compatible satellite reception system, which is aligned with a satellite used by HDP or, in certain cases, cable reception (see www.hd-plus.de /faq) and use of a digital receiver marked with the HD + logo and a playback device (e.g. TV). However, these are not included within the scope of delivery (cf. Section 1.5).
2.3 Unlimited, comprehensive use of the HD + service is only possible when using HD + certified digital receivers. When using digital receivers without HD + certification, technical limitations regarding the use of the HD + service can occur, even if HD + certified common interface and receiver modules are used. In particular, it may be that the decryption or playback of specific programming is not possible. Therefore, the user has neither a right to issue warranty claims against HDP nor a right of extraordinary termination.
3. Fixed rate service fee / duration and extension of the HD+ service
3.1 Within the context of marketing offers, for example in conjunction with the purchase of an HD+ certified digital receiver, HD+ cards will be issued that come pre-activated for several months of use of the HD+ service, at no additional cost to the user. 3.2 Incidentally, there is a fixed rate service fee for use of the HD+ service, subject to the respective special conditions.
3.3 The term for the use of the HD + service begins upon activation of the HD + card. A card is activated if it is inserted into the intended slot on a digital receiver that is certified for HD + and used to decrypt an HD + channel, or upon extension or activation by the user
3.4 In due time, prior to expiry of the respective activation of the HD + service, the user will be notified of any possible extension or repurchase options for use of the HD + service, by means of a message on the playback device. The activation of an HD + card should only be extended after the message is displayed on the playback device. Otherwise the term of an existing activation can be cut short.
However, the purchase of an HD+ card does not entitle you to an extension of the card activation.
3.5 The programming and the services of third parties and their reception or use can incur separate costs, for which the user will be responsible.
4. Compliance with copyrights
4.1 The HD + software and the HD + card are legally protected. Where channels are used by licensors, their property is protected to the same extent. In the event of unauthorised duplication or distribution of the HD + software or the HD + card and / or copying of the same, HDP will pursue civil and, if applicable, criminal proceedings.
5. Rights and obligations of the user
5.1 Each user of the HD + service shall bear responsibility for its proper use him-/ herself; in particular, the user must ensure that broadcasting content not suitable for children is only made available to the group of users legally permitted to view it.
5.2 The user must not abuse the HD + service and is obliged to protect his HD + card against loss or misuse. In particular, the user cannot make or cause to have made any interventions to the HD + software, for example to enable the unauthorised receipt of encrypted programming. The use of devices to circumvent the encryption is also prohibited. Such abuses may be subject to civil or criminal proceedings. We hereby refer you to Section 6 and Section 7.3.
5.3 If HDP replaces the HD + card due to damage or loss for which the user is responsible, the user must provide compensation for damages.
5.4 If provision of the HD + service is impacted or interrupted due to interventions in the software or hardware for which HDP is not responsible, the user shall not be entitled to the refund of any service fees already paid. This also applies if the HD + card has been damaged or lost.
6. Indemnification
6.1 The user is liable towards HDP for adherence to the obligations outlined in Sections 4 and 5. He indemnifies HDP from all third-party claims that are brought against HDP as the result of the culpable violation of these obligations and / or harmful actions on the part of the user, and shall pay compensation for any additional damages, including the costs for necessary legal proceedings and defence.
7. Rights and obligations of HDP
7.1 HDP will notify the user of any service adjustment or limitation, even if only minor. There is no notification obligation if, under the respective circumstances, notification is not objectively possible prior to the commencement of the adjustment or limitation, or if the correction would delay interruptions that have already occurred.
7.2 HDP reserves the right to carry out maintenance and repair work on its technical equipment in order to maintain or improve the HD + service, without further notification. During this maintenance window, reception of the programming may be interrupted or affected; however, this does not entitle the user to a discount.
7.3 In the event of a breach of these conditions of use, or the justified suspicion of a breach by the user, in particular pursuant to Sections 4 and 5 above, at its own discretion HDP shall be entitled:
7.3.1 to temporarily or permanently exclude the user from use of the HD+ services and / or
7.3.2 to extraordinarily terminate the user relationship in accordance with Section 10.1.
7.4 HDP will issue the user with a warning prior to exclusion or termination, provided the breach is not so serious that it would not be reasonable for HDP to continue the user relationship.
7.5 In the event of exclusion from use in accordance with Section 7.3 for which the user is responsible, the user will still be obliged to pay the fee for the duration of the exclusion and the interruption to service.
8. Guarantee
8.1 HDP provides services using third-party communication networks or technical installations that are outside of HDP's control. HDP cannot rule out temporary limitations, impairments or failures of the HD + service caused by influences for which HDP is not responsible. In particular, HDP accepts no liability for ensuring that specific programming can be received at a certain time; this does not apply if HDP is responsible for a fault.
8.2 The user recognises that the quality of the programming that is decrypted or made accessible is dependent on the one hand on the signal quality provided by third parties and, on the other, on the performance capability of the playback device used by the user, both of which fall outside of HDP's responsibility. The user also recognises that the recording and playback of recorded programmes can be limited by third parties.
8.3 HDP hereby points out that software programs are not developed such that they run without errors under all conditions.
8.4 Within the scope of its existing technical and operational capabilities, HDP immediately corrects all reported faults with the HD+ service, for which correction does not require the replacement of the HD+ card. The user bears the costs for use of HDP's customer service. Temporary impairments to reception caused by atmospheric faults or broadcaster or satellite / cable network failures do not entitled the user to a discount.
9. Liability
9.1 HDP is only liable to the extent that HDP, its vicarious agents and / or legal representatives commit a wilful or grossly negligent act.
9.2 In the case of damage resulting from minor negligence, HDP shall only be liable if a major contractual obligation has been breached, or in the case of delay or impossibility. In these cases, liability is limited to the typically foreseeable damages.
9.3 If temporary impairments to the reception of programming should occur that fall outside of HDP's sphere of influence, in particular a signal drop-out for which HDP is not responsible, HDP shall not be held liable.
9.4 HDP is not responsible for the decrypted programming made accessible by you, nor for its content.
9.5 Legally prescribed, strict liability on the part of HDP, in particularly liability in accordance with the Product Liability Act and statutory warranty liability shall remain unaffected by the aforementioned liability limitations. The same applies for HDP's liability in the case of culpable loss of life, injury or damage to the user's health. Strict liability in accordance with § 536a of the German Civil Code (BGB) is excluded if a HDP cedes an HD + card to the user.
9.6 Sections 9.1, 9.2 and 9.5 cover all contractual and statutory claims that may be brought on account of the use of the HD+ service.
10. Termination of the contract and modification of the HD + service
10.1 The contract covering the use of the HD + service shall run for the respective agreed duration from the activation of the HD + card. Any extension requires that the HD + card has not been blocked in accordance with Section 1.8. Any extraordinary termination rights shall remain unaffected.
10.2 The user cannot extraordinarily terminate the contract on account of changes to the volume or content of the program- ming that can be decrypted by the user using the HD + software during the contractual period.
10.3 If HDP terminates the HD + service following the issuing of a warning pursuant to Section 7.3, HDP can demand compensation for damages in accordance with statutory regulations.
11. Data protection
11.1 Specific details regarding data processing can be found in the data protection notice (see www.hd-plus.de/datenschutz).
12. Final provisions
12.1 HDP is entitled to transfer your rights and obligations from this contract, in part or in full, to a third party suitable for the proper continuation of the contract. In this case, the user is entitled to terminate the contractual relationship with effect from the time of the transfer.
12.2 The law of the Federal Republic of Germany applies. The application of the UN Convention on Contracts for the International Sale of Goods is excluded.
Version: July 2014
TechniSat Warranty


2 year warranty on product registration

Here's how to secure your warranty!
In addition to the statutory guarantee, TechniSat grants you the following warranty / warranty extension options:

2 Year Warranty
Register your product within 4 weeks of purchase online at
www.technisat.de/garantie. In the case of product registration, the warranty period (device warranty) runs for 2 years from the date of purchase from your specialist retailer or distribution partner, or in the TechniShop.
Extend your warranty period!

3 Year Warranty
If, during product registration (www.technisat.de/garantie), you
have consented to use of your personal data by TechniSat Digital GmbH for advertising and marketing purposes, the warranty period (device warranty) shall be extended by a further year, to 3 years from the date of purchase.

Warranty Tickets
TechniSat offers the option of you purchasing a parts warranty ticket for 10 parts in your specialist retail outlet or in an office (www.technishop.de). Thus, following a two-year (or extended three-year) device is pending on the ticket duration - you will be charged parts warranty.
All detailed information can be found on the following pages.
TechniSat
The German Television Brand
Our products are subject to strict quality control. Should your TechniSat product nonetheless fail to function without fault, we very much regret this and request that you contact your specialist retailer or distribution partner or our service hotline as outlined below.
In addition to the statutory guarantee, we offer a warranty on all specifically labelled TechniSat devices in accordance with the following provisions, unless we have expressly excluded certain devices from our warranty promise (e.g. goods sold as seconds or on special offer). This does not affect your statutory rights.
- In the case of product registration, the warranty period (device warranty) runs for 2 years from the date of purchase from your specialist retailer or distribution partner, or in the TechniShop.
- If, during product registration (www.technisat.de/garantie), you have consented to use of your personal data by TechniSat Digital GmbH for advertising and marketing purposes, the warranty period (device warranty) shall be extended by a further year, to 3 years from the date of purchase.
- If you have purchased an additional parts warranty (Parts Warranty Ticket) via your specialist retailer, your distribution partner or in the TechniShop and have registered the product, following expiry of the two-year (or extended three-year) device warranty - depending on the ticket duration - you will receive an extended parts warranty on the following device parts: all electronic components and assemblies, excluding the screen, inverter board, housing and remote control.
- The device and parts warranty is valid within the territory of the European Union and Switzerland.
9. The following steps are required in order to make a warranty claim:
- During the warranty period, devices with defects resulting from material and manufacturing defects will be repaired or replaced at our discretion. Replaced devices or parts of devices shall pass into our ownership. Services performed under warranty shall neither result in an extension of the warranty period nor cause a new warranty to be brought into effect.
- Warranty services include neither compensation for damages nor expenses for data losses incurred within the scope of the repair (e.g. created broadcaster lists or recordings on hard disks). We request that you perform a data backup prior to sending us the device.
- Warranty claims must be made immediately after becoming aware of the defect, and within the warranty period.
- The warranty is only valid for the initial purchaser of the device and cannot be transferred to third parties (e.g. by means of private resale).
(1) In order to receive the TechniSat warranty, you must have registered your device with us no later than 4 weeks after purchase, online on the product registration page. Product registration can be carried out at www.technisat.de/garantie
(1a) Options for extension of the two-year device warranty: You have extended the warranty period by an additional year by consenting to the use of your personal data for advertising purposes on the product registration page and/or have acquired the parts warranty by means of the purchase and registration of the Parts Warranty Ticket on the product registration page.
(2) In order to make a warranty claim and to have the device inspected, please first contact your specialist retailer or distribution partner from whom you purchased the device. They will agree and initiate the further processing of the warranty claim with TechniSat.
(3) For devices that have been purchased in the TechniShop we request that, in order to make a warranty claim and so as to clarify the defect, you first contact our technical service hotline on +49 3925- 9220 1800
(4) If you have been recommended by our service hotline employees to send the device to our TechniSat Service Centre, we request that you use our free shipping note available via the Returns section at www.technishop.de, and send your device to the service address provided below
- including the proof of purchase stating the date of purchase and serial number
- including all accessories (e.g. network cable, remote control (but without the smartcards and CI modules that are not included within the scope of delivery)),
- including, if applicable, the separately purchased parts warranty ticket.
with a precise description of the fault and - in the original packaging.
(5) Should - following consultation with our service hotline - the device be sent to us via your specialist retailer or distribution partner, they will send the faulty device to the service address provided below for you, free of charge, with their own service report and with the proof of purchase (copy of the invoice or till receipt along with the separately purchased parts warranty ticket if applicable).
(6) Warranty claims are excluded in the case of damage caused by:
- Misuse or improper handling
Environmental influences (humidity, heat, overvoltage,dust,etc.) - Failure to adhere to the safety precautions applicable to the device
- Failure to adhere to the operating manual
- Use of force (e.g. impact, shock, dropping)
- Interventions that are not performed by an authorised service agent or by a TechniSat specialist retailer
- Attempted self-repairs
- Return shipping in packaging that is not suitable for goods transport.
(7) In case of warranty you will receive a repaired or as-new equivalent device. We will cover the cost of return.
(8) Subject to charge, we will repair defects or damage to the device not (or no longer) included within the scope of the warranty. For a personal quotation, please contact our Service Hotline. In this case you must cover the shipping costs.
Service report for the warranty claim
Should, contrary to expectation, a fault occur in spite of the cutting edge production and continual quality controls, we request that you first contact our technical hotline on +49 3925 - 9220 1800. If we cannot solve the problem in this way, we request that you contact your specialist retailer or distribution partner or send the device purchased in the TechniShop to our TechniSat Service Centre. When so doing - in all cases - complete the following service report in advance.
Service Report
Serial No.
Item No.
Note
The serial and item numbers are located on the reverse side of the box or directly on the device.
Error description
Please explain your device's defect as accurately as possible
Surname:
First name:
Street:
Postal
code:
Telephone: optional
Town/
City:


Please note that a repair under warranty can only take place quickly and smoothly if this Service Report is completely filled in, and sent with a precise error description, proof of purchase (delivery note, invoice, till receipt etc.) and the defective device in the original packaging, including all accessories (e.g. power cable, remote control). You will receive the service report, returned to you with a corresponding comment from our service workshop and the repaired device.