
MS6CM6155 - Blender BOSCH - Free user manual and instructions
Find the device manual for free MS6CM6155 BOSCH in PDF.




| Product type | Multifunctional food processor with blender function |
| Brand | Bosch |
| Model | MS6CM6155 |
| Power supply | 220-240 V, 50/60 Hz |
| Number of speeds | 7 (or 4 depending on variant) + pulse button M |
| Mixing bowl capacity | Up to 750 g flour + ingredients |
| Blender capacity | 1.25 L max (0.5 L for hot or frothy liquids) |
| Main functions | Mixing, kneading, whisking, blending, grating, slicing, chopping, crushing ice |
| Included accessories | Mixing whisk, beating whisk, dough hook, mixing bowl, lid, blender bowl, grating/slicing discs, storage bag |
| Bowl material | Plastic (stainless steel optional) |
| Care and cleaning | Bowl, accessories and blender are dishwasher safe. Wipe base with a damp cloth. |
| Safety | Lock-out safety, anti-tip safety, overload protection, restart safety |
| Spare parts and repairability | Available from Bosch customer service |
| Warranty | According to the conditions of the country of purchase |
| Cord length | 1 m max (automatic cord winder on some models) |
| Storage | Accessory storage bag, cord winder |
Frequently Asked Questions - MS6CM6155 BOSCH
User questions about MS6CM6155 BOSCH
0 question about this device. Answer the ones you know or ask your own.
Ask a new question about this device
Download the instructions for your Blender in PDF format for free! Find your manual MS6CM6155 - BOSCH and take your electronic device back in hand. On this page are published all the documents necessary for the use of your device. MS6CM6155 by BOSCH.
USER MANUAL MS6CM6155 BOSCH
Register your new Bosch now: www.bosch-home.com/welcome

MUM5....

BOSCH
de Gebrauchsanleitung en Instruction manual fr Mode d'emploi it Istruzioni per l'uso nl Gebruiksaanwijzing da Brugsanvisning
no Bruksanvisning sv Bruksanvisning fi Käyttöohje es Instrucciones de uso pt Instruções de serviços el Οδηγίες χρήσης
tr Kullanım kılavuzu pl Instrukcja obsługi uk Інструкція з експлуатації ru Инструкция по эксплуатации ar دليل الاستخدام
de Deutsch 3 en English 17 fr Français 30 it Italiano 44 nl Nederlands 57 da Dansk 70 no Norsk 83 sv Svenska 96 fi Suomi 109 es Español 121 pt Português 136 el Ελληνικά 150 tr Türkçe 165 pl Polski 181 uk Українська 195 ru Русский 209 ar العربية 241
1 packet baking powder
125 ml milk
This appliance is intended for domestic use only. Use the appliance only for processing normal amounts of food and for normal amounts of time for domestic use. Do not exceed permitted maximum quantities (→ "Application examples" see page 26).
The appliance is suitable for mixing, kneading and beating food. The appliance must not be used for processing other substances or objects. Additional applications are possible if the accessories approved by the manufacturer are used. Only use the appliance with approved genuine parts and accessories. Never use the accessory parts for other appliances.
Only use the appliance indoors at room temperature and up to 2000 m above sea level.
Important safety information
Read and follow the instruction manual carefully and keep for later reference! Enclose these instructions when you give this appliance to someone else. If the instructions for correct use of the appliance are not observed, the manufacturer's liability for any resulting damage will be excluded.
This appliance can be used by persons with reduced physical, sensory or mental capabilities or lack of experience and/or knowledge if they have been given supervision or instruction concerning use of the appliance in a safe way and if they understand the hazards involved. Keep children away from the appliance and connecting cable and do not allow them to use the appliance. Do not let children play with the appliance. Cleaning and user maintenance must not be performed by children.
Risk of electric shock and fire!
- Connect and operate the appliance only in accordance with the specifications on the rating plate. Do not use the appliance if the power cord and/or appliance are damaged. Only our customer service may repair the appliance, e.g. by replacing a damaged power cord, in order to avoid hazards.
- Use only the rotary switch to switch the appliance on or off. Never connect the appliance to timer switches or remote-controllable sockets. Never leave the appliance unattended while it is switched on!
- Do not place the appliance on or near hot surfaces, e.g. hobs. The power cord must not come into contact with hot parts or be pulled across sharp edges.
- Never immerse the base unit in water or place it in the dishwasher. Do not steam-clean the appliance. Do not use the appliance with damp hands.
- After each use, whenever the appliance is unsupervised, prior to assembly, prior to disassembly, prior to cleaning and in the event of an error, the appliance must always be disconnected from the mains.
Risk of injury!
Before replacing accessories or additional parts which move during operation, the appliance must be switched off and disconnected from the power supply. After switching off, the drive continues for a short time. Wait until the drive has come to a standstill. - Do not adjust the swivel arm while the appliance is switched on. - Only use tools when the bowl is inserted, the lid is fitted and the protective drive covers are in place! When using accessories, fit the bowl, lid and drive covers according to the instructions! - While operating the appliance, never reach into the bowl or filling shaft with your hands. Do not insert any objects (e.g. wooden spoon) into the bowl or filling shaft. Keep hands, hair, clothing and other utensils away from rotating parts. - Never use tools and accessories or 2 accessories at the same time. When using the accessories, follow the individual operating instructions enclosed. - The accessory must be completely assembled before use. Never assemble the accessory on the base unit. The accessory should only be used in the intended operating position. - Do not grip the sharp blades or edges of the cutting discs. Take hold of cutting discs by the edge only. - Do not touch blender blades with bare hands. - Never reach into the attached blender! Never use the blender without the lid in place. - Care shall be taken when handling the sharp cutting blades, emptying the container and during cleaning.
Risk of scalding!
If processing hot liquids, steam escapes through the funnel in the lid. Add a max. 0.5 litres of hot or frothing liquid.
Risk of suffocation!
Do not allow children to play with packaging material.
Caution!
We recommend that the appliance is never switched on for longer than is necessary to process the ingredients. Do not operate at no-load.
Important!
It is essential to clean the appliance thoroughly after each use or after it has not been used for an extended period (→ "Cleaning and servicing" see page 24).
Explanation of the symbols on the appliance or accessory

Follow the instructions in the operating instructions.

Caution! Rotating blades.

Caution! Rotating tools.
Do not place fingers in the feed tube.
Congratulations on the purchase of your new Bosch appliance. You can find further information about our products on our web page.
Contents
Intended use 17
Important safety information 17
Safety systems. 19
Overview 20
Operating positions 20
Operation 21
Cleaning and servicing 24
Storage 25
Troubleshooting 25
Application examples 26
Disposal 27
Guarantee 27
Optional accessories 28
Safety systems
Start lock-out
See "Operating positions" table.
The appliance can be switched on in pos. 1 and 3 only:
- when the bowl (11) has been inserted and turned until it locks into place.
Restart lock-out
If the power is interrupted, the appliance remains switched on but the motor does not start running again when the power is restored. To switch the appliance on again, turn the rotary switch to P, then switch on.
Overload protection
If the motor switches itself off while the appliance is being used, the overload protection feature has been activated. A possible cause may be that too much food was processed at one time.
If a safety system is activated, see "Troubleshooting".
The appliance requires no maintenance.
Overview
Please fold out the illustrated pages.
Fig. A:
Base unit
1 Release button
2 Swivel arm
"Easy Armlift" function to support the upward movement of the arm (see "Work positions").
3 Rotary switch
When the appliance has been switched off (position P), the appliance runs automatically to the optimum position for changing the tools.
MUM52...
0/off = Stop
M = Instantaneous switching at maximum speed, hold switch for required blending duration.
Settings 1-4, Operating speed:
1 = low speed - slow,
4 = high speed - fast.
MUM54/.MUM55/.MUM56..
0/off = Stop
M = Instantaneous switching at maximum speed, hold switch for required blending duration.
Settings 1-7, Operating speed:
1 = low speed - slow,
7 = high speed - fast.
4 On/Off display
(MUM54/.55/.56.)
Is lit while the appliance is operating (rotary switch on M or 1-7). Flashes if the appliance has been operated incorrectly, the electronic fuse has tripped or the appliance is defective - see section "Troubleshooting".
5 Drive cover
To remove the drive cover, press on the rear area and remove the cover.
6 Drive for
- Continuous-feed shredder and
- Citrus press (optional accessory*).
When not in use, attach the drive cover.
7 Drive for tools (stirrer, whisk, kneading hook) and mincer (optional accessory*)
8 Blender drive cover
9 Drive for blender (optional accessory*) When not in use, attach the blender drive cover.
10 Cord store
MUM52..MUM54..
Stow the cord in the cord store
MUM55./MUM56.:
Automatic cord winder
Bowl with accessories
11 Stainless steel stirring bowl
12 Lid
Tools
13 Stirrer
14 Whisk
15 Kneading hook with dough deflector
16 Accessories bag
For storage of the tools and cutting discs.
Continuous-feed shredder
17 Pusher
18 Cover with filling shaft
19 Cutting discs
a Reversible slicing disc - thick / thin b Reversible shredding disc - coarse / fine c Grating disc - medium-fine
20 Disc holder 21 Housing with outlet opening Blender* 22 Blender jug 23 Lid 24 Funnel
- If an accessory is not included in the product package, it can be purchased via the trade or customer service.
Operating positions
Fig. B:
Attention!
Before operating the appliance, attach the tool / accessory to the correct drive and in the correct position and place in the operating position according to this table. The swivel arm must be engaged in every operating position.
Note
The swivel arm features an "Easy Armlift" function which supports the upwards movement of the swivel arm.
Selecting the operating position:
Press the Release button and move the swivel arm. Support movement with your hand. - Move the swivel arm until it engages in the required position.
| Position | Drive | MUM52.. MUM 54/55/ 56.. | ||
| 1 | 7 | ↑ | 1-4 | 1-7 |
| 1-4 | 1-7 | |||
| 1-2 | 1-3 | |||
| 2 | 7 | * | - | |
| 3 | 6 | ↓ | 2-4 | 3-7 |
| 2-3 | 3-5 | |||
| 4 | 9 | ↓ | 3-4 | 5-7 |
| 7 | ← | 3-4 | 5-7 | |
- Insert / remove whisk, stirrer or kneading hook. Add large quantities of ingredients.
Operation
Risk of injury!
Do not insert mains plug until all preparations for working with the appliance are complete.
Attention!
Do not operate the appliance without an accessory/tool in the operating position. Do not operate the appliance empty. Do not expose appliance or accessories to heat sources. Parts are not microwave-safe.
Before operating the appliance and accessories for the first time, clean thoroughly; see "Cleaning and servicing".
Important information
In these instructions for use, the recommended reference values for the operating speed refer to appliances with a 7-setting rotary switch. For appliances with a 4-setting rotary switch, you can find the values in brackets after the values for a 7-setting rotary switch.
These operating instructions contain a sticker with reference values for the operating speed of the appliance when using the tools or accessories. We recommend attaching this sticker to the appliance (Fig. ⑥).
Preparation
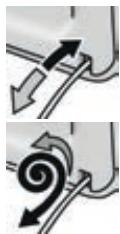
- Place the base unit on a smooth, clean surface. Pull out the power cord (Fig. D).
MUM52../MUM54...
Cord store: Pull out cable to the required length.
MUM55./MUM56..
Automatic cord winder: Pull out the cord in one go to the required length (max. 100 cm) and slowly release; the cord is locked.
Reducing the cord length: Pull gently on the cord and allow it to roll up to the required length. Then gently pull the cord again and slowly release; the cable is locked.
Warning!
Do not twist the cord when inserting it. If the appliance features an automatic cord winder, do not insert the cord manually. If the cord jams, pull out the cord all the way and then allow it to wind up.
Insert the mains plug.
Bowl and tools
Risk of injury from the rotating tools! While the appliance is operating, never place fingers in the mixing bowl. Attach the cover (12) before operating the appliance! Do not change tools until the drive has come to a standstill - when the appliance is switched off, the drive continues running briefly and stops in the tool change position. Do not move the swivel arm until the tool has come to a standstill.
Always secure unused drives with protective drive covers.
Attention!
Use bowl with this appliance only.
Stirrer (13)
for stirring dough, e.g. cake mixture
Whisk (14)
for whisking egg whites, cream and light dough, e.g. sponge mixture
Kneading hook (15)
for kneading heavy dough and mixing in ingredients that ought not be cut (e.g. raisins and chocolate chips)
Working with the bowl and the tools Fig. 1:
Press the Release button and move the swivel arm to position 2. Insert the bowl: Tilt the bowl forwards and then set it down. Turn anti-clockwise until it locks into place. Depending on the processing task, insert the stirrer, whisk or kneading hook until it locks into position.


Note:
If using the kneading hook, rotate the dough deflector until the kneading hook can lock into position (Fig. 4-4b).
Put the ingredients to be processed into the bowl. Press the Release button and move the swivel arm to position 1. - Attach the cover. Set the rotary switch to the desired setting.
Our recommendation:
- Stirrer:
first stir in at setting 1 (1), then select setting 7 (4)
- Whisk:
setting 7 (4), mix in at setting 1 (1)
- Kneading hook:
first stir in at setting 1 (1), knead at setting 3 (2)
Adding more ingredients
- Switch off the appliance with the rotary switch.
- Add more ingredients through the feed tube in the cover.
or
Remove lid. Press the Release button and move the swivel arm to position 2. - Add ingredients.
After using the appliance
- Switch off the appliance with the rotary switch. Remove mains plug. Remove lid. Press the Release button and move the swivel arm to position 2. Take the tool out of the drive. Remove the bowl. Clean all parts, see "Cleaning and servicing".
Continuous-feed shredder
Risk of injury!
Do not grip the sharp blades or edges of the cutting discs. Take hold of cutting discs by the edge only. Before attaching or removing the continuous-feed shredder, wait until the drive has come to a standstill and pull out the mains plug. Do not reach into the feed tube.


Warning!
The continuous-feed shredder must be completely assembled before use. Never assemble the continuous-feed shredder on the base unit. Operate the continuous-feed shredder in the indicated operating position only.
Predetermined breaking point Fig. F:
The built-in predetermined breaking point protects the drive of the appliance. If an overload occurs, the drive shaft of the continuous-feed shredder breaks. However, the drive shaft can easily be replaced. A new disc holder with drive shaft is available from customer service.
Reversible slicing disc - thick / thin

for slicing fruit and vegetables.
Process at setting 5 (3).
Designation on the reversible slicing disc:
"1" for the thick slicing side
"3" for the thin slicing side
Warning!
The reversible slicing disc is not suitable for slicing hard cheese, bread, rolls or chocolate. Slice boiled, waxy potatoes only when they are cold.
Reversible shredding disc - coarse / fine

for shredding vegetables, fruit and cheese, except for hard cheese (e.g. Parmesan).
Processing at setting 3 (2) or 4 (3).
Designation on the reversible shredding disc:
"2" for the coarse shredding side
"4" for the fine shredding side
Warning!
The reversible shredding disc is not suitable for shredding nuts. Shred soft cheese with the coarse side only at setting 7 (4).
Grating disc - medium-fine

for grating raw potatoes, hard cheese (e.g. Parmesan), cooled chocolate and nuts.
Process at setting 7 (4).
Warning!
The grating disc is not suitable for grating soft cheese and cheese slices.
Working with the continuous-feed shredder
Fig. G:
Press the Release button and move the swivel arm to position 2. Insert the bowl:

Tilt the bowl forwards and then set it down. Turn anti-clockwise until it locks into place.

Press the Release button and move the swivel arm to position 3. Remove the drive cover from the drive of the continuous-feed shredder (Fig. G-5a). Hold the disc holder at the lower end, ensuring that the two tips are face up. Carefully place the required slicing or shredding disc onto the tips of the disc holder (Fig. G-6a). In the case of reversible discs, ensure that the required side is face up. Grip the disc holder at the upper end and insert it into the housing (Fig. 6-6b). Attach the cover (note the mark) and turn it all the way in a clockwise direction. Place the continuous-feed shredder on the drive and rotate it all the way in a clockwise direction, as illustrated in Fig. 6-8. Turn the rotary switch to the recommended setting. Put the food to be processed in the feed tube and push it down with the pusher.
Warning!
Prevent the cut ingredients from building up in the outlet opening.
Tip: To ensure even cutting results, process thin ingredients in bunches.
Note: If the food to be processed sticks in the continuous-feed shredder, switch the food processor off, pull out the mains plug, wait until the drive comes to a standstill, remove the cover from the continuous-feed shredder and empty the feed tube.
After using the appliance
- Switch off the appliance with the rotary switch.
- Rotate the continuous-feed shredder in an anti-clockwise direction and remove it.
- Rotate the lid in an anti-clockwise direction and remove it.
- Remove the disc holder with the disc. To do this, press a finger from below against the drive shaft (Fig. H). Clean the parts.
Blender
Risk of injury from sharp blades / rotating drive!
Never place fingers in the attached blender! Do not remove / attach the blender until the drive is at a standstill! Operate the assembled blender only and with the lid attached.
Risk of scalding!
If processing hot liquids, steam escapes through the funnel in the lid. Add a max. 0.5 litres of hot or frothing liquid.
Warning!
Blender may be damaged. Do not process deep-frozen ingredients (except ice cubes). Do not operate blender when empty.
Working with the blender Fig.1:
Press the release button and move the swivel arm to position 4. Remove the blender drive cover. - Attach blender jug (mark on the handle on mark on the base unit) and turn all the way in an anti-clockwise direction. Add ingredients.
Maximum amount of liquid = 1.25 litres; maximum amount of frothing or hot liquids = 0.5 litres; Optimal processing capacity - solids = 50 - 100 g
- Attach the cover and turn anti-clockwise all the way into the blender handle. The cover must be locked in position. Set the rotary switch to the desired setting.
Adding more ingredients
Fig. 1-8:
- Switch off the appliance with the rotary switch. Remove the lid and add ingredients or remove the funnel and gradually add solid ingredients through the refill opening or
- pour liquid ingredients through the funnel. After using the appliance
- Switch off the appliance with the rotary switch.
- Rotate the blender in a clockwise direction and remove.
Tip: It is recommended to clean the blender immediately after use.
Cleaning and servicing
The attachments and accessories used must be thoroughly cleaned after each use.
Attention!
Do not use abrasive cleaning agents.
Surfaces may be damaged.
Cleaning the base unit
Danger of electric shock!
Never immerse the base unit in water or place under running water. Do not use a steam cleaner.
Remove mains plug. Wipe the base unit and drive cover with a damp cloth. If required, use a little detergent. Then dry the base unit.
Cleaning the bowl and tools
The bowl and tools are dishwasher-proof. Do not wedge plastic parts in the dishwasher, as they could be permanently deformed during the washing process!
Cleaning the continuous-feed shredder
Risk of injury from sharp blades!
Do not grip the sharp blades or edges of the cutting discs. Clean them with a brush.
All parts of the continuous-feed shredder are dishwasher-proof.
Tip: To remove the red film after processing e.g. carrots, pour a little cooking oil on a cloth and rub the film off the continuous-feed shredder (not the cutting discs). Then rinse the continuous-feed shredder.
Cleaning the blender
Risk of injury from sharp blades!
Do not touch blender blades with bare hands.
The blender jug, lid and funnel are dishwasher-proof.
Tip: After processing liquids, it is often sufficient to clean the blender without removing it from the appliance. Pour a little water and washing-up liquid into the attached blender. Switch on the blender for several seconds (setting M). Pour out the water and rinse out the blender with clear water.
Important information
If required, clean accessories bag. Follow care instructions in the bag.
Storage
Risk of injury!
When the appliance is not in use, pull out the mains plug.
Fig. K:
- Store tools and cutting discs in the accessories bag.
- Keep accessories bag in the bowl. To store in the original packaging, see
Fig. L.
Troubleshooting
Risk of injury!
Before eliminating a fault, pull out the mains plug.
Important information for MUM54/.MUM55/.MUM56..
The Operating indicator flashes if the appliance has been operated incorrectly or the electronic fuse has tripped or the appliance is defective.
The swivel arm must be engaged in every operating position.
Initially try to eliminate the problem which has occurred with the help of the following information.
Fault
Appliance does not start.
Remedial action
Check the power supply. Check the mains plug. - Check swivel arm. Correct position? Engaged? Screw on blender or bowl as far as possible. - Attach the blender cover and screw on as far as possible. - Attach drive cover to unused drives. The safety lock is active. Switch appliance to P and then back to the required setting.
Fault
Appliance switches off during use. The overload protection feature has been activated.
Too much food was processed at one time.
Remedial action
Switch off the appliance. Reduce processing quantity. - Do not exceed permitted maximum quantities (see "Application examples").
Fault
While the drive was running, the release button was inadvertently pressed. The swivel arm moves up. The drive switches off, but does not stop in the tool change position.
Remedial action
Set the rotary switch to 0/off. Move swivel arm to position 1. Switch on appliance (setting 1). Switch off appliance again.
Tool stops in tool change position.

Fault
Blender does not start working or stops during use, the drive is "humming". Blade is blocked.
Remedial action
- Switch off the appliance and pull out the mains plug.
- Detach the blender and remove the obstruction. Re-attach the blender. Switch on the appliance.
Important information
If the fault cannot be eliminated, please contact customer service.
Application examples
Whipped cream
100-600 g

Whip cream with the whisk for 1 1/2 to 4 minutes at setting 7 (4) depending on the quantity and properties of the cream.
Egg white
1 to 8 egg whites. Beat egg white with the whisk for 4 to 6 minutes at setting 7 (4).
Sponge mixture
Basic recipe: 2 eggs, 2-3 tbsp. hot water, 100 g sugar, 1 packet of vanilla sugar, 70 g flour, 70 g cornflour, baking powder if required.

Beat the ingredients (except flour and cornflour) with the whisk for approx. 4-6 minutes at setting 7 (4) until frothy. Rotate switch to setting 1 (1) and spoon in the sifted flour and cornflour within approx. 1/2 to 1 minute.
Maximum quantity: 2 x basic recipe
Cake mixture
Basic recipe
3-4 eggs
200-250 g sugar
1 pinch of salt
1 packet of vanilla sugar
or peel from 1/2 lemon
200-250 g butter or margarine
(room temperature)
500 g flour
1 packet of baking powder
125 ml of milk
Mix all ingredients with the stirrer for approx. 1/2 minute at setting 1 (4), then for approx. 3-4 minutes at setting 7 (4).
Maximum quantity: 1.5 x basic recipe
Short pastry
Basic recipe
125 g butter (room temperature)
100-125 g sugar
1 egg
1 pinch of salt
A little lemon peel or vanilla sugar
250 g flour
Baking powder if required
Using the stirrer, process all ingredients for approx. 1/2 minute at setting 1 (1), then for approx. 2-3 minutes at setting 6 (3). From 500 g flour: - Knead the ingredients with the kneading hook for approx. 1/2 minute at setting 1 (1), then for approx. 3-4 minutes at setting 3 (2). Maximum quantity: 2 x basic recipe


Yeast dough
Basic recipe
500 g flour
1 egg
80 g fat (room temperature)
80 g sugar
200-250 ml lukewarm milk
25 g fresh yeast or 1 packet of dried yeast
Peel of 1/2 lemon
1 pinch of salt
Process all ingredients for approx.
1/2 minute at setting 1, then for approx. 3-6 minutes at setting 3 (2) using the kneading hook.
Maximum quantity: 1.5 x basic recipe
Pasta dough
Basic recipe
300 g flour
3 eggs
1-2 tbs. (10-20 g) cold water as required
Process all ingredients for approx.
3-5 minutes at setting 3 (2) until a dough forms.
Maximum quantity: 1.5 x basic recipe
Bread dough
Basic recipe
750 g flour
2 packets of dry yeast
2 tsp. salt
450-500 ml warm water
Process all ingredients for approx.
1/2 minute at setting 1, then for approx.
4-5 minutes at setting 3 (2) using the kneading hook.
Mayonnaise
2 eggs
2 tsp. mustard
1/4 oil
2 tbs. lemon juice or vinegar
1 pinch of salt
1 pinch of sugar
Ingredients must be at the same temperature.

- Process the ingredients (except the oil) in the blender for several seconds at setting 3 (2) or 4 (3).
- Switch the blender to setting 7 (4) and slowly pour the oil through the funnel and mix until the mayonnaise emulsifies.
Eat the mayonnaise immediately, do not store.
Disposal

Dispose of packaging in an environmentally-friendly manner. This appliance is labelled in accordance with European Directive 2012/19/EU concerning used electrical and electronic appliances (waste electrical and electronic equipment - WEEE). The guideline determines the framework for the return and recycling of used appliances as applicable throughout the EU. Please ask your specialist retailer about current disposal facilities.
Guarantee
The guarantee conditions for this appliance are as defined by our representative in the country in which it is sold. Details regarding these conditions can be obtained from the dealer from whom the appliance was purchased. The bill of sale or receipt must be produced when making any claim under the terms of this guarantee.
Changes reserved.

Optional accessories
| MUZ5ZP1 Citrus press | For squeezing oranges, lemons and grapefruits. | |
| MUZ5CC1 Dicer | For cutting fruit and vegetables into equally sized cubes. | |
| MUZ5FW1 Mincer | For cutting fresh meat for steak tartare or meat loaf. | |
| MUZ45LS1 Perforated disc set fine (3 mm), coarse (6 mm) | For the mincer MUZ5FW1. Fine disc for pasties and spreads, coarse disc for sausages and bacon. | |
| MUZ45SV1 Viennese whirl attachment | For the mincer MUZ5FW1. With metal template for 4 different pastry moulds. | |
| MUZ45RV1 Grater attachment | For the mincer MUZ5FW1. For grating nuts, almonds, chocolate and dried bread rolls. | |
| MUZ45FV1 Juicer attachment | For the mincer MUZ5FW1. For pressing soft fruit, except raspberries, tomatoes and rose hips, to a pulp. At the same time e.g. currants are automatically stemmed and pitted. | |
| MUZ45PS1 Chipper disc | For the continuous-feed shredder MUZ5DS1. For slicing raw potatoes for chips. | |
| MUZ45AG1 Asian vegetable disc | For the continuous-feed shredder MUZ5DS1. Slices fruit and vegetables into fine strips for Asian vegetable dishes. | |
| MUZ45RS1 Grating disc coarse | For the continuous-feed shredder MUZ5DS1. For grating raw potatoes, e.g. for potato pancakes or dumplings. | |
| MUZ45KP1 Potato fritter disc | For the continuous-feed shredder MUZ5DS1. For grating raw potatoes for rostis and potato fritters, for cutting fruit and vegetables into thick slices. | |
| MUZ5ER2 Stainless steel stirring bowl | Up to 750 g of flour plus ingredients can be processed in the bowl. | |
| MUZ5KR1 Plastic mixing bowl | Up to 750 g of flour plus ingredients can be processed in the bowl. | |
| MUZ5MX1 Plastic blender attachment | For blending drinks, for pureeing fruit and vegetables, for preparing mayonnaise, for cutting fruit, nuts, for crushing ice cubes. | |
| MUZ5MM1 Multi-mixer | For chopping herbs, vegetables, apples and meat, for shredding carrots, radishes and cheese, for grating nuts and cooled chocolate. |
If an accessory is not included in the product package, it can be purchased via the trade or from customer service.
Caution! Rotating blades.

Caution! Rotating accessories.
Overload protection
(ACCESSORY OPTIONAL*).
"2" for the coarse rasp side
4" for the fine rasp side
NOTE!
Tool holder (tool
Setting the working position:
Pull the telescopic arm towards you and turn it. Support the movement with one hand. Turn the telescopic arm to the desired position until it clicks.
| Öeön | Kívnon | MUM52.. | MUM 54/55/ 56.. | |
| 1 | 7 | ↑ | 1-4 | 1-7 |
| 1-4 | 1-7 | |||
| 1-2 | 1-3 | |||
| 2 | 7 | - | - | |
| 3 | 6 | ↓ | 2-4 | 3-7 |
| 2-3 | 3-5 | |||
| 4 | 9 | ↓ | 3-4 | 5-7 |
| 7 | ← | 3-4 | 5-7 | |
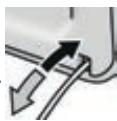
Pull the cable to the desired length (max. 100 cm) towards the outside and let it retract freely. The cable has a lock in the desired position.
Reducing the cable length:
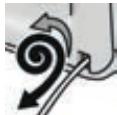
Pull the cable out completely and let it retract to the desired length. Then pull the cable out again and let it retract freely. The cable is locked.
Caution!
When retracting towards the inside, make sure the cable does not get twisted. On models with automatic cable retraction, guide the cable with your hand towards the inside. If the cable is twisted, pull it out to the end towards the outside and then let it retract again.
Insert the plug into the socket
Motor and tools
Rotating tools can cause injury!
Disconnect the tool from the mains before changing tools. Only use tools with the recommended speed (12). Change the tool only with the motor stopped. After switching off, the motor continues to run for a short time and stops at the tool change position. Move the telescopic arm only after the tool has stopped. Always cover the moving parts of the motor with the covers of the motor.
Caution!
Use the motor only for the intended purpose.
PANHELLENIC TELEPHONE SERVICE FOR APPLIANCES
www.bosch-home.com/tr
www.bosch-yetkiliservisi.com
He Do3B0JNe Te DITaM rpaTnC 3 NaKyBaJIbHm MaTePiaJom.
Ybara!
PekomeHdyetbcra Hi B ykomy pa3i He 3aJnShaTn npuJaD BBIMKHeHm DoBwe, hIX ue nOtpi6Ho dIy nepepo6kn npoodykTtB. He BMkaTe npuJaD BXOJIOCTy.
BaxJInBo!
Пися Кожног ВИКОРИСТАНЯ, a TAKOЖ пicя ТрпВало ГЕВИКОРИСТАНЯ пилад HeobxIDHо Oчицати (→ «Oчиценг i doaЯd» due. cmop. 203).
19 Dnckn nna noepi6HeHHa
aДвOCTOPOHHIДИСКДПЯHAPI3A HHA -HaTOBCTI/TOHkiCKINK bДBOCTOPOHHAATKIBHINU-KpynHo/dpi6Ho cДиCK-TeptKa-cepeHbO
20 Tpimau nckiv
21 Kopnyc 3 BnnyckHIM OTBOPOM
Blehendep
22 KeJnx 6JIeHepa
23 Kpnska
24 BoporHka
* DeTJI, kI He BXOJaTb Do KOMPJIeKTy NOCTaBKN, MOJHa 3aMOBnTu y ToprIbIi Ta cnlyk6i cepBicy.
Poboyi noJoxeHHa
WARNING:
CAUTION!
The cutting attachment can only be used if the blades are installed in the correct direction and in the correct position according to this table and are in working condition. The turning lever must be locked in the pause in each working position.
Instructions
Do not touch sharp blades and cutting edges of the cutting attachment. The cutting attachment can only be held by the edge!
The multifunctional cutting attachment can only be inserted/removed after the drive has stopped and after disconnecting the plug from the socket.
Do not insert the tool into the fixed bunker.
CAUTION!
The multifunctional cutting attachment must only be used in a fully assembled condition. The multifunctional cutting attachment must never be used as the main blade. The multifunctional cutting attachment must only be used in the specified working position.
Protection against overload of the attachment
To prevent damage to the attachment in case of overload of the multifunctional cutting attachment, a notch (place of intended breakage) has been made on the drive shaft of the multifunctional cutting attachment. In case of overload, the drive shaft will break in its place. A new shaft for discs with a drive shaft can be purchased at a service center.
Double-sided disc for cutting - for thick / thin sheets

Never insert into the installed bunker! The bunker can only be removed/installed after stopping the drive! The bunker can only be used in the folded state and with the cover installed.
Danger of burns from hot parts!
When processing waste products in the incinerator, steam is released. Fill with a maximum of 0.5 liters of water or cleaning liquid.
The blender may be damaged. Do not process frozen products (except ice cubes). Do not operate the blender when it is tilted.
Operating the blender, Fig. J:
Press the release button, turn the drive shaft to position 4. Remove the blender attachment lid. Install the blender cup (the mark on the cup should be opposite the mark on the base) and turn it clockwise until it stops. Load the ingredients. Maximum quantity of liquid = 1.25 liters; maximum quantity of thick or liquid products = 0.5 liters; optimal quantity for processing solid products = 50-100 grams. Install the lid and turn it counterclockwise until it stops on the blender cup. The lid must be fixed in the groove. Set the rotary switch to the desired level.
Adding ingredients, Fig. J-8:
Remove the measuring cup from the rotary lid. Remove the lid and fill the ingredients, or remove the pusher and fill solid ingredients gradually through the feed tube, or pour liquid ingredients through the opening.
After use
Remove the measuring cup from the rotary lid. Turn the blender clockwise and remove it.
Tip: The blender works best when used correctly.

Cleaning and care
Using the appliance requires thorough cleaning after each use.
Do not use abrasive cleaning agents. Damage may occur on the surfaces.
Cleaning the main unit
Danger of electric shock!
Do not immerse the main unit in water and do not hold it under running water. Do not use steam cleaners.
Remove the plug from the socket. Check the main unit and the protective cover of the drive with a damp cloth. If necessary, use a small amount of detergent. Then wipe dry.
Cleaning the attachments
The attachments can be washed in the dishwasher. Do not put plastic elements in the dishwasher, as this may cause them to deform during washing!
Cleaning the multifunctional attachment
Danger of injury from sharp blades!
Do not touch the sharp blades and knives with bare hands when cleaning. Use a brush for cleaning.
All parts of the multifunctional attachment can be washed in the dishwasher.
Tip: To remove red deposits after processing, e.g., carrots, apply a little vegetable oil to a cloth and wipe the multifunctional attachment (except for the discs for shredding). Then rinse the multifunctional attachment with clean water.
Cleaning the blender
Danger of injury from sharp blades!
Do not touch the blender blades with bare hands.
The blender jug, lid, and pusher can be washed in the dishwasher.
Tip: To clean the blender after use, it is not necessary to remove it from the appliance. To do this, add a little water with a drop of detergent to the blender jug. Switch on the blender for a few seconds (speed level 1). Then remove the jug and rinse the blender with clean water.
Important note
Cymky nIpy npuaIpy nouchitb 3a notpe6n. IotpmyTece pyekomeHdaui 3 dorgny B cyMci.
36epirahnna
He6e3neka TpaBMyBaHHa!
IhpeiEHTN NOBHHi MaTN OHaKOBy TEMnepaTpy.
IHRpeiEHTN (kpim onii) DekiIbka cekyHn nepepo6Tn B 6JeHdepi Ha cTyniHi 3 (2) a6o 4 (3). ■Блелдерпегкночин ha CTynih 7 (4) i 3aINBaTn NOBInbH OOnIO Yepe3 BOpOHky - 3bINBaTn Do Tnx nip, NOKI MaNoHe3 He emyIbIgE.
Maiohe3 BnKOpNCtAn JaKnaIbUdIe, He 36epiratn Ioro.
YtNiI3aciia

LcH npuJaMapkipoBaHo 3rIiHO noJoxHeB EbponeCbKoI DnpeKtNB
2012/19/EU cTocobho eNeKtpoHnHex Ta eNeKtpoPpinaIb, 00 6yIn y BnKopncTaHni (waste electrical and electronic equipment - WEEE).
ДирктюВиЗнаHTьСМоКЛВОТI,якEДиCHИМУМexKAX
CbponecboKoro coo3y, zoDo npnHraTt Ha3aJ Ta yTuNl3aCi 6ByuXx BykOpncTaHHi npnAadIB.
IpoaktyaJIbHI MoXJIINBOCTIДЯ BnJaJIeHHa MoXHa Di3HaTIncR
B cneiJI3OBAHOMy MaIa3NHi.
yMOBn rapaHTii
CTOCOBHO zboI O npnAdy IIOHb yMOBn rapaHTi, 606 6yIn ONy6NikOBaHi HaWM KOMPeTeHTHM INpeCDtABHnTbOM B KpaIH, B kki B n pnpDan npnJa. Bm MoKeTe
This device is covered by a warranty provided by the specialized store where you purchased it, or directly by our representative in your country.
The warranty terms for your device and the address can be found on the last pages of this brochure. In addition, the warranty terms are also published on the Internet at the specified address. To use warranty services, you must present the purchase receipt in any case.
Models are subject to change.
Special instructions
Use the device only indoors at room temperature and at an altitude not exceeding 2000 m above sea level.
Important safety rules
Carefully read the operating instructions and follow the instructions in this manual during operation, and keep it for future use! When passing the device to other persons, provide them with this manual. The manufacturer is not liable for damage resulting from failure to follow the instructions for proper use of the device. This device can be used by persons with reduced physical, sensory or mental capabilities or lacking sufficient experience or knowledge, if they are under supervision or have been instructed on the safe use of the device and understand the dangers involved. Children must not be allowed near the device or to play with it. Children are prohibited from playing with the device. Cleaning and maintenance must not be performed by children.
Danger of electric shock and fire!
When connecting the device and during its operation, follow the data given on the nameplate. Use the device only if the cable and the device are not damaged. To avoid dangerous situations, repair of the device, for example, replacement of a damaged power cord, is allowed only by our service department.
The device can be switched on and off only with the rotary switch. It is strictly forbidden to connect the device to lamps or sockets with remote control. Always monitor the device during operation! Never place the device on hot surfaces, for example, on an electric stove, or near them. The power cord must not touch hot parts or pass over sharp edges. Never immerse the main unit in water or wash it in a dishwasher. Do not use steam cleaners. Do not use the device with wet hands. After each use, if unattended, before assembly, disassembly or cleaning, and in case of malfunction, always disconnect the device from the mains.
Risk of injury is not excluded!
Danger of injury!
Before replacing accessories or parts that move during operation, the appliance must be switched off and disconnected from the power supply. After switching off, the drive continues to move for some time. Wait until the drive has completely stopped. Do not change the position of the rotary switch while the appliance is switched on. Use only the attachments when the mixing bowl is inserted, with the lid and protective lid installed according to the instructions. During operation of the appliance, never put your hands or fingers into the mixing bowl or the feed tube. Do not insert any objects (e.g., a spatula) into the mixing bowl or the feed tube. Keep hands, hair, clothing, and other objects away from rotating parts. It is strictly forbidden to use attachments and accessories of any other type simultaneously. When using accessories, follow this instruction manual and other instructions included in the delivery set. The accessory must only be used when fully assembled! Never assemble the accessory on the main unit of the appliance. Use the accessory only in the intended working position.
Do not touch the sharp blades or the protrusions of the chopping discs. Hold the chopping discs only by the edge! Do not touch the blender blades with bare hands. Never put your hands into the installed blender! It is strictly forbidden to use the blender without the lid installed. Exercise caution when handling sharp blades, when emptying the bowl, and when cleaning.
Danger of burns!
Do not allow children to play with the packaging material.
Attention!
It is recommended not to leave the appliance switched on longer than necessary for processing food. Do not switch on the appliance without load.
Important!
Follow the instructions and operating manual.

Caution! Rotating blades.

Caution! Rotating attachments. Do not put your hand into the feed opening.
We sincerely congratulate you on your purchase of the new Bosch appliance. You will find additional information about our products on our website on the Internet.
Contents
Intended use 209
Important safety rules
Technical safety 209
Safety systems 212
Equipment sets 212
Work positions 213
Operation 214
Maintenance and care 218
Storage 218
Troubleshooting 219
Examples of use 219
Utilization 221
Warranty service 221
Special accessories 222
Safety systems
Insertion block
See table "Work positions".
Cm. Ta6nIuY «Pa6oUne nOIOXKeHnra>.
2 NOBOPHTbI KPOHHTeH
Cable storage compartment: pull out the cable to the required length.
MUM55./MUM56..
Automatic cable retraction:
Pull the cable out once to the desired length (max.
100 cm) and release it; the cable will lock.
To shorten the working length of the cable: gently pull the cable and let it retract to the desired length. Then gently pull the cable again and slowly release; the cable will lock.
Warning!
Do not twist the cable when feeding it. In devices with automatic cable retraction, the cable must not be fed manually. If the cable jams, pull it out completely and then let it retract.
Insert the mains plug into the socket.
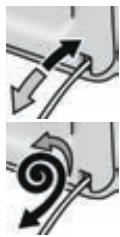
Never put your hands into the installed blender! The blender may only be removed/installed after the drive has stopped! The blender may only be used when assembled and with the lid installed.
Danger of scalding!
When processing hot products in the blender, steam escapes through the opening in the lid. Fill a maximum of 0.5 liters of hot liquid.
Warning!
Loading ingredients Figure 8-8:
Turn on the appliance using the rotary switch. Remove the lid and load the ingredients for making the hole gradually, loading the solid ingredients through the loading opening.
Pour the liquid ingredients through the hole.
After work
Turn off the appliance using the rotary switch. Turn the blender clockwise and remove it.
Recommendation: It is best to clean the blender immediately after use.
Cleaning and care
After each use, the used parts and accessories must be thoroughly cleaned.
Attention!
Do not use abrasive cleaning agents. The surfaces of the appliance may be damaged.
Cleaning the main unit
Danger of electric shock!
Never immerse the main unit in water or hold it under running water. Do not use a steam cleaner.
Unplug the power cord from the outlet. Wipe the main unit, protective covers, and attachments with a damp cloth. If necessary, use a little dishwashing liquid. Finally, wipe the appliance dry.
Do not touch the sharp blades or protrusions of the chopper blades. Use a brush for cleaning.
Thanks to the universal blade, it can be washed in the dishwasher.
Recommendation: To remove red stains from processing, e.g., carrots, pour a little vegetable oil onto the blade and let the universal blade run briefly (without the chopping insert). Then rinse the universal blade.
Cleaning the blender
Danger of injury from sharp blades!
Do not touch the blender blades with bare hands. The blender jar, lid, and pusher can be washed in the dishwasher.
Recommendation: After processing liquids, it is often sufficient to clean the blender without removing it from the appliance. To do this, pour some water with a drop of dishwashing liquid into the installed blender. Switch on the blender for a few seconds (turbo). Pour out the soapy water and rinse the blender with clean water.
Important note
Dry the appliance and attachments thoroughly if necessary. Follow the instructions for drying.
Storage
Danger of injury!
When the appliance is not in use, remove the plug from the socket.
Figure K:
Store the accessories and chopping insert in the accessory bag. Store the accessory bag in a dry place. For storage in the original packaging, see figure.
Switch off the appliance. Reduce the amount of food being processed.
Do not exceed the maximum allowable quantity of products (see "Examples of use").
During operation, the appliance may randomly stop. The rotating knives are located at the top. The drive rotates but does not stop for changing attachments.
Troubleshooting
Turn the switch to the 0/off position. Turn the rotating knives to position 1. Turn on the appliance (step 1). Turn off the appliance again.
The attachment stops in the position for changing attachments.
Malfunction
The blender does not start or stops during use, the motor hums. The blade is blocked.
Troubleshooting
- Turn off the appliance and remove the plug from the socket. Remove the blender and remove the obstruction. Reinstall the blender. Turn on the appliance.
Important note
If the malfunction cannot be resolved in this way, please contact the service department.
Recipe examples
Whipped cream
100-600 g

Process the cream for 1/2 to 4 minutes at level 7 (4), depending on the quantity and properties of the cream, using the whisk attachment.

Beat the ingredients (except flour and starch) for about 4-6 minutes on speed 7 (4) using the whisk attachment until a foam forms.
Basic recipe
Basic recipe
2 eggs
2-3 tbsp. hot water
100 g sugar
1 packet of vanilla sugar
70 g flour
70 g starch
If necessary, a little chemical
leavening agent
Beat the ingredients (except flour and starch) for about 4-6 minutes on speed 7 (4) using the whisk attachment until a foam forms. Turn the rotary switch to speed 1 (1) and gradually add the sifted flour and starch over about 1/2 - 1 minute.
Maximum quantity: 2X basic recipe
Cdo6Hoe Tecto
OchOBHOn peueNT
3-4 yu
200-250 r caxapa
1 ueioTka coJI
1 NaKeTnK BaHnJIbHOro caxapa
JIINIeIpaC 1/2 JIMMOHa
200-250 r cJIINBOUHOro MaCJa NJIIM MapraPnHa (KOMHaTHOH TeMnepaTpybl)
500 r MykN
1 NaKeTnK XmMueckoro pa3pbixNITeJIA
125 MЛ MoJIOKa
Bce INHrpEiNeHTbI nepeMeuBaTb B TeueHne npimepHo 1/2 MNHyTbI Ha CTyneH 1 (1), a 3aTeM B TeueHne npimepHo 3-4 MInyT ha CTyneH 7 (4) c NOMOJIbEOBENKAnIpeMeuBAHnA.
MaKcImaJIbHoe KOJIuYeCTBO:
1,5 x ochOBHOn peCNT

Pecouhoe Tecto
125 g of vegetable oil (at room temperature)
100-125 g of sugar
1 egg
chicken liver
a little lemon zest or vanilla sugar
250 g of flour
pa3pbIxIITeIa
Mix all ingredients for approximately 1/2 minute on speed 1 (1), then for approximately 2-3 minutes on speed 6 (3) with the kneading hook.
Process all ingredients for approximately 3 to 5 minutes on speed 3 (2) until the dough is smooth.
Maximum quantity:
1.5 x basic recipe
Dough for bread
Basic recipe
24.II. coII
450-500 ml of warm water
Process all ingredients for about 1/2 minute at speed 1 (1), then for about 4-5 minutes at speed 3 (2) using the mixing attachment.
Mayonnaise
2 eggs
2. Y. II. Gornizbly 1/4 cup vegetable oil 2 tbsp lemon juice or vinegar 1 teaspoon salt 1 teaspoon sugar
Ingredients should have the same temperature.
Ingredients (except vegetable oil) blend for a few seconds at speed 3 (2) or 4 (3) in a blender. Switch blender to speed 7 (4), slowly pour oil through the funnel and continue mixing until mayonnaise emulsifies.
Mayonnaise should be consumed immediately, do not store it.

Disposal

Dispose of packaging using environmentally safe methods. This device is marked in accordance with European standards 2012/19/EU for disposal of electrical and electronic equipment (WEEE). These standards define the rules for the return and disposal of old appliances applicable in the European Union. Information about current disposal options can be obtained from the store where you purchased the appliance.
Warranty conditions
You can obtain detailed information about warranty conditions at your nearest authorized service center, at the service center of the manufacturer LLC "All Household Appliances", or in the accompanying documentation.
The manufacturer reserves the right to make changes.
Special accessories
This is garbled OCR text and should be removed.

- The declared conformity of the device with the requirements of the legislation on the procedure for mandatory certification and declaration of conformity
Information on the mandatory confirmation of conformity of our products, including data on the certificate of conformity (declaration of conformity) and its validity period, is available from the authorized importer OOO "5CX" (see below).
Our products are subject to quality control by Bosch Hausgeräte GmbH, address: Carl-Wer-Str. 34, 81739 München, Germany.
The organization authorized by the foreign manufacturer, authorized by the manufacturer on the basis of an agreement with it, is OOO "BSH Bytovye Pribory", 198515, Saint Petersburg, Peterhof, ul. Karla Simensa, d. 1, lit. A, office in Moscow, 119071, ul. Malaya Kaluzhskaya, d. 13, phone (495) 737-2777, fax (495) 737-2798.
5. Technical data of the device are given on the rating plate and/or in the operating instructions.
6. Accessories and care products
For the flawless functioning of your device and proper care, the manufacturer recommends using only original accessories and care products. Original accessories and care products are designed specifically for your device, they are ideally suited to it. Original accessories and care products meet the highest quality requirements of the Bosch brand, they undergo factory tests and are specially tested for reliability. For all questions regarding accessories and care products for your device, you can contact the authorized service center or by phone at the support service.
7. Manufacturer's warranty
The manufacturer provides a warranty for the household appliance sold by you in the Russian Federation for a period of 1 year from the date of transfer to the consumer. For appliances sold in the Republic of Belarus, the warranty period is established by the warranty card issued at the time of purchase, unless otherwise provided by the legislation of the Republic of Belarus.
8. Attention! Important information for the consumer
This device is intended for use exclusively in household, domestic, and similar non-commercial applications, not related to professional entrepreneurial activity, and for satisfying household needs. Use of the device for purposes other than those specified above is a violation of the rules of safe operation of the device.
Be sure to keep the factory data plate on the appliance! Please make sure it is on the appliance throughout the entire service life of the appliance. Removing the data plate will lead to decommissioning of the appliance and to possible violations of its operating rules.
The manufacturer is not liable for deficiencies in the product that arise as a result of improper use, transportation, storage, exposure to third-party factors, as well as substances, significant violations of technical requirements specified in the operating instructions, including instability of electrical network parameters established by GOST 32144-2013.
Please keep the purchase receipt, warranty card, and documents confirming the date of purchase.
Following the recommendations contained in the operating instructions (operating rules) will help avoid problems in the operation of the appliance and its breakdowns.
Faulty parts of the appliance are repaired or replaced with new ones. The decision on the feasibility of their replacement or repair remains with the service department.
9. Service information
During the warranty period and after its expiration, the service department, as well as the workshops of our partners, are always ready to offer you their services. The list of addresses of authorized service centers is available on the official website on the Internet: www.bosch-home.ru.
The service life of small household appliances (except for juicers and vacuum cleaners) is 2 years. The service life of juicers and vacuum cleaners is 5 years. The service life of the product is calculated from the date of its purchase, or if it is impossible to determine, from the date of manufacture of the product, indicated on the product's nameplate. In accordance with the manufacturer's standard, the date of manufacture is encrypted as follows: D MM, where D is the year of manufacture minus 1920, and MM is the month of manufacture. To determine the year of manufacture of the appliance, it is necessary to add 1920 to the number D.
- Free round-the-clock telephone for calls within the Russian Federation.
B34C065N1-1M00 03/2017
Information about household appliances manufactured under the control of the BSH Hausgeräte GmbH concern, Carl-Wery-Str. 34, 81739 Munich, Germany, in accordance with the requirements of the Federal Law of the Russian Federation of November 23, 2009 No. 261-FZ, legislation on technical regulation and legislation on the protection of consumer rights of the Russian Federation
Products: juicers, mixers, blenders, cutters, food processors, coffee grinders, meat grinders, shredders
Bosch trademark
Attention! The product is constantly being improved, including its energy efficiency. The product is regularly subjected to mandatory certification for compliance with the current legislation. Information about the current certificates of conformity, current information about the energy efficiency class of the product, and information about the current product range can be obtained from the organization performing the functions of the authorized importer on the territory of the Russian Federation: LLC "BSH Household Appliances", 198515, Saint Petersburg, Peterhof, Karl Simenza Ave., 1, lit. A, branch in Moscow, 119071, Malaya Kaluzhskaya St., 15, phone (495) 737-2777, fax (495) 737-2798.
LLC "BSH Household Appliances", 198515, Saint Petersburg, Peterhof, Karl Simenza Ave., 1, lit. A, branch in Moscow, 119071, Malaya Kaluzhskaya St., 15, phone (495) 737-2777, fax (495) 737-2798, carries out activities to confirm the conformity of products on behalf of the manufacturer and on the unified customs territory of the Eurasian Economic Union in accordance with current technical regulations, as an authorized person of the manufacturer, and also fulfills the requirements provided for by Federal Law No. 184-FZ "On Technical Regulation" for a person performing the functions of a foreign manufacturer on the territory of the Russian Federation.
The importer in the Russian Federation of products certified as serial products is LLC "BSH Household Appliances", 198515, Saint Petersburg, Peterhof, Karl Simenza Ave., 1, lit. A, branch in Moscow, 119071, Malaya Kaluzhskaya St., 15, phone (495) 737-2777.
The organization indicated on the product in the product identification signs and carrying out the initial placement of the product on the market of the Eurasian Economic Union is Robert Bosch Hausgeräte GmbH, Carl-Wery-Str. 34, 81739 Munich, Germany.
The manufacturer (producer) carrying out the production of the product on its own behalf and responsible for its compliance with the requirements of the applicable technical regulations is BSH Hausgeräte GmbH, Carl-Wery-Str. 34, 81739 Munich, Germany.
When transporting, storing, and unpacking the product, you should be guided by the requirements set out in the operating instructions.
It is forbidden to subject the product to significant mechanical loads that could lead to damage to the product or violation of its packaging.
- It is necessary to avoid getting water and other liquids on the product packaging.
(waste electrical and electronic equipment - WEEE).
sole!
gall sgcjgo juiuuy gai .
aill lll aiei iiaii iia
Therefore, the area of triangle OBC is 1/2 * CO * BC = 1/2 * CD * 5.
Jalal
Lilao jno jolal lol jaiall b ydiy
jlll lgl
Joo 0000000000000000000000000000000000000000000
jiaai jie jieai iia ijui jii jzss
gjgljgljgljgljglj
julal 4 jbi ci
iLi

i
auiuul 1 aai
300
3
210-20) 2-1
5 3 2d cllsall
linne 2023 (2) 3 4 15
Jlalal 1.5 2c:la)
A

∴ m = 3/11
auiuul 1 ylaal
750
aennnnn nnne 2
Cdo oysda 2
jololo jlll450-500
1/2 1/2
4-5 1
(2)3

2
ii jIoo o o o 2
1/4
joula juaac jdu a jus 2
class no ai ä 1
swll 10 aia 1
y
LdLd g (yjll 1x) cLiSall 1x! p
(3)4 (2)3 4
a a a a a a a a a a a a a a a a a a
J 1
gina.
.

a
125
[{S}_{\Delta APQ} = {90}\% = {90}\% ]
1
1
250
.
∴ | x - 2| = | x - 4| = 3 .
12 12

a 1/2 all 2d all
3-6 1
(2)3
a.s 1.5:la)
aWulwJ1 aWogJ1
()
6 4 2022
dillio joluliljolll jll
. c loaII loa II S
p1

100-600
y 2 y
(4)7 a+1 4 1/21
∴ S ΔOBC = S ΔCOD + S ΔBOC - S ΔBOC

128 1

\overrightarrow{a} = \left( x_1, y_1 \right), \overrightarrow{b} = \left( x_2, y_2 \right)
2
1
y_1 = \frac{2}{x}, y_2 = -\frac{2}{x}
1 2
Jaaal 1
0/off 1
Aislo 1jwll 1yll 1bll 1blll 1c
15 1
aJia jIgW d! gblal alil 12:10 aJIbii pJn JgKlll nn cllll nJyS jIgZg, g. jIgall lc nJyS nJyS bblll eLg g CJIablld Jn JIgall eo all nCwliu blll Jzwi pi Jn JIgall Gc JIgall blill pi JIg. (M agJrle buiell eo) JIg. . eI ayblll abai pJcblll eo Kw
P
ailll lalll 5 g jg jilj ic o gall aaj jlc ai gall ayaiiei ocljo
IMO2019
jiee
1yla 1yda
jgllll jla l jla jla jla jla jla
y 1
K
ailllll
Therefore, c1 + d1 = 2
1
.
MUM54../MUM55../MUM56...
A
Therefore, the area of triangle OBC equals the area of triangle COD plus the area of triangle BOC.
15
(1)
Therefore, there must be a minimum ∴ x + 2yE -1,4
:J 0
1 4
aalil oJyI yol gol llbll laii
aalalalalalalalalalalalalalalal
aaiiaaae aie

150
.3
aalil jdy lgl gyllll
a aalll jac oai jaiy
Gaaalil
Therefore, l = 1
jia gao lao 1 jolal ball aial algall
121 121 121 121 121 121


(1)
(3)4 (2)3 3 a
jai jia gale jgall jao jol a
Therefore, {1,2,3} ∪ {1,4,5} ∪ {2,4,5}
jul 1
Therefore, a1 = 2, a(n+1) = a(n)/1 + a(n)/2
1pda 4
j
aillll jllg.().
a
.(4)7

aegill buaa - j
(201)
Therefore, |x - 1| = |x + 2| = sqrt(5)

a
2 1
4 4
A
Therefore, a + b = 1
-
(1) 1 aRall
(4)7 1
y
(1) 1 aJzJ (4) 7 aJzJ
:
1
1 1
(2) 3
cllgssll
jglal 1aai jglal

Therefore, c(b-1) is in [1,1].
rho is in S, i is in j, S' is a subset of S^2, and S' intersect S^2 is empty.
| 1-7 | 1-4 | 7 | 1 | |
| 1-7 | 1-4 | |||
| 1-3 | 1-2 | |||
| - | - | * | 7 | 2 |
Ae iio 8 (3)
Jg 7
*Jalssj
8
* 9
oJIOIgOgEeBcGgOgOgOgOgOgOgOg
∴ S ΔOBC = S ΔCOD + SΔBOC
10
:MUM52/.MUM54..
:MUM55/.MUM56..
jbjil jlgally Jbc 2g jic jgi jslj
1
J
15
biinaii i jyj y jg jgl g jll
Therefore, in right triangle ABN:
5
J 1
glil
Jzill 1
a
Jaaal 1 2 3 4 5 6 7
j 1
0/off 1
.
i j 1
a bai jia d i jie cui xi li jiu jiu jiu jiu
Aloc! 10b1 p i d j s jll Jssill aas
2000

AE United Arab Emirates,
BSH Home Appliances FZE
Round About 13,
Plot Nr MO-0532A
Jebel Ali Free Zone – Dubai
Tel.: 04 881 4401
mailto:service.uae@bshg.com
www.bosch-home.com/ae
Republic of Albania, Albania
ELEKTRO-SERVIS sh.p.k
Rr. Shkelqim Fusha, Selite,
Pallati "Matrix Konstruktion",
Ground floor and +1
1023 Tirane
Tel.: 42278130, -131
Fax: 4 2278 130
mailto:info@elektro-servis.com
EXPERT SERVIS
Rugae Kavajes,
Kulla B Nr 223/1 Kati I
1023 Tirane
Tel.: 44806061
Tel.: 42274941
Fax: 4 227 0448
Cel: +355 069 60 45555
mailto:info@expert-servis.al
Gate 1, 1555 Centre Road
Clayton, Victoria 3168
Tel.: 1300 369 744*
Fax: 1300 306 818
mailto:aftersales.au@bshg.com
www.bosch-home.com.au
*Mo-Fr: 24 hours
BA Bosnia and Herzegovina
"HIGH" d.o.o.
Gradačačka 29b
71000 Sarajevo
Tel.: 061 10 09 05
Fax: 033 21 35 13
mailto:bosch_siemens_sarajevo@
yahoo.com
BE Belgium
BSH Home Appliances S.A.
European Trade Center Building, 5th floor
1784 Sofia
Tel.: 0700 208 17
Fax: 02 878 79 72
mailto:informacia.servis-bg@bshg.com
www.bosch.home.bg
BH Bahrain,
Khalaifat Est.
P.O.Box 5111
Manama
Tel.: 017400553
mailto:service@khalaifat.com
BY Belarus, Benapycb
OOO“5CXБытOBаТХnka"
ten.: 495 737 2961
mailto:mok-kdhl@bshg.com
CH Schweiz, Suisse, Svizzera, Switzerland
BSH Hausgeräte AG
+7snt/min (alv 24%
To arrange an engineer visit, to order
spare parts and accessories or for
product advice please visit
www.bosch-home.co.uk
or call Tel.: 0344 892 8979*
*Calls are charged at the basic rate, please check with your telephone service provider for exact charges
GR Greece, Ελλάς
BSH Ikiakes Siskeves A.B.E.
Central Branch Service
17 km E.O. Athinon-Lamias &
Potamou 20
14564 Kifisia
Unit 1 & 2, 3rd Floor
North Block, Skyway House,
3 Sham Mong Road
Tai Kok Tsui, Kowloon
Hong Kong
Tel.: 2565 6151
Fax: 2565 6681
mailto:bosch.hk.service@bshg.com
www.bosch-home.cn
HR Hrvatska, Croatia
BSH kućni uređaji d.o.o.
Kneza Branimira 22
10000 Zagreb
Tel.: 015520888
Fax: 01 640 36 03
mailto:informacije.servis-hr@bshg.com
www.bosch-home.com/hr
www.bosch-home.com/hu
IE Republic of Ireland
BSH Home Appliances Ltd.
Unit F4, Ballymount Drive
Ballymount Industrial Estate
Walkinstown
Dublin 12
Service Requests, Spares and Accessories
Tel.: 01450 2655*
Fax: 01450 2520
www.bosch-home.co.uk
*0.03 € per minute at peak.
Off peak 0.0088 € per minute.
IL Israel,
C/S/B/ Home Appliance Ltd.
1, Hamasger St.
North Industrial Park
Lod, 7129801
Tel.: 08 9777 222
Fax: 08 9777 245
mailto:csb-serv@csb-ltd.co.il
www.bosch-home.co.il
IN India, Bharat,
BSH Household Appliances
Mfg. Pvt. Ltd. Arena House, Main Bldg,
2nd Floor.
Plot No. 103, Road No. 12
MIDC, Andheri East
Mumbai 400 093
Toll Free 1800 266 1880*
www.bosch-home.com/in
- Mo-Sa: 8.00am to 8.00pm
(excluding public holidays)
IS Iceland
Smith & Norland hf.
Noatuni 4
105 Reykjavik
Tel.: 0520 3000
Fax: 0520 3011
www.sminor.is
IT Italia, Italy
www.bosch-home.com/it
KZ Kazakhstan, Казахстан
IP Turebekov Yerzhan
Nurmanovich
Jangeldina str. 15
Shimkent 160018
Tel.: 0252 31 00 06
mailto:evrika_kz@mail.ru
LB Lebanon,
Teheni, Hana & Co.
Boulevard Dora 4043 Beyrouth
P.O.Box 90449
Jdeideh, 1202 2040
Tel.: 01 255 211
mailto:Info@Teheni-Hana.com
LT Lietuva, Lithuania
Senuku prekybos centras UAB
Jonavos g. 62
44192 Kaunas
Tel.: 0372 12146
Fax: 0372 12165
www.senukai.lt
UAB "AG Service"
R. Kalantos g. 32
52494 Kaunas
Tel.: 070055655
Fax: 037 331 363
mailto:servisas@agservice.lt
www.agservice.lt
Baltic Continent Ltd.
Lukšio g. 23
09132 Vinius
Tel.: 05 274 1788
Fax: 05 274 1722
mailto:info@balticcontinent.It
www.balticcontinent.lt
LU Luxembourg
S.R.L. "Rialto-Studio"
yn. Lcyceba 98
2012 KuniHneB
TeN./ΦaKc:022 23 81 80
mailto:bosch-md@mail.ru
ME Crna Gora, Montenegro
Elektronika komerc
Ul. Slobode 17
84000 Bijelo Polje
Tel./Fax: 050 432 575
Mobil: 069324812
mailto:ekobosch.servis@t-com.me
MK Macedonia,Makeonna
GORENEC
Jane Sandanski 69 lok.3
1000 Skopje
Tel.: 022 454 600
Mobil: 070 697 463
mailto:gorenec@yahoo.com
MT Malta
Oxford House Ltd.
Notabile Road
Mriehel BKR 14
Tel.: 021 442 334
Fax: 021 488 656
www.oxfordhouse.com.mt
MV Raajeyge Jumhooriyyaa, Maledives
Lintel Investments
Ma. Maadheli, Majeedhee Magu
Malé
Tel.: 0331 0742
mailto:mohamed.zuhuree@
lintel.com.mv
NL Nederlande, Netherlands
Unit F 2, 4 Orbit Drive
Mairangi Bay
Auckland 0632
Tel.: 0800 245 700*
Fax: 0800 256 535
mailto: aftersales.nz@bshg.com
www.bosch-home.co.nz
*Mo-Fr: 8:30am to 4:00pm (exclude public holidays)
PL Polska, Poland
SA Kingdom Saudi Arabia,
1
Abdul Latif Jameel Electronics
and Airconditioning Co. Ltd.
BOSCH Service centre,
Kilo 5 Old Makkah Road
(Next to Toyota), Jamiah Dist.
P.O.Box 7997
Jeddah 21472
Tel.: 800 127 9999
mailto:palakkalin@alj.com
www.aljelectronics.com.sa
SE Sverige, Sweden
BSH Home Appliances AB
Landsvagen 32
169 29 Solna
Tel.: 0771 11 22 77 local rate
mailto:Bosch-Service-SE@bshg.com
www.bosch-home.se
SG Singapore, Singapore
BSH Home Appliances Pte. Ltd.
Block 4012, Ang Mo Kio Avenue 10
01-01 Techplace 1
Singapore 569628
Tel.: 6751 5000*
Fax: 67515005
mailto:bshsgp.service@bshg.com
www.bosch-home.com.sg
- Mo-Fr: 8.30am to 7.00pm, Sa: 8.30am to 5.30pm (exclude public holidays)
SI Slovenia, Slovenia
BSH Hišni aparati d.o.o.
Litostrojska 48
1000 Ljubljana
Tel.: 015830700
Fax: 01 583 08 89
mailto:informacije.servis@bshg.com
www.bosch-home.com/si
SK Slovensko, Slovakia
www.bosch-home.com/tr
BSH Home Appliances Private Limited
11F., No.80, Zhouzi St., Neihu Dist.
Taipei City 11493
Tel.: 0800 368 888
Fax: 02 2627 9788
Fax: 02 2627 9788
mailto:bshtzn-service@bshg.com
Service-General SH.P.K.
Rruga Mag Prishtei-Ferizaj
70000 Ferizaj
Tel.: 0290 321 434
Tel.: 0290 330 723
mailto:a_service@
gama-electronics.com
XS Srbija, Serbia
BSH Kučni aparati d.o.o.
Milutina Milankovica br. 9ž
11070 Novi Beograd
Tel.: 011 353 70 08
Fax: 011 205 23 89
mailto:informacije.servis-sr@
bshg.com
www.bosch-home.rs
ZA South Africa
BSH Home Appliances (Pty) Ltd.
15th Road Randjespark
Private Bag X36, Randjespark
1685 Midrand-Johannesburg
Tel.: 086 002 6724
Fax: 086 617 1780
mailto:applianceserviceza@bshg.com
www.bosch-home.com/za


- IMPORTANT SAFETY INFORMATION
- RISK OF ELECTRIC SHOCK AND FIRE
- RISK OF INJURY
- RISK OF SCALDING
- RISK OF SUFFOCATION
- CAUTION
- IMPORTANT
- EXPLANATION OF THE SYMBOLS ON THE APPLIANCE OR ACCESSORY
- CONTENTS
- SAFETY SYSTEMS
- START LOCK-OUT
- RESTART LOCK-OUT
- OVERLOAD PROTECTION
- IF A SAFETY SYSTEM IS ACTIVATED, SEE "TROUBLESHOOTING
- OVERVIEW
- FIG. A
- BASE UNIT
- OPERATING POSITIONS
- FIG. B
- ATTENTION
- NOTE
- SELECTING THE OPERATING POSITION
- OPERATION
- IMPORTANT INFORMATION
- PREPARATION
- MUM52../MUM
- MUM55./MUM
- WARNING
- BOWL AND TOOLS
- STIRRER (13)
- WHISK (14)
- KNEADING HOOK (15)
- WORKING WITH THE BOWL AND THE TOOLS FIG
- OUR RECOMMENDATION
- STIRRER
- WHISK
- KNEADING HOOK
- ADDING MORE INGREDIENTS
- AFTER USING THE APPLIANCE
- CONTINUOUS-FEED SHREDDER
- PREDETERMINED BREAKING POINT FIG. F
- REVERSIBLE SLICING DISC - THICK / THIN
- REVERSIBLE SHREDDING DISC - COARSE / FINE
- GRATING DISC - MEDIUM-FINE
- WORKING WITH THE CONTINUOUS-FEED SHREDDER
- FIG. G
- BLENDER
- RISK OF INJURY FROM SHARP BLADES / ROTATING DRIVE
- WORKING WITH THE BLENDER FIG
- FIG
- CLEANING AND SERVICING
- CLEANING THE BASE UNIT
- DANGER OF ELECTRIC SHOCK
- CLEANING THE BOWL AND TOOLS
- CLEANING THE CONTINUOUS-FEED SHREDDER
- CLEANING THE BLENDER
- STORAGE
- TROUBLESHOOTING
- THE SWIVEL ARM MUST BE ENGAGED IN EVERY OPERATING POSITION
- REMEDIAL ACTION
- FAULT
- APPLICATION EXAMPLES
- WHIPPED CREAM
- EGG WHITE
- SPONGE MIXTURE
- CAKE MIXTURE
- SHORT PASTRY
- YEAST DOUGH
- PASTA DOUGH
- BREAD DOUGH
- MAYONNAISE
- DISPOSAL
- GUARANTEE
- SETTING THE WORKING POSITION
- MOTOR AND TOOLS
- ROTATING TOOLS CAN CAUSE INJURY
- PANHELLENIC TELEPHONE SERVICE FOR APPLIANCES
- DNCKN NNA NOEPI6HEHHA
- TPIMAU NCKIV
- KOPNYC 3 BNNYCKHIM OTBOPOM
- KEJNX 6JIEHEPA
- KPNSKA
- BOPORHKA
- POBOYI NOJOXEHHA
- INSTRUCTIONS
- PROTECTION AGAINST OVERLOAD OF THE ATTACHMENT
- DOUBLE-SIDED DISC FOR CUTTING - FOR THICK / THIN SHEETS
- DANGER OF BURNS FROM HOT PARTS
- OPERATING THE BLENDER, FIG. J
- ADDING INGREDIENTS, FIG. J
- AFTER USE
- CLEANING AND CARE
- CLEANING THE MAIN UNIT
- CLEANING THE ATTACHMENTS
- CLEANING THE MULTIFUNCTIONAL ATTACHMENT
- DANGER OF INJURY FROM SHARP BLADES
- IMPORTANT NOTE
- EPIRAHNNA
- HE6E3NEKA TPABMYBAHHA
- YTNII3ACIIA
- YMOBN RAPAHTII
- CAREFULLY READ THE OPERATING INSTRUCTIONS AND FOLLOW THE INSTRUCTIONS IN THIS MANUAL DURING OPERATION, AND KEEP IT FOR FUTURE USE! WHEN PASSING THE DEVICE TO OTHER PERSONS, PROVIDE THEM WITH THIS MANUAL. THE MANUFACTURER IS NOT LIABLE FOR DAMAGE RESULTING FROM FAILURE TO FOLLOW THE INSTRUCTIONS FOR PROPER USE OF THE DEVICE. THIS DEVICE CAN BE USED BY PERSONS WITH REDUCED PHYSICAL, SENSORY OR MENTAL CAPABILITIES OR LACKING SUFFICIENT EXPERIENCE OR KNOWLEDGE, IF THEY ARE UNDER SUPERVISION OR HAVE BEEN INSTRUCTED ON THE SAFE USE OF THE DEVICE AND UNDERSTAND THE DANGERS INVOLVED. CHILDREN MUST NOT BE ALLOWED NEAR THE DEVICE OR TO PLAY WITH IT. CHILDREN ARE PROHIBITED FROM PLAYING WITH THE DEVICE. CLEANING AND MAINTENANCE MUST NOT BE PERFORMED BY CHILDREN
- WHEN CONNECTING THE DEVICE AND DURING ITS OPERATION, FOLLOW THE DATA GIVEN ON THE NAMEPLATE. USE THE DEVICE ONLY IF THE CABLE AND THE DEVICE ARE NOT DAMAGED. TO AVOID DANGEROUS SITUATIONS, REPAIR OF THE DEVICE, FOR EXAMPLE, REPLACEMENT OF A DAMAGED POWER CORD, IS ALLOWED ONLY BY OUR SERVICE DEPARTMENT
- DANGER OF INJURY
- DANGER OF BURNS
- INSERTION BLOCK
- SEE TABLE "WORK POSITIONS
- DANGER OF SCALDING
- LOADING INGREDIENTS FIGURE
- AFTER WORK
- FIGURE K
- MALFUNCTION
- RECIPE EXAMPLES
- BASIC RECIPE
- CDO6HOE TECTO
- MAKCIMAJIBHOE KOJIUYECTBO
- PECOUHOE TECTO
- MAXIMUM QUANTITY
- DOUGH FOR BREAD
- WARRANTY CONDITIONS
- ACCESSORIES AND CARE PRODUCTS
- MANUFACTURER'S WARRANTY
- ATTENTION! IMPORTANT INFORMATION FOR THE CONSUMER
- SERVICE INFORMATION
- INFORMATION ABOUT HOUSEHOLD APPLIANCES MANUFACTURED UNDER THE CONTROL OF THE BSH HAUSGERÄTE GMBH CONCERN, CARL-WERY-STR. 34, 81739 MUNICH, GERMANY, IN ACCORDANCE WITH THE REQUIREMENTS OF THE FEDERAL LAW OF THE RUSSIAN FEDERATION OF NOVEMBER 23, 2009 NO. 261-FZ, LEGISLATION ON TECHNICAL REGULATION AND LEGISLATION ON THE PROTECTION OF CONSUMER RIGHTS OF THE RUSSIAN FEDERATION
- JALAL
- A
- JIEE
- MUM54../MUM55../MUM
- GR GREECE, ΕΛΛΆΣ
- HR HRVATSKA, CROATIA
- IE REPUBLIC OF IRELAND
- IL ISRAEL
- IN INDIA, BHARAT
- IS ICELAND
- IT ITALIA, ITALY
- KZ KAZAKHSTAN, КАЗАХСТАН
- LB LEBANON
- LT LIETUVA, LITHUANIA
- LU LUXEMBOURG
- ME CRNA GORA, MONTENEGRO
- MK MACEDONIA,MAKEONNA
- MT MALTA
- MV RAAJEYGE JUMHOORIYYAA, MALEDIVES
- NL NEDERLANDE, NETHERLANDS
- PL POLSKA, POLAND
- SA KINGDOM SAUDI ARABIA
- SE SVERIGE, SWEDEN
- SG SINGAPORE, SINGAPORE
- SI SLOVENIA, SLOVENIA
- SK SLOVENSKO, SLOVAKIA
- XS SRBIJA, SERBIA
- ZA SOUTH AFRICA
Brand : BOSCH
Model : MS6CM6155
Category : Blender